
Date Range in Excel Formula
We need to perform different operations like addition or subtraction on date values with Excel. By setting date ranges in Excel, we can perform calculations on these dates. For setting date ranges in Excel, we can first format the cells that have a start and end date as ‘Date’ and then use the operators: ‘+’ or ‘-‘to determine the end date or range duration.
For example, suppose we have two dates in cells A2 and B2. To create a date range, we may use the following formula with the TEXT function:
=TEXT(A2,”mm/dd”)&” – “&TEXT(B2,”mm/dd”)
You are free to use this image on your website, templates, etc, Please provide us with an attribution linkArticle Link to be Hyperlinked
For eg:
Source: Date Range in Excel (wallstreetmojo.com)
Table of contents
- Date Range in Excel Formula
- Examples of Date Range in Excel
- Example #1 – Basic Date Ranges
- Example #2 – Creating Date Sequence
- Example #3
- Example #4
- Things to Remember
- Recommended Articles
- Examples of Date Range in Excel
Examples of Date Range in Excel
You can download this Date Range Excel Template here – Date Range Excel Template
Example #1 – Basic Date Ranges
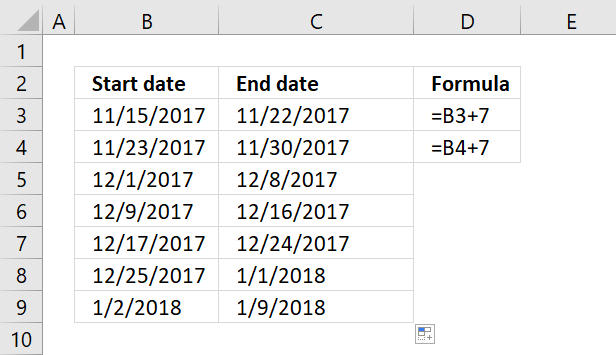
Let us see how adding a number to a date can create a date range.
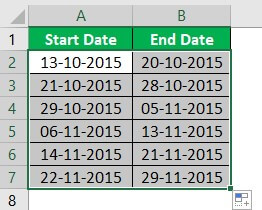
Suppose we have a start date in cell A2.
If we add a number, say 5, to it, we can build a date range.
When we select cell A3 and type “=B2 + 1.”
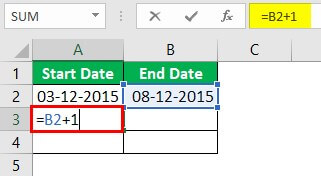
Then, we need to copy cell B2 and paste it into cell B3; the relative cell referenceCell reference in excel is referring the other cells to a cell to use its values or properties. For instance, if we have data in cell A2 and want to use that in cell A1, use =A2 in cell A1, and this will copy the A2 value in A1.read more would change as follows:
So we can see that multiple date ranges can be built this way.
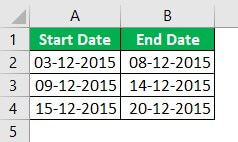
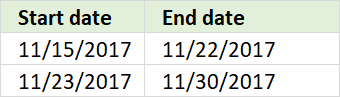
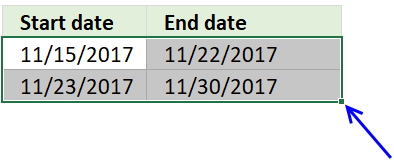
Example #2 – Creating Date Sequence
With Excel, we can easily create several sequences. Now we know that dates are some numbers in Excel. So we can use the same method to generate date ranges. So to create date ranges that have the same range or gap, but the dates change as we go down, we can follow the below steps:
- We must first type a start date and end date in a minimum of two rows.
- Then, select the ranges and drag them down below the row where we require the dates ranges.
So we can see that using the date ranges in the first two rows as a template, Excel automatically creates date ranges for the subsequent rows.
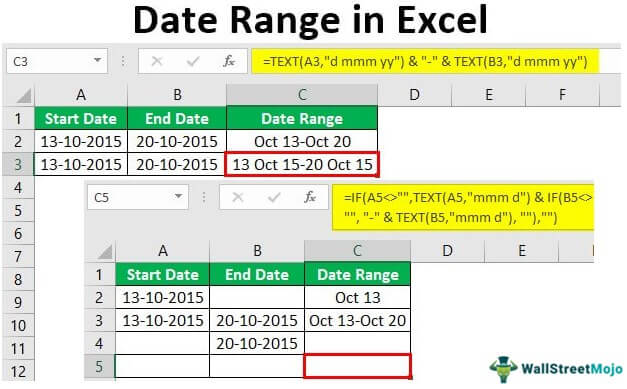
Example #3
Now, suppose we have two dates in two cells, and we wish to display them concatenated as a date range in a single cell. For doing this, we can use a formula based on the ‘TEXT’ function can be used. The general syntax for this formula is as follows:
= TEXT(date1,”format”) & ” – ” & TEXT(date2,”format”)
Case 1:
This function receives two date values as numeric and concatenates these two dates in the form of a date range according to a custom date format (“mmm d” in this case):
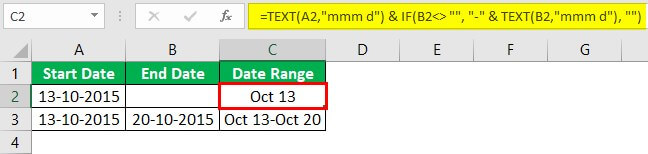
Date Range =TEXT(A2,”mmm d”) & “-” & TEXT(B2,”mmm d”)
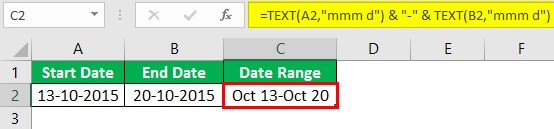
So we can see in the above screenshot that we have applied the formula in cell C2. The TEXT function receives the dates stored in cells A2 and B2. The ampersand ‘&’ operator is used to concatenate the two dates as a date range in a custom format, specified as “mmm d” in this case, in a single cell, and the two dates are joined with a hyphen ‘-‘ in the resultant date range which is determined in cell C2.
Case 2:
In this example, we wish to combine the two dates as a date range in a single cell with a different format, say “d mmm yy.” So the formula for a date range, in this case, would be as follows:
Date Range =TEXT(A3,”d mmm yy”) & “-” & TEXT(B3,”d mmm yy”)
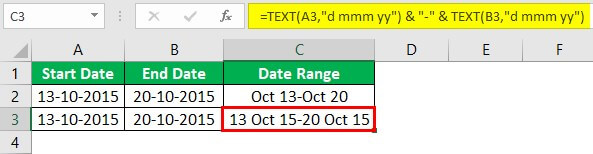
So we can see in the above screenshot that the TEXT function receives the dates stored in cells A3 and B3, and the ampersand ‘&’ operator is used to concatenate the two dates as a date range in a custom format, specified as “d mmm yy” in this case, in a single cell. Then, finally, the two dates are joined with a hyphen ‘-‘in the resultant date range determined in cell C3.
Example #4
Now let us see what happens if the start date or end date is missing. For example, suppose the end date is missing as follows:
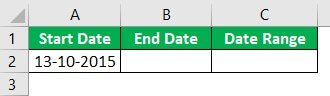
The formula based on the TEXT function that we have used above would not work correctly if the end date is missing. As the hyphen in the formula would anyhow be appended to the start date, i.e., along with the start date, we would also see a hyphen displayed in the date range. In contrast, we would only wish to see the start date as the date range if the end date is missing.
So, in this case, we can have the formula by wrapping the concatenation and the second TEXT function inside an IF clause as follows:
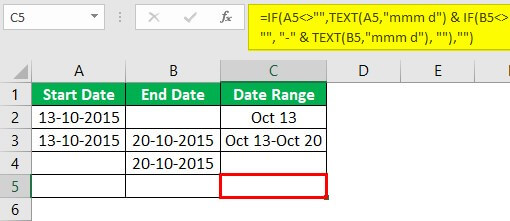
Date Range =TEXT(A2,”mmm d”) & IF(B2<> “”, “-” & TEXT(B2,”mmm d”), “”)
So we can see that the above formula creates a full date range using both the dates when both are present. However, it displays only the start date in the specified format if the end date is missing. It is done with the help of an IF clause.
Now in case both the dates are missing, we could use a nested IF statement in excelIn Excel, nested if function means using another logical or conditional function with the if function to test multiple conditions. For example, if there are two conditions to be tested, we can use the logical functions AND or OR depending on the situation, or we can use the other conditional functions to test even more ifs inside a single if.read more, (i.e., one IF inside another IF statement) as follows:
Date Range =IF(A4<>””,TEXT(A4,”mmm d”) & IF(B4<> “”, “-” & TEXT(B4,”mmm d”), “”),””)

So we can see that the above formula returns an empty string if the start date is missing.
If both the dates are missing, an empty string is also returned.
Things to Remember
- We can even create a list of sequential dates using the ‘Fill Handle’ command. We can select the cell having a start date and then drag it to the range of cells where we wish to fill. Next, click on the “Home” tab -> “Editing” ->”Fill Series” and then choose a date unit we want to use.
- If we wish to calculate the duration or number of days between two dates, we can subtract the two dates using the ‘-‘operator, and we will get the desired result.

Note: The format of cells: A2 and B2 is ‘Date,’ whereas that of cell C2 is ‘General’ as it calculates the number of days.
Recommended Articles
This article has been a guide to Date Range in Excel. Here, we discuss formulas to create date ranges in Excel in different ways and a downloadable Excel template. You may learn more about Excel from the following articles: –
- DATE Excel Function
- EDATE Excel Function
- Subtract Date In Excel
- Compare Dates in Excel
Author: Oscar Cronquist Article last updated on February 25, 2019
Question: I am trying to create an excel spreadsheet that has a date range. Example:
Cell A1 1/4/2009-1/10/2009
Cell B1 1/11/2009-1/17/2009
Cell C1 1/18/2009-1/24/2009
How do I create a formula to do this?
I will in this article discuss what Excel dates actually are, how to use them in formulas and how to create a sequence of dates that you can use as date ranges.
What is on this page?
- Explaining Excel dates
- Basic date ranges
- Create a date sequence
- Advanced formula
- Explaining advanced formula
- Get workbook
What are dates in Excel?
First, what are dates in Excel? They are actually numbers and I will prove it to you, try these steps:

- Type a date in a cell
- Select the cell
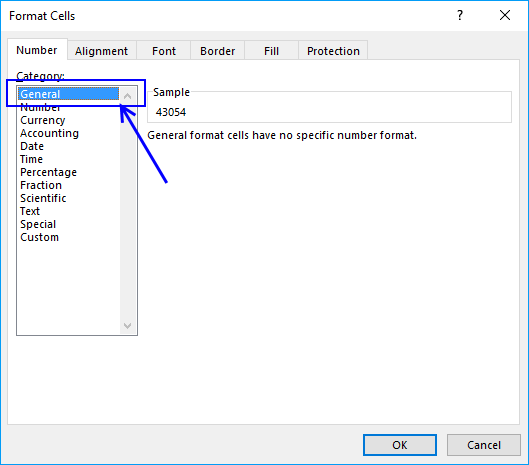
- Press CTRL + 1 to open the «Format Cells» dialog box
- Select «General»

- Press with left mouse button on OK button
- The cell you selected now has a different formatting. This shows you what dates are in Excel.
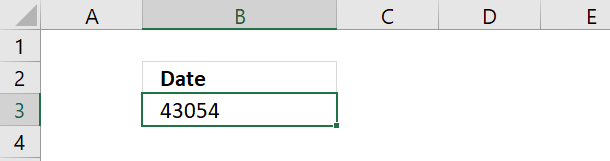
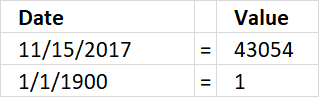
Date 11/15/2017 is 43054. Excel starts numbering dates at 1/1/1900 with value 1. Type 1 in a cell and change the cell formatting to «Date» and see what Excel displays.
Date 11/15/2017 is 43053 days from 1/1/1900. This means also that you can’t use dates prior to 1/1/1900.
Recommended articles
- How to format date values
- Calculate last date in month
- Find latest date based on a condition
- Workdays within date range
Back to top
Basic date ranges
You can build a formula or use a built-in feature to build date ranges, read on to learn more.
Now you know that dates in Excel are numbers. You can easily create a date range by adding a number to a date.
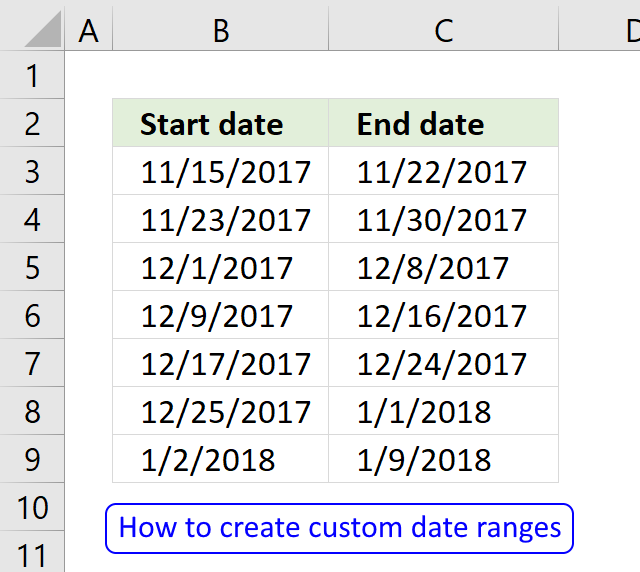
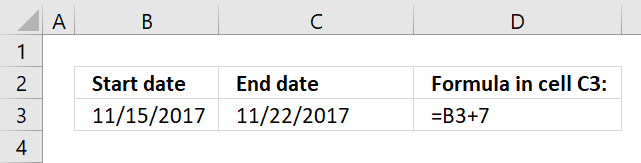
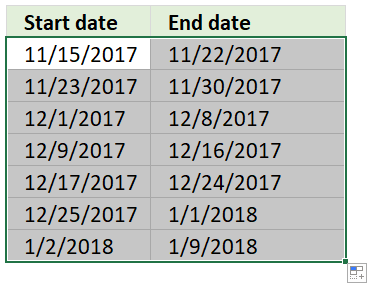
The picture below shows a start date 11/15/2017, adding number 7 to that date returns 11/22/2017
This allows you to quickly build date ranges simply by adding a number to a date.
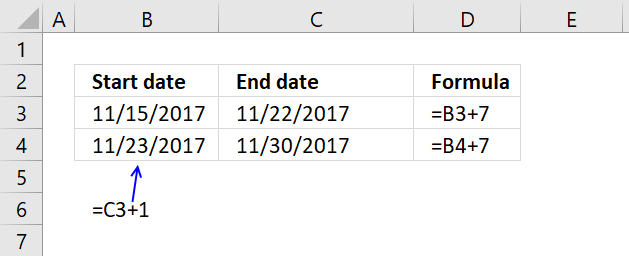
Now select cell B4 and type =C3+1
Copy cell C3 and paste to cell C4.
Relative cell references changes when you copy a cell and paste it to a new cell and I am going to use that now.
Copy cell range B4:C4 and paste it to cells below.
You have now built multiple date ranges using simple mathematics.
Create a date sequence
Excel has a great built-in feature that allows you to create number sequences in no time. Since dates are numbers in Excel you can use the same technique to build date ranges.
To build date ranges that have the same range but dates change, follow these steps:
- Type the start date and the end date in a cell each
- Type the second start date an end date in cells below

- Select both date ranges
- Press and hold on black dot

- Drag to cells below

- Release mouse button

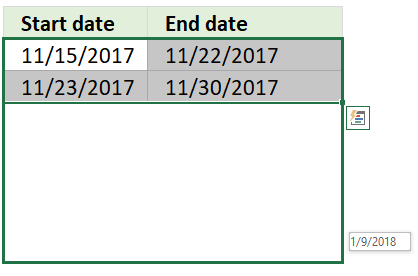
Excel has now built date ranges automatically using the two first date ranges as a template.
Recommended articles
- Use MEDIAN function to calculate overlapping ranges
- Identify overlapping date ranges
- Count overlapping days across multiple date ranges
- Find missing dates in a set of date ranges
- Category: Overlapping date ranges
Back to top
Advanced formula

If you need to build date ranges that have both the start and end date in the same cell you need to build a more complicated formula. The TEXT function lets you format dates out of numbers.
See row 3 in the above picture.
Date ranges horizontally
The following formula returns date ranges that exists after the start date, the start date in this case is 1/4/2009, however you can easily change that.
The DATE function creates the number using three arguments. The first argument is the year, the second argument is the month and the third argument is the day.
DATE(year, month, day)
Formula in cell A3:
=TEXT(DATE(2009, 1, 4)+(COLUMNS($A:A)-1)*7, «mm/dd/yy»)&»-«&TEXT(DATE(2009, 1, 4)+(COLUMNS($A:A)-1)*7+6, «mm/dd/yy»)
Copy cell A3 and paste to cells to the right as far as needed.
This formula returns date ranges that are prior to the given start date.
Formula in A6:
=TEXT(DATE(2009,1,4)+(2-COLUMN(A:A)-1)*7,»mm/dd/yy»)&»-«&TEXT(DATE(2009,1,4)+(2-COLUMN(A:A)-1)*7+6,»mm/dd/yy»)
Date ranges vertically
Formula in A9:
=TEXT(DATE(2009, 1, 4)+(ROW(1:1)-1)*7, «mm/dd/yy»)&»-«&TEXT(DATE(2009, 1, 4)+(ROW(1:1)-1)*7+6, «mm/dd/yy»)
Formula in A18:
=TEXT(DATE(2009, 1, 4)+(2-ROW(1:1)-1)*7, «mm/dd/yy»)&»-«&TEXT(DATE(2009, 1, 4)+(2-ROW(1:1)-1)*7+6, «mm/dd/yy»)
Back to top
How the formula in cell A3 works

The goal with the formula above is to create a date range from Sunday to Saturday. When cell A3 is copied and pasted to the right, the date range adjusts accordingly.
The formula consists of two parts. The first part calculates the start date of the date range. I have bolded the start date part of the formula below.
=TEXT(DATE(2009, 1, 4)+(COLUMNS($A:A)-1)*7, «mm/dd/yy»)&»-«&TEXT(DATE(2009, 1, 4)+(COLUMNS($A:A)-1)*7+6, «mm/dd/yy»)
Step 1 — First part of the formula creates the start date (bolded)
I have bolded the start date in this date range: 01/04/09 — 01/10/09.
TEXT(DATE(2009, 1, 4)+(COLUMNS($A:A)-1)*7, «mm/dd/yy»)
DATE(2009, 1, 4) is the start date of the date range series.
DATE(2009, 1, 4) returns 39817
(COLUMN(A:A)-1)*7 creates a number determined by the current column.
COLUMNS($A:A) returns 1.
COLUMNS($A:A) — 1 returns 0.
(COLUMNS($A:A)-1)*7 returns 0.
This number creates how many days there is between start dates in the date ranges.
Start dates are bolded below.
Example
01/04/09 — 01/10/09 ; 01/11/09 — 01/17/09 ; 01/18/09 — 01/10/09
11 — 4 = 7, 18 — 11 = 7.
When the formula is copied and pasted to the right, the relative reference in COLUMNS($A:A) changes.
This cell reference changes as the formula is copied and pasted to the right.
Example,
COLUMNS($A:A) is 1
COLUMNS($A:B) is 2
COLUMNS($A:C) is 3
TEXT(DATE(2009, 1, 4)+0, «mm/dd/yy»)
becomes
TEXT(39817 + 0, «mm/dd/yy»).
«M/DD/YY» is the specified number format.
TEXT(39817 + 0, «mm/dd/yy») returns 01/04/09
Step 2 — Second part of the formula creates the end date
The second part of the formula is
TEXT(DATE(2009, 1, 4)+(COLUMNS($A:A)-1)*7+6, «mm/dd/yy»)
The only difference between the first part of the formula:
TEXT(DATE(2009, 1, 4)+(COLUMNS($A:A)-1)*7, «mm/dd/yy»)
and the second part of the formula:
TEXT(DATE(2009, 1, 4)+(COLUMNS($A:A)-1)*7+6, «mm/dd/yy»)
is +6 (bolded)
Example
01/04/09 — 01/10/09
10 — 4 = 6
Back to top
Recommended reading
Recommended articles
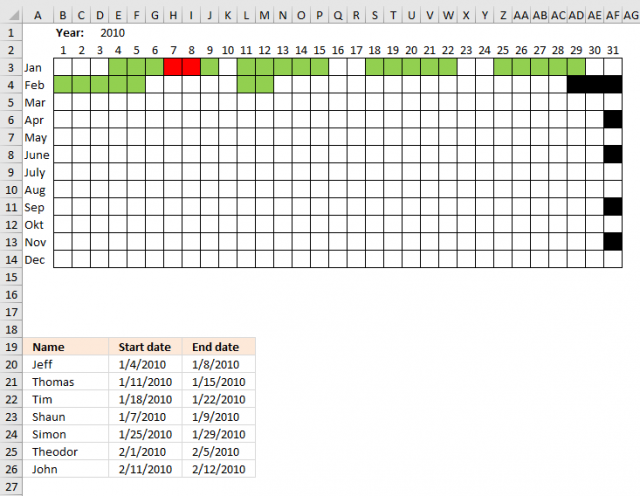
Plot date ranges in a calendar
The image above demonstrates cells highlighted using a conditional formatting formula based on a table containing date ranges. The calendar […]
What are Date Ranges in Excel?
Date ranges in Excel convert a value to text in a specified format. It also calculates the range within two specified dates. To set date ranges in Excel, we need to format the cell containing a start and end date as ‘date’ and use the operation ‘+’ or ‘-‘ to specify the end date or date range. To create a date range, we may use the following formula with the Text function available on the function toolbar.
Key Highlights
- Date ranges in excel convert a value to text in a specified format.
- Adding a number to a date can formulate a date change.
- The date sequencing helps in filling the gaps between the two date ranges.
- For calculating the duration or number of days between two dates, we can subtract the two dates using the operation ‘+’ or ‘-’ to specify the end date or date range.
Explanation of Date Ranges
- The date range in Excel helps generalize the range of dates between two specific dates to get an idea of the modus operandi assigned.
- The text function assists in formulating the date range through cell selection, data sequencing, and operations like + or -. It also uses the ‘IF‘ function toolbar to analyze if the start or the end date is missing.
- Date ranges help in notifying the stakeholders to understand the specific ranges to execute operationally and to get an idea of the priorities assigned.
- It also helps in checking the irregularities between the two dates by speculating the range values.
How to Create Date Ranges in Excel?
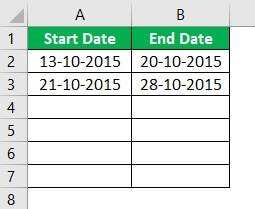
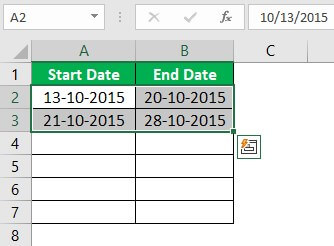
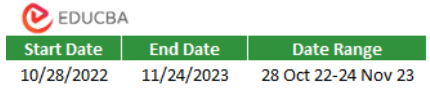
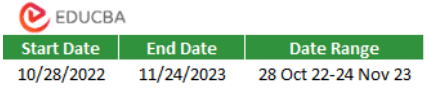
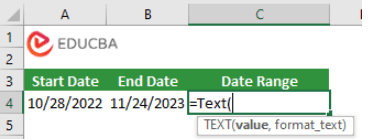
- Let’s take two random cells to include the start and the end date. Also, mention the date range in the corresponding cell. Mention any random date in the cells. For example, the start date is 10/28/2022, and the end date is 11/24/2023.
- As mentioned earlier, the text function helps to tabulate the date range. It is available on the function toolbar (fx) with =Text(value, format text). Also, click on the cell below the data range to find the position of the result.
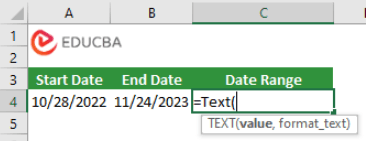
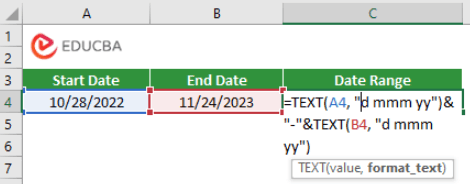
- To create a date range, we may use the following formula with the TEXT function: =TEXT(A4, “d mmm yy”)&”-“&TEXT(B4, “d mmm yy”). Cells A4 and B4 denote the start and the end date.
- Press Enter to see the results.
- It will be shown in the image below.
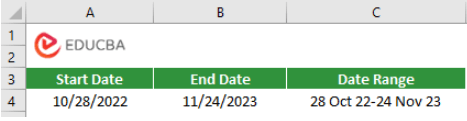
- The date range denotes the dates from October 2022 to November 2023.
Examples of Date Ranges in Excel
You can download this Date Ranges Template here – Date Ranges Template
Example #1: Adding a number to the date range
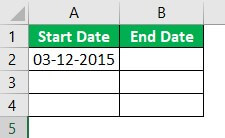
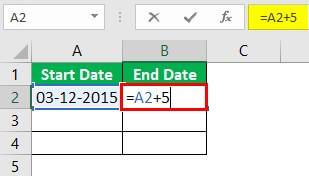
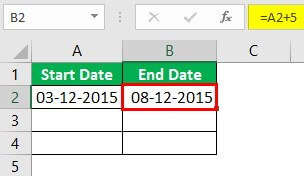
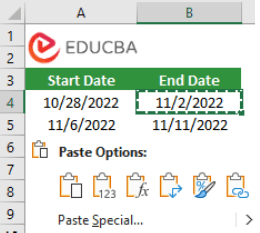
- Cell A2 contains a start date. We want to build a date range by adding a number to this start date.
- If we add a number, say 5, to it, we can also build a date range.
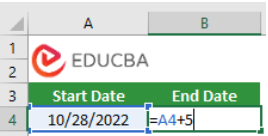
- Press enter to see the results. 10/28/2022 changes to 11/2/2022 by doing an operation =A4+5 in cell B4.
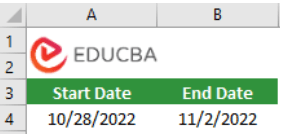
- The basic data range changes with reference to the cell mentioned by manipulating the cell reference and adding numbers to it. The operation will act according to the formula used.
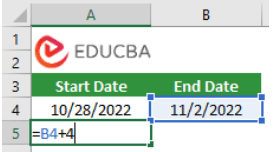
- By adding the number 4 to cell B4, it will add the successive date accordingly.
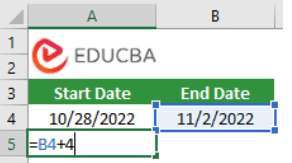
- Also, if you copy cell B4 and paste it on cell B5, it will give the same result as the operation between A4 and B4.
Example #2: Building a date sequence
- To create a date sequence, we need to fill the start and end dates in a minimum of two rows.
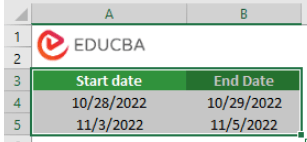
- Then, select these dates and drag down the cursor by clicking on the square mark in the extreme right corner. It will automatically add new dates.
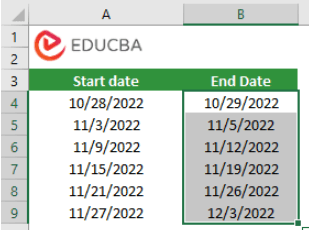
- So we can see that by using the date ranges in the first two rows as a template, Excel automatically creates date ranges for the subsequent rows.
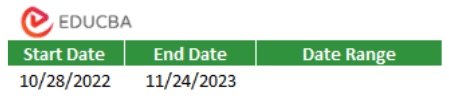
Example #3: Date range in a single cell
- Let’s take two random cells to include the start and the end date. Also, mention the date range in the corresponding cell.
- To start with, mention any random date in the cells. For example, the start date is 10/28/2022, and the end date is 11/24/2023.
- As mentioned earlier, the text function helps to tabulate the date range. It is available on the function toolbar (fx) with =Text(value, format text).
- To create a date range, we may use the following formula with the TEXT function: =TEXT(A4,”d mmm yy”)&” – “&TEXT(B4,”d mmm yy”). Cells A4 and B4 denote the start and the end date.
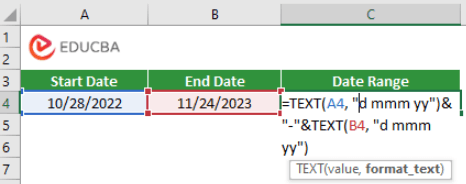
- Press Enter to see the results.
- It will be shown like the image below.
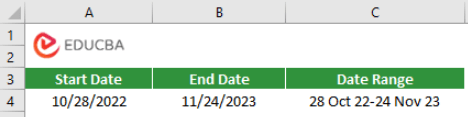
- The date range denotes the dates from October 2022 to November 2023.
Things to Remember
- If we wish to know the difference between the two dates, use the following operation command by selecting the cells.
- For example: =(B4-A4) in the formula (fx) toolbar.
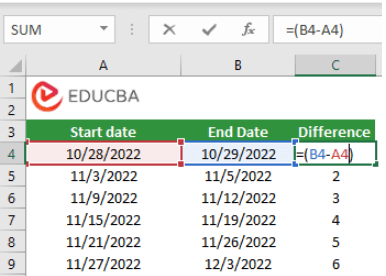
- Also, you can use the square bar in the right corner to extend the rows. It will automate the difference.
FAQ
Q1. What do you mean by date range in Excel?
Answer: Date ranges in Excel converts a value to text in a specified format. It also calculates the range within two specified dates. To set date ranges in Excel, we need to format the cell containing a start and end date as ‘date’ and use the operation ‘+’ or ‘-‘ to specify the end date or date range.
Q2. What is the formula for calculating the date range?
Answer: You can calculate the date range by using the formula =Text(value, format text). You can select the cell and use the formula as shown below:
=TEXT(A2,”d mmm yy”)&” – “&TEXT(B2,”d mmm yy”). The cells A2 and B2 denote the start and the end date
Q3. How to calculate the difference between the two dates?
Answer: You can calculate the difference between the dates by using operations like + or -.
For example: =(B2-A2).
Recommended Articles
This article explains everything about Date Ranges in Excel. To know more, read the following articles:
- Paste Special Shortcut in Excel
- Time Function in Excel
- Excel DAY Function
- Excel Date Format
Create a list of sequential dates
You can quickly create a list of dates, in sequential order, by using the Fill Handle  or the Fill command.

Use the Fill Handle
-
Select the cell that contains the first date. Drag the fill handle across the adjacent cells that you want to fill with sequential dates.
-
Select the fill handle
 at the lower-right corner of the cell, hold down, and drag to fill the rest of the series. Fill handles can be dragged up, down, or across a spreadsheet.
 -

Use the Fill command
-
Select the cell with the first date. Then select the range of cells you want to fill.
-
Select Fill > Series > Date unit. Select the unit you want to use.
Tip: You can sort dates much like any other data. By default, dates are sorted from the earliest date to the latest date.
Need more help?
You can always ask an expert in the Excel Tech Community or get support in the Answers community.
See Also
Fill data automatically in worksheet cells
Use AutoFill and Flash Fill
Need more help?
Home / Excel Formulas / Create a Date Range in Excel
While working in data where you have dates, you might have to create a range of dates. A range is something that has a start date and an end date. In this tutorial, you will learn to create a date range.
Create a Date Range Starting from Today
Now let’s say you want to create a date range of seven days starting from today. In the following example, we have today’s date in cell A1 which we have got by using today’s function.

=A1+7To create a date range, follow these simple steps:
- Enter the “=” in cell B1, or any other cell.
- Refer to cell A1, where you have the starting date of the range.
- Use the “+” sign to add days to today’s date.
- Specify the number of days you want to add to today’s date.

Create a Date Range in a Single Cell
Let’s go a little further and create a date range in a single cell. And for this, we need to combine both starting date and the ending date in a single cell. But the problem is when you try to combine two dates within a single cell it returns something like the below.

Now to overcome this problem we need to use the TEXT function to convert dates into text and then combine them as a range of dates. The formula would be something like the one below.

=TEXT(A1,"dd/mmm/yy")&" --- "&TEXT(B1,"dd/mmm/yy")Now as you can see, we have a range of dates in cell C1 starting from 8-Feb-22 to 15-Feb-22. And if you want to create a range of dates in a single cell, you can use the following formula.
=TEXT(TODAY(),"dd/mmm/yy")&" --- "&TEXT(A1+7,"dd/mmm/yy")In the part about using the TEXT function, you can change the format of the date the way you want.
Download Sample File
- Ready
sample-file