
If you copy text from a different location, it’s likely that it will have some unwanted formatting.
If that formatting includes superscript, then you might be trying to figure out how to remove superscript in Word 2013.
Luckily adding or removing superscript are very similar processes, so you can continue reading our tutorial below and learn how to use that type of formatting or remove it from your document.
How to Undo Raised Numbers in Word 2013
- Open your document.
- Select the superscript text.
- Choose the Home tab.
- Click the Superscript button.
Our article continues below with additional information on how to remove superscript in Word, including pictures of these steps.
Is Word sometimes replacing text when you’re editing a document? Our why does it delete when I type article can show you why this happens and how to stop it.
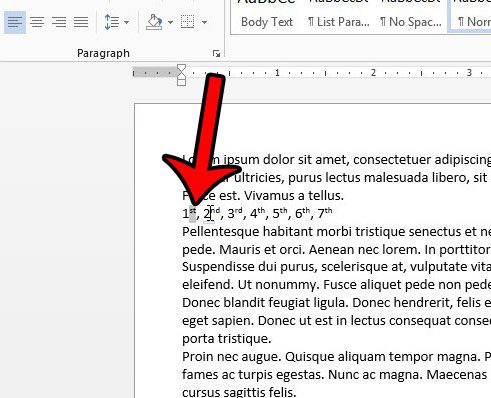
Numbers and letters that appear smaller, and are raised above the line in a Word document, are called superscript. This formatting is common when writing math equations, and also for the formatting of ordinals like 1st, 2nd, 3rd, etc. However, not everyone wants to use that type of notation, so you may be looking for a way to remove existing superscript from your document.
Our guide below will show you how to clear existing superscript formatting, as well as how to change the default Word 2013 settings that are often the cause of its appearance.
Google Docs has similar options. Read our how to do subscript in Google Docs guide if you want to know how to add or remove superscript and subscript in that application.
How to Remove Superscript Formatting in Word 2013 (Guide with Pictures)
The steps in this guide will show you how to select text that has superscript formatting, then remove it. The result will be text that is on the same default baseline as the rest of your text.
If you would like to prevent Word 2013 from automatically adding superscript to text that it thinks should be superscript, then we will show you how to change that option at the end of this tutorial.
Step 1: Open the document containing the superscripting that you would like to remove.
Step 2: Use your mouse to highlight the superscript text.
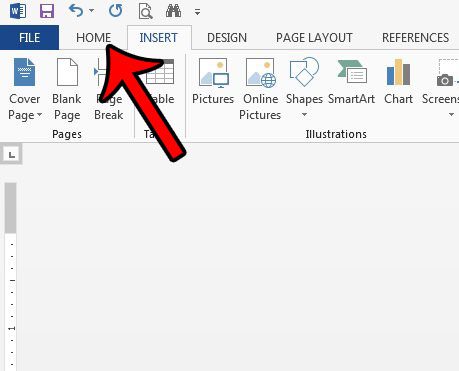
Step 3: Click the Home tab at the top of the window.
Step 4: Click the Superscript button in the Font section of the ribbon.
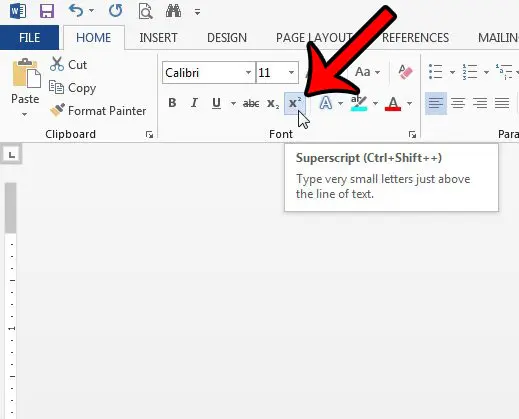
If you have a string of text containing superscript formatting, as we do in the same images above, then you can highlight all of the text, then click the Superscript button twice. The first time you click the button, all of the text will become superscript. The second time you click the button, all of the superscript formatting will be removed.
Turning Off the Word 2013 Options That Insert Raised Numbers By Default
Now that we have seen how to remove the raised number formatting that already exists, we can change the options that cause it to happen in the first place.
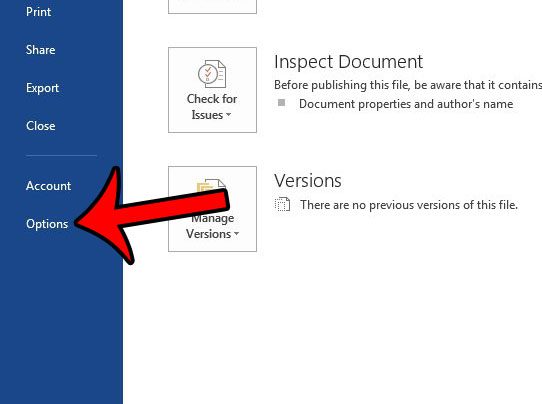
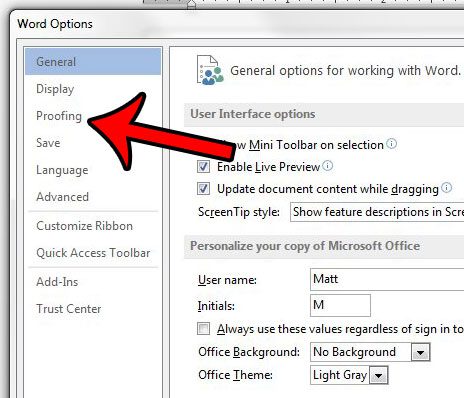
Step 1: Click the File tab at the top-left corner of the window.

Step 2: Click Options at the bottom of the column on the left.
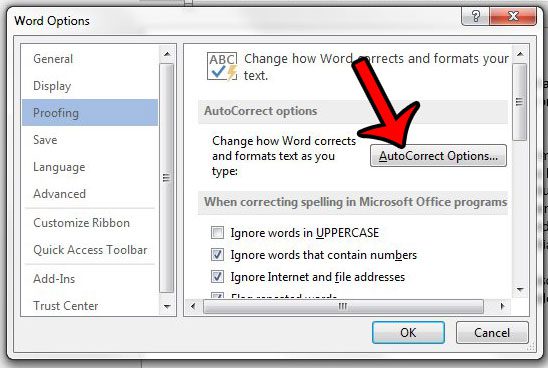
Step 3: Click Proofing in the left column of the Word Options window.
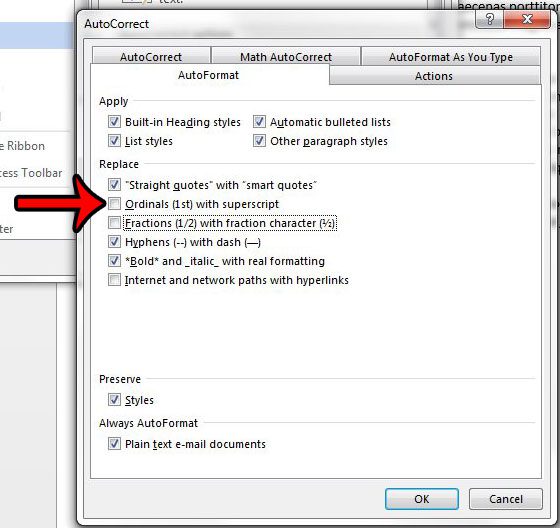
Step 4: Click the AutoCorrect Options button.
Step 5: Click the AutoFormat As You Type tab.
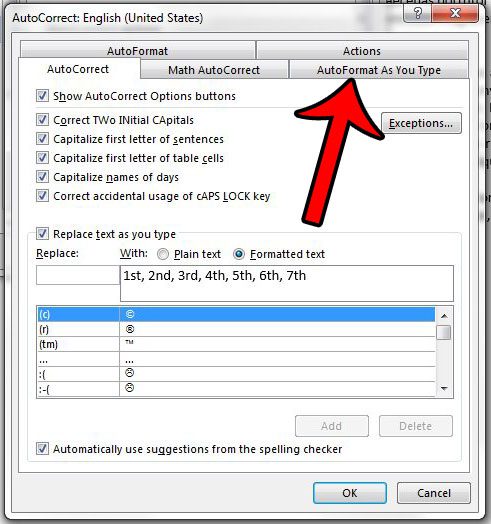
Step 6: Uncheck the box to the left of Ordinals (1st) with superscript. You can also click the box to the left of Fractions (1/2) with fraction character (1/2) to stop that formatting as well. Click the AutoFormat tab next.
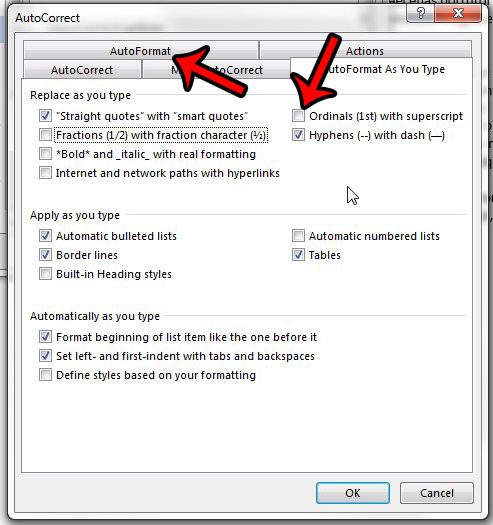
Step 7: Clear the checkboxes to the left of Ordinals (1st) with superscript and (optionally) Fractions (1/2) with fraction character(1/2), then click the OK button to close and save your changes.
Now that you know the answer to how to remove superscript in Word you will be able to add or remove this formatting to a document whenever you need to.
If there is a lot more formatting that you would like to remove from your document, then it can be time consuming to remove each formatting element individually. This article – https://www.solveyourtech.com/remove-formatting-word-2013/ – will show you how to quickly clear all formatting from a text selection.
Additional Sources

Matthew Burleigh has been writing tech tutorials since 2008. His writing has appeared on dozens of different websites and been read over 50 million times.
After receiving his Bachelor’s and Master’s degrees in Computer Science he spent several years working in IT management for small businesses. However, he now works full time writing content online and creating websites.
His main writing topics include iPhones, Microsoft Office, Google Apps, Android, and Photoshop, but he has also written about many other tech topics as well.
Read his full bio here.
![]()
Download Article
![]()
Download Article
Exponents are superscripted numbers or variables (single letters) showing what power a number has been raised to; that is, how many times it is used as a factor in multiplying it by itself. (Raising 5 to the third power means using it as a factor 3 times in multiplying it by itself, or 5 x 5 x 5 = 125.) You can add exponents to Microsoft Word in 1 of several ways: as symbols, as text formatted with the Font dialog, or with the Equation Editor. Following are instructions for adding exponents using each method.
-

1
Open the Symbol dialog. Word lets you insert special symbols into your text through the Symbol dialog. How you open the dialog depends on your version of Word.
- For Word 2007 and later, which use the ribbon interface, click the Symbol button (which displays the Greek letter omega) in the Symbols section of the Insert ribbon tab. Select «More Symbols» at the bottom of the popup menu of commonly used symbols to display the Symbol dialog.
- For Word 2003 and earlier, select «Symbol» from the «Insert» menu.
-
2
Choose the font you want to display the exponent in. In most cases, you’ll want to display the exponent in the same font as the rest of the text, so you can leave the setting «(normal text)» in the Font dropdown alone. If you want to display the exponent in a different font, click the down arrow button at the right of the dropdown and select the font you desire from the list.
- Be aware that not all fonts include superscripted numbers or letters. If the font you’re using for your primary text doesn’t support the exponent you want to add, you’ll have to choose a font that supports the exponent.
Advertisement
-
3
Choose the exponent you want to display. You can scroll to the exponent using the scroll bar on the right of the character display, or you can select one of these options from the Subset dropdown menu: «Latin-1 Supplement» (or simply «Latin-1») or «Superscripts and Subscripts.» The available numeric exponents are «1,» «2,» and «3,» and a superscripted «n» is available to represent an exponent variable. Click on the superscript character to select it.
-
4
Insert the exponent in your text. Click the Insert button at the bottom of the Symbol dialog. This will close the dialog and insert your exponent in the text at the point of your cursor.
- In Word 2007 and later, after you select an exponent, it will appear in the Recently Used Symbols display at the bottom of the Symbols dialog page. If you want to use the exponent again, you can select it from this location.
- You can also insert the exponent by using the shortcut key for that exponent. When you select an exponent, the Symbol dialog displays a shortcut key of «Alt» followed by a letter or 4-digit combination. By pressing the «Alt» key and entering this combination, you can display the exponent without displaying the Symbol dialog. (Older versions of Word may not display a shortcut key for some exponents.) You can also create or modify a shortcut key by using the Shortcut Key button.


Advertisement
-
1
Select the text you want to format as an exponent. Place your cursor in front of the number or letter you want to format as superscript (an exponent), then hold down your left mouse button and drag the cursor over the text to highlight it.
-
2
Access the Font dialog. The Font dialog not only lets you change the font and point size of your text, but it also lets you format the text in a number of ways, including making it into an exponent. How you access the Font dialog depends on your version of Word.
- For Word 2007 and later, click the diagonal down arrow button at the right of the Font section in the Home ribbon tab.
- For Word 2003 and earlier, select «Font» from the «Format» menu.
- Your highlighted text will be displayed in the Preview window.
-
3
Check the «Superscript» box in the Effects section. The text in the Preview window will appear small and raised.
-
4
Click «OK.» This closes the Font dialog and displays your selected text as superscript.
- In addition to representing mathematical exponents, you can use this method to represent ionic charge, which is written as raised plus or minus signs (with either a number denoting how many electrons were gained or lost or with a sign for each extra or missing electron) after the chemical symbol. Do not use superscript numbers to represent multiple atoms of an element in a molecule; for that, use subscript numbers.
- Instead of typing the text you want to superscript first, you can bring up the Font dialog, check «Superscript,» click «OK,» and then type your text. If you do this, you must bring up the Font dialog box after typing your superscripted text and uncheck «Superscript» to turn this feature off.


Advertisement
-
1
Open the Equation Editor. Click the Equation button (which displays the Greek letter pi) in the Symbols section of the Insert ribbon tab. Select the «Insert New Equation» option at the bottom of the dropdown menu.
- You can open the editor from a new or existing document, but the Equation Editor is available only in Word’s XML-based .docx or .dotx formats.
-
2
Select the Script option from the Structures section of the Design tab. This option button displays an «e» raised to the power of «x.» Clicking the option button displays a dropdown menu with headings labeled «Subscripts and Superscripts» and «Common Subscripts and Superscripts.»
-
3
Select the first option under «Subscripts and Superscripts.» This option displays a larger dashed-line rectangular box with a smaller, raised rectangular box to its right. Selecting this option displays a similar pair of boxes in the Equation field on the document page.
-
4
Enter the number or variable (base) to be raised to a power. Enter the value of the base in the larger box to the left using your keyboard. If you enter a letter for a variable, it will automatically be displayed in italics.
-
5
Enter the number or variable for the exponent. Enter this value in the smaller box to the right using your keyboard. If you enter a letter for a variable, it will automatically be displayed in italics.
- You can also enter the base and exponent in the Equation field entirely from the keyboard by typing first the base, then the caret (^) symbol, then the exponent. When you hit Enter, closing the Equation field, the caret will disappear and the exponent will appear as a superscript.
- The Equation Editor in Word 2007 and later treats equations as Word text, with the Equation Editor using a special math font.


Advertisement
-
1
Open the Equation Editor. Click «Object» on the «Insert» menu. Select the «Create New» option from the Insert Object dialog box, then select «Microsoft Equation 3.0.»
-
2
Click the Exponent button on the bottom row of the Equation toolbar. This will display a template with a space for the base and a space for the exponent.
-
3
Enter the value of the base. Enter this value in the larger box to the left using your keyboard.
-
4
Enter the value of the exponent. Enter this value in the smaller box to the right.
- The Equation Editor in Word 2003 and earlier treats equations as objects, rather than text, but you can change the font and its size, format, and position as you would regular text.


Advertisement
Ask a Question
200 characters left
Include your email address to get a message when this question is answered.
Submit
Advertisement
Video
Thanks for submitting a tip for review!
-
Although Word offers several ways to create exponents and superscripts, they are considered special characters. Not all fonts will support exponents, and Word text with exponents copied into other applications may not display the exponent correctly. If there’s any doubt as to whether the exponent will display, you can write the exponent as a regular number, preceded by a caret. (The Equation Editor in Word 2007 or later will convert exponents created with it to this format. Click on the equation with the exponent to be converted to display the Equation field, then click the down arrow button at the lower right. Select Linear from the Equation Options dropdown menu.)
Advertisement
About This Article
Thanks to all authors for creating a page that has been read 671,415 times.
Is this article up to date?
Continue Learning about Other Math
What 3 letter math word that doesn’t have any vowels?
nth. This refers to a number raised to an undefined power.
«Consider x to the nth power.»
What is the word which is 10 raised to the 255th power?
One hundred octovigintillion = 10 raised to the 255th power.
What is a Google math wise?
math wise a googol is a cardinal number represented as one followed by 100 zeroes (ten raised to the power of a hundered) . and 10 raised to the power of googol is a googolplex . Googolplex is the larges word known to human or ever been counted till.
How would you write this number in word form?
Just like this:»this number in word form»
Word and number notation for 3000000000?
3000000000:Word form: Three billionStandard (number) notation: 3,000,000,000
Some fonts are naturally positioned higher than others, and when you are mixing fonts or small graphics together the positioning may look awkward.
For example, in my training guides, keystrokes or button images are used a lot.
Here is a sample sentence. Notice how the bottom of TAB and ENTER sit on the baseline of the text.

After lowering TAB by 3pt and lowering ENTER by 5pt, here is the result. Notice how it flows more naturally.

To reposition text in relation to the baseline:
1. Select the text.
2. Select the Home tab.
3. Click the launcher in the bottom-right corner of the Font group.

4. Select the Advanced tab.
5. On the Position row, nudge the By arrows up or down.
When you increase the By value, Position will switch to Raised and your text will sit higher than its natural position.
When you decrease the By value, Position will switch to Lowered and your text will sit lower than its natural position.

Here are some other advanced text effects you may be interested in.
I hope you found plenty of value in this post. I’d love to hear your biggest takeaway in the comments below together with any questions you may have.
Have a fantastic day.


About the author
Jason Morrell
Jason loves to simplify the hard stuff, cut the fluff and share what actually works. Things that make a difference. Things that slash hours from your daily work tasks. He runs a software training business in Queensland, Australia, lives on the Gold Coast with his wife and 4 kids and often talks about himself in the third person!
SHARE
- Insert Roman numerals by typing English letters
- Insert Roman numerals as a numbering style
- Insert Roman numerals as a page number
- Insert Roman numerals using Unicode
- Insert Roman numerals by MS Word fields
Method 1: Insert Roman Numerals by Typing English Letters
This first method is the fastest way to insert Roman numerals. We’ll make use of the English alphabets on your keyboard that look like the Roman numbers we want.
Step 1: Open up an MS Word file.

Step 2: Type in the Roman numeral.
Once your document is opened, start typing the Roman numbers you need.
We’ve provided a table below that you can use to figure out the numerical counterpart.
| Roman Numeral | Number |
| Ⅰ | 1 |
| Ⅴ | 5 |
| Ⅹ | 10 |
| Ⅼ | 50 |
| Ⅽ | 100 |
| Ⅾ | 500 |
| Ⅿ | 1000 |
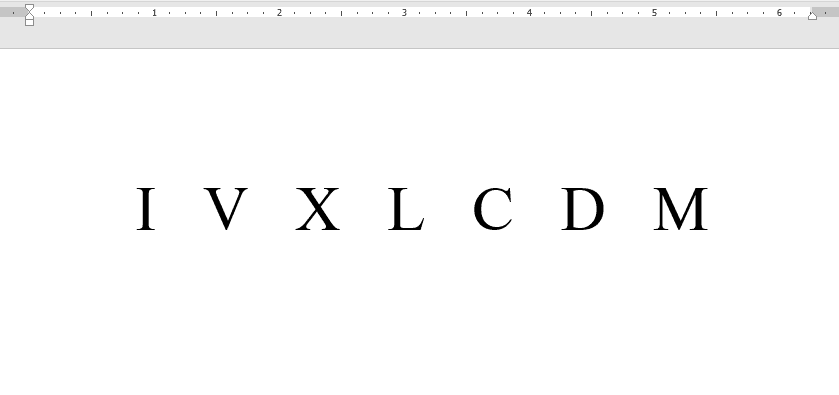
As an example, simply type MMXII from your keyboard to insert the year 2021.
Of course, feel free to make it look more convincing by changing the font into something like Times New Roman. MMXII
Method 2: Insert Roman Numerals as a List Style
Roman numerals are also used as a numbering system. In this method, we’ll guide you through each step on using MS Word’s Numbering Format tool to insert Roman numerals. This tool is part of the list styles of the paragraph toolbar found in the Ribbon.
Step 1: Open up an MS Word file.

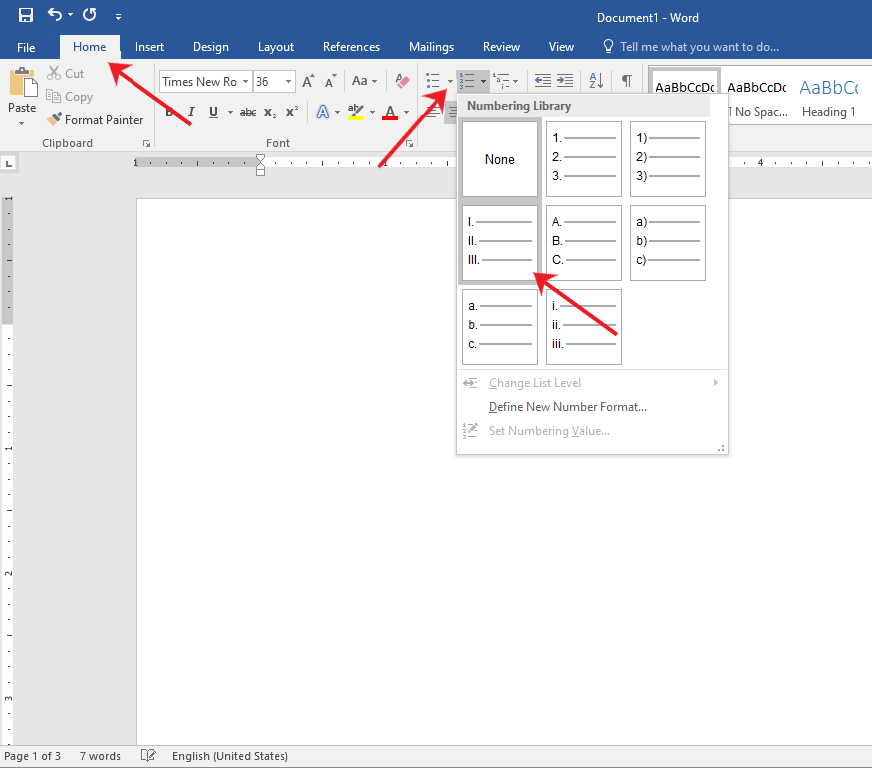
Step 2: Go to the Home tab.
On your MS Word window, navigate to the Home tab in the Ribbon and click on the Number Library drop-down menu.
Then, select the Roman numeral option in the selection.
Method 3: Insert Roman Numerals as Page Numbers
One of the most common uses of Roman numerals is to serve as page numbers. They are usually placed in appendices or introductions of a book.
In this method, we’ll walk you through the steps on how to insert Roman numerals as page numbers.
Step 1: Open up a Word file.

Step 2: Insert a page number.
Go to the Insert tab and click on the Page Number drop-down menu.
Then, select Bottom of Page.
Choose one of the options under the Simple group.
For this example, we’ll use Plain Number 2.

Step 3: Convert page number into Roman Numeral.
You should see the page number we just inserted at the footer. By default, this should be highlighted and ready for editing. If not, select the page number to start editing.
Now, go to the Design tab and click the Quick Parts button. On the drop-down menu, select Field…
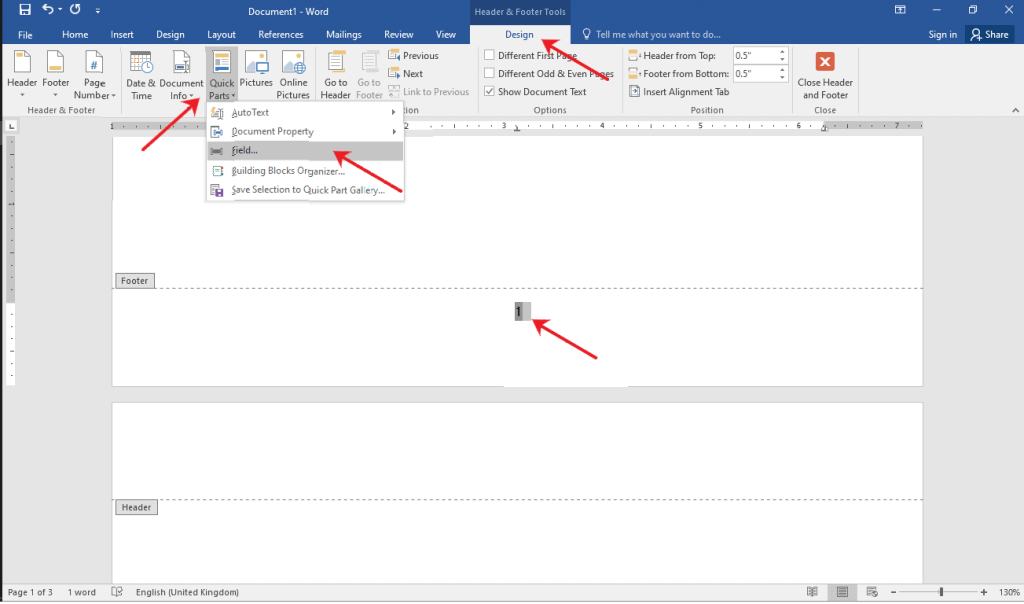
The Field dialogue box will appear in the middle of your window.
In the Categories: drop-down menu select Numbering.
Now, select Page under the Field names: and the roman numerals under Field Properties Format.
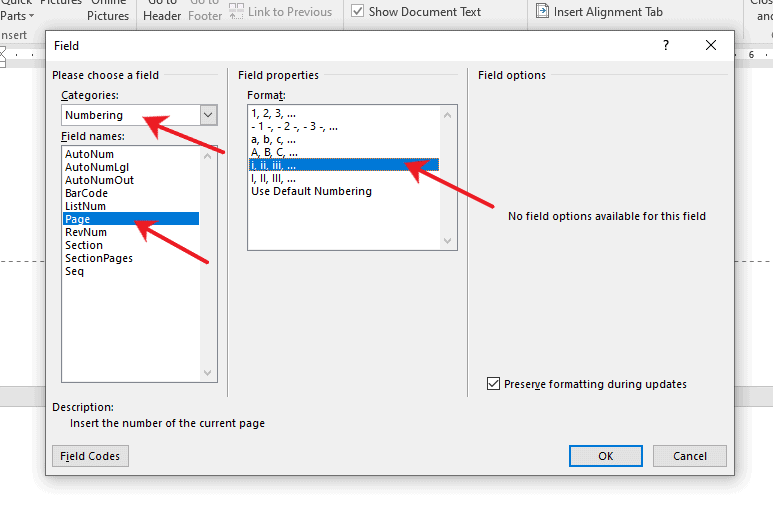
Click the OK button to apply changes. Otherwise, click the Cancel button.
Method 4: Insert Roman Numerals using Unicode
This method allows you to use unicodes to insert Roman numerals. Unicodes are the standard codes assigned to every character we use. You’ll find this method helpful, especially when you want to insert Roman numerals anywhere in your document.
Step 1: Open up a Word file.
Step 2: Type in the Unicode.
Type in the Unicode of the Roman numeral you want to insert. We’ve provided a list below.
| Roman Numeral | Unicode |
| Ⅰ | 2160 |
| Ⅴ | 2164 |
| Ⅹ | 2169 |
| Ⅼ | 216C |
| Ⅽ | 216D |
| Ⅾ | 216E |
| Ⅿ | 216F |
For the complete list of Roman numeral Unicodes, visit this site.
After you’ve typed out the unicodes, highlight them by left-clicking your mouse and dragging it over the text.
Now, simply press and hold the ALT key for at least two seconds and then press X.
You should see the Unicodes transform into Roman numerals.
Method 5: Insert Roman Numerals using MS Word Fields
Step 1: Open up an MS Word file.

Step 2: Insert a Word field.
On your keyboard, press CTRL + F9.
Type in an equal sign then the number that you want to convert to a Roman number followed by “*Roman”.
For example, if we want to convert 2021 into a Roman numeral, we would type “=2021*Roman”.
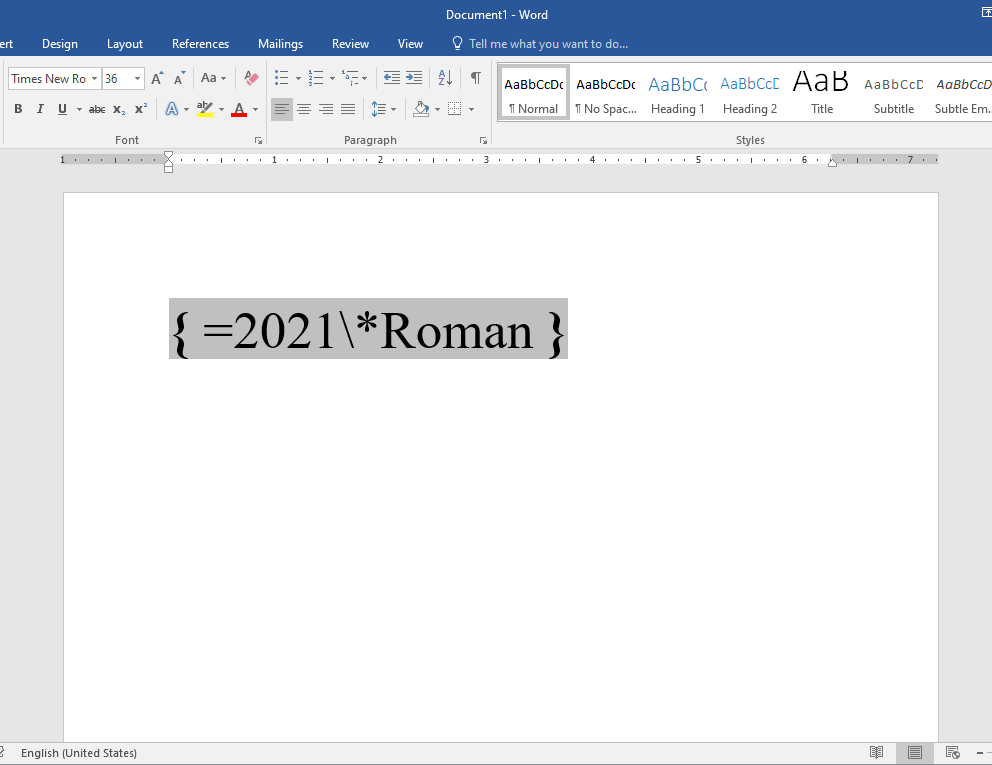
Note that the field is highlighted and enclosed in curly braces.
Now, press F9 to apply the formula and exit the Word field.
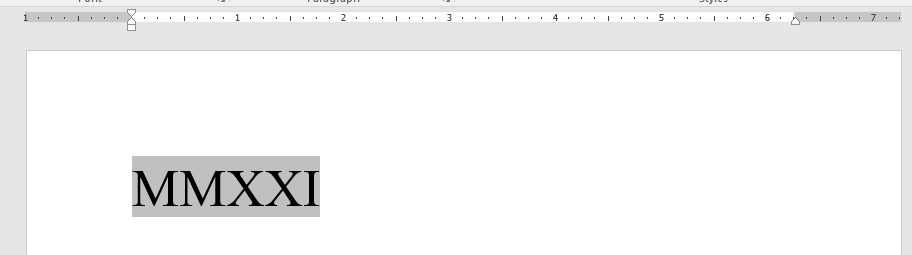
This will insert the corresponding roman numeral in the document.
Editing and Deleting Roman Numerals in MS Word
To delete, select the Roman numerals and hit the Delete key on your keyboard.
Conclusion
We hope you’ve found this article helpful!
You are here
If you’re using Word to present a table of data that includes numbers, you can use Word’s built in formulas to add up those numbers rather than manually calculate them each time they change. This can also eliminate the possibility of error — particularly important if you’re producing a sales proposal or an important report.
Note that you can’t just add up numbers on different lines — you can only add up numbers that are presented in either a column or a row inside a table.
First, create your table and decide which column or row will hold the numbers you wish to add up. Enter the numbers, making sure that there is a number in each cell in the column.
Then, in the last row in the table, click in the cell in the number column and choose Insert > Quick Parts > Field, then click Formula
A new dialog box should appear containing a Formula field with one of the following formulas:
=SUM(ABOVE)
=SUM(LEFT)
Note — if you get an error rather than one of these formula, it most likely means that Word couldn’t find any numbers in the cells above or to the left of the current cell.
You can now choose a format for the number. The list of available number format is somewhat limited, but you can manually enter any format that is supported by Excel. For example, the following format is not listed but will work to format the number with a $ sign, thousand separators and two decimal places:
$#,###.##
Once you’ve chosen a format, you can click OK.
This will insert the SUM formula into the cell. Word will then calculate the sum of all the cells above the cell where the formula is located provided they all contain numbers.
If you find that Word does not calculate the sum of all the numbers in the column, it is possible that one of the cells does not contain a valid number. This gives rise to two possibilities:
- Word will ignore any cells containing non-numbers (i.e. text) in the column above and add up the rest of the cells. In some cases, you may have typed a number which Word sees as text instead. Try retyping these numbers to see if that fixes the problem.
- Word encounters an empty cell. Once it hits an empty cell, Word stops calculating. Any cells above the empty cell will be ignored. If this happens, you may need to rearrange the order of the rows in the table, or consider putting a text value into the empty cells.
.
Want to learn more? Try these lessons:
.
.
Our Comment Policy.
We welcome your comments and questions about this lesson. We don’t welcome spam. Our readers get a lot of value out of the comments and answers on our lessons and spam hurts that experience. Our spam filter is pretty good at stopping bots from posting spam, and our admins are quick to delete spam that does get through. We know that bots don’t read messages like this, but there are people out there who manually post spam. I repeat — we delete all spam, and if we see repeated posts from a given IP address, we’ll block the IP address. So don’t waste your time, or ours. One other point to note — if you post a link in your comment, it will automatically be deleted.
Add a comment to this lesson
.
Comments on this lesson
This is helpful, but one must
This is helpful, but one must remember that if you change the numbers in the table, you need to recalculate the total. It doesn’t update automatically, as it does in Excel.
.
Recalculating totals when the numbers change
Thanks for pointing this out. You’re right that the numbers won’t update automatically. You can update a total by right-clicking the total and choosing the Update Field option. If you have multiple total fields (or other types of Word fields, such as a table of contents or cross references to other parts of your document) you can trick Word into recalculating all of them by pressing CTRL+P (or simply choosing the Print option). You don’t actually have to print the document, but this will force Word to recalculate the fields in your document.
.
What about the formatting of the input numbers
It appears the numbers captured in the table need to be «unformatted» (e.g. 1000000 instead of $1,000,000) for them to be added up. Is there a way around this?
.
Adding up formatted numbers in a Word table
Hmmm. In my experience, adding up numbers with formatting such as you’ve shown is no problem at all. Perhaps there is something else happening in your table? Happy to take a look at an example document if you would like to get in touch directly via the Contact page.
.
Adding Up Numbers in Word
I have tried these instructions at least twice. The numbers aren’t adding up correctly. I have Word 2013. Does this make a difference in the «how to» instructions?
.
Added up different lines not just the whole column
you certainly can just add up different lines e.g. =SUM(B2:B3) just like in Excel. You just have to image the rows and columns numbered like an Excel spreadsheet. And if you put a number in brackets e.g. (£750.00) it will subtract the amount.
.
Sum word table cells with numbers in bracket
Word 2016 will sum correctly all numbers in text whether there are thousand separators and brackets.
But Word 2007 could not sum text like «-» or number in brackets
.
Sum Numbers in MS Word
So we have an invoice with a subtotal, then add tax for final total, etc. But how do we image to discover what the Subtotal & Tax fields are to add for the final total?
.
auto sum in word
i did above steps and i am able to do auto sum but my problem is, i need to use that word file with Autosum function as a template and send it to all employee. i saved the word and re open it and when i enter data it do not automatically auto sum it. how can i fix this?
.
.
.
.
.
You want to write numbers with powers (example: 10 to the power of 6 = 106 ) on your keyboard, in Word or in another word processing software ? To do so, it will depend on the power used:
1. To make the symbol «squared» (ex: 10 squared: 10²)
To write «squared», you can press the key located just below the Esc key (the key at the top left of your keyboard), otherwise you can also press the Altkey (to the left of your Space bar) + «253«, then release the Alt key.
-
Alt + 2 5 3 (Alt + 253) -> 10 to the power of 2 = 10²
2. To make the symbol «cubed» (example: 2 cubic meters: 2m³)
To write «cube», you can press the » Alt » key (to the left of your Space bar) + » 252 «, then release the «Alt» key.
-
Alt + 2 5 2 (Alt + «252) -> 10 to the power of 3 = 10³
3. To make the powers or exponents greater than 3 (example: 10 to the power of 4 or 10 to the power of 5 : 10 4 or 10 5 )
Above the power «3», there is no keyboard shortcut available, it will depend on where you want to write your power or your exponent:
- In Microsoft tools (Word, Powerpoint, Outlook, etc.): The easiest way is to select the figure to be superseded then to use the following keyboard shortcut : Ctrl + Shift ⇧ + = (ie the key «+ =» to the left of the Return key) .
- Example: 10 to the power of 8:
- We write 108 , we select 8 and we do the combination Ctrl + Shift ⇧ + = → 10 8
- Example: 10 to the power of 8:
- In OpenOffice : Same method but with a different combination: Select the number to put in superscript or in power then perform the key combination : Ctrl + Shift ⇧ + P
IMPORTANT : Note that you can also use this method to write letters by superscribing as for the abbreviations of first : 1st or second : 2nd . This technique works will all letters or symbols.
Conversely, if you want to put the number or letters at the bottom, as for typical chemical formulas: H2O, you just have to type:
- Ctrl + = in Microsoft tools (Word, Excel, Powerpoint, etc…)
- Ctrl + Shift ⇧ + B in Open Office.
The other day a colleague of mine had a question about numbering. She was writing a rather long document and wanted to do (or have) few things in her document:
1. To number paragraphs automatically,
2. To start numbering from a given paragraph number.
How? It is easy. Let see how to do that.
First, let me explain a little more about Fields and associated options. There are not many of them and knowing fields better will help you creating better documents and save your time.

Here is the document and I want each article to have its own number, starting from number four (4). I also want Word to number paragraphs automatically when I copy/paste the text “Article 4” by increasing number 4 by 1 (one).
Sure, I can copy/paste the text “Article 4” and change the value manually. But what would happen if I had a hundred (200) articles and wanted to delete Article 9? I would have to correct all remaining values to correct sequence number: I would have to make 91 corrections. And I would have to do that each and every time I add or delete an article.
Imagine what would you have to do if Word was lacking its page numbering feature? I don’t want even to think about it. You would have to manually correct page numbers every time you add or delete a page. That’s exactly the same. (Believe it or not, I remember typing on a typewriter and making a mistake, adding and throwing pages away, making corrections and typing into the night…)
I can’t use Numbering feature here because the text would look like this:

Fortunately there are Fields to ease our tasks, to automate and enhance documents. There are lot of them, and and we are going to meet some. This time the ones that deal with numbering.
To have auto numbering feature automatically update a number we need to insert Field first.
1. Type a text, for example, Article, and press Space to separate the word from the field.
2. Go to Insert tab, click Quick Parts and choose Field…

This opens the Field dialog box:

This dialog box has two parts:
1. Narrower part on the left, where you choose a field from a list of available fields. On the top there is Categories pull-down menu that can help you narrow down the field list. Description is on the bottom.
2. Wider part on the right, where you can change Field Properties of the selected field.

Word 2010 has 9 field categories and 77 fields.
Click on Numbering category to filter and display fields that are related to numbering.

Take a look at the Field Names on the left. Have you noticed something familiar? No? Take look again.
AutoNum is selected and first in the list that look familiar. Click on Page field. Familiar too? Yes! These features you were using are Fields actually!
Numbering and Page Numbers are fields and we were using them without even noticing!
Like two mentioned before, you’ve heard of other well known fields: table of contents, total number of pages, outlined numbered lists, date and time, index and tables, mail merge and others. In fact, all Fields have a shared feature (guess what  ): they are updated automatically!
Two examples are shown below:


Back to our Field dialog box.
On the left click ListNum. This is the field we were looking for and it has some “switches” and “levers” we can pull to make some adjustments to fit our needs.

Now you have Field Properties and Field Options. Field Codes button on bottom left is used to reveal Field Codes of the selected field. Fields are, essentially, data placeholders and Field Codes define what data fields are made of and what kind of data is filled and updated in it.
When pressed, Field Codes button changes to Hide Codes button and reveals Advanced Field Properties that displays (1) Field Codes for the field, (2) field syntax, and (3) Options… button. 
Options button reveals Options dialog box specific for the chosen field where you can adjust its various options.

Dialog box on the left displays Field Option specific to ListNum field.
Different fields have different field options.
Four different Field Properties control type of numbering displayed in the document:

In combination with Level in the list Field Options, the results are as follows:
|
List Name |
(none) |
LegalDefault |
NumberDefault |
OutlineDefault |
|
Level in the list=OFF |
1) |
1. |
1) |
I. |
|
Level in the list=1 |
1) |
1. |
1) |
I. |
|
Level in the list=2 |
a) |
1.1. |
a) |
A. |
|
Level in the list=3 |
i) |
1.1.1. |
i) |
1. |
|
Level in the list=4 |
(1) |
1.1.1.1. |
(1) |
a) |
|
Level in the list=5 |
(a) |
1.1.1.1.1. |
(a) |
(1) |
|
Level in the list=6 |
(i) |
1.1.1.1.1.1. |
(i) |
(a) |
|
Level in the list=7 |
1. |
1.1.1.1.1.1.1. |
1. |
(i) |
|
Level in the list=8 |
a. |
1.1.1.1.1.1.1.1. |
a. |
(a) |
|
Level in the list=9 |
i. |
1.1.1.1.1.1.1.1.1. |
i. |
(i) |

If selected, fields are highlighted in gray color.
 Left-click on the field you’ve just entered displays menu with two options related to field: Edit Field… and Toggle Field Codes.
Toggle Field Codes has its keyboard shortcut for faster switching between field codes and text: SHIFT+F9. When field code is shown in the document you can type directly in the field and change its values, without opening Field dialog box. That way, changing field values and adjusting it to fit your needs, is faster.
IMPORTANT: Field codes have their syntaxes. If the syntax is not correct, the field won’t update and, eventually, work. Make sure you don’t leave some extra spaces or letters after editing, and add space between brackets and text if its needed. Just make sure that the syntax is correct.
Finally, here is the option that will solve our problem: Start-at value. If you check this option and enter a number, Word starts counting from that number. It works only with positive numbers and negative numbers don’t have any effect.
If you have not typed any text yet, take a look at my post about generating dummy text.
1. Generate some text to practice if you want to, but you don’t need any. It works fine on blank page, too.
2. Type a text before a paragraph, for example, Article, and press Space to separate the word from the field.
3. Go to Insert tab, click Quick Parts and click Field…
4. On the left, in Categories pull-down menu, click Numbering.
5. Under Field Names, click ListNum.
6. In the middle, under ListName, click LegalDefault.
7. On the right, under Field Options, select Start-at value: checkbox and type value 4 in the space provided.
8. Click OK.
There it is! You have created a field with an automatic numbering feature turned on. Now, if you click onto number 4 it will be highlighted grey. Press SHIFT+F9 and Word will reveal field codes for the selected field. It looks like this: Article { LISTNUM LegalDefault s 4 }
Press SHIFT+F9 again and it will switch back to Article 4. text.
Wait! Just few steps more and we’re done:
1. Select Article 4. text and copy it to clipboard (CTRL+C, for example).
2. Paste it in the next line or before some other paragraph, if you practice on text (CTRL+V).

3. Click on number 4 in “Article 4.” text
4. Right-click on Field and click Edit Field…

5. Un-check Start-at value checkbox.
6. Click OK.
What happened? It displays “Article 5.” now!

Now you can select “Article 5.” text and paste it around as many times as you want. Each time you paste it, it will increase its number by 1. If you delete any field(s) or add field(s), Word will update its number. You don’t have to update manually article numbers anymore because Word and fields are doing it for you.
If you want to break the sequence and start at different number just repeat what you have done before (steps 2. to 8.) and Word will start numbering from the number you typed in.

Take a look at other fields, you might find something useful to use at your workplace.
Good luck!