
Следующие учебники покажут вам несколько методов, как вставить переключатель в документ MS Word.
- Вставьте один переключатель с элементом управления ActiveX в Word
- Пакетная вставка нескольких переключателей с Kutools for Word
Вставьте один переключатель с элементом управления ActiveX в Word
Этот метод поможет вам включить вкладку «Разработчик» на ленте Word, а затем вставить элемент управления ActiveX кнопки «Option» в Word. Пожалуйста, сделайте следующее:
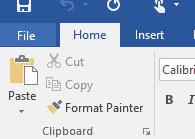
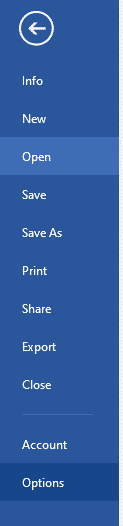
1. Нажмите Файл > Опции , чтобы открыть диалоговое окно «Параметры Word».
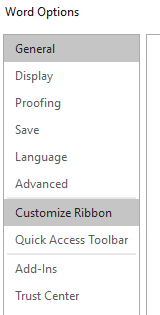
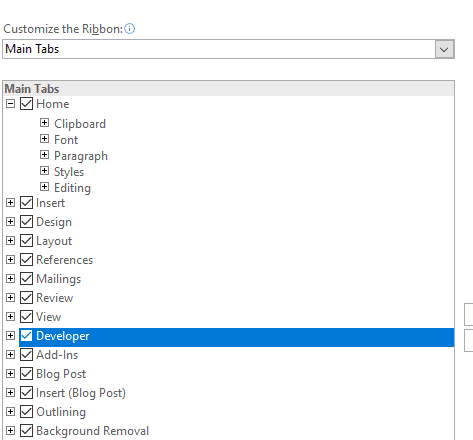
2. В диалоговом окне «Параметры Word» (1) нажмите на Настроить ленту в левом баре, (2) проверить Застройщик вариант в правом поле и (3) нажмите OK кнопка. Смотрите скриншот:
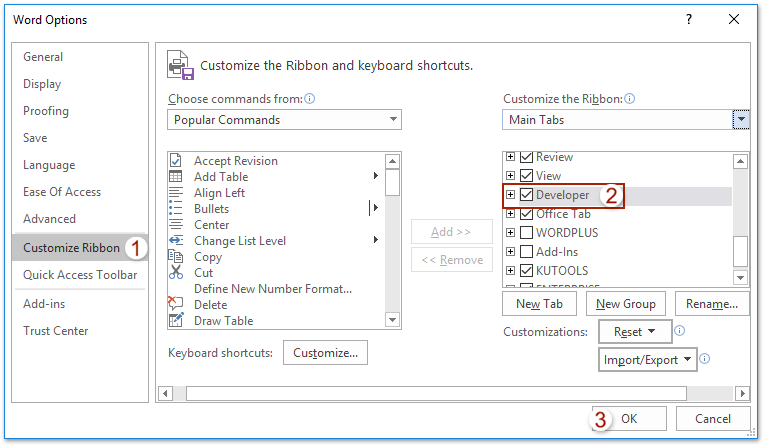
Теперь вкладка Разработчик добавлена в ленту Word.
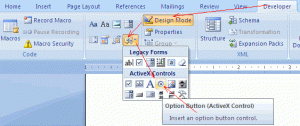
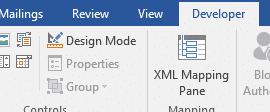
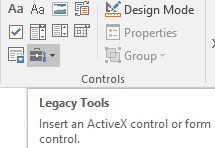
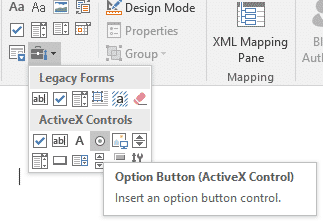
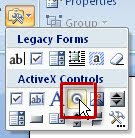
3. Продолжайте нажимать Застройщик > Устаревшие инструменты > Кнопка выбора. Смотрите скриншот:

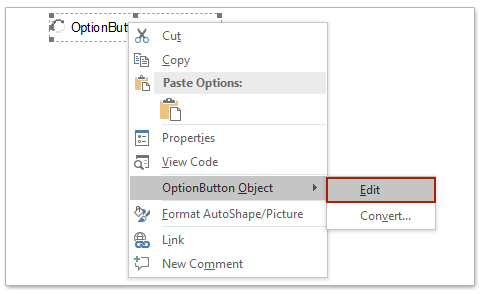
4. Теперь радиокнопка вставлена в документ, на котором находится курсор. Щелкните его правой кнопкой мыши и выберите Объект OptionButton > Редактировать из контекстного меню. Смотрите скриншот:
5. Теперь название кнопки выбора можно редактировать. Введите текст, который вам нужен, чтобы заменить его.

6. Чтобы вставить несколько кнопок выбора, повторите выше Шаг 3 — 5 как вам нужно.
7. Выйдите из режима дизайна, нажав Застройщик > Режим проектирования. Смотрите скриншот:

Теперь эти вставленные переключатели можно отметить.
Пакетная вставка нескольких переключателей с Kutools for Word
Помимо описанного выше метода, вы хотели бы узнать еще один простой способ быстрой вставки переключателя в документ Word? В настоящее время, Kutools for WordАвтора Переключатель Утилита может помочь вам быстро вставить сразу несколько переключателей. Пожалуйста, сделайте следующее:
Kutools for Word это удобная надстройка, облегчающая вашу работу и расширяющая возможности обработки текстовых документов. Бесплатная пробная версия для 60 дней! Получи это сейчас!
1. Выберите текст, для которого вы хотите вставить переключатель, и нажмите Кутулс > Флажок > Переключатель. Смотрите скриншот:
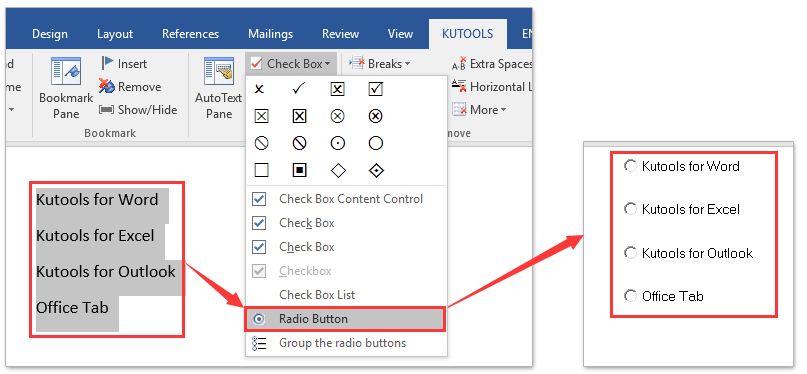
Теперь радиокнопка вставлена.
2. Выйдите из режима дизайна, нажав Застройщик > Режим проектирования, (Внимание: Нажмите, чтобы просмотреть способы отображение вкладки «Разработчик» на ленте Word.)
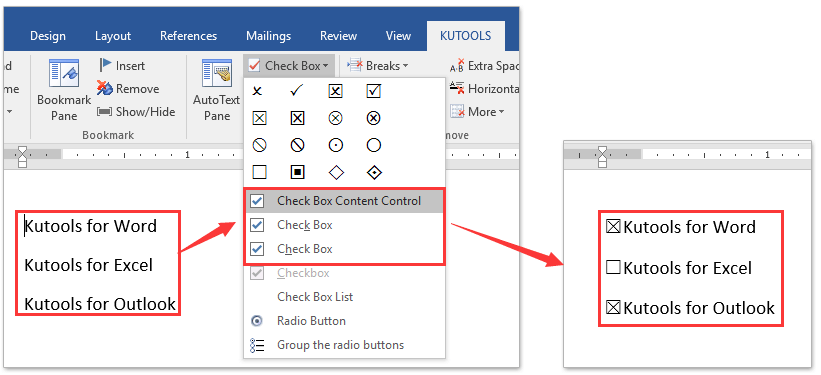
Функции: Kutools for Word также поддерживает быструю вставку флажка (элемент управления содержимым), флажка элемента управления ActiveX или флажка (поле формы) одним щелчком мыши.
Просмотр и редактирование нескольких документов Word с вкладками в Firefox, Chrome, Internet Explore 10!
Возможно, вы знакомы с просмотром нескольких веб-страниц в Firefox / Chrome / IE и возможностью переключения между ними, легко щелкая соответствующие вкладки. Здесь вкладка Office поддерживает аналогичную обработку, которая позволяет просматривать несколько документов Word в одном окне Word и легко переключаться между ними, щелкая их вкладки. Нажмите, чтобы получить полную бесплатную пробную версию!
Относительная статья:
Сгруппировать переключатель в Word
Это только один из инструментов Kutools for Word
![]() Kutools for Word освобождает от выполнения трудоемких операций в Word;
Kutools for Word освобождает от выполнения трудоемких операций в Word;
![]() С наборами удобных инструментов для Word 2021 — 2003 и Office 365;
С наборами удобных инструментов для Word 2021 — 2003 и Office 365;
![]() Простота использования и установки в Windows XP, Windows 7, Windows 8/10/11 и Windows Vista;
Простота использования и установки в Windows XP, Windows 7, Windows 8/10/11 и Windows Vista;

Дополнительные функции | Скачать бесплатно | Купить
Комментарии (18)
Оценок пока нет. Оцените первым!
Download PC Repair Tool to quickly find & fix Windows errors automatically
A Radio button or Options button is a graphical control element in Microsoft Word that allows users to select a response from preformatted options. The radio buttons are often used in forms or surveys to capture customer or audience feedback.
Follow the steps below to insert a clickable Radio button in Microsoft Word:
- Launch Word.
- Click the Developer tab.
- Click the Legacy button in the Controls group, then select the Radio button or Options button from the menu.
- The radio button is inserted into the document.
- To edit the Radio button, right-click the Radio button and select OptionButton Object, then click Edit from the context menu.
- Now the Radio or options button is editable, type the text you want.
- Follow the step above to insert more radio buttons.
- Click the Design button to exit the Design Mode.
- Now, the buttons are clickable.
Launch Word.
Click the Developer tab.

Click the Legacy button in the Controls group, then select the Radio button or Options button from the menu.
The radio button is inserted into the document.
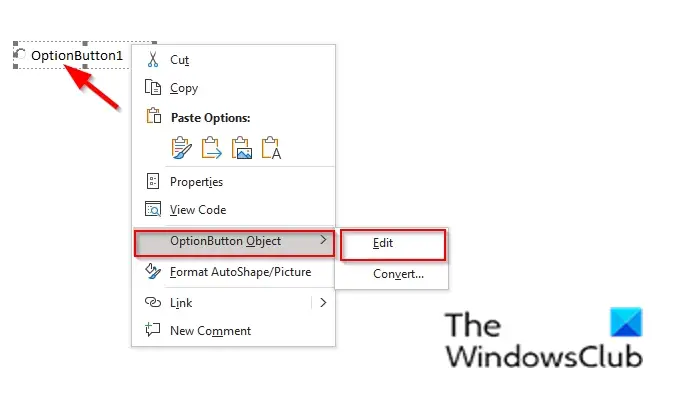
To edit the Radio button, right-click the Radio button and select OptionButton Object, then click Edit from the context menu.
Now the Radio or options button is editable, type the text you want.
Follow the step above to insert more radio buttons.
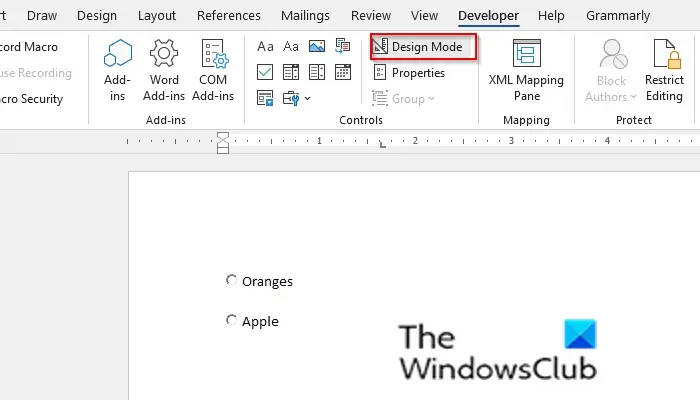
Click the Design Mode button to exit the Design Mode.
Now, the buttons are clickable.
How do I group Radio buttons in Word?
In Microsoft Word, you can group your Radio buttons; Follow the steps below to group the Radio buttons.
- In the Design Mode, right-click the Radio button and select Option Properties from the context menu.
- The Properties sheet will appear.
- On the Properties sheet under the tab Alphabetic, look for the row with the heading GroupName.
- Click the neighboring cell and enter a group name.
- Keep the group name for the rest of the radio buttons, which you want to keep as one group.
- Close the Properties window.
What can I use instead of a Radio button?
If you do not want to use Radio buttons on your surveys or forms, you can use alternatives such as checkboxes and drop-down boxes, which function the same.
We hope this tutorial helps you understand how to use the insert Radio button in a Microsoft Word document; if you have questions about the tutorial, let us know in the comments.

Shantel has studied Data Operations, Records Management, and Computer Information Systems. She is quite proficient in using Office software. Her goal is to become a Database Administrator or a System Administrator.
На чтение 3 мин. Просмотров 107 Опубликовано 27.05.2021
Следующие руководства покажут вам несколько методов вставки переключателя в документ MS Word.
- Вставить один переключатель с элементом управления ActiveX в Word
- Пакетная вставка нескольких переключателей с помощью Kutools for Word
Содержание
- Один щелчок для одновременной вставки нескольких переключателей в Word
- Вставить один переключатель с элементом управления ActiveX в Word
- Пакетная вставка нескольких переключателей с помощью Kutools for Word
- Просмотр и редактирование нескольких документов Word с вкладками в Firefox, Chrome, Internet Explore 10!
- Относительная статья:
- Это только один инструмент Kutools for Word
- Дополнительные возможности | Бесплатная загрузка | Купить сейчас
Один щелчок для одновременной вставки нескольких переключателей в Word
В общем, мы обычно можем вставлять переключатели за раз, включив вкладку «Разработчик», вставка кнопки выбора элемента управления ActiveX и переименование кнопки выбора. Но теперь, с функцией Radio Button в Kutools for Word, вы можете быстро вставить несколько переключателей сразу одним щелчком мыши! Нажмите, чтобы получить 60-дневную бесплатную пробную версию!

->
Вставить один переключатель с элементом управления ActiveX в Word
Этот метод поможет вам включить вкладку «Разработчик» на ленте Word, а затем вставить элемент управления ActiveX кнопки «Option» в Word. Пожалуйста, сделайте следующее:
1 . Нажмите Файл > Параметры , чтобы открыть диалоговое окно Параметры Word.
2 . В диалоговом окне “Параметры Word” (1) щелкните Настроить ленту на левой панели, (2) установите флажок Разработчик в правом поле и (3) нажмите кнопку OK . См. Снимок экрана:

Теперь вкладка “Разработчик” добавлена на ленту Word.
3 . Нажмите Developer > Legacy Tools > Option Button . См. Снимок экрана:

4 . Теперь радиокнопка вставлена в документ, на котором находится курсор. Щелкните его правой кнопкой мыши и выберите Объект OptionButton > Изменить в контекстном меню. См. Снимок экрана:

5 . Теперь название кнопки выбора можно редактировать. Введите тексты, которые вам нужно заменить.

6 . Чтобы вставить несколько кнопок выбора, повторите приведенные выше шаги 3 – 5 по мере необходимости.
7 . Выйдите из режима дизайна, нажав Разработчик > Режим дизайна . См. Снимок экрана:

Теперь эти вставленные переключатели можно отмечать.
Пакетная вставка нескольких переключателей с помощью Kutools for Word
Помимо описанного выше метода, хотите ли вы узнать еще один простой способ быстрой вставки переключателя в документ Word? Теперь утилита Radio Button в Kutools for Word может помочь вам быстро вставить сразу несколько переключателей. Пожалуйста, сделайте следующее:
Kutools for Word – это удобная надстройка, которая упрощает вашу работу и расширяет ваши возможности обработки текстовых документов. Бесплатная пробная версия на 60 дней! Получите прямо сейчас!
1 . Выберите текст, для которого вы хотите вставить переключатель, и нажмите Kutools > Check Box > Radio Button . См. Снимок экрана:

Теперь переключатель вставлен.
2 . Выйдите из режима дизайна, нажав Разработчик > Режим дизайна . ( Примечание : щелкните, чтобы просмотреть способы отображения вкладки «Разработчик» на ленте Word.)
Совет : Kutools for Word также поддерживает быструю вставку флажка (элемент управления содержимым), флажка элемента управления ActiveX или флажка (поле формы) одним щелчком мыши. Нажмите, чтобы получить 60-дневную бесплатную пробную версию!

Просмотр и редактирование нескольких документов Word с вкладками в Firefox, Chrome, Internet Explore 10!
Возможно, вы знакомы с просмотром нескольких веб-страниц в Firefox/Chrome/IE и возможностью переключения между ними, легко щелкая соответствующие вкладки. Здесь вкладка Office поддерживает аналогичную обработку, которая позволяет просматривать несколько документов Word в одном окне Word и легко переключаться между ними, щелкая их вкладки. Нажмите, чтобы получить бесплатную пробную версию с полным набором функций!

Относительная статья:
Сгруппировать переключатель в Word
Это только один инструмент Kutools for Word
 Kutools for Word освобождает вас от выполнения трудоемких операций в Word;
С наборами удобных инструментов для Word 2019, 2016, 2013, 2010, 2007, 2003 и Office 365;
Простота использования и установки в Windows XP, Windows 7, Windows 8/10 и Windows Vista;

Дополнительные возможности | Бесплатная загрузка | Купить сейчас
Radio button can be used in a Form to capture user’s feedback. Following is a simple example that shows the usage of a radio button also known as Option button.

- On the Word Ribbon, under the tab Developer, within the group Controls, click the Legacy Tools icon. A drop-down list appears.
- From the drop-down list, under the section ActiveX Controls, click the icon Option Button (ActiveX Control). Word creates something like the following.
- By default, the radio button appears in Design Mode. Click the Design Mode option available within group Controls to switch to normal mode, so that the radio button becomes clickable.
- To change the caption of the radio button,
- Click the radio button and then click Design Mode from the Controls group.
- Right-click the radio button and click option Properties from the right-click menu.
- On the Properties sheet, under the tab Alphabetic, look for the row with the heading Caption. On the adjacent cell of Caption, double-click to delete the default caption i.e. OptionButton 1 and enter a new caption. Alternatively, you can delete the default caption to retain only radio button. Later, you can resize the button by dragging the resize handles.
The next challenge is to group the radio buttons under different sections.
This is important for each group of buttons to behave independently. Otherwise, all the buttons in the document would behave as one group (by default) and only one feedback could be captured.
For example, in the above example form, each question contains two radio buttons (Yes/No) to capture feedback. Each pair of buttons must be grouped to capture feedback for individual question.
To group radio buttons
- Switch to design mode by selecting the radio button and then clicking the Design Mode option from within the group Controls.
- Once you are in Design Mode, right-click the radio button and select option Properties from the right-click menu. The Properties sheet appears.
- On the Properties sheet, under the tab Alphabetic, look for the row with the heading GroupName. Click the adjacent cell to enter a group name.
- Now you need to keep the same group name for the rest of the radio buttons, which you want to keep as one group. You are done.
Note: Before you share a document containing Radio button or any other controls, you should to protect your document to prevent editing of the document. To know how to protect a document, read the following articles:
https://wordknowhow.wordpress.com/2013/06/25/how-to-insert-text-fields-check-boxes-drop-down-lists-etc-in-a-word-document-to-create-a-form/
https://wordknowhow.wordpress.com/2014/04/03/how-to-create-or-add-checkboxes-checkbox-controls-to-your-word-document/

About wordknowhowhttp://wordknowhow.comThis blog site was started to help people with Microsoft Word. I use Word a lot at work, and I understand that some features are difficult to use. There were no simplified instructions online to help me use these features. It is for this reason that this site exists; to make your life easier with Word.
Feel free to post your comments, queries, suggestions, etc. I will do my best to help you!
As a word processing program, Microsoft Word has a wide variety of text editing features. In addition to text editing, you can easily add images, charts, shapes, tables and even insert text on a picture all in a Microsoft Word document.
Microsoft Word allows you to create an interactive survey for your audience with controls and form tools such as; check boxes, list boxes as well as the radio button.
Using radio buttons in a Microsoft Word document survey provides your readers with the opportunity to select a response from pre-formatted options.
How to add a radio button in a Microsoft Word document
The radio button, also known as the Option button is used in Microsoft Word to capture the audience’s feedback.
Here is how you can insert a radio button in a Microsoft Word document:
Step 1. Place the cursor where you would like to insert a radio button and then click File in the top left corner of your Microsoft Word document.
Step 2. Click Option to open the Word Options dialog box.
Step 3. In the Word Option dialog box, click Customize Ribbon
Step 4. Having clicked Customize Ribbon, two boxes will pop up under the Word Option dialog box. Check the Developer option in the right box, then click OK at the bottom right corner of the Word Option dialog box.
Step 5. Then go ahead to click Developer.
Step 6. Click Legacy Tools highlighted grey below.
Step 7. Select the Option Button highlighted grey under ActiveX Controls.
Step 8. A radio button is inserted in the Microsoft Word document where your cursor was placed in the beginning. Right click it, and select Option Button Object > Edit from the context menu, in case the need to edit the radio button arises.

Why you need Simul Docs to execute your tasks as a team
Collaborating on a Microsoft Word document as a team can prove to be challenging, with back and forth emails that may result into disorganization and delays in the working process.
Simul Docs is a collaboration tool and version control that makes it easy for individuals working with organisations and companies to efficiently work together on Microsoft Word documents.
Having uploaded your original Microsoft Word document to Simul Docs, you and your work collegueaus can easily access the document to make changes at the same time, even when working remotely from different locations.
Simul Docs also recognises when multiple collaborators are making changes at the same time, and saves each person’s changes in different versions to avoid having anything overridden or deleted.
With Simul Docs, each author’s changes are marked up as tracked changes in Microsoft Word, allowing you to easily identify the differences, and accept or reject the changes.
Having reached a final draft of your document, you can merge all the changes made into one Microsoft Word document with just one click of your mouse.
Employing Simul Docs as part of your day to day process ensures creation of a secure database of your working process, with all the changes made being recorded and saved.
Being able to keep track of the changes made to your Microsoft word document in real time, is another great perk that comes with working with Simul Docs. It becomes easy to make comparisons of different versions of a Microsoft word document, whether or not the tracked changes were turned on. This has proven to be an efficient way to monitor what changes were made, who made them and when.
Reverting to the previous versions of the Microsoft Word document in the event that the need arises to restore the original version is easy courtesy of Simul Docs. Simul Docs has also proved very helpful in taking content from the previous versions and adding it to the latest Microsoft Word document.
When it comes to sharing the final document with others, unaware of Simul Docs, you can simply download the latest version of your Word document, and share it via email. You can also export the document using cloud storage tools, for example: SharePoint, Dropbox, Google Drive to mention but a few.
In conclusion, working with Simul Docs is not only effective, efficient and time saving, it is also the best way to have multiple members working on a project to easily execute tasks in Microsoft Word that would otherwise prove difficult. Create a better and much simplified working experience with Simul Docs today.
Кнопка-переключатель или кнопка «Параметры» — это графический элемент управления в Microsoft Word, который позволяет пользователям выбирать ответ из предварительно отформатированных вариантов. Переключатели часто используются в формах или опросах для сбора отзывов клиентов или аудитории.
Выполните следующие действия, чтобы вставить интерактивную кнопку-переключатель в Microsoft Word:
- Запустите Ворд.
- Щелкните вкладку Разработчик.
- Нажмите кнопку «Наследие» в группе «Элементы управления», затем выберите в меню кнопку «Переключатель» или кнопку «Параметры».
- Радиокнопка вставляется в документ.
- Чтобы отредактировать кнопку-переключатель, щелкните правой кнопкой мыши кнопку-переключатель и выберите объект OptionButton, затем нажмите «Изменить» в контекстном меню.
- Теперь кнопку «Радио» или «Параметры» можно редактировать, введите нужный текст.
- Следуйте шагу выше, чтобы вставить больше переключателей.
- Нажмите кнопку «Дизайн», чтобы выйти из режима «Дизайн».
- Теперь кнопки кликабельны.
Запустите Ворд.
Щелкните вкладку Разработчик.
Нажмите на Наследие кнопка в Элементы управления группу, затем выберите Радио кнопка или Опции кнопку из меню.
Радиокнопка вставляется в документ.
Чтобы отредактировать радиокнопку, щелкните ее правой кнопкой мыши и выберите Объект OptionButton, затем нажмите Редактировать из контекстного меню.
Теперь кнопку «Радио» или «Параметры» можно редактировать, введите нужный текст.
Следуйте шагу выше, чтобы вставить больше переключателей.
Нажмите на Режим дизайна кнопку для выхода из режима дизайна.
Теперь кнопки кликабельны.
Как сгруппировать радиокнопки в Word?
В Microsoft Word вы можете сгруппировать свои радиокнопки; Выполните следующие шаги, чтобы сгруппировать радиокнопки.
- В режиме «Дизайн» щелкните правой кнопкой мыши кнопку «Переключатель» и выберите «Свойства параметра» в контекстном меню.
- Появится лист свойств.
- На странице «Свойства» на вкладке «Алфавитный» найдите строку с заголовком «Имя группы».
- Щелкните соседнюю ячейку и введите имя группы.
- Сохраните имя группы для остальных переключателей, которые вы хотите сохранить как одну группу.
- Закройте окно свойств.
Что я могу использовать вместо радиокнопки?
Если вы не хотите использовать радиокнопки в своих опросах или формах, вы можете использовать альтернативные варианты, такие как флажки и раскрывающиеся списки, которые работают так же.
Мы надеемся, что это руководство поможет вам понять, как использовать радиокнопку вставки в документе Microsoft Word; если у вас есть вопросы по поводу урока, дайте нам знать в комментариях.
В некоторых случаях (например, в файлах заявок) полезно использовать элементы управления Переключатель (OptionButton или RadioButton) и Флажок (Checkbox). Причем, во многих случаях программная обработка этих элементов управления не требуется.
Элементы управления Переключатель и Флажок можно найти в группе Элементы управления (раздел Элементы ActiveX) (вкладка Разработчик – группа Элементы управления).
Переключатель имеет вид кружка с точкой внутри или без нее, а флажок – вид квадратика с галочкой внутри или без нее.
Переключатели обычно объединяются в группы, причем в каждой группе можно выбрать только один переключатель.
Флажки тоже могут быть объединены в группы (но для флажков это не обязательно). В каждой группе можно выбрать любое количество флажков.
Редактирование элементов управления производится в Режиме конструктора (вкладка Разработчик – группа Элементы управления – кнопка Режим конструктора). После активации данного режима кнопка Режим конструктора должна быть выделена.
При скачивании элементов управления из указанного раздела рядом с элементом управления указывается автоматически созданное имя элемента (CheckBox1 или OptionButton2). Для редактирования или удаления этого имени используется редактируемое поле атрибута Caption в свойствах элемента (правая кнопка мыши – Свойства – Caption).
Размеры указанных элементов управления неизменны, но окружающее поле можно изменять с помощью курсора мыши.
Некоторые переключатели нам понадобится объединить в группы. Для объединения элементов управления в группы используется поле атрибута GroupName в свойствах элемента (правая кнопка мыши – Свойства – GroupName). В указанные поля каждого переключателя нужно ввести соответствующее имя группы (желательно, состоящее из букв латиницы, знаки тире и подчеркивания и цифры (также желательно, чтобы первые знаки каждого имени группы представляли собой буквы латиницы)).
Используемые имена групп должны быть уникальны в пределах файла.
По окончании редактирования элементов управления завершите работу режима конструктора, повторно нажав на кнопку Режим конструктора (вкладка Разработчик – группа Элементы управления – кнопка Режим конструктора). После завершения работы данного режима кнопка Режим конструктора должна быть «погашена».
Сохраните результаты редактирования и проверьте работоспособность введенных элементов управления и сохранение их значений после повторного открытия файла.
Удобной и приятной работы в Word!
Перевести спасибо на Яндекс кошелёк — 41001162202962; на WebMoney — R581830807057.
How to Add Radio Buttons to MS Word 2007 Documents
Radio buttons, or option buttons as Microsoft now refers to them, are used in online questionnaires, and forms that require users to make a selection.
This tutorial demonstrates how to insert radio buttons into a document in Microsoft Word 2007, using a PC with Windows XP or Vista. The tutorial consists of two tasks:
- Adding the Developer tab to the ribbon
- Inserting option buttons into an MS Word document
For the remainder of this tutorial, the term «option button» will be used instead of «radio button.»
To add the Developer tab to the ribbon:
1. Open Microsoft Word 2007.
2. In the upper left corner, click the Microsoft Office Button.

3. Click the Word Options button.

4. In the Word Options dialog box that appears, select Popular.

Note: Popular is the default selection.
5. Click the check box next to Show Developer tab in the Ribbon.

Note: you want the check box enabled, i.e., with a check mark.
6. Click OK.
The Developer tab now appears in the Microsoft Windows 2007 ribbon.
To insert option buttons into an MS Word document:
1. Click the Developer tab.

2. In the Controls group, click the Design Mode button.

Note: you want the Design Mode button enabled. When it is enabled, it is highlighted in orange.
3. In the Controls group, click the Legacy Tools button.

Tip: When you click the Legacy Tools button, if you have not already clicked the Design Mode button, the Design Mode button will now be enabled.
4. Under Active X Controls, click Option Button.
Result: An option button now appears in the MS Word document.
5. Hover your cursor inside the option button, right click, and point to OptionButton Object, and click Edit.

Result: the colour of the option button changes, which indicates that you can now edit the text.
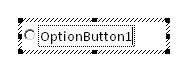
6. Use the left arrow backspace key on your keyboard to delete the default text, and change the text to suit your preference.

Tip: if the text you want to add exceeds the default size of the option button text box, click on the black square on the right side of the box so that a double sided arrow appears, and drag to the right.
7. Click outside the option button.
8. Click the Design Mode button so that it is disabled.
The radio button is now active—i.e., you can click it and a dark circle will appear inside, indicating that it is the option that you have selected. Add as many more option boxes as you like, and preface the series of options with a question, statement, or instructions.