
Microsoft SQL Server 2005 Standard Edition Microsoft SQL Server 2005 Enterprise Edition Microsoft SQL Server 2005 Developer Edition Microsoft SQL Server 2005 Workgroup Edition More…Less
Summary
Microsoft SQL Server supports connections to other OLE DB data sources on a persistent or an ad hoc basis. The persistent connection is known as a linked server; an ad hoc connection that is made for the sake of a single query is known as a distributed query.
Microsoft Excel workbooks are one type of OLE DB data source that you can query through SQL Server in this manner. This article describes the syntax that is necessary to configure an Excel data source as a linked server, as well as the syntax that is necessary to use a distributed query that queries an Excel data source.
More Information
Querying an Excel data source on a linked server
You can use SQL Server Management Studio or Enterprise Manager, a system stored procedure, SQL-DMO (Distributed Management Objects), or SMO (SQL Server Management Objects) to configure an Excel data source as a SQL Server linked server. (SMO are only available for Microsoft SQL Server 2005.) In all of these cases, you must always set the following four properties:
-
The name that you want to use for the linked server.
-
The OLE DB Provider that is to be used for the connection.
-
The data source or complete path and file name for the Excel workbook.
-
The provider string, which identifies the target as an Excel workbook. By default, the Jet Provider expects an Access database.
The system stored procedure sp_addlinkedserver also expects the @srvproduct property, which can be any string value.
Note If you are using SQL Server 2005, you must specify a value that is not empty for the Product name property in SQL Server Management Studio or for the @srvproduct property in the stored procedure for an Excel data source.
Using SQL Server Management Studio or Enterprise Manager to configure an Excel data source as a linked server
SQL Server Management Studio (SQL Server 2005)
-
In SQL Server Management Studio, expand Server Objects in Object Explorer.
-
Right-click Linked Servers, and then click New linked server.
-
In the left pane, select the General page, and then follow these steps:
-
In the first text box, type any name for the linked server.
-
Select the Other data source option.
-
In the Provider list, click Microsoft Jet 4.0 OLE DB Provider.
-
In the Product name box, type Excel for the name of the OLE DB data source.
-
In the Data source box, type the full path and file name of the Excel file.
-
In the Provider string box, type Excel 8.0 for an Excel 2002, Excel 2000, or Excel 97 workbook.
-
Click OK to create the new linked server.
-
Note In SQL Server Management Studio, you cannot expand the new linked server name to view the list of objects that the server contains.
Enterprise Manager (SQL Server 2000)
-
In Enterprise Manager, click to expand the Security folder.
-
Right-click Linked Servers, and then click New linked server.
-
On the General tab, follow these steps:
-
In the first text box, type any name for the linked server.
-
In the Server type box, click Other data source.
-
In the Provider name list, click Microsoft Jet 4.0 OLE DB Provider.
-
In the Data source box, type the full path and file name of the Excel file.
-
In the Provider string box, type Excel 8.0 for an Excel 2002, Excel 2000, or Excel 97 workbook.
-
Click OK to create the new linked server.
-
-
Click to expand the new linked server name to expand the list of objects that it contains.
-
Under the new linked server name, click Tables. Notice that your worksheets and named ranges appear in the right pane.
Using a stored procedure to configure an Excel data source as a linked server
You can also use the system stored procedure sp_addlinkedserver to configure an Excel data source as a linked server:
DECLARE @RC int
DECLARE @server nvarchar(128)
DECLARE @srvproduct nvarchar(128)
DECLARE @provider nvarchar(128)
DECLARE @datasrc nvarchar(4000)
DECLARE @location nvarchar(4000)
DECLARE @provstr nvarchar(4000)
DECLARE @catalog nvarchar(128)
-- Set parameter values
SET @server = 'XLTEST_SP'
SET @srvproduct = 'Excel'
SET @provider = 'Microsoft.Jet.OLEDB.4.0'
SET @datasrc = 'c:book1.xls'
SET @provstr = 'Excel 8.0'
EXEC @RC = [master].[dbo].[sp_addlinkedserver] @server, @srvproduct, @provider,
@datasrc, @location, @provstr, @catalog
As noted above, this stored procedure requires an additional, arbitrary string value for the @srvproduct argument, which appears as «Product name» in the Enterprise Manager and SQL Server Management Studio configuration. The @location and @catalog arguments are not used.
Using SQL-DMO to configure an Excel data source as a linked server
You can use SQL Distributed Management Objects to configure an Excel data source as a linked server programmatically from Microsoft Visual Basic or another programming language. You must supply the same four arguments that are required in the Enterprise Manager and SQL Server Management Studio configuration.
Private Sub Command1_Click()
    Dim s As SQLDMO.SQLServer
    Dim ls As SQLDMO.LinkedServer
    Set s = New SQLDMO.SQLServer
    s.Connect "(local)", "sa", "password"
    Set ls = New SQLDMO.LinkedServer
    With ls
        .Name = "XLTEST_DMO"
        .ProviderName = "Microsoft.Jet.OLEDB.4.0"
        .DataSource = "c:book1.xls"
        .ProviderString = "Excel 8.0"
    End With
    s.LinkedServers.Add ls
    s.Close
End Sub
Using SMO to configure an Excel data source as a linked server
In SQL Server 2005, you can use SQL Server Management Objects (SMO) to configure an Excel data source as a linked server programmatically. To do this, you can use Microsoft Visual Basic .NET or another programming language. You must supply the arguments that are required in the SQL Server Management Studio configuration. The SMO object model extends and supersedes the Distributed Management Objects (SQL-DMO) object model. Because SMO is compatible with SQL Server version 7.0, SQL Server 2000, and SQL Server 2005, you can also use SMO for configuration of SQL Server 2000.
Imports Microsoft.SqlServer.Management.Smo
Imports Microsoft.SqlServer.Management.CommonPublic Class Form1
Private Sub Button1_Click(ByVal sender As System.Object, ByVal e As System.EventArgs) Handles Button1.Click
Dim s As Server
Dim conn As ServerConnection
Dim ls As LinkedServerconn = New ServerConnection("ServerNameInstanceName", "YourUesrName", "YourPassword")
s = New Server(conn)
Try
ls = New LinkedServer(s, "XLTEST_DMO")
With ls
.ProviderName = "Microsoft.Jet.OLEDB.4.0"
.ProductName = "Excel"
.DataSource = "c:book1.xls"
.ProviderString = "Excel 8.0"
End With
ls.Create()
MessageBox.Show("New linked Server has been created.")
Catch ex As SmoException
MessageBox.Show(ex.Message)
Finally
ls = Nothing
If s.ConnectionContext.IsOpen = True Then
s.ConnectionContext.Disconnect()
End If
End TryEnd Sub
End Class
Querying an Excel data source on a linked server
After you configure an Excel data source as a linked server, you can easily query its data from Query Analyzer or another client application. For example, to retrieve the rows of data that are stored in Sheet1 of your Excel file, the following code uses the linked server that you configured by using SQL-DMO:
SELECT * FROM XLTEST_DMO...Sheet1$
You can also use OPENQUERY to query the Excel linked server in a «passthrough» manner, as follows:
SELECT * FROM OPENQUERY(XLTEST_DMO, 'SELECT * FROM [Sheet1$]')
The first argument that OPENQUERY expects is the linked server name. Delimiters are required for worksheet names, as shown above.
You can also obtain a list of all the tables that are available on the Excel linked server by using the following query:
EXECUTE SP_TABLES_EX 'XLTEST_DMO'
Querying an Excel data source by using distributed queries
You can use SQL Server distributed queries and the OPENDATASOURCE or OPENROWSET function to query infrequently accessed Excel data sources on an ad hoc basis.
Note If you are using SQL Server 2005, make sure that you have enabled the Ad Hoc Distributed Queries option by using SQL Server Surface Area Configuration, as in the following example:
SELECT * FROM OPENDATASOURCE('Microsoft.Jet.OLEDB.4.0',
   'Data Source=c:book1.xls;Extended Properties=Excel 8.0')...Sheet1$
Note that OPENROWSET uses an uncommon syntax for the second («Provider String») argument:
SELECT * FROM OPENROWSET('Microsoft.Jet.OLEDB.4.0',
   'Excel 8.0;Database=c:book1.xls', Sheet1$)
The syntax that an ActiveX Data Objects (ADO) developer may expect to use for the second («Provider String») argument with OPENROWSET:
SELECT * FROM OPENROWSET('Microsoft.Jet.OLEDB.4.0',
   'Data Source=c:book1.xls;Extended Properties=Excel 8.0', Sheet1$)
This syntax raises the following error from the Jet Provider:
Could not find installable ISAM.
Note This error also occurs if you enter DataSource instead of Data Source. For example, the following argument is incorrect:
SELECT * FROM OPENROWSET('Microsoft.Jet.OLEDB.4.0', 'DataSource=c:book1.xls;Extended Properties=Excel 8.0', Sheet1$)
References
Because SQL Server linked servers and distributed queries use the OLE DB Provider, the general guidelines and cautions about using ADO with Excel apply here.
For more information, click the following article number to view the article in the Microsoft Knowledge Base:
257819 How to use ADO with Excel data from Visual Basic or VBA
For more information about SQL Server Management Objects, visit the following Microsoft Developer Network (MSDN) Web site:
http://msdn2.microsoft.com/en-us/library/ms162169(ide).aspxFor more information about how to enable the Ad Hoc Distributed Queries option, visit the following MSDN Web site:
http://msdn2.microsoft.com/en-us/library/ms189978(ide).aspx
Need more help?
Want more options?
Explore subscription benefits, browse training courses, learn how to secure your device, and more.
Communities help you ask and answer questions, give feedback, and hear from experts with rich knowledge.
Export SQL Data to Excel from Microsoft SQL Server
Let’s go over three ways to export an SQL Query to an Excel File Using MSSQL
Despite the pushback from Database aficionados, sometimes it makes sense to export data from SQL to an Excel file. It really depends on who is the audience of the information. Not everyone is great with SQL Analysis. Few people require access to the database.
And lots of times the boss just needs to see the information in Excel.
So, if Excel is the Output required this article is here to help you Export SQL Queries to Excel.
Here are three ways to Export a SQL query to Excel format. The last one can be kind of tricky. I’ll provide a condensed version followed by a detailed version with screenshots.
Three quick ways to Export SQL Data to Excel:
Choose the Summarized Version and then scroll to further down to use the SQL Export Version to Excel that works best for you.
Method Number 1 – Copy Grid results and Paste into Excel
Under Query, Make sure results to Grid are selected.
After Running your query, right-click the top right corner of the grid.
Copy With Headers.
Paste into an Excel File
Possible Issues:
I’ve seen formatting issues with this strategy. For Example, there are situations where the spreadsheet drops preceding zeroes after the copy-paste.
I’ve also noticed lengthy fields, (think of a really long free text field) end up running into the next line.
For the reasons above, I prefer this next method for a clean Excel file.
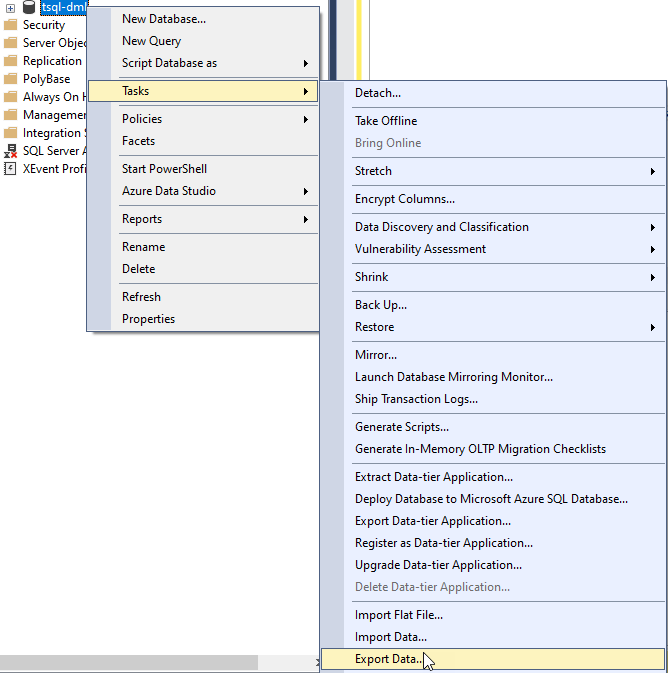
Method Number 2: Export the Query Results as a Task
In the object explorer window, find the database you want to export from.
Right Click the Database, Click Tasks, and Export Data
The Wizard walks you through the rest of the steps but I have included screenshots below.
Method Number 3 – Use Good Old fashioned TSQL to send the data to an excel file
For those who value speed above all use the following script format.
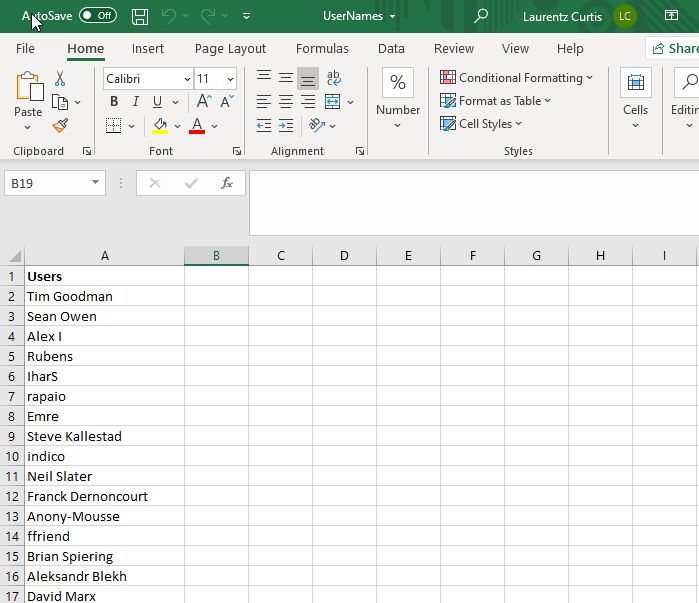
INSERT INTO OPENROWSET(‘Microsoft.ACE.OLEDB.12.0′,’Excel 12.0; Database=C:SQL2019ReportsUsernames.xlsx;’,’SELECT * FROM [Sheet1$]’) SELECT DisplayName FROM dbo.Users Where Reputation > 2000
Possible Issues – Configuring this might not be your type of fun and getting this straight deserves its own article.
Step by Step instructions with screenshots
Method Number 1 – Copy Grid results and paste into Excel
After ensuring results to grid turned on, Execute your query, right-click the top left-hand corner of the results grid.
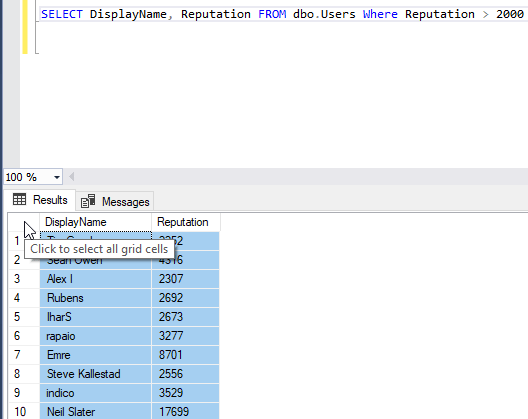
Choose Copy with Headers and then you are ready to paste in Excel with Ctrl + C
Method 2 – Export Via the Export Wizard
Right-click on the database you want to export from. Then Select tasks and “Export Data”.
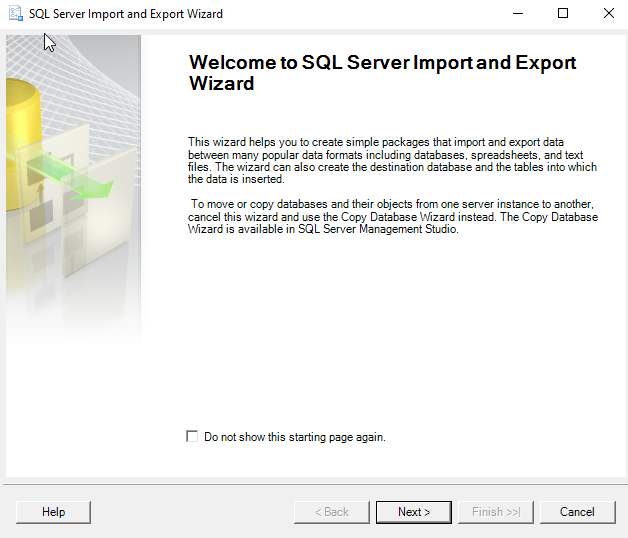
The SQL Server Wizard will startup. Click Next through the prompts.
Select the appropriate Native client, your server name, and database and choose “Next”.
Next, Select Microsoft Excel and the file path where you want to import the data. The .xls file that you name will be created by this process.
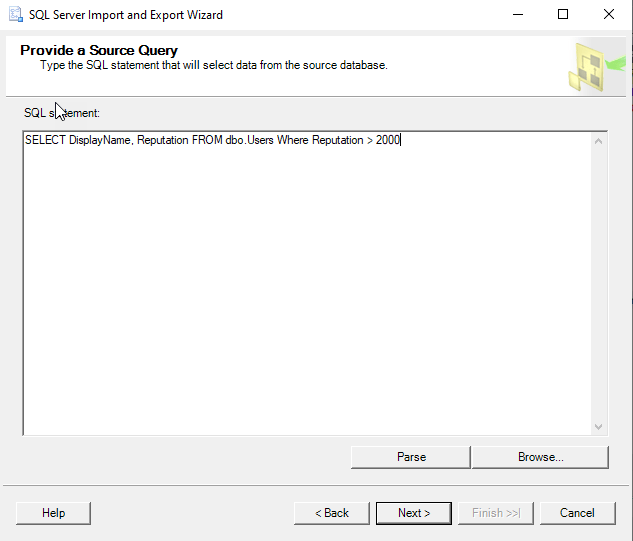
Now you can choose to export a whole table or a query. For the purpose of this exercise, we are creating a query.
Paste the query into the SQL Statement field. Make sure every output field has a unique name.
Click Next on the “Select Source Tables and Views” screen.

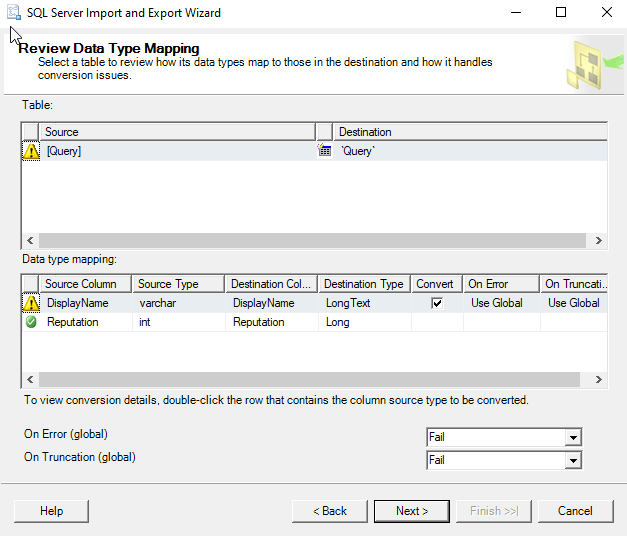
I use the default settings on the “conversion issues and data type mapping screen”
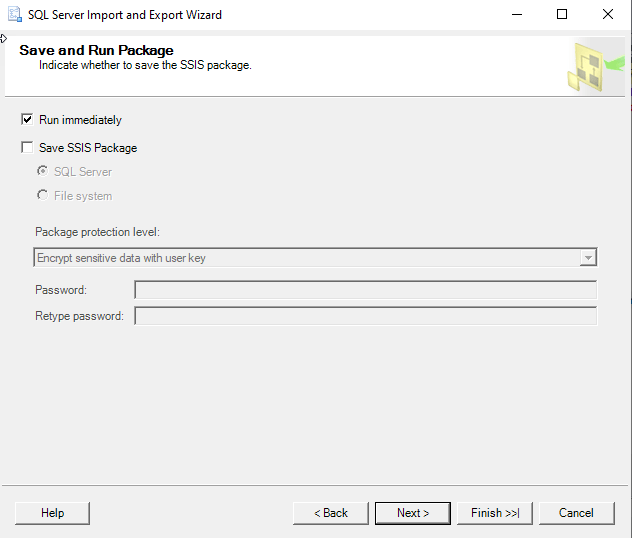
Now you can choose to Run immediately or Save an SSIS Package for later reuse.
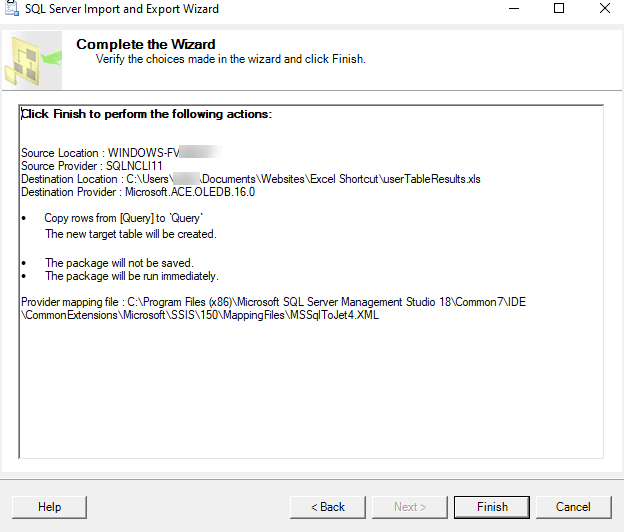
Double Check your settings and click finish.
Make sure there were no errors in the Export.
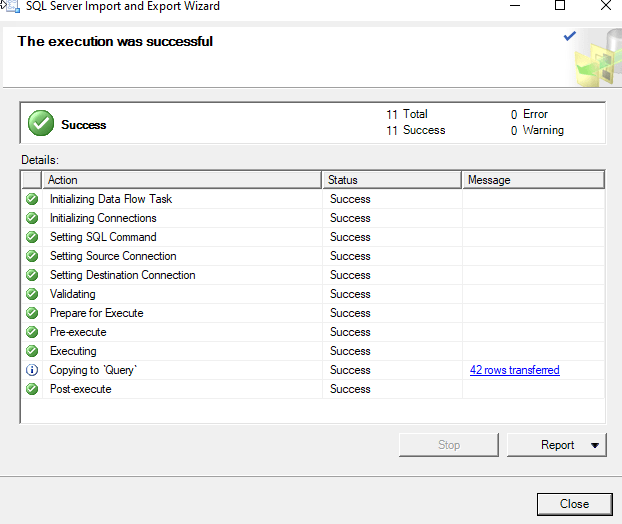
Now Go to the directory you choose earlier and make sure you have a sweet-looking Excel File at that location!
Method Number 3 – Use TSQL to send the data to an excel file
This method is the quickest once you get it set up but the configuration is the tricky part. Permissions can be a limiting factor.
Also with the script below, you have to make sure the file exists before you run the query for it to import properly.
First, create a blank excel file at the directory of your choosing.
C:SQL2019ReportsUsernames.xlsx
Then run this script below.
INSERT INTO OPENROWSET(‘Microsoft.ACE.OLEDB.12.0’,’Excel 12.0;
Database=C:SQL2019ReportsUsernames.xlsx;’,’SELECT * FROM [Sheet1$]’)
SELECT DisplayName FROM dbo.Users Where Reputation > 2000

Configuring this can be tricky and dependent on your level of permissions. Make sure you have the correct Linked Server/Provider installed (‘Microsoft.ACE.OLEDB.12.0’) And check your Database user settings to this server .

In several scenarios, we need to use some data which is available in SQL Server, but we need it in MS Excel. Instead of putting every data manually into Excel, the SQL Server provides an option to import and export data from SQL Server to Excel sheets. In this tutorial, we will learn various methods of importing and exporting data from or to SQL Server. Also, we will cover these topics.
- How to export data from SQL Server to Excel using Import and Export Wizard
- How to export data from SQL Server to Excel automatically
- How to export data from SQL Server to Excel using the query
- How to import data from SQL Server into Excel using Data Connection Wizard
- Export data from SQL Server to Excel using stored procedures
Here, for all the functionality, I have used SQL Server 2019 Express edition.
Export data from SQL Server to Excel using Import and Export Wizard
In this section, we will learn how to export data from the SQL Server database into an Excel worksheet automatically using import & export Wizard. We will be using the import and export wizard in SQL Server Management Studio.
- Below is the table that we are going to export automatically using the import and export wizard in SQL Server.

- Right-click on the database using which table is created.
- Select the Tasks option from the dropdown another dropdown will appear.
- Click on the Export Data.

- Once you have clicked on the Export Data option from the drop-down menu then Import and Export wizard window will appear.
- Click on Next to proceed in the process.

- Once you have clicked on the Next button on Import and Export wizard a new window will appear asking to Choose a Data Source
- Select SQL Server Native Client 11.0 in Data Source
- Select the instance from the dropdown for the Server name.
- For Authentication, you can use:
- Use Windows Authentication, which means the username and password of your computer. It automatically picks up from the system.
- Use SQL Server Authentication, this requests the Username and Password that was creating an instance.
- Select the database name from the dropdown and click on the Next button.

- The SQL Server Import and Export Wizard will ask for destination details. Choose Destination field as Microsoft Excel
- Give the path to the Excel file into which you want to export the data
- Select the Excel Version according to the version of the Excel that you have installed on your system and click Next.

- Now the SQL Server Import and Export Wizard will ask whether you want to copy all data from the existing tables or query-specific data. We can select Copy data from one or more tables or views to import all the table data.
- We will also explain how you can copy data that is modified by SQL query with Write a query to specify the data to transfer option
Read: How to Create a Database in SQL Server 2019 [Step by Step]
Export data from SQL Server to Excel automatically
SQL Server 2019 provides a method to export all the data from SQL server to Excel worksheet. In this section, we will demonstrate how to export SQL server data to Excel automatically using Import and Export Wizard.

- Choose the table from the Source tab which you want to export and specify the name of the table in the Destination tab and click Next

- In the next step, you can choose whether you want to save the SSIS Package or not. In this section, we will continue without saving.

- Now you will see the final overview of the operation before the execution, click on the Finish Button.

- Now data has been successfully exported from SQL Server to Excel worksheet.Click on the Close button to exit the window.

- You can check that the file is created at the specified location.

Read: How to create a table in sql server management studio
At times, it is not necessary to export all the table data. Instead, we need to export data using a query. In such situations, we can export query-specific data from SQL Server to Excel worksheet.
- After selecting the source and destination of data using SQL Import and Export Wizard, the wizard show two options. Choose the second option which says Write a query to specify the data to transfer and then click on the Next button.

- Then we need to specify the query which we want to implement. In our case we will execute a query to show the Name and Age of people whose salaries are greater than 100000. After writing the query, click Next

- Now you will see the overview of table source and destination. You can also see how the data looks after the query is implemented by clicking on the Preview button. Then click Next

- Run immediately is checked by default, click on Next button.
- Now all the configurations are complete. You can click on the Finish button to start the Wizard

- If all actions are successfully completed, your query is implemented and the data is exported. You can close this window.

- Navigate to the destination path and you can see that data is exported successfully

Read: Advanced Stored Procedure Examples in SQL Server
How to import data from SQL Server into Excel using Data Connection Wizard
We can also import data from SQL Server to Excel using the Data Connection Wizard in Excel. The benefit of using this method is that we can get live data from SQL Server.
Live data means that the changes made in the SQL Server database will be reflected into the Excel worksheet also. We will demonstrate this with the help of an example
- Open MS Excel and create a new worksheet or open an existing worksheet into which you want to import the data from SQL Server
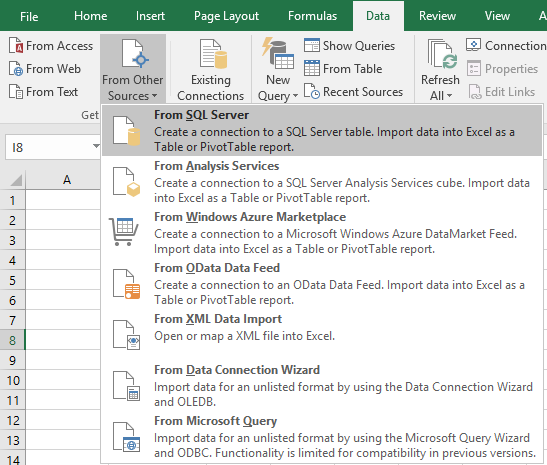
- Go to the Data tab and click on From Other Sources and then From SQL Server as shown in the image below

- Enter the name of the Server instance that you have created in the Server name field. You can use either Windows Authentication or SQL Server login credentials to make a connection with the database. After inserting the required details, click Next

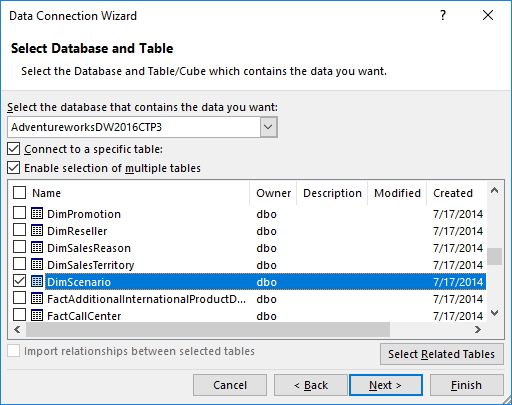
- Now select the database and the table that you want to import. You can also import data from multiple tables by checking the option Enable selection of multiple tables

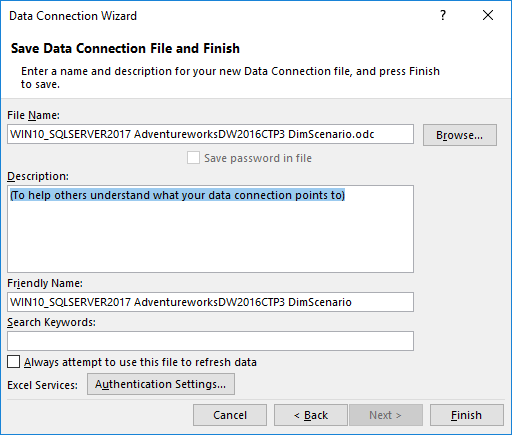
- Save the Data Connection File. Add description to it to store more information about the connection. It will help you to know the information about the connection when you will connect to the database again. Click Next

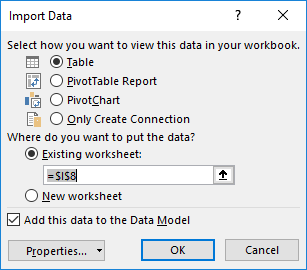
- A small window will appear where you can decide how you want to view your data in the Excel Workbook. You can import the data either in an existing worksheet or in a new worksheet. Select the desired option and then click OK

- Now you can see, your data is imported successfully from SQL Server

- As mentioned above, this type of connection is a live connection to the database. Try to change the data in SQL Server. You will see that the changes will be reflected in the Excel worksheet also. Let us see an example
- Run the following query in the SQL Query Window in SQL Studio Management
update Employees set Age =20 where [Employee ID]=1;
select * from Employees;
Here is the implementation of above mentioned code snippet.

- Changes are made in the table. Now refresh the excel worksheet where you have imported the data or open it again. You will the same changes in the imported data

In this tutorial, we have learned how to import data from SQL Server into MS Excel using Import and Export wizard in different ways. Also, we have covered these topics.
Export data from SQL Server to Excel using stored procedures
- There is a method in SQL Server called OPENROWSET method which is used to export data from SQL Server to Excel
- OPENROWSET method has some requirements that need to be fulfilled before we can use this method
- Administrator permissions to SQL Server Management Studio
- enable “Show Advanced Options”
- enable “Ad Hoc Distributed Queries”
- Run SQL Server Management Studio as Administrator
- Write the query following query to enable these options
EXEC sp_configure 'show advanced options', 1;
RECONFIGURE;
GO
EXEC sp_configure 'Ad Hoc Distributed Queries',1;
RECONFIGURE;
GO
- Give permissions to the Microsoft.ACE.OLEDB.12.0 driver by excecuting the following command
EXEC sp_MSset_oledb_prop N'Microsoft.ACE.OLEDB.12.0', N'AllowInProcess', 1
EXEC sp_MSset_oledb_prop N'Microsoft.ACE.OLEDB.12.0', N'DynamicParameters', 1- After successfully running the above commands, you have to create an Excel sheet with the same fields which are there in the database table

- Now you can write the query to export data from SQL Server to Excel
INSERT INTO OPENROWSET('Microsoft.ACE.OLEDB.12.0','Excel 12.0;
Database=C:UsersBladesDesktopexported_data.xls;','SELECT * FROM [Sheet1$]')
Select * from Employees;- Remember to set the Database path, Excel file name, Excel worksheet name and database name in the above query
- You may encounter the following error while executing the query
- This error states that the SQL Server is running on 64-bit architecture but Microsoft Access Database Engine only has 32-bit drivers installed

This means you have to download the 64-bit Access Database Engine
You can download the 64-bit version of Access Database Engine from the specified link
Install Access Database Engine and this will install the 64-bit version of Microsoft.ACE.OLEDB.12.0 driver.
Now run the query again
INSERT INTO OPENROWSET('Microsoft.ACE.OLEDB.12.0','Excel 12.0;
Database=C:UsersBladesDesktopexported_data.xls;','SELECT * FROM [Sheet1$]')
Select * from Employees;- Now you can see, the query is run successfully

- You can open the Excel file and see if the data is exported

- You can use this OPENROWSET method in your own stored procedure and export data from SQL Server to Excel.
You may like the following sql server articles:
- SQL Server Substring Function
- SQL Server Replace Function + Examples
- SQL Server Convert String to Date
In this tutorial, we learned about the various methods of exporting the data from SQL Server to Excel. We solved some encountered errors also.
- How to export data from SQL Server to Excel using Import and Export Wizard
- How to export data from SQL Server to Excel automatically
- How to export data from SQL Server to Excel using the query
- How to import data from SQL Server into Excel using Data Connection Wizard
- Export data from SQL Server to Excel using stored procedures
I am Bijay having more than 15 years of experience in the Software Industry. During this time, I have worked on MariaDB and used it in a lot of projects. Most of our readers are from the United States, Canada, United Kingdom, Australia, New Zealand, etc.
Want to learn MariaDB? Check out all the articles and tutorials that I wrote on MariaDB. Also, I am a Microsoft MVP.
There are several ways to Export/Import SQL Server data to an Excel file. In this article, a couple of ways to import and export SQL Server data to an Excel file will be explained:
- Export SQL Server data to an Excel file using
- the SQL Server Import and Export Wizard
- T-SQL code
- Export to Excel from ApexSQL Complete
- Import SQL Server data into Excel using the Data Connection Wizard
In SQL Server Management Studio (SSMS), there is a feature that provides for exporting data from one data source to another data source; in this case, data from SQL Server will be copied to an Excel file trough Export Wizard.
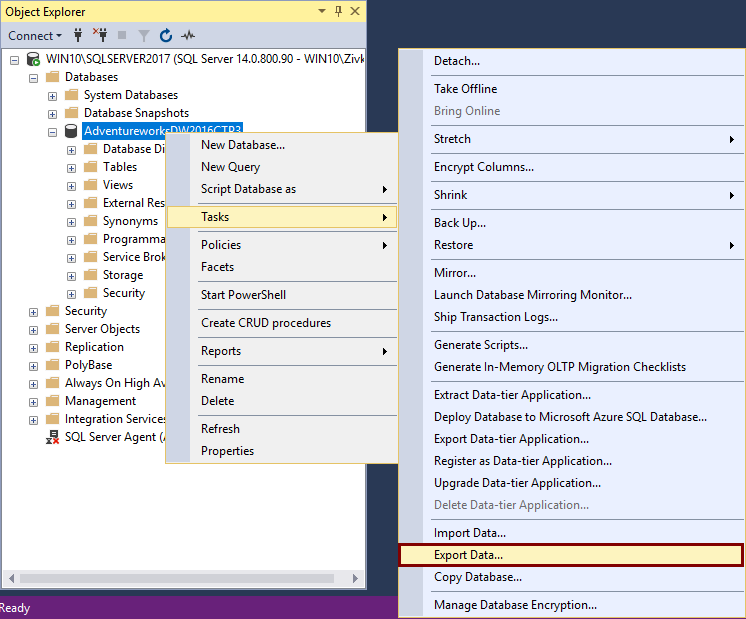
To start to use this feature, go to Object Explorer, right click on any database (e.g. AdventureworksDW2016CTP3), under the Tasks, choose Export Data command:
This will open the SQL Server Import and Export Wizard window:
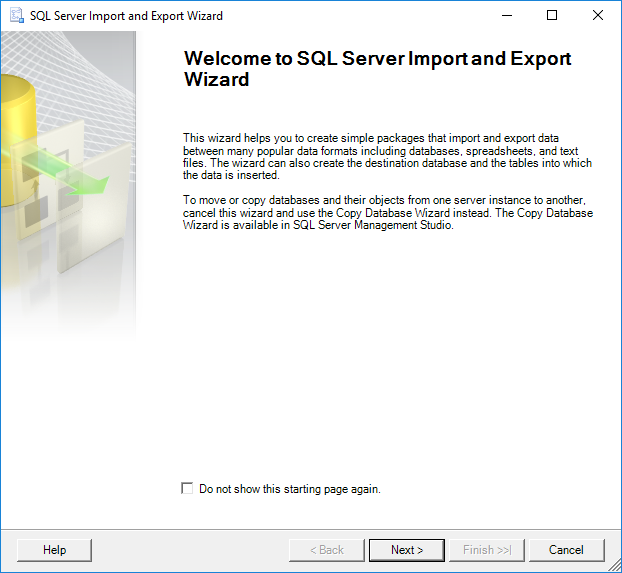
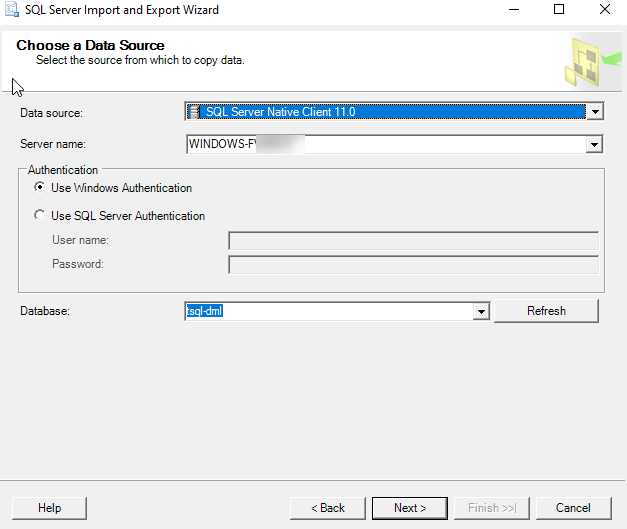
To proceed with exporting SQL Server data to an Excel file, click the Next button. This will open the Choose a Data Source window. On this window, a source from which you want to copy data can be chosen:
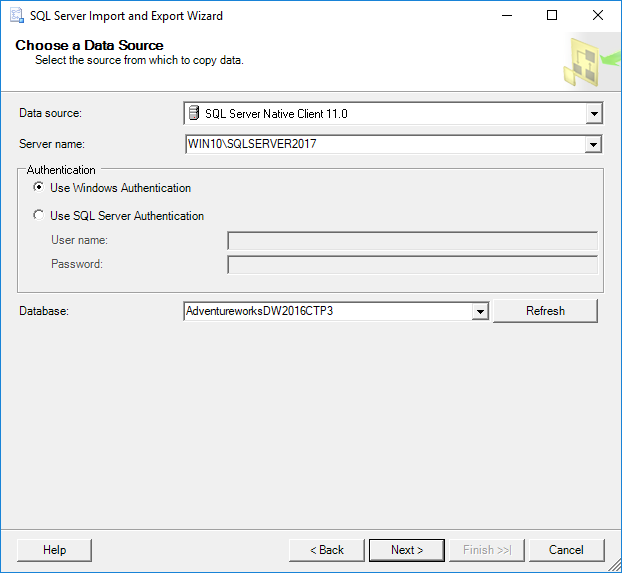
From the Data source drop down box, choose the SQL Server Native Client 11.0 item. Under the Server name drop down box, choose the SQL Server instance from which data need to be copied. In the Authentication section, choose the authentication mode for the data source connection and under the Database drop down box, choose the database from which the data will be copied. After all these options are set, click the Next button to proceed.
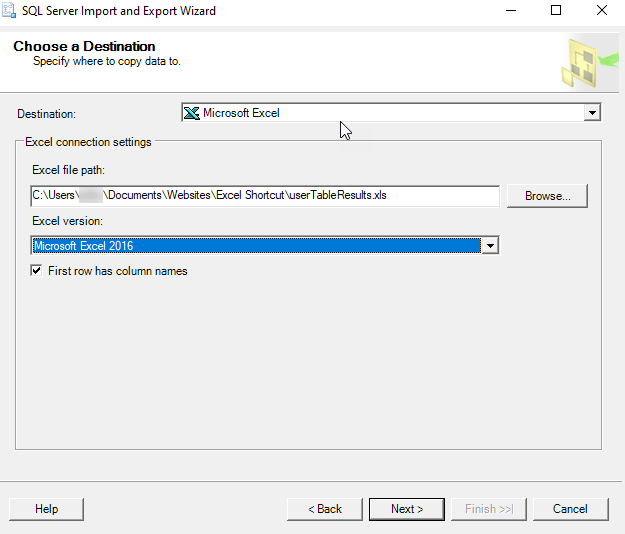
This will open the Choose a Destination window in which can be specified where to copy data from the data source:

In the Destination drop down box, choose the Microsoft Excel item. Under the Excel file path, choose the destination for copied data from SQL Server data source (SQL Data.xlsx). In the Excel version drop down box, choose the version of the Microsoft Excel worksheet. After these are all set, press the Next button to continue. But after pressing the Next button, the following warning message may appear:
The operation could not be completed.
ADDITIONAL INFORMATION:
The ‘Microsoft.ACE.OLEDB.12.0’ provider is not registered on the local machine. (System.Data)
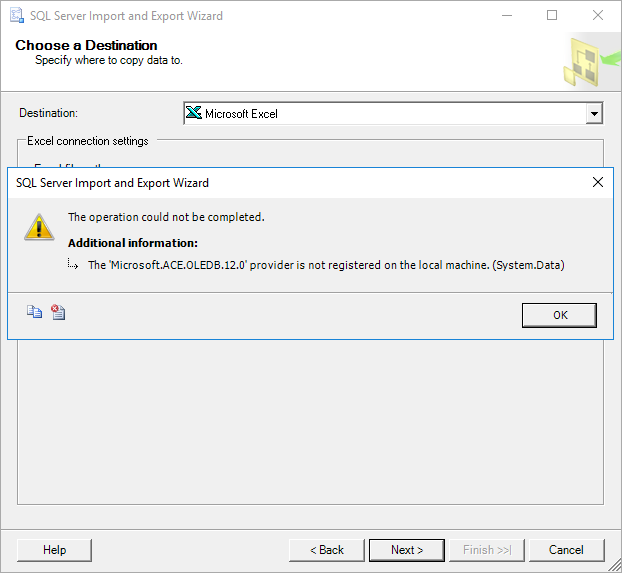
This happens because SSMS is a 32-bit application and when you launch the Export Wizard via SSMS, it launches a 32-bit version of Export Wizard. On the other hand, the machine (Operating system) on which SSMS is installed is a 64-bit version and the installed SQL Server is a 64-bit version.
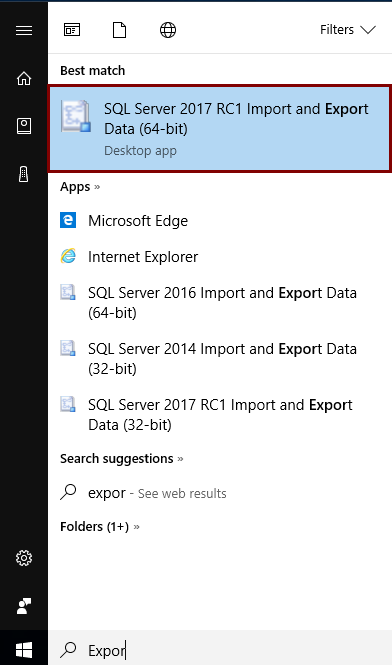
To solve this problem, close SSMS, go to the Start menu and find the 64-bit version of SQL Server Import and Export Data:
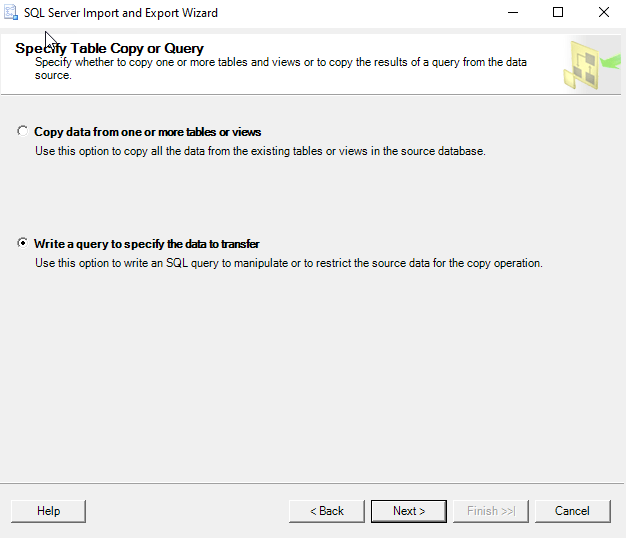
After launching this SQL Server Import and Export Wizard, it will be prompted with the same window that is used via SSMS. After setting all previous options, click the Next button. The Specify Table Copy or Query window will appear:
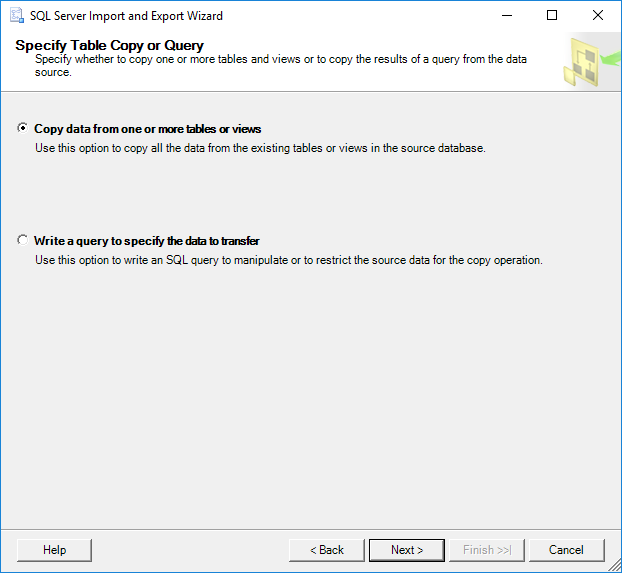
On this window, whether to copy data from one or more tables and views or to copy the results of a query can be specified.
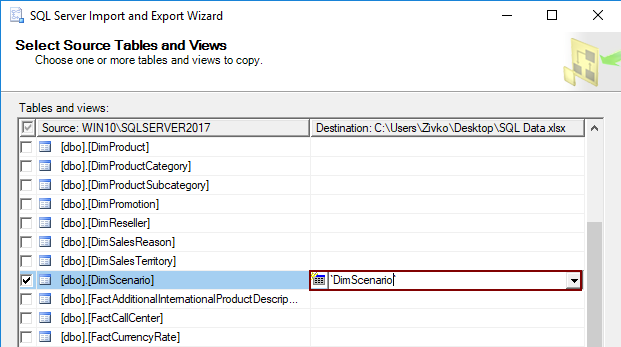
Select the Copy data from one or more tables or views radio button and click the Next button. The Select Source Table and Views window allows choosing one or more tables and views from which you want to export SQL Server data to an Excel file by clicking the check box next to the name of the table/view:
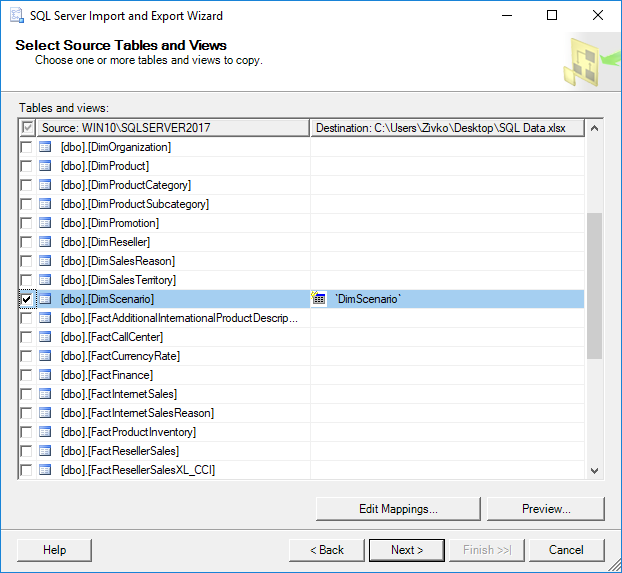
As it may be noticed, as soon as the check box next to a table/view is checked, the name of the table/view will be copied under the Destination column. This name represents the name of the sheet where the data from the table will be put, this name can be changed to whatever you like, but for now, it will be left as it is:
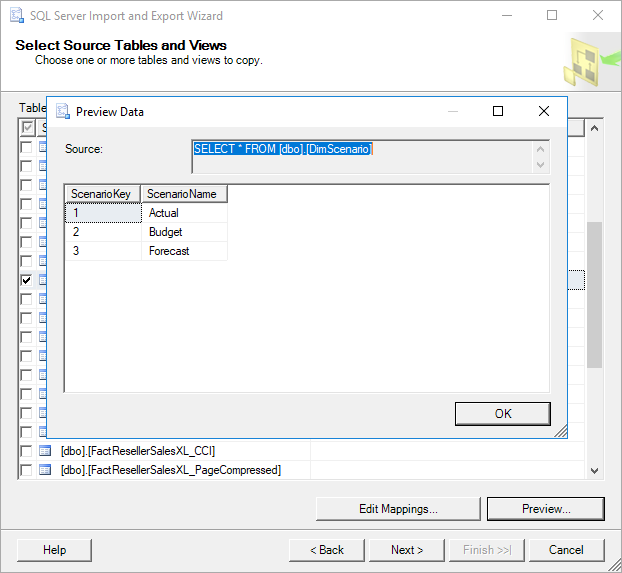
To preview which data will be generated to an Excel file, click the Preview button:
After choosing which tables/views data will be copied to an Excel file, click the Next button:
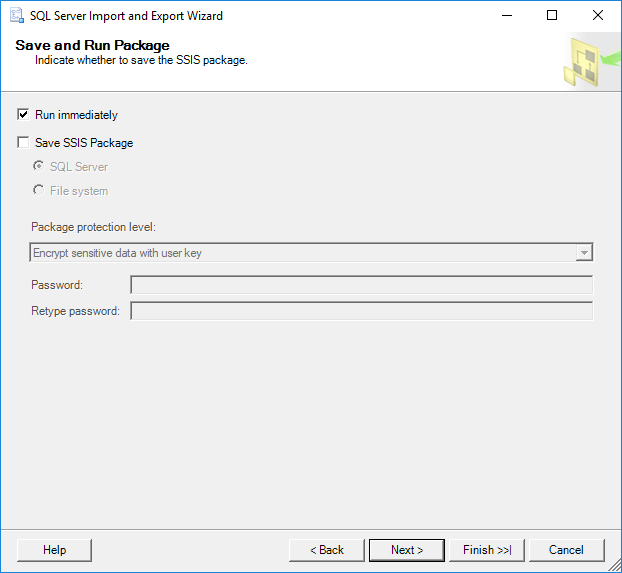
On the Save as Run Package window, check the Run immediately check box and click the Next button:
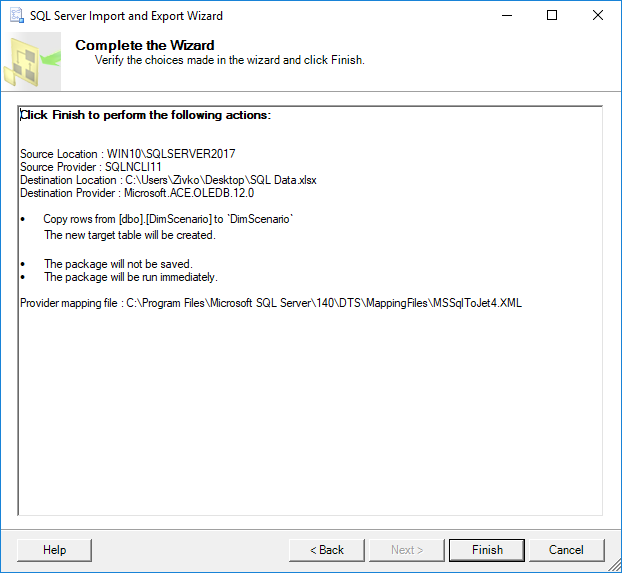
The Complete the Wizard window shows all options that are chosen for exporting operations. To finalize the process of export SQL Server data to an Excel file, click the Finish button. The last SQL Server Import and Export Wizard window shows the state of the data have been successfully exported or some errors occurred during exporting data:
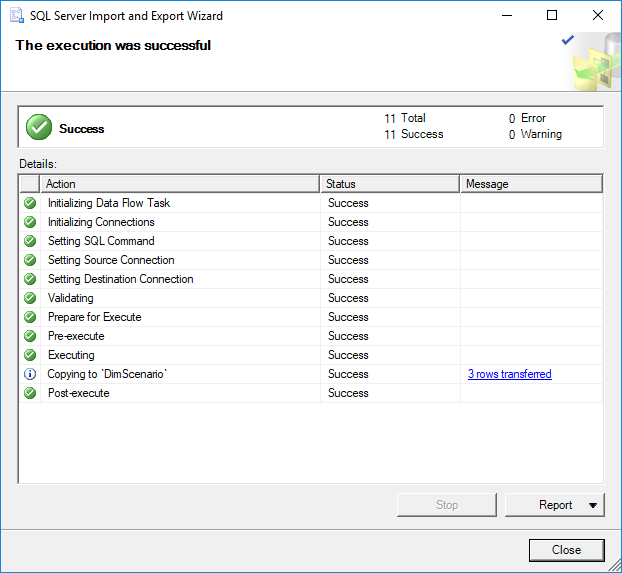
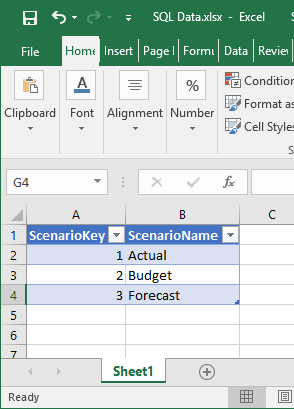
In our case, the data were successfully generated into the SQL Data.xlsx file in the DimScenario sheet:
Export SQL Server data to an Excel file using T-SQL code
The Transact-SQL OPENROWSET can be used to export SQL Server data to an Excel file via SSMS. In a query editor type and execute the following code:
INSERT INTO OPENROWSET('Microsoft.ACE.OLEDB.12.0','Excel 12.0;
Database=C:UsersZivkoDesktopSQL Data.xlsx;','SELECT * FROM [Sheet1$]')
SELECT * FROM dbo.DimScenario
But, when executing the above code, the following error may occur:
Msg 15281, Level 16, State 1, Line 1
SQL Server blocked access to STATEMENT ‘OpenRowset/OpenDatasource’ of component ‘Ad Hoc Distributed Queries’ because this component is turned off as part of the security configuration for this server. A system administrator can enable the use of ‘Ad Hoc Distributed Queries’ by using sp_configure. For more information about enabling ‘Ad Hoc Distributed Queries’, search for ‘Ad Hoc Distributed Queries’ in SQL Server Books Online.
To resolve this error the Ad Hoc Distributed Queries option should be enabled This can be done by using the sp_configure procedure and executing the following SQL code in a query editor:
EXEC sp_configure 'show advanced options', 1
RECONFIGURE
EXEC sp_configure 'Ad Hoc Distributed Queries', 1
RECONFIGURE
After executing the above code, the following message will appear that indicate that the show advanced options and Ad Hoc Distributed Queries options are enabled:
Configuration option ‘show advanced options’ changed from 0 to 1. Run the RECONFIGURE statement to install.
Configuration option ‘Ad Hoc Distributed Queries’ changed from 0 to 1. Run the RECONFIGURE statement to install.
Now, when again the code is executed:
INSERT INTO OPENROWSET('Microsoft.ACE.OLEDB.12.0','Excel 12.0;
Database=C:UsersZivkoDesktopSQL Data.xlsx;','SELECT * FROM [Sheet1$]')
SELECT * FROM dbo.DimScenario
The following error may appear:
OLE DB provider “Microsoft.ACE.OLEDB.12.0” for linked server “(null)” returned message “The Microsoft Access database engine cannot open or write to the file ”. It is already opened exclusively by another user, or you need permission to view and write its data.”.
Msg 7303, Level 16, State 1, Line 1
Cannot initialize the data source object of OLE DB provider “Microsoft.ACE.OLEDB.12.0” for linked server “(null)
This usually happens because of inadequate permissions.
More about how to resolving these issues can be found in the How to query Excel data using SQL Server linked servers page.
One way for resolving this issue is to open SSMS as an administrator and execute the code again. But this time, another error may appear:
Msg 213, Level 16, State 1, Line 1
Column name or number of supplied values does not match table definition.
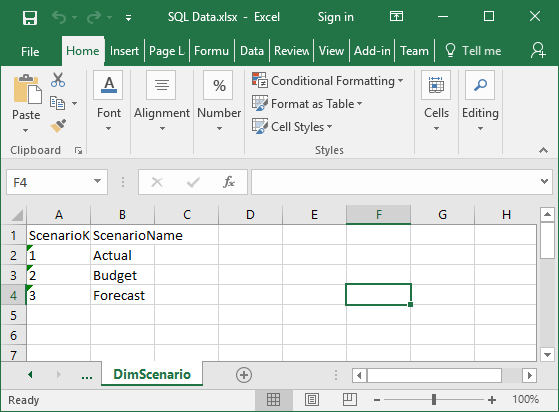
To resolved this, open excel file (e.g. SQL Data.xlsx) for which is planned to store the data from SQL Server table (e.g. dbo.DimScenario) and enter the column names which will represent the column names from the DimScenario table:
Close the SQL Data.xlsx file and once again execute the code:
Now, the following message will appear:
(3 rows affected)
Finally, the data from the SQL Server table are copied into the Excel file:
Import SQL Server data into Excel using the Data Connection Wizard dialog
Another way to copy data from SQL Server table to an Excel file is to use the Data Connection Wizard dialog from Excel.
In order to achieve that, open an Excel file (e.g. SQL Data.xlsx) in which you want to import data. In the Data tab, under the From Other Source sub-menu, choose the From SQL Server command:
This will open the Data Connection Wizard dialog. In the Server name, enter a name of the SQL Server instance from which data need to be copied. In the Log on credentials section, choose the authentication mode for the data source connection and click the Next button:

From the Select the database that contains the data you want drop down box, choose the database from which the data will be copied. In the grid, all available tables and views will be listed. Choose a desired table / view (e.g. DimScenario) and click the Next button to proceed.
On this window, leave everything as it is and press the Finish button:
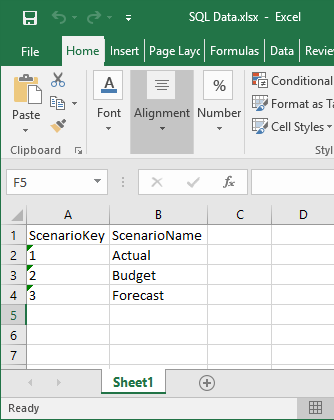
In the Import Data dialog, choose the Table radio button, under the Where do you want to put the data? section, choose the Existing worksheet radio button and press the OK button:
After pressing the OK button, the data from the DimScenario table will be copied to the SQL Data.xslx file:
Export SQL Server data to an Excel file using Export to Excel from ApexSQL Complete
Using the Export to Excel feature from ApexSQL Complete, add-in for SSMS and Visual Studio, exporting data from the SQL Server table to an Excel file can be done by one click.
In a query editor, type and execute the following code:
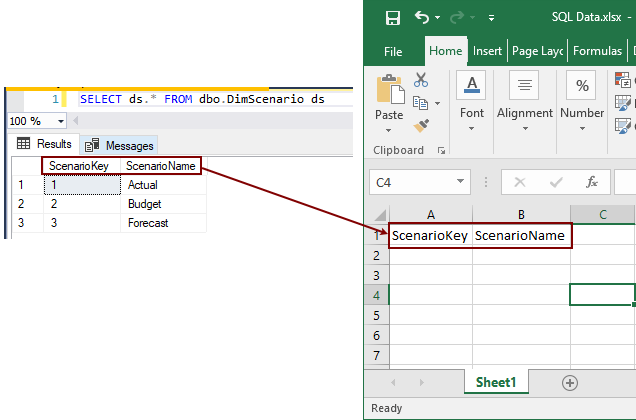
SELECT * FROM dbo.DimScenario ds
From the Results grid, select data that you want to export to an Excel file, right click in the Result grid and, from the context menu, choose the Export to Excel option:
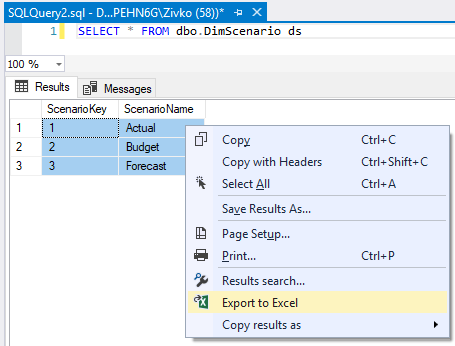
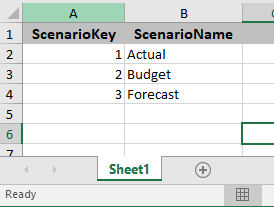
This will open a new Excel workbook and the selected data from the Results grid will be copied in the first worksheet:
More about exporting to Excel via ApexSQL Complete can be found on the Export to Excel page.
See also:
- Tutorial: Import Data into Excel, and Create a Data Model
- Get started with this simple example of the Import and Export Wizard
- How to query Excel data using SQL Server linked servers
- Export to Excel
September 11, 2017
Мало пользователей, да и начинающих программистов, которые знают о возможности Excel подключаться к внешним источникам, и в частности к SQL серверу, для загрузки данных из этих источников. Эта возможность достаточно полезна, поэтому сегодня мы займемся ее рассмотрением.
Функционал Excel получения данных из внешних источников значительно упростит выгрузку данных с SQL сервера, так как Вам не придется просить об этом программиста, к тому же данные попадают сразу в Excel. Для этого достаточно один раз настроить подключение и в случае необходимости получать данные в Excel из любых таблиц и представлений Views, из базы настроенной в источнике, естественно таких источников может быть много, например, если у Вас несколько баз данных.
И для того чтобы более понятно рассмотреть данную возможность, мы это будем делать как обычно на примере. Другими словами допустим, что нам надо выгрузить данные, одной таблицы, из базы SQL сервера, средствами Excel, т.е. без помощи вспомогательных инструментов, таких как Management Studio SQL сервера.
Примечание! Все действия мы будем делать, используя Excel 2010. SQL сервер у нас будет MS Sql 2008.
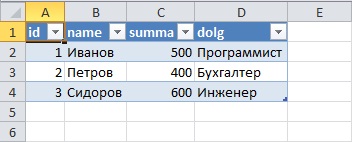
И для начала разберем исходные данные, допустим, есть база test, а в ней таблица test_table, данные которой нам нужно получить, для примера будут следующими:
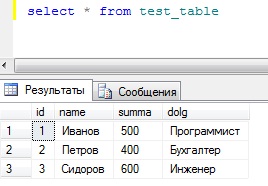
Эти данные располагаются в таблице test_table базы test, их я получил с помощью простого SQL запроса select, который я выполнил в окне запросов Management Studio. И если Вы программист SQL сервера, то Вы можете выгрузить эти данные в Excel путем простого копирования (данные не большие), или используя средство импорта и экспорта MS Sql 2008. Но сейчас речь идет о том, чтобы простые пользователи могли выгружать эти данные.
Заметка! Если Вас интересует SQL и T-SQL, рекомендую посмотреть мои видеокурсы по T-SQL, с помощью которых Вы «с нуля» научитесь работать с SQL и программировать с использованием языка T-SQL в Microsoft SQL Server.
Настройка Excel для получения данных с SQL сервера
Настройка, делается достаточно просто, но требует определенных навыков и консультации администратора SQL сервера. Вы, конечно, можете попросить программиста настроить Excel на работу или сделать это сами, просто спросив пару пунктов, а каких мы сейчас узнаем.
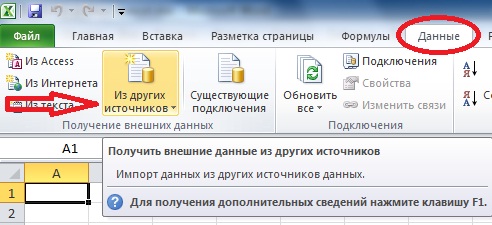
И первое что нам нужно сделать, это конечно открыть Excel 2010. Затем перейти на вкладку «Данные» и нажать на кнопку «Из других источников» и выбрать «С сервера SQL Server»
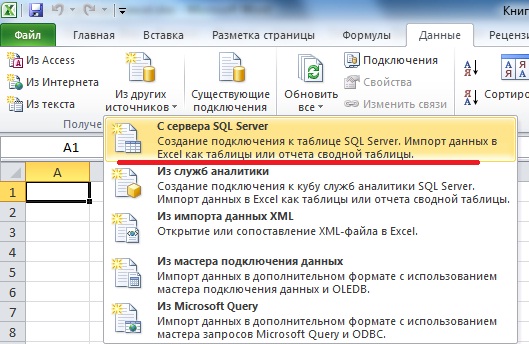
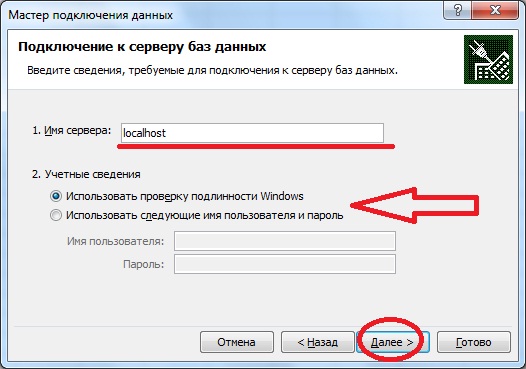
Затем у Вас откроется окно «Мастер подключения данных» в котором Вам необходимо, указать на каком сервере располагается база данных и вариант проверки подлинности. Вот именно это Вам придется узнать у администратора баз данных, а если Вы и есть администратор, то заполняйте поля и жмите «Далее».

Где,
- Имя сервера – это адрес Вашего сервера, здесь можно указывать как ip адрес так и DNS имя, в моем случае сервер расположен на этом же компьютере поэтому я и указал localhost;
- Учетные данные – т.е. это логин и пароль подключения к серверу, здесь возможно два варианта, первый это когда в сети Вашей организации развернута Active directory (Служба каталогов или домен), то в этом случае можно указать, что использовать те данные, под которыми Вы загрузили компьютер, т.е. доступы доменной учетки, и в этом случае никаких паролей здесь вводить не надо, единственное замечание что и на MSSql сервере должна стоять такая настройка по проверки подлинности. У меня именно так и настроено, поэтому я и выбрал этот пункт. А второй вариант, это когда администратор сам заводит учетные данные на SQL сервере и выдает их Вам, и в этом случае он должен их Вам предоставить.
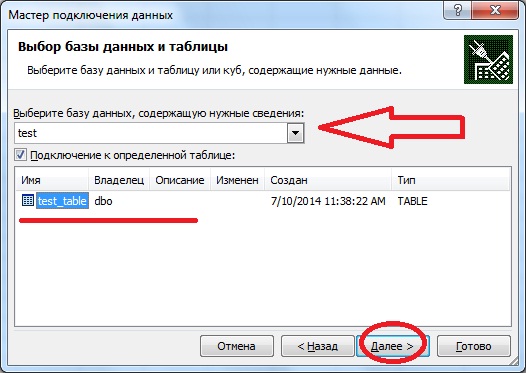
Далее необходимо выбрать базу, к которой подключаться, в нашем примере это база test. Также это подключение можно настроить сразу на работу с определенной таблицей или представлением, список таблиц и представлений у Вас будет отображен, давайте мы сделаем именно так и настроем подключение сразу на нашу таблицу test_table. Если Вы не хотите этого, а хотите чтобы Вы подключались к базе и потом выбирали нужную таблицу, то не ставьте галочку напротив пункта «Подключаться к определенной таблице», а как я уже сказал, мы поставим эту галочку и жмем «Далее».
В следующем окне нам предложат задать имя файла подключения, название и описание, я например, написал вот так:

После того как Вы нажмете «Готово» у Вас откроется окно импорта этих данных, где можно указать в какие ячейки копировать данные, я например, по стандарту выгружу данные, начиная с первой ячейки, и жмем «ОК»:

В итоге у меня загрузятся из базы вот такие данные:
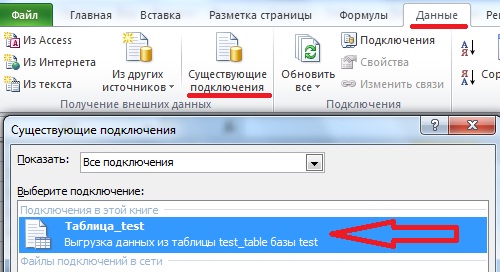
Т.е. в точности как в базе. Теперь когда, например, изменились данные в этой таблице, и Вы хотите выгрузить их повторно Вам не нужно повторять все заново, достаточно в excel перейти на вкладку «Данные» нажать кнопку «Существующие подключения» и выбрать соответствующее, т.е. то которое Вы только что создали.
Вот собственно и все, как мне кажется все достаточно просто.
Таким способом получать данные в Excel из базы SQL сервера очень удобно и главное быстро, надеюсь, Вам пригодятся эти знания полученные в сегодняшнем уроке. Удачи!