
In this tutorial, you’ll learn how to save your Pandas DataFrame or DataFrames to Excel files. Being able to save data to this ubiquitous data format is an important skill in many organizations. In this tutorial, you’ll learn how to save a simple DataFrame to Excel, but also how to customize your options to create the report you want!
By the end of this tutorial, you’ll have learned:
- How to save a Pandas DataFrame to Excel
- How to customize the sheet name of your DataFrame in Excel
- How to customize the index and column names when writing to Excel
- How to write multiple DataFrames to Excel in Pandas
- Whether to merge cells or freeze panes when writing to Excel in Pandas
- How to format missing values and infinity values when writing Pandas to Excel
Let’s get started!
The Quick Answer: Use Pandas to_excel
To write a Pandas DataFrame to an Excel file, you can apply the .to_excel() method to the DataFrame, as shown below:
# Saving a Pandas DataFrame to an Excel File
# Without a Sheet Name
df.to_excel(file_name)

# With a Sheet Name
df.to_excel(file_name, sheet_name='My Sheet')

# Without an Index
df.to_excel(file_name, index=False)
Understanding the Pandas to_excel Function
Before diving into any specifics, let’s take a look at the different parameters that the method offers. The method provides a ton of different options, allowing you to customize the output of your DataFrame in many different ways. Let’s take a look:
# The many parameters of the .to_excel() function
df.to_excel(excel_writer, sheet_name='Sheet1', na_rep='', float_format=None, columns=None, header=True, index=True, index_label=None, startrow=0, startcol=0, engine=None, merge_cells=True, encoding=None, inf_rep='inf', verbose=True, freeze_panes=None, storage_options=None)
Let’s break down what each of these parameters does:
| Parameter | Description | Available Options |
|---|---|---|
excel_writer= |
The path of the ExcelWriter to use | path-like, file-like, or ExcelWriter object |
sheet_name= |
The name of the sheet to use | String representing name, default ‘Sheet1’ |
na_rep= |
How to represent missing data | String, default '' |
float_format= |
Allows you to pass in a format string to format floating point values | String |
columns= |
The columns to use when writing to the file | List of strings. If blank, all will be written |
header= |
Accepts either a boolean or a list of values. If a boolean, will either include the header or not. If a list of values is provided, aliases will be used for the column names. | Boolean or list of values |
index= |
Whether to include an index column or not. | Boolean |
index_label= |
Column labels to use for the index. | String or list of strings. |
startrow= |
The upper left cell to start the DataFrame on. | Integer, default 0 |
startcol= |
The upper left column to start the DataFrame on | Integer, default 0 |
engine= |
The engine to use to write. | openpyxl or xlsxwriter |
merge_cells= |
Whether to write multi-index cells or hierarchical rows as merged cells | Boolean, default True |
encoding= |
The encoding of the resulting file. | String |
inf_rep= |
How to represent infinity values (as Excel doesn’t have a representation) | String, default 'inf' |
verbose= |
Whether to display more information in the error logs. | Boolean, default True |
freeze_panes= |
Allows you to pass in a tuple of the row, column to start freezing panes on | Tuple of integers with length 2 |
storage_options= |
Extra options that allow you to save to a particular storage connection | Dictionary |
.to_excel() methodHow to Save a Pandas DataFrame to Excel
The easiest way to save a Pandas DataFrame to an Excel file is by passing a path to the .to_excel() method. This will save the DataFrame to an Excel file at that path, overwriting an Excel file if it exists already.
Let’s take a look at how this works:
# Saving a Pandas DataFrame to an Excel File
import pandas as pd
df = pd.DataFrame.from_dict(
{'A': [1, 2, 3], 'B': [4, 5, 6], 'C': [7, 8, 9]}
)
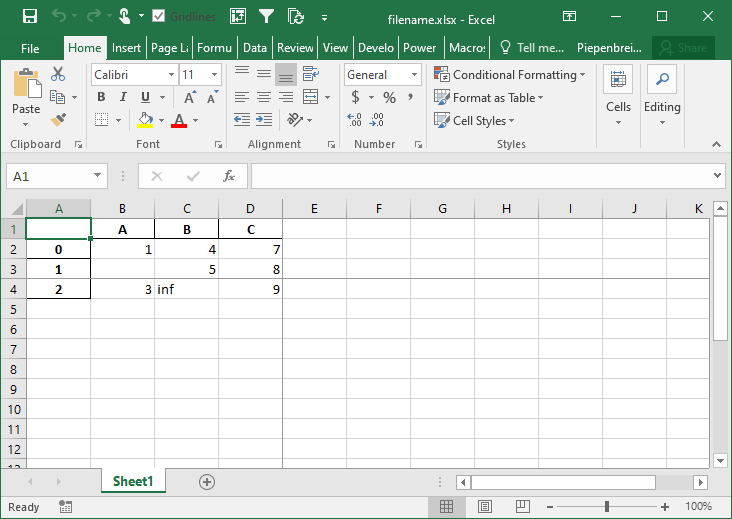
df.to_excel('filename.xlsx')Running the code as shown above will save the file with all other default parameters. This returns the following image:

You can specify a sheetname by using the sheet_name= parameter. By default, Pandas will use 'sheet1'.
# Specifying a Sheet Name When Saving to Excel
import pandas as pd
df = pd.DataFrame.from_dict(
    {'A': [1, 2, 3], 'B': [4, 5, 6], 'C': [7, 8, 9]}
)

df.to_excel('filename.xlsx', sheet_name='Your Sheet')
This returns the following workbook:
In the following section, you’ll learn how to customize whether to include an index column or not.
How to Include an Index when Saving a Pandas DataFrame to Excel
By default, Pandas will include the index when saving a Pandas Dataframe to an Excel file. This can be helpful when the index is a meaningful index (such as a date and time). However, in many cases, the index will simply represent the values from 0 through to the end of the records.
If you don’t want to include the index in your Excel file, you can use the index= parameter, as shown below:
# How to exclude the index when saving a DataFrame to Excel
import pandas as pd
df = pd.DataFrame.from_dict(
{'A': [1, 2, 3], 'B': [4, 5, 6], 'C': [7, 8, 9]}
)
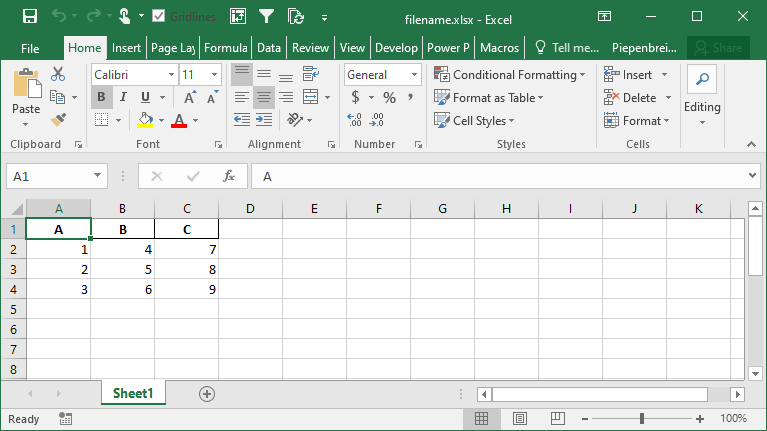
df.to_excel('filename.xlsx', index=False)This returns the following Excel file:
In the following section, you’ll learn how to rename an index when saving a Pandas DataFrame to an Excel file.
How to Rename an Index when Saving a Pandas DataFrame to Excel
By default, Pandas will not named the index of your DataFrame. This, however, can be confusing and can lead to poorer results when trying to manipulate the data in Excel, either by filtering or by pivoting the data. Because of this, it can be helpful to provide a name or names for your indices.
Pandas makes this easy by using the index_label= parameter. This parameter accepts either a single string (for a single index) or a list of strings (for a multi-index). Check out below how you can use this parameter:
# Providing a name for your Pandas index
import pandas as pd
df = pd.DataFrame.from_dict(
{'A': [1, 2, 3], 'B': [4, 5, 6], 'C': [7, 8, 9]}
)
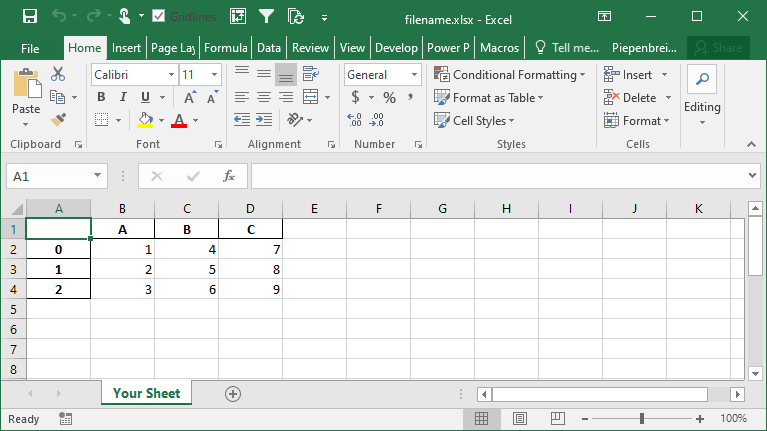
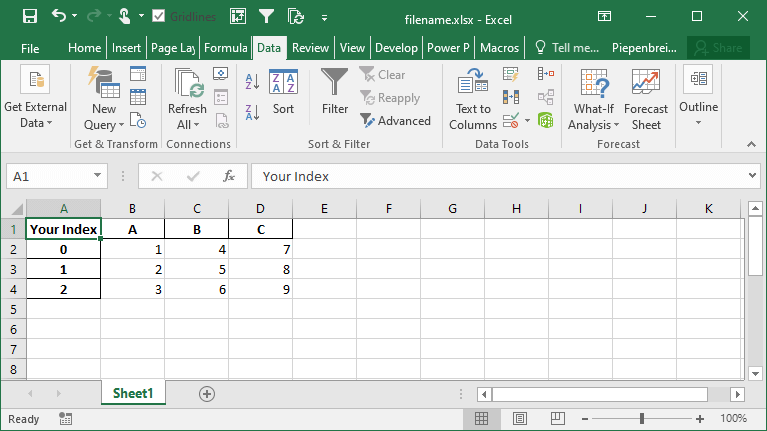
df.to_excel('filename.xlsx', index_label='Your Index')This returns the following sheet:
How to Save Multiple DataFrames to Different Sheets in Excel
One of the tasks you may encounter quite frequently is the need to save multi Pandas DataFrames to the same Excel file, but in different sheets. This is where Pandas makes it a less intuitive. If you were to simply write the following code, the second command would overwrite the first command:
# The wrong way to save multiple DataFrames to the same workbook
import pandas as pd
df = pd.DataFrame.from_dict(
    {'A': [1, 2, 3], 'B': [4, 5, 6], 'C': [7, 8, 9]}
)

df.to_excel('filename.xlsx', sheet_name='Sheet1')
df.to_excel('filename.xlsx', sheet_name='Sheet2')
Instead, we need to use a Pandas Excel Writer to manage opening and saving our workbook. This can be done easily by using a context manager, as shown below:
# The Correct Way to Save Multiple DataFrames to the Same Workbook
import pandas as pd
df = pd.DataFrame.from_dict(
    {'A': [1, 2, 3], 'B': [4, 5, 6], 'C': [7, 8, 9]}
)

with pd.ExcelWriter('filename.xlsx') as writer:
    df.to_excel(writer, sheet_name='Sheet1')
    df.to_excel(writer, sheet_name='Sheet2')
This will create multiple sheets in the same workbook. The sheets will be created in the same order as you specify them in the command above.
This returns the following workbook:

How to Save Only Some Columns when Exporting Pandas DataFrames to Excel
When saving a Pandas DataFrame to an Excel file, you may not always want to save every single column. In many cases, the Excel file will be used for reporting and it may be redundant to save every column. Because of this, you can use the columns= parameter to accomplish this.
Let’s see how we can save only a number of columns from our dataset:
# Saving Only a Subset of Columns to Excel
import pandas as pd
df = pd.DataFrame.from_dict(
{'A': [1, 2, 3], 'B': [4, 5, 6], 'C': [7, 8, 9]}
)
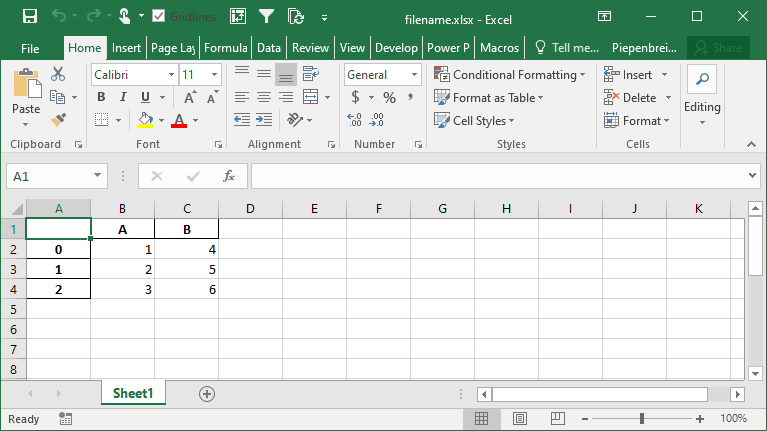
df.to_excel('filename.xlsx', columns=['A', 'B'])This returns the following Excel file:
How to Rename Columns when Exporting Pandas DataFrames to Excel
Continuing our discussion about how to handle Pandas DataFrame columns when exporting to Excel, we can also rename our columns in the saved Excel file. The benefit of this is that we can work with aliases in Pandas, which may be easier to write, but then output presentation-ready column names when saving to Excel.
We can accomplish this using the header= parameter. The parameter accepts either a boolean value of a list of values. If a boolean value is passed, you can decide whether to include or a header or not. When a list of strings is provided, then you can modify the column names in the resulting Excel file, as shown below:
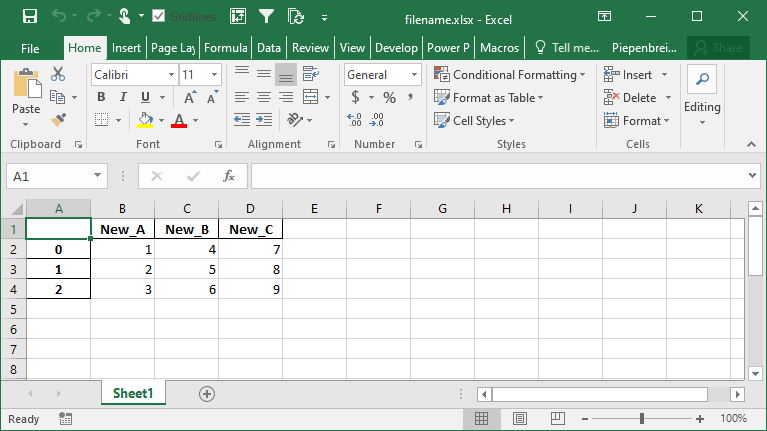
# Modifying Column Names when Exporting a Pandas DataFrame to Excel
import pandas as pd
df = pd.DataFrame.from_dict(
    {'A': [1, 2, 3], 'B': [4, 5, 6], 'C': [7, 8, 9]}
)

df.to_excel('filename.xlsx', header=['New_A', 'New_B', 'New_C'])
This returns the following Excel sheet:
How to Specify Starting Positions when Exporting a Pandas DataFrame to Excel
One of the interesting features that Pandas provides is the ability to modify the starting position of where your DataFrame will be saved on the Excel sheet. This can be helpful if you know you’ll be including different rows above your data or a logo of your company.
Let’s see how we can use the startrow= and startcol= parameters to modify this:
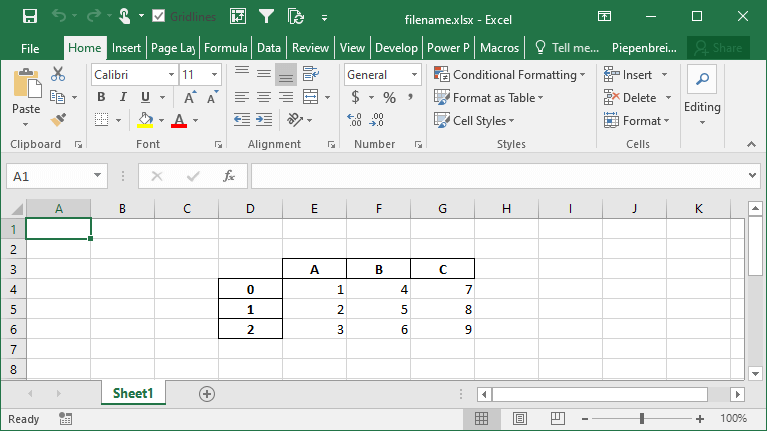
# Changing the Start Row and Column When Saving a DataFrame to an Excel File
import pandas as pd
df = pd.DataFrame.from_dict(
    {'A': [1, 2, 3], 'B': [4, 5, 6], 'C': [7, 8, 9]}
)

df.to_excel('filename.xlsx', startcol=3, startrow=2)
This returns the following worksheet:
How to Represent Missing and Infinity Values When Saving Pandas DataFrame to Excel
In this section, you’ll learn how to represent missing data and infinity values when saving a Pandas DataFrame to Excel. Because Excel doesn’t have a way to represent infinity, Pandas will default to the string 'inf' to represent any values of infinity.
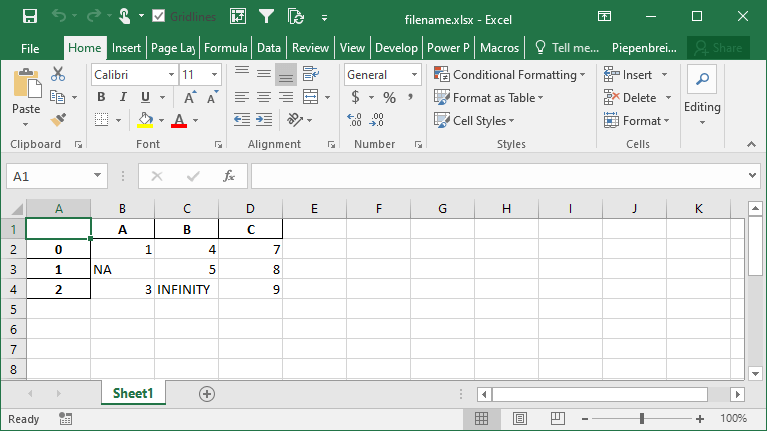
In order to modify these behaviors, we can use the na_rep= and inf_rep= parameters to modify the missing and infinity values respectively. Let’s see how we can do this by adding some of these values to our DataFrame:
# Customizing Output of Missing and Infinity Values When Saving to Excel
import pandas as pd
import numpy as np

df = pd.DataFrame.from_dict(
    {'A': [1, np.NaN, 3], 'B': [4, 5, np.inf], 'C': [7, 8, 9]}
)

df.to_excel('filename.xlsx', na_rep='NA', inf_rep='INFINITY')
This returns the following worksheet:
How to Merge Cells when Writing Multi-Index DataFrames to Excel
In this section, you’ll learn how to modify the behavior of multi-index DataFrames when saved to Excel. By default Pandas will set the merge_cells= parameter to True, meaning that the cells will be merged. Let’s see what happens when we set this behavior to False, indicating that the cells should not be merged:
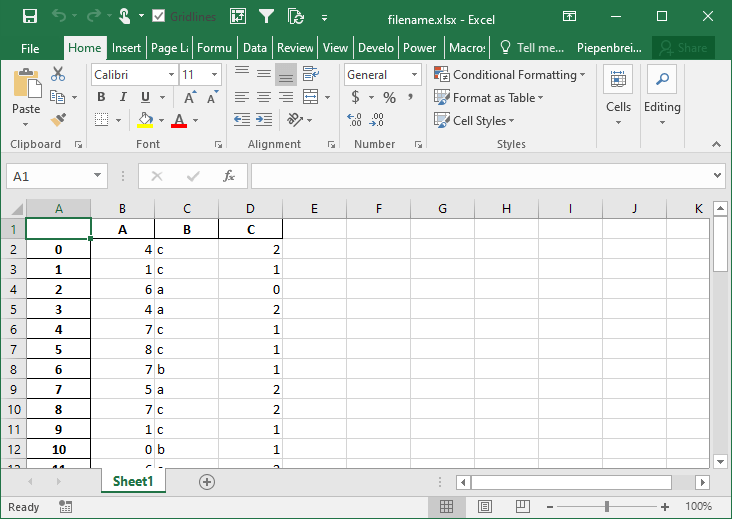
# Modifying Merge Cell Behavior for Multi-Index DataFrames
import pandas as pd
import numpy as np
from random import choice

df = pd.DataFrame.from_dict({
    'A': np.random.randint(0, 10, size=50),
    'B': [choice(['a', 'b', 'c']) for i in range(50)],
    'C': np.random.randint(0, 3, size=50)})

pivot = df.pivot_table(index=['B', 'C'], values='A')

pivot.to_excel('filename.xlsx', merge_cells=False)
This returns the Excel worksheet below:
How to Freeze Panes when Saving a Pandas DataFrame to Excel
In this final section, you’ll learn how to freeze panes in your resulting Excel worksheet. This allows you to specify the row and column at which you want Excel to freeze the panes. This can be done using the freeze_panes= parameter. The parameter accepts a tuple of integers (of length 2). The tuple represents the bottommost row and the rightmost column that is to be frozen.
Let’s see how we can use the freeze_panes= parameter to freeze our panes in Excel:
# Freezing Panes in an Excel Workbook Using Pandas
import pandas as pd
import numpy as np

df = pd.DataFrame.from_dict(
    {'A': [1, np.NaN, 3], 'B': [4, 5, np.inf], 'C': [7, 8, 9]}
)

df.to_excel('filename.xlsx', freeze_panes=(3,4))
This returns the following workbook:
Conclusion
In this tutorial, you learned how to save a Pandas DataFrame to an Excel file using the to_excel method. You first explored all of the different parameters that the function had to offer at a high level. Following that, you learned how to use these parameters to gain control over how the resulting Excel file should be saved. For example, you learned how to specify sheet names, index names, and whether to include the index or not. Then you learned how to include only some columns in the resulting file and how to rename the columns of your DataFrame. You also learned how to modify the starting position of the data and how to freeze panes.
Additional Resources
To learn more about related topics, check out the tutorials below:
- How to Use Pandas to Read Excel Files in Python
- Pandas Dataframe to CSV File – Export Using .to_csv()
- Introduction to Pandas for Data Science
- Official Documentation: Pandas to_excel
Improve Article
Save Article
Like Article
Improve Article
Save Article
Like Article
Let us see how to export a Pandas DataFrame to an Excel file.
Algorithm:
- Create the DataFrame.
- Determine the name of the Excel file.
- Call to_excel() function with the file name to export the DataFrame.
Example 1:
Python3
import pandas as pd
marks_data = pd.DataFrame({'ID': {0: 23, 1: 43, 2: 12,
3: 13, 4: 67, 5: 89,
6: 90, 7: 56, 8: 34},
'Name': {0: 'Ram', 1: 'Deep',
2: 'Yash', 3: 'Aman',
4: 'Arjun', 5: 'Aditya',
6: 'Divya', 7: 'Chalsea',
8: 'Akash' },
'Marks': {0: 89, 1: 97, 2: 45, 3: 78,
4: 56, 5: 76, 6: 100, 7: 87,
8: 81},
'Grade': {0: 'B', 1: 'A', 2: 'F', 3: 'C',
4: 'E', 5: 'C', 6: 'A', 7: 'B',
8: 'B'}})
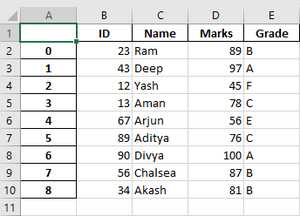
file_name = 'MarksData.xlsx'
marks_data.to_excel(file_name)
print('DataFrame is written to Excel File successfully.')
Output:
DataFrame is written to Excel File successfully.
The Excel file is:
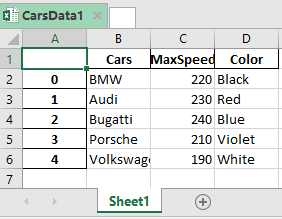
Example 2: We can also first use the ExcelWriter() method to save it.
Python3
import pandas as pd
cars_data = pd.DataFrame({'Cars': ['BMW', 'Audi', 'Bugatti',
'Porsche', 'Volkswagen'],
'MaxSpeed': [220, 230, 240, 210, 190],
'Color': ['Black', 'Red', 'Blue',
'Violet', 'White']})
datatoexcel = pd.ExcelWriter('CarsData1.xlsx')
cars_data.to_excel(datatoexcel)
datatoexcel.save()
print('DataFrame is written to Excel File successfully.')
Output:
DataFrame is written to Excel File successfully.
Like Article
Save Article
Excel files can be a great way of saving your tabular data particularly when you want to display it (and even perform some formatting to it) in a nice GUI like Microsoft Excel. In this tutorial, we’ll look at how to save a pandas dataframe to an excel .xlsx file.
Note: The terms “excel file” and “excel workbook” are used interchangeably in this tutorial.
The to_excel() function
The pandas DataFrame to_excel() function is used to save a pandas dataframe to an excel file. It’s like the to_csv() function but instead of a CSV, it writes the dataframe to a .xlsx file. The following is its syntax:
df.to_excel("pathfile_name.xlsx")
Here, df is a pandas dataframe and is written to the excel file file_name.xlsx present at the location path. By default, the dataframe is written to Sheet1 but you can also give custom sheet names. You can also write to multiple sheets in the same excel workbook as well (See the examples below).
Note that once the excel workbook is saved, you cannot write further data without rewriting the whole workbook.
Examples
First, we’ll create a sample dataframe that we’ll be using throughout this tutorial.
import pandas as pd

data = {
    'Name': ['Microsoft Corporation', 'Google, LLC', 'Tesla, Inc.',
             'Apple Inc.', 'Netflix, Inc.'],
    'Symbol': ['MSFT', 'GOOG', 'TSLA', 'AAPL', 'NFLX'],
    'Shares': [100, 50, 150, 200, 80]
}

# create dataframe from data
df = pd.DataFrame(data)
# display the dataframe
df
Now, let’s look at examples of some of the different use-cases where the to_excel() function might be useful.
1. Save dataframe to an excel file with default parameters
df.to_excel("portfolio.xlsx")
If you just pass the file name to the to_excel() function and use the default values for all the other parameters, the resulting Excel file gets saved in your current working directory with the given file name. Here’s a snapshot of the file when opened in Excel.

You can see that by default, the dataframe is saved to the sheet Sheet1. Also, note that the index of the dataframe is saved as a separate column. Pass index=False if you don’t want the index as a separate column in the excel file.
# to not include index as a column
df.to_excel("portfolio.xlsx", index=False)
Here’s how the saved excel file looks now.

2. Save dataframe to an excel file with custom sheet name
You can specify the name of the worksheet using the sheet_name parameter.
# with custom sheet name
df.to_excel("portfolio.xlsx", sheet_name="stocks")

You can see in the above snapshot that the resulting excel file has stocks as its sheet name.
3. Save to multiple sheets in the same workbook
You can also save dataframes to multiple worksheets within the same workbook using the to_excel() function. For this, you need to specify an ExcelWriter object which is a pandas object used to write to excel files. See the example below:
# write to multiple sheets
df2 = df.copy()
with pd.ExcelWriter("portfolio.xlsx") as writer:
    df.to_excel(writer, sheet_name="stocks1")
    df2.to_excel(writer, sheet_name="stocks2")
Here’s how the saved excel file looks.

In the above example, an ExcelWriter object is used to write the dataframes df and df2 to the worksheets stocks1 and stocks2 respectively.
Note that creating an ExcelWriter object with a file name that already exists will result in the contents of the existing file being erased.
For more on the pandas dataframe to_excel() function, refer to its official documentation.
You might also be interested in –
- Write a Pandas DataFrame to a JSON File
- Copy Pandas DataFrame to the Clipboard
- Save Pandas DataFrame to a CSV file
With this, we come to the end of this tutorial. The code examples and results presented in this tutorial have been implemented in a Jupyter Notebook with a python (version 3.8.3) kernel having pandas version 1.0.5
Subscribe to our newsletter for more informative guides and tutorials.
We do not spam and you can opt out any time.
-

Piyush is a data professional passionate about using data to understand things better and make informed decisions. He has experience working as a Data Scientist in the consulting domain and holds an engineering degree from IIT Roorkee. His hobbies include watching cricket, reading, and working on side projects.
View all posts

Время на прочтение
7 мин
Количество просмотров 172K
Если Вы только начинаете свой путь знакомства с возможностями Python, ваши познания еще имеют начальный уровень — этот материал для Вас. В статье мы опишем, как можно извлекать информацию из данных, представленных в Excel файлах, работать с ними используя базовый функционал библиотек. В первой части статьи мы расскажем про установку необходимых библиотек и настройку среды. Во второй части — предоставим обзор библиотек, которые могут быть использованы для загрузки и записи таблиц в файлы с помощью Python и расскажем как работать с такими библиотеками как pandas, openpyxl, xlrd, xlutils, pyexcel.
В какой-то момент вы неизбежно столкнетесь с необходимостью работы с данными Excel, и нет гарантии, что работа с таким форматами хранения данных доставит вам удовольствие. Поэтому разработчики Python реализовали удобный способ читать, редактировать и производить иные манипуляции не только с файлами Excel, но и с файлами других типов.
Отправная точка — наличие данных
ПЕРЕВОД
Оригинал статьи — www.datacamp.com/community/tutorials/python-excel-tutorial
Автор — Karlijn Willems
Когда вы начинаете проект по анализу данных, вы часто сталкиваетесь со статистикой собранной, возможно, при помощи счетчиков, возможно, при помощи выгрузок данных из систем типа Kaggle, Quandl и т. д. Но большая часть данных все-таки находится в Google или репозиториях, которыми поделились другие пользователи. Эти данные могут быть в формате Excel или в файле с .csv расширением.
Данные есть, данных много. Анализируй — не хочу. С чего начать? Первый шаг в анализе данных — их верификация. Иными словами — необходимо убедиться в качестве входящих данных.
В случае, если данные хранятся в таблице, необходимо не только подтвердить качество данных (нужно быть уверенным, что данные таблицы ответят на поставленный для исследования вопрос), но и оценить, можно ли доверять этим данным.
Проверка качества таблицы
Чтобы проверить качество таблицы, обычно используют простой чек-лист. Отвечают ли данные в таблице следующим условиям:
- данные являются статистикой;
- различные типы данных: время, вычисления, результат;
- данные полные и консистентные: структура данных в таблице — систематическая, а присутствующие формулы — работающие.
Ответы на эти простые вопросы позволят понять, не противоречит ли ваша таблица стандарту. Конечно, приведенный чек-лист не является исчерпывающим: существует много правил, на соответствие которым вы можете проверять данные в таблице, чтобы убедиться, что таблица не является “гадким утенком”. Однако, приведенный выше чек-лист наиболее актуален, если вы хотите убедиться, что таблица содержит качественные данные.
Бест-практикс табличных данных
Читать данные таблицы при помощи Python — это хорошо. Но данные хочется еще и редактировать. Причем редактирование данных в таблице, должно соответствовать следующим условиям:
- первая строка таблицы зарезервирована для заголовка, а первый столбец используется для идентификации единицы выборки;
- избегайте имен, значений или полей с пробелами. В противном случае, каждое слово будет интерпретироваться как отдельная переменная, что приведет к ошибкам, связанным с количеством элементов в строке в наборе данных. Лучше использовать подчеркивания, регистр (первая буква каждого раздела текста — заглавная) или соединительные слова;
- отдавайте предпочтение коротким названиям;
- старайтесь избегать использования названий, которые содержат символы ?, $,%, ^, &, *, (,),-,#, ?,,,<,>, /, |, , [ ,] ,{, и };
- удаляйте любые комментарии, которые вы сделали в файле, чтобы избежать дополнительных столбцов или полей со значением NA;
- убедитесь, что любые недостающие значения в наборе данных отображаются как NA.
После внесения необходимых изменений (или когда вы внимательно просмотрите свои данные), убедитесь, что внесенные изменения сохранены. Это важно, потому что позволит еще раз взглянуть на данные, при необходимости отредактировать, дополнить или внести изменения, сохраняя формулы, которые, возможно, использовались для расчета.
Если вы работаете с Microsoft Excel, вы наверняка знаете, что есть большое количество вариантов сохранения файла помимо используемых по умолчанию расширения: .xls или .xlsx (переходим на вкладку “файл”, “сохранить как” и выбираем другое расширение (наиболее часто используемые расширения для сохранения данных с целью анализа — .CSV и.ТХТ)). В зависимости от варианта сохранения поля данных будут разделены знаками табуляции или запятыми, которые составляют поле “разделитель”. Итак, данные проверены и сохранены. Начинаем готовить рабочее пространство.
Подготовка рабочего пространства
Подготовка рабочего пространства — одна из первых вещей, которую надо сделать, чтобы быть уверенным в качественном результате анализа.
Первый шаг — проверка рабочей директории.
Когда вы работаете в терминале, вы можете сначала перейти к директории, в которой находится ваш файл, а затем запустить Python. В таком случае необходимо убедиться, что файл находится в директории, из которой вы хотите работать.
Для проверки дайте следующие команды:
# Import `os`
import os

# Retrieve current working directory (`cwd`)
cwd = os.getcwd()
cwd

# Change directory
os.chdir("/path/to/your/folder")

# List all files and directories in current directory
os.listdir('.')
Эти команды важны не только для загрузки данных, но и для дальнейшего анализа. Итак, вы прошли все проверки, вы сохранили данные и подготовили рабочее пространство. Уже можно начать чтение данных в Python?  К сожалению пока нет. Нужно сделать еще одну последнюю вещь.
Установка пакетов для чтения и записи Excel файлов
Несмотря на то, что вы еще не знаете, какие библиотеки будут нужны для импорта данных, нужно убедиться, что у все готово для установки этих библиотек. Если у вас установлен Python 2> = 2.7.9 или Python 3> = 3.4, нет повода для беспокойства — обычно, в этих версиях уже все подготовлено. Поэтому просто убедитесь, что вы обновились до последней версии
Для этого запустите в своем компьютере следующую команду:
# For Linux/OS X
pip install -U pip setuptools

# For Windows
python -m pip install -U pip setuptools
В случае, если вы еще не установили pip, запустите скрипт python get-pip.py, который вы можете найти здесь (там же есть инструкции по установке и help).
Установка Anaconda
Установка дистрибутива Anaconda Python — альтернативный вариант, если вы используете Python для анализа данных. Это простой и быстрый способ начать работу с анализом данных — ведь отдельно устанавливать пакеты, необходимые для data science не придется.
Это особенно удобно для новичков, однако даже опытные разработчики часто идут этим путем, ведь Anakonda — удобный способ быстро протестировать некоторые вещи без необходимости устанавливать каждый пакет отдельно.
Anaconda включает в себя 100 наиболее популярных библиотек Python, R и Scala для анализа данных в нескольких средах разработки с открытым исходным кодом, таких как Jupyter и Spyder. Если вы хотите начать работу с Jupyter Notebook, то вам сюда.
Чтобы установить Anaconda — вам сюда.
Загрузка файлов Excel как Pandas DataFrame
Ну что ж, мы сделали все, чтобы настроить среду! Теперь самое время начать импорт файлов.
Один из способов, которым вы будете часто пользоваться для импорта файлов с целью анализа данных — импорт с помощью библиотеки Pandas (Pandas — программная библиотека на языке Python для обработки и анализа данных). Работа Pandas с данными происходит поверх библиотеки NumPy, являющейся инструментом более низкого уровня. Pandas — мощная и гибкая библиотека и она очень часто используется для структуризации данных в целях облегчения анализа.
Если у вас уже есть Pandas в Anaconda, вы можете просто загрузить файлы в Pandas DataFrames с помощью pd.Excelfile ():
# Import pandas
import pandas as pd

# Assign spreadsheet filename to `file`
file = 'example.xlsx'

# Load spreadsheet
xl = pd.ExcelFile(file)

# Print the sheet names
print(xl.sheet_names)

# Load a sheet into a DataFrame by name: df1
df1 = xl.parse('Sheet1')
Если вы не установили Anaconda, просто запустите pip install pandas, чтобы установить пакет Pandas в вашей среде, а затем выполните команды, приведенные выше.
Для чтения .csv-файлов есть аналогичная функция загрузки данных в DataFrame: read_csv (). Вот пример того, как вы можете использовать эту функцию:
# Import pandas
import pandas as pd

# Load csv
df = pd.read_csv("example.csv")
Разделителем, который эта функция будет учитывать, является по умолчанию запятая, но вы можете, если хотите, указать альтернативный разделитель. Перейдите к документации, если хотите узнать, какие другие аргументы можно указать, чтобы произвести импорт.
Как записывать Pandas DataFrame в Excel файл
Предположим, после анализа данных вы хотите записать данные в новый файл. Существует способ записать данные Pandas DataFrames (с помощью функции to_excel ). Но, прежде чем использовать эту функцию, убедитесь, что у вас установлен XlsxWriter, если вы хотите записать свои данные на несколько листов в файле .xlsx:
# Install `XlsxWriter`
pip install XlsxWriter

# Specify a writer
writer = pd.ExcelWriter('example.xlsx', engine='xlsxwriter')

# Write your DataFrame to a file
yourData.to_excel(writer, 'Sheet1')

# Save the result
writer.save()
Обратите внимание, что в фрагменте кода используется объект ExcelWriter для вывода DataFrame. Иными словами, вы передаете переменную writer в функцию to_excel (), и указываете имя листа. Таким образом, вы добавляете лист с данными в существующую книгу. Также можно использовать ExcelWriter для сохранения нескольких разных DataFrames в одной книге.
То есть если вы просто хотите сохранить один файл DataFrame в файл, вы можете обойтись без установки библиотеки XlsxWriter. Просто не указываете аргумент, который передается функции pd.ExcelWriter (), остальные шаги остаются неизменными.
Подобно функциям, которые используются для чтения в .csv-файлах, есть также функция to_csv () для записи результатов обратно в файл с разделителями-запятыми. Он работает так же, как когда мы использовали ее для чтения в файле:
# Write the DataFrame to csv
df.to_csv("example.csv")
Если вы хотите иметь отдельный файл с вкладкой, вы можете передать a t аргументу sep. Обратите внимание, что существуют различные другие функции, которые можно использовать для вывода файлов. Их можно найти здесь.
Использование виртуальной среды
Общий совет по установке библиотек — делать установку в виртуальной среде Python без системных библиотек. Вы можете использовать virtualenv для создания изолированных сред Python: он создает папку, содержащую все необходимое для использования библиотек, которые потребуются для Python.
Чтобы начать работу с virtualenv, сначала нужно его установить. Потом перейти в директорию, где будет находится проект. Создать virtualenv в этой папке и загрузить, если нужно, в определенную версию Python. После этого активируете виртуальную среду. Теперь можно начинать загрузку других библиотек и начинать работать с ними.
Не забудьте отключить среду, когда вы закончите!
# Install virtualenv
$ pip install virtualenv

# Go to the folder of your project
$ cd my_folder

# Create a virtual environment `venv`
$ virtualenv venv

# Indicate the Python interpreter to use for `venv`
$ virtualenv -p /usr/bin/python2.7 venv

# Activate `venv`
$ source venv/bin/activate

# Deactivate `venv`
$ deactivate
Обратите внимание, что виртуальная среда может показаться сначала проблематичной, если вы делаете первые шаги в области анализа данных с помощью Python. И особенно, если у вас только один проект, вы можете не понимать, зачем вообще нужна виртуальная среда.
Но что делать, если у вас несколько проектов, работающих одновременно, и вы не хотите, чтобы они использовали одну и ту же установку Python? Или если у ваших проектов есть противоречивые требования. В таких случаях виртуальная среда — идеальное решение.
Во второй части статьи мы расскажем об основных библиотеках для анализа данных.
Продолжение следует…
Write Excel with Python Pandas. You can write any data (lists, strings, numbers etc) to Excel, by first converting it into a Pandas DataFrame and then writing the DataFrame to Excel.
To export a Pandas DataFrame as an Excel file (extension: .xlsx, .xls), use the to_excel() method.
Related course: Data Analysis with Python Pandas
installxlwt, openpyxl
to_excel() uses a library called xlwt and openpyxl internally.
- xlwt is used to write .xls files (formats up to Excel2003)
- openpyxl is used to write .xlsx (Excel2007 or later formats).
Both can be installed with pip. (pip3 depending on the environment)
1 |
$ pip install xlwt |
Write Excel
Write DataFrame to Excel file
Importing openpyxl is required if you want to append it to an existing Excel file described at the end.
A dataframe is defined below:
1 |
import pandas as pd |
You can specify a path as the first argument of the to_excel() method.
Note: that the data in the original file is deleted when overwriting.
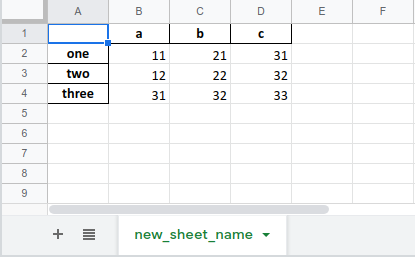
The argument new_sheet_name is the name of the sheet. If omitted, it will be named Sheet1.
1 |
df.to_excel('pandas_to_excel.xlsx', sheet_name='new_sheet_name') |
Related course: Data Analysis with Python Pandas
If you do not need to write index (row name), columns (column name), the argument index, columns is False.
1 |
df.to_excel('pandas_to_excel_no_index_header.xlsx', index=False, header=False) |
Write multiple DataFrames to Excel files
The ExcelWriter object allows you to use multiple pandas. DataFrame objects can be exported to separate sheets.
As an example, pandas. Prepare another DataFrame object.
1 |
df2 = df[['a', 'c']] |
Then use the ExcelWriter() function like this:
1 |
with pd.ExcelWriter('pandas_to_excel.xlsx') as writer: |
You don’t need to call writer.save(), writer.close() within the blocks.
Append to an existing Excel file
You can append a DataFrame to an existing Excel file. The code below opens an existing file, then adds two sheets with the data of the dataframes.
Note: Because it is processed using openpyxl, only .xlsx files are included.
1 |
path = 'pandas_to_excel.xlsx' |
Related course: Data Analysis with Python Pandas