
Last Updated on July 14, 2022 by
In the previous post, we touched on how to read an Excel file into Python. Here we’ll attempt to read multiple Excel sheets (from the same file) with Python pandas. We can do this in two ways: use pd.read_excel() method, with the optional argument sheet_name; the alternative is to create a pd.ExcelFile object, then parse data from that object.
pd.read_excel() method
In the below example:
- Select sheets to read by index:
sheet_name = [0,1,2]means the first three sheets. - Select sheets to read by name:
sheet_name = ['User_info', 'compound']. This method requires you to know the sheet names in advance. - Select all sheets: sheet_name = None.
import pandas as pd
df = pd.read_excel('users.xlsx', sheet_name = [0,1,2])
df = pd.read_excel('users.xlsx', sheet_name = ['User_info','compound'])
df = pd.read_excel('users.xlsx', sheet_name = None) # read all sheets
We will read all sheets from the sample Excel file, then use that dataframe for the examples going forward.
The df returns a dictionary of dataframes. The keys of the dictionary contain sheet names, and values of the dictionary contain sheet content.
>>> df.keys()
dict_keys(['User_info', 'purchase', 'compound', 'header_row5'])

>>> df.values()
dict_values([      User Name Country      City Gender  Age
0  Forrest Gump     USA  New York      M   50
1     Mary Jane  CANADA   Tornoto      F   30
2  Harry Porter      UK    London      M   20
3     Jean Grey   CHINA  Shanghai      F   30,

ID      Customer            purchase       Date
0  101  Forrest Gump        Dragon Ball  2020-08-12
1  102     Mary Jane          Evangelion 2020-01-01
2  103  Harry Porter        Kill la Kill 2020-08-01
3  104     Jean Grey        Dragon Ball  1999-01-01
4  105     Mary Jane          Evangelion 2019-12-31
5  106  Harry Porter  Ghost in the Shell 2020-01-01
6  107     Jean Grey          Evangelion 2018-04-01,

....
]
To obtain data from a specific sheet, simply reference the key in the dictionary. For example, df['header_row5'] returns the sheet in which data starts from row 5.
>>> df['header_row5']

   Unnamed: 0    Unnamed: 1          Unnamed: 2           Unnamed: 3
0         NaN           NaN                 NaN                  NaN
1         NaN           NaN                 NaN                  NaN
2         NaN           NaN                 NaN                  NaN
3          ID      Customer            purchase                 Date
4         101  Forrest Gump        Dragon Ball   2020-08-12 00:00:00
5         102     Mary Jane          Evangelion  2020-01-01 00:00:00
6         103  Harry Porter        Kill la Kill  2020-08-01 00:00:00
7         104     Jean Grey        Dragon Ball   1999-01-01 00:00:00
8         105     Mary Jane          Evangelion  2019-12-31 00:00:00
9         106  Harry Porter  Ghost in the Shell  2020-01-01 00:00:00
10        107     Jean Grey          Evangelion  2018-04-01 00:00:00
pd.ExcelFile()
With this approach, we create a pd.ExcelFile object to represent the Excel file. We do not need to specify which sheets to read when using this method. Note that the previous read_excel() method returns a dataframe or a dictionary of dataframes; whereas pd.ExcelFile() returns a reference object to the Excel file.
f = pd.ExcelFile('users.xlsx')

>>> f
<pandas.io.excel._base.ExcelFile object at 0x00000138DAE66670>
To get sheet names, we can all the sheet_names attribute from the ExcelFile object, which returns a list of the sheet names (string).
>>> f.sheet_names
['User_info', 'purchase', 'compound', 'header_row5']
To get data from a sheet, we can use the parse() method, and provide the sheet name.
>>> f.parse(sheet_name = 'User_info')
      User Name Country      City Gender  Age
0  Forrest Gump     USA  New York      M   50
1     Mary Jane  CANADA   Tornoto      F   30
2  Harry Porter      UK    London      M   20
3     Jean Grey   CHINA  Shanghai      F   30
One thing to note is that the pd.ExcelFile.parse() method is equivalent to the pd.read_excel() method, so that means you can pass in the same arguments used in read_excel().
Moving on…
We have learned how to read data from Excel or CSV files, next we’ll cover how to save a dataframe back into an Excel (or CSV) file.
Microsoft Excel is one of the most powerful spreadsheet software applications in the world, and it has become critical in all business processes. Companies across the world, both big and small, are using Microsoft Excel to store, organize, analyze, and visualize data.
As a data professional, when you combine Python with Excel, you create a unique data analysis bundle that unlocks the value of the enterprise data.
In this tutorial, we’re going to learn how to read and work with Excel files in Python.
After you finish this tutorial, you’ll understand the following:
- Loading Excel spreadsheets into pandas DataFrames
- Working with an Excel workbook with multiple spreadsheets
- Combining multiple spreadsheets
- Reading Excel files using the
xlrdpackage
In this tutorial, we assume you know the fundamentals of pandas DataFrames. If you aren’t familiar with the pandas library, you might like to try our Pandas and NumPy Fundamentals – Dataquest.
Let’s dive in.
Reading Spreadsheets with Pandas
Technically, multiple packages allow us to work with Excel files in Python. However, in this tutorial, we’ll use pandas and xlrd libraries to interact with Excel workbooks. Essentially, you can think of a pandas DataFrame as a spreadsheet with rows and columns stored in Series objects. Traversability of Series as iterable objects allows us to grab specific data easily. Once we load an Excel workbook into a pandas DataFrame, we can perform any kind of data analysis on the data.
Before we proceed to the next step, let’s first download the following spreadsheet:
Sales Data Excel Workbook — xlsx ver.
The Excel workbook consists of two sheets that contain stationery sales data for 2020 and 2021.
NOTE
Although Excel spreadsheets can contain formula and also support formatting, pandas only imports Excel spreadsheets as flat files, and it doesn’t support spreadsheet formatting.
To import the Excel spreadsheet into a pandas DataFrame, first, we need to import the pandas package and then use the read_excel() method:
import pandas as pd
df = pd.read_excel('sales_data.xlsx')
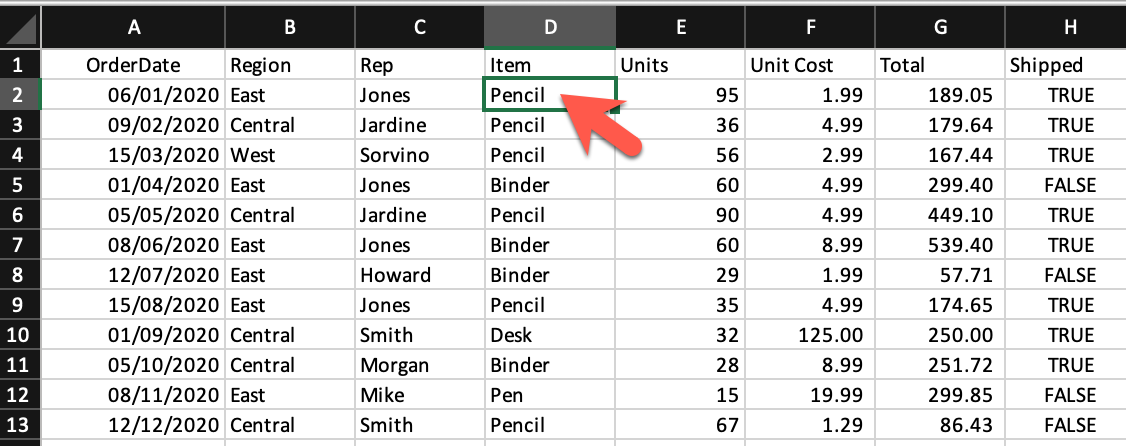
display(df)| OrderDate | Region | Rep | Item | Units | Unit Cost | Total | Shipped | |
|---|---|---|---|---|---|---|---|---|
| 0 | 2020-01-06 | East | Jones | Pencil | 95 | 1.99 | 189.05 | True |
| 1 | 2020-02-09 | Central | Jardine | Pencil | 36 | 4.99 | 179.64 | True |
| 2 | 2020-03-15 | West | Sorvino | Pencil | 56 | 2.99 | 167.44 | True |
| 3 | 2020-04-01 | East | Jones | Binder | 60 | 4.99 | 299.40 | False |
| 4 | 2020-05-05 | Central | Jardine | Pencil | 90 | 4.99 | 449.10 | True |
| 5 | 2020-06-08 | East | Jones | Binder | 60 | 8.99 | 539.40 | True |
| 6 | 2020-07-12 | East | Howard | Binder | 29 | 1.99 | 57.71 | False |
| 7 | 2020-08-15 | East | Jones | Pencil | 35 | 4.99 | 174.65 | True |
| 8 | 2020-09-01 | Central | Smith | Desk | 32 | 125.00 | 250.00 | True |
| 9 | 2020-10-05 | Central | Morgan | Binder | 28 | 8.99 | 251.72 | True |
| 10 | 2020-11-08 | East | Mike | Pen | 15 | 19.99 | 299.85 | False |
| 11 | 2020-12-12 | Central | Smith | Pencil | 67 | 1.29 | 86.43 | False |
If you want to load only a limited number of rows into the DataFrame, you can specify the number of rows using the nrows argument:
df = pd.read_excel('sales_data.xlsx', nrows=5)
display(df)| OrderDate | Region | Rep | Item | Units | Unit Cost | Total | Shipped | |
|---|---|---|---|---|---|---|---|---|
| 0 | 2020-01-06 | East | Jones | Pencil | 95 | 1.99 | 189.05 | True |
| 1 | 2020-02-09 | Central | Jardine | Pencil | 36 | 4.99 | 179.64 | True |
| 2 | 2020-03-15 | West | Sorvino | Pencil | 56 | 2.99 | 167.44 | True |
| 3 | 2020-04-01 | East | Jones | Binder | 60 | 4.99 | 299.40 | False |
| 4 | 2020-05-05 | Central | Jardine | Pencil | 90 | 4.99 | 449.10 | True |
Skipping a specific number of rows from the begining of a spreadsheet or skipping over a list of particular rows is available through the skiprows argument, as follows:
df = pd.read_excel('sales_data.xlsx', skiprows=range(5))
display(df)| 2020-05-05 00:00:00 | Central | Jardine | Pencil | 90 | 4.99 | 449.1 | True | |
|---|---|---|---|---|---|---|---|---|
| 0 | 2020-06-08 | East | Jones | Binder | 60 | 8.99 | 539.40 | True |
| 1 | 2020-07-12 | East | Howard | Binder | 29 | 1.99 | 57.71 | False |
| 2 | 2020-08-15 | East | Jones | Pencil | 35 | 4.99 | 174.65 | True |
| 3 | 2020-09-01 | Central | Smith | Desk | 32 | 125.00 | 250.00 | True |
| 4 | 2020-10-05 | Central | Morgan | Binder | 28 | 8.99 | 251.72 | True |
| 5 | 2020-11-08 | East | Mike | Pen | 15 | 19.99 | 299.85 | False |
| 6 | 2020-12-12 | Central | Smith | Pencil | 67 | 1.29 | 86.43 | False |
The code above skips the first five rows and returns the rest of the data. Instead, the following code returns all the rows except for those with the mentioned indices:
df = pd.read_excel('sales_data.xlsx', skiprows=[1, 4,7,10])
display(df)| OrderDate | Region | Rep | Item | Units | Unit Cost | Total | Shipped | |
|---|---|---|---|---|---|---|---|---|
| 0 | 2020-02-09 | Central | Jardine | Pencil | 36 | 4.99 | 179.64 | True |
| 1 | 2020-03-15 | West | Sorvino | Pencil | 56 | 2.99 | 167.44 | True |
| 2 | 2020-05-05 | Central | Jardine | Pencil | 90 | 4.99 | 449.10 | True |
| 3 | 2020-06-08 | East | Jones | Binder | 60 | 8.99 | 539.40 | True |
| 4 | 2020-08-15 | East | Jones | Pencil | 35 | 4.99 | 174.65 | True |
| 5 | 2020-09-01 | Central | Smith | Desk | 32 | 125.00 | 250.00 | True |
| 6 | 2020-11-08 | East | Mike | Pen | 15 | 19.99 | 299.85 | False |
| 7 | 2020-12-12 | Central | Smith | Pencil | 67 | 1.29 | 86.43 | False |
Another useful argument is usecols, which allows us to select spreadsheet columns with their letters, names, or positional numbers. Let’s see how it works:
df = pd.read_excel('sales_data.xlsx', usecols='A:C,G')
display(df)| OrderDate | Region | Rep | Total | |
|---|---|---|---|---|
| 0 | 2020-01-06 | East | Jones | 189.05 |
| 1 | 2020-02-09 | Central | Jardine | 179.64 |
| 2 | 2020-03-15 | West | Sorvino | 167.44 |
| 3 | 2020-04-01 | East | Jones | 299.40 |
| 4 | 2020-05-05 | Central | Jardine | 449.10 |
| 5 | 2020-06-08 | East | Jones | 539.40 |
| 6 | 2020-07-12 | East | Howard | 57.71 |
| 7 | 2020-08-15 | East | Jones | 174.65 |
| 8 | 2020-09-01 | Central | Smith | 250.00 |
| 9 | 2020-10-05 | Central | Morgan | 251.72 |
| 10 | 2020-11-08 | East | Mike | 299.85 |
| 11 | 2020-12-12 | Central | Smith | 86.43 |
In the code above, the string assigned to the usecols argument contains a range of columns with : plus column G separated by a comma. Also, we’re able to provide a list of column names and assign it to the usecols argument, as follows:
df = pd.read_excel('sales_data.xlsx', usecols=['OrderDate', 'Region', 'Rep', 'Total'])
display(df)| OrderDate | Region | Rep | Total | |
|---|---|---|---|---|
| 0 | 2020-01-06 | East | Jones | 189.05 |
| 1 | 2020-02-09 | Central | Jardine | 179.64 |
| 2 | 2020-03-15 | West | Sorvino | 167.44 |
| 3 | 2020-04-01 | East | Jones | 299.40 |
| 4 | 2020-05-05 | Central | Jardine | 449.10 |
| 5 | 2020-06-08 | East | Jones | 539.40 |
| 6 | 2020-07-12 | East | Howard | 57.71 |
| 7 | 2020-08-15 | East | Jones | 174.65 |
| 8 | 2020-09-01 | Central | Smith | 250.00 |
| 9 | 2020-10-05 | Central | Morgan | 251.72 |
| 10 | 2020-11-08 | East | Mike | 299.85 |
| 11 | 2020-12-12 | Central | Smith | 86.43 |
The usecols argument accepts a list of column numbers, too. The following code shows how we can pick up specific columns using their indices:
df = pd.read_excel('sales_data.xlsx', usecols=[0, 1, 2, 6])
display(df)| OrderDate | Region | Rep | Total | |
|---|---|---|---|---|
| 0 | 2020-01-06 | East | Jones | 189.05 |
| 1 | 2020-02-09 | Central | Jardine | 179.64 |
| 2 | 2020-03-15 | West | Sorvino | 167.44 |
| 3 | 2020-04-01 | East | Jones | 299.40 |
| 4 | 2020-05-05 | Central | Jardine | 449.10 |
| 5 | 2020-06-08 | East | Jones | 539.40 |
| 6 | 2020-07-12 | East | Howard | 57.71 |
| 7 | 2020-08-15 | East | Jones | 174.65 |
| 8 | 2020-09-01 | Central | Smith | 250.00 |
| 9 | 2020-10-05 | Central | Morgan | 251.72 |
| 10 | 2020-11-08 | East | Mike | 299.85 |
| 11 | 2020-12-12 | Central | Smith | 86.43 |
Working with Multiple Spreadsheets
Excel files or workbooks usually contain more than one spreadsheet. The pandas library allows us to load data from a specific sheet or combine multiple spreadsheets into a single DataFrame. In this section, we’ll explore how to use these valuable capabilities.
By default, the read_excel() method reads the first Excel sheet with the index 0. However, we can choose the other sheets by assigning a particular sheet name, sheet index, or even a list of sheet names or indices to the sheet_name argument. Let’s try it:
df = pd.read_excel('sales_data.xlsx', sheet_name='2021')
display(df)| OrderDate | Region | Rep | Item | Units | Unit Cost | Total | Shipped | |
|---|---|---|---|---|---|---|---|---|
| 0 | 2021-01-15 | Central | Gill | Binder | 46 | 8.99 | 413.54 | True |
| 1 | 2021-02-01 | Central | Smith | Binder | 87 | 15.00 | 1305.00 | True |
| 2 | 2021-03-07 | West | Sorvino | Binder | 27 | 19.99 | 139.93 | True |
| 3 | 2021-04-10 | Central | Andrews | Pencil | 66 | 1.99 | 131.34 | False |
| 4 | 2021-05-14 | Central | Gill | Pencil | 53 | 1.29 | 68.37 | False |
| 5 | 2021-06-17 | Central | Tom | Desk | 15 | 125.00 | 625.00 | True |
| 6 | 2021-07-04 | East | Jones | Pen Set | 62 | 4.99 | 309.38 | True |
| 7 | 2021-08-07 | Central | Tom | Pen Set | 42 | 23.95 | 1005.90 | True |
| 8 | 2021-09-10 | Central | Gill | Pencil | 47 | 1.29 | 9.03 | True |
| 9 | 2021-10-14 | West | Thompson | Binder | 57 | 19.99 | 1139.43 | False |
| 10 | 2021-11-17 | Central | Jardine | Binder | 11 | 4.99 | 54.89 | False |
| 11 | 2021-12-04 | Central | Jardine | Binder | 94 | 19.99 | 1879.06 | False |
The code above reads the second spreadsheet in the workbook, whose name is 2021. As mentioned before, we also can assign a sheet position number (zero-indexed) to the sheet_name argument. Let’s see how it works:
df = pd.read_excel('sales_data.xlsx', sheet_name=1)
display(df)| OrderDate | Region | Rep | Item | Units | Unit Cost | Total | Shipped | |
|---|---|---|---|---|---|---|---|---|
| 0 | 2021-01-15 | Central | Gill | Binder | 46 | 8.99 | 413.54 | True |
| 1 | 2021-02-01 | Central | Smith | Binder | 87 | 15.00 | 1305.00 | True |
| 2 | 2021-03-07 | West | Sorvino | Binder | 27 | 19.99 | 139.93 | True |
| 3 | 2021-04-10 | Central | Andrews | Pencil | 66 | 1.99 | 131.34 | False |
| 4 | 2021-05-14 | Central | Gill | Pencil | 53 | 1.29 | 68.37 | False |
| 5 | 2021-06-17 | Central | Tom | Desk | 15 | 125.00 | 625.00 | True |
| 6 | 2021-07-04 | East | Jones | Pen Set | 62 | 4.99 | 309.38 | True |
| 7 | 2021-08-07 | Central | Tom | Pen Set | 42 | 23.95 | 1005.90 | True |
| 8 | 2021-09-10 | Central | Gill | Pencil | 47 | 1.29 | 9.03 | True |
| 9 | 2021-10-14 | West | Thompson | Binder | 57 | 19.99 | 1139.43 | False |
| 10 | 2021-11-17 | Central | Jardine | Binder | 11 | 4.99 | 54.89 | False |
| 11 | 2021-12-04 | Central | Jardine | Binder | 94 | 19.99 | 1879.06 | False |
As you can see, both statements take in either the actual sheet name or sheet index to return the same result.
Sometimes, we want to import all the spreadsheets stored in an Excel file into pandas DataFrames simultaneously. The good news is that the read_excel() method provides this feature for us. In order to do this, we can assign a list of sheet names or their indices to the sheet_name argument. But there is a much easier way to do the same: to assign None to the sheet_name argument. Let’s try it:
all_sheets = pd.read_excel('sales_data.xlsx', sheet_name=None)Before exploring the data stored in the all_sheets variable, let’s check its data type:
type(all_sheets)dictAs you can see, the variable is a dictionary. Now, let’s reveal what is stored in this dictionary:
for key, value in all_sheets.items():
    print(key, type(value))
2020 <class 'pandas.core.frame.DataFrame'>
2021 <class 'pandas.core.frame.DataFrame'>The code above shows that the dictionary’s keys are the Excel workbook sheet names, and its values are pandas DataFrames for each spreadsheet. To print out the content of the dictionary, we can use the following code:
for key, value in all_sheets.items():
    print(key)
display(value)2020| OrderDate | Region | Rep | Item | Units | Unit Cost | Total | Shipped | |
|---|---|---|---|---|---|---|---|---|
| 0 | 2020-01-06 | East | Jones | Pencil | 95 | 1.99 | 189.05 | True |
| 1 | 2020-02-09 | Central | Jardine | Pencil | 36 | 4.99 | 179.64 | True |
| 2 | 2020-03-15 | West | Sorvino | Pencil | 56 | 2.99 | 167.44 | True |
| 3 | 2020-04-01 | East | Jones | Binder | 60 | 4.99 | 299.40 | False |
| 4 | 2020-05-05 | Central | Jardine | Pencil | 90 | 4.99 | 449.10 | True |
| 5 | 2020-06-08 | East | Jones | Binder | 60 | 8.99 | 539.40 | True |
| 6 | 2020-07-12 | East | Howard | Binder | 29 | 1.99 | 57.71 | False |
| 7 | 2020-08-15 | East | Jones | Pencil | 35 | 4.99 | 174.65 | True |
| 8 | 2020-09-01 | Central | Smith | Desk | 32 | 125.00 | 250.00 | True |
| 9 | 2020-10-05 | Central | Morgan | Binder | 28 | 8.99 | 251.72 | True |
| 10 | 2020-11-08 | East | Mike | Pen | 15 | 19.99 | 299.85 | False |
| 11 | 2020-12-12 | Central | Smith | Pencil | 67 | 1.29 | 86.43 | False |
2021| OrderDate | Region | Rep | Item | Units | Unit Cost | Total | Shipped | |
|---|---|---|---|---|---|---|---|---|
| 0 | 2021-01-15 | Central | Gill | Binder | 46 | 8.99 | 413.54 | True |
| 1 | 2021-02-01 | Central | Smith | Binder | 87 | 15.00 | 1305.00 | True |
| 2 | 2021-03-07 | West | Sorvino | Binder | 27 | 19.99 | 139.93 | True |
| 3 | 2021-04-10 | Central | Andrews | Pencil | 66 | 1.99 | 131.34 | False |
| 4 | 2021-05-14 | Central | Gill | Pencil | 53 | 1.29 | 68.37 | False |
| 5 | 2021-06-17 | Central | Tom | Desk | 15 | 125.00 | 625.00 | True |
| 6 | 2021-07-04 | East | Jones | Pen Set | 62 | 4.99 | 309.38 | True |
| 7 | 2021-08-07 | Central | Tom | Pen Set | 42 | 23.95 | 1005.90 | True |
| 8 | 2021-09-10 | Central | Gill | Pencil | 47 | 1.29 | 9.03 | True |
| 9 | 2021-10-14 | West | Thompson | Binder | 57 | 19.99 | 1139.43 | False |
| 10 | 2021-11-17 | Central | Jardine | Binder | 11 | 4.99 | 54.89 | False |
| 11 | 2021-12-04 | Central | Jardine | Binder | 94 | 19.99 | 1879.06 | False |
Combining Multiple Excel Spreadsheets into a Single Pandas DataFrame
Having one DataFrame per sheet allows us to have different columns or content in different sheets.
But what if we prefer to store all the spreadsheets’ data in a single DataFrame? In this tutorial, the workbook spreadsheets have the same columns, so we can combine them with the concat() method of pandas.
If you run the code below, you’ll see that the two DataFrames stored in the dictionary are concatenated:
combined_df = pd.concat(all_sheets.values(), ignore_index=True)
display(combined_df)| OrderDate | Region | Rep | Item | Units | Unit Cost | Total | Shipped | |
|---|---|---|---|---|---|---|---|---|
| 0 | 2020-01-06 | East | Jones | Pencil | 95 | 1.99 | 189.05 | True |
| 1 | 2020-02-09 | Central | Jardine | Pencil | 36 | 4.99 | 179.64 | True |
| 2 | 2020-03-15 | West | Sorvino | Pencil | 56 | 2.99 | 167.44 | True |
| 3 | 2020-04-01 | East | Jones | Binder | 60 | 4.99 | 299.40 | False |
| 4 | 2020-05-05 | Central | Jardine | Pencil | 90 | 4.99 | 449.10 | True |
| 5 | 2020-06-08 | East | Jones | Binder | 60 | 8.99 | 539.40 | True |
| 6 | 2020-07-12 | East | Howard | Binder | 29 | 1.99 | 57.71 | False |
| 7 | 2020-08-15 | East | Jones | Pencil | 35 | 4.99 | 174.65 | True |
| 8 | 2020-09-01 | Central | Smith | Desk | 32 | 125.00 | 250.00 | True |
| 9 | 2020-10-05 | Central | Morgan | Binder | 28 | 8.99 | 251.72 | True |
| 10 | 2020-11-08 | East | Mike | Pen | 15 | 19.99 | 299.85 | False |
| 11 | 2020-12-12 | Central | Smith | Pencil | 67 | 1.29 | 86.43 | False |
| 12 | 2021-01-15 | Central | Gill | Binder | 46 | 8.99 | 413.54 | True |
| 13 | 2021-02-01 | Central | Smith | Binder | 87 | 15.00 | 1305.00 | True |
| 14 | 2021-03-07 | West | Sorvino | Binder | 27 | 19.99 | 139.93 | True |
| 15 | 2021-04-10 | Central | Andrews | Pencil | 66 | 1.99 | 131.34 | False |
| 16 | 2021-05-14 | Central | Gill | Pencil | 53 | 1.29 | 68.37 | False |
| 17 | 2021-06-17 | Central | Tom | Desk | 15 | 125.00 | 625.00 | True |
| 18 | 2021-07-04 | East | Jones | Pen Set | 62 | 4.99 | 309.38 | True |
| 19 | 2021-08-07 | Central | Tom | Pen Set | 42 | 23.95 | 1005.90 | True |
| 20 | 2021-09-10 | Central | Gill | Pencil | 47 | 1.29 | 9.03 | True |
| 21 | 2021-10-14 | West | Thompson | Binder | 57 | 19.99 | 1139.43 | False |
| 22 | 2021-11-17 | Central | Jardine | Binder | 11 | 4.99 | 54.89 | False |
| 23 | 2021-12-04 | Central | Jardine | Binder | 94 | 19.99 | 1879.06 | False |
Now the data stored in the combined_df DataFrame is ready for further processing or visualization. In the following piece of code, we’re going to create a simple bar chart that shows the total sales amount made by each representative. Let’s run it and see the output plot:
total_sales_amount = combined_df.groupby('Rep').Total.sum()
total_sales_amount.plot.bar(figsize=(10, 6))
Reading Excel Files Using xlrd
Although importing data into a pandas DataFrame is much more common, another helpful package for reading Excel files in Python is xlrd. In this section, we’re going to scratch the surface of how to read Excel spreadsheets using this package.
NOTE
The xlrd package doesn’t support xlsx files due to a potential security vulnerability. So, we use the xls version of the sales data. You can download the xls version from the link below:
Sales Data Excel Workbook — xls ver.
Let’s see how it works:
import xlrd
excel_workbook = xlrd.open_workbook('sales_data.xls')
Above, the first line imports the xlrd package, then the open_workbook method reads the sales_data.xls file.
We can also open an individual sheet containing the actual data. There are two ways to do so: opening a sheet by index or by name. Let’s open the first sheet by index and the second one by name:
excel_worksheet_2020 = excel_workbook.sheet_by_index(0)
excel_worksheet_2021 = excel_workbook.sheet_by_name('2021')
Now, let’s see how we can print a cell value. The xlrd package provides a method called cell_value() that takes in two arguments: the cell’s row index and column index. Let’s explore it:
print(excel_worksheet_2020.cell_value(1, 3))PencilWe can see that the cell_value function returned the value of the cell at row index 1 (the 2nd row) and column index 3 (the 4th column).
The xlrd package provides two helpful properties: nrows and ncols, returning the number of nonempty spreadsheet’s rows and columns respectively:
print('Columns#:', excel_worksheet_2020.ncols)
print('Rows#:', excel_worksheet_2020.nrows)
Columns#: 8
Rows#: 13Knowing the number of nonempty rows and columns in a spreadsheet helps us with iterating over the data using nested for loops. This makes all the Excel sheet data accessible via the cell_value() method.
Conclusion
This tutorial discussed how to load Excel spreadsheets into pandas DataFrames, work with multiple Excel sheets, and combine them into a single pandas DataFrame. We also explored the main aspects of the xlrd package as one of the simplest tools for accessing the Excel spreadsheets data.
There are various options depending on the use case:
-
If one doesn’t know the sheets names.
-
If the sheets name is not relevant.
-
If one knows the name of the sheets.
Below we will look closely at each of the options.
See the Notes section for information such as finding out the sheet names.
Option 1
If one doesn’t know the sheets names
# Read all sheets in your File
df = pd.read_excel('FILENAME.xlsx', sheet_name=None)

# Prints all the sheets name in an ordered dictionary
print(df.keys())
Then, depending on the sheet one wants to read, one can pass each of them to a specific dataframe, such as
sheet1_df = pd.read_excel('FILENAME.xlsx', sheet_name=SHEET1NAME)
sheet2_df = pd.read_excel('FILENAME.xlsx', sheet_name=SHEET2NAME)
Option 2
If the name is not relevant and all one cares about is the position of the sheet. Let’s say one wants only the first sheet
# Read all sheets in your File
df = pd.read_excel('FILENAME.xlsx', sheet_name=None)

sheet1 = list(df.keys())[0]
Then, depending on the sheet name, one can pass each it to a specific dataframe, such as
sheet1_df = pd.read_excel('FILENAME.xlsx', sheet_name=SHEET1NAME)
Option 3
Here we will consider the case where one knows the name of the sheets.
For the examples, one will consider that there are three sheets named Sheet1, Sheet2, and Sheet3. The content in each is the same, and looks like this
     0         1     2
0   85   January  2000
1   95  February  2001
2  105     March  2002
3  115     April  2003
4  125       May  2004
5  135      June  2005
With this, depending on one’s goals, there are multiple approaches:
-
Store everything in same dataframe. One approach would be to concat the sheets as follows
sheets = ['Sheet1', 'Sheet2', 'Sheet3']
df = pd.concat([pd.read_excel('FILENAME.xlsx', sheet_name = sheet) for sheet in sheets], ignore_index = True)

[Out]:

      0         1     2
0    85   January  2000
1    95  February  2001
2   105     March  2002
3   115     April  2003
4   125       May  2004
5   135      June  2005
6    85   January  2000
7    95  February  2001
8   105     March  2002
9   115     April  2003
10  125       May  2004
11  135      June  2005
12   85   January  2000
13   95  February  2001
14  105     March  2002
15  115     April  2003
16  125       May  2004
17  135      June  2005
Basically, this how
pandas.concatworks (Source):
-
Store each sheet in a different dataframe (let’s say,
df1,df2, …)sheets = ['Sheet1', 'Sheet2', 'Sheet3'] for i, sheet in enumerate(sheets): globals()['df' + str(i + 1)] = pd.read_excel('FILENAME.xlsx', sheet_name = sheet) [Out]: # df1 0 1 2 0 85 January 2000 1 95 February 2001 2 105 March 2002 3 115 April 2003 4 125 May 2004 5 135 June 2005 # df2 0 1 2 0 85 January 2000 1 95 February 2001 2 105 March 2002 3 115 April 2003 4 125 May 2004 5 135 June 2005 # df3 0 1 2 0 85 January 2000 1 95 February 2001 2 105 March 2002 3 115 April 2003 4 125 May 2004 5 135 June 2005

Notes:
-
If one wants to know the sheets names, one can use the
ExcelFileclass as followssheets = pd.ExcelFile('FILENAME.xlsx').sheet_names [Out]: ['Sheet1', 'Sheet2', 'Sheet3'] -
In this case one is assuming that the file
FILENAME.xlsxis on the same directory as the script one is running.-
If the file is in a folder of the current directory called Data, one way would be to use
r'./Data/FILENAME.xlsx'create a variable, such aspathas followspath = r'./Data/Test.xlsx' df = pd.read_excel(r'./Data/FILENAME.xlsx', sheet_name=None)
-
-
This might be a relevant read.
Last updated on
Jul 18, 2021
In this post you can learn how to read Excel files (ext xls, xlsx etc) with Python and Pandas. We will import one or several sheets from an Excel file to a Pandas DataFrame.
The list of the supported file extensions:
xlsxlsxxlsmxlsbodfodsodt
Note for ods, ods and odt please check: Read Excel(OpenDocument ODS) with Python Pandas
Step 1: Install Pandas and odfpy
Python offers many different modules for reading and manipulating Excel files. In this guide we are going to use pandas and odfpy:
pip install pandas
pip install odfpy
Step 2: Read the one sheet of Excel(XLS) file
Pandas offers a powerful method for reading any type of Excel files read_excel(). It’s pretty easy to be used and requires only the file path:
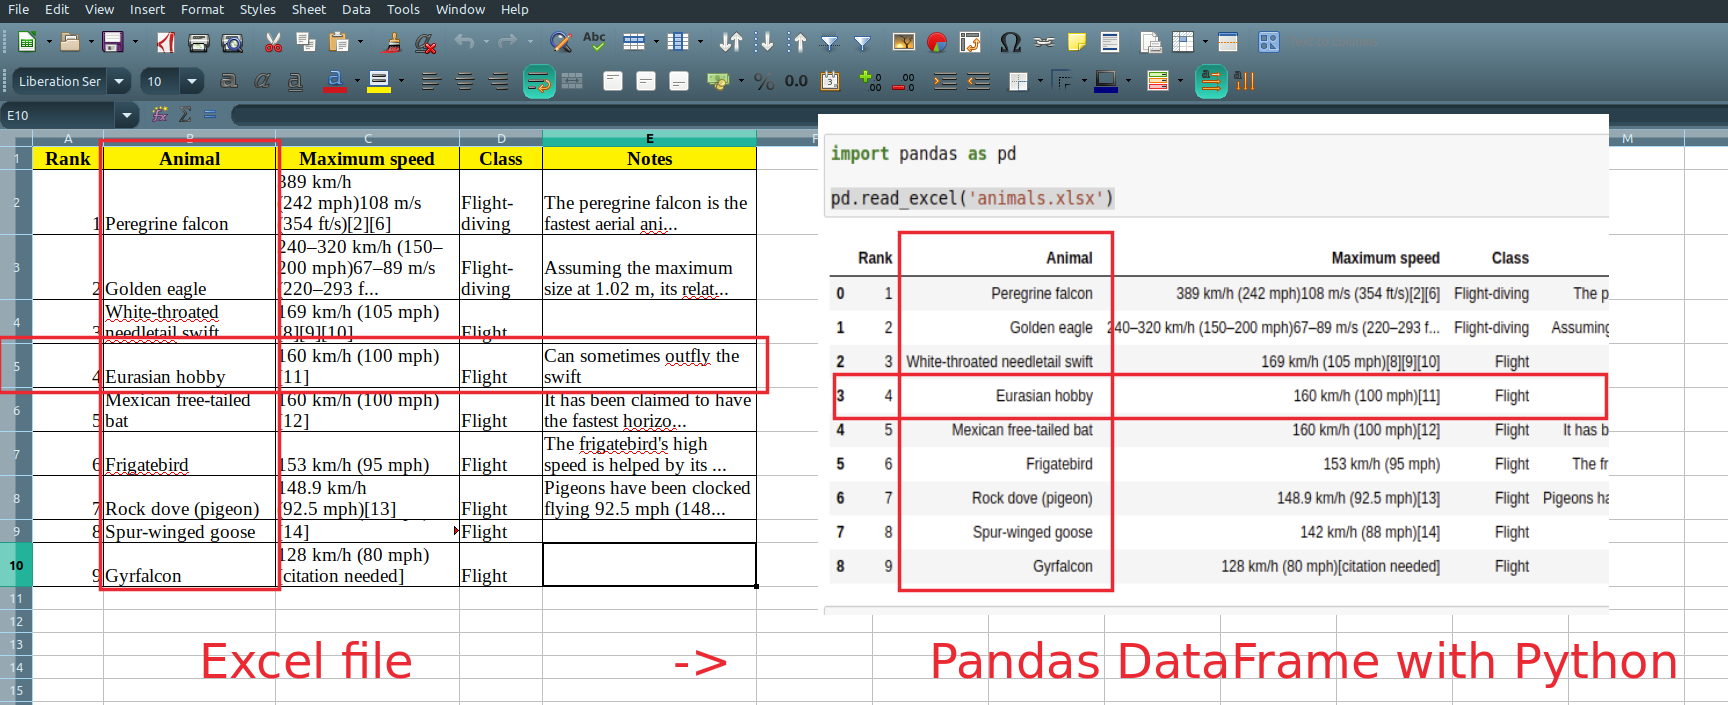
import pandas as pd

pd.read_excel('animals.xls')
It will read and return all non empty cells from the Excel file:
| Rank | Animal | Maximum speed | Class | Notes | |
|---|---|---|---|---|---|
| 0 | 1 | Peregrine falcon | 389 km/h (242 mph)108 m/s (354 ft/s)[2][6] | Flight-diving | The peregrine falcon is the fastest aerial ani… |
| 1 | 2 | Golden eagle | 240–320 km/h (150–200 mph)67–89 m/s (220–293 f… | Flight-diving | Assuming the maximum size at 1.02 m, its relat… |
| 2 | 3 | White-throated needletail swift | 169 km/h (105 mph)[8][9][10] | Flight | NaN |
| 3 | 4 | Eurasian hobby | 160 km/h (100 mph)[11] | Flight | Can sometimes outfly the swift |
| 4 | 5 | Mexican free-tailed bat | 160 km/h (100 mph)[12] | Flight | It has been claimed to have the fastest horizo… |
| 5 | 6 | Frigatebird | 153 km/h (95 mph) | Flight | The frigatebird’s high speed is helped by its … |
| 6 | 7 | Rock dove (pigeon) | 148.9 km/h (92.5 mph)[13] | Flight | Pigeons have been clocked flying 92.5 mph (148… |
| 7 | 8 | Spur-winged goose | 142 km/h (88 mph)[14] | Flight | NaN |
| 8 | 9 | Gyrfalcon | 128 km/h (80 mph)[citation needed] | Flight | NaN |
Step 3: Read the second sheet of Excel file by name
If you like to read data from a specific sheet — for example Sheet 2 then you can specify the name as a parameter — sheet_name:
pd.read_excel('animals.xlsx', sheet_name="Sheet2")
Which will result in:
| Blackbuck | Unnamed: 1 | |
|---|---|---|
| 0 | NaN | NaN |
| 1 | Male blackbuck | Male blackbuck |
| 2 | NaN | NaN |
| 3 | Female with young at the National Zoological Park Delhi | Female with young at the National Zoological P… |
| 4 | Conservation status | Conservation status |
| 5 | Least Concern (IUCN 3.1)[1] | Least Concern (IUCN 3.1)[1] |
| 6 | Scientific classification | Scientific classification |
Step 4: Python read excel file — specify columns and rows
If you like to read a range of data and not the whole sheet — read_excel offers several very useful parameters.
Python read excel file select rows
Next code example will show you how to read 3 rows skipping the first two rows. In this way Pandas will read only some rows from the whole sheet:
pd.read_excel('animals.xlsx', skiprows=2, nrows=3)
which will result in:
| 2 | Golden eagle | 240–320 km/h (150–200 mph)67–89 m/s (220–293 f… | Flight-diving | Assuming the maximum size at 1.02 m, its relat… | |
|---|---|---|---|---|---|
| 0 | 3 | White-throated needletail swift | 169 km/h (105 mph)[8][9][10] | Flight | NaN |
| 1 | 4 | Eurasian hobby | 160 km/h (100 mph)[11] | Flight | Can sometimes outfly the swift |
| 2 | 5 | Mexican free-tailed bat | 160 km/h (100 mph)[12] | Flight | It has been claimed to have the fastest horizo… |
Python read excel file select columns
If you like to** work with few columns** and not the whole sheet — then parameter use_cols can be used as shown:
pd.read_excel('animals.xlsx', usecols='C:D')
Python read excel file specify columns and rows
Finally if you like to select a range from specific columns and rows than you can use:
Which will result into:
| 240–320 km/h (150–200 mph)67–89 m/s (220–293 f… | Flight-diving | |
|---|---|---|
| 0 | 169 km/h (105 mph)[8][9][10] | Flight |
| 1 | 160 km/h (100 mph)[11] | Flight |
| 2 | 160 km/h (100 mph)[12] | Flight |
Step 5. Read multiple sheets from Excel file
What if you like to read with Pandas multiple sheets from Excel. It’s possible with pd.read_excel by providing a list of all sheets to be read as follows:
pd.read_excel('animals.xlsx', sheet_name=["Sheet1", "Sheet2"])
Note that a dictionary of
- keys — sheet names
- values — resulted DataFrames
will be returned.
In order to access data you can access it by a sheet name as:
pd.read_excel('animals.xlsx', sheet_name=["Sheet1", "Sheet2"]).get('Sheet1')
which will return the data for Sheet1 as a DataFrame.
Read All Sheets
For loading all sheets from Excel file use sheet_name=None:
pd.read_excel('animals.xlsx', sheet_name=None)
Step 6. Pandas read excel data with conversion, NA values and parsing
Finally let’s check what we can do if we need to convert data, drop or fill missing values, parse dates and numbers.
Pandas offers several parameters for this purpose:
- converters — dict of functions for converting values in certain columns
- keep_default_na — whether or not to include the default NaN values
- parse_dates
- ate_parser — converting a sequence of string columns to an array of datetime instances.
- thousands
- convert_float
You can check the Notebook in the resources for more examples of the above.
Resources
- Python Pandas Reading Excel files
- pandas.read_excel
- Notebook —
Read Excel ODS with Python Pandas
The read_excel() method can read Excel 2003 (.xls) and
Excel 2007+ (.xlsx) files using the xlrd Python
module. The to_excel() instance method is used for
saving a DataFrame to Excel. Generally the semantics are
similar to working with csv data. See the cookbook for some
advanced strategies
10.5.1 Reading Excel Files
In the most basic use-case, read_excel takes a path to an Excel
file, and the sheetname indicating which sheet to parse.
# Returns a DataFrame
read_excel('path_to_file.xls', sheetname='Sheet1')
10.5.1.1 ExcelFile class
To facilitate working with multiple sheets from the same file, the ExcelFile
class can be used to wrap the file and can be be passed into read_excel
There will be a performance benefit for reading multiple sheets as the file is
read into memory only once.
xlsx = pd.ExcelFile('path_to_file.xls)
df = pd.read_excel(xlsx, 'Sheet1')
The ExcelFile class can also be used as a context manager.
with pd.ExcelFile('path_to_file.xls') as xls:
    df1 = pd.read_excel(xls, 'Sheet1')
    df2 = pd.read_excel(xls, 'Sheet2')
The sheet_names property will generate
a list of the sheet names in the file.
The primary use-case for an ExcelFile is parsing multiple sheets with
different parameters
data = {}
# For when Sheet1's format differs from Sheet2
with pd.ExcelFile('path_to_file.xls') as xls:
    data['Sheet1'] = pd.read_excel(xls, 'Sheet1', index_col=None, na_values=['NA'])
    data['Sheet2'] = pd.read_excel(xls, 'Sheet2', index_col=1)
Note that if the same parsing parameters are used for all sheets, a list
of sheet names can simply be passed to read_excel with no loss in performance.
# using the ExcelFile class
data = {}
with pd.ExcelFile('path_to_file.xls') as xls:
    data['Sheet1'] = read_excel(xls, 'Sheet1', index_col=None, na_values=['NA'])
    data['Sheet2'] = read_excel(xls, 'Sheet2', index_col=None, na_values=['NA'])

# equivalent using the read_excel function
data = read_excel('path_to_file.xls', ['Sheet1', 'Sheet2'], index_col=None, na_values=['NA'])
New in version 0.12.
ExcelFile has been moved to the top level namespace.
New in version 0.17.
read_excel can take an ExcelFile object as input
10.5.1.2 Specifying Sheets
Note
The second argument is sheetname, not to be confused with ExcelFile.sheet_names
Note
An ExcelFile’s attribute sheet_names provides access to a list of sheets.
- The arguments
sheetnameallows specifying the sheet or sheets to read. - The default value for
sheetnameis 0, indicating to read the first sheet - Pass a string to refer to the name of a particular sheet in the workbook.
- Pass an integer to refer to the index of a sheet. Indices follow Python
convention, beginning at 0. - Pass a list of either strings or integers, to return a dictionary of specified sheets.
- Pass a
Noneto return a dictionary of all available sheets.
# Returns a DataFrame
read_excel('path_to_file.xls', 'Sheet1', index_col=None, na_values=['NA'])
Using the sheet index:
# Returns a DataFrame
read_excel('path_to_file.xls', 0, index_col=None, na_values=['NA'])
Using all default values:
# Returns a DataFrame
read_excel('path_to_file.xls')
Using None to get all sheets:
# Returns a dictionary of DataFrames
read_excel('path_to_file.xls',sheetname=None)
Using a list to get multiple sheets:
# Returns the 1st and 4th sheet, as a dictionary of DataFrames.
read_excel('path_to_file.xls',sheetname=['Sheet1',3])
New in version 0.16.
read_excel can read more than one sheet, by setting sheetname to either
a list of sheet names, a list of sheet positions, or None to read all sheets.
New in version 0.13.
Sheets can be specified by sheet index or sheet name, using an integer or string,
respectively.
10.5.1.3 Reading a MultiIndex
New in version 0.17.
read_excel can read a MultiIndex index, by passing a list of columns to index_col
and a MultiIndex column by passing a list of rows to header. If either the index
or columns have serialized level names those will be read in as well by specifying
the rows/columns that make up the levels.
For example, to read in a MultiIndex index without names:
In [1]: df = pd.DataFrame({'a':[1,2,3,4], 'b':[5,6,7,8]},
   ...:                   index=pd.MultiIndex.from_product([['a','b'],['c','d']]))
   ...:

In [2]: df.to_excel('path_to_file.xlsx')

In [3]: df = pd.read_excel('path_to_file.xlsx', index_col=[0,1])

In [4]: df
Out[4]:
     a  b
a c  1  5
  d  2  6
b c  3  7
  d  4  8
If the index has level names, they will parsed as well, using the same
parameters.
In [5]: df.index = df.index.set_names(['lvl1', 'lvl2'])

In [6]: df.to_excel('path_to_file.xlsx')

In [7]: df = pd.read_excel('path_to_file.xlsx', index_col=[0,1])

In [8]: df
Out[8]:
           a  b
lvl1 lvl2
a    c     1  5
     d     2  6
b    c     3  7
     d     4  8
If the source file has both MultiIndex index and columns, lists specifying each
should be passed to index_col and header
In [9]: df.columns = pd.MultiIndex.from_product([['a'],['b', 'd']], names=['c1', 'c2'])

In [10]: df.to_excel('path_to_file.xlsx')

In [11]: df = pd.read_excel('path_to_file.xlsx',
   ....:                     index_col=[0,1], header=[0,1])
   ....:

In [12]: df
Out[12]:
c1         a
c2         b  d
lvl1 lvl2
a    c     1  5
     d     2  6
b    c     3  7
     d     4  8
Warning
Excel files saved in version 0.16.2 or prior that had index names will still able to be read in,
but the has_index_names argument must specified to True.
10.5.1.4 Parsing Specific Columns
It is often the case that users will insert columns to do temporary computations
in Excel and you may not want to read in those columns. read_excel takes
a parse_cols keyword to allow you to specify a subset of columns to parse.
If parse_cols is an integer, then it is assumed to indicate the last column
to be parsed.
read_excel('path_to_file.xls', 'Sheet1', parse_cols=2)
If parse_cols is a list of integers, then it is assumed to be the file column
indices to be parsed.
read_excel('path_to_file.xls', 'Sheet1', parse_cols=[0, 2, 3])
10.5.1.5 Cell Converters
It is possible to transform the contents of Excel cells via the converters
option. For instance, to convert a column to boolean:
read_excel('path_to_file.xls', 'Sheet1', converters={'MyBools': bool})
This options handles missing values and treats exceptions in the converters
as missing data. Transformations are applied cell by cell rather than to the
column as a whole, so the array dtype is not guaranteed. For instance, a
column of integers with missing values cannot be transformed to an array
with integer dtype, because NaN is strictly a float. You can manually mask
missing data to recover integer dtype:
cfun = lambda x: int(x) if x else -1
read_excel('path_to_file.xls', 'Sheet1', converters={'MyInts': cfun})
10.5.2 Writing Excel Files
10.5.2.1 Writing Excel Files to Disk
To write a DataFrame object to a sheet of an Excel file, you can use the
to_excel instance method. The arguments are largely the same as to_csv
described above, the first argument being the name of the excel file, and the
optional second argument the name of the sheet to which the DataFrame should be
written. For example:
df.to_excel('path_to_file.xlsx', sheet_name='Sheet1')
Files with a .xls extension will be written using xlwt and those with a
.xlsx extension will be written using xlsxwriter (if available) or
openpyxl.
The DataFrame will be written in a way that tries to mimic the REPL output. One
difference from 0.12.0 is that the index_label will be placed in the second
row instead of the first. You can get the previous behaviour by setting the
merge_cells option in to_excel() to False:
df.to_excel('path_to_file.xlsx', index_label='label', merge_cells=False)
The Panel class also has a to_excel instance method,
which writes each DataFrame in the Panel to a separate sheet.
In order to write separate DataFrames to separate sheets in a single Excel file,
one can pass an ExcelWriter.
with ExcelWriter('path_to_file.xlsx') as writer:
    df1.to_excel(writer, sheet_name='Sheet1')
    df2.to_excel(writer, sheet_name='Sheet2')
Note
Wringing a little more performance out of read_excel
Internally, Excel stores all numeric data as floats. Because this can
produce unexpected behavior when reading in data, pandas defaults to trying
to convert integers to floats if it doesn’t lose information (1.0 -->). You can pass
1convert_float=False to disable this behavior, which
may give a slight performance improvement.
10.5.2.2 Writing Excel Files to Memory
New in version 0.17.
Pandas supports writing Excel files to buffer-like objects such as StringIO or
BytesIO using ExcelWriter.
New in version 0.17.
Added support for Openpyxl >= 2.2
# Safe import for either Python 2.x or 3.x
try:
    from io import BytesIO
except ImportError:
    from cStringIO import StringIO as BytesIO

bio = BytesIO()

# By setting the 'engine' in the ExcelWriter constructor.
writer = ExcelWriter(bio, engine='xlsxwriter')
df.to_excel(writer, sheet_name='Sheet1')

# Save the workbook
writer.save()

# Seek to the beginning and read to copy the workbook to a variable in memory
bio.seek(0)
workbook = bio.read()
Note
engine is optional but recommended. Setting the engine determines
the version of workbook produced. Setting engine='xlrd' will produce an
Excel 2003-format workbook (xls). Using either 'openpyxl' or
'xlsxwriter' will produce an Excel 2007-format workbook (xlsx). If
omitted, an Excel 2007-formatted workbook is produced.
10.5.3 Excel writer engines
New in version 0.13.
pandas chooses an Excel writer via two methods:
- the
enginekeyword argument - the filename extension (via the default specified in config options)
By default, pandas uses the XlsxWriter for .xlsx and openpyxl
for .xlsm files and xlwt for .xls files. If you have multiple
engines installed, you can set the default engine through setting the
config options io.excel.xlsx.writer and
io.excel.xls.writer. pandas will fall back on openpyxl for .xlsx
files if Xlsxwriter is not available.
To specify which writer you want to use, you can pass an engine keyword
argument to to_excel and to ExcelWriter. The built-in engines are:
openpyxl: This includes stable support for Openpyxl from 1.6.1. However,
it is advised to use version 2.2 and higher, especially when working with
styles.xlsxwriterxlwt
# By setting the 'engine' in the DataFrame and Panel 'to_excel()' methods.
df.to_excel('path_to_file.xlsx', sheet_name='Sheet1', engine='xlsxwriter')

# By setting the 'engine' in the ExcelWriter constructor.
writer = ExcelWriter('path_to_file.xlsx', engine='xlsxwriter')

# Or via pandas configuration.
from pandas import options
options.io.excel.xlsx.writer = 'xlsxwriter'

df.to_excel('path_to_file.xlsx', sheet_name='Sheet1')
Read Excel files (extensions:.xlsx, .xls) with Python Pandas. To read an excel file as a DataFrame, use the pandas read_excel() method.
You can read the first sheet, specific sheets, multiple sheets or all sheets. Pandas converts this to the DataFrame structure, which is a tabular like structure.
Related course: Data Analysis with Python Pandas
Excel
In this article we use an example Excel file. The programs we’ll make reads Excel into Python.
Creat an excel file with two sheets, sheet1 and sheet2. You can use any Excel supporting program like Microsoft Excel or Google Sheets.
The contents of each are as follows:
sheet1:
sheet2:
Install xlrd
Pandas. .read_excel a.) uses a library called xlrd internally.
xlrd is a library for reading (input) Excel files (.xlsx, .xls) in Python.
Related article: How to use xlrd, xlwt to read and write Excel files in Python
If you call pandas.read_excel s() in an environment where xlrd is not installed, you will receive an error message similar to the following:
ImportError: Install xlrd >= 0.9.0 for Excel support
xlrd can be installed with pip. (pip3 depending on the environment)
1 |
$ pip install xlrd |
Read excel
Specify the path or URL of the Excel file in the first argument.
If there are multiple sheets, only the first sheet is used by pandas.
It reads as DataFrame.
1 |
import pandas as pd |
The code above outputs the excel sheet content:
1 |
Unnamed: 0 A B C |
Get sheet
You can specify the sheet to read with the argument sheet_name.
Specify by number (starting at 0)
1 |
df_sheet_index = pd.read_excel('sample.xlsx', sheet_name=1) |
1 |
# AA BB CC |
Specify by sheet name:
1 |
df_sheet_name = pd.read_excel('sample.xlsx', sheet_name='sheet2') |
1 |
# AA BB CC |
Load multiple sheets
It is also possible to specify a list in the argumentsheet_name. It is OK even if it is a number of 0 starting or the sheet name.
The specified number or sheet name is the key key, and the data pandas. The DataFrame is read as the ordered dictionary OrderedDict with the value value.
1 |
df_sheet_multi = pd.read_excel('sample.xlsx', sheet_name=[0, 'sheet2']) |
Then you can use it like this:
1 |
print(df_sheet_multi[0]) |
Load all sheets
If sheet_name argument is none, all sheets are read.
1 |
df_sheet_all = pd.read_excel('sample.xlsx', sheet_name=None) |
In this case, the sheet name becomes the key.
1 |
print(df_sheet_all['sheet1']) |
Related course: Data Analysis with Python Pandas
In this Pandas tutorial, we will learn how to work with Excel files (e.g., xls) in Python. It will provide an overview of how to use Pandas to load xlsx files and write spreadsheets to Excel.
In the first section, we will go through, with examples, how to use Pandas read_excel to; 1) read an Excel file, 2) read specific columns from a spreadsheet, 3) read multiple spreadsheets, and combine them to one dataframe. Furthermore, we are going to learn how to read many Excel files, and how to convert data according to specific data types (e.g., using Pandas dtypes).
When we have done this, we will continue by learning how to use Pandas to write Excel files; how to name the sheets and how to write to multiple sheets. Make sure to check out the newer post about reading xlsx files in Python with openpyxl, as well.
- Read the How to import Excel into R blog post if you need an overview on how to read xlsx files into R dataframes.
How to Install Pandas
Before we continue with this Pandas read and write Excel files tutorial there is something we need to do; installing Pandas (and Python, of course, if it’s not installed). We can install Pandas using Pip, given that we have Pip installed, that is. See here how to install pip.
# Linux Users
pip install pandas

# Windows Users
python pip install pandasCode language: Bash (bash)
Note, if pip is telling us that there’s a newer version of pip, we may want to upgrade it. In a recent post, we cover how to upgrade pip to the latest version. Finally, before going on to the next section, you can use pip to install a certain version (i.e., older) of a packages usch as Pandas.
Installing Anaconda Scientific Python Distribution
Another great option is to consider is to install the Anaconda Python distribution. This is really an easy and fast way to get started with computer science. No need to worry about installing the packages you need to do computer science separately.
Both of the above methods are explained in this tutorial. Now, in a more recent blog post, we also cover how to install a Python package using pip, conda, and Anaconda. In that post, you will find more information about installing Python packages.
How to Read Excel Files to Pandas Dataframes:
Can Pandas read xlsx files? The short answer is, of course, “yes”. In this section, we are going to learn how to read Excel files and spreadsheets to Pandas dataframe objects. All examples in this Pandas Excel tutorial use local files. Note, that read_excel also can also load Excel files from a URL to a dataframe. As always when working with Pandas, we have to start by importing the module:
import pandas as pdCode language: Python (python)Now it’s time to learn how to use Pandas read_excel to read in data from an Excel file. The easiest way to use this method is to pass the file name as a string. If we don’t pass any other parameters, such as sheet name, it will read the first sheet in the index. In the first example, we are not going to use any parameters:
# Pandas read xlsx
df = pd.read_excel('MLBPlayerSalaries.xlsx')
df.head()Code language: Python (python)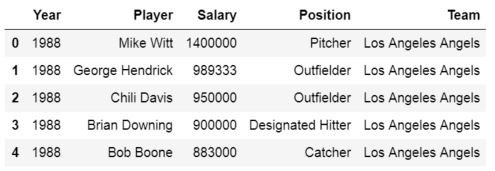
Here, Pandas read_excel method read the data from the Excel file into a Pandas dataframe object. We then stored this dataframe into a variable called df.
When using read_excel Pandas will, by default, assign a numeric index or row label to the dataframe, and as usual, when int comes to Python, the index will start with zero. We may have a reason to leave the default index as it is.
For instance, if your data doesn’t have a column with unique values that can serve as a better index. In case there is a column that would serve as a better index, we can override the default behavior.
Setting the Index Column when Reading xls File
This is done by setting the index_col parameter to a column. It takes a numeric value for setting a single column as index or a list of numeric values for creating a multi-index. In the example below, we use the column ‘Player’ as indices. Note, these are not unique and it may, thus, not make sense to use these values as indices.
df = pd.read_excel('MLBPlayerSalaries.xlsx', sheet_names='MLBPlayerSalaries', index_col='Player')Code language: Python (python)Now, if one or two of your columns, for instance, are objects you use Pandas to_datetime to convert a column, properly.
Importing an Excel File to Pandas in Two Easy Steps:
Time needed: 1 minute.
Here’s a quick answer to the How do you import an Excel file into Python using Pandas? Importing an Excel file into a Pandas dataframe basically only requires two steps, given that we know the path, or URL, to the Excel file:
- Import Pandas
In the script type import pandas as pd

- Use Pandas read_excel method
Next step is to type df = pd.read_excel(FILE_PATH_OR_URL)
Remember to change FILE_PATH_OR_URL to the path or the URL of the Excel file.


Now that we know how easy it is to load an Excel file into a Pandas dataframe we are going to continue with learning more about the read_excel method.
Reading Specific Columns using Pandas read_excel
When using Pandas read_excel we will automatically get all columns from an Excel file. If we, for some reason, don’t want to parse all columns in the Excel file, we can use the parameter usecols. Let’s say we want to create a dataframe with the columns Player, Salary, and Position, only. We can do this by adding 1, 3, and 4 in a list:
cols = [1, 2, 3]

df = pd.read_excel('MLBPlayerSalaries.xlsx', sheet_names='MLBPlayerSalaries', usecols=cols)
df.head()Code language: Python (python)
According to the read_excel documentation, we should be able to put in a string. For instance, cols=’Player:Position’ should give us the same results as above.
Handling Missing Data using Pandas read_excel
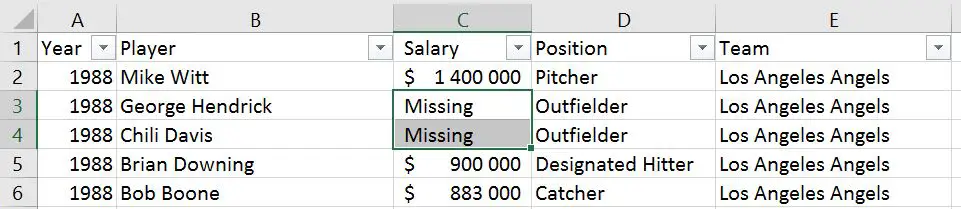
If our data has missing values in some cells and these missing values are coded in some way, like “Missing” we can use the na_values parameter.
Pandas Read Excel Example with Missing Data
In the example below, we are using the parameter na_values and we are putting in a string (i.e., “Missing’):
df = pd.read_excel('MLBPlayerSalaries_MD.xlsx', na_values="Missing", sheet_names='MLBPlayerSalaries', usecols=cols)
df.head()Code language: Python (python)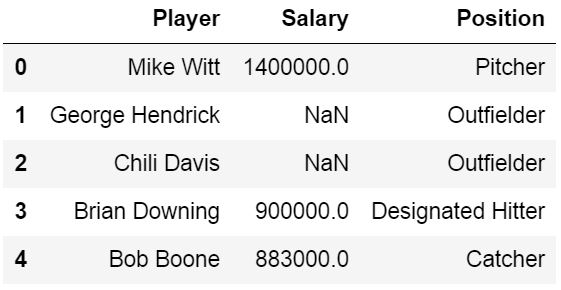
In the read excel examples above we used a dataset that can be downloaded from this page.
- Read the post Data manipulation with Pandas for three methods on data manipulation of dataframes, including missing data.
- Learn easy methods to clean data using Pandas and Pyjanitor
How to Skip Rows when Reading an Excel File
Now we will learn how to skip rows when loading an Excel file using Pandas. For this read excel example, we will use data that can be downloaded here.
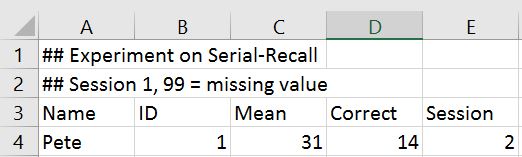
In the following Pandas read_excel example we load the sheet ‘session1’, which contains rows that we need to skip (these rows contain some information about the dataset).
We will use the parameter sheet_name=’Session1′ to read the sheet named ‘Session1’ (the example data contains more sheets; e.g., ‘Session2’ will load that sheet). Note, the first sheet will be read if we don’t use the sheet_name parameter. In this example, the important part is the parameter skiprow=2. We use this to skip the first two rows:
df = pd.read_excel('example_sheets1.xlsx', sheet_name='Session1', skiprows=2)
df.head()Code language: Python (python)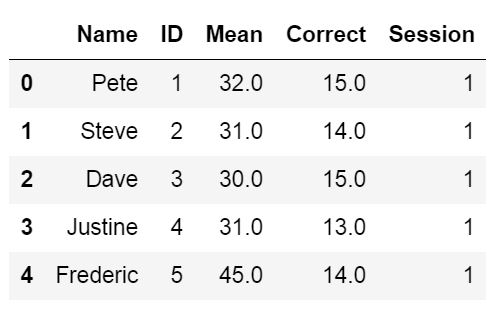
Another way to get Pandas read_excel to read from the Nth row is by using the header parameter. In the example Excel file, we use here, the third row contains the headers and we will use the parameter header=2 to tell Pandas read_excel that our headers are on the third row.
df = pd.read_excel('example_sheets1.xlsx', sheet_name='Session1', header=2)Code language: Python (python)Now, if we want Pandas read_excel to read from the second row, we change the number in the skiprows and header arguments to 2, and so on.
Reading Multiple Excel Sheets to Pandas Dataframes
In this section, of the Pandas read excel tutorial, we are going to learn how to read multiple sheets. Our Excel file, example_sheets1.xlsx’, has two sheets: ‘Session1’, and ‘Session2.’ Each sheet has data from an imagined experimental session. In the next example we are going to read both sheets, ‘Session1’ and ‘Session2’. Here’s how to use Pandas read_excel to read multiple sheets:
df = pd.read_excel('example_sheets1.xlsx',
    sheet_name=['Session1', 'Session2'], skiprows=2)Code language: Python (python)
By using the parameter sheet_name, and a list of names, we will get an ordered dictionary containing two dataframes:
dfCode language: Python (python)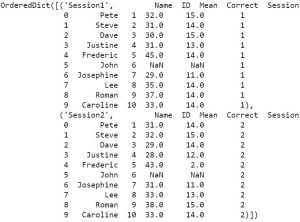
When working with Pandas read_excel we may want to join the data from all sheets (in this case sessions). Merging Pandas dataframes are quite easy; we just use the concat function and loop over the keys (i.e., sheets):
df2 = pd.concat(df[frame] for frame in data.keys())Code language: Python (python)Now in the example Excel file, there is a column identifying the dataset (e.g., session number). However, maybe we don’t have that kind of information in our Excel file. To merge the two dataframes and adding a column depicting which session we can use a for loop:
dfs = []
for framename in data.keys():
    temp_df = data[framename]
    temp_df['Session'] = framename
    dfs.append(temp_df)

df = pd.concat(dfs)Code language: Python (python)
In the code above, we start by creating a list and continue by looping through the keys in the list of dataframes. Finally, we create a temporary dataframe and take the sheet name and add it in the column ‘Session’.
Pandas Read Excel: How to Read All Sheets
Now, it is, of course, possible that when we want to read multiple sheets we also want to read all the sheets in the Excel file. That is, if we want to use read_excel to load all sheets from an Excel file to a dataframe it is possible. When reading multiple sheets and we want all sheets we can set the parameter sheet_name to None.
all_sheets_df = pd.read_excel('example_sheets1.xlsx', sheet_name=None)Code language: Python (python)Pandas Read Excel: Reading Many Excel Files
In this section, of the Pandas read excel tutorial, we will learn how to load many files into a Pandas dataframe because, in some cases, we may have a lot of Excel files containing data from, let’s say, different experiments. In Python, we can use the modules os and fnmatch to read all files in a directory. Finally, we use list comprehension to use read_excel on all files we found:
import os, fnmatch
xlsx_files = fnmatch.filter(os.listdir('.'), '*concat*.xlsx')

dfs = [pd.read_excel(xlsx_file) for xlsx_file in xlsx_files]Code language: Python (python)
If it makes sense we can, again, use the function concat to merge the dataframes:
df = pd.concat(dfs, sort=False)Code language: Python (python)There are other methods for reading many Excel files and merging them. We can, for instance, use the module glob together with Pandas concat to read multiple xlsx files:
import glob
list_of_xlsx = glob.glob('./*concat*.xlsx')
df = pd.concat(list_of_xlsx)Code language: Python (python)
Note, the files in this example, where we read multiple xlsx files using Pandas, are located here. They are named example_concat.xlsx, example_concat1.xlsx, and example_concat3.xlsx and should be added to the same directory as the Python script. Another option, of course, is to add the file path to the files. E.g., if we want to read multiple Excel files, using Pandas read_excel method, and they are stored in a directory called “SimData” we would do as follows:
import glob
list_of_xlsx = glob.glob('./SimData/*concat*.xlsx')
df = pd.concat(list_of_xlsx)Code language: Python (python)
Setting the Data Type for Data or Columns
If we need to, we can also, set the data type for the columns when reading Excel files using Pandas. Let’s use Pandas to read the example_sheets1.xlsx again. In the Pandas read_excel example below we use the dtype parameter to set the data type of some of the columns.
df = pd.read_excel('example_sheets1.xlsx',sheet_name='Session1',
                   header=1,dtype={'Names':str,'ID':str,
                                        'Mean':int, 'Session':str})Code language: Python (python)
We can use the method info to see the what data types the different columns have:
df.info()Code language: Python (python)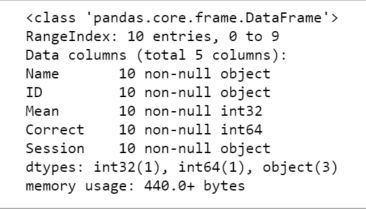
Writing Pandas Dataframes to Excel
Excel files can, of course, be created in Python using Pandas to_excel method. In this section of the post, we will learn how to create an excel file using Pandas. First, before writing an Excel file, we will create a dataframe containing some variables. Before that, we need to import Pandas:
import pandas as pdCode language: Python (python)The next step is to create the dataframe. We will create the dataframe using a dictionary. The keys will be the column names and the values will be lists containing our data:
df = pd.DataFrame({'Names':['Andreas', 'George', 'Steve',
                           'Sarah', 'Joanna', 'Hanna'],
                  'Age':[21, 22, 20, 19, 18, 23]})Code language: Python (python)
In this Pandas write to Excel example, we will write the dataframe to an Excel file using the to_excel method. Noteworthy, when using Pandas to_excel in the code chunk below, we don’t use any parameters.
df.to_excel('NamesAndAges.xlsx')Code language: Python (python)In the Excel file created when using Pandas to_excel is shown below. Evidently, if we don’t use the parameter sheet_name we get the default sheet name, ‘Sheet1’. Now, we can also see that we get a new column in our Excel file containing numbers. These are the index from the dataframe.
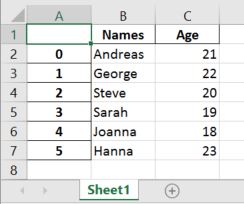
If we want our sheet to be named something else and we don’t want the index column we can add the following argument and parameters when we use Pandas to write to Excel:
df.to_excel('NamesAndAges.xlsx', sheet_name='Names and Ages', index=False)Code language: Python (python)Writing Multiple Pandas Dataframes to an Excel File:
In this section, we are going to use Pandas ExcelWriter and Pandas to_excel to write multiple Pandas dataframes to one Excel file. That is if we happen to have many dataframes that we want to store in one Excel file but on different sheets, we can do this easily. However, we need to use Pandas ExcelWriter now:
df1 = pd.DataFrame({'Names': ['Andreas', 'George', 'Steve',
                           'Sarah', 'Joanna', 'Hanna'],
                   'Age':[21, 22, 20, 19, 18, 23]})

df2 = pd.DataFrame({'Names': ['Pete', 'Jordan', 'Gustaf',
                           'Sophie', 'Sally', 'Simone'],
                   'Age':[22, 21, 19, 19, 29, 21]})

df3 = pd.DataFrame({'Names': ['Ulrich', 'Donald', 'Jon',
                           'Jessica', 'Elisabeth', 'Diana'],
                   'Age':[21, 21, 20, 19, 19, 22]})

dfs = {'Group1':df1, 'Group2':df2, 'Group3':df3}
writer = pd.ExcelWriter('NamesAndAges.xlsx', engine='xlsxwriter')

for sheet_name in dfs.keys():
    dfs[sheet_name].to_excel(writer, sheet_name=sheet_name, index=False)

writer.save()Code language: Python (python)
In the code above, we create 3 dataframes and then we continue to put them in a dictionary. Note, the keys are the sheet names and the cell names are the dataframes. After this is done we create a writer object using the xlsxwriter engine. We then continue by looping through the keys (i.e., sheet names) and add each sheet. Finally, the file is saved. Note, the final step is important as leaving this out will not give you the intended results.
Of course, there are other ways to store data. One of them is using JSON files. See the latest tutorial on how to read and write JSON files using Pandas to learn about one way to load and save data in the JSON format.
More resources on how to load data in different formats:
- How to read and write CSV files using Pandas
- How to read and write SPSS files using Python
Summary: How to Work With Excel Files using Pandas
That was it! In this post, we have learned a lot! We have, among other things, learned how to:
- Read Excel files and Spreadsheets using read_excel
- Load Excel files to dataframes:
- Read Excel sheets and skip rows
- Merging many sheets to a dataframe
- Loading many Excel files into one dataframe
- Load Excel files to dataframes:
- Write a dataframe to an Excel file
- Taking many dataframes and writing them to one Excel file with many sheets
Leave a comment below if you have any requests or suggestions on what should be covered next! Check the post A Basic Pandas Dataframe Tutorial for Beginners to learn more about working with Pandas dataframe. That is after you have loaded them from a file (e.g., Excel spreadsheets)
In this tutorial, you’ll learn how to use Python and Pandas to read Excel files using the Pandas read_excel function. Excel files are everywhere – and while they may not be the ideal data type for many data scientists, knowing how to work with them is an essential skill.
By the end of this tutorial, you’ll have learned:
- How to use the Pandas read_excel function to read an Excel file
- How to read specify an Excel sheet name to read into Pandas
- How to read multiple Excel sheets or files
- How to certain columns from an Excel file in Pandas
- How to skip rows when reading Excel files in Pandas
- And more
Let’s get started!
The Quick Answer: Use Pandas read_excel to Read Excel Files
To read Excel files in Python’s Pandas, use the read_excel() function. You can specify the path to the file and a sheet name to read, as shown below:
# Reading an Excel File in Pandas
import pandas as pd

df = pd.read_excel('/Users/datagy/Desktop/Sales.xlsx')

# With a Sheet Name
df = pd.read_excel(
   io='/Users/datagy/Desktop/Sales.xlsx'
   sheet_name ='North'
)
In the following sections of this tutorial, you’ll learn more about the Pandas read_excel() function to better understand how to customize reading Excel files.
Understanding the Pandas read_excel Function
The Pandas read_excel() function has a ton of different parameters. In this tutorial, you’ll learn how to use the main parameters available to you that provide incredible flexibility in terms of how you read Excel files in Pandas.
| Parameter | Description | Available Option |
|---|---|---|
io= |
The string path to the workbook. | URL to file, path to file, etc. |
sheet_name= |
The name of the sheet to read. Will default to the first sheet in the workbook (position 0). | Can read either strings (for the sheet name), integers (for position), or lists (for multiple sheets) |
usecols= |
The columns to read, if not all columns are to be read | Can be strings of columns, Excel-style columns (“A:C”), or integers representing positions columns |
dtype= |
The datatypes to use for each column | Dictionary with columns as keys and data types as values |
skiprows= |
The number of rows to skip from the top | Integer value representing the number of rows to skip |
nrows= |
The number of rows to parse | Integer value representing the number of rows to read |
.read_excel() functionThe table above highlights some of the key parameters available in the Pandas .read_excel() function. The full list can be found in the official documentation. In the following sections, you’ll learn how to use the parameters shown above to read Excel files in different ways using Python and Pandas.
As shown above, the easiest way to read an Excel file using Pandas is by simply passing in the filepath to the Excel file. The io= parameter is the first parameter, so you can simply pass in the string to the file.
The parameter accepts both a path to a file, an HTTP path, an FTP path or more. Let’s see what happens when we read in an Excel file hosted on my Github page.
# Reading an Excel file in Pandas
import pandas as pd

df = pd.read_excel('https://github.com/datagy/mediumdata/raw/master/Sales.xlsx')
print(df.head())

# Returns:
#         Date Customer  Sales
# 0 2022-04-01        A    191
# 1 2022-04-02        B    727
# 2 2022-04-03        A    782
# 3 2022-04-04        B    561
# 4 2022-04-05        A    969
If you’ve downloaded the file and taken a look at it, you’ll notice that the file has three sheets? So, how does Pandas know which sheet to load? By default, Pandas will use the first sheet (positionally), unless otherwise specified.
In the following section, you’ll learn how to specify which sheet you want to load into a DataFrame.
How to Specify Excel Sheet Names in Pandas read_excel
As shown in the previous section, you learned that when no sheet is specified, Pandas will load the first sheet in an Excel workbook. In the workbook provided, there are three sheets in the following structure:
Sales.xlsx
|---East
|---West
|---North
Because of this, we know that the data from the sheet “East” was loaded. If we wanted to load the data from the sheet “West”, we can use the sheet_name= parameter to specify which sheet we want to load.
The parameter accepts both a string as well as an integer. If we were to pass in a string, we can specify the sheet name that we want to load.
Let’s take a look at how we can specify the sheet name for 'West':
# Specifying an Excel Sheet to Load by Name
import pandas as pd

df = pd.read_excel(
    io='https://github.com/datagy/mediumdata/raw/master/Sales.xlsx',
    sheet_name='West')
print(df.head())

# Returns:
#         Date Customer  Sales
# 0 2022-04-01        A    504
# 1 2022-04-02        B    361
# 2 2022-04-03        A    694
# 3 2022-04-04        B    702
# 4 2022-04-05        A    255
Similarly, we can load a sheet name by its position. By default, Pandas will use the position of 0, which will load the first sheet. Say we wanted to repeat our earlier example and load the data from the sheet named 'West', we would need to know where the sheet is located.
Because we know the sheet is the second sheet, we can pass in the 1st index:
# Specifying an Excel Sheet to Load by Position
import pandas as pd

df = pd.read_excel(
    io='https://github.com/datagy/mediumdata/raw/master/Sales.xlsx',
    sheet_name=1)
print(df.head())

# Returns:
#         Date Customer  Sales
# 0 2022-04-01        A    504
# 1 2022-04-02        B    361
# 2 2022-04-03        A    694
# 3 2022-04-04        B    702
# 4 2022-04-05        A    255
We can see that both of these methods returned the same sheet’s data. In the following section, you’ll learn how to specify which columns to load when using the Pandas read_excel function.
How to Specify Columns Names in Pandas read_excel
There may be many times when you don’t want to load every column in an Excel file. This may be because the file has too many columns or has different columns for different worksheets.
In order to do this, we can use the usecols= parameter. It’s a very flexible parameter that lets you specify:
- A list of column names,
- A string of Excel column ranges,
- A list of integers specifying the column indices to load
Most commonly, you’ll encounter people using a list of column names to read in. Each of these columns are comma separated strings, contained in a list.
Let’s load our DataFrame from the example above, only this time only loading the 'Customer' and 'Sales' columns:
# Specifying Columns to Load by Name
import pandas as pd

df = pd.read_excel(
    io='https://github.com/datagy/mediumdata/raw/master/Sales.xlsx',
    usecols=['Customer', 'Sales'])
print(df.head())

# Returns:
#   Customer  Sales
# 0        A    191
# 1        B    727
# 2        A    782
# 3        B    561
# 4        A    969
We can see that by passing in the list of strings representing the columns, we were able to parse those columns only.
If we wanted to use Excel changes, we could also specify columns 'B:C'. Let’s see what this looks like below:
# Specifying Columns to Load by Excel Range
import pandas as pd

df = pd.read_excel(
    io='https://github.com/datagy/mediumdata/raw/master/Sales.xlsx',
    usecols='B:C')
print(df.head())

# Returns:
#   Customer  Sales
# 0        A    191
# 1        B    727
# 2        A    782
# 3        B    561
# 4        A    969
Finally, we can also pass in a list of integers that represent the positions of the columns we wanted to load. Because the columns are the second and third columns, we would load a list of integers as shown below:
# Specifying Columns to Load by Their Position
import pandas as pd

df = pd.read_excel(
    io='https://github.com/datagy/mediumdata/raw/master/Sales.xlsx',
    usecols=[1,2])
print(df.head())

# Returns:
#   Customer  Sales
# 0        A    191
# 1        B    727
# 2        A    782
# 3        B    561
# 4        A    969
In the following section, you’ll learn how to specify data types when reading Excel files.
How to Specify Data Types in Pandas read_excel
Pandas makes it easy to specify the data type of different columns when reading an Excel file. This serves three main purposes:
- Preventing data from being read incorrectly
- Speeding up the read operation
- Saving memory
You can pass in a dictionary where the keys are the columns and the values are the data types. This ensures that data are ready correctly. Let’s see how we can specify the data types for our columns.
# Specifying Data Types for Columns When Reading Excel Files
import pandas as pd

df = pd.read_excel(
    io='https://github.com/datagy/mediumdata/raw/master/Sales.xlsx',
    dtype={'date':'datetime64', 'Customer': 'object', 'Sales':'int'})
print(df.head())

# Returns:
#   Customer  Sales
#         Date Customer  Sales
# 0 2022-04-01        A    191
# 1 2022-04-02        B    727
# 2 2022-04-03        A    782
# 3 2022-04-04        B    561
# 4 2022-04-05        A    969
It’s important to note that you don’t need to pass in all the columns for this to work. In the next section, you’ll learn how to skip rows when reading Excel files.
How to Skip Rows When Reading Excel Files in Pandas
In some cases, you’ll encounter files where there are formatted title rows in your Excel file, as shown below:
If we were to read the sheet 'North', we would get the following returned:
# Reading a poorly formatted Excel file
import pandas as pd

df = pd.read_excel(
    io='https://github.com/datagy/mediumdata/raw/master/Sales.xlsx',
    sheet_name='North')
print(df.head())

# Returns:
#            North Sales Unnamed: 1 Unnamed: 2
# 0     Totals Available        NaN        NaN
# 1                 Date   Customer      Sales
# 2  2022-04-01 00:00:00          A        164
# 3  2022-04-02 00:00:00          B        612
# 4  2022-04-03 00:00:00          A        260
Pandas makes it easy to skip a certain number of rows when reading an Excel file. This can be done using the skiprows= parameter. We can see that we need to skip two rows, so we can simply pass in the value 2, as shown below:
# Reading a Poorly Formatted File Correctly
import pandas as pd

df = pd.read_excel(
    io='https://github.com/datagy/mediumdata/raw/master/Sales.xlsx',
    sheet_name='North',
    skiprows=2)
print(df.head())

# Returns:
#         Date Customer  Sales
# 0 2022-04-01        A    164
# 1 2022-04-02        B    612
# 2 2022-04-03        A    260
# 3 2022-04-04        B    314
# 4 2022-04-05        A    215
This read the file much more accurately! It can be a lifesaver when working with poorly formatted files. In the next section, you’ll learn how to read multiple sheets in an Excel file in Pandas.
How to Read Multiple Sheets in an Excel File in Pandas
Pandas makes it very easy to read multiple sheets at the same time. This can be done using the sheet_name= parameter. In our earlier examples, we passed in only a single string to read a single sheet. However, you can also pass in a list of sheets to read multiple sheets at once.
Let’s see how we can read our first two sheets:
# Reading Multiple Excel Sheets at Once in Pandas
import pandas as pd

dfs = pd.read_excel(
    io='https://github.com/datagy/mediumdata/raw/master/Sales.xlsx',
    sheet_name=['East', 'West'])

print(type(dfs))

# Returns: <class 'dict'>
In the example above, we passed in a list of sheets to read. When we used the type() function to check the type of the returned value, we saw that a dictionary was returned.
Each of the sheets is a key of the dictionary with the DataFrame being the corresponding key’s value. Let’s see how we can access the 'West' DataFrame:
# Reading Multiple Excel Sheets in Pandas
import pandas as pd

dfs = pd.read_excel(
    io='https://github.com/datagy/mediumdata/raw/master/Sales.xlsx',
    sheet_name=['East', 'West'])

print(dfs.get('West').head())

# Returns:
#         Date Customer  Sales
# 0 2022-04-01        A    504
# 1 2022-04-02        B    361
# 2 2022-04-03        A    694
# 3 2022-04-04        B    702
# 4 2022-04-05        A    255
You can also read all of the sheets at once by specifying None for the value of sheet_name=. Similarly, this returns a dictionary of all sheets:
# Reading Multiple Excel Sheets in Pandas
import pandas as pd

dfs = pd.read_excel(
    io='https://github.com/datagy/mediumdata/raw/master/Sales.xlsx',
    sheet_name=None)
In the next section, you’ll learn how to read multiple Excel files in Pandas.
How to Read Only n Lines When Reading Excel Files in Pandas
When working with very large Excel files, it can be helpful to only sample a small subset of the data first. This allows you to quickly load the file to better be able to explore the different columns and data types.
This can be done using the nrows= parameter, which accepts an integer value of the number of rows you want to read into your DataFrame. Let’s see how we can read the first five rows of the Excel sheet:
# Reading n Number of Rows of an Excel Sheet
import pandas as pd

df = pd.read_excel(
    io='https://github.com/datagy/mediumdata/raw/master/Sales.xlsx',
    nrows=5)
print(df)

# Returns:
#         Date Customer  Sales
# 0 2022-04-01        A    191
# 1 2022-04-02        B    727
# 2 2022-04-03        A    782
# 3 2022-04-04        B    561
# 4 2022-04-05        A    969
Conclusion
In this tutorial, you learned how to use Python and Pandas to read Excel files into a DataFrame using the .read_excel() function. You learned how to use the function to read an Excel, specify sheet names, read only particular columns, and specify data types. You then learned how skip rows, read only a set number of rows, and read multiple sheets.
Additional Resources
To learn more about related topics, check out the tutorials below:
- Pandas Dataframe to CSV File – Export Using .to_csv()
- Combine Data in Pandas with merge, join, and concat
- Introduction to Pandas for Data Science
- Summarizing and Analyzing a Pandas DataFrame