
How can I convert an Excel date (in a number format) to a proper date in Python?
asked Jul 10, 2009 at 8:41
![]()
4
You can use xlrd.
From its documentation, you can read that dates are always stored as numbers; however, you can use xldate_as_tuple to convert it to a python date.
Note: the version on the PyPI seems more up-to-date than the one available on xlrd’s website.
![]()
answered Jul 10, 2009 at 8:53
![]()
robrob
36.7k2 gold badges56 silver badges65 bronze badges
0
Here’s the bare-knuckle no-seat-belts use-at-own-risk version:
import datetime

def minimalist_xldate_as_datetime(xldate, datemode):
    # datemode: 0 for 1900-based, 1 for 1904-based
    return (
        datetime.datetime(1899, 12, 30)
        + datetime.timedelta(days=xldate + 1462 * datemode)
        )
answered Jul 11, 2009 at 1:25
![]()
John MachinJohn Machin
80.8k11 gold badges140 silver badges186 bronze badges
3
After testing and a few days wait for feedback, I’ll svn-commit the following whole new function in xlrd’s xldate module … note that it won’t be available to the diehards still running Python 2.1 or 2.2.
##
# Convert an Excel number (presumed to represent a date, a datetime or a time) into
# a Python datetime.datetime
# @param xldate The Excel number
# @param datemode 0: 1900-based, 1: 1904-based.
# <br>WARNING: when using this function to
# interpret the contents of a workbook, you should pass in the Book.datemode
# attribute of that workbook. Whether
# the workbook has ever been anywhere near a Macintosh is irrelevant.
# @return a datetime.datetime object, to the nearest_second.
# <br>Special case: if 0.0 <= xldate < 1.0, it is assumed to represent a time;
# a datetime.time object will be returned.
# <br>Note: 1904-01-01 is not regarded as a valid date in the datemode 1 system; its "serial number"
# is zero.
# @throws XLDateNegative xldate < 0.00
# @throws XLDateAmbiguous The 1900 leap-year problem (datemode == 0 and 1.0 <= xldate < 61.0)
# @throws XLDateTooLarge Gregorian year 10000 or later
# @throws XLDateBadDatemode datemode arg is neither 0 nor 1
# @throws XLDateError Covers the 4 specific errors

def xldate_as_datetime(xldate, datemode):
    if datemode not in (0, 1):
        raise XLDateBadDatemode(datemode)
    if xldate == 0.00:
        return datetime.time(0, 0, 0)
    if xldate < 0.00:
        raise XLDateNegative(xldate)
    xldays = int(xldate)
    frac = xldate - xldays
    seconds = int(round(frac * 86400.0))
    assert 0 <= seconds <= 86400
    if seconds == 86400:
        seconds = 0
        xldays += 1
    if xldays >= _XLDAYS_TOO_LARGE[datemode]:
        raise XLDateTooLarge(xldate)

    if xldays == 0:
        # second = seconds % 60; minutes = seconds // 60
        minutes, second = divmod(seconds, 60)
        # minute = minutes % 60; hour    = minutes // 60
        hour, minute = divmod(minutes, 60)
        return datetime.time(hour, minute, second)

    if xldays < 61 and datemode == 0:
        raise XLDateAmbiguous(xldate)

    return (
        datetime.datetime.fromordinal(xldays + 693594 + 1462 * datemode)
        + datetime.timedelta(seconds=seconds)
        )
answered Jul 10, 2009 at 13:29
![]()
John MachinJohn Machin
80.8k11 gold badges140 silver badges186 bronze badges
3
xlrd.xldate_as_tuple is nice, but there’s xlrd.xldate.xldate_as_datetime that converts to datetime as well.
import xlrd
wb = xlrd.open_workbook(filename)
xlrd.xldate.xldate_as_datetime(41889, wb.datemode)
=> datetime.datetime(2014, 9, 7, 0, 0)
answered Jan 29, 2015 at 17:21
![]()
beardcbeardc
19.9k17 gold badges74 silver badges94 bronze badges
Please refer to this link: Reading date as a string not float from excel using python xlrd
it worked for me:
in shot this the link has:
import datetime, xlrd
book = xlrd.open_workbook("myfile.xls")
sh = book.sheet_by_index(0)
a1 = sh.cell_value(rowx=0, colx=0)
a1_as_datetime = datetime.datetime(*xlrd.xldate_as_tuple(a1, book.datemode))
print 'datetime: %s' % a1_as_datetime
![]()
answered Oct 7, 2014 at 7:59
![]()
Snehal ParmarSnehal Parmar
5,3333 gold badges36 silver badges45 bronze badges
4
Incase you’re using pandas and your read_excel reads in Date formatted as Excel numbers improperly and need to recover the real dates behind…
The lambda function applied on the column uses xlrd to recover the date back
import xlrd
df['possible_intdate'] = df['possible_intdate'].apply(lambda s: xlrd.xldate.xldate_as_datetime(s, 0))


>> df['possible_intdate']

   dtype('<M8[ns]')
answered Dec 15, 2016 at 1:49
![]()
Shankar ARULShankar ARUL
12.3k11 gold badges67 silver badges69 bronze badges
0
Expected situation
# Wrong output from cell_values()
42884.0

# Expected output
2017-5-29
Example: Let cell_values(2,2) from sheet number 0 will be the date
targeted
Get the required variables as the following
workbook = xlrd.open_workbook("target.xlsx")

sheet = workbook.sheet_by_index(0)

wrongValue = sheet.cell_value(2,2)
And make use of xldate_as_tuple
year, month, day, hour, minutes, seconds = xlrd.xldate_as_tuple(wrongValue, workbook.datemode)
print("{0} - {1} - {2}".format(year, month, day))
That’s my solution
answered Jun 16, 2017 at 18:57
![]()
EdwardhkEdwardhk
874 silver badges9 bronze badges
Since there’s a chance that your excel files are coming from different computers/people; there’s a chance that the formatting is messy; so be extra cautious.
I just imported data from 50 odd excels where the dates were entered in DD/MM/YYYY or DD-MM-YYYY, but most of the Excel files stored them as MM/DD/YYYY (Probably because the PCs were setup with en-us instead of en-gb or en-in).
Even more irritating was the fact that dates above 13/MM/YYYY were in DD/MM/YYYY format still. So there was variations within the Excel files.
The most reliable solution I figured out was to manually set the Date column on each excel file to to be Plain Text — then use this code to parse it:
if date_str_from_excel:
    try:
        return datetime.strptime(date_str_from_excel, '%d/%m/%Y')
    except ValueError:
        print("Unable to parse date")
answered Jul 29, 2018 at 13:39
![]()
Nitin NainNitin Nain
5,0021 gold badge38 silver badges51 bronze badges
excel stores dates and times as a number representing the number of days since 1900-Jan-0, if you want to get the dates in date format using python, just subtract 2 days from the days column, as shown below:
Date = sheet.cell(1,0).value-2 //in python
at column 1 in my excel, i have my date and above command giving me date values minus 2 days, which is same as date present in my excel sheet
answered Apr 17, 2019 at 21:24
![]()
This is a revised version from @hounded. My code handles both date and time, something like 43705.591795706
    import math
    import datetime


    def xldate_to_datetime(xldatetime): #something like 43705.6158241088

      tempDate = datetime.datetime(1899, 12, 31)
      (days, portion) = math.modf(xldatetime)

      deltaDays = datetime.timedelta(days=days)
      #changing the variable name in the edit
      secs = int(24 * 60 * 60 * portion)
      detlaSeconds = datetime.timedelta(seconds=secs)
      TheTime = (tempDate + deltaDays + detlaSeconds )
      return TheTime.strftime("%Y-%m-%d %H:%M:%S")


xldate_to_datetime(43705.6158241088)
# 2019-08-29 14:46:47
![]()
answered Aug 28, 2019 at 22:32
![]()
Dustin SunDustin Sun
5,1729 gold badges49 silver badges87 bronze badges
1
For quick and dirty:
year, month, day, hour, minute, second = xlrd.xldate_as_tuple(excelDate, wb.datemode)
whatYouWant = str(month)+'/'+str(day)+'/'+str(year)
answered Jun 10, 2014 at 3:35
![]()
CmagCmag
14.8k25 gold badges89 silver badges139 bronze badges
A combination of peoples post gave me the date and the time for excel conversion. I did return it as a string
def xldate_to_datetime(xldate):
  tempDate = datetime.datetime(1900, 1, 1)
  deltaDays = datetime.timedelta(days=int(xldate))
  secs = (int((xldate%1)*86400)-60)
  detlaSeconds = datetime.timedelta(seconds=secs)
  TheTime = (tempDate + deltaDays + detlaSeconds )
  return TheTime.strftime("%Y-%m-%d %H:%M:%S")
answered Mar 30, 2015 at 0:14
![]()
houndedhounded
6669 silver badges20 bronze badges
1
If you have a datetime column in excel file. Then below code will fix it. I went through a lot of answers on StackOverflow and nothing fixed it. I thought file is corrupted.
from datetime import datetime
jsts = 1468629431.0
datetime.fromtimestamp(jsts)
answered Jun 4, 2020 at 8:34
![]()
When converting an excel file to CSV the date/time cell looks like this:
foo, 3/16/2016 10:38, bar,
To convert the datetime text value to datetime python object do this:
from datetime import datetime

date_object = datetime.strptime('3/16/2016 10:38', '%m/%d/%Y %H:%M')    # excel format (CSV file)
print date_object will return 2005-06-01 13:33:00
answered Mar 16, 2016 at 11:49
![]()
1
Dates and times can be stored in two distinct ways in XLSX files: as an
ISO 8601 formatted string or as a single number. openpyxl supports
both representations and translates between them and Python’s datetime
module representations when reading from and writing to files. In either
representation, the maximum date and time precision in XLSX files is
millisecond precision.
XLSX files are not suitable for storing historic dates (before 1900),
due to bugs in Excel that cannot be fixed without causing backward
compatibility problems. To discourage users from trying anyway, Excel
deliberately refuses to recognize and display such dates. Consequently,
it is not advised to use openpyxl for such purposes either, especially
when exchanging files with others.
Timezones
The date and time representations in Excel do not support timezones,
therefore openpyxl can only deal with naive datetime/time objects.
Any timezone information attached to Python datetimes must be stripped
off by the user before datetimes can be stored in XLSX files.
Using the ISO 8601 format
To make openpyxl store dates and times in the ISO 8601 format on
writing your file, set the workbook’s iso_dates flag to True:
>>> import openpyxl
>>> wb = openpyxl.Workbook()
>>> wb.iso_dates = True
The benefit of using this format is that the meaning of the stored
information is not subject to interpretation, as it is with the single
number format [1].
The Office Open XML standard does not specify a supported subset of the
ISO 8601 duration format for representing time interval durations.
openpyxl therefore always uses the single number format for timedelta
values when writing them to file.
The 1900 and 1904 date systems
The ‘date system’ of an XLSX file determines how dates and times in the
single number representation are interpreted. XLSX files always use one
of two possible date systems:
- In the 1900 date system (the default), the reference date (with number 1) is 1900-01-01.
- In the 1904 date system, the reference date (with number 0) is 1904-01-01.
Complications arise not only from the different start numbers of the
reference dates, but also from the fact that the 1900 date system has a
built-in (but wrong) assumption that the year 1900 had been a leap year.
Excel deliberately refuses to recognize and display dates before the
reference date correctly, in order to discourage people from storing
historical data.
- More information on this issue is available from Microsoft:
-
- https://docs.microsoft.com/en-us/office/troubleshoot/excel/1900-and-1904-date-system
- https://docs.microsoft.com/en-us/office/troubleshoot/excel/wrongly-assumes-1900-is-leap-year
In workbooks using the 1900 date system, openpyxl behaves the same as
Excel when translating between the worksheets’ date/time numbers and
Python datetimes in January and February 1900. The only exception is 29
February 1900, which cannot be represented as a Python datetime object
since it is not a valid date.
You can get the date system of a workbook like this:
>>> import openpyxl
>>> wb = openpyxl.Workbook()
>>> if wb.epoch == openpyxl.utils.datetime.CALENDAR_WINDOWS_1900:
...     print("This workbook is using the 1900 date system.")
...
This workbook is using the 1900 date system.
and set it like this:
>>> wb.epoch = openpyxl.utils.datetime.CALENDAR_MAC_1904
Handling timedelta values
Excel users can use number formats resembling [h]:mm:ss or
[mm]:ss to display time interval durations, which openpyxl
considers to be equivalent to timedeltas in Python.
openpyxl recognizes these number formats when reading XLSX files and
returns datetime.timedelta values for the corresponding cells.
When writing timedelta values from worksheet cells to file, openpyxl
uses the [h]:mm:ss number format for these cells.
Footnotes
| [1] | For example, the serial 1 in an Excel worksheet can be interpreted as 00:00, as 24:00, as 1900-01-01, as 1440 (minutes), etc., depending solely on the formatting applied. |
Improve Article
Save Article
Like Article
Improve Article
Save Article
Like Article
In this article, we are going to see how to convert any Dates in Spreadsheets using Python.
Used file:
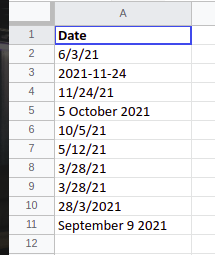
This file comprises a single column entitled ‘Date’ and stores random dates of 2021 in some different forms of format.
Approach:
- We’ll begin by importing the pandas library.
- Let’s have a look at the code that converts the dates.
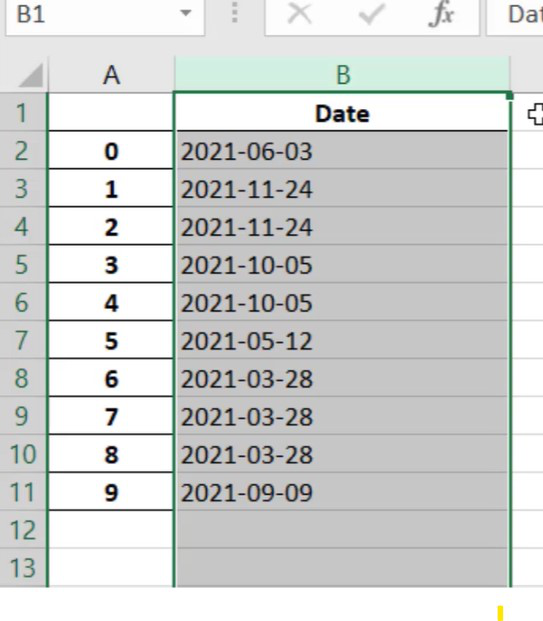
sample_dates[“Date”] = pd.to_datetime(sample_dates[“Date”]).dt.strftime(“%Y-%m-%d”)
- To perform tasks involving date and time, we must first transform the column into a datetime data type, which this section of the code will do:
sample_dates[“Date”] = pd.to_datetime(sample_dates[“Date”])
- Then we use the dt and strftime methods with a value of “%Y-%m-%d” to inform Python how to format the date. Example here we used is “%Y-%m-%” where %Y is the full year, %m is the month with 2 digits and %d is the date with 2 digits.
Example 1: Convert any Dates in Spreadsheets
Python3
import pandas as pd
sample_dates = pd.read_excel("sample_dates.xlsx")
sample_dates["Date"] = pd.to_datetime(
sample_dates["Date"]).dt.strftime("%Y-%m-%d")
sample_dates.to_excel("sample_dates_formated.xlsx")
Output:
Other well-known formats:
Example date – Saturday, 18 December, 2021, 7:00 PM
- “%A, %B %d” -> “Saturday, December 18”
- “%d-%b-%y” -> “18-Dec-21”
- “%d/%m/%Y” -> “18/12/2021”
- “%b %d, %Y” -> “Dec 18, 2021”
| Directive | Meaning | Example |
|---|---|---|
| %a | Weekday as locale’s abbreviated name |
Sun, Mon,…..,Sat(en_US); So, Mo,…..,Sa(de_DE) |
| %A | Weekday as locale full name | Sunday, Monday, ….., Saturday |
| %w | Weekday as a decimal number, where 0 is Sunday and 6 is Saturday | 0, 1, 2, 3……,6 |
| %d | Day of the month as a zero-padded decimal number | 01,02,….31 |
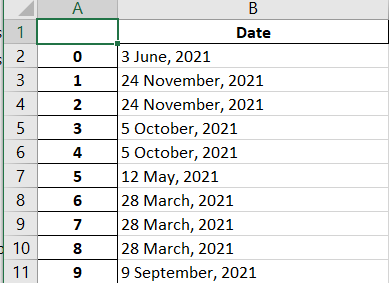
Example 2:
We’re going to use the same dataset that we used in the last example.
Format - "%d %b, %Y" -> "18 December, 2021"
Here we will use ‘%#d’ to remove the padding of zero from the day, i.e. 08 to 8. This will not do padding of zero if the date is in single digit. We can use ‘%-d’ on Linux.
Python3
import pandas as pd
sample_dates = pd.read_excel("sample_dates.xlsx")
sample_dates["Date"] = pd.to_datetime(
sample_dates["Date"]).dt.strftime("%#d %B, %Y")
sample_dates.to_excel("sample_dates_formated.xlsx")
Output:
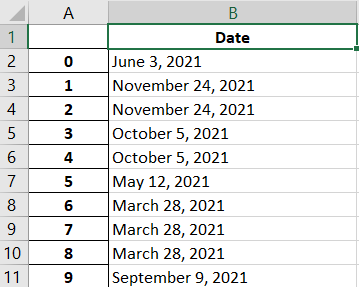
Example 3:
Here we will use different format
Format - "%B %d, %Y" -> "December 18, 2021"
Python3
import pandas as pd
sample_dates = pd.read_excel("sample_dates.xlsx")
sample_dates["Date"] = pd.to_datetime(
sample_dates["Date"]).dt.strftime("%B %d, %Y")
sample_dates.to_excel("sample_dates_formated.xlsx")
Output:
Like Article
Save Article
Improve Article
Save Article
Like Article
Improve Article
Save Article
Like Article
This article will discuss the conversion of an excel serial date to DateTime in Python.
The Excel “serial date” format is actually the number of days since 1900-01-00 i.e., January 1st, 1900. For example, the excel serial date number 43831 represents January 1st, 2020, and after converting 43831 to a DateTime becomes 2020-01-01.
By using xlrd.xldate_as_datetime() function this can be achieved. The xlrd.xldate_as_datetime() function is used to convert excel date/time number to datetime.datetime object.
Syntax: xldate_as_datetime (xldate, datemode)
Parameters: This function accepts two parameters that are illustrated below:
- xldate: This is the specified excel date that will converted into datetime.
- datemode: This is the specified datemode in which conversion will be performed.
Return values: This function returns the datetime.datetime object.
First, call xlrd.xldate_as_datetime(date, 0) function to convert the specified Excel date to a datetime.datetime object. Then, call datetime.datetime.date() function on the returned datetime.datetime object to return the date as a datetime.date object. Lastly, call datetime.date.isoformat() function to convert the returned datetime.date object to a ISO format date string.
Let’s see some examples to illustrate the above algorithm:
Example: Python program to convert excel serial date to string date
Python3
import xlrd
xl_date = 43831
datetime_date = xlrd.xldate_as_datetime(xl_date, 0)
date_object = datetime_date.date()
string_date = date_object.isoformat()
print(string_date)
print(type(string_date))
Output:
2020-01-01
<class 'str'>
Example 2: Python program to convert excel serial number to DateTime
Python3
import xlrd
xl_date = 43831
datetime_date = xlrd.xldate_as_datetime(xl_date, 0)
date_object = datetime_date.date()
print(date_object)
print(type(date_object))
Output:
2020-01-01
<class 'datetime.date'>
Like Article
Save Article
Содержание
- Объект ячейки Cell модуля openpyxl в Python.
- Основные атрибуты и методы объекта ячейки Cell.
- Содержание:
- Cell.base_date :
- Cell.check_string(value) :
- Cell.col_idx :
- Cell.column :
- Cell.column_letter :
- Cell.comment :
- Cell.coordinate :
- Cell.encoding :
- Cell.hyperlink :
- Cell.is_date :
- Cell.offset(row=0, column=0) :
- The Format Class
- Creating and using a Format object
- Format Defaults
- Modifying Formats
- Number Format Categories
- Number Formats in different locales
- Format methods and Format properties
- format.set_font_name()
- format.set_font_size()
- format.set_font_color()
- format.set_bold()
- format.set_italic()
- format.set_underline()
- format.set_font_strikeout()
- format.set_font_script()
- format.set_num_format()
- format.set_locked()
- format.set_hidden()
- format.set_align()
- format.set_center_across()
- format.set_text_wrap()
- format.set_rotation()
- format.set_reading_order()
- format.set_indent()
- format.set_shrink()
- format.set_text_justlast()
- format.set_pattern()
- format.set_bg_color()
- format.set_fg_color()
- format.set_border()
- format.set_bottom()
- format.set_top()
- format.set_left()
- format.set_right()
- format.set_border_color()
- format.set_bottom_color()
- format.set_top_color()
- format.set_left_color()
- format.set_right_color()
- format.set_diag_border()
- format.set_diag_type()
- format.set_diag_color()
- format.set_quote_prefix()
Объект ячейки Cell модуля openpyxl в Python.
Основные атрибуты и методы объекта ячейки Cell.
Объект ячейки Cell управляет отдельными ячейками электронной таблицы, а также описывает ее свойства. Класс Cell() должен знать свое значение и тип, параметры отображения и любые другие функции ячейки Excel.
Не создавайте объекты ячейки самостоятельно. Доступ к произвольной ячейке можно получить, обратившись к объекту рабочего листа Worksheet как к словарю, при этом ключом будет служить строка с именем ячейки, например ws[‘A1’] . Это вернет ячейку на ‘A4’ или создаст ее, если она еще не существует. Значения могут быть присвоены напрямую:
Для доступа к ячейке с использованием индексов столбцов и строк, можно использовать метод Worksheet.cell() .
Пример работы с объектом ячейки через переменную:
Содержание:
- Cell.base_date базовый класс обработки даты,
- Cell.check_error() проверяет правильность кодировка строки,
- Cell.col_idx числовой индекс столбца,
- Cell.column номер столбца этой ячейки,
- Cell.column_letter возвращает букву столбца ячейки,
- Cell.comment возвращает/назначает объект комментария,
- Cell.coordinate возвращает координаты этой ячейки,
- Cell.encoding возвращает кодировку этой ячейки,
- Cell.hyperlink устанавливает гиперссылку,
- Cell.is_date проверяет значение ячейки на дату,
- Cell.offset() смещенный объект ячейки,
- Cell.parent объект рабочего листа,
- Cell.row номер строки этой ячейки,
- Cell.value возвращает/устанавливает значение в ячейку,
- Cell.alignment выравнивает значения в ячейке,
- Cell.font стиль шрифта ячейки,
- Cell.border стиль оформления границ ячейки,
- Cell.fill цвет заливки ячейки.
Cell.base_date :
Свойство Cell.base_date содержит базовый класс обработки даты. По умолчанию это datetime .
Cell.check_string(value) :
Метод Cell.check_string() проверяет правильность кодировка строки, а также ее допустимой длины и символ разрыва строки.
Cell.col_idx :
Атрибут Cell.col_idx возвращает числовой индекс столбца. Нумерация столбцов в модуле openpyxl начинается с 1, а не с 0 как в списке.
Cell.column :
Атрибут Cell.column возвращает номер столбца этой ячейки. Нумерация столбцов в модуле openpyxl начинается с 1, а не с 0 как в списке.
Cell.column_letter :
Атрибут Cell.column_letter возвращает букву столбца ячейки.
Атрибут Cell.comment возвращает/назначает объект комментария Comment , связанный с этой ячейкой. Объект комментария содержит текстовый атрибут и атрибут автора, которые должны быть установлены.
Если назначить один и тот же комментарий нескольким ячейкам, то openpyxl автоматически создаст копии.
Cell.coordinate :
Атрибут Cell.coordinate возвращает координаты этой ячейки.
Cell.encoding :
Атрибут Cell.encoding возвращает кодировку этой ячейки.
Cell.hyperlink :
Свойство Cell.hyperlink устанавливает целевую гиперссылку.
Некоторые говорят что код, представленный выше — не работает. В таком случае установить ссылку в ячейку можно используя встроенную в Excel функцию ‘=HYPERLINK(link, linkName)`, например:
Cell.is_date :
Свойство Cell.is_date возвращает True , если значение отформатировано как дата.
Cell.offset(row=0, column=0) :
Метод Cell.offset() возвращает объект ячейки, смещенный на кол-во строк row и столбцов column относительно этой ячейки.
- row — количество смещения строк.
- column — количество смещения столбцов.
Источник
The Format Class
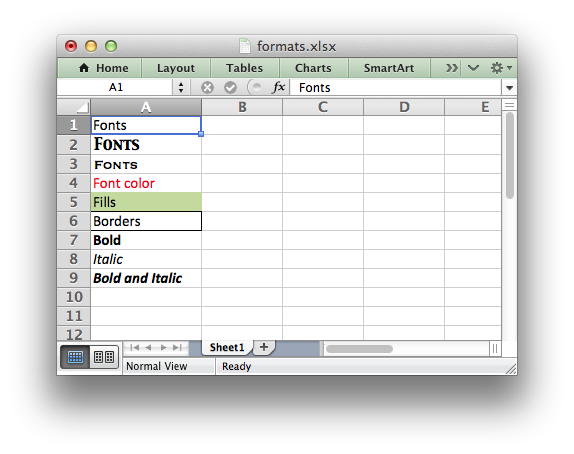
This section describes the methods and properties that are available for formatting cells in Excel.
The properties of a cell that can be formatted include: fonts, colors, patterns, borders, alignment and number formatting.
Creating and using a Format object
Cell formatting is defined through a Format object. Format objects are created by calling the workbook add_format() method as follows:
There are two ways of setting Format properties: by using the object interface or by setting the property as a dictionary of key/value pairs in the constructor. For example, a typical use of the object interface would be as follows:
By comparison the properties can be set by passing a dictionary of properties to the add_format() constructor:
In general the key/value interface is more flexible and clearer than the object method and is the recommended method for setting format properties. However, both methods produce the same result.
Once a Format object has been constructed and its properties have been set it can be passed as an argument to the worksheet write() methods as follows:
Formats can also be passed to the worksheet set_row() and set_column() methods to define the default formatting properties for a row or column:
Format Defaults
The default Excel 2007+ cell format is Calibri 11 with all other properties off.
In general a format method call without an argument will turn a property on, for example:
Since most properties are already off by default it isn’t generally required to turn them off. However, it is possible if required:
Modifying Formats
Each unique cell format in an XlsxWriter spreadsheet must have a corresponding Format object. It isn’t possible to use a Format with a write() method and then redefine it for use at a later stage. This is because a Format is applied to a cell not in its current state but in its final state. Consider the following example:
Cell A1 is assigned a format which initially has the font set to the color red. However, the color is subsequently set to green. When Excel displays Cell A1 it will display the final state of the Format which in this case will be the color green.
Number Format Categories
The set_num_format() method, shown below, is used to set the number format for numbers:
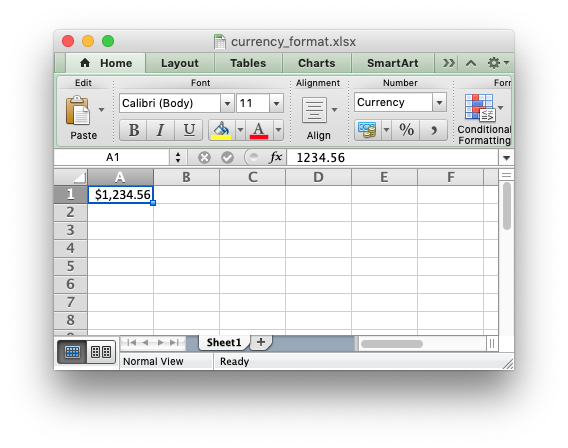
If the number format you use is the same as one of Excel’s built in number formats then it will have a number category such as General, Number, Currency, Accounting, Date, Time, Percentage, Fraction, Scientific, Text, Special or Custom. In the case of the example above the formatted output shows up as a Number category:
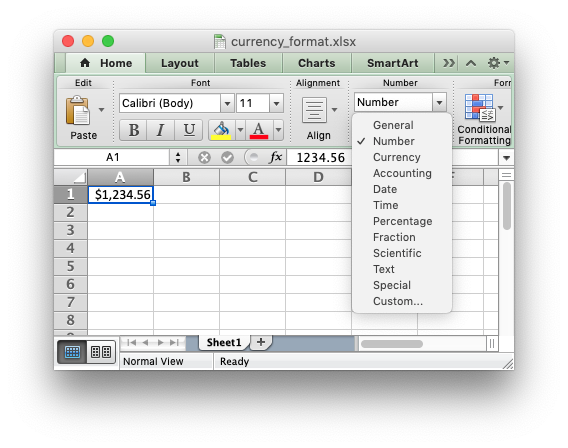
If we wanted it to have a different category, such as Currency, then we would have to match the number format string with the number format used by Excel. The easiest way to do this is to open the Number Formatting dialog in Excel and set the format that you want:
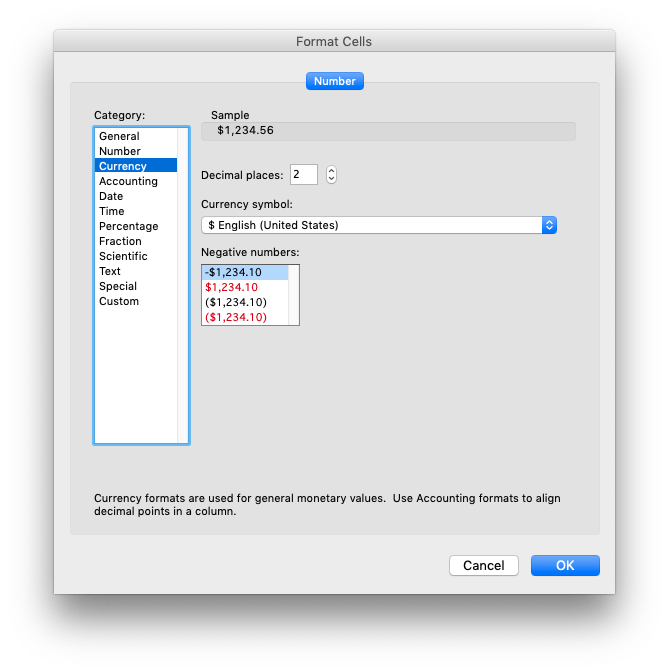
Then, while still in the dialog, change to Custom. The format displayed is the format used by Excel.
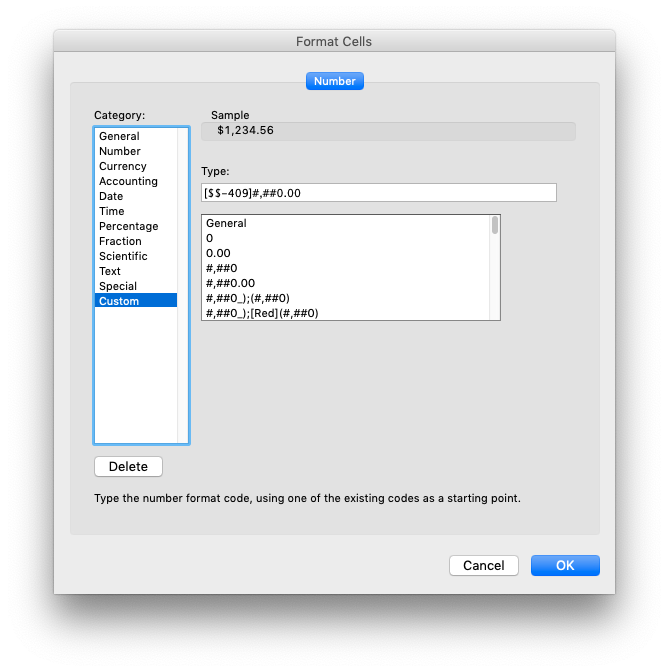
If we put the format that we found ( ‘[$$-409]#,##0.00’ ) into our previous example and rerun it we will get a number format in the Currency category:
Here is the output:
The same process can be used to find format strings for Date or Accountancy formats. However, you also need to be aware of the OS settings Excel uses for number separators such as the “grouping/thousands” separator and the “decimal” point. See the next section for details.
Number Formats in different locales
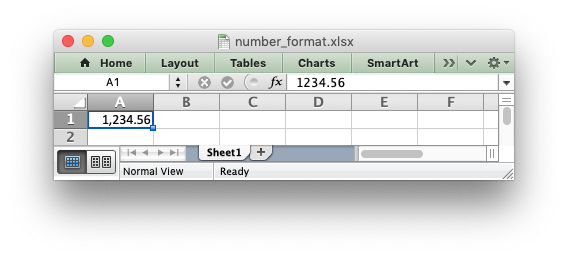
As shown in the previous section the set_num_format() method is used to set the number format for Xlsxwriter formats. A common use case is to set a number format with a “grouping/thousands” separator and a “decimal” point:
In the US locale (and some others) where the number “grouping/thousands” separator is “,” and the “decimal” point is “.” this would be shown in Excel as:
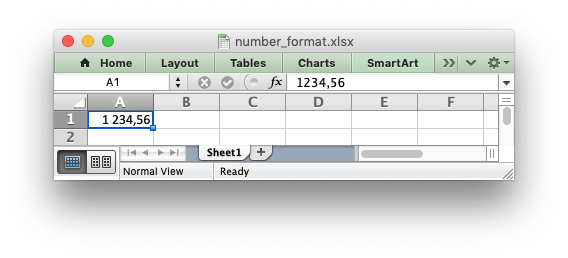
In other locales these values may be reversed or different. They are generally set in the “Region” settings of Windows or Mac OS. Excel handles this by storing the number format in the file format in the US locale, in this case #,##0.00 , but renders it according to the regional settings of the host OS. For example, here is the same, unmodified, output file shown above in a German locale:

And here is the same file in a Russian locale. Note the use of a space as the “grouping/thousands” separator:
In order to replicate Excel’s behavior all XlsxWriter programs should use US locale formatting which will then be rendered in the settings of your host OS.
Format methods and Format properties
The following table shows the Excel format categories, the formatting properties that can be applied and the equivalent object method:
| Category | Description | Property | Method Name |
|---|---|---|---|
| Font | Font type | ‘font_name’ | set_font_name() |
| Font size | ‘font_size’ | set_font_size() | |
| Font color | ‘font_color’ | set_font_color() | |
| Bold | ‘bold’ | set_bold() | |
| Italic | ‘italic’ | set_italic() | |
| Underline | ‘underline’ | set_underline() | |
| Strikeout | ‘font_strikeout’ | set_font_strikeout() | |
| Super/Subscript | ‘font_script’ | set_font_script() | |
| Number | Numeric format | ‘num_format’ | set_num_format() |
| Protection | Lock cells | ‘locked’ | set_locked() |
| Hide formulas | ‘hidden’ | set_hidden() | |
| Alignment | Horizontal align | ‘align’ | set_align() |
| Vertical align | ‘valign’ | set_align() | |
| Rotation | ‘rotation’ | set_rotation() | |
| Text wrap | ‘text_wrap’ | set_text_wrap() | |
| Reading order | ‘reading_order’ | set_reading_order() | |
| Justify last | ‘text_justlast’ | set_text_justlast() | |
| Center across | ‘center_across’ | set_center_across() | |
| Indentation | ‘indent’ | set_indent() | |
| Shrink to fit | ‘shrink’ | set_shrink() | |
| Pattern | Cell pattern | ‘pattern’ | set_pattern() |
| Background color | ‘bg_color’ | set_bg_color() | |
| Foreground color | ‘fg_color’ | set_fg_color() | |
| Border | Cell border | ‘border’ | set_border() |
| Bottom border | ‘bottom’ | set_bottom() | |
| Top border | ‘top’ | set_top() | |
| Left border | ‘left’ | set_left() | |
| Right border | ‘right’ | set_right() | |
| Border color | ‘border_color’ | set_border_color() | |
| Bottom color | ‘bottom_color’ | set_bottom_color() | |
| Top color | ‘top_color’ | set_top_color() | |
| Left color | ‘left_color’ | set_left_color() | |
| Right color | ‘right_color’ | set_right_color() |
The format properties and methods are explained in the following sections.
format.set_font_name()
Set the font used in the cell.
| Parameters: | fontname (string) – Cell font. |
|---|
Specify the font used used in the cell format:
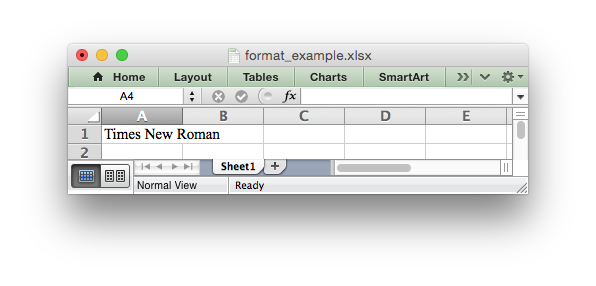
Excel can only display fonts that are installed on the system that it is running on. Therefore it is best to use the fonts that come as standard such as ‘Calibri’, ‘Times New Roman’ and ‘Courier New’.
The default font for an unformatted cell in Excel 2007+ is ‘Calibri’.
format.set_font_size()
Set the size of the font used in the cell.
| Parameters: | size (int) – The cell font size. |
|---|
Set the font size of the cell format:
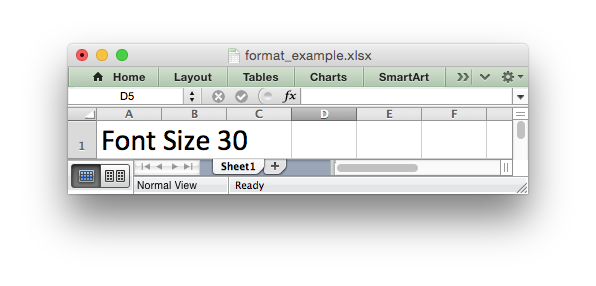
Excel adjusts the height of a row to accommodate the largest font size in the row. You can also explicitly specify the height of a row using the set_row() worksheet method.
format.set_font_color()
Set the color of the font used in the cell.
| Parameters: | color (string) – The cell font color. |
|---|
Set the font color:
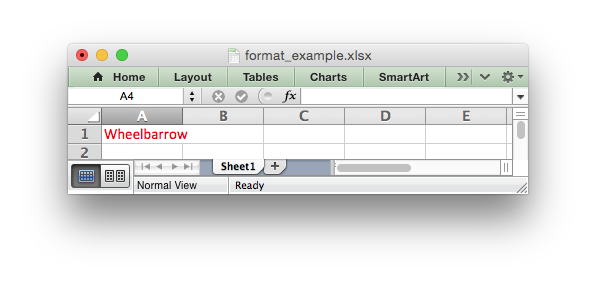
The color can be a Html style #RRGGBB string or a limited number of named colors, see Working with Colors .
Note: The set_font_color() method is used to set the color of the font in a cell. To set the color of a cell use the set_bg_color() and set_pattern() methods.
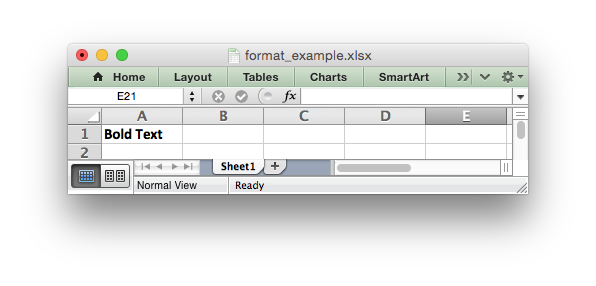
format.set_bold()
Turn on bold for the format font.
Set the bold property of the font:
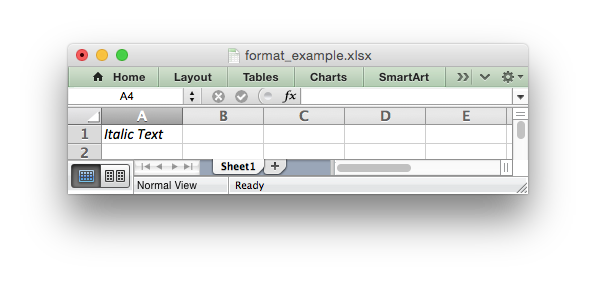
format.set_italic()
Turn on italic for the format font.
Set the italic property of the font:
format.set_underline()
Turn on underline for the format.
| Parameters: | style (int) – Underline style. |
|---|
Set the underline property of the format:

The available underline styles are:
- 1 = Single underline (the default)
- 2 = Double underline
- 33 = Single accounting underline
- 34 = Double accounting underline
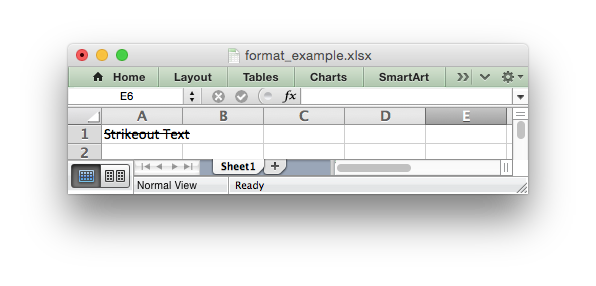
format.set_font_strikeout()
Set the strikeout property of the font.
format.set_font_script()
Set the superscript/subscript property of the font.
The available options are:
- 1 = Superscript
- 2 = Subscript
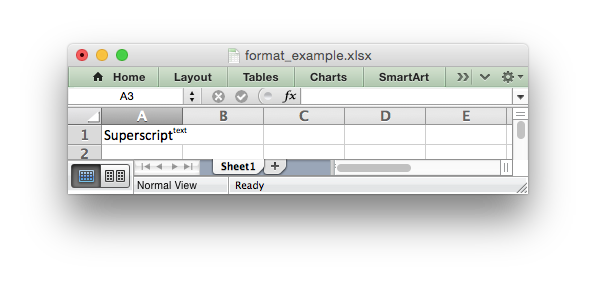
This property is generally only useful when used in conjunction with write_rich_string() .
format.set_num_format()
Set the number format for a cell.
| Parameters: | format_string (string) – The cell number format. |
|---|
This method is used to define the numerical format of a number in Excel. It controls whether a number is displayed as an integer, a floating point number, a date, a currency value or some other user defined format.
The numerical format of a cell can be specified by using a format string or an index to one of Excel’s built-in formats:
Format strings can control any aspect of number formatting allowed by Excel:
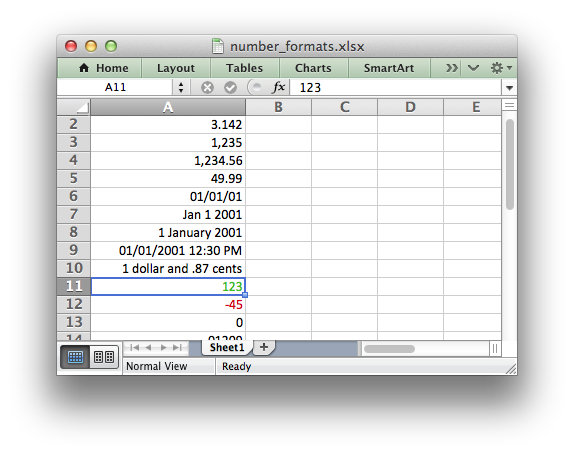
The number system used for dates is described in Working with Dates and Time .
The color format should have one of the following values:
For information on how to get a number format to show up as one of the number format categories such as Currency, Accounting, Date, Time, Percentage, Fraction, Scientific or Text, see Number Format Categories , above.
For backwards compatibility XlsxWriter also supports Excel’s built-in formats which are set via an index number, rather than a string:
The format indexes and the equivalent strings are shown in the following table:
| Index | Format String |
|---|---|
| 0 | General |
| 1 | 0 |
| 2 | 0.00 |
| 3 | #,##0 |
| 4 | #,##0.00 |
| 5 | ($#,##0_);($#,##0) |
| 6 | ($#,##0_);[Red]($#,##0) |
| 7 | ($#,##0.00_);($#,##0.00) |
| 8 | ($#,##0.00_);[Red]($#,##0.00) |
| 9 | 0% |
| 10 | 0.00% |
| 11 | 0.00E+00 |
| 12 | # ?/? |
| 13 | # ??/?? |
| 14 | m/d/yy |
| 15 | d-mmm-yy |
| 16 | d-mmm |
| 17 | mmm-yy |
| 18 | h:mm AM/PM |
| 19 | h:mm:ss AM/PM |
| 20 | h:mm |
| 21 | h:mm:ss |
| 22 | m/d/yy h:mm |
| … | … |
| 37 | (#,##0_);(#,##0) |
| 38 | (#,##0_);[Red](#,##0) |
| 39 | (#,##0.00_);(#,##0.00) |
| 40 | (#,##0.00_);[Red](#,##0.00) |
| 41 | _(* #,##0_);_(* (#,##0);_(* «-«_);_(@_) |
| 42 | _($* #,##0_);_($* (#,##0);_($* «-«_);_(@_) |
| 43 | _(* #,##0.00_);_(* (#,##0.00);_(* «-«??_);_(@_) |
| 44 | _($* #,##0.00_);_($* (#,##0.00);_($* «-«??_);_(@_) |
| 45 | mm:ss |
| 46 | [h]:mm:ss |
| 47 | mm:ss.0 |
| 48 | ##0.0E+0 |
| 49 | @ |
Numeric formats 23 to 36 are not documented by Microsoft and may differ in international versions. The listed date and currency formats may also vary depending on system settings.
The dollar sign in the above format usually appears as the defined local currency symbol. To get more locale specific formatting see see Number Format Categories , above.
format.set_locked()
Set the cell locked state.
| Parameters: | state (bool) – Turn cell locking on or off. Defaults to True. |
|---|
This property can be used to prevent modification of a cell’s contents. Following Excel’s convention, cell locking is turned on by default. However, it only has an effect if the worksheet has been protected using the worksheet protect() method:
Hide formulas in a cell.
This property is used to hide a formula while still displaying its result. This is generally used to hide complex calculations from end users who are only interested in the result. It only has an effect if the worksheet has been protected using the worksheet protect() method:
format.set_align()
Set the alignment for data in the cell.
| Parameters: | alignment (string) – The vertical and or horizontal alignment direction. |
|---|
This method is used to set the horizontal and vertical text alignment within a cell. The following are the available horizontal alignments:
| Horizontal alignment |
|---|
| left |
| center |
| right |
| fill |
| justify |
| center_across |
| distributed |
The following are the available vertical alignments:
| Vertical alignment |
|---|
| top |
| vcenter |
| bottom |
| vjustify |
| vdistributed |
As in Excel, vertical and horizontal alignments can be combined:
Text can be aligned across two or more adjacent cells using the ‘center_across’ property. However, for genuine merged cells it is better to use the merge_range() worksheet method.
The ‘vjustify’ (vertical justify) option can be used to provide automatic text wrapping in a cell. The height of the cell will be adjusted to accommodate the wrapped text. To specify where the text wraps use the set_text_wrap() method.
format.set_center_across()
Center text across adjacent cells.
Text can be aligned across two or more adjacent cells using the set_center_across() method. This is an alias for the set_align(‘center_across’) method call.
Only the leftmost cell should contain the text. The other cells in the range should be blank but should include the formatting:
For actual merged cells it is better to use the merge_range() worksheet method.
format.set_text_wrap()
Wrap text in a cell.
Turn text wrapping on for text in a cell:
If you wish to control where the text is wrapped you can add newline characters to the string:
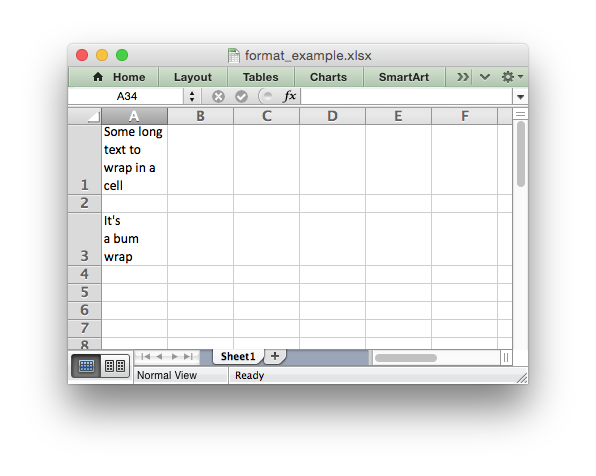
Excel will adjust the height of the row to accommodate the wrapped text, as shown in the image above. This can be useful but it can also have unwanted side-effects:
- Objects such as images or charts that cross the automatically adjusted cells will not be scaled correctly. See Object scaling due to automatic row height adjustment .
- You may not want the row height to change. In that case you should set the row height to a non-default value such as 15.001.
format.set_rotation()
Set the rotation of the text in a cell.
| Parameters: | angle (int) – Rotation angle in the range -90 to 90 and 270. |
|---|
Set the rotation of the text in a cell. The rotation can be any angle in the range -90 to 90 degrees:
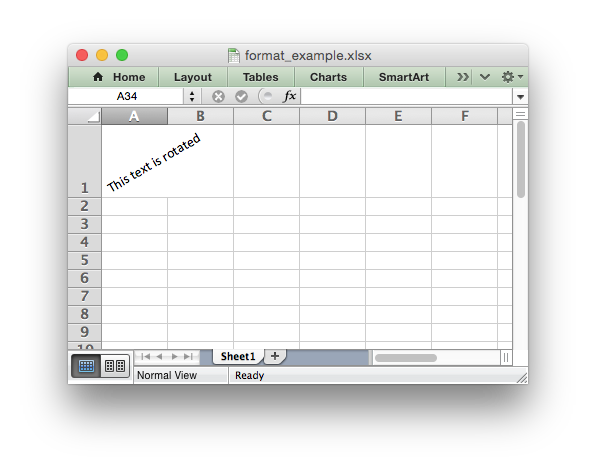
The angle 270 is also supported. This indicates text where the letters run from top to bottom.
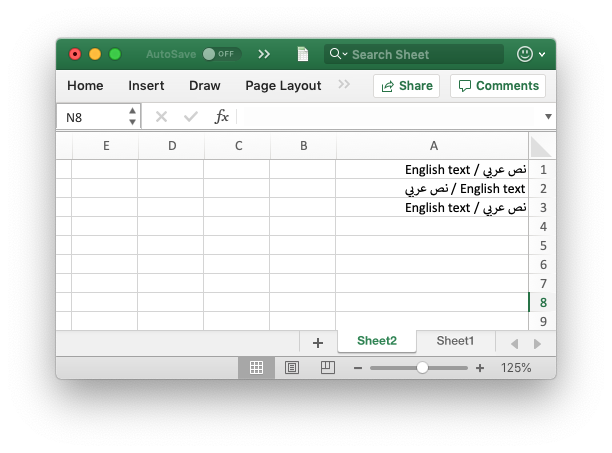
format.set_reading_order()
Set the reading order for the text in a cell.
| Parameters: | direction (int) – Reading order direction. |
|---|
Set the text reading direction. This is useful when creating Arabic, Hebrew or other near or far eastern worksheets. It can be used in conjunction with the Worksheet right_to_left() method to also change the direction of the worksheet.
format.set_indent()
Set the cell text indentation level.
| Parameters: | level (int) – Indentation level. |
|---|
This method can be used to indent text in a cell. The argument, which should be an integer, is taken as the level of indentation:
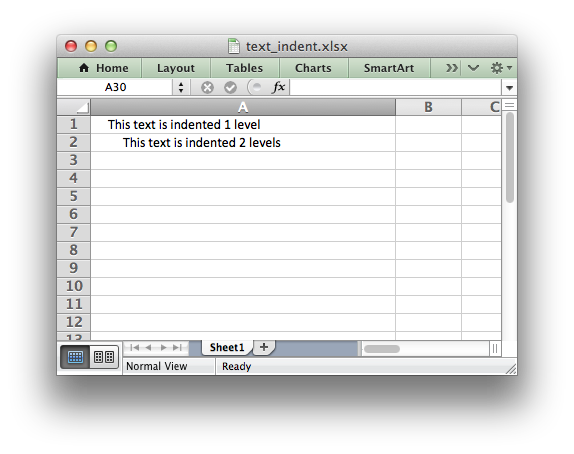
Indentation is a horizontal alignment property. It will override any other horizontal properties but it can be used in conjunction with vertical properties.
format.set_shrink()
Turn on the text “shrink to fit” for a cell.
This method can be used to shrink text so that it fits in a cell:
format.set_text_justlast()
Turn on the justify last text property.
Only applies to Far Eastern versions of Excel.
format.set_pattern()
set_pattern ( index )
| Parameters: | index (int) – Pattern index. 0 — 18. |
|---|
Set the background pattern of a cell.
The most common pattern is 1 which is a solid fill of the background color.
format.set_bg_color()
Set the color of the background pattern in a cell.
| Parameters: | color (string) – The cell font color. |
|---|
The set_bg_color() method can be used to set the background color of a pattern. Patterns are defined via the set_pattern() method. If a pattern hasn’t been defined then a solid fill pattern is used as the default.
Here is an example of how to set up a solid fill in a cell:
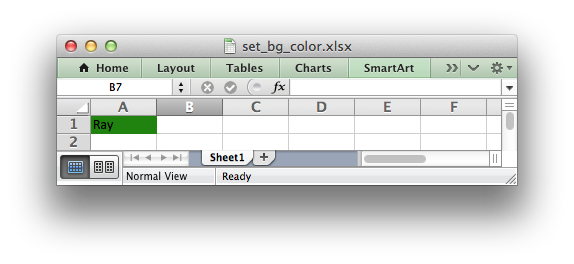
The color can be a Html style #RRGGBB string or a limited number of named colors, see Working with Colors .
format.set_fg_color()
Set the color of the foreground pattern in a cell.
| Parameters: | color (string) – The cell font color. |
|---|
The set_fg_color() method can be used to set the foreground color of a pattern.
The color can be a Html style #RRGGBB string or a limited number of named colors, see Working with Colors .
format.set_border()
Set the cell border style.
| Parameters: | style (int) – Border style index. Default is 1. |
|---|
Individual border elements can be configured using the following methods with the same parameters:
A cell border is comprised of a border on the bottom, top, left and right. These can be set to the same value using set_border() or individually using the relevant method calls shown above.
The following shows the border styles sorted by XlsxWriter index number:
| Index | Name | Weight | Style |
|---|---|---|---|
| 0 | None | 0 | |
| 1 | Continuous | 1 | ———— |
| 2 | Continuous | 2 | ———— |
| 3 | Dash | 1 | — — — — — — |
| 4 | Dot | 1 | . . . . . . |
| 5 | Continuous | 3 | ———— |
| 6 | Double | 3 | =========== |
| 7 | Continuous | 0 | ———— |
| 8 | Dash | 2 | — — — — — — |
| 9 | Dash Dot | 1 | — . — . — . |
| 10 | Dash Dot | 2 | — . — . — . |
| 11 | Dash Dot Dot | 1 | — . . — . . |
| 12 | Dash Dot Dot | 2 | — . . — . . |
| 13 | SlantDash Dot | 2 | / — . / — . |
The following shows the borders in the order shown in the Excel Dialog:
| Index | Style | Index | Style |
|---|---|---|---|
| 0 | None | 12 | — . . — . . |
| 7 | ———— | 13 | / — . / — . |
| 4 | . . . . . . | 10 | — . — . — . |
| 11 | — . . — . . | 8 | — — — — — — |
| 9 | — . — . — . | 2 | ———— |
| 3 | — — — — — — | 5 | ———— |
| 1 | ———— | 6 | =========== |
format.set_bottom()
Set the cell bottom border style.
| Parameters: | style (int) – Border style index. Default is 1. |
|---|
Set the cell bottom border style. See set_border() for details on the border styles.
format.set_top()
Set the cell top border style.
| Parameters: | style (int) – Border style index. Default is 1. |
|---|
Set the cell top border style. See set_border() for details on the border styles.
format.set_left()
Set the cell left border style.
| Parameters: | style (int) – Border style index. Default is 1. |
|---|
Set the cell left border style. See set_border() for details on the border styles.
format.set_right()
Set the cell right border style.
| Parameters: | style (int) – Border style index. Default is 1. |
|---|
Set the cell right border style. See set_border() for details on the border styles.
format.set_border_color()
Set the color of the cell border.
| Parameters: | color (string) – The cell border color. |
|---|
Individual border elements can be configured using the following methods with the same parameters:
Set the color of the cell borders. A cell border is comprised of a border on the bottom, top, left and right. These can be set to the same color using set_border_color() or individually using the relevant method calls shown above.
The color can be a Html style #RRGGBB string or a limited number of named colors, see Working with Colors .
format.set_bottom_color()
Set the color of the bottom cell border.
| Parameters: | color (string) – The cell border color. |
|---|
See set_border_color() for details on the border colors.
format.set_top_color()
Set the color of the top cell border.
| Parameters: | color (string) – The cell border color. |
|---|
See set_border_color() for details on the border colors.
format.set_left_color()
Set the color of the left cell border.
| Parameters: | color (string) – The cell border color. |
|---|
See set_border_color() for details on the border colors.
format.set_right_color()
Set the color of the right cell border.
| Parameters: | color (string) – The cell border color. |
|---|
See set_border_color() for details on the border colors.
format.set_diag_border()
Set the diagonal cell border style.
| Parameters: | style (int) – Border style index. Default is 1. |
|---|
Set the style for a diagonal border. The style is the same as those used in set_border() .
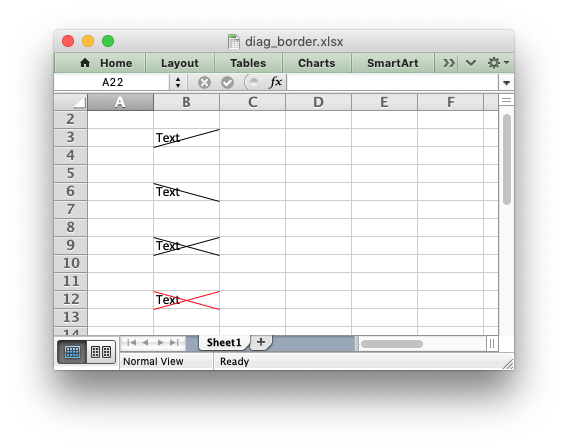
format.set_diag_type()
Set the diagonal cell border type.
| Parameters: | style (int) – Border type, 1-3. No default. |
|---|
Set the type of the diagonal border. The style should be one of the following values:
- From bottom left to top right.
- From top left to bottom right.
- Same as type 1 and 2 combined.
format.set_diag_color()
Set the color of the diagonal cell border.
| Parameters: | color (string) – The cell border color. |
|---|
See set_border_color() for details on the border colors.
format.set_quote_prefix()
Turn on quote prefix for the format.
Set the quote prefix property of a format to ensure a string is treated as a string after editing. This is the same as prefixing the string with a single quote in Excel. You don’t need to add the quote to the string but you do need to add the format.
© Copyright 2013-2023, John McNamara.
Created using Sphinx 1.8.6.
Источник