
Dates and times in Excel are represented by real numbers, for example “Jan 1
2013 12:00 PM” is represented by the number 41275.5.
The integer part of the number stores the number of days since the epoch and
the fractional part stores the percentage of the day.
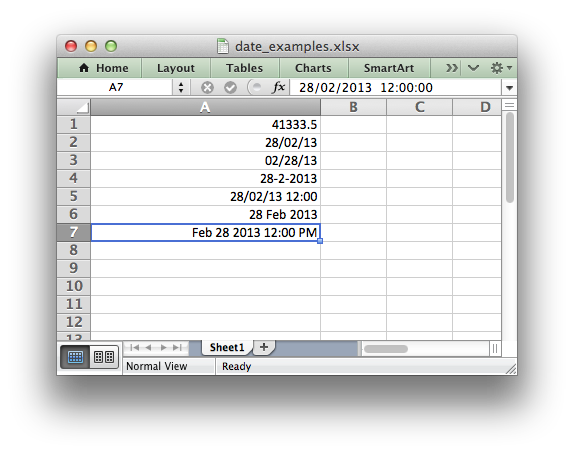
A date or time in Excel is just like any other number. To display the number as
a date you must apply an Excel number format to it. Here are some examples:
import xlsxwriter

workbook = xlsxwriter.Workbook('date_examples.xlsx')
worksheet = workbook.add_worksheet()

# Widen column A for extra visibility.
worksheet.set_column('A:A', 30)

# A number to convert to a date.
number = 41333.5

# Write it as a number without formatting.
worksheet.write('A1', number)                # 41333.5

format2 = workbook.add_format({'num_format': 'dd/mm/yy'})
worksheet.write('A2', number, format2)       # 28/02/13

format3 = workbook.add_format({'num_format': 'mm/dd/yy'})
worksheet.write('A3', number, format3)       # 02/28/13

format4 = workbook.add_format({'num_format': 'd-m-yyyy'})
worksheet.write('A4', number, format4)       # 28-2-2013

format5 = workbook.add_format({'num_format': 'dd/mm/yy hh:mm'})
worksheet.write('A5', number, format5)       # 28/02/13 12:00

format6 = workbook.add_format({'num_format': 'd mmm yyyy'})
worksheet.write('A6', number, format6)       # 28 Feb 2013

format7 = workbook.add_format({'num_format': 'mmm d yyyy hh:mm AM/PM'})
worksheet.write('A7', number, format7)       # Feb 28 2013 12:00 PM

workbook.close()
To make working with dates and times a little easier the XlsxWriter module
provides a write_datetime() method to write dates in standard library
datetime format.
Specifically it supports datetime objects of type datetime.datetime,
datetime.date, datetime.time and datetime.timedelta.
There are many way to create datetime objects, for example the
datetime.datetime.strptime() method:
date_time = datetime.datetime.strptime('2013-01-23', '%Y-%m-%d')
See the datetime documentation for other date/time creation methods.
As explained above you also need to create and apply a number format to format
the date/time:
date_format = workbook.add_format({'num_format': 'd mmmm yyyy'})
worksheet.write_datetime('A1', date_time, date_format)

# Displays "23 January 2013"
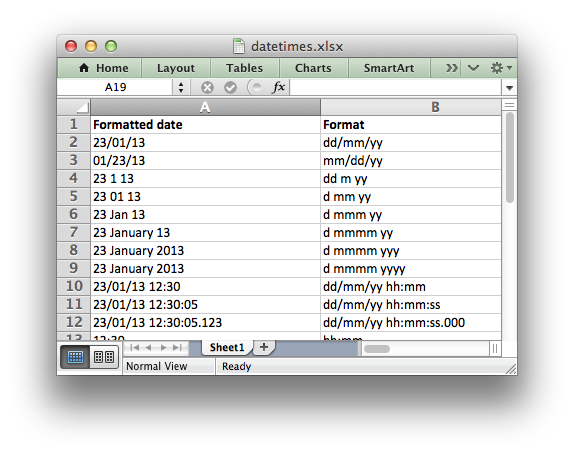
Here is a longer example that displays the same date in a several different
formats:
from datetime import datetime
import xlsxwriter

# Create a workbook and add a worksheet.
workbook = xlsxwriter.Workbook('datetimes.xlsx')
worksheet = workbook.add_worksheet()
bold = workbook.add_format({'bold': True})

# Expand the first columns so that the dates are visible.
worksheet.set_column('A:B', 30)

# Write the column headers.
worksheet.write('A1', 'Formatted date', bold)
worksheet.write('B1', 'Format', bold)

# Create a datetime object to use in the examples.

date_time = datetime.strptime('2013-01-23 12:30:05.123',
                              '%Y-%m-%d %H:%M:%S.%f')

# Examples date and time formats.
date_formats = (
    'dd/mm/yy',
    'mm/dd/yy',
    'dd m yy',
    'd mm yy',
    'd mmm yy',
    'd mmmm yy',
    'd mmmm yyy',
    'd mmmm yyyy',
    'dd/mm/yy hh:mm',
    'dd/mm/yy hh:mm:ss',
    'dd/mm/yy hh:mm:ss.000',
    'hh:mm',
    'hh:mm:ss',
    'hh:mm:ss.000',
)

# Start from first row after headers.
row = 1

# Write the same date and time using each of the above formats.
for date_format_str in date_formats:

    # Create a format for the date or time.
    date_format = workbook.add_format({'num_format': date_format_str,
                                      'align': 'left'})

    # Write the same date using different formats.
    worksheet.write_datetime(row, 0, date_time, date_format)

    # Also write the format string for comparison.
    worksheet.write_string(row, 1, date_format_str)

    row += 1

workbook.close()
Default Date Formatting
In certain circumstances you may wish to apply a default date format when
writing datetime objects, for example, when handling a row of data with
write_row().
In these cases it is possible to specify a default date format string using the
Workbook() constructor default_date_format option:
workbook = xlsxwriter.Workbook('datetimes.xlsx', {'default_date_format':
                                                  'dd/mm/yy'})
worksheet = workbook.add_worksheet()
date_time = datetime.now()
worksheet.write_datetime(0, 0, date_time)  # Formatted as 'dd/mm/yy'

workbook.close()
Timezone Handling
Excel doesn’t support timezones in datetimes/times so there isn’t any fail-safe
way that XlsxWriter can map a Python timezone aware datetime into an Excel
datetime. As such the user should handle the timezones in some way that makes
sense according to their requirements. Usually this will require some
conversion to a timezone adjusted time and the removal of the tzinfo from
the datetime object so that it can be passed to write_datetime():
utc_datetime = datetime(2016, 9, 23, 14, 13, 21, tzinfo=utc)
naive_datetime = utc_datetime.replace(tzinfo=None)

worksheet.write_datetime(row, 0, naive_datetime, date_format)
Alternatively the Workbook() constructor option remove_timezone can
be used to strip the timezone from datetime values passed to
write_datetime(). The default is False. To enable this option use:
workbook = xlsxwriter.Workbook(filename, {'remove_timezone': True})
When Working with Pandas and XlsxWriter you can pass the argument as follows:
writer = pd.ExcelWriter('pandas_example.xlsx',
                        engine='xlsxwriter',
                        options={'remove_timezone': True})
Improve Article
Save Article
Like Article
Improve Article
Save Article
Like Article
This article will discuss the conversion of an excel serial date to DateTime in Python.
The Excel “serial date” format is actually the number of days since 1900-01-00 i.e., January 1st, 1900. For example, the excel serial date number 43831 represents January 1st, 2020, and after converting 43831 to a DateTime becomes 2020-01-01.
By using xlrd.xldate_as_datetime() function this can be achieved. The xlrd.xldate_as_datetime() function is used to convert excel date/time number to datetime.datetime object.
Syntax: xldate_as_datetime (xldate, datemode)
Parameters: This function accepts two parameters that are illustrated below:
- xldate: This is the specified excel date that will converted into datetime.
- datemode: This is the specified datemode in which conversion will be performed.
Return values: This function returns the datetime.datetime object.
First, call xlrd.xldate_as_datetime(date, 0) function to convert the specified Excel date to a datetime.datetime object. Then, call datetime.datetime.date() function on the returned datetime.datetime object to return the date as a datetime.date object. Lastly, call datetime.date.isoformat() function to convert the returned datetime.date object to a ISO format date string.
Let’s see some examples to illustrate the above algorithm:
Example: Python program to convert excel serial date to string date
Python3
import xlrd
xl_date = 43831
datetime_date = xlrd.xldate_as_datetime(xl_date, 0)
date_object = datetime_date.date()
string_date = date_object.isoformat()
print(string_date)
print(type(string_date))
Output:
2020-01-01
<class 'str'>
Example 2: Python program to convert excel serial number to DateTime
Python3
import xlrd
xl_date = 43831
datetime_date = xlrd.xldate_as_datetime(xl_date, 0)
date_object = datetime_date.date()
print(date_object)
print(type(date_object))
Output:
2020-01-01
<class 'datetime.date'>
Like Article
Save Article
Dates in Excel spreadsheets
.. currentmodule:: xlrd.xldate
In reality, there are no such things. What you have are floating point
numbers and pious hope.
There are several problems with Excel dates:
-
Dates are not stored as a separate data type; they are stored as
floating point numbers and you have to rely on:- the «number format» applied to them in Excel and/or
- knowing which cells are supposed to have dates in them.
This module helps with the former by inspecting the
format that has been applied to each number cell;
if it appears to be a date format, the cell
is classified as a date rather than a number.Feedback on this feature, especially from non-English-speaking locales,
would be appreciated. -
Excel for Windows stores dates by default as the number of
days (or fraction thereof) since1899-12-31T00:00:00. Excel for
Macintosh uses a default start date of1904-01-01T00:00:00.The date system can be changed in Excel on a per-workbook basis (for example:
Tools -> Options -> Calculation, tick the «1904 date system» box).
This is of course a bad idea if there are already dates in the
workbook. There is no good reason to change it even if there are no
dates in the workbook.Which date system is in use is recorded in the
workbook. A workbook transported from Windows to Macintosh (or vice
versa) will work correctly with the host Excel.When using this package’s :func:`xldate_as_tuple` function to convert numbers
from a workbook, you must use the :attr:`~xlrd.Book.datemode` attribute of
the :class:`~xlrd.Book` object. If you guess, or make a judgement depending
on where you believe the workbook was created, you run the risk of being 1462
days out of kilter.Reference:
https://support.microsoft.com/en-us/help/180162/xl-the-1900-date-system-vs.-the-1904-date-system -
The Excel implementation of the Windows-default 1900-based date system
works on the incorrect premise that 1900 was a leap year. It interprets the
number 60 as meaning1900-02-29, which is not a valid date.Consequently, any number less than 61 is ambiguous. For example, is 59 the
result of1900-02-28entered directly, or is it1900-03-01minus 2
days?The OpenOffice.org Calc program «corrects» the Microsoft problem;
entering1900-02-27causes the number 59 to be stored.
Save as an XLS file, then open the file with Excel and you’ll see
1900-02-28displayed.Reference: https://support.microsoft.com/en-us/help/214326/excel-incorrectly-assumes-that-the-year-1900-is-a-leap-year
-
The Macintosh-default 1904-based date system counts
1904-01-02as day 1
and1904-01-01as day zero. Thus any number such that
(0.0 <= number < 1.0)is ambiguous. Is 0.625 a time of day
(15:00:00), independent of the calendar, or should it be interpreted as
an instant on a particular day (1904-01-01T15:00:00)?The functions in :mod:`~xlrd.xldate` take the view that such a number is a
calendar-independent time of day (like Python’s :class:`datetime.time` type)
for both date systems. This is consistent with more recent Microsoft
documentation. For example, the help file for Excel 2002, which says that the
first day in the 1904 date system is1904-01-02. -
Usage of the Excel
DATE()function may leave strange dates in a
spreadsheet. Quoting the help file in respect of the 1900 date system:If year is between 0 (zero) and 1899 (inclusive), Excel adds that value to 1900 to calculate the year. For example, DATE(108,1,2) returns January 2, 2008 (1900+108).
This gimmick, semi-defensible only for arguments up to 99 and only in the
pre-Y2K-awareness era, means thatDATE(1899, 12, 31)is interpreted as
3799-12-31.For further information, please refer to the documentation for the
functions in :mod:`~xlrd.xldate`.
Содержание
- Working with Dates and Time
- Default Date Formatting
- Timezone Handling
- Python – Convert excel serial date to datetime
- Dates in Excel spreadsheets
- Convert any Dates in Spreadsheets using Python
- Pre-requisite
- Full Code
- Create the File for Code
- Import Library
- Read the File
- Convert Dates to YYYY-MM-DD & Write conversion to a new file
- Create the Date Format String
- Examples for a date 22 September, 2019, 5:30PM
- Additional Things
- Converting to Excel «Date» format (within Excel file) using python and pandas from another date format from html table
- 1 Answer 1
Working with Dates and Time
Dates and times in Excel are represented by real numbers, for example “Jan 1 2013 12:00 PM” is represented by the number 41275.5.
The integer part of the number stores the number of days since the epoch and the fractional part stores the percentage of the day.
A date or time in Excel is just like any other number. To display the number as a date you must apply an Excel number format to it. Here are some examples:
To make working with dates and times a little easier the XlsxWriter module provides a write_datetime() method to write dates in standard library datetime format.
There are many way to create datetime objects, for example the datetime.datetime.strptime() method:
See the datetime documentation for other date/time creation methods.
As explained above you also need to create and apply a number format to format the date/time:
Here is a longer example that displays the same date in a several different formats:
Default Date Formatting
In certain circumstances you may wish to apply a default date format when writing datetime objects, for example, when handling a row of data with write_row() .
In these cases it is possible to specify a default date format string using the Workbook() constructor default_date_format option:
Timezone Handling
Excel doesn’t support timezones in datetimes/times so there isn’t any fail-safe way that XlsxWriter can map a Python timezone aware datetime into an Excel datetime. As such the user should handle the timezones in some way that makes sense according to their requirements. Usually this will require some conversion to a timezone adjusted time and the removal of the tzinfo from the datetime object so that it can be passed to write_datetime() :
Alternatively the Workbook() constructor option remove_timezone can be used to strip the timezone from datetime values passed to write_datetime() . The default is False . To enable this option use:
When Working with Pandas and XlsxWriter you can pass the argument as follows:
Источник
Python – Convert excel serial date to datetime
This article will discuss the conversion of an excel serial date to DateTime in Python.
The Excel “serial date” format is actually the number of days since 1900-01-00 i.e., January 1st, 1900. For example, the excel serial date number 43831 represents January 1st, 2020, and after converting 43831 to a DateTime becomes 2020-01-01.
By using xlrd.xldate_as_datetime() function this can be achieved. The xlrd.xldate_as_datetime() function is used to convert excel date/time number to datetime.datetime object.
Syntax: xldate_as_datetime (xldate, datemode)
Parameters: This function accepts two parameters that are illustrated below:
- xldate: This is the specified excel date that will converted into datetime.
- datemode: This is the specified datemode in which conversion will be performed.
Return values: This function returns the datetime.datetime object.
First, call xlrd.xldate_as_datetime(date, 0) function to convert the specified Excel date to a datetime.datetime object. Then, call datetime.datetime.date() function on the returned datetime.datetime object to return the date as a datetime.date object. Lastly, call datetime.date.isoformat() function to convert the returned datetime.date object to a ISO format date string.
Let’s see some examples to illustrate the above algorithm:
Example: Python program to convert excel serial date to string date
Источник
Dates in Excel spreadsheets
In reality, there are no such things. What you have are floating point numbers and pious hope. There are several problems with Excel dates:
Dates are not stored as a separate data type; they are stored as floating point numbers and you have to rely on:
the “number format” applied to them in Excel and/or
knowing which cells are supposed to have dates in them.
This module helps with the former by inspecting the format that has been applied to each number cell; if it appears to be a date format, the cell is classified as a date rather than a number.
Feedback on this feature, especially from non-English-speaking locales, would be appreciated.
Excel for Windows stores dates by default as the number of days (or fraction thereof) since 1899-12-31T00:00:00 . Excel for Macintosh uses a default start date of 1904-01-01T00:00:00 .
The date system can be changed in Excel on a per-workbook basis (for example: Tools -> Options -> Calculation, tick the “1904 date system” box). This is of course a bad idea if there are already dates in the workbook. There is no good reason to change it even if there are no dates in the workbook.
Which date system is in use is recorded in the workbook. A workbook transported from Windows to Macintosh (or vice versa) will work correctly with the host Excel.
When using this package’s xldate_as_tuple() function to convert numbers from a workbook, you must use the datemode attribute of the Book object. If you guess, or make a judgement depending on where you believe the workbook was created, you run the risk of being 1462 days out of kilter.
The Excel implementation of the Windows-default 1900-based date system works on the incorrect premise that 1900 was a leap year. It interprets the number 60 as meaning 1900-02-29 , which is not a valid date.
Consequently, any number less than 61 is ambiguous. For example, is 59 the result of 1900-02-28 entered directly, or is it 1900-03-01 minus 2 days?
The OpenOffice.org Calc program “corrects” the Microsoft problem; entering 1900-02-27 causes the number 59 to be stored. Save as an XLS file, then open the file with Excel and you’ll see 1900-02-28 displayed.
The Macintosh-default 1904-based date system counts 1904-01-02 as day 1 and 1904-01-01 as day zero. Thus any number such that (0.0 number 1.0) is ambiguous. Is 0.625 a time of day ( 15:00:00 ), independent of the calendar, or should it be interpreted as an instant on a particular day ( 1904-01-01T15:00:00 )?
The functions in xldate take the view that such a number is a calendar-independent time of day (like Python’s datetime.time type) for both date systems. This is consistent with more recent Microsoft documentation. For example, the help file for Excel 2002, which says that the first day in the 1904 date system is 1904-01-02 .
Usage of the Excel DATE() function may leave strange dates in a spreadsheet. Quoting the help file in respect of the 1900 date system:
This gimmick, semi-defensible only for arguments up to 99 and only in the pre-Y2K-awareness era, means that DATE(1899, 12, 31) is interpreted as 3799-12-31 .
For further information, please refer to the documentation for the functions in xldate .
© Copyright 2005-2019 Stephen John Machin, Lingfo Pty Ltd. 2019-2021 Chris Withers Revision 0c4e80b3 .
Источник
Convert any Dates in Spreadsheets using Python
DISCLAIMER: If you don’t know how to code, feel free to check our tool www.cleanspreadsheets.com that lets you do this no-code!
If you sample a 100 people who work with data and ask them what data type (text, numbers etc.) usually gives them the most trouble, I bet at least half of them would say dates.
Dates are a mess. There seem to be a crap load of ways to format them. Then different programs use different methods to see if a piece of text is a date or not. This leads to the enemy of Data — unstandardization and messiness.
PSA: Can we all please agree to write dates as YYYY-MM-DD? It’s clean, easy to recognize and makes sorting a breeze. Pass this on and let’s end this Date-pocalypse once in for all.
But until we can all get on board with this message, we regularly need to convert dates into one format whenever we are doing data analysis.
This tutorial outlines one way to convert dates in a spreadsheet using Python and Pandas. There are many ways to do this but we have found this to be the easiest.
Pre-requisite
If you do not know how to use the Terminal and Python, or how to read and write files using Python and Pandas, then go through this tutorial first
We are going to use a sample file for this tutorial. You can download it by clicking on the file name: CustomerCalls.xlsx
This file contains a row for calls made to a customer. The date column that we will be standardizing is named DateTime Recorded and as seen below there are all kinds of different date formats.
Full Code
The full code is below and you can follow along. We will break down the code in the tutorial
Create the File for Code
Open a text editor and create a file dates.py. Save this in the same folder as the CustomerCalls.xlsx file
Import Library
Import the pandas library to read, convert dates and write the spreadsheets.
Read the File
We are going to be reading the spreadsheet using pandas and storing the result in a data frame customer_calls
Convert Dates to YYYY-MM-DD & Write conversion to a new file
Now let’s look at the line of code that converts the dates. This is the meat of the tutorial so we will dissect it in detail.
The right side of the line does a few things:
- It accesses the DateTime Recorded column from the data frame and then converts the column to a datetime data type. We need to do this before we can do anything on this column related to dates.
2. Then we call the dt and strftime method with a value, “%Y-%m-%d” that tells Python how we want to format the date. Let’s call this the date format string. We will be looking at how to create this value for any format a little later on in the tutorial.
The left side of the line assigns the result of the conversion back to the DateTime Recorded column of the customer_calls data frame.
Then we write this data frame with the converted column to a new file. You can open and check it for the converted dates.
Create the Date Format String
Converting to any other format requires the proper date format string. Python provides a mapping of the various common parts of the date, such as a 4 digit Year (2019), and what they correspond to in Python, such as %Y.
In the official docs, this is called a directive. You can then use them to create the date format string and convert the dates. Python will replace the directives with the appropriate date value formatted.
E.g., %Y is the full year, %m is the month with 2 digits and %d is the date with 2 digits. If we want YYYY-MM-DD then we specify “%Y-%m-%d”. If we wanted DD/MM/YYYY, then we specify “%d/%m/%Y”.
We can literally specify anything like “%d day of %m awesome month of % Y year” will convert all the dates to 24 day of 02 awesome month of 2019 year.
Let’s take a look at the mapping below. You can also read about this in the official docs:
Examples for a date 22 September, 2019, 5:30PM
- “%A, %B %d” -> “Sunday, September 22”
- “%d-%b-%y” -> “22-Sep-19”
- “%d %b, %Y — %I:%M %p in the %Z timezone” -> “22 September, 2019–5:30 PM in the EST timezone”
Once again, as you can see the date format string can contain anything in it. The directives marked by % get replaced with the appropriate date format and everything else remains the same.
To convert the DateTime Recorded to something like 22-Sep-19 your date format string would be “%d-%b-%y” and your line of code to convert dates becomes the following
Feel free to try out the different combinations and output the files to experiment.
Additional Things
There are some things you might run into while converting dates.
Источник
Converting to Excel «Date» format (within Excel file) using python and pandas from another date format from html table
I am new to python and exploring to get data from excel using it and found pandas library to get data
I need to get the rates from a HTML table on a website. Table from which the data has to be read Then dump it in an excel file. I am using Python I have used the following code
The dates are in dd mmm yyyy format in the ‘Effective Date’ column
I would like to convert them to the dd/mm/yyyy format
I used the following code to convert the table
but it fails to convert the dates in the column. Could someone head me in some proper direction please.
Here is the complete code

1 Answer 1
You need to use pd.ExcelWriter to create a writer object, so that you can change to Date format WITHIN Excel; however, this problem has a couple of different aspects to it:
- You have non-date values in your date column, including «Legend:», «Cash rate decreased», «Cash Rate increased», and «Cash rate unchanged».
- As mentioned in the comments, you must pass format=’%d %b %Y’ to pd.to_datetime() as that is the Date format you are converting FROM.
- You must pass errors=’coerce’ in order to return NaT for those that don’t meet the specified format
- For the pd.to_datetime() line of code, you must add .dt.date at the end, because we use a date_format parameter and not a datetime_format parameter in creating the writer object later on. However, you could also exclude dt.date and change the format of the datetime_format parameter.
- Then, do table = table.dropna() to drop rows with any columns with NaT
- Pandas does not change the Date format WITHIN Excel. If you want to do that, then you should use openpyxl and create a writer object and pass the date_format . In case someone says this, you CANNOT simply do: pd.to_datetime(table[‘Effective Date’], format=’%d %b %Y’, errors=’coerce’).dt.strftime(‘%m/%d/%y’) or .dt.strftime(‘%d/%m/%y’) , because that creates a «General» date format in EXCEL.
- Output is ugly if you do not widen your columns, so I’ve included code for that as well. Please note that I am on a USA locale, so passing d/m/yyyy creates a «Custom» format in Excel.
NOTE: In my code, I have to pass m/d/yyyy in order for a «Date» format to appear in EXCEL. You can simply change to date_format=’d/m/yyyy’ since my computer has a different locale than you (USA) that Excel utilizes for «Date» format.
Источник
Для лучшей читабельности электронной таблицы .XLSX иногда бывает нужно указать формат ячейки, представляющую дату (день, месяц, год), проценты, денежный формат и т.д. Модуль openpyxl предоставляет такую возможность при помощи атрибута ячейки .number_format.
Формат даты в ячейку, можно установить используя дату и время Python:
>>> import datetime
>>> from openpyxl import Workbook
>>> wb = Workbook()
>>> ws = wb.active
# установим формат ячейки как дата,
# используя дату и время Python
>>> ws['A1'] = datetime.date.today()
>>> ws['A1'].number_format
# 'yyyy-mm-dd'
>>> ws['A2'] = datetime.datetime.now()
>>> ws['A2'].number_format
# 'yyyy-mm-dd h:mm:ss'
Во-первых, не каждого пользователя устроит формат даты, возвращаемый модулем Python datetime. Во-вторых, как быть с денежным форматом или например с процентами?
Модуль openpyxl предоставляет некоторые встроенные форматы ячеек в своем подмодуле openpyxl.styles.numbers, в частности в словаре BUILTIN_FORMATS.
Пример установки формата ячейки:
>>> from openpyxl.styles.numbers import BUILTIN_FORMATS
# укажем, что ячейка будет иметь формат процентов
>>> ws['A3'].number_format = BUILTIN_FORMATS[10]
>>> ws['A3'] = 100
Что бы посмотреть все встроенные форматы ячеек, нужно просто распечатать словарь BUILTIN_FORMATS.
>>> from openpyxl.styles.numbers import BUILTIN_FORMATS
>>> for key, val in BUILTIN_FORMATS.items():
...     print(f'{key}: {val}')
# 0: General
# 1: 0
# 2: 0.00
# 3: #,##0
# 4: #,##0.00
# 5: "$"#,##0_);("$"#,##0)
# 6: "$"#,##0_);[Red]("$"#,##0)
...
# 14: mm-dd-yy
...
# 37: #,##0_);(#,##0)
# 38: #,##0_);[Red](#,##0)
# 39: #,##0.00_);(#,##0.00)
# 40: #,##0.00_);[Red](#,##0.00)
...
Как можно видеть, словарь со встроенными форматами BUILTIN_FORMATS не содержит формата привычной нам даты ДД-ММ-ГГГГ, а так же денежного формата в рублях. Но это не беда, ведь формат ячейки — это простой текст, который определяет правила форматирования ячейки электронные таблицы. Другими словами, этот текст заставляет программу Excel форматировать ячейку определенным образом. Например денежный формат в рублях будет выглядеть как то так: '# ###0,00 [$₽-419]'
Примеры составления и записи в ячейки собственных форматов:
# стандартный денежный формат
>>> ws['A4'].number_format = '# ###0,00 [$₽-419]'
>>> ws['A4'] = 8000000
# или
>>> ws['A5'].number_format = '# ###0,00 [$RUR-419]'
>>> ws['A5'] = 9000000
# денежный формат можно записать и так, отрицательные
# значения будут автоматически выделятся красным
>>> ws['A6'].number_format = '# ###0,00" руб.";[RED]-# ###0,00" руб."'
>>> ws['B6'].number_format = '# ###0,00" руб.";[RED]-# ###0,00" руб."'
>>> ws['A6'] = 900
>>> ws['B6'] = -90
# привычный формат даты можно записать так
>>> ws['A7'].number_format = 'DD.MM.YYYY'
# а еще даты можно записать так
>>> ws['A8'].number_format = 'D MMM, YYYY'
# или так
>>> ws['A9'].number_format = 'D MMMM, YYYY'
>>> ws['A10'].number_format = 'NN, D MMM, YY'
>>> ws['A11'].number_format = 'NNNND MMMM, YYYY'
# теперь время
>>> ws['A12'].number_format = 'HH:MM:SS'
>>> ws['A13'].number_format = 'HH:MM'
# теперь вставим в ячейки дату
>>> for row in range(7, 14):
...     ws.cell(row, 1, datetime.datetime.now())
# сохраняем и смотрим что получилось
>>> wb.save("cell_format.xlsx")
Еще можно открыть программу Excel, перейти на любую ячейку, выбрать нужный формат, а потом скопировать паттерн формата, который выдала программа. Вот и все.
Более подробно о составлении форматов ячеек читайте в документации к Microsoft Excel.
xlrd is a library for reading data and formatting information from Excel files, whether they are .xls or .xlsx files.
Handling of Unicode
This package presents all text strings as Python unicode objects. From Excel 97 onwards, text in Excel spreadsheets has been stored as Unicode. Older files (Excel 95 and earlier) don’t keep strings in Unicode; a CODEPAGE record provides a codepage number (for example, 1252) which is used by xlrd to derive the encoding (for same example: “cp1252”) which is used to translate to Unicode.
If the CODEPAGE record is missing (possible if the file was created by third-party software), xlrd will assume that the encoding is ascii, and keep going. If the actual encoding is not ascii, a UnicodeDecodeError exception will be raised and you will need to determine the encoding yourself, and tell xlrd:
book = xlrd.open_workbook(..., encoding_override="cp1252")
If the CODEPAGE record exists but is wrong (for example, the codepage number is 1251, but the strings are actually encoded in koi8_r), it can be overridden using the same mechanism.
The supplied runxlrd.py has a corresponding command-line argument, which may be used for experimentation:
runxlrd.py -e koi8_r 3rows myfile.xls
The first place to look for an encoding, the “codec name”, is the Python documentation.
Dates in Excel spreadsheets
In reality, there are no such things. What you have are floating point numbers and pious hope. There are several problems with Excel dates:
-
Dates are not stored as a separate data type; they are stored as floating point numbers and you have to rely on:
- the “number format” applied to them in Excel and/or
- knowing which cells are supposed to have dates in them.
This module helps with the former by inspecting the format that has been applied to each number cell; if it appears to be a date format, the cell is classified as a date rather than a number.
Feedback on this feature, especially from non-English-speaking locales, would be appreciated.
-
Excel for Windows stores dates by default as the number of days (or fraction thereof) since
1899-12-31T00:00:00. Excel for Macintosh uses a default start date of1904-01-01T00:00:00.The date system can be changed in Excel on a per-workbook basis (for example: Tools -> Options -> Calculation, tick the “1904 date system” box). This is of course a bad idea if there are already dates in the workbook. There is no good reason to change it even if there are no dates in the workbook.
Which date system is in use is recorded in the workbook. A workbook transported from Windows to Macintosh (or vice versa) will work correctly with the host Excel.
When using this package’s
xldate_as_tuple()function to convert numbers from a workbook, you must use thedatemodeattribute of theBookobject. If you guess, or make a judgement depending on where you believe the workbook was created, you run the risk of being 1462 days out of kilter.Reference: https://support.microsoft.com/en-us/help/180162/xl-the-1900-date-system-vs.-the-1904-date-system
-
The Excel implementation of the Windows-default 1900-based date system works on the incorrect premise that 1900 was a leap year. It interprets the number 60 as meaning
1900-02-29, which is not a valid date.Consequently, any number less than 61 is ambiguous. For example, is 59 the result of
1900-02-28entered directly, or is it1900-03-01minus 2 days?The OpenOffice.org Calc program “corrects” the Microsoft problem; entering
1900-02-27causes the number 59 to be stored. Save as an XLS file, then open the file with Excel and you’ll see1900-02-28displayed.Reference: https://support.microsoft.com/en-us/help/214326/excel-incorrectly-assumes-that-the-year-1900-is-a-leap-year
-
The Macintosh-default 1904-based date system counts
1904-01-02as day 1 and1904-01-01as day zero. Thus any number such that(0.0 <= number < 1.0)is ambiguous. Is 0.625 a time of day (15:00:00), independent of the calendar, or should it be interpreted as an instant on a particular day (1904-01-01T15:00:00)?The functions in
xldatetake the view that such a number is a calendar-independent time of day (like Python’sdatetime.timetype) for both date systems. This is consistent with more recent Microsoft documentation. For example, the help file for Excel 2002, which says that the first day in the 1904 date system is1904-01-02. -
Usage of the Excel
DATE()function may leave strange dates in a spreadsheet. Quoting the help file in respect of the 1900 date system:If year is between 0 (zero) and 1899 (inclusive), Excel adds that value to 1900 to calculate the year. For example, DATE(108,1,2) returns January 2, 2008 (1900+108).
This gimmick, semi-defensible only for arguments up to 99 and only in the pre-Y2K-awareness era, means that
DATE(1899, 12, 31)is interpreted as3799-12-31.For further information, please refer to the documentation for the functions in
xldate.
Named references, constants, formulas, and macros
A name is used to refer to a cell, a group of cells, a constant value, a formula, or a macro. Usually the scope of a name is global across the whole workbook. However it can be local to a worksheet. For example, if the sales figures are in different cells in different sheets, the user may define the name “Sales” in each sheet. There are built-in names, like “Print_Area” and “Print_Titles”; these two are naturally local to a sheet.
To inspect the names with a user interface like MS Excel, OOo Calc, or Gnumeric, click on Insert -> Names -> Define. This will show the global names, plus those local to the currently selected sheet.
A Book object provides two dictionaries (Book.name_map and Book.name_and_scope_map) and a list (Book.name_obj_list) which allow various ways of accessing the Name objects. There is one Name object for each NAME record found in the workbook. Name objects have many attributes, several of which are relevant only when obj.macro is 1.
In the examples directory you will find namesdemo.xls which showcases the many different ways that names can be used, and xlrdnamesAPIdemo.py which offers 3 different queries for inspecting the names in your files, and shows how to extract whatever a name is referring to. There is currently one “convenience method”, Name.cell(), which extracts the value in the case where the name refers to a single cell. The source code for Name.cell() is an extra source of information on how the Name attributes hang together.
Note
Name information is not extracted from files older than Excel 5.0 (Book.biff_version < 50).
Formatting information in Excel Spreadsheets
Introduction
This collection of features, new in xlrd version 0.6.1, is intended to provide the information needed to:
- display/render spreadsheet contents (say) on a screen or in a PDF file
- copy spreadsheet data to another file without losing the ability to display/render it.
The Palette; Colour Indexes
A colour is represented in Excel as a (red, green, blue) (“RGB”) tuple with each component in range(256). However it is not possible to access an unlimited number of colours; each spreadsheet is limited to a palette of 64 different colours (24 in Excel 3.0 and 4.0, 8 in Excel 2.0). Colours are referenced by an index (“colour index”) into this palette.
Colour indexes 0 to 7 represent 8 fixed built-in colours: black, white, red, green, blue, yellow, magenta, and cyan.
The remaining colours in the palette (8 to 63 in Excel 5.0 and later) can be changed by the user. In the Excel 2003 UI, Tools -> Options -> Color presents a palette of 7 rows of 8 colours. The last two rows are reserved for use in charts.
The correspondence between this grid and the assigned colour indexes is NOT left-to-right top-to-bottom.
Indexes 8 to 15 correspond to changeable parallels of the 8 fixed colours – for example, index 7 is forever cyan; index 15 starts off being cyan but can be changed by the user.
The default colour for each index depends on the file version; tables of the defaults are available in the source code. If the user changes one or more colours, a PALETTE record appears in the XLS file – it gives the RGB values for all changeable indexes.
Note that colours can be used in “number formats”: [CYAN].... and [COLOR8].... refer to colour index 7; [COLOR16].... will produce cyan unless the user changes colour index 15 to something else.
In addition, there are several “magic” colour indexes used by Excel:
0x18(BIFF3-BIFF4),0x40(BIFF5-BIFF8):- System window text colour for border lines (used in
XF,CF, andWINDOW2records) 0x19(BIFF3-BIFF4),0x41(BIFF5-BIFF8):- System window background colour for pattern background (used in
XFandCFrecords ) 0x43:- System face colour (dialogue background colour)
0x4D:- System window text colour for chart border lines
0x4E:- System window background colour for chart areas
0x4F:- Automatic colour for chart border lines (seems to be always Black)
0x50:- System ToolTip background colour (used in note objects)
0x51:- System ToolTip text colour (used in note objects)
0x7FFF:-
System window text colour for fonts (used in
FONTandCFrecords).Note
0x7FFFappears to be the default colour index. It appears quite often inFONTrecords.
Default Formatting
Default formatting is applied to all empty cells (those not described by a cell record):
- Firstly, row default information (
ROWrecord,Rowinfoclass) is used if available. - Failing that, column default information (
COLINFOrecord,Colinfoclass) is used if available. - As a last resort the worksheet/workbook default cell format will be used; this should always be present in an Excel file, described by the
XFrecord with the fixed index 15 (0-based). By default, it uses the worksheet/workbook default cell style, described by the very firstXFrecord (index 0).
Formatting features not included in xlrd
-
Asian phonetic text (known as “ruby”), used for Japanese furigana. See OOo docs s3.4.2 (p15)
-
Conditional formatting. See OOo docs s5.12, s6.21 (CONDFMT record), s6.16 (CF record)
-
Miscellaneous sheet-level and book-level items, e.g. printing layout, screen panes.
-
Modern Excel file versions don’t keep most of the built-in “number formats” in the file; Excel loads formats according to the user’s locale. Currently, xlrd’s emulation of this is limited to a hard-wired table that applies to the US English locale. This may mean that currency symbols, date order, thousands separator, decimals separator, etc are inappropriate.
Note
This does not affect users who are copying XLS files, only those who are visually rendering cells.
Loading worksheets on demand
This feature, new in version 0.7.1, is governed by the on_demand argument to the open_workbook() function and allows saving memory and time by loading only those sheets that the caller is interested in, and releasing sheets when no longer required.
on_demand=False(default):- No change.
open_workbook()loads global data and all sheets, releases resources no longer required (principally thestrormmap.mmapobject containing the Workbook stream), and returns. on_demand=Trueand BIFF version < 5.0:- A warning message is emitted,
on_demandis recorded asFalse, and the old process is followed. on_demand=Trueand BIFF version >= 5.0:open_workbook()loads global data and returns without releasing resources. At this stage, the only information available about sheets isBook.nsheetsandBook.sheet_names().
Book.sheet_by_name() and Book.sheet_by_index() will load the requested sheet if it is not already loaded.
Book.sheets() will load all unloaded sheets.
The caller may save memory by calling Book.unload_sheet() when finished with the sheet. This applies irrespective of the state of on_demand.
The caller may re-load an unloaded sheet by calling Book.sheet_by_name() or Book.sheet_by_index(), except if the required resources have been released (which will have happened automatically when on_demand is false). This is the only case where an exception will be raised.
The caller may query the state of a sheet using Book.sheet_loaded().
Book.release_resources() may used to save memory and close any memory-mapped file before proceeding to examine already-loaded sheets. Once resources are released, no further sheets can be loaded.
When using on-demand, it is advisable to ensure that Book.release_resources() is always called, even if an exception is raised in your own code; otherwise if the input file has been memory-mapped, the mmap.mmap object will not be closed and you will not be able to access the physical file until your Python process terminates. This can be done by calling Book.release_resources() explicitly in the finally part of a try/finally block.
The Book object is also a context manager, so you can wrap your code in a with statement that will make sure underlying resources are closed.
XML vulnerabilities and Excel files
If your code ingests .xlsx files that come from sources in which you do not have absolute trust, please be aware that .xlsx files are made up of XML and, as such, are susceptible to the vulnerabilities of XML.
xlrd uses ElementTree to parse XML, but as you’ll find if you look into it, there are many different ElementTree implementations. A good summary of vulnerabilities you should worry can be found here: XML vulnerabilities.
For clarity, xlrd will try and import ElementTree from the following sources. The list is in priority order, with those earlier in the list being preferred to those later in the list:
- xml.etree.cElementTree
- cElementTree
- lxml.etree
- xml.etree.ElementTree
- elementtree.ElementTree
To guard against these problems, you should consider the defusedxml project which can be used as follows:
import defusedxml
from defusedxml.common import EntitiesForbidden
from xlrd import open_workbook
defusedxml.defuse_stdlib()


def secure_open_workbook(**kwargs):
    try:
        return open_workbook(**kwargs)
    except EntitiesForbidden:
        raise ValueError('Please use a xlsx file without XEE')
API Reference
xlrd
xlrd.open_workbook(filename=None, logfile=<_io.TextIOWrapper name='<stdout>’ mode=’w’ encoding=’UTF-8′>, verbosity=0, use_mmap=1, file_contents=None, encoding_override=None, formatting_info=False, on_demand=False, ragged_rows=False)¶- Open a spreadsheet file for data extraction.
Parameters: - filename – The path to the spreadsheet file to be opened.
- logfile – An open file to which messages and diagnostics are written.
- verbosity – Increases the volume of trace material written to the logfile.
- use_mmap –Whether to use the mmap module is determined heuristically. Use this arg to override the result.Current heuristic: mmap is used if it exists.
- file_contents – A string or an
mmap.mmapobject or some other behave-alike object. Iffile_contentsis supplied,filenamewill not be used, except (possibly) in messages. - encoding_override – Used to overcome missing or bad codepage information in older-version files. See Handling of Unicode.
- formatting_info –The default is
False, which saves memory. In this case, “Blank” cells, which are those with their own formatting information but no data, are treated as empty by ignoring the file’sBLANKandMULBLANKrecords. This cuts off any bottom or right “margin” of rows of empty or blank cells. Onlycell_value()andcell_type()are available.WhenTrue, formatting information will be read from the spreadsheet file. This provides all cells, including empty and blank cells. Formatting information is available for each cell. - on_demand – Governs whether sheets are all loaded initially or when demanded by the caller. See Loading worksheets on demand.
- ragged_rows –The default of
Falsemeans all rows are padded out with empty cells so that all rows have the same size as found inncols.Truemeans that there are no empty cells at the ends of rows. This can result in substantial memory savings if rows are of widely varying sizes. See also therow_len()method.
Returns: An instance of the
Bookclass.
xlrd.dump(filename, outfile=<_io.TextIOWrapper name='<stdout>’ mode=’w’ encoding=’UTF-8′>, unnumbered=False)¶- For debugging: dump an XLS file’s BIFF records in char & hex.
Parameters: - filename – The path to the file to be dumped.
- outfile – An open file, to which the dump is written.
- unnumbered – If true, omit offsets (for meaningful diffs).
xlrd.count_records(filename, outfile=<_io.TextIOWrapper name='<stdout>’ mode=’w’ encoding=’UTF-8′>)¶- For debugging and analysis: summarise the file’s BIFF records. ie: produce a sorted file of
(record_name, count).Parameters: - filename – The path to the file to be summarised.
- outfile – An open file, to which the summary is written.
xlrd.biffh
- exception
xlrd.biffh.XLRDError¶ - An exception indicating problems reading data from an Excel file.
- class
xlrd.biffh.BaseObject¶ - Parent of almost all other classes in the package. Defines a common
dump()method for debugging.dump(f=None, header=None, footer=None, indent=0)¶-
Parameters: - f – open file object, to which the dump is written
- header – text to write before the dump
- footer – text to write after the dump
- indent – number of leading spaces (for recursive calls)
xlrd.biffh.error_text_from_code= {0: ‘#NULL!’, 36: ‘#NUM!’, 23: ‘#REF!’, 42: ‘#N/A’, 7: ‘#DIV/0!’, 29: ‘#NAME?’, 15: ‘#VALUE!’}¶- This dictionary can be used to produce a text version of the internal codes that Excel uses for error cells.
xlrd.biffh.unpack_unicode(data, pos, lenlen=2)¶- Return unicode_strg
xlrd.biffh.unpack_unicode_update_pos(data, pos, lenlen=2, known_len=None)¶- Return (unicode_strg, updated value of pos)
xlrd.book
- class
xlrd.book.Name¶ - Information relating to a named reference, formula, macro, etc.
Note
Name information is not extracted from files older than Excel 5.0 (
Book.biff_version < 50)hidden= 0¶- 0 = Visible; 1 = Hidden
func= 0¶- 0 = Command macro; 1 = Function macro. Relevant only if macro == 1
vbasic= 0¶- 0 = Sheet macro; 1 = VisualBasic macro. Relevant only if macro == 1
macro= 0¶- 0 = Standard name; 1 = Macro name
complex= 0¶- 0 = Simple formula; 1 = Complex formula (array formula or user defined).
Note
No examples have been sighted.
builtin= 0¶- 0 = User-defined name; 1 = Built-in name
Common examples:
Print_Area,Print_Titles; see OOo docs for full list
funcgroup= 0¶- Function group. Relevant only if macro == 1; see OOo docs for values.
binary= 0¶- 0 = Formula definition; 1 = Binary data
Note
No examples have been sighted.
name_index= 0¶- The index of this object in book.name_obj_list
raw_formula= bӦ- An 8-bit string.
scope= -1¶-
-1:- The name is global (visible in all calculation sheets).
-2:- The name belongs to a macro sheet or VBA sheet.
-3:- The name is invalid.
0 <= scope < book.nsheets:- The name is local to the sheet whose index is scope.
result= None¶- The result of evaluating the formula, if any. If no formula, or evaluation of the formula encountered problems, the result is
None. Otherwise the result is a single instance of theOperandclass.
cell()¶- This is a convenience method for the frequent use case where the name refers to a single cell.
Returns: An instance of the Cellclass.Raises: xlrd.biffh.XLRDError – The name is not a constant absolute reference to a single cell.
area2d(clipped=True)¶- This is a convenience method for the use case where the name refers to one rectangular area in one worksheet.
Parameters: clipped – If True, the default, the returned rectangle is clipped to fit in(0, sheet.nrows, 0, sheet.ncols). it is guaranteed that0 <= rowxlo <= rowxhi <= sheet.nrowsand that the number of usable rows in the area (which may be zero) isrowxhi - rowxlo; likewise for columns.Returns: a tuple (sheet_object, rowxlo, rowxhi, colxlo, colxhi).Raises: xlrd.biffh.XLRDError – The name is not a constant absolute reference to a single area in a single sheet.
- class
xlrd.book.Book¶ - Contents of a “workbook”.
Warning
You should not instantiate this class yourself. You use the
Bookobject that was returned when you calledopen_workbook().datemode= 0¶- Which date system was in force when this file was last saved.
- 0:
- 1900 system (the Excel for Windows default).
- 1:
- 1904 system (the Excel for Macintosh default).
Defaults to 0 in case it’s not specified in the file.
biff_version= 0¶- Version of BIFF (Binary Interchange File Format) used to create the file. Latest is 8.0 (represented here as 80), introduced with Excel 97. Earliest supported by this module: 2.0 (represented as 20).
codepage= None¶- An integer denoting the character set used for strings in this file. For BIFF 8 and later, this will be 1200, meaning Unicode; more precisely, UTF_16_LE. For earlier versions, this is used to derive the appropriate Python encoding to be used to convert to Unicode. Examples:
1252 -> 'cp1252',10000 -> 'mac_roman'
encoding= None¶- The encoding that was derived from the codepage.
countries= (0, 0)¶- A tuple containing the telephone country code for:
[0]:- the user-interface setting when the file was created.
[1]:- the regional settings.
Example:
(1, 61)meaning(USA, Australia).This information may give a clue to the correct encoding for an unknown codepage. For a long list of observed values, refer to the OpenOffice.org documentation for the
COUNTRYrecord.
user_name= Ӧ- What (if anything) is recorded as the name of the last user to save the file.
font_list= []¶- A list of
Fontclass instances, each corresponding to a FONT record.New in version 0.6.1.
format_list= []¶- A list of
Formatobjects, each corresponding to aFORMATrecord, in the order that they appear in the input file. It does not contain builtin formats.If you are creating an output file using (for example)
xlwt, use this list.The collection to be used for all visual rendering purposes is
format_map.New in version 0.6.1.
format_map= {}¶- The mapping from
format_keytoFormatobject.New in version 0.6.1.
load_time_stage_1= -1.0¶- Time in seconds to extract the XLS image as a contiguous string (or mmap equivalent).
load_time_stage_2= -1.0¶- Time in seconds to parse the data from the contiguous string (or mmap equivalent).
sheets()¶-
Returns: A list of all sheets in the book. All sheets not already loaded will be loaded.
sheet_by_index(sheetx)¶-
Parameters: sheetx – Sheet index in range(nsheets)Returns: A Sheet.
sheet_by_name(sheet_name)¶-
Parameters: sheet_name – Name of the sheet required. Returns: A Sheet.
sheet_names()¶-
Returns: A list of the names of all the worksheets in the workbook file. This information is available even when no sheets have yet been loaded.
sheet_loaded(sheet_name_or_index)¶-
Parameters: sheet_name_or_index – Name or index of sheet enquired upon Returns: Trueif sheet is loaded,Falseotherwise.New in version 0.7.1.
unload_sheet(sheet_name_or_index)¶-
Parameters: sheet_name_or_index – Name or index of sheet to be unloaded. New in version 0.7.1.
release_resources()¶- This method has a dual purpose. You can call it to release memory-consuming objects and (possibly) a memory-mapped file (
mmap.mmapobject) when you have finished loading sheets inon_demandmode, but still require theBookobject to examine the loaded sheets. It is also called automatically (a) whenopen_workbook()raises an exception and (b) if you are using awithstatement, when thewithblock is exited. Calling this method multiple times on the same object has no ill effect.
name_and_scope_map= {}¶-
- A mapping from
(lower_case_name, scope)to a singleName - object.
New in version 0.6.0.
- A mapping from
name_map= {}¶- A mapping from lower_case_name to a list of
Nameobjects. The list is sorted in scope order. Typically there will be one item (of global scope) in the list.New in version 0.6.0.
nsheets= 0¶- The number of worksheets present in the workbook file. This information is available even when no sheets have yet been loaded.
name_obj_list= []¶- List containing a
Nameobject for eachNAMErecord in the workbook.New in version 0.6.0.
colour_map= {}¶- This provides definitions for colour indexes. Please refer to The Palette; Colour Indexes for an explanation of how colours are represented in Excel.
Colour indexes into the palette map into
(red, green, blue)tuples. “Magic” indexes e.g.0x7FFFmap toNone.colour_mapis what you need if you want to render cells on screen or in a PDF file. If you are writing an output XLS file, usepalette_record.Note
Extracted only if
open_workbook(..., formatting_info=True)New in version 0.6.1.
palette_record= []¶- If the user has changed any of the colours in the standard palette, the XLS file will contain a
PALETTErecord with 56 (16 for Excel 4.0 and earlier) RGB values in it, and this list will be e.g.[(r0, b0, g0), ..., (r55, b55, g55)]. Otherwise this list will be empty. This is what you need if you are writing an output XLS file. If you want to render cells on screen or in a PDF file, usecolour_map.Note
Extracted only if
open_workbook(..., formatting_info=True)New in version 0.6.1.
xf_list= []¶- A list of
XFclass instances, each corresponding to anXFrecord.New in version 0.6.1.
style_name_map= {}¶- This provides access via name to the extended format information for both built-in styles and user-defined styles.
It maps
nameto(built_in, xf_index), wherenameis either the name of a user-defined style, or the name of one of the built-in styles. Known built-in names are Normal, RowLevel_1 to RowLevel_7, ColLevel_1 to ColLevel_7, Comma, Currency, Percent, “Comma [0]”, “Currency [0]”, Hyperlink, and “Followed Hyperlink”.built_inhas the following meanings- 1:
- built-in style
- 0:
- user-defined
xf_indexis an index intoBook.xf_list.References: OOo docs s6.99 (
STYLErecord); Excel UI Format/StyleNew in version 0.6.1.
Extracted only if
open_workbook(..., formatting_info=True)New in version 0.7.4.
xlrd.book.unpack_SST_table(datatab, nstrings)¶- Return list of strings
xlrd.compdoc
Implements the minimal functionality required to extract a “Workbook” or “Book” stream (as one big string) from an OLE2 Compound Document file.
xlrd.compdoc.SIGNATURE= b’xd0xcfx11xe0xa1xb1x1axe1′¶- Magic cookie that should appear in the first 8 bytes of the file.
- class
xlrd.compdoc.CompDoc(mem, logfile=<_io.TextIOWrapper name='<stdout>’ mode=’w’ encoding=’UTF-8′>, DEBUG=0)¶ - Compound document handler.
Parameters: mem – The raw contents of the file, as a string, or as an mmap.mmapobject. The only operation it needs to support is slicing.get_named_stream(qname)¶- Interrogate the compound document’s directory; return the stream as a string if found, otherwise return
None.Parameters: qname – Name of the desired stream e.g. u'Workbook'. Should be in Unicode or convertible thereto.
locate_named_stream(qname)¶- Interrogate the compound document’s directory.
If the named stream is not found,
(None, 0, 0)will be returned.If the named stream is found and is contiguous within the original byte sequence (
mem) used when the document was opened, then(mem, offset_to_start_of_stream, length_of_stream)is returned.Otherwise a new string is built from the fragments and
(new_string, 0, length_of_stream)is returned.Parameters: qname – Name of the desired stream e.g. u'Workbook'. Should be in Unicode or convertible thereto.
xlrd.formatting
Module for formatting information.
xlrd.formatting.nearest_colour_index(colour_map, rgb, debug=0)¶- General purpose function. Uses Euclidean distance. So far used only for pre-BIFF8
WINDOW2record. Doesn’t have to be fast. Doesn’t have to be fancy.
- class
xlrd.formatting.EqNeAttrs¶ - This mixin class exists solely so that
Format,Font, andXFobjects can be compared by value of their attributes.
- class
xlrd.formatting.Font¶ - An Excel “font” contains the details of not only what is normally considered a font, but also several other display attributes. Items correspond to those in the Excel UI’s Format -> Cells -> Font tab.
New in version 0.6.1.
bold= 0¶- 1 = Characters are bold. Redundant; see “weight” attribute.
character_set= 0¶- Values:
0 = ANSI Latin
1 = System default
2 = Symbol,
77 = Apple Roman,
128 = ANSI Japanese Shift-JIS,
129 = ANSI Korean (Hangul),
130 = ANSI Korean (Johab),
134 = ANSI Chinese Simplified GBK,
136 = ANSI Chinese Traditional BIG5,
161 = ANSI Greek,
162 = ANSI Turkish,
163 = ANSI Vietnamese,
177 = ANSI Hebrew,
178 = ANSI Arabic,
186 = ANSI Baltic,
204 = ANSI Cyrillic,
222 = ANSI Thai,
238 = ANSI Latin II (Central European),
255 = OEM Latin I
colour_index= 0¶- An explanation of “colour index” is given in The Palette; Colour Indexes.
escapement= 0¶- 1 = Superscript, 2 = Subscript.
family= 0¶- Values:
0 = None (unknown or don't care)
1 = Roman (variable width, serifed)
2 = Swiss (variable width, sans-serifed)
3 = Modern (fixed width, serifed or sans-serifed)
4 = Script (cursive)
5 = Decorative (specialised, for example Old English, Fraktur)
font_index= 0¶- The 0-based index used to refer to this Font() instance. Note that index 4 is never used; xlrd supplies a dummy place-holder.
height= 0¶- Height of the font (in twips). A twip = 1/20 of a point.
italic= 0¶- 1 = Characters are italic.
name= Ӧ- The name of the font. Example:
u"Arial".
struck_out= 0¶- 1 = Characters are struck out.
underline_type= 0¶- Values:
0 = None
1 = Single;  0x21 (33) = Single accounting
2 = Double;  0x22 (34) = Double accounting
underlined= 0¶- 1 = Characters are underlined. Redundant; see
underline_typeattribute.
weight= 400¶- Font weight (100-1000). Standard values are 400 for normal text and 700 for bold text.
outline= 0¶- 1 = Font is outline style (Macintosh only)
shadow= 0¶- 1 = Font is shadow style (Macintosh only)
- class
xlrd.formatting.Format(format_key, ty, format_str)¶ - “Number format” information from a
FORMATrecord.New in version 0.6.1.
format_key= 0¶- The key into
format_map
type= 0¶- A classification that has been inferred from the format string. Currently, this is used only to distinguish between numbers and dates. Values:
FUN = 0 # unknown
FDT = 1 # date
FNU = 2 # number
FGE = 3 # general
FTX = 4 # text
format_str= Ӧ- The format string
xlrd.formatting.fmt_bracketed_sub()¶- Return the string obtained by replacing the leftmost non-overlapping occurrences of pattern in string by the replacement repl.
- class
xlrd.formatting.XFBorder¶ - A collection of the border-related attributes of an
XFrecord. Items correspond to those in the Excel UI’s Format -> Cells -> Border tab.An explanations of “colour index” is given in The Palette; Colour Indexes.
There are five line style attributes; possible values and the associated meanings are:
0 = No line,
1 = Thin,
2 = Medium,
3 = Dashed,
4 = Dotted,
5 = Thick,
6 = Double,
7 = Hair,
8 = Medium dashed,
9 = Thin dash-dotted,
10 = Medium dash-dotted,
11 = Thin dash-dot-dotted,
12 = Medium dash-dot-dotted,
13 = Slanted medium dash-dotted.
The line styles 8 to 13 appear in BIFF8 files (Excel 97 and later) only. For pictures of the line styles, refer to OOo docs s3.10 (p22) “Line Styles for Cell Borders (BIFF3-BIFF8)”.</p>
New in version 0.6.1.
top_colour_index= 0¶- The colour index for the cell’s top line
bottom_colour_index= 0¶- The colour index for the cell’s bottom line
left_colour_index= 0¶- The colour index for the cell’s left line
right_colour_index= 0¶- The colour index for the cell’s right line
diag_colour_index= 0¶- The colour index for the cell’s diagonal lines, if any
top_line_style= 0¶- The line style for the cell’s top line
bottom_line_style= 0¶- The line style for the cell’s bottom line
left_line_style= 0¶- The line style for the cell’s left line
right_line_style= 0¶- The line style for the cell’s right line
diag_line_style= 0¶- The line style for the cell’s diagonal lines, if any
diag_down= 0¶- 1 = draw a diagonal from top left to bottom right
diag_up= 0¶- 1 = draw a diagonal from bottom left to top right
- class
xlrd.formatting.XFBackground¶ - A collection of the background-related attributes of an
XFrecord. Items correspond to those in the Excel UI’s Format -> Cells -> Patterns tab.An explanations of “colour index” is given in The Palette; Colour Indexes.
New in version 0.6.1.
fill_pattern= 0¶- See section 3.11 of the OOo docs.
background_colour_index= 0¶- See section 3.11 of the OOo docs.
pattern_colour_index= 0¶- See section 3.11 of the OOo docs.
- class
xlrd.formatting.XFAlignment¶ - A collection of the alignment and similar attributes of an
XFrecord. Items correspond to those in the Excel UI’s Format -> Cells -> Alignment tab.New in version 0.6.1.
hor_align= 0¶- Values: section 6.115 (p 214) of OOo docs
vert_align= 0¶- Values: section 6.115 (p 215) of OOo docs
rotation= 0¶- Values: section 6.115 (p 215) of OOo docs.
Note
file versions BIFF7 and earlier use the documented
orientationattribute; this will be mapped (without loss) intorotation.
text_wrapped= 0¶- 1 = text is wrapped at right margin
indent_level= 0¶- A number in
range(15).
shrink_to_fit= 0¶- 1 = shrink font size to fit text into cell.
text_direction= 0¶- 0 = according to context; 1 = left-to-right; 2 = right-to-left
- class
xlrd.formatting.XFProtection¶ - A collection of the protection-related attributes of an
XFrecord. Items correspond to those in the Excel UI’s Format -> Cells -> Protection tab. Note the OOo docs include the “cell or style” bit in this bundle of attributes. This is incorrect; the bit is used in determining which bundles to use.New in version 0.6.1.
cell_locked= 0¶- 1 = Cell is prevented from being changed, moved, resized, or deleted (only if the sheet is protected).
formula_hidden= 0¶- 1 = Hide formula so that it doesn’t appear in the formula bar when the cell is selected (only if the sheet is protected).
- class
xlrd.formatting.XF¶ - eXtended Formatting information for cells, rows, columns and styles.
Each of the 6 flags below describes the validity of a specific group of attributes.
In cell XFs:
flag==0means the attributes of the parent styleXFare used, (but only if the attributes are valid there);flag==1means the attributes of thisXFare used.
In style XFs:
flag==0means the attribute setting is valid;flag==1means the attribute should be ignored.
Note
the API provides both “raw” XFs and “computed” XFs. In the latter case, cell XFs have had the above inheritance mechanism applied.
New in version 0.6.1.
is_style= 0¶- 0 = cell XF, 1 = style XF
parent_style_index= 0¶- cell XF: Index into Book.xf_list of this XF’s style XF
style XF: 0xFFF
xf_index= 0¶- Index into
xf_list
font_index= 0¶- Index into
font_list
format_key= 0¶- Key into
format_mapWarning
OOo docs on the XF record call this “Index to FORMAT record”. It is not an index in the Python sense. It is a key to a map. It is true only for Excel 4.0 and earlier files that the key into format_map from an XF instance is the same as the index into format_list, and only if the index is less than 164.
protection= None¶- An instance of an
XFProtectionobject.
background= None¶- An instance of an
XFBackgroundobject.
alignment= None¶- An instance of an
XFAlignmentobject.
border= None¶- An instance of an
XFBorderobject.
xlrd.formula
Module for parsing/evaluating Microsoft Excel formulas.
- class
xlrd.formula.Operand(akind=None, avalue=None, arank=0, atext=’?’)¶ - Used in evaluating formulas. The following table describes the kinds and how their values are represented.
Kind symbol Kind number Value representation oBOOL 3 integer: 0 => False; 1 => True oERR 4 None, or an int error code (same as XL_CELL_ERROR in the Cell class). oMSNG 5 Used by Excel as a placeholder for a missing (not supplied) function argument. Should *not* appear as a final formula result. Value is None. oNUM 2 A float. Note that there is no way of distinguishing dates. oREF -1 The value is either None or a non-empty list of absolute Ref3D instances. oREL -2 The value is None or a non-empty list of fully or partially relative Ref3D instances. oSTRG 1 A Unicode string. oUNK 0 The kind is unknown or ambiguous. The value is None kind= 0¶- oUNK means that the kind of operand is not known unambiguously.
value= None¶- None means that the actual value of the operand is a variable (depends on cell data), not a constant.
text= ‘?’¶- The reconstituted text of the original formula. Function names will be in English irrespective of the original language, which doesn’t seem to be recorded anywhere. The separator is ”,”, not ”;” or whatever else might be more appropriate for the end-user’s locale; patches welcome.
- class
xlrd.formula.Ref3D(atuple)¶ - Represents an absolute or relative 3-dimensional reference to a box of one or more cells.
The
coordsattribute is a tuple of the form:(shtxlo, shtxhi, rowxlo, rowxhi, colxlo, colxhi)
where
0 <= thingxlo <= thingx < thingxhi.Note
It is quite possible to have
thingx > nthings; for examplePrint_Titlescould havecolxhi == 256and/orrowxhi == 65536irrespective of how many columns/rows are actually used in the worksheet. The caller will need to decide how to handle this situation. Keyword:IndexError🙂The components of the coords attribute are also available as individual attributes:
shtxlo,shtxhi,rowxlo,rowxhi,colxlo, andcolxhi.The
relflagsattribute is a 6-tuple of flags which indicate whether the corresponding (sheet|row|col)(lo|hi) is relative (1) or absolute (0).Note
There is necessarily no information available as to what cell(s) the reference could possibly be relative to. The caller must decide what if any use to make of
oRELoperands.New in version 0.6.0.
xlrd.formula.cellname(rowx, colx)¶- Utility function:
(5, 7)=>'H6'
xlrd.formula.cellnameabs(rowx, colx, r1c1=0)¶- Utility function:
(5, 7)=>'$H$6'
xlrd.formula.colname(colx)¶- Utility function:
7=>'H',27=>'AB'
xlrd.formula.rangename3d(book, ref3d)¶- Utility function:
Ref3D(1, 4, 5, 20, 7, 10)=>'Sheet2:Sheet3!$H$6:$J$20'(assuming Excel’s default sheetnames)
xlrd.formula.rangename3drel(book, ref3d, browx=None, bcolx=None, r1c1=0)¶- Utility function:
Ref3D(coords=(0, 1, -32, -22, -13, 13), relflags=(0, 0, 1, 1, 1, 1))In R1C1 mode =>
'Sheet1!R[-32]C[-13]:R[-23]C[12]'In A1 mode => depends on base cell
(browx, bcolx)
xlrd.sheet
- class
xlrd.sheet.Sheet(book, position, name, number)¶ - Contains the data for one worksheet.
In the cell access functions,
rowxis a row index, counting from zero, andcolxis a column index, counting from zero. Negative values for row/column indexes and slice positions are supported in the expected fashion.For information about cell types and cell values, refer to the documentation of the
Cellclass.Warning
You don’t instantiate this class yourself. You access
Sheetobjects via theBookobject that was returned when you calledxlrd.open_workbook().col(colx)¶- Returns a sequence of the
Cellobjects in the given column.
gcw¶- A 256-element tuple corresponding to the contents of the GCW record for this sheet. If no such record, treat as all bits zero. Applies to BIFF4-7 only. See docs of the
Colinfoclass for discussion.
vert_split_pos= 0¶- Number of columns in left pane (frozen panes; for split panes, see comments in code)
horz_split_pos= 0¶- Number of rows in top pane (frozen panes; for split panes, see comments in code)
horz_split_first_visible= 0¶- Index of first visible row in bottom frozen/split pane
vert_split_first_visible= 0¶- Index of first visible column in right frozen/split pane
split_active_pane= 0¶- Frozen panes: ignore it. Split panes: explanation and diagrams in OOo docs.
has_pane_record= 0¶- Boolean specifying if a
PANErecord was present, ignore unless you’rexlutils.copy
book= None¶- A reference to the
Bookobject to which this sheet belongs.Example usage:
some_sheet.book.datemode
name= Ӧ- Name of sheet.
nrows= 0¶- Number of rows in sheet. A row index is in
range(thesheet.nrows).
ncols= 0¶- Nominal number of columns in sheet. It is one more than the maximum column index found, ignoring trailing empty cells. See also the
ragged_rowsparameter toopen_workbook()androw_len().
defcolwidth= None¶- Default column width from
DEFCOLWIDTHrecord, elseNone. From the OOo docs:Column width in characters, using the width of the zero character from default font (first FONT record in the file). Excel adds some extra space to the default width, depending on the default font and default font size. The algorithm how to exactly calculate the resulting column width is not known. Example: The default width of 8 set in this record results in a column width of 8.43 using Arial font with a size of 10 points.
For the default hierarchy, refer to the
Colinfoclass.New in version 0.6.1.
standardwidth= None¶- Default column width from
STANDARDWIDTHrecord, elseNone.From the OOo docs:
Default width of the columns in 1/256 of the width of the zero character, using default font (first FONT record in the file).
For the default hierarchy, refer to the
Colinfoclass.New in version 0.6.1.
default_row_height= None¶- Default value to be used for a row if there is no
ROWrecord for that row. From the optionalDEFAULTROWHEIGHTrecord.
default_row_height_mismatch= None¶- Default value to be used for a row if there is no
ROWrecord for that row. From the optionalDEFAULTROWHEIGHTrecord.
default_row_hidden= None¶- Default value to be used for a row if there is no
ROWrecord for that row. From the optionalDEFAULTROWHEIGHTrecord.
default_additional_space_above= None¶- Default value to be used for a row if there is no
ROWrecord for that row. From the optionalDEFAULTROWHEIGHTrecord.
default_additional_space_below= None¶- Default value to be used for a row if there is no
ROWrecord for that row. From the optionalDEFAULTROWHEIGHTrecord.
colinfo_map= {}¶- The map from a column index to a
Colinfoobject. Often there is an entry inCOLINFOrecords for all column indexes inrange(257).Note
xlrd ignores the entry for the non-existent 257th column.
On the other hand, there may be no entry for unused columns.
New in version 0.6.1.
Populated only if
open_workbook(..., formatting_info=True)
rowinfo_map= {}¶- The map from a row index to a
Rowinfoobject.- ..note::
- It is possible to have missing entries – at least one source of XLS files doesn’t bother writing
ROWrecords.
New in version 0.6.1.
Populated only if
open_workbook(..., formatting_info=True)
col_label_ranges= []¶- List of address ranges of cells containing column labels. These are set up in Excel by Insert > Name > Labels > Columns.
New in version 0.6.0.
How to deconstruct the list:
for crange in thesheet.col_label_ranges:
    rlo, rhi, clo, chi = crange
    for rx in xrange(rlo, rhi):
        for cx in xrange(clo, chi):
            print "Column label at (rowx=%d, colx=%d) is %r"
                (rx, cx, thesheet.cell_value(rx, cx))
row_label_ranges= []¶- List of address ranges of cells containing row labels. For more details, see
col_label_ranges.New in version 0.6.0.
merged_cells= []¶- List of address ranges of cells which have been merged. These are set up in Excel by Format > Cells > Alignment, then ticking the “Merge cells” box.
Note
The upper limits are exclusive: i.e.
[2, 3, 7, 9]only spans two cells.Note
Extracted only if
open_workbook(..., formatting_info=True)New in version 0.6.1.
How to deconstruct the list:
for crange in thesheet.merged_cells:
    rlo, rhi, clo, chi = crange
    for rowx in xrange(rlo, rhi):
        for colx in xrange(clo, chi):
            # cell (rlo, clo) (the top left one) will carry the data
            # and formatting info; the remainder will be recorded as
            # blank cells, but a renderer will apply the formatting info
            # for the top left cell (e.g. border, pattern) to all cells in
            # the range.
rich_text_runlist_map= {}¶- Mapping of
(rowx, colx)to list of(offset, font_index)tuples. The offset defines where in the string the font begins to be used. Offsets are expected to be in ascending order. If the first offset is not zero, the meaning is that the cell’sXF‘s font should be used from offset 0.This is a sparse mapping. There is no entry for cells that are not formatted with rich text.
How to use:
runlist = thesheet.rich_text_runlist_map.get((rowx, colx))
if runlist:
    for offset, font_index in runlist:
        # do work here.
        pass
New in version 0.7.2.
Populated only if
open_workbook(..., formatting_info=True)
horizontal_page_breaks= []¶- A list of the horizontal page breaks in this sheet. Breaks are tuples in the form
(index of row after break, start col index, end col index).Populated only if
open_workbook(..., formatting_info=True)New in version 0.7.2.
vertical_page_breaks= []¶- A list of the vertical page breaks in this sheet. Breaks are tuples in the form
(index of col after break, start row index, end row index).Populated only if
open_workbook(..., formatting_info=True)New in version 0.7.2.
visibility= 0¶- Visibility of the sheet:
0 = visible
1 = hidden (can be unhidden by user -- Format -> Sheet -> Unhide)
2 = "very hidden" (can be unhidden only by VBA macro).
hyperlink_list= []¶- A list of
Hyperlinkobjects corresponding toHLINKrecords found in the worksheet.New in version 0.7.2.
hyperlink_map= {}¶- A sparse mapping from
(rowx, colx)to an item inhyperlink_list. Cells not covered by a hyperlink are not mapped. It is possible using the Excel UI to set up a hyperlink that covers a larger-than-1×1 rectangle of cells. Hyperlink rectangles may overlap (Excel doesn’t check). When a multiply-covered cell is clicked on, the hyperlink that is activated (and the one that is mapped here) is the last inhyperlink_list.New in version 0.7.2.
cell_note_map= {}¶- A sparse mapping from
(rowx, colx)to aNoteobject. Cells not containing a note (“comment”) are not mapped.New in version 0.7.2.
cell(rowx, colx)¶Cellobject in the given row and column.
cell_value(rowx, colx)¶- Value of the cell in the given row and column.
cell_type(rowx, colx)¶- Type of the cell in the given row and column.
Refer to the documentation of the
Cellclass.
cell_xf_index(rowx, colx)¶- XF index of the cell in the given row and column. This is an index into
xf_list.New in version 0.6.1.
row_len(rowx)¶- Returns the effective number of cells in the given row. For use with
open_workbook(ragged_rows=True)which is likely to produce rows with fewer thanncolscells.New in version 0.7.2.
row(rowx)¶- Returns a sequence of the
Cellobjects in the given row.
get_rows()¶- Returns a generator for iterating through each row.
row_types(rowx, start_colx=0, end_colx=None)¶- Returns a slice of the types of the cells in the given row.
row_values(rowx, start_colx=0, end_colx=None)¶- Returns a slice of the values of the cells in the given row.
row_slice(rowx, start_colx=0, end_colx=None)¶- Returns a slice of the
Cellobjects in the given row.
col_slice(colx, start_rowx=0, end_rowx=None)¶- Returns a slice of the
Cellobjects in the given column.
col_values(colx, start_rowx=0, end_rowx=None)¶- Returns a slice of the values of the cells in the given column.
col_types(colx, start_rowx=0, end_rowx=None)¶- Returns a slice of the types of the cells in the given column.
computed_column_width(colx)¶- Determine column display width.
Parameters: colx – Index of the queried column, range 0 to 255. Note that it is possible to find out the width that will be used to display columns with no cell information e.g. column IV (colx=255). Returns: The column width that will be used for displaying the given column by Excel, in units of 1/256th of the width of a standard character (the digit zero in the first font). New in version 0.6.1.
- class
xlrd.sheet.Note¶ - Represents a user “comment” or “note”. Note objects are accessible through
Sheet.cell_note_map.New in version 0.7.2.
- Author of note
col_hidden= 0¶Trueif the containing column is hidden
colx= 0¶- Column index
rich_text_runlist= None¶- List of
(offset_in_string, font_index)tuples. UnlikeSheet.rich_text_runlist_map, the first offset should always be 0.
row_hidden= 0¶- True if the containing row is hidden
rowx= 0¶- Row index
show= 0¶- True if note is always shown
text= Ӧ- Text of the note
- class
xlrd.sheet.Hyperlink¶ - Contains the attributes of a hyperlink. Hyperlink objects are accessible through
Sheet.hyperlink_listandSheet.hyperlink_map.New in version 0.7.2.
frowx= None¶- Index of first row
lrowx= None¶- Index of last row
fcolx= None¶- Index of first column
lcolx= None¶- Index of last column
type= None¶- Type of hyperlink. Unicode string, one of ‘url’, ‘unc’, ‘local file’, ‘workbook’, ‘unknown’
url_or_path= None¶- The URL or file-path, depending in the type. Unicode string, except in the rare case of a local but non-existent file with non-ASCII characters in the name, in which case only the “8.3” filename is available, as a
bytes(3.x) orstr(2.x) string, with unknown encoding.
desc= None¶- Description. This is displayed in the cell, and should be identical to the cell value. Unicode string, or
None. It seems impossible NOT to have a description created by the Excel UI.
target= None¶- Target frame. Unicode string.
Note
No cases of this have been seen in the wild. It seems impossible to create one in the Excel UI.
textmark= None¶- The piece after the “#” in “http://docs.python.org/library#struct_module”, or the
Sheet1!A1:Z99part when type is “workbook”.
quicktip= None¶- The text of the “quick tip” displayed when the cursor hovers over the hyperlink.
- class
xlrd.sheet.Cell(ctype, value, xf_index=None)¶ - Contains the data for one cell.
Warning
You don’t call this class yourself. You access
Cellobjects via methods of theSheetobject(s) that you found in theBookobject that was returned when you calledopen_workbook()Cell objects have three attributes:
ctypeis an int,value(which depends onctype) andxf_index. Ifformatting_infois not enabled when the workbook is opened,xf_indexwill beNone.The following table describes the types of cells and how their values are represented in Python.
Type symbol Type number Python value XL_CELL_EMPTY 0 empty string u” XL_CELL_TEXT 1 a Unicode string XL_CELL_NUMBER 2 float XL_CELL_DATE 3 float XL_CELL_BOOLEAN 4 int; 1 means TRUE, 0 means FALSE XL_CELL_ERROR 5 int representing internal Excel codes; for a text representation, refer to the supplied dictionary error_text_from_code XL_CELL_BLANK 6 empty string u”. Note: this type will appear only when open_workbook(…, formatting_info=True) is used.
- class
xlrd.sheet.Colinfo¶ - Width and default formatting information that applies to one or more columns in a sheet. Derived from
COLINFOrecords.Here is the default hierarchy for width, according to the OOo docs:
In BIFF3, if a
COLINFOrecord is missing for a column, the width specified in the recordDEFCOLWIDTHis used instead.In BIFF4-BIFF7, the width set in this
COLINFOrecord is only used, if the corresponding bit for this column is cleared in theGCWrecord, otherwise the column width set in theDEFCOLWIDTHrecord is used (theSTANDARDWIDTHrecord is always ignored in this case [1]).In BIFF8, if a
COLINFOrecord is missing for a column, the width specified in the recordSTANDARDWIDTHis used. If thisSTANDARDWIDTHrecord is also missing, the column width of the recordDEFCOLWIDTHis used instead.[1] The docs on the
GCWrecord say this:If a bit is set, the corresponding column uses the width set in the
STANDARDWIDTHrecord. If a bit is cleared, the corresponding column uses the width set in theCOLINFOrecord for this column.If a bit is set, and the worksheet does not contain the
STANDARDWIDTHrecord, or if the bit is cleared, and the worksheet does not contain theCOLINFOrecord, theDEFCOLWIDTHrecord of the worksheet will be used instead.xlrd goes with the GCW version of the story. Reference to the source may be useful: see
Sheet.computed_column_width().New in version 0.6.1.
width= 0¶- Width of the column in 1/256 of the width of the zero character, using default font (first
FONTrecord in the file).
xf_index= -1¶- XF index to be used for formatting empty cells.
hidden= 0¶- 1 = column is hidden
bit1_flag= 0¶- Value of a 1-bit flag whose purpose is unknown but is often seen set to 1
outline_level= 0¶- Outline level of the column, in
range(7). (0 = no outline)
collapsed= 0¶- 1 = column is collapsed
- class
xlrd.sheet.Rowinfo¶ - Height and default formatting information that applies to a row in a sheet. Derived from
ROWrecords.New in version 0.6.1.
height¶- Height of the row, in twips. One twip == 1/20 of a point.
has_default_height¶- 0 = Row has custom height; 1 = Row has default height.
outline_level¶- Outline level of the row (0 to 7)
outline_group_starts_ends¶- 1 = Outline group starts or ends here (depending on where the outline buttons are located, see
WSBOOLrecord, which is not parsed by xlrd), and is collapsed.
hidden¶- 1 = Row is hidden (manually, or by a filter or outline group)
height_mismatch¶- 1 = Row height and default font height do not match.
has_default_xf_index¶- 1 = the xf_index attribute is usable; 0 = ignore it.
xf_index¶- Index to default
XFrecord for empty cells in this row. Don’t use this ifhas_default_xf_index == 0.
additional_space_above¶- This flag is set if the upper border of at least one cell in this row or if the lower border of at least one cell in the row above is formatted with a thick line style. Thin and medium line styles are not taken into account.
additional_space_below¶- This flag is set if the lower border of at least one cell in this row or if the upper border of at least one cell in the row below is formatted with a medium or thick line style. Thin line styles are not taken into account.
xlrd.xldate
Tools for working with dates and times in Excel files.
The conversion from days to (year, month, day) starts with an integral “julian day number” aka JDN. FWIW:
- JDN 0 corresponds to noon on Monday November 24 in Gregorian year -4713.
More importantly:
- Noon on Gregorian 1900-03-01 (day 61 in the 1900-based system) is JDN 2415080.0
- Noon on Gregorian 1904-01-02 (day 1 in the 1904-based system) is JDN 2416482.0
- exception
xlrd.xldate.XLDateError¶ - A base class for all datetime-related errors.
- exception
xlrd.xldate.XLDateNegative¶ xldate < 0.00
- exception
xlrd.xldate.XLDateAmbiguous¶ - The 1900 leap-year problem
(datemode == 0 and 1.0 <= xldate < 61.0)
- exception
xlrd.xldate.XLDateTooLarge¶ - Gregorian year 10000 or later
- exception
xlrd.xldate.XLDateBadDatemode¶ datemodearg is neither 0 nor 1
xlrd.xldate.xldate_as_tuple(xldate, datemode)¶- Convert an Excel number (presumed to represent a date, a datetime or a time) into a tuple suitable for feeding to datetime or mx.DateTime constructors.
Parameters: - xldate – The Excel number
- datemode – 0: 1900-based, 1: 1904-based.
Raises: - xlrd.xldate.XLDateNegative –
- xlrd.xldate.XLDateAmbiguous –
- xlrd.xldate.XLDateTooLarge –
- xlrd.xldate.XLDateBadDatemode –
- xlrd.xldate.XLDateError –
Returns: Gregorian
(year, month, day, hour, minute, nearest_second).Warning
When using this function to interpret the contents of a workbook, you should pass in the
datemodeattribute of that workbook. Whether the workbook has ever been anywhere near a Macintosh is irrelevant.Special case
If
0.0 <= xldate < 1.0, it is assumed to represent a time;(0, 0, 0, hour, minute, second)will be returned.Note
1904-01-01is not regarded as a valid date in thedatemode==1system; its “serial number” is zero.
xlrd.xldate.xldate_as_datetime(xldate, datemode)¶- Convert an Excel date/time number into a
datetime.datetimeobject.Parameters: - xldate – The Excel number
- datemode – 0: 1900-based, 1: 1904-based.
Returns: A
datetime.datetimeobject.
xlrd.xldate.xldate_from_date_tuple(date_tuple, datemode)¶- Convert a date tuple (year, month, day) to an Excel date.
Parameters: - year – Gregorian year.
- month –
1 <= month <= 12 - day –
1 <= day <= last day of that (year, month) - datemode – 0: 1900-based, 1: 1904-based.
Raises: - xlrd.xldate.XLDateAmbiguous –
- xlrd.xldate.XLDateBadDatemode –
- xlrd.xldate.XLDateBadTuple –
(year, month, day)is too early/late or has invalid component(s) - xlrd.xldate.XLDateError –
xlrd.xldate.xldate_from_time_tuple(time_tuple)¶- Convert a time tuple
(hour, minute, second)to an Excel “date” value (fraction of a day).Parameters: - hour –
0 <= hour < 24 - minute –
0 <= minute < 60 - second –
0 <= second < 60
Raises: xlrd.xldate.XLDateBadTuple – Out-of-range hour, minute, or second
- hour –
xlrd.xldate.xldate_from_datetime_tuple(datetime_tuple, datemode)¶- Convert a datetime tuple
(year, month, day, hour, minute, second)to an Excel date value. For more details, refer to other xldate_from_*_tuple functions.Parameters: - datetime_tuple –
(year, month, day, hour, minute, second) - datemode – 0: 1900-based, 1: 1904-based.
- datetime_tuple –
You may also wish to consult the tutorial.
For details of how to install the package or get involved in its development, please see the sections below:
Installation Instructions
If you want to experiment with xlrd, the easiest way to install it is to do the following in a virtualenv:
If your package uses setuptools and you decide to use xlrd, then you should add it as a requirement by adding an install_requires parameter in your call to setup as follows:
setup(
    # other stuff here
    install_requires=['xlrd'],
    )
Python version requirements
This package has been tested with Python 2.6, 2.7, 3.3+ on Linux, and is also expected to work on Mac OS X and Windows.
Development
This package is developed using continuous integration which can be found here:
https://travis-ci.org/python-excel/xlrd
If you wish to contribute to this project, then you should fork the repository found here:
https://github.com/python-excel/xlrd
Once that has been done and you have a checkout, you can follow these instructions to perform various development tasks:
Setting up a virtualenv
The recommended way to set up a development environment is to turn your checkout into a virtualenv and then install the package in editable form as follows:
$ virtualenv .
$ bin/pip install -Ur requirements.txt
$ bin/pip install -e .
Running the tests
Once you’ve set up a virtualenv, the tests can be run as follows:
To run tests on all the versions of Python that are supported, you can do:
If you change the supported python versions in .travis.yml, please remember to do the following to update tox.ini:
$ bin/panci --to=tox .travis.yml > tox.ini
Building the documentation
The Sphinx documentation is built by doing the following, having activated the virtualenv above, from the directory containing setup.py:
Changes
1.0.0 (2 June 2016)
- Official support, such as it is, is now for 2.6, 2.7, 3.3+
- Fixes a bug in looking up non-lowercase sheet filenames by ensuring that the sheet targets are transformed the same way as the component_names dict keys.
- Fixes a bug for
ragged_rows=Falsewhen merged cells increases the number of columns in the sheet. This requires all rows to be extended to ensure equal row lengths that match the number of columns in the sheet. - Fixes to enable reading of SAP-generated .xls files.
- support BIFF4 files with missing FORMAT records.
- support files with missing WINDOW2 record.
- Empty cells are now always unicode strings, they were a bytestring on Python 2 and a unicode string on Python 3.
- Fix for
<cell>inlineStrattribute without<si>child. - Fix for a zoom of
Nonecausing problems on Python 3. - Fix parsing of bad dimensions.
- Fix xlsx sheet to comments relationship.
Thanks to the following for their contributions to this release:
- Lars-Erik Hannelius
- Deshi Xiao
- Stratos Moro
- Volker Diels-Grabsch
- John McNamara
- Ville Skyttä
- Patrick Fuller
- Dragon Dave McKee
- Gunnlaugur Þór Briem
0.9.4 (14 July 2015)
- Automated tests are now run on Python 3.4
- Use
ElementTree.iter()if available, instead of the deprecatedgetiterator()when parsing xlsx files. - Fix #106 : Exception Value: unorderable types: Name() < Name()
- Create row generator expression with Sheet.get_rows()
- Fix for forward slash file separator and lowercase names within xlsx internals.
Thanks to the following for their contributions to this release:
- Corey Farwell
- Jonathan Kamens
- Deepak N
- Brandon R. Stoner
- John McNamara
0.9.3 (8 Apr 2014)
- Github issue #49
- Github issue #64 – skip meaningless chunk of 4 zero bytes between two otherwise-valid BIFF records
- Github issue #61 – fix updating of escapement attribute of Font objects read from workbooks.
- Implemented
Sheet.visibilityfor xlsx files - Ignore anchors (
$) in cell references - Dropped support for Python 2.5 and earlier, Python 2.6 is now the earliest Python release supported
- Read xlsx merged cell elements.
- Read cell comments in .xlsx files.
- Added xldate_as_datetime() function to convert from Excel serial date/time to datetime.datetime object.
Thanks to the following for their contributions to this release:
- John Machin
- Caleb Epstein
- Martin Panter
- John McNamara
- Gunnlaugur Þór Briem
- Stephen Lewis
0.9.2 (9 Apr 2013)
- Fix some packaging issues that meant docs and examples were missing from the tarball.
- Fixed a small but serious regression that caused problems opening .xlsx files.
0.9.1 (5 Apr 2013)
- Many fixes bugs in Python 3 support.
- Fix bug where ragged rows needed fixing when formatting info was being parsed.
- Improved handling of aberrant Excel 4.0 Worksheet files.
- Various bug fixes.
- Simplify a lot of the distribution packaging.
- Remove unused and duplicate imports.
Thanks to the following for their contributions to this release:
- Thomas Kluyver
0.9.0 (31 Jan 2013)
- Support for Python 3.2+
- Many new unit test added.
- Continuous integration tests are now run.
- Various bug fixes.
Special thanks to Thomas Kluyver and Martin Panter for their work on Python 3 compatibility.
Thanks to Manfred Moitzi for re-licensing his unit tests so we could include them.
Thanks to the following for their contributions to this release:
- “holm”
- Victor Safronovich
- Ross Jones
0.8.0 (22 Aug 2012)
- More work-arounds for broken source files.
- Support for reading .xlsx files.
- Drop support for Python 2.5 and older.
0.7.8 (7 June 2012)
- Ignore superfluous zero bytes at end of xls OBJECT record.
- Fix assertion error when reading file with xlwt-written bitmap.
0.7.7 (13 Apr 2012)
- More packaging changes, this time to support 2to3.
0.7.6 (3 Apr 2012)
- Fix more packaging issues.
0.7.5 (3 Apr 2012)
- Fix packaging issue that missed
version.txtfrom the distributions.
0.7.4 (2 Apr 2012)
- More tolerance of out-of-spec files.
- Fix bugs reading long text formula results.
0.7.3 (28 Feb 2012)
- Packaging and documentation updates.
0.7.2 (21 Feb 2012)
- Tolerant handling of files with extra zero bytes at end of NUMBER record. Sample provided by Jan Kraus.
- Added access to cell notes/comments. Many cross-references added to Sheet class docs.
- Added code to extract hyperlink (HLINK) records. Based on a patch supplied by John Morrisey.
- Extraction of rich text formatting info based on code supplied by Nathan van Gheem.
- added handling of BIFF2 WINDOW2 record.
- Included modified version of page breaks patch from Sam Listopad.
- Added reading of the PANE record.
- Reading SCL record. New attribute
Sheet.scl_mag_factor. - Lots of bug fixes.
- Added
ragged_rowsfunctionality.
0.7.1 (31 May 2009)
- Backed out “slash’n’burn” of sheet resources in unload_sheet(). Fixed problem with STYLE records on some Mac Excel files.
- quieten warnings
- Integrated on_demand patch by Armando Serrano Lombillo
0.7.0 (11 March 2009)
- colname utility function now supports more than 256 columns.
- Fix bug where BIFF record type 0x806 was being regarded as a formula opcode.
- Ignore PALETTE record when formatting_info is false.
- Tolerate up to 4 bytes trailing junk on PALETTE record.
- Fixed bug in unused utility function xldate_from_date_tuple which affected some years after 2099.
- Added code for inspecting as-yet-unused record types: FILEPASS, TXO, NOTE.
- Added inspection code for add_in function calls.
- Added support for unnumbered biff_dump (better for doing diffs).
- ignore distutils cruft
- Avoid assertion error in compdoc when -1 used instead of -2 for first_SID of empty SCSS
- Make version numbers match up.
- Enhanced recovery from out-of-order/missing/wrong CODEPAGE record.
- Added Name.area2d convenience method.
- Avoided some checking of XF info when formatting_info is false.
- Minor changes in preparation for XLSX support.
- remove duplicate files that were out of date.
- Basic support for Excel 2.0
- Decouple Book init & load.
- runxlrd: minor fix for xfc.
- More Excel 2.x work.
- is_date_format() tweak.
- Better detection of IronPython.
- Better error message (including first 8 bytes of file) when file is not in a supported format.
- More BIFF2 formatting: ROW, COLWIDTH, and COLUMNDEFAULT records;
- finished stage 1 of XF records.
- More work on supporting BIFF2 (Excel 2.x) files.
- Added support for Excel 2.x (BIFF2) files. Data only, no formatting info. Alpha.
- Wasn’t coping with EXTERNSHEET record followed by CONTINUE record(s).
- Allow for BIFF2/3-style FORMAT record in BIFF4/8 file
- Avoid crash when zero-length Unicode string missing options byte.
- Warning message if sector sizes are extremely large.
- Work around corrupt STYLE record
- Added missing entry for blank cell type to ctype_text
- Added “fonts” command to runxlrd script
- Warning: style XF whose parent XF index != 0xFFF
- Logfile arg wasn’t being passed from open_workbook to compdoc.CompDoc.
0.6.1 (10 June 2007)
- Version number updated to 0.6.1
- Documented runxlrd.py commands in its usage message. Changed commands: dump to biff_dump, count_records to biff_count.
0.6.1a5
- Bug fixed: Missing “<” in a struct.unpack call means can’t open files on bigendian platforms. Discovered by “Mihalis”.
- Removed antique undocumented Book.get_name_dict method and experimental “trimming” facility.
- Meaningful exception instead of IndexError if a SAT (sector allocation table) is corrupted.
- If no CODEPAGE record in pre-8.0 file, assume ascii and keep going (instead of raising exception).
0.6.1a4
- At least one source of XLS files writes parent style XF records after the child cell XF records that refer to them, triggering IndexError in 0.5.2 and AssertionError in later versions. Reported with sample file by Todd O’Bryan. Fixed by changing to two-pass processing of XF records.
- Formatting info in pre-BIFF8 files: Ensured appropriate defaults and lossless conversions to make the info BIFF8-compatible. Fixed bug in extracting the “used” flags.
- Fixed problems discovered with opening test files from Planmaker 2006 (http://www.softmaker.com/english/ofwcomp_en.htm): (1) Four files have reduced size of PALETTE record (51 and 32 colours; Excel writes 56 always). xlrd now emits a NOTE to the logfile and continues. (2) FORMULA records use the Excel 2.x record code 0x0021 instead of 0x0221. xlrd now continues silently. (3) In two files, at the OLE2 compound document level, the internal directory says that the length of the Short-Stream Container Stream is 16384 bytes, but the actual contents are 11264 and 9728 bytes respectively. xlrd now emits a WARNING to the logfile and continues.
- After discussion with Daniel Rentz, the concept of two lists of XF (eXtended Format) objects (raw_xf_list and computed_xf_list) has been abandoned. There is now a single list, called xf_list
0.6.1a3
- Added Book.sheets … for sheetx, sheet in enumerate(book.sheets):
- Formatting info: extraction of sheet-level flags from WINDOW2 record, and sheet.visibility from BOUNDSHEET record. Added Macintosh- only Font attributes “outline” and “shadow’.
0.6.1a2
- Added extraction of merged cells info.
- pyExcelerator uses “general” instead of “General” for the generic “number format”. Worked around.
- Crystal Reports writes “WORKBOOK” in the OLE2 Compound Document directory instead of “Workbook”. Changed to case-insensitive directory search. Reported by Vic Simkus.
0.6.1a1 (18 Dec 2006)
- Added formatting information for cells (font, “number format”, background, border, alignment and protection) and rows/columns (height/width etc). To save memory and time for those who don’t need it, this information is extracted only if formatting_info=1 is supplied to the open_workbook() function. The cell records BLANK and MULBLANKS which contain no data, only formatting information, will continue to be ignored in the default (no formatting info) case.
- Ralph Heimburger reported a problem with xlrd being intolerant about an Excel 4.0 file (created by “some web app”) with a DIMENSIONS record that omitted Microsoft’s usual padding with 2 unused bytes. Fixed.
0.6.0a4 (not released)
- Added extraction of human-readable formulas from NAME records.
- Worked around OOo Calc writing 9-byte BOOLERR records instead of 8. Reported by Rory Campbell-Lange.
- This history file converted to descending chronological order and HTML format.
0.6.0a3 (19 Sept 2006)
- Names: minor bugfixes; added script xlrdnameAPIdemo.py
- ROW records were being used as additional hints for sizing memory requirements. In some files the ROW records overstate the number of used columns, and/or there are ROW records for rows that have no data in them. This would cause xlrd to report sheet.ncols and/or sheet.nrows as larger than reasonably expected. Change: ROW records are ignored. The number of columns/rows is based solely on the highest column/row index seen in non-empty data records. Empty data records (types BLANK and MULBLANKS) which contain no data, only formatting information, have always been ignored, and this will continue. Consequence: trailing rows and columns which contain only empty cells will vanish.
0.6.0a2 (13 Sept 2006)
- Fixed a bug reported by Rory Campbell-Lange.: “open failed”; incorrect assumptions about the layout of array formulas which return strings.
- Further work on defined names, especially the API.
0.6.0a1 (8 Sept 2006)
- Sheet objects have two new convenience methods: col_values(colx, start_rowx=0, end_rowx=None) and the corresponding col_types. Suggested by Dennis O’Brien.
- BIFF 8 file missing its CODEPAGE record: xlrd will now assume utf_16_le encoding (the only possibility) and keep going.
- Older files missing a CODEPAGE record: an exception will be raised. Thanks to Sergey Krushinsky for a sample file. The open_workbook() function has a new argument (encoding_override) which can be used if the CODEPAGE record is missing or incorrect (for example, codepage=1251 but the data is actually encoded in koi8_r). The runxlrd.py script takes a corresponding -e argument, for example -e cp1251
- Further work done on parsing “number formats”. Thanks to Chris Withers for the
"General_)"example. - Excel 97 introduced the concept of row and column labels, defined by Insert > Name > Labels. The ranges containing the labels are now exposed as the Sheet attributes row_label_ranges and col_label_ranges.
- The major effort in this 0.6.0 release has been the provision of access to named cell ranges and named constants (Excel: Insert/Name/Define). Juan C. Mendez provided very useful real-world sample files.
0.5.3a1 (24 May 2006)
- John Popplewell and Richard Sharp provided sample files which caused any reliance at all on DIMENSIONS records and ROW records to be abandoned.
- If the file size is not a whole number of OLE sectors, a warning message is logged. Previously this caused an exception to be raised.
0.5.2 (14 March 2006)
- public release
- Updated version numbers, README, HISTORY.
0.5.2a3 (13 March 2006)
- Gnumeric writes user-defined formats with format codes starting at 50 instead of 164; worked around.
- Thanks to Didrik Pinte for reporting the need for xlrd to be more tolerant of the idiosyncracies of other software, for supplying sample files, and for performing alpha testing.
- ‘_’ character in a format should be treated like an escape character; fixed.
- An “empty” formula result means a zero-length string, not an empty cell! Fixed.
0.5.2a2 (9 March 2006)
- Found that Gnumeric writes all DIMENSIONS records with nrows and ncols each 1 less than they should be (except when it clamps ncols at 256!), and pyXLwriter doesn’t write ROW records. Cell memory pre- allocation was generalised to use ROW records if available with fall- back to DIMENSIONS records.
0.5.2a1 (6 March 2006)
- pyXLwriter writes DIMENSIONS record with antique opcode 0x0000 instead of 0x0200; worked around
- A file written by Gnumeric had zeroes in DIMENSIONS record but data in cell A1; worked around
0.5.1 (18 Feb 2006)
- released to Journyx
- Python 2.1 mmap requires file to be opened for update access. Added fall-back to read-only access without mmap if 2.1 open fails because “permission denied”.
0.5 (7 Feb 2006)
- released to Journyx
- Now works with Python 2.1. Backporting to Python 2.1 was partially funded by Journyx – provider of timesheet and project accounting solutions (http://journyx.com/)
- open_workbook() can be given the contents of a file instead of its name. Thanks to Remco Boerma for the suggestion.
- New module attribute __VERSION__ (as a string; for example “0.5”)
- Minor enhancements to classification of formats as date or not-date.
- Added warnings about files with inconsistent OLE compound document structures. Thanks to Roman V. Kiseliov (author of pyExcelerator) for the tip-off.
0.4a1, (7 Sept 2005)
- released to Laurent T.
- Book and sheet objects can now be pickled and unpickled. Instead of reading a large spreadsheet multiple times, consider pickling it once and loading the saved pickle; can be much faster. Thanks to Laurent Thioudellet for the enhancement request.
- Using the mmap module can be turned off. But you would only do that for benchmarking purposes.
- Handling NUMBER records has been made faster
0.3a1 (15 May 2005)
- first public release
Acknowledgements
Development of this package would not have been possible without the document OpenOffice.org’s Documentation of the Microsoft Excel File Format” (“OOo docs” for short). The latest version is available from OpenOffice.org in PDF format and ODT format. Small portions of the OOo docs are reproduced in this document. A study of the OOo docs is recommended for those who wish a deeper understanding of the Excel file layout than the xlrd docs can provide.
Backporting to Python 2.1 was partially funded by Journyx – provider of timesheet and project accounting solutions.
Provision of formatting information in version 0.6.1 was funded by Simplistix Ltd.
Licenses
There are two licenses associated with xlrd. This one relates to the bulk of the work done on the library:
Portions copyright © 2005-2009, Stephen John Machin, Lingfo Pty Ltd
All rights reserved.

Redistribution and use in source and binary forms, with or without
modification, are permitted provided that the following conditions are met:

1. Redistributions of source code must retain the above copyright notice,
this list of conditions and the following disclaimer.

2. Redistributions in binary form must reproduce the above copyright notice,
this list of conditions and the following disclaimer in the documentation
and/or other materials provided with the distribution.

3. None of the names of Stephen John Machin, Lingfo Pty Ltd and any
contributors may be used to endorse or promote products derived from this
software without specific prior written permission.

THIS SOFTWARE IS PROVIDED BY THE COPYRIGHT HOLDERS AND CONTRIBUTORS "AS IS"
AND ANY EXPRESS OR IMPLIED WARRANTIES, INCLUDING, BUT NOT LIMITED TO,
THE IMPLIED WARRANTIES OF MERCHANTABILITY AND FITNESS FOR A PARTICULAR
PURPOSE ARE DISCLAIMED. IN NO EVENT SHALL THE COPYRIGHT OWNER OR CONTRIBUTORS
BE LIABLE FOR ANY DIRECT, INDIRECT, INCIDENTAL, SPECIAL, EXEMPLARY, OR
CONSEQUENTIAL DAMAGES (INCLUDING, BUT NOT LIMITED TO, PROCUREMENT OF
SUBSTITUTE GOODS OR SERVICES; LOSS OF USE, DATA, OR PROFITS; OR BUSINESS
INTERRUPTION) HOWEVER CAUSED AND ON ANY THEORY OF LIABILITY, WHETHER IN
CONTRACT, STRICT LIABILITY, OR TORT (INCLUDING NEGLIGENCE OR OTHERWISE)
ARISING IN ANY WAY OUT OF THE USE OF THIS SOFTWARE, EVEN IF ADVISED OF
THE POSSIBILITY OF SUCH DAMAGE.
This one covers some earlier work:
/*-
 * Copyright (c) 2001 David Giffin.
 * All rights reserved.
 *
 * Based on the the Java version: Andrew Khan Copyright (c) 2000.
 *
 *
 * Redistribution and use in source and binary forms, with or without
 * modification, are permitted provided that the following conditions
 * are met:
 *
 * 1. Redistributions of source code must retain the above copyright
 *    notice, this list of conditions and the following disclaimer.
 *
 * 2. Redistributions in binary form must reproduce the above copyright
 *    notice, this list of conditions and the following disclaimer in
 *    the documentation and/or other materials provided with the
 *    distribution.
 *
 * 3. All advertising materials mentioning features or use of this
 *    software must display the following acknowledgment:
 *    "This product includes software developed by
 *     David Giffin <david@giffin.org>."
 *
 * 4. Redistributions of any form whatsoever must retain the following
 *    acknowledgment:
 *    "This product includes software developed by
 *     David Giffin <david@giffin.org>."
 *
 * THIS SOFTWARE IS PROVIDED BY DAVID GIFFIN ``AS IS'' AND ANY
 * EXPRESSED OR IMPLIED WARRANTIES, INCLUDING, BUT NOT LIMITED TO, THE
 * IMPLIED WARRANTIES OF MERCHANTABILITY AND FITNESS FOR A PARTICULAR
 * PURPOSE ARE DISCLAIMED.  IN NO EVENT SHALL DAVID GIFFIN OR
 * ITS CONTRIBUTORS BE LIABLE FOR ANY DIRECT, INDIRECT, INCIDENTAL,
 * SPECIAL, EXEMPLARY, OR CONSEQUENTIAL DAMAGES (INCLUDING, BUT
 * NOT LIMITED TO, PROCUREMENT OF SUBSTITUTE GOODS OR SERVICES;
 * LOSS OF USE, DATA, OR PROFITS; OR BUSINESS INTERRUPTION)
 * HOWEVER CAUSED AND ON ANY THEORY OF LIABILITY, WHETHER IN CONTRACT,
 * STRICT LIABILITY, OR TORT (INCLUDING NEGLIGENCE OR OTHERWISE)
 * ARISING IN ANY WAY OUT OF THE USE OF THIS SOFTWARE, EVEN IF ADVISED
 * OF THE POSSIBILITY OF SUCH DAMAGE.
 */
When you use Python to process data, you often need to handle data in Excel. Nowadays, you basically use Pandas to read data from Excel, but there are some Python packages other than Pandas that can satisfy the need to read Excel data.

Before we begin, learn the concepts involved in Excel.
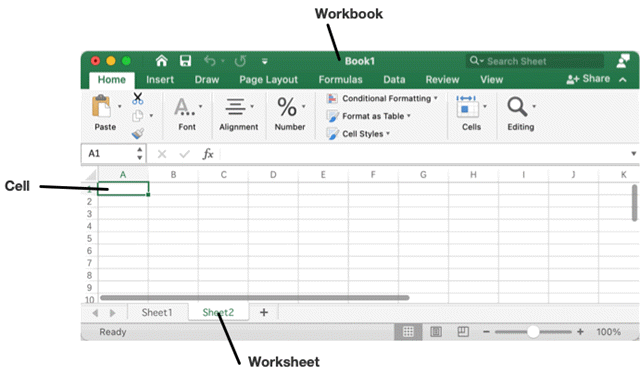
- workbook : In various libraries, a workbook is actually an excel file, which can be regarded as a database.
- sheet : In an excel file, there may be more than one sheet, a sheet can be regarded as a table in a database
- row : row is actually a row in a table, normally represented by the numbers 1, 2, 3, 4
- column : column is a column in a table, normally represented by the letters A, B, C, D
- cell : cell is a cell in a table, you can use the combination of row + column to represent, for example: A3
Differences between the file formats commonly used in Excel.
- XLS : The file format used before Excel version 2003, the binary way of saving files. xls files support a maximum of 65536 rows. xlsx supports a maximum of 1048576 rows. xls supports a maximum of 256 columns, xlsx is 16384 columns, this is the limit of the number of rows and columns is not from Excel version but the version of the file type.
- XLSX: XLSX is actually a ZIP file, that is, if you change the file name of XLSX to zip, and then you can use the unzip software to open the zip file directly, you open it to see the words, you will be able to see a lot of xml files inside.
Python Excel read/write package of xlrd, xlwt
xlrd, xlwt, xlutils is developed by Simplistix, the original website content is basically emptied, the project migrated to http://www.python-excel.org and open source in GitHub, see https://github.com/python-excel. On the website is also currently Very much not recommended for the above tools, the official currently also do not recommend the continued use of the main reasons.
- xlrd module: can read .xls, .xlsx tables
- xlwt module: can write .xls tables (can not write .xlsx files!!!)
- xlutils is not required, but additionally provides some tool functions to simplify the operation.
xlrd
Read file functionality is provided by the xlrd package. xlrd implements the xlrd.book.Book (hereafter referred to as Book), xlrd.sheet.Sheet (hereafter referred to as Sheet) and xlrd.sheet.Cell (hereafter referred to as Cell) types, which correspond to the workbook, sheet and cell concepts in Excel, where the cell is the minimum operational granularity.
xlrd load form files on a function open_workbook, commonly used parameters on two.
- filename, specify the path to open the Excel file
- on_demand, if it is True, then load the workbook on-demand form, if it is False, then directly load all forms, the default is False, in order to save resources is generally set to True, which is more obvious when the performance of large files.
After reading the Excel file to get the Workbook, the next step is to locate the Sheet. the Book class object has several important properties and methods for indexing Sheets.
- nsheets property, which indicates the number of Sheet objects contained
- sheet_names method, which returns the names of all sheets
- sheet_by_index, sheet_by_name methods, which index the sheets using the serial number and name, respectively
- sheets method, which returns a list of all Sheet objects
|
|
After getting the Sheet object, the next step is to index the rows/columns/cells and get the data of the rows/columns/cells. the Sheet class object has several important properties and methods to support the subsequent operations.
- the name property, which is the name of the form.
- nrows, ncols properties, indicating the maximum number of rows and columns read into the form. Since cells only support row number indexing, these two properties are necessary to check for out-of-bounds content.
- cell method, accepts 2 parameters, i.e. row and column serial numbers, returns Cell object, note that xlrd only supports indexing cells by row serial number, row serial number starts from 0.
- cell_value method, similar to the cell method, except that the value returned is the value in the cell, not the Cell object.
- cell_type method, returns the type of cell
- row, col method, returns a list of Cell objects composed of 1 whole row (column).
- row_types, col_types, return the type of cells in a number of columns (rows) within the specified row (column).
- row_values, col_values, returns the value of the cell in the specified row (column) of a number of columns (rows).
- row_slice, col_slice, return to the specified row (column) within a number of columns (rows) of cells, is a combination of types and values.
|
|
Note that xlrd reads excel workbooks with row and column indexes starting from 0.
- row = ws.row_values(i, ca, cb) # read the contents of the [ca, cb) column in row i, return list. note that the cb column is not included
- col = ws.col_values(i, ra, rb) # read the contents of the [ra, rb) row in column i, return to list. note that the rb row is not included
- cell= ws.cell_value(r, c) # read the contents of the cell in column j of row i
For predefined constants of data types
| predefined constants | numeric | strings |
|---|---|---|
| XL_CELL_EMPTY | 0 | empty |
| XL_CELL_TEXT | 1 | text |
| XL_CELL_NUMBER | 2 | number |
| XL_CELL_DATE | 3 | xldate |
| XL_CELL_BOOLEAN | 4 | boolean |
| XL_CELL_ERROR | 5 | error |
| XL_CELL_BLANK | 6 | blank |
The date data type is read as a floating point number and needs to be manually converted to time format, such as a cell date of 2020-2-5, xlrd module reads the value: 43866.0, there are two ways to convert a floating point number to the correct time format.
- xldate_as_tuple(xdate,datemode): returns a meta ancestor consisting of (year,month,day,hours,minutes,seconds), datemode parameter has 2 values, 0 means 1900 as the base timestamp (common), 1 means 1904 as the base timestamp. Dates before 1900-3-1 cannot be converted to tuples.
- xldate_as_datetime(xdate,datemode) (need to introduce datetime module first), return a datetime object directly, xlrd.xldate_as_datetime(xdate,datemode).strftime( ‘%Y-%m-%d %H:%M:%S’)
For indexing purposes, the cellname, cellnameabs, and colname functions of the xlrd package convert the row and column serial numbers to Excel-style cell addresses; the rowcol_to_cell and rowcol_pair_to_cellrange functions of the xlwt.Utils module can also convert the row and column serial numbers to Excel-style cell address; and col_by_name, cell_to_rowcol, cell_to_rowcol2, cellrange_to_rowcol_pair functions, the Excel-style cell address converted to row number.
|
|
The row number and cell address conversions are summarized in the following figure.
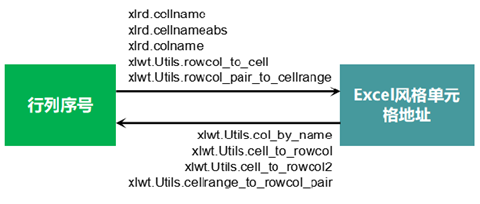
To iterate through all the cells in a sheet, usually by row and column order to get the cell by cell, and then read out the cell value to save for subsequent processing. You can also directly get a whole row (column), the whole row (column) to deal with the data.
|
|
xlwt
xlrd package can only read out the data in the form, can not do anything to rewrite the data, rewrite the data and save it to a file, by xlwt package. xlwt implements a set of xlwt.Workbook. Worksheet (hereinafter referred to as Worksheet) types, but unfortunately there is no inheritance relationship with the xlrd package, which results in the Book and Sheet objects read out of the xlrd package can not be used directly to create Workbook and Worksheet objects, but only to store the data temporarily for subsequent writing back, making the process very cumbersome.
The types, methods, functions and parameters exposed to the public by the xlwt package are also very concise and fit closely with the process of rewriting data and saving it to a file.
- Call the Workbook function of the Workbook module to create a Workbook object, the first parameter is encoding
- call the Workbook object’s add_sheet method to add Worksheet objects to Workbook, the first parameter sheetname specifies the name of the form, the second parameter cell_overwrite_ok determines whether to allow cell overwriting, it is recommended to set to True, to avoid the program may write data to the cell multiple times and throw an error.
- call the Worksheet object write method, to the Worksheet row / column / cell write data, the data used here in most cases from the xlrd package from the Excel file to read the results, the first two parameters for the row number, the third parameter is the value to be written, the fourth parameter is the cell style, such as no special needs default can be; * call the Workbook object write method, to write data to the Worksheet row / column / cell.
- Call the save method of the Workbook object to save the Workbook object to a file, with the parameters of the file name or file stream object.
Other properties, methods, functions are generally used less.
xlwt mainly involves three classes: Workbook corresponds to the workbook file, Worksheet corresponds to the worksheet, XFStyle object used to control the cell format (XF record).
|
|
Example.
|
|
There are two things to remember about saving.
- All Python libraries involving Excel operations do not support “edit and save in place”, and xlwt is no exception. “Save” is actually “Save As”, except that if you specify to save to the original file, the original file is overwritten.
- Even if you specify the extension .xlsx, the file format itself is still xls format.
Note that the date read from data.xls is essentially a numeric value, copied and written or numeric, you need to set the cell to date format in Excel to display as a date form.
xlwt also supports writing formulas, but more limited.
|
|
In addition, xlwr supports writing the contents of merged cells across rows or columns (rowx and colx starting from 0):
|
|
Setting excel cell styles
Set cell data formatting.
|
|
The style instance needs to be specified in ws.write() to take effect.
Example.
|
|
Or.
|
|
XFStyle is used to specify the cell content format, use the easyxf function to get an XFStyle object.
|
|
strg_to_parse is a string that defines the format, and can control the formatting properties including font (font), alignment (align), border form (border), color style (pattern) and cell protection (protection), etc. The specific formatting properties are listed in detail at the end of the article.
String strg_to_parse syntax format is as follows.
|
|
For example.
|
|
The parameter string num_format_str is used to specify the format of the number, e.g.
|
|
The following are some use cases for xlwt.Style.easyxf.
|
|
xlutils
xlutils depends on xlrd and xlwt and contains the following modules.
- copy: copy xlrd.Book object to xlwt.Workbook object
- display: to display information about xlrd related objects in a more friendly and secure way
- filter: a small framework for splitting and filtering existing Excel files to new Excel files
- margins: get how much useful information is contained in the Excel file
- Book object into an Excel file
- styles: a tool for formatting information in Excel files
- view: use the view information of the worksheet in workbook
Here we mainly introduce the use of two functions, the first xlutils.copy.copy(wb). From the above steps, if you are only generating a brand new Excel file, you can use the xlwt package. If you are “editing” some data in the Excel file, you must use xlrd to load the original file and make a copy of the original table, and then use xlwt to handle the cells that need to be edited, which is a cumbersome process. xlutils package copy is created to simplify this process, and can convert xlrd’s Book object to xlwt’s Workbook object.
|
|
The other is the function xlutils.filter.process(reader, *chain) in xlutils.filter.
The module xlutils.filter contains some built-in modules reader, writer and filter, and the function process() for stringing them together, with the main function of filtering and splitting Excel files.
- The reader is used to fetch data from the data source and convert it into a series of Book objects, which will then call the first filter-related method. There are some basic reader classes provided within the module.
- filterThe user gets the results needed for a specific task. Some specific methods have to be defined in the filter. The implementation of these methods can be filled with any functionality as needed, but will usually end with a call to the corresponding method of the next filter.
- writer handles the specific method in the last filter in the parameter chain. writer is usually used to copy information from the data source and write it to the output file. Since there is a lot of work involved in the writer and usually only writing binary data to the target location is slightly different, some basic writer classes are provided within the module.
- process(reader, *chain) can execute built-in or custom readers, writers and filters in tandem.
XFStyle format
format attributes
- font
- bold: boolean value, default is False
- charset: see next section for optional values, default is sys_default
- color (or color_index, color_index, color): see the next section for optional values, default is automatic
- escapement: optional value is none, superscript or subscript, default value is none
- family: a string containing the font family of the font, the default value is none
- height: the height value obtained by multiplying point size by 20, the default is 200, corresponding to 10pt
- italic: boolean value, default is False
- name: a string containing the name of the font, default is Arial
- outline: Boolean value, default is False
- shadow: Boolean value, default is False
- struck_out: Boolean value, default is False
- underline: boolean value or one of none, single, single_acc, double, double_acc. The default value is none
- alignment (or align)
- direction (or dire): one of the general, lr, rl, default general
- horizontal (or horiz, horz): one of the following: general, left, center|centre, right, filled, justified, center|centre_across_selection, distributed one of the following, the default value is general
- indent (or inde): indent value 0 to 15, default value 0
- rotation (or rota): integer value between -90 and +90 or stacked, one of none, default is none
- shrink_to_fit (or shri, shrink): boolean value, default is False
- vertical (or vert): one of top, center|centre, bottom, justified, distributed, default is bottom
- wrap: Boolean value, default is False
- borders (or borders)
- left: border style, see the next section for details
- right: border style, see next section
- top: border style, see next section
- bottom: border style, see next section
- diag: the border style, see the next section
- left_colour (or left_color): color value, see next section, default is automatic
- right_colour (or right_color): color value, see next section, default is automatic
- top_colour (or top_color): color value, see next section, default is automatic
- bottom_colour (or bottom_color): color value, see next section, default is automatic
- diag_colour (or diag_color): color value, see next section, default is automatic
- need_diag_1: Boolean value, default is False
- need_diag_2: Boolean value, default is False
- pattern
- back_colour (or back_color, pattern_back_colour, pattern_back_color): color value, see the next section, default is automatic
- fore_colour (or fore_color, pattern_fore_colour, pattern_fore_color): color value, see next section for details, default is automatic
- pattern: no_fill, none, solid, solid_fill, solid_pattern, fine_dots, alt_bars, sparse_dots, thick_horz_bands, thick_vert_bands, thick_ backward_diag, thick_forward_diag, big_spots, bricks, thin_horz_bands, thin_vert_bands, thin_backward_diag, thin_forward_diag, squares, and diamonds one of them, default is none
- protection
- cell_locked: Boolean value, default is True
- formula_hidden: Boolean value, default is False
Description of the values taken
Boolean
- True can be represented as 1, yes, true, or on.
- False can be 0, no, false, or off.
charset
The optional values for the character set are as follows.
|
|
color
The available values for color are as follows.
| aqua | dark_red_ega | light_blue | plum |
|---|---|---|---|
| black | dark_teal | light_green | purple_ega |
| blue | dark_yellow | light_orange | red |
| blue_gray | gold | light_turquoise | rose |
| bright_green | gray_ega | light_yellow | sea_green |
| brown | gray25 | lime | silver_ega |
| coral | gray40 | magenta_ega | sky_blue |
| cyan_ega | gray50 | ocean_blue | tan |
| dark_blue | gray80 | olive_ega | teal |
| dark_blue_ega | green | olive_green | teal_ega |
| dark_green | ice_blue | orange | turquoise |
| dark_green_ega | indigo | pale_blue | violet |
| dark_purple | ivory | periwinkle | white |
| dark_red | lavender | pink | yellow |
borderline
Can be an integer value from 0 to 13, or one of the following values.
|
|
Reference link.
- https://github.com/python-excel
- http://xlrd.readthedocs.io/en/latest/
- http://xlwt.readthedocs.io/en/latest/api.html
- http://xlutils.readthedocs.io/en/latest/
XlsxWriter is a Python module for writing documents in Excel 2007+ XLSX file format.
xlsxwriter can be used to write text, numbers, formulas and hyperlinks to multiple worksheets, supports formatting and more, and includes.
- 100% compatible with Excel XLSX files.
- Full formatting.
- Merge cells.
- Defined names.
- Charting.
- Automatic filtering.
- Data validation and drop-down lists.
- Conditional formatting.
- Worksheet png/jpeg/bmp/wmf/emf images.
- Rich multi-format strings.
- Cell annotation.
- Integration with Pandas.
- Text boxes.
- Support for adding macros.
- Memory-optimized mode for writing large files.
Pros.
- More powerful: Relatively speaking, this is the most powerful tool other than Excel itself. Font settings, foreground color background color, border settings, view zoom (zoom), cell merge, autofilter, freeze panes, formulas, data validation, cell comments, row height and column width settings, etc.
- Support for large file writes: If the amount of data is very large, you can enable constant memory mode, which is a sequential write mode that writes a row of data as soon as you get it, without keeping all the data in memory.
Disadvantages.
- No read and modify support: The author did not intend to make an XlsxReader to provide read operations. If you can’t read, you can’t modify. It can only be used to create new files. When you write data in a cell, there is still no way to read the information that has been written unless you have saved the relevant content yourself.
- XLS files are not supported: XLS is the format used in Office 2013 or earlier and is a binary format file. XLSX is a compressed package made up of a series of XML files (the final X stands for XML). If you have to create a lower version of XLS file, please go to xlwt.
- Pivot Table is not supported at this time.
xlsxwriter easy to use
|
|
We can also set the style to the excel table, set the style to the table using the add_format method.
|
|
The xlsxwriter package allows us to insert data by row and column, using the following methods.
|
|
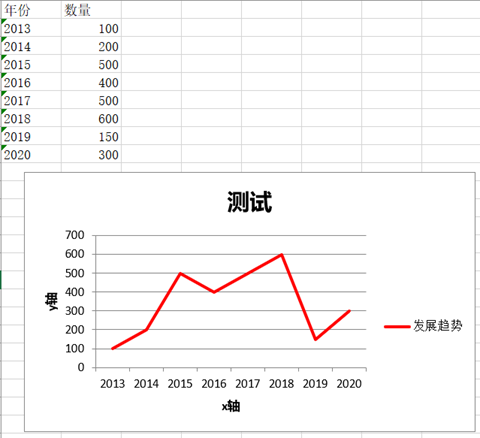
Common functions of xlsxwriter module
Set cell formatting
Set the formatting directly by means of a dictionary.
|
|
Set the cell format by means of the format object.
|
|
There are many more operations like this for some cell tables, so you can study them according to your needs.
|
|
Common chart types.
- area: Creates an Area (solid line) style sheet.
- bar: Creates a bar style (transposed histogram) chart.
- column: Creates a column style (histogram) chart.
- line: Creates a line chart.
- pie: Creates a pie-style chart.
- doughnut: Creates a doughnut style chart.
- scatter: Creates a scatter chart style chart.
- stock: Creates a stock style chart.
- radar: Creates a radar style sheet.
Sample Code Explanation
|
|
Types supported by XlsxWriter
Excel often treats different types of input data, such as strings and numbers, differently, though usually transparently to the user. the XlsxWriter view emulates this with the worksheet.write() method, by mapping Python data types to the types supported by Excel.
The write() method serves as a generic alias for several more specific methods.
- write_string()
- write_number()
- write_blank()
- write_formula()
- write_datetime()
- write_boolean()
- write_url()
In the code here, we use some of these methods to handle different types of data.
|
|
This is mainly to show that if you need more control over the data you write to the worksheet, you can use the appropriate methods. In this simple example, the write() method actually works out well.
Date handling is also new to the program.
Dates and times in Excel are floating-point numbers applied in a numeric format to make it easier to display them in the correct format. If the date and time are Python datetime objects, then XlsxWriter will automatically do the required numeric conversion. However, we also need to add numeric formatting to ensure that Excel displays them as dates.
|
|
Finally, set_column() is needed to adjust the width of column B so that the date can be displayed clearly.
|
|
Reference links.
- https://xlsxwriter.readthedocs.io/
Python Excel Reading and Writing with OpenPyXL
And you can make detailed settings for the cells in the Excel file, including cell styles and other content, and even support the insertion of charts, print settings and other content. openpyxl can read and write xltm, xltx, xlsm, xlsx and other types of files.
The general process of using openpyxl is: create/read excel file -> select sheet object -> operate on form/cell -> save excel
Create/read excel files
|
|
sheet form operations
|
|
Cell object
|
|
Format style setting
|
|
Other
|
|
Python Excel manipulation of xlwings
xlwings is a BSD-licensed Python based library. It makes it easy to call each other between Python and Excel:
- Scripting: Automate the processing of Excel data in Python or interact with Excel using VBA-like syntax.
- Macros: Replace VBA macros with powerful and clean Python code.
- UDFs (User Defined Functions): Write User Defined Functions (UDFs) in Python, for windows only.
- REST API: Open Excel workbooks to the outside through the REST API.
- Support for Windows and MacOS
xlwings open source free , can be very easy to read and write data in Excel files , and cell formatting changes . xlwings can also seamlessly connect with matplotlib, Numpy and Pandas , support for reading and writing Numpy, Pandas data types , matplotlib visual charts into excel. The most important thing is that xlwings can call the program written by VBA in Excel file, and also can let VBA call the program written in Python. It supports reading of .xls files and reading and writing of .xlsx files.
The main structure of xlwings.
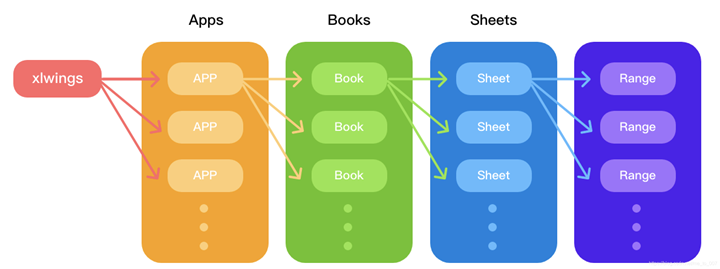
As you can see, the direct interface with xlwings is the apps, that is, the Excel application, then the workbook books and worksheet sheets, and finally the cell area range, which is quite different from openpyxl, and because of this, xlwings needs to still have the Excel application environment installed.
App common syntax
|
|
Book common syntax
|
|
Sheet common syntax
|
|
Range common syntax
|
|
Transformer
|
|
Reference link.
- https://github.com/xlwings/xlwings
- https://docs.xlwings.org/zh_CN/latest/index.html
PyExcelerate is claimed to be the best performing Python writing package for Excel xlsx files. It is also relatively easy to use.
|
|
PyExcel is an open source Excel manipulation library. It wraps a set of APIs for reading and writing file data , this set of APIs accept parameters including two keyword collections , one specifying the data source , the other specifying the destination file , each collection has many keyword parameters to control the read and write details . pyexcel package also implements a workbook , form types for accessing , manipulating and saving data , read and write operations are very fancy.
Read the file
pyexcel contains some get functions for reading files: get_array, get_dict, get_record, get_book, get_book_dict, get_sheet. These methods convert the file content to various types such as array, dict, sheet/book, etc., masking the file media to be csv/tsv text, xls/xlsx table files, dict/list types, sql database tables, and other details. There is also an equivalent set of iget series functions, the only difference being the return generator for efficiency.
- The get_sheet function takes the sheet_name parameter, which is used to specify the sheet to be read for Excel tables with multiple sheets, or the 1st sheet if default. get_sheet function also takes the name_columns_by_row/name_rows_by_column parameter for the specified row/column as the column/row name. The default value is 0, which represents the 1st row, and the sheet.Sheet class has a method with the same name for the same operation. Several other functions are more similar to get_sheet and accept the same parameters.
- The get_array function converts the file data into an array, i.e. a nested list, with each element of the list corresponding to one row of the table.
- The get_dict function converts the file data into an ordered dictionary, using the field in the first row as the key and subsequent rows of values forming a list as the value.
- get_record function converts the file data into a list formed by an ordered dictionary, each line of data corresponds to an ordered dictionary, and the dictionary uses the field of the first line of the file as the key and the line of data as the value.
- get_book function converts the file into a book.Book object. If read from a csv file, it contains only 1 sheet, the name is the file name; if read from an xls file, it contains all the sheets in the xls file.
- get_book_dict function converts the file data into an ordered dictionary of multiple sheets, with sheet name as key and sheet data in the form of a nested list as value, which is more useful in Excel tables containing multiple sheets; for csv files, as there is only 1 sheet, the returned ordered dictionary has only 1 item.
Data Access
Book and Sheet
Book and pyexcel.book.Sheet types are implemented in pyexcel, which correspond to the concept of book and sheet in Excel sheet files, and can be obtained as book/sheet objects by the above get series functions, or by pyexcel.Book()/ pyexcel.Sheet() function to create.
After getting the book object, the next step is to access the sheets in the book. pyexcel.book.Book class object can index the corresponding sheets by serial number, or you can call the sheet_by_index and sheet_by_name methods to get the specified sheet content, and call the sheet_names method to return Calling the sheet_names method returns the names of all the sheets contained in the book object.
The pyexcel.sheet.Sheet class object has a texttable property, which means that the text, in addition to the sheet name, and the dotted line character to draw the table border, directly print the variable sh and print sh.texttable effect is the same.
In addition, pyexcel.sheet.Sheet class has several very useful properties.
- content property, compared to displaying the sheet directly, there is less of the sheet name in the first row.
- csv property, the csv form of the sheet data, without the table box line.
- array property, the array form of the sheet data (nested list), the same as the get_array function returns.
- row/column property, very similar to nested list, supports accessing specified row/column by subscript, serial number starts from 0.
Rows and Columns
After getting pyexcel.sheet.Sheet object, besides using row/column property to get all the row/column objects collection for further iterative traversal, you can also index any row/column by serial number, which starts from 0. When the serial number exceeds the table row/column range, an IndexError error is thrown, and you can use the row_range/column_range methods of the sheet object to check the row/column range. row_at/column_at methods of pyexcel.sheet. The serial number index is equivalent.
Cells
The pyexcel.sheet.Sheet object supports binary serial number indexing of any cell, or replacing the serial number with a row/column name (please note the code comments below). It can also be indexed in its entirety as an Excel sheet cell address without any conversion.
Rewrite the file
Rewriting a file includes two steps: rewriting variable values and writing variable objects to the file, which is recommended to be done through pyexcel.book.Sheet or pyexcel.book.
For pyexcel.book.Sheet class object, row and column properties support add, delete and change operations like list, and both have save_as method for writing objects to file. In addition, pyexcel provides the save series wrapper functions: save_as, save_book_as to write to a file, and when specifying the destination file, the parameter names used are prefixed with “dest_” compared to the get series. For example, get series use file_name to specify the source of the data file, save series use dest_file_name to specify the destination file path; get series use delimiter parameter to specify the csv separator, save series use dest_delimiter to specify the separator used when writing to csv files. pyexcel. Sheet class object can be added, deleted or changed in whole rows/columns, and can also be positioned to assign values to specific cells, and the number of elements should be consistent with the number of columns/rows when using a list of whole rows/columns to assign values. For pyexcel.book.Book class object, you can either extend the whole book as a whole like an operation list, or index only some sheets and then stitch and assign values as a whole. pyexcel.book.Sheet also implements form transpose, region, cut, paste, and map application. paste, map application (map), row filtering (filter), formatting (format) and other fancy operations.
Book class object’s save_as method, which is simple and straightforward, and is recommended for operating Excel. You can also use the pyexcel package level save series wrapper functions, which are more suitable for file type conversion, and there is an equivalent set of isave series functions, the main difference is that the variables are only read in when writing, to improve efficiency. These save methods/functions above will automatically discern the format type based on the destination file extension. pyexcel.book.Sheet or pyexcel.book.Book classes also implement the save_to series of functions to write objects to database, ORM, memory, etc.
Summary
- The pyexcel package encapsulates the get series of functions for reading and converting data from files, all of which can flexibly support multiple ways of reading files. For manipulating Excel files, the get_sheet function is recommended to be preferred.
- pyexcel package support for different formats of files depends on different plug-in packages.
- pyexcel package internally implements the book.Sheet or pyexcel.book.Book type, which corresponds to the workbook and form concepts of Excel files, providing a variety of flexible methods for data access, deletion, and visualization.
- Book type has the save series of methods to write object variables to files, databases, memory, etc., which is recommended and preferred; also the pyexcel package level save_as series of wrapper functions are very convenient for converting file types; these methods/functions for writing to files automatically discriminate based on the destination file extensions The format type is automatically determined by the destination file extension.
- cookbook package encapsulates some utility functions, such as multi-type file merge, table split;
- book.Sheet and pyexcel.book.Book and other classes do not implement the full method, call some will throw an error, be aware of this big hole, this article in the ipython environment when writing examples of the error is not given, which is also the reason for the prompt number is not consecutive.
Reference links.
- http://docs.pyexcel.org
Other tools.
- Excel formula tool: https://github.com/vinci1it2000/formulas