
Installation
Install openpyxl using pip. It is advisable to do this in a Python virtualenv
without system packages:
Note
There is support for the popular lxml library which will be used if it
is installed. This is particular useful when creating large files.
Warning
To be able to include images (jpeg, png, bmp,…) into an openpyxl file,
you will also need the “pillow” library that can be installed with:
or browse https://pypi.python.org/pypi/Pillow/, pick the latest version
and head to the bottom of the page for Windows binaries.
Working with a checkout
Sometimes you might want to work with the checkout of a particular version.
This may be the case if bugs have been fixed but a release has not yet been
made.
$ pip install -e hg+https://foss.heptapod.net/openpyxl/openpyxl/@3.1#egg=openpyxl
Create a workbook
There is no need to create a file on the filesystem to get started with openpyxl.
Just import the Workbook class and start work:
>>> from openpyxl import Workbook
>>> wb = Workbook()
A workbook is always created with at least one worksheet. You can get it by
using the Workbook.active property:
Note
This is set to 0 by default. Unless you modify its value, you will always
get the first worksheet by using this method.
You can create new worksheets using the Workbook.create_sheet() method:
>>> ws1 = wb.create_sheet("Mysheet") # insert at the end (default)
# or
>>> ws2 = wb.create_sheet("Mysheet", 0) # insert at first position
# or
>>> ws3 = wb.create_sheet("Mysheet", -1) # insert at the penultimate position
Sheets are given a name automatically when they are created.
They are numbered in sequence (Sheet, Sheet1, Sheet2, …).
You can change this name at any time with the Worksheet.title property:
Once you gave a worksheet a name, you can get it as a key of the workbook:
>>> ws3 = wb["New Title"]
You can review the names of all worksheets of the workbook with the
Workbook.sheetname attribute
>>> print(wb.sheetnames)
['Sheet2', 'New Title', 'Sheet1']
You can loop through worksheets
>>> for sheet in wb:
...     print(sheet.title)
You can create copies of worksheets within a single workbook:
Workbook.copy_worksheet() method:
>>> source = wb.active
>>> target = wb.copy_worksheet(source)
Note
Only cells (including values, styles, hyperlinks and comments) and
certain worksheet attributes (including dimensions, format and
properties) are copied. All other workbook / worksheet attributes
are not copied — e.g. Images, Charts.
You also cannot copy worksheets between workbooks. You cannot copy
a worksheet if the workbook is open in read-only or write-only
mode.
Playing with data
Accessing one cell
Now we know how to get a worksheet, we can start modifying cells content.
Cells can be accessed directly as keys of the worksheet:
This will return the cell at A4, or create one if it does not exist yet.
Values can be directly assigned:
There is also the Worksheet.cell() method.
This provides access to cells using row and column notation:
>>> d = ws.cell(row=4, column=2, value=10)
Note
When a worksheet is created in memory, it contains no cells. They are
created when first accessed.
Warning
Because of this feature, scrolling through cells instead of accessing them
directly will create them all in memory, even if you don’t assign them a value.
Something like
>>> for x in range(1,101):
...        for y in range(1,101):
...            ws.cell(row=x, column=y)
will create 100×100 cells in memory, for nothing.
Accessing many cells
Ranges of cells can be accessed using slicing:
>>> cell_range = ws['A1':'C2']
Ranges of rows or columns can be obtained similarly:
>>> colC = ws['C']
>>> col_range = ws['C:D']
>>> row10 = ws[10]
>>> row_range = ws[5:10]
You can also use the Worksheet.iter_rows() method:
>>> for row in ws.iter_rows(min_row=1, max_col=3, max_row=2):
...    for cell in row:
...        print(cell)
<Cell Sheet1.A1>
<Cell Sheet1.B1>
<Cell Sheet1.C1>
<Cell Sheet1.A2>
<Cell Sheet1.B2>
<Cell Sheet1.C2>
Likewise the Worksheet.iter_cols() method will return columns:
>>> for col in ws.iter_cols(min_row=1, max_col=3, max_row=2):
...     for cell in col:
...         print(cell)
<Cell Sheet1.A1>
<Cell Sheet1.A2>
<Cell Sheet1.B1>
<Cell Sheet1.B2>
<Cell Sheet1.C1>
<Cell Sheet1.C2>
Note
For performance reasons the Worksheet.iter_cols() method is not available in read-only mode.
If you need to iterate through all the rows or columns of a file, you can instead use the
Worksheet.rows property:
>>> ws = wb.active
>>> ws['C9'] = 'hello world'
>>> tuple(ws.rows)
((<Cell Sheet.A1>, <Cell Sheet.B1>, <Cell Sheet.C1>),
(<Cell Sheet.A2>, <Cell Sheet.B2>, <Cell Sheet.C2>),
(<Cell Sheet.A3>, <Cell Sheet.B3>, <Cell Sheet.C3>),
(<Cell Sheet.A4>, <Cell Sheet.B4>, <Cell Sheet.C4>),
(<Cell Sheet.A5>, <Cell Sheet.B5>, <Cell Sheet.C5>),
(<Cell Sheet.A6>, <Cell Sheet.B6>, <Cell Sheet.C6>),
(<Cell Sheet.A7>, <Cell Sheet.B7>, <Cell Sheet.C7>),
(<Cell Sheet.A8>, <Cell Sheet.B8>, <Cell Sheet.C8>),
(<Cell Sheet.A9>, <Cell Sheet.B9>, <Cell Sheet.C9>))
or the Worksheet.columns property:
>>> tuple(ws.columns)
((<Cell Sheet.A1>,
<Cell Sheet.A2>,
<Cell Sheet.A3>,
<Cell Sheet.A4>,
<Cell Sheet.A5>,
<Cell Sheet.A6>,
...
<Cell Sheet.B7>,
<Cell Sheet.B8>,
<Cell Sheet.B9>),
(<Cell Sheet.C1>,
<Cell Sheet.C2>,
<Cell Sheet.C3>,
<Cell Sheet.C4>,
<Cell Sheet.C5>,
<Cell Sheet.C6>,
<Cell Sheet.C7>,
<Cell Sheet.C8>,
<Cell Sheet.C9>))
Note
For performance reasons the Worksheet.columns property is not available in read-only mode.
Values only
If you just want the values from a worksheet you can use the Worksheet.values property.
This iterates over all the rows in a worksheet but returns just the cell values:
for row in ws.values:
   for value in row:
     print(value)
Both Worksheet.iter_rows() and Worksheet.iter_cols() can
take the values_only parameter to return just the cell’s value:
>>> for row in ws.iter_rows(min_row=1, max_col=3, max_row=2, values_only=True):
...   print(row)

(None, None, None)
(None, None, None)
Data storage
Once we have a Cell, we can assign it a value:
>>> c.value = 'hello, world'
>>> print(c.value)
'hello, world'

>>> d.value = 3.14
>>> print(d.value)
3.14
Saving to a file
The simplest and safest way to save a workbook is by using the
Workbook.save() method of the Workbook object:
>>> wb = Workbook()
>>> wb.save('balances.xlsx')
Warning
This operation will overwrite existing files without warning.
Note
The filename extension is not forced to be xlsx or xlsm, although you might have
some trouble opening it directly with another application if you don’t
use an official extension.
As OOXML files are basically ZIP files, you can also open it with your
favourite ZIP archive manager.
If required, you can specify the attribute wb.template=True, to save a workbook
as a template:
>>> wb = load_workbook('document.xlsx')
>>> wb.template = True
>>> wb.save('document_template.xltx')
Saving as a stream
If you want to save the file to a stream, e.g. when using a web application
such as Pyramid, Flask or Django then you can simply provide a
NamedTemporaryFile():
>>> from tempfile import NamedTemporaryFile
>>> from openpyxl import Workbook
>>> wb = Workbook()
>>> with NamedTemporaryFile() as tmp:
        wb.save(tmp.name)
        tmp.seek(0)
        stream = tmp.read()
Warning
You should monitor the data attributes and document extensions
for saving documents in the document templates and vice versa,
otherwise the result table engine can not open the document.
Note
The following will fail:
>>> wb = load_workbook('document.xlsx')
>>> # Need to save with the extension *.xlsx
>>> wb.save('new_document.xlsm')
>>> # MS Excel can't open the document
>>>
>>> # or
>>>
>>> # Need specify attribute keep_vba=True
>>> wb = load_workbook('document.xlsm')
>>> wb.save('new_document.xlsm')
>>> # MS Excel will not open the document
>>>
>>> # or
>>>
>>> wb = load_workbook('document.xltm', keep_vba=True)
>>> # If we need a template document, then we must specify extension as *.xltm.
>>> wb.save('new_document.xlsm')
>>> # MS Excel will not open the document
Loading from a file
You can use the openpyxl.load_workbook() to open an existing workbook:
>>> from openpyxl import load_workbook
>>> wb = load_workbook(filename = 'empty_book.xlsx')
>>> sheet_ranges = wb['range names']
>>> print(sheet_ranges['D18'].value)
3
Note
There are several flags that can be used in load_workbook.
- data_only controls whether cells with formulae have either the
formula (default) or the value stored the last time Excel read the sheet. - keep_vba controls whether any Visual Basic elements are preserved or
not (default). If they are preserved they are still not editable.
Warning
openpyxl does currently not read all possible items in an Excel file so
shapes will be lost from existing files if they are opened and saved with
the same name.
Errors loading workbooks
Sometimes openpyxl will fail to open a workbook. This is usually because there is something wrong with the file.
If this is the case then openpyxl will try and provide some more information. Openpyxl follows the OOXML specification closely and will reject files that do not because they are invalid. When this happens you can use the exception from openpyxl to inform the developers of whichever application or library produced the file. As the OOXML specification is publicly available it is important that developers follow it.
You can find the spec by searching for ECMA-376, most of the implementation specifics are in Part 4.
This ends the tutorial for now, you can proceed to the Simple usage section
Reading Excel spreadsheets is all well and good. However, you also need to be able to create or edit a spreadsheet. The focus of this chapter will be on learning how to do that! OpenPyXL lets you create Microsoft Excel spreadsheets with a minimum of fuss.
Creating Excel spreadsheets using Python allows you to generate a new type of report that your users will use. For example, you might receive your data from a client in the form of JSON or XML. These data formats are not something that most accountants or business people are used to reading.
Once you learn how to create Excel spreadsheets with Python, you can leverage that knowledge to transform other data into Excel spreadsheets. This knowledge also allows you to do the reverse, taking in an Excel spreadsheet and output a different format, such as JSON or XML.
In this article, you will learn how to use OpenPyXL to do the following:
- Create a spreadsheet
- Write to a spreadsheet
- Add and remove sheets
- Insert and delete rows and columns
- Edit cell data
- Create merged cells
- Fold rows and columns
Let’s get started by creating a brand new spreadsheet!
Editor’s note: This article is based on a chapter from the book: Automating Excel with Python. You can order a copy on Gumroad or Kickstarter.
Creating a Spreadsheet
Creating an empty spreadsheet using OpenPyXL doesn’t take much code. Open up your Python editor and create a new file. Name it creating_spreadsheet.py.
Now add the following code to your file:
# creating_spreadsheet.py

from openpyxl import Workbook


def create_workbook(path):
    workbook = Workbook()
    workbook.save(path)


if __name__ == "__main__":
    create_workbook("hello.xlsx")
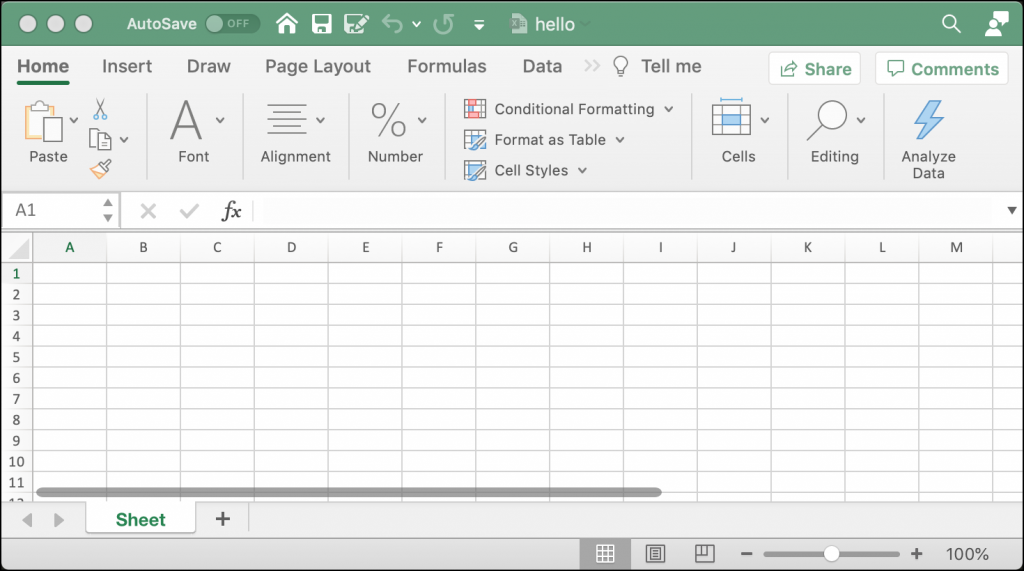
The critical piece here is that you need to import the Workbook class. This class allows you to instantiate a workbook object that you can then save. All this code does is create the file that you pass to it and save it.
Your new spreadsheet will look like this:
Now you’re ready to learn how to add some data to the cells in your spreadsheet.
Writing to a Spreadsheet
When writing data in a spreadsheet, you need to get the “sheet” object. You learned how to do that in the previous chapter using workbook.active, which gives you the active or currently visible sheet. You could also explicitly tell OpenPyXL which sheet you want to access by passing it a sheet title.
For this example, you will create another new program and then use the active sheet. Open up a new file and name it adding_data.py. Now add this code to your file:
# adding_data.py

from openpyxl import Workbook


def create_workbook(path):
    workbook = Workbook()
    sheet = workbook.active
    sheet["A1"] = "Hello"
    sheet["A2"] = "from"
    sheet["A3"] = "OpenPyXL"
    workbook.save(path)


if __name__ == "__main__":
    create_workbook("hello.xlsx")
This code will overwrite the previous example’s Excel spreadsheet. After you create the Workbook() object, you grab the active Worksheet. Then you add text strings to the cells: A1, A2, and A3. The last step is to save your new spreadsheet.
When you run this code, your new spreadsheet will look like this:

You can use this technique to write data to any cell in your spreadsheet.
Now let’s find out how to add and remove a worksheet!
Adding and Removing Sheets
Adding a worksheet to a workbook happens automatically when you create a new Workbook. The Worksheet will be named “Sheet” by default. If you want, you can set the name of the sheet yourself.
To see how this works, create a new file named creating_sheet_title.py and add the following code:
# creating_sheet_title.py

from openpyxl import Workbook


def create_sheets(path):
    workbook = Workbook()
    sheet = workbook.active
    sheet.title = "Hello"
    sheet2 = workbook.create_sheet(title="World")
    workbook.save(path)


if __name__ == "__main__":
    create_sheets("hello_sheets.xlsx")
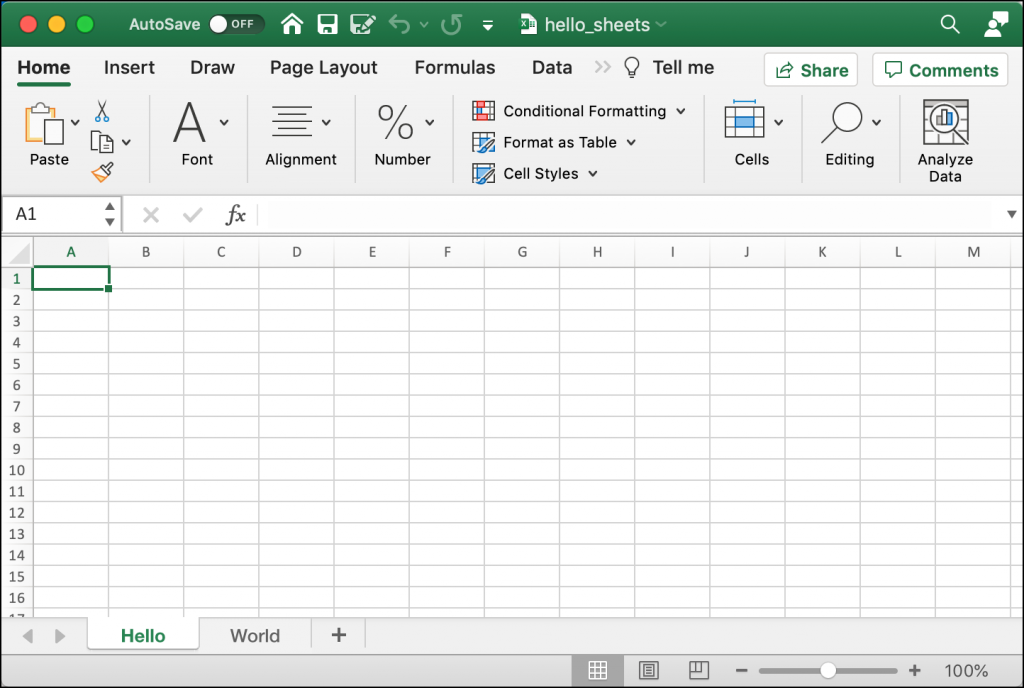
Here you create the Workbook and then grab the active Worksheet. You can then set the Worksheet’s title using the title attribute. The following line of code adds a new worksheet to the Workbook by calling create_sheet().
The create_sheet() method takes two parameters: title and index. The title attribute gives a title to the Worksheet. The index tells the Workbook where to insert the Worksheet, from left to right. If you specify zero, your Worksheet gets inserted at the beginning.
If you run this code, your new spreadsheet will look like this:
Sometimes you will need to delete a worksheet. Perhaps that sheet no longer has valid information, or it was created by accident.
To see how to delete a worksheet, create another new file and name it delete_sheets.py. Then add this code:
# delete_sheets.py

import openpyxl


def create_worksheets(path):
    workbook = openpyxl.Workbook()
    workbook.create_sheet()
    print(workbook.sheetnames)
    # Insert a worksheet
    workbook.create_sheet(index=1, title="Second sheet")
    print(workbook.sheetnames)
    del workbook["Second sheet"]
    print(workbook.sheetnames)
    workbook.save(path)


if __name__ == "__main__":
    create_worksheets("del_sheets.xlsx")
In this example, you create two new sheets. The first Worksheet has no title specified, so it defaults to “Sheet1”. You supply a title to the second sheet, and then you print out all the current worksheet titles.
Next, you use Python’s del keyword to delete the Worksheet’s name from the workbook, which removes the sheet. Then you print out the current worksheet titles again.
Here is the output from running the code:
['Sheet', 'Sheet1']
['Sheet', 'Second sheet', 'Sheet1']
['Sheet', 'Sheet1']
The first Worksheet gets created automatically when you instantiate the Workbook. The Worksheet is named “Sheet”. Then you make “Sheet1”. Lastly, you create “Second sheet”, but you insert it at position 1, which tells the Workbook to shift ‘Sheet1’ to the right by one position.
You can see from the output above how the worksheets are ordered before and after you add and delete the “Second sheet”.
Now let’s learn about inserting and removing rows and columns!
Inserting and Deleting Rows and Columns
The OpenPyXL package provides you with several methods that you can use to insert or delete rows and columns. These methods are a part of the Worksheet object.
You will learn about the following four methods:
.insert_rows().delete_rows().insert_cols().delete_cols()
Each of these methods can take these two arguments:
idx– The index to insert into (or delete from)amount– The number of rows or columns to add (or delete)
You can use the insert methods to insert rows or columns at the specified index.
Open up a new file and name it insert_demo.py. Then enter this code in your new file:
# insert_demo.py

from openpyxl import Workbook


def inserting_cols_rows(path):
    workbook = Workbook()
    sheet = workbook.active
    sheet["A1"] = "Hello"
    sheet["A2"] = "from"
    sheet["A3"] = "OpenPyXL"
    # insert a column before A
    sheet.insert_cols(idx=1)
    # insert 2 rows starting on the second row
    sheet.insert_rows(idx=2, amount=2)
    workbook.save(path)


if __name__ == "__main__":
    inserting_cols_rows("inserting.xlsx")
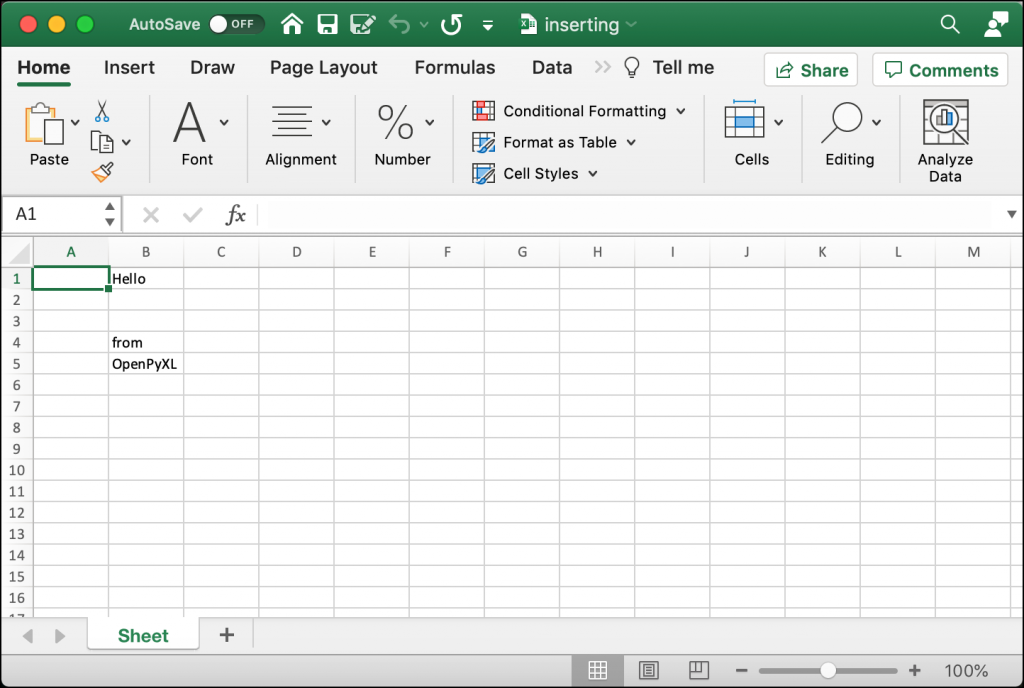
Here you create another new Spreadsheet. In this case, you add text to the first three cells in the “A” column. Then you insert one column at index one. That means you inserted a single column before “A”, which causes the cells in column “A” to shift to column “B”.
Next, you insert two new rows starting at index two. This code will insert two rows between the first and second rows.
You can see how this changes things by taking a look at the following screenshot:
Try changing the indexes or number of rows and columns that you want to insert and see how it works.
You will also need to delete columns and rows from time to time. To do that you will use .delete_rows() and .delete_cols().
Open up a new file and name it delete_demo.py. Then add this code:
# delete_demo.py

from openpyxl import Workbook


def deleting_cols_rows(path):
    workbook = Workbook()
    sheet = workbook.active
    sheet["A1"] = "Hello"
    sheet["B1"] = "from"
    sheet["C1"] = "OpenPyXL"
    sheet["A2"] = "row 2"
    sheet["A3"] = "row 3"
    sheet["A4"] = "row 4"
    # Delete column A
    sheet.delete_cols(idx=1)
    # delete 2 rows starting on the second row
    sheet.delete_rows(idx=2, amount=2)
    workbook.save(path)


if __name__ == "__main__":
    deleting_cols_rows("deleting.xlsx")
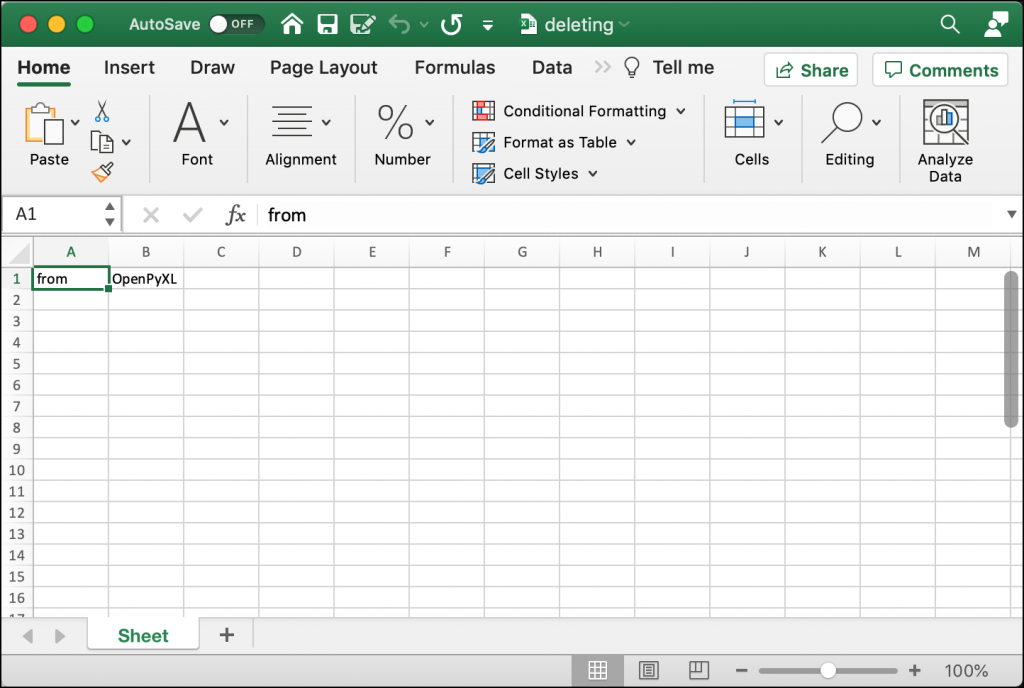
In this example, you add text to six different cells. Four of those cells are in column “A”. Then you use delete_cols() to delete column “A”! That means you got rid of four values. Next, you delete two rows, starting at row number two.
When you run this code, your result should look like this:
Try editing the index or amount values to get familiar with deleting rows and columns.
Now you are ready to learn about editing a spreadsheet’s values!
Editing Cell Data
You can use OpenPyXL to change the values in a pre-existing Excel spreadsheet. You can do that by specifying the cell you want to change and then setting it to a new value.
For this example, you will use the inserting.xlsx file you created in the previous section. Now create a new Python file named editing_demo.py. Then add the following code:
# editing_demo.py

from openpyxl import load_workbook


def edit(path, data):
    workbook = load_workbook(filename=path)
    sheet = workbook.active
    for cell in data:
        current_value = sheet[cell].value
        sheet[cell] = data[cell]
        print(f'Changing {cell} from {current_value} to {data[cell]}')
    workbook.save(path)

if __name__ == "__main__":
    data = {"B1": "Hi", "B5": "Python"}
    edit("inserting.xlsx", data)
This code loads up the Excel file that you created in the previous section. It then loops over each value in the data dictionary that you passed to the edit() function. You get the current value for the cell using a key in the dictionary. Then you change that cell’s value to match the value in the dictionary.
To make it more obvious what is going on, you print out the old and new values of the cell.
When you run this code, you will see the following output:
Changing B1 from Hello to Hi
Changing B5 from OpenPyXL to Python
Open up the new version of the inserting.xlsx file, and it should now look like this:

Here you can see how the cell values have changed to match the one specified in the data dictionary.
Now you can move on and learn how to create merged cells!
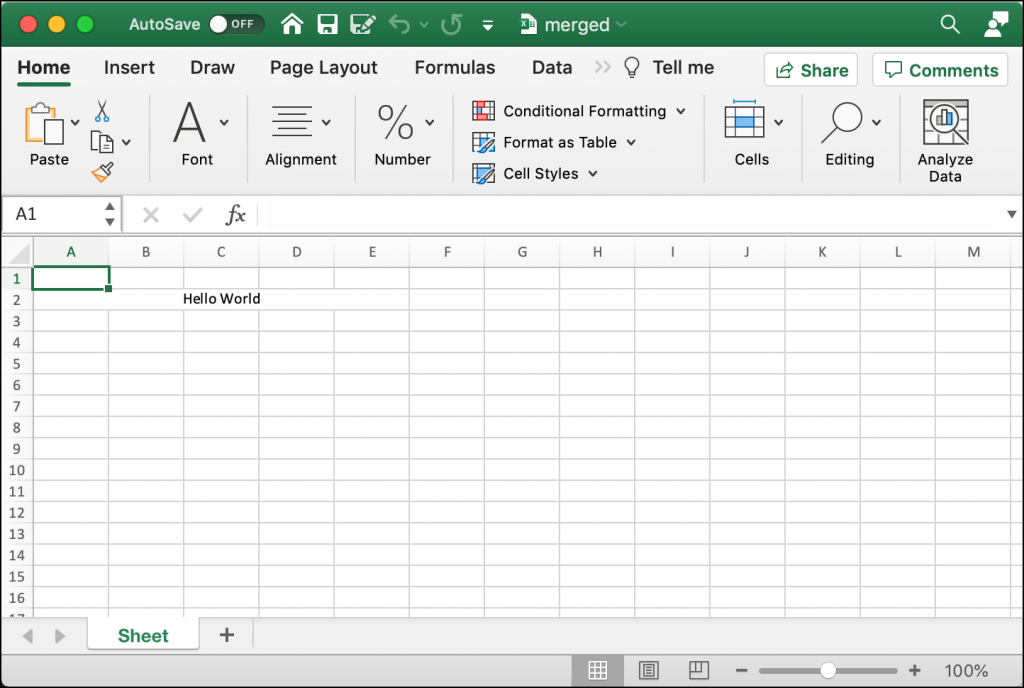
Creating Merged Cells
A merged cell is where two or more cells get merged into one. To set a MergedCell’s value, you have to use the top-left-most cell. For example, if you merge “A2:E2”, you would set the value of cell “A2” for the merged cells.
To see how this works in practice, create a file called merged_cells.py and add this code to it:
# merged_cells.py

from openpyxl import Workbook
from openpyxl.styles import Alignment


def create_merged_cells(path, value):
    workbook = Workbook()
    sheet = workbook.active
    sheet.merge_cells("A2:E2")
    top_left_cell = sheet["A2"]
    top_left_cell.alignment = Alignment(horizontal="center",
                                        vertical="center")
    sheet["A2"] = value
    workbook.save(path)


if __name__ == "__main__":
    create_merged_cells("merged.xlsx", "Hello World")
OpenPyXL has many ways to style cells. In this example, you import Alignment from openpyxl.styles. You will learn more about styles and formatting cells in a later chapter.
Here you merge the cells “A2:E2” and set the alignment to the center of the cell. Then you set the value of “A2” to a string that you passed to the create_merged_cells() function.
When you run this example, your new Excel spreadsheet will look like this:
To get some hands-on experience, change the range of cells you want to merge and try it with and without the alignment set.
Now you are ready to learn about folding columns or rows!
Folding Rows and Columns
Microsoft Excel supports the folding of rows and columns. The term “folding” is also called “hiding” or creating an “outline”. The rows or columns that get folded can be unfolded (or expanded) to make them visible again. You can use this functionality to make a spreadsheet briefer. For example, you might want to only show the sub-totals or the results of equations rather than all of the data at once.
OpenPyXL supports folding too. To see how this works, create a new file named folding.py and enter the following code:
# folding.py

import openpyxl


def folding(path, rows=None, cols=None, hidden=True):
    workbook = openpyxl.Workbook()
    sheet = workbook.active

    if rows:
        begin_row, end_row = rows
        sheet.row_dimensions.group(begin_row, end_row, hidden=hidden)

    if cols:
        begin_col, end_col = cols
        sheet.column_dimensions.group(begin_col, end_col, hidden=hidden)

    workbook.save(path)


if __name__ == "__main__":
    folding("folded.xlsx", rows=(1, 5), cols=("C", "F"))
Your folding() function accepts a tuple of rows or columns or both. You can tell OpenPyXL whether or not you want those rows and columns to be hidden, or folded. In this example, you fold rows 1-5 and columns C-F. To cause the folding to occur, you need to call sheet.row_dimensions.group().
When you run this code, your spreadsheet will look like this:

You can see in this spreadsheet that some of the rows and columns are folded or hidden. There is a “+” symbol next to row 6 and another “+” symbol above column “G”. If you click on either of those buttons, it will expand the folded rows or columns.
Give this code a try. You can also experiment with different row or column ranges.
Now you are ready to learn how to freeze a pane!
Freezing Panes
Microsoft Excel allows you to freeze panes. What that means is that you can freeze one or more columns or rows. One popular use case is to freeze a row of headers so that the headers are always visible while scrolling through a lot of data.
OpenPyXL provides a freeze_panes attribute on the Worksheet object that you can set. You need to select a cell below and to the right of the columns that you want to freeze. For example, if you want to freeze the first row in your spreadsheet, then you would select cell at “A2” to apply the freeze to that row.
You can see how this works by writing some code. Open up a new file and name it freezing_panes.py. Then enter the following into it:
# freezing_panes.py

from openpyxl import Workbook


def freeze(path, row_to_freeze):
    workbook = Workbook()
    sheet = workbook.active
    sheet.title = "Freeze"
    sheet.freeze_panes = row_to_freeze
    headers = ["Name", "Address", "State", "Zip"]
    sheet["A1"] = headers[0]
    sheet["B1"] = headers[1]
    sheet["C1"] = headers[2]
    sheet["D1"] = headers[3]
    data = [dict(zip(headers, ("Mike", "123 Storm Dr", "IA", "50000"))),
            dict(zip(headers, ("Ted", "555 Tornado Alley", "OK", "90000")))]
    row = 2
    for d in data:
        sheet[f'A{row}'] = d["Name"]
        sheet[f'B{row}'] = d["Address"]
        sheet[f'C{row}'] = d["State"]
        sheet[f'D{row}'] = d["Zip"]
        row += 1
    workbook.save(path)


if __name__ == "__main__":
    freeze("freeze.xlsx", row_to_freeze="A2")
Here you create a new Workbook and set the active sheet’s title to “Freeze”. Then you set the freeze_panes attribute to “A2”. The rest of the code in the function adds a couple of rows of data to the Worksheet.
When you run this code, the spreadsheet that you create will look like this:
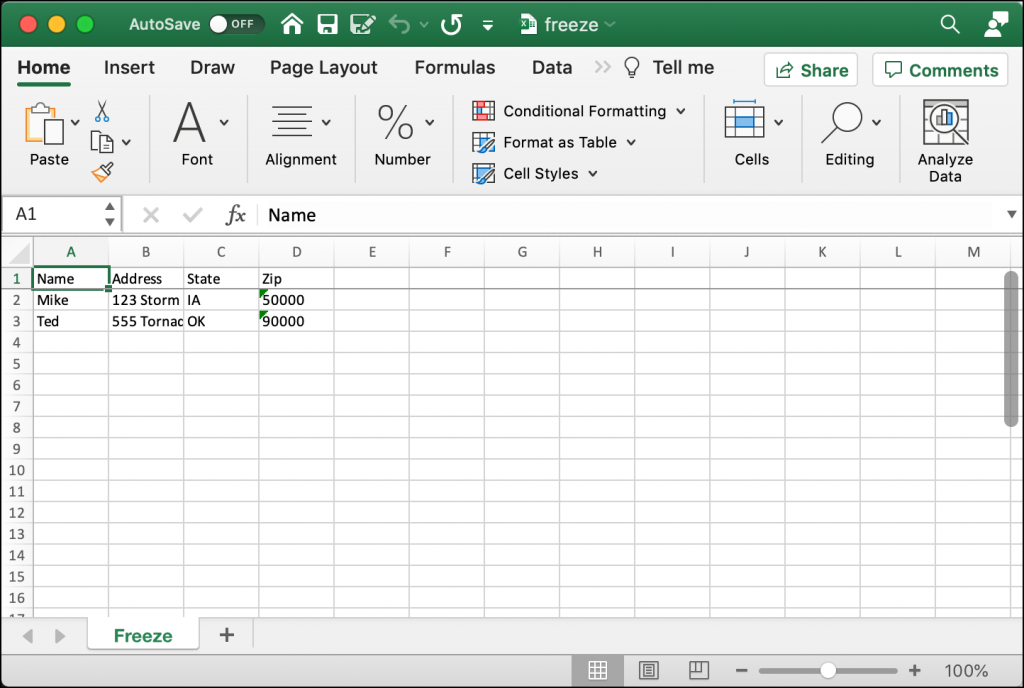
Try scrolling down through some rows in the spreadsheet. The top row should always remain visible because it has been “frozen”.
Wrapping Up
You can use OpenPyXL not only to create an Excel spreadsheet, but modify a pre-existing one. In this chapter, you learned how to do the following:
- Create a spreadsheet
- Write to a spreadsheet
- Add and remove sheets
- Insert and delete rows and columns
- Edit cell data
- Create merged cells
- Freeze panes
Give the examples in this chapter a try. Then modify them a bit to see what else you can do on your own.
Introduction
In previous article, I showed how to create a new Excel file with openpyxl in Python.
In this article, I create a new Worksheet, change sheet property Excel files in Python.
Environment
Runtime environment is as below.
- python 3.6
- openpyxl 2.5.6
Use create_sheet function to add new Worksheet.
1from openpyxl.workbook import Workbook
2
3wb = Workbook()
4
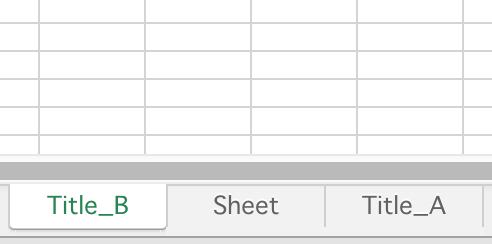
5ws1 = wb.create_sheet("Sheet_A")
6ws1.title = "Title_A"
7
8ws2 = wb.create_sheet("Sheet_B", 0)
9ws2.title = "Title_B"
10
11wb.save(filename = 'sample_book.xlsx')The create_sheet function can insert sheet at arbitrary position by giving a number to the second argument. Without arguments, create_sheet function adds sheet to the end of Workbook in default.
Get all sheet names
To get all sheet names of Workbook, access to sheetnames property in Workbook instance.
1wb.sheetnames
2# Returns all sheet names as list
3# ['Title_B', 'Sheet', 'Title_A']
Using for loop to Workbook, it gets each Worksheet instance in Workbook object.
1for ws in wb:
2    print(ws.title)
Select Worksheet
Workbook object has key-value pairs. To get the Worksheet instance, specify the sheet name as key.
1# wb means Workbook object
2ws1 = wb["Title_A"]
Change Worksheet property
Tab color
The sheet_properties property in Worksheet instance has a tabColor attribute.
To change tab color, specify the color code.
1ws1.sheet_properties.tabColor = "1072BA"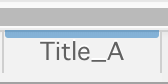
Filter mode
Setting filterMode to True, apply filter mode to specific Worksheet.
The structure of data format in the Workseat must be in a format that can apply filters.
1ws1.sheet_properties.filterMode = TrueOther properties
The sheet_properties has other worksheet attribute values in addition.
An example is introduced below.
| property | type | meaning |
|---|---|---|
| codeName | str | Specify CodeName |
| enableFormatConditionsCalculation | bool | Gets or sets a value that determines whether conditional formatting is applied automatically |
| published | bool | Save a collection of items or items in the document in a web page format |
| syncHorizontal | bool | Synchronize the active sheet when scrolling horizontally |
| syncVertical | bool | Synchronize the active sheet when scrolling vertically |
Conclusion
It is available to
- Create a new
Worksheetwithcreate_sheetfunction - Get
Worksheetinstance inWorkbookobject using key-value. - Set worksheet attributes with
sheet_properties
Since there are various kinds of operation of the workseat, it will be summarized.
Watch Now This tutorial has a related video course created by the Real Python team. Watch it together with the written tutorial to deepen your understanding: Editing Excel Spreadsheets in Python With openpyxl
Excel spreadsheets are one of those things you might have to deal with at some point. Either it’s because your boss loves them or because marketing needs them, you might have to learn how to work with spreadsheets, and that’s when knowing openpyxl comes in handy!
Spreadsheets are a very intuitive and user-friendly way to manipulate large datasets without any prior technical background. That’s why they’re still so commonly used today.
In this article, you’ll learn how to use openpyxl to:
- Manipulate Excel spreadsheets with confidence
- Extract information from spreadsheets
- Create simple or more complex spreadsheets, including adding styles, charts, and so on
This article is written for intermediate developers who have a pretty good knowledge of Python data structures, such as dicts and lists, but also feel comfortable around OOP and more intermediate level topics.
Before You Begin
If you ever get asked to extract some data from a database or log file into an Excel spreadsheet, or if you often have to convert an Excel spreadsheet into some more usable programmatic form, then this tutorial is perfect for you. Let’s jump into the openpyxl caravan!
Practical Use Cases
First things first, when would you need to use a package like openpyxl in a real-world scenario? You’ll see a few examples below, but really, there are hundreds of possible scenarios where this knowledge could come in handy.
Importing New Products Into a Database
You are responsible for tech in an online store company, and your boss doesn’t want to pay for a cool and expensive CMS system.
Every time they want to add new products to the online store, they come to you with an Excel spreadsheet with a few hundred rows and, for each of them, you have the product name, description, price, and so forth.
Now, to import the data, you’ll have to iterate over each spreadsheet row and add each product to the online store.
Exporting Database Data Into a Spreadsheet
Say you have a Database table where you record all your users’ information, including name, phone number, email address, and so forth.
Now, the Marketing team wants to contact all users to give them some discounted offer or promotion. However, they don’t have access to the Database, or they don’t know how to use SQL to extract that information easily.
What can you do to help? Well, you can make a quick script using openpyxl that iterates over every single User record and puts all the essential information into an Excel spreadsheet.
That’s gonna earn you an extra slice of cake at your company’s next birthday party!
Appending Information to an Existing Spreadsheet
You may also have to open a spreadsheet, read the information in it and, according to some business logic, append more data to it.
For example, using the online store scenario again, say you get an Excel spreadsheet with a list of users and you need to append to each row the total amount they’ve spent in your store.
This data is in the Database and, in order to do this, you have to read the spreadsheet, iterate through each row, fetch the total amount spent from the Database and then write back to the spreadsheet.
Not a problem for openpyxl!
Learning Some Basic Excel Terminology
Here’s a quick list of basic terms you’ll see when you’re working with Excel spreadsheets:
| Term | Explanation |
|---|---|
| Spreadsheet or Workbook | A Spreadsheet is the main file you are creating or working with. |
| Worksheet or Sheet | A Sheet is used to split different kinds of content within the same spreadsheet. A Spreadsheet can have one or more Sheets. |
| Column | A Column is a vertical line, and it’s represented by an uppercase letter: A. |
| Row | A Row is a horizontal line, and it’s represented by a number: 1. |
| Cell | A Cell is a combination of Column and Row, represented by both an uppercase letter and a number: A1. |
Getting Started With openpyxl
Now that you’re aware of the benefits of a tool like openpyxl, let’s get down to it and start by installing the package. For this tutorial, you should use Python 3.7 and openpyxl 2.6.2. To install the package, you can do the following:
After you install the package, you should be able to create a super simple spreadsheet with the following code:
from openpyxl import Workbook

workbook = Workbook()
sheet = workbook.active

sheet["A1"] = "hello"
sheet["B1"] = "world!"

workbook.save(filename="hello_world.xlsx")
The code above should create a file called hello_world.xlsx in the folder you are using to run the code. If you open that file with Excel you should see something like this:
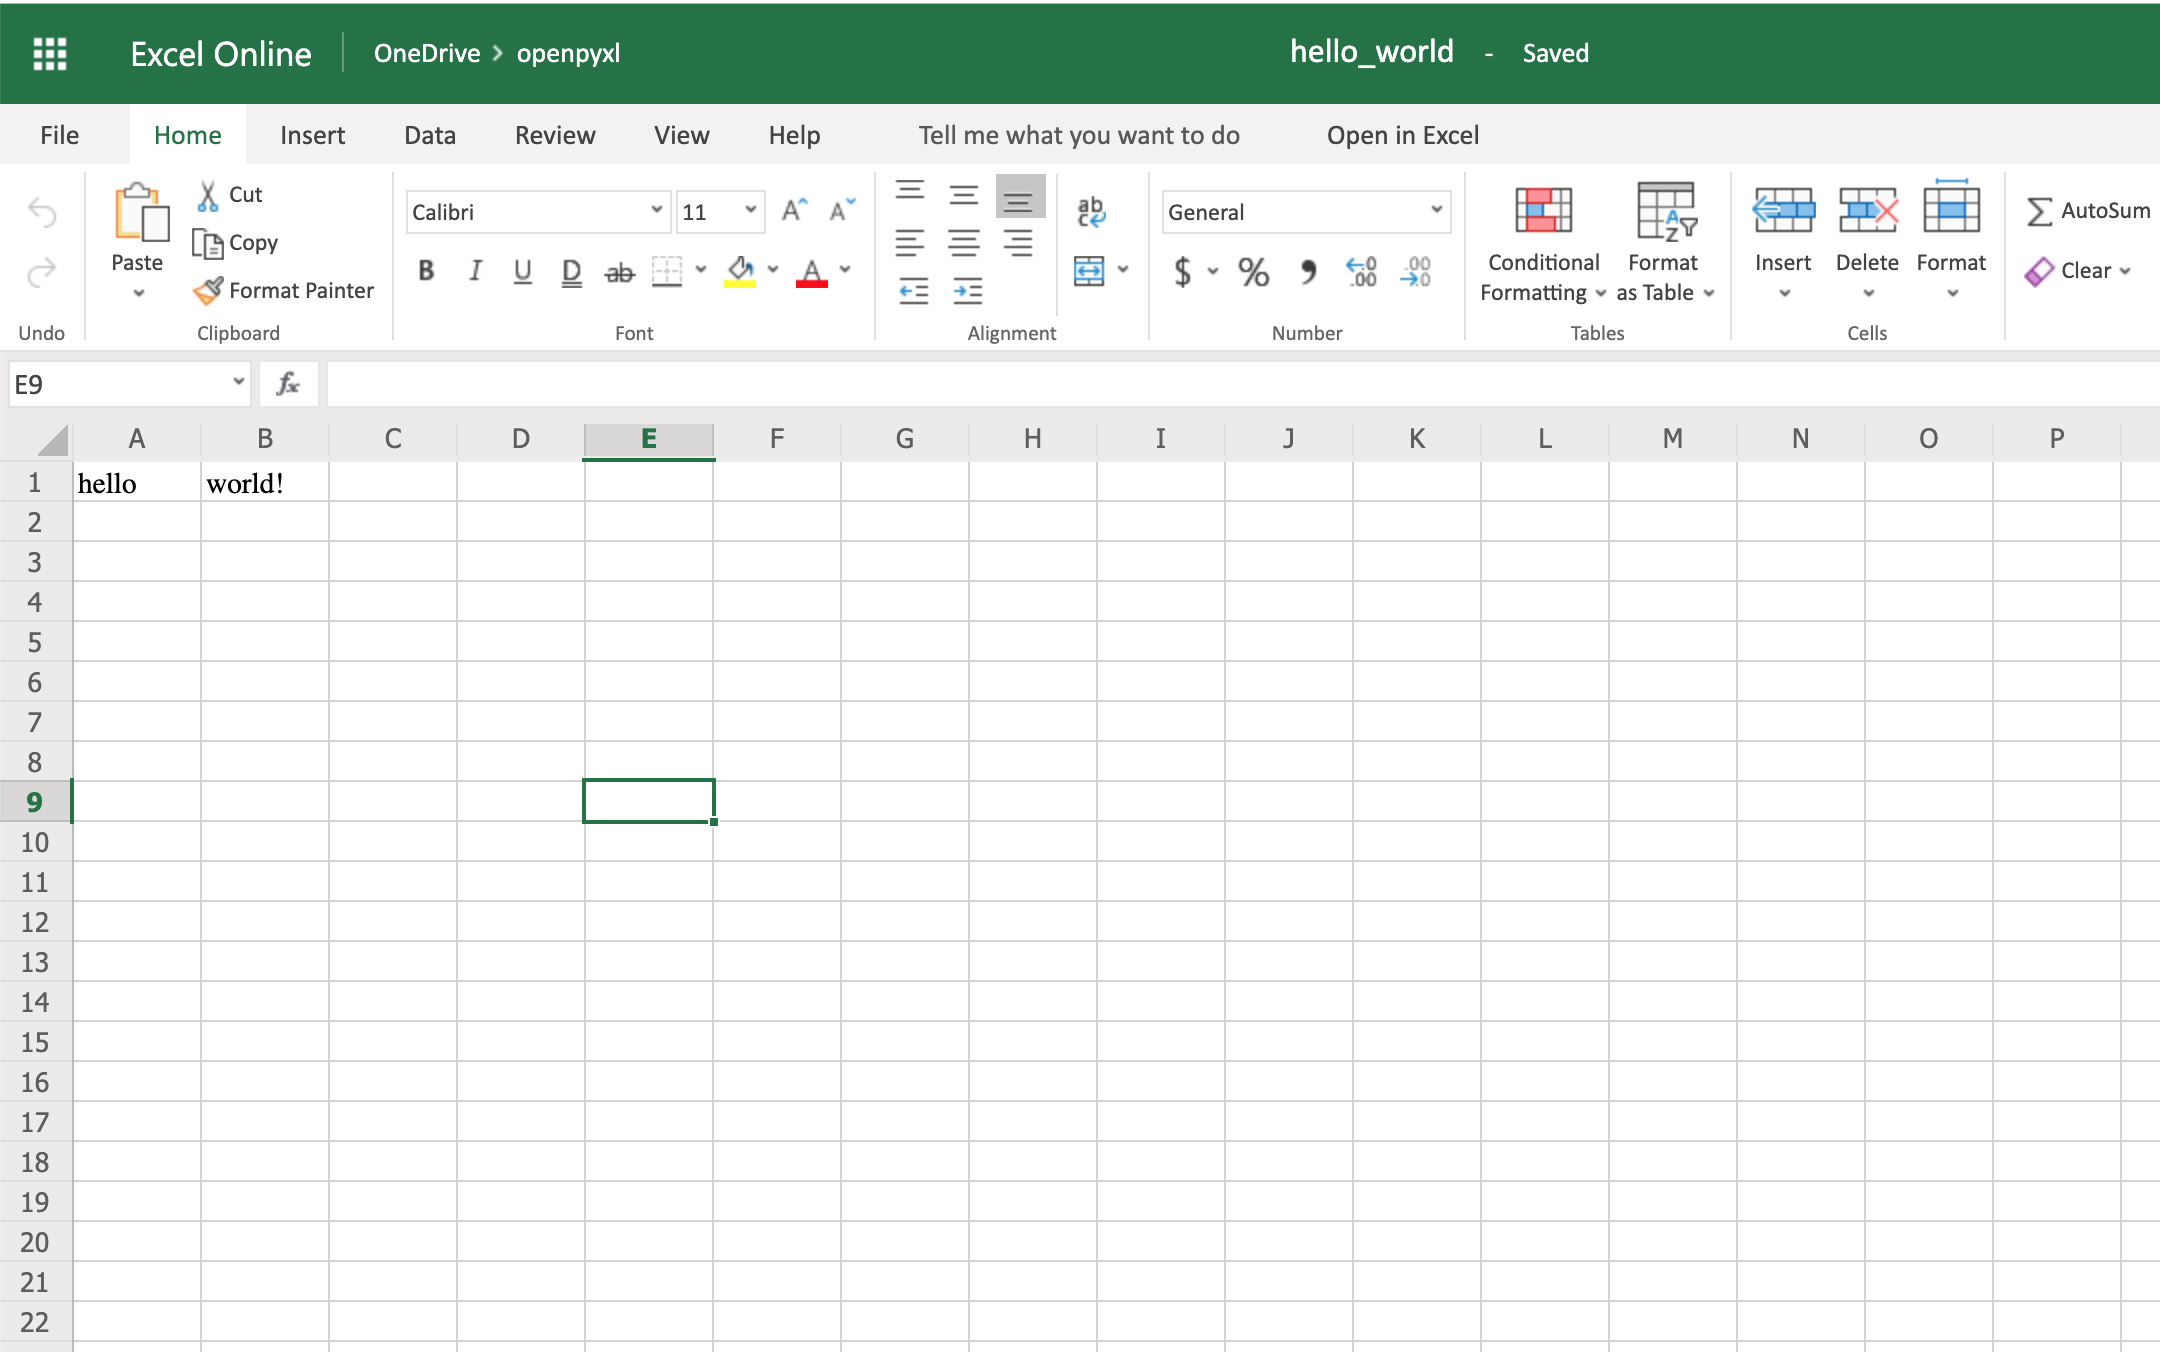
Woohoo, your first spreadsheet created!
Reading Excel Spreadsheets With openpyxl
Let’s start with the most essential thing one can do with a spreadsheet: read it.
You’ll go from a straightforward approach to reading a spreadsheet to more complex examples where you read the data and convert it into more useful Python structures.
Dataset for This Tutorial
Before you dive deep into some code examples, you should download this sample dataset and store it somewhere as sample.xlsx:
This is one of the datasets you’ll be using throughout this tutorial, and it’s a spreadsheet with a sample of real data from Amazon’s online product reviews. This dataset is only a tiny fraction of what Amazon provides, but for testing purposes, it’s more than enough.
A Simple Approach to Reading an Excel Spreadsheet
Finally, let’s start reading some spreadsheets! To begin with, open our sample spreadsheet:
>>>
>>> from openpyxl import load_workbook
>>> workbook = load_workbook(filename="sample.xlsx")
>>> workbook.sheetnames
['Sheet 1']

>>> sheet = workbook.active
>>> sheet
<Worksheet "Sheet 1">

>>> sheet.title
'Sheet 1'
In the code above, you first open the spreadsheet sample.xlsx using load_workbook(), and then you can use workbook.sheetnames to see all the sheets you have available to work with. After that, workbook.active selects the first available sheet and, in this case, you can see that it selects Sheet 1 automatically. Using these methods is the default way of opening a spreadsheet, and you’ll see it many times during this tutorial.
Now, after opening a spreadsheet, you can easily retrieve data from it like this:
>>>
>>> sheet["A1"]
<Cell 'Sheet 1'.A1>

>>> sheet["A1"].value
'marketplace'

>>> sheet["F10"].value
"G-Shock Men's Grey Sport Watch"
To return the actual value of a cell, you need to do .value. Otherwise, you’ll get the main Cell object. You can also use the method .cell() to retrieve a cell using index notation. Remember to add .value to get the actual value and not a Cell object:
>>>
>>> sheet.cell(row=10, column=6)
<Cell 'Sheet 1'.F10>

>>> sheet.cell(row=10, column=6).value
"G-Shock Men's Grey Sport Watch"
You can see that the results returned are the same, no matter which way you decide to go with. However, in this tutorial, you’ll be mostly using the first approach: ["A1"].
The above shows you the quickest way to open a spreadsheet. However, you can pass additional parameters to change the way a spreadsheet is loaded.
Additional Reading Options
There are a few arguments you can pass to load_workbook() that change the way a spreadsheet is loaded. The most important ones are the following two Booleans:
- read_only loads a spreadsheet in read-only mode allowing you to open very large Excel files.
- data_only ignores loading formulas and instead loads only the resulting values.
Importing Data From a Spreadsheet
Now that you’ve learned the basics about loading a spreadsheet, it’s about time you get to the fun part: the iteration and actual usage of the values within the spreadsheet.
This section is where you’ll learn all the different ways you can iterate through the data, but also how to convert that data into something usable and, more importantly, how to do it in a Pythonic way.
Iterating Through the Data
There are a few different ways you can iterate through the data depending on your needs.
You can slice the data with a combination of columns and rows:
>>>
>>> sheet["A1:C2"]
((<Cell 'Sheet 1'.A1>, <Cell 'Sheet 1'.B1>, <Cell 'Sheet 1'.C1>),
 (<Cell 'Sheet 1'.A2>, <Cell 'Sheet 1'.B2>, <Cell 'Sheet 1'.C2>))
You can get ranges of rows or columns:
>>>
>>> # Get all cells from column A
>>> sheet["A"]
(<Cell 'Sheet 1'.A1>,
 <Cell 'Sheet 1'.A2>,
 ...
 <Cell 'Sheet 1'.A99>,
 <Cell 'Sheet 1'.A100>)

>>> # Get all cells for a range of columns
>>> sheet["A:B"]
((<Cell 'Sheet 1'.A1>,
  <Cell 'Sheet 1'.A2>,
  ...
  <Cell 'Sheet 1'.A99>,
  <Cell 'Sheet 1'.A100>),
 (<Cell 'Sheet 1'.B1>,
  <Cell 'Sheet 1'.B2>,
  ...
  <Cell 'Sheet 1'.B99>,
  <Cell 'Sheet 1'.B100>))

>>> # Get all cells from row 5
>>> sheet[5]
(<Cell 'Sheet 1'.A5>,
 <Cell 'Sheet 1'.B5>,
 ...
 <Cell 'Sheet 1'.N5>,
 <Cell 'Sheet 1'.O5>)

>>> # Get all cells for a range of rows
>>> sheet[5:6]
((<Cell 'Sheet 1'.A5>,
  <Cell 'Sheet 1'.B5>,
  ...
  <Cell 'Sheet 1'.N5>,
  <Cell 'Sheet 1'.O5>),
 (<Cell 'Sheet 1'.A6>,
  <Cell 'Sheet 1'.B6>,
  ...
  <Cell 'Sheet 1'.N6>,
  <Cell 'Sheet 1'.O6>))
You’ll notice that all of the above examples return a tuple. If you want to refresh your memory on how to handle tuples in Python, check out the article on Lists and Tuples in Python.
There are also multiple ways of using normal Python generators to go through the data. The main methods you can use to achieve this are:
.iter_rows().iter_cols()
Both methods can receive the following arguments:
min_rowmax_rowmin_colmax_col
These arguments are used to set boundaries for the iteration:
>>>
>>> for row in sheet.iter_rows(min_row=1,
...                            max_row=2,
...                            min_col=1,
...                            max_col=3):
...     print(row)
(<Cell 'Sheet 1'.A1>, <Cell 'Sheet 1'.B1>, <Cell 'Sheet 1'.C1>)
(<Cell 'Sheet 1'.A2>, <Cell 'Sheet 1'.B2>, <Cell 'Sheet 1'.C2>)


>>> for column in sheet.iter_cols(min_row=1,
...                               max_row=2,
...                               min_col=1,
...                               max_col=3):
...     print(column)
(<Cell 'Sheet 1'.A1>, <Cell 'Sheet 1'.A2>)
(<Cell 'Sheet 1'.B1>, <Cell 'Sheet 1'.B2>)
(<Cell 'Sheet 1'.C1>, <Cell 'Sheet 1'.C2>)
You’ll notice that in the first example, when iterating through the rows using .iter_rows(), you get one tuple element per row selected. While when using .iter_cols() and iterating through columns, you’ll get one tuple per column instead.
One additional argument you can pass to both methods is the Boolean values_only. When it’s set to True, the values of the cell are returned, instead of the Cell object:
>>>
>>> for value in sheet.iter_rows(min_row=1,
...                              max_row=2,
...                              min_col=1,
...                              max_col=3,
...                              values_only=True):
...     print(value)
('marketplace', 'customer_id', 'review_id')
('US', 3653882, 'R3O9SGZBVQBV76')
If you want to iterate through the whole dataset, then you can also use the attributes .rows or .columns directly, which are shortcuts to using .iter_rows() and .iter_cols() without any arguments:
>>>
>>> for row in sheet.rows:
...     print(row)
(<Cell 'Sheet 1'.A1>, <Cell 'Sheet 1'.B1>, <Cell 'Sheet 1'.C1>
...
<Cell 'Sheet 1'.M100>, <Cell 'Sheet 1'.N100>, <Cell 'Sheet 1'.O100>)
These shortcuts are very useful when you’re iterating through the whole dataset.
Manipulate Data Using Python’s Default Data Structures
Now that you know the basics of iterating through the data in a workbook, let’s look at smart ways of converting that data into Python structures.
As you saw earlier, the result from all iterations comes in the form of tuples. However, since a tuple is nothing more than an immutable list, you can easily access its data and transform it into other structures.
For example, say you want to extract product information from the sample.xlsx spreadsheet and into a dictionary where each key is a product ID.
A straightforward way to do this is to iterate over all the rows, pick the columns you know are related to product information, and then store that in a dictionary. Let’s code this out!
First of all, have a look at the headers and see what information you care most about:
>>>
>>> for value in sheet.iter_rows(min_row=1,
...                              max_row=1,
...                              values_only=True):
...     print(value)
('marketplace', 'customer_id', 'review_id', 'product_id', ...)
This code returns a list of all the column names you have in the spreadsheet. To start, grab the columns with names:
product_idproduct_parentproduct_titleproduct_category
Lucky for you, the columns you need are all next to each other so you can use the min_column and max_column to easily get the data you want:
>>>
>>> for value in sheet.iter_rows(min_row=2,
...                              min_col=4,
...                              max_col=7,
...                              values_only=True):
...     print(value)
('B00FALQ1ZC', 937001370, 'Invicta Women's 15150 "Angel" 18k Yellow...)
('B00D3RGO20', 484010722, "Kenneth Cole New York Women's KC4944...)
...
Nice! Now that you know how to get all the important product information you need, let’s put that data into a dictionary:
import json
from openpyxl import load_workbook

workbook = load_workbook(filename="sample.xlsx")
sheet = workbook.active

products = {}

# Using the values_only because you want to return the cells' values
for row in sheet.iter_rows(min_row=2,
                           min_col=4,
                           max_col=7,
                           values_only=True):
    product_id = row[0]
    product = {
        "parent": row[1],
        "title": row[2],
        "category": row[3]
    }
    products[product_id] = product

# Using json here to be able to format the output for displaying later
print(json.dumps(products))
The code above returns a JSON similar to this:
{
  "B00FALQ1ZC": {
    "parent": 937001370,
    "title": "Invicta Women's 15150 ...",
    "category": "Watches"
  },
  "B00D3RGO20": {
    "parent": 484010722,
    "title": "Kenneth Cole New York ...",
    "category": "Watches"
  }
}
Here you can see that the output is trimmed to 2 products only, but if you run the script as it is, then you should get 98 products.
Convert Data Into Python Classes
To finalize the reading section of this tutorial, let’s dive into Python classes and see how you could improve on the example above and better structure the data.
For this, you’ll be using the new Python Data Classes that are available from Python 3.7. If you’re using an older version of Python, then you can use the default Classes instead.
So, first things first, let’s look at the data you have and decide what you want to store and how you want to store it.
As you saw right at the start, this data comes from Amazon, and it’s a list of product reviews. You can check the list of all the columns and their meaning on Amazon.
There are two significant elements you can extract from the data available:
- Products
- Reviews
A Product has:
- ID
- Title
- Parent
- Category
The Review has a few more fields:
- ID
- Customer ID
- Stars
- Headline
- Body
- Date
You can ignore a few of the review fields to make things a bit simpler.
So, a straightforward implementation of these two classes could be written in a separate file classes.py:
import datetime
from dataclasses import dataclass

@dataclass
class Product:
    id: str
    parent: str
    title: str
    category: str

@dataclass
class Review:
    id: str
    customer_id: str
    stars: int
    headline: str
    body: str
    date: datetime.datetime
After defining your data classes, you need to convert the data from the spreadsheet into these new structures.
Before doing the conversion, it’s worth looking at our header again and creating a mapping between columns and the fields you need:
>>>
>>> for value in sheet.iter_rows(min_row=1,
...                              max_row=1,
...                              values_only=True):
...     print(value)
('marketplace', 'customer_id', 'review_id', 'product_id', ...)

>>> # Or an alternative
>>> for cell in sheet[1]:
...     print(cell.value)
marketplace
customer_id
review_id
product_id
product_parent
...
Let’s create a file mapping.py where you have a list of all the field names and their column location (zero-indexed) on the spreadsheet:
# Product fields
PRODUCT_ID = 3
PRODUCT_PARENT = 4
PRODUCT_TITLE = 5
PRODUCT_CATEGORY = 6

# Review fields
REVIEW_ID = 2
REVIEW_CUSTOMER = 1
REVIEW_STARS = 7
REVIEW_HEADLINE = 12
REVIEW_BODY = 13
REVIEW_DATE = 14
You don’t necessarily have to do the mapping above. It’s more for readability when parsing the row data, so you don’t end up with a lot of magic numbers lying around.
Finally, let’s look at the code needed to parse the spreadsheet data into a list of product and review objects:
from datetime import datetime
from openpyxl import load_workbook
from classes import Product, Review
from mapping import PRODUCT_ID, PRODUCT_PARENT, PRODUCT_TITLE,
    PRODUCT_CATEGORY, REVIEW_DATE, REVIEW_ID, REVIEW_CUSTOMER,
    REVIEW_STARS, REVIEW_HEADLINE, REVIEW_BODY

# Using the read_only method since you're not gonna be editing the spreadsheet
workbook = load_workbook(filename="sample.xlsx", read_only=True)
sheet = workbook.active

products = []
reviews = []

# Using the values_only because you just want to return the cell value
for row in sheet.iter_rows(min_row=2, values_only=True):
    product = Product(id=row[PRODUCT_ID],
                      parent=row[PRODUCT_PARENT],
                      title=row[PRODUCT_TITLE],
                      category=row[PRODUCT_CATEGORY])
    products.append(product)

    # You need to parse the date from the spreadsheet into a datetime format
    spread_date = row[REVIEW_DATE]
    parsed_date = datetime.strptime(spread_date, "%Y-%m-%d")

    review = Review(id=row[REVIEW_ID],
                    customer_id=row[REVIEW_CUSTOMER],
                    stars=row[REVIEW_STARS],
                    headline=row[REVIEW_HEADLINE],
                    body=row[REVIEW_BODY],
                    date=parsed_date)
    reviews.append(review)

print(products[0])
print(reviews[0])
After you run the code above, you should get some output like this:
Product(id='B00FALQ1ZC', parent=937001370, ...)
Review(id='R3O9SGZBVQBV76', customer_id=3653882, ...)
That’s it! Now you should have the data in a very simple and digestible class format, and you can start thinking of storing this in a Database or any other type of data storage you like.
Using this kind of OOP strategy to parse spreadsheets makes handling the data much simpler later on.
Appending New Data
Before you start creating very complex spreadsheets, have a quick look at an example of how to append data to an existing spreadsheet.
Go back to the first example spreadsheet you created (hello_world.xlsx) and try opening it and appending some data to it, like this:
from openpyxl import load_workbook

# Start by opening the spreadsheet and selecting the main sheet
workbook = load_workbook(filename="hello_world.xlsx")
sheet = workbook.active

# Write what you want into a specific cell
sheet["C1"] = "writing ;)"

# Save the spreadsheet
workbook.save(filename="hello_world_append.xlsx")
Et voilà, if you open the new hello_world_append.xlsx spreadsheet, you’ll see the following change:
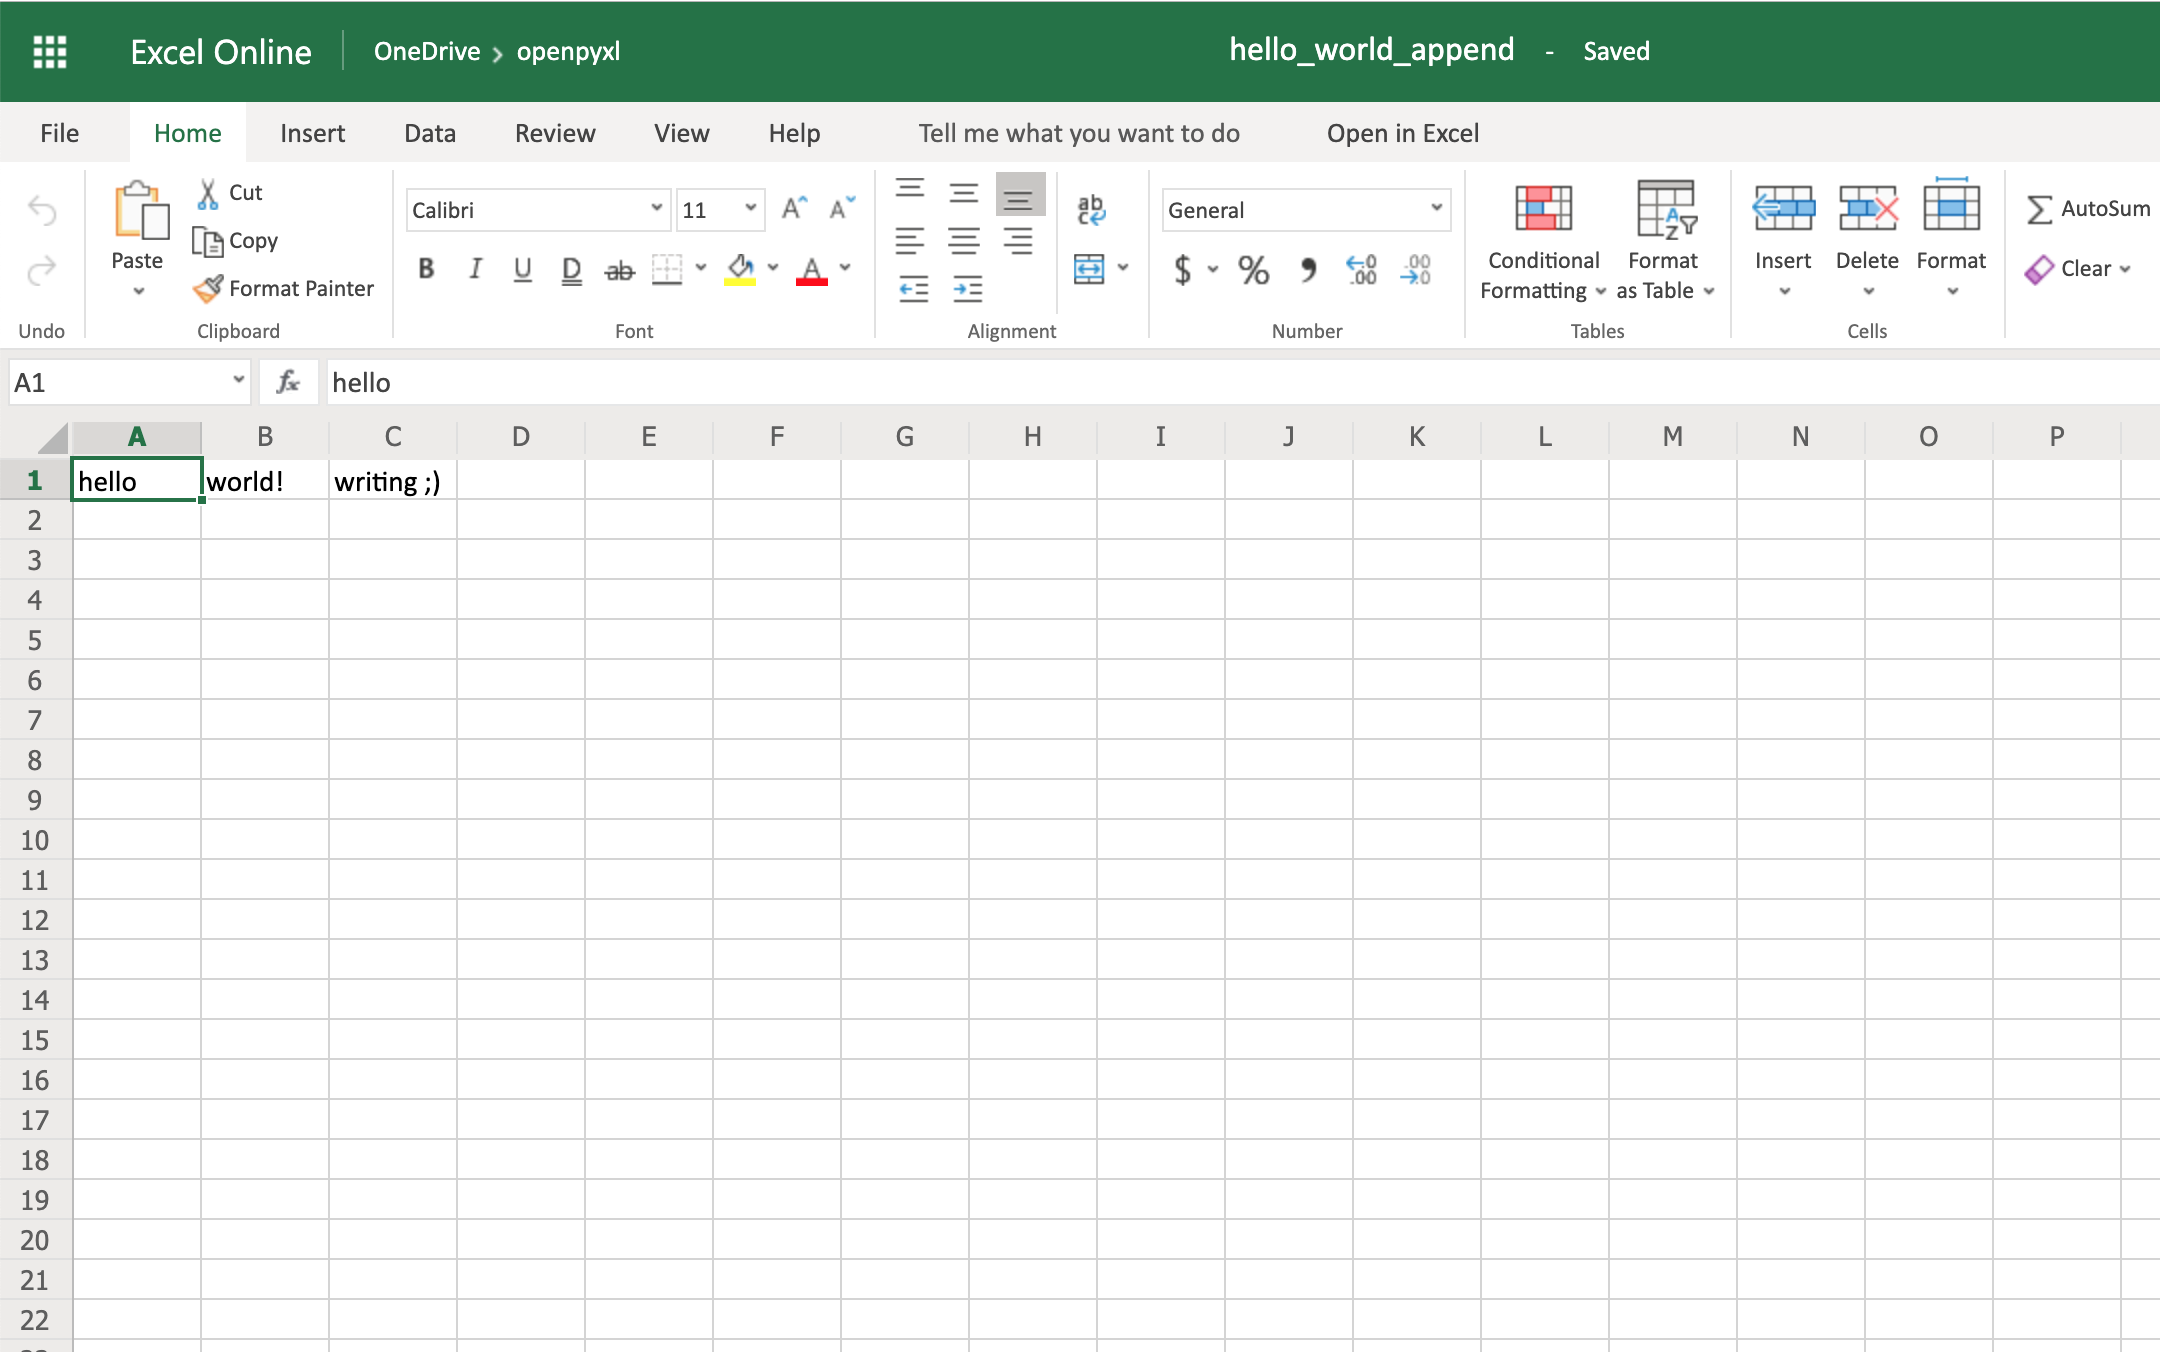
Notice the additional writing  on cell
 C1.
Writing Excel Spreadsheets With openpyxl
There are a lot of different things you can write to a spreadsheet, from simple text or number values to complex formulas, charts, or even images.
Let’s start creating some spreadsheets!
Creating a Simple Spreadsheet
Previously, you saw a very quick example of how to write “Hello world!” into a spreadsheet, so you can start with that:
 1from openpyxl import Workbook
 2
 3filename = "hello_world.xlsx"
 4
 5workbook = Workbook()
 6sheet = workbook.active
 7
 8sheet["A1"] = "hello"
 9sheet["B1"] = "world!"
10
11workbook.save(filename=filename)
The highlighted lines in the code above are the most important ones for writing. In the code, you can see that:
- Line 5 shows you how to create a new empty workbook.
- Lines 8 and 9 show you how to add data to specific cells.
- Line 11 shows you how to save the spreadsheet when you’re done.
Even though these lines above can be straightforward, it’s still good to know them well for when things get a bit more complicated.
One thing you can do to help with coming code examples is add the following method to your Python file or console:
>>>
>>> def print_rows():
...     for row in sheet.iter_rows(values_only=True):
...         print(row)
It makes it easier to print all of your spreadsheet values by just calling print_rows().
Basic Spreadsheet Operations
Before you get into the more advanced topics, it’s good for you to know how to manage the most simple elements of a spreadsheet.
Adding and Updating Cell Values
You already learned how to add values to a spreadsheet like this:
>>>
>>> sheet["A1"] = "value"
There’s another way you can do this, by first selecting a cell and then changing its value:
>>>
>>> cell = sheet["A1"]
>>> cell
<Cell 'Sheet'.A1>

>>> cell.value
'hello'

>>> cell.value = "hey"
>>> cell.value
'hey'
The new value is only stored into the spreadsheet once you call workbook.save().
The openpyxl creates a cell when adding a value, if that cell didn’t exist before:
>>>
>>> # Before, our spreadsheet has only 1 row
>>> print_rows()
('hello', 'world!')

>>> # Try adding a value to row 10
>>> sheet["B10"] = "test"
>>> print_rows()
('hello', 'world!')
(None, None)
(None, None)
(None, None)
(None, None)
(None, None)
(None, None)
(None, None)
(None, None)
(None, 'test')
As you can see, when trying to add a value to cell B10, you end up with a tuple with 10 rows, just so you can have that test value.
Managing Rows and Columns
One of the most common things you have to do when manipulating spreadsheets is adding or removing rows and columns. The openpyxl package allows you to do that in a very straightforward way by using the methods:
.insert_rows().delete_rows().insert_cols().delete_cols()
Every single one of those methods can receive two arguments:
idxamount
Using our basic hello_world.xlsx example again, let’s see how these methods work:
>>>
>>> print_rows()
('hello', 'world!')

>>> # Insert a column before the existing column 1 ("A")
>>> sheet.insert_cols(idx=1)
>>> print_rows()
(None, 'hello', 'world!')

>>> # Insert 5 columns between column 2 ("B") and 3 ("C")
>>> sheet.insert_cols(idx=3, amount=5)
>>> print_rows()
(None, 'hello', None, None, None, None, None, 'world!')

>>> # Delete the created columns
>>> sheet.delete_cols(idx=3, amount=5)
>>> sheet.delete_cols(idx=1)
>>> print_rows()
('hello', 'world!')

>>> # Insert a new row in the beginning
>>> sheet.insert_rows(idx=1)
>>> print_rows()
(None, None)
('hello', 'world!')

>>> # Insert 3 new rows in the beginning
>>> sheet.insert_rows(idx=1, amount=3)
>>> print_rows()
(None, None)
(None, None)
(None, None)
(None, None)
('hello', 'world!')

>>> # Delete the first 4 rows
>>> sheet.delete_rows(idx=1, amount=4)
>>> print_rows()
('hello', 'world!')
The only thing you need to remember is that when inserting new data (rows or columns), the insertion happens before the idx parameter.
So, if you do insert_rows(1), it inserts a new row before the existing first row.
It’s the same for columns: when you call insert_cols(2), it inserts a new column right before the already existing second column (B).
However, when deleting rows or columns, .delete_... deletes data starting from the index passed as an argument.
For example, when doing delete_rows(2) it deletes row 2, and when doing delete_cols(3) it deletes the third column (C).
Managing Sheets
Sheet management is also one of those things you might need to know, even though it might be something that you don’t use that often.
If you look back at the code examples from this tutorial, you’ll notice the following recurring piece of code:
This is the way to select the default sheet from a spreadsheet. However, if you’re opening a spreadsheet with multiple sheets, then you can always select a specific one like this:
>>>
>>> # Let's say you have two sheets: "Products" and "Company Sales"
>>> workbook.sheetnames
['Products', 'Company Sales']

>>> # You can select a sheet using its title
>>> products_sheet = workbook["Products"]
>>> sales_sheet = workbook["Company Sales"]
You can also change a sheet title very easily:
>>>
>>> workbook.sheetnames
['Products', 'Company Sales']

>>> products_sheet = workbook["Products"]
>>> products_sheet.title = "New Products"

>>> workbook.sheetnames
['New Products', 'Company Sales']
If you want to create or delete sheets, then you can also do that with .create_sheet() and .remove():
>>>
>>> workbook.sheetnames
['Products', 'Company Sales']

>>> operations_sheet = workbook.create_sheet("Operations")
>>> workbook.sheetnames
['Products', 'Company Sales', 'Operations']

>>> # You can also define the position to create the sheet at
>>> hr_sheet = workbook.create_sheet("HR", 0)
>>> workbook.sheetnames
['HR', 'Products', 'Company Sales', 'Operations']

>>> # To remove them, just pass the sheet as an argument to the .remove()
>>> workbook.remove(operations_sheet)
>>> workbook.sheetnames
['HR', 'Products', 'Company Sales']

>>> workbook.remove(hr_sheet)
>>> workbook.sheetnames
['Products', 'Company Sales']
One other thing you can do is make duplicates of a sheet using copy_worksheet():
>>>
>>> workbook.sheetnames
['Products', 'Company Sales']

>>> products_sheet = workbook["Products"]
>>> workbook.copy_worksheet(products_sheet)
<Worksheet "Products Copy">

>>> workbook.sheetnames
['Products', 'Company Sales', 'Products Copy']
If you open your spreadsheet after saving the above code, you’ll notice that the sheet Products Copy is a duplicate of the sheet Products.
Freezing Rows and Columns
Something that you might want to do when working with big spreadsheets is to freeze a few rows or columns, so they remain visible when you scroll right or down.
Freezing data allows you to keep an eye on important rows or columns, regardless of where you scroll in the spreadsheet.
Again, openpyxl also has a way to accomplish this by using the worksheet freeze_panes attribute. For this example, go back to our sample.xlsx spreadsheet and try doing the following:
>>>
>>> workbook = load_workbook(filename="sample.xlsx")
>>> sheet = workbook.active
>>> sheet.freeze_panes = "C2"
>>> workbook.save("sample_frozen.xlsx")
If you open the sample_frozen.xlsx spreadsheet in your favorite spreadsheet editor, you’ll notice that row 1 and columns A and B are frozen and are always visible no matter where you navigate within the spreadsheet.
This feature is handy, for example, to keep headers within sight, so you always know what each column represents.
Here’s how it looks in the editor:
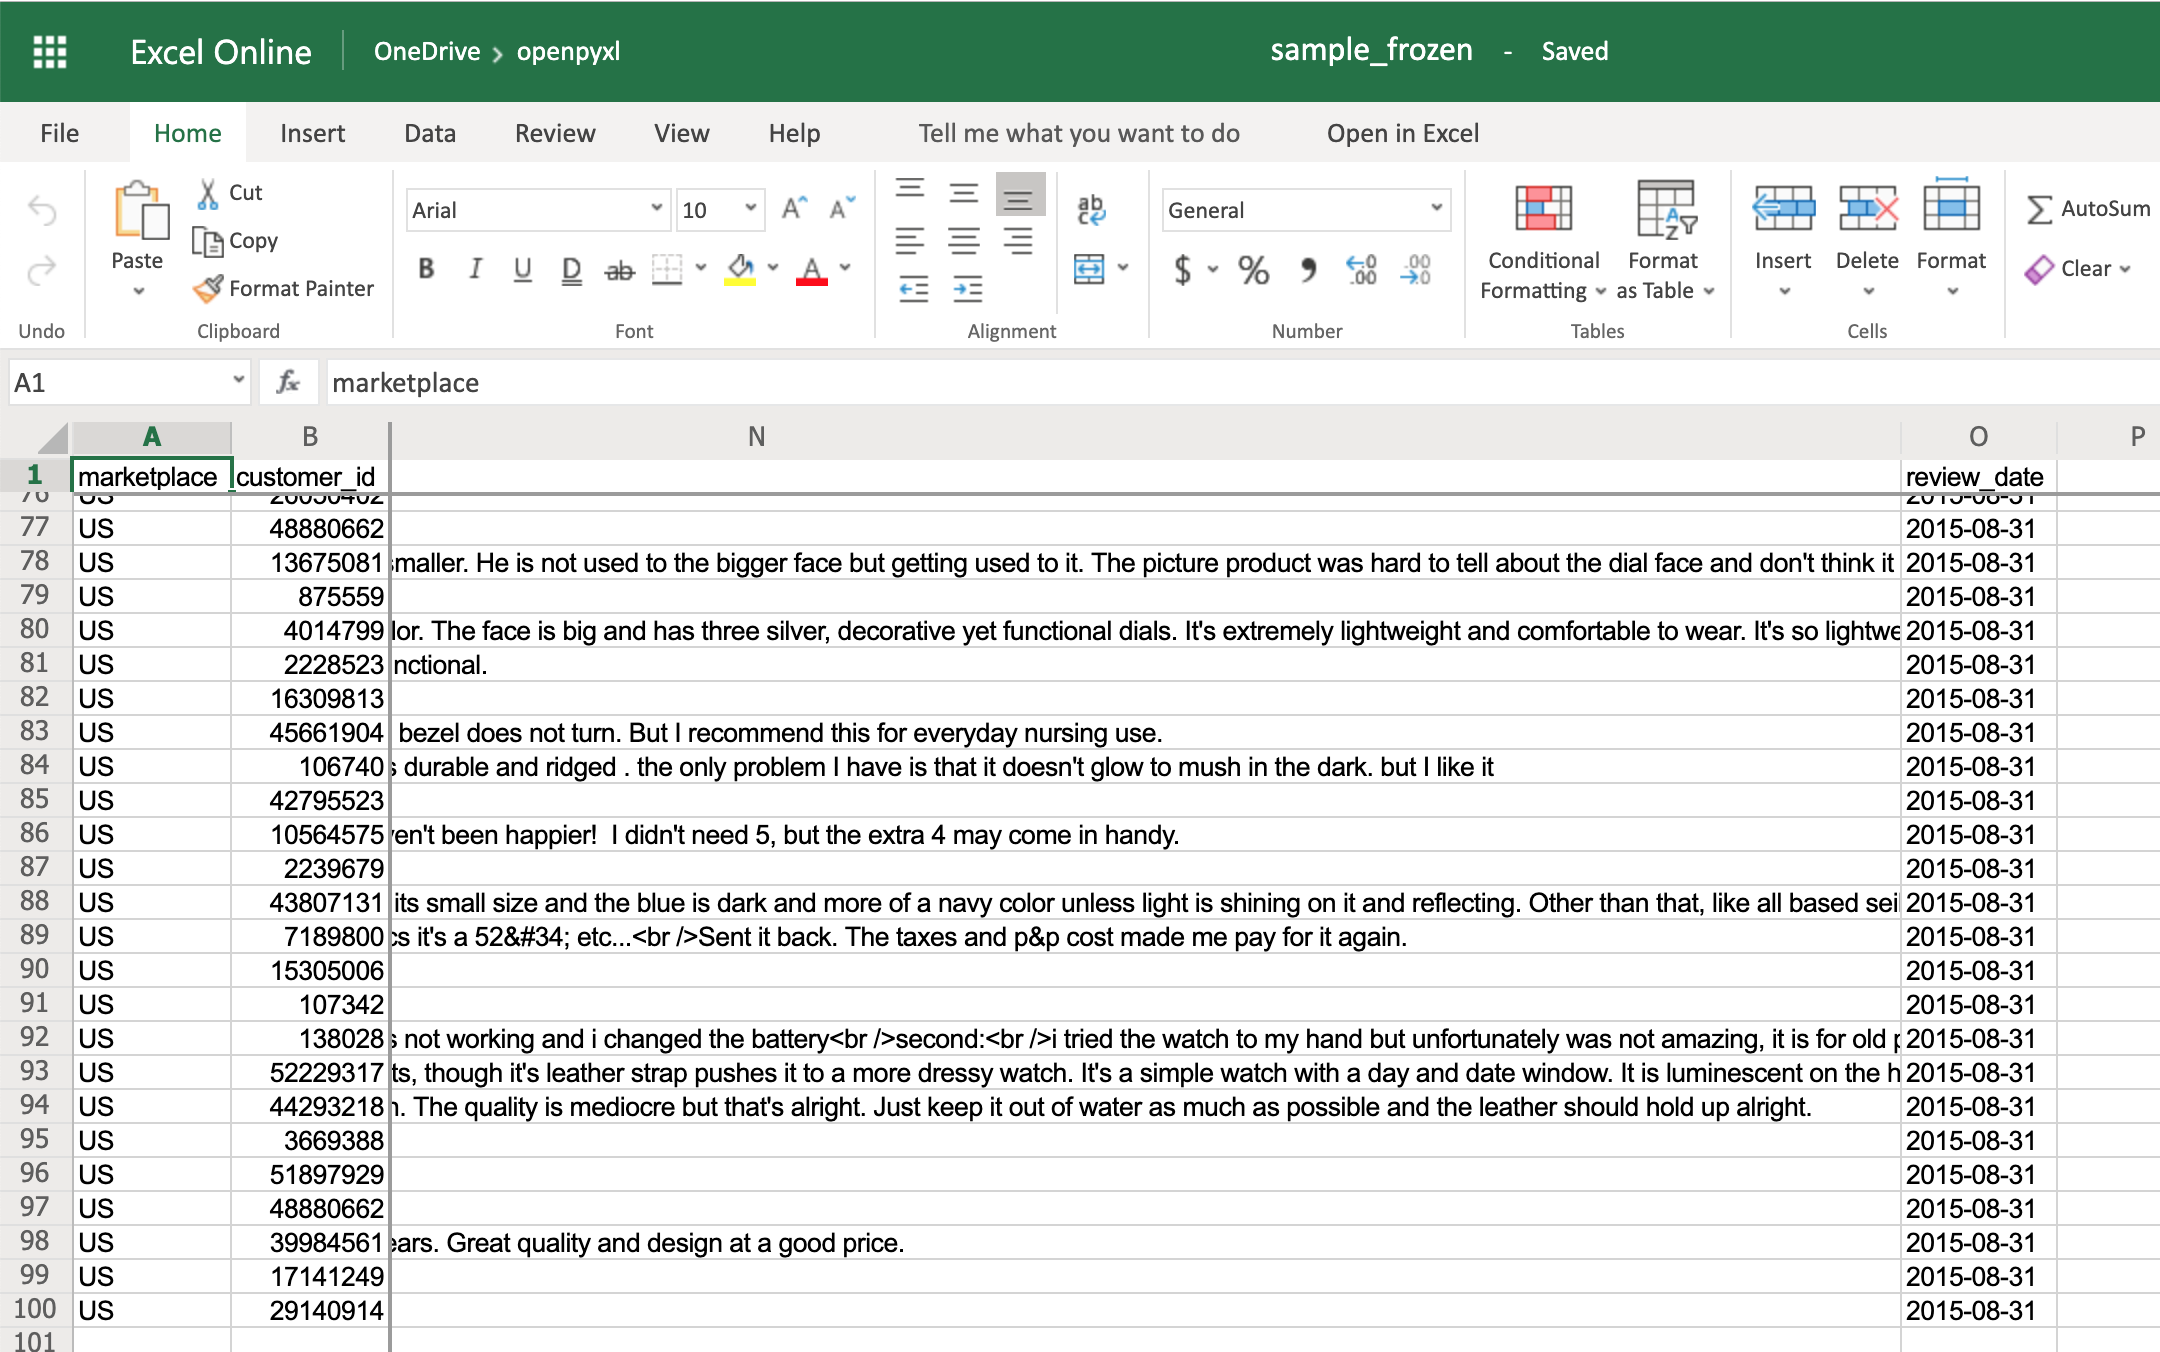
Notice how you’re at the end of the spreadsheet, and yet, you can see both row 1 and columns A and B.
Adding Filters
You can use openpyxl to add filters and sorts to your spreadsheet. However, when you open the spreadsheet, the data won’t be rearranged according to these sorts and filters.
At first, this might seem like a pretty useless feature, but when you’re programmatically creating a spreadsheet that is going to be sent and used by somebody else, it’s still nice to at least create the filters and allow people to use it afterward.
The code below is an example of how you would add some filters to our existing sample.xlsx spreadsheet:
>>>
>>> # Check the used spreadsheet space using the attribute "dimensions"
>>> sheet.dimensions
'A1:O100'

>>> sheet.auto_filter.ref = "A1:O100"
>>> workbook.save(filename="sample_with_filters.xlsx")
You should now see the filters created when opening the spreadsheet in your editor:
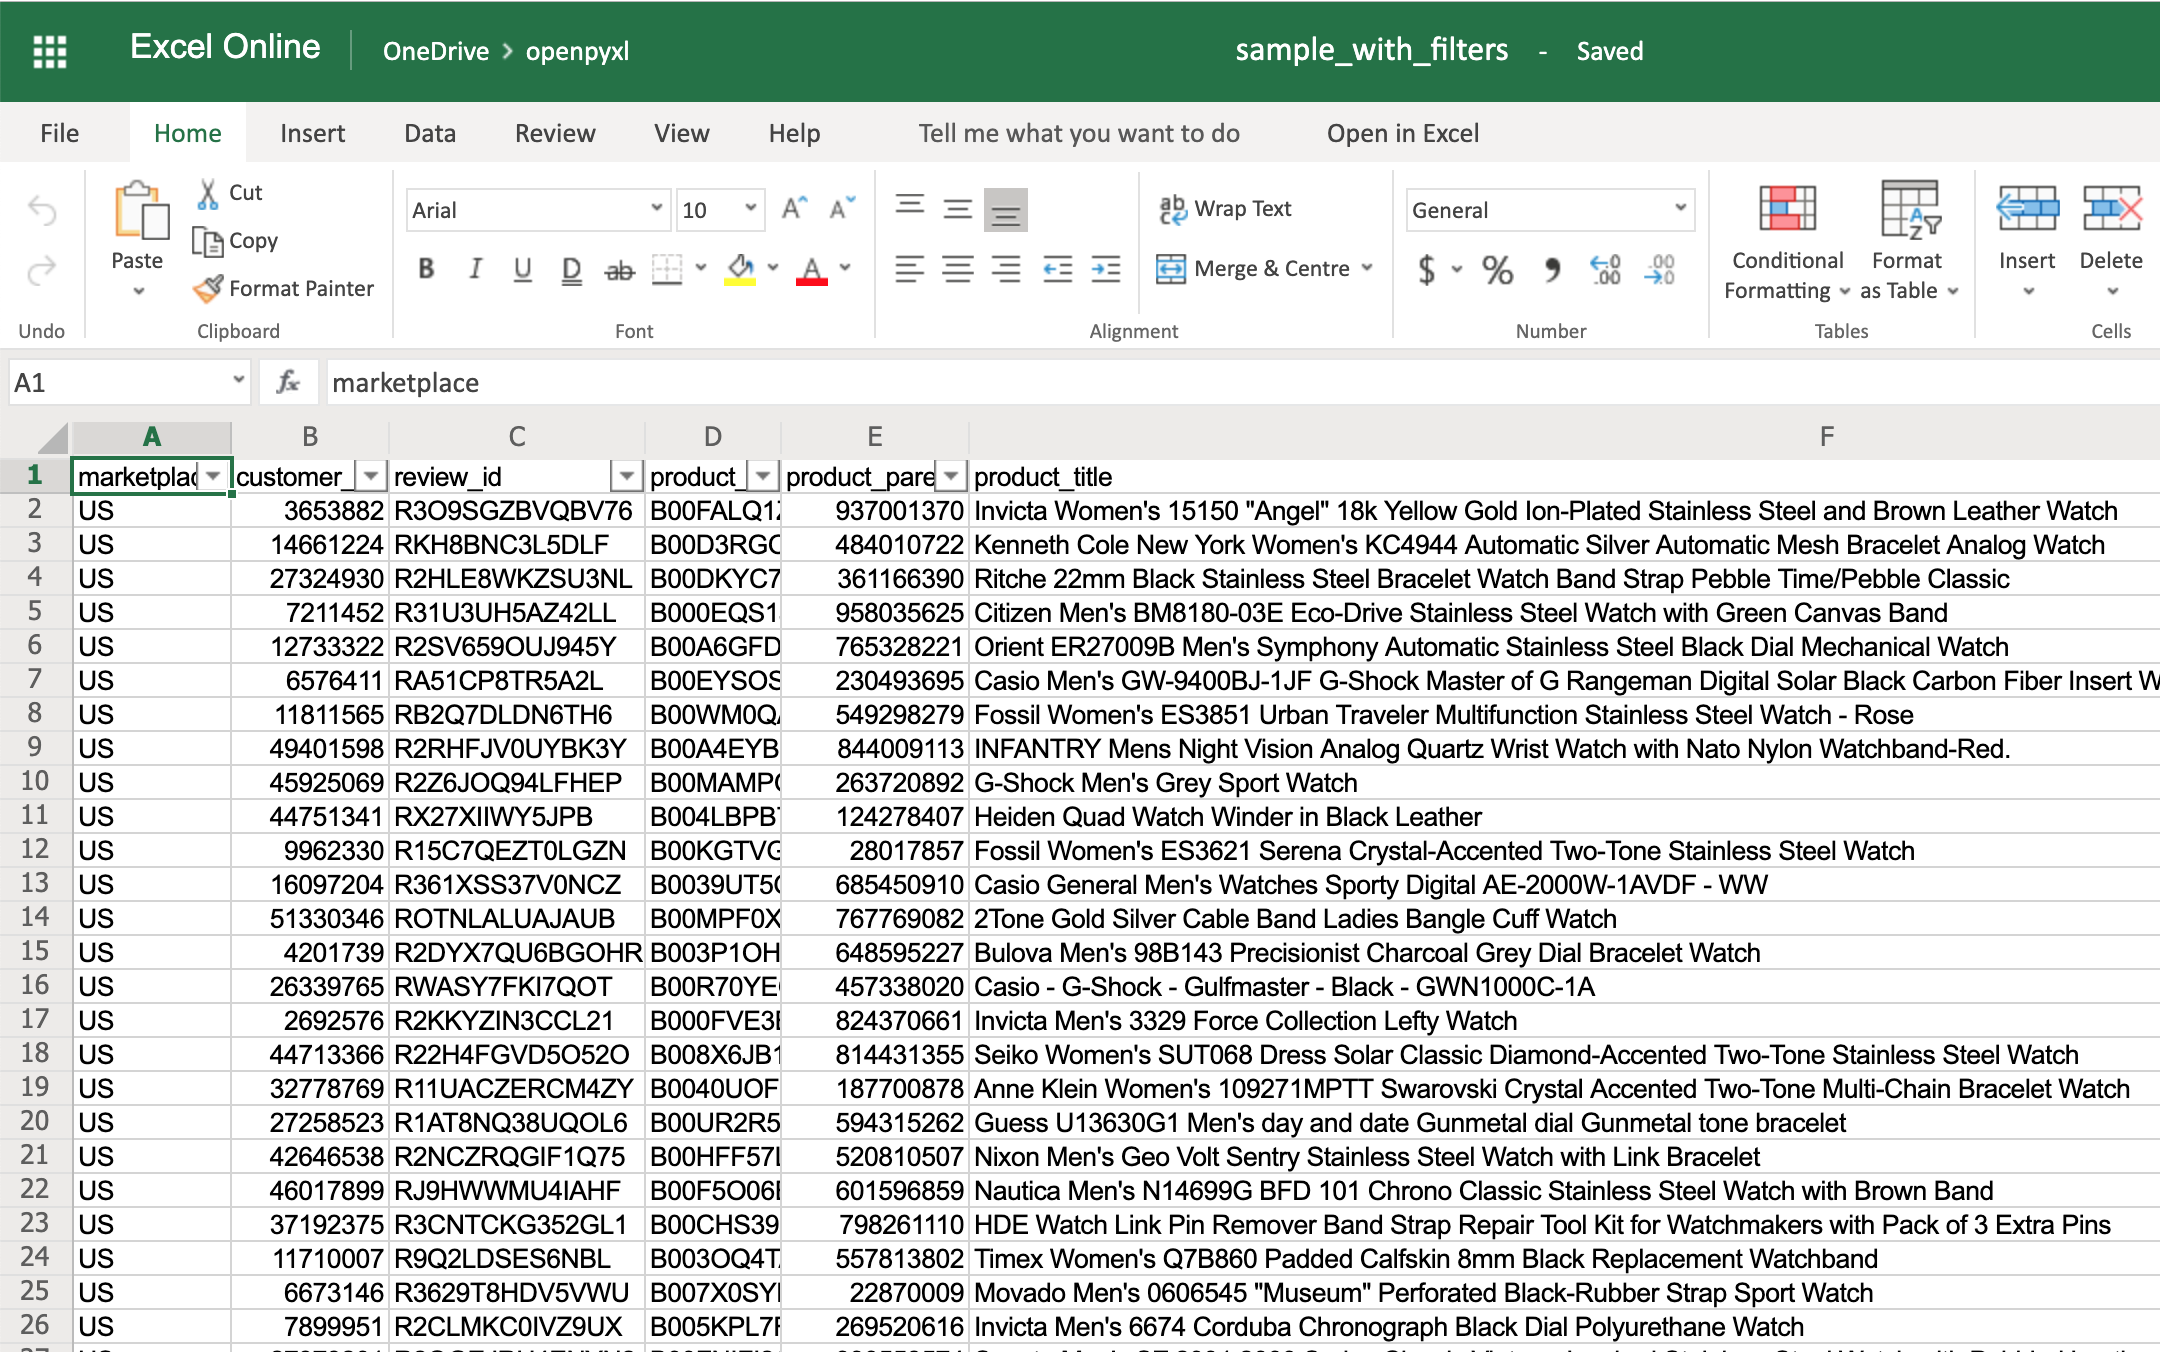
You don’t have to use sheet.dimensions if you know precisely which part of the spreadsheet you want to apply filters to.
Adding Formulas
Formulas (or formulae) are one of the most powerful features of spreadsheets.
They gives you the power to apply specific mathematical equations to a range of cells. Using formulas with openpyxl is as simple as editing the value of a cell.
You can see the list of formulas supported by openpyxl:
>>>
>>> from openpyxl.utils import FORMULAE
>>> FORMULAE
frozenset({'ABS',
           'ACCRINT',
           'ACCRINTM',
           'ACOS',
           'ACOSH',
           'AMORDEGRC',
           'AMORLINC',
           'AND',
           ...
           'YEARFRAC',
           'YIELD',
           'YIELDDISC',
           'YIELDMAT',
           'ZTEST'})
Let’s add some formulas to our sample.xlsx spreadsheet.
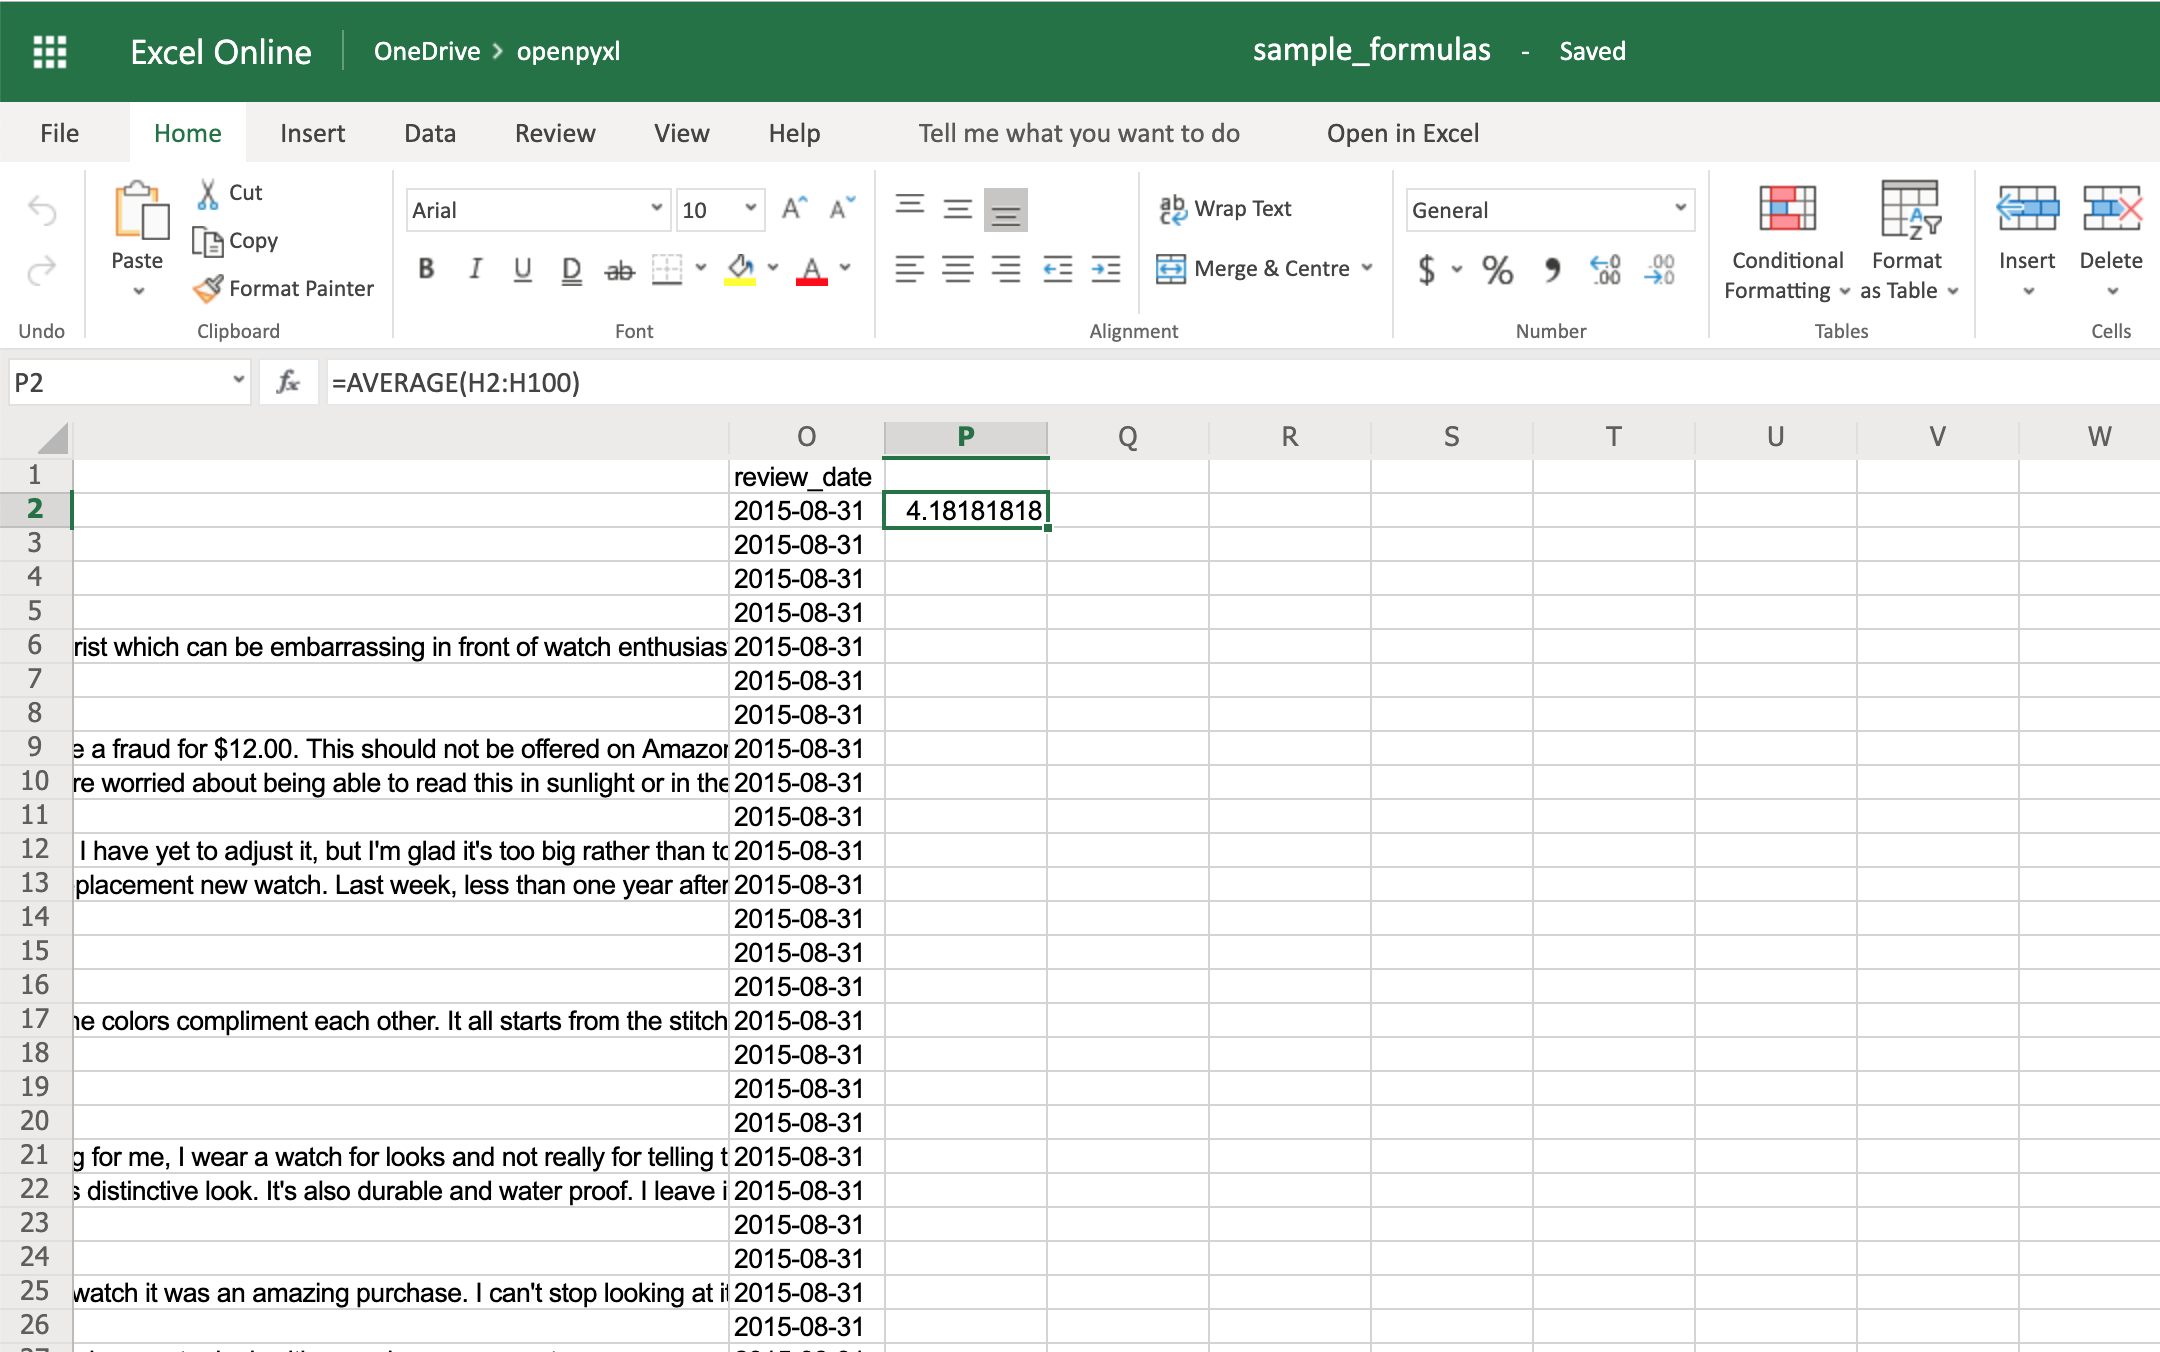
Starting with something easy, let’s check the average star rating for the 99 reviews within the spreadsheet:
>>>
>>> # Star rating is column "H"
>>> sheet["P2"] = "=AVERAGE(H2:H100)"
>>> workbook.save(filename="sample_formulas.xlsx")
If you open the spreadsheet now and go to cell P2, you should see that its value is: 4.18181818181818. Have a look in the editor:
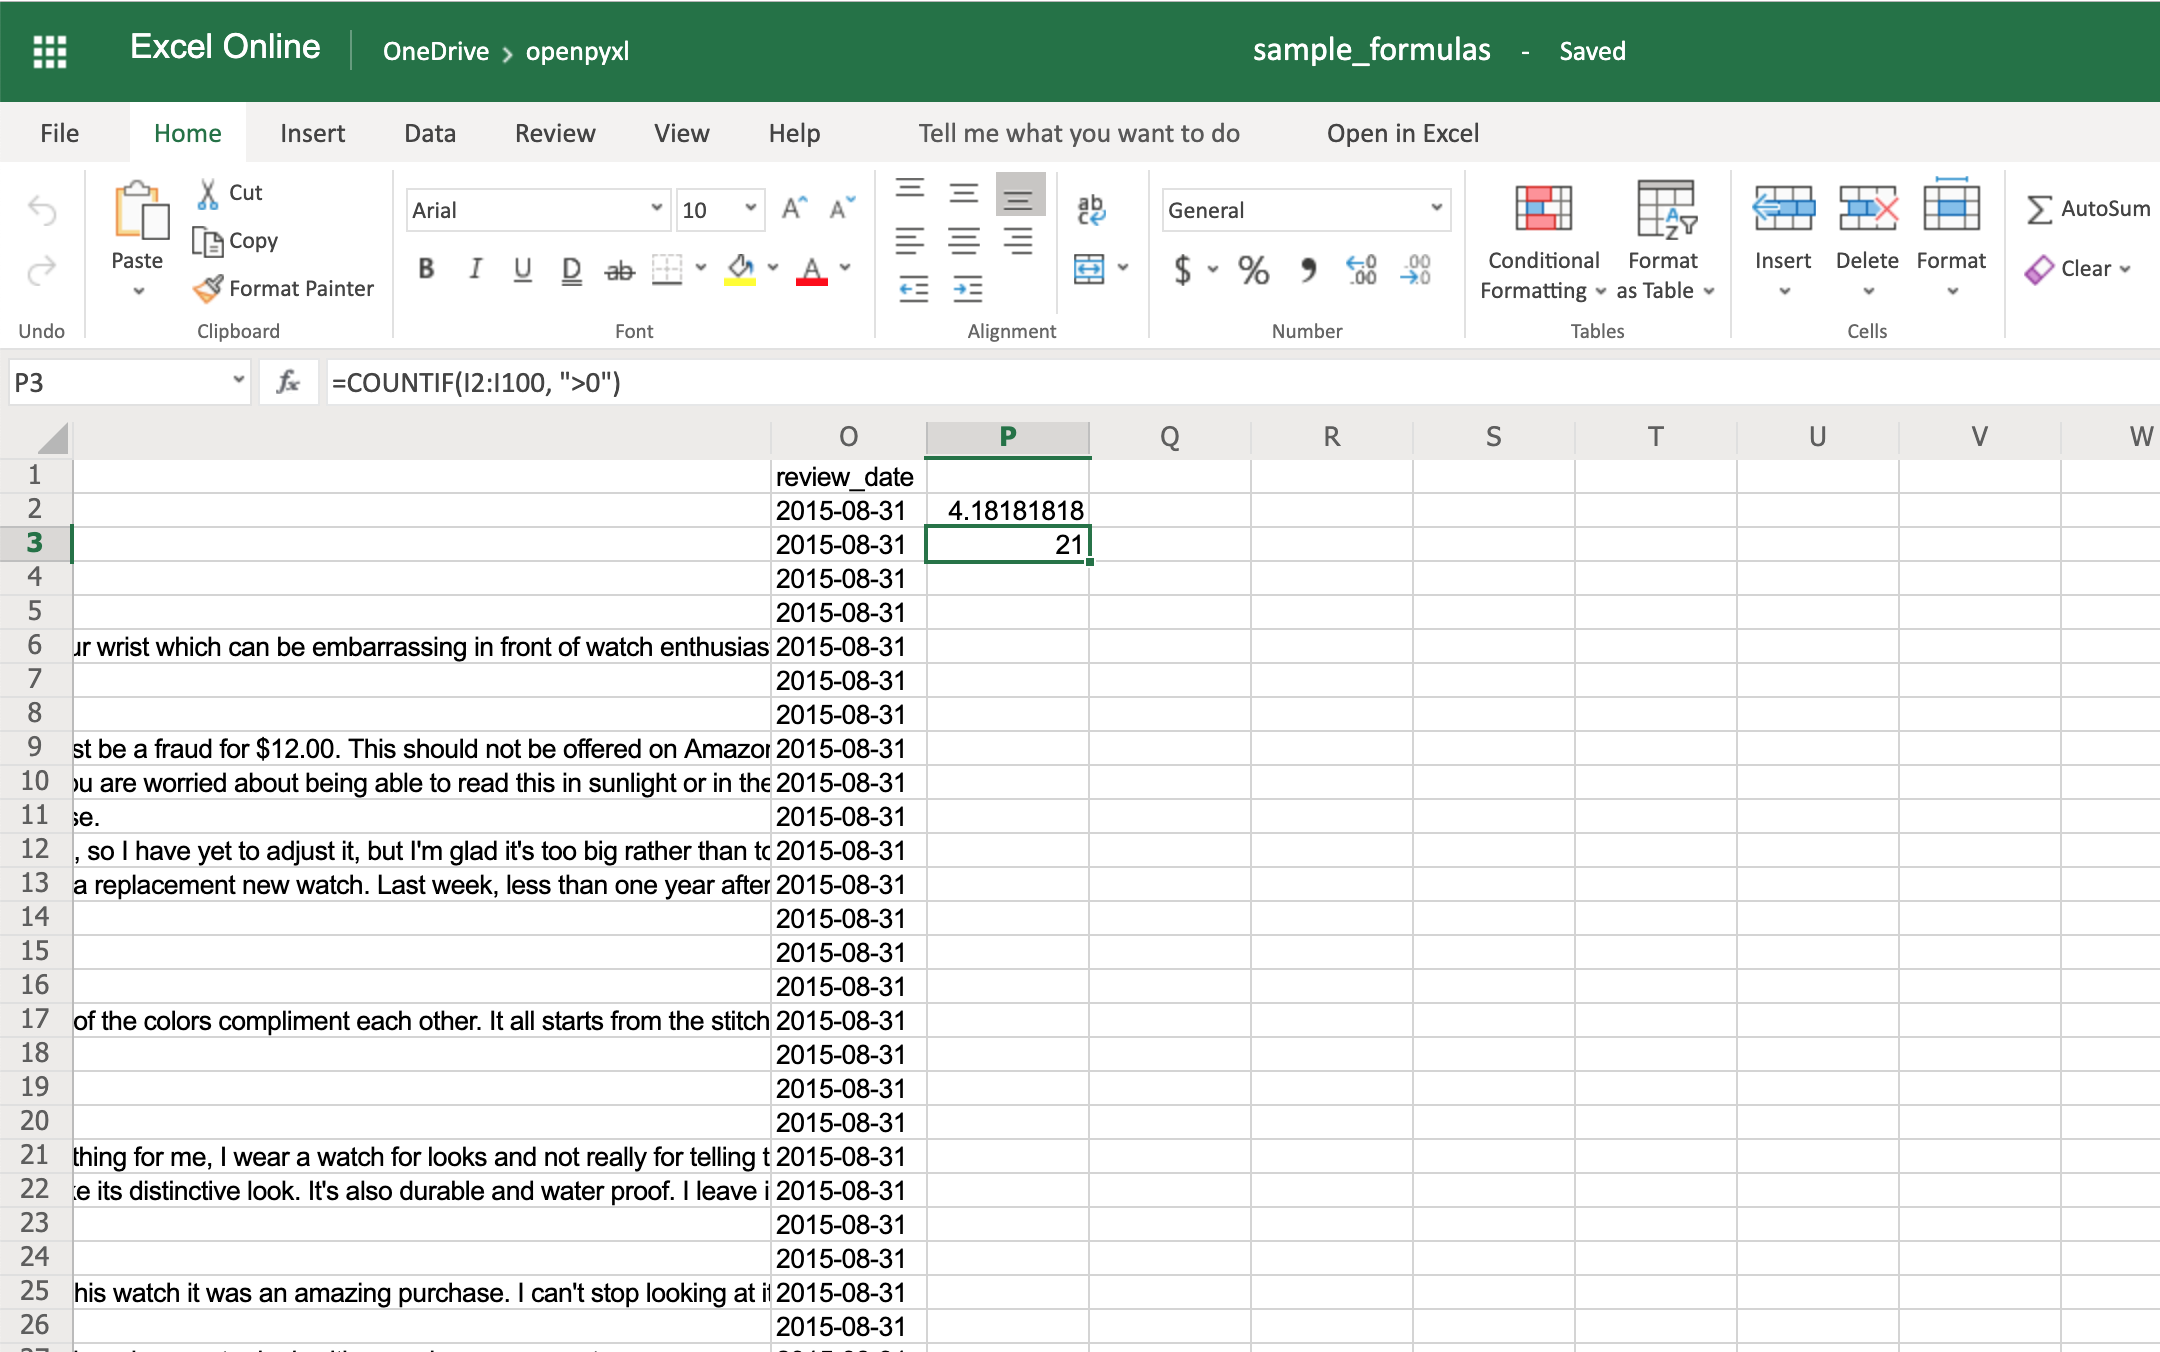
You can use the same methodology to add any formulas to your spreadsheet. For example, let’s count the number of reviews that had helpful votes:
>>>
>>> # The helpful votes are counted on column "I"
>>> sheet["P3"] = '=COUNTIF(I2:I100, ">0")'
>>> workbook.save(filename="sample_formulas.xlsx")
You should get the number 21 on your P3 spreadsheet cell like so:
You’ll have to make sure that the strings within a formula are always in double quotes, so you either have to use single quotes around the formula like in the example above or you’ll have to escape the double quotes inside the formula: "=COUNTIF(I2:I100, ">0")".
There are a ton of other formulas you can add to your spreadsheet using the same procedure you tried above. Give it a go yourself!
Adding Styles
Even though styling a spreadsheet might not be something you would do every day, it’s still good to know how to do it.
Using openpyxl, you can apply multiple styling options to your spreadsheet, including fonts, borders, colors, and so on. Have a look at the openpyxl documentation to learn more.
You can also choose to either apply a style directly to a cell or create a template and reuse it to apply styles to multiple cells.
Let’s start by having a look at simple cell styling, using our sample.xlsx again as the base spreadsheet:
>>>
>>> # Import necessary style classes
>>> from openpyxl.styles import Font, Color, Alignment, Border, Side
>>> # Create a few styles
>>> bold_font = Font(bold=True)
>>> big_red_text = Font(color="00FF0000", size=20)
>>> center_aligned_text = Alignment(horizontal="center")
>>> double_border_side = Side(border_style="double")
>>> square_border = Border(top=double_border_side,
... right=double_border_side,
... bottom=double_border_side,
... left=double_border_side)
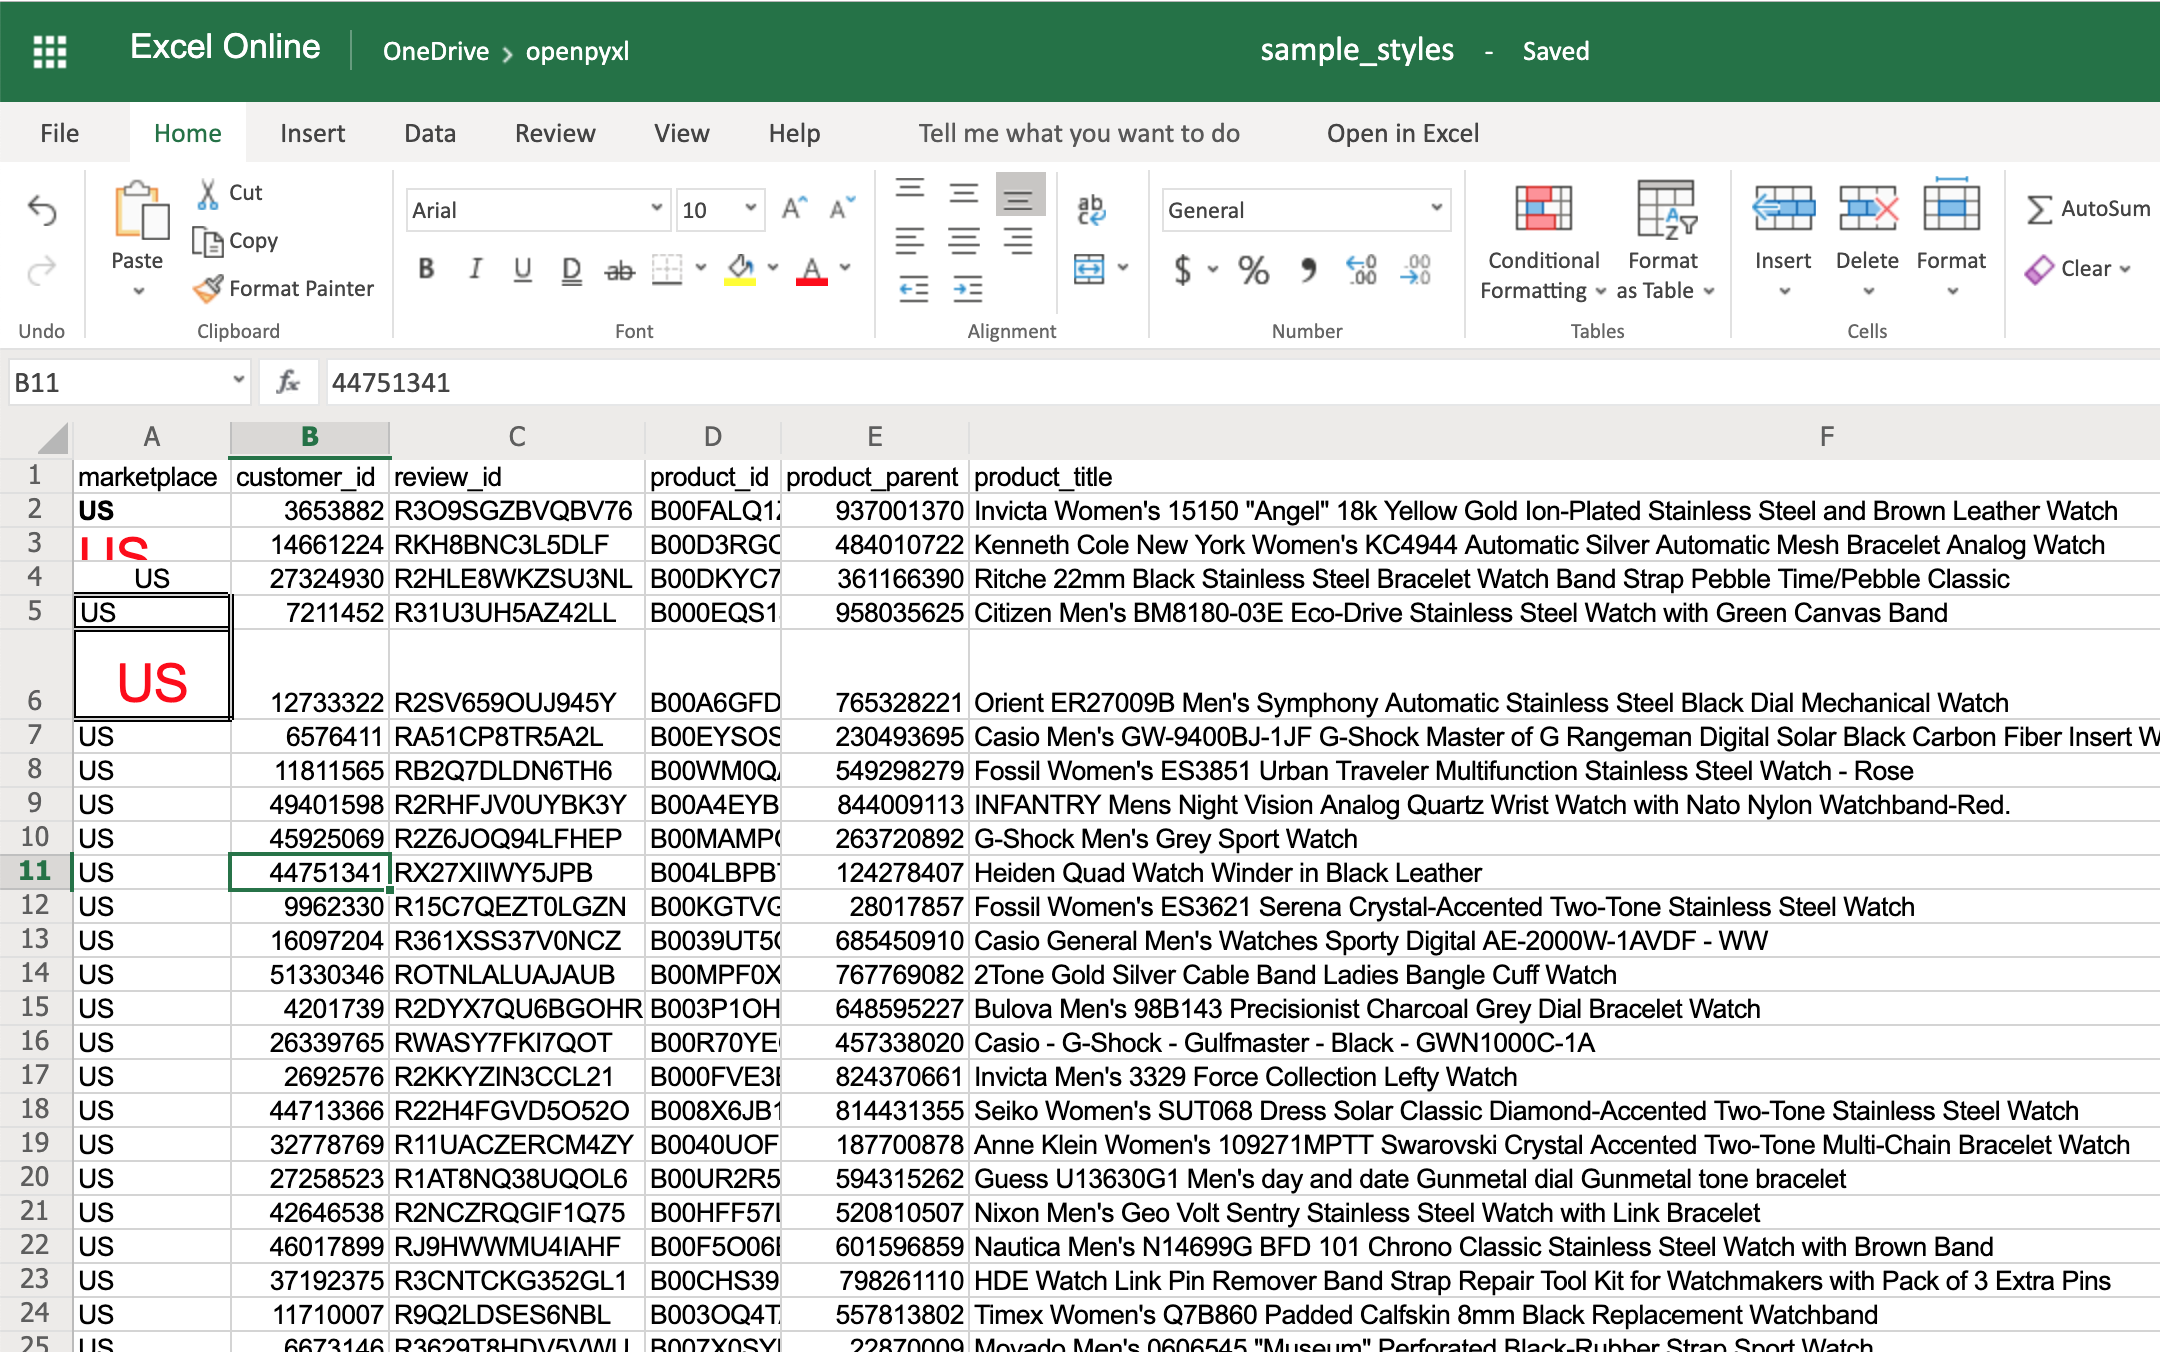
>>> # Style some cells!
>>> sheet["A2"].font = bold_font
>>> sheet["A3"].font = big_red_text
>>> sheet["A4"].alignment = center_aligned_text
>>> sheet["A5"].border = square_border
>>> workbook.save(filename="sample_styles.xlsx")
If you open your spreadsheet now, you should see quite a few different styles on the first 5 cells of column A:
There you go. You got:
- A2 with the text in bold
- A3 with the text in red and bigger font size
- A4 with the text centered
- A5 with a square border around the text
You can also combine styles by simply adding them to the cell at the same time:
>>>
>>> # Reusing the same styles from the example above
>>> sheet["A6"].alignment = center_aligned_text
>>> sheet["A6"].font = big_red_text
>>> sheet["A6"].border = square_border
>>> workbook.save(filename="sample_styles.xlsx")
Have a look at cell A6 here:
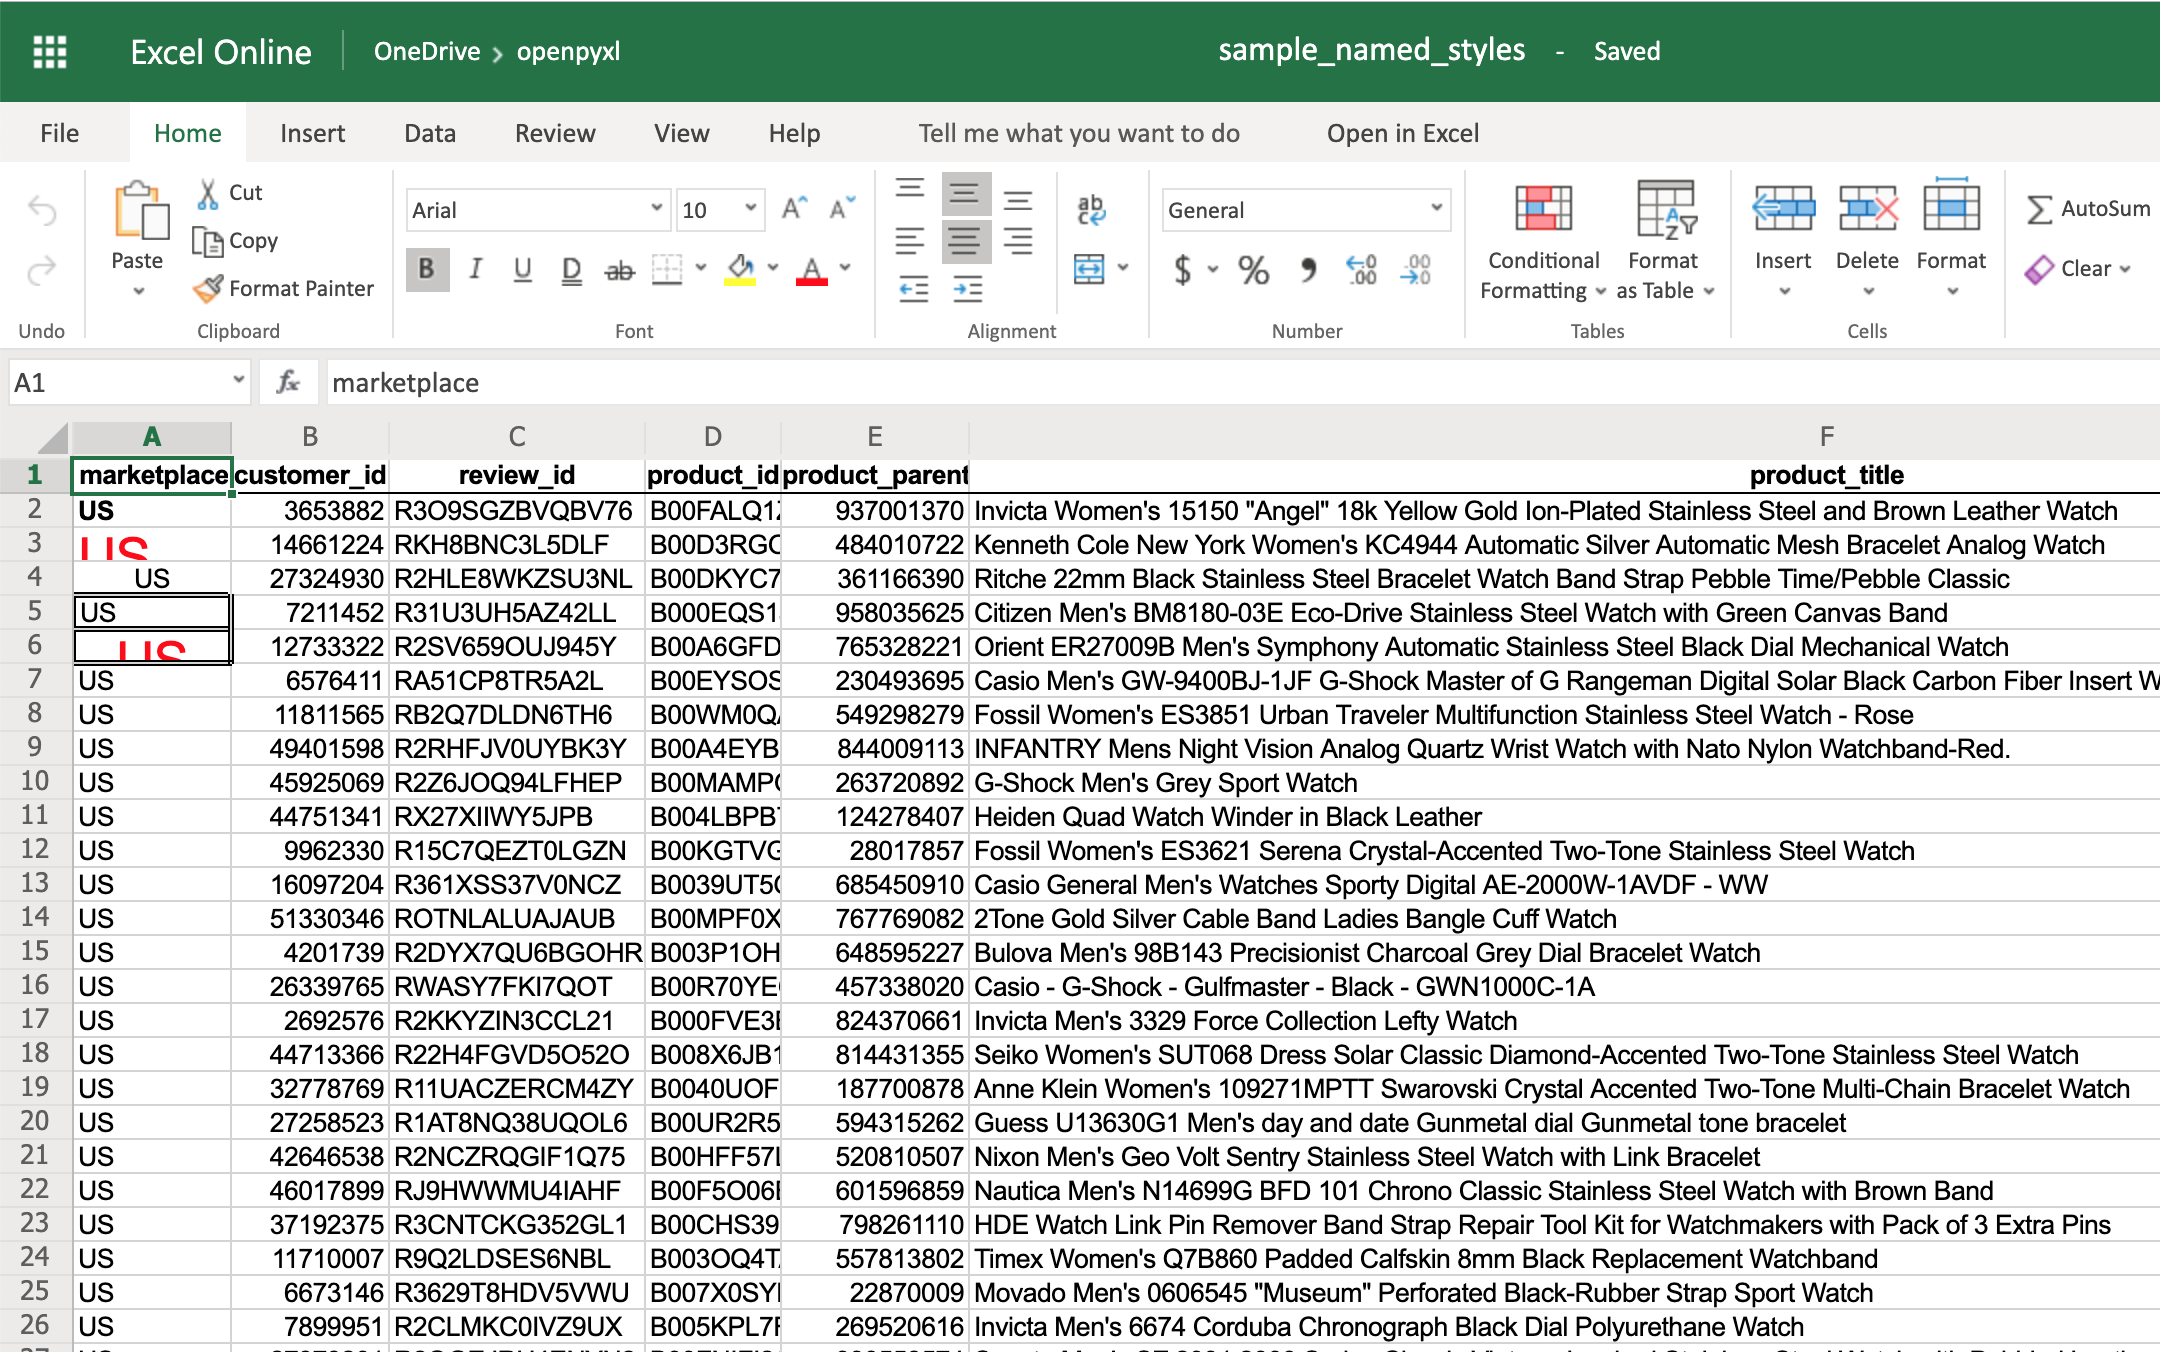
When you want to apply multiple styles to one or several cells, you can use a NamedStyle class instead, which is like a style template that you can use over and over again. Have a look at the example below:
>>>
>>> from openpyxl.styles import NamedStyle

>>> # Let's create a style template for the header row
>>> header = NamedStyle(name="header")
>>> header.font = Font(bold=True)
>>> header.border = Border(bottom=Side(border_style="thin"))
>>> header.alignment = Alignment(horizontal="center", vertical="center")

>>> # Now let's apply this to all first row (header) cells
>>> header_row = sheet[1]
>>> for cell in header_row:
...     cell.style = header

>>> workbook.save(filename="sample_styles.xlsx")
If you open the spreadsheet now, you should see that its first row is bold, the text is aligned to the center, and there’s a small bottom border! Have a look below:
As you saw above, there are many options when it comes to styling, and it depends on the use case, so feel free to check openpyxl documentation and see what other things you can do.
Conditional Formatting
This feature is one of my personal favorites when it comes to adding styles to a spreadsheet.
It’s a much more powerful approach to styling because it dynamically applies styles according to how the data in the spreadsheet changes.
In a nutshell, conditional formatting allows you to specify a list of styles to apply to a cell (or cell range) according to specific conditions.
For example, a widespread use case is to have a balance sheet where all the negative totals are in red, and the positive ones are in green. This formatting makes it much more efficient to spot good vs bad periods.
Without further ado, let’s pick our favorite spreadsheet—sample.xlsx—and add some conditional formatting.
You can start by adding a simple one that adds a red background to all reviews with less than 3 stars:
>>>
>>> from openpyxl.styles import PatternFill
>>> from openpyxl.styles.differential import DifferentialStyle
>>> from openpyxl.formatting.rule import Rule

>>> red_background = PatternFill(fgColor="00FF0000")
>>> diff_style = DifferentialStyle(fill=red_background)
>>> rule = Rule(type="expression", dxf=diff_style)
>>> rule.formula = ["$H1<3"]
>>> sheet.conditional_formatting.add("A1:O100", rule)
>>> workbook.save("sample_conditional_formatting.xlsx")
Now you’ll see all the reviews with a star rating below 3 marked with a red background:
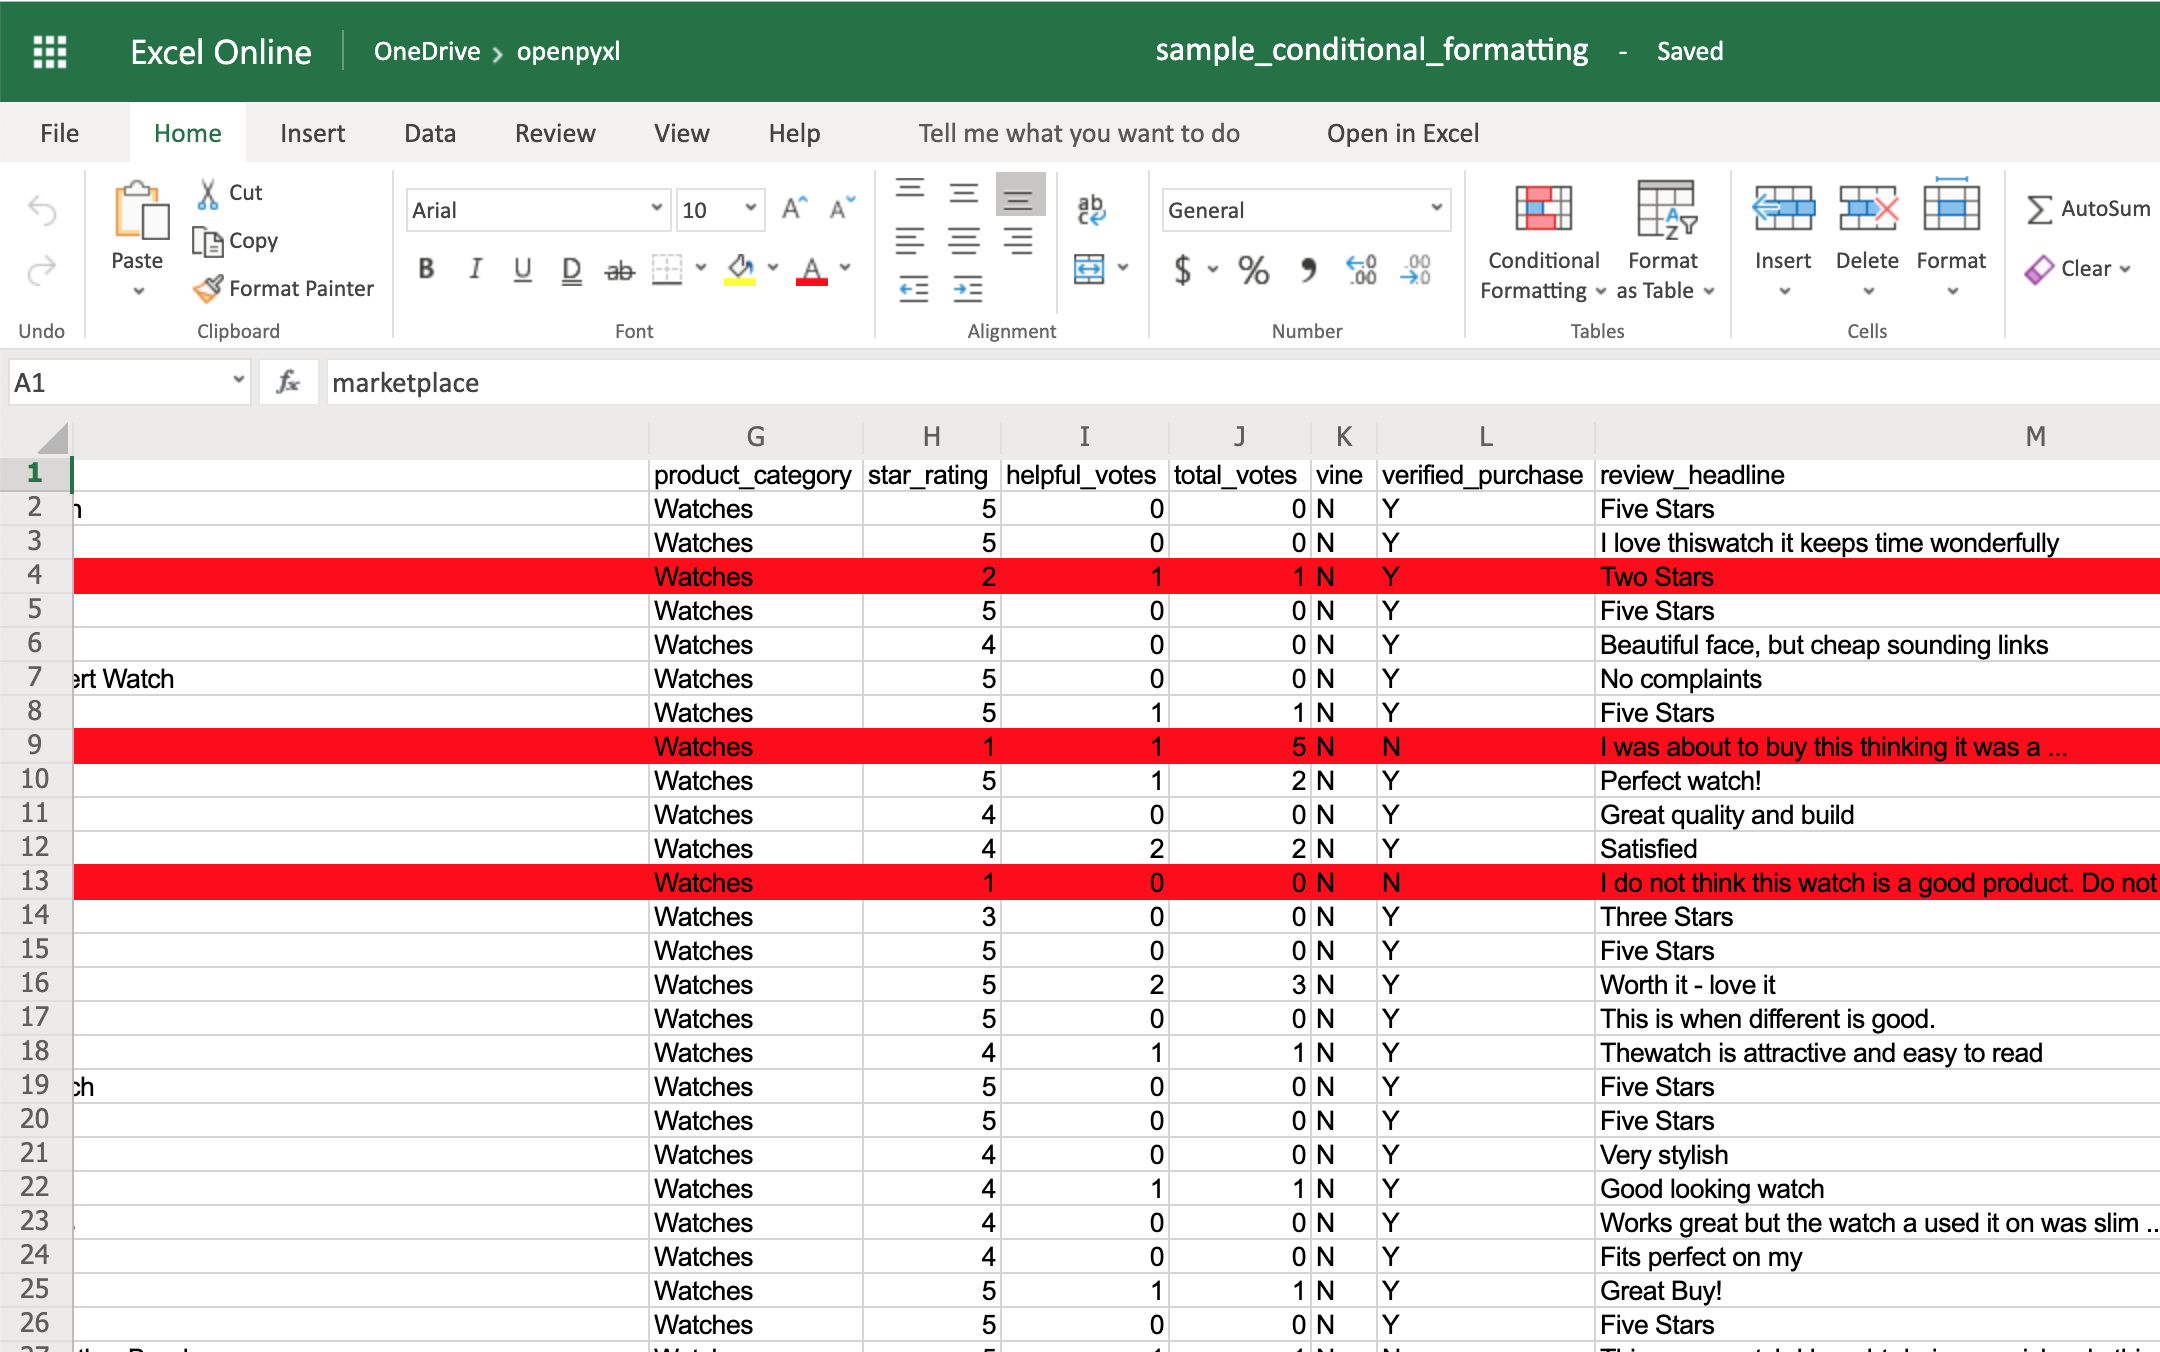
Code-wise, the only things that are new here are the objects DifferentialStyle and Rule:
DifferentialStyleis quite similar toNamedStyle, which you already saw above, and it’s used to aggregate multiple styles such as fonts, borders, alignment, and so forth.Ruleis responsible for selecting the cells and applying the styles if the cells match the rule’s logic.
Using a Rule object, you can create numerous conditional formatting scenarios.
However, for simplicity sake, the openpyxl package offers 3 built-in formats that make it easier to create a few common conditional formatting patterns. These built-ins are:
ColorScaleIconSetDataBar
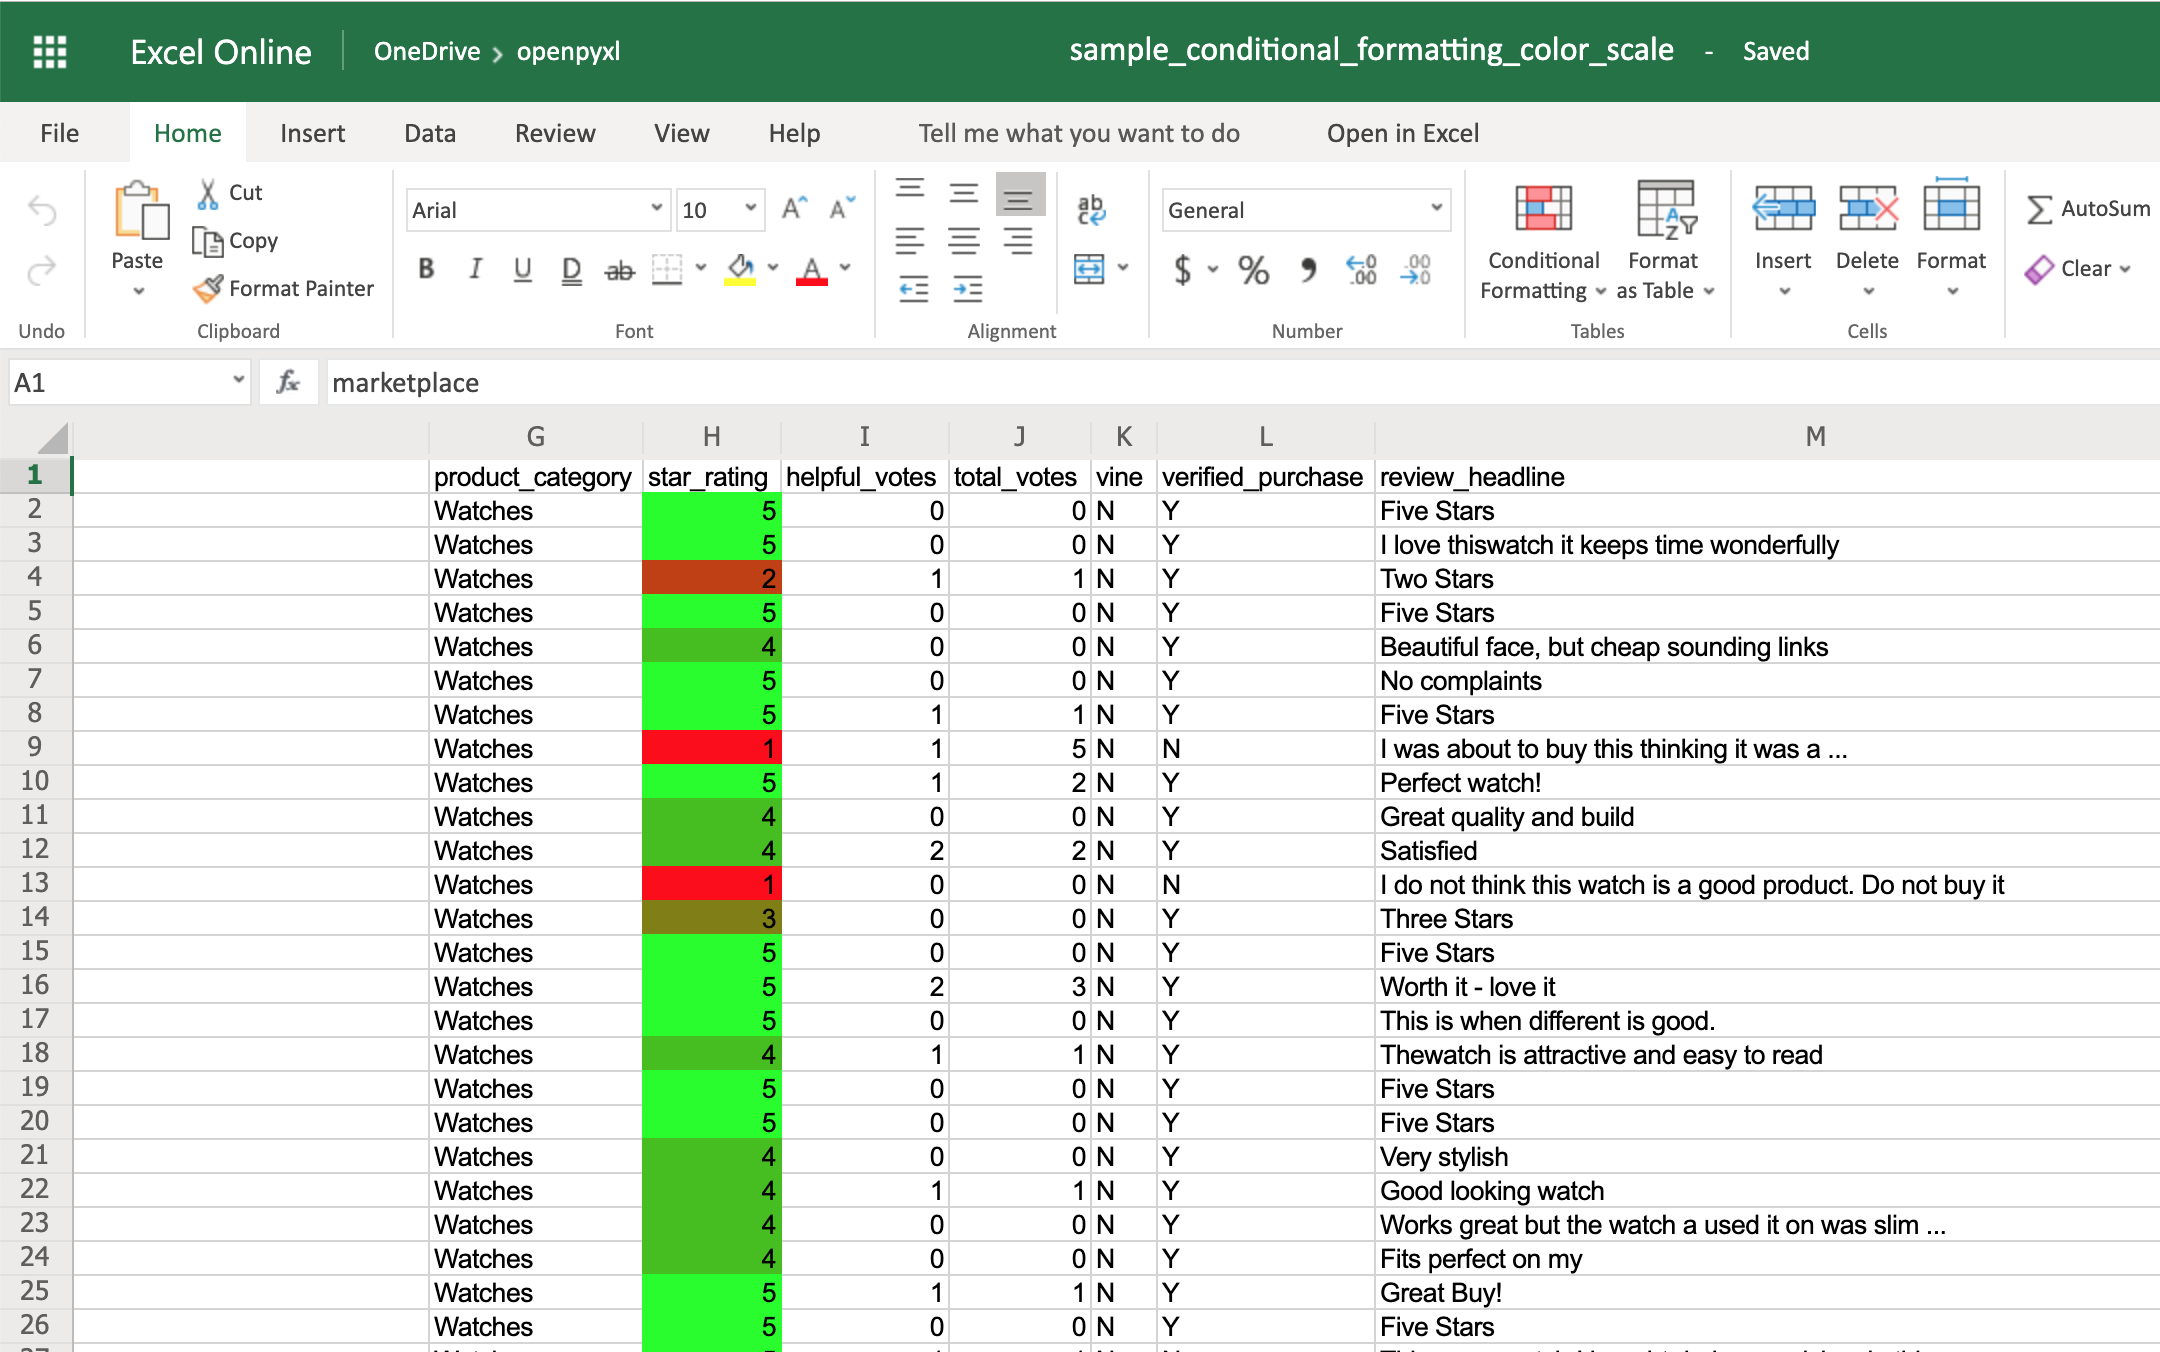
The ColorScale gives you the ability to create color gradients:
>>>
>>> from openpyxl.formatting.rule import ColorScaleRule
>>> color_scale_rule = ColorScaleRule(start_type="min",
...                                   start_color="00FF0000",  # Red
...                                   end_type="max",
...                                   end_color="0000FF00")  # Green

>>> # Again, let's add this gradient to the star ratings, column "H"
>>> sheet.conditional_formatting.add("H2:H100", color_scale_rule)
>>> workbook.save(filename="sample_conditional_formatting_color_scale.xlsx")
Now you should see a color gradient on column H, from red to green, according to the star rating:
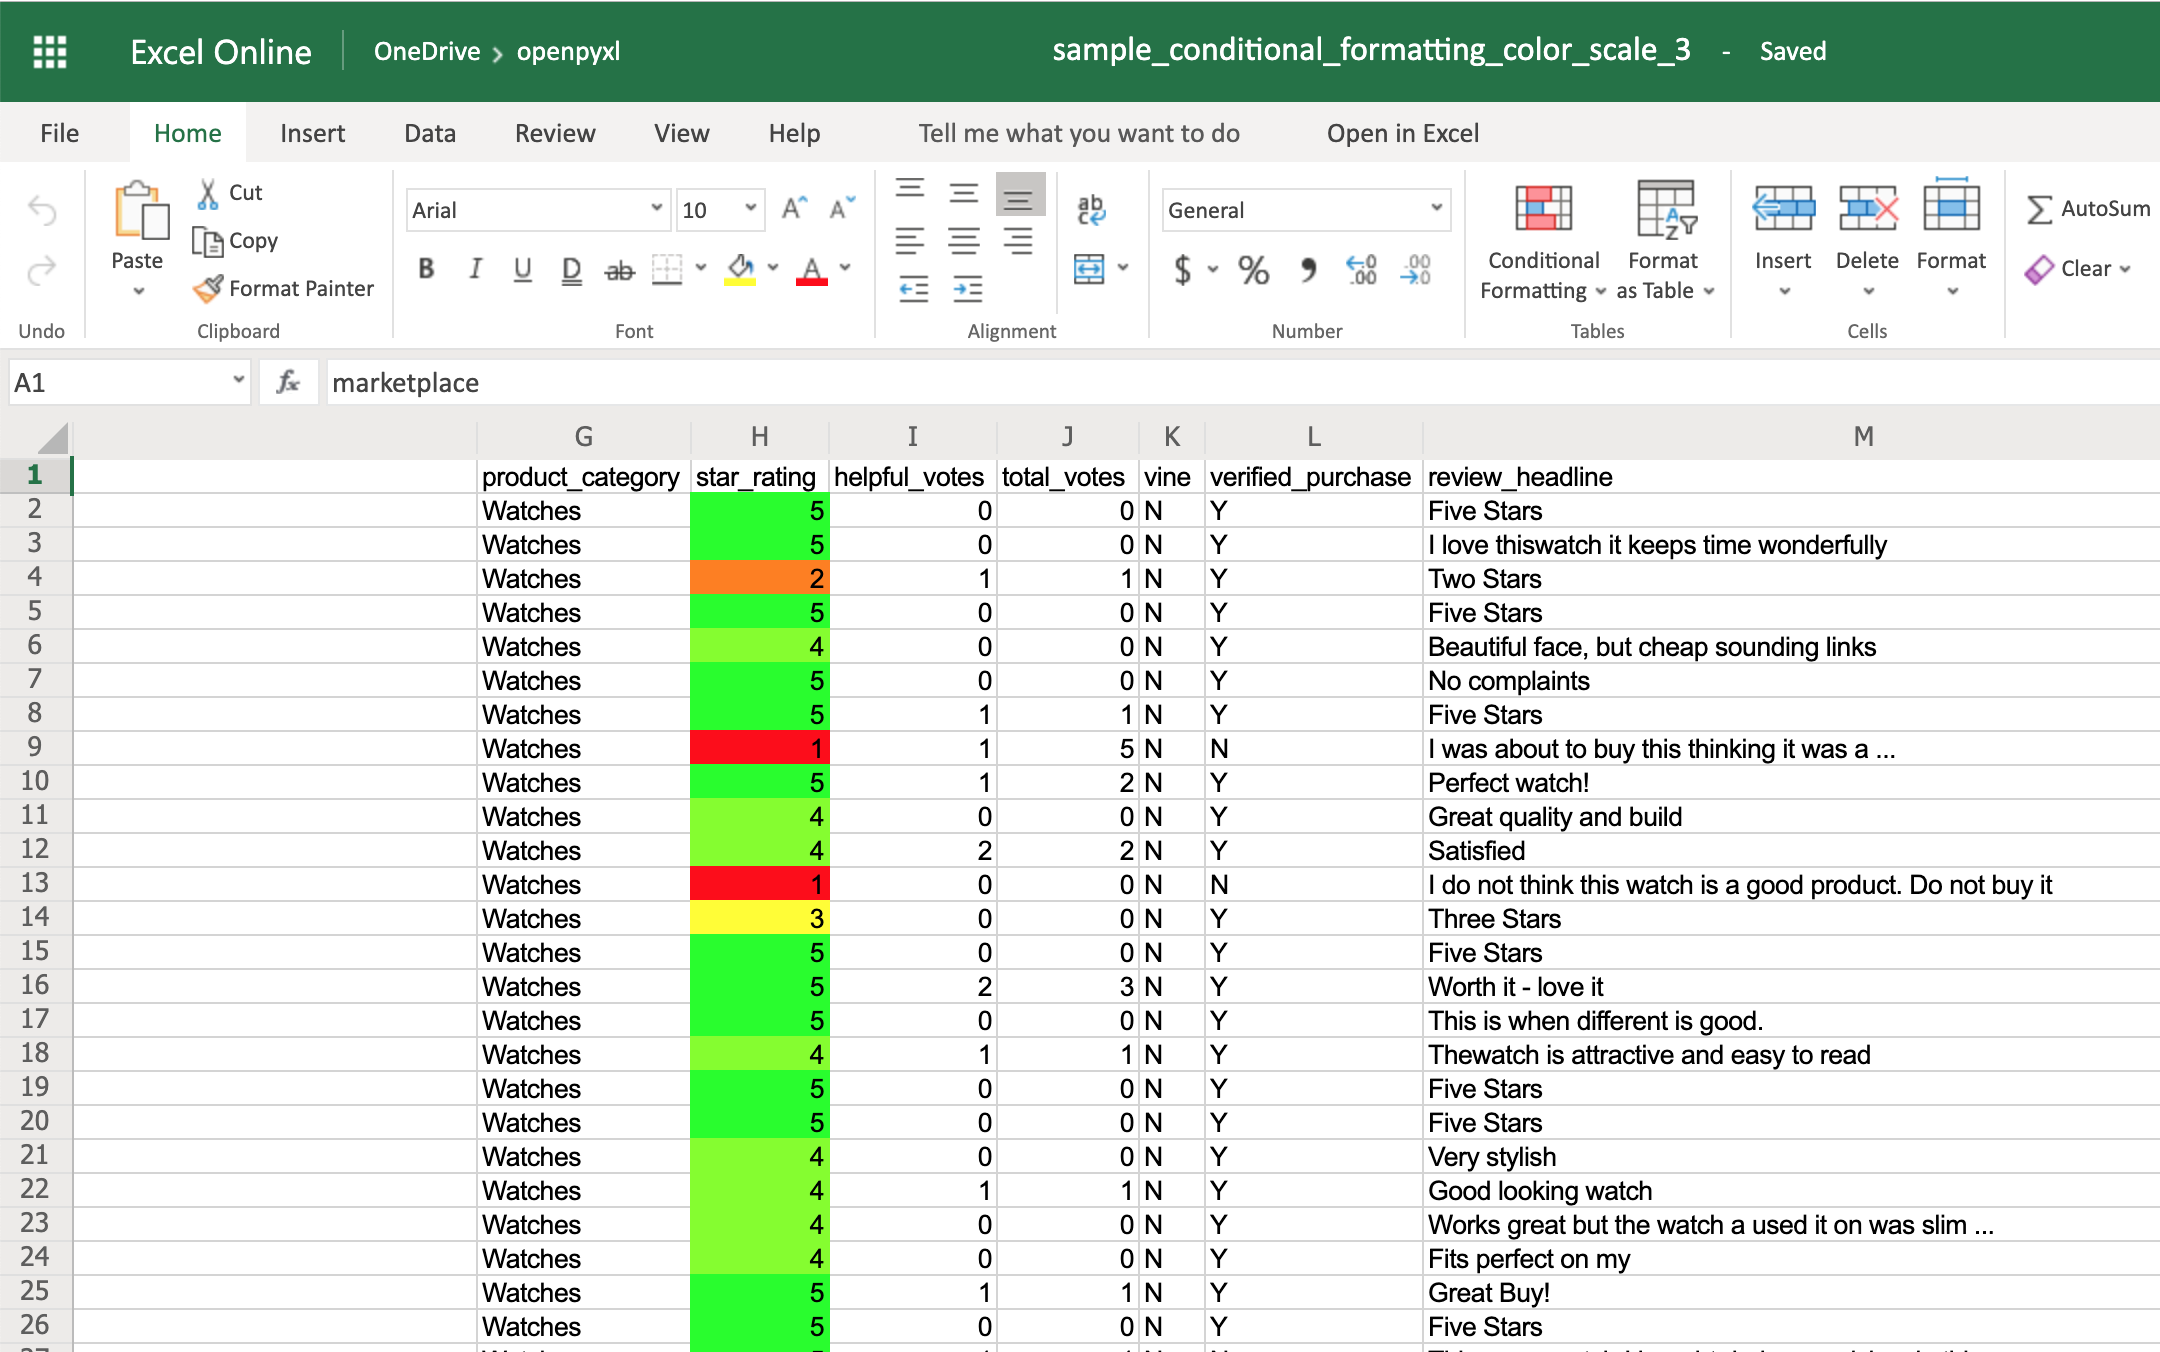
You can also add a third color and make two gradients instead:
>>>
>>> from openpyxl.formatting.rule import ColorScaleRule
>>> color_scale_rule = ColorScaleRule(start_type="num",
...                                   start_value=1,
...                                   start_color="00FF0000",  # Red
...                                   mid_type="num",
...                                   mid_value=3,
...                                   mid_color="00FFFF00",  # Yellow
...                                   end_type="num",
...                                   end_value=5,
...                                   end_color="0000FF00")  # Green

>>> # Again, let's add this gradient to the star ratings, column "H"
>>> sheet.conditional_formatting.add("H2:H100", color_scale_rule)
>>> workbook.save(filename="sample_conditional_formatting_color_scale_3.xlsx")
This time, you’ll notice that star ratings between 1 and 3 have a gradient from red to yellow, and star ratings between 3 and 5 have a gradient from yellow to green:
The IconSet allows you to add an icon to the cell according to its value:
>>>
>>> from openpyxl.formatting.rule import IconSetRule

>>> icon_set_rule = IconSetRule("5Arrows", "num", [1, 2, 3, 4, 5])
>>> sheet.conditional_formatting.add("H2:H100", icon_set_rule)
>>> workbook.save("sample_conditional_formatting_icon_set.xlsx")
You’ll see a colored arrow next to the star rating. This arrow is red and points down when the value of the cell is 1 and, as the rating gets better, the arrow starts pointing up and becomes green:
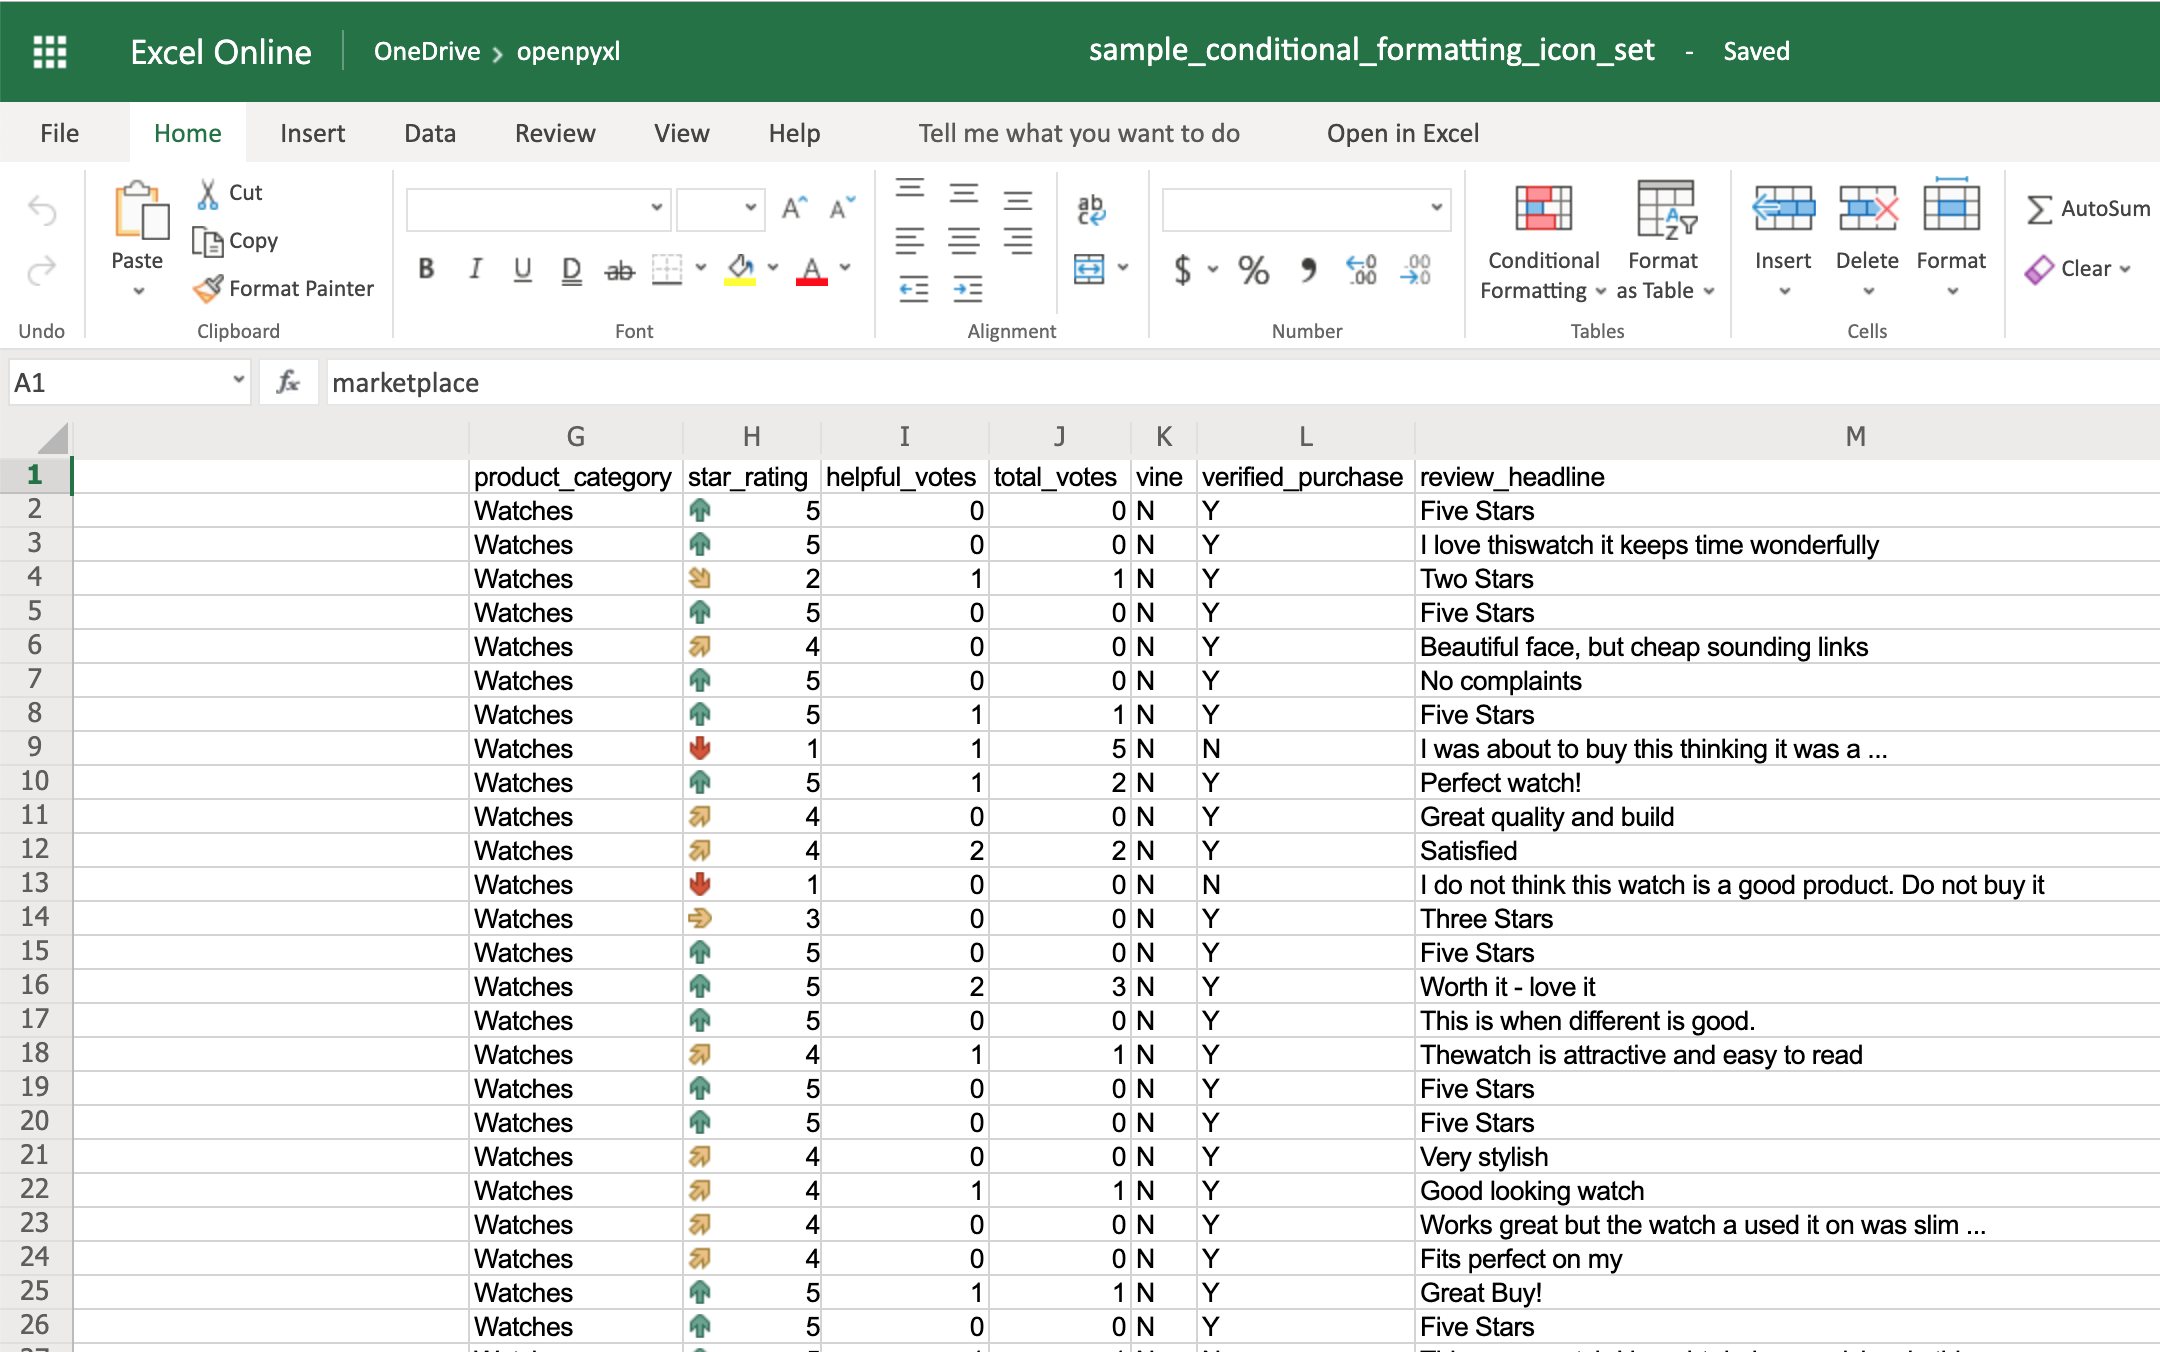
The openpyxl package has a full list of other icons you can use, besides the arrow.
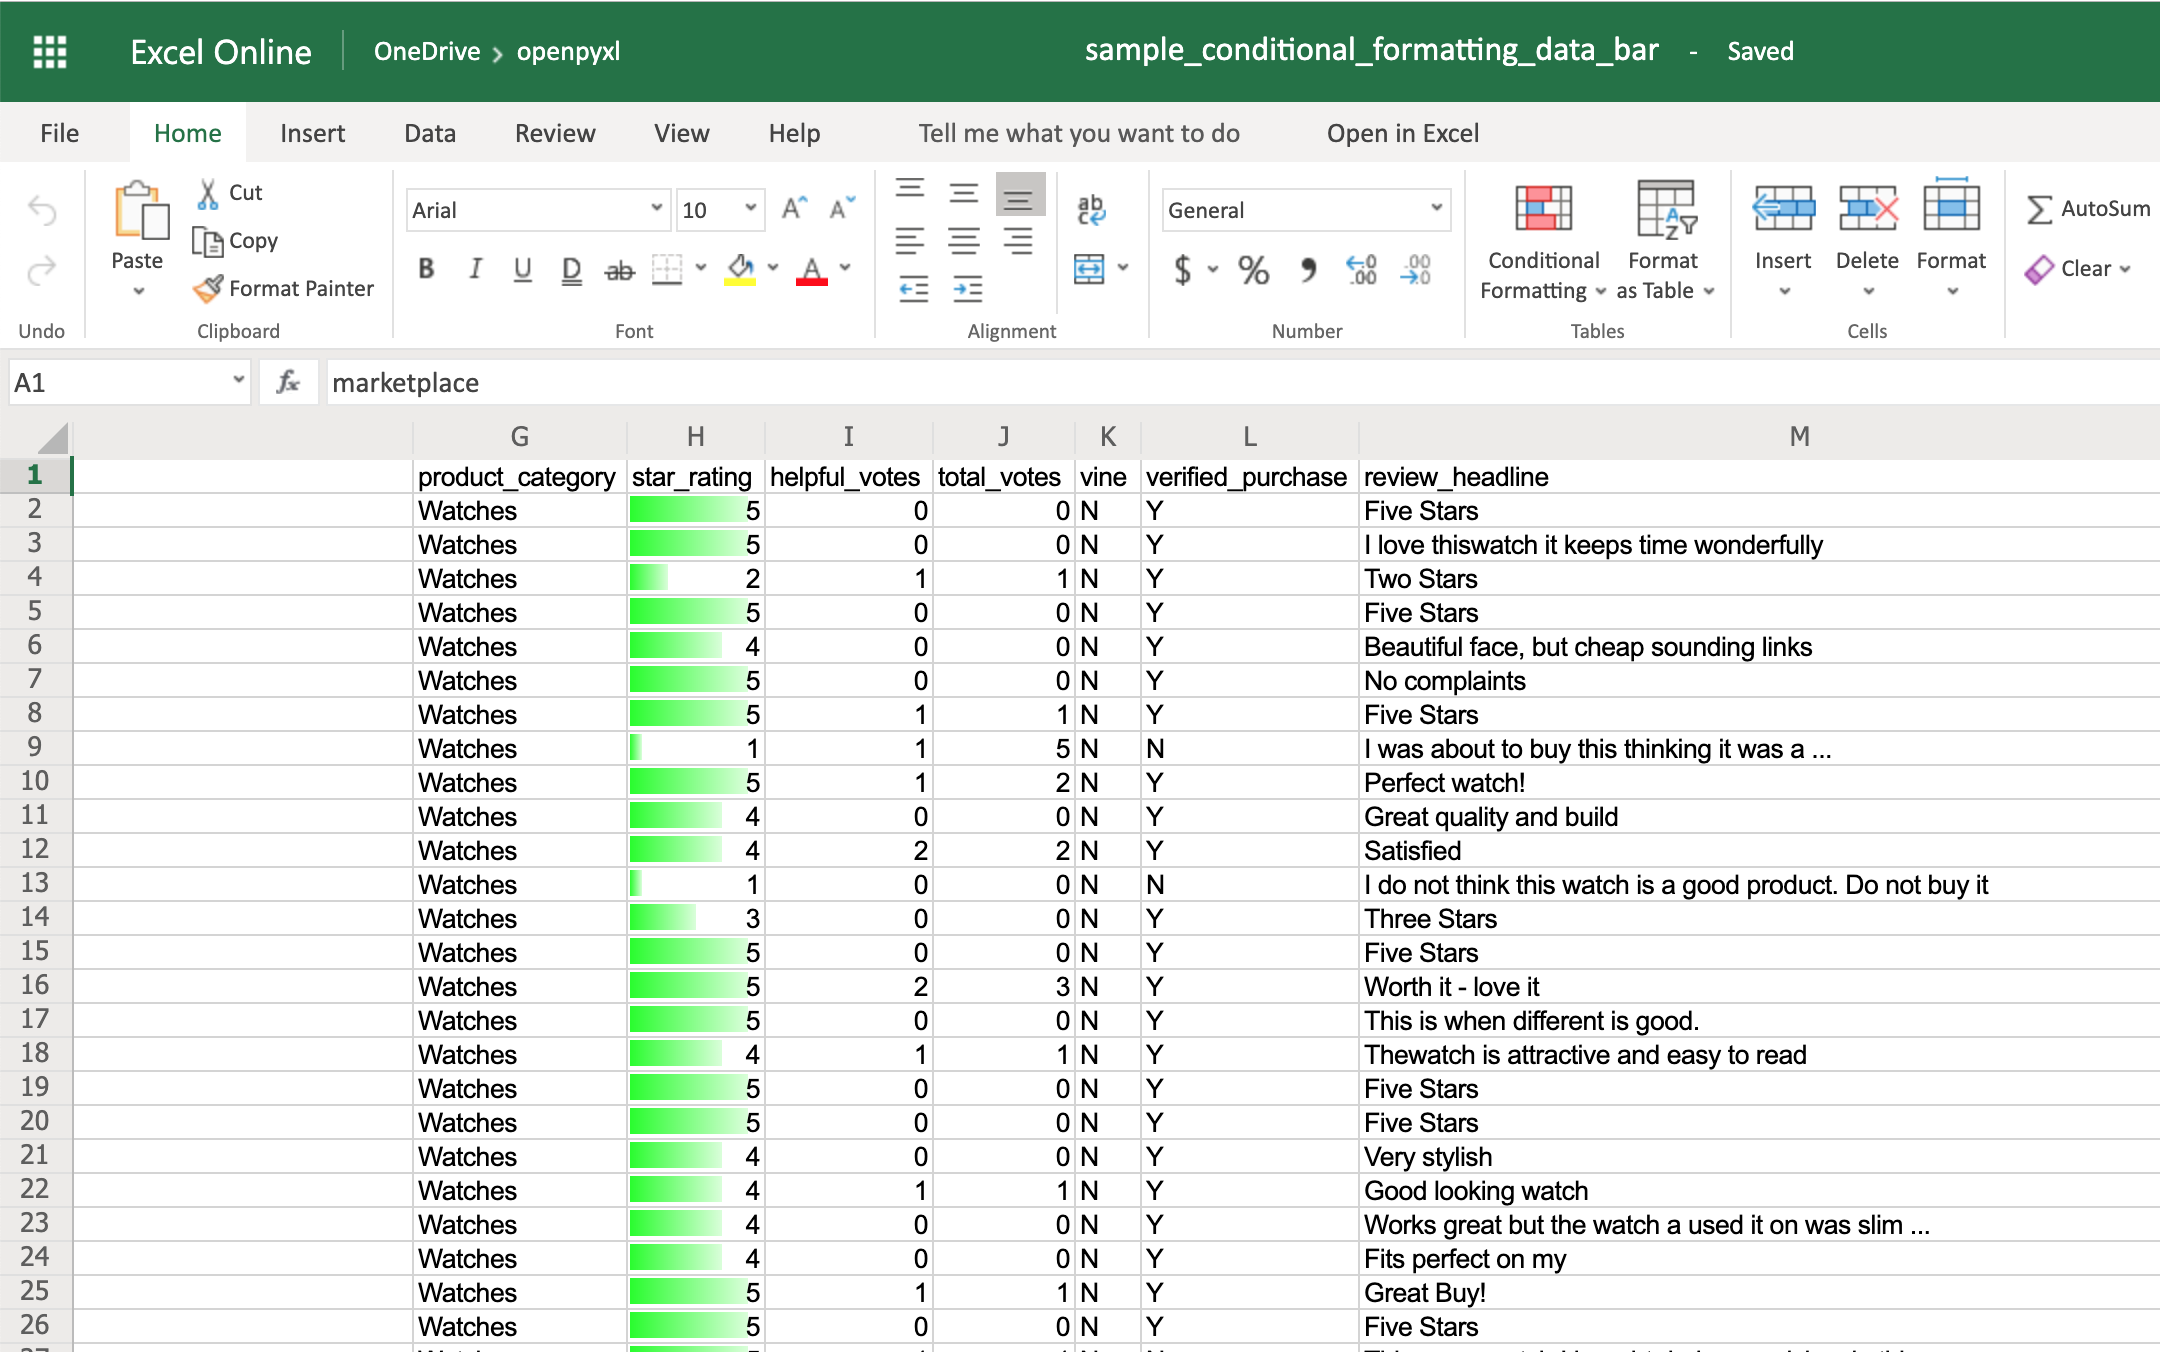
Finally, the DataBar allows you to create progress bars:
>>>
>>> from openpyxl.formatting.rule import DataBarRule

>>> data_bar_rule = DataBarRule(start_type="num",
...                             start_value=1,
...                             end_type="num",
...                             end_value="5",
...                             color="0000FF00")  # Green
>>> sheet.conditional_formatting.add("H2:H100", data_bar_rule)
>>> workbook.save("sample_conditional_formatting_data_bar.xlsx")
You’ll now see a green progress bar that gets fuller the closer the star rating is to the number 5:
As you can see, there are a lot of cool things you can do with conditional formatting.
Here, you saw only a few examples of what you can achieve with it, but check the openpyxl documentation to see a bunch of other options.
Adding Images
Even though images are not something that you’ll often see in a spreadsheet, it’s quite cool to be able to add them. Maybe you can use it for branding purposes or to make spreadsheets more personal.
To be able to load images to a spreadsheet using openpyxl, you’ll have to install Pillow:
Apart from that, you’ll also need an image. For this example, you can grab the Real Python logo below and convert it from .webp to .png using an online converter such as cloudconvert.com, save the final file as logo.png, and copy it to the root folder where you’re running your examples:
![]()
Afterward, this is the code you need to import that image into the hello_word.xlsx spreadsheet:
from openpyxl import load_workbook
from openpyxl.drawing.image import Image

# Let's use the hello_world spreadsheet since it has less data
workbook = load_workbook(filename="hello_world.xlsx")
sheet = workbook.active

logo = Image("logo.png")

# A bit of resizing to not fill the whole spreadsheet with the logo
logo.height = 150
logo.width = 150

sheet.add_image(logo, "A3")
workbook.save(filename="hello_world_logo.xlsx")
You have an image on your spreadsheet! Here it is:
The image’s left top corner is on the cell you chose, in this case, A3.
Adding Pretty Charts
Another powerful thing you can do with spreadsheets is create an incredible variety of charts.
Charts are a great way to visualize and understand loads of data quickly. There are a lot of different chart types: bar chart, pie chart, line chart, and so on. openpyxl has support for a lot of them.
Here, you’ll see only a couple of examples of charts because the theory behind it is the same for every single chart type:
For any chart you want to build, you’ll need to define the chart type: BarChart, LineChart, and so forth, plus the data to be used for the chart, which is called Reference.
Before you can build your chart, you need to define what data you want to see represented in it. Sometimes, you can use the dataset as is, but other times you need to massage the data a bit to get additional information.
Let’s start by building a new workbook with some sample data:
 1from openpyxl import Workbook
 2from openpyxl.chart import BarChart, Reference
 3
 4workbook = Workbook()
 5sheet = workbook.active
 6
 7# Let's create some sample sales data
 8rows = [
 9    ["Product", "Online", "Store"],
10    [1, 30, 45],
11    [2, 40, 30],
12    [3, 40, 25],
13    [4, 50, 30],
14    [5, 30, 25],
15    [6, 25, 35],
16    [7, 20, 40],
17]
18
19for row in rows:
20    sheet.append(row)
Now you’re going to start by creating a bar chart that displays the total number of sales per product:
22chart = BarChart()
23data = Reference(worksheet=sheet,
24                 min_row=1,
25                 max_row=8,
26                 min_col=2,
27                 max_col=3)
28
29chart.add_data(data, titles_from_data=True)
30sheet.add_chart(chart, "E2")
31
32workbook.save("chart.xlsx")
There you have it. Below, you can see a very straightforward bar chart showing the difference between online product sales online and in-store product sales:
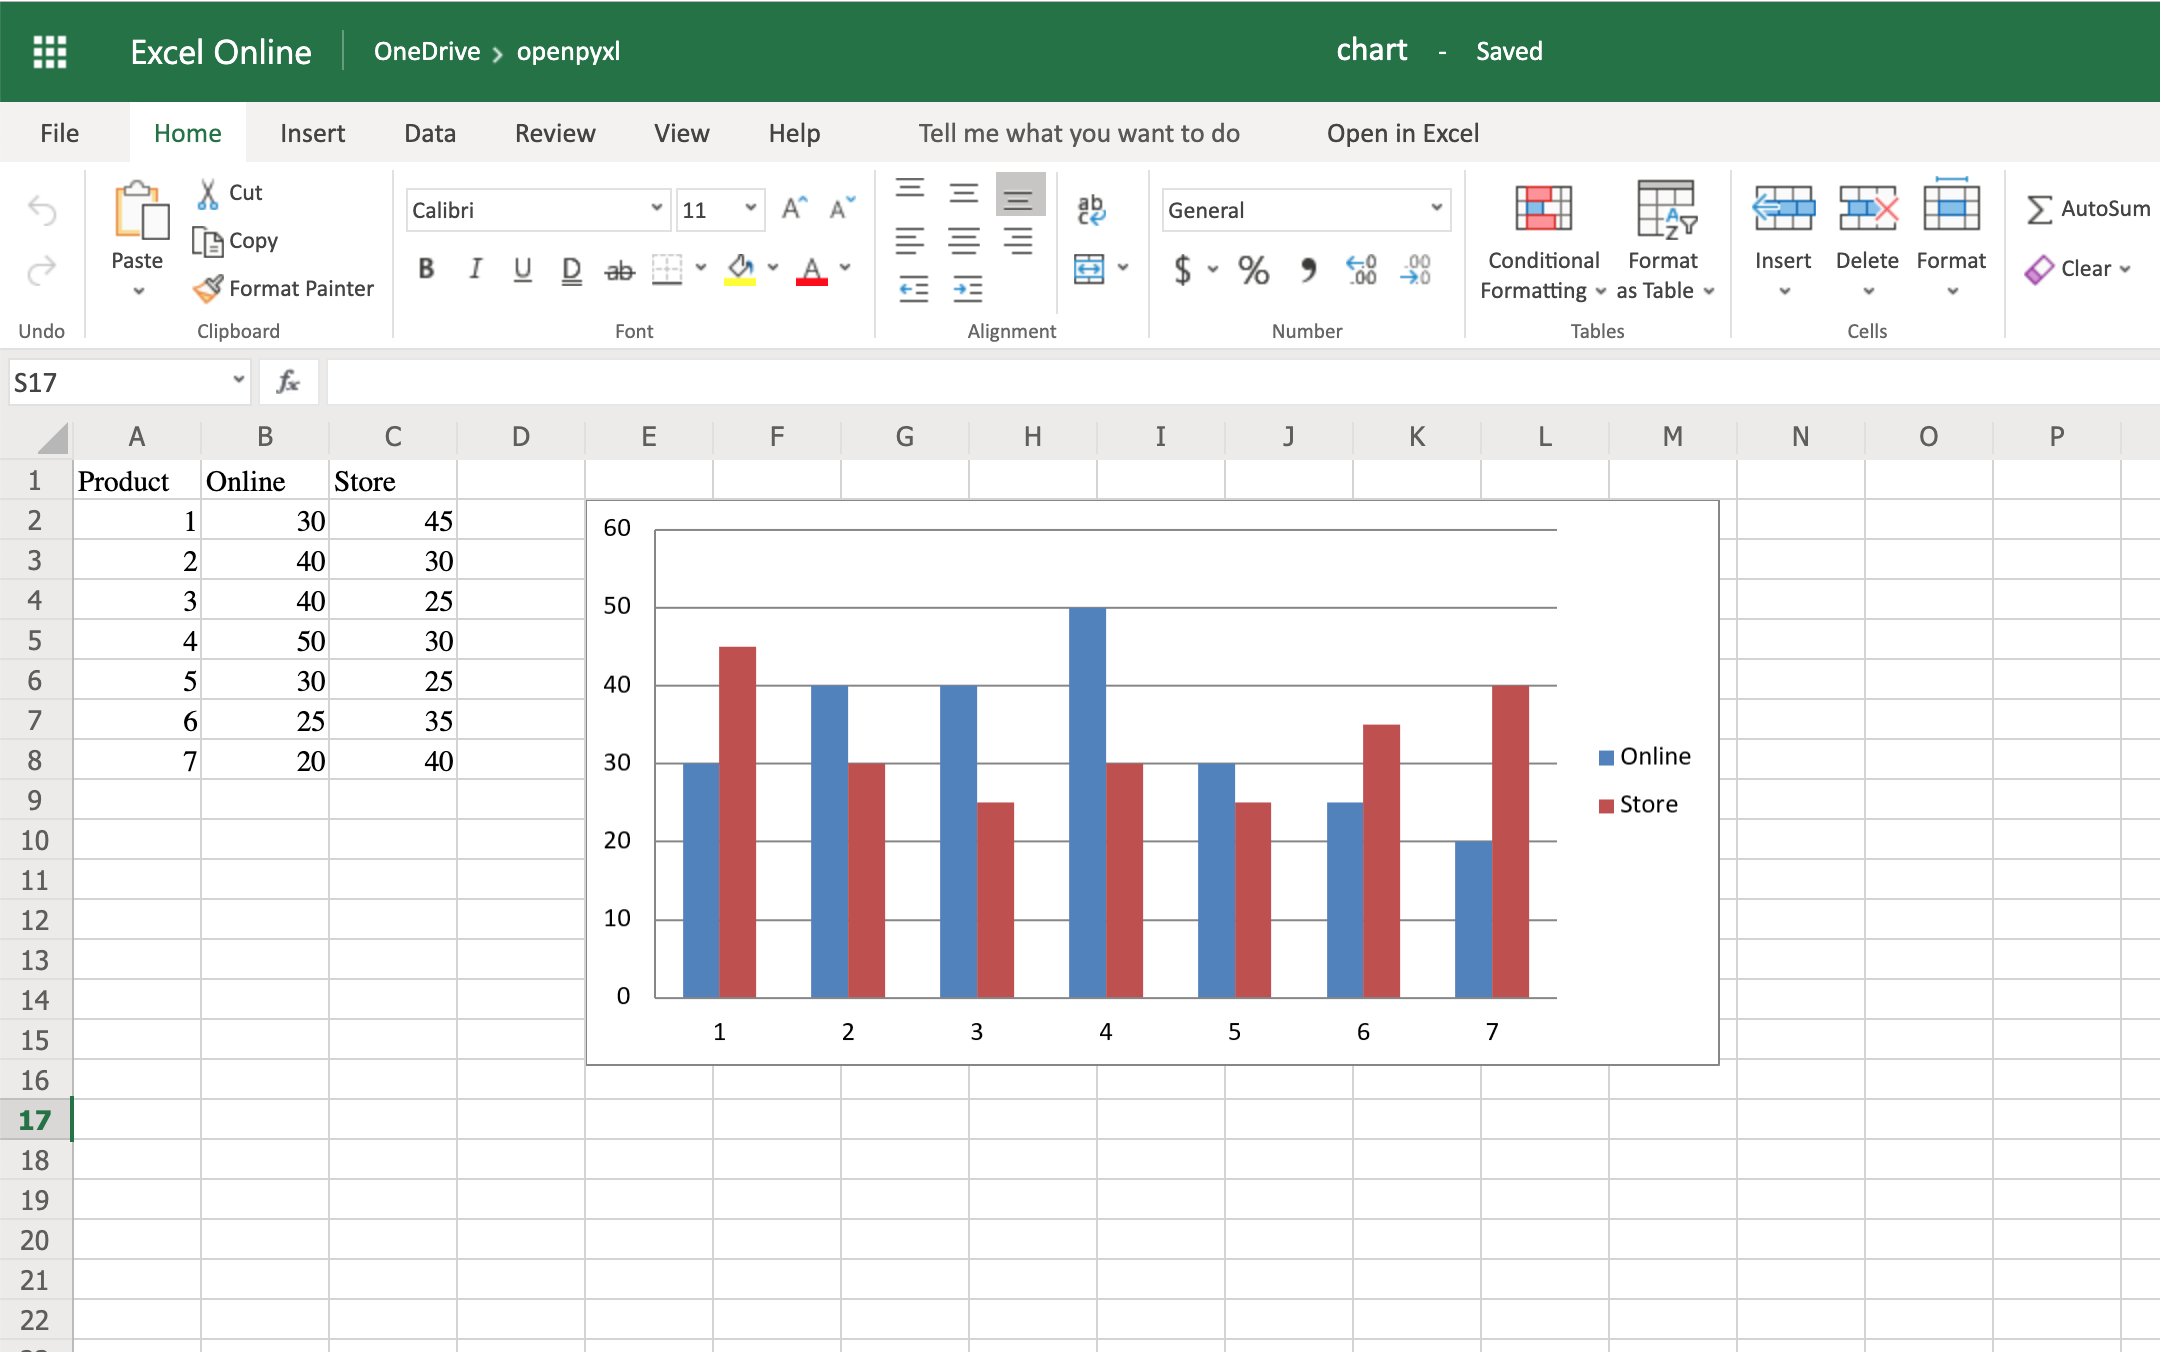
Like with images, the top left corner of the chart is on the cell you added the chart to. In your case, it was on cell E2.
Try creating a line chart instead, changing the data a bit:
 1import random
 2from openpyxl import Workbook
 3from openpyxl.chart import LineChart, Reference
 4
 5workbook = Workbook()
 6sheet = workbook.active
 7
 8# Let's create some sample sales data
 9rows = [
10    ["", "January", "February", "March", "April",
11    "May", "June", "July", "August", "September",
12     "October", "November", "December"],
13    [1, ],
14    [2, ],
15    [3, ],
16]
17
18for row in rows:
19    sheet.append(row)
20
21for row in sheet.iter_rows(min_row=2,
22                           max_row=4,
23                           min_col=2,
24                           max_col=13):
25    for cell in row:
26        cell.value = random.randrange(5, 100)
With the above code, you’ll be able to generate some random data regarding the sales of 3 different products across a whole year.
Once that’s done, you can very easily create a line chart with the following code:
28chart = LineChart()
29data = Reference(worksheet=sheet,
30                 min_row=2,
31                 max_row=4,
32                 min_col=1,
33                 max_col=13)
34
35chart.add_data(data, from_rows=True, titles_from_data=True)
36sheet.add_chart(chart, "C6")
37
38workbook.save("line_chart.xlsx")
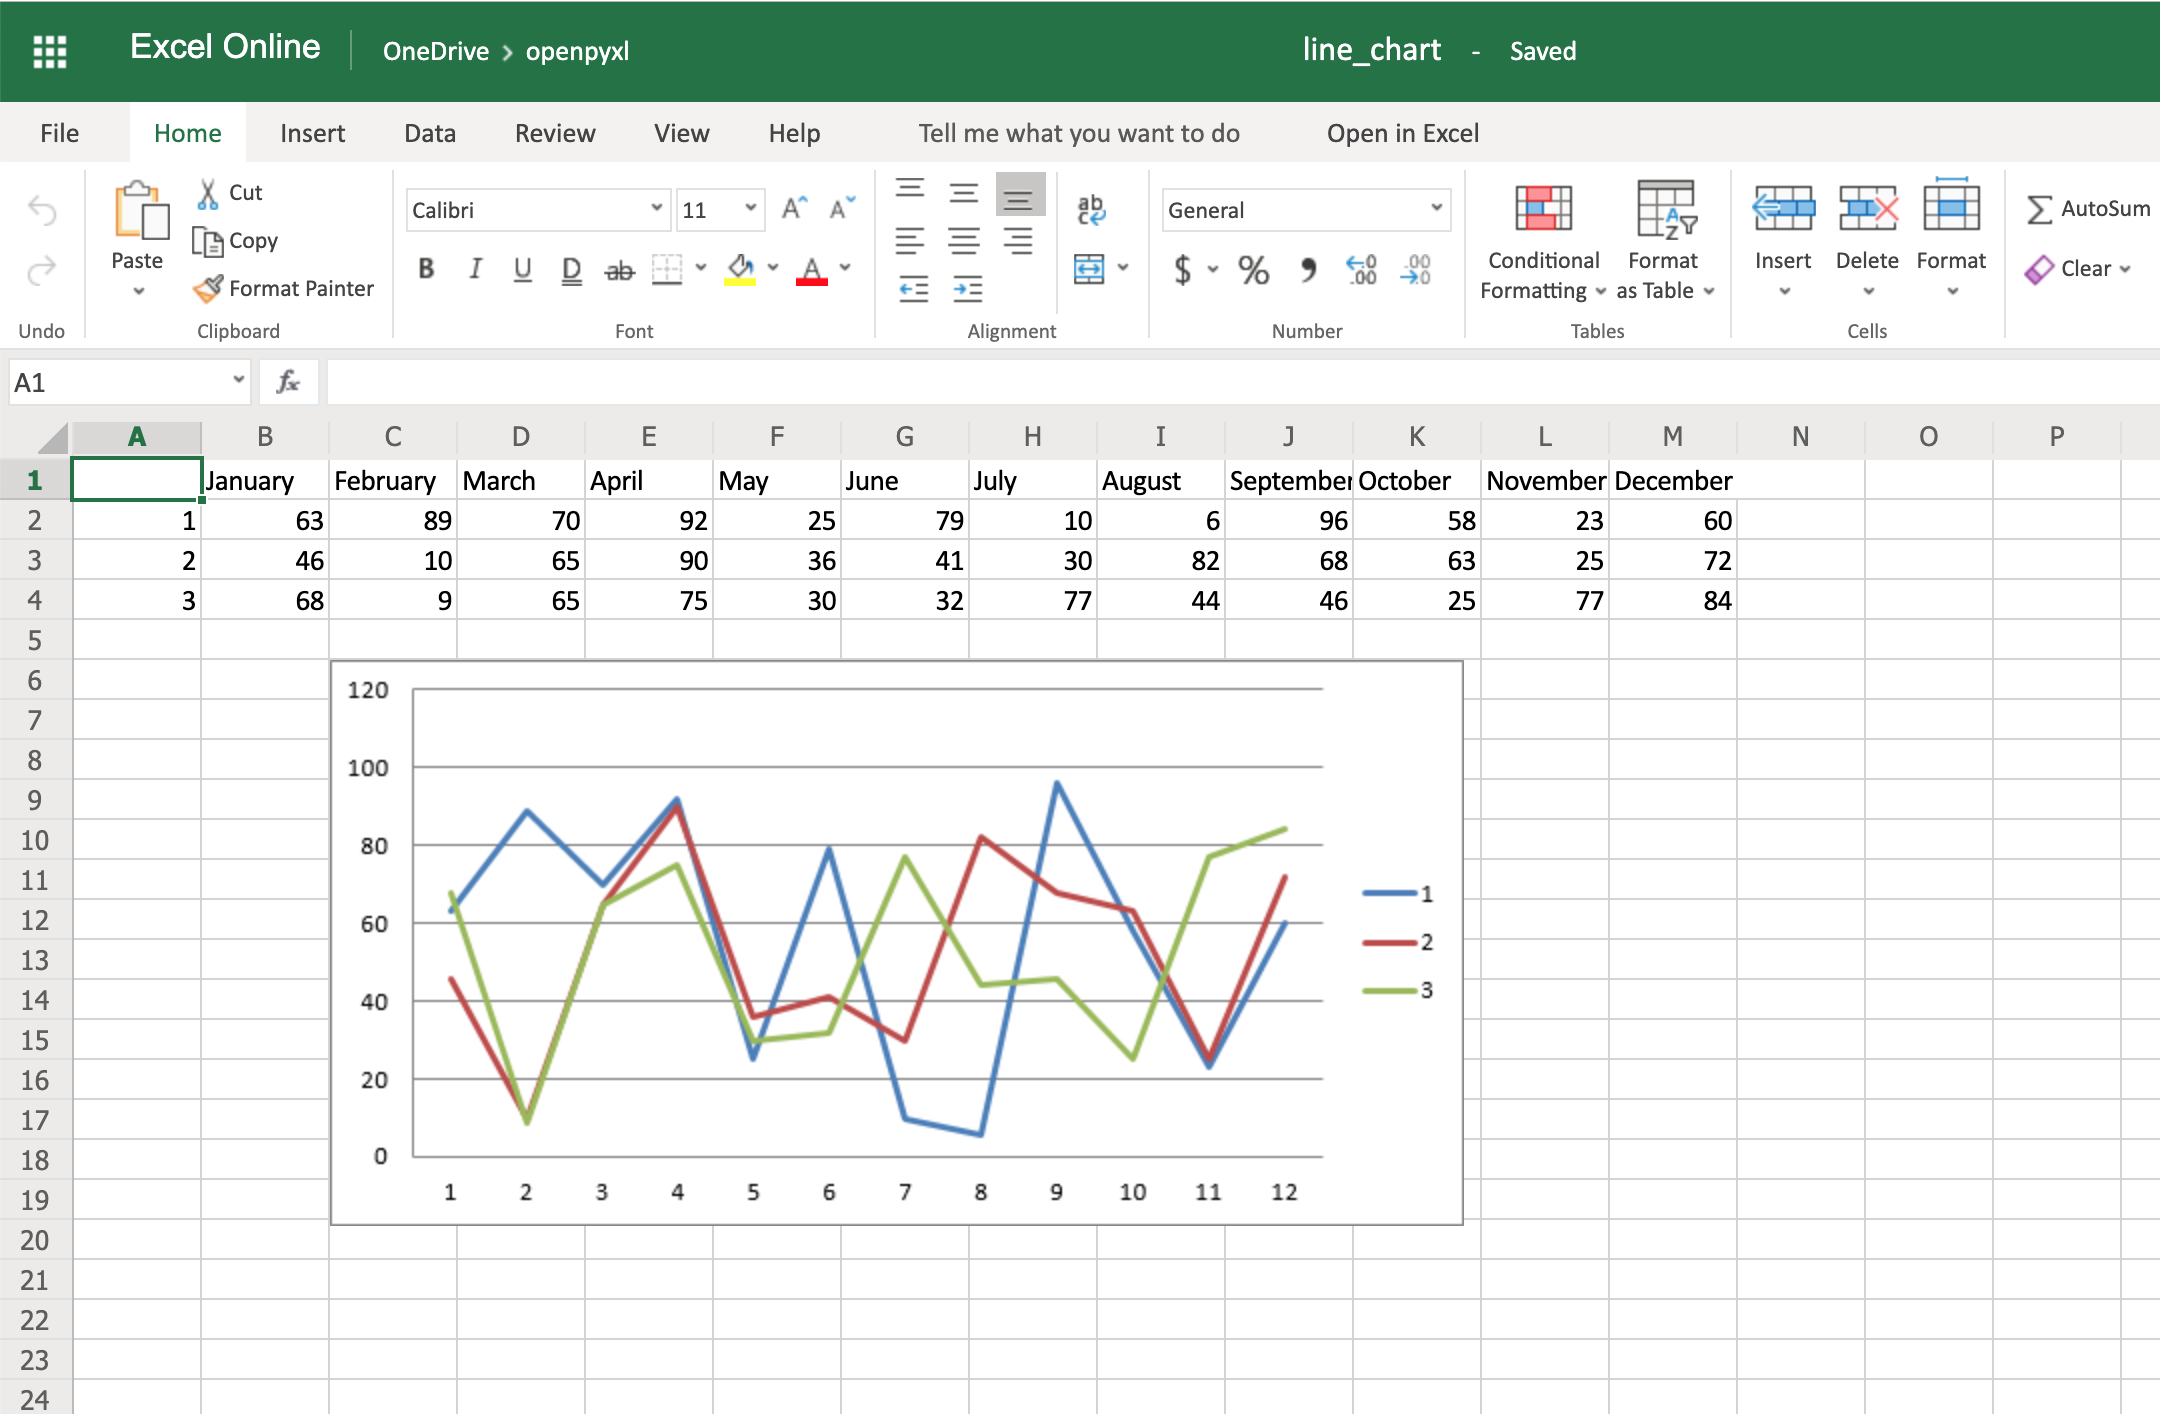
Here’s the outcome of the above piece of code:
One thing to keep in mind here is the fact that you’re using from_rows=True when adding the data. This argument makes the chart plot row by row instead of column by column.
In your sample data, you see that each product has a row with 12 values (1 column per month). That’s why you use from_rows. If you don’t pass that argument, by default, the chart tries to plot by column, and you’ll get a month-by-month comparison of sales.
Another difference that has to do with the above argument change is the fact that our Reference now starts from the first column, min_col=1, instead of the second one. This change is needed because the chart now expects the first column to have the titles.
There are a couple of other things you can also change regarding the style of the chart. For example, you can add specific categories to the chart:
cats = Reference(worksheet=sheet,
                 min_row=1,
                 max_row=1,
                 min_col=2,
                 max_col=13)
chart.set_categories(cats)
Add this piece of code before saving the workbook, and you should see the month names appearing instead of numbers:
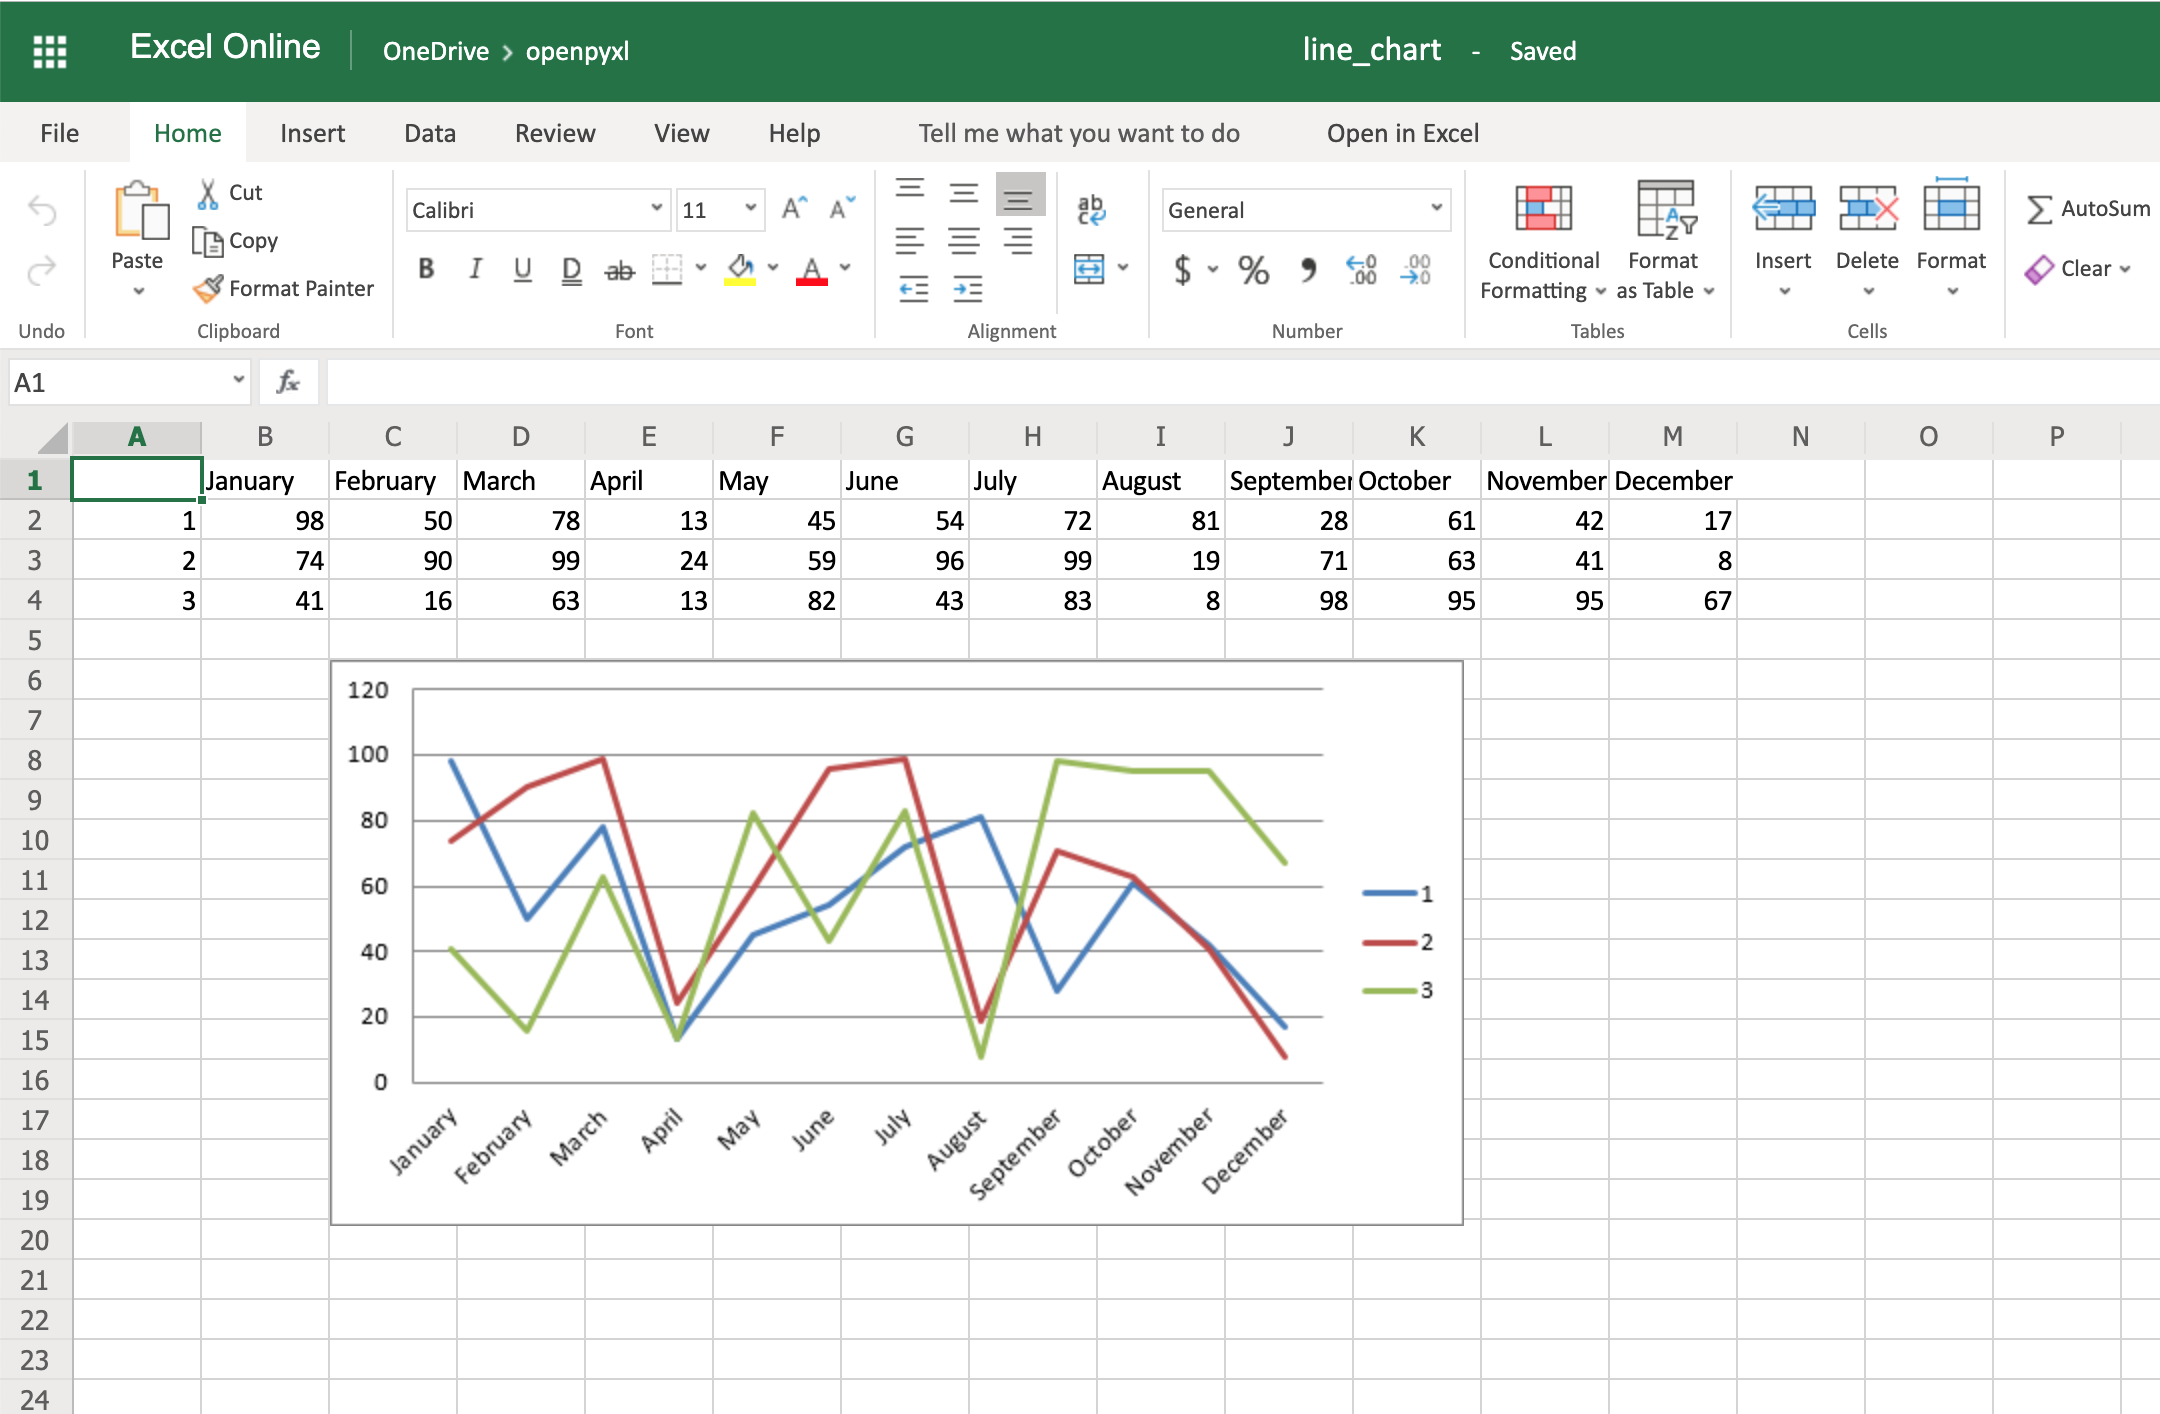
Code-wise, this is a minimal change. But in terms of the readability of the spreadsheet, this makes it much easier for someone to open the spreadsheet and understand the chart straight away.
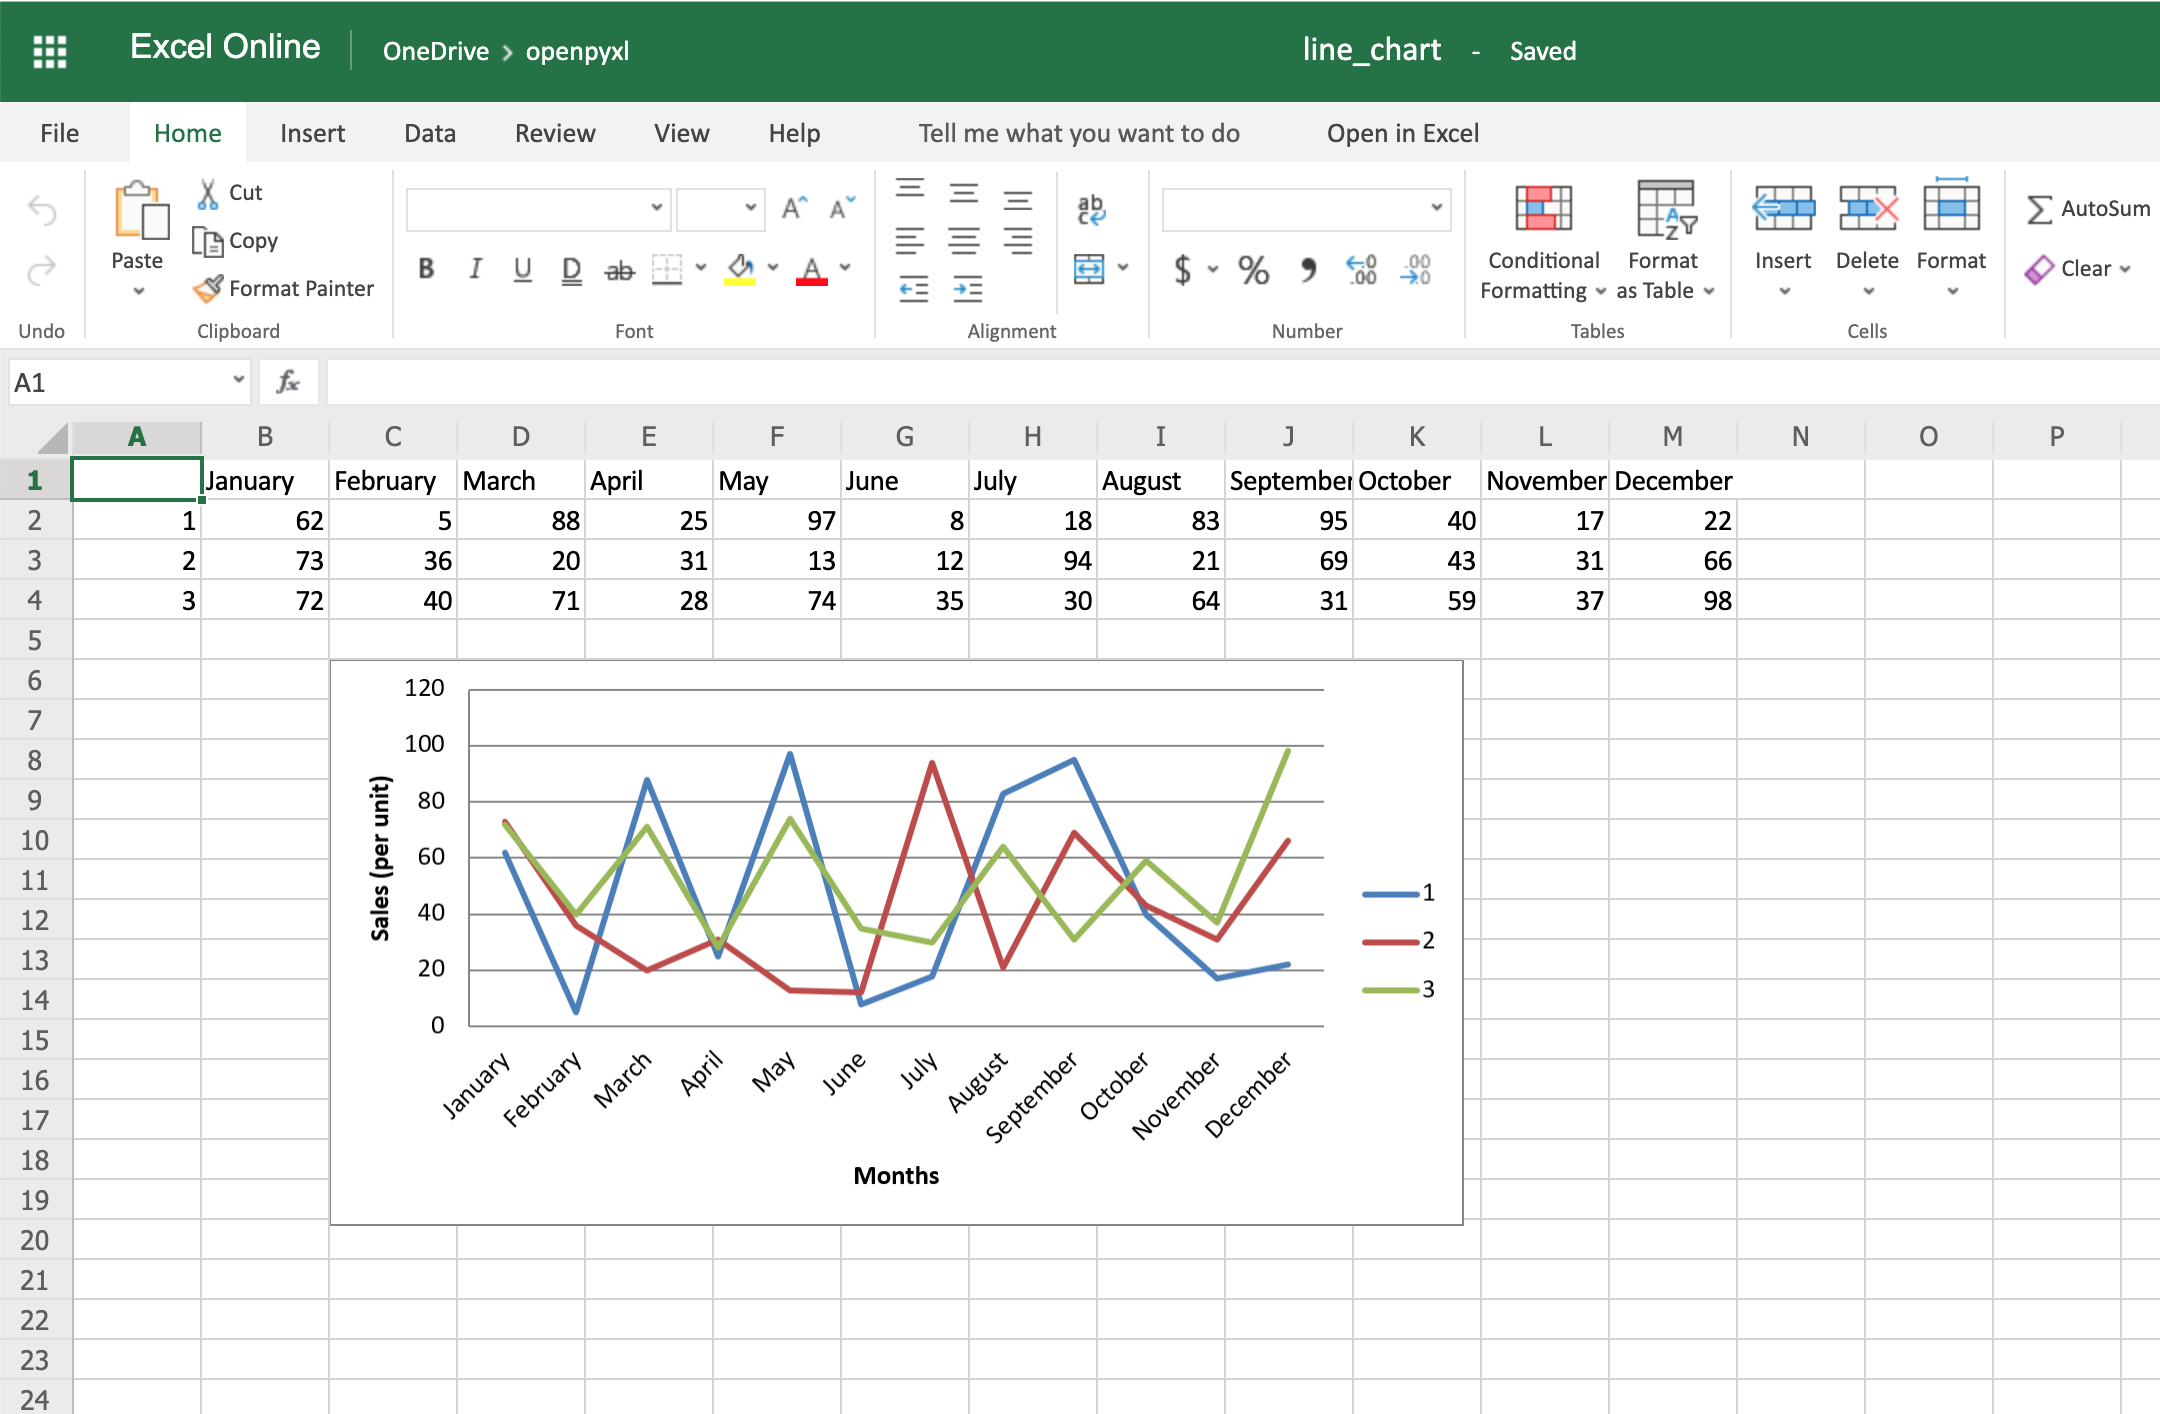
Another thing you can do to improve the chart readability is to add an axis. You can do it using the attributes x_axis and y_axis:
chart.x_axis.title = "Months"
chart.y_axis.title = "Sales (per unit)"
This will generate a spreadsheet like the below one:
As you can see, small changes like the above make reading your chart a much easier and quicker task.
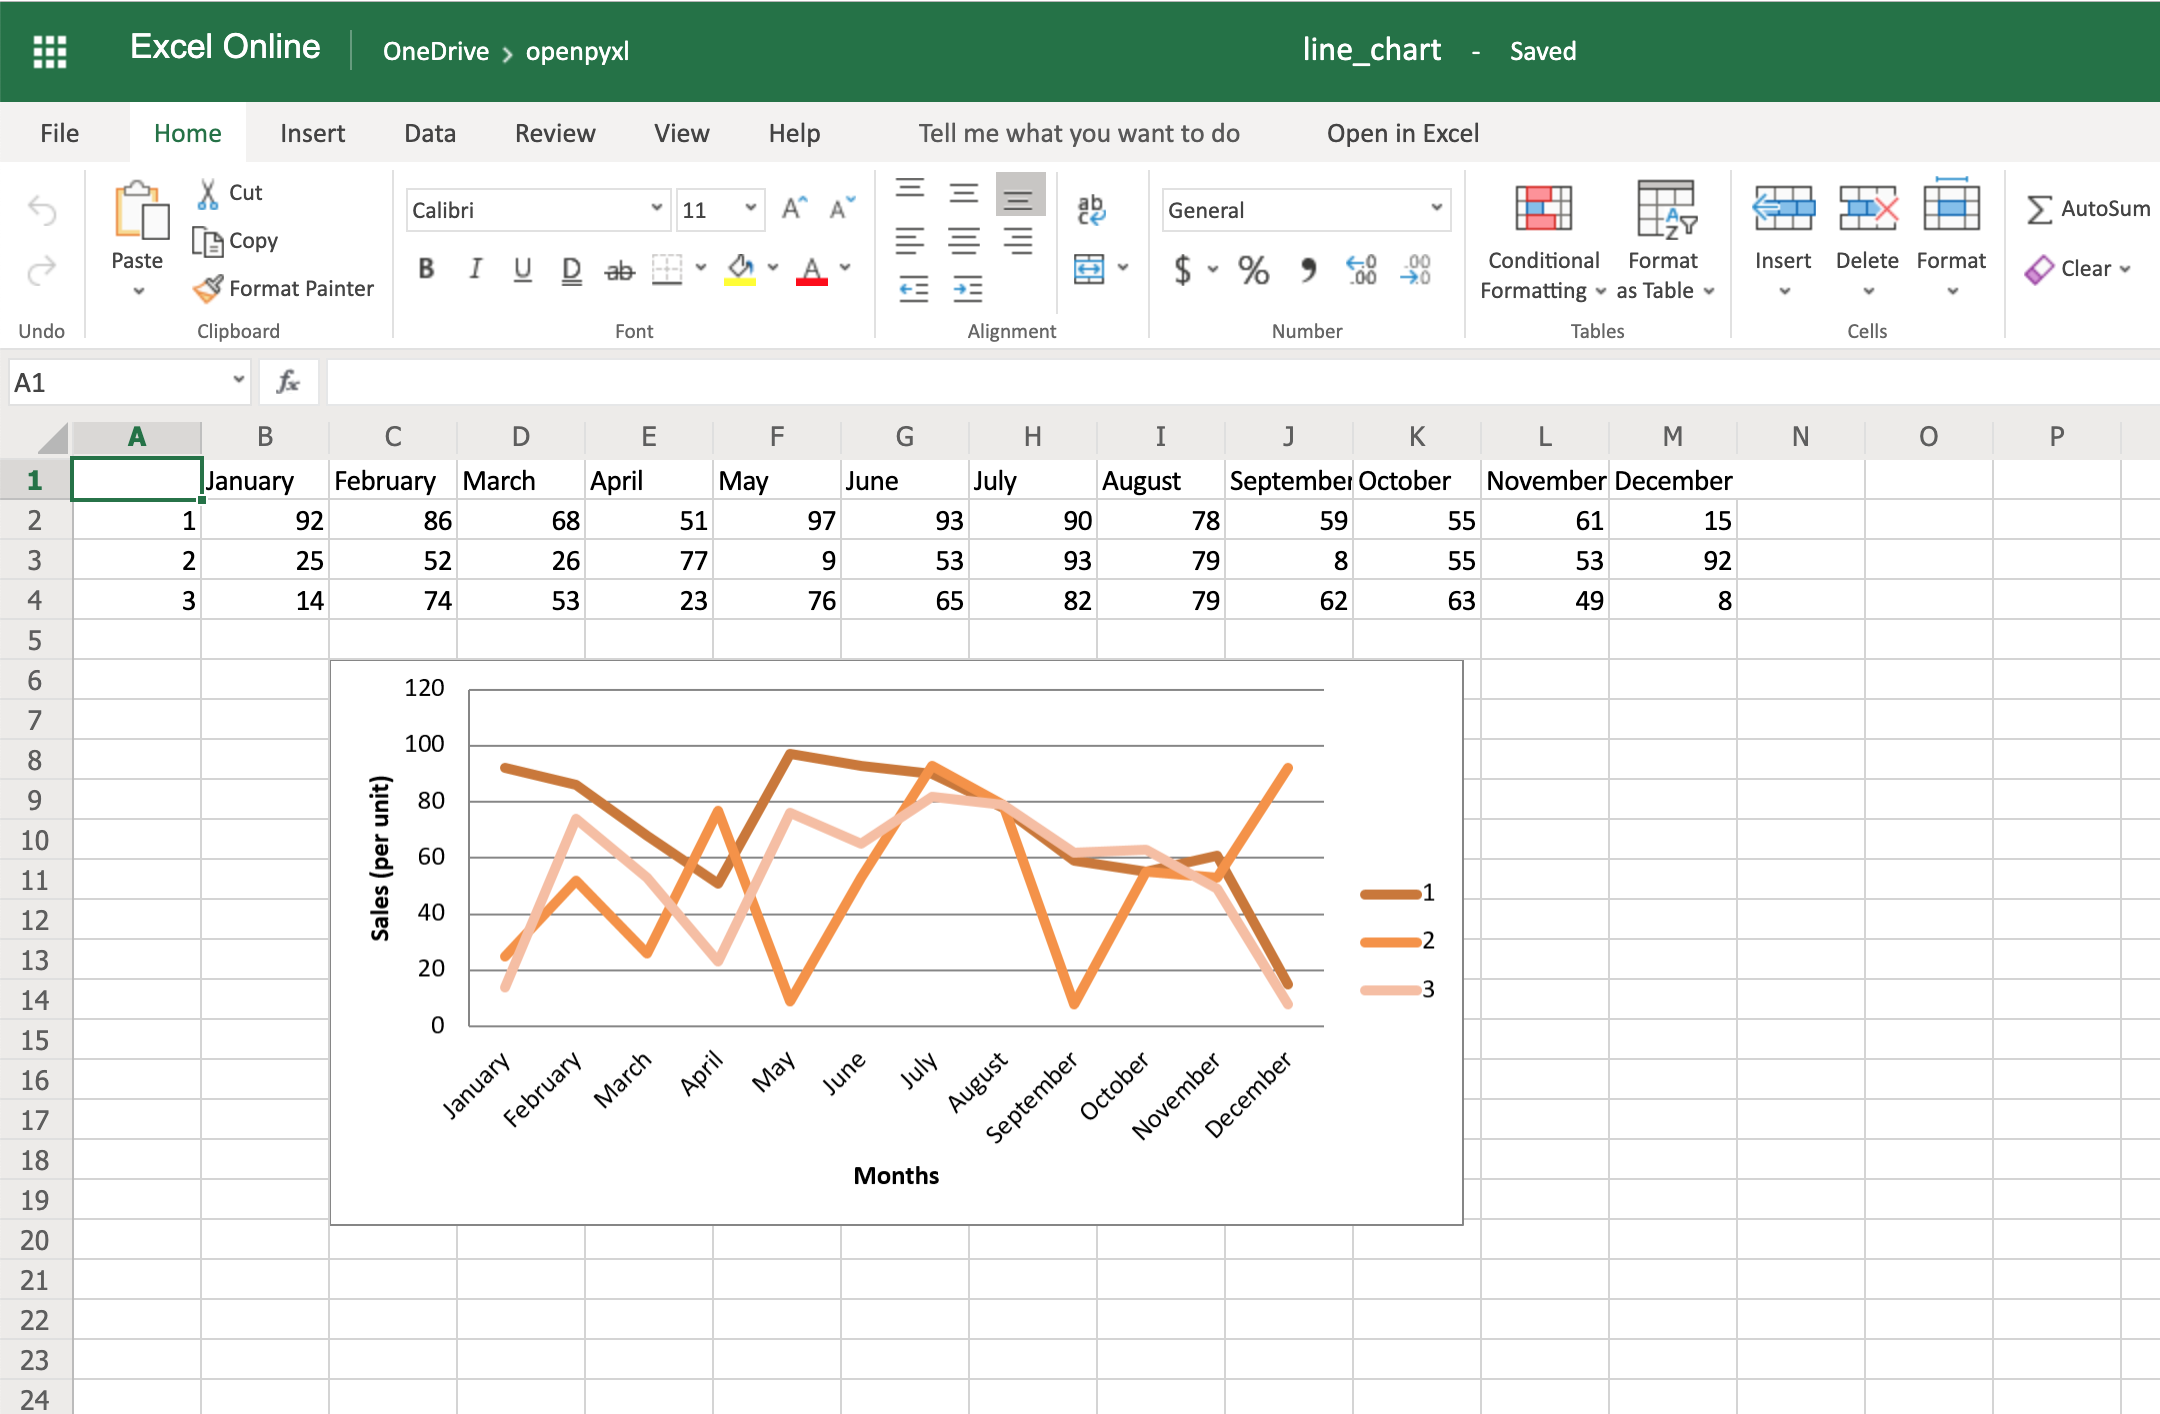
There is also a way to style your chart by using Excel’s default ChartStyle property. In this case, you have to choose a number between 1 and 48. Depending on your choice, the colors of your chart change as well:
# You can play with this by choosing any number between 1 and 48
chart.style = 24
With the style selected above, all lines have some shade of orange:
There is no clear documentation on what each style number looks like, but this spreadsheet has a few examples of the styles available.
Here’s the full code used to generate the line chart with categories, axis titles, and style:
import random
from openpyxl import Workbook
from openpyxl.chart import LineChart, Reference

workbook = Workbook()
sheet = workbook.active

# Let's create some sample sales data
rows = [
    ["", "January", "February", "March", "April",
    "May", "June", "July", "August", "September",
     "October", "November", "December"],
    [1, ],
    [2, ],
    [3, ],
]

for row in rows:
    sheet.append(row)

for row in sheet.iter_rows(min_row=2,
                           max_row=4,
                           min_col=2,
                           max_col=13):
    for cell in row:
        cell.value = random.randrange(5, 100)

# Create a LineChart and add the main data
chart = LineChart()
data = Reference(worksheet=sheet,
                           min_row=2,
                           max_row=4,
                           min_col=1,
                           max_col=13)
chart.add_data(data, titles_from_data=True, from_rows=True)

# Add categories to the chart
cats = Reference(worksheet=sheet,
                 min_row=1,
                 max_row=1,
                 min_col=2,
                 max_col=13)
chart.set_categories(cats)

# Rename the X and Y Axis
chart.x_axis.title = "Months"
chart.y_axis.title = "Sales (per unit)"

# Apply a specific Style
chart.style = 24

# Save!
sheet.add_chart(chart, "C6")
workbook.save("line_chart.xlsx")
There are a lot more chart types and customization you can apply, so be sure to check out the package documentation on this if you need some specific formatting.
Convert Python Classes to Excel Spreadsheet
You already saw how to convert an Excel spreadsheet’s data into Python classes, but now let’s do the opposite.
Let’s imagine you have a database and are using some Object-Relational Mapping (ORM) to map DB objects into Python classes. Now, you want to export those same objects into a spreadsheet.
Let’s assume the following data classes to represent the data coming from your database regarding product sales:
from dataclasses import dataclass
from typing import List

@dataclass
class Sale:
    quantity: int

@dataclass
class Product:
    id: str
    name: str
    sales: List[Sale]
Now, let’s generate some random data, assuming the above classes are stored in a db_classes.py file:
 1import random
 2
 3# Ignore these for now. You'll use them in a sec ;)
 4from openpyxl import Workbook
 5from openpyxl.chart import LineChart, Reference
 6
 7from db_classes import Product, Sale
 8
 9products = []
10
11# Let's create 5 products
12for idx in range(1, 6):
13    sales = []
14
15    # Create 5 months of sales
16    for _ in range(5):
17        sale = Sale(quantity=random.randrange(5, 100))
18        sales.append(sale)
19
20    product = Product(id=str(idx),
21                      name="Product %s" % idx,
22                      sales=sales)
23    products.append(product)
By running this piece of code, you should get 5 products with 5 months of sales with a random quantity of sales for each month.
Now, to convert this into a spreadsheet, you need to iterate over the data and append it to the spreadsheet:
25workbook = Workbook()
26sheet = workbook.active
27
28# Append column names first
29sheet.append(["Product ID", "Product Name", "Month 1",
30              "Month 2", "Month 3", "Month 4", "Month 5"])
31
32# Append the data
33for product in products:
34    data = [product.id, product.name]
35    for sale in product.sales:
36        data.append(sale.quantity)
37    sheet.append(data)
That’s it. That should allow you to create a spreadsheet with some data coming from your database.
However, why not use some of that cool knowledge you gained recently to add a chart as well to display that data more visually?
All right, then you could probably do something like this:
38chart = LineChart()
39data = Reference(worksheet=sheet,
40                 min_row=2,
41                 max_row=6,
42                 min_col=2,
43                 max_col=7)
44
45chart.add_data(data, titles_from_data=True, from_rows=True)
46sheet.add_chart(chart, "B8")
47
48cats = Reference(worksheet=sheet,
49                 min_row=1,
50                 max_row=1,
51                 min_col=3,
52                 max_col=7)
53chart.set_categories(cats)
54
55chart.x_axis.title = "Months"
56chart.y_axis.title = "Sales (per unit)"
57
58workbook.save(filename="oop_sample.xlsx")
Now we’re talking! Here’s a spreadsheet generated from database objects and with a chart and everything:
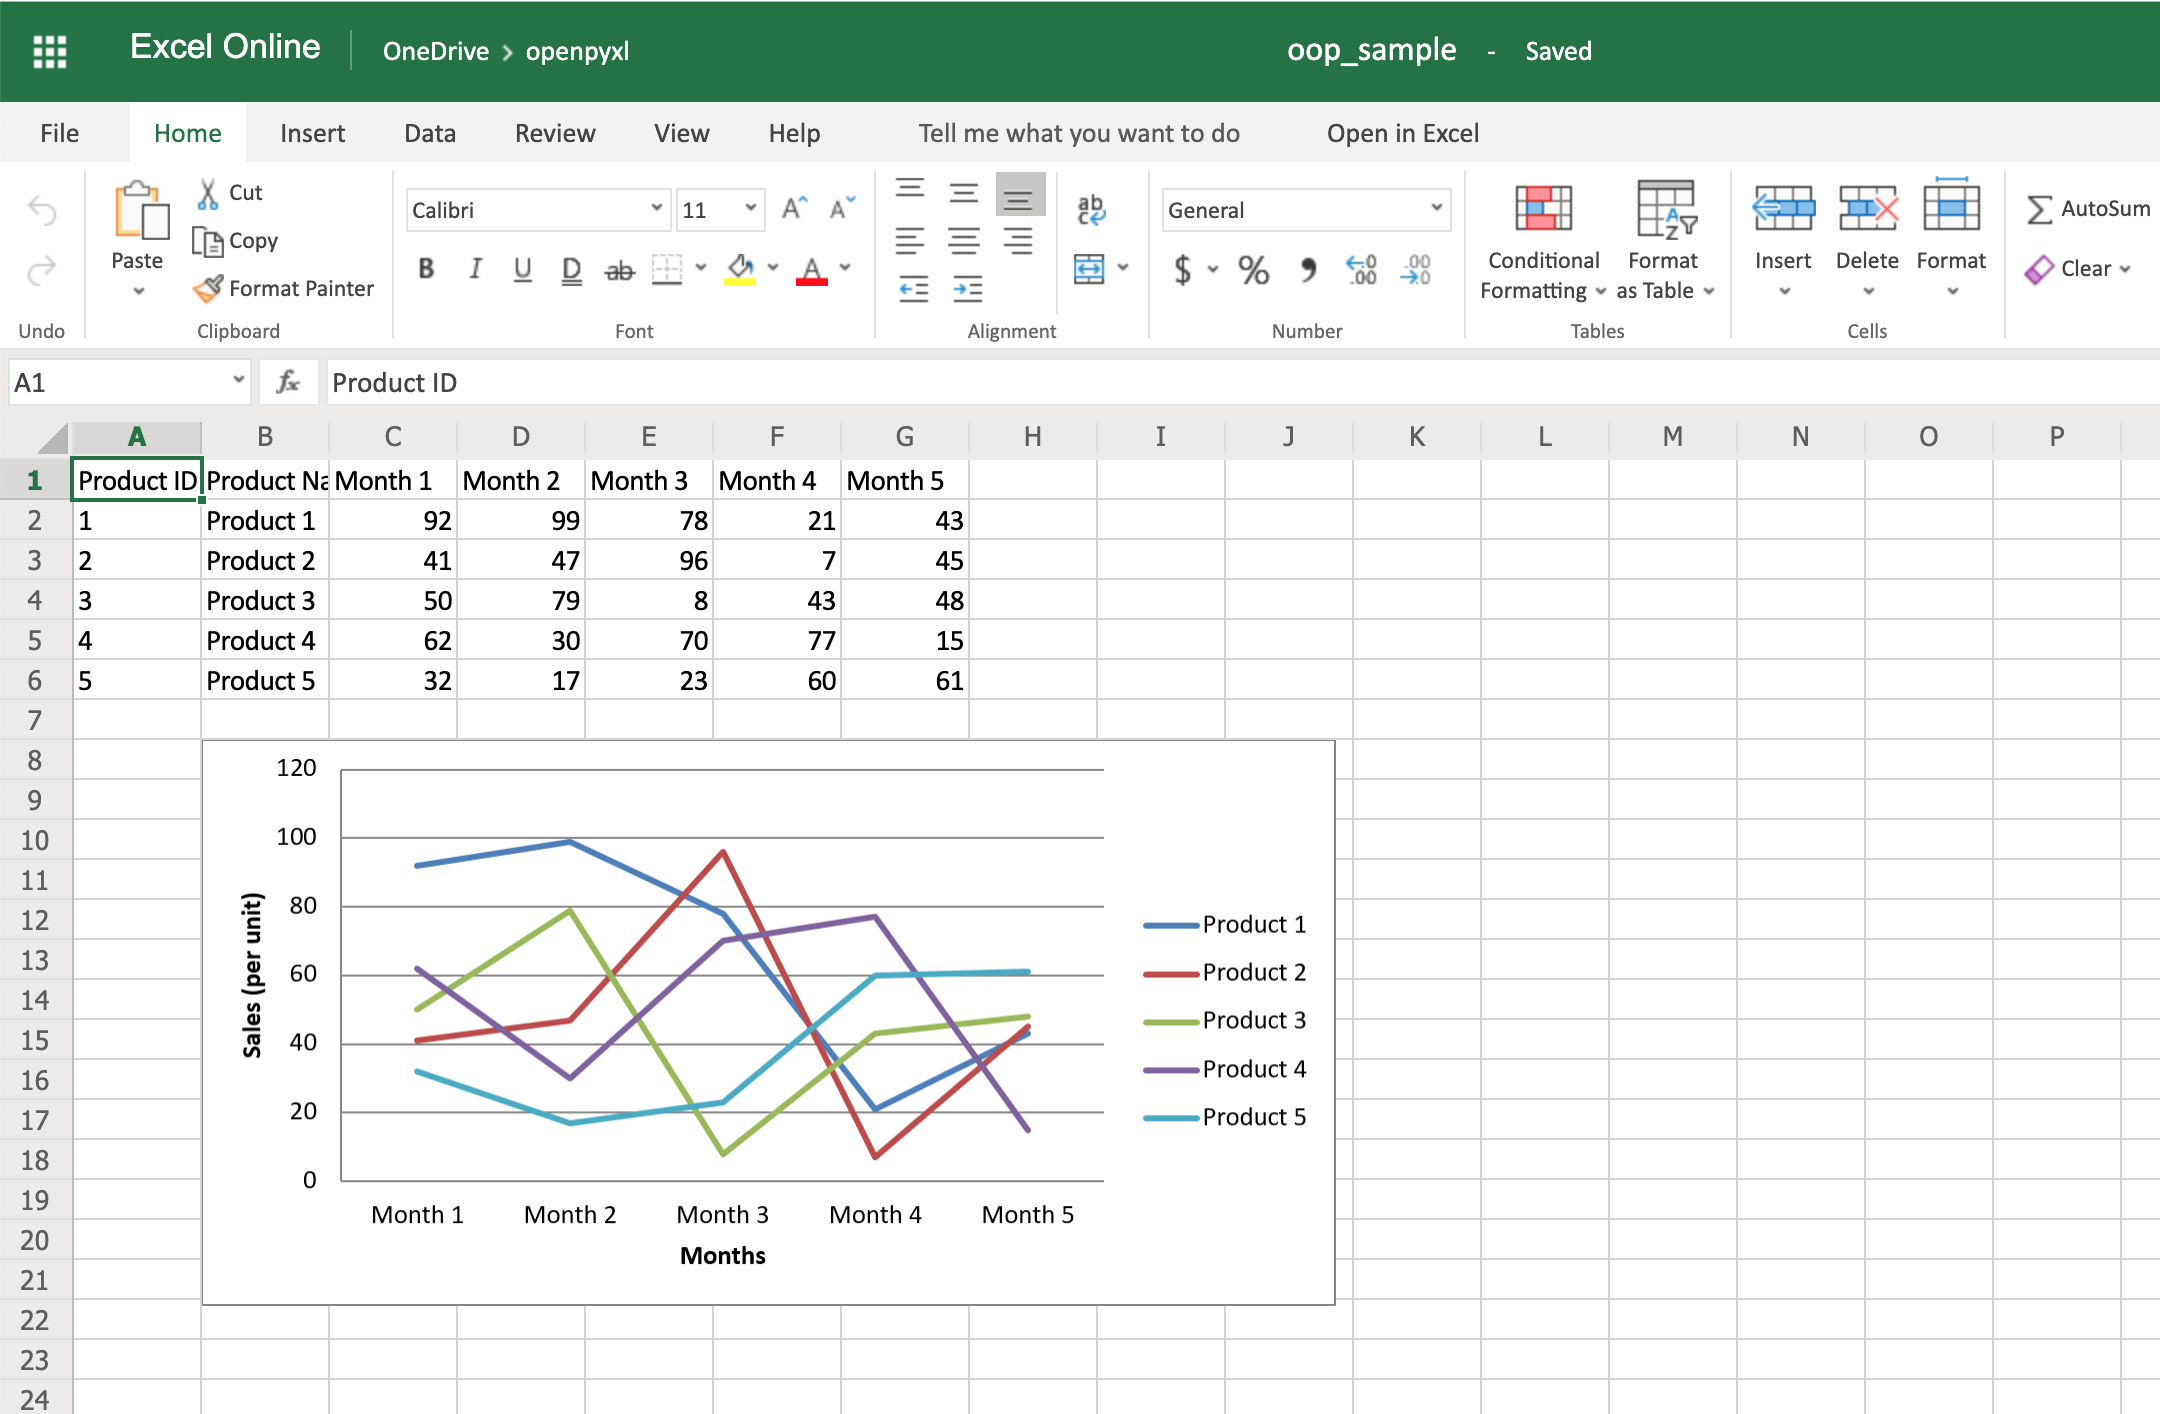
That’s a great way for you to wrap up your new knowledge of charts!
Bonus: Working With Pandas
Even though you can use Pandas to handle Excel files, there are few things that you either can’t accomplish with Pandas or that you’d be better off just using openpyxl directly.
For example, some of the advantages of using openpyxl are the ability to easily customize your spreadsheet with styles, conditional formatting, and such.
But guess what, you don’t have to worry about picking. In fact, openpyxl has support for both converting data from a Pandas DataFrame into a workbook or the opposite, converting an openpyxl workbook into a Pandas DataFrame.
First things first, remember to install the pandas package:
Then, let’s create a sample DataFrame:
 1import pandas as pd
 2
 3data = {
 4    "Product Name": ["Product 1", "Product 2"],
 5    "Sales Month 1": [10, 20],
 6    "Sales Month 2": [5, 35],
 7}
 8df = pd.DataFrame(data)
Now that you have some data, you can use .dataframe_to_rows() to convert it from a DataFrame into a worksheet:
10from openpyxl import Workbook
11from openpyxl.utils.dataframe import dataframe_to_rows
12
13workbook = Workbook()
14sheet = workbook.active
15
16for row in dataframe_to_rows(df, index=False, header=True):
17    sheet.append(row)
18
19workbook.save("pandas.xlsx")
You should see a spreadsheet that looks like this:
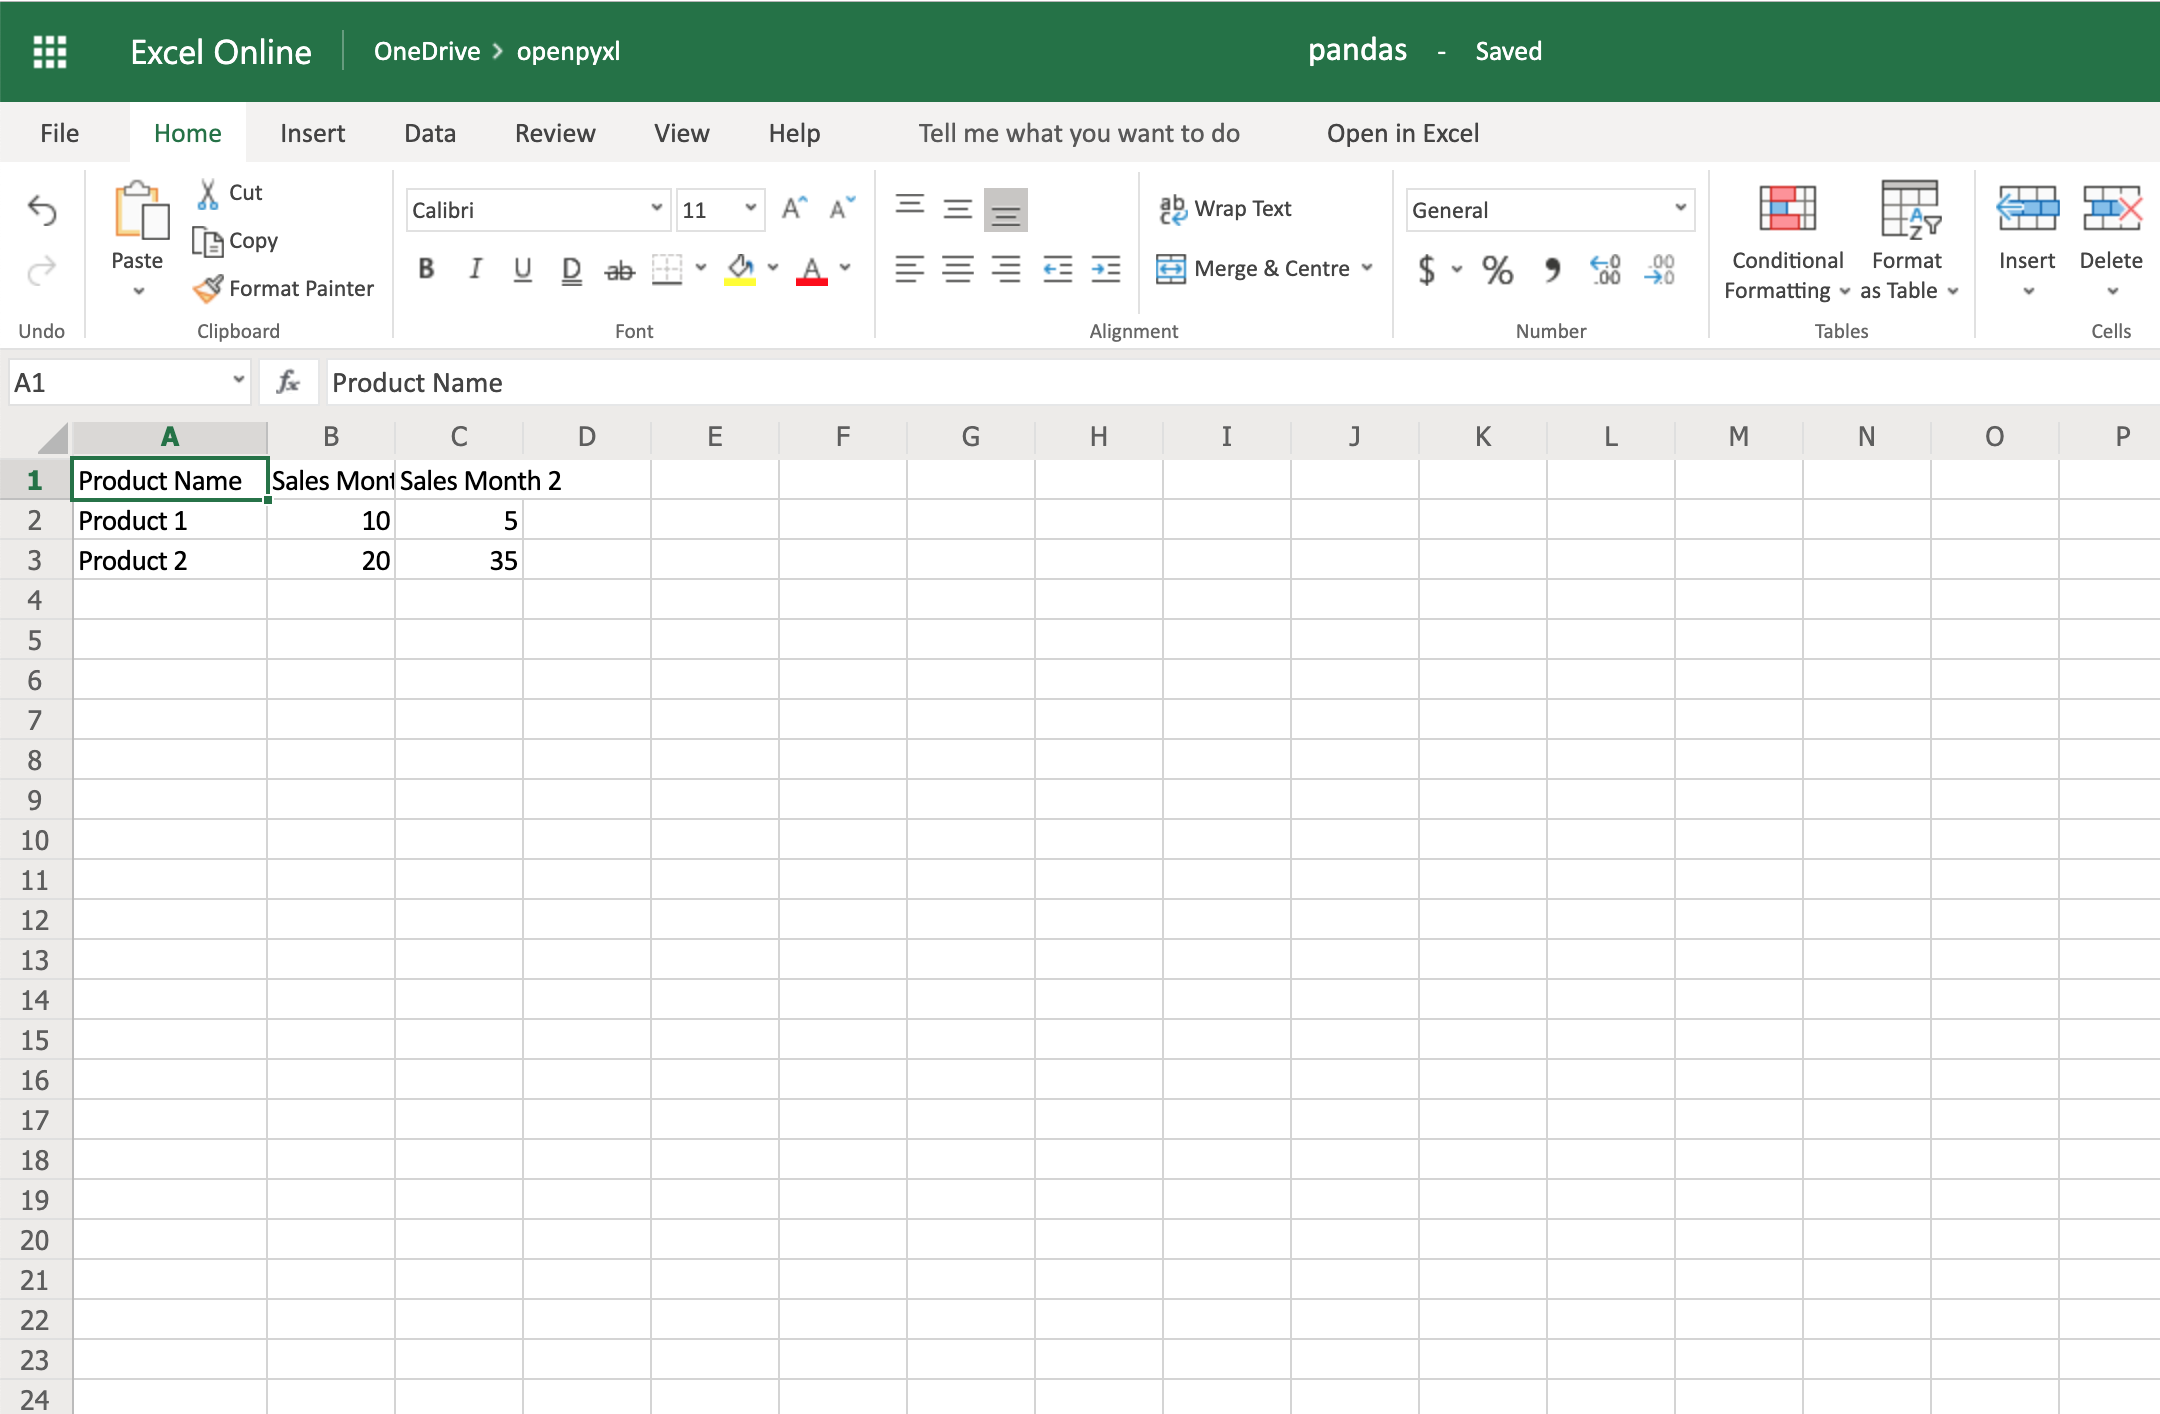
If you want to add the DataFrame’s index, you can change index=True, and it adds each row’s index into your spreadsheet.
On the other hand, if you want to convert a spreadsheet into a DataFrame, you can also do it in a very straightforward way like so:
import pandas as pd
from openpyxl import load_workbook

workbook = load_workbook(filename="sample.xlsx")
sheet = workbook.active

values = sheet.values
df = pd.DataFrame(values)
Alternatively, if you want to add the correct headers and use the review ID as the index, for example, then you can also do it like this instead:
import pandas as pd
from openpyxl import load_workbook
from mapping import REVIEW_ID

workbook = load_workbook(filename="sample.xlsx")
sheet = workbook.active

data = sheet.values

# Set the first row as the columns for the DataFrame
cols = next(data)
data = list(data)

# Set the field "review_id" as the indexes for each row
idx = [row[REVIEW_ID] for row in data]

df = pd.DataFrame(data, index=idx, columns=cols)
Using indexes and columns allows you to access data from your DataFrame easily:
>>>
>>> df.columns
Index(['marketplace', 'customer_id', 'review_id', 'product_id',
       'product_parent', 'product_title', 'product_category', 'star_rating',
       'helpful_votes', 'total_votes', 'vine', 'verified_purchase',
       'review_headline', 'review_body', 'review_date'],
      dtype='object')

>>> # Get first 10 reviews' star rating
>>> df["star_rating"][:10]
R3O9SGZBVQBV76    5
RKH8BNC3L5DLF     5
R2HLE8WKZSU3NL    2
R31U3UH5AZ42LL    5
R2SV659OUJ945Y    4
RA51CP8TR5A2L     5
RB2Q7DLDN6TH6     5
R2RHFJV0UYBK3Y    1
R2Z6JOQ94LFHEP    5
RX27XIIWY5JPB     4
Name: star_rating, dtype: int64

>>> # Grab review with id "R2EQL1V1L6E0C9", using the index
>>> df.loc["R2EQL1V1L6E0C9"]
marketplace               US
customer_id         15305006
review_id     R2EQL1V1L6E0C9
product_id        B004LURNO6
product_parent     892860326
review_headline   Five Stars
review_body          Love it
review_date       2015-08-31
Name: R2EQL1V1L6E0C9, dtype: object
There you go, whether you want to use openpyxl to prettify your Pandas dataset or use Pandas to do some hardcore algebra, you now know how to switch between both packages.
Conclusion
Phew, after that long read, you now know how to work with spreadsheets in Python! You can rely on openpyxl, your trustworthy companion, to:
- Extract valuable information from spreadsheets in a Pythonic manner
- Create your own spreadsheets, no matter the complexity level
- Add cool features such as conditional formatting or charts to your spreadsheets
There are a few other things you can do with openpyxl that might not have been covered in this tutorial, but you can always check the package’s official documentation website to learn more about it. You can even venture into checking its source code and improving the package further.
Feel free to leave any comments below if you have any questions, or if there’s any section you’d love to hear more about.
Watch Now This tutorial has a related video course created by the Real Python team. Watch it together with the written tutorial to deepen your understanding: Editing Excel Spreadsheets in Python With openpyxl
Основные атрибуты и методы объекта Worksheet.
Объект Worksheet представляет собой рабочий лист, который в электронных таблицах Excel служит контейнером 2-го уровня.
Не создавайте рабочие листы самостоятельно, для этого используйте Workbook.create_sheet(). При создании новой рабочей книги средствами модуля openpyxl, по умолчанию уже создается один рабочий лист, доступ к которому можно получить через свойство Workbook.active.
>>> from openpyxl import Workbook
# создаем объект книги
>>> wb = Workbook()
# список имен листов в только
# что созданной книге
>>> wb.sheetnames
# ['Sheet']

# доступ к созданному по
# умолчанию листу 'Sheet'
>>> ws = wb.active
# переименовываем
>>> ws.title = 'MySheet'
# или создаем новый
>>> ws1 = wb.create_sheet('NewSheet')
# список имен листов в книге
>>> wb.sheetnames
# ['MySheet', 'NewSheet']
Содержание:
Worksheet.active_cellимя активной ячейки,Worksheet.add_chart()добавляет объект диаграммы ,Worksheet.add_data_validation()добавляет объект проверки данных,Worksheet.add_image()добавляет изображение,Worksheet.add_table()добавляет объект таблицы,Worksheet.append()добавляет группу значений в последнюю строку,Worksheet.calculate_dimension()возвращают минимальный диапазон ячеек с данными,Worksheet.cell()возвращает объект ячейки,Worksheet.columnsгенератор всех объектов ячеек с данными по столбцам,Worksheet.column_dimensionsинформация о свойствах отображения столбца,Worksheet.delete_cols()удаляет столбец или столбцы,Worksheet.delete_rows()удаляет строку или строки,Worksheet.freeze_panesфиксирует строки и колонки,Worksheet.insert_cols()вставляет столбец или столбцы,Worksheet.insert_rows()вставляет строку или строки,Worksheet.iter_cols()читает объекты ячеек,Worksheet.iter_rows()читает объекты строк,Worksheet.max_columnмаксимальный индекс столбца с данными,Worksheet.max_rowмаксимальный индекс строки с данными,Worksheet.merge_cellsустанавливает слияние в диапазоне ячеек,Worksheet.min_columnминимальный индекс столбца,Worksheet.min_rowминимальный индекс строки,Worksheet.move_range()перемещает диапазон ячеек,Worksheet.print_areaустанавливает область печати,Worksheet.print_title_colsустанавливает колонки, которые печатаются на каждой странице,Worksheet.print_title_rowsустанавливает строки, которые печатаются на каждой странице,Worksheet.row_dimensionsинформация о свойствах отображения строки,Worksheet.rowsгенератор всех объектов ячеек с данными по строкам,Worksheet.set_printer_settings()задает параметры принтера,Worksheet.tablesвсе объекты таблиц текущего листа,Worksheet.unmerge_cells()удаляет слияние ячеек,Worksheet.valuesгенератор всех значений ячеек по строкам.
Worksheet.active_cell:
Свойство Worksheet.active_cell возвращает имя активной ячейки листа Worksheet.
>>> ws.active_cell
# 'A1'
Worksheet.add_chart(chart, anchor=None):
Метод Worksheet.add_chart() добавляет объект диаграммы chart на текущий рабочий лист. При необходимости можно указать ячейку anchor для привязки к ней диаграммы. Диаграмма привязывается к левому верхнему углу ячейки.
Worksheet.add_data_validation(data_validation):
Метод Worksheet.add_data_validation() добавляет на рабочий лист электронной таблицы объект проверки данных data_validation.
Объект проверки данных определяет тип применяемой проверки данных и ячейку или диапазон ячеек, к которым она должна применяться.
Worksheet.add_image(img, anchor=None):
Метод Worksheet.add_image() добавляет изображение img на лист электронной таблицы.
При желании можно указать ячейку anchor для привязки изображения. Изображение привязывается к левому верхнему углу ячейки.
Worksheet.add_table(table):
Метод Worksheet.add_table() добавляет объект таблицы table на лист электронной таблицы.
Объект таблицы рабочего листа представляет собой ссылку на группу ячеек, что облегчает работу с данными, если на одном листе представлены несколько таблиц.
Перед добавлением объекта таблицы рабочего листа Table, необходимо сначала проверить наличие имени таблицы displayName в определенных именах и других таблицах рабочего листа во избежании получения исключения.
# проверим имя таблицы
if not ws.tables.get('MyTable'):
    # создаем объект таблицы
    table = Table(displayName="MyTable", ref="A1:E5")
    # добавляем таблицу
    ws.add_table(table)
Worksheet.append(iterable):
Метод Worksheet.append() добавляет группу значений в последнюю строку, которая не содержит данных.
- Если это список: все значения добавляются по порядку, начиная с первого столбца.
- Если это словарь: значения присваиваются столбцам, обозначенным ключами (цифрами или буквами).
Варианты использования:
- добавление списка:
.append([‘ячейка A1’, ‘ячейка B1’, ‘ячейка C1’]) - добавление словаря:
- вариант 1:
.append({‘A’ : ‘ячейка A1’, ‘C’ : ‘ячейка C1’}), в качестве ключей используются буквы столбцов. - вариант 2:
.append({1 : ‘ячейка A1’, 3 : ‘ячейка C1’}), в качестве ключей используются цифры столбцов.
- вариант 1:
Пример добавление данных из списка:
# существующие листы рабочей книги
>>> wb.sheetnames
# ['MySheet', 'NewSheet']

# добавим данные в лист с именем `Mysheet2`
>>> ws = wb["MySheet"]
# создадим произвольные данные, используя
# вложенный генератор списков
>>> data = [[row*col for col in range(1, 10)] for row in range(1, 31)]
>>> data
# [
#     [1, 2, 3, 4, 5, 6, 7, 8, 9],
#     [2, 4, 6, 8, 10, 12, 14, 16, 18],
# ...
# ...
#     [30, 60, 90, 120, 150, 180, 210, 240, 270]
# ]

# добавляем данные в выбранный лист
>>> for row in data:
...     ws.append(row)
...
Вот и все, данные добавлены…
Worksheet.calculate_dimension()
Worksheet.dimensions:
Метод Worksheet.calculate_dimension() и свойство Worksheet.dimensions возвращают минимальный диапазон для всех ячеек текущего рабочего листа, которые содержат данные (например, ‘A1:M24’).
>>> ws.calculate_dimension()
# 'A1:I35'
>>> ws.dimensions
# 'A1:I35'
Worksheet.cell(row, column, value=None):
Метод Worksheet.cell() возвращает объект ячейки Cell на основе заданных координат.
Аргументы:
row— индекс строки ячейки, целое число.column— индекс столбца ячейки, целое число.value— значение ячейки, может быть число или дата/время или строка илиboolилиNone.
Пример:
# доступ к объекту ячейки
>>> cell = ws.cell(row=4, column=2)
>>> cell
# <Cell 'Sheet'.B4>

# доступ с присваиваем значения ячейки
>>> cell = ws.cell(row=4, column=2, value=10)
Важно! Ячейки создаются при первом доступе к ним. Из-за такого поведения, простой перебор ячеек в цикле, создаст объекты этих ячеек в памяти, даже если не присваивать им значения.
Этот код создаст в памяти 100×100=10000 пустых объектов ячеек, просто так израсходовав оперативную память.
>>> for x in range(1,101):
...        for y in range(1,101):
...            # доступ к объекту ячейки
...            ws.cell(row=x, column=y)
Worksheet.columns:
Свойство Worksheet.columns создает генератор всех объектов ячеек текущего рабочего листа, в которых есть данные, по столбцам. Дополнительно смотрите метод Worksheet.iter_cols().
>>> ws.columns
# [(<Cell 'Sheet'.A1>, <Cell 'Sheet'.A2>, <Cell 'Sheet'.A3>, ...),
# (<Cell 'Sheet'.B1>, <Cell 'Sheet'.B2>, <Cell 'Sheet'.B3>, ...),
# ...

>>> for col in ws.columns:
...     for cell in col:
...         print(cell)
# <Cell 'Sheet'.A1>
# <Cell 'Sheet'.A2>
# <Cell 'Sheet'.A3>
# ...
# <Cell 'Sheet'.B1>
# <Cell 'Sheet'.B2>
# <Cell 'Sheet'.B3>
...
Worksheet.column_dimensions:
Свойство Worksheet.column_dimensions содержит информацию о свойствах отображения столбцов и представляет собой словарный объект. Ключами объекта служат буквы столбцов рабочего листа. Например, что бы обратиться к группе ячеек определенного столбца, необходимо указать букву этого столбца: Worksheet.column_dimensions['D'].
Этот словарный объект имеет полезные атрибуты .width при помощи которого можно изменять ширину столбца.
Пример изменения высоты строки и ширины ячейки:
>>> from openpyxl import Workbook
>>> wb = Workbook()
>>> ws = wb.active
>>> ws.title = 'RowColDimension'
# изменяем ширину колонки
>>> ws.column_dimensions['B'].width = 30
>>> ws.column_dimensions['D'].width = 50
# изменяем высоту строки
>>> ws.row_dimensions[5].height = 50
# для наглядности запишем в ячейки значения
>>> ws['B5'] = 'ширина = 30, высота = 50'
>>> ws['D5'] = 'ширина = 50, высота = 50'
# ну и выравним
>>> from openpyxl.styles import Alignment
>>> for cell in ws[5]:
...     if cell.value:
...         cell.alignment = Alignment(horizontal="center", vertical="center")
>>> wb.save('width-height.xlsx')
Примечание: в коде используется свойство рабочего листа электронной таблицы Worksheet.row_dimensions.
Свойство Worksheet.column_dimensions имеет метод .group(start, end=None, outline_level=1, hidden=False), который разрешает группировку ряда последовательных строк или столбцов вместе, что бы свернуть/скрыть или показать их.
Принимаемые аргументы .group():
start: первый столбец для группировки (обязательно).end=None: последний столбец для группировки (необязательно).outline_level=1: уровень вложенности сворачивания. Например можно свернуть с 1 по 10 строки с уровнем 1, а потом свернуть строки с 5 по 10 с уровнем 2. В этом случае, при открытии документа появиться возможность показать/развернуть скрытые строки в 2 этапа. Так же это работает и с колонками.hidden=False: должна ли группа быть свернута/скрыта на рабочем листе.
Пример сворачивания группы колонок и строк:
>>> from openpyxl import Workbook
>>> wb = Workbook()
>>> ws = wb.active
>>> ws.title = 'RowColFold'
# свернем колонки с буквами с 'C' до 'F'
>>> ws.column_dimensions.group('C','F', hidden=True)
# свернем строки с номерами с 3 по 10
>>> ws.row_dimensions.group(3, 10, hidden=True)
# теперь свернем строки с номерами с 7 по 10, с уровнем 2
>>> ws.row_dimensions.group(7,10, outline_level=2, hidden=True)
>>> wb.save('fold_row-col.xlsx')
Worksheet.delete_cols(idx, amount=1):
Метод Worksheet.delete_cols() удаляет столбец или столбцы из col==idx, где idx числовой индекс столбца. Аргумент amount — количество удаляемых столбцов. По умолчанию удаляется один столбец.
Например, чтобы удалить столбцы в диапазоне F:H необходимо вызвать ws.delete_cols(6, 3).
# удалим 3 столбцы в диапазоне `F:H`
>>> ws.delete_cols(6, 3)
Worksheet.delete_rows(idx, amount=1):
Метод Worksheet.delete_rows() удаляет строку или строки из row==idx, где idx числовой индекс строки. Аргумент amount — количество удаляемых строк. По умолчанию удаляется одна строка.
Например, чтобы удалить строки в диапазоне 5:8 необходимо вызвать ws.delete_rows(5, 3).
# удалим 3 строки с 5 по 8
>>> ws.delete_rows(5, 3)
Worksheet.freeze_panes:
Свойство Worksheet.freeze_panes фиксирует строки и колонки находящиеся выше и левее указанной ячейки. Другими словами, это свойство фиксирует все что выше и левее указанной ячейки.
Например, если указать ws.freeze_panes = 'A3', то это заставит программу Excel зафиксировать только две верхние строки от прокрутки по вертикали. А если указать ws.freeze_panes = 'B3', то это зафиксирует две верхние строки от прокрутки по вертикали и колонку ‘A’ от прокрутки по горизонтали.
Worksheet.insert_cols(idx, amount=1):
Метод Worksheet.insert_cols() вставляет столбец или столбцы перед col==idx, где idx числовой индекс столбца. Аргумент amount — количество вставляемых столбцов. По умолчанию вставляется один столбец.
Например, чтобы вставить 3 столбца перед существующим столбцом D необходимо вызвать ws.insert_cols(4, 3).
# вставим 3 новых столбца
>>> ws.insert_cols(4, 3)
Worksheet.insert_rows(idx, amount=1):
Метод Worksheet.insert_rows() вставляет строку или строки перед row==idx, где idx числовой индекс строки. Аргумент amount — количество вставляемых строк. По умолчанию вставляется одна строка.
Например, чтобы вставить 3 строки перед существующей 7-ой строкой необходимо вызвать ws.insert_rows(7, 3).
# вставим 3 новые строки перед
# существующей 7-ой строкой
>>> ws.insert_rows(7, 3)
Worksheet.iter_cols(min_col=None, max_col=None, min_row=None, max_row=None, values_only=False):
Метод Worksheet.iter_cols() читает объекты ячеек на рабочем листе по столбцам (только те, которые имеют данные). Диапазон итерации задается с помощью индексов строк и столбцов. Возвращает генератор объектов из прочитанных ячеек.
- Если индексы не указаны, то диапазон начинается с ячейки
A1. - Если на листе нет ячеек с данными, то будет возвращен пустой кортеж.
Аргументы:
min_col— наименьший индекс столбца.min_row— наименьший индекс строки.max_col— наибольший индекс столбца.max_row— наибольший индекс строки.values_only— следует ли возвращать только значения ячеек.
>>> for col in ws.iter_cols(max_col=2, min_row=1, max_row=2):
...     for cell in col:
...         print(cell)
# <Cell Sheet1.A1>
# <Cell Sheet1.A2>
# <Cell Sheet1.B1>
# <Cell Sheet1.B2>
Примечание. Из соображений производительности метод Worksheet.iter_cols() недоступен в режиме только для чтения.
Worksheet.iter_rows(min_row=None, max_row=None, min_col=None, max_col=None, values_only=False):
Метод Worksheet.iter_rows() читает объекты ячеек на рабочем листе по строкам (только те, которые имеют данные). Диапазон итерации задается с помощью индексов строк и столбцов. Возвращает генератор объектов из прочитанных ячеек.
- Если индексы не указаны, то диапазон начинается с ячейки
A1. - Если на листе нет ячеек с данными, то будет возвращен пустой кортеж.
Аргументы:
min_col— наименьший индекс столбца.min_row— наименьший индекс строки.max_col— наибольший индекс столбца.max_row— наибольший индекс строки.values_only— следует ли возвращать только значения ячеек.
>>> for col in ws.iter_rows(min_col=1, max_col=2, max_row=2):
...     for cell in col:
...         print(cell)
# <Cell 'Sheet'.A1>
# <Cell 'Sheet'.B1>
# <Cell 'Sheet'.A2>
# <Cell 'Sheet'.B2>
Worksheet.max_column:
Свойство Worksheet.max_column возвращает максимальный индекс столбца, содержащий данные. Индексы столбцов начинаются с 1, а не с 0, как в списке.
Worksheet.max_row:
Свойство Worksheet.max_row возвращает максимальный индекс строки, содержащий данные. Индексы строк начинаются с 1, а не с 0, как в списке.
Worksheet.merge_cells(range_string=None, start_row=None, start_column=None, end_row=None, end_column=None):
Свойство Worksheet.merge_cells устанавливает слияние в диапазоне ячеек range_string. Диапазон range_string — это диапазон ячеек, который задается строкой, например, 'A1:E1'.
Диапазон ячеек, также можно установить при помощи аргументов start_row, start_column, end_row и end_column.
>>> from openpyxl import Workbook
>>> wb = Workbook()
>>> ws = wb.active
# объединить ячейки, находящиеся
# в диапазоне `B2 : E2`
>>> ws.merge_cells('B2:E2')
Worksheet.min_column:
Свойство Worksheet.min_column возвращает минимальный индекс столбца, содержащий данные. Индексы столбцов начинаются с 1, а не с 0, как в списке.
Worksheet.min_row:
Свойство Worksheet.min_row возвращает минимальный индекс строки, содержащий данные. Индексы строк начинаются с 1, а не с 0, как в списке.
Worksheet.move_range(cell_range, rows=0, cols=0, translate=False):
Метод Worksheet.move_range() перемещает диапазон ячеек cell_range на количество строк rows и/или столбцов cols:
- вниз, если
rows > 0, и вверх, еслиrows < 0, - вправо, если
cols > 0, и влево, еслиcols < 0.
Существующие ячейки будут перезаписаны. Формулы и ссылки обновляться не будут.
Пример:
>>> ws.move_range("D4:F10", rows=-1, cols=2)
Это приведет к перемещению ячеек в диапазоне ячеек D4:F10 вверх на одну строку и вправо на два столбца. Ячейки будут перезаписаны всеми существующими ячейками.
Если ячейки содержат формулы, то openpyxl может транслировать их, но этот функционал умолчанию отключен. Кроме того, будут транслированы только формулы в самих ячейках. Ссылки на ячейки из других ячеек или определенные имена обновляться не будут. Для этого можно использовать переводчик формул синтаксического анализа:
>>> ws.move_range("G4:H10", rows=1, cols=1, translate=True)
Это приведет к перемещению относительных ссылок в формулах в диапазоне на одну строку и один столбец.
Worksheet.print_area:
Свойство Worksheet.print_area возвращает/устанавливает область печати «по умолчанию» для текущего рабочего листа электронной таблицы. Если область печати не задана, то возвращается None.
Для установки области печати «по умолчанию«, необходимо указать диапазон, например 'A1:D4', или список диапазонов.
>>> print(ws.print_area)
# None

# установим диапазон печати
>>> ws.print_area = 'A1:F10'
>>> ws.print_area
# ['$A$1:$F$10']

# несколько диапазонов для печати по умолчанию
>>> ws.print_area = ['A1:B2', 'C3:F5']
>>> ws.print_area
# ['$A$1:$a$2', '$a$3:$f$10']
Worksheet.print_title_cols:
Свойство Worksheet.print_title_cols устанавливает колонки, которые должны быть напечатаны слева на каждой странице, например: 'A:C'.
# заставляем Excel печатать
# колонку `A` на каждом листе
>>> ws.print_title_cols = 'A:A'
Worksheet.print_title_rows:
Свойство Worksheet.print_title_rows устанавливает строки, которые должны быть напечатаны вверху каждой страницы, например, '1:3'.
# заставляем Excel печатать диапазон
# строк со 2 по 3 на каждом листе
>>> ws.print_title_rows = '2:3'
Worksheet.rows:
Свойство Worksheet.rows создает генератор всех объектов ячеек текущего рабочего листа, в которых есть данные, по строкам. Дополнительно смотрите метод Worksheet.iter_rows().
>>> list(ws.rows)
# [(<Cell 'Sheet'.A1>, <Cell 'Sheet'.B1>, <Cell 'Sheet'.C1>,
# (<Cell 'Sheet'.A2>, <Cell 'Sheet'.B2>, <Cell 'Sheet'.C2>, , ...),
# ...

>>> for row in ws.rows:
...     for cell in row:
...         print(cell)
# <Cell 'Sheet'.A1>
# <Cell 'Sheet'.B1>
# <Cell 'Sheet'.C1>
# ...
# <Cell 'Sheet'.A2>
# <Cell 'Sheet'.B2>
# <Cell 'Sheet'.C2>
...
Worksheet.row_dimensions:
Свойство Worksheet.row_dimensions содержит информацию о свойствах отображения строк и представляет собой словарный объект. Ключами объекта служат номера строк.
Этот словарный объект имеет полезные атрибут .height при помощи которого можно менять высоту строки и метод .group, который служит для группировки строк, для дальнейшего их сворачивания.
Так же смотрите свойство Worksheet.column_dimensions и материал «Изменение размеров строки/столбца модулем openpyxl в Python»
Worksheet.set_printer_settings(paper_size, orientation):
Метод Worksheet.set_printer_settings() устанавливает размер бумаги paper_size и ориентацию страницы orientation по умолчанию для текущего листа электронной таблицы.
Аргумент paper_size может принимать значения:
Worksheet.PAPERSIZE_A3 = '8'.Worksheet.PAPERSIZE_A4= '9'.Worksheet.PAPERSIZE_A4_SMALL= '10'.Worksheet.PAPERSIZE_A5= '11'.Worksheet.PAPERSIZE_EXECUTIVE= '7'.Worksheet.PAPERSIZE_LEDGER= '4'.Worksheet.PAPERSIZE_LEGAL= '5'.Worksheet.PAPERSIZE_LETTER= '1'.Worksheet.PAPERSIZE_LETTER_SMALL= '2'.Worksheet.PAPERSIZE_STATEMENT= '6'.Worksheet.PAPERSIZE_TABLOID= '3'.
Ориентация страницы, так же настраивается при помощи констант объекта Worksheet
Worksheet.ORIENTATION_LANDSCAPE= 'landscape'.Worksheet.ORIENTATION_PORTRAIT= 'portrait'.
Примечание: В коде не обязательно использовать имена констант, можно напрямую использовать их значения.
# формат `А4`, ориентированный как `landscape`
>>> set_printer_settings('9', 'landscape')
Worksheet.tables:
Свойство Worksheet.tables возвращает все объекты таблиц текущего листа документа XLSX, добавленные методом Worksheet.add_table().
Worksheet.unmerge_cells(range_string=None, start_row=None, start_column=None, end_row=None, end_column=None):
Метод Worksheet.unmerge_cells() удаляет слияние ячеек в диапазоне range_string. Аргумент range_string — это диапазон ячеек, который ранее был объединен при помощи метода Worksheet.merge_cells() и задается строкой, например, 'A1:E1'.
Диапазон ячеек, также можно установить при помощи аргументов start_row, start_column, end_row и end_column.
>>> from openpyxl import Workbook
>>> wb = Workbook()
>>> ws = wb.active
# объединим ячейки
>>> ws.merge_cells('B2:E2')
# а теперь разъединим ячейки,
# в диапазоне `B2 : E2`
>>> ws.unmerge_cells('B2:E2')
Worksheet.values:
Свойство Worksheet.values создает генератор, который содержит все значения ячеек, которые имеются на текущем листе по строкам.
for row in ws.values:
   for value in row:
     print(value)
Этот код напечатает все значения ячеек текущего рабочего листа, которые имеют какие-то данные.
Microsoft Excel is probably one of the highly used data storage applications. A huge proportion of small to medium size businesses fulfill their analytics requirement using Excel.
However, analyzing huge amount of data in Excel can become highly tedious and time-consuming. You could build customized data processing and analytics application using Visual Basic(VBA), the language that powers the Excel sheets. However, learning VBA could be difficult and perhaps, not worth it.
However, if you have a little knowledge of Python, you could build highly professional Business Intelligence using Excel data, without the need of a database. Using Python with Excel could be a game changer for your business.
Sections Covered
- Basic Information about Excel
- What is Openpyxl and how to install it?
- Reading data from Excel in Python
- Reading multiple cells from Excel in Python
- Find the max row and column number of an Excel sheet in Python
- How to iterate over Excel rows and columns in Python?
- Create a new Excel file with Python
- Writing data to Excel in Python
- Appending data to Excel in Python
- Manipulating Excel Sheets in Python
- Practical usage example of data analysis of Excel sheets in Python
Basic Information about Excel
Before beginning this Openpyxl tutorial, you need to keep the following details in mind.
- Excel files are called Workbooks.
- Each Workbook can contain multiple sheets.
- Every sheet consists of rows starting from 1 and columns starting from A.
- Rows and columns together make up a cell.
- Any type of data can be stored.
What is Openpyxl and how to install it?
The Openpyxl module in Python is used to handle Excel files without involving third-party Microsoft application software. It is arguably, the best python excel library that allows you to perform various Excel operations and automate excel reports using Python. You can perform all kinds of tasks using Openpyxl like:-
- Reading data
- Writing data
- Editing Excel files
- Drawing graphs and charts
- Working with multiple sheets
- Sheet Styling etc.
You can install Openpyxl module by typing pip install openpyxl in your command line.
pip install openpyxlReading data from Excel in Python
To import an excel file in Python, use the load_workbook method from Openpyxl library.
Let’s import an Excel file named wb1.xlsx in Python using Openpyxl module. It has the following data as shown in the image below.

Step 1 — Import the load_workbook method from Openpyxl.
from openpyxl import load_workbook
Step 2 — Provide the file location for the Excel file you want to open in Python.
wb = load_workbook('wb1.xlsx')If your Excel file is present in the same directory as the python file, you don’t need to provide to entire file location.
Step 3 — Choose the first active sheet present in the workbook using wb.active attribute.
sheet = wb.activeThe above points are a standard way of accessing Excel sheets using Python. You will see them being used multiple times through out this article.
Let’s read all the data present in Row 1 (header row).
Method 1 — Reading data through Excel cell name in Python
Code
from openpyxl import load_workbook

wb = load_workbook('wb1.xlsx')

sheet = wb.active

print(sheet["A1"].value)
print(sheet["B1"].value)
print(sheet["C1"].value)
print(sheet["D1"].value)
Output
ProductId
ProductName
Cost per Unit
Quantity
Method 2 — Reading data from Excel using cell() method in Python
Code
from openpyxl import load_workbook

wb = load_workbook('wb1.xlsx')

sheet = wb.active

print(sheet.cell(row=1, column=1).value)
print(sheet.cell(row=1, column=2).value)
print(sheet.cell(row=1, column=3).value)
print(sheet.cell(row=1, column=4).value)
Output
ProductId
ProductName
Cost per Unit
Quantity
Reading Multiple Cells from Excel in Python
You can also read multiple cells from an Excel workbook. Let’s understand this through various examples. Refer to the image of the wb1.xlsx file above for clarity.
Method 1 — Reading a range of cells in Excel using cell names
To read the data from a specific range of cells in your Excel sheet, you need to slice your sheet object through both the cells.
Code
from openpyxl import load_workbook

wb = load_workbook('wb1.xlsx')

sheet = wb.active

# Access all cells from A1 to D11
print(sheet["A1:D11"])
Output
((<Cell 'Sheet1'.A1>, <Cell 'Sheet1'.B1>, <Cell 'Sheet1'.C1>, <Cell 'Sheet1'.D1>),
 (<Cell 'Sheet1'.A2>, <Cell 'Sheet1'.B2>, <Cell 'Sheet1'.C2>, <Cell 'Sheet1'.D2>),
 (<Cell 'Sheet1'.A3>, <Cell 'Sheet1'.B3>, <Cell 'Sheet1'.C3>, <Cell 'Sheet1'.D3>),
 (<Cell 'Sheet1'.A4>, <Cell 'Sheet1'.B4>, <Cell 'Sheet1'.C4>, <Cell 'Sheet1'.D4>),
 (<Cell 'Sheet1'.A5>, <Cell 'Sheet1'.B5>, <Cell 'Sheet1'.C5>, <Cell 'Sheet1'.D5>),
 (<Cell 'Sheet1'.A6>, <Cell 'Sheet1'.B6>, <Cell 'Sheet1'.C6>, <Cell 'Sheet1'.D6>),
 (<Cell 'Sheet1'.A7>, <Cell 'Sheet1'.B7>, <Cell 'Sheet1'.C7>, <Cell 'Sheet1'.D7>),
 (<Cell 'Sheet1'.A8>, <Cell 'Sheet1'.B8>, <Cell 'Sheet1'.C8>, <Cell 'Sheet1'.D8>),
 (<Cell 'Sheet1'.A9>, <Cell 'Sheet1'.B9>, <Cell 'Sheet1'.C9>, <Cell 'Sheet1'.D9>),
 (<Cell 'Sheet1'.A10>, <Cell 'Sheet1'.B10>, <Cell 'Sheet1'.C10>, <Cell 'Sheet1'.D10>),
 (<Cell 'Sheet1'.A11>, <Cell 'Sheet1'.B11>, <Cell 'Sheet1'.C11>, <Cell 'Sheet1'.D11>))
You can see that by slicing the sheet data from A1:D11, it returned us tuples of row data inside a tuple. In order to read the values of every cell returned, you can iterate over each row and use .value.
Code
from openpyxl import load_workbook

wb = load_workbook('wb1.xlsx')

sheet = wb.active

# Access all cells from A1 to D11
for row in sheet["A1:D11"]:
    print ([x.value for x in row])
Output
['ProductId', 'ProductName', 'Cost per Unit', 'Quantity']
[1, 'Pencil', '$0.5', 200]
[2, 'Pen', '$1', 500]
[3, 'Eraser', '$0.25', 100]
[4, 'Sharpner', '$0.75', 100]
[5, 'Files', '$3', 50]
[6, 'A4 Size Paper', '$9', 10]
[7, 'Pencil Box', '$12', 20]
[8, 'Pen Stand', '$5.5', 10]
[9, 'Notebook', '$2', 50]
[10, 'Marker', '$1', 75]
Method 2 — Reading a single row in Excel using cell name
To read a single row in your Excel sheet, just access the single row number from your sheet object.
Code
from openpyxl import load_workbook

wb = load_workbook('wb1.xlsx')

sheet = wb.active

# Access all cells in row 1
for data in sheet["1"]:
    print(data.value)
Output
ProductId
ProductName
Cost per Unit
Quantity
Method 3 — Reading all rows in Excel using rows attribute
To read all the rows, use sheet.rows to iterate over rows with Openpyxl. You receive a tuple element per row by using the sheet.rows attribute.
Code
from openpyxl import load_workbook

wb = load_workbook('wb1.xlsx')

sheet = wb.active

# Access all cells in row 1
for row in sheet.rows:
    print([data.value for data in row])
Output
['ProductId', 'ProductName', 'Cost per Unit', 'Quantity']
[1, 'Pencil', '$0.5', 200]
[2, 'Pen', '$1', 500]
[3, 'Eraser', '$0.25', 100]
[4, 'Sharpner', '$0.75', 100]
[5, 'Files', '$3', 50]
[6, 'A4 Size Paper', '$9', 10]
[7, 'Pencil Box', '$12', 20]
[8, 'Pen Stand', '$5.5', 10]
[9, 'Notebook', '$2', 50]
[10, 'Marker', '$1', 75]
Method 4 — Reading a single column in Excel using cell name
Similar to reading a single row, you can read the data in a single column of your Excel sheet by its alphabet.
Code
from openpyxl import load_workbook

wb = load_workbook('wb1.xlsx')

sheet = wb.active

# Access all cells in column A
for data in sheet["A"]:
    print(data.value)
Output
ProductId
1
2
3
4
5
6
7
8
9
10
Method 5 — Reading all the columns in Excel using columns attribute
To read all the data as a tuple of the columns in your Excel sheet, use sheet.columns attribute to iterate over all columns with Openpyxl.
Code
from openpyxl import load_workbook

wb = load_workbook('wb1.xlsx')

sheet = wb.active

# Access all columns
for col in sheet.columns:
    print([data.value for data in col])
Output
['ProductId', 1, 2, 3, 4, 5, 6, 7, 8, 9, 10]
['ProductName', 'Pencil', 'Pen', 'Eraser', 'Sharpner', 'Files', 'A4 Size Paper', 'Pencil Box', 'Pen Stand', 'Notebook', 'Marker']
['Cost per Unit', '$0.5', '$1', '$0.25', '$0.75', '$3', '$9', '$12', '$5.5', '$2', '$1']
['Quantity', 200, 500, 100, 100, 50, 10, 20, 10, 50, 75]
Method 6 — Reading all the data in Excel
To read all the data present in your Excel sheet, you don’t need to index the sheet object. You can just iterate over it.
Code
from openpyxl import load_workbook

wb = load_workbook('wb1.xlsx')

sheet = wb.active

# Access all cells in Excel
for row in sheet:
    print([data.value for data in row])
Output
['ProductId', 'ProductName', 'Cost per Unit', 'Quantity']
[1, 'Pencil', '$0.5', 200]
[2, 'Pen', '$1', 500]
[3, 'Eraser', '$0.25', 100]
[4, 'Sharpner', '$0.75', 100]
[5, 'Files', '$3', 50]
[6, 'A4 Size Paper', '$9', 10]
[7, 'Pencil Box', '$12', 20]
[8, 'Pen Stand', '$5.5', 10]
[9, 'Notebook', '$2', 50]
[10, 'Marker', '$1', 75]
Find the max row and column number of an Excel Sheet in Python
To find the max row and column number from your Excel sheet in Python, use sheet.max_row and sheet.max_column attributes in Openpyxl.
Code
from openpyxl import load_workbook

wb = load_workbook('wb1.xlsx')

sheet = wb.active

print(f"Max row in the active sheet is {sheet.max_row}")
print(f"Max column in the active sheet is {sheet.max_column}")
Output
Max row in the active sheet is 11
Max column in the active sheet is 4
Note — If you update a cell with a value, the sheet.max_row and sheet.max_column values also change, even though you haven’t saved your changes.
Code
from openpyxl import load_workbook

wb = load_workbook('pylenin.xlsx')

sheet = wb.active

sheet["A1"].value = "Lenin"
print(sheet.max_row)

sheet["A2"].value = "Mishra"
print(sheet.max_row)

# wb.save('pylenin.xlsx')
Output
1
2
How to iterate over Excel rows and columns in Python?
Openpyxl offers two commonly used methods called iter_rows and iter_cols to iterate over Excel rows and columns in Python.
iter_rows()— Returns one tuple element per row selected.iter_cols()— Returns one tuple element per column selected.
Both the above mentioned methods can receive the following arguments for setting boundaries for iteration:
- min_row
- max_row
- min_col
- max_col
Example 1 — iter_rows()
Code
from openpyxl import load_workbook

wb = load_workbook('wb1.xlsx')

sheet = wb.active

# Access all cells from between
# "Row 1 and Row 2" and "Column 1 and Column 3"
for row in sheet.iter_rows(min_row=1,
                           max_row=2,
                           min_col=1,
                           max_col=3):
    print([data.value for data in row])
Output
['ProductId', 'ProductName', 'Cost per Unit']
[1, 'Pencil', '$0.5']
As you can see, only the first 3 columns of the first 2 rows are returned. The tuples are row based.
You can also choose to not pass in some or any arguments in iter_rows method.
Code — Not passing min_col and max_col
from openpyxl import load_workbook

wb = load_workbook('wb1.xlsx')

sheet = wb.active

# min_col and max_col arguments are not provided
for row in sheet.iter_rows(min_row=1,
                           max_row=2):
    print([data.value for data in row])
Output
['ProductId', 'ProductName', 'Cost per Unit', 'Quantity']
[1, 'Pencil', '$0.5', 200]
All the columns from the first 2 rows are being printed.
Example 2 — iter_cols()
Code
from openpyxl import load_workbook

wb = load_workbook('wb1.xlsx')

sheet = wb.active

# Access all cells from A1 to D11
for row in sheet.iter_cols(min_row=1,
                           max_row=2,
                           min_col=1,
                           max_col=3):
    print([data.value for data in row])
Output
['ProductId', 1]
['ProductName', 'Pencil']
['Cost per Unit', '$0.5']
The tuples returned are column based on using iter_cols() method.
You can also choose to not pass in some or any arguments in iter_cols() method.
Code — Not passing any argument
from openpyxl import load_workbook

wb = load_workbook('wb1.xlsx')

sheet = wb.active

# min_col and max_col arguments are not provided
for row in sheet.iter_cols():
    print([data.value for data in row])
Output
['ProductId', 1, 2, 3, 4, 5, 6, 7, 8, 9, 10]
['ProductName', 'Pencil', 'Pen', 'Eraser', 'Sharpner', 'Files', 'A4 Size Paper', 'Pencil Box', 'Pen Stand', 'Notebook', 'Marker']
['Cost per Unit', '$0.5', '$1', '$0.25', '$0.75', '$3', '$9', '$12', '$5.5', '$2', '$1']
['Quantity', 200, 500, 100, 100, 50, 10, 20, 10, 50, 75]
Create a new Excel file with Python
To create a new Excel file in Python, you need to import the Workbook class from Openpyxl library.
Code
from openpyxl import Workbook

wb = Workbook()
sheet = wb.active

sheet['A1'] = "Pylenin"
sheet['B1'] = "loves"
sheet['C1'] = "Python"

wb.save("pylenin.xlsx")
This should create a new Excel workbook called pylenin.xlsx with the provided data.

Writing data to Excel in Python
There are multiple ways to write data to an Excel file in Python.
Method 1 — Writing data to Excel using cell names
Code
from openpyxl import Workbook

wb = Workbook()
sheet = wb.active

sheet['A1'] = "Pylenin"
sheet['B1'] = "loves"
sheet['C1'] = "Python"

wb.save("pylenin.xlsx")
Output

Method 2 — Writing data to Excel using the cell() method
Code
from openpyxl import Workbook

wb = Workbook()
sheet = wb.active

sheet.cell(row=1, column=1).value = "Pylenin"
sheet.cell(row=1, column=2).value = "loves"
sheet.cell(row=1, column=3).value = "Python"

wb.save("pylenin.xlsx")
Output

Method 3 — Writing data to Excel by iterating over rows
Code — Example 1
from openpyxl import Workbook

wb = Workbook()
sheet = wb.active

for row in sheet["A1:D3"]:
    row[0].value = "Pylenin"
    row[1].value = "loves"
    row[2].value = "Python"

wb.save("pylenin.xlsx")
Output

You can also use methods like iter_rows() and iter_cols() to write data to Excel.
Code — Example 2 — using iter_rows() method
from openpyxl import Workbook

wb = Workbook()
sheet = wb.active

for row in sheet.iter_rows(min_row=1,
                           max_row=3,
                           min_col=1,
                           max_col=3):
    row[0].value = "Pylenin"
    row[1].value = "loves"
    row[2].value = "Python"

wb.save("pylenin.xlsx")
Output

Code — Example 3 — using iter_cols() method
from openpyxl import Workbook

wb = Workbook()
sheet = wb.active

for col in sheet.iter_cols(min_row=1,
                           max_row=3,
                           min_col=1,
                           max_col=3):
    col[0].value = "Pylenin"
    col[1].value = "loves"
    col[2].value = "Python"

wb.save("pylenin.xlsx")
Output

Appending data to Excel in Python
Openpyxl provides an append() method, which is used to append values to an existing Excel sheet in Python.
Code
from openpyxl import load_workbook

wb = load_workbook('pylenin.xlsx')
sheet = wb.active

data = (
    ("Pylenin", "likes", "icecream"),
    ("Pylenin", "likes", "Cricket")
)

for row in data:
    sheet.append(row)
wb.save('pylenin.xlsx')
Output

Manipulating Excel Sheets in Python
Each Excel workbook can contain multiple sheets. To get a list of all the sheet names in an Excel workbook, you can use the wb.sheetnames.
Code
from openpyxl import load_workbook

wb = load_workbook('pylenin.xlsx')
print(wb.sheetnames)
Output
['Sheet']As you can see, pylenin.xlsx has only one sheet.
To create a new sheet in Python, use the create_sheet() method from the Openpyxl library.
Code
from openpyxl import load_workbook

wb = load_workbook('pylenin.xlsx')
wb.create_sheet('Pylenin')

wb.save('pylenin.xlsx')
Output

You can also create sheets at different positions in the Excel Workbook.
Code
from openpyxl import load_workbook

wb = load_workbook('pylenin.xlsx')

# insert sheet at 2nd to last position
wb.create_sheet('Lenin Mishra', -1)

wb.save('pylenin.xlsx')
Output

If your Excel workbook contains multiple sheets and you want to work with a particular sheet, you can refer the title of that sheet in your workbook object.
Code
from openpyxl import load_workbook

wb = load_workbook('pylenin.xlsx')
ws = wb["Pylenin"]

ws["A1"].value = "Pylenin"
ws["A2"].value = "loves"
ws["A3"].value = "Python"

wb.save('pylenin.xlsx')
Output

Practical usage example of data analysis of Excel sheets in Python
Let’s perform some data analysis with wb1.xlsx file as shown in the first image.
Objective
- Add a new column showing
Total Price per Product. - Calculate the
Total Costof all the items bought.
The resulting Excel sheet should look like the below image.

Step 1 — Find the max row and max column of the Excel sheet
As mentioned before, you can use the sheet.max_row and sheet.max_column attributes to find the max row and max column for any Excel sheet with Openpyxl.
Code
from openpyxl import load_workbook

wb = load_workbook('wb1.xlsx')

sheet = wb.active

print(f"Max row in the active sheet is {sheet.max_row}")
print(f"Max column in the active sheet is {sheet.max_column}")
Output
Max row in the active sheet is 11
Max column in the active sheet is 4
Step 2 — Add an extra column in Excel with Python

To add an extra column in the active Excel sheet, with calculations, you need to first create a new column header in the first empty cell and then iterate over all rows to multiply Quantity with Cost per Unit.
Code
from openpyxl import load_workbook

wb = load_workbook('wb1.xlsx')

sheet = wb.active

# Add new column header

sheet.cell(row=1, column=sheet.max_column+1).value = "Total Price per Product"

wb.save("wb1.xlsx")
Output

Now that an extra column header has been created, the sheet.max_column value will change to 5.
Now you can calculate the Total Price per Product using iter_rows() method.
Code
from openpyxl import load_workbook

wb = load_workbook('wb1.xlsx')

sheet = wb.active

# Calculate Total Price per Product

for id, row in enumerate(sheet.iter_rows(min_row=2,
                                         max_row = sheet.max_row)):

    row_number = id + 2 # index for enumerate will start at 0
    product_name = row[1].value
    cost_per_unit = row[2].value
    quantity = row[3].value
    print(f"Total cost for {product_name} is {cost_per_unit*quantity}")

    # Update cell value in the last column
    current_cell = sheet.cell(row=row_number, column=sheet.max_column)
    current_cell.value = cost_per_unit*quantity

    # Format cell from number to $ currency
    current_cell.number_format = '$#,#0.0'

print("nSuccesfully updated Excel")
wb.save('wb1.xlsx')
Output
Total cost for Pencil is 100.0
Total cost for Pen is 500
Total cost for Eraser is 25.0
Total cost for Sharpner is 75.0
Total cost for Files is 150
Total cost for A4 Size Paper is 90
Total cost for Pencil Box is 240
Total cost for Pen Stand is 55.0
Total cost for Notebook is 100
Total cost for Marker is 75

Succesfully updated Excel
Step 3 — Calculate sum of a column in Excel with Python
The last step is to calculate the Total Cost of the last column in the Excel file.
Access the last column and add up all the cost.
You can read the last column by accessing the sheet.columns attribute. Since it returns a generator, you first convert it to a python list and access the last column.
last_column_data = list(sheet.columns)[-1]
# Ignore header cell
total_cost = sum([x.value for x in last_column_data[1:]])
Create a new row 2 places down from the max_row and fill in Total Cost.
max_row = sheet.max_row

total_cost_descr_cell = sheet.cell(row = max_row +2, column = sheet.max_column -1)
total_cost_descr_cell.value = "Total Cost"

total_cost_cell =  sheet.cell(row = max_row +2, column = sheet.max_column)
total_cost_cell.value = total_cost
Import Font class from openpyxl.styles to make the last row Bold.
# Import the Font class from Openpyxl
from openpyxl.styles import Font

bold_font = Font(bold=True)
total_cost_descr_cell.font = bold_font
total_cost_cell.font = bold_font

total_cost_cell.number_format = "$#,#0.0"
Final Code
Code
from openpyxl import load_workbook

wb = load_workbook('wb1.xlsx')

sheet = wb.active

last_column_data = list(sheet.columns)[-1]
# Ignore header cell
total_cost = sum([x.value for x in last_column_data[1:]])

max_row = sheet.max_row

total_cost_descr_cell = sheet.cell(row = max_row + 2, column = sheet.max_column -1)
total_cost_descr_cell.value = "Total Cost"

total_cost_cell =  sheet.cell(row = max_row + 2, column = sheet.max_column)
total_cost_cell.value = total_cost

# Import the Font class from Openpyxl
from openpyxl.styles import Font

bold_font = Font(bold=True)
total_cost_descr_cell.font = bold_font
total_cost_cell.font = bold_font

total_cost_cell.number_format = "$#,#0.0"

print("nSuccesfully updated Excel")
wb.save('wb1.xlsx')
When you run the above code, you should see all the relevant updates to your Excel sheet.

Документ электронной таблицы Excel называется рабочей книгой. Каждая книга может хранить некоторое количество листов. Лист, просматриваемый пользователем в данный момент, называется активным. Лист состоит из из столбцов (адресуемых с помощью букв, начиная с A) и строк (адресуемых с помощью цифр, начиная с 1).
Модуль OpenPyXL не поставляется вместе с Python, поэтому его предварительно нужно установить:
> pip install openpyxl
Чтение файлов Excel
Начинаем работать:
>>> import openpyxl
>>> wb = openpyxl.load_workbook('example.xlsx')
>>> type(wb)
<class 'openpyxl.workbook.workbook.Workbook'>
>>> wb.sheetnames
['Лист1', 'Лист2', 'Лист3']
>>> sheet = wb.active
>>> sheet
<Worksheet "Лист1">
>>> sheet['A1']
<Cell Лист1.A1>
А теперь небольшой скрипт:
import openpyxl

# читаем excel-файл
wb = openpyxl.load_workbook('example.xlsx')

# печатаем список листов
sheets = wb.sheetnames
for sheet in sheets:
    print(sheet)

# получаем активный лист
sheet = wb.active

# печатаем значение ячейки A1
print(sheet['A1'].value)
# печатаем значение ячейки B1
print(sheet['B1'].value)
Результат работы:
Лист1
Лист2
Лист3

2015-04-05 13:34:02
Яблоки
Как получить другой лист книги:
# получаем другой лист
sheet2 = wb['Лист2']
# печатаем значение ячейки A1
print(sheet2['A2'].value)
Как сделать лист книги активным:
# делаем третий лист активным
wb.active = 2
Как задать имя листа:
sheet.title = 'Третий лист'
Объект Cell имеет атрибут value, который содержит значение, хранящееся в ячейке. Объект Cell также имеет атрибуты row, column и coordinate, которые предоставляют информацию о расположении данной ячейки в таблице.
# получаем ячейку листа B2
cell = sheet['B2']
print('Строка: ' + str(cell.row))
print('Столбец: ' + cell.column)
print('Ячейка: ' + cell.coordinate)
print('Значение: ' + cell.value)
Строка: 2
Столбец: B
Ячейка: B2
Значение: Вишни
К отдельной ячейке можно также обращаться с помощью метода cell() объекта Worksheet, передавая ему именованные аргументы row и column. Первому столбцу или первой строке соответствует число 1, а не 0:
# получаем ячейку листа B2
cell = sheet.cell(row = 2, column = 2)
print(cell.value)
Вишни
Размер листа можно получить с помощью атрибутов max_row и max_column объекта Worksheet:
rows = sheet.max_row
cols = sheet.max_column

for i in range(1, rows + 1):
    string = ''
    for j in range(1, cols + 1):
        cell = sheet.cell(row = i, column = j)
        string = string + str(cell.value) + ' '
    print(string)
2015-04-05 13:34:02 Яблоки 73
2015-04-05 03:41:23 Вишни 85
2015-04-06 12:46:51 Груши 14
2015-04-08 08:59:43 Апельсины 52
2015-04-10 02:07:00 Яблоки 152
2015-04-10 18:10:37 Бананы 23
2015-04-10 02:40:46 Земляника 98
Чтобы преобразовать буквенное обозначение столбца в цифровое, следует вызвать функцию
openpyxl.utils.column_index_from_string()
Чтобы преобразовать цифровое обозначение столбуа в буквенное, следует вызвать функцию
openpyxl.utils.get_column_letter()
Для вызова этих функций загружать рабочую книгу не обязательно.
>>> from openpyxl.utils import get_column_letter, column_index_from_string
>>> get_column_letter(1)
'A'
>>> get_column_letter(27)
'AA'
>>> column_index_from_string('A')
1
>>> column_index_from_string('AA')
27
Используя срезы объектов Worksheet, можно получить все объекты Cell, принадлежащие определенной строке, столбцу или прямоугольной области.
>>> sheet['A1':'C3']
((<Cell 'Лист1'.A1>, <Cell 'Лист1'.B1>, <Cell 'Лист1'.C1>),
 (<Cell 'Лист1'.A2>, <Cell 'Лист1'.B2>, <Cell 'Лист1'.C2>),
 (<Cell 'Лист1'.A3>, <Cell 'Лист1'.B3>, <Cell 'Лист1'.C3>))
for row in sheet['A1':'C3']:
    string = ''
    for cell in row:
        string = string + str(cell.value) + ' '
    print(string)
2015-04-05 13:34:02 Яблоки 73
2015-04-05 03:41:23 Вишни 85
2015-04-06 12:46:51 Груши 14
Выводим значения второй колонки:
>>> sheet['B']
(<Cell 'Лист1'.B1>, <Cell 'Лист1'.B2>, <Cell 'Лист1'.B3>, <Cell 'Лист1'.B4>, ..., <Cell 'Лист1'.B7>)
for cell in sheet['B']:
    print(cell.value)
Яблоки
Вишни
Груши
Апельсины
Яблоки
Бананы
Земляника
Выводим строки с первой по третью:
>>> sheet[1:3]
((<Cell 'Лист1'.A1>, <Cell 'Лист1'.B1>, <Cell 'Лист1'.C1>),
 (<Cell 'Лист1'.A2>, <Cell 'Лист1'.B2>, <Cell 'Лист1'.C2>),
 (<Cell 'Лист1'.A3>, <Cell 'Лист1'.B3>, <Cell 'Лист1'.C3>))
for row in sheet[1:3]:
    string = ''
    for cell in row:
        string = string + str(cell.value) + ' '
    print(string)
2015-04-05 13:34:02 Яблоки 73
2015-04-05 03:41:23 Вишни 85
2015-04-06 12:46:51 Груши 14
Для доступа к ячейкам конкретной строки или столбца также можно воспользоваться атрибутами rows и columns объекта Worksheet.
>>> list(sheet.rows)
[(<Cell 'Лист1'.A1>, <Cell 'Лист1'.B1>, <Cell 'Лист1'.C1>),
 (<Cell 'Лист1'.A2>, <Cell 'Лист1'.B2>, <Cell 'Лист1'.C2>),
 ..........
 (<Cell 'Лист1'.A6>, <Cell 'Лист1'.B6>, <Cell 'Лист1'.C6>),
 (<Cell 'Лист1'.A7>, <Cell 'Лист1'.B7>, <Cell 'Лист1'.C7>)]
for row in sheet.rows:
    print(row)
(<Cell 'Лист1'.A1>, <Cell 'Лист1'.B1>, <Cell 'Лист1'.C1>)
(<Cell 'Лист1'.A2>, <Cell 'Лист1'.B2>, <Cell 'Лист1'.C2>)
..........
(<Cell 'Лист1'.A6>, <Cell 'Лист1'.B6>, <Cell 'Лист1'.C6>)
(<Cell 'Лист1'.A7>, <Cell 'Лист1'.B7>, <Cell 'Лист1'.C7>)
>>> list(sheet.columns)
[(<Cell 'Лист1'.A1>, <Cell 'Лист1'.A2>, <Cell 'Лист1'.A3>, <Cell 'Лист1'.A4>, ..., <Cell 'Лист1'.A7>),
 (<Cell 'Лист1'.B1>, <Cell 'Лист1'.B2>, <Cell 'Лист1'.B3>, <Cell 'Лист1'.B4>, ..., <Cell 'Лист1'.B7>),
 (<Cell 'Лист1'.C1>, <Cell 'Лист1'.C2>, <Cell 'Лист1'.C3>, <Cell 'Лист1'.C4>, ..., <Cell 'Лист1'.C7>)]
for column in sheet.columns:
    print(column)
(<Cell 'Лист1'.A1>, <Cell 'Лист1'.A2>, <Cell 'Лист1'.A3>, <Cell 'Лист1'.A4>, ..., <Cell 'Лист1'.A7>)
(<Cell 'Лист1'.B1>, <Cell 'Лист1'.B2>, <Cell 'Лист1'.B3>, <Cell 'Лист1'.B4>, ..., <Cell 'Лист1'.B7>)
(<Cell 'Лист1'.C1>, <Cell 'Лист1'.C2>, <Cell 'Лист1'.C3>, <Cell 'Лист1'.C4>, ..., <Cell 'Лист1'.C7>)
Выводим значения всех ячеек листа:
for row in sheet.rows:
    string = ''
    for cell in row:
        string = string + str(cell.value) + ' '
    print(string)
2015-04-05 13:34:02 Яблоки 73
2015-04-05 03:41:23 Вишни 85
2015-04-06 12:46:51 Груши 14
2015-04-08 08:59:43 Апельсины 52
2015-04-10 02:07:00 Яблоки 152
2015-04-10 18:10:37 Бананы 23
2015-04-10 02:40:46 Земляника 98
Выводим значения второй строки (индекс 1):
for cell in list(sheet.rows)[1]:
    print(str(cell.value))
2015-04-05 03:41:23
Вишни
85
Выводим значения второй колонки (индекс 1):
for row in sheet.rows:
    print(str(row[1].value))
Яблоки
Вишни
Груши
Апельсины
Яблоки
Бананы
Земляника
Запись файлов Excel
>>> import openpyxl >>> wb = openpyxl.Workbook() >>> wb.sheetnames ['Sheet'] >>> wb.create_sheet(title = 'Первый лист', index = 0) <Worksheet "Первый лист"> >>> wb.sheetnames ['Первый лист', 'Sheet'] >>> wb.remove(wb['Первый лист']) >>> wb.sheetnames ['Sheet'] >>> wb.save('example.xlsx')
Метод create_sheet() возвращает новый объект Worksheet, который по умолчанию становится последним листом книги. С помощью именованных аргументов title и index можно задать имя и индекс нового листа.
Метод remove() принимает в качестве аргумента не строку с именем листа, а объект Worksheet. Если известно только имя листа, который надо удалить, используйте wb[sheetname]. Еще один способ удалить лист — использовать инструкцию del wb[sheetname].
Не забудьте вызвать метод save(), чтобы сохранить изменения после добавления или удаления листа рабочей книги.
Запись значений в ячейки напоминает запись значений в ключи словаря:
>>> import openpyxl >>> wb = openpyxl.Workbook() >>> wb.create_sheet(title = 'Первый лист', index = 0) >>> sheet = wb['Первый лист'] >>> sheet['A1'] = 'Здравствуй, мир!' >>> sheet['A1'].value 'Здравствуй, мир!'
Заполняем таблицу 3×3:
import openpyxl # создаем новый excel-файл wb = openpyxl.Workbook() # добавляем новый лист wb.create_sheet(title = 'Первый лист', index = 0) # получаем лист, с которым будем работать sheet = wb['Первый лист'] for row in range(1, 4): for col in range(1, 4): value = str(row) + str(col) cell = sheet.cell(row = row, column = col) cell.value = value wb.save('example.xlsx')
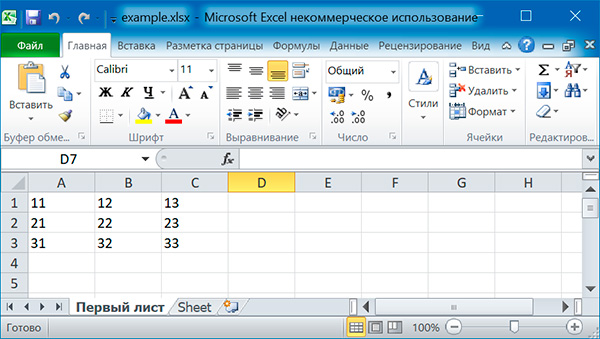
Можно добавлять строки целиком:
sheet.append(['Первый', 'Второй', 'Третий']) sheet.append(['Четвертый', 'Пятый', 'Шестой']) sheet.append(['Седьмой', 'Восьмой', 'Девятый'])
Стилевое оформление
Для настройки шрифтов, используемых в ячейках, необходимо импортировать функцию Font() из модуля openpyxl.styles:
from openpyxl.styles import Font
Ниже приведен пример создания новой рабочей книги, в которой для шрифта, используемого в ячейке A1, устанавливается шрифт Arial, красный цвет, курсивное начертание и размер 24 пункта:
import openpyxl from openpyxl.styles import Font # создаем новый excel-файл wb = openpyxl.Workbook() # добавляем новый лист wb.create_sheet(title = 'Первый лист', index = 0) # получаем лист, с которым будем работать sheet = wb['Первый лист'] font = Font(name='Arial', size=24, italic=True, color='FF0000') sheet['A1'].font = font sheet['A1'] = 'Здравствуй мир!' # записываем файл wb.save('example.xlsx')
Именованные стили применяются, когда надо применить стилевое оформление к большому количеству ячеек.
import openpyxl from openpyxl.styles import NamedStyle, Font, Border, Side # создаем новый excel-файл wb = openpyxl.Workbook() # добавляем новый лист wb.create_sheet(title = 'Первый лист', index = 0) # получаем лист, с которым будем работать sheet = wb['Первый лист'] # создаем именованный стиль ns = NamedStyle(name='highlight') ns.font = Font(bold=True, size=20) border = Side(style='thick', color='000000') ns.border = Border(left=border, top=border, right=border, bottom=border) # вновь созданный именованный стиль надо зарегистрировать # для дальнейшего использования wb.add_named_style(ns) # теперь можно использовать именованный стиль sheet['A1'].style = 'highlight' # записываем файл wb.save('example.xlsx')
Добавление формул
Формулы, начинающиеся со знака равенства, позволяют устанавливать для ячеек значения, рассчитанные на основе значений в других ячейках.
sheet['B9'] = '=SUM(B1:B8)'
Эта инструкция сохранит =SUM(B1:B8) в качестве значения в ячейке B9. Тем самым для ячейки B9 задается формула, которая суммирует значения, хранящиеся в ячейках от B1 до B8.
Формула Excel — это математическое выражение, которое создается для вычисления результата и которое может зависеть от содержимого других ячеек. Формула в ячейке Excel может содержать данные, ссылки на другие ячейки, а также обозначение действий, которые необходимо выполнить.
Использование ссылок на ячейки позволяет пересчитывать результат по формулам, когда происходят изменения содержимого ячеек, включенных в формулы. Формулы Excel начинаются со знака =. Скобки () могут использоваться для определения порядка математических операции.
Примеры формул Excel: =27+36, =А1+А2-АЗ, =SUM(А1:А5), =MAX(АЗ:А5), =(А1+А2)/АЗ.
Хранящуюся в ячейке формулу можно читать, как любое другое значение. Однако, если нужно получить результат расчета по формуле, а не саму формулу, то при вызове функции load_workbook() ей следует передать именованный аргумент data_only со значением True.
Настройка строк и столбцов
С помощью модуля OpenPyXL можно задавать высоту строк и ширину столбцов таблицы, закреплять их на месте (чтобы они всегда были видны на экране), полностью скрывать из виду, объединять ячейки.
Настройка высоты строк и ширины столбцов
Объекты Worksheet имеют атрибуты row_dimensions и column_dimensions, которые управляют высотой строк и шириной столбцов.
sheet['A1'] = 'Высокая строка' sheet['B2'] = 'Широкий столбец' sheet.row_dimensions[1].height = 70 sheet.column_dimensions['B'].width = 30
Атрибуты row_dimensions и column_dimensions представляют собой значения, подобные словарю. Атрибут row_dimensions содержит объекты RowDimensions, а атрибут column_dimensions содержит объекты ColumnDimensions. Доступ к объектам в row_dimensions осуществляется с использованием номера строки, а доступ к объектам в column_dimensions — с использованием буквы столбца.
Для указания высоты строки разрешено использовать целые или вещественные числа в диапазоне от 0 до 409. Для указания ширины столбца можно использовать целые или вещественные числа в диапазоне от 0 до 255. Столбцы с нулевой шириной и строки с нулевой высотой невидимы для пользователя.
Объединение ячеек
Ячейки, занимающие прямоугольную область, могут быть объединены в одну ячейку с помощью метода merge_cells() рабочего листа:
sheet.merge_cells('A1:D3') sheet['A1'] = 'Объединены двенадцать ячеек' sheet.merge_cells('C5:E5') sheet['C5'] = 'Объединены три ячейки'
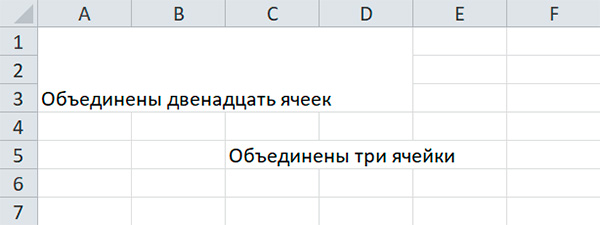
Чтобы отменить слияние ячеек, надо вызвать метод unmerge_cells():
sheet.unmerge_cells('A1:D3') sheet.unmerge_cells('C5:E5')
Закрепление областей
Если размер таблицы настолько велик, что ее нельзя увидеть целиком, можно заблокировать несколько верхних строк или крайних слева столбцов в их позициях на экране. В этом случае пользователь всегда будет видеть заблокированные заголовки столбцов или строк, даже если он прокручивает таблицу на экране.
У объекта Worksheet имеется атрибут freeze_panes, значением которого может служить объект Cell или строка с координатами ячеек. Все строки и столбцы, расположенные выше и левее, будут заблокированы.
| Значение атрибута freeze_panes | Заблокированные строки и столбцы |
|---|---|
sheet.freeze_panes = 'A2' |
Строка 1 |
sheet.freeze_panes = 'B1' |
Столбец A |
sheet.freeze_panes = 'C1' |
Столбцы A и B |
sheet.freeze_panes = 'C2' |
Строка 1 и столбцы A и B |
sheet.freeze_panes = None |
Закрепленные области отсутствуют |
Диаграммы
Модуль OpenPyXL поддерживает создание гистогорамм, графиков, а также точечных и круговых диаграмм с использование данных, хранящихся в электронной таблице. Чтобы создать диаграмму, необходимо выполнить следующие действия:
- создать объект
Referenceна основе ячеек в пределах выделенной прямоугольной области; - создать объект
Series, передав функцииSeries()объектReference; - создать объект Chart;
- дополнительно можно установить значения переменных
drawing.top,drawing.left,drawing.width,drawing.heightобъектаChart, определяющих положение и размеры диаграммы; - добавить объект
Chartв объектWorksheet.
Объекты Reference создаются путем вызова функции openpyxl.charts.Reference(), принимающей пять аргуменов:
- Объект
Worksheet, содержащий данные диаграммы. - Два целых числа, представляющих верхнюю левую ячейку выделенной прямоугольной области, в которых содержатся данные диаграммы: первое число задает строку, второе — столбец; первой строке соответствует 1, а не 0.
- Два целых числа, представляющих нижнюю правую ячейку выделенной прямоугольной области, в которых содержатся данные диаграммы: первое число задает строку, второе — столбец.
from openpyxl import Workbook from openpyxl.chart import BarChart, Reference # создаем новый excel-файл wb = Workbook() # добавляем новый лист wb.create_sheet(title = 'Первый лист', index = 0) # получаем лист, с которым будем работать sheet = wb['Первый лист'] sheet['A1'] = 'Серия 1' # это колонка с данными for i in range(1, 11): cell = sheet.cell(row = i + 1, column = 1) cell.value = i * i # создаем диаграмму chart = BarChart() chart.title = 'Первая серия данных' data = Reference(sheet, min_col = 1, min_row = 1, max_col = 1, max_row = 11) chart.add_data(data, titles_from_data = True) # добавляем диаграмму на лист sheet.add_chart(chart, 'C2') # записываем файл wb.save('example.xlsx')
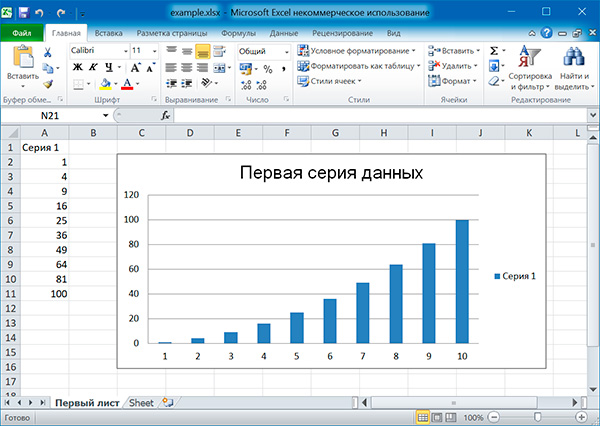
Аналогично можно создавать графики, точечные и круговые диаграммы, вызывая методы:
openpyxl.chart.LineChart()openpyxl.chart.ScatterChart()openpyxl.chart.PieChart()
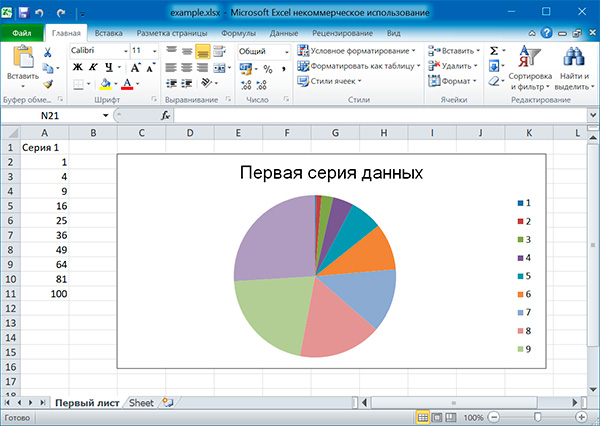
Поиск:
Excel • MS • Python • Web-разработка • Модуль
Improve Article
Save Article
Like Article
Improve Article
Save Article
Like Article
XlsxWriter is a Python module for writing files in the XLSX file format. It can be used to write text, numbers, and formulas to multiple worksheets. Also, it supports features such as formatting, images, charts, page setup, auto filters, conditional formatting and many others.
Use this command to install xlsxwriter module:
pip install xlsxwriter
Note: Throughout XlsxWriter, rows and columns are zero indexed. The first cell in a worksheet, A1 is (0, 0), B1 is (0, 1), A2 is (1, 0), B2 is (1, 1) ..similarly for all.
Let’s see how to create and write to an excel-sheet using Python.
Code #1 : Using A1 notation(cell name) for writing data in the specific cells.
Python3
import xlsxwriter
workbook = xlsxwriter.Workbook('hello.xlsx')
worksheet = workbook.add_worksheet()
worksheet.write('A1', 'Hello..')
worksheet.write('B1', 'Geeks')
worksheet.write('C1', 'For')
worksheet.write('D1', 'Geeks')
workbook.close()
Output:
Code #2 : Using the row-column notation(indexing value) for writing data in the specific cells.
Python3
import xlsxwriter
workbook = xlsxwriter.Workbook('Example2.xlsx')
worksheet = workbook.add_worksheet()
row = 0
column = 0
content = ["ankit", "rahul", "priya", "harshita",
"sumit", "neeraj", "shivam"]
for item in content :
worksheet.write(row, column, item)
row += 1
workbook.close()
Output:
Code #3 : Creating a new sheet with the specific name
Python3
import xlsxwriter
workbook = xlsxwriter.Workbook('Example3.xlsx')
worksheet = workbook.add_worksheet("My sheet")
scores = (
['ankit', 1000],
['rahul', 100],
['priya', 300],
['harshita', 50],
)
row = 0
col = 0
for name, score in (scores):
worksheet.write(row, col, name)
worksheet.write(row, col + 1, score)
row += 1
workbook.close()
Output:

XlsxWriter has some advantages and disadvantages over the alternative Python modules for writing Excel files.
Advantages:
- It supports more Excel features than any of the alternative modules.
- It has a high degree of fidelity with files produced by Excel. In most cases the files produced are 100% equivalent to files produced by Excel.
- It has extensive documentation, example files and tests.
- It is fast and can be configured to use very little memory even for very large output files.
Disadvantages:
- It cannot read or modify existing Excel XLSX files.
Like Article
Save Article