
Время на прочтение
2 мин
Количество просмотров 70K
Исполняем обязанности по получению сведений о своих бенефициарных владельцах
Небольшая вводная
Начиная с 21 декабря 2016 года вступили изменения в ФЗ РФ «О противодействии легализации (отмыванию) доходов, полученных преступным путем, и финансированию терроризма», касательно обязанности юридического лица по раскрытию информации о своих бенефициарных владельцах. В связи с этим, многие компании направляют запросы по цепочке владения с целью выяснения своих бенефициарных владельцев. Кто-то формирует запросы на бумаге, кто-то рассылает электронные письма.
На наш взгляд, надлежащим доказательством исполнения обязанности «знай своего бенефициарного владельца» является наличие письма на бумаге с отметкой об отправке/вручении. Данные письма в идеале должны готовиться не реже одного раза в год. Если в ведении юриста находится всего несколько компаний, то составление писем не составляет особого труда. Но, если компаний больше 3-х десятков, составление писем превращается в уничтожающую позитив рутину. Дело усугубляется тем, что реквизиты писем постоянно меняются: подписанты увольняются, компании перерегистрируются, меняя адреса. Все это надо учитывать. Как здесь могут помочь навыки программирования на python?
Очень просто — хорошо бы иметь программу, которая сама будет подставлять в письма необходимые реквизиты. В том числе формировать сами письма, не заставляя создавать документ за документом вручную. Попробуем.
Структура письма в word. Модуль python docxtpl
Перед написанием кода программы посмотрим как должен выглядеть шаблон письма, в который мы будем помещать наши данные.
Текст письма от общества своему участнику/акционеру будет примерно следующим:

Напишем простую программу, которая заполнит для начала одно поле в нашем шаблоне, чтобы понять принцип работы.
Для начала в самом шаблоне письма Word вместо одного из полей, например, подписанта поставим переменную. Данная переменная должна быть на либо на англ. языке, либо на русском, но в одно слово.Также переменная должна быть обязательно заключена в двойные фигурные скобки. Выглядеть это будет примерно так:

Сама программа будет иметь следующий вид:
from docxtpl import DocxTemplate
doc = DocxTemplate("шаблон.docx")
context = { 'director' : "И.И.Иванов"}
doc.render(context)
doc.save("шаблон-final.docx")
Вначале мы импортируем модуль для работы с документами формата Word. Далее мы открываем шаблон, и в поле директор, которое бы обозначили ранее в самом шаблоне, вносим ФИО директора. В конце документ сохраняется под новым именем.
Таким образом, чтобы заполнить все поля в файле-шаблоне Word нам для начала необходимо определить все поля ввода в самом шаблоне скобками {} вместе с переменными и потом написать программу. Код будет примерно следующим:
from docxtpl import DocxTemplate
doc = DocxTemplate("шаблон.docx")
context = { 'emitent' : 'ООО Ромашка', 'address1' : 'г. Москва, ул. Долгоруковская, д. 0', 'участник': 'ООО Участник', 'адрес_участника': 'г. Москва, ул. Полевая, д. 0', 'director': 'И.И. Иванов'}
doc.render(context)
doc.save("шаблон-final.docx")
На выходе при исполнении программы мы получим готовый заполненный документ.
Скачать готовый шаблон Word можно здесь.
Python is an excellent choice when it comes to automating repetitive tasks. In this article we will look at how we can leverage the power of Python to scrape web content and convert it to a well formatted Word document.
Continue reading to learn how to:
- Scrape content using
BeautifulSoup - Convert scraped data to Word format using
Pandoc
Defining the problem
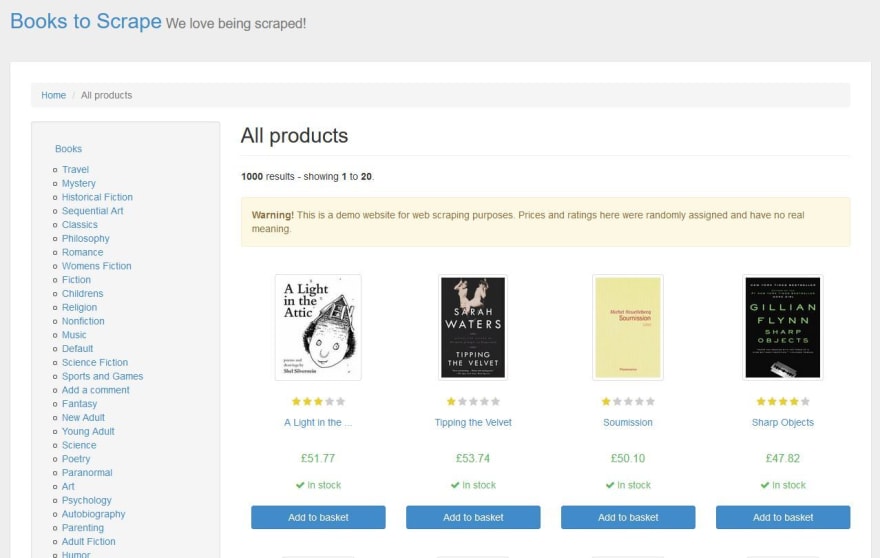
Let’s suppose that we have a website with a catalogue of books organised into categories. We want to have a version of the catalogue in a Word document. The are essentially two elements to this problem: (1) How do we collect the data? and (2) How do we create a Word document from this data?
The examples in this tutorial we will use the following dummy website created for scraping practice: http://books.toscrape.com/
The following steps summarise what is required to solve this problem:
- Collect data from index page
- Scrape a list of links to all film category pages
- Visit each category page and scrape a list of films in that category
- Visit each film in each category and scrape relevant data for that film
- Format collected data into a markdown string
- Store collected data as a Word document
Collect data from index page
The first step is to get the data from the index page:
from urllib.request import urlopen
from bs4 import BeautifulSoup


def collect_website_data(url):
    """
    Takes url string parameter, returns BeautifulSoup object with website content
    """
    index_page = urlopen(url) # HTTP Response
    scrape_data = BeautifulSoup(index_page, "html.parser") # BeatifulSoup Object
    return scrape_data


if __name__ == "__main__":
    BASE_URL = "http://books.toscrape.com/"
    page_data = collect_website_data(BASE_URL)
Enter fullscreen mode
Exit fullscreen mode
Let’s understand what is going on in the script above. We define a function called collect_website_data. This function takes a string as a parameter. We expect this to be the url of the page we want to scrape.
Here we are using the urlopen method from the urllib.request library.
The http response is then converted into a BeautifulSoup object and it is now ready for scraping.
In the main section of the script we are calling the collect_website_data function and provide the BASE_URL as the parameter.
Getting a list of categories
Now that we have a web scraping object to work on we need figure out how to get a list of all the category pages.
For that purpose we create another function
...

def get_list_of_category_urls(bs_object, base_url):
    """
    Takes a BeautifulSoup object as parameter, returns a list of urls
    """
    category_a_elements = bs_object.find("div", {"class": "side_categories"}).li.ul.findAll("a")
    category_links = []

    for item in category_a_elements:
        href = base_url + item.get("href")
        category_links.append(href)

    return category_links


if __name__ == "__main__":
    ...
    links_to_categories = get_list_of_category_urls(page_data, BASE_URL)
Enter fullscreen mode
Exit fullscreen mode
The get_list_of_category_urls takes two parameters: a BeautifulSoup object and a string representing the base url.
Analysis of the category sidebar section reveals that the <div class="side_categories"> holds the sidebar menu.

However, we need to drill down to the child <ul> element and find all <a> elements there. Using BeautifulSoup this can be achieved like so:
category_a_elements = bs_object.find("div", {"class": "side_categories"}).li.ul.findAll("a")
Enter fullscreen mode
Exit fullscreen mode
As this is not a BeautifulSoup tutorial per se. I refer you to the Beautiful documentation for additional information and examples.
Next, we are then using a for loop to go through every element in the list to pick out the href property. Because all the hrefs are relative in our example we need to prefix the BASE_URL to each to build a list of absolute links.
for item in category_a_elements:
        href = base_url + item.get("href")
        category_links.append(href)
Enter fullscreen mode
Exit fullscreen mode
With each loop, a href item is added to the category_links = [] list. After cycling through all the categories we return a list of strings which are full urls to category pages.
We store the list in links_to_categories variable.
Scrape data from each category page
With the list of category urls ready, we can now proceed to write a scraping script that will visit each page and retrieve the information that we want.
Let’s start from something easy like getting the category title from each category page:
...

def get_category_titles_from_each_page(list_of_urls):
    """
    Takes a list of urls, returns category titles from each visited page
    """
    titles = []

    for url in list_of_urls:
        category_page = urlopen(url)
        scrape_data = BeautifulSoup(
            category_page, "html.parser")  # BeatifulSoup Object
        title = scrape_data.h1.text
        titles.append(title)

    return(titles)


if __name__ == "__main__":
    ...
    titles = get_category_titles_from_each_page(links_to_categories)
Enter fullscreen mode
Exit fullscreen mode
Using the list we have in links_to_categories as input we run the get_category_titles_from_each_page function.
The function uses an empty list called titles. We are then using a for loop to repeat the process of requesting a web page and converting it to a BeautifulSoup object and then retrieving the text of <h1> tag from it. With each run we are appending the titles list. The completed list is what the function returns.
Apply Markdown formatting
The next step is to convert the list of records into a Markdown string.
Why Markdown? It allows us to apply simple string manipulation techniques on raw text to turn it into Markdown. Markdown format can then be easily converted to a number of output formats.
For the purposes of this exercise we need to know the following Markdown principles:
# One '#' marks a h1 header

## Two '#'s mark a h2 header

This will be a paragraph

This will another paragraph
Enter fullscreen mode
Exit fullscreen mode
The apply_markdown_formatting function prefixes a # followed by a space and suffixes with two new line nn characters.
...

def apply_markdown_formatting(list_of_records):
    """
    Takes an iterable, returns markdown formatted string
    """
    markdown_string = ""

    for item in list_of_records:
        line = "#" + " " + item + "nn"
        markdown_string += line

    return markdown_string


if __name__ == "__main__":
    ...
    markdown = apply_markdown_formatting(titles)
Enter fullscreen mode
Exit fullscreen mode
If we run print(markdown_string) we should get something like this:
# Travel

# Mystery

# Historical Fiction

# Sequential Art
...
Enter fullscreen mode
Exit fullscreen mode
Convert to Word
It is now time to check if we can successfully convert the Markdown string into a Word document.
For this you will need to install pandoc universal document converter. Pandoc is available on Windows, macOS as well as Linux. Pandoc supports a large number of document markup formats and is not limited to Markdown and Word.
In the script itself we will be using the pypandoc library which provides a thin wrapper for pandoc. You might also wish to install an additional filter called pandoc-docx-pagebreakpy which will allow you to insert page breaks into Word output. Both packages are available on pypi and can be installed via pip.
...
import pypandoc
...

def convert_markdown_to_docx(markdown_string):
    """
    Takes a markdown string, converts it to docx
    """
    filters = ['pandoc-docx-pagebreakpy']
    output = pypandoc.convert_text(
        markdown_string, 'docx', format='md', outputfile="output.docx", filters=filters)
    pass


if __name__ == "__main__":
    ...
    convert_markdown_to_docx(markdown)
Enter fullscreen mode
Exit fullscreen mode
Voilà! We’ve created a Word document from scraping data! The output.docx file should contain a list of scraped film categories formatted as Heading 1.
This provides the bare-bones functionality for the web-to-docx script but let’s spice it up a bit.
A more complex example
Consider the following function get_info_for_each_film which combines the functionality of get_category_titles_from_each_page and apply_markdown_formatting. We will reuse the collect_website_data and get_list_of_category_urls as well as the convert_markdown_to_docx functions:
import progressbar
import pypandoc
from urllib.request import urlopen
from bs4 import BeautifulSoup


def collect_website_data(url):
    ...
    return scrape_data


def get_list_of_category_urls(bs_object, base_url):
    ...
    return category_links


def get_info_for_each_film(list_of_urls, base_url):
    """
    Takes a list of urls, returns markdown formatted string
    """
    markdown_string = ""

    print('Retrieving film data for each category:')
    with progressbar.ProgressBar(max_value=len(list_of_urls)) as bar:
        for counter, url in enumerate(list_of_urls):
            category_page = urlopen(url)
            scrape_data = BeautifulSoup(
                category_page, "html.parser")
            category = scrape_data.h1.text
            category_md = "#" + " " + category + "nn"
            markdown_string += category_md
            links_to_films = scrape_data.find_all("h3")
            links_to_films = [base_url + "catalogue/" +
                              i.a.get("href")[9:] for i in links_to_films]
            for film_link in links_to_films:
                film_page = urlopen(film_link)
                scrape_data = BeautifulSoup(
                    film_page, "html.parser")
                film_title = scrape_data.h1.text
                film_title_md = "##" + " " + film_title + "n"
                markdown_string += film_title_md
                try:
                    description = scrape_data.find(
                        "div", {"id": "product_description"}).next_sibling.next_sibling.text
                    description_md = description + "nn"
                    markdown_string += description_md
                except AttributeError as e:
                    markdown_string += 'nn'
            markdown_string += '\newpage'
            bar.update(counter)
    return markdown_string


def convert_markdown_to_docx(markdown_string):
    ...
    pass


if __name__ == "__main__":
    BASE_URL = "http://books.toscrape.com/"
    page_data = collect_website_data(BASE_URL)
    links_to_categories = get_list_of_category_urls(page_data, BASE_URL)
    film_data = get_info_for_each_film(links_to_categories, BASE_URL)
    convert_markdown_to_docx(film_data)
Enter fullscreen mode
Exit fullscreen mode
The above function will do the necessary web scraping and string formatting to create a valid Markdown string in one go.
Because the script take a while to run, I have also added a progressbar using the progressbar2 library. The progress bar uses the length of the list containing category urls to set the maximum range for progress increments. The enumerate method adds a counter to the for loop that we can use to increment the bar’s progress.
For the script to be more useful we can drill down and scrape data from each film on each category. The aim will be to create a document that will follow this pattern:
[Heading 1] -- Category
    [Heading 2] -- Title
        [Paragraph] -- Film description
Enter fullscreen mode
Exit fullscreen mode
Each category will become a Heading 1 with each film title becoming a Heading 2. We will also add a Paragraph with the scraped film description.
In order to do that we need to list the urls for films on each category page. Analysis of the underlying html reveals that links to films are contained in h3 elements on category pages. The first step is then to retrieve all h3 elements. To get the urls for film pages I am using list comprehension which perhaps sacrifices some of the code readability for conciseness:
links_to_films = scrape_data.find_all("h3")
links_to_films = [base_url + "catalogue/" + i.a.get("href")[9:] for i in links_to_films]
Enter fullscreen mode
Exit fullscreen mode
Let’s go through what’s going on here: For each item in links_to_films, get the href property from the a tag, trim characters from the beginning of the string (those refer to relative url characters in the link), prepend the base_url variable as well as «catalogue/». Together this builds a list of film page urls i.e.:
[
...
"http://books.toscrape.com/catalogue/emma_17/index.html",
"http://books.toscrape.com/catalogue/alice-in-wonderland-alices-adventures-in-wonderland-1_5/index.html"
...
]
Enter fullscreen mode
Exit fullscreen mode
A nested for loop allows us to drill down to each film page and scrape data from it. Some of the BeautifulSoup trickery such as the doubled next_sibling in this example is explained in BeautifulSoup documentation:
description = scrape_data.find(
                        "div", {"id": "product_description"}).next_sibling.next_sibling.text
Enter fullscreen mode
Exit fullscreen mode
In short, a single next_sibling only retrieves the white space between the elements. The second next_sibling correctly retrieves the p element that holds the film description.
I have added a Try/Except block around the description scraper to handle situations where films have no descriptions.
When using Pandoc to export to a Word document, the \newpage tag will require you to install the pandoc-docx-pagebreakpy.
You are welcome to check out the full script on Github:
Real-life application of this solution
The inspiration to write this article came from a problem I had to solve recently. In my day job I am an IT Business Analyst at a large university. One of the administrative offices asked for help in order to provide an improved way of generating a Word document containing an export of postgraduate course data available on the courses website.
The process to generate the file would involve a member of staff going through some 200 course pages meticulously copying and pasting course information into a Word file. That Word file would serve as the source for the printed version of the College Postgraduate Prospectus.
After some trial and error the methodology outlined above worked and I ended up with a Word document structured more or less like this:
[Heading 1] -- Faculty
    [Heading 2] -- School
        [Heading 3] -- Course title
            [Paragraph] -- Course details
            [Paragraph] -- Course description
            [Paragraph] -- Course requirements
Enter fullscreen mode
Exit fullscreen mode
The final output files was well received by the office in question and I got some nice feedback too 😄:
As Clarke once put it: «Any sufficiently advanced technology is indistinguishable from magic.», and this is magic, it will be of huge assistance for the development of the prospectus.
It’s great to see how a little bit of programming can make someone’s life much easier.
Before you go… If you enjoyed this article, go ahead and click the Follow button. Consider following me on Twitter. See you soon 
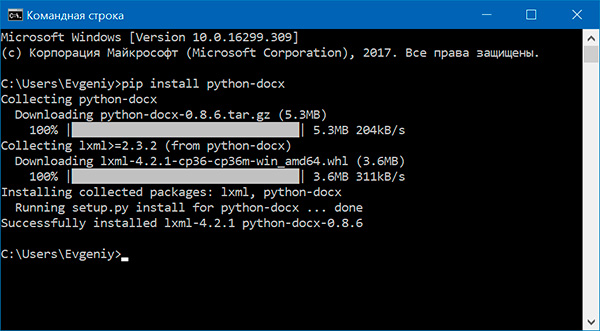
С помощью модуля python-docx можно создавать и изменять документы MS Word с расширением .docx. Чтобы установить этот модуль, выполняем команду
> pip install python-docx
При установке модуля надо вводить python-docx, а не docx (это другой модуль). В то же время при импортировании модуля python-docx следует использовать import docx, а не import python-docx.
Чтение документов MS Word
Файлы с расширением .docx обладают развитой внутренней структурой. В модуле python-docx эта структура представлена тремя различными типами данных. На самом верхнем уровне объект Document представляет собой весь документ. Объект Document содержит список объектов Paragraph, которые представляют собой абзацы документа. Каждый из абзацев содержит список, состоящий из одного или нескольких объектов Run, представляющих собой фрагменты текста с различными стилями форматирования.

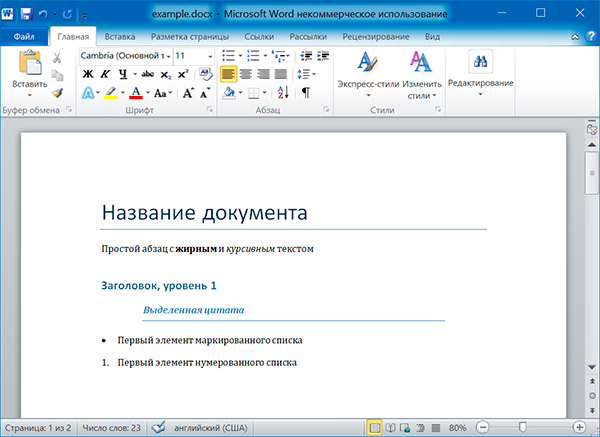
import docx

doc = docx.Document('example.docx')

# количество абзацев в документе
print(len(doc.paragraphs))

# текст первого абзаца в документе
print(doc.paragraphs[0].text)

# текст второго абзаца в документе
print(doc.paragraphs[1].text)

# текст первого Run второго абзаца
print(doc.paragraphs[1].runs[0].text)
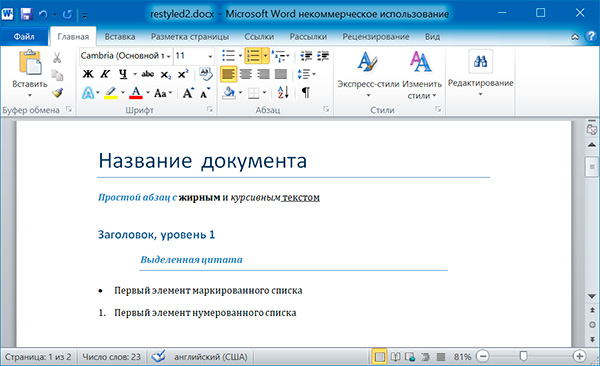
6
Название документа
Простой абзац с жирным и курсивным текстом
Простой абзац с
Получаем весь текст из документа:
text = []
for paragraph in doc.paragraphs:
    text.append(paragraph.text)
print('n'.join(text))
Название документа
Простой абзац с жирным и курсивным текстом
Заголовок, уровень 1
Выделенная цитата
Первый элемент маркированного списка
Первый элемент нумерованного списка
Стилевое оформление
В документах MS Word применяются два типа стилей: стили абзацев, которые могут применяться к объектам Paragraph, стили символов, которые могут применяться к объектам Run. Как объектам Paragraph, так и объектам Run можно назначать стили, присваивая их атрибутам style значение в виде строки. Этой строкой должно быть имя стиля. Если для стиля задано значение None, то у объекта Paragraph или Run не будет связанного с ним стиля.
Стили абзацев
NormalBody TextBody Text 2Body Text 3CaptionHeading 1Heading 2Heading 3Heading 4Heading 5Heading 6Heading 7Heading 8Heading 9Intense QuoteListList 2List 3List BulletList Bullet 2List Bullet 3List ContinueList Continue 2List Continue 3List NumberList Number 2List Number 3List ParagraphMacro TextNo SpacingQuoteSubtitleTOCHeadingTitle
Стили символов
EmphasisStrongBook TitleDefault Paragraph FontIntense EmphasisSubtle EmphasisIntense ReferenceSubtle Reference
paragraph.style = 'Quote'
run.style = 'Book Title'
Атрибуты объекта Run
Отдельные фрагменты текста, представленные объектами Run, могут подвергаться дополнительному форматированию с помощью атрибутов. Для каждого из этих атрибутов может быть задано одно из трех значений: True (атрибут активизирован), False (атрибут отключен) и None (применяется стиль, установленный для данного объекта Run).
bold— Полужирное начертаниеunderline— Подчеркнутый текстitalic— Курсивное начертаниеstrike— Зачеркнутый текст
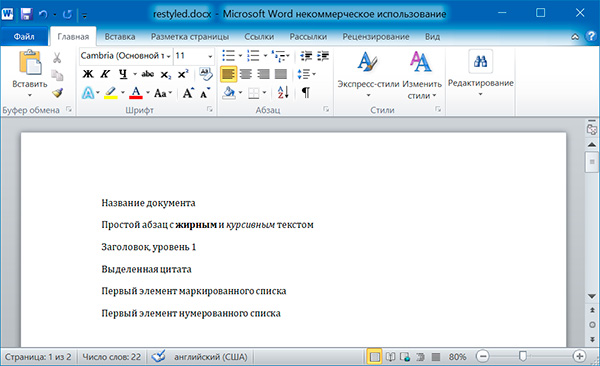
Изменим стили для всех параграфов нашего документа:
import docx

doc = docx.Document('example.docx')

# изменяем стили для всех параграфов
for paragraph in doc.paragraphs:
    paragraph.style = 'Normal'

doc.save('restyled.docx')
А теперь восстановим все как было:
import docx

os.chdir('C:\example')

doc1 = docx.Document('example.docx')
doc2 = docx.Document('restyled.docx')

# получаем из первого документа стили всех абзацев
styles = []
for paragraph in doc1.paragraphs:
    styles.append(paragraph.style)

# применяем стили ко всем абзацам второго документа
for i in range(len(doc2.paragraphs)):
    doc2.paragraphs[i].style = styles[i]

doc2.save('restored.docx')

Изменим форматирвание объектов Run второго абзаца:
import docx

doc = docx.Document('example.docx')

# добавляем стиль символов для runs[0]
doc.paragraphs[1].runs[0].style = 'Intense Emphasis'
# добавляем подчеркивание для runs[4]
doc.paragraphs[1].runs[4].underline = True

doc.save('restyled2.docx')
Запись докуменов MS Word
Добавление абзацев осуществляется вызовом метода add_paragraph() объекта Document. Для добавления текста в конец существующего абзаца, надо вызвать метод add_run() объекта Paragraph:
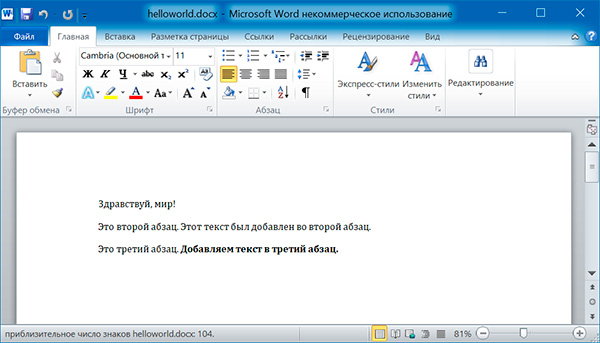
import docx

doc = docx.Document()

# добавляем первый параграф
doc.add_paragraph('Здравствуй, мир!')

# добавляем еще два параграфа
par1 = doc.add_paragraph('Это второй абзац.')
par2 = doc.add_paragraph('Это третий абзац.')

# добавляем текст во второй параграф
par1.add_run(' Этот текст был добавлен во второй абзац.')

# добавляем текст в третий параграф
par2.add_run(' Добавляем текст в третий абзац.').bold = True

doc.save('helloworld.docx')
Оба метода, add_paragraph() и add_run() принимают необязательный второй аргумент, содержащий строку стиля, например:
doc.add_paragraph('Здравствуй, мир!', 'Title')
Добавление заголовков
Вызов метода add_heading() приводит к добавлению абзаца, отформатированного в соответствии с одним из возможных стилей заголовков:
doc.add_heading('Заголовок 0', 0)
doc.add_heading('Заголовок 1', 1)
doc.add_heading('Заголовок 2', 2)
doc.add_heading('Заголовок 3', 3)
doc.add_heading('Заголовок 4', 4)
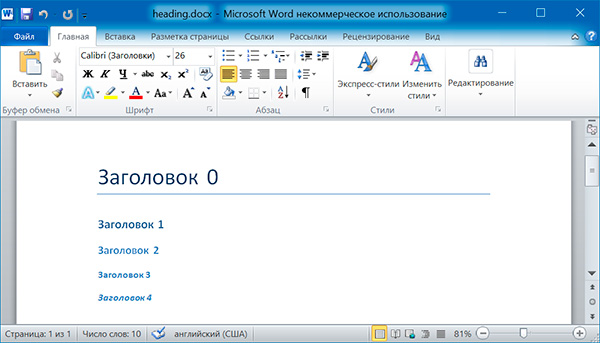
Аргументами метода add_heading() являются строка текста и целое число от 0 до 4. Значению 0 соответствует стиль заголовка Title.
Добавление разрывов строк и страниц
Чтобы добавить разрыв строки (а не добавлять новый абзац), нужно вызвать метод add_break() объекта Run. Если же требуется добавить разрыв страницы, то методу add_break() надо передать значение docx.enum.text.WD_BREAK.PAGE в качестве единственного аргумента:
import docx

doc = docx.Document()

doc.add_paragraph('Это первая страница')
doc.paragraphs[0].runs[0].add_break(docx.enum.text.WD_BREAK.PAGE)
doc.add_paragraph('Это вторая страница')

doc.save('pages.docx')
Добавление изображений
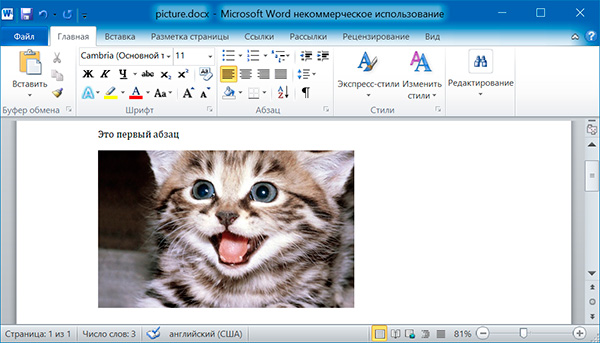
Метод add_picture() объекта Document позволяет добавлять изображения в конце документа. Например, добавим в конец документа изображение kitten.jpg шириной 10 сантиметров:
import docx

doc = docx.Document()

doc.add_paragraph('Это первый абзац')
doc.add_picture('kitten.jpg', width = docx.shared.Cm(10))

doc.save('picture.docx')
Именованные аргументы width и height задают ширину и высоту изображения. Если их опустить, то значения этих аргументов будут определяться размерами самого изображения.
Добавление таблицы
import docx

doc = docx.Document()

# добавляем таблицу 3x3
table = doc.add_table(rows = 3, cols = 3)
# применяем стиль для таблицы
table.style = 'Table Grid'

# заполняем таблицу данными
for row in range(3):
    for col in range(3):
        # получаем ячейку таблицы
        cell = table.cell(row, col)
        # записываем в ячейку данные
        cell.text = str(row + 1) + str(col + 1)

doc.save('table.docx')
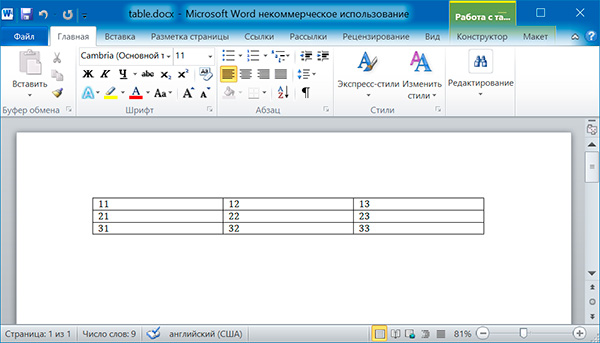
import docx

doc = docx.Document('table.docx')

# получаем первую таблицу в документе
table = doc.tables[0]

# читаем данные из таблицы
for row in table.rows:
    string = ''
    for cell in row.cells:
        string = string + cell.text + ' '
    print(string)
11 12 13
21 22 23
31 32 33
Дополнительно
- Документация python-docx
Поиск:
MS • Python • Web-разработка • Word • Модуль
Каталог оборудования
Lorem ipsum dolor sit amet, consectetur adipiscing elit, sed do eiusmod tempor incididunt ut labore et dolore magna aliqua.
Производители
Lorem ipsum dolor sit amet, consectetur adipiscing elit, sed do eiusmod tempor incididunt ut labore et dolore magna aliqua.
Функциональные группы
Lorem ipsum dolor sit amet, consectetur adipiscing elit, sed do eiusmod tempor incididunt ut labore et dolore magna aliqua.