
Содержание:
- Добавление табличных данных в документ DOCX.
- Извлечение табличных данных их документов DOCX.
Добавление табличных данных в документ DOCX.
При создании документа DOCX, часто встречается контент, который необходимо представить в виде аккуратной таблицы. Редактор MS Word неплохо справляется с этим. А вот как добавить таблицу при помощи модуля python-docx:
Пример добавления пустой таблицы, содержащей 2х2 ячейки:
from docx import Document

# создание пустого документа
doc = Document()
# добавляем пустую таблицу 2х2 ячейки
table = doc.add_table(rows=2, cols=2)
Объект таблицы Table имеет несколько свойств и методов, которые необходимо вызвать, чтобы заполнить таблицу данными. В качестве базового дальнейшего действия, всегда можно получить доступ к ячейке таблицы, исходя из ее расположения в строке и столбце:
Этот код возвратит объект ячейки Cell, которая расположена справа в верхней строке таблицы. Обратите внимание, что индексы строк и столбцов начинаются с нуля, как в списке.
В полученный объект ячейки можно записать какие-нибудь данные:
# добавляем данные как прогон абзаца
# и выделяем текст жирным
cell.paragraphs[0].add_run('Бык').bold = True

# можно записать данные в ячейку проще
cell.text = 'Бык'
# что бы теперь отформатировать текст, нужно
# получить доступ к свойствам прогона ячейки
rc = cell.paragraphs[0].runs[0]
rc.font.name = 'Arial'
rc.font.bold = True
Часто бывает проще получить доступ к ряду ячеек одновременно, например, при заполнении таблицы переменной длины из источника данных. Свойство таблицы Table.rows предоставляет доступ к отдельным строкам, каждая из которых имеет свойство Table.rows[i].cells. Свойство .cells как в строке, так и в столбце поддерживает доступ к ячейке по индексу (как с списку):
# получаем 2-ю строку таблицы
row = table.rows[1]
# запись данных в ячейки
row.cells[0].text = 'Заяц'
row.cells[1].text = 'Волк'
Последовательности Table.rows и Table.columns в таблице являются итерируемыми, следовательно можно использовать их непосредственно в цикле for. То же самое с последовательностями ячеек, например для первой строки таблицы Table.rows[0].cells или для первого столбца Table.columns[0].cells:
# читаем ячейки таблицы `table`
for row in table.rows:
    for cell in row.cells:
        print(cell.text)
Если необходимо узнать количество строк или столбцов в таблице, то просто используйте функцию len() для соответствующей последовательности:
# количество строк в таблице
row_count = len(table.rows)
# количество колонок в таблице
col_count = len(table.columns)
Также можно добавлять строки в таблицу постепенно, например:
Это может быть очень удобно для построения таблицы переменной длины:
# полноценный рабочий код
from docx import Document
from docx.enum.text import WD_ALIGN_PARAGRAPH

# создание пустого документа
doc = Document()
# данные таблицы без названий колонок
items = (
    (7, '1024', 'Плюшевые котята'),
    (3, '2042', 'Меховые пчелы'),
    (1, '1288', 'Ошейники для пуделей'),
)
# добавляем таблицу с одной строкой
# для заполнения названий колонок
table = doc.add_table(1, len(items[0]))
# определяем стиль таблицы
table.style = 'Light Shading Accent 1'
# Получаем строку с колонками из добавленной таблицы
head_cells = table.rows[0].cells
# добавляем названия колонок
for i, item in enumerate(['Кол-во', 'ID', 'Описание']):
    p = head_cells[i].paragraphs[0]
    # название колонки
    p.add_run(item).bold = True
    # выравниваем посередине
    p.alignment = WD_ALIGN_PARAGRAPH.CENTER
# добавляем данные к существующей таблице
for row in items:
    # добавляем строку с ячейками к объекту таблицы
    cells = table.add_row().cells
    for i, item in enumerate(row):
        # вставляем данные в ячейки
        cells[i].text = str(item)
        # если последняя ячейка
        if i == 2:
            # изменим шрифт
            cells[i].paragraphs[0].runs[0].font.name = 'Arial'
doc.save('test.docx')
То же самое работает для столбцов, хотя строить таблицу таким способом не удобно.
MS Word имеет набор предварительно отформатированных стилей таблиц, которые можно выбрать из его галереи стилей таблиц. Применить один из них к таблице можно следующим образом:
table.style = 'Light Shading Accent 1'
Обратите внимание, что имя стиля таблицы немного отличается от имени, отображаемого в пользовательском интерфейсе MS Word. Дефис, если он есть, то его необходимо удалить. Например, Light Shading - Accent 1 становится Light Shading Accent 1.
Чтобы узнать название стиля таблицы, наведите указатель мыши на его эскиз в галерее стилей таблиц Word.
Важно!!! Встроенные стили хранятся в файле WordprocessingML под своим английским именем, например 'Table Grid', и не зависят от локализации MS Word. Так как модуль python-docx работает с файлом WordprocessingML, то поиск стиля должен использовать английское имя. Если файл WordprocessingML не найден (MS Word не установлен, например в OS Linux) то модуль python-docx работает со своей версией этого файла. Что бы создать сопоставление между именами стилей на русском языке и именами на английском языке посетите эту ссылку.
Все стили таблиц можно посмотреть, выполнив код:
>>> from docx import Document
>>> from docx.enum.style import WD_STYLE_TYPE
>>> doc = Document()
>>> all_styles = doc.styles
>>> table_styles = [s for s in all_styles if s.type == WD_STYLE_TYPE.TABLE]
>>> for style in table_styles:
...   print(table_styles.name)
# Normal Table
# Table Grid
# Light Shading
# Light Shading Accent 1
Извлечение табличных данных их документов DOCX.
При чтении существующего документа DOCX, все находящиеся в нем объекты таблиц Table группируются в последовательности Document.tables. Следовательно, что бы узнать количество таблиц в документе, нужно вызвать функцию len() для этой последовательности.
Доступ к объектам таблиц будем осуществлять по индексу последовательности Document.tables.
Смотрим пример:
# полноценный рабочий код
from docx import Document

doc = Document('test.docx')
# последовательность всех таблиц документа
all_tables = doc.tables
print('Всего таблиц в документе:', len(all_tables))

# создаем пустой словарь под данные таблиц
data_tables = {i:None for i in range(len(all_tables))}
# проходимся по таблицам
for i, table in enumerate(all_tables):
    print('nДанные таблицы №', i)
    # создаем список строк для таблицы `i` (пока пустые)
    data_tables[i] = [[] for _ in range(len(table.rows))]
    # проходимся по строкам таблицы `i`
    for j, row in enumerate(table.rows):
        # проходимся по ячейкам таблицы `i` и строки `j`
        for cell in row.cells:
            # добавляем значение ячейки в соответствующий
            # список, созданного словаря под данные таблиц
            data_tables[i][j].append(cell.text)

    # смотрим извлеченные данные
    # (по строкам) для таблицы `i`
    print(data_tables[i])
    print('n')

print('Данные всех таблиц документа:')
print(data_tables)
Improve Article
Save Article
Like Article
Improve Article
Save Article
Like Article
Prerequisites: docx
Word documents contain formatted text wrapped within three object levels. Lowest level- run objects, middle level- paragraph objects and highest level- document object. So, we cannot work with these documents using normal text editors. But, we can manipulate these word documents in python using the python-docx module.
Python docx module allows user to manipulate docs by either manipulating the existing one or creating a new empty document and manipulating it. It is a powerful tool as it helps you to manipulate the document to a very large extend. You can also add and manipulate tables using this module.
To add a table we will use add_table() method as it will add a table in the word document.
Syntax:
doc.add_table(rows = None, cols = None)
Parameters:
- rows: Add n number of rows in the table.
- cols: Add n number of cols in the table.
First, we will save all the data in a list then we will create a table object with values of rows = 1 and cols = 2. Then we will add the headings in the table. After that, we will use .add_row() method to add a row then we will add the data in it.
Table can only take a string as an input in its cells, so we have to convert the data into string if it is not.
Installation
Pip command to install this module is:
pip install python-docx
Approach
- Import module
- Declare docx object
- Add table data as a list
- Create table using above function
- Save to document
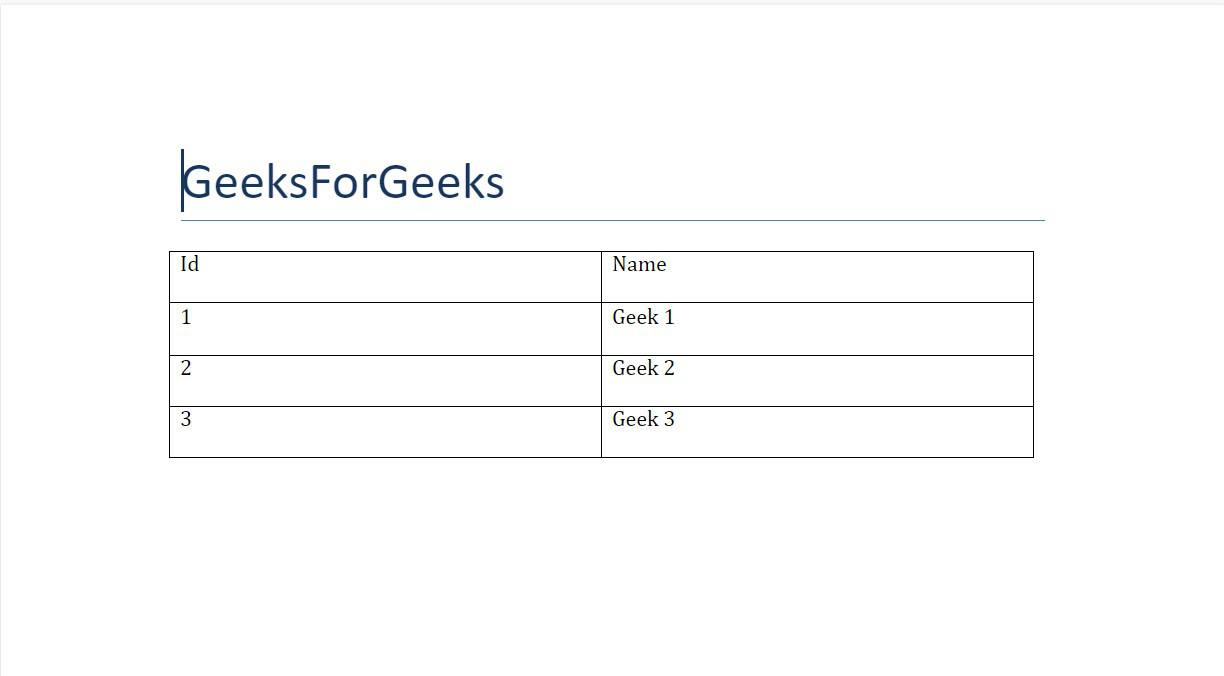
Example 1: Adding a table in a Word document.
Python3
import docx
doc = docx.Document()
doc.add_heading('GeeksForGeeks', 0)
data = (
(1, 'Geek 1'),
(2, 'Geek 2'),
(3, 'Geek 3')
)
table = doc.add_table(rows=1, cols=2)
row = table.rows[0].cells
row[0].text = 'Id'
row[1].text = 'Name'
for id, name in data:
row = table.add_row().cells
row[0].text = str(id)
row[1].text = name
doc.save('gfg.docx')
Output:
The table so obtained is a simple table, but docx supports mechanism to style it. To style a table we use style method to select a style.
Syntax:
table.style = String style_name
Parameter:
- String style_name: It is the name of the style from the list mentioned below.
Approach
- Import module
- Create data to be inserted as list
- Create table
- Style it as required
- Save to document
Example 2: Adding a table with style in a word document.
Python3
import docx
doc = docx.Document()
doc.add_heading('GeeksForGeeks', 0)
data = (
(1, 'Geek 1'),
(2, 'Geek 2'),
(3, 'Geek 3')
)
table = doc.add_table(rows=1, cols=2)
row = table.rows[0].cells
row[0].text = 'Id'
row[1].text = 'Name'
for id, name in data:
row = table.add_row().cells
row[0].text = str(id)
row[1].text = name
table.style = 'Colorful List'
doc.save('gfg.docx')
Output:

Like Article
Save Article
Getting started with |docx| is easy. Let’s walk through the basics.
Opening a document
First thing you’ll need is a document to work on. The easiest way is this:
from docx import Document

document = Document()
This opens up a blank document based on the default «template», pretty much
what you get when you start a new document in Word using the built-in
defaults. You can open and work on an existing Word document using |docx|,
but we’ll keep things simple for the moment.
Adding a paragraph
Paragraphs are fundamental in Word. They’re used for body text, but also for
headings and list items like bullets.
Here’s the simplest way to add one:
paragraph = document.add_paragraph('Lorem ipsum dolor sit amet.')
This method returns a reference to a paragraph, newly added paragraph at the
end of the document. The new paragraph reference is assigned to paragraph
in this case, but I’ll be leaving that out in the following examples unless
I have a need for it. In your code, often times you won’t be doing anything
with the item after you’ve added it, so there’s not a lot of sense in keep
a reference to it hanging around.
It’s also possible to use one paragraph as a «cursor» and insert a new
paragraph directly above it:
prior_paragraph = paragraph.insert_paragraph_before('Lorem ipsum')
This allows a paragraph to be inserted in the middle of a document, something
that’s often important when modifying an existing document rather than
generating one from scratch.
Adding a heading
In anything but the shortest document, body text is divided into sections, each
of which starts with a heading. Here’s how to add one:
document.add_heading('The REAL meaning of the universe')
By default, this adds a top-level heading, what appears in Word as ‘Heading 1’.
When you want a heading for a sub-section, just specify the level you want as
an integer between 1 and 9:
document.add_heading('The role of dolphins', level=2)
If you specify a level of 0, a «Title» paragraph is added. This can be handy to
start a relatively short document that doesn’t have a separate title page.
Adding a page break
Every once in a while you want the text that comes next to go on a separate
page, even if the one you’re on isn’t full. A «hard» page break gets this
done:
document.add_page_break()
If you find yourself using this very often, it’s probably a sign you could
benefit by better understanding paragraph styles. One paragraph style property
you can set is to break a page immediately before each paragraph having that
style. So you might set your headings of a certain level to always start a new
page. More on styles later. They turn out to be critically important for really
getting the most out of Word.
Adding a table
One frequently encounters content that lends itself to tabular presentation,
lined up in neat rows and columns. Word does a pretty good job at this. Here’s
how to add a table:
table = document.add_table(rows=2, cols=2)
Tables have several properties and methods you’ll need in order to populate
them. Accessing individual cells is probably a good place to start. As
a baseline, you can always access a cell by its row and column indicies:
cell = table.cell(0, 1)
This gives you the right-hand cell in the top row of the table we just created.
Note that row and column indicies are zero-based, just like in list access.
Once you have a cell, you can put something in it:
cell.text = 'parrot, possibly dead'
Frequently it’s easier to access a row of cells at a time, for example when
populating a table of variable length from a data source. The .rows
property of a table provides access to individual rows, each of which has a
.cells property. The .cells property on both Row and Column
supports indexed access, like a list:
row = table.rows[1]
row.cells[0].text = 'Foo bar to you.'
row.cells[1].text = 'And a hearty foo bar to you too sir!'
The .rows and .columns collections on a table are iterable, so you
can use them directly in a for loop. Same with the .cells sequences
on a row or column:
for row in table.rows:
    for cell in row.cells:
        print(cell.text)
If you want a count of the rows or columns in the table, just use len() on
the sequence:
row_count = len(table.rows)
col_count = len(table.columns)
You can also add rows to a table incrementally like so:
row = table.add_row()
This can be very handy for the variable length table scenario we mentioned
above:
# get table data -------------
items = (
    (7, '1024', 'Plush kittens'),
    (3, '2042', 'Furbees'),
    (1, '1288', 'French Poodle Collars, Deluxe'),
)

# add table ------------------
table = document.add_table(1, 3)

# populate header row --------
heading_cells = table.rows[0].cells
heading_cells[0].text = 'Qty'
heading_cells[1].text = 'SKU'
heading_cells[2].text = 'Description'

# add a data row for each item
for item in items:
    cells = table.add_row().cells
    cells[0].text = str(item.qty)
    cells[1].text = item.sku
    cells[2].text = item.desc
The same works for columns, although I’ve yet to see a use case for it.
Word has a set of pre-formatted table styles you can pick from its table style
gallery. You can apply one of those to the table like this:
table.style = 'LightShading-Accent1'
The style name is formed by removing all the spaces from the table style name.
You can find the table style name by hovering your mouse over its thumbnail in
Word’s table style gallery.
Adding a picture
Word lets you place an image in a document using the Insert > Photo > Picture menu item. Here’s how to do it in |docx|:
from file...
document.add_picture('image-filename.png')
This example uses a path, which loads the image file from the local filesystem.
You can also use a file-like object, essentially any object that acts like an
open file. This might be handy if you’re retrieving your image from a database
or over a network and don’t want to get the filesystem involved.
Image size
By default, the added image appears at native size. This is often bigger than
you want. Native size is calculated as pixels / dpi. So a 300×300 pixel
image having 300 dpi resolution appears in a one inch square. The problem is
most images don’t contain a dpi property and it defaults to 72 dpi. This would
make the same image appear 4.167 inches on a side, somewhere around half the
page.
To get the image the size you want, you can specify either its width or height
in convenient units, like inches or centimeters:
from docx.shared import Inches

document.add_picture('image-filename.png', width=Inches(1.0))
You’re free to specify both width and height, but usually you wouldn’t want to.
If you specify only one, |docx| uses it to calculate the properly scaled value
of the other. This way the aspect ratio is preserved and your picture doesn’t
look stretched.
The Inches and Cm classes are provided to let you specify measurements
in handy units. Internally, |docx| uses English Metric Units, 914400 to the
inch. So if you forget and just put something like width=2 you’ll get an
extremely small image :). You’ll need to import them from the docx.shared
sub-package. You can use them in arithmetic just like they were an integer,
which in fact they are. So an expression like width = Inches(3) works just fine.
/ thing_count
Applying a paragraph style
If you don’t know what a Word paragraph style is you should definitely check it
out. Basically it allows you to apply a whole set of formatting options to
a paragraph at once. It’s a lot like CSS styles if you know what those are.
You can apply a paragraph style right when you create a paragraph:
document.add_paragraph('Lorem ipsum dolor sit amet.', style='ListBullet')
This particular style causes the paragraph to appear as a bullet, a very handy
thing. You can also apply a style afterward. These two lines are equivalent to
the one above:
paragraph = document.add_paragraph('Lorem ipsum dolor sit amet.')
paragraph.style = 'List Bullet'
The style is specified using its style name, ‘List Bullet’ in this example.
Generally, the style name is exactly as it appears in the Word user interface
(UI).
Applying bold and italic
In order to understand how bold and italic work, you need to understand
a little about what goes on inside a paragraph. The short version is this:
- A paragraph holds all the block-level formatting, like indentation, line
height, tabs, and so forth. - Character-level formatting, such as bold and italic, are applied at the
run level. All content within a paragraph must be within a run, but there
can be more than one. So a paragraph with a bold word in the middle would
need three runs, a normal one, a bold one containing the word, and another
normal one for the text after.
When you add a paragraph by providing text to the .add_paragraph() method,
it gets put into a single run. You can add more using the .add_run() method
on the paragraph:
paragraph = document.add_paragraph('Lorem ipsum ')
paragraph.add_run('dolor sit amet.')
This produces a paragraph that looks just like one created from a single
string. It’s not apparent where paragraph text is broken into runs unless you
look at the XML. Note the trailing space at the end of the first string. You
need to be explicit about where spaces appear at the beginning and end of
a run. They’re not automatically inserted between runs. Expect to be caught by
that one a few times :).
|Run| objects have both a .bold and .italic property that allows you to
set their value for a run:
paragraph = document.add_paragraph('Lorem ipsum ')
run = paragraph.add_run('dolor')
run.bold = True
paragraph.add_run(' sit amet.')
which produces text that looks like this: ‘Lorem ipsum dolor sit amet.’
Note that you can set bold or italic right on the result of .add_run() if
you don’t need it for anything else:
paragraph.add_run('dolor').bold = True

# is equivalent to:

run = paragraph.add_run('dolor')
run.bold = True

# except you don't have a reference to `run` afterward
It’s not necessary to provide text to the .add_paragraph() method. This can
make your code simpler if you’re building the paragraph up from runs anyway:
paragraph = document.add_paragraph()
paragraph.add_run('Lorem ipsum ')
paragraph.add_run('dolor').bold = True
paragraph.add_run(' sit amet.')
Applying a character style
In addition to paragraph styles, which specify a group of paragraph-level
settings, Word has character styles which specify a group of run-level
settings. In general you can think of a character style as specifying a font,
including its typeface, size, color, bold, italic, etc.
Like paragraph styles, a character style must already be defined in the
document you open with the Document() call (see
:ref:`understanding_styles`).
A character style can be specified when adding a new run:
paragraph = document.add_paragraph('Normal text, ')
paragraph.add_run('text with emphasis.', 'Emphasis')
You can also apply a style to a run after it is created. This code produces
the same result as the lines above:
paragraph = document.add_paragraph('Normal text, ')
run = paragraph.add_run('text with emphasis.')
run.style = 'Emphasis'
As with a paragraph style, the style name is as it appears in the Word UI.