
Word for Microsoft 365 Outlook for Microsoft 365 Word 2021 Outlook 2021 Word 2019 Outlook 2019 Word 2016 Outlook 2016 Word 2013 Outlook 2013 Word 2010 Outlook 2010 Word 2007 Outlook 2007 More…Less
You can add horizontal lines, sometimes called horizontal rules, to a document or email message to help separate sections of text and add visual appeal.
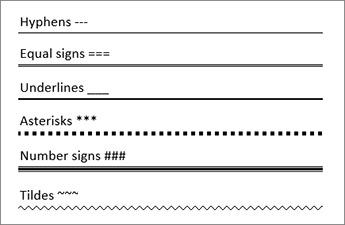
By default, Word and Outlook have a three-character shortcuts that inserts a full-width horizontal rule in your document or message. The appearance of that rule—thinner, thicker, double-line, dotted, wavy—depends on which shortcut you use, as illustrated in the image below.
If this automatic line feature doesn’t suit you, you can turn off this feature in Word or turn it off in Outlook.
If you want to draw a line for illustration purposes, see Draw a line in Word or Outlook instead.
Insert a horizontal line by typing a few characters
The fastest way to add a horizontal line or rule is to use the AutoFormat feature. When you type certain characters three times in their own paragraph and then press Enter, those characters instantly become a full-width horizontal line.
-
Place the cursor where you want to insert the horizontal line.
-
Type three of the characters illustrated below, and then press Enter.

The line is inserted for the full width of the page. When inserted into a column, the line is inserted to match the width of the column. To add text above the line, put your cursor where you want the text and begin typing.
Format the horizontal line after you create it
The shortcut described above creates an empty paragraph with a bottom border. You can change the look of that border line by using the Borders options:
-
In Word, on the Home tab of the ribbon, select the down arrow next to
Borders.In Outlook, on the Format Text tab of the ribbon, select the down arrow next to
Borders. -
At the bottom of the menu, select Borders and Shading.
-
In the dialog, you can change the line’s style (solid, dotted, wavy, double, and so on), color, or width as you see fit.
-
When you’re done formatting the line, select OK. Then, on the ribbon, select the
Borders button to apply your changes.
 Borders.
 Borders button to apply your changes.
 Word: Turn off the automatic line feature
To prevent Word or Outlook from automatically inserting a horizontal line when you type the three shortcut characters, do the following:
-
On the ribbon, select File > Options.
-
In the dialog box, select Proofing > AutoCorrect Options > AutoFormat As You Type.
-
Clear the Border Lines option.
-
Select OK.
Outlook: Turn off the automatic line feature
-
On the ribbon, select File > Options.
-
In the dialog box, select the Mail tab, then select Editor Options.
-
On the Proofing tab, select AutoCorrect Options > AutoFormat As You Type.
-
Under Apply as you type, clear the Border Lines option.
-
Select OK.
Want to draw a line?
See Draw a line in Word or Outlook.
See Also
Add a border to some text
Draw shapes
Need more help?
![]()
Download Article
A user-friendly guide to making different types of lines in Microsoft Word
![]()
Download Article
- Using Shapes to Draw a Line
- Using Borders to Add a Line
- Using Keyboard Shortcuts
- Using the Mobile App
- Q&A
- Tips
|
|
|
|
|
Do you want to create a horizontal line in your resumé or other Microsoft Word document? If you want to customize the color and format of the line, you can use the Shapes tool. If you need to make a quick, basic line, you can use the keyboard shortcut. While you can use the keyboard shortcut on Windows and Mac, you cannot use it on the mobile app. This wikiHow will show you how to insert different lines in Microsoft Word on your Windows, Mac, iPhone, or Android device.
Things You Should Know
- On desktop, go to the Insert tab. Click Shapes, then select a line. Click and drag across the document to create a line.
- To customize the line, double-click it. Click Shape Outline to change the color.
- On mobile, click the three dots. Tap Home and select Insert. Tap Shapes to select a line. Tap and drag across the document to create a line.
-
1
Open Microsoft Word on your Windows or Mac computer. Click or double-click the Word app icon, which resembles a white «W» on a dark-blue background.
- If you want to draw a line in an existing Word document, double-click the Word document to open it and skip the next step.
- You’ll need a subscription to use Office 365.
-
2
Click Blank document. It’s in the upper-left side of the page.
Advertisement
-
3
Click the Insert tab. This tab is in the blue ribbon at the top of the Word window, between Home and Draw.
-
4
Click Shapes. It’s in the Insert toolbar, next to the icon of an overlapping circle and square.
- A drop-down menu will appear.
-
5
Select a line shape. In the «Lines» heading, click one of the line templates. You can choose a line, line arrow, double line arrow, and more.
-
6
Draw your line. Click and drag across the document to create your line.
- If you need to adjust the line’s length and orientation, click the left or right circle. Drag it left or right to adjust the length, or drag it up and down to adjust the orientation.
- To move the line, double-click and drag it to the desired position.


Advertisement
-
1
Open Microsoft Word on your Windows or Mac computer. Click or double-click the Word app icon, which resembles a white «W» on a dark-blue background.
- If you want to draw a line in an existing Word document, double-click the Word document to open it and skip the next step.
-
2
Click Blank document. It’s in the upper-left side of the page.
-
3
Click the Home tab. This tab is in the blue ribbon at the top of the Word window, between File and Insert.
- You may already be on this tab by default.
-
4
Click the «Borders» arrow. This is next to the icon of the dotted square with a solid bottom line.
- A drop-down menu will open.
-
5
Click Horizontal Line. This will be towards the bottom, above Draw Table.
- A horizontal line will be added.
-
6
Format your line. Double-click the line; a dialogue box will appear.
- To change the line thickness, use the up and down arrow below Height. The higher the number, the thicker the line will be.
- To change the color, click the color box underneath Color. Select your desired color.
- Click OK to save and apply your changes.
- To move the line, double-click and drag it to the desired position.


Advertisement
-
1
Open Microsoft Word on your Windows or Mac computer. Click or double-click the Word app icon, which resembles a white «W» on a dark-blue background.[1]
- If you want to draw a line in an existing Word document, double-click the Word document to open it and skip the next step.
-
2
Click Blank document. It’s in the upper-left side of the page.
-
3
Place your cursor where you want your line to appear. You’ll need to be on a blank line, as this won’t work if there is text before or after your cursor on the same line.
- You’ll be creating a horizontal line that spans from one edge of your page to the other. The line will stop at your set margins.
- If you want to make the line span the whole page, you’ll need to change your document margins.
-
4
Type three dashes in a row. Use your dash key on the number row at the top of your keyboard, or on the numeric pad.
-
5
Press ↵ Enter to convert the dashes into a line. AutoCorrect will automatically create a solid line that will situate itself directly beneath the previous line of text.
- Note that the line does not occupy the space of a line of text, but instead exists between lines of text.
- If you do not have AutoCorrect enabled, do so by clicking File → Options → Proofing → AutoCorrect Options…. This will open a new window.
- Make sure the Border Lines box is checked. This can be found underneath Apply as you type.
- If you want to turn off AutoCorrect, uncheck the boxes.
-
6
Use different characters for different line styles. There are a variety of different lines that you can create by using characters other than the dash:[2]
- Thin line: Three hyphens (-).
- Thick line: Three underscores (_).
- Double line: Three equal signs (=).
- Dotted line: Three asterisk (*).
- Triple line: Three pound signs (#).
- Squiggly line: Three tildes (~).
-
7
Move the line by entering text above it. You can prompt the line to move down by typing text above it and then pressing Enter.
- Deleting text above the line will prompt it to move upward.


Advertisement
-
1
Open a document in the Microsoft Word app. This looks like a blue notebook next to a W.
- Microsoft Word is available for iOS in the App Store and for Android in the Google Play Store.
- Tap Blank document to open a new document or tap a file to open an existing document.
-
2
Tap ••• . This can be found above the keyboard, to the right.
- If you don’t see your keyboard, tap the document to bring it up.
- A new menu will open.
-
3
Tap Home. This will be to the left of the formatting window.
- A drop-down menu will open.
-
4
Tap Insert. You’ll see a list of all objects you can insert.
-
5
Tap Shapes. This is next to the icon of an overlapping circle and square.
-
6
Select a line shape. In the «Lines» heading, tap one of the line templates. You can choose a line, line arrow, double line arrow, and more.
-
7
Draw your line. Tap and drag across the document to create your line.
- Use two fingers to pinch and zoom out to view the entire document.
- If you need to adjust the line’s length and orientation, tap the left or right circle. Drag it left or right to adjust the length, or drag it up and down to adjust the orientation.
- To move the line, tap and drag it to the desired position.


Advertisement
Add New Question
-
Question
How do I view all available symbols in Microsoft Word?

Click «Insert» and then click «Symbols» and you should be shown a box with all of the symbols in it.
-
Question
How do I add a line on the first page, and no lines on the second?
Click «Insert» and then click «Symbols» and you should be shown a box with all of the symbols in it.
-
Question
How do I change the color of the line?
In the paragraph section, open the drop-down menu on the «Borders» button. At the very bottom is a «Borders and Shading» option. In that option, change the color of the bottom border to your specified color. Click the «Borders» button.
See more answers
Ask a Question
200 characters left
Include your email address to get a message when this question is answered.
Submit
Advertisement
-
Looking for money-saving deals on Microsoft Office products? Check out our coupon site for tons of coupons and promo codes on your next subscription.
Thanks for submitting a tip for review!
Advertisement
About This Article
Article SummaryX
1. Click Insert.
2. Click Shapes.
3. Select a line template.
4. Click and drag across your Microsoft Word document to draw the line.
Did this summary help you?
Thanks to all authors for creating a page that has been read 2,043,531 times.
Is this article up to date?
465
465 people found this article helpful
Use these three methods to quickly insert a line in your document
Updated on December 4, 2020
What to Know
- AutoFormat: Type the three characters for the desired line style > Enter.
- Horizontal Line tool: In Home tab, select Borders drop-down menu > Horizontal Line.
- Shapes menu: Go to Insert > Shapes. In Lines group, select and drag a line shape across the page.
This article covers three ways to insert horizontal lines in Word for Microsoft 365, Word 2019, Word 2016, Word 2013, and Word 2010.
Use AutoFormat to Insert a Line in Word
You can quickly insert a line into a Word document with the AutoFormat feature. To create a line, place the cursor in the location that you’d like to insert it, type the three characters for the desired line style, then press Enter.
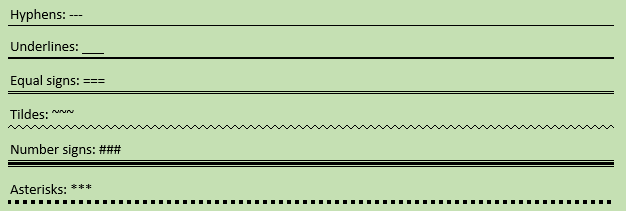
To create the different types of lines, press the associated keys on the keyboard:
- Plain single line: Three hyphens (—)
- Plain double line: Three equal signs (===)
- Broken or dotted line: Three asterisks (***)
- Bold single line: Three underline symbols (___)
- Wavy line: Three tildes (~~~)
- Triple line with a thick center: Three number signs (###)
Here’s what each of these line types looks like in Word:
Use the Horizontal Line Tool to Insert a Line in Word
To insert a line into a Word document using the built-in Horizontal Line tool:
-
Place the cursor where you want to insert a line.
-
Go to the Home tab.
By default, the Home tab is selected when you open a new or existing Word document.
-
In the Paragraph group, select the Borders drop-down arrow and choose Horizontal Line.
-
To change the look of the line, double-click the line in the document.
-
In the Format Horizontal Line dialog box, modify the width, height, color, and alignment of the line.
Use the Shapes Menu to Insert a Line in Word
A third way to add a line to a Word document is to draw it on the page. The Shapes menu contains several line options, including lines with arrow points on one or both ends. After you draw the line, customize the color and appearance.
-
Place the cursor in the spot where you want to insert a line.
-
Go to the Insert tab.
-
In the Illustrations group, select the Shapes drop-down arrow.
-
In the Lines group, choose a line shape.
-
In the Word document, drag across the location where you want the line to appear.
-
To change the look of the line, select the line to enable the Shape Format tab. (Some versions of Word call this Format.)
-
Go to the Shape Format tab and change the color, use a different line style, or apply effects.
FAQ
-
How do I change line spacing in Word?
To fix spacing in Word, highlight the text whose spacing you want to change and select the Home tab. Next to Paragraph, select the down arrow to expand the options. In the Spacing section, set the amount of space before and after line breaks or choose a preset line-spacing option.
-
How do I add a signature line in Word?
To insert a signature line in Word, go to the Insert tab and select Signature Line. Selecting few or no options leaves a blank line, and a signature line will appear in the document.
-
How do I add line numbers in Word?
To add line numbers in Word, go to Layout > Page Setup > Line Numbers and choose Continuous, Restart Each Page or Restart Each Section > Line Numbering Options.
Thanks for letting us know!
Get the Latest Tech News Delivered Every Day
Subscribe
Draw Method
- Click the Drawing toolbar button on the Standard toolbar, or point to Toolbars on the View menu, and then click Drawing.
- Click Line on the Drawing toolbar.
- Place the pointer where you want the line to start.
- Click and hold the mouse button, and drag the line to the length you want.
Contents
- 1 Is there a lined paper template in Word?
- 2 How do you insert multiple lines in Word?
- 3 Is there a shortcut to insert row in Word?
- 4 How can I make my own handwriting into a font?
- 5 What are font ligatures?
- 6 How do I convert handwritten notes to text?
- 7 Is Writing Wizard app free?
- 8 How do you insert a row *?
- 9 How do you select a row using the keyboard?
- 10 How do you insert a row in Word Online?
Is there a lined paper template in Word?
You can use the lined paper templates for Word to print your own lined paper with different line heights or line colors. The template was created using a Table, so to change the row heights or borders, select the rows or columns that you want to modify, then right-click on one of them and select Table Properties.
How do you insert multiple lines in Word?
Hold down the “Shift” key and press the “Underline ( _ )” key three times. Release both keys then press “Enter” to place a heavier line across the Word document.
Is there a shortcut to insert row in Word?
To insert row or column by shortcut keys
Select an entire row/column that you want to add a row/column above or left of it, and then press Ctrl + + keys, then a new blank row/column added above/left of your selected row/column.
How can I make my own handwriting into a font?
How to Turn Your Handwriting into a Font: Quick Steps
- Go to MyScriptFont.com.
- Download the printable template.
- Print the template.
- Complete the template.
- Scan the now filled-in template into your computer.
- Upload your file, name your font, and choose format.
- Download your font.
- Install it on your computer.
What are font ligatures?
Typographic ligatures are when multiple characters appear to combine into a single character. Simplistically, when you type two or more characters and they magically attach to each other, you’re using ligatures that were supported by your OS, your app, and your font.
How do I convert handwritten notes to text?
To convert handwriting to text, do the following:
- On the Draw tab, choose the Lasso Select button.
- On the page, drag a selection over the handwriting you want to convert.
- On the Draw tab, choose Ink to Text.
Is Writing Wizard app free?
The Writing Wizard is a free resource for teachers and homeschooling moms and dads.
How do you insert a row *?
To insert a single row: Right-click the whole row above which you want to insert the new row, and then select Insert Rows. To insert multiple rows: Select the same number of rows above which you want to add new ones. Right-click the selection, and then select Insert Rows.
How do you select a row using the keyboard?
Select the row number to select the entire row. Or click on any cell in the row and then press Shift + Space. To select non-adjacent rows or columns, hold Ctrl and select the row or column numbers.
How do you insert a row in Word Online?
Put your cursor wherever in the table you want to add a column or row.
- To insert a row, click Insert Above or Insert Below.
- To insert a column, click Insert Left or Insert Right.
Learn how to create vertical lines, horizontal lines, borderlines, signature lines, strikethrough, as well as underline in this article offered by MiniTool Corporation. The methods in this article apply to Microsoft 365, Word 2019, Word 2016, Word 2013, Word 2010, Word 2007, as well as the respected corresponding versions of Outlook.
To insert horizontal line in Word documents or emails, also called horizontal rules, can separate text sections and increase visual appeal.
#1 How to Insert a Line in Word? (Horizontal Line)
How to add a line in Word? The quickest method is to rely on the AutoFormat feature. When you key in certain characters 3 times on their own line and press Enter, those characters will turn into a horizontal line immediately. The detailed guide is as below.
Step 1. Put your mouse cursor where you would like to make a horizontal line.
Step 2. Input 3 times for one of the below characters and then press Enter.
- Hyphens: —
- Underlines: ___
- Equal signs: ===
- Tildes: ~~~
- Number signs: ###
- Asterisks: ***
Step 3. Then, the three characters will become a horizontal line for the full width of the page.
If you are within a column, the line will match the width of the column. If you want to further add text above the line, just locate the cursor where you’d like the text to be and start typing.
Please note that the AutoFormat function isn’t available in Office Online. If you have a desktop version of Office, just click Open in (program name) in your desktop program to open the file and make use of the cropping tools.
Also read: [Beginner’s Guide] How to Use Find and Replace in Word?
#2 How to Draw a Line in Word? (Multi-shape Line)
Besides automatically create a line in Word, also, you are able to manually draw a line instead. Just follow the guidance below.
Step 1. Within the Insert tab on the top menu, click on the Shapes option.
Step 2. In the drop-down menu, under the Lines section, select a type of line you like.
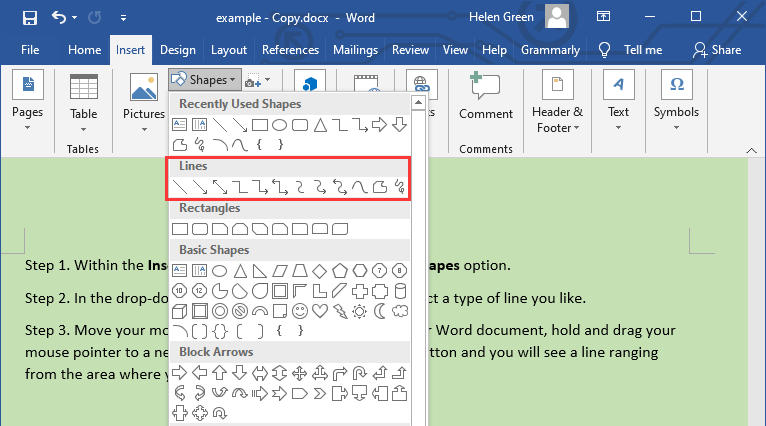
Step 3. Move your mouse cursor to the target location in your Word document, hold and drag your mouse pointer to a new location. Then, release the mouse button and you will see a line ranging from the area where your mouse has gone through.
You can customize the line by clicking on it, select the Layout Options icon or further choose See more. Then, personalize your own line style. Or, you can right-click on the line and specify your preferences.
#3 How to Make a Line in Word? (Horizontal & Border Lines)
Another way to put a line in Word is via the Ribbon. Just do the below steps.
Step 1. Locate the mouse cursor where you plan to insert a line in Word.
Step 2. In the Home tab, click the inverted triangle behind the Borders icon within the Paragraph section.
Step 3. Choose Horizontal Line in the drop-down menu.
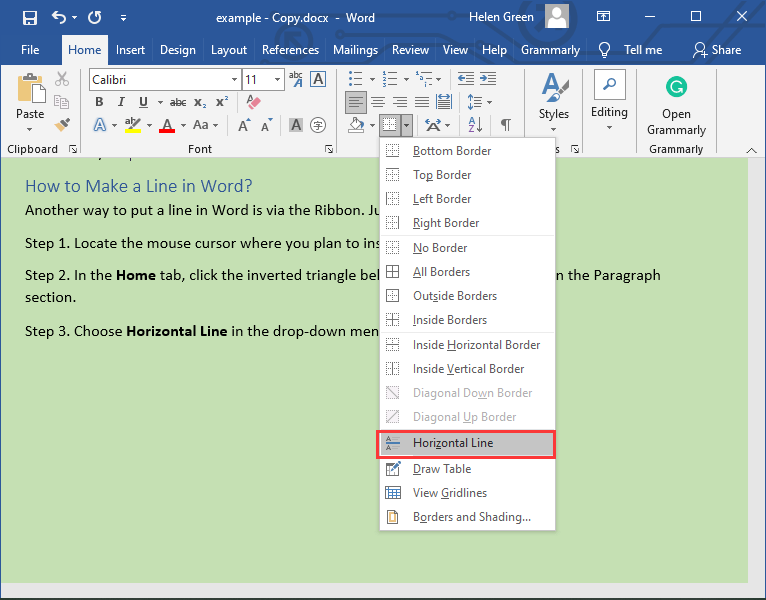
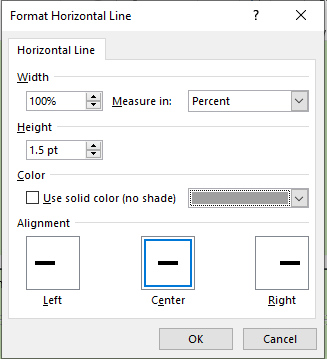
You can specify the look of the horizontal line by double-clicking on it. Then, the Format Horizontal Line box will appear and you can modify the width, height, color, and alignment there. Or, right-click on the line and specify its borders and shading. Or, click on the horizontal line to make it active, then, drag to change its length and width.
Related article: How to Double Space in Microsoft Word 2019/2016/2013/2010
Border Lines
Or, you may choose one of the borders to serve as the line. The top and bottom borders look very similar to the horizontal lines. The right and left borders seem like vertical lines; yet, the left and right borders are very short and can only cover the width of a single line of text.

#4 How to Insert a Line in Word? (Vertical)
The following will introduce two ways of creating a vertical line.
Way 1. Add Vertical Line with Columns
You can rely on separating the text into multiple columns to create a vertical line between two columns.
Step 1. Select the content that you want to separate into columns. If you don’t choose, it will separate the whole document into columns.
Step 2. In the Layout tab, click the Columns and select the type of columns you like, One, Two, Three, Left, or Right.

Step 3. If none of the above selections is what you want, you can click More Columns and specify your columns in the pop-up dialog.
Step 4. In the Column dialog, check Line between option and click OK to save the changes.
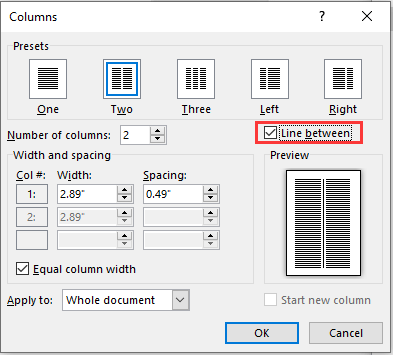
Finally, your text will be separated into columns with a vertical line between two columns. If you want to delete this type of vertical line, just uncheck Line between or change the columns to One.
You may also like: How to Add Page Numbers in Word (Start from a Specific Page)
Way 2. Draw a Vertical Line with a Bar Tab
Tab stops in Word align lines and paragraphs. The bar tab, however, does not set a tab stop. Instead, it inserts a vertical line and demarcates your paragraph into columns.
Step 1. Select the paragraph(s) where you’d like to add a vertical line.
Step 2. In the Home tab, click the arrow in the bottom right corner of the Paragraph section to open the Paragraph Settings window.
Step 3. In the Paragraph window, click the Tabs button in the lower left.

Step 4. In the next Tab dialog, input your preferred value into the Tab stop position column, select Bar in the Alignment section, click Set, and then OK to save settings.

Finally, you can see a vertical line appears covering the paragraph you select in the beginning. If you want to remove the vertical line, just select the target paragraph(s), go to the Tabs dialog, select Clear/Clear All, and click OK.
Similar article: How to Rearrange Pages in Word? | How to Move Pages in Word?
#5 How to Put a Line in Word? (Underline)
There is another kind of line called underline that locates right under the text. If you want to start to use the underline with your next text, just click the Underline icon in the Home tab, or use the Ctrl + U shortcut key, and then start typing.
If you want to add an underline to the already exist content, just select it and click the Underline icon.
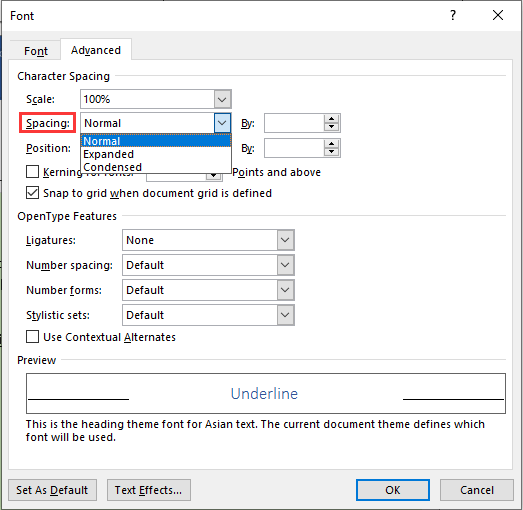
You can customize the underline type by clicking the inverted triangle behind the icon and select the type and color you like.

How to Change Line Spacing in Word?
If you choose More Underlines in the underline menu, you can further specify the line spacing in Word in the Advanced tab in the pop-up window. There are three models to choose from: normal, expanded, or condensed. Furthermore, you can decide how much space in the behind By box.
#6 How to Create a Line in Word? (Strikethrough)
Strikethrough draws a line cross through the text. Just click its icon in the Home tab to enable it and re-click the icon to disable it.
#7 How to Insert a Line in Word? (Signature Line)
The signature line specifies the individual who must sign. While inserting a digital signature requires that you obtain a digital ID, such as one from a certified Microsoft partner. Let’s go directly to the steps.
Step 1. Move to the Insert tab.
Step 2. Click on the Signature Line.
Step 3. In the drop-down menu, select the signature line type you want and finish the settings. Here, let’s take the Microsoft Office Signature Line for example.

#8 How to Remove Line in Word?
Since you can put different lines into your Word document, the way to remove them are unlike.
How to Delete Horizontal Line in Word?
There are 2 methods.
Method 1
Move your cursor to select the horizontal or vertical line and press Delete or Backspace on the keyboard to delete the line. This method is also appliable to the borderlines.
Method 2
Click on the horizontal line to activate it, then use the Delete or Backspace key to remove it.
How to Get Rid of a Line in Word?
Here, we will talk about how to remove underline and strikethrough. Just select the text with which you want to remove the line, click the icon for the underline or strikethrough and the line will disappear. It is as easy as a piece of cake.
Conclusion
All in all, lines in Word serves as decoration. They attract readers’ attention to where they are and help authors to express themselves better. Now, start writing your articles with all kinds of lines!
How about:
- Microsoft Word Won’t Open on Windows & Mac: How to Fix It
- 5 Ways – How to Make a Copy of a Word Document
- Word Could Not Create the Work File? Get Solutions Here