
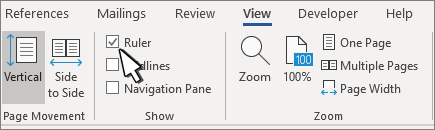
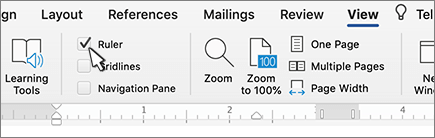
Turn on the ruler
If you don’t see the ruler at the top of your document, go to View > Ruler to display it.
Set a tab stop using the ruler
-
Select Left Tab
 at the left end of the horizontal ruler to change it to the type of tab you want.
-
Choose one of the following types:
-
A Left tab stop sets the left end of the text line. As you type, the text fills toward the right.
-
A Center tab stop sets the position at the middle of the text line. As you type, the text centers on this position.
-
A Right tab stop sets the right end of the text line. As you type, the text fills toward the left.
-
A Decimal tab stop aligns numbers around a decimal point. Without regard to the number of digits, the decimal point remains in the same position. See Use decimal tabs to line up numbers with decimal points.
-
A Bar tab stop doesn’t position text. It inserts a vertical bar at the tab position. Unlike other tabs, the bar tab is added to the text as soon as you click the ruler. If you don’t clear the bar tab stop before you print your document, the vertical line is printed.
-
-
Click or tap the bottom of the horizontal ruler where you want to set the tab stop.
 at the left end of the horizontal ruler to change it to the type of tab you want.
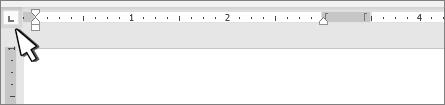
 A Center tab stop sets the position at the middle of the text line. As you type, the text centers on this position.
 A Right tab stop sets the right end of the text line. As you type, the text fills toward the left.
 A Decimal tab stop aligns numbers around a decimal point. Without regard to the number of digits, the decimal point remains in the same position. See Use decimal tabs to line up numbers with decimal points.
 A Bar tab stop doesn’t position text. It inserts a vertical bar at the tab position. Unlike other tabs, the bar tab is added to the text as soon as you click the ruler. If you don’t clear the bar tab stop before you print your document, the vertical line is printed.
Drag the tab stop down off the ruler to remove it.
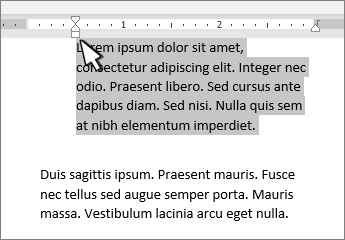
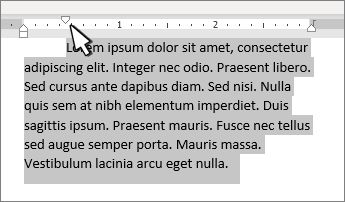
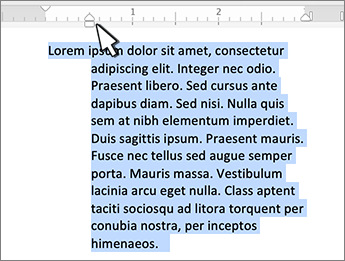
The left indent sets the position of the left side of a paragraph. When you move the left indent, your first line indent or hanging indent are moved in sync.
-
Select the text where you want set the left indent.
-
On the ruler, drag the square marker on the lower left side of the ruler to the place you want the left edge of the paragraph.
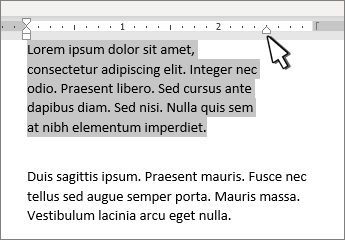
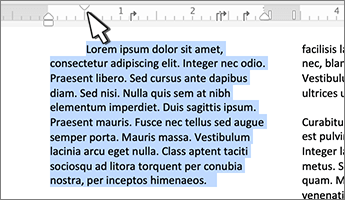
The right indent marker controls the position of the right side of a paragraph.
-
Select the text where you want set the right indent.
-
On the ruler, drag the triangular marker on the lower right side of the ruler to the place you want the right edge of the paragraph.
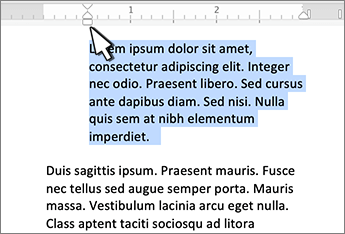
With a first line indent, the first line of a paragraph is indented and the following lines of a paragraph are not.
-
Select the text where you want to add a first line indent.
-
On the ruler, drag the triangular marker on the top left of the ruler to the place you want the indentation to start, for example to the 1″ mark.
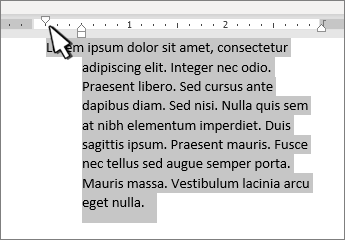
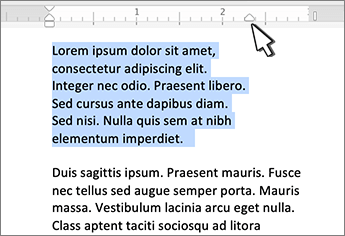
With a hanging indent, the second and all the following lines of a paragraph are indented more than the first.
-
Select the text where you want to add a hanging indent.
-
On the ruler, drag the upper triangular part of the lower marker to the place you want the indentation to start, for example to the 1″ mark.
Turn on the ruler
If you don’t see the ruler at the top of your document, go to View > Ruler to display it.
Set a tab stop using the ruler
-
Select Left Tab
at the left end of the horizontal ruler to change it to the type of tab you want.
-
Choose one of the following types:
-
A Left tab stop sets the left end of the text line. As you type, the text fills toward the right.
-
A Center tab stop sets the position at the middle of the text line. As you type, the text centers on this position.
-
A Right tab stop sets the right end of the text line. As you type, the text fills toward the left.
-
A Decimal tab stop aligns numbers around a decimal point. Without regard to the number of digits, the decimal point remains in the same position. See Use decimal tabs to line up numbers with decimal points.
-
A Bar tab stop doesn’t position text, it inserts a vertical bar at the tab position. Unlike other tabs, the bar tab is added to the text as soon as you click the ruler. If you don’t clear the bar tab stop before you print your document, the vertical line is printed.
-
-
Click or tap the bottom of the horizontal ruler where you want to set the tab stop.
 at the left end of the horizontal ruler to change it to the type of tab you want.
 A Center tab stop sets the position at the middle of the text line. As you type, the text centers on this position.
 A Right tab stop sets the right end of the text line. As you type, the text fills toward the left.
 A Decimal tab stop aligns numbers around a decimal point. Without regard to the number of digits, the decimal point remains in the same position. See Use decimal tabs to line up numbers with decimal points.
 A Bar tab stop doesn’t position text, it inserts a vertical bar at the tab position. Unlike other tabs, the bar tab is added to the text as soon as you click the ruler. If you don’t clear the bar tab stop before you print your document, the vertical line is printed.
Drag the tab stop down off the ruler to remove it.
The left indent sets the position of the left side of a paragraph. When you move the left indent, your first line indent or hanging indent are moved in sync.
-
Select the text where you want set the left indent.
-
On the ruler, drag the square marker on the lower left side of the ruler to the place you want the left edge of the paragraph.
The right indent marker controls the position of the right side of a paragraph.
-
Select the text where you want set the right indent.
-
On the ruler, drag the triangular marker on the lower right side of the ruler to the place you want the right edge of the paragraph.
With a first line indent, the first line of a paragraph is indented and the following lines of a paragraph are not.
-
Select the text where you want to add a first line indent.
-
On the ruler, drag the triangular marker on the top left of the ruler to the place you want the indentation to start, for example to the 1″ mark.
With a hanging indent, the second and all the following lines of a paragraph are indented more than the first.
-
Select the text where you want to add a hanging indent.
-
On the ruler, drag the upper triangular part of the lower marker to the place you want the indentation to start, for example to the 1″ mark.
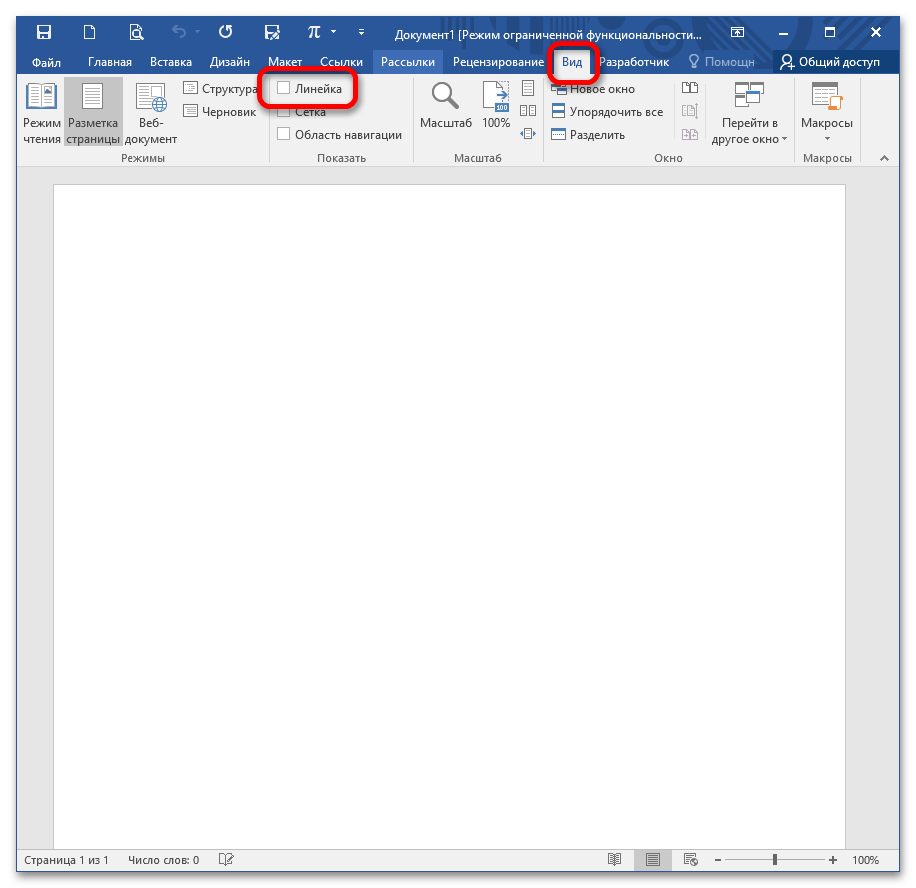
С помощью линейки в MS Word можно табулировать текст, сдвигать поля, делать отступ или выступ красной строки. Если данный инструмент отключен, для его отображения в документе пройдите в меню «Вид» и установите галочку в чекбоксе «Линейка» в блоке «Показать».
Подробнее: Включаем отображение линейки в Microsoft Word
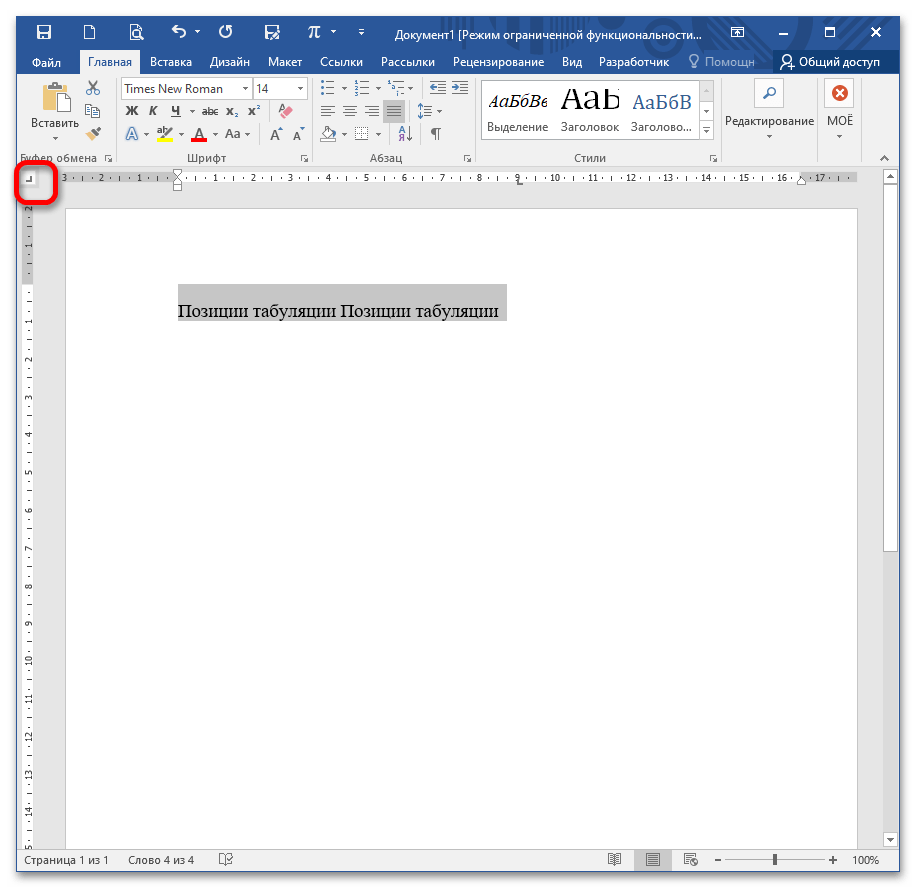
Позиции табуляции
При открытии документа в Word отсутствуют метки табуляции, однако если вы проставите их нажатием клавиши TAB, курсор будет передвигаться на заданный промежуток, равный 1,25 см. Вы можете настроить собственный интервал для лучшего контроля и выстраивания текста, повышения читаемости и усовершенствования формата документа.
Найдите слева на «перекрестке» двух линеек кнопку «Инструмент выбора позиций». С его помощью вы можете выбрать любую позиции табуляции и задать расположение текста относительно выбранной метки.
Подробнее: Табуляция в Microsoft Word
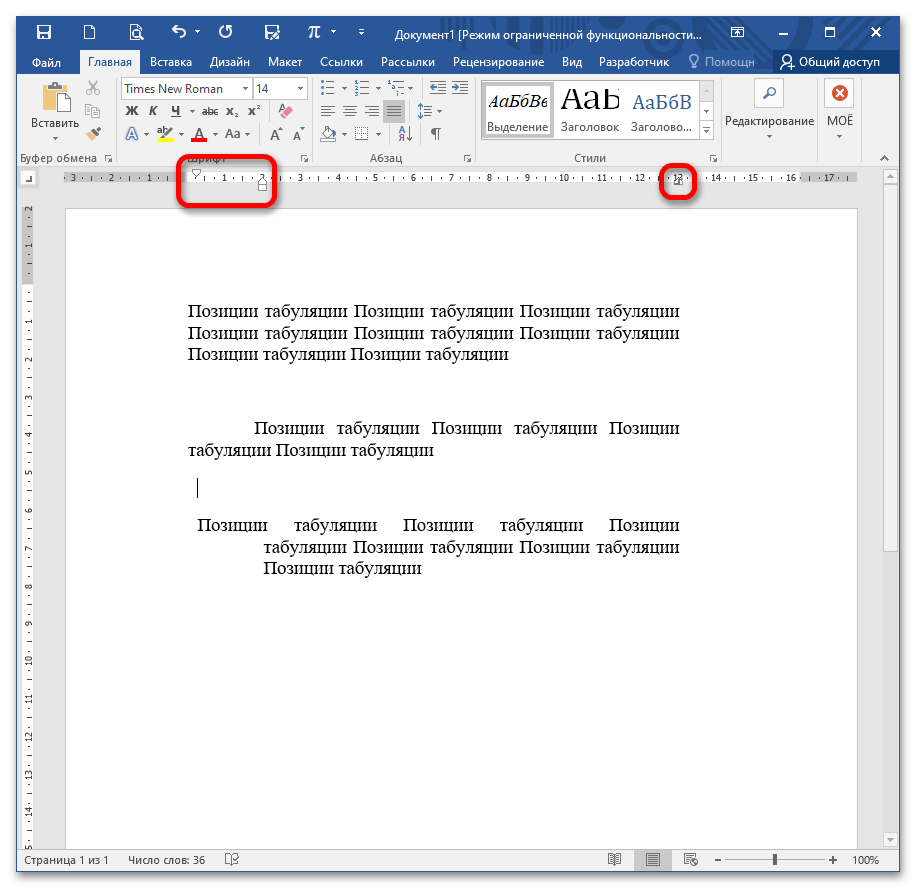
Настройка отступов
С помощью линейки вы можете быстро настроить абзацные отступы справа и слева, передвинув ползунки на заданный интервал. Также с помощью левых ползунков вы можете сделать либо отступ (стандартная красная строка), либо выступ.
Подробнее: Настройка абзацных отступов в Microsoft Word
Настройка полей
Для быстрой настройки полей без вызова диалогового окна достаточно потянуть в нужную сторону границу серой и белой части линейки, при этом курсор примет вид двусторонней стрелки.
Подробнее: Растягиваем текст по ширине в Word


Еще статьи по данной теме:
Помогла ли Вам статья?
19
19 people found this article helpful
How to Show the Ruler in Word
Use it to adjust margins, tabs, and more
What to Know
- In Print Layout: On the View tab, select Print Layout. Choose the Ruler check box to display the rulers.
- In Draft Layout: On the View tab, select Draft. Choose the Ruler check box to display the rulers.
- With the rulers enabled in the print or draft layout, you can change the margins and tabs.
This article explains how to display the ruler in Microsoft Word—and how to use the ruler to change margins and create tabs.
How to Show the Ruler in Word
Word has a ruler feature that enables you to do reasonably accurate layout work right within a Word document. If you want to set a tab, or see how big your text box or headline will be when you print a document, you can use the ruler to measure where on the page you want those elements to fall and see how big they will be when printed.
If you don’t see the ruler while working on a document, it’s probably turned off. Here’s how to show the ruler in Word.
-
If you want a ruler that appears horizontally and vertically, first make sure you’re working in the Print Layout view. With your document open, select Print Layout on the View tab.
-
Select the Ruler check box. In the Ribbon, it’s located at the top of the column that also contains Gridlines and Navigation Pain.
-
The ruler will appear above your document, as well as vertically on the left side in the Print Layout.
-
With the rule enabled, you can use tabs and margins, measure the size and placement of text boxes, and more in the Print Layout view.
-
To turn the ruler off, uncheck the Ruler check box.
How to Display the Microsoft Ruler in the Draft Layout in Word
If you prefer to work in the Draft layout, rather than the Print layout, the ruler works similarly in that view. While the ruler will not appear along the vertical margin of your document in the Draft layout, it will display along the top. It works much the same way as it does in the Print layout.
-
First make sure your document is open and you’re looking at it in the Draft view. To do this, Select Draft on the View tab.
-
Select the Ruler check box on the Ribbon. It’s in the same column on the ribbon as Gridlines and Navigation Pane.
How to Use the Microsoft Word Ruler
With the Ruler is enabled in either the Print Layout or in the Draft Layout, you can use it to change the margins and tabs, or to see the size and placement of graphic or type elements.
Using the Ruler to Change the Margins
-
Hover the mouse over the double tab at the left margin. Your mouse will turn to a double arrow and “Left Margin” will display as hover text. The part of the document outside the margin — the the left — is shaded grey.
-
Select and drag the left margin icon to increase your left margin.
-
On the right end of the ruler is the right margin. Hover your mouse over it until your mouse turns into a two-way arrow with «Right Margin» appearing over it.
-
Select and drag the right margin icon to see how it changes your right margin.
How to Create a Tab Using the Ruler
-
Place your cursor on the line where you want to place the tab.
-
Select the ruler in the spot where you want the tab. This will create a small corner-shaped icon representing your tab.
-
Press the Tab key to place a tab in your document, then drag along to ruler to change the tab’s placement.
Thanks for letting us know!
Get the Latest Tech News Delivered Every Day
Subscribe

Word’s rulers let you control the margins of your page and the indentation of paragraphs. They’re great for precisely lining up images, text, and other elements. If you’re printing a document, the rulers can help ensure that what you see on your screen translates into what you’ll get on the printed page.
The trouble is, rulers aren’t even visible by default in Word anymore. Here’s how to turn them on, and how to make the most out of them.
Note: We’re working with Office 2016 in this article. The rulers have been around pretty much forever, though, and work similarly in previous versions of Word.
Activate the Rulers
First, make sure you’re in Print Layout view. On the Ribbon, switch to the “View” tab (all the way on the right). If “Print Layout” isn’t already highlighted, click it now.

Now look towards the center of the Ribbon. In the “Show” section, enable the “Rulers” option. You should immediately see the horizontal ruler above your document and the vertical ruler to its left.
Note: The horizontal ruler is also visible in Web Layout and Draft view. The vertical ruler is not.
Access the Page Setup Window
Double-click any empty space on the ruler to open the Page Setup window. This is the same window you can open from the Layout tab on the Ribbon.
The “Page Setup” window shows you most of the physical layout properties of the document. The “Margins” tab lets you set the margins for the top, bottom, left, and right, which you can verify with the markers on the ruler (see below). The Gutter is extra space on the page, usually used as an extra blank space for things like comb binding (those little plastic corkscrews that make a cheap notebook). It’s set as blank by default. You can also use this tab to control page orientation.
If you’re printing your document, the “Paper” tab lets you can change the physical size of the paper to match different paper sizes in your printer. The default is 8.5 inches by 11 inches, the standard “Letter” size for US paper printing (215.9 x 279.4mm). You can see the result of this setting in the digital rulers on the page, with the default 1-inch margins resulting in a 7.5-inch horizontal ruler and a 10-inch vertical ruler. If you’re planning on printing via a standard home printer or you’re using the primary tray in your office printer, leave this as is.
Change Margins On the Fly
Margins are indicated on the ruler by the gray and white areas. The gray areas at either end of the ruler represent your margin; the white areas the active page. The scaling of the rulers seems a little strange at first. It actually starts on the far left (or top for the vertical ruler) with a number indicating the size of your margin and then counts down. When it reaches the white, active area, it starts counting up again. You can see this in the image below, where I’ve set the margin to two inches.
In Word’s default 8.5 by 11-inch page setup, the horizontal ruler starts at 1 (indicating a one-inch margin), then resets at zero where the margin ends, then counts up to 7.5 for the remaining horizontal space. Ditto for the vertical ruler: starts at one for a one-inch margin, restarts at zero at the white space, and only goes up to ten.
Note: Word’s rulers show whatever measurement you have set in File > Options > Advanced > Show Measurements In Units Of. You can change measurements to centimeters, millimeters, points, or picas. Be aware, though, that this settings controls the units of measurement used throughout Word—not just the ruler.
You can also quickly adjust margins right from the ruler. Hold your mouse over the line separating the white and gray area. You’ll see the pointer turn to a double arrow and will likely see a tooltip letting you know you’re point at the margin. Now, just click and drag that line left or right to adjust that margin.
Change Indents on the Fly
Those little triangle- and box-shaped markers on the ruler are quite handy. They control the indenting of individual paragraphs. Just position your cursor in the paragraph you want to adjust and slide them around. If you want to change multiple paragraphs, select the paragraphs you want to change. And if you want to change indents throughout the whole document, just hit Ctrl+A (to select everything), and then adjust the sliders.
Here’s how each indent works.
Dragging the Left Indent marker changes the indentation for all lines of a paragraph. As you slide it, the other two indent markers move as well. Here, I’m moving the Left Indent half an inch in from the left margin.
Dragging the First Line Indent marker changes indentation for only the first line of a paragraph.
Dragging the Hanging Indent marker changes the indentation of all lines except the first line.
On the right end of the ruler, you’ll find only one marker: the Right Indent marker. Drag it to constrain the paragraph on the right side.
Add Tab Stops
A tab stop is the location your cursor moves to when you hit the Tab key. A default Word document has no tab stops, so each time you hit the Tab key, the cursor jumps ahead about eight characters. Setting tab stops lets you better control and line up text.
Of course, Word offers enough options that things get a little more complicated than that. If you look all the way to the left edge of your document, just above the vertical ruler, you’ll see the Tab Stop button.
Clicking this button lets you cycle through the different types of tab stops Word makes available. Here they are:
- Left: Left tabs are Word’s default tap stop. They’re what most people think of when they think of tab stops, and what you’ll likely use most of the time. Text is aligned against the left edge of the tab stop.
- Center: Center tabs align the text around the center of the tab stop.
- Right: Right tabs align text against the tab stop’s right edge and are a great way to align the rightmost digits of lengthy lists of numbers as you enter them.
- Decimal: Decimal tabs align numbers (or text) based on decimal points. They are great for aligning currency figures. Be careful, though. Text is also aligned on decimals, so if you type a sentence with a period, the period will align on the tab stop.
- Bar Tab: Bar tabs do not create an actual tab stop. Instead, they create a vertical line wherever you insert them. You could use these for putting vertical lines between tabbed columns in instances where you’d rather not use a table.
- Indents: Select first line and hanging indent options and then click anywhere in the active ruler space (the white area) to place the indent there. This works the same as dragging the indent markers the way we discussed in the previous section.
A little tip for you. If you’re cycling through tab stops and don’t remember what each symbol means, move your mouse away from the button and then back to activate a tool tip describing that tab stop.
To insert a tab stop, just use the button to select the type of stop you want. Now, point your mouse anywhere on the white portion of the horizontal ruler (toward the bottom of the ruler line), and then click. A symbol appears indicating the type of tab stop you’ve placed. This is a tab marker, showing where the text will jump to if you press the Tab button on your keyboard.
Here’s an example. In this paragraph, the Left Indent is half an inch from the left margin, the First Line indent is another half inch further in, and I’ve set a tab stop at two inches. I pressed the Tab button with my cursor in front of “Lorem,” so the text jumped to my manually-set tab point.
You can insert multiple tab markers if you want, and you can click and drag them around to reposition them on the fly.
To get rid of a tab marker, just drag it down (away from the ruler) and release the mouse button.
And, if you prefer to set up your tab stops manually (and a little more precisely), double-click any tab marker to open the “Tabs” window.
The ruler is just one of the little features in Word that packs a whole lot more functionality than most people realize. It provides a quick way to control margins, set various indents for a paragraph, and keep things in line using tab stops. Why Word leaves it turned off by default is beyond us, but at least now you know how to turn it back on and put it to use.
READ NEXT
- › How to Number Paragraphs in Microsoft Word
- › How to Change the Ruler Measurement Unit in Microsoft Word
- › How-To Geek is Looking for Microsoft Office Writers
- › How to Insert a Vertical Line in Microsoft Word: 5 Methods
- › How to Indent Paragraphs in Google Docs
- › How to Add, Edit, and Remove Tab Stops in Microsoft Word
- › How to Add Sideheads and Pull Quotes to Microsoft Word Documents
- › How to Adjust and Change Discord Fonts
- Click the View tab. To view the ruler you’ll need to be in Print Layout, Web Layout, or Draft.
- Check the box next to Ruler. You can un-check the box to disable the ruler.
Contents
- 1 How do I put the Ruler on Microsoft Word?
- 2 How do I show the Ruler in Word and hide it?
- 3 How do you make the margins visible in Word 2013?
- 4 In which tab Ruler is present?
- 5 How many rulers are there in Microsoft Word?
- 6 How do you hide or view Ruler we should go to which of the following menus?
- 7 How do I show alignment lines in Word?
- 8 What will you click to view the Ruler?
- 9 What does Ruler help in MS Word?
- 10 How do I make one page landscape in Word 2013?
- 11 How do I show the tab bar in Word?
- 12 Where is the ruler located?
- 13 Where is horizontal ruler in Word?
- 14 What are the different types of rulers used in MS Word?
- 15 Is the direction in which a document is displayed or printed?
- 16 Which of the following provides the option to hide view a ruler tools view insert?
- 17 How do I show the ruler in LibreOffice?
- 18 What is alignment guide in Word?
- 19 How do you right align a line in Word?
How do I put the Ruler on Microsoft Word?
The ruler is naturally hidden in Word. To show the ruler, click the View tab and place a check mark by the Ruler item, found in the Show group. In Print Layout view, the ruler appears on the top of the writing part of the Word window.
How do I show the Ruler in Word and hide it?
Answer: Select the View tab in the toolbar at the top of the screen. Then uncheck the Ruler option in the Show/Hide group. Now the horizontal and vertical rulers should be hidden.
How do you make the margins visible in Word 2013?
How to Set Page Margins in Word 2013
- In Word, with the document open from the previous exercise, click the Page Layout tab on the Ribbon.
- Click the Margins button.
- Click the Narrow option.
- Click the Margins button again and then click Custom Margins.
In which tab Ruler is present?
Answer: On the View tab of the Ribbon, in the Show group, check the box for Ruler.
How many rulers are there in Microsoft Word?
Answer: Word displays a horizontal ruler at the top of your document in most views; however, a ruler is only available only in Print Layout view.
correct option: c.
The View Menu can assist to hide or view the ruler. Thus, this is the right option.
How do I show alignment lines in Word?
Click the shape or object in the document. Under Drawing Tools on the Format tab, in the Arrange group, click Align, and then click View Gridlines.
What will you click to view the Ruler?
So, if you don’t see the rulers, and you haven’t turned them off, click the “View” tab and then click the “Print Layout” button in the Views section. The View tab is also where you can hide or show the rulers. To hide the rulers, uncheck the “Ruler” box in the Show section.
What does Ruler help in MS Word?
Word’s rulers let you control the margins of your page and the indentation of paragraphs. They’re great for precisely lining up images, text, and other elements. If you’re printing a document, the rulers can help ensure that what you see on your screen translates into what you’ll get on the printed page.
How do I make one page landscape in Word 2013?
Click the Page Layout Launcher button on the Page Layout tab in the Page Setup group. Click Portrait or Landscape on the Margins tab in the Orientation section. Select Selected Text in the Apply To drop-down list. Click the OK button.
How do I show the tab bar in Word?
You can click the button above the vertical scrollbar on the right hand side to show/hide the ruler. Or activate the View tab of the ribbon and tick the check box “Ruler” in the Show group. Do you mean the tab selector box (located to the left of the ruler). Clicking on it will activate any type of tab.
Where is the ruler located?
The Ruler is located below the Ribbon around the edge of the document. It is used to change the format of the document, i.e. it helps you align the text, tables, graphics and other elements of your document.
Where is horizontal ruler in Word?
To see both horizontal and vertical rulers, you must be in Print Layout view.
- To make sure you’re in Print Layout view, click Print Layout on the View tab.
- Select the Ruler check box.
What are the different types of rulers used in MS Word?
Types of Ruler
- Horizontal Ruler bar: It is displayed on the top of the document and mainly used to set left and right margins of page and indentation of paragraph.
- Vertical Ruler bar: It is mainly displayed on left side of the document and used to set top and bottom margins of page.
Is the direction in which a document is displayed or printed?
Page orientation is the direction in which a document is displayed or printed. The two basic types of page orientation are portrait (vertical) and landscape (horizontal). Most monitors have a landscape display, while most documents are printed in portrait mode.
Which of the following provides the option to hide view a ruler tools view insert?
To hide the ruler, click View, and in the Show group, clear the Ruler box. To permanently hide the vertical ruler, click File > Options > Advanced, scroll down to the Display section, and clear the Show vertical ruler box.
How do I show the ruler in LibreOffice?
To show or hide rulers, choose View – Ruler. To show the vertical ruler, choose Tools – Options – LibreOffice Writer – View, and then select Vertical ruler in the Ruler area.
What is alignment guide in Word?
Microsoft Word is equipped with live layout and alignment guides to help you align, resize, and move objects.Move the shape (or other element) around the document to see layout guides and allign them to existing objects.
How do you right align a line in Word?
Click to the left of the text you want to right align. For this example, click to the left of “right-aligned,” and press Tab. Figure D shows the results of using the right-aligned tab to push part of the text to the right margin. It doesn’t matter how much text you push to the right, the tab will align it perfectly.