
Insert footnotes and endnotes

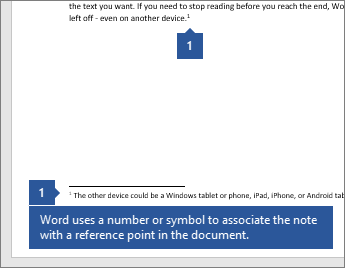
Footnotes appear at the bottom of the page and endnotes come at the end of the document. A number or symbol on the footnote or endnote matches up with a reference mark in the document.
-
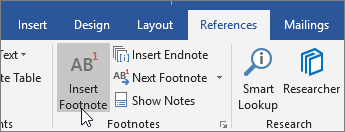
Click where you want to reference to the footnote or endnote.
-
On the References tab, select Insert Footnote or Insert Endnote.

-
Enter what you want in the footnote or endnote.
-
Return to your place in the document by double-clicking the number or symbol at the beginning of the note.
Need more help?
Want more options?
Explore subscription benefits, browse training courses, learn how to secure your device, and more.
Communities help you ask and answer questions, give feedback, and hear from experts with rich knowledge.
Use footnotes and endnotes to explain, comment on, or provide references to something in a document. Usually, footnotes appear at the bottom of the page, while endnotes come at the end of the document or section.
If you’re in Reading View, switch to Editing View by clicking Edit Document > Edit in Word for the web.

Add a footnote
-
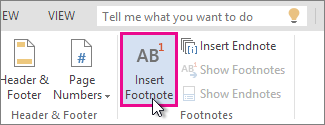
Click where you want to add the footnote.
-
Click Insert > Insert Footnote.
Word inserts a reference mark in the text and adds the footnote mark at the bottom of the page.
-
Type the footnote text.
Add an endnote
-
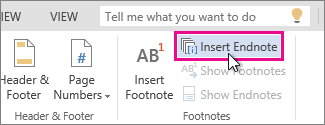
Click where you want to add the endnote.
-
Click Insert > Insert Endnote.
Word inserts a reference mark in the text and adds the endnote mark at the end of the document.
-
Type the endnote text.
Customize your footnotes and endnotes
To customize a footnote or endnote:
-
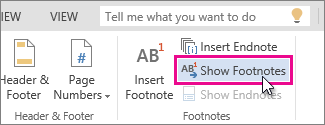
Click the reference number or mark in the body of the text or click Insert > Show Footnotes(for endnotes, click Insert > Show Endnotes).
-
In the footnote/endnote view, click Format Footnotes or Format Endnotes to display the Format Options dialog, where you can change the size, font, and indentation of one or all of your footnotes or endnotes.

Note: If you want to convert footnotes to endnotes or the other way around, use the Open in Word command and convert them there. When you save the doc in Word, it’s saved where you opened it in Word for the web.
Need more help?
Want more options?
Explore subscription benefits, browse training courses, learn how to secure your device, and more.
Communities help you ask and answer questions, give feedback, and hear from experts with rich knowledge.
Содержание
- Вставка примечаний в документ
- Изменение примечаний в документе
- Изменение или добавление имени пользователя в примечаниях
- Удаление примечаний в документе
- Вопросы и ответы
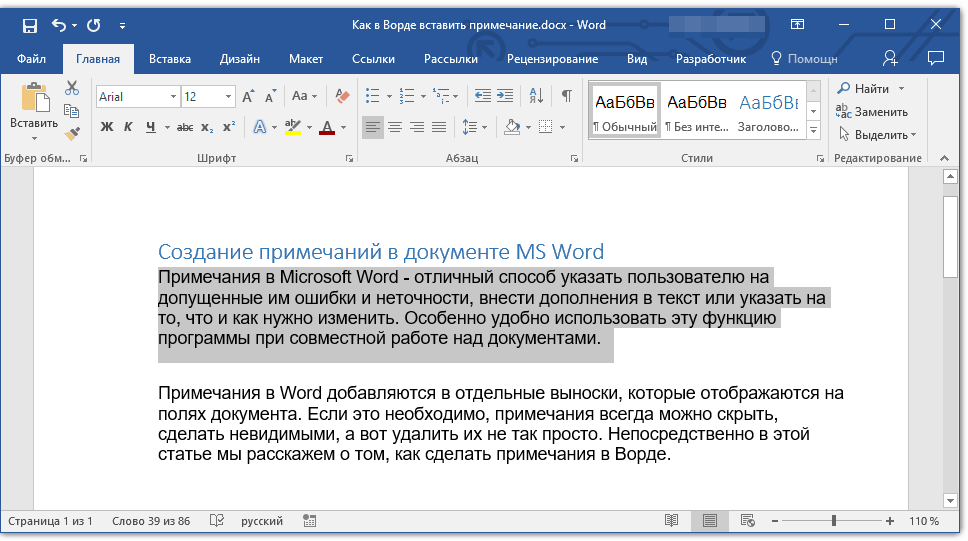
Примечания в Microsoft Word — отличный способ указать пользователю на допущенные им ошибки и неточности, внести дополнения в текст или указать на то, что и как нужно изменить. Особенно удобно использовать эту функцию программы при совместной работе над документами.
Урок: Как в Ворде добавить сноски
Примечания в Word добавляются в отдельные выноски, которые отображаются на полях документа. Если это необходимо, примечания всегда можно скрыть, сделать невидимыми, а вот удалить их не так просто. Непосредственно в этой статье мы расскажем о том, как сделать примечания в Ворде.
Урок: Настройка полей в MS Word
Вставка примечаний в документ
1. Выделите фрагмент текста или элемент в документе, с которым нужно связать будущее примечание.
- Совет: Если примечание будет относиться ко всему тексту, перейдите в конец документа, чтобы добавить его там.
2. Перейдите во вкладку “Рецензирование” и нажмите там кнопку “Создать примечание”, расположенную в группе “Примечания”.
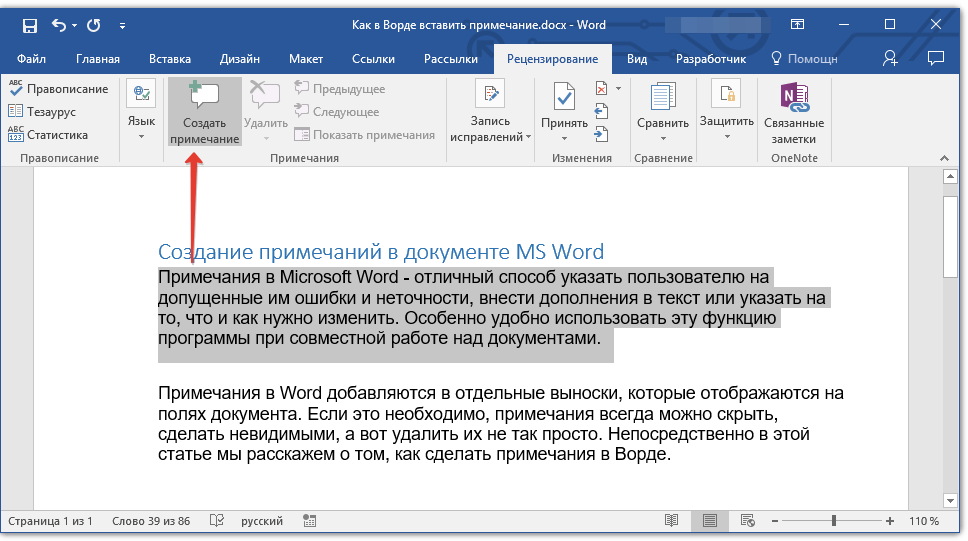
3. Введите необходимый текст примечания в выноски или области проверки.
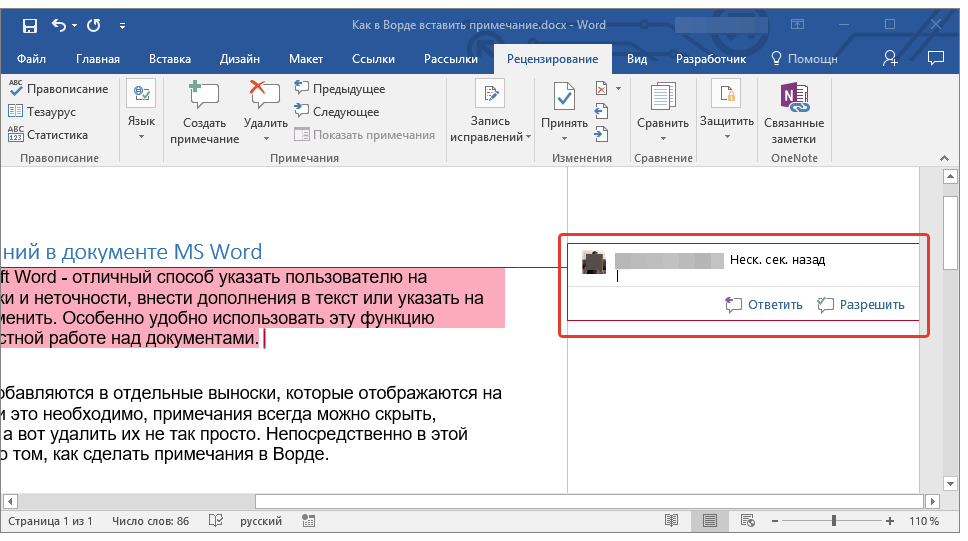
- Совет: Если вы хотите ответить на уже существующее примечание, кликните по его выноске, а затем уже по кнопке “Создать примечание”. В появившейся выноске введите необходимый текст.

Изменение примечаний в документе
В случае, если примечания на отображаются в документе, перейдите во вкладку “Рецензирование” и нажмите на кнопку “Показать исправления”, расположенную в группе “Отслеживание”.
Урок: Как в Ворде включить режим правки
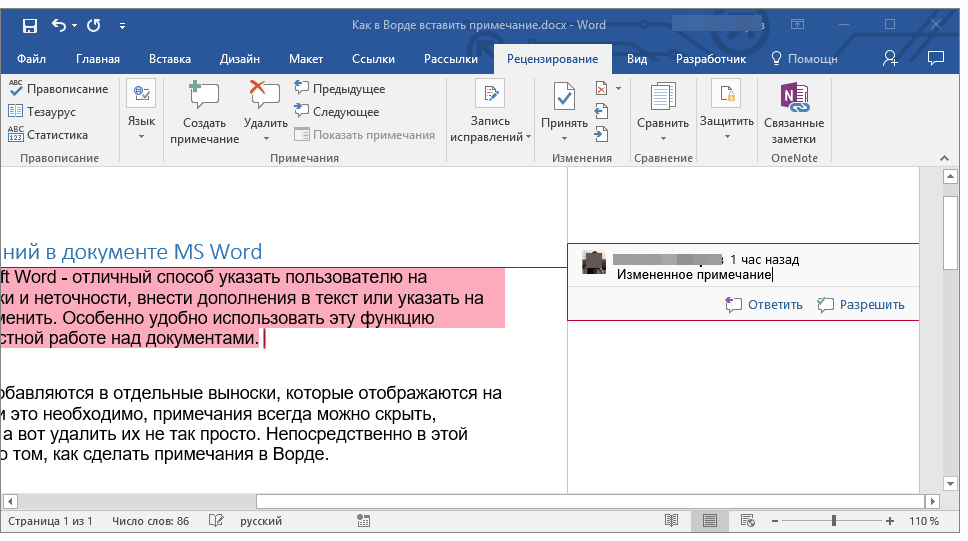
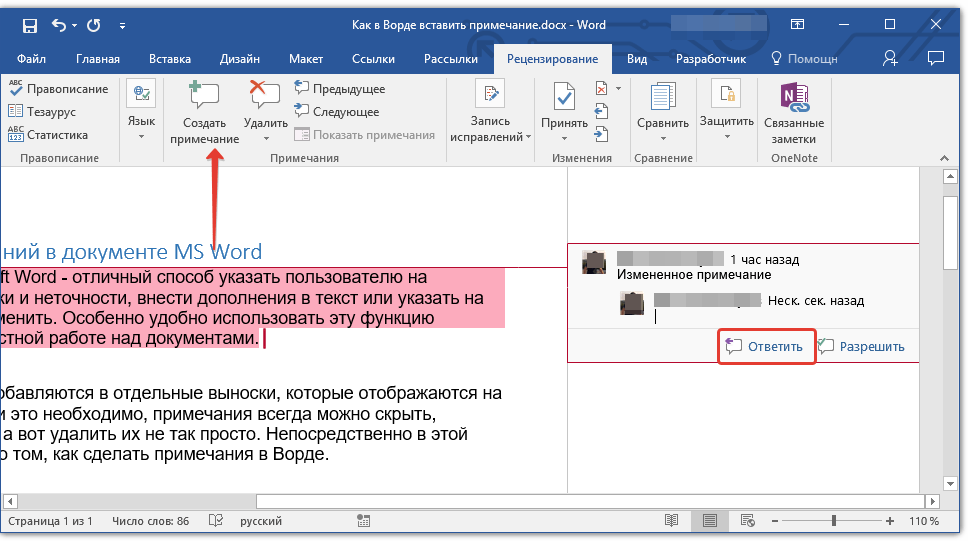
1. Кликните по выноске примечания, которое необходимо изменить.

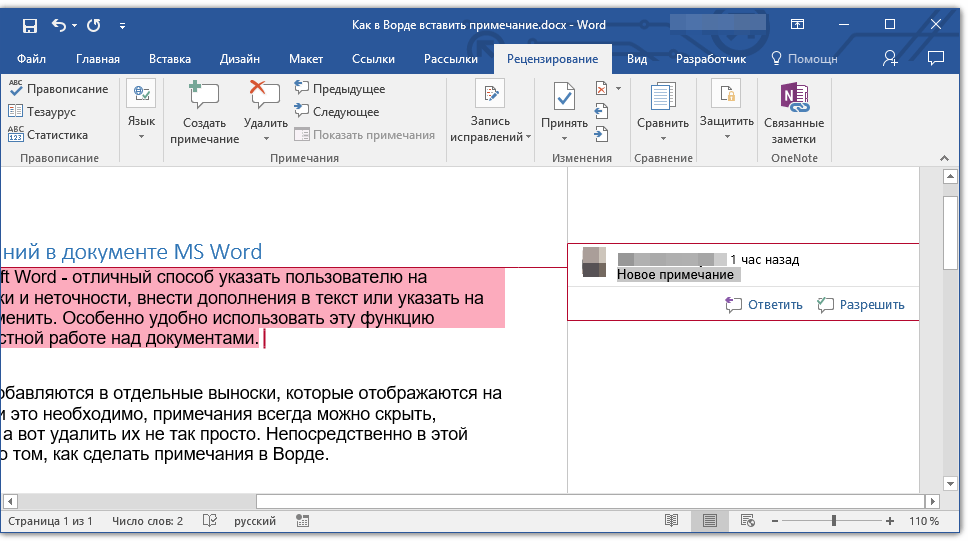
2. Внесите необходимые изменения в примечание.
В случае, если выноски в документе скрыты или же отображается только часть примечания, изменить его можно в окне просмотра. Чтобы отобразить или скрыть это окно следует выполнить следующие действия:
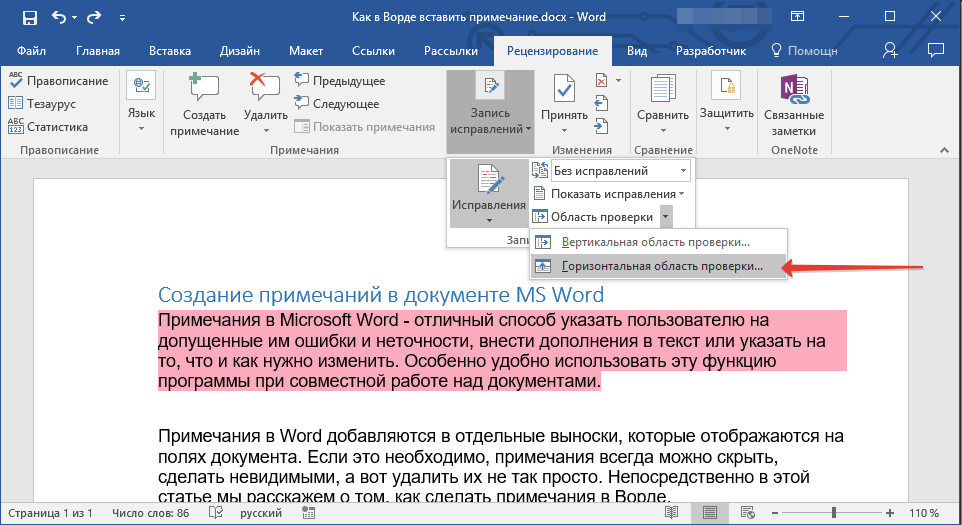
1. Нажмите кнопку “Исправления” (ранее “Область проверки”), которая расположена в группе “Запись исправлений” (ранее “Отслеживание”).
Если необходимо переместить окно проверки в конец документа или нижнюю часть экрана, кликните по стрелке, расположенной около этой кнопки.
В выпадающем меню выберите “Горизонтальная область проверки”.
Если вы хотите ответить на примечание, кликните по его выноске, а затем нажмите на кнопку “Создать примечание”, расположенную на панели быстрого доступа в группе “Примечания” (вкладка “Рецензирование”).
Изменение или добавление имени пользователя в примечаниях
Если это необходимо, в примечаниях всегда можно изменить указанное имя пользователя или добавить новое.
Урок: Как в Word изменить имя автора документа
Чтобы это сделать, выполните следующие пункты:
1. Откройте вкладку “Рецензирование” и нажмите на стрелку возле кнопки “Исправления” (группа “Запись исправлений” или “Отслеживание” ранее).
2. Из выпадающего меню выберите пункт “Сменить пользователя”.
3. Выберите пункт “Личная настройка”.
4. В разделе “Личная настройка Office” введите или измените имя пользователя и его инициалы (в дальнейшем именно эта информация будет использоваться в примечаниях).
ВАЖНО: Имя и инициалы пользователя, введенные вами, изменятся для всех приложений пакета “Microsoft Office”.
Примечание: Если изменения в имени пользователя и его инициалах использовались только для его комментариев, то применены они будут только к тем комментариям, которые будут сделаны после внесения изменений в имени. Ранее добавленные комментарии не будут обновлены.
Удаление примечаний в документе
Если это необходимо, вы всегда можете удалить примечания, предварительно их приняв или отклонив. Для более детального ознакомления с данной темой рекомендуем вам прочесть нашу статью:
Урок: Как удалить примечания в Ворде
Теперь вы знаете, зачем в Word нужны примечания, как их добавлять и изменять, если это необходимо. Напомним, что, в зависимости от используемой вами версии программы, названия некоторых пунктов (параметров, инструментов) могут отличаться, но их содержание и местонахождение всегда примерно одинаков. Изучайте Microsoft Office, осваивая новые возможности этого программного продукта.
![]()
Download Article
Multiple easy-to-follow ways to add footnotes in Word
![]()
Download Article
Footnotes allow you to cite sources or explain a concept in detail without sidetracking the main text. Word makes managing footnotes easy, as new footnotes are numbered automatically, and the footnotes area expands and shrinks dynamically based on the amount of text. Give your document a professional feel by strategically using footnotes to clarify information and credit your sources.
-
1
Click the «References» tab. This is located at the top of the window, typically between «Page Layout» and «Mailings». This tab lets you insert various reference tools, such as a table of contents, footnotes and endnotes, citations, captions and more.
-
2
Place your cursor where you want the footnote to appear. By default, footnotes will be designated by increasing superscript numbers. Place the cursor where you want the number to appear.
Advertisement
-
3
Click the «Insert Footnote» button. This is located in the «Footnotes» section of the «References» tab. The footnote number will be inserted, and a separator bar will be added to the bottom of the page. Your cursor will automatically be taken to the footnote at the bottom of the page so that you can fill it out.
- An endnote is like a footnote except the reference occurs at the end of the document. By default, endnotes are numbered with Roman numerals (i, ii, iii, etc.).
- Alternatively, you can press Ctrl + Alt + F to create a footnote, or Ctrl + Alt + D to create an endnote.
-
4
Change when your footnotes numbering resets. By default, your footnotes will increase in number throughout your whole document. You can change this so that the numbers restart every page or at section breaks in the document.[1]
- Click the Menu button in the bottom-right corner of the «Footnotes» section. This will open the «Footnote and Endnote» window. In the «Format» section, use the «Numbering» drop-down menu to select when you want the footnote numbers to restart.
- You can insert section breaks into your document by clicking the «Page Layout» tab, clicking the «Breaks» button in the «Page Setup» section, and then selecting the type of break you’d like to insert. Besides changing the way footnotes are numbered, section breaks are great for making layout changing to specific portions of a document.
-
5
Change your footnote formatting. If you’d rather have symbols instead of numbers, want the footnotes to appear below the text instead of at the bottom of the page, or want the numbering to start at a different number, you can change this from the «Footnote and Endnote» window. Click the Menu button in the bottom right-corner of the «Footnotes» section to open it.
- Click Symbol… to choose a symbol from the Symbol menu. You can choose any character from any font, though the «Symbols» font will open by default.


Advertisement
-
1
Switch to Print Layout view. Click View and select Print Layout.
-
2
Place your cursor where you want the footnote to appear. Your footnote will appear at the cursor, so place the cursor at the end of the text that you want to create a footnote reference for.
-
3
Insert the footnote. Click the «Document Elements» tab, and then click the «Footnote» button in the «Citations» section. A footnote will be inserted at your cursor and you will be taken to the footnote text section to enter the contents of the footnote. The footnote text will be at the bottom of the same page as the footnote, separated by a line.
- Alternatively, you can press Command + Option + F to create a footnote, or Command + Option + E to create an endnote.
-
4
Change your footnote formatting. If you’d rather have symbols instead of numbers, want the footnotes to appear below the text instead of at the bottom of the page, or want the numbering to start at a different number, you can change this from the «Footnote and Endnote» window. Click Insert and select Footnote.
- Click Symbol… to choose a symbol from the Symbol menu. You can choose any character from any font, though the «Symbols» font will open by default.
- By default, your footnotes will increase in number throughout your whole document. You can change this so that the numbers restart every page or at section breaks in the document. In the «Format» section, use the «Numbering» drop-down menu to select when you want the footnote numbers to restart.
- You can apply your formatting changes to just your selected text, the current section, or your entire document.
- Click Symbol… to choose a symbol from the Symbol menu. You can choose any character from any font, though the «Symbols» font will open by default.


Advertisement
-
1
Switch to Print Layout view. Click View and select Print Layout.
-
2
Place your cursor where you want the footnote to appear. Your footnote will appear at the cursor, so place the cursor at the end of the text that you want to create a footnote reference for.
-
3
Insert the footnote. Click Insert → Reference → Footnote… to open the «Footnote and Endnote» window. Select «Footnote», and then choose your numbering option. You can have Word number your footnotes automatically, or you can choose a custom symbol to insert.
- In Word 2004/2008, click Insert → Footnote….
- Alternatively, you can press Ctrl + Alt + F to create a footnote, or Ctrl + Alt + D to create an endnote in Windows. On a Mac, press Command + Option + F to create a footnote, or Command + Option + E to create an endnote.
-
4
Enter your footnote text. Your footnote will be created and you will be taken to the footnote text section at the bottom of the page. You can enter the text you want for the footnote, and then click back in your document when you are finished.


Advertisement
Add New Question
-
Question
Why is my first footnote printing on the next page?

A header or footnote is applied to all pages when put in a document. Unless it is a page number generated by the document (which you select). Otherwise, the header and footnote follows you through all of your pages.
-
Question
How do I insert more information into a footnote that already exists?
You can double click on an existing footnote to edit it.
-
Question
When I create a footnote for a word, does it appear each time I use the word?
No, it doesn’t. Footnotes are bound to locations in the document, not to words. This means that, even if you change the word or the text around the footnote, the footnote remains where it is.
Ask a Question
200 characters left
Include your email address to get a message when this question is answered.
Submit
Advertisement
Video
Thanks for submitting a tip for review!
About This Article
Article SummaryX
1. Click References.
2. Click the desired location.
3. Click Insert Footnote.
4. Select a number format.
5. Select a symbol.
6. Click Insert.
Did this summary help you?
Thanks to all authors for creating a page that has been read 808,785 times.
Is this article up to date?
Are you drafting a document in Word, you would need to add some footnotes but you don’t know how to do it? Don’t worry, it’s really child’s play. What you have to do is take five minutes of free time, follow the instructions in the guide on how to insert notes in word I’m about to propose and put them into practice.
In the tutorial I will also deal with the endnotes, which are very similar to the footnotes but are automatically positioned at the end of the document (instead of at the end of the selected page); comments, which instead serve to suggest corrections and changes to be made to the file, and bibliographic notes. In short, at the end of the reading, you will have a rather complete picture of the possibilities at your disposal.
If it’s all clear, I’d say we can take action — find the explanations you need right below. The instructions cover all the most recent versions of Word, both for computers and for mobile devices, including the online version of the famous Microsoft application. So I just have to wish you a good reading and a good job!
Index
- How to insert notes in a Word document
- How to insert notes in Word on PC
- How to insert notes in Word Online
- How to insert notes in Word on smartphones and tablets
- How to insert bibliographic notes in Word
How to insert notes in a Word document
Be vuoi scoprire how to insert notes in a Word document operating from the classic desktop version of the Microsoft program, via Word Online or via the official Word app for smartphones and tablets, continue reading: you will find all the relevant instructions below.
How to insert notes in Word on PC
If you want to learn how to insert notes in word acting from the classic desktop version of the program for Windows and macOS, the first step you need to take is to start Word by selecting the relative link that you find in the Start menu di Windows or in Launchpad di MacOS.
Once the main program screen is displayed, open the document you want to act on, selecting it from the recent ones in the section Home of the software, or among the files saved on your computer or on OneDrive, choosing the element of your interest from the section apri. Next, place the Word cursor in the position where you want the first reference to the information in the footer to appear.
At this point, select the tab References from the toolbar at the top and click on the button Insert footnote. Then type the note to be shown in the footer at the point of the selected document and that’s it.
Repeat the operation for each note you want to insert in your file and you will have all the information in the footer numbered and automatically linked to the selected points of the Word sheet.
If you are a lover of keyboard shortcuts, you can also insert new footnotes into your document by navigating to the place on the sheet where you want to insert the note and pressing the key combination Alt+Ctrl+F (its Windows) oppure option+command+f (on macOS) on your computer keyboard.
After inserting the footnotes, you can also change their numbering type (for example using Roman numbering) and position within the file, moving it to the end of the text they refer to or to the last page of the document. .
To customize these and other parameters of the notes entered in Word, select the tab References from the toolbar of the program and click on the button in the shape of arrow placed next to the wording Footnotes.
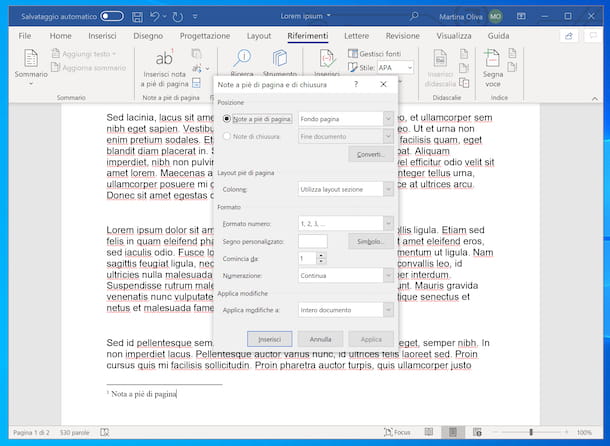
In the window that opens, you can change the position of the notes in the document using the drop-down menu Footnotes or by clicking on the button Converted (in this case, the notes are transformed into endnotes and moved to the end of the document), you can change the type of note numbering via the menu Number format and you can choose from which number to start the numbering of the same by setting a value in the field It starts with.
The changes have immediate effect on all notes previously inserted in the document. Furthermore, using the appropriate buttons on the tab References In Word, you can switch from one note to another with one click and automatically display the content of the footnotes without manually searching for it in the document pages. Better than this?
Do you want to insert notes in Word to report changes and corrections to be made to a document? In this case you can use the function to insert i Comments, which, precisely, allows you to add comments to specific parts of a document and thus indicate changes and corrections to be made in the latter. This is an extremely useful tool when you work with other people and want to report changes to be made (or made) to the file.
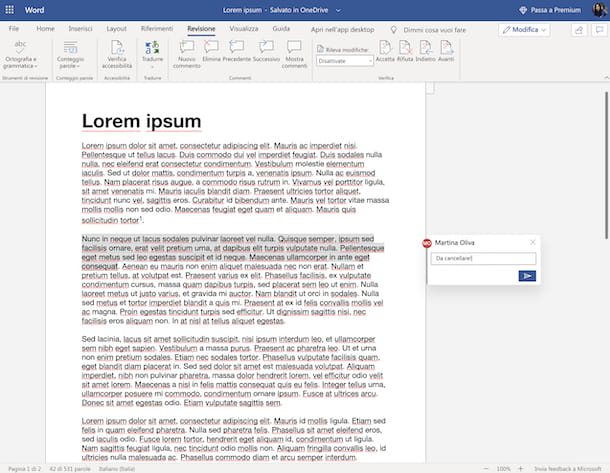
To add a comment note in Word, select the portion of text you want to «comment», go to the tab revision of the program, click on the button Post comments which is located in the top center and then on the item New comment from the menu that opens. After doing this, a box will appear on the right where you can write your comment.
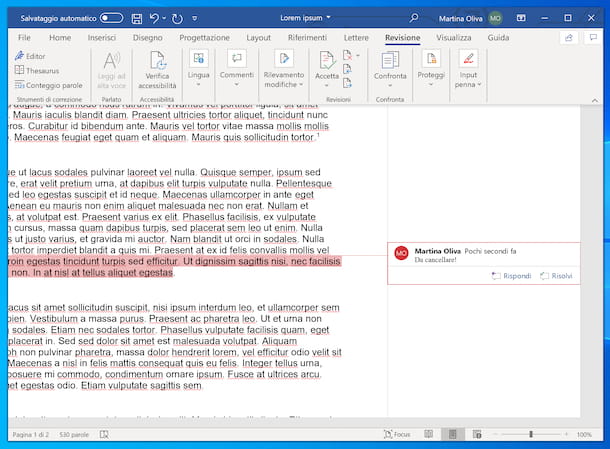
Repeat, therefore, the operation with all the parts of the document of your interest. Whoever has the task of reviewing the document will be able to add notes in turn or respond directly to your comments, by pressing the appropriate button in the comments box.
If Word does not automatically show the comments present in a document, to solve, you have to go to the tab revision program, click on the button Post comments and on the voice Show comments present in the menu that appears.
How to insert notes in Word Online
Now let’s see how to insert notes in Word using the online version of the application, which can be used directly from the browser without installing additional software. To use it, go to its home page and log into your Microsoft account (if necessary).
Once you have logged in, open the document in relation to which you are interested in going to act, selecting it from those already loaded in the past or pressing on the item to load a new document (top right). Once the text editor screen is displayed, click where in the document you want to insert your note, then select the tab References present at the top and click on the item Insert footnote from the menu located at the top of the screen.
After completing the above steps, type the note to be shown in the footer in the appropriate field that you see appearing below. Then repeat these steps for all the notes you intend to insert within the document.
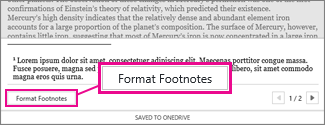
You can also customize the footnotes you have entered, by changing the font type and size, by clicking on them, then on the button Footnote format in the box that appears at the bottom and acting on the menus Character in the window that opens. To apply the changes to the single note, click on the button Apply, while to apply the changes to all the notes press the button Apply to all.
If you are interested in inserting endnotes, instead, click on the item Insert endnote that you always find in the top menu, in the tab References, type the note in the appropriate field that appears below and you’re done. Then repeat these steps for all the endnotes you want to insert. If you want, I would like to point out that even in this case you can apply customizations to the characters by pressing the button Endnote format.
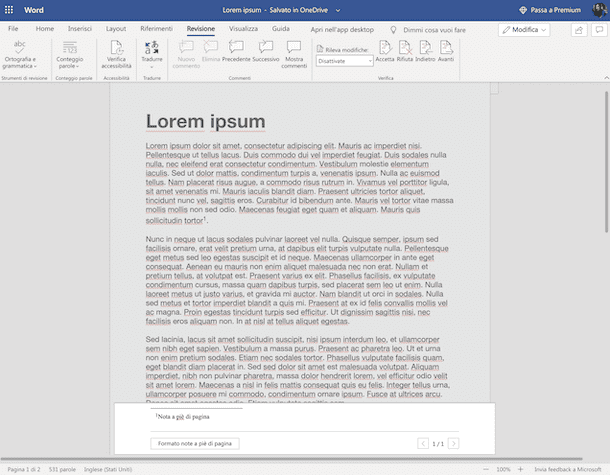
If this may interest you, I would like to point out that you can immediately view all the footnotes and closing notes present in the document by expanding the options attached to the menu of the card. References, by clicking on down arrow that you find at the top right and then selecting the captions respectively Show footnotes e Show endnotes that you find at the top left.
To insert comments, instead, proceed as follows: select the portion of text you are interested in, select the tab revision and click sul pulsating New comment found on the menu located at the top of the screen. Then type your comment in the box that you see appear on the right and click on the button with thepaper airplane to be able to save it. Then repeat these steps for all parts of the document to be commented on.
If after being entered, the comments do not appear automatically in Word, to be able to consult them, click on the button Show comments that you find in the card menu revision And that’s it.
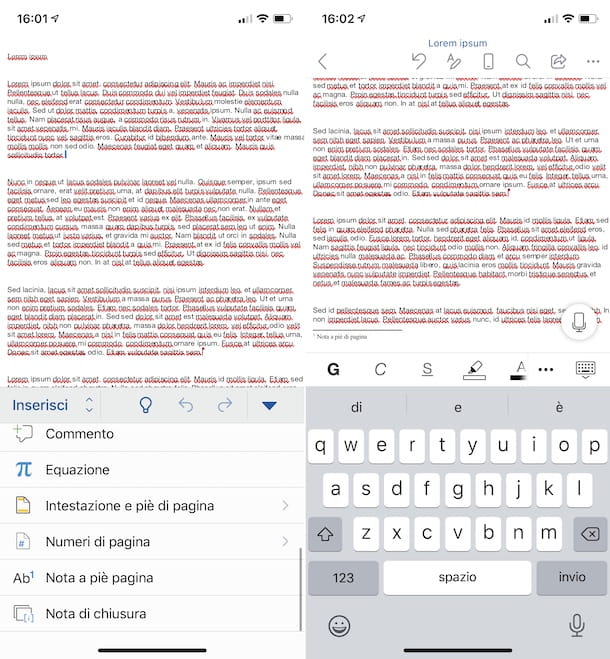
How to insert notes in Word on smartphones and tablets
Footnote, endnote, and comment features are also available in versions of Word for smartphones and tablets, usable in the form of an app for Android and iOS / iPadOS (free on devices up to 10.1 ″, otherwise they require a Microsoft 365 subscription starting from 7 euros / month).
To use the app in question, start it and open the document in relation to which you are interested in going to act, selecting it from the section Home or by pressing on the icon folder, at the bottom right, and taking it from the files on your device or OneDrive.
Once the document is displayed, to insert a footnote, tap in the point of the file of your interest, press the button (…) located at the bottom right and select the option Inserisci from the menu on the left. If you are using a tablet, go directly to the tab Inserisciby selecting the appropriate item at the top.
At this point, tap on the option Footnote and type your note in the field provided. Then repeat the steps I just indicated for each footnote you want to insert in the document.
I also inform you that, if you want, you can make any customizations to the notes using the formatting tools that you see appear at the bottom of the screen after selecting them.
You can follow the same procedure that I have just indicated for the closing notes. The only difference is that after opening the menu or tab Inserisci, you have to tap on the option Ending note present at the bottom of the screen.
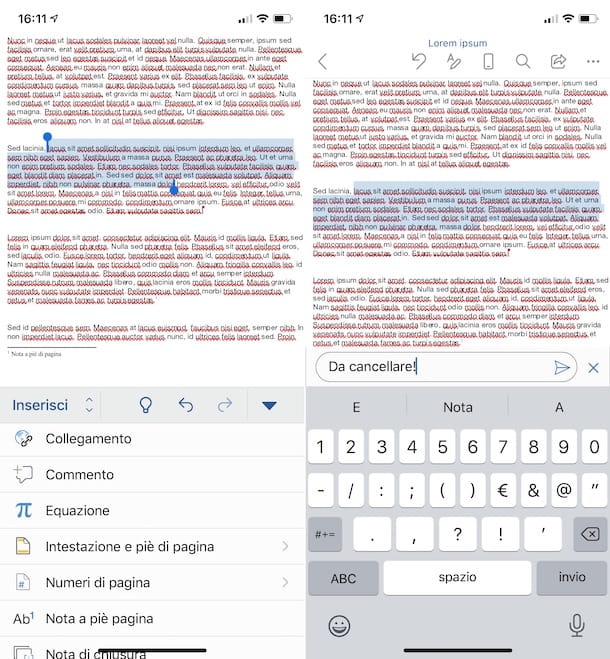
As I told you, even in the case of Word for smartphones and tablets it is possible to insert comments. To do this, do this: select the portion of text to «comment», go to the menu or tab Inserisci, proceeding as I have already explained to you, and then tap on the option Comment.
Therefore, type your comment in the appropriate text field and press the button with thepaper airplane to insert it. Later, you will be able to view the comments entered simply by selecting the relevant portion of text.
If you cannot see the comments in the text, if you are using a smartphone, tap the button (…) and select the item revision in the menu on the left, while if you are using a tablet go directly to the tab revision from the top of the screen. Next, tap on the option View for review and choose the item All comments (embedded) give the menu check if you press.
How to insert bibliographic notes in Word
Let us now how to insert bibliographic notes in Word. If so, please note that this is only a feature available on the desktop version del celebre programma di videoscrittura Microsoft.
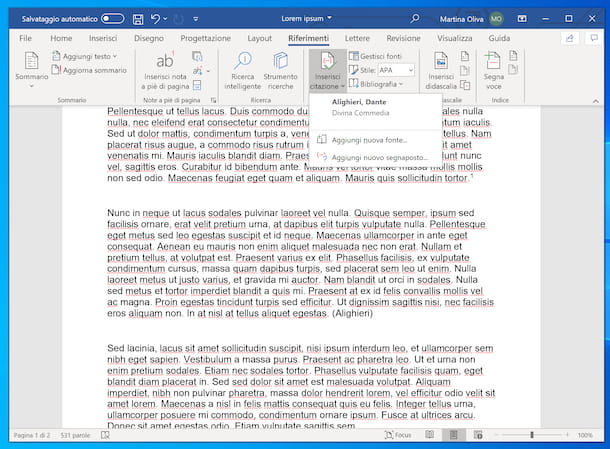
So, what you have to do, after starting Word on your PC or your Mac and having opened the document in relation to which you are interested in going to act, is to place the cursor at the end of the text you want to quote, select the tab Reference at the top and choose the quote style you prefer from the menu Style, which you find at the top of the screen.
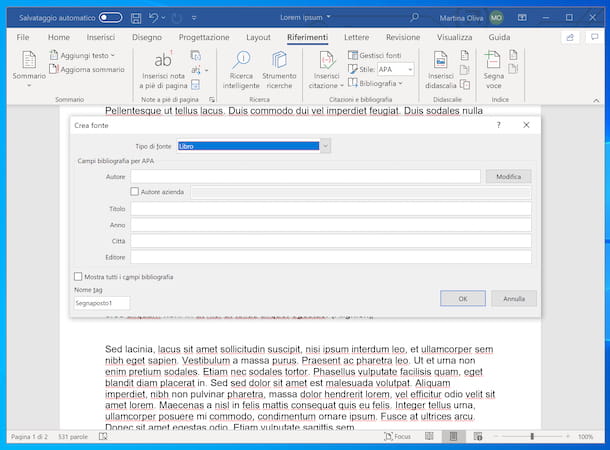
Successively click on your button Insert quote always present at the top, choose the option Add new source from the menu that opens and fill in the fields in the new window that appears on the screen with the information relating to the source of your interest, then press the button OK and the quote will be inserted immediately.
If you want, you can insert further citations using the data already entered, positioning the Word cursor in the point of the document you prefer, clicking on the button Insert quote and choosing the reference source from the menu that is shown to you.
To make changes to inserted citations by, for example, adding page numbers if you are citing a book, select the citation, then click the button with the arrow that you find in its correspondence, choose the option Edit quote from the menu that appears and intervene through the new window that is shown on the screen.
To create a bibliography using the sources cited in the document, instead, proceed as follows: move the mouse pointer to the point of the document you are interested in, select the tab References From the top of the Word window, click on the menu References and choose one of the formats available from the latter.
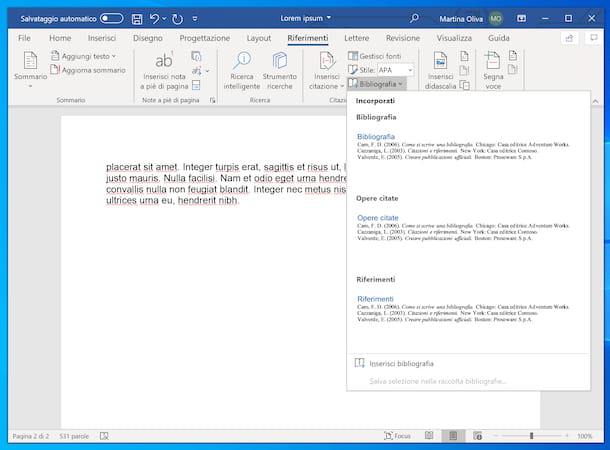
If you need to change the sources of your bibliographic notes, you can do so by clicking on the button Manage sources that you always find at the top of the card References Word and then taking advantage of the options and menus in the new window that is shown on the screen.