Word for Microsoft 365 Word 2021 Word 2019 Word 2016 Word 2013 Word 2010 Word 2007 More…Less
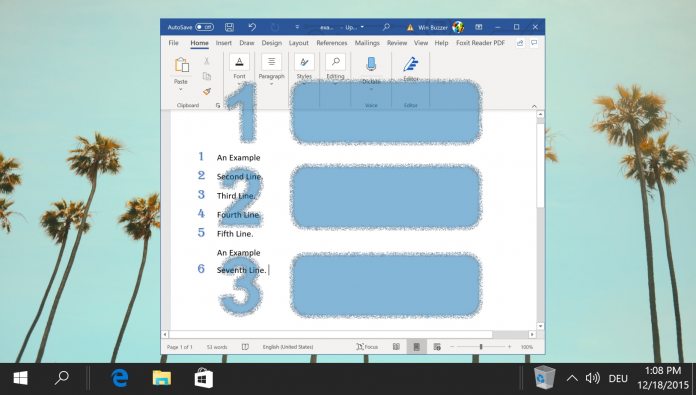
Word can automatically count the lines in a document and display the appropriate number beside each line of text. This is useful when you need to refer to specific lines in a document, such as a script or a legal contract.

By default, Word numbers every line in a document (except those in tables, footnotes, endnotes, text boxes, and headers and footers). However, you can choose which line numbers to display. For example, you can display line numbers in all or part of the document. Or you can display line numbers at intervals, such as every tenth line (10, 20, 30, and so on).
What do you want to do?
-
Add line numbers
-
Remove line numbers
Add line numbers
You can add line numbers to all or part of a document. To view line numbers, you must be in Print Layout view (click the View tab to check).
Notes:
-
A table is counted as one line.
-
A figure is counted as one line.
-
A text box is counted as one line if it is positioned inline with the text on the page. If text on the page wraps around the text box, the lines of text on the page are counted. Lines of text inside a text box are not counted.
Add line numbers to an entire document
-
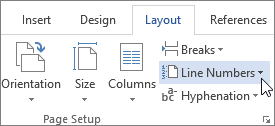
On the Layout tab, in the Page Setup group, click Line Numbers.
Note: If your document is divided into sections and you want to add line numbers to the entire document, you first need to select the document. Click Select in the Editing group on the Home tab, and then click Select All. Or press CTRL+A.
-
Do one of the following:
-
To number consecutively throughout the document, click Continuous.
-
To start with number 1 on each page, click Restart Each Page.
-
To start with number 1 after each section break, click Restart Each Section.
-
For more advanced line numbering options, such as numbering at different intervals, click Line Numbering Options, and then click Line Numbers on the Layout tab.
-
Add line numbers to a section or to multiple sections
-
Click in a section or select multiple sections.
-
On the Layout tab, in the Page Setup group, click Line Numbers.
-
Click Line Numbering Options, and then click the Layout tab.
-
In the Apply to list, click Selected sections.
-
Click Line Numbers.
-
Select the Add line numbering check box, and then select the options that you want.
Top of Page
Remove line numbers
You can remove line numbers from the entire document, from a section, or from a paragraph.
-
Click in the document, or click in the section or paragraph from which you want to remove line numbers. If you want to remove line numbers from multiple sections, select the sections.
-
On the Layout tab, in the Page Setup group, click Line Numbers.
-
Do one of the following:
-
To remove line numbers from the entire document or section, click None.
-
To remove line numbers from a single paragraph, click Suppress for Current Paragraph.
-
Top of Page
What do you want to do?
-
Add line numbers
-
Remove line numbers
Add line numbers
You can add line numbers to all or part of a document. To view line numbers, you must be in Print Layout view (click the View tab to check).
Notes:
-
A table is counted as one line.
-
A figure is counted as one line.
-
A text box is counted as one line if it is positioned inline with the text on the page. If text on the page wraps around the text box, the lines of text on the page are counted. Lines of text inside a text box are not counted.
Add line numbers to an entire document
-
On the Page Layout tab, in the Page Setup group, click Line Numbers.
Note: If your document is divided into sections and you want to add line numbers to the entire document, you first need to select the document. Click Select in the Editing group on the Home tab, and then click Select All. Or press CTRL+A.
-
Do one of the following:
-
To number consecutively throughout the document, click Continuous.
-
To start with number 1 on each page, click Restart Each Page.
-
To start with number 1 after each section break, click Restart Each Section.
-
For more advanced line numbering options, such as numbering at different intervals, click Line Numbering Options, and then click Line Numbers on the Layout tab.
-
Add line numbers to a section or to multiple sections
-
Click in a section or select multiple sections.
-
On the Page Layout tab, in the Page Setup group, click Line Numbers.
-
Click Line Numbering Options, and then click the Layout tab.
-
In the Apply to list, click Selected sections.
-
Click Line Numbers.
-
Select the Add line numbering check box, and then select the options that you want.
Top of Page
Remove line numbers
You can remove line numbers from the entire document, from a section, or from a paragraph.
-
Click in the document, or click in the section or paragraph from which you want to remove line numbers. If you want to remove line numbers from multiple sections, select the sections.
-
On the Page Layout tab, in the Page Setup group, click Line Numbers.
-
Do one of the following:
-
To remove line numbers from the entire document or section, click None.
-
To remove line numbers from a single paragraph, click Suppress for Current Paragraph.
-
Top of Page
Need more help?
Adding line numbers to a Microsoft Word document can help you point others to exact positions within it, especially in documents with multiple pages. Here’s how to quickly add line numbers in Word.
These instructions should work for recent Office versions (from 2010 onwards). Before you begin, note that Word will treat tables and text boxes as if they’re on a single line, regardless of how large they are.
Adding Line Numbers to an Entire Document
To start adding line numbers, you’ll need to open your Word document. In the ribbon bar at the top, click on the “Layout” tab. From here, click the “Line Numbers” button.
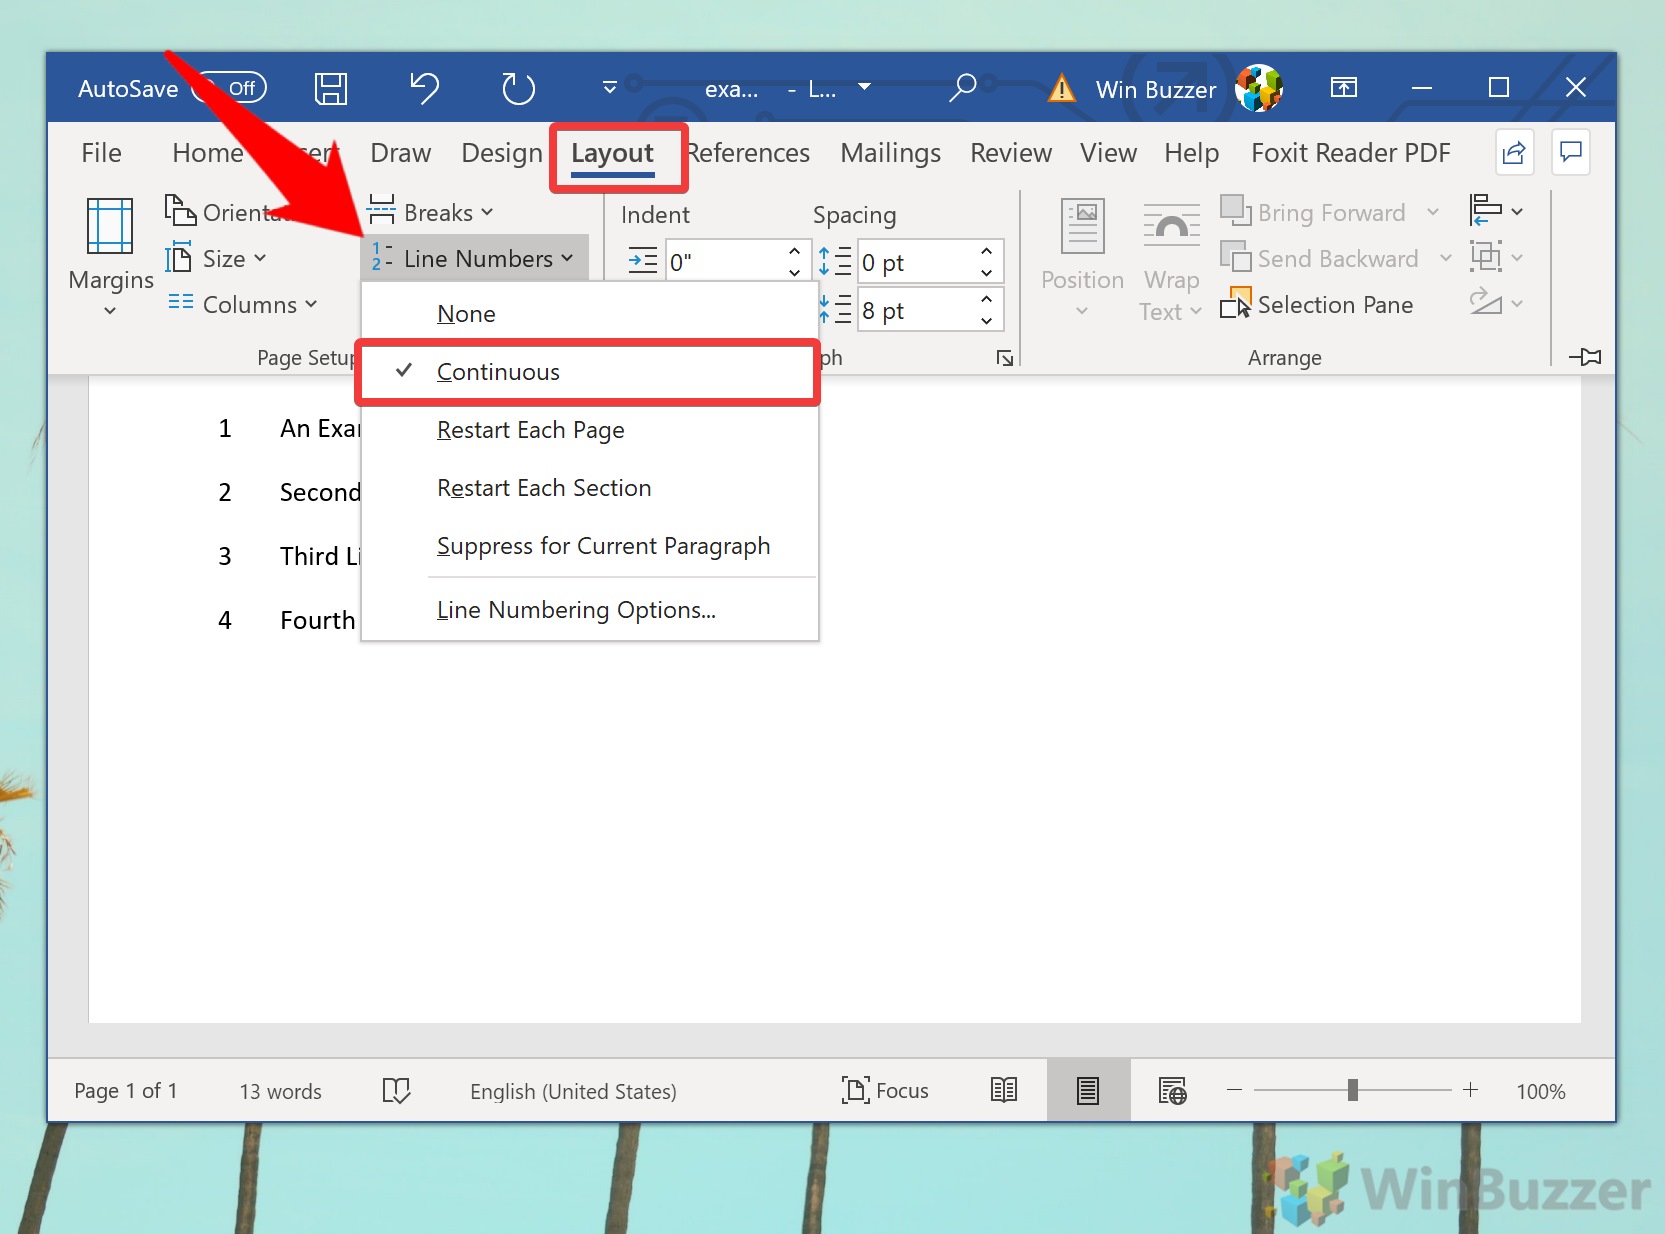
A drop-down menu offers several potential options. To have line numbers that run through your document continuously, rather than restarting on each new page, click on the “Continuous” option.
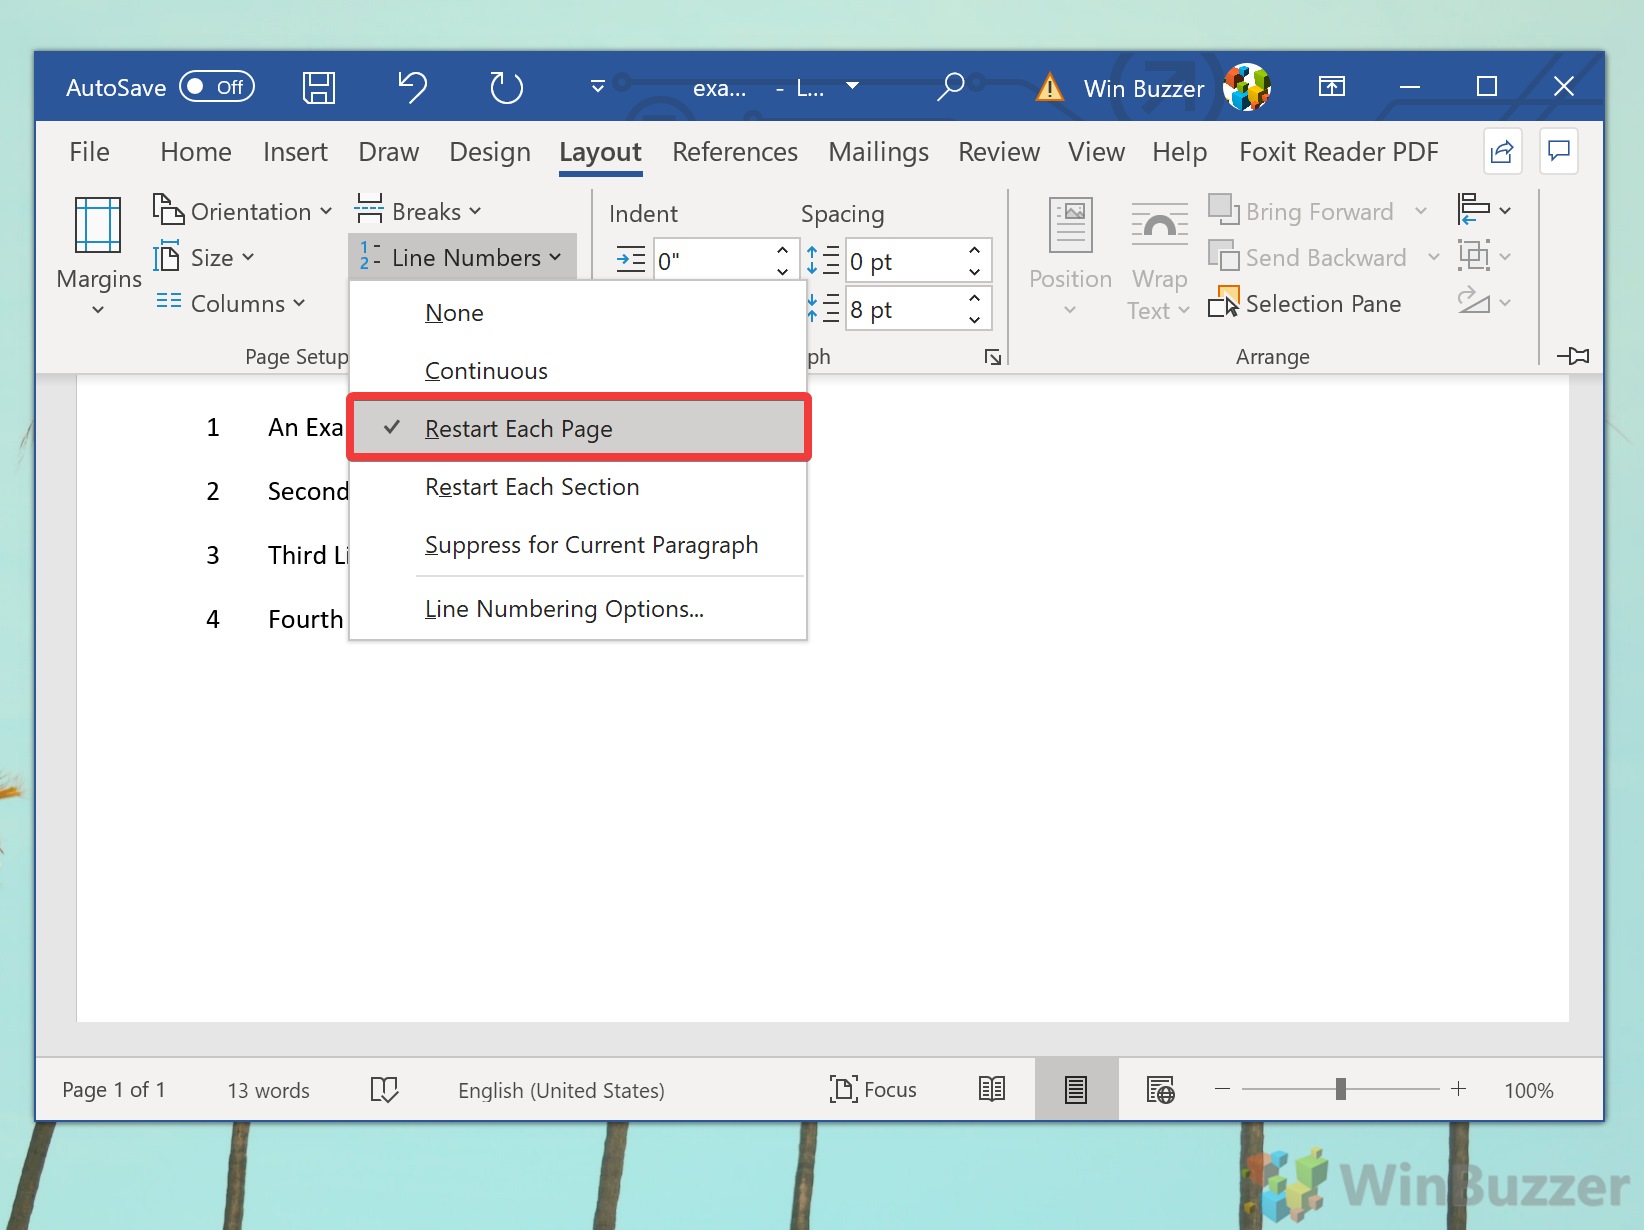
To have the line numbers restart on each new page, select “Restart Each Page” instead.
Once selected, the line numbers will appear on the left side of the document page.
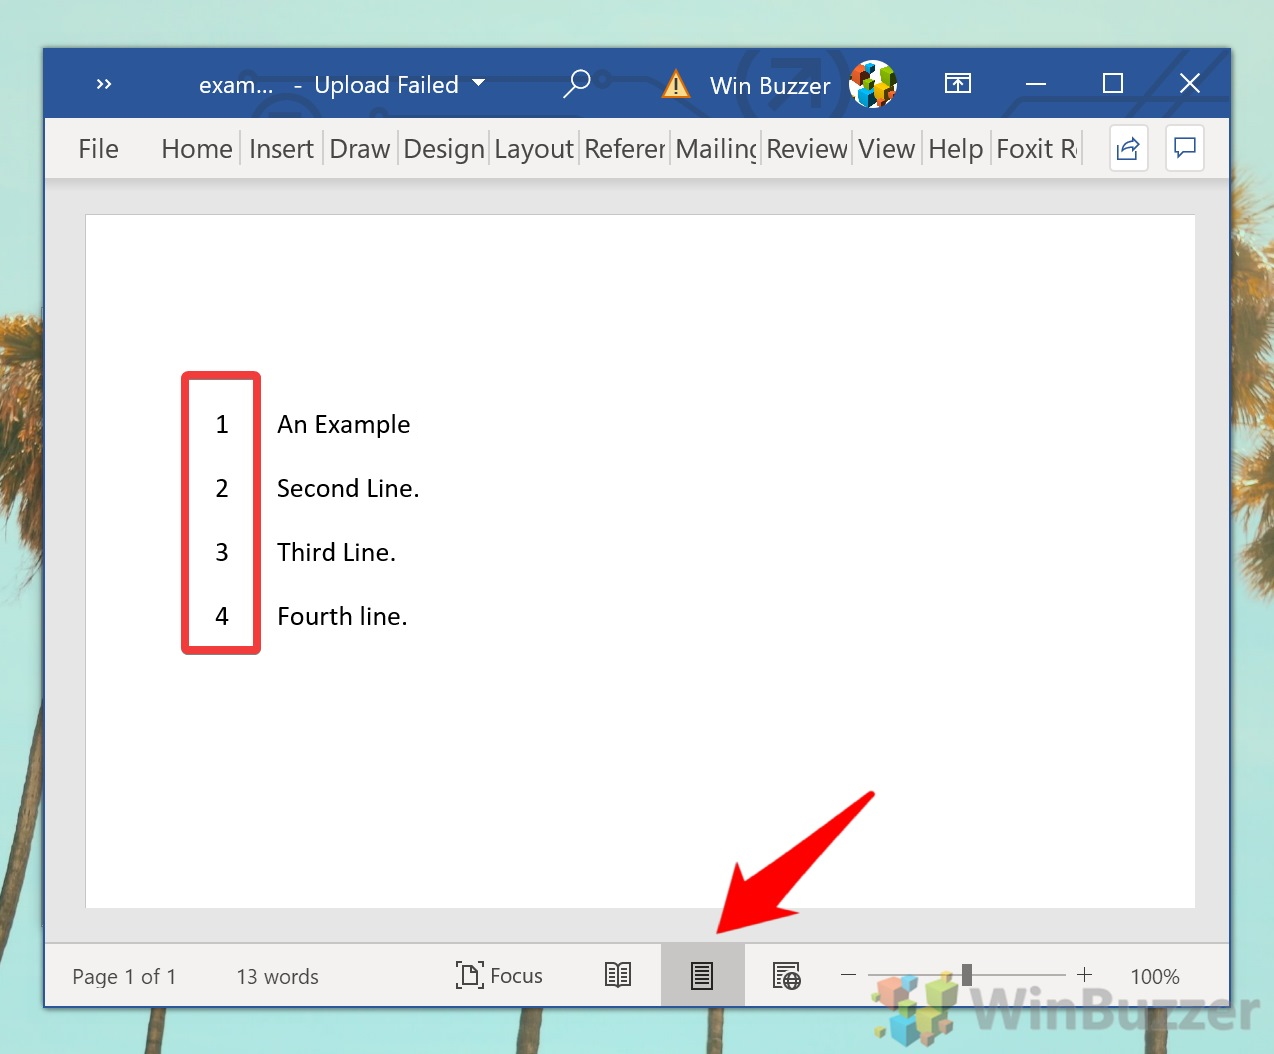
Line numbers will appear only in the print view mode, so if you have another viewing mode selected, click on the “Print Layout” button in the bottom-right corner of your Word document window.
Adding Line Numbers to Individual Sections
It’s possible to separate pages of a Word document into individual sections using section breaks. You can set Word to restart the sequence of line numbers with each new section break.
RELATED: How to Find Section Breaks in a Word Document
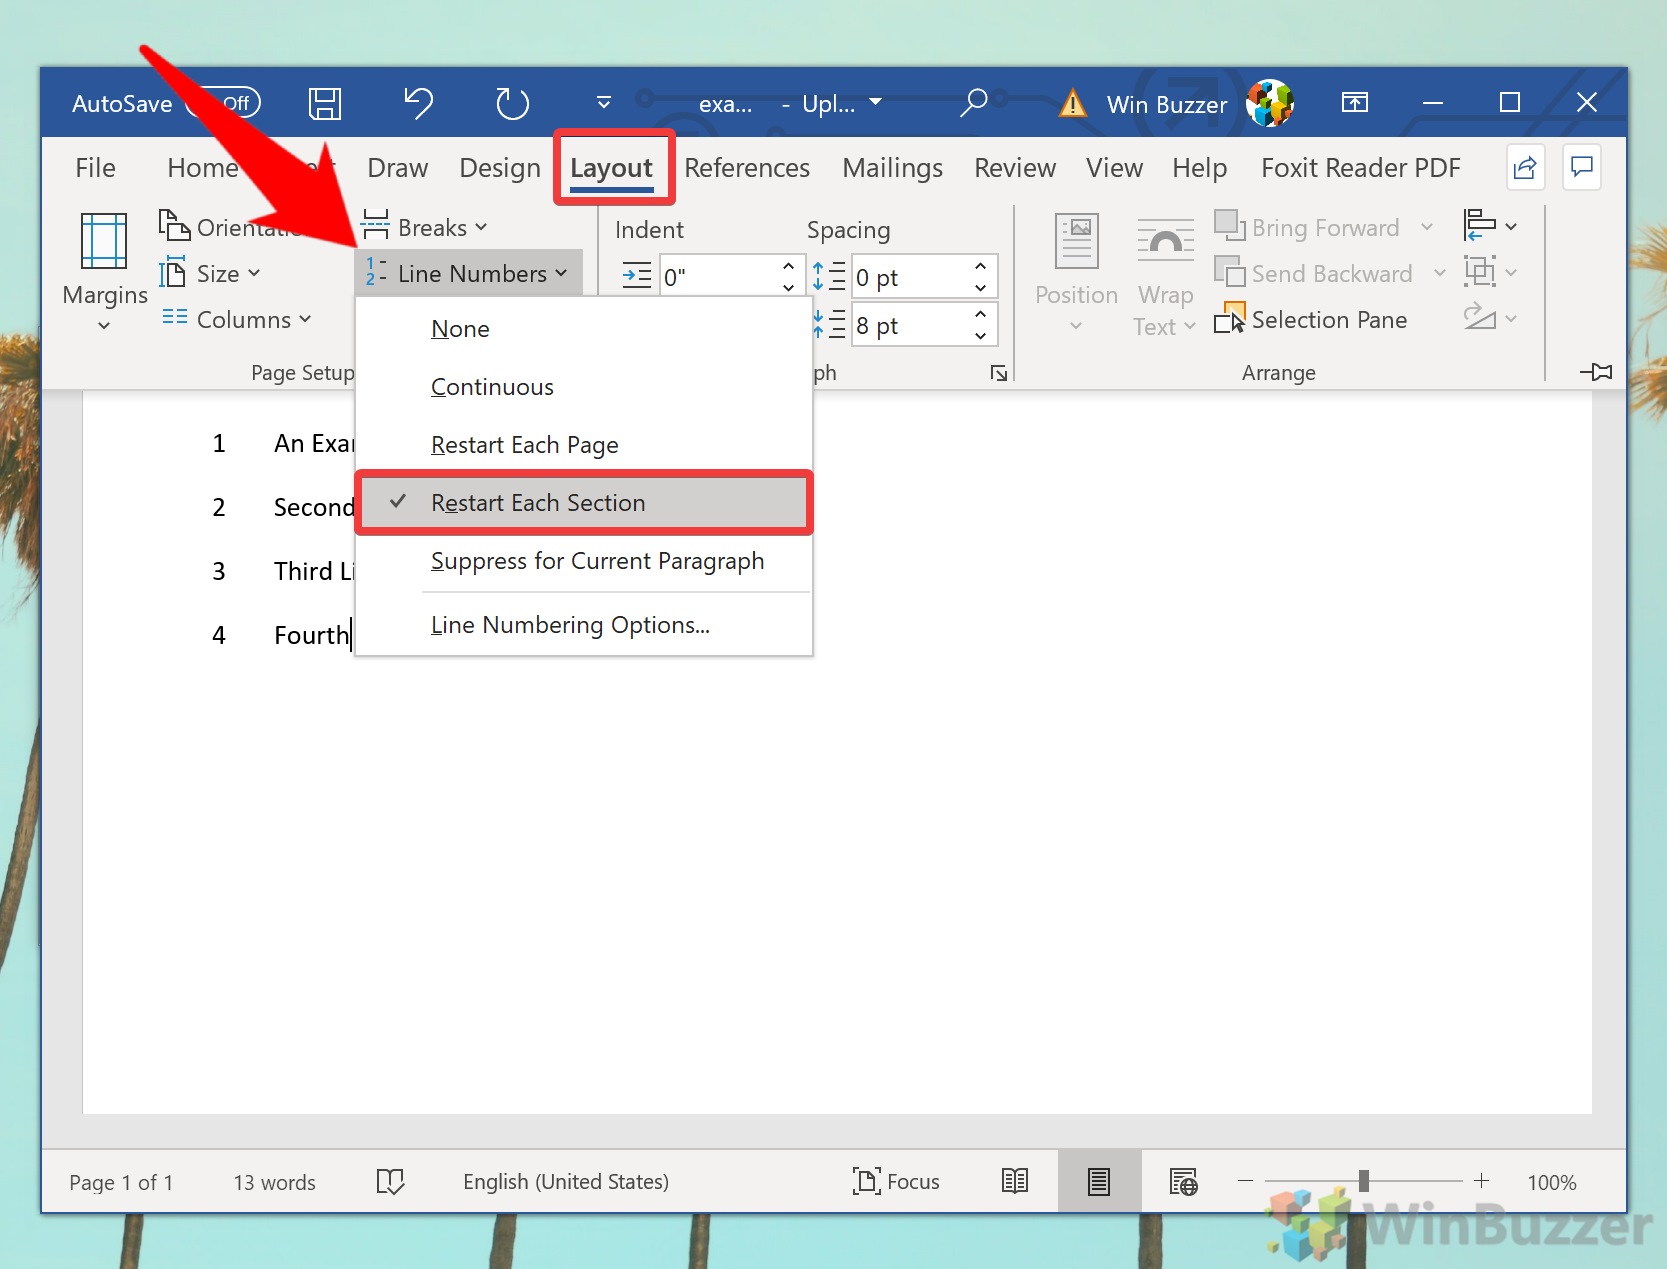
In your Word document, click the “Layout” tab in the ribbon bar and then click on the “Line Numbers” button. Select “Restart Each Section” from the drop-down menu.
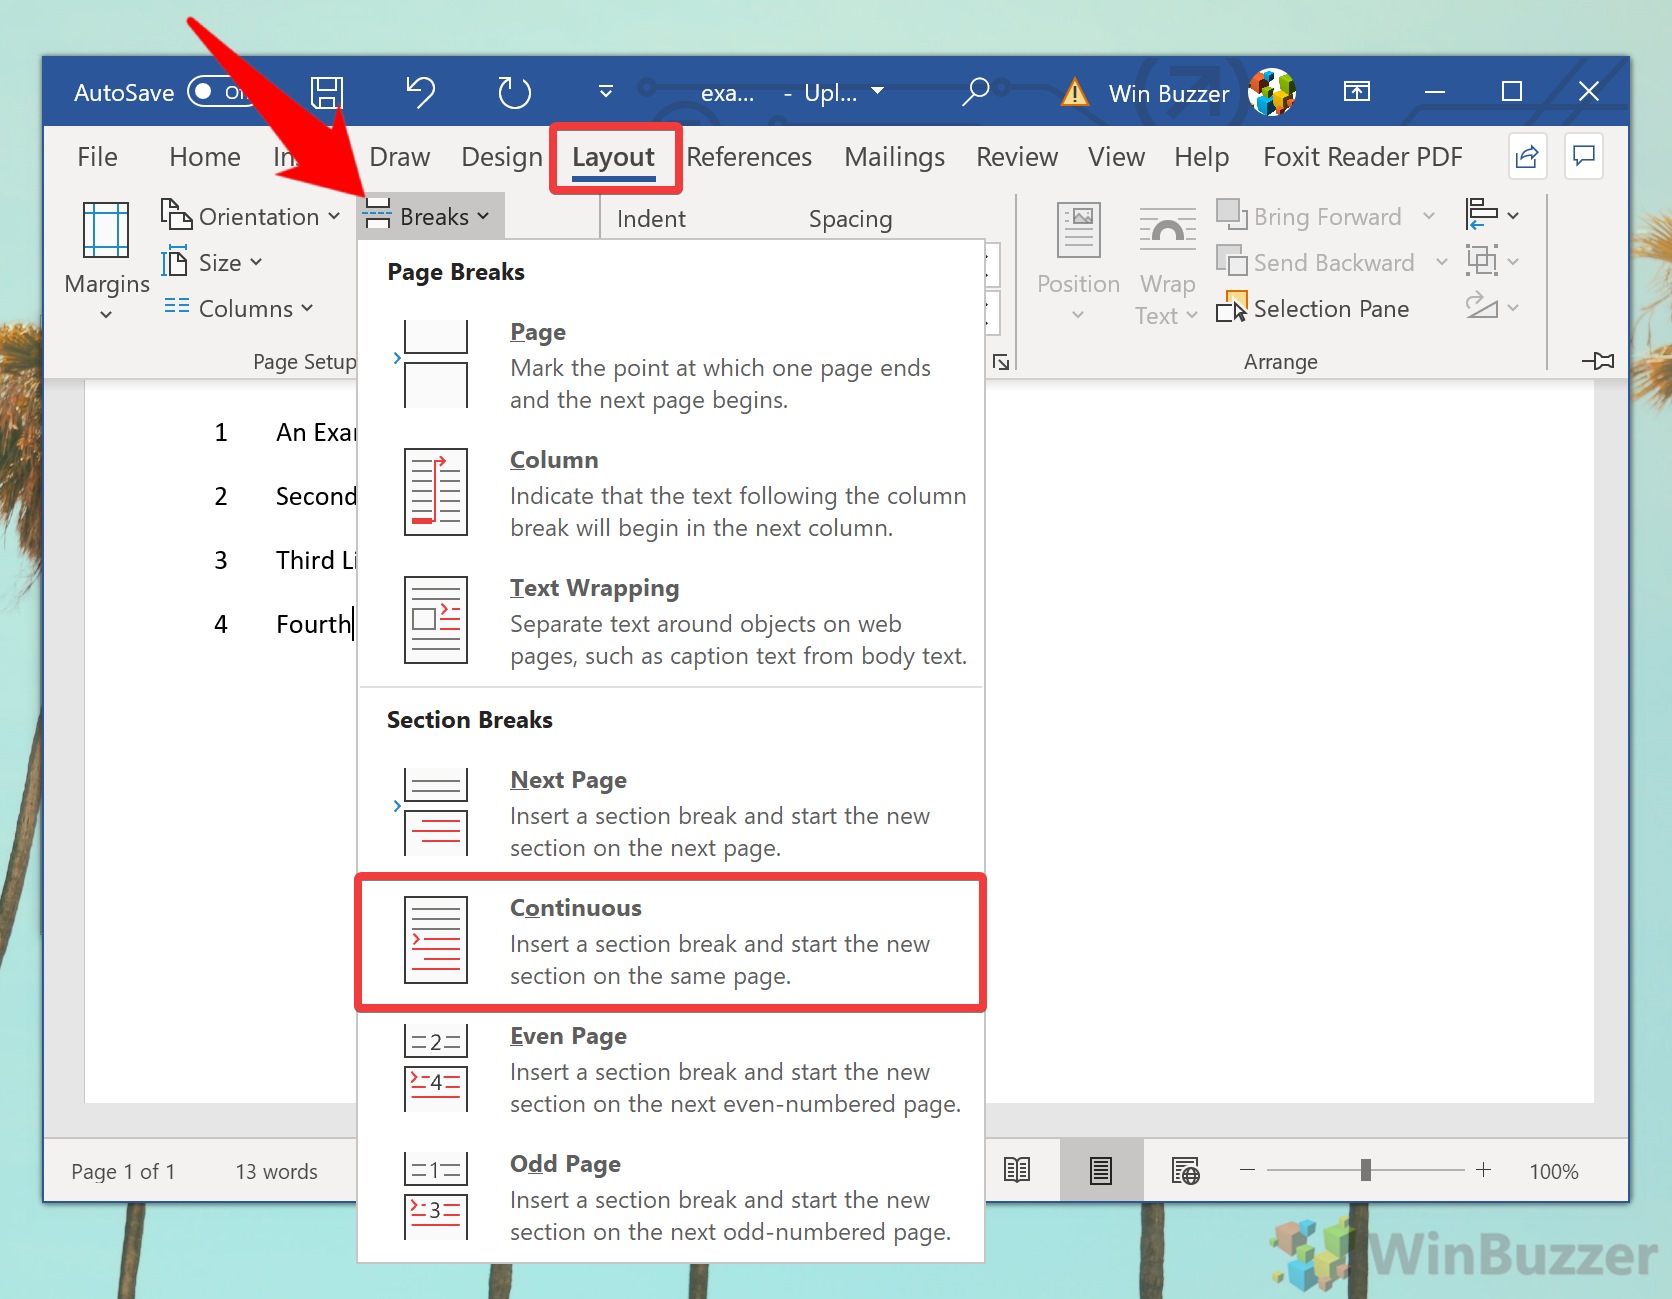
If you want to add a new section break, click the “Breaks” button. This is just above the “Line Numbers” button in the “Layout” tab.
From there, click “Continuous” to add a new section break without shifting the Word cursor to a new page.
A new set of line numbers will begin immediately underneath the newly-inserted section break.
Removing Line Numbers
If you’d prefer to remove line numbers from your document, in whole or in part, you can also do this from the “Line Numbers” menu (Layout > Line Numbers).
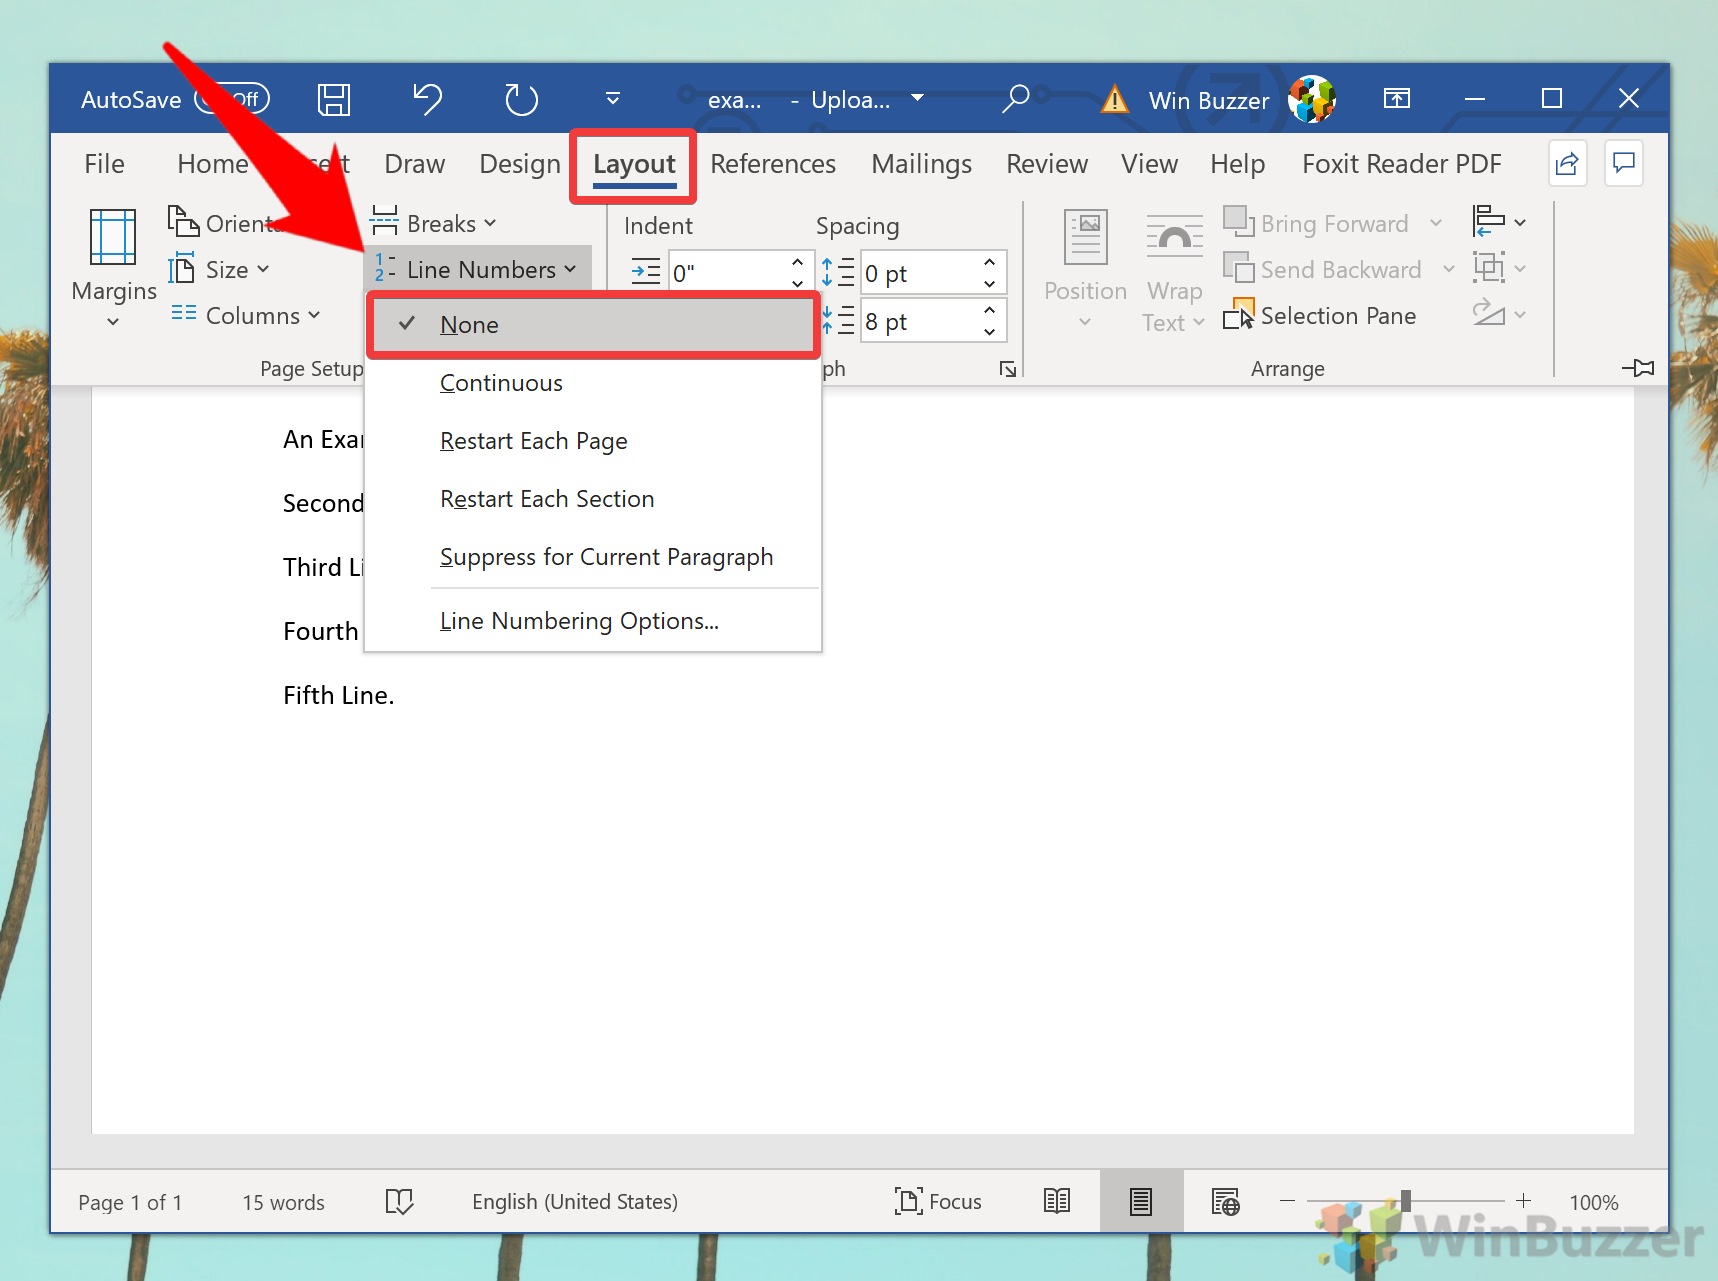
To remove them from your document entirely, click “None” in the “Line Numbers” drop-down menu.
If you want to hide them from a particular paragraph, click on the paragraph and then select “Suppress for Current Paragraph” from the “Line Numbers” drop-down menu instead.
This will completely remove the paragraph from the line numbers sequence. The sequence will restart with the following number on the next line immediately underneath the paragraph.
Line Number Formatting
By default, your line numbers will appear with the same font, size, and color as specified by the default “Line Number” style in Word. To modify the appearance of your line numbers, you’ll need to modify this text style, although Word hides it by default.
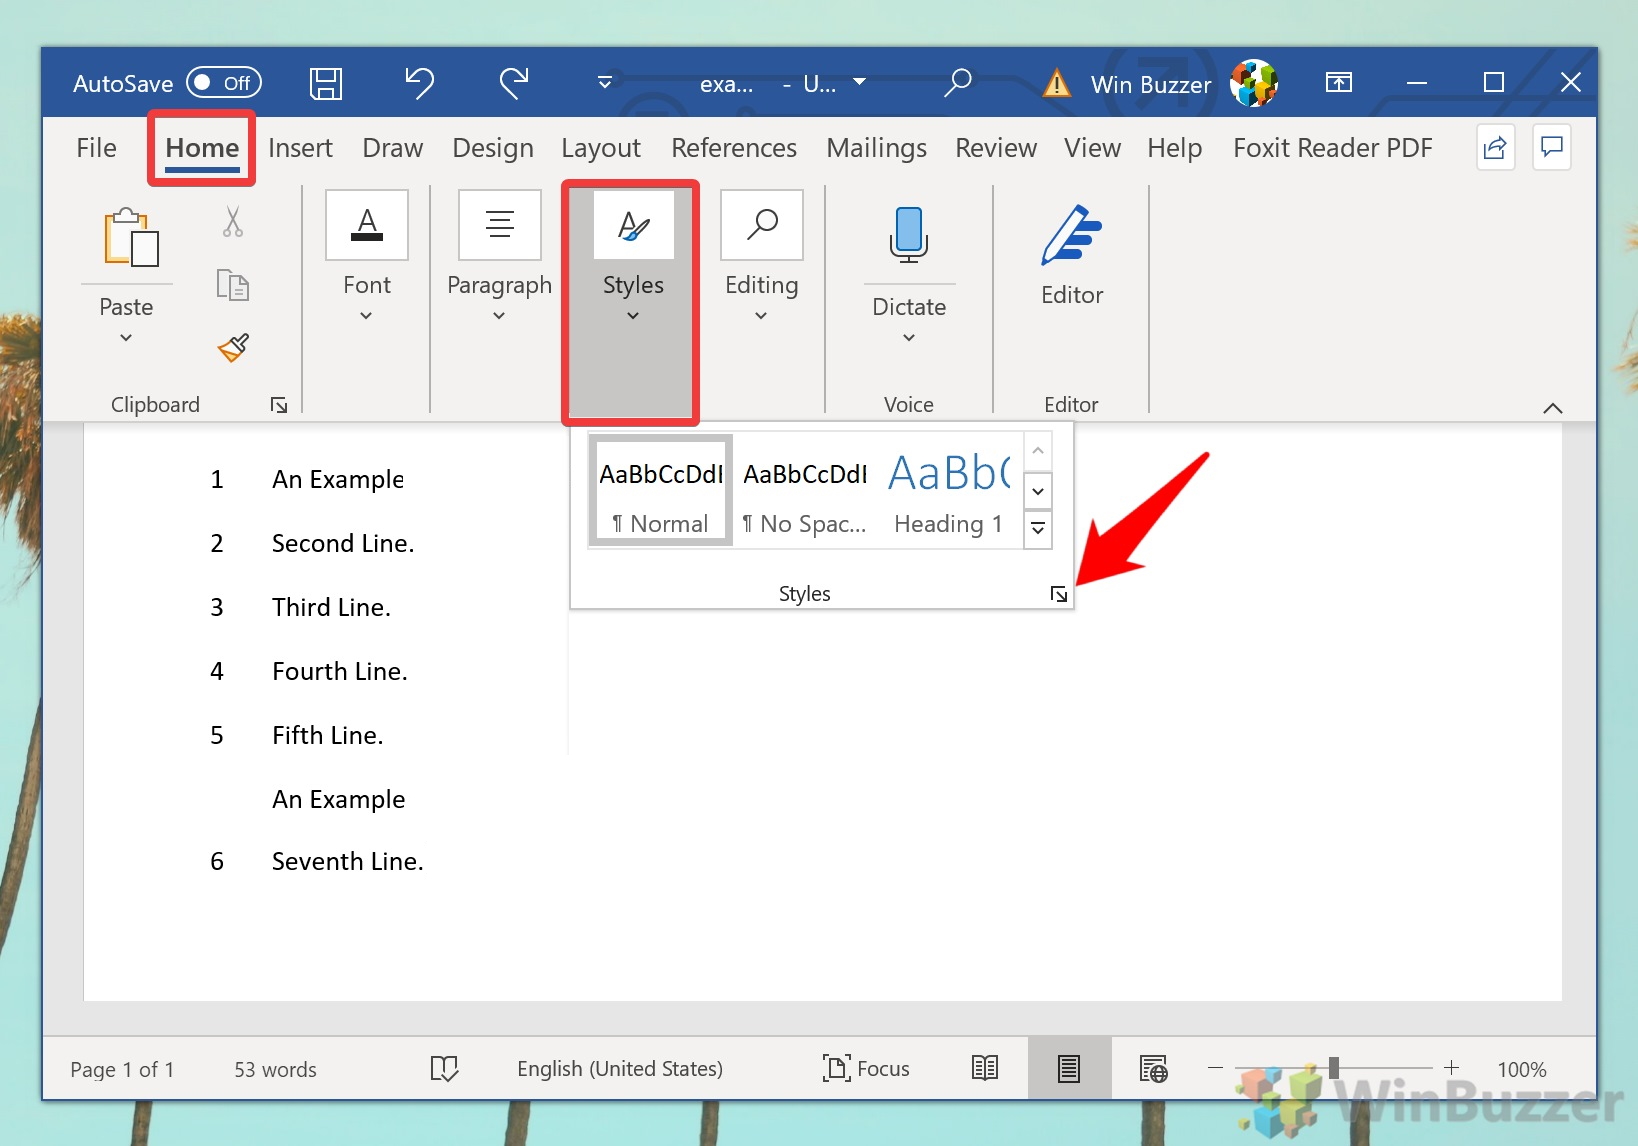
First, click on the “Home” tab in your ribbon bar. Click the vertical arrow menu button in the lower-right corner of the “Styles” section. This will bring up an extra pop-up “Styles” menu.
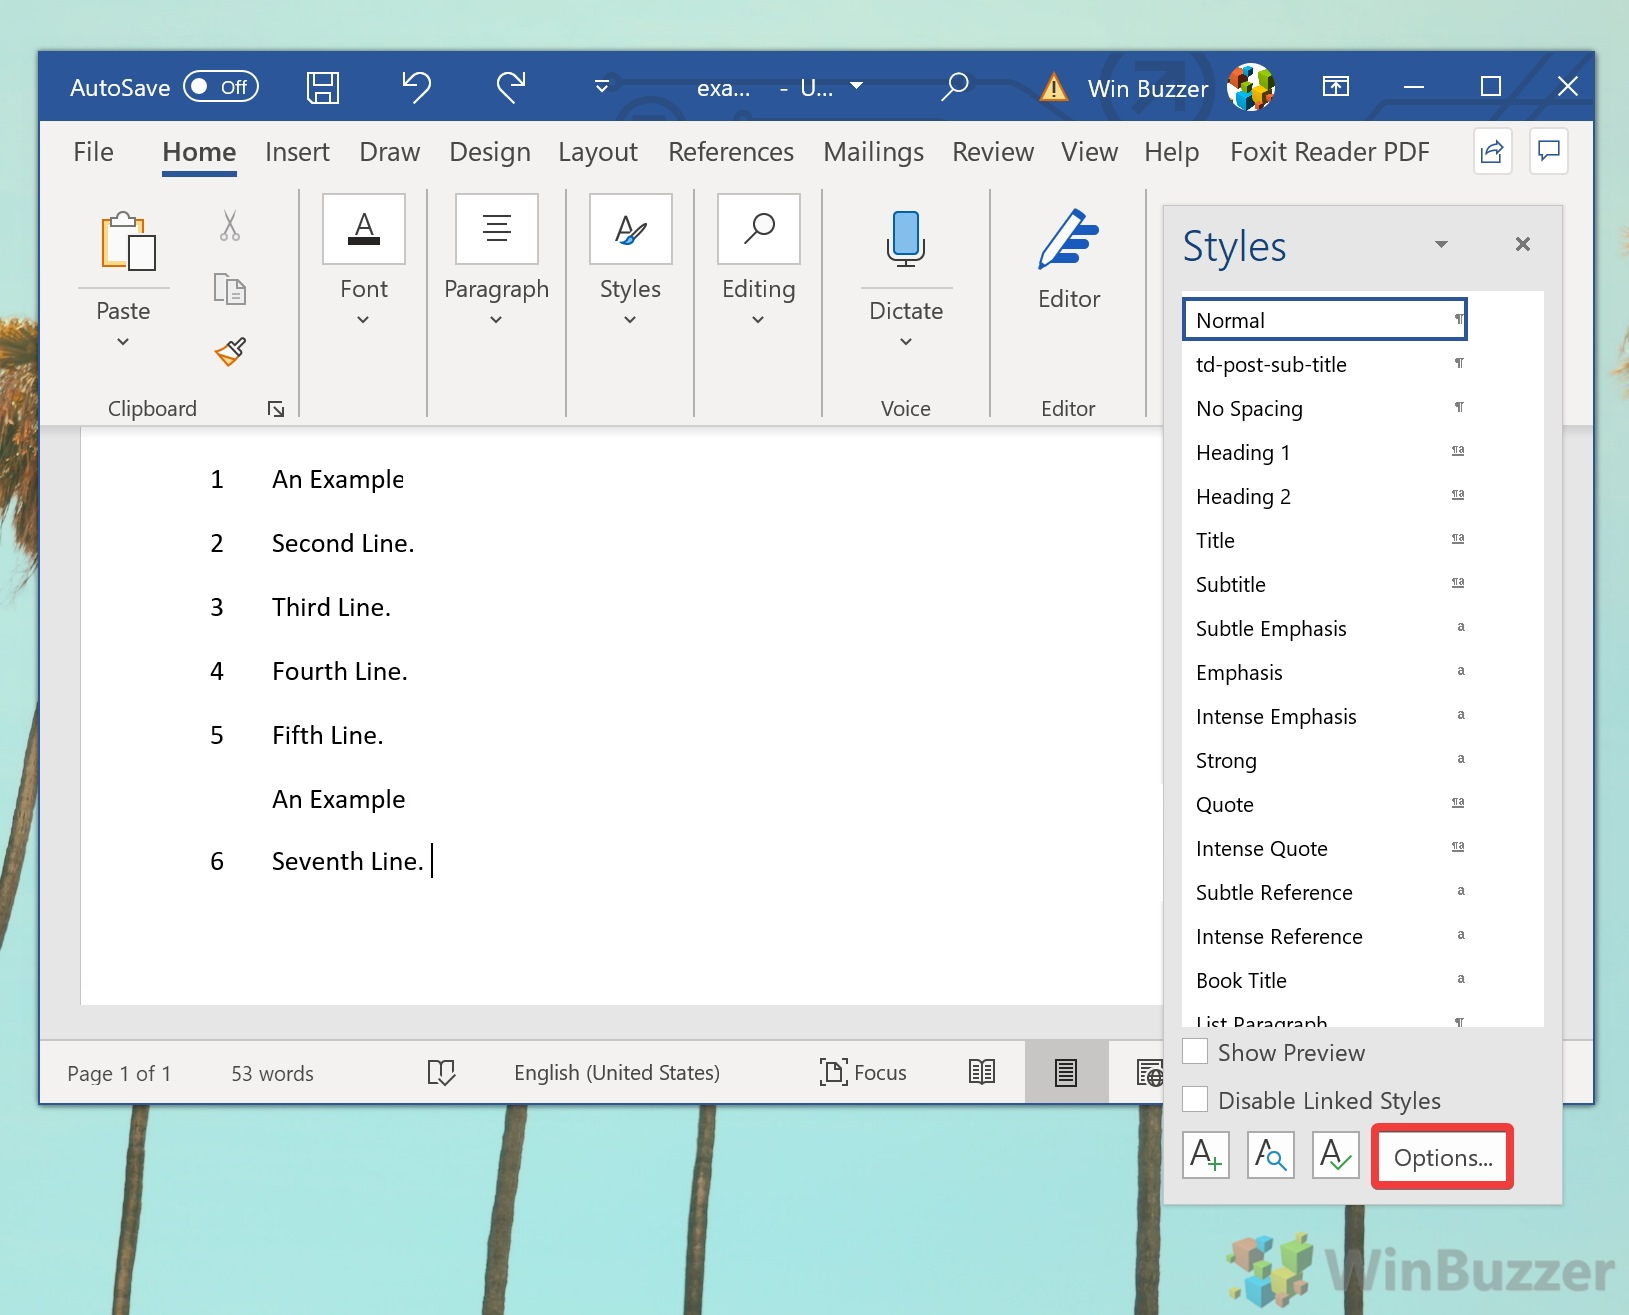
From there, click the “Options” button.
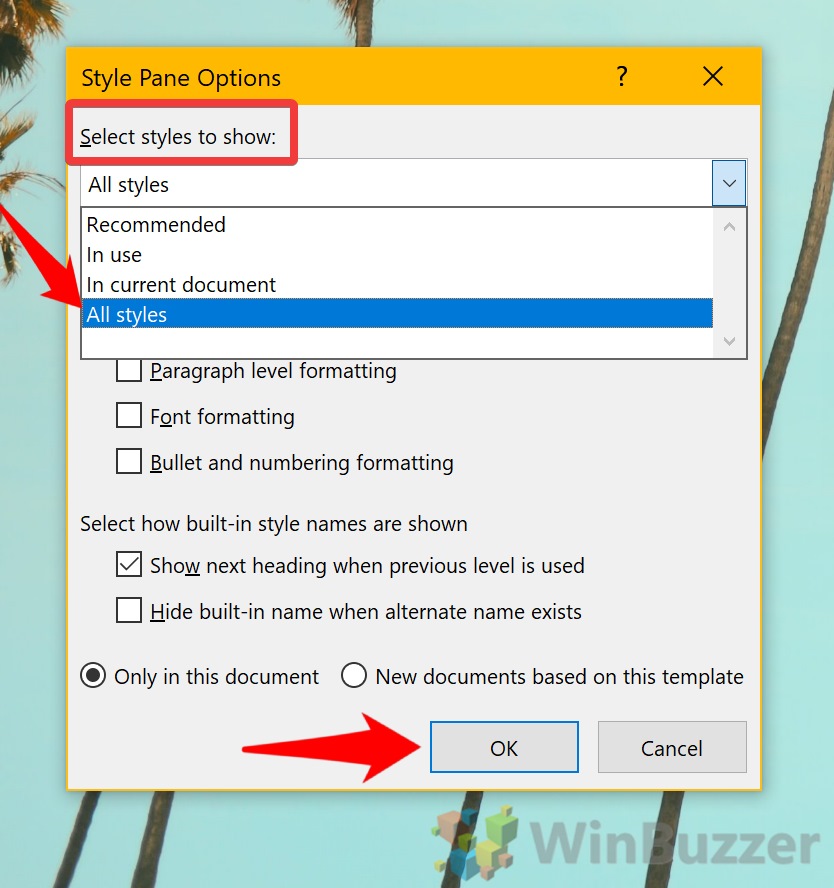
In the “Select Styles to Show” drop-down menu, select “All Styles” before clicking the “OK” button to save.
You’ll now be able to edit the “Line Number” font style.
In the pop-up “Styles” menu, find the “Line Number” option. Click on the side menu arrow next to the listing and then click on the “Modify” button.
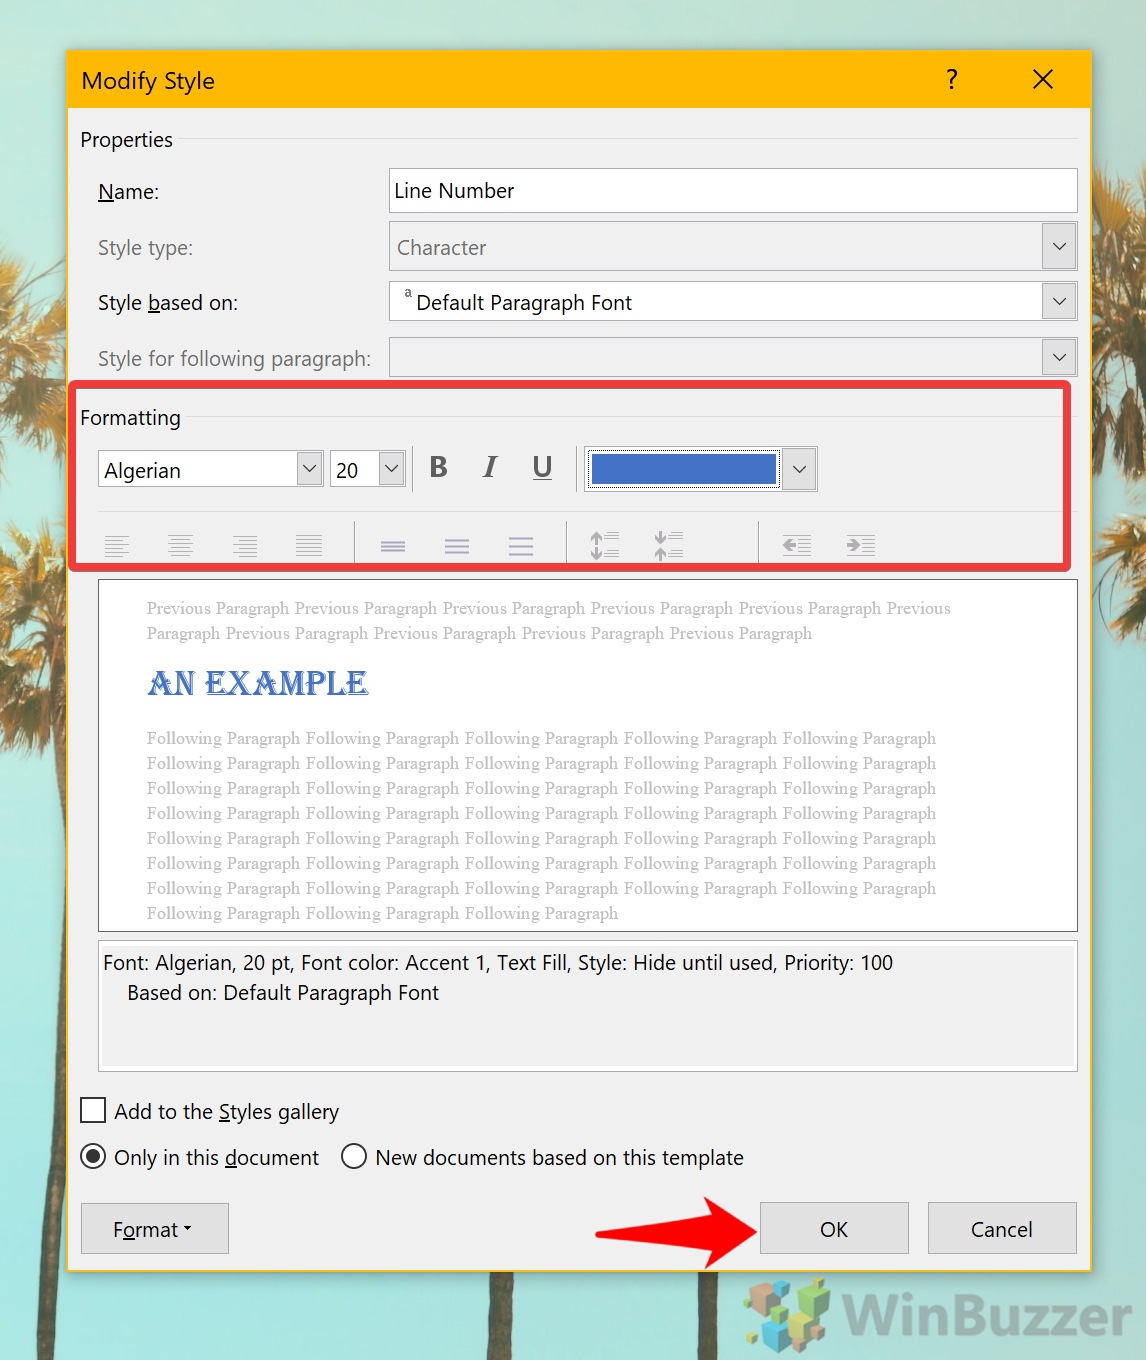
In the “Modify Style” menu, edit the formatting options for your line number style, as appropriate.
Click “OK” to apply the new style to your line numbers.
Once applied, your new font style will be applied to all of the line numbers in your Word document.
READ NEXT
- › How to Number Paragraphs in Microsoft Word
- › Google Chrome Is Getting Faster
- › How to Adjust and Change Discord Fonts
- › This New Google TV Streaming Device Costs Just $20
- › HoloLens Now Has Windows 11 and Incredible 3D Ink Features
- › BLUETTI Slashed Hundreds off Its Best Power Stations for Easter Sale
- › The New NVIDIA GeForce RTX 4070 Is Like an RTX 3080 for $599
Organize your documents by numbering them
What to Know
- Select Layout > Page Setup > Line Numbers > choose option > select Apply to drop-down > Selected sections.
- Next, select Line Numbers > Add line numbering > OK.
This article explains how to add line numbers to documents in Word for Microsoft 365, Word 2019, 2016, 2013, 2010, and 2007.
How to Add Line Numbers to a Word Document
To include line numbers in a document:
-
Go to Layout > Page Setup > Line Numbers.
If the document is divided into sections and you want to add line numbers to the entire document, press Ctrl+A to select the entire document.
-
Choose one of the following options:
- Continuous: Allows consecutive numbering throughout the document.
- Restart Each Page: Starts each page with the number 1.
- Restart Each Section: Starts with number 1 after each section break.
- Line Numbering Options: Allows more advanced line numbering options, for example, to number at different intervals.
-
To add line numbers to a specific section or to multiple sections, choose Line Numbering Options to open the Page Setup dialog box, then select the Layout tab.
-
Select the Apply to drop-down arrow and choose Selected sections.
-
Select Line Numbers.
-
Select the Add line numbering check box.
-
Select any other options you want, then select OK to close the window.
-
Select OK to save your changes.
All About Line Numbers
Microsoft Word automatically numbers all lines except for a select few. It counts an entire table as one line. It also skips text boxes, headers and footers, and footnotes and endnotes.
Microsoft Word does count figures as one line, as well as a text box that has inline with text wrapping applied. However, the lines of text within the text box are not counted.
You decide how Word handles line numbers. For example, apply line numbers to specific sections, or number lines in increments such as every tenth line.
Then, when it’s time to finalize the document, remove the line numbers and you’re ready to go.
Thanks for letting us know!
Get the Latest Tech News Delivered Every Day
Subscribe
Contents
- 1 How to Add Line Numbers to an Entire Document in Word
- 2 How to Number Lines in Word for Individual Sections
- 3 How to Remove Word Line Numbers
- 4 How to Change Word Line Number Formatting
While some text editors come with line numbers, the same can’t be said about Microsoft Word. To reduce visual clutter, they aren’t present by default, despite being a useful visual aid.
As a result, this guide will show you how to add line numbers in Word with just a few clicks. We’ll also teach you how to change the formatting of your line numbers, so they aren’t so intrusive.
However, while Word has several different options when it comes to numbering, all of them treat tables and text boxes as a single line.
It’s also worth noting that the instructions will only work with Word 2010 and onwards. If you have an older version, we recommend an upgrade – you’ll be missing out on vital security updates at this point. Let’s get started:
How to Add Line Numbers to an Entire Document in Word
Most commonly, users want Word line numbers across their entire document so they can easily reference parts to colleagues or clients. This can be achieved easily through the ribbon.
- Insert continuous line numbers in Word
With your Word document open, click the “Layout” tab in the ribbon. On the right-hand side, you’ll see a “Line Numbers” button. Click it, then select “Continuous”.
Continuous lines will add numbers sequentially across your entire document. If a page has 44 lines, for example, the next page will start on 46. This is the most common use case.
- How to insert line numbers in Word and have them restart each page
Click the “Line Numbers” button, then select “Restart Each Page”. This will cause the first line on each page to start from 1.
- Make sure you’re on the ‘Print’ view
If you still don’t seer line numbers, it may be because you’re on the reading or browser layout view for word. Line numbers only show up on Print view. At the bottom of your document, press the page icon in the middle to switch the view.
How to Number Lines in Word for Individual Sections
So what if you want your numbers to restart in the middle of the page? You can just do it manually of course, but that takes time and may conflict with existing formatting. Instead, we can use the “Each Section” option under Line Numbers.
- Select the ‘Restart Each Section’ optionClick the “Layout” tab in your word Ribbon and then “Line Numbers” on the right-hand side. Click “Restart Each Section”.
- Add a section break
To restart your numbers anywhere on a page, select where you want the break to be. Then, click the “Layout” tab in your Ribbon, followed by “Breaks”, and “Continuous”.
- Make sure your numbers have changed
You should notice that your line numbers switch back to “1” wherever you put your section break.
If you’ve received a document that already has line numbers on, you can perform similar steps to remove them. Handily, you can also remove them for an individual paragraph.
- How to remove all line numbers in WordTo get rid of all line numbers from a document, click the “Layout” tab, then “Line Numbers” and select “None”.
- How to remove Word line numbers from a single paragraph
Select the line you want to remove the line number from. Click the “Layout” tab, then “Line Numbers”, and tick “Suppress for Current Paragraph”. The lines underneath should continue the count as if that line doesn’t exist.
How to Change Word Line Number Formatting
You may have noticed that the line numbers in Word stand out quite a bit by default. If you don’t want them to distract from your text, you can change their style to suit your preferences. Alternatively, you can make them stand out more if you wish.
- Open the Styles panelIn the Word ribbon, select the “Home” tab, click the “Styles” button, then press the maximize icon in the bottom right corner of the pop-out.
- Open Styles options
In the Styles panel, press the “Options…” button at the bottom of the screen.
- Select the option to show ‘All styles’
Under the “Select styles to show:” header, click the drop-down and click “All styles”. Click “OK”.
- Modify the Word’s Line Number style
Your styles list should now have an entry called “Line Number”. Find it, right-click it, and press “Modify…”.
- Change font, color, and text size to your liking
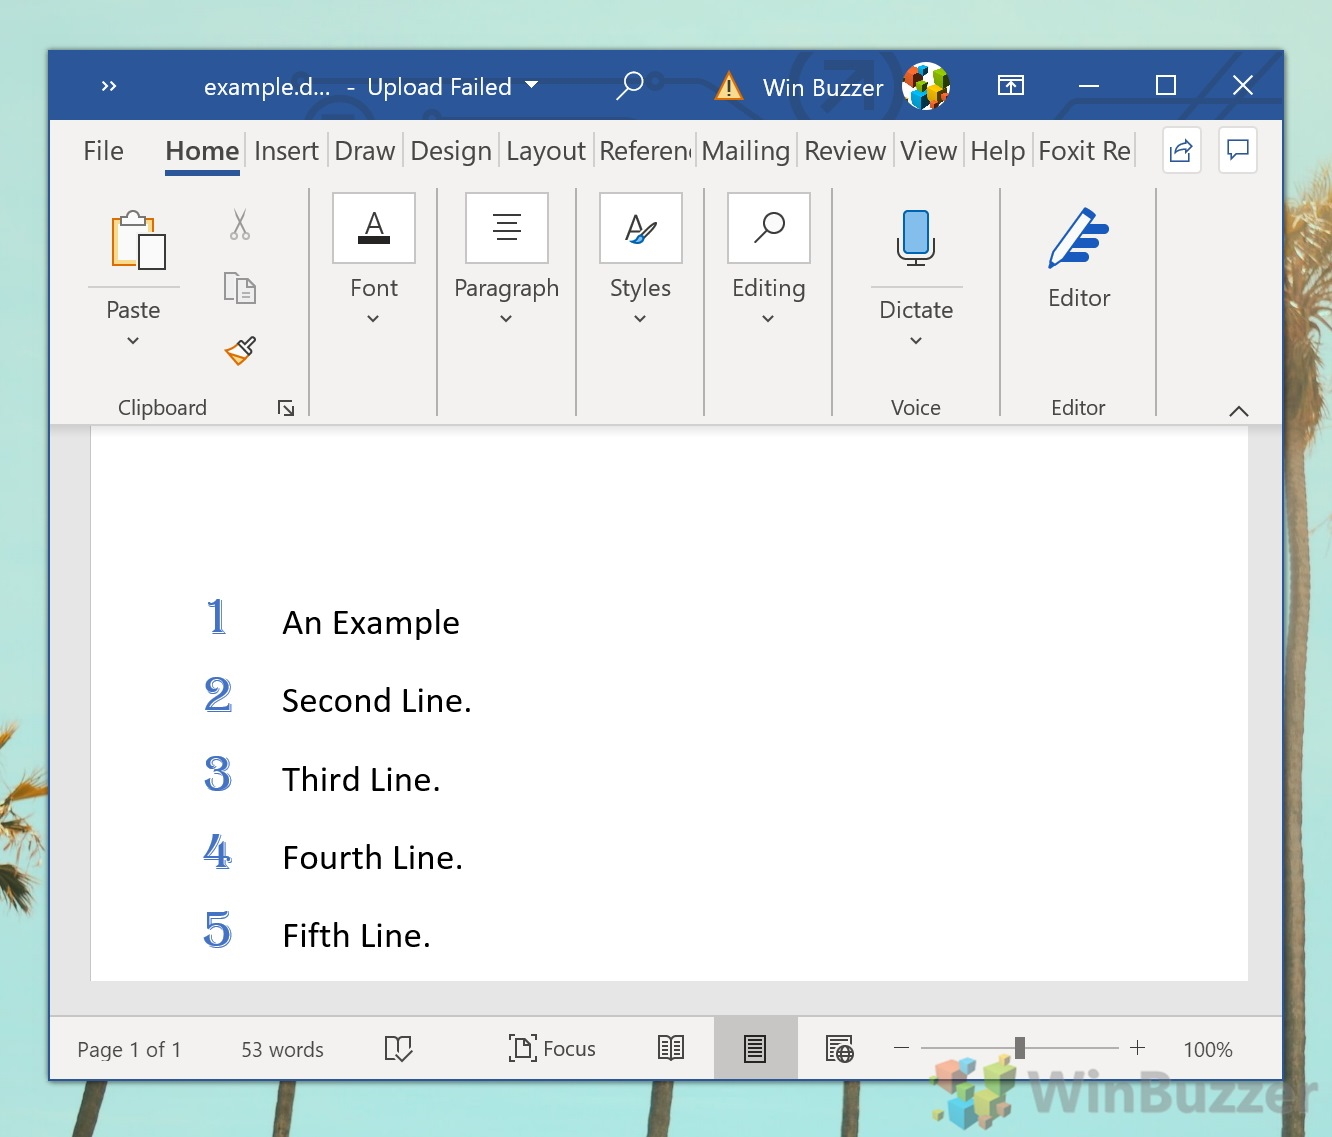
Under the “Formatting” section, you’ll find several options for changing your text. If you’re looking for a more subdued look, try changing the color to light grey. For the sake of this tutorial, we’re going to change ours to a funky blue font so it stands out.
Once you’re done, press “OK”.
- View your modified line numbers in Word
Back in your main Word document, your line numbers should have automatically updated with the new style.
If you found this tutorial useful, you may also want to learn how to change background color in Word.
Add line numbers to a section or to multiple sections
- Click in a section or select multiple sections.
- On the Page Layout tab, in the Page Setup group, click Line Numbers.
- Click Line Numbering Options, and then click the Layout tab.
- In the Apply to list, click Selected sections.
- Click Line Numbers.
Contents
- 1 Why can’t I see line numbers in Word?
- 2 How do I number every 5th line in Word?
- 3 How do I add line numbers in Word for Mac?
- 4 How do I format line numbers in Word?
- 5 How do you show lines in Word?
- 6 How do you create a first line indent in Word?
- 7 How do I start numbering on page 3 in Word?
- 8 How do I show column lines in Word?
- 9 How do I indent text in Word?
- 10 How do you drag the first line indent marker in Word?
- 11 How do I make page 1 in Word 3?
- 12 What is the first step in adding footer?
- 13 How do I start page numbers on page 3 in Word for Mac?
- 14 How do you put a horizontal line in the middle of a word document?
Why can’t I see line numbers in Word?
To use line numbers in Word, you must be in Print Layout view. Go to the View tab and click Print Layout in the Views section of the ribbon. Next, insert the numbers by heading to the Layout tab. Click the Line Numbers button in the Page Setup section of the ribbon.
How do I number every 5th line in Word?
How to number every nth line in Word 2013
- On Page Layout tab, click on Line Numbers and click Line Numbering Options…
- Page Setup opens.
- Line Numbers windows opens.
- You can start numbering at a specific number (Start at), control number position (From text) and number every nth line (Count by).
How do I add line numbers in Word for Mac?
In your Word document, click the “Layout” tab in the ribbon bar and then click on the “Line Numbers” button. Select “Restart Each Section” from the drop-down menu. If you want to add a new section break, click the “Breaks” button. This is just above the “Line Numbers” button in the “Layout” tab.
How do I format line numbers in Word?
Customize Line Numbers
- On the Layout tab, click the Line Numbers button.
- Select Line Numbering Options. The Page Setup dialog box opens.
- Click the Line Numbers button.
- Change the options to customize your line numbers and click OK.
- Click OK to close the Page Setup dialog box.
How do you show lines in Word?
To show the gridlines, in Excel, PowerPoint, or Word, click the View tab, and then check the Gridlines box. To hide the gridlines, clear the Gridlines check box.
How do you create a first line indent in Word?
First-line indent by default
- Put the cursor anywhere in the paragraph.
- On the Home tab, right-click the Normal style, and choose Modify.
- Select Format, and then choose Paragraph.
- On the Indents and Spacing tab, under Indentation, select First line.
- Select OK.
- Select OK again.
How do I start numbering on page 3 in Word?
Step 2: Insert page numbers
- Put the cursor in the footer of page 3.
- Go to the tab “Insert” and click on the button “Page Number” How to insert a page number (c) Screenshot.
- Choose your preferred design. By default, MS Word inserts page number 3.
- Click on “Format Page Numbers”
- Choose “Start at”
How do I show column lines in Word?
Choose Page Layout > Columns. At the bottom of the list, choose More Columns. In the Columns dialog box, select the check box next to Line between.
How do I indent text in Word?
293 How do I indent a paragraph in Word?
- Select the paragraph to be indented;
- From the Home tab, Paragraph group, select the dialog box launcher;
- Check that the Indents and Spacing tab is selected;
- In the Indentation section set the indent value you require.
How do you drag the first line indent marker in Word?
If the ruler doesn’t appear, mark the Ruler check box on the View tab. Select the paragraphs to affect and then drag a marker, as follows: The upper triangle on the left is the First Line Indent marker. Drag it to affect only the first line.
How do I make page 1 in Word 3?
To ensure your pages begin with 1, go to the Insert tab → Page Number. Select Format Page Numbers… → Page numbering → Start at and add 1.
Try it!
- Select Insert > Header or Footer.
- Select one of the built in designs.
- Type the text you want in the header or footer.
- Select Close Header and Footer when you’re done.
How do I start page numbers on page 3 in Word for Mac?
How to have page numbers start on page 3 using MS Word 2011 for…
- Step 1: Insert a section break at the end of the title page, and the end of the contents page. Put your cursor at the END of your title page, then click Insert => Break => Section Break (next page)
- Step 2: Insert the Page Numbers.
How do you put a horizontal line in the middle of a word document?
Use the Horizontal Line Tool to Insert a Line in Word
- Place the cursor where you want to insert a line.
- Go to the Home tab.
- In the Paragraph group, select the Borders drop-down arrow and choose Horizontal Line.
- To change the look of the line, double-click the line in the document.

