
Insert a table of contents
A table of contents in Word is based on the headings in your document.

Create the table of contents
-
Put your cursor where you want to add the table of contents.
-
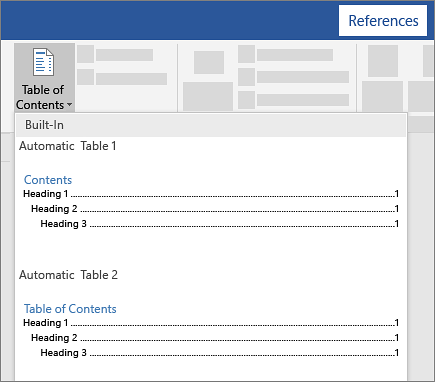
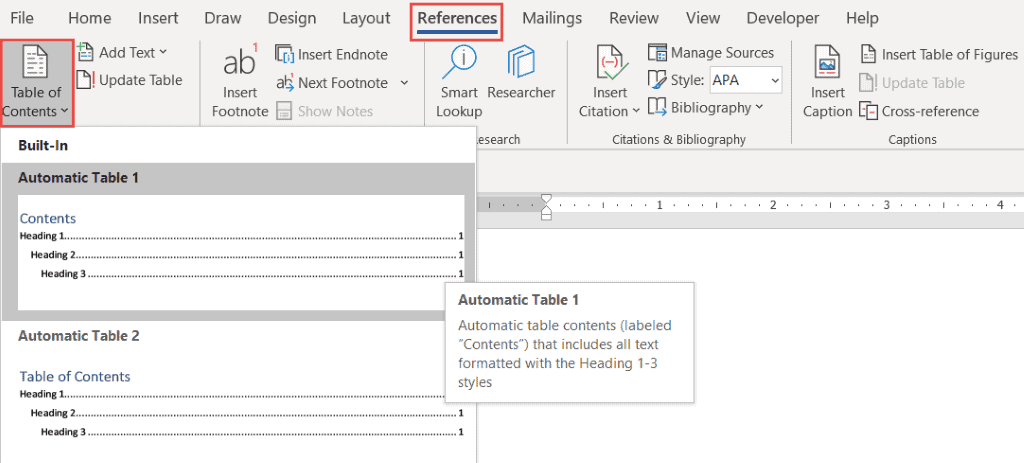
Go to References > Table of Contents. and choose an automatic style.

-
If you make changes to your document that affect the table of contents, update the table of contents by right-clicking the table of contents and choosing Update Field.
To update your table of contents manually, see Update a table of contents.
If you have missing entries
Missing entries often happen because headings aren’t formatted as headings.
-
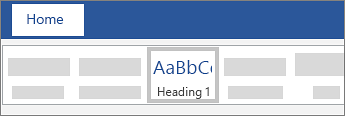
For each heading that you want in the table of contents, select the heading text.
-
Go to Home > Styles, and then choose Heading 1.
-
Update your table of contents.
To update your table of contents manually, see Update a table of contents.
Create the table of contents
Word uses the headings in your document to build an automatic table of contents that can be updated when you change the heading text, sequence, or level.
-
Click where you want to insert the table of contents – usually near the beginning of a document.
-
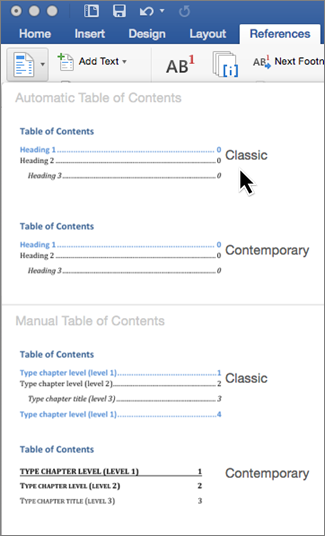
Click References > Table of Contents and then choose an Automatic Table of Contents style from the list.
Note: If you use a Manual Table of Contents style, Word won’t use your headings to create a table of contents and won’t be able to update it automatically. Instead, Word will use placeholder text to create the look of a table of contents so you can manually type each entry into the table of contents. To update your manual table of contents, see Update a table of contents.
If you want to Format or customize your table of contents, you can. For example, you can change the font, the number of heading levels, and whether to show dotted lines between entries and page numbers.
If you have missing entries
Missing entries often happen because headings aren’t formatted as headings.
-
For each heading that you want in the table of contents, select the heading text.
-
Go to Home > Styles, and then choose Heading 1.
-
Update your table of contents.
To update your table of contents manually, see Update a table of contents.
Word uses the headings in your document to build an automatic table of contents that can be updated when you change the heading text, sequence, or level.
-
Click where you want to insert the table of contents—usually near the beginning of the document.
-
On the toolbar ribbon, select References.
-
Near the left end, select Insert Table of Contents. (Or select Table of Contents > Insert Table of Contents.
The table of contents is inserted, showing the headings and page numbering in your document.
If you make changes to your document that affect the table of contents, you can update it by right-clicking the table and selecting Update Table of Contents.
Get the learning guide
For a hands-on guide that steps you through the process of creating a table of contents, download our Table of Contents tutorial. Or, in desktop Word, go to File > New, and search for table of contents.
See Also
Update a table of contents
Need more help?
![]()
Download Article
![]()
Download Article
This wikiHow teaches you how to insert the contents of and/or a link to another document into a Microsoft Word document on Windows or Mac.[1]
Steps
-
1
Open a Microsoft Word document. To do so, double-click the blue app that contains or is shaped like a W. Then click File at the top of the screen and Open….
- To create a new document, click New in the file menu.
-
2
Click the place in the document where you want to insert the file.
Advertisement
-
3
Click the Insert tab. It’s at the top of the window.
-
4
Click the
next to Object. It’s in the Text group on the right side of the tool bar at the top of the window.
- On Mac, click Text to expand the group.
-
5
Choose the type of file to insert.
- Click Object… to insert a PDF, image, or another type of non-text file into your Word document. Then click From File… on the left side of the dialog box that opens.
- If you prefer to insert a link to and/or icon of the file, rather than the entire document, click Options on the left side of the dialog box and check Link to File and/or Display as Icon.
- Click Text from File… to insert the text of another Word or text document into the current Word document.
- Click Object… to insert a PDF, image, or another type of non-text file into your Word document. Then click From File… on the left side of the dialog box that opens.
-
6
Select the file to insert.
-
7
Click OK. The file contents, a linked icon, or the text of the file will be inserted into your Word document.


Advertisement
Add New Question
-
Question
I like that I can copy the file and paste to a blank page within another Word file. Is there a way to paste a document that’s more than one page?

Open Microsoft Word. On the top left menu choose Insert. Choose File. Browse through your file system to the file you want. Click on the file name. Choose Insert. For an existing document, place the cursor at the point you want to insert the document, then follow the above instructions. You can also choose a range of pages substituting the final Insert with Range.
-
Question
How do I insert a file into a Word document?
Read and follow the instructions listed in the article above.
-
Question
I need to email a document that is not already in a file. What do I do?
Okay, where is the document? All documents are files. If you don’t like the current format, save it to another format, or copy the material into another file in a standard format. If desperate, take a screenshot by pressing the PrintScreen key and pasting it into a Word document. Save it and you’ll have a file. If you mean the document is a physical piece of paper and not on your computer, you can either scan it or just take a picture of it with your phone.
See more answers
Ask a Question
200 characters left
Include your email address to get a message when this question is answered.
Submit
Advertisement
Video
Thanks for submitting a tip for review!
About This Article
Article SummaryX
1. Open a Word document.
2. Click a place in the document.
3. Click Insert.
4. Click the Object drop-down.
5. Choose the type of file to insert.
6. Select a file to insert.
7. Click OK.
Did this summary help you?
Thanks to all authors for creating a page that has been read 455,972 times.
Is this article up to date?
Word allows you to insert other files with data and functionality from another document or program directly into your Word document.
Microsoft calls these additions ‘Objects’ which makes it sound overly technical and difficult but it’s not. Don’t get fazed by all the nerd talk about ‘objects’, that’s programmer speak that’s leaked out into the real world.
Whenever you see the word ‘Object’ think ‘Another file’.
Objects are just other files or sometimes, parts of other files. Word or text files, graphs, Excel worksheets, PDF’s, PowerPoint files or a lot more.
You can either create a new object within your Word document or insert an existing file. You can also choose to either embed or link the object.
Embedding
Embedding an object just takes a snapshot or copy of the file at the time you embedded it. If you later change the original file, the changes are not reflected in your document.
- Use this to keep a copy of the file at a particular time like end of financial year or when contract is finalized.
- Embedding can also hide files and documents from prying eyes, that’s explained in our ebook Beating Bots, Spies and Cock-ups.
Linking
Linking an object creates a live link to the original file. If you make changes to the original file, the changes will appear in the object in your Word document. See Putting Excel into Word
To insert an object in Word, go to Insert | Object.

Insert all the Text from Another File
If you have another text document, such as another Word file, plain text file, or even a PDF file, you can easily insert all of the text from that file into your document.
To do this, select the Text from File option.

The Insert File dialog will open for you to navigate to the file that you want to insert.
NOTES:
- The content will be inserted along with all its formatting from the source file. If the original is a large, complex document, this may take some time.
- If you select a PDF document, Word will do the best it can to convert it into Word, along with all its formatting. It may not look exactly like the original file, especially if the source file contains a lot of graphics. Very complex PDF files may take excessive time or may not be able to be imported.
Insert a New Object
To insert any other kind of object other than a text file, select the Object option.

The Object dialog will open with the Create New tab selected by default. You will see that there is an extensive list of object types available to choose from. In this example we will choose to insert a new Excel worksheet in the document.

An Excel worksheet will appear in the document, and the Excel ribbon and tools will appear above it, just as if you are working in an Excel file.

You can now drag the edges to show as much of the worksheet as you wish, enter whatever data, and perform whatever functions you wish within the worksheet.
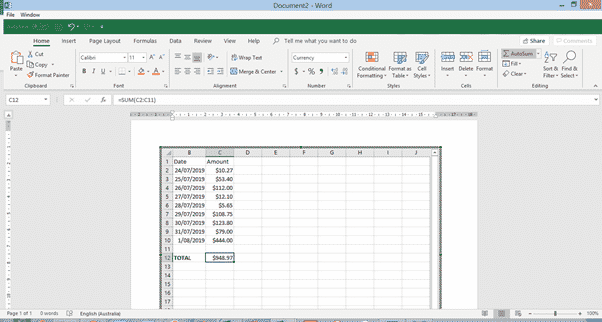
When you’re done, click anywhere outside the object, and the Excel ribbon will disappear, but the worksheet will still appear as a table in your document. You can then double-click within the object to enter and edit it again.
NOTES:
- When you insert a new object in this way, you can click within the object any time to edit it.
- If the Excel worksheet contains more data than fits in the visible window in your document, the part that you have visible when you click out of the object is what will appear in your document when you click out of the object.
Embed an Existing Object
To insert an existing object in your document, click the Create from File tab in the Object dialog and browse to the file you want to insert.

A section of the file will appear in the document, and the reader can double-click on it to open it and view the whole file. The part of the file that displays in the document varies depending on the type of file:
- A PowerPoint presentation will show the first slide only. Double-clicking will allow the reader to click through the whole presentation.
- An Excel file with multiple worksheets will display the worksheet that was open the last time the file was saved. Double-clicking will give access to all worksheets.
- A PDF file will display the first page of the document. (Unlike the Insert Text from File option, with this method the inserted object will still be a PDF file, not converted to Word.)

PowerPoint presentation embedded in a Word document
An Excel worksheet embedded in a Word document
For more see Putting Excel into Word
NOTES:
- An embedded object is just a snapshot of the file at the time you embedded it. It no longer has any link to the original file, and any subsequent changes made to the original will have no effect on the object in your document.
- If the object is an editable file, such as an Excel file, you can edit it after you have inserted it. Double-click on the object, and the interface of the original application will open within your document, just as described above for inserting a new object.
Link an Existing Object
To embed an object and maintain a live link between it and the original file, again, select the Create from File tab in the Object dialog, but this time also click the “Link to file” box.
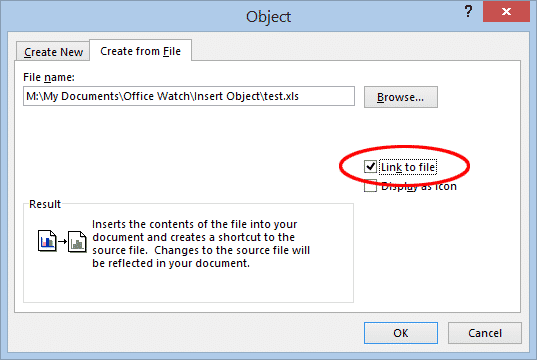
The object will appear in the document just like an embedded object, but with one big difference. In this case, if any changes are made to the original file, those changes will be reflected in the object in your document. You also will not be able to edit the object in the document – double-clicking on, for example, an Excel object will open the original Excel document in a separate window.
Refreshing the Link
Sometimes a change to the original file will not immediately appear in the object in your document. To ensure that you are looking at the latest information, right-click on the object and select Update Link.

Displaying an Icon Instead of the Object
There is one more choice in the Object dialog that we have not touched on yet. Whether you are inserting a new object, or embedding or linking an existing object, you have the option to just display an icon in your document rather then the object itself. The reader or editor can then click on the icon to open the file to view or edit it.

By default, the icon for the program the file is created in will show, but you can click Change Icon and choose your own icon file to use instead. The Change Icon button also allows you to edit the caption that appears under the icon in your document.

Inserted objects displayed as icons
This Contents Page in Word tutorial is suitable for users of Word 2010, 2013, 2016, 2019, and Word for Microsoft 365.
Objective
Create a Table of Contents for a Word document and update it to add new entries.
Table of Contents Explained
A Table of Contents page makes it easier for your readers to navigate and work with long documents. It gives documents a professional look and feel and helps you jump to a specific section quickly and easily.
A Table of Contents is usually inserted at the beginning of a document or just after a cover page. It can be modified to fit the overall style of the document and be updated easily with one click when new headings and paragraphs are added to the document.
The golden rule, when creating a contents page, is good preparation.
A Table of Contents relies on the document being formatted with heading styles in order to work correctly. Word scans the document and looks for anything marked with a heading style and pulls it through into the contents page. You can choose how many heading levels you would like to include.
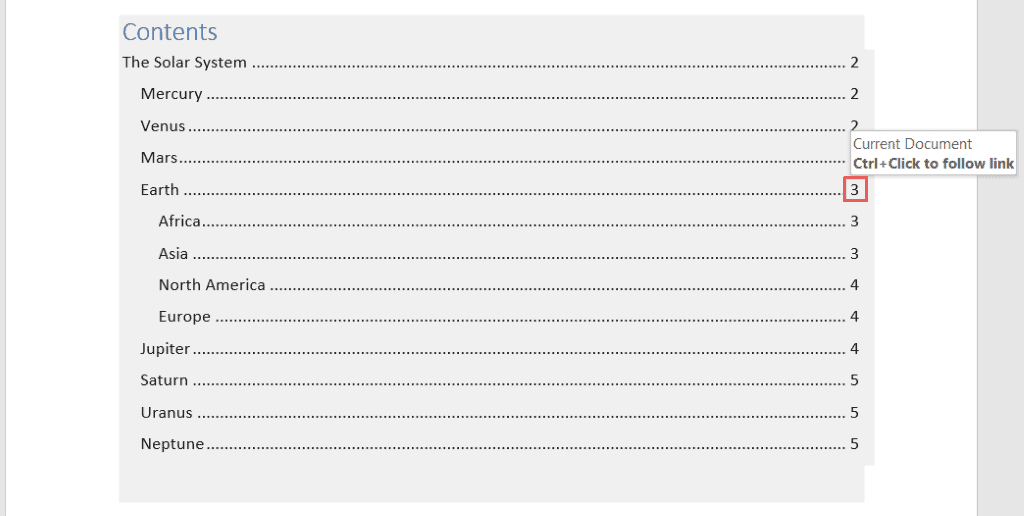
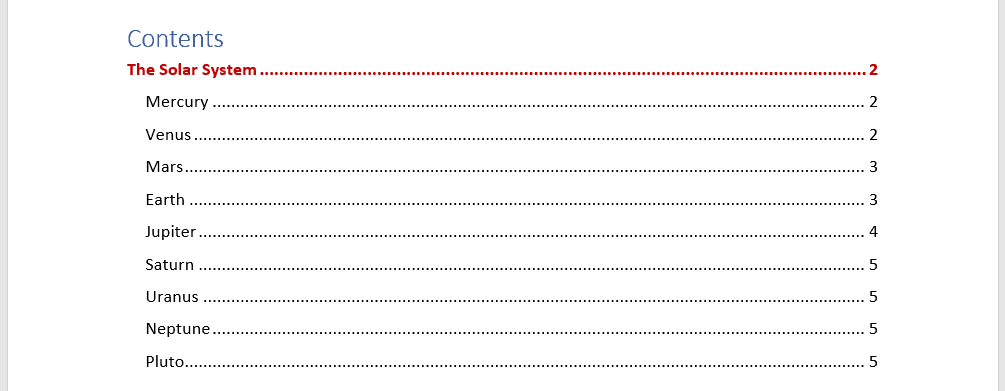
In this screenshot, I have pulled through 3 levels of heading.
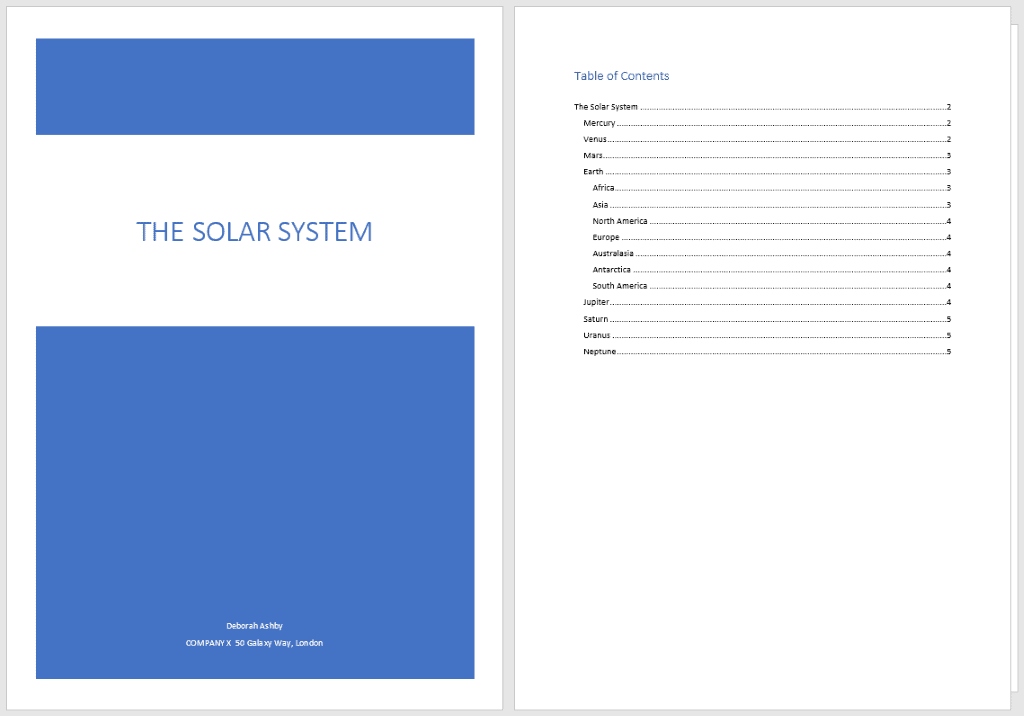
Method
In this example, I am going to go through the process of creating, modifying, and updating a Table of Contents in Word for a document titled ‘The Solar System’.
Prepare the Word document
In order to successfully insert a Table of Contents page, you must first set-up the document correctly by using Word styles to denote headings.
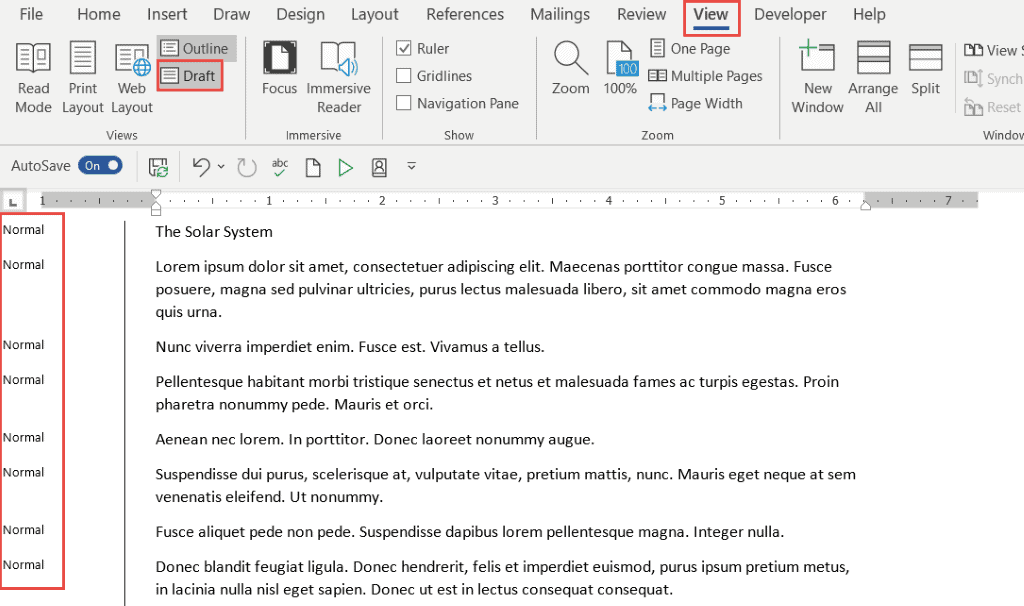
Switching to Draft View
You may find it easier to view your document in draft mode when working with styles, as it makes it easy to see which headings you’ve applied to which items.
- Click the View tab
- Click Draft
The style currently applied to each paragraph will display on the left-hand side of the document. Normal denotes no style has been applied.
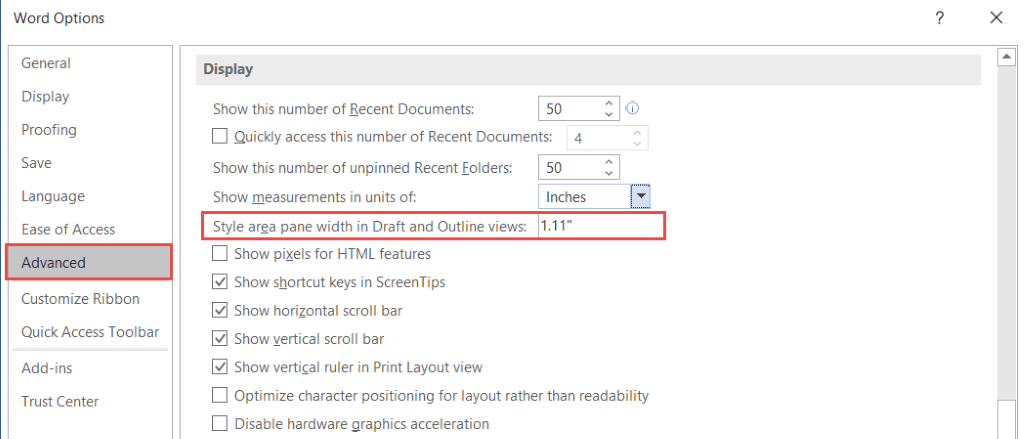
NOTE: When you switch to Draft view, if you do not see the style pane on the left-hand side, you will need to go into Word Options and turn it on.
- Click the File tab
- Click Options
- Click the Advanced tab
- Scroll down the Display section
If you cannot see the styles pane, it will say 0 inches. Set this to 1 – 2 inches and click OK.
Apply heading styles to the document
- Select the first main heading in your document
- Click the Home tab
- In the Styles group, click Heading 1
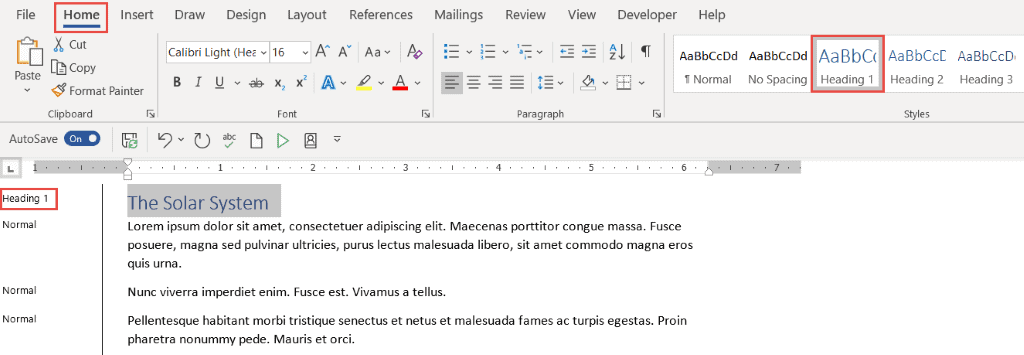
Scroll through the document and apply a Heading 1 style to all top-level headings
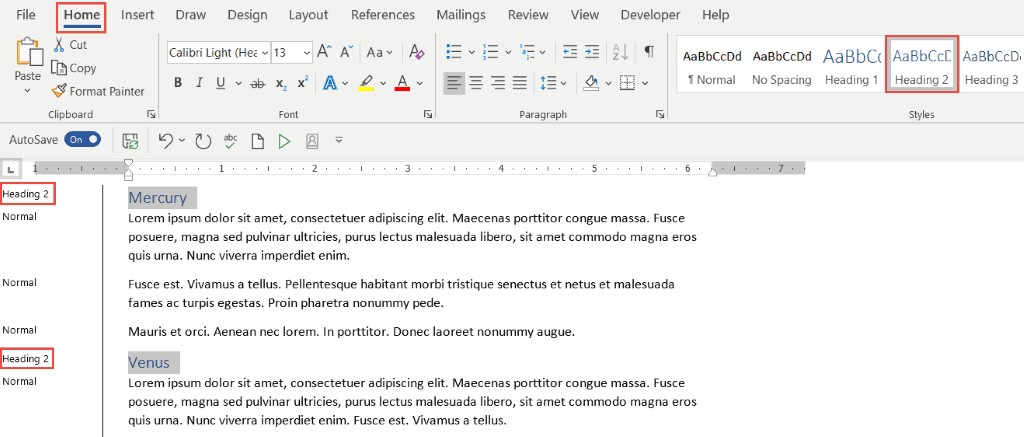
- Select the second-level headings in your document
- In the Styles group, click Heading 2
Apply a Heading 2 to all second-level headings in the document. You can hold down the CTRL key to select multiple headings at the same time.
Repeat this process for any other headings in the document. In this example, I have three levels of heading in my document.
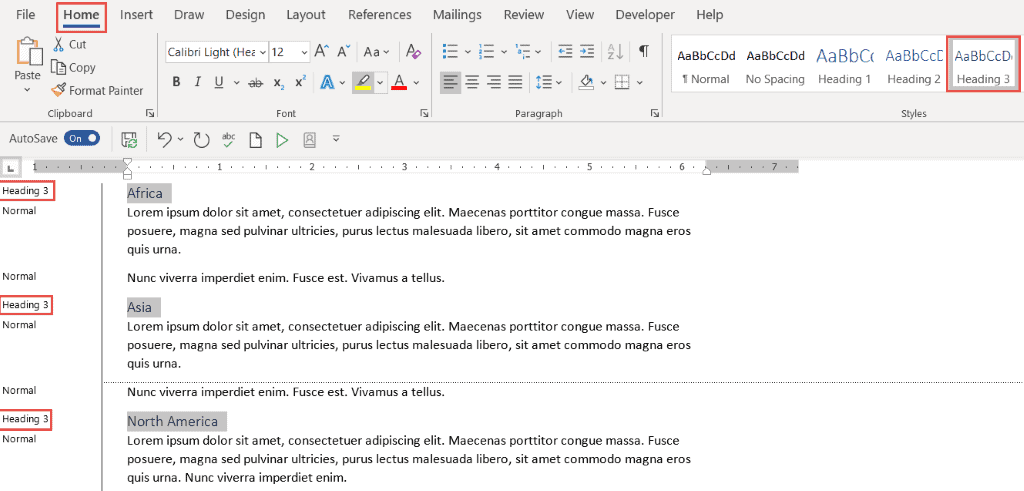
Once the document is styled and organized correctly, it becomes easy to insert a Table of Contents.
Insert the Contents Page
A contents page is normally inserted at the beginning of the document.
- Scroll to the top of the document and position the cursor before the first letter of the first word in the document
- Press CTRL+Enter to insert a page break
- Click the References tab
- Click Table of Contents
Word makes it simple to quickly add a Table of Contents by providing a small selection of in-built tables. In this example, I have selected Automatic Table 1.
Hold down the CTRL key and click on a page number to jump to that page.
Modify a Table of Contents
You can make changes to the Table of Contents and format it as you please.
- Click on the Table of Contents to select it
- Click on the References tab
- Click Table of Contents
- Click Custom Table of Contents
Tab leaders and levels
Tab leaders
Tab leaders are the dots you see between the heading and the page number in the Table of Contents. You can change these to solid lines or dashes.
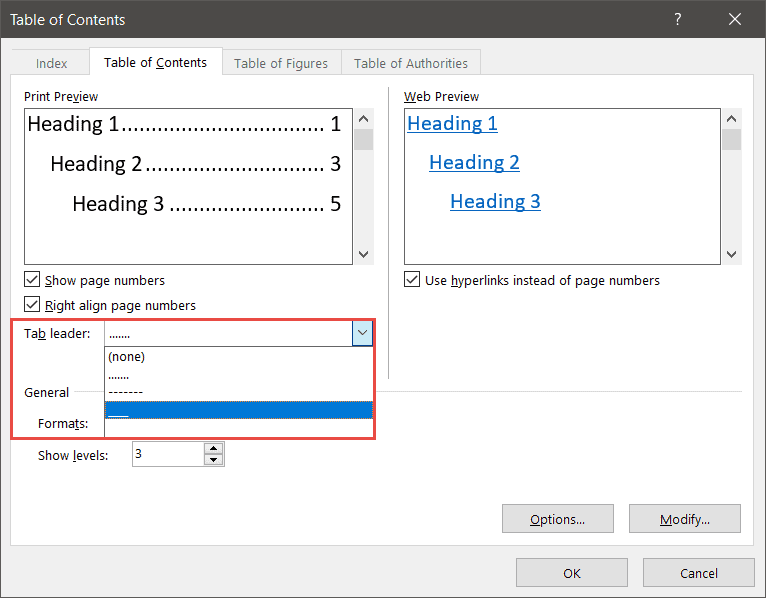
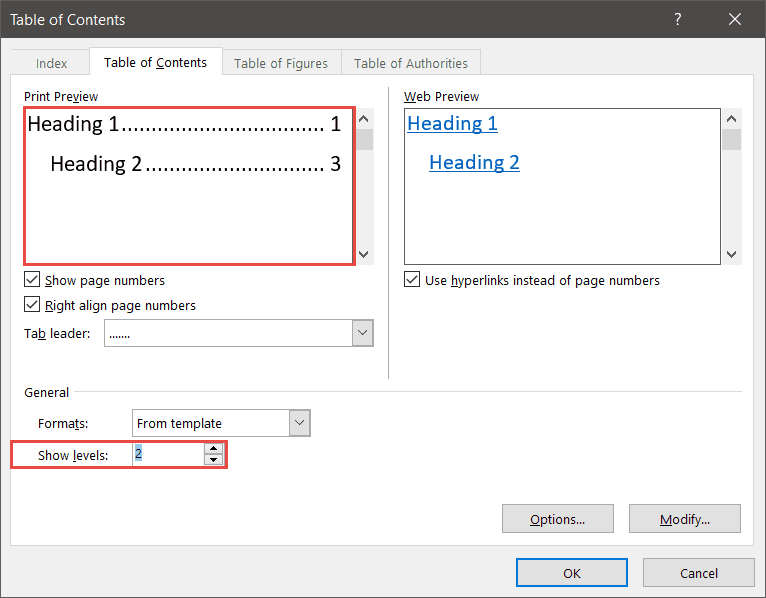
Show levels
You can also specify how many levels of heading you want to show in the Table of Contents. For example, you might have four levels of heading in the document, but you only want to show two levels in the Table of Contents.
- Click OK
If you make a change to the Table of Contents, Word will ask if you would like to replace the current Table of Contents.
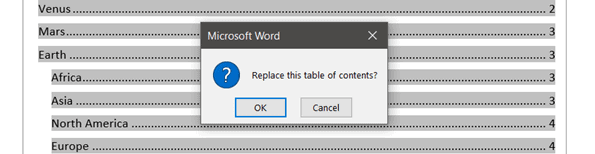
- Click OK to replace
Updating a Table of Contents
It’s rare for a document to stay the same forever. New paragraphs might be added either at the end of the document or somewhere within it. With each new addition, headings are pushed on to new pages, and the new items need to be added to the Table of Contents.
Fortunately, it’s very easy to update a Table of Contents in Word.
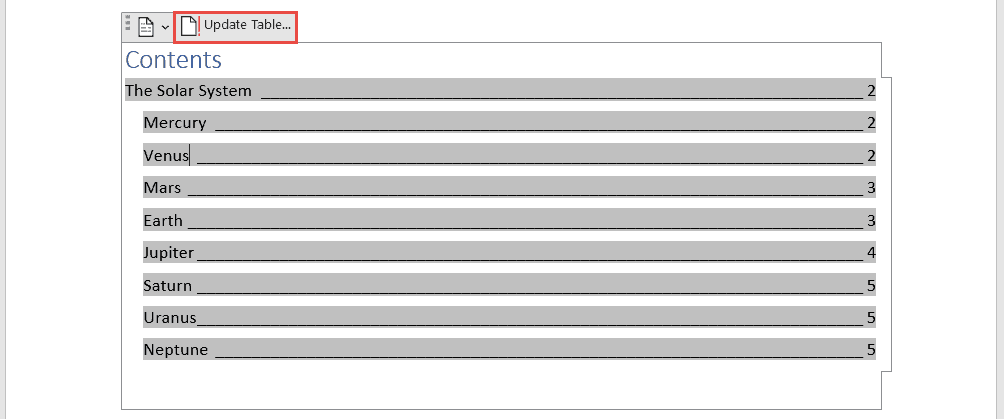
In this example, I’ve added a paragraph for ‘Pluto’ at the end of the document. I’ve formatted it with a heading 2 style.

I now need to update my Table of Contents to include the additional heading.
- Click on the Table of Contents to select it
- Click the Update Table button
Word will ask if you want to update the pages numbers only or the entire table.
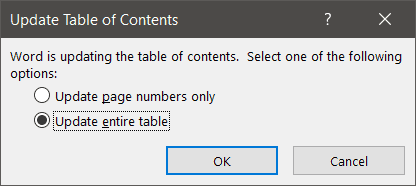
If you have reorganized your document and moved headings on to different pages but not added any new headings, you could select ‘Update page numbers only.’ For everything else, select ‘Update entire table.’
Custom Table of Contents
You can customize the look and feel of your Table of Contents by modifying the formatting. For example, you might decide that you want all level 2 headings to display in a bold, red font.
- Click on the Table of Contents to select it
- Click on the References tab
- Click Table of Contents
- Click Custom Table of Contents
- Click Modify
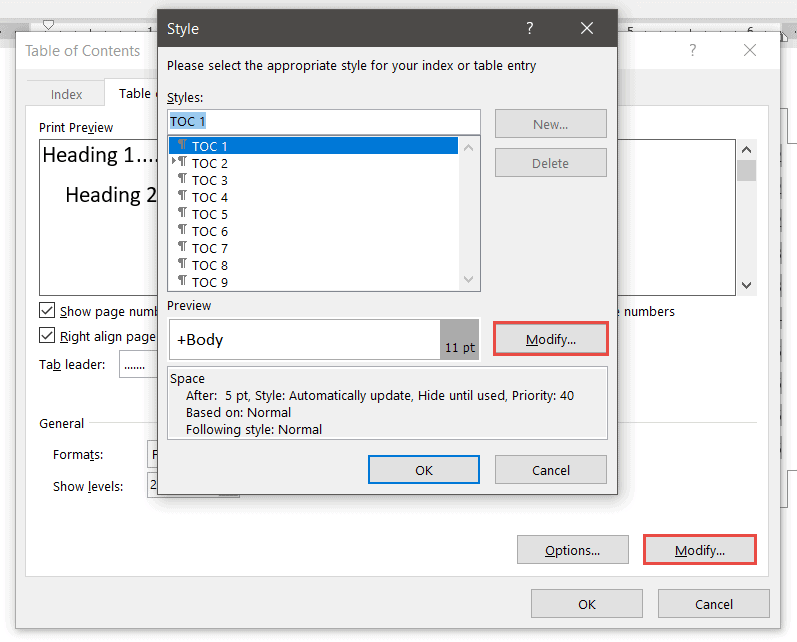
Modifying ‘TOC 1’ will affect all level 1 headings. Modifying ‘TOC 2’ will affect all level 2 headings and so on.
- Select TOC 1
- Click Modify
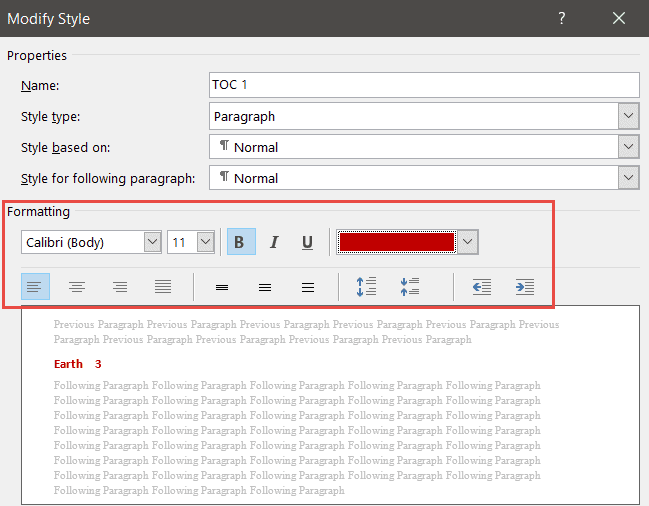
- Make the desired formatting changes
- Click OK
Video Tutorial
To see a demo of how to create a Contents Page in Word, please watch the following video tutorial.
How to create a Contents Page in Word Video (15:09)
For more Free Microsoft Office tutorials from Simon Sez IT. Take a look at our MS Office Resource Center.
To learn Word with Simon Sez IT. Take a look at the Word courses we have available.
Deborah Ashby

Deborah Ashby is a TAP Accredited IT Trainer, specializing in the design, delivery, and facilitation of Microsoft courses both online and in the classroom.She has over 11 years of IT Training Experience and 24 years in the IT Industry. To date, she’s trained over 10,000 people in the UK and overseas at companies such as HMRC, the Metropolitan Police, Parliament, SKY, Microsoft, Kew Gardens, Norton Rose Fulbright LLP.She’s a qualified MOS Master for 2010, 2013, and 2016 editions of Microsoft Office and is COLF and TAP Accredited and a member of The British Learning Institute.
While inserting a file (such as Word, Excel, PowerPoint, PDF, image, etc.) as an object into a Word document, you can either create a new or use an existing file.
Create a new file and insert as an object
1. Place the mouse cursor where you want to create the object.
2. From the Ribbon, under the tab Insert, within the group Text, click Object. The object dialog box appears.
3. Select an object to create from the Object Type list.
4. Select the Display as icon check box.
5. Word creates an icon of the selected Program at the cursor position and opens the program to create a new file.
For example, if you select object type as “Microsoft Office Excel Worksheet”, an Excel icon is created at the cursor position and then Word opens the Excel program to create a new Excel document.

Insert an existing file as an object
1. You can insert an existing file into your document in two different ways: either embed the file or link the file.
2. Place your mouse cursor where you want to create the object
3. From the Ribbon, under the tab Insert, within the group Text, click Object. The object dialog box appears.
4. From the dialog box, click Create from File.
5. Click the Browse button to locate the file in your system.
6. Select the Display as icon check box.
7. The object icon is created at the cursor position. This way you can embed a file into your document.
8. If you want to link the file, also select the Link to File check box.
Difference between embedding and linking an existing file
If you want to update an embedded file, you have to double-click the object to open the file and then edit. Updating the source file will not update the embedded file.
However, if you are linking an existing file, then changes in the source file will be reflected in the linked file.

About wordknowhowhttp://wordknowhow.comThis blog site was started to help people with Microsoft Word. I use Word a lot at work, and I understand that some features are difficult to use. There were no simplified instructions online to help me use these features. It is for this reason that this site exists; to make your life easier with Word.
Feel free to post your comments, queries, suggestions, etc. I will do my best to help you!

When working on a document in Word, you may find that you need to insert text from another Word document. Maybe you’re collaborating with others and combining multiple pieces, for example.
RELATED: How to Collaborate on Documents in Real-Time in Office 2016
There is a better way to collaborate on documents in Office 2016, but there may be times when a fellow collaborator needs to work offline and they send you a document to integrate into the main document. So, we’ll show you how to insert the contents of a Word file into another Word file for situations where online collaboration is not an option. (Sure, you could just open the second document and copy and paste its text, but the method below is often faster.)
For the purposes of this article, we’ll call the file being inserted the “source” file and the file into which you are inserting the source file the “target” file.
To insert the contents of a source Word file into a target Word file, open the target document, place the cursor where you want to insert the source file, and then click the “Insert” tab.

In the “Text” section, click the “Object” button and select “Text from File” from the drop-down menu.
The “Insert File” dialog box displays. Navigate to the folder that contains the source file you want to insert and select the file. Then, click “Insert”.
NOTE: You can also insert text from a text (.txt) file.
The entire contents of the source file (text, images, tables, etc.) will be inserted at the cursor in the target document.
When inserting text from a source document that has styles using the same names as in the target document (for example, the “Normal” style), the style in the target document takes precedence. If you want to keep the formatting of the text from the source document, make sure the style applied to that text in the source document has a different name than any of the styles in the target document. So, if you want the text from the source document to look like the text in the target document, such that the formatting is consistent, you’re good. All you have to do is insert the file or part of the file as we described in this article.
You can also insert text from a text (.txt) file, but you have to insert the entire file in that case, because you cannot add bookmarks to text files.
RELATED: How to Reference Text from Other Documents in Microsoft Word
We previously described a trick where can put common content into one Word document and reference it in other Word documents. The content will even automatically update in all your documents if you change it in the common document because the two are linked using a field. That feature is different from inserting files as described in this article because when you insert content from a source file into a target file, there is no link between the source file and the target file. So, when you change the content in the source file that content is not updated in the target file.
READ NEXT
- › The New NVIDIA GeForce RTX 4070 Is Like an RTX 3080 for $599
- › This New Google TV Streaming Device Costs Just $20
- › HoloLens Now Has Windows 11 and Incredible 3D Ink Features
- › BLUETTI Slashed Hundreds off Its Best Power Stations for Easter Sale
- › Google Chrome Is Getting Faster
- › How to Adjust and Change Discord Fonts
How-To Geek is where you turn when you want experts to explain technology. Since we launched in 2006, our articles have been read billions of times. Want to know more?
Download PC Repair Tool to quickly find & fix Windows errors automatically
Content Controls in Microsoft Word offer a great way to automate your document creation. It also helps in organizing the content in a structured manner. These and many more features make Content controls easy to understand and use. So, let’s see how to add and change content controls in Word.
Content controls mostly find their use in creating templates and forms as they provide flexibility in content placement. Also, depending on your preferences, you can prevent them from being edited or deleted. Here’s how!
- Click File in Word.
- Scroll down to Options.
- Choose Customize Ribbon.
- Select the Developer box.
- Click OK.
- To add a Content control, click Rich Text Content Control box.
- Place the box at appropriate location, select Properties.
- Add General Information.
- Change Locking permissions.
How do you edit Rich Text Content Control?
Before proceeding with the steps to edit or Rich Text Content Control in Word, you’ll need to add the Developer tab to the Ribbon menu in Word.
For this, click the File tab on the Ribbon menu and choose Options.
When the Options window opens, navigate to Customize Ribbon.

Here, select the Developer box and hit the Ok button as shown in the image above.
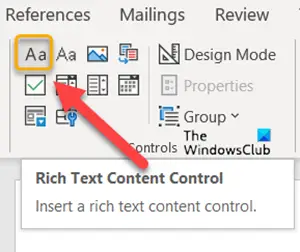
Next, to add a Content control, click Rich Text Content Control box.
Place the box at the appropriate location, to create a template.
Then, select Properties under Controls block.
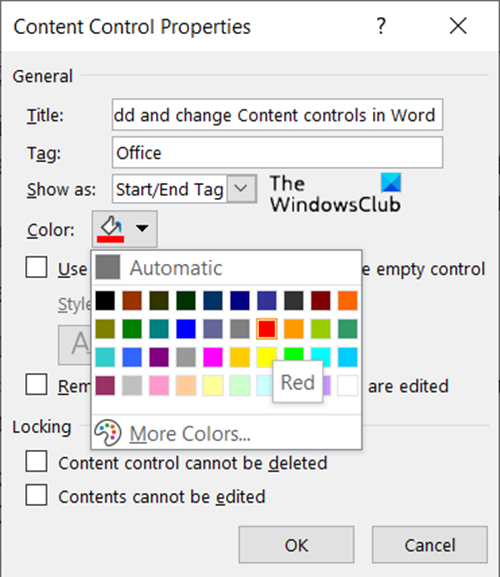
Add description like the title for the box, tags to be used, color for the box, etc.
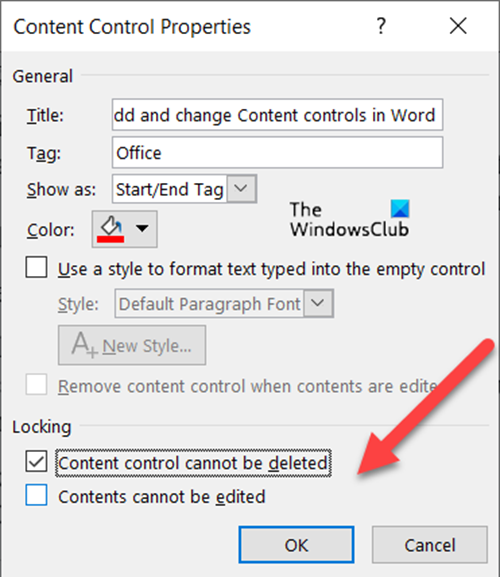
You can also change Content controls by changing its locking permission (editing or deleting them) by checking/un-checking the following boxes.
- Content Controls cannot be deleted.
- Content Controls cannot be edited.
Similarly, you can choose to create a Drop-down List via Content controls.
How do I remove content control in Word?
If you would like to delete or remove Content controls in Word:
- Press Ctrl+A to select the entire document.
- Then, right-click a visible content control.
- Now, in the context menu that appears on your computer screen, click Remove Content Control.
What is a Rich Text Content control?
A block of rich text that can be formatted represents a Rich Text Content control. So, all the custom formatted text like pictures, tables and other such items can be included in this category.
Hope it helps!

A post-graduate in Biotechnology, Hemant switched gears to writing about Microsoft technologies and has been a contributor to TheWindowsClub since then. When he is not working, you can usually find him out traveling to different places or indulging himself in binge-watching.