
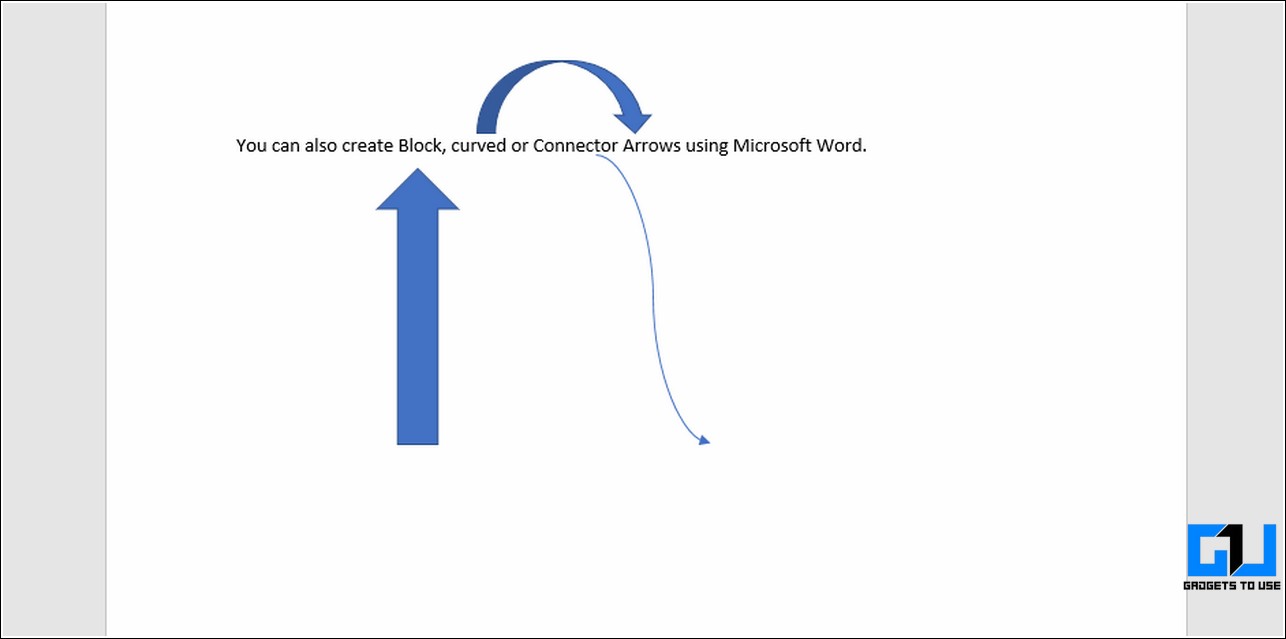
Sometimes it is necessary to add images in a Word document to display several points concisely. Adding arrows with different shapes, sizes, and directions pointing to the specific point in the image serves to further emphasize each point.
Word allows you to insert / draw many types of arrows:
- Keyboard arrows
- Arrows by Unicode
- Arrows as symbols
- Line arrows
- Block, curved, and connector arrows
Depending on your requirement you can use any or all of them in your document. We provide you step-by-step instructions here.
Method #1: Insert Keyboard Arrows
Step #1: Open a Word Document
Open the Word Document in which you want to insert arrows. Place your cursor at the position where the arrow should appear.
Step #2: Insert keyboard arrows
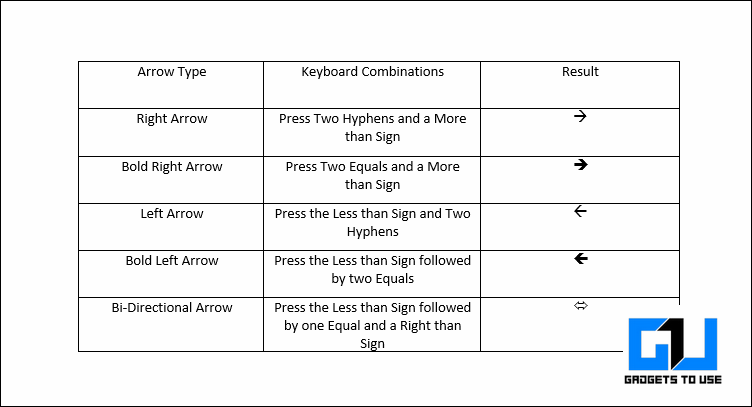
- Type two Hyphens and a More Than sign to insert a Right arrow.
- Type a Less Than sign and two Hyphens to insert a Left arrow.
- Type two Equal signs and a More Than sign to insert a Bold Right arrow
- Type a Less Than sign and two Equal signs to insert a Bold Left arrow
- Type a Less Than sign, one Equal sign, and a More Than sign to insert a Double arrow.
This is how the arrows look.

Method #2: Insert Arrows by Unicode
Step #1: Open a Word Document
Open the Word Document in which you want to insert arrows. Place your cursor at the position where the arrow should appear.
Step #2: Insert unicodes for arrows
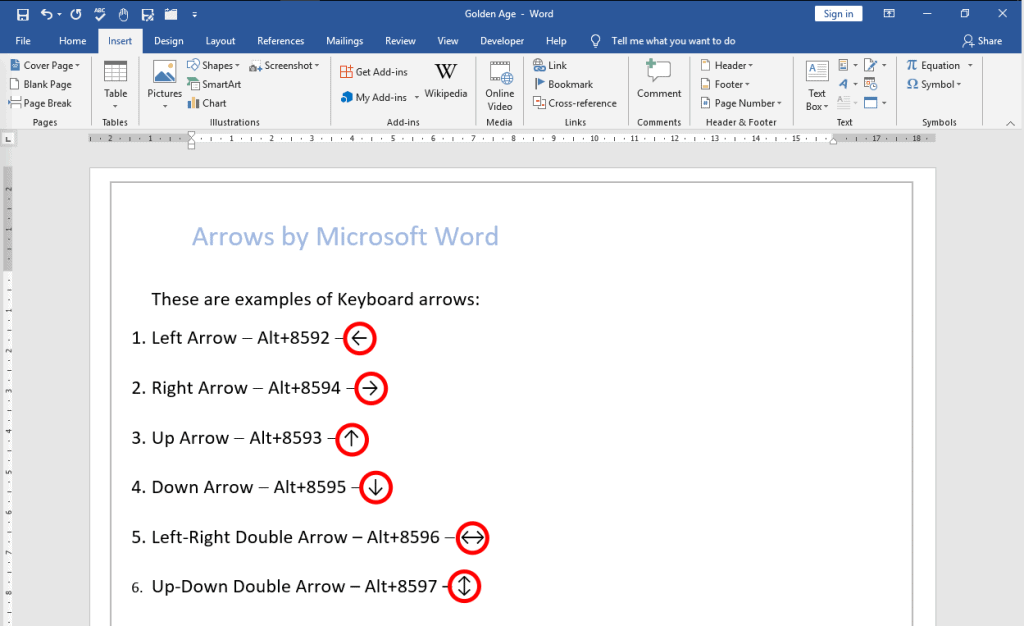
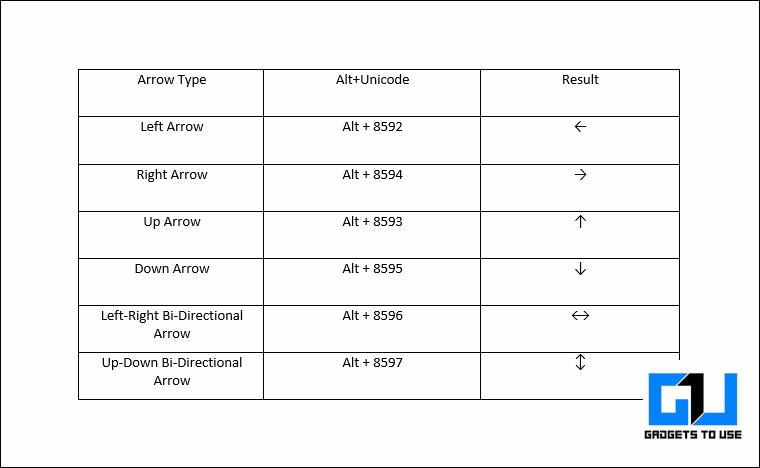
Hold down the Alt key on your keyboard and type the following numbers on the numeric keypad. Release the Alt key only after you have finished typing the complete string. Follow the table for the type of arrow you want to insert.
| Arrow Type | Alt+Unicode (on numerical keypad) |
| Left Arrow | Alt+8592 |
| Right Arrow | Alt+8594 |
| Up Arrow | Alt+8593 |
| Down Arrow | Alt+8595 |
| Left-Right Double Arrow | Alt+8596 |
| Up-Down Double Arrow | Alt+8597 |
This is how the arrows look.
Method #3: Insert Arrows as symbols
Step #1: Open a Word Document
Open the Word Document in which you want to insert arrows. Place your cursor at the position where you want the arrow to appear.

Step #2: Open the Symbols Table
Click on the Insert tab on the top menu bar to change the ribbon. In the Symbols section, click on Symbols, and then on More Symbols to open the Symbols Table.

Step #3: Select and insert the Symbol
Scroll up and down to see various symbols, and click on the one you want to insert. Click on the Insert tab to insert the symbol and then click on the Close tab to close the table. This is how your document will look.

Method #4: Insert Line Arrows
Step #1: Open a Word Document
Open the Word Document in which you want to insert line arrows.

Step #2: Select the Shape
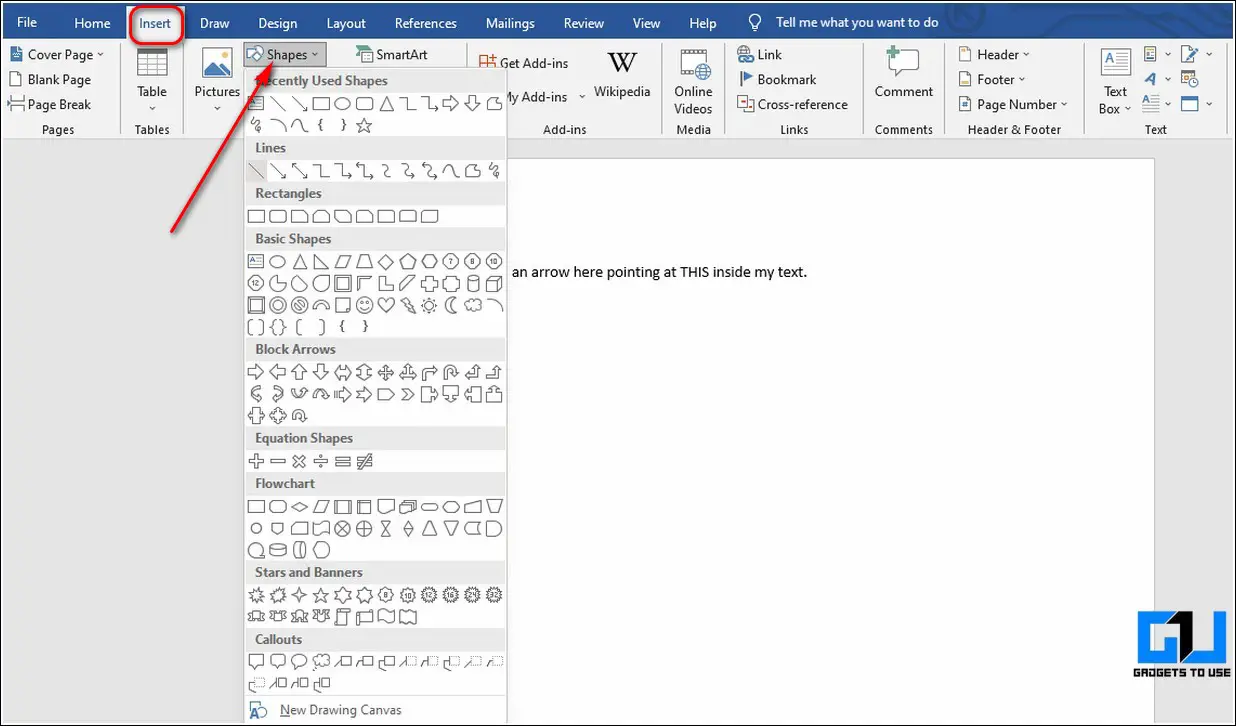
Click on the Insert tab on the top menu bar to change the ribbon. In the Illustrations section, click on Shapes to open the choice of Shapes.

Under Lines, click on the second shape from the left. If you prefer, select any other line shape instead. Word closes the choice of Shapes and changes the cursor to a cross.

Step #3: Draw the arrow
Move the cursor to the position where you want the tail of the arrow to be, hold down the left mouse button and drag the mouse and the cross to where you want the arrow to point. Word will insert the arrow, and when you release the mouse button, will place the arrow.

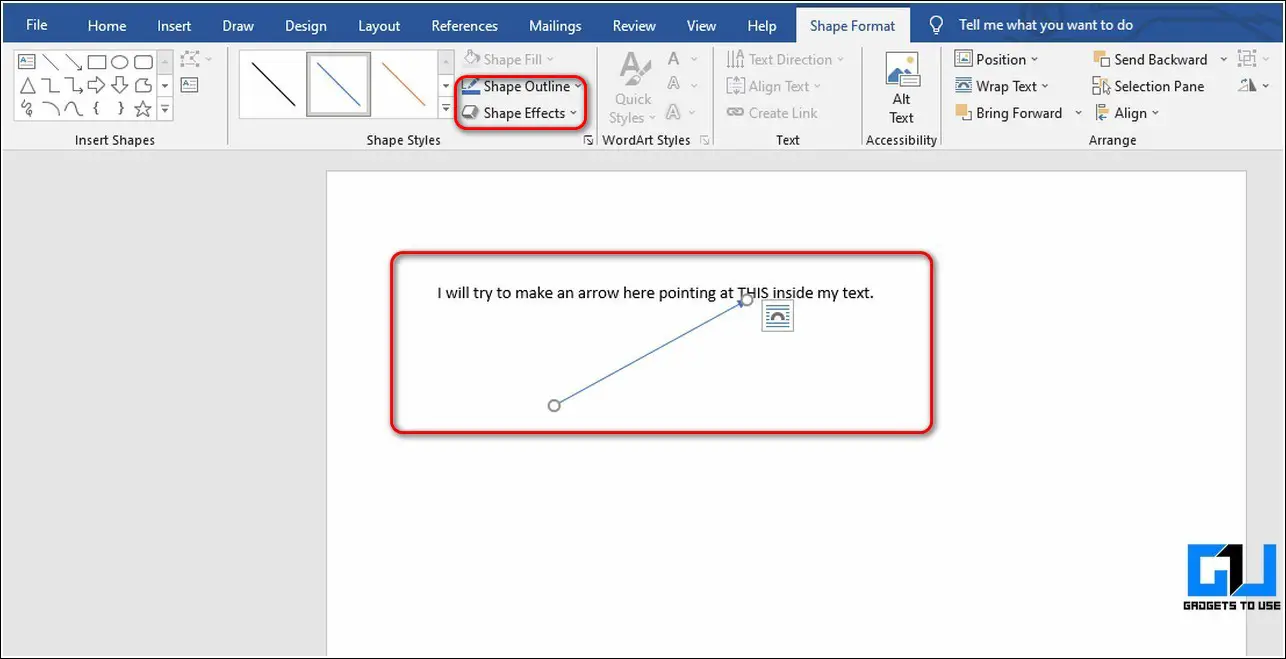
Step #4: Modify the arrow
Notice that the ribbon has changed and Word has opened the Format tab under Drawing Tools. The section Shape Styles allows changing the shape of the arrow such as:
- Style
- Outline
- Effects
- Shape
Style — Click on the downward arrow on the right of Subtle Shapes [1] to open the Theme Styles and Presets choice. Proceed from Step #5.
Outline — Click on the small triangle on the right of Shape Outline [2] to open the Theme Colors dialog. Proceed from Step #6.
Effects — Click on the small triangle on the right of Shape Effects [3] to open the Effects selection. Proceed from Step #7.
Shape — Click on the small triangle at the bottom right of Shape Styles section [4] to open the Format Shape dialog. Proceed from Step #8.
Step #5: Change the style of the arrow

In the Theme Styles and Presets choice, Word offers some preset styles. Click on the one you like best, and the arrow will change accordingly.
Step #6: Change the outline of the arrow
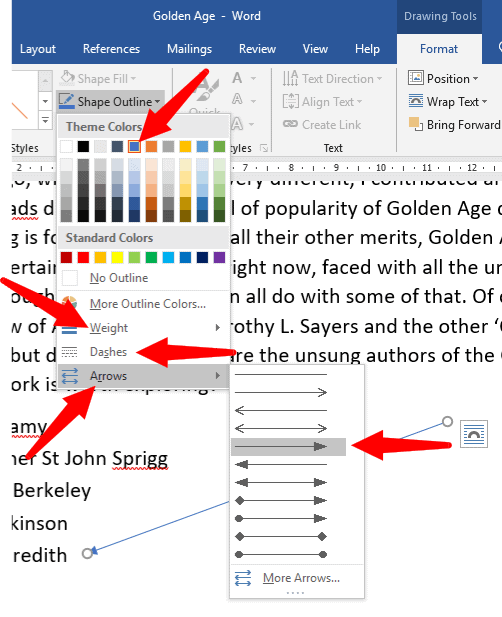
In the Theme Colors dialog, Word allows you to change many features of your arrow:
- Color
- Weight
- Dashes
- Arrow
You can change the color of the arrow, weight (thickness) of the arrow, Dashes (solid line or dotted) of the arrow, and Arrows (type of the arrow head). Simply hover the mouse pointer over the tabs—Weight, Dashes, and Arrow—to see the choices available. Click on the choice you like.
Step #7: Change the shape effects of the arrow

The Effects selection allows introduction of different effects on the arrow. The selection offers several effects such as:
- Preset
- Shadow
- Reflection
- Glow
- Soft Edges
- Bevel
- 3-D Rotation
Simply hovering the mouse pointer over the choices will show the various choices available, and you can pick anything you like. Word will store your choice in Preset on the top.
Step #8: Change the Shape of the arrow

The Format Shape dialog offers three choices:
- Fill and Line
- Effects
- Layout and Properties
Fill and Line — You can select various fill and line properties for the arrow.
Effects — Offers the same choices as in Step #7.
Layout and Properties — This dialog allows you to assign a Title to your arrow and give it a description.
Once you have made your choice, click on the cross to close the dialog.
Your arrow may look like this

Method #5: Insert Block, Curved, and Connector arrows
Step #1: Open a Word Document
Open the Word Document in which you want to insert arrows.

Step #2: Select the Shape
Click on the Insert tab on the top menu bar to change the ribbon. In the Illustrations section, click on Shapes to open the choice of Shapes.

Under Block Arrows, select the type of arrow you need. Word will display the name of the arrow when you hover the mouse pointer over it. Click on the arrow you prefer, and Word will close the dialog, and change the mouse pointer to a cross.

Step #3: Insert the arrow
Position the cross where you want the arrow to start, and holding down the left mouse button, drag the cross to where you want the arrow to end.

Notice that Word has changed the ribbon to include a Format tab under Drawing Tools.
Step #4: Modify the arrow
You can change the position and shape of the arrow by clicking and dragging the appropriate circles around it. You can rotate the arrow in 3-D by clicking and dragging the circular handle on its top.
For modifying the arrow further, follow Method #4, Step #4 onwards.
Finally, your arrow may look like this.

Conclusion
You can add many types of arrows to beautify and emphasize your Word document. Although the process looks involved with too many steps, following our instructions above should make the task easier.
When editing documents in Word, sometimes we can insert some graphic symbols to make the content more intuitive and lively, like arrows with different shapes and directions. Since they can’t be typed directly like numbers and characters, here I’d like to introduce 3 common used ways to insert arrows in Word. The method 1 and method 2 can also be applied in Microsoft Excel. Let’s have a look.
Insert Arrow Shape
1. Open the Word (or Excel) document.
2. Switch to Insert tab, click Shape button to expand the drop-down menu.
2. There are many different types of arrows with different directions, you can choose any one you like.

3. Hold your mouse to draw a shape you selected, and drag its frame to adjust the size and direction of the arrow.

4. You can also change its color or effect in Format (Drawing Tools) tab.

Insert Arrow Symbol
1. Open the Word document (or Excel file).
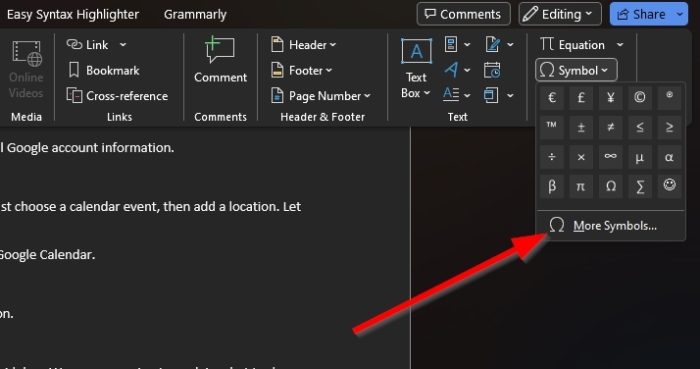
2. Go to Insert tab, click Symbol button on the right of the ribbon and choose More Symbols… in the menu.

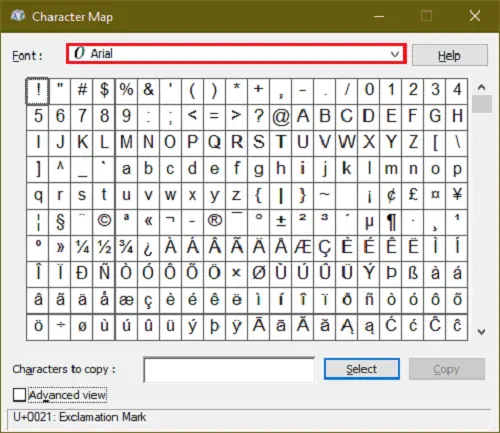
2. Change the Font into Wingdings in the popping out Symbol window, scroll down till the end and you’ll find many different arrow symbols here. Select the one you want and hit Insert button to add it to your document.

Insert Arrow by Code
Alternatively, you can also insert different arrows in Word only by keyboard.
1. First you should make sure that your numeric keypad is enabled, otherwise, tap [Num Lock] to turn on it.
2. Press and hold [Alt] key while tapping corresponding numeric code. Then release the [Alt] key and the arrow will show in your document.
3. Here I collect a list of arrow code (all in Unicode 11), you can find the arrow you want and use its corresponding code.
| Arrow | Code |
| Left Arrow ← | 8592 |
| Right Arrow → | 8594 |
| Up Arrow ↑ | 8593 |
| Down Arrow ↓ | 8595 |
| Left-right Arrow ↔ | 8596 |
| Up-down Arrow ↕ | 8597 |
For example, if you want to insert a right arrow ↓ in Word document, you just need to hold [Alt] key and enter 8594 on numeric keypad. Then release the [Alt] key, you will see the right arrow is successfully inserted.
Copyright Statement: Regarding all of the posts by this website, any copy or use shall get the written permission or authorization from Myofficetricks.
![]()
Download Article
![]()
Download Article
Do you need to use an arrow to point to something? An arrow is mostly used in mathematical equations to show the flow of logic, but you can also use arrows to point out specific details. This wikiHow article teaches you how to insert an arrow icon into your Word document using a Windows or Mac computer.
Steps
-

1
Open a Microsoft Word document on your computer. You can either open a document by launching Word, then going to File > Open or by double-clicking the file in your file manager.
- Alternatively, you can open the Word app, and start a new, blank document.
-
2
Click the INSERT tab. You can find this button next to HOME in the upper-left corner of the document. It will open your INSERT tools on the toolbar ribbon.
Advertisement
-
3
Click the
icon next to Symbol. The Symbol option is listed next to a blue «Ω» icon on the INSERT toolbar. You can see a list of all the available symbols here.
- On some versions, this button may be labeled Advanced Symbol. In this case, click on it to see the full list of symbols you can insert.
-
4
Click More Symbols at the bottom. This will open the full list of symbols you can use in a new pop-up window.
-
5
Double-click the arrow icon you want to insert. Find the arrow you want to type in the Symbol window and click on the icon to select it.
- If you cannot find the arrow you want, select Wingdings from the font selection menu and you’ll see more symbols.
- While double-clicking the symbol will insert it into your document, you can single-click it to see more information, like its Alt Code. To use Alt Code in your writing, your keyboard must have a separate section for the number pad (0-9 that’s not the same as the numbered keys at the top of your keyboard). Press and hold Alt as you enter the code on your number pad (you may need to have Num Lock enabled or press the Fn key as well). Common alt code for arrows includes:
- Alt+2+4 (↑),
- Alt+2+5 (↓),
- Alt+2+6 (→), and
- Alt+2+7 (←).
-
6
Click the Close button. You can find this button in the bottom-right corner. It will close the Symbol window.[1]
- You can alternatively use the equation menu.[2]
- You can alternatively use the equation menu.[2]

Advertisement
Ask a Question
200 characters left
Include your email address to get a message when this question is answered.
Submit
Advertisement
-
Once you insert the arrow icon you want to type, you can copy and paste it anywhere you want to use in your document.
Advertisement
About This Article
Article SummaryX
1. Open a Word document.
2. Click the Insert tab.
3. Click Symbol or Advanced Symbol.
4. Click More Symbols.
5. Select the arrow icon you want to use.
6. Click Insert.
7. Click Close.
Did this summary help you?
Thanks to all authors for creating a page that has been read 55,970 times.
Is this article up to date?
Download PC Repair Tool to quickly find & fix Windows errors automatically
Typing arrows in Microsoft Word does not have to be a chore. The application has provided multiple ways for users to accomplish this task, and we’re going to talk about how to insert an Arrow symbol in a Word document

Arrows are useful symbols for getting across information more efficiently than normal. This can save folks from typing long explanations when a simple arrow could suffice. Now, not everyone who uses Microsoft Word knows how to get this done, but believe us when we say that it doesn’t take much.
We’re going to show you how to insert an Arrow symbol in a Word via AutoCorrect, Shortcuts, and Symbols, so the following solutions should help:
1] Use the AutoCorrect feature to insert an Arrow symbol in a Word
OK, so the first thing to do here is to try and use the AutoCorrect feature in Microsoft Word to type arrows. From our point of view, this is probably the fastest way to get the job done, well, when it works because there are rare times when it doesn’t.
So, let us look at how to do this right now:
- Open the Microsoft Word application, then launch into a new document or an old one.
- Move the mouse cursor to the location in the document where you want the arrow to appear.
- Now, type the relevant combination of characters to create arrows.
2] Create arrows in Word using Shortcuts
Let’s assume that AutoCorrect in its default form does not produce the type of arrows you need. You can always create a keyboard shortcut for Emoji in Office apps
This will help you add your own arrows that are not found by default in Microsoft Word.
3] Type arrows using special characters in Word
For those who are wondering, the option is there to type arrows by the means of special characters. We do not view this as the ideal way, but there are some arrows from the section of the special character that cannot be brought to the forefront via AutoCorrect.
To learn how to get this done, please read our post on how to use Special Characters and Letters.
4] How to type Arrows using equation mode in Word
Microsoft Word has an equation mode that makes it possible for users to use mathematical symbols. With this feature, users can insert arrows into their documents, so let us look at how to get this done.
- Place the mouse cursor where you want the arrow to appear.
- Next, you must press the Alt+= buttons to fire up the equation mode section.
- You must now type a Backslash along with the relevant Math AutoCorrect shortcut.
- Press the Space button and the shortcut text will transform into a specified arrow.
The following are examples of shortcuts you can use, along with what the arrows look like:
- uparrow ↑
- Uparrow ⇑
- downarrow ↓
- Downarrow ⇓
- leftarrow ←
- Leftarrow ⇐
- rightarrow →
- Rightarrow ⇒
- nearrow ↗
- nwarrow ↖
- searrow ↘
- swarrrow ↙
- leftrightarrow ↔
- Leftrightarrow ⇔
- updownarrow ↕
- Updownarrow ⇕
- Longleftarrow ⟸
- Longrightarrow ⟹
READ: 10 Default Microsoft Word settings you need to change
Why can’t I use Arrow keys?
If you are having problems with using the arrow keys on your keyboard, then chances are it has something to do with the turning on of the scroll lock feature. Look for the scroll lock button on your computer keyboard to see if it is enabled. If this is the case, the button usually lights up, so disable it promptly.
How many Arrow keys are there?
There are a maximum of eight arrow keys on a full-sized keyboard. On other types of keyboards, the number sits at four, and that’s fine since most computer users have no need for using eight arrows. But if that is not the case, then purchasing a new keyboard is always an option.

Vamien has studied Computer Information Services and Web Design. He has over 10 years of experience in building desktop computers, fixing problems relating to Windows, and Python coding.
If you frequently use Microsoft word to draft your documents and require the use of arrows and circles in your text, then this guide will be your true savior. In this read, we have listed 3 ways to add arrow or circle text inside a document using Microsoft Word. You can also learn how to change default font in Microsoft Word.
Also, Read | 3 Best Ways to Protect PDF Files with Password for free
Ways to Add Arrow or Circle Text in Microsoft Word
Add Arrows to Document Using Microsoft Word
Microsoft Word allows you to add a variety of different arrows to your text using several methods. Using these methods, you can conveniently create an illustration or add impact to plain text inside a document. Follow these simple techniques to achieve the same.
Try Keyboard Shortcuts to Add Arrows to Text
To quickly add arrows to your text inside a Word document, you can follow these nifty keypress combinations.
Use Unicode to Insert Arrows in Your Text
Another quick method through which you can easily add arrows to your text inside a word document is through the help of the Arrow Unicodes. To create arrows using this method, you need to press the Alt key on your keyboard and type the corresponding numbers using the numeric keypad. As soon as you release the Alt key after pressing the Unicode, the desired arrow will appear at your inserted position. Follow this quick chart to use the arrow Unicode.
Insert Arrows in Document as Shapes
If you wish to create long custom arrows in your text, you can simply create them by dragging the desired one using the Shapes feature in Microsoft Word. Follow these steps to achieve the same.
- Open the word document using Microsoft Word in which you wish to add arrows.
- Expand the Insert option present in the toolbar at the top and click on the Shapes button to find and choose your desired arrow.
- Once you click on your desired arrow shape, your mouse pointer will convert to a crosshair pointer and you can simply drag it over your text to easily create an arrow.
- You can also format the look and provide a custom appearance to your arrow by formatting it using style, outline, and effects.
- That’s it. You’ve successfully added an arrow to your text using this method.

Use Block, Curved, and Connector Arrows to Create Impactful Illustrations
In addition to simple arrows, you can also add a wide variety of different kinds of arrows to your text such as block, curved, or connector arrows using the Shape feature inside Microsoft Word. Follow these steps to add all such arrows using this method.
- Open your desired document using Microsoft word to which you wish to add arrows.
- Expand the Insert option in the toolbar and click on the Shapes button to choose your desired arrow.
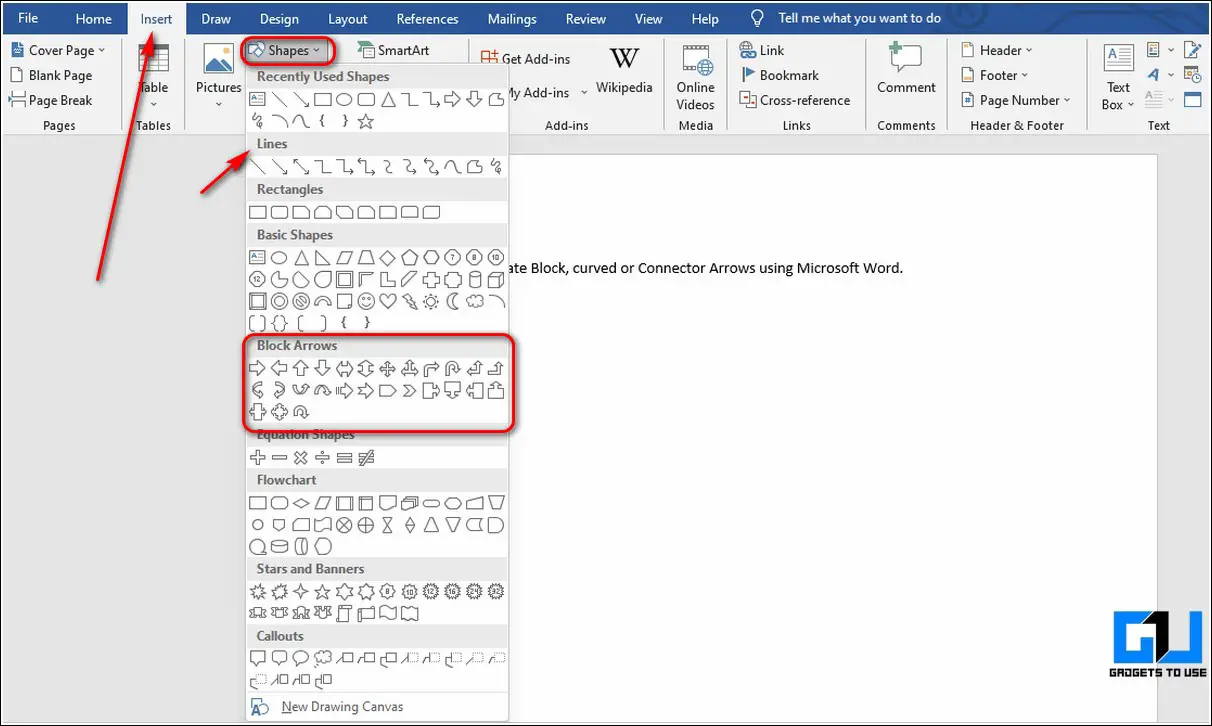
- Drag your chosen (block, curved, or connector) arrow over the text to get the preferred results.
Circle and Text Inside Word Document Using Shapes
Similar to creating arrows, you can also add a circle to your text using the Shapes button in Microsoft Word to highlight certain text or create an illustration.
- Expand the Insert option in the toolbar located at the top and press the Shapes button.
- Under the Basic Shapes section, you can find the circle shape. Click on this shape and drag it over the text to create a circle.

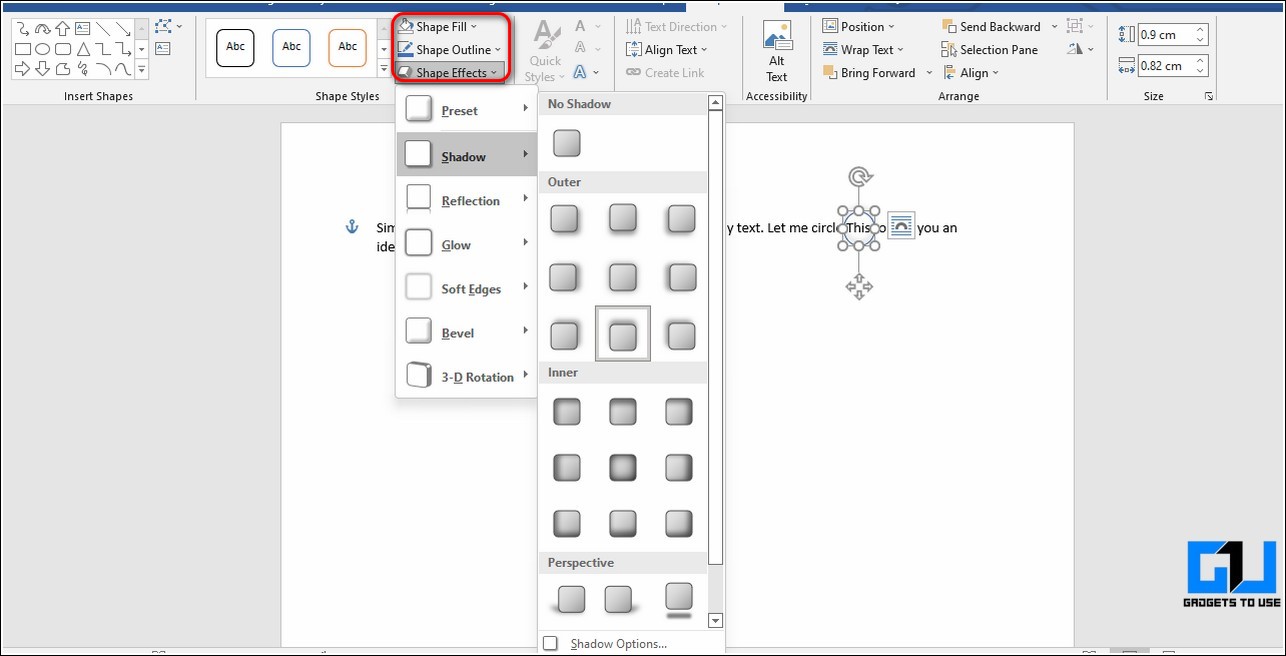
- By default, the circle is filled with a solid color. To make it transparent with visible circle boundaries, click on the Shape Fill option at the top.

- Inside the Shape Fill option, press the No Fill option to create a transparent circle around your text.

- You can also customize this circle by formatting it using Outline and Shape Effects.
Congrats. You’ve successfully added a circle to your text using this method.
Bonus Tip: Create a Flowchart Diagram in Word using SmartArt
Microsoft Word also offers you the feature to use different varieties of charts instantly using the SmartArt feature. Follow these simple steps to create a ready-to-use flowchart using this method.
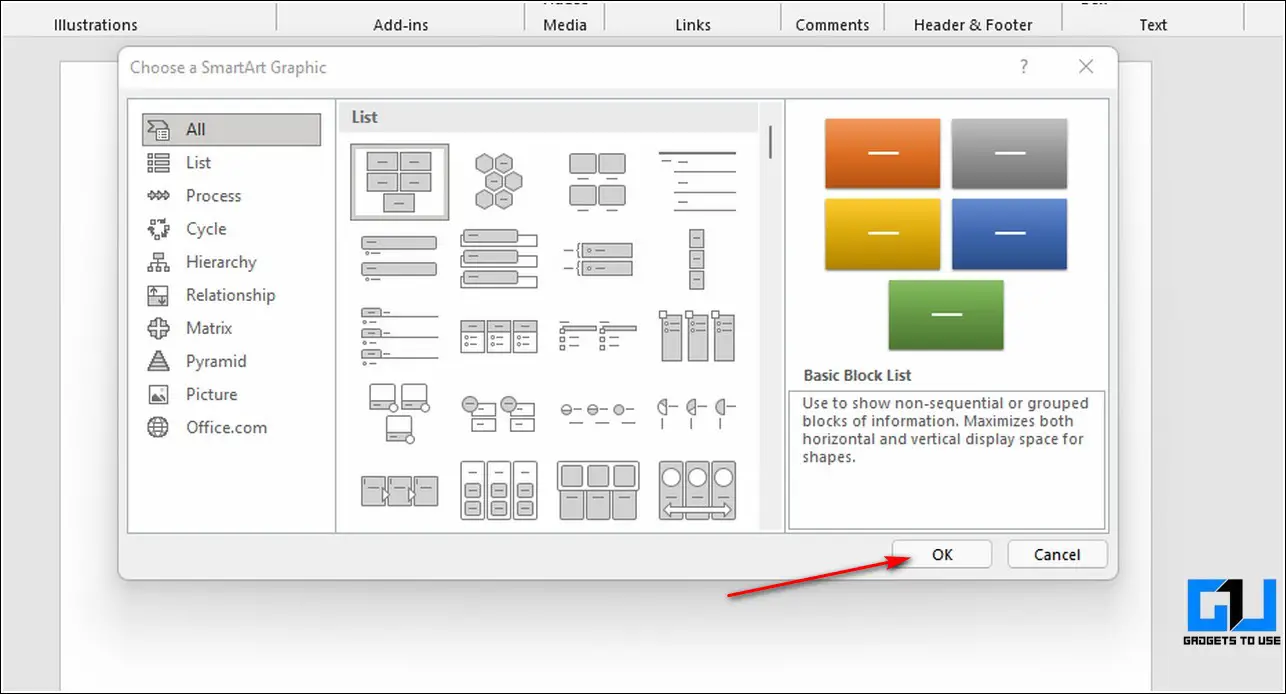
- To create a chart inside a word document, expand the insert option in the toolbar at the top and click on the SmartArt button.

- You will now see a popup window containing different varieties of ready-to-use charts. Browse and choose your preferred chart from the window. Click on the OK button to add it to your word document.
- Add your desired labels to the chart. You can also delete a label here to dynamically make adjustments to your chosen chart.

- That’s it. You’ve successfully created a flowchart diagram using SmartArt.

Related | How to Protect your Office Documents with a Password.
Wrapping Up: Creating Impactful Documents using Word
So, that’s a wrap for the top 3 ways to add arrow or circle text using Microsoft Word. If this quick read has helped you to create impactful documents by adding required arrows and circles, then hit the Like button and share this read among your friends to assist them as well. Stay tuned for more helpful reads.
You can also follow us for instant tech news at Google News or for tips and tricks, smartphones & gadgets reviews, join GadgetsToUse Telegram Group, or for the latest review videos subscribe GadgetsToUse Youtube Channel.
In the world of word processors, Microsoft Word is a well-known name. It is known as the best programme for making, editing, and sharing documents easily. The software is included in the productivity suite Office and the subscription service Microsoft 365. It has been used in offices and homes for decades and is preferred over free alternatives like LibreOffice or Google Docs. But… What is so great about MS Word? Microsoft Word’s many features, real-time collaboration tools, and easy-to-use interface make it possible for anyone to make documents that look professional in just a few minutes. Because of this, it’s a great choice for students, businesses, freelancers, or anyone who just likes to write. This article is about how to Insert an Arrow in Word Document.
How to put an arrow in Word is a question that users look for a lot. It is a very popular thought among users. There are many ways to insert an arrow in Word, and all of them are easy and common. It doesn’t have to be hard to type arrows in Microsoft Word. The application has given users more than one way to do this task. With arrows, you can get your message across more quickly and clearly than usual. People won’t have to type out long explanations when a simple arrow would do. Now, not everyone who knows how to use Microsoft Word knows how to do this, but trust us when we say it’s not hard.
Ways to Insert an Arrow in Word Document

How to Insert An Arrow Symbol in Word
- Click the Insert tab in the top bar of your Word file.
- Click on the icon on the right, then click on More icons.
- It will show the Symbol window. Choose Wingdings from the list of fonts.
- If you scroll down in the Wingdings symbol section, you will find different arrow symbols. Choose the one you want to use and then click the Insert button. Or, double-click the arrow symbol to add an arrow to your Word document.
How to Insert An Arrow Symbol in Word Using Code
- Click the Insert tab in the top bar of your Word file.
- Click on the icon on the right, then click on More icons.
- It will show the Symbol window. Choose Wingdings from the list of fonts.
- Find the arrow you want to use and write down its character code and whether it is a Symbol (Hex) or Symbol character (Decimal). If it’s in Hex, it’s an ASCII symbol, and if it’s in Decimal, it’s a Unicode symbol.
- Close the Symbol window and put the cursor where you want to add the arrow symbol.
- To turn the character code into the right symbol, which in this case is an arrow, you need to press the right buttons in the right order.
How to Insert An Arrow Symbol in Word Using Shapes
- Open the Word file where you want to add an arrow.
- Add the text or image to the document.
- Click “Insert” in the top menu and then “Shapes” to get to the shapes.
- In the Line section, choose the simple arrow. You can also choose an arrow with two sides or a curve. If you want a solid arrow, choose the style you want from the Block Arrows menu.
- Once you choose the arrow style you want, your mouse pointer will change to a pointer icon. Now, hold down the mouse button and draw an arrow on the picture or area of the document you want to look at. To finish the arrow, let go of the mouse button.
About MS Words
MS Word is a popular word processor and one of the best ways to make documents on the market today. It can be used to make many different kinds of documents, like reports, letters, resumes, and more. Word’s easy-to-use interface and large number of pre-made templates make it very easy to make documents that look professional in record time. Word also has a lot of editing features that were carefully made to make it easier to change any document.
The app has a grammar and spelling checker and lets you add images, tables, and other formatting elements to your documents to make them stand out. What You See Is What You Get, or WYSIWYG, editors make it easy to set up and format documents in the way you want. Because of this, it is a great choice for group projects where clear communication through documents is important.
Final Words
So, here we conclude our article on methods to Ways to Insert an Arrow in Word Document. Adding images to a Word document is sometimes necessary to show several points in a clear way. Adding arrows of different sizes, shapes, and directions that point to each point in the picture helps to bring it out even more. Words can be powerful on their own, but sometimes you need pictures or symbols to really show what you mean. Adding an arrow to your Microsoft Word document will make things clearer, whether you’re making a sign or just showing the connection between two ideas. There are several ways to do this, depending on your personal preference and the type of arrow you need. If you want to know how to Insert an Arrow in MS Words then follow the steps mentioned above.
I hope you understand this article, How to Insert an Arrow in Word Document.
James Hogan
James Hogan is a senior staff writer at Bollyinside, where he has been covering various topics, including laptops, gaming gear, keyboards, storage, and more. During that period, they evaluated hundreds of laptops and thousands of accessories and built a collection of entirely too many mechanical keyboards for their own use.

Whether you need to point to an image for emphasis or demonstrate where to click for interactivity, there is a wide range of arrow shapes that you can create and customize in Microsoft Word. Let’s take a look at how they work.
Drawing a Basic Arrow Shape
First, let’s review the steps on how to draw a basic arrow. On the “Insert” tab on the Ribbon, click the “Shapes” button. In the Lines group on the drop-down menu, click the “Line Arrow” option.

A crosshair symbol will display. Press and hold your mouse button, then drag to draw the arrow. Release the mouse button to finish drawing the arrow.
Here’s the result:
RELATED: How to Position Images and Other Objects in Microsoft Word
Resizing, Rotating and Changing the Color of Arrows
Now let’s go a step further. If you don’t change a thing, your arrow will default to the normal settings, which is black for the color and 3/4 point for the width. But what if the thin black arrow doesn’t suit your fancy? Maybe you need a thick, shorter blue arrow. No problem. You can make changes to it in a snap.
Resizing an Arrow
To change the length of your arrow, one way you can quickly accomplish this is with your mouse. Hover over the arrow tip until you see the double-arrow symbol.
Click and then drag your mouse to make the arrow shorter or longer or point it in a new direction. If you only want to shorten or lengthen the arrow without risking reorienting it, hold Shift down while you click and drag it.
To make even more changes to your arrow, you can:
- Use the options in the Format tab in the Ribbon
- Click “Advanced Tools” (the small diagonal arrow on the bottom right of the Shape Styles group) in the Ribbon
- Right click on the arrow to open the Format Autoshape/Picture dialog box to see even more options
Changing the Color of an Arrow
To change the arrow color, click the “Shape Outline” button on the “Format” tab and then click the color of your choice.
Changing the Thickness of an Arrow
To change the thickness of the arrow, click the “Shape Outline” button, point to the “Weight” menu, and then click on the thickness you want.
Rotating an Arrow
To rotate the arrow, click the “Rotate” button on the Format tab and choose a rotation option. Hovering over each option lets you preview how your arrow will look.
For even more rotation options, click the “More Rotation Options” command. On the “Size” tab of the Layout window that opens, you can specify an exact rotation in degrees.
Using Block, Curved, and Connector Arrows
If a straight arrow doesn’t cut it, there are other arrow types available, including block, curved, and connector arrows. Let’s take a look.
How to Create a Block Arrow
On the “Insert” tab of the Ribbon, click the “Shapes” button. In the “Block Arrows” section of the drop-down menu, click arrow style you want. In this example, we’re using an upward block arrow.
Your pointer turns into a crosshair symbol. Click and drag to draw the arrow. Release the mouse button to finish.
You can use the same formatting tools we talked about in the previous section to change the color, outline, and so on. Also, you can any of the eight white handles to resize the overall arrow. Grab the yellow handles to reshape the arrows head and shaft separately.
How to Create a Curved Arrow
On the “Insert” tab of the Ribbon, click the “Shapes” button. In the “Lines” section, click one of the curved arrow shapes. You’ll find one with a single arrowhead, one with two heads, and a simple curved line with no arrowheads.
Your pointer turns into a crosshair symbol. Click and drag to draw the arrow. Release the mouse button to finish.
After drawing the curved arrow, you can change the curve by dragging the yellow handle in the center of the arrow. Here, we’ve dragged it out to the right to make a more sweeping curve.
For even more curved arrow options, check the curved arrows in the Block Arrows section.
And just like with any other shape, you can use the standard formatting tools to change the color, outline, and so on.
How to Create a Straight Connector Arrow
Finally, there’s the connector arrow. These are great for connecting the kinds of shapes you’d use in flowcharts or organizational diagrams.
On the “Insert” tab of the Ribbon, click the “Shapes” button. In the “Lines” section of the drop-down menu, choose one of the connector arrows. Just like with curved arrows, you’re just choosing how many arrowheads you want.
Your pointer turns into a crosshair symbol. Click and drag to draw the arrow. Release the mouse button to finish.
After drawing the connector arrow, you can grab the yellow handle to change the shape of the arrow. Use the white handles at either end to change the length of that portion of the arrow.
And there you have it. It’s probably more than you wanted to know about using arrows in Microsoft Word, but it’s always good to know what’s available.
READ NEXT
- › How to Circle Text in Microsoft Word
- › How to Group and Ungroup Shapes and Objects in Microsoft Word
- › How to Use the Ink Features in Microsoft Office
- › How to Insert a Line in Microsoft Word
- › BLUETTI Slashed Hundreds off Its Best Power Stations for Easter Sale
- › HoloLens Now Has Windows 11 and Incredible 3D Ink Features
- › Google Chrome Is Getting Faster
- › The New NVIDIA GeForce RTX 4070 Is Like an RTX 3080 for $599