
Updated: 03/13/2021 by

Using the AutoFormat feature in Microsoft Word, you can create both an Em dash (—) and En dash (–) automatically by typing hyphens. Alternatively, you can insert these special characters using the Insert Symbol menu. You can also copy and paste the dashes from another document, such as a web page, to your Word document.
Insert an Em dash using AutoFormat

If you do the following, AutoFormat inserts an Em dash (—) as you type.
In a Word document:
- Type a word, with no space after it.
- Type two hyphens, with no space between or after them.
- Type another word.
- Type a space.
For example, typing:
Something—Something(space)
Automatically formats the line as:
Something—Something
When you press spacebar after typing the example text above.
Insert an En dash using AutoFormat

If you do the following, AutoFormat inserts an En dash (–) as you type.
In a Word document:
- Type a word, with a space after it.
- Type a single hyphen, with a space after it.
- Type another word.
- Type a space.
For example, typing:
1993(space)—(space)1995(space)
Automatically formats the line to:
1993 – 1995
When you press spacebar after typing the example text above.
Insert an Em or En dash using shortcut keys
To create an Em dash, use the shortcut key combination Ctrl+Alt+-.
To create an En dash, use the shortcut key combination Ctrl+-.
You can also insert a special dash using the Insert Symbol menu:
- In a Microsoft Word document, choose Insert in the Menu bar.
- Choose Symbol.
- Choose More Symbols.
- Click the characters you’d like to insert. The Em dash should be on the second row. To insert multiple characters, click them one at a time.
- When you’re finished, click Close to close the special characters window.

Note
If the En dash is not offered in your Symbol menu, you can still use another method to insert it.
Insert an Em or En dash using copy and paste
If all else fails, copy and paste the dash from another document, such as this page.
- Highlight the dash you want to insert:
Em dash: —
En dash: –
- Copy it. (Press Ctrl+C, or Command+C on a Mac)
- In your Word document, place the text cursor where you’d like the dash to go, and paste it. (Press Ctrl+V, or Command+V on a Mac)
Remove an Em or En dash
If your Word document has an Em dash or En dash and you want to remove it, do one of the following.
- Highlight the Em dash or En dash using your mouse, then press Del key.
- Place the text cursor after the Em dash or En dash, then press Backspace.
If you want to replace the Em dash or En dash with a normal hyphen, type the hyphen after removing the Em or En dash.
1. Inserting an em or en dash using Insert Symbol
- Click where you want to insert the em dash or en dash.
- Click the Insert tab in the Ribbon.
- In the Symbols group, click Symbol. A drop-down menu appears.
- Click More Symbols.
- Click the Special Characters tab.
- Click Em Dash or En Dash.
- Click Insert.
- Click Close.
Contents
- 1 How do you type a long dash?
- 2 How do you type a dash character?
- 3 How do I type an em dash in Windows 10?
- 4 How do you type an en dash in Google Docs?
- 5 How do you type a dash or a hyphen?
- 6 How do you type a dash and a hyphen?
- 7 How do you type an upper dash?
- 8 How do you use em dash in a sentence?
- 9 How do you use an em dash example?
- 10 How do you use dashes in writing?
- 11 Where is the hyphen key?
- 12 How do you type an em dash on a Chromebook?
- 13 What is dash used for in punctuation?
- 14 Can you use dashes instead of commas?
- 15 How do you use dashes in dialogue?
How do you type a long dash?
For an em-dash, hold down the Alt key and type 0151, then release the Alt key. That’s it! For an en-dash, hold down the Alt key and type 0150, then release the Alt key.
How do you type a dash character?
Hold down the Alt key, press 0 1 5 0 on the numeric pad, and then release the Alt key. The en dash will appear in the text field where your cursor is.
How do I type an em dash in Windows 10?
How to type an em dash on Windows
- Hold the Alt key.
- Now type “0151” on the num pad.
- A clunkier method, but one that works with any keyboard, is to use the Windows 10 emoji keyboard.
- Click the right-most tab with the omega (Ω) symbol on it.
- Scroll down until you find the em dash symbol (—).
How do you type an en dash in Google Docs?
To create an em dash, press the option and minus key. To create an en dash, press Shift, Option, and the minus key.
How do you type a dash or a hyphen?
To begin, a hyphen (-) is shorter than a dash (–). Hyphens join words together and dashes indicate range. But that’s just the beginning. If you really want to keep these lines straight, read on.
How do you type a dash and a hyphen?
For desktop PC: press “alt+ctrl+minus” on the numeric keypad (the number section on the far right of your keyboard). The trick will not work if you press the hyphen-key on the typewriter section of the keyboard.
How do you type an upper dash?
less simple: you need to use an alt code to get an em dash. If you have a numeric keyboard, hold down the Alt key and type 0151 for an em dash or 0150 for an en dash.
How do you use em dash in a sentence?
The em dash can be used in place of a colon when you want to emphasize the conclusion of your sentence. The dash is less formal than the colon. After months of deliberation, the jurors reached a unanimous verdict—guilty. The white sand, the warm water, the sparkling sun—this is what brought them to Fiji.
How do you use an em dash example?
- Use em dashes in place of commas or parentheses to create a break in a sentence. Examples: Please call my lawyer—Richard Smith—on Tuesday.
- Use an em dash like a colon or semicolon to create emphasis. A) In place of a colon:
- Use an em dash to show a sudden change of thought. Examples:
How do you use dashes in writing?
Use dashes to set off an idea or an appositive within a sentence. A dash (—) is a punctuation mark used to set off an idea within a sentence and may be used alone or in pairs. Dashes interrupt a thought in a more dramatic way than a phrase enclosed in commas, but less theatrically than parentheses.
Where is the hyphen key?
Alternatively known as a dash, subtract, negative, or minus sign, the hyphen ( – ) is a punctuation mark on the underscore key next to the “0” key on US keyboards.
How do you type an em dash on a Chromebook?
In the menu at the top, click Insert then Special Characters. In the next window, set options on left to Punctuation and on right to Dash/Connector. Select em dash and close the window. The em dash is inserted.
What is dash used for in punctuation?
Grammarly. A dash is a little horizontal line that floats in the middle of a line of text (not at the bottom: that’s an underscore). It’s longer than a hyphen and is commonly used to indicate a range or a pause. Dashes are used to separate groups of words, not to separate parts of words like a hyphen does.
Can you use dashes instead of commas?
Use Dashes in Place of a Comma
Em dashes can be used in pairs to replace commas when writing a parenthetical or interruptive phrase. The dashes have a slightly more emphatic feel, making the reader focus on this information that is set inside the special marks.
How do you use dashes in dialogue?
The main things to remember are: Use an em dash if the speaker stops mid-word, in the same way as you’d use a hyphen. Put it inside the closing quotation marks. Use an em dash if the speaker’s able to complete a word, but someone or something stops them before they finish their thought.
Insert an Em or En Dash in Microsoft Word using the Ribbon or Keyboard Shortcuts
by Avantix Learning Team | Updated March 3, 2023
Applies to: Microsoft® Word® 2010, 2013, 2016, 2019, 2021 or 365 (Windows)
You can insert an em dash or en dash in a Microsoft Word document using the Insert Symbol command or by using keyboard shortcuts. An em dash is a long dash which is the width of the letter m. An en dash is the width of the letter n.
The dashes appear as follows:
- Em dash (—)
- En dash (–)
- Dash or hyphen (-)
Recommended article: How to Keep Text Together in Microsoft Word
1. Insert an em or en dash using Insert Symbol
You can use the Insert Symbol command to insert special characters in Word documents.
To insert an em or en dash using Insert Symbol:
- Click where you want to insert the em dash or en dash.
- Click the Insert tab in the Ribbon.
- In the Symbols group, click Symbol. A drop-down menu appears.
- Click More Symbols. A dialog box appears. In Word, there are two tabs at the top of the dialog box.
- Click the Special Characters tab.
- Click Em Dash or En Dash.
- Click Insert.
- Click Close.
Below is the Insert Symbol dialog box in Word:

2. Insert an em or en dash using Ctrl and keyboard shortcuts
To insert an em dash, click where you want to insert the em dash and then press Ctrl + Alt + – (minus sign on the numeric keypad).
To insert an en dash, click where you want to insert the en dash and then press Ctrl + – (minus sign on the numeric keypad).
If this doesn’t work, press NumLock on the numeric keypad.
3. Insert an em or en dash using AutoFormat as you type
There are built-in options that are turned on by default in AutoCorrect in the AutoFormat as you type settings.
To insert an em dash using AutoFormat as you type:
- Type a word with no space after it.
- Type two dashes or hyphens with no space between or after them.
- Type another word.
- Press the Spacebar.
To insert an en dash using AutoFormat as you type:
- Type a word.
- Press the Spacebar.
- Type a single dash or hyphen.
- Press the spacebar.
- Type another word.
- Press the Spacebar.
4. Insert an em or en dash using Alt and keyboard shortcuts
You can also use the Alt key in combination with a sequence of numbers of insert an em dash or en dash.
To insert an em dash, click where you want to insert the em dash and then press and hold Alt and then type 8212 on the numeric keypad.
To insert an en dash, click where you want to insert the en dash and then press and hold Alt and then type 8211 on the numeric keypad.
If this doesn’t work, press NumLock on the numeric keypad.
The Alt keyboard shortcuts will work in multiple programs but the other shortcuts will work only in Microsoft Word.
This article was first published on July 22, 2020 and has been updated for clarity and content.
Subscribe to get more articles like this one
Did you find this article helpful? If you would like to receive new articles, JOIN our email list.
More resources
How to Double Space in Word (4 Ways)
How to Create a Table of Contents in Word
How to Add Page Numbers in Word (Step-by-Step)
How to View Word Count in Microsoft Word (4 Ways)
How to Reduce the Size of Large Word Documents (10 Ways to Compress Word Files)
Related courses
Microsoft Word: Intermediate / Advanced
Microsoft Excel: Intermediate / Advanced
Microsoft PowerPoint: Intermediate / Advanced
Microsoft Access: Introduction
VIEW MORE COURSES >
Our instructor-led courses are delivered in virtual classroom format or at our downtown Toronto location at 18 King Street East, Suite 1400, Toronto, Ontario, Canada (some in-person classroom courses may also be delivered at an alternate downtown Toronto location). Contact us at info@avantixlearning.ca if you’d like to arrange custom instructor-led virtual classroom or onsite training on a date that’s convenient for you.
Copyright 2023 Avantix® Learning
Microsoft, the Microsoft logo, Microsoft Office and related Microsoft applications and logos are registered trademarks of Microsoft Corporation in Canada, US and other countries. All other trademarks are the property of the registered owners.
Avantix Learning |18 King Street East, Suite 1400, Toronto, Ontario, Canada M5C 1C4 | Contact us at info@avantixlearning.ca
If a novice user wonders how to put a dash in Word, he will immediately demonstrate his “excellent” knowledge of the keyboard and put a symbol into the sentence by pressing the button located one from Backspace. Unfortunately, such a «dash» is suitable only for informal correspondence.
If this is an official document, it can simply be rejected. The problem is that the «minus», «dash», «hyphen» looks very similar, but despite this they carry a completely different semantic meaning. Using the wrong spelling of characters, the whole meaning of the written can be distorted. It is for this reason that many are trying to figure out how to put a long dash in Word.

Insert character
Word is an office application with unlimited possibilities, which the user himself may not even suspect until such an urgent need arises in this knowledge.
In the Word, it is possible to put both a hyphen and three types of dashes: long, medium and electronic. To do this, you should only familiarize yourself with these possibilities, learn how to make a long dash in Word.
Using special characters
When typing information there is a need to display a character that is not on the keyboard, the user resorts to using the special functionality of Word.
To do this, in the main menu «Insert» go to the line «Symbol», then a dialog box with the same name, containing two tabs, opens. The first tab is automatically open, and in order to understand how to put a dash in Word, you should go to the second tab “Special Characters”.
Among the listed special characters, it is sufficient to simply find a long and a short dash. Having selected the one that the user needs right now, they hover over it by clicking on it, highlight it in blue, and then click Paste at the bottom of the dialog box.

This option is good if the user only occasionally needs to put a dash in the Word document. Those who print official documents should explore alternatives for how to make a dash in Word to speed up the process.
Process automation
So that the process of printing the desired character does not take much time, in Word there are options to automate the process, as a result of which the execution of such a task will be easy and instant.
Use codes
The developers of the Word office application, in principle, were worried about the automatic replacement of the character that was installed instead of the punctuation mark when creating the document. If Word detects two words with spaces between them and a minus is set, it automatically replaces it with the correct character.
If, for any reason, such an auto-replacement has not been implemented, the user can replace the symbol himself using a special code. In particular, it is enough to dial the number 2014, and then immediately hold down simultaneously the two buttons «Alt» and «X», as the application instantly fixes everything, a long dash appears in the document.
This method works only in Word, but there is an alternative way to enter the code, the effect of which extends not only to the office application, but thanks to it manages to put a long dash in any other text editor, including Notepad and html-editor.
Just hold down the “Alt” button, then enter 0151, and then release “Alt”, as the desired punctuation mark is displayed in the editor. Everything is incredibly simple, to put such a punctuation mark is quite simple, and the actions do not take much time.
You can also put a dash by holding just three buttons on the keyboard, but this will require that the keyboard be full and have a “digital” component on the right. In this case, at the same time are clamped in order to put:
- middle dash — «Ctrl» and minus;
- large — Сtrl, Alt and minus.
If the user is difficult to remember all the codes listed, he would prefer that the shortcut would be different, the office application provides him with a unique opportunity. You just need to use the following hint.
To do this, you have to re-open the insert symbol dialog box. After selecting the desired symbol in blue, you should press the «Keyboard shortcut» button located at the bottom of the window. Next, a form will appear in which you will be asked to establish a combination that the user himself wishes. Now, if it becomes necessary to put a dash in the text, it will be enough to apply the combination that the user entered.
So, putting a dash is not difficult, having thoroughly mastered one of the listed methods. Having learned how to correctly place punctuation marks in accordance with punctuation norms, all documents can be successfully tested, they will be accepted, and the creator of such a competent document will expect an increase in success and considerable respect from others.

При работе с документами нам часто приходится поставить тире, ведь дефис выглядит совсем по-другому, и это может навредить общему виду. Важно знать, что тире бывает длинным, средним и коротким, и в этой статье мы разберём, как же добавлять в текст самый длинный вариант этого знака препинания.
Способ 1: Использование нампада
Данный способ подходит для использования в любых текстовых редакторах, будь то Word или OpenOffice. Для этого нам понадобится цифровая клавиатура, которая находится справа.
Смотрите также: Установка тире в Microsoft Excel
- Поставьте курсор там, где вы хотите поставить тире.
- Нажмите «NumLock», чтобы цифровой блок включился.
- Зажмите клавишу «Alt», затем наберите на нампаде «0151». Отпустив «Alt», вы увидите, что там, где был установлен курсор, появился нужный символ.


Есть ещё один вариант использования нампада.

Способ 2: Автозамена в определённых предложениях
Ворд может автоматически исправить дефис на тире, если юзер пишет предложение, содержащее слово «это». Например: «Слон – это животное». Автозамена работает лишь тогда, когда перед и после дефиса стоят пробелы. Поэтому в таких словах как «куда-либо» останется дефис, и ничего не поменяется.

Способ 3: Применение шестнадцатеричных кодов
Если цифровой клавиатуры нет (например, она может отсутствовать в небольших ноутбуках), а автозамена не сработала, то используйте шестнадцатеричные коды.
- Поставьте курсор туда, где хотите видеть тире.
- Набрав на клавиатуре «2014», нажмите комбинацию клавиш «Alt + X».
- 2014 сменится на длинное тире, а 2013 на среднее.


Способ 4: Вставка символа
В данном случае мы воспользуемся вставкой символа через специальное окно.
- Заходим во вкладку «Вставка» – «Символы» – «Другие символы».
- В появившемся окне перейдите в «Специальные знаки» и найдите необходимое тире из списка.
- Не переходя во вкладку «Специальные знаки», также можно вставить тире. В строке «Шрифт» выберите «Обычный текст», а в графе «Набор» – «Знаки пунктуации».

- Обратите внимание — внизу окна можно найти сочетания клавиш, что мы уже разбирали в предыдущем способе. Нажмите «Вставить». При этом окно не закроется, можно менять положение курсора в документе и вставлять другие символы, что очень удобно.


Настройка автозамены
- Зайдите во вкладку «Вставка» – «Символы» – «Другие символы» – «Автозамена…».
- По умолчанию уже стоит изменение какого-либо слова, сочетания букв, цифр на длинное тире. Введите, например, число 6700 и нажмите «Добавить». При его написании в работе, оно автоматически будет меняться на тире.


Итак, мы рассмотрели несколько способов постановки тире в Ворде, а также узнали, как настроить параметры автозамены. Теперь работать с документами станет проще, ведь вы знаете, как ставить длинное тире в любом текстовом редакторе.
![]()
Download Article
A user-friendly guide to typing a dotted line in Microsoft Word on your computer or mobile device
![]()
Download Article
- Using Keyboard Shortcuts
- Using the Insert Tool on Desktop
- Using the Insert Tool on Mobile
|
|
Do you want to add a dotted or dashed line to your Microsoft Word document? You can use an easy keyboard shortcut to add a dotted line across the page, or you can use Word’s «Insert» function to manually draw a line. After inserting the line, you’ll be able to change its size, thickness, color, and more. This wikiHow will show you how to insert a dotted line into your Microsoft Word document using your computer, iPhone, or Android device.
Things You Should Know
- Type three asterisks (*) where you want your dotted line, then press «Enter».
- Click «Insert» → «Shapes» → select a line. Click «Shape Outline» → «Dashes».
- On mobile, click «Home» → «Insert» → «Shape» → select a line. Tap «Shape Style» and select dotted.
-

1
-
2
Place your cursor where you want your line to appear. You’ll need to be on a blank line, as this won’t work if there is text before or after your cursor on the same line.
- You’ll be creating a horizontal line that spans from one edge of your page to the other. The line will stop at your set margins.
- If you want to make the line span the whole page, you’ll need to change your document margins.
Advertisement
-
3
Type three asterisks (*) in a row. Hold down Shift and press 8 on the number row at the top of your keyboard to create an asterisk.
-
4
Press ↵ Enter to convert the dashes into a line. AutoCorrect will automatically create a dotted line.
- If you don’t have AutoCorrect enabled, do so by clicking File → Options → Proofing → AutoCorrect Options…. This will open a new window.
- Make sure the Border Lines box is checked. This can be found underneath Apply as you type.
- If you want to turn off AutoCorrect, uncheck the boxes.
- If you don’t have AutoCorrect enabled, do so by clicking File → Options → Proofing → AutoCorrect Options…. This will open a new window.
-
5
Use different characters for different line styles (optional). You can create different lines by using characters other than the dash.
- Thin line: Three hyphens (-).
- Thick line: Three underscores (_).
- Double line: Three equal signs (=).
- Triple line: Three pound signs (#).
- Squiggly line: Three tildes (~).


Advertisement
-
1
Open a project in Microsoft Word. This looks like a W on top of a blue square. Microsoft Word is available to install for Windows and Mac.[1]
- You must have a subscription to use Office 365.
-
2
Click the Insert tab. This tab is in the blue ribbon at the top of the Word window, between Home and Draw.
-
3
Click Shapes. It’s in the Insert toolbar, next to the icon of an overlapping circle and square.
- A drop-down menu will appear.
-
4
Select a line shape. In the «Lines» heading, click one of the line templates. You can choose a line, line arrow, double line arrow, and more. These lines can be adjusted to be dotted later.
-
5
Draw your line. Click and drag across the document to create your line.
- If you need to adjust the line’s length and orientation, click the left or right circle. Drag it left or right to adjust the length, or drag it up and down to adjust the orientation.
- To move the line, double-click and drag it to the desired position.
-
6
Double-click the line. You’ll be taken to the Shape Format tab.
-
7
Click Shape Outline. This will be in the Shape Styles section.
- A drop-down menu will open.
-
8
Click Dashes. The menu will expand.
-
9
Select a dash style. You can choose from the available presets or click More Lines to customize your own in the Format Shape panel.
- In the Format Shape panel, you can adjust the color, transparency, width, and more.


Advertisement
-
1
Open a document in the Microsoft Word app. This looks like a blue notebook next to a W.
- Microsoft Word is available for iOS in the App Store and for Android in the Google Play Store.
- Tap Blank document to open a new document or tap a file to open an existing document.
-
2
Tap the «Edit» icon at the top. It’s on the blue toolbar at the top. This will open the editing menu in the bottom half of your screen.
- On iPhone/iPad, this button looks like a white «A» and a pencil icon on the blue toolbar.
- On Android, you may find the same icon or just a white pencil.
-
3
Tap the Home button. It’s in the upper-left corner of the toolbar menu at the bottom. This will open your toolbar tabs.
-
4
Select Insert on the toolbar menu. This will open the available options.
-
5
Select Shape. This will open a menu with all the available shapes you can add.
-
6
Select the type of line you want to add. This will add the selected line to your document.
- You can add dots to your line later.
-
7
Drag the blue end-points of the line to adjust the line (optional). Adjust the size and position of your line from the blue dots on both ends of the shape.
- You can also do this after adding dots to your line.
-
8
Tap Shape Style on the Shape menu. This will open all the available styles for your line.
-
9
Select a dotted style. This will turn the selected line into a dotted line. You can size and position it however you want.


Advertisement
Ask a Question
200 characters left
Include your email address to get a message when this question is answered.
Submit
Advertisement
Thanks for submitting a tip for review!
About This Article
Article SummaryX
1. Open a document.
2. Type «***» where you want the line.
3. Press Enter or Return on your keyboard.
Did this summary help you?
Thanks to all authors for creating a page that has been read 179,265 times.
Is this article up to date?
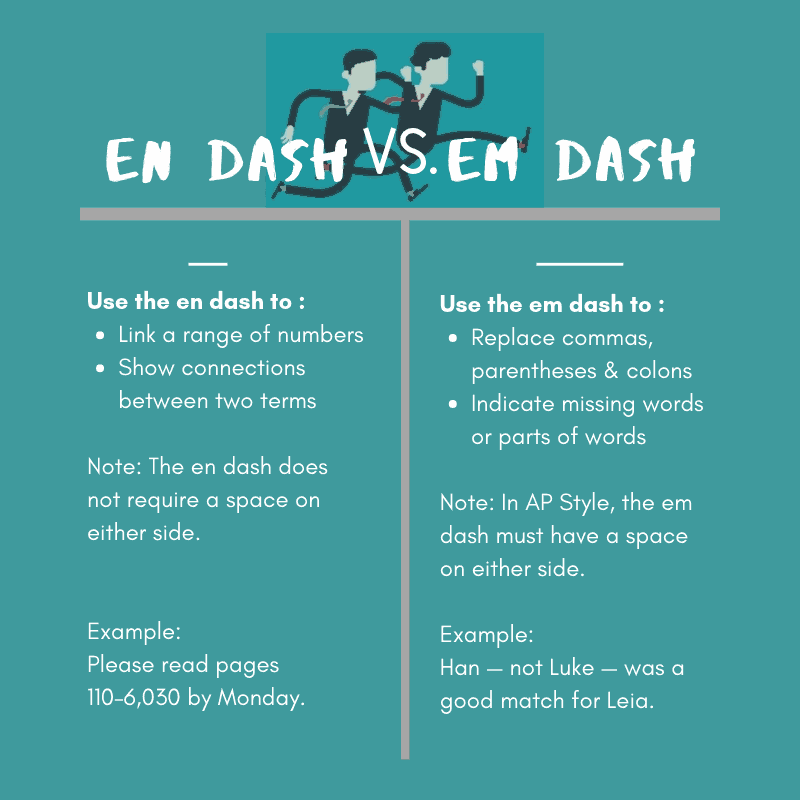
There are two types of dashes in Word documents: the en dash (–) and the em dash
(—). The em dash (—) is typically about as wide as a capital M. The
en dash (–) is about as wide as a capital N. There are different rules and
standards for how and when dashes may or may not have spaces around them.
En and em dashes are often mistakenly entered with two or three hyphens in a row (— or
—). We strongly recommend avoiding using hyphens in Word; see below how to insert them
to create your perfect document.
Using an em dash
The em dash marks a break between parts of a sentence. Usually, it is used when a comma is too
weak, but a colon, semicolon, or parentheses pair is too strong. The em dash puts a nice pause in the
text—and it is underused in professional writing.
For example: In North American usage—and also in old British usage—an em dash is never
surrounded by spaces.
To insert the em dash into a document Word, use one of the following ways:
- On the Insert tab, in the Symbols group, select the Symbol button, and then click More Symbols…:

In the Symbol dialog box, on the Special Characters tab, choose the Em Dash:

After choosing the symbol, press the Insert button and close the Symbol dialog box.
- Press Alt+Ctrl+Num-
- Type 2014 and press Alt+X: —

Using an en dash
The en dash has two uses:
- It indicates a range of values. For example, 2015–2020, pp. 33–37, Rooms A–C.
- It denotes a connection or contrast between pairs of words — for example, New York–London flight, high–priority, Dragon Age: Origins – Awakening.
To insert the en dash into a document Word, do one of the following:
- On the Insert tab, in the Symbols group, select the Symbol button, and then click More Symbols…:

In the Symbol dialog box, on the Special Characters tab, choose the En Dash:
After choosing the symbol, press the Insert button and close the Symbol dialog box.
- Press Ctrl+Num-
- Type 2013 and press Alt+X: –

Note: Word has one option, using which two hyphens — can be changed automatically to an en dash. You can turn it in or off:
1. On the File tab, click the Options button:

2. In the Word Options dialog box, on the
Proofing tab, click the AutoCorrect Options… button:

3. In the AutoCorrect dialog box, on the AutoFormat As You Type tab, in the Replace as you type group, check or uncheck Hyphens (—) with dash (—) to turn on or off this option:

What is the difference between an En Dash and am Em Dash?
An en dash is the shorter dash – this is the one Microsoft word will often autoformat for you when you place a dash between two words without a space. The smaller en dash is the default symbol for most of us.
An em dash is the longer dash — this guy can be created a few ways, you can insert an em dash as a symbol or Microsoft does offer an autocorrect option for the em dash as well, it’s just not quite as obvious.
In this article, we will show you how to insert an em dash using the autocorrect option as well as how to insert an em dash manually, just in case you version on Microsoft Word doesn’t have that autocorrect function just yet.
Inserting an Em Dash using Autocorrect
- Open Word
- Place your cursor where you would like to insert the em dash
- Type two — hyphens in a row
- Press Spacebar
- This will automatically change your two hyphens into an em dash
Example
![]()
Then press spacebar after the last word and it will turn into this:
![]()
Inserting an Em Dash using Symbols
- Open Word
- Place your cursor where you would like to insert the em dash
- Press Insert
- Press Advanced Symbol
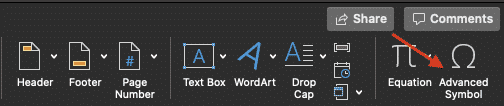
- Find and click the em dash symbol
- Press Insert
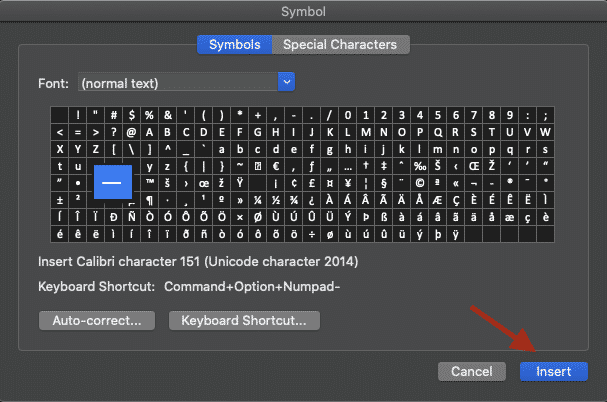
You have now successfully inserted an em dash using symbols.
To save time, you can simply copy and past the em dash symbol each time you would like to re-use it rather than re-inserting a symbol each time.
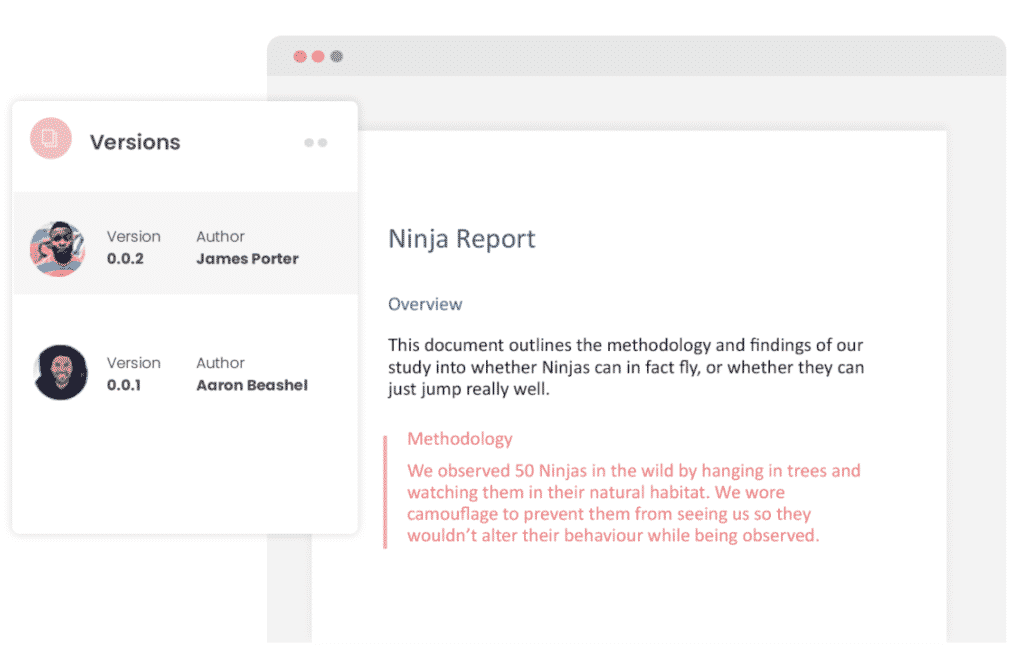
Searching for a better way to collaborate and track changes in Microsoft Word?
When collaborating in Microsoft Word, tracking your changes is a must.
Without tracked changes, there is no way for future readers to know what changes were made where and who made them. This is why Microsoft added the ‘Tracked Changes’ feature to Word, which is great when you remember to turn it on…
We’re not sure why we always seem to forget, but we do and we’re pretty sure you may as well. So you go ahead and start making a few minor changes to the document without noticing that tracked changes aren’t on until your halfway through your 18-page document and bugger…now you have to re-read the first 9 pages that you’ve already reviewed and try to remember what you changed.

Some of your changes will be easy to find, it’s the small or ones related to punctuation that are more challenging.
The other issue with Microsoft’s tracked changes is also related to an author not turning them on, but this time maybe not by mistake. An author can quickly jump into your document and make a minor edit without you knowing, because Word will only track the changes you ask it to you may end up progressing on with the document oblivious to the sneaky little change made by your colleague 3 versions ago.
There are so many things that could go wrong because of this if someone changes a legal document or draft contract agreement and you don’t notice, that could have huge ramifications down the line. So, it’s not only your time that is being lost when you honestly forget to turn tracked changes on, but it also becomes a huge risk to your company if you can’t control every edit made, or at least know its there.

To save us all from ourselves and our sometimes sneaky colleagues, you can employ the help of a collaboration tool such as Simul Docs.
Simul was built for Word, with collaboration in mind.
It knows that when you open a document and start making changes you probably want them tracked, so Simul tracks changes automatically. Because of the automatic tracked changes feature, it is impossible for any changes to be made in your document without you knowing about it.
Each change made will have an except of decline button sitting next to it, similar to what you see in Microsoft Words track changes feature. You can quickly review any changes made in that version and accept any you like and decline any that aren’t quite right.

On top of that, your colleagues can also leave comments or notes within the document to give you additional information such as ‘once Jane has reviewed this and added her changes I will take another look’. This comments feature can also be used in Simul to start an in the document conversation thread, allowing you to type short messages between you collaborating team members about the document (or after-work drinks, there are no limits here) while keeping everything in the same place. Living in the document, as they should.
Once you have finished collaborating and you are ready to save and send your document, Simul has all of the features you need to share via whichever tool or source you prefer.
Save your document as a word file or PDF, thats easy.
Share it via a direct link, email or a cloud system such as GoogleDrive, OneDrive, Dropbox and more.

If you share the document in word formate with someone outside of your organisation, they too can edit and make changes using Simul so you can continue collaborating without worrying about moving the document in and out of the software.
With Simul offering so many cool features that truly make collaborating easy, we wouldn’t be surprised if you share it with someone outside of your organisation and they quickly become Simul Docs converts too.
Easy collaboration is addictive. Once you’ve tried it you’ll never go back.

Content
- What are the dash, hyphen and minus signs
- Hyphen and Dash Cases
- How to insert a dash
- How to type a character on the keyboard
- Adding a dash via the insert tab
- Insert dash and hyphen by character code
- With a keyboard shortcut
- Dash special code
- Setting up automatic replacement
When working with text, it is important to follow the rules for placing punctuation marks. One of the widespread signs used by each author to express numerous intonations is the dash. If you often work with texts on a computer, you may have noticed that the keyboard has a button in the number row, which is responsible for simultaneously setting the hyphen «-» and the underscore «_», the minus key «-«, which has a place in the number block , while the one that would allow the direct use of the dash is absent at all. Few people think about this, because when typing in Microsoft Word, you can get a character using a hyphen. That is, when the hyphen is surrounded by spaces, it will automatically turn into a dash of medium length. This usually suits the user, since punctuation is respected without the need to manually enter a character, although in fact in most cases it is an em dash that should be used.

If strict requirements are imposed on the content, you should treat the case more responsibly. Although in Russian the punctuation requirements do not establish its length, due to the advancement of computer publishing systems, both em and en dashes began to be used.
What are the dash, hyphen and minus signs
The difference between a hyphen and a dash is obvious, each of the elements has its own purpose and from the point of view of grammar they are fundamentally different, so with a high-quality typing in Word, these signs should be distinguished. To write symbols in the editor, different actions are performed, and these signs can be distinguished not only by context, but also visually:
— em dash.
— middle dash (also called short).
— minus.
— hyphen.
Even though the middle dash looks like a minus, it is not. As a mathematical symbol, minus is useful in arithmetic calculations and can indicate negative numbers. When used, it is flush with the horizontal line of the «+ -» sign.

Hyphen and Dash Cases
The spelling hyphen is used, for example:
- In compound nouns formed from two words (major general, dynamo, southeast).
- In adjectives (bright orange, physico-chemical).
- In words containing numbers at the root (50th anniversary, 7th).
- To wrap words to the next line.
- For the purpose of designation of abbreviations (rn, madam).
- In some dialects (in my opinion, first of all, somewhere, after all).
- In pronouns (someone, someone, someone), verbs (bring-ka, go-ka).
As a rule, the hyphen is not separated by spaces on either side, unless in two-part words both refer to the first (“audio and video file”, “micro and macro elements”).

Dash is one of the punctuation marks. Its functions, unlike the hyphen, are more diverse and are not limited to the framework of the school course, since the element serves to manifest various shades of intonation and can be applied in accordance with the author’s tasks. There are many examples of its use.The “-” sign separates speech words and is framed on both sides by spaces when typing. It is applicable in direct speech, between the subject and the predicate in sentences with a compound nominal predicate, to replace a member of a sentence, as well as to separate the main part of a complex sentence from a subordinate clause. The «-» can also be located in other scenarios of complex syntactic constructions assumed by the context.
In Word, the difference between a hyphen and a dash is in character length and spelling variations. Moreover, in editors, even a dash may differ in length:
- Medium (or short) — «n dash», corresponding in width to «N». This sign will be placed between numbers, not separated by spaces, and indicates the range (5-10), usually used in Western typography.
- Long — «m dash», corresponding in width to «M». This symbol is thus a genuine typographical dash.
There is also a digital one called figure dash. Its length is the same as that of the middle version and a sign is used to separate the numbers (do not take a minus for it).
How to insert a dash
Now let’s figure out how to put a dash of a certain length in Word, having done it correctly using the keyboard and editor tools. There are several methods implemented in the program.
How to type a character on the keyboard
Each user knows where the hyphen is on the keyboard. The key is located in the number row after «0», with its help, in combination with Shift, you can also put an underscore. The same button allows the editor to automatically make a dash out of a hyphen if you surround it with spaces and write a word, also applying a space after it. It is this character that is called the middle or en dash, and it is supposed to be inserted between the numbers. To write a full-fledged punctuation mark, other methods are needed.
Adding a dash via the insert tab
In Word there is an option that allows you to put an em dash, short or use other characters, for which the program should do the following:
Insert dash and hyphen by character code
Each of the characters in Word is assigned a specific code, by applying which you can insert a line of the required length. In this case, you will need to additionally use the Alt + X hotkeys. Let’s take a closer look at how to apply codes in MS Word.
How to put an em dash:
- Place the cursor at the desired position.
- In the digital block, type the number 2014 and press Alt + X.
- Instead of a number, you get the corresponding “-” sign.
How to make a middle (short) dash:
- We set the pointer to the right place.
- Type 2013 and use Alt + X to turn the number into an en dash «-«.

How to hyphen:
- We set the pointer to the place for setting the symbol.
- The hyphen corresponds to the code 2010, we type it and use Alt + X, after which we get «-«.
With a keyboard shortcut
To perform a task, a key combination can also be used, provided that the digital block is activated by the «Num Lock» button.
You can insert an em dash in Word («-«) by holding Ctrl + Alt and simultaneously pressing «-» (minus) on the numeric keypad.
If you need to get a short («-«), hold Ctrl and press «-«.

Dash special code
The universal method for placing an em dash in Word and other editors involves the following actions:
- We place the cursor in the right place.
- Hold Alt and type 0151.
- The result of the manipulations will be the «-» sign.
Setting up automatic replacement
With large volumes of work with texts, it is advisable to set up autocorrect. Then when a set of certain elements specified in the parameters, after entering them, we will receive the selected character. To do this, follow these steps:
After these manipulations, when you type three hyphens in a row, a dash will automatically appear instead.
Now you know what possibilities for using symbols Microsoft Word offers and, despite the absence of a separate button on the keyboard, you can easily put the necessary punctuation marks in any convenient way.
Если вы часто работаете в Ворде, вам рано или поздно потребуется создать горизонтальную линию над текстом или под ним. Это очень удобно, когда требуется сделать шаблон для определенного документа.
Способов сделать в Ворде много, но мы рассмотрим самые простые пути решения этой задачи.
Горизонтальные линии в Word 2003
Для начала устанавливаем курсор в необходимое место. Заходим в меню «Формат» и выбираем там пункт «Границы и заливка». Выбираем себе необходимую линию в меню «Тип» и нажимаем «Ок». Теперь же выбранная нами линия будет принадлежать всему абзацу. Если же вам необходима лишь определенная часть строки, то лучше всего использовать вставку ячеек. Там же нужно будет отметить видимые и невидимые линии.
Горизонтальные линии в Word 2007 и выше
В этой версии Ворда, горизонтальную линию можно сделать несколькими способами
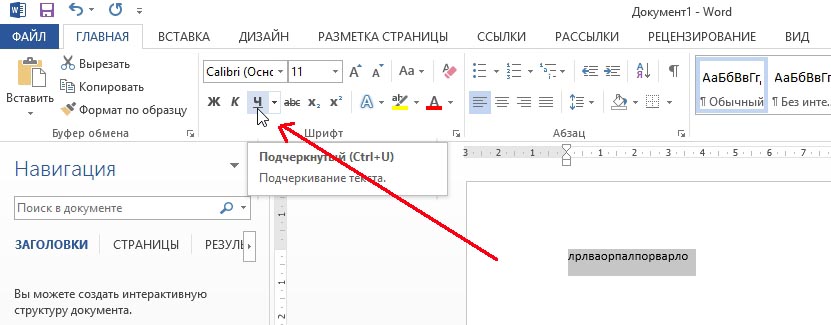
. Если же необходим просто подчеркнутый текст, то можно воспользоваться кнопкой «Ч» в разделе «Главная». Легко и просто.
Для создания линии сверху, слева, справа
(вертикальные), нужно обратиться в раздел «Абзац» и открыть меню «Границы». Здесь вы сможете выбрать необходимую вам линию, после чего можно смело набирать текст. Он будет набираться уже с линией.
При таком подходе важно не забывать, что клавиша «Enter» уберет линию. Поэтому передвигаться по документу нужно исключительно на «стрелочках».
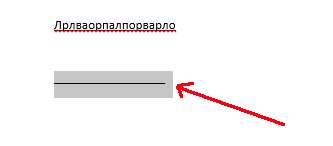
Если же нужна подстрочная линия, но без текста, ее можно сделать просто зажав клавишу «Shift» нажимая при этом необходимое количество раз на клавишу «-». Получится линия вида «______» без текста.
Теперь вы можете делать в программе Word горизонтальные линии.
Добрый день.
В сегодняшнем небольшом уроке хотел бы показать как в Word можно сделать линию. Вообще, это довольно распространенный вопрос, на который сложно дать ответ, т.к. непонятно о какой линии вообще идет речь. Именно поэтому, я хочу разобрать 4 способа созданий различных линий.
И так, начнем…
1 Способ
Допустим, вы написали какой-то текст и вам нужно провести под ним прямую линию, т.е. подчеркнуть. В Word для этого есть специальный инструмент подчеркивания. Просто сначала выделите нужные символы, далее выберите на панели инструментов значок с буквой «Ч
«. См. скриншот ниже.
2 Способ
На клавиатуре есть специальная кнопка — «тире». Так вот, если зажать кнопку «Cntrl» и затем нажать на «-» — в Word появиться небольшая прямая, как подчеркивание. Если повторить операцию несколько раз — длину линии можно получить на всю страницу. См. картинку ниже.
На картинке показана линия, созданная с помощью кнопок: «Cntrl» и «-«.
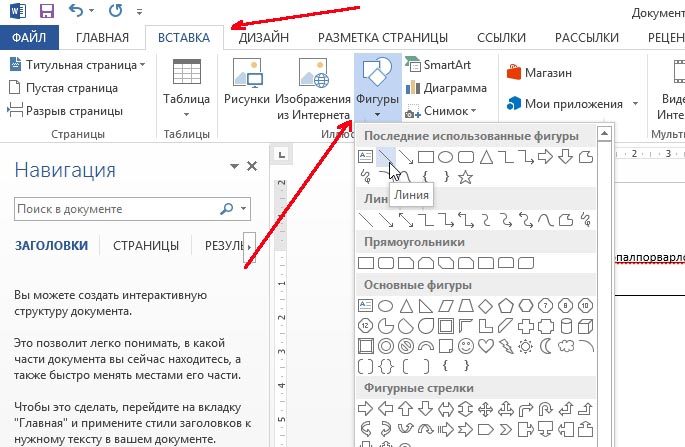
3 Способ
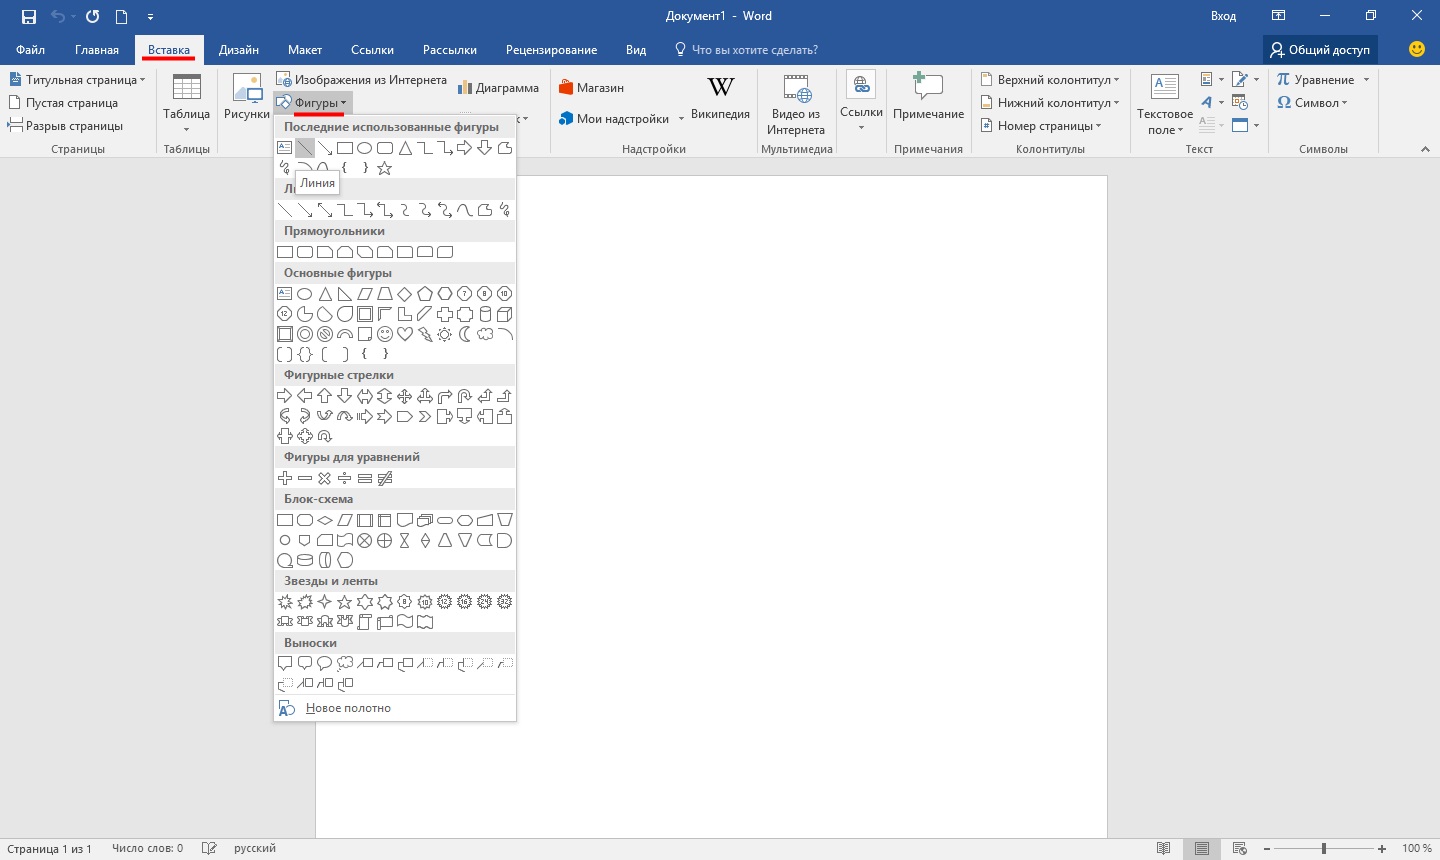
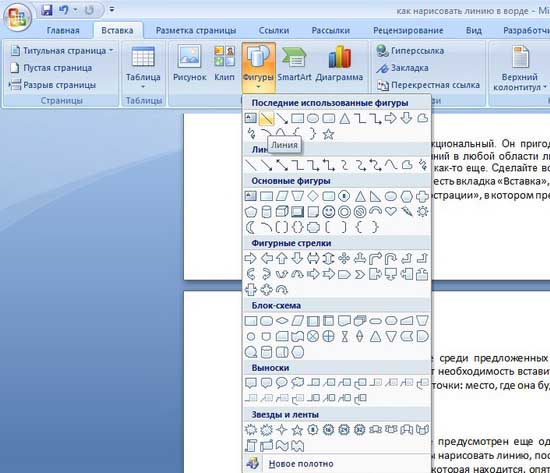
Этот способ пригодится в тех случаях, когда вы хотите провести прямую линию (и даже, может быть, не одну) в любом месте на листе: вертикально, горизонтально, поперек, на наискосок и пр. Для этого перейдите в меню в раздел «ВСТАВКА» и выберите функцию вставки «Фигуры». Далее просто щелкаете по значку с прямой линией и вставляете ее в нужное место, задав две точки: начало и конец.
4 Способ
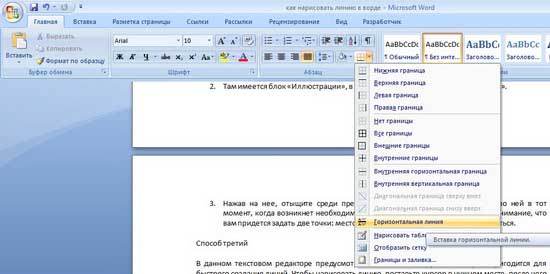
В главном меню есть еще одна специальная кнопка, которую можно использовать для создания линий. Для этого поставьте курсор в нужную вам строчку, а затем выберите кнопку на панельке «Границы» (находится в разделе «ГЛАВНАЯ»). Далее у вас в нужной строчке должна появиться прямая линия во всю ширину листа.
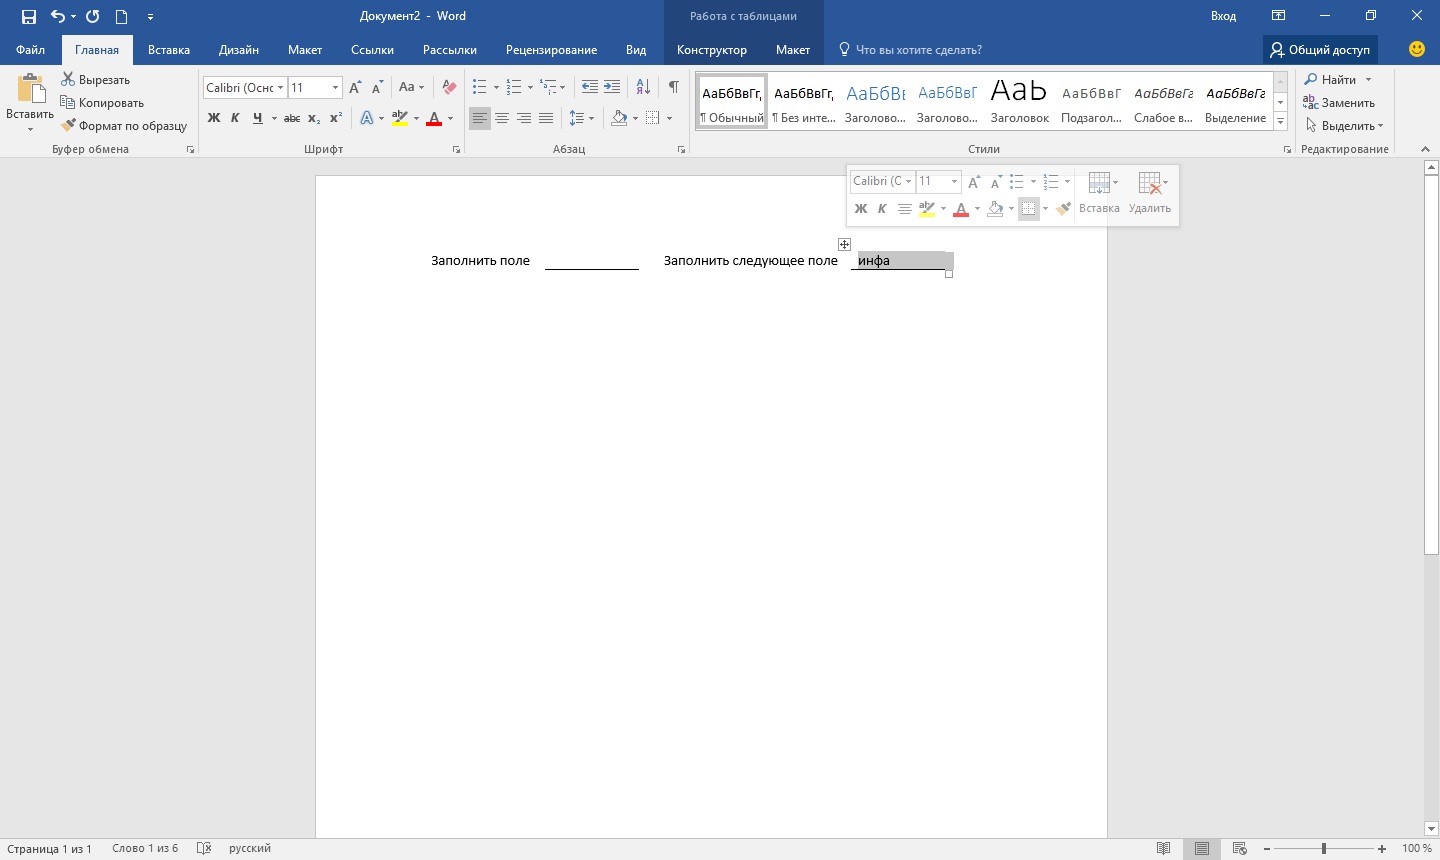
В обычном тексте в Ворде линии используются довольно редко, но без них не обойтись при составлении различных бланков или форм. Подчеркнуть уже готовый текст довольно просто, но при составлении бланков подчеркивать нужно пустое пространство, а если учесть, что этот бланк будет заполняться в электронном виде, обычным подчеркиванием здесь не обойтись. Далее мы рассмотрим, как сделать линию в Ворде различными способами, из которых каждый сможет выбрать себе подходящий вариант.
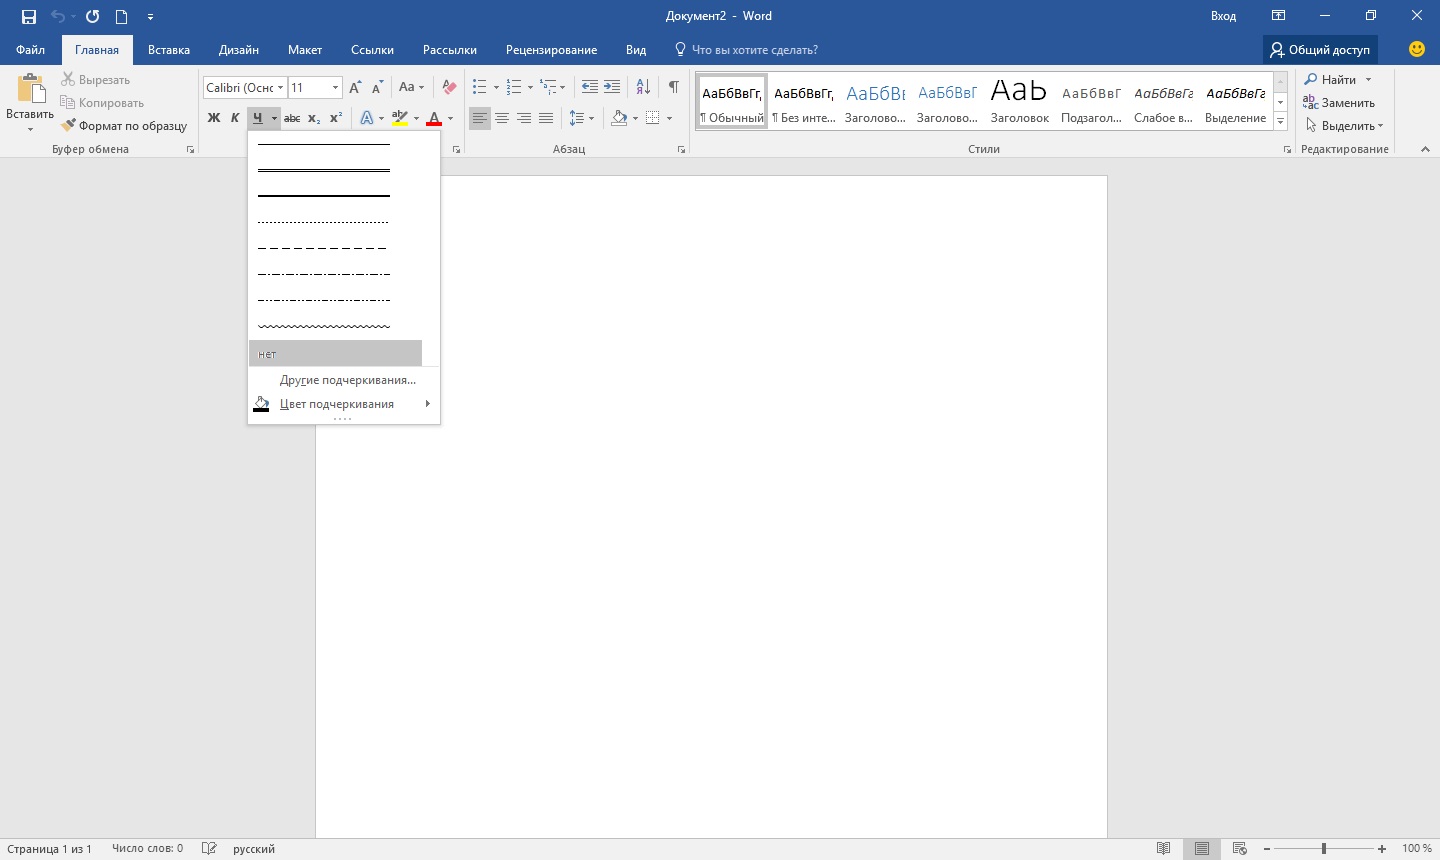
Самый простой способ сделать линию под текстом в Ворде, это использовать меню подчеркивания текста. Подчеркнуть таким способом можно текст и табуляцию. Но использовать такое подчеркивание для размещения линии на пустом месте, т.е. создавать такими линиями поля для дальнейшего ввода текста, крайне неудобно. Когда на такой линии будет писаться текст, к нему будет применяться подчеркивание, но весь дальнейший текст будет перемещаться, что сразу может нарушить структуру документа.
Чтобы сделать такое простое подчеркивание текста необходимо на вкладке «Главная»
в разделе «Шрифт»
найти значок «Подчеркивание текста»
, и нажать на него. Выделенный заранее текст станет подчеркнутым, а весь далее набираемый текст также будет подчеркиваться.
Если нажать на стрелочку вниз, можно будет выбрать различные стили подчеркивания и даже цвет линии.
Следующий способ сделать линию в Word заключается в использовании символа подчеркивания, который имеется на клавиатуре. Для этого необходимо зажать клавишу «Shift»
и нажимая значок нижнего подчеркивания «_»
рисовать линию необходимой длины. Но такая линия также далека от идеальной. Писать на такой линии в Ворде не получится, и она не совпадает по уровню с обычным подчеркиванием текста.
Более подходящий способ сделать линию в Ворде для подписи, это использовать ячейку таблицы, в которой нужно оставить видимой только нижнюю границу. При этом могут возникнуть некоторые проблемы с позиционированием отдельной ячейки, но ради возможности заполнять подчеркнутую область документа в электронном виде можно и постараться. Нужно всего лишь вставить таблицу из одной ячейки и настроить ее размещение, размер, а также границы.
Ну и последний способ нарисовать линию в Ворде, на которой можно будет писать, это просто нарисовать линию, как отдельный объект. Для этого переходим на вкладку «Вставка»
и находим пункт «Фигуры»
в разделе «Иллюстрации»
. В фигурах находим обычную линию, нажимаем на нее и рисуем в нужно месте на листе. Если при рисовании линии удерживать клавишу «Shift»
, то линия получится горизонтальной. При необходимости линию можно дополнительно настроить в соответствующем меню.
Как вы уже, наверное, поняли, текстовый редактор Word является многофункциональной программой, и, возможно, на первых порах очень зря недооценивается многими пользователями. Конечно, в некоторых моментах все же лучше использовать тот же Excel, но, в целом, Ворд способен справиться со многими задачами.
С его помощью вы всегда можете красиво оформить документ, придав нарочитой деловитости или же наоборот, сделав его неформальным. Можно поработать с таблицами, сменить стиль текста, и т.д. Кроме того, интерфейс Ворда продуман до мелочей, он позволяет в считанные секунды найти необходимый инструмент для работы. Кстати, в Ворде можно даже нарисовать линию, если вам она вдруг понадобится. Собственно, о том, как нарисовать линию в ворде, мы и поговорим дальше.
Способ первый
На самом деле, практически в любой спорной ситуации, которая возникает в Word, существует несколько вариантов выхода из нее. И это очень хорошо, ведь каждый пользователь может подобрать то, что нравится и подходит ему больше всего. Итак, давайте начнем с первого способа, на мой взгляд, очень простого и понятного каждому.
Представим, что вы набрали какой-то текст, и вам необходимо выделить его нижним подчеркиванием. Для этого делаем вот что: выделяем текст, затем во вкладке «Главная» на панели инструментов находим блок «Шрифт». Там есть три кнопки: полужирный, курсив и подчеркнутый, а если еще вам нужен , то это можно сделать уже через другое меню. Соответственно, просто кликните на последнюю кнопку, как это показано на скриншоте ниже.
Способ второй
Данный способ еще более функциональный. Он пригодится в тех ситуациях, когда вы захотите провести одну или несколько линий в любой области листа, причем, неважно, горизонтально это будет, вертикально, поперек или как-то еще. Сделайте вот что:
- На панели инструментов есть вкладка «Вставка», откройте ее.
- Там имеется блок «Иллюстрации», в котором предусмотрена кнопка «Фигуры».
- Нажав на нее, отыщите среди предложенных прямую линию. Кликните по ней в тот момент, когда возникнет необходимость вставить линию в текст. Обратите внимание, что вам придется задать две точки: место, где она будет начинать и где заканчиваться.
Способ третий
В данном текстовом редакторе предусмотрен еще один инструмент, который пригодится для быстрого создания линий. Чтобы нарисовать линию, поставьте курсор в нужном месте, после чего нажмите на кнопку «Границы», которая находится, опять-таки, во вкладке «Главная». После этого должна появиться горизонтальная линия по всей ширине листа.
Надеюсь, один из этих способов рисования линии в Ворде пришелся вам по душе. Выбирайте любой и смело экспериментируйте!
Видео в помощь
Казалось бы, зачем могут понадобиться четыре способа? Ведь практически каждый человек использует один способ, к которому он привык. Например, нажал на Shift и на клавишу «тире» несколько раз, вот и получилась горизонтальная линия.
А что, если при этом получается пунктирная линия, а нужна сплошная?
Скорее всего, на клавиатуре клавиша Shift неисправна. Тут придут на помощь другие способы.
Пожалуй, самый привычный способ сделать линию в Ворде – это использовать пару-тройку клавиш на клавиатуре.
I Горизонтальная линия в Word с помощью клавиатуры
Ниже приведен рисунок клавиатуры с английской, но без русской раскладки, однако это не имеет значения, ибо нас интересует только три клавиши: Shift, тире и Enter.
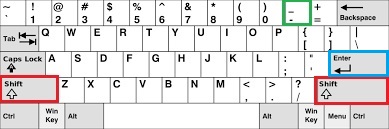
Рис. 1. Три клавиши на клавиатуре: Shift, тире и Enter для непрерывной горизонтальной линии в Ворде
С помощью этих трех клавиш можно нарисовать непрерывную горизонтальную линию в Word: пунктирную или сплошную, тонкую или толстую, длинную или короткую.
1 При нажатии несколько раз на клавишу «-» (тире) в редакторе Word получаем пунктирную линию любой длины.
Чтобы сделать тонкую длинную линию на всю ширину страницы:
- Находим на клавиатуре клавишу «тире» (справа от клавиши «ноль», в зеленой рамке на рис. 1).
- С новой (!) строки в Word несколько раз нажимаем на эту клавишу: —
- И потом нажать на клавишу «Enter» (). Несколько напечатанных тире вдруг превратятся в непрерывную горизонтальную тонкую линию на всю ширину страницы.
2 При одновременном нажатии Shift и «-» (тире) печатается НЕ тире, а подчеркивание _________. Таким образом можно сделать непрерывную линию произвольной длины в любом месте документа.
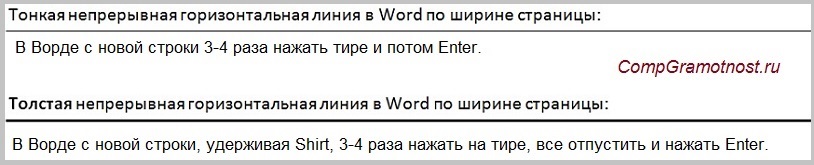
Рис. 2. Тонкая и толстая горизонтальная линия в Word
Теперь печатаем толстую горизонтальную линию на всю ширину страницы:
- Снова находим эту же клавишу «тире», а также клавишу Shift (слева или справа, кому как нравится). Нажмите Shift, держите и не отпускайте.
- И теперь с новой (!) строки несколько раз (например, 3-4 раза) нажмите на тире (при этом не отпуская Shift): ___. Отпустите Shift.
- Теперь нажмите на клавишу Enter. Вы увидите толстую горизонтальную сплошную линию.
II Линия в Word с помощью таблицы
Горизонтальную линию можно получить, если использовать таблицу из одной клетки (1×1), в которой окрашена (будет видимой) только верхняя или нижняя граница, а остальные три стороны таблицы имеют незакрашенные границы (они будут невидимыми).
Ставим курсор в место, где должна быть линия. В верхнем меню Word кликаем:
- Вставка (1 на рис. 3),
- Таблица (2 на рис. 3),
- Одна клетка (3 на рис. 3).
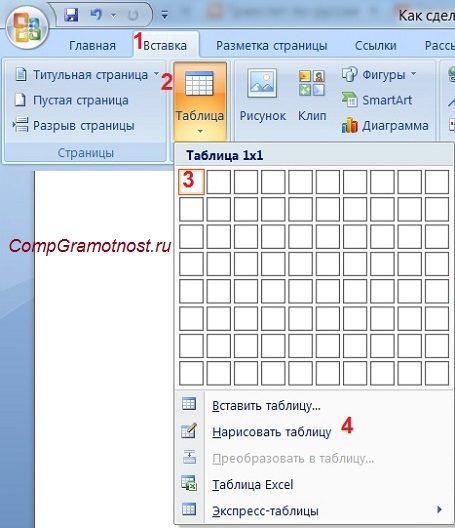
Рис. 3. Как в Ворде вставить таблицу 1х1 (из одной клетки)
В результате получится таблица из одной большой клетки (1х1):
Осталось в таблице 1х1 с трех сторон убрать границы. Для этого
- переходим во вкладку «Главная» (1 на рис. 4),
- далее рядом с «Шрифт» находим «Абзац» и границы (2 на рис. 4),
- убираем все границы, кликнув «Нет границы» (3 на рис. 4),
- выделяем «Верхняя граница» или «Нижняя граница» (4 на рис. 4).
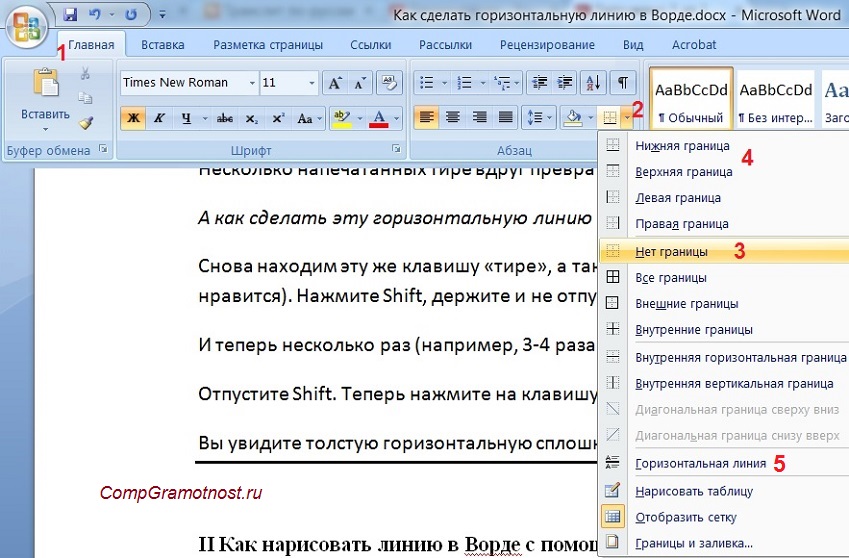
Рис. 4. Как в таблице Ворд убрать выделение границ (сделать границы невидимыми)
Наглядно я это показываю в видео (в конце статьи).
Кстати, на рис. 3 видно, что есть способ проще. Можно поставить курсор в начало строки в Word и кликнуть «Горизонтальная линия» (5 на рис. 4):
III Линия в Word с помощью рисования
Вставка (1 на рис. 5) – Фигуры (2 на рис. 5) – это еще один способ получить в Ворде горизонтальную линию.
Чтобы линия была строго горизонтальной, следует держать нажатой клавишу Shift и одновременно рисовать линию.
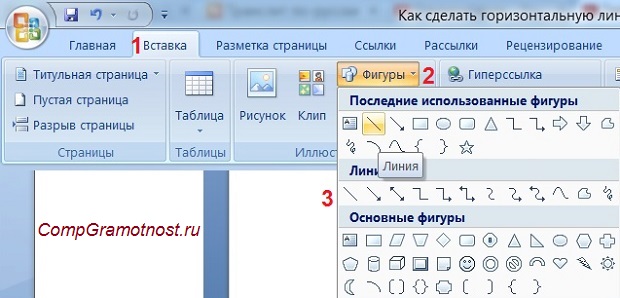
Рис. 5. Как нарисовать линию в Word
IV Линия в Ворде с помощью экранной клавиатуры
Для Windows 10 найти экранную клавиатуру можно также путем ввода в строку Поиска слов «экранная клавиатура».
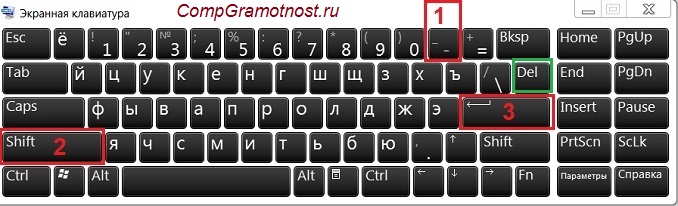
Рис. 6. Экранная клавиатура
Горизонтальную линию будем создавать так же, как в первом варианте с обычной клавиатурой. На экранной клавиатуре понадобится три кнопки: тире, Shift и Enter.
1 Тире и Enter
С новой строки в Word несколько раз кликаем по тире (1 на рис. 6) и жмем на Enter. Получится тонкая горизонтальная линия.
2 Shift, тире и Enter
С новой строки в Word клик сначала Shift (2 на рис. 6), потом Тире (1 на рис. 6). Получится подчеркивание. Так повторим еще 2 раза, а потом нажмем на Enter. В результате увидим толстую горизонтальную линию.