
Show the Developer tab
If the developer tab isn’t already visible, see Show the Developer tab.
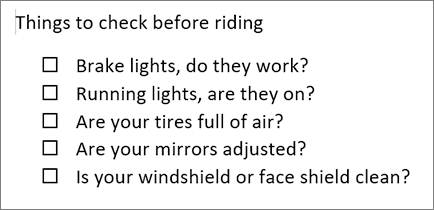
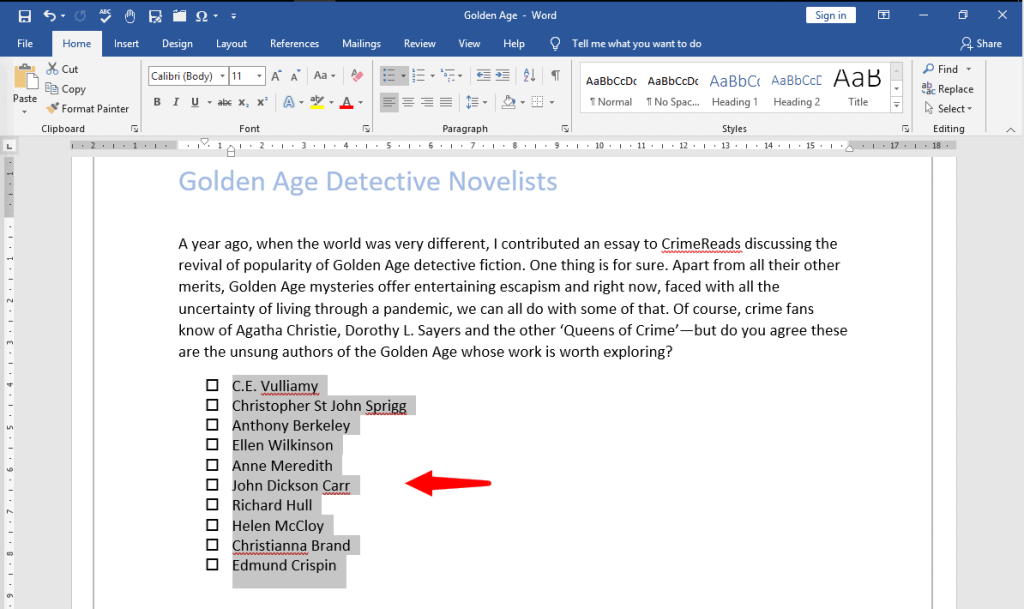
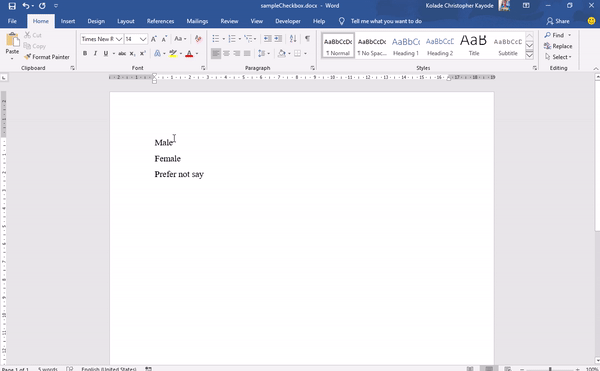
Make your list
-
Type the list.
-
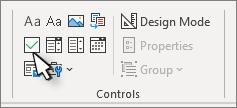
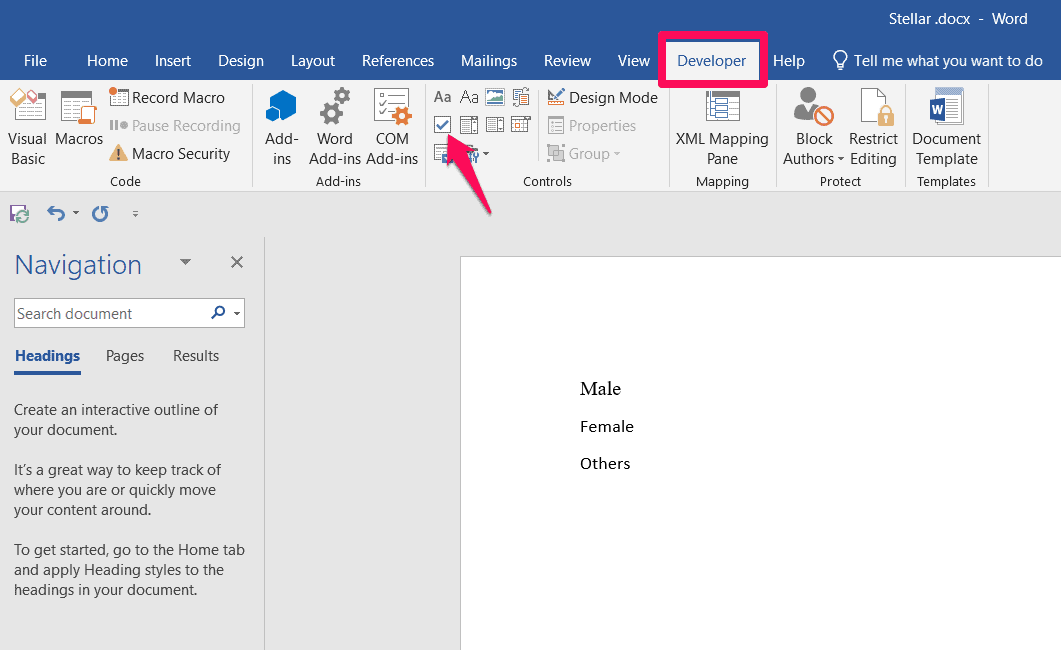
Go to Developer and select the Check Box Content Control at the beginning of the first line.

-
To change the default X to something else, see Make changes to checkboxes.
-
Copy and paste the check box control at the beginning of each line.
-
Select a checkbox to put an X (or other character) in the check box.
Add hanging indentation
If some list items are more than one line long, use hanging indents to align them.
-
Select the list. Bullets or numbers won’t look selected.
-
Go to Home and select the Paragraph dialog box launcher
. -
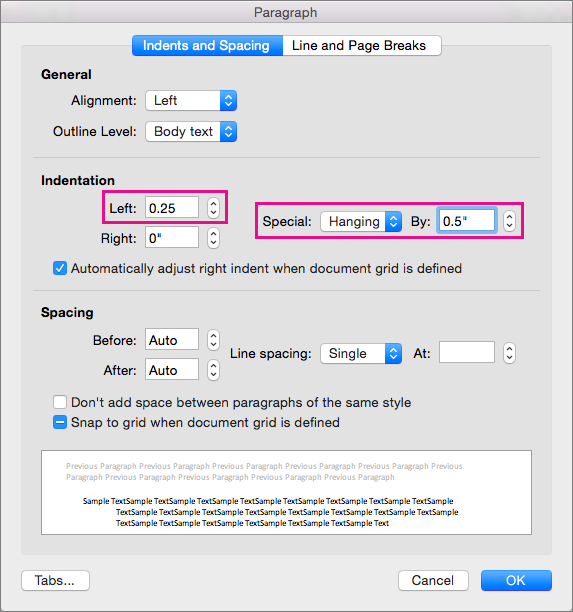
Under Indentation, in the Left box, type 0.25.
-
Under Special, choose Hanging.
-
For By, Word sets a default value of 0.5 inches. Change this if you want your additional lines indented differently.
-
Select OK when finished.
 .
.Lock the text and controls to prevent changes
-
Select the list and checkboxes.
-
Go to Developer >Group > Group.
To unlock the list, select the list and choose Group > Ungroup.
Create a print only list
-
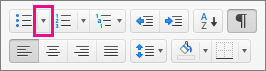
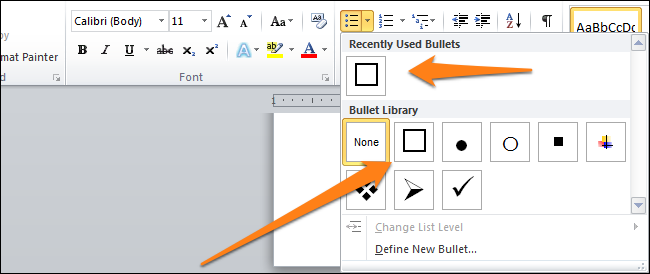
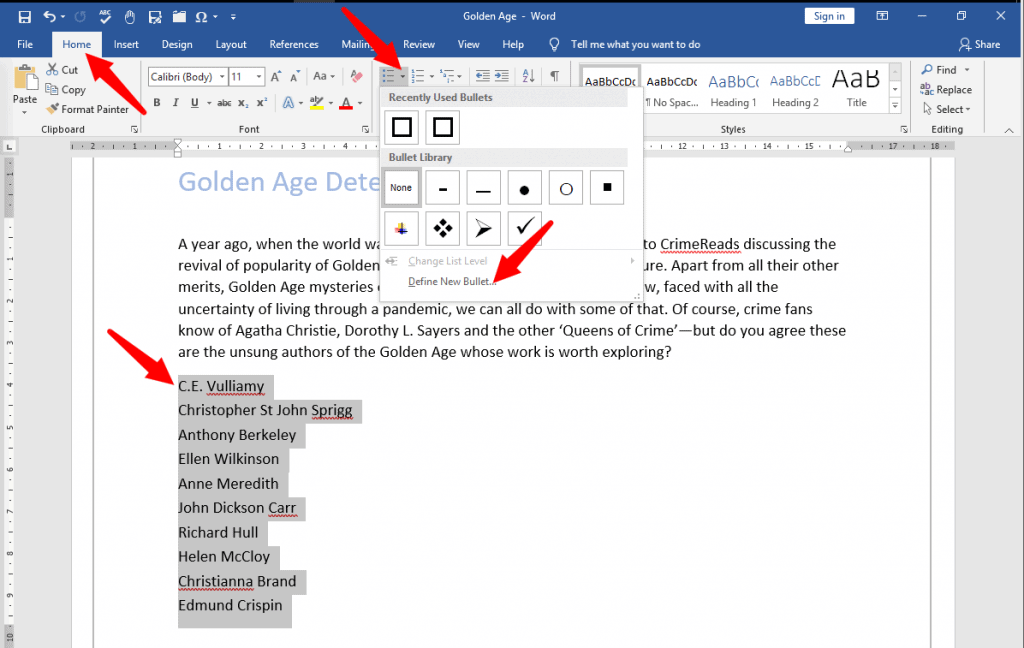
Go to Home and select the down arrow next to the Bullets button.
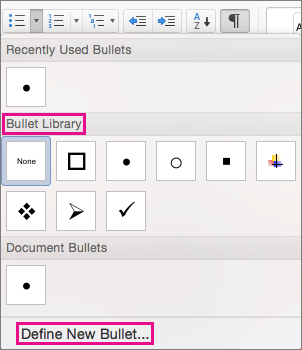
-
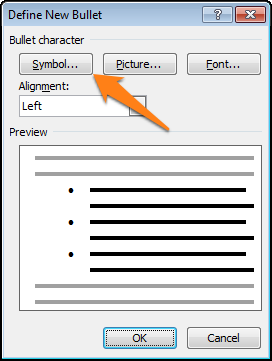
In the drop down menu, select Define New Bullet.
-
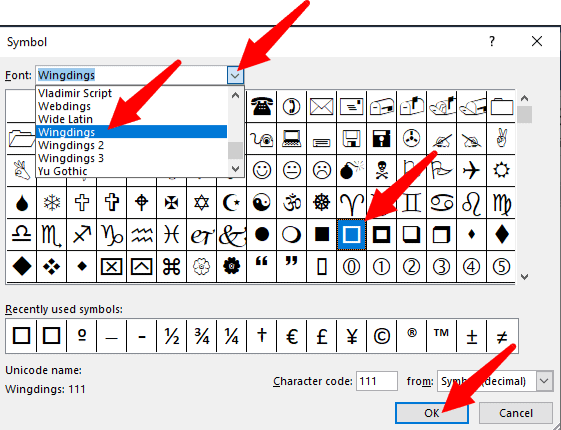
Select Symbol and find a box character. If you don’t initially see one, change Font to Wingdings or Segoe UI Symbol.
-
Select OK twice, and create your list.

Make a checklist you can check off in Word
To create a list that you can check off in Word, add content controls for checkboxes to your document.
Show the Developer tab
For more info if the developer tab isn’t already visible in Word, see Show the Developer tab.
Make your list
-
Create your list.
-
Place you cursor at the start of the first line.
-
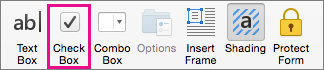
Go to the Developer tab, and then click Check Box.
-
If you want a space after the check box, press Tab or Spacebar.
Use a Tab character if you want to format the list item with hanging indentation, like Word applies to bulleted lists.
-
Select and copy (⌘ + C) the check box and any tabs or spaces.
-
Place the cursor at the start of the each list item, and paste (⌘ + V ) the copied check box and characters.
-
Paste the checkbox at the start of each line in your list.
Add hanging indentation
If some of the list items are longer than one line, use hanging indentation to align them.
-
Select the list.
-
Go to Format and select Paragraph.
-
Under Indentation, type 0.25 in the Left box.
-
In the Special list, choose Hanging.
For By, Word sets a default value of 0.5 inches. Change this if you want your additional lines indented differently.
Make a print only check list
You can replace the bullets or numbers in a list with another symbol, such as a box can be checked on a printed version of your document.
-
Select the entire list.
-
Select Home and select the arrow next to Bullets.
-
Select Define New Bullet.
-
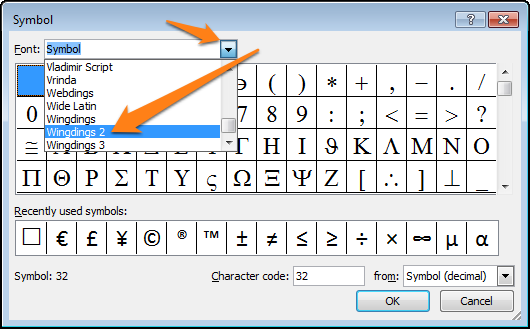
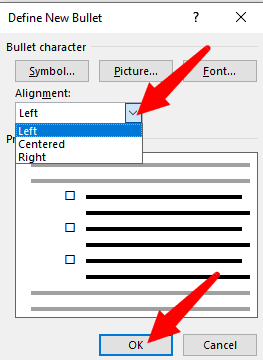
Select Bullet, and choose a symbol from the table of symbols.
For more choices, in the Font box choose a symbol font, such as Wingdings.
-
Select a symbol to use, such as an open box (
) or a three-dimensional box (). -
Select OK, and then select OK again.
 ) or a three-dimensional box (
 ).
).Word for the web supports only the on-paper form of checklist.
-
Write your list, and then select it.
-
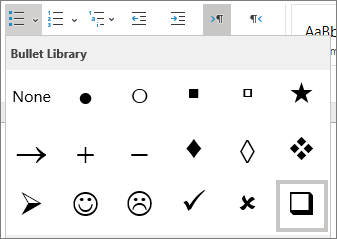
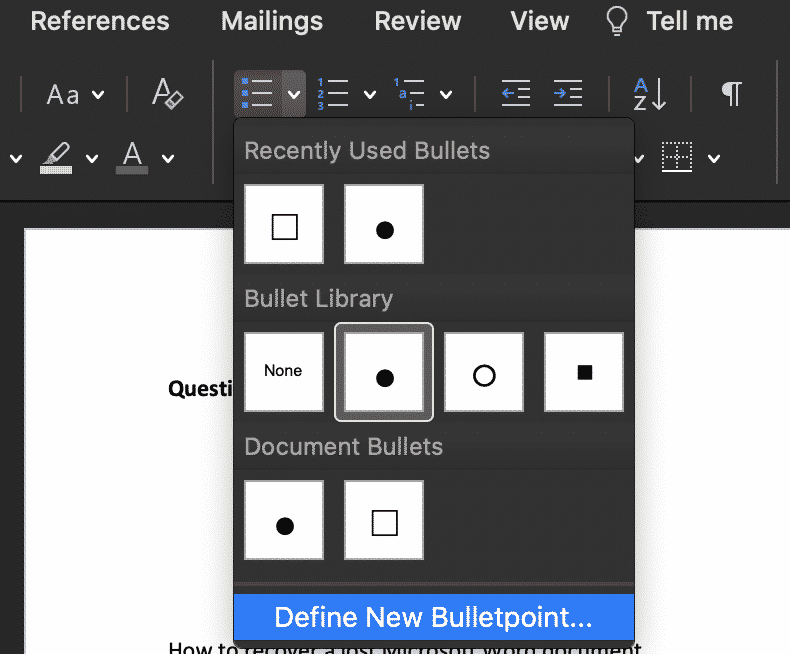
On the Home tab, choose the down-arrow next to the Bullets list to open the bullet library, and then choose the checkbox symbol.
![]()
Download Article
![]()
Download Article
Want to add a check box or tick box to a list or form in Microsoft Word? It’s easy to do, and you can even make it checkable so you can click the box with your mouse. We’ll show you an easy way to add a clickable checkbox using Developer Mode in Microsoft Word.
Steps
-
1
Open a new file in Microsoft Word. Do so by opening the app shaped like a blue W. Then click on File in the menu bar at the top of the screen, and click on New Blank Document.
-
2
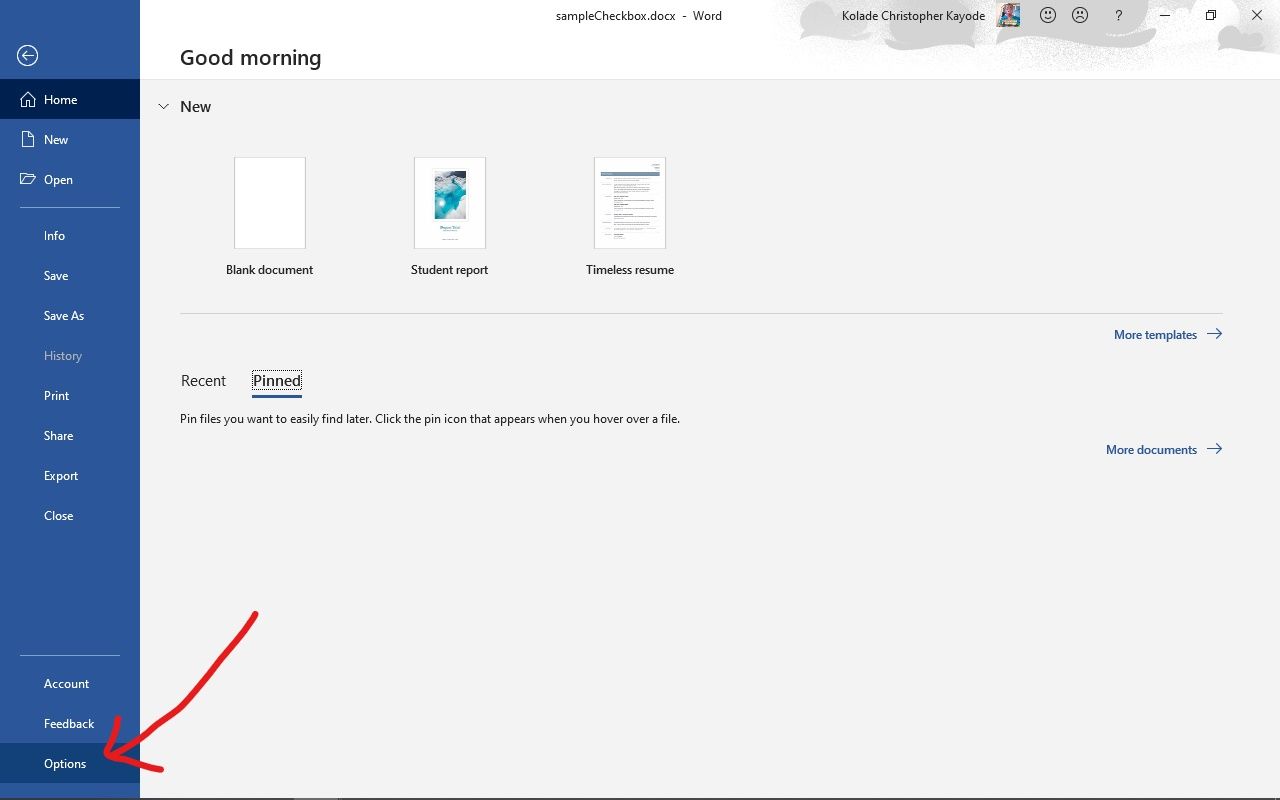
Click on File in the menu bar and then Options in the menu.
- On Mac, click on Word in the menu bar and then Preferences… in the menu.
Advertisement
-
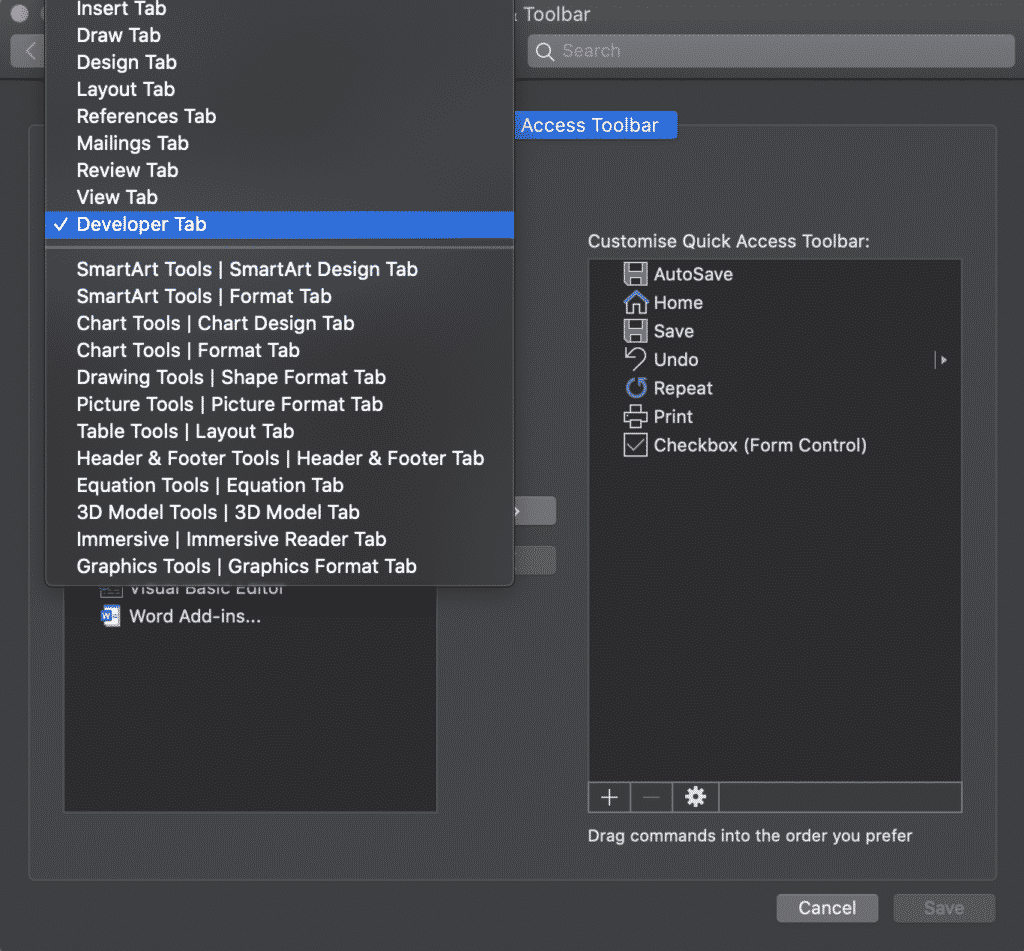
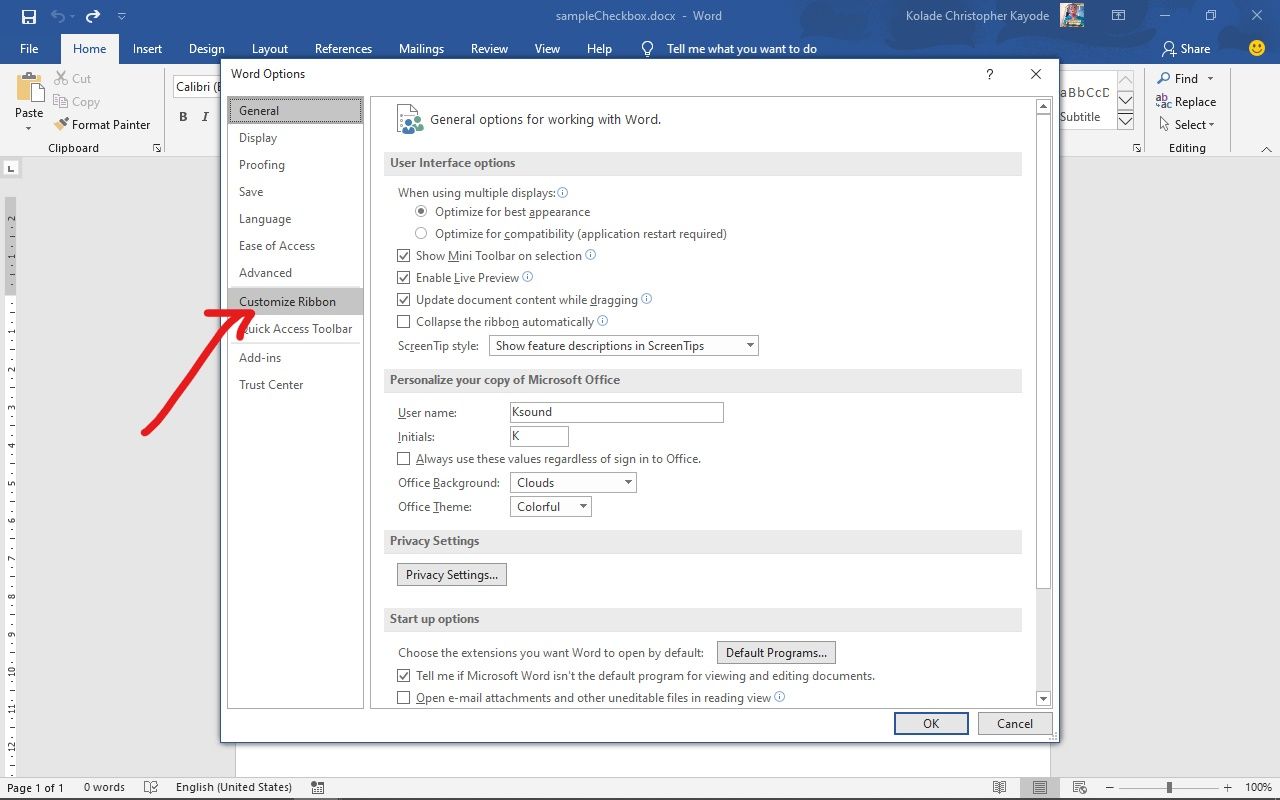
3
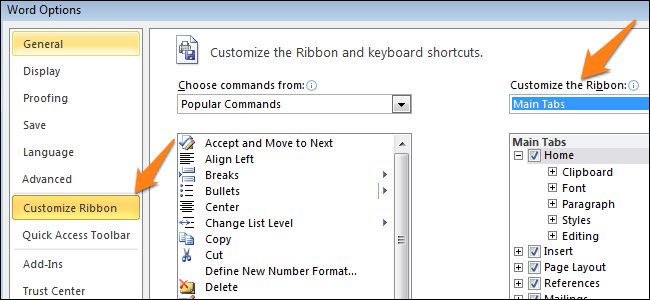
Click on Customize Ribbon and then Main Tabs in the «Customize the Ribbon:» drop-down menu.»[1]
- On Mac, click on Ribbon & Toolbar in the «Authoring and Proofing Tools» section of the dialog box, then click on the Ribbon tab at the top of the dialog box.
-
4
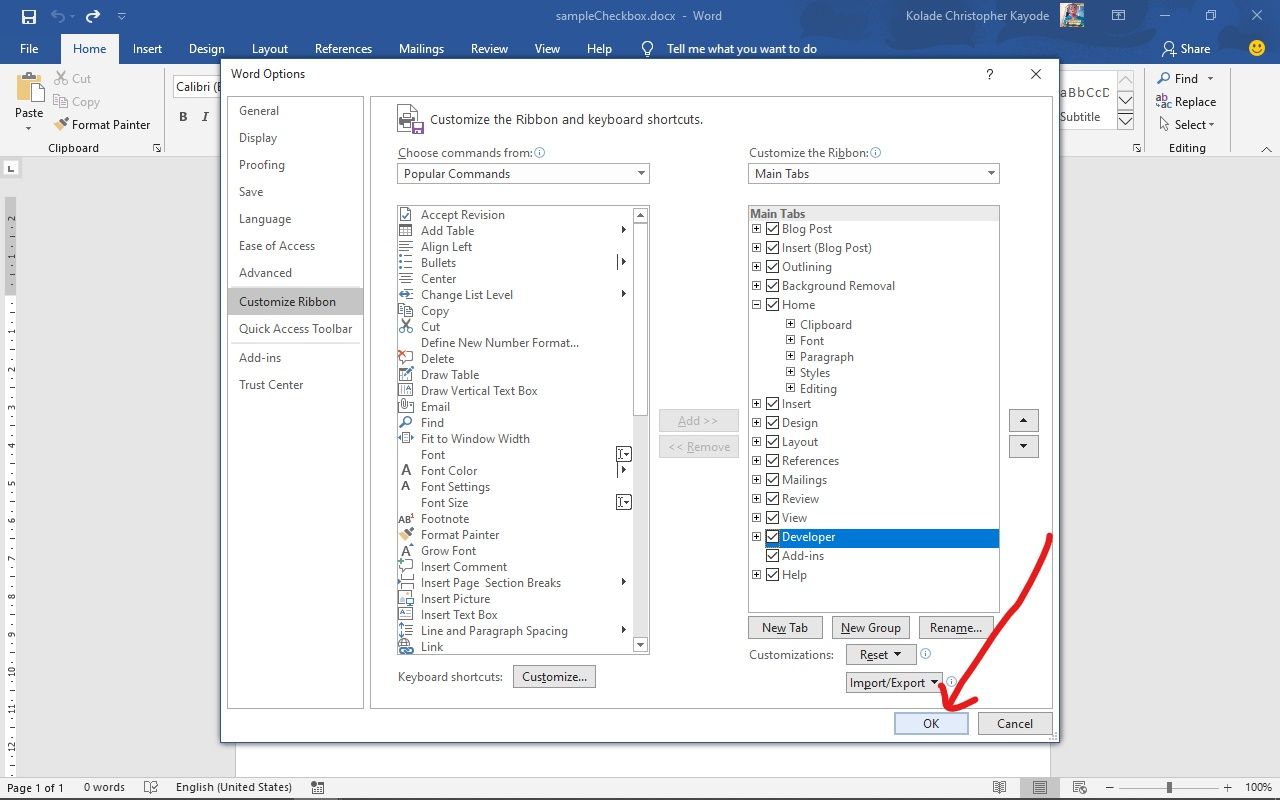
Check «Developer» in the «Main Tabs» pane.
-
5
Click on Ok.
-
6
Click on Developer. It’s a tab in the upper-right part of the window.
-
7
Position the cursor where you’d like to insert the check box.
-
8
Click on Check Box. It’s in the menu bar at the top of the window.
-
9
Add additional check boxes and text as needed.
-
10
Lock the form. To do so, select the entire list, to be found in the Controls section on the Developer tab, then click on Group and Group.
- On Mac, click Protect Form in the Developer tab toolbar.


Advertisement
Add New Question
-
Question
What should I do if the check box is grayed out in my ribbon?

It is grayed out for me too. However, if you click on the one icon that isn’t — Legacy Tools — then you will find the exact same checkbox, which you should be able to select.
-
Question
How can I enlarge the size of a text box without enlarging the text?
In Word, just dragging the corner of the text box should be sufficient. If the text changes size accidentally, you can always highlight it and change it back to the desired size.
-
Question
How do you make a drop box in word?
Download LibreOffice. Follow the manual on how to add a list or list/add or list/multiselect box (or just look under «insert» in the menu). You can add a data source for the dropdown menu items from a database, a spreadsheet or within the file structure itself.
See more answers
Ask a Question
200 characters left
Include your email address to get a message when this question is answered.
Submit
Advertisement
Thanks for submitting a tip for review!
About This Article
Article SummaryX
1. Open a document.
2. Click File.
3. Select Customize Ribbon and then click Main Tabs.
4. Check the «Developer» box.
5. Click Save.
6. Click Developer.
7. Click where you want to insert the check box.
8. Click Check Box.
9. Add additional boxes and text.
10. Lock the form.
Did this summary help you?
Thanks to all authors for creating a page that has been read 1,240,770 times.
Is this article up to date?
На чтение 3 мин Опубликовано 24.07.2015
Когда Вы создаёте опросы или формы в Microsoft Word, то для удобства можно добавить флажки (чек-боксы), чтобы было проще выбрать и отметить один из вариантов ответа. Для этого есть два основных способа. Первый отлично подходит для документов, которые нужно заполнять в электронном виде, второй удобен для печатных документов (таких как списки дел).
- Способ 1 – Элементы управления для электронных документов
- Способ 2 – Флажки для печатных документов
Способ 1 – Элементы управления для электронных документов
Чтобы создавать заполняемые формы с флажками (чек-боксами), сперва нужно активировать вкладку Developer (Разработчик). Для этого откройте меню File (Файл) и нажмите кнопку Options (Параметры). Перейдите на вкладку Customize Ribbon (Настроить ленту) и выберите из выпадающего списка Customize the Ribbon (Настроить ленту) вариант Main Tabs (Основные вкладки).
Поставьте галочку в строке Developer (Разработчик) и нажмите ОК.
На Ленте появилась новая вкладка с инструментами для разработчиков.

Теперь Вы можете добавить в документ элемент управления — Check Box (Флажок). Это просто: запишите вопрос и варианты ответа на него, откройте вкладку Developer (Разработчик) и кликните значок Check Box Content Control (Элемент управления содержимым «флажок”) .

Теперь повторите тот же приём для всех вариантов ответа. Как видно на рисунке ниже, рядом с каждым ответом появится чек-бокс.
Способ 2 – Флажки для печатных документов
Второй способ подходит для создания документов, которые нужно распечатать на бумаге. Он потребует вставки маркеров. Откройте вкладку Home (Главная), и Вы увидите кнопку для вставки маркеров в разделе Paragraph (Абзац).
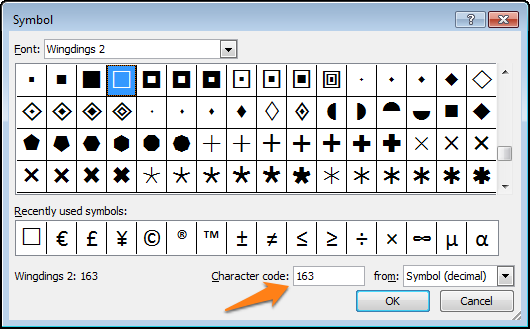
Просто нажмите маленькую стрелку рядом с этой кнопкой и выберите команду Define New Bullet (Определить новый маркер). Обратите внимание, что там уже есть несколько вариантов на выбор, но среди них нет нужного значка.
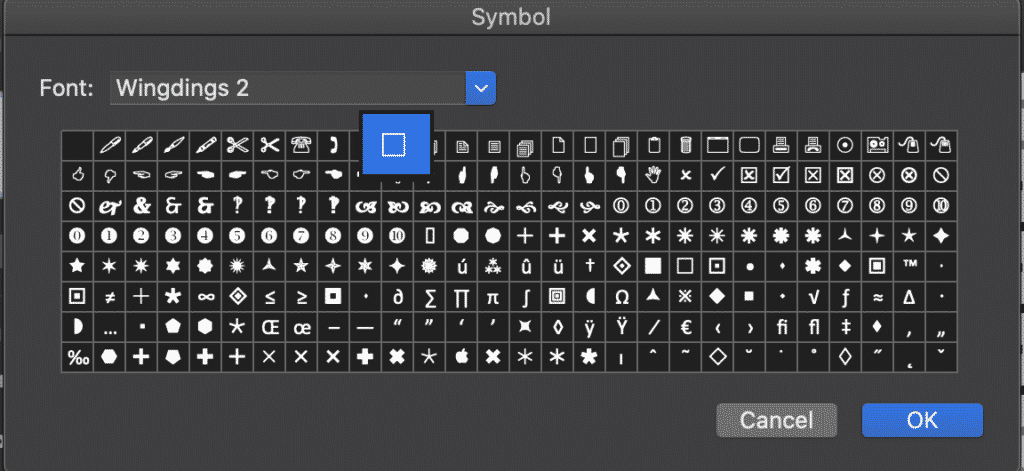
Чтобы определить новый маркер, в открывшемся диалоговом окне выберите вариант Symbol (Символ).
Когда откроется окно выбора символов, Вы увидите множество различных вариантов. В верхней части окна находится выпадающий список. Кликните по нему и выберите Wingdings 2.
Теперь введите в поле Character Code (Код знака) код 163, чтобы автоматически перейти к лучшему варианту чек-бокса в Word.
Запишите варианты ответов маркированным списком:
В следующий раз, когда Вам понадобится вставить такой символ, просто кликните по маленькой стрелке рядом с кнопкой выбора маркеров, и Вы увидите его в одном ряду с символами по умолчанию.
Попробуйте сами поэкспериментировать с настройкой маркеров, используя символы. Возможно Вы найдёте варианты лучше, чем привычный чек-бокс. Наслаждайтесь, создавая опросы и документы с использованием флажков.
Оцените качество статьи. Нам важно ваше мнение:

First, you need to customize Word’s ribbon and enable the “Developer” tab to show the option to add check boxes. Then, select “Developer” and click the “Check Box Content Control” button to insert a check box into your document. You can also transform Word’s bullets into checkboxes.
When you create surveys or forms with Microsoft Word, check boxes make the options easier to read and answer. We’re covering two good options for doing just that. The first is ideal for documents that you want people to fill out digitally within the Word document itself. The second option is easier if you’re planning to print documents like to-do lists.
Option 1: Use Word’s Developer Tools to Add the Check Box Option for Forms
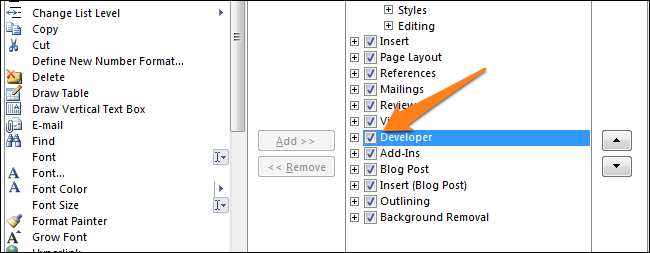
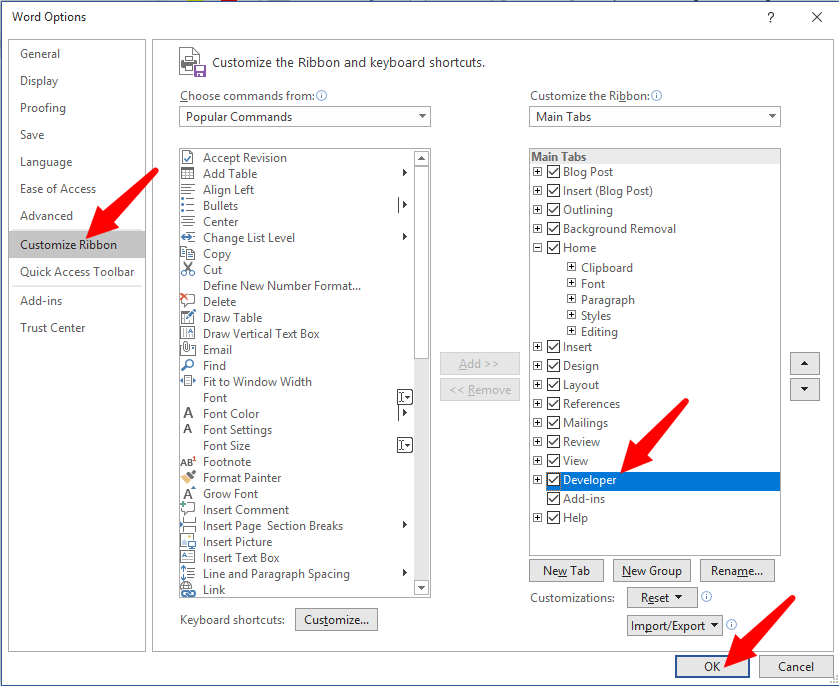
In order to create fillable forms that include checkboxes, you first need to enable the “Developer” tab on the Ribbon. With a Word document open, click the “File” drop-down menu and then choose the “Options” command. In the “Word Options” window, switch to the “Customize Ribbon” tab. On the right-hand “Customize the Ribbon” list, select “Main Tabs” on the dropdown menu.

On the list of available main tabs, select the “Developer” check box, and then click the “OK” button
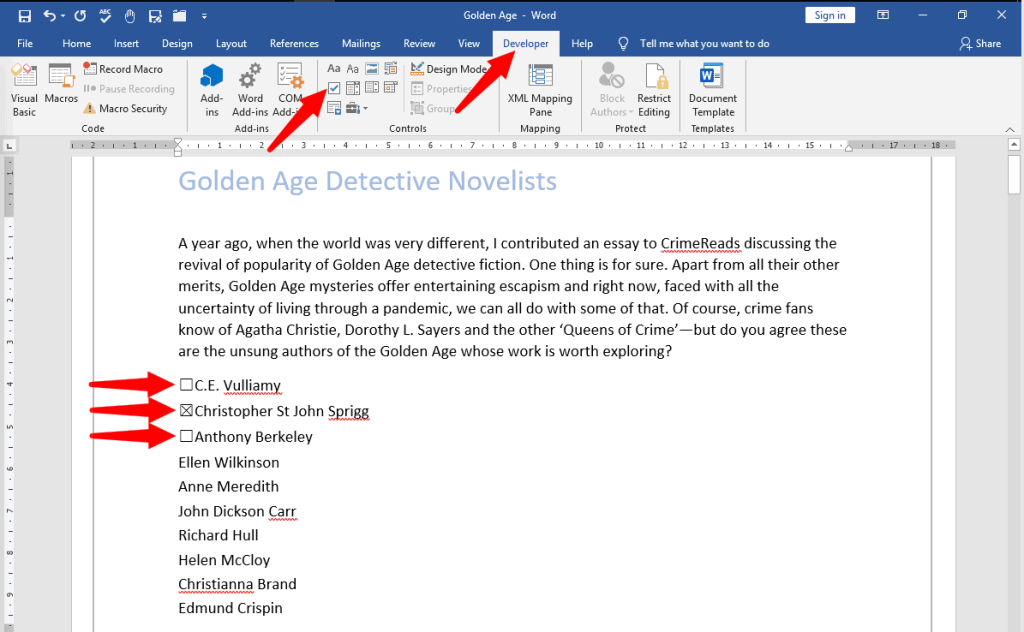
Notice that the “Developer” tab is added to your Ribbon. Just position your cursor in the document where you want a check box, switch to the “Developer” tab, and then click the “Check Box Content Control” button.
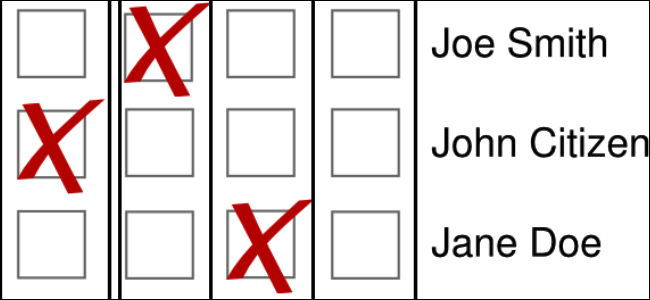
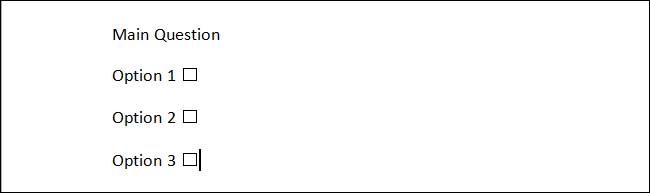
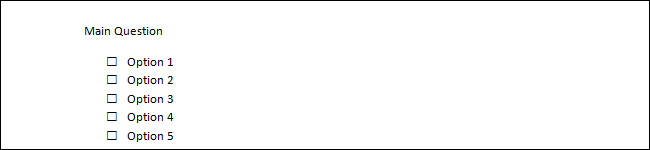
You should see a check box appear wherever you placed your cursor. Here, we’ve gone ahead and placed a check box next to each answer and, as you can see, those check boxes are interactive. Click a box to mark it with an “X” (as we’ve done for answers 2, 3, and 4) or select the whole form box (as we’ve done for answer 4) to move the check box around, format it, and so on.
RELATED: How to Create a Fillable Form With Microsoft Word
Option 2: Change Bullets to Check Boxes for Printed Documents
If you’re creating a document to print out—like a to-do list or printed survey—and just want check boxes on it, you don’t have to mess around with adding Ribbon tabs and using forms. Instead, you can create a simple bullet list and then change the bullets from the default symbol to check boxes.
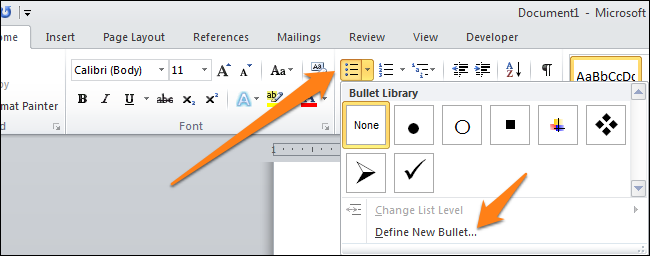
In your Word document, on the “Home” tab, click the small arrow to the right of the “Bullet List” button. On the dropdown menu, select the “Define new bullet” command.
In the “Define New Bullet” window, click the “Symbol” button.
In the “Symbol” window, click the “Font” dropdown and choose the “Wingdings 2” option.
You can scroll through the symbols to find the empty square symbol that looks like a check box, or you just type the number “163” into the “Character Code” box to automatically select it. Of course, if you see a symbol you like better—like the open circle (symbol 153)—feel free to choose that instead.
When you’ve selected your symbol, click the “OK” button to close the “Symbol” window, and then click the “OK” button to close the “Define New Bullet” window, too.
Back in your Word document, you can now type your bullet list. The check boxes appear instead of the regular bullet symbol.
And the next time you need the check box symbol, you don’t have to navigate through that whole set of windows. Just click that small arrow to the right of the “Bullet List” button again, and you’ll see the checkbox listed under the “Recently Used Bullets” section.
Again, this method is really only useful for documents you want to print out. The check box symbols are not interactive, so you can’t check them off inside a Word document.
If you’re also creating spreadsheets and presentations, you may want to learn how to insert checkboxes in Excel and add checkboxes to PowerPoint too.
RELATED: How to Add a Check Mark or Tick Mark in Word
READ NEXT
- › How to Add a Drop-Down List to a Word Document
- › How to Add a Check Mark or Tick Mark in Word
- › How to Create a Fillable Form With Microsoft Word
- › How to Count Checkboxes in Microsoft Excel
- › How to Create a Basic Survey in Microsoft Word
- › HoloLens Now Has Windows 11 and Incredible 3D Ink Features
- › How to Adjust and Change Discord Fonts
- › BLUETTI Slashed Hundreds off Its Best Power Stations for Easter Sale
Adding checkboxes to your Microsoft Word document gives you the functionality of a check list. Ticking off line items as they are complete, actioned or done.
Inserting a check list into your Word document is incredibly handy, most commonly used when creating surveys in word.

There are two ways to insert check boxes into Word, the first being more suitable for digital marking within Word itself and the second more suited to documents being printed and then checked off, such as a to do list.
In this post, we will show you how to insert both types of check boxes into your document with ease.
Inserting a tick-box in Microsoft Word
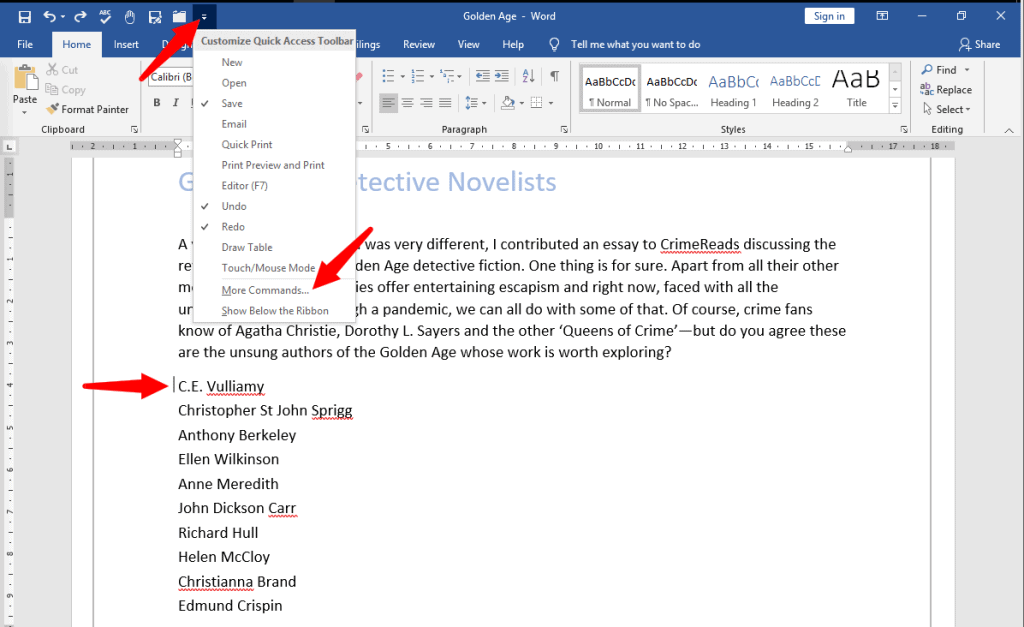
Option 1: Best for Digital Marking in Word itself

- Open Word
- Check that ‘Developer’ is turned on
- How to Turn Developer on
- Select the Customize Quick Access Toolbar dropdown
- Select More Commands
- Select Developer Tab
- Select Tick Box
- Press Insert
- How to Turn Developer on
- Once the Developer Tab has been activated:
- Place your cursor where you would like to insert the tick box

- Select the Tick Box in your Quick Access Short Cuts
- Repeat for each line that you would like a tick box added in front of

Option 2: Best for Printing

- Open Word
- Highlight your list
- Click the Bullet Point button
- Click Define New Bulletpoint…
- Click Bulletpoint…
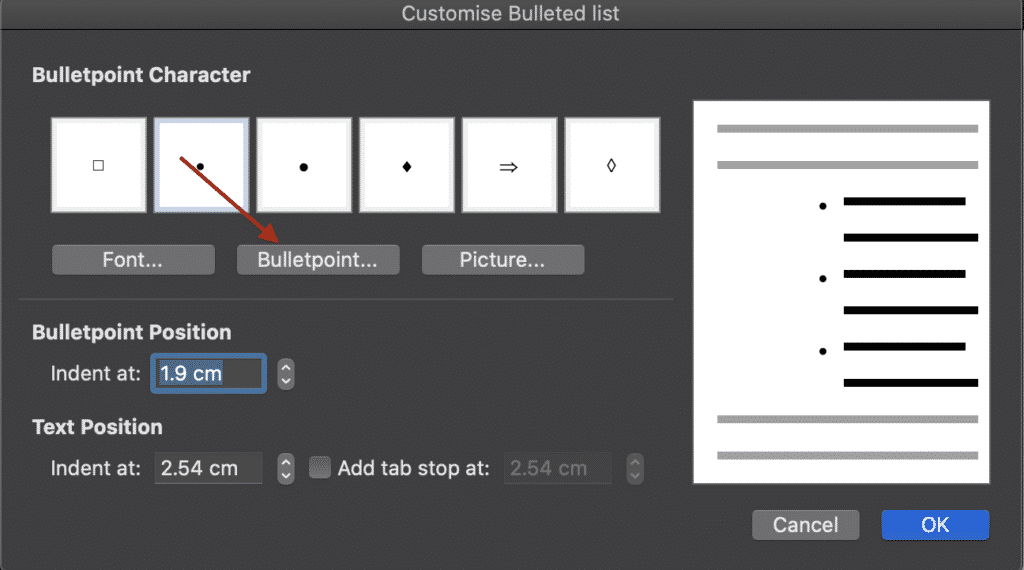
- Change Font to Wingdings 2
- Select the Square Symbol
- Press OK
You have now successfully inserted check boxes in front of all highlighted lines.
Is Version Control causing issues for you? We have a solution!
If you are collaborating on a Microsoft Word Document with others and are required to keep each version saved away for future reference, it is likely you are facing the same version control pain points that every other company is.
A very cluttered shared drive or cloud, one where each new version is saved every time one of your colleagues makes an edit. Leaving you with a shared drive full of documents looking something like ReportV4_updated_final_FINAL1 and no idea if that is actually the final version or not.
Then you face the challenge of naming your new document, do you add another _FINAL2 or is _JDsedits enough for everyone else to understand what’s going on?

If it wasn’t for the ability to sort your files in date order, I’m sure most of us would have given up on the search for the most recent file a decade ago and just rolled the dice on what looked like it was most recent. It must be _final_FINAL2_FINALFINAL right?
Or those days you don’t have shared drive access and do the drag and drop to your desktop and hope you remember to take that file back over into the shared drive next time you are in the office.
Its risky business. There must be an easier way!
Lucky for us all there is, companies such as Simul Docs offer purpose built tools to help us collaborate better and manage our version control for us.
Yep thats right, Simul docs will manage the version control for you. When you open your file, from the moment you start making edits Simul will save the document as the newest version giving it a version number such as 0.0.2 or 0.0.3.
You can then refer back to any version with ease, knowing at a glance which version is the most recent (goodbye _FINAL2_Updated) and hello simple numbered versions and clearly marked authors next to each.
Its version control bliss!
Not only that, but Simul Docs allows you to access your Word Document from anywhere, anytime. There is no need for remote shared drive access or the old clunky desktop saving. Simul gives you access to every version, anywhere, all you need is an internet connection.
Now that you have accessed your document from the comfort of the airport or your own home, you can add your tracked changes and comments, press save and let Simul notify the other collaborators that you have made some changes and they should probably jump in and check them out.
That means, no more emailing Word Documents back and forth with every edit.
Did your shared drive and inbox get a little lighter just thinking about these possibilities?

There really isn’t a downside to collaborating better with Simul Docs.
With free entry level packages on offer, its worth checking out.
When you create forms or a survey with Microsoft Word, there are two ways you can get people to interact with it.
You can either print it and give it to them to read and fill in or you can ask them to read and answer it online.
In both cases, checkboxes are a great help to get feedback from your audience.
When used with a printout, your audience has the option of filling in the checkboxes with a pen or a pencil to add a cross or a tick mark to signify their disagreement or consent.
This type of checkbox is a visual symbol only, non-interactive and non-clickable, useful only when printed.
When online, you can present them with a digital document with functional or clickable checkboxes pre-filled with either a cross or a tick mark, and your audience has to click on the checkbox to toggle its contents to match their answer.
Microsoft Word allows you to insert both types of checkboxes in your document, and we will show you the two methods for inserting.
However, your document may have a long list making it tedious to insert checkboxes individually.
You may want to have a bulleted list with checkboxes acting as the bullets. However, Word allows you to have a bulleted list with only non-interactive checkboxes, but not with interactive checkboxes. Therefore, we will show you how to insert:
- A single non-interactive checkbox
- A bulleted list of non-interactive checkboxes
- Interactive checkbox
Let’s start.
Method #1: Insert a Single Non-Interactive Checkbox
Step #1: Open your Word Document
Open the Word document that contains the form or survey to which you wish to add non-interactive checkboxes.
Step #2: Open Symbol Dialog
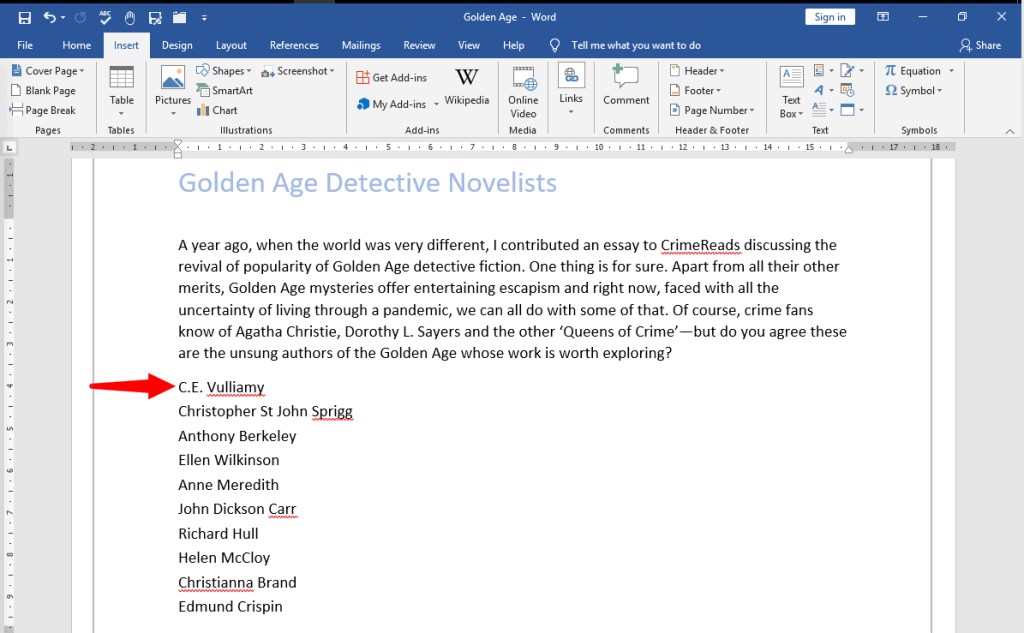
Position the cursor where you want the first checkbox to appear. Click on the Insert tab in the top menu bar to change the ribbon. Click on Symbol to open a group of symbols and then on More Symbols to open the Symbol Dialog.
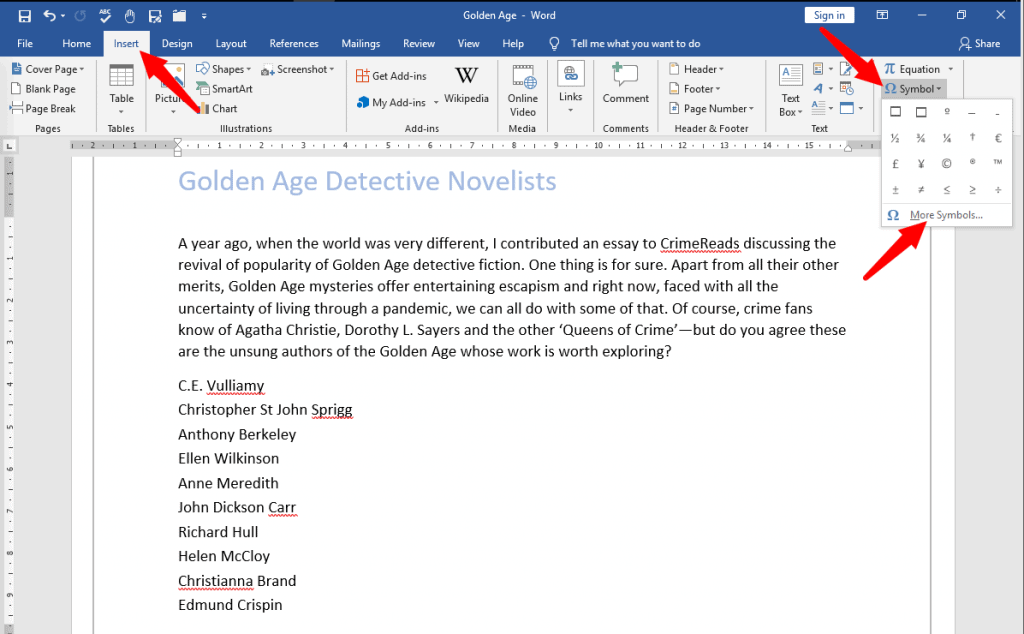
Step #3: Choose the Checkbox
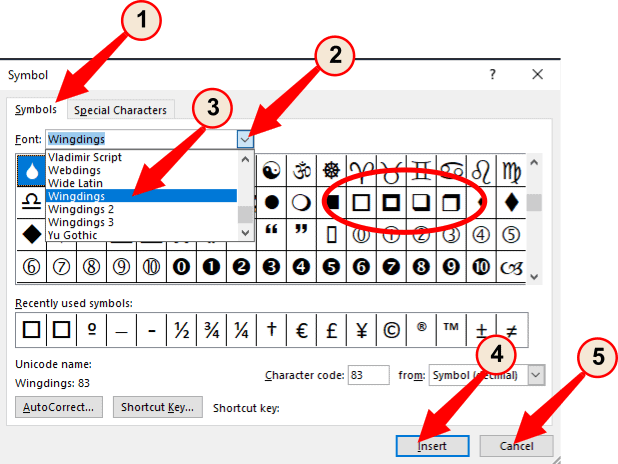
Under the Symbol [1] tab, click on the down arrow on the right side of Font[2] and select Wingdings [3]. Word will display a large number of symbols, from which you can select the type of checkbox you prefer to use in your document. Click on Insert [4] to insert the checkbox symbol into your document. Click on Close [5] to close the Symbol Dialog. From now on, your chosen checkbox appears within the group of symbols under Symbol.
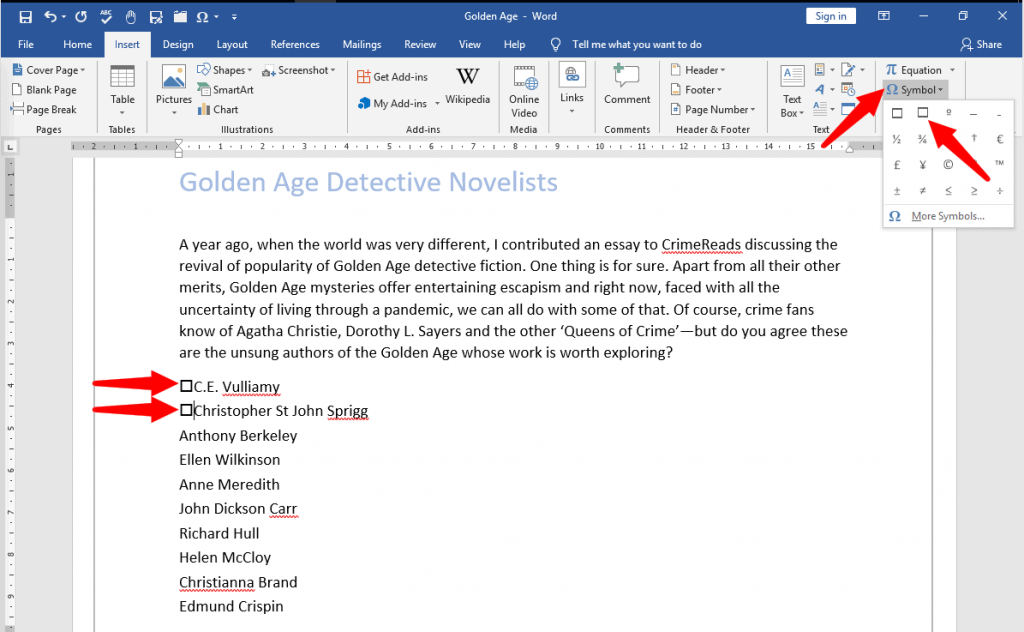
Step #4: Insert another Checkbox
Place the cursor where you want to insert the next checkbox. Click on Symbol under Insert tab (refer Step #2), and click on the checkbox symbol from within the group of symbols on display. This is how your document will now look like.
Method #2: Insert a Bulleted List of Non-Interactive Checkbox
Step #1: Open your Word Document
Open the Word document that contains the form or survey to which you wish to add non-interactive checkboxes. Select the list.
Step #2: Define a new bullet
Click on the Home tab on the top menu bar to change the ribbon. Within the section Paragraph, click on the small triangle beside Bullets to open the Bullet Library. Click on Define New Bullet at the bottom. This will open a Define New Bullet Dialog.

Step #3: Choose the checkbox
Click on the Symbol tab to open the Symbol dialog. Click on the down arrow on the right side of Font, and select Wingdings. Word will display a large number of symbols, from which you can select the type of checkbox you prefer to use in your document. Click on Ok, and you will return to the Define New Bullet dialog.
Step #4: Insert bulleted checkbox
Click on the down arrow under Alignment, and choose where you want to place the checkboxes in the gap preceding the list—on the left, centered, or on the right side. Click Ok to allow Word to place the checkboxes before the list.
This is how your document will now look like. Word has inserted a non-interactive checkbox against all entries in the list.
Method #3: Insert Interactive checkbox
Step #1: Open your Word Document
Open the Word document that contains the form or survey to which you wish to add interactive checkboxes. Place the cursor at the location where you want the checkbox to appear.
Step #2: Enable Developer Mode
Click on the small triangle in the Quick Access Toolbar to display a drop menu to Customize Quick Access Toolbar. Click on More Commands to open the Word Options dialog.
Click on Customize Ribbon. In the right column, under Customize the Ribbon, click on Developer, making sure a tick-mark appears on the checkbox immediately on the left. Click on Ok to close the dialog. Notice that Word has added a checkbox at the cursor position.

Notice that Word has also added a new tab Developer in its top menu bar.
Step #3: Insert the checkbox
Click on the Developer tab in the top menu bar to change the ribbon. Within the Controls section, click on the Check Box Content Control. You can place additional checkboxes at positions of your choice by placing the cursor there, and clicking on Check Box Content Control for inserting each checkbox.

Finally, this is how your document may look like. If you click on any checkbox repeatedly, its contents will change from blank to a cross and back.
Step #4: Modify the checkbox content properties
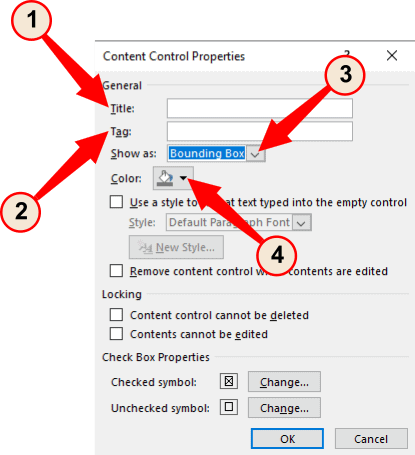
Word allows you to choose the default content of the interactive checkbox from blank, cross, and tick-mark. To modify a specific checkbox, click on it and then click on Properties within the Control section of Developer tab. This will open a Contents Control Properties dialog.
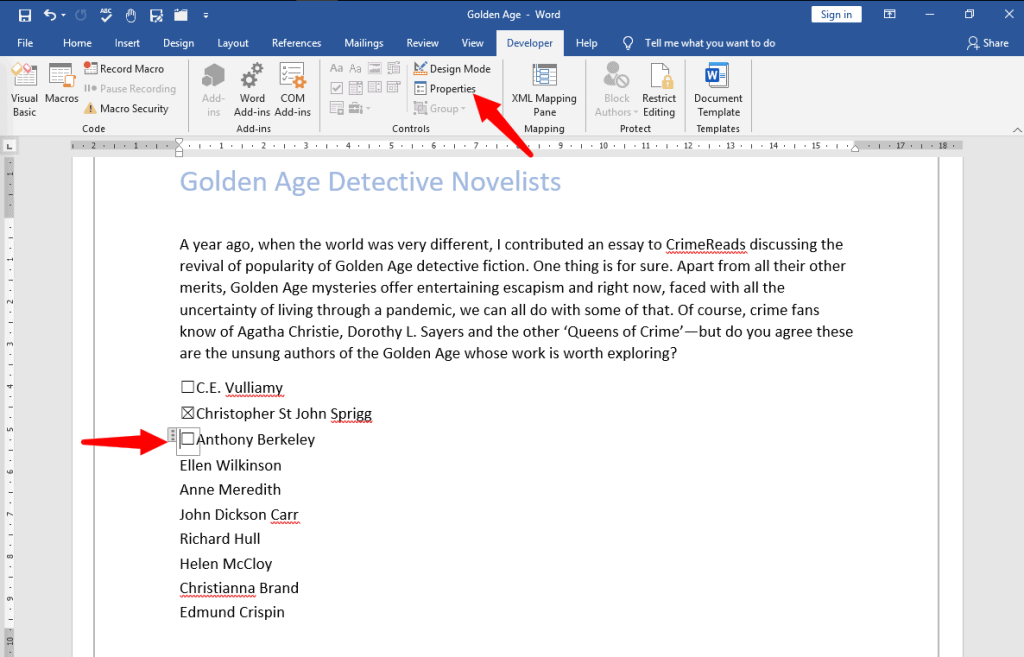
The Contents Control Properties dialog allows changing several properties of the selected checkbox. Under General, you may assign a Title [1] and a Tag [2] to the checkbox. You may also choose to Show as a Bounding Box, Start/End Tag, or as None [3]. You may also choose the color of the checkbox [4].
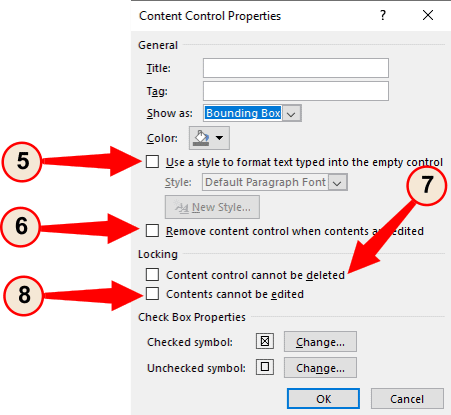
You may also choose to select your own text to appear within the checkbox [5] rather than a cross or tick-mark. You may also choose to make the checkbox contents blank when edited [6]. If necessary, under Locking, you can also choose to disallow deleting a checkbox [7] or prevent its contents from changing [8].
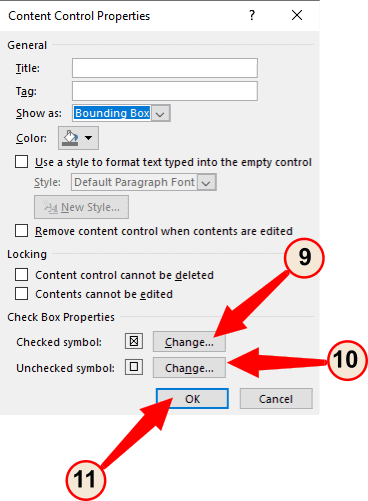
Under Check Box Properties, Word allows you to change the Checked Symbol [9] and the Unchecked Symbol [10]. Clicking on any of the Change tabs will take you to the Symbol Dialog, from where you can choose the Winding symbol of your preference (Refer Step #3 under Method #2). Click on Ok [11] to exit the dialog.
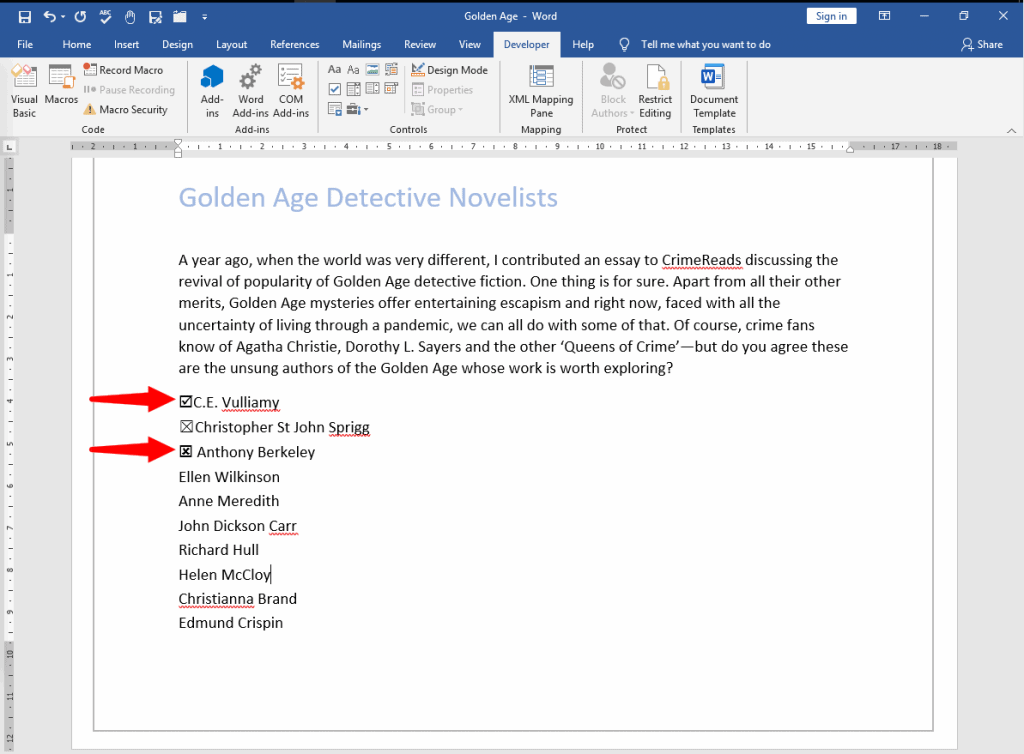
Finally, your document may look like this. Notice that items 1 and 3 have modified interactive checkboxes.
Conclusion
Obtaining feedback from your audience through forms or surveys is always easier when they have to check a few boxes, rather than express their answers. Word allows inserting checkboxes against a list of items, and allows the choice of presenting a printout or digital document to your audience for their feedback. We have shown you how to insert checkboxes in your document in a few simple steps.

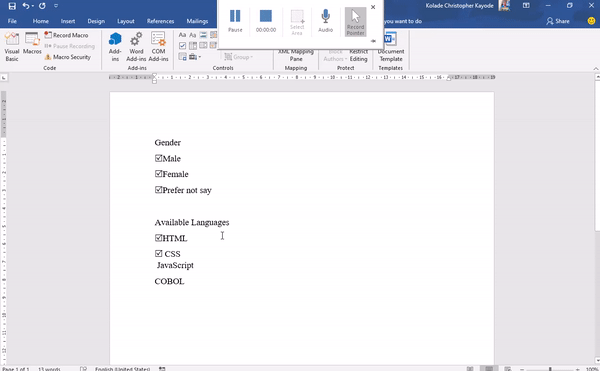
In Microsoft Word, you can create digital forms, surveys, to-do lists, and printable forms. And you might need to add a checkbox in these forms so your respondents can select certain options.
In this tutorial, I will show you how to insert an interactive checkbox in Microsoft Word for softcopy documents, and a non-interactive checkbox for hardcopy (printed) documents. Then you can start using them in your forms, surveys, and lists.
I will be using the Microsoft Word 2016 desktop app in this guide because it’s my personal preference. If you are using a different version, things may not be entirely the same, but you can still follow along.
How to Insert a Checkbox in Softcopy Documents like Digital Forms and Surveys
To insert a checkbox in a softcopy document (like forms and surveys that you want respondents to fill out digitally within the Word document), you’ll use the Developer tab in the menu bar.
Unlike other tabs such as File, Home, Insert, Design, and so on, the Developer tab doesn’t appear in the menu bar by default. So I will start this guide by walking you through how to show the Developer tab in the menu bar.
How to Show the Developer Tab
To show the Developer tab in the menu bar, first click on “File”:

Next, click “Options”:
Then select “Customize Ribbon” in the pop up that shows up:
Under “Main Tabs”, check the “Developer” option:

Finally, click “Ok”:
How to Insert the Checkbox in your Word Document
First, place the cursor where you want to insert the checkbox.
Next, click on the Developer tab in the menu bar. You will see options such as Add-ins, XML Mapping Pane, and some others (you will not see their names until you hover on them).
Hover on the one that has a checkmark and select it.
This will insert your checkbox.
How to Change the Icon of the Checked State of the Checkbox
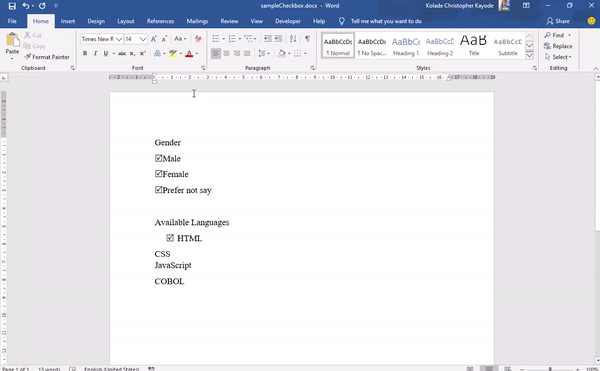
The checkbox becomes interactive immediately after you insert it. The only problem is that an «X» appears by default in the checked state, and you might want a checkmark instead of this.
So now I’m going to show you how to change the X to a checkmark.
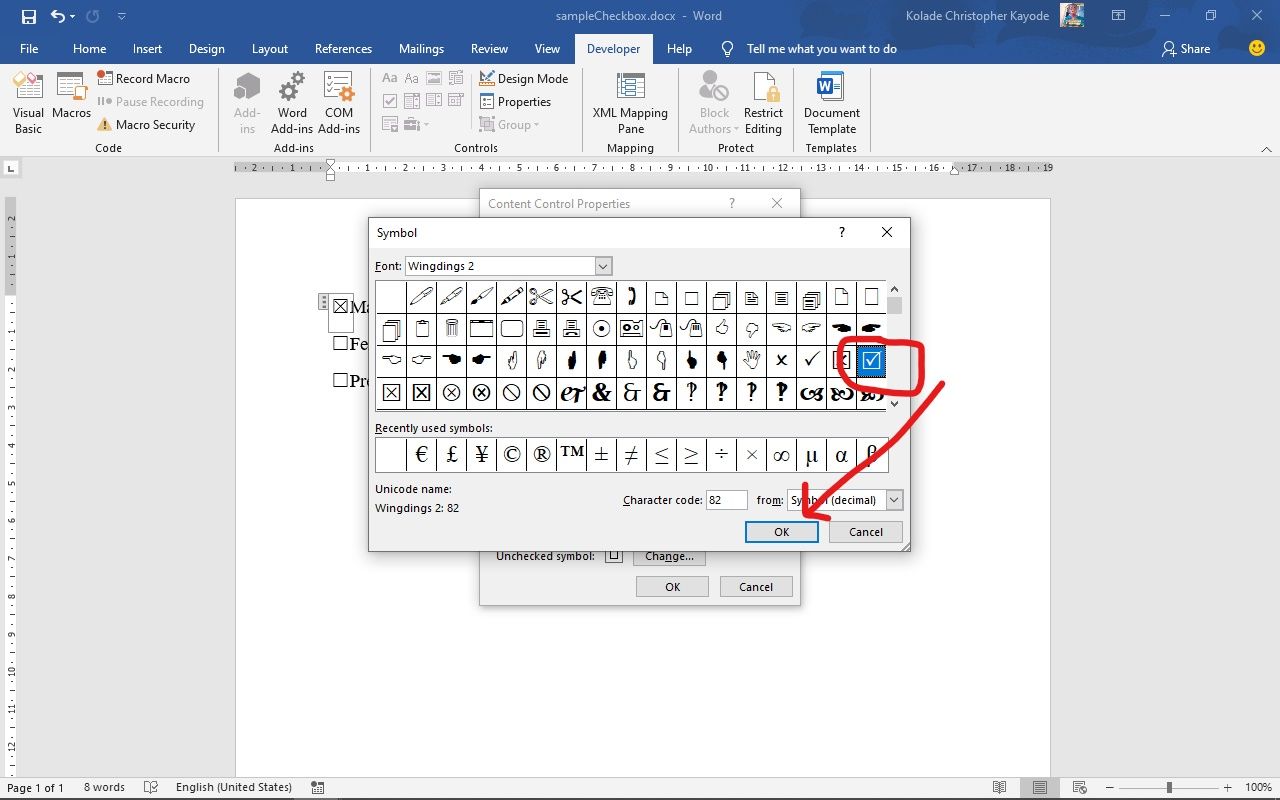
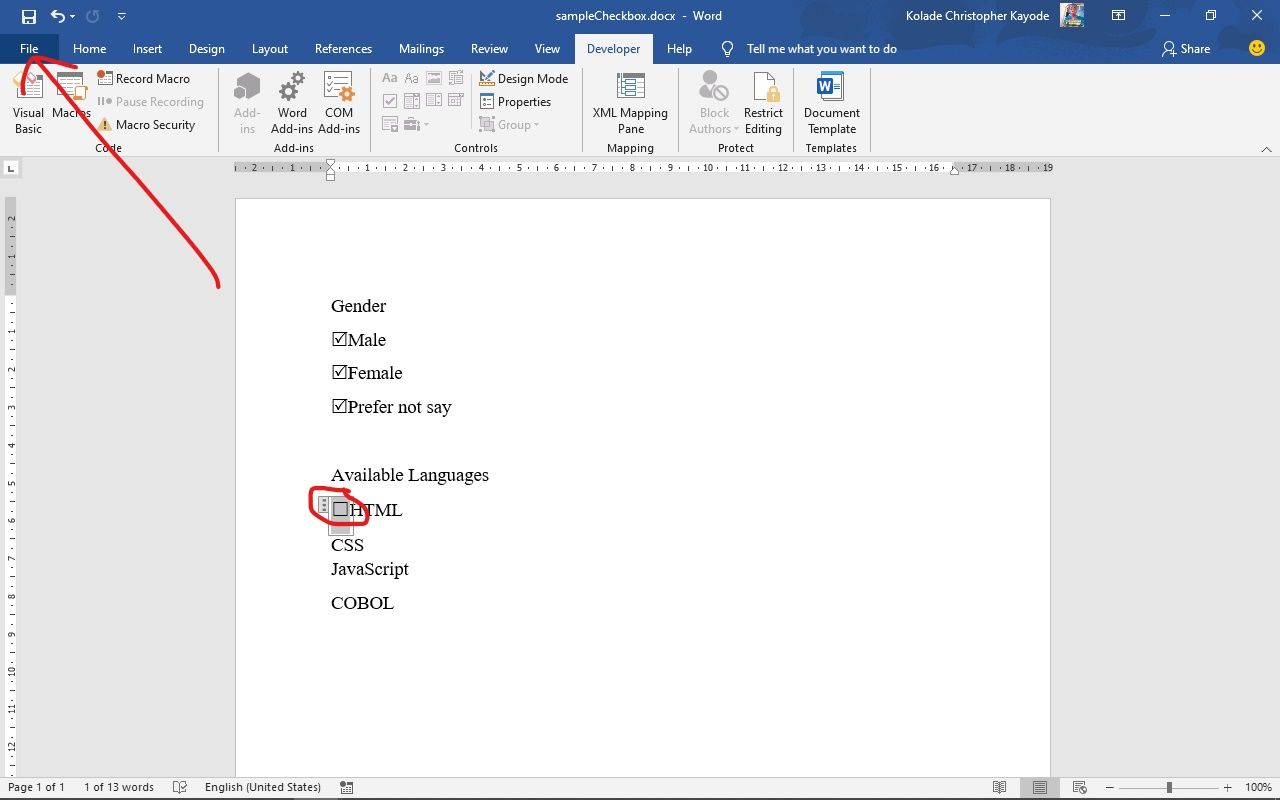
Step 1: Select the checkbox, or place the cursor right next to it:

Step 2: Click on the Developer tab and select “Properties”:

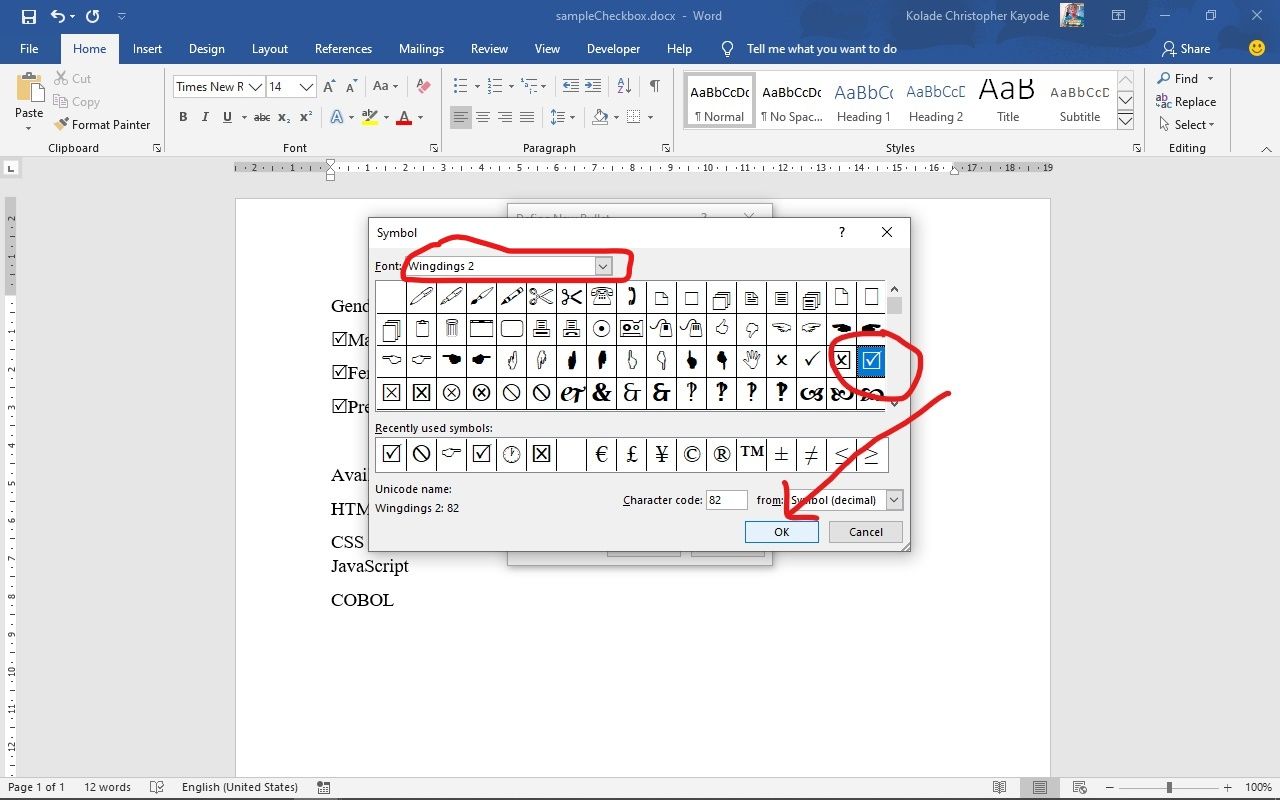
Step 3: You will see the default symbols for checked and unchecked symbols. Right next to the “Checked Symbol”, click “change”.
Step 4: In the popup that shows up, look for “winding2” under font and select it. You will see the common checkmark icons used for the checked state of checkboxes. Just select one of them and click “Ok”, then “Ok” again.
Below is a gif demonstrating how to change the checked icon:

You can follow the same process to change the unchecked state, as I’ve shown below:

How to Remove the Bounding Box of the Checkmark
Another way you can make the checkbox look better and make it user-friendly is to remove the bounding box that appears when it is checked or unchecked, and when the cursor is placed on it.
Step 1: Place the cursor on the checkbox.
Step 2: Select the Developer tab in the menu bar and click on “Properties”.
Step 3: Right next to “Show as”, click the dropdown and select “None”.
Thee 3 steps above are demonstrated in the animated gif below:
How to Insert a Checkbox in Hardcopy (Printed) Documents
If you are dealing with printed documents, you don’t need to dabble around with the Developer tab to insert a checkbox. Instead, you can define a custom bullet point for the purpose.
Step 1: Make sure you are on the Home tab of the menu bar.
Step 2: Click the Bullets dropdown icon:

Step 3: Click “Define new bullet”:
Step 4: Select «Symbol» in the popup that shows up:
Step 5: Select «Winding2» as the font.
Step 6: Choose the checkmark Icon and click “Ok”, then “Ok” again:
This is how its all done:
How to Create a Shortcut to Add an Interactive Checkbox in Word
If you want to continue inserting more interactive checkboxes, you don’t need to waste time by doing it from the Developer tab all the time. You can create a shortcut with the steps below.
Step 1: Make sure the checkbox is being shown as a bounding box.
Refer to the steps under the «Remove the Bounding Box” part of this tutorial to get a refresh on how to do this.
Step 2: Highlight the checkbox and click on the File tab of the menu bar:
Step 3: Click on “Options”:
Step 4: Select “Proofing” in the popup that comes up and click on “Autocorrect Options”:
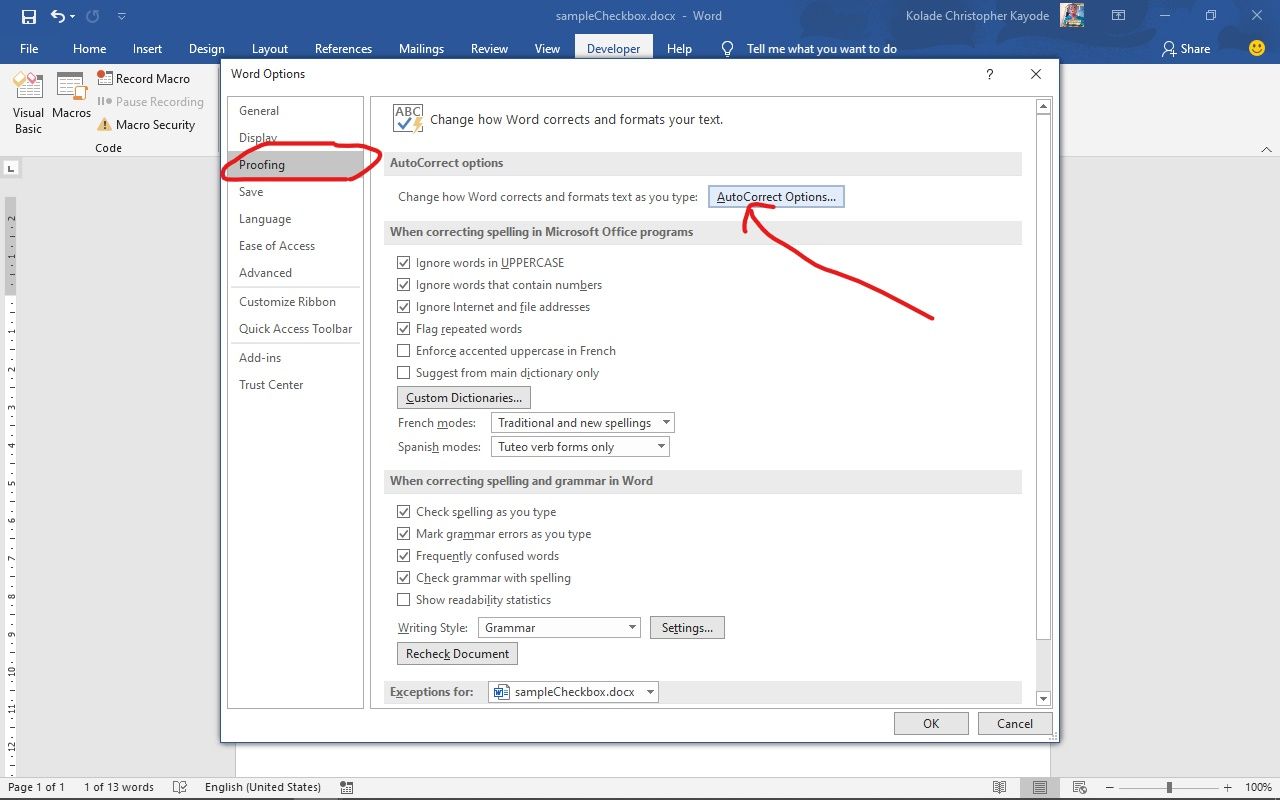
Step 5: You should see several options checked. Make sure “Replace text as you type” is checked too.
Step 6: In the editor under “Replace”, type in the shortcut you would like to use to insert checkboxes and click “Add”. Click “Ok” and “Ok” again.
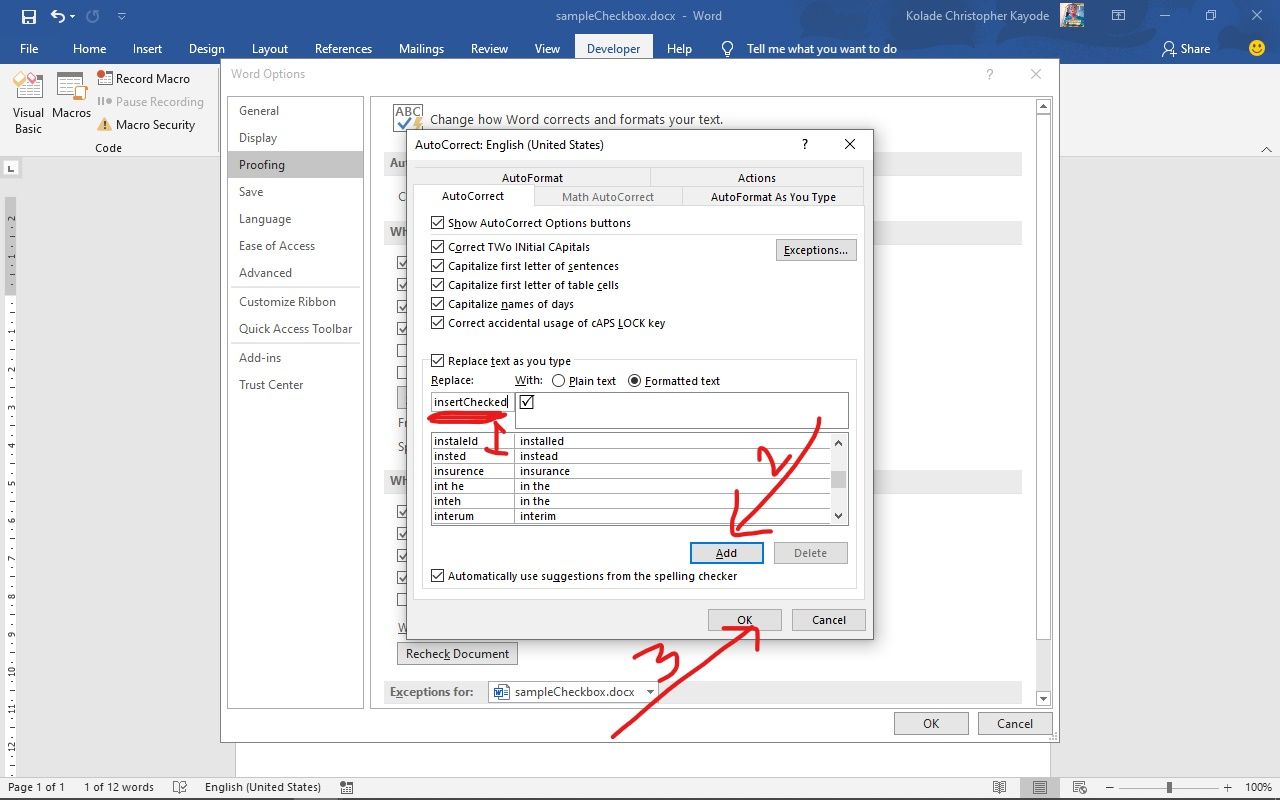
Now, to insert a checkbox, you can simply type the word you entered in step 6 and hit the space bar.
Conclusion
Checkboxes often play a crucial role in data collection using softcopy and printed documents. I hope this tutorial helped you understand how they work.
In this guide, you learned how to insert an interactive checkbox for fillable digital documents such as forms and surveys, and insert a non-interactive checkbox in printed documents.
Thank you for reading, and have a nice time.
Learn to code for free. freeCodeCamp’s open source curriculum has helped more than 40,000 people get jobs as developers. Get started
- You can insert a checkbox in a Word document in 2 ways, depending on how you want it to be used.
- If you want to print empty checkboxes that people can fill in real life, use Word’s «Home» tab.
- By enabling Word’s Developer ribbon, you can add functional checkboxes that can be filled on a computer.
We live in a world of checklists and checkboxes, so it stands to reason you might sometimes want to include checkboxes in documents you create.
There are two different kinds of checkboxes you can create in Microsoft Word: decorative ones for printed documents (that can be checked off in real life with a pen or pencil), and functional checkboxes that users can check with a mouse click if they’re viewing the document on a computer.
How to insert a checkbox in Word for printed documents
1. Position the cursor where you want to place the checkbox in your Word document.
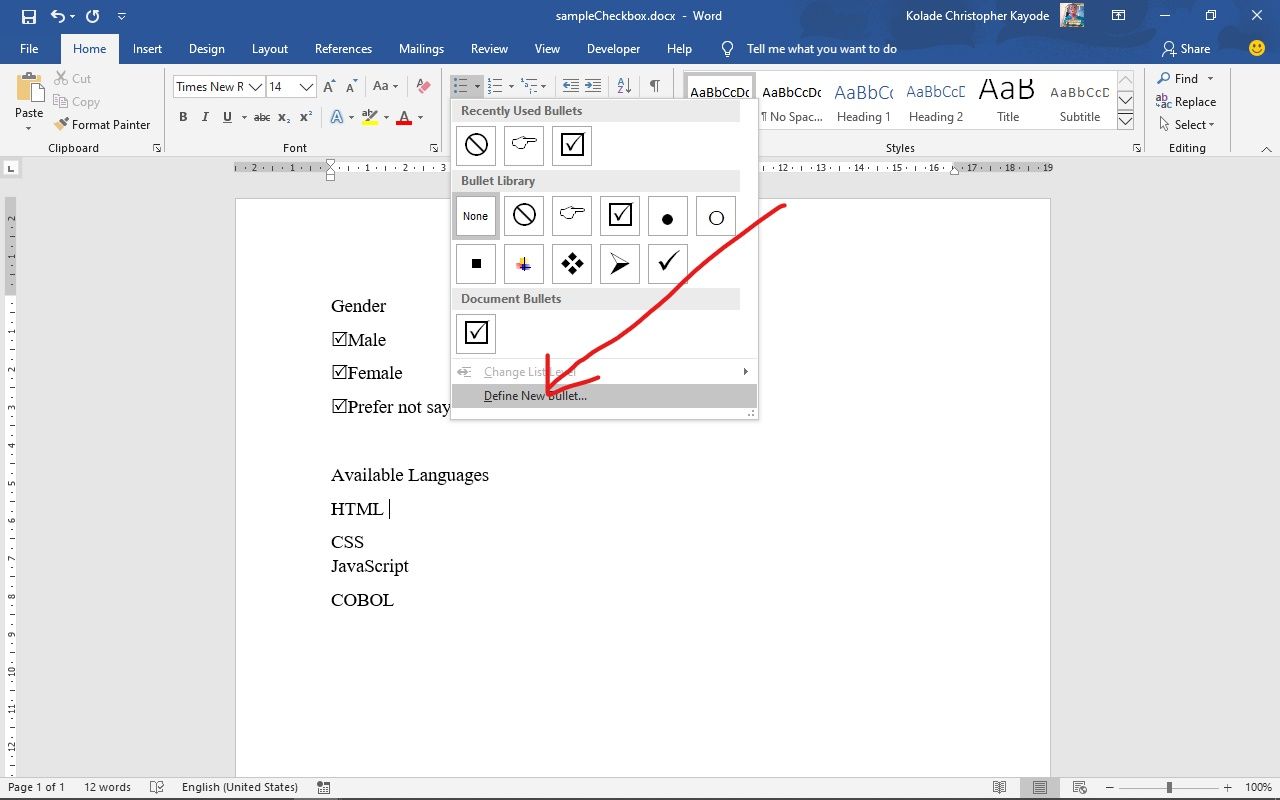
2. In the ribbon at the top of the screen, make sure you’re on the «Home» tab and then click the down-arrow beside the Bullets button.
3. In the drop-down menu, click «Define New Bullet.»
Dave Johnson/Insider
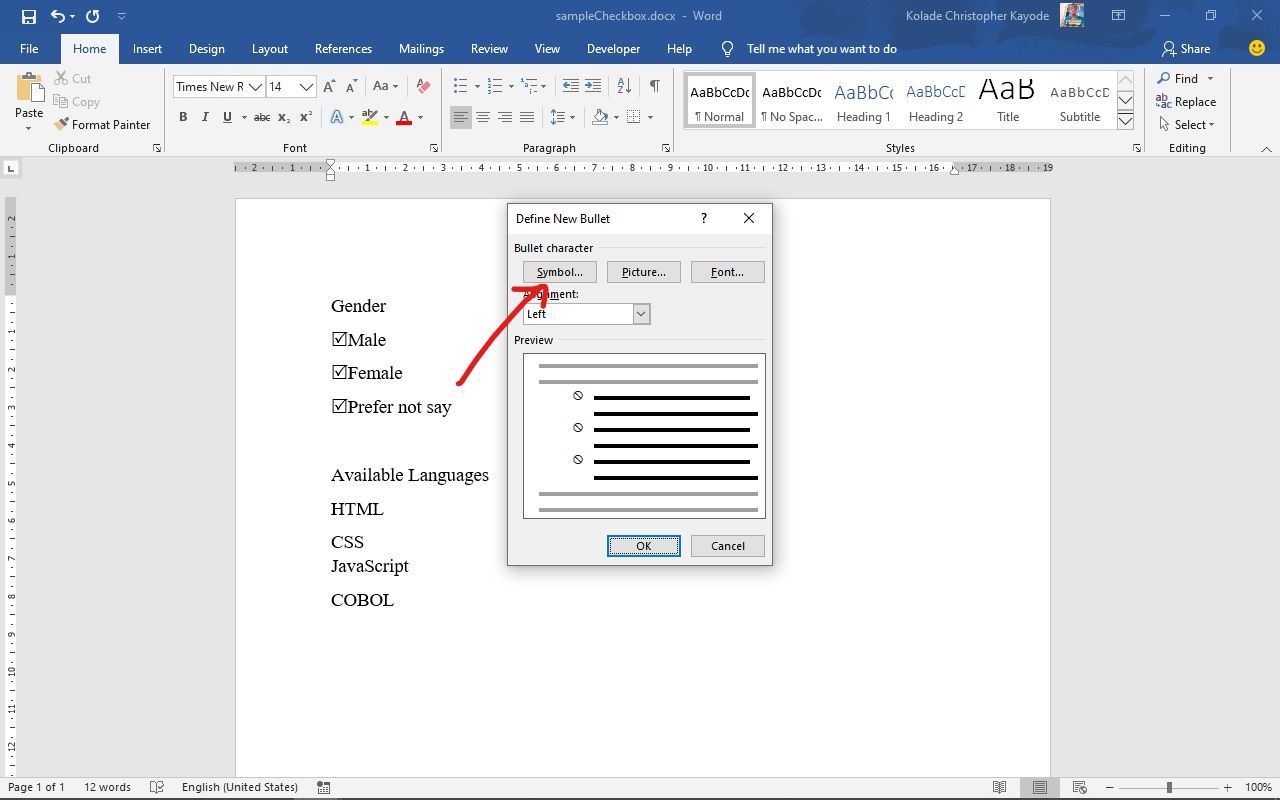
4. Click «Symbol.»
5. In the Symbol dialog box, find a symbol that looks like a checkbox. There are a number of options to choose from, but here’s a good choice: In the «Font» drop-down, choose «Wingdings 2» and then in the «Character code» field, enter «163.» If you like this option, click «OK.»
Dave Johnson/Insider
6. Click «OK» again to close the other open window.
7. The checkbox will now be added to your document.
To add more checkboxes, just use the Bullet button and it’ll be inserted automatically (to get your usual bullet back, click the down-arrow next to the Bullet button and choose the symbol you prefer). In the future, you can choose either the usual bullet or the checkbox from the menu without needing to select it from the «Define New Bullet» dialog box.
Dave Johnson/Insider
How to insert a checkbox in Word for electronic documents
If you want a «clickable» checkbox in electronic documents, you’ll need to enable the Developer ribbon in Options. You’ll only need to do that once, and then you can add a functional checkbox anytime you need it.
1. In the ribbon at the top of Word, click the «File» tab and then click «Options.»
Dave Johnson/Insider
2. In the Word «Options» dialog box, click «Customize Ribbon» in the navigation pane on the left.
3. In the «Customize the Ribbon» section on the right, choose «Main Tabs» from the drop-down menu and then click the checkbox for «Developer» in the list.
Dave Johnson/Insider
4. Click «OK» to close Word Options.
5. In the ribbon, click the new «Developer» tab.
6. In the «Controls» section, click the checkbox icon. You should see it appear in the document. It’s clickable – you can make it appear checked or unchecked by clicking.
Dave Johnson/Insider
Dave Johnson
Freelance Writer
Dave Johnson is a technology journalist who writes about consumer tech and how the industry is transforming the speculative world of science fiction into modern-day real life. Dave grew up in New Jersey before entering the Air Force to operate satellites, teach space operations, and do space launch planning. He then spent eight years as a content lead on the Windows team at Microsoft. As a photographer, Dave has photographed wolves in their natural environment; he’s also a scuba instructor and co-host of several podcasts. Dave is the author of more than two dozen books and has contributed to many sites and publications including CNET, Forbes, PC World, How To Geek, and Insider.
Read more
Read less
Your Microsoft Word document can be transformed into a checklist by adding checkboxes. Keeping track of completed, actioned, and completed items. Word has many great features, including the ability to insert checklists, especially when creating surveys. So, do you want to add checkboxes in Word to create a checklist for your survey?
It’s your lucky day if you’re looking for such an article that will help you to do so. Here we have mentioned some great ways using which you can easily create or add checkboxes in MS Word to create a checklist. Let’s move forward with the guide and see if any of the methods mentioned below helped you or not.
Why Inserting Check Box in Documents Important?
Using a checkbox allows the user to select one, a few, or none of the options in a list of options. Thus, checking one checkbox does not uncheck the others, as each checkbox is independent of all the others. There are plenty of names for checkboxes, such as check box, tick box, and tick box.
However, in other words, checkboxes are graphical widgets that provide the user with a binary choice, i.e., two mutually exclusive options. In a yes/no question, for example, the user may have to choose between yes (checked) and no (not checked).
How to Insert a Checkbox in Word in Softcopy Document
Using the Developer tab in Word’s menu bar, you can insert a checkbox in a softcopy document (such as surveys and forms that you want respondents to fill out digitally). However, the menu bar has no default Developer tab, unlike File, Home, Insert, Design, etc.
That’s why before moving to the main highlight of today’s article, i.e., create or add checkboxes in MS Word to create a checklist. We will first describe to you how to access the Developer’s tab. So, let’s check out the method to do so,
How to Show the Developer Tab in Word
So, as we have already mentioned earlier that there is no dedicated option using which you can access the developer tab directly. However, to access the Developer tab, you must have to follow these steps:
- First, click on File to reveal the Developer tab.

- The next step is to click Options.

- In the popup that appears, select Customize Ribbon.
- The Developer option can be found under the Main Tabs.
- Once you have clicked OK, you are done.


Well, you are now accessed the Developer’s tab. Therefore, now you are ready to know how to add checkboxes in Word to create a checklist. So, let’s check out the different methods to do so.
How to Create/Insert the Checkbox in your Word Document
Since you are now familiar with how to access the Developer’s tab, you are now able to insert the checkbox in your softcopy of documents such as .doc files. So, let’s check out the steps to do so:
- Firstly, place the cursor where the checkbox should appear.
- In the menu bar, click the Developer tab. In the list of options, you will find Add-ins, XML Mapping Pane, and some others (their names will not be visible until you hover over them).

- Now, make sure you select the one with a checkmark.
- That’s it. Now, it will insert your checkbox.


Can You Change the Icon of the Checked State of the Checkbox?
You can immediately interact with the checkbox after inserting it. The only problem is that when checked, an X appears by default, and you might not want this X, or we say cross sign. So now know how to turn the X into a checkmark.
- Put the cursor right next to the checkbox or select it.
- Access the Developer tab and select Properties.

- When you check or uncheck symbols, you will see the default symbols. You can change the Checked Symbol, and to do so, click on the change button.

- Select wingdings2 under font in the popup that appears. For checked checkboxes, you will see the common checkmark icons. Once you’ve selected one of the icons, click Ok, followed by Ok.


Remove the Bounding Box of the Checkmark
Whenever the checkbox is checked or unchecked or when the cursor is placed on it, the bounding box that appears can also be removed in order to make the checkbox look better and more user-friendly.
- Select the checkbox by placing the cursor over it.
- In the menu bar, select the Developer tab and click Properties.
- You can choose None from the dropdown menu right next to Show as.


How to Insert a Checkbox in Hardcopy Documents
Some documents, such as identification documents or authentication documents, frequently require hard copies. Physical copies may be the only option in such cases when digital copies aren’t sufficient. You do not have to fumble around with the Developer tab to insert a checkbox into printed documents. For this purpose, you may instead define a custom bullet point.
- On the menu bar, make sure the Home tab is selected.
- Then, to access the Bullets dropdown menu, click on it.
- Now, define a new bullet by clicking Define new bullet.

- In the popup window, select Symbol.
- Make sure Wingdings2 is selected as the font.

- You can select the checkmark icon and hit the Ok button followed by Ok.


Is There Any Way to Create a Shortcut to Add an Interactive Checkbox in Word
It’s unnecessary to go into the Developer tab whenever you want to add checkboxes in Word. Instead, you can create a shortcut to insert the checkbox on your Word document. So, here are some crucial steps that you need to follow in order to create a shortcut.
- It is important to make sure the checkbox is displayed as a bounding box. We have already mentioned in this article how to remove the bounding box. Therefore, if you don’t know about that, you can refer to that para above.
- Access the File tab located in the menu bar after selecting the checkbox.
- Select Options from the menu.
- In the popup that appears, click on Autocorrect Options under Proofing.

- The checkboxes should be filled in for several options. Ensure Replace text as you type is also checked.
- To insert checkboxes, type in the shortcut under Replace and click Add. You will need to click Ok followed by Ok.

- That’s it. Now, you do not have to perform the whole steps; instead, you directly start typing the Word that is entered in step number 6 and press the space bar.


Conclusion
A variety of forms can be created with Microsoft Word, including digital forms, surveys, to-do lists, and printable forms. There might be a need to include a checkbox so your respondents can choose certain options in these forms.
Well, that’s what we have already explained in this guide. Therefore, we hope that you now know how to insert checkbox in Word to create a checklist. But, in case you have any doubts or queries, comment below and let us know.
READ NEXT:
- What is Kahoot.it Game Pins 2023 and Best Kahoot Join Codes
- How To Make One Page Landscape In MS Word Document
- MS Office 2013 Professional Download Free Full Version
- Microsoft Office 2019 Professional Free Download Full Version
- Download LibreOffice 2023 Offline Installer for Windows 11