
Word for Microsoft 365 Word for Microsoft 365 for Mac Word 2021 Word 2021 for Mac Word 2019 Word 2019 for Mac Word 2016 Word 2016 for Mac Word 2013 Word 2010 Word 2013 Developer Word Starter 2010 More…Less
Sometimes, putting a border around text will work better in your document than inserting a text box or a one-cell table, to achieve a similar look.
-
Select a word, line, or paragraph.
-
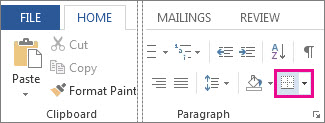
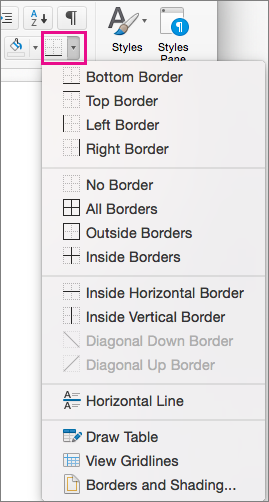
Go to Home > Borders, and then open the menu of border choices.

-
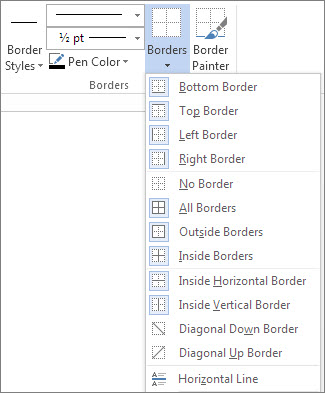
Choose the type of border you want:
Customize the border
-
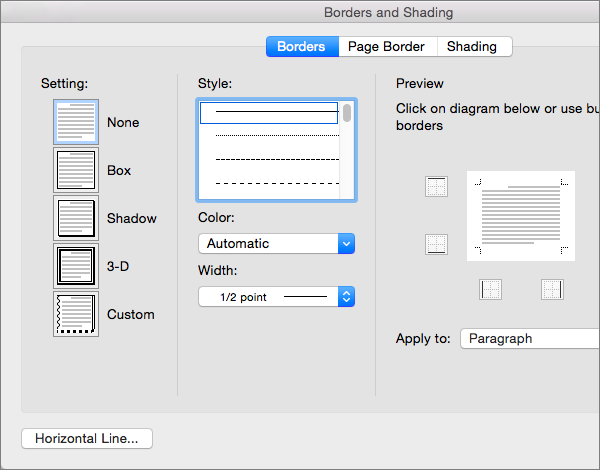
After you’ve selected your text and found the basic type of border you’d like, open the Borders menu again, and choose Borders and Shading.
-
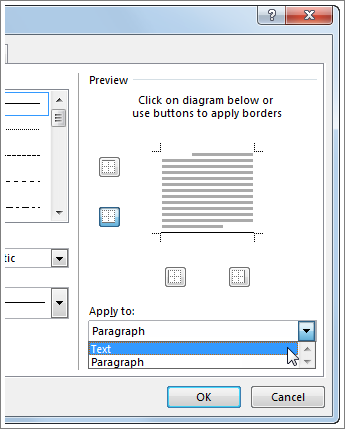
Make your choices for style, color, and width, and then apply the choice with the buttons in the Preview section of the dialog box. When the preview is the way you want it, click OK.
Note: Make sure that the Apply to box has the correct setting: Text or Paragraph.
See Also
Add, change, or delete borders from documents or pictures
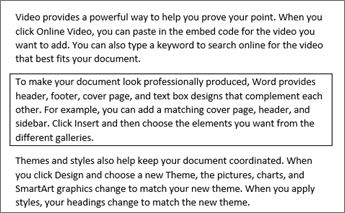
You can add a border to an individual word, a line of text, or an entire paragraph. You can make borders as plain or fancy as you want.
You can also add a border to a picture, put a border around a table, add a border to an individual page.
Add a border to selected text
-
Select a word, line, or paragraph.
-
On the Home tab, click the arrow next to the Borders button.
-
In the Borders gallery, click the border style that you want to apply.
Customize the text border
-
After you’ve selected your text and found the basic type of border you’d like, click the arrow next to the Borders button again, and then click Borders and Shading.
-
In the Borders and Shading dialog box, change Setting, Style, Color, and Width to create the border style that you want.
Note: To make sure the border style is correctly applied, set Apply to to Text or Paragraph. If you haven’t selected any text, you can only set Apply to to Paragraph.
-
Click OK to apply your selected border styles.
Tip: You can also fill the area of your selected text with color. In the Borders and Shading dialog box, click Shading to select a color and patterns. The color you pick in the Fill list fills the rectangular area; the color you select from the Color menu is applied to the rectangular area in a pattern you select from the Style list.
See Also
Add, change, or delete borders from documents or pictures
Add a border to a table
Need more help?
Select the texts you will add borders, click Home > Borders > Borders and Shading. See screenshot: 2. In the Borders and Shading dialog box, select the Up, Down, Left and Right border boxes in the Preview section, select Text from the Apply to drop-down, and then click the OK button.
Contents
- 1 How do I Colour a box around text in Word?
- 2 How do you put a box around a paragraph?
- 3 Can you put a border around a text box?
- 4 How do you make a text box transparent in Word 2020?
- 5 How do I create a Text Box without borders?
- 6 How do you type a box?
- 7 How do I make Text Box lines disappear in Word?
- 8 How do I put a frame around a picture in Word?
- 9 Why can’t I add a text box in Word?
- 10 How do I edit text in a text box in Word?
- 11 How do I make a box symbol in Word?
- 12 Can you insert a text box in Word Online?
- 13 Can you add a text box in Word Online?
How do I Colour a box around text in Word?
Change the text color
- Select the shape or text box.
- On the Drawing Tools Format tab, click Text Fill > More Fill Colors.
- In the Colors box, either click the color you want on the Standard tab, or mix your own color on the Custom tab.
How do you put a box around a paragraph?
How to Put Borders Around a Paragraph in Word 2016
- Place the insertion pointer in a paragraph.
- Click the Home tab.
- In the Paragraphs group, click the triangle next to the Borders command button. The Borders menu appears.
- Choose a border style from the menu.
Can you put a border around a text box?
Add a custom border
Right-click the text box, AutoShape, picture, or object that you want to add the border to. Select the appropriate Format
-
1
Click the Insert tab.
-
2
On the right side of all of the things you can insert, look for ‘Text Box.’
Advertisement
-
3
Select the text box that you want to use and double click on it.
-
4
Cut and paste the text into the text box.


Advertisement
Ask a Question
200 characters left
Include your email address to get a message when this question is answered.
Submit
Advertisement
Video
-
To change the size of the text box, click on it once, and drag one of the 8 circles.
-
You can change the design of the text box you have selected by going into the format tab.
Thanks for submitting a tip for review!
Advertisement
About This Article
Thanks to all authors for creating a page that has been read 98,464 times.
Is this article up to date?
wikiHow Tech Help Pro:
Level up your tech skills and stay ahead of the curve
Let’s go!

When you need to highlight a portion of text, it’s not always convenient to use a text box. To emphasize a paragraph while keeping it within the main content, you can put a border around that text in Word instead.
You can put a border around specific text, such as a single sentence, or an entire paragraph. Let’s look at how to do both as well as customize the border.
Select the text you want to surround with a border and go to the Home tab. Click the drop-down arrow next to Borders and choose “Borders and Shading.”

Use a Setting option on the left or the buttons below Preview on the right to add the border around the text. You can also adjust the Style, Color, and Width settings in the center of the window to customize the line for the border.
RELATED: How to Add Borders to or Change Borders on a Table in Word
In the Apply To drop-down box on the right side, select “Text” and when you finish, click “OK” to apply the border.
You’ll then see your text outlined with a border.
Put a Border Around a Paragraph
If you have an entire paragraph you’d like to place a border around, the process is similar. However, you have a few extra customization options.
RELATED: How to Put Borders Around Images in Microsoft Word
Select the paragraph you want to surround with a border and head to the Home tab. Click the Borders drop-down arrow and pick one of the quick border options such as Outside Borders or All Borders.
This places the border around the paragraph from margin to margin on each side and gives you a fast way to add the border. But you can also customize the border and adjust the space between the border and the text.
Select the bordered paragraph, click the drop-down arrow next to Borders on the Home tab, and choose “Borders and Shading.”
Like with customizing the border for specific text, you can change the Style, Color, and Width for the border line. Confirm that “Paragraph” is selected in the Apply To drop-down box. Then, to adjust the spacing, click “Options” on the right side of the window.
At the top, use the arrows or enter the number of points for the spacing on the top, bottom, left, and right of the border in relation to the text. As you make the changes, you’ll see a preview directly below. Click “OK” when you finish.
Make any other adjustments you want in the Borders and Shading window and click “OK” when you’re done to apply the border.
RELATED: How to Change Page Margins in Word
Remove a Border From Text in Word
If you decide later to remove a border you’ve added, it takes only a few clicks. Select the text or paragraph containing the border and revisit the Home tab. Click the drop-down arrow next to Borders and pick “No Border.”
Text boxes in Word are great ways to call out portions of text. But if you want to keep your text in line with the rest and simply highlight a small piece, consider surrounding it in a border. For other types of borders, take a look at how to create a page border in Word.
READ NEXT
- › How to Outline Text in Adobe Photoshop
- › How to Mirror or Flip Text in Microsoft Word
- › HoloLens Now Has Windows 11 and Incredible 3D Ink Features
- › Google Chrome Is Getting Faster
- › BLUETTI Slashed Hundreds off Its Best Power Stations for Easter Sale
- › How to Adjust and Change Discord Fonts
- › This New Google TV Streaming Device Costs Just $20
- › The New NVIDIA GeForce RTX 4070 Is Like an RTX 3080 for $599
How-To Geek is where you turn when you want experts to explain technology. Since we launched in 2006, our articles have been read billions of times. Want to know more?
Moving Images Behind Text
Select the shape.
Make sure the Format tab of the ribbon is displayed.
In the Arrange group, click the down-arrow next to the Send to Back tool (Word 2007 or Word 2010) or the down-arrow next to Send Backward tool (Word 2013 or a later version). …
Choose Send Behind Text from the submenu.
Therefore, How do I insert text without box in Word?
Remove the border
- Select the text box or shape. If you want to change multiple text boxes or shapes, click the first text box or shape, and then press and hold Ctrl while you click the other text boxes or shapes.
- On the Format tab, click Shape Outline, and then click No Outline.
As well, How do I put a shape behind a shape in Word?
Add a color or pattern behind a group of objects, an entire page,…
- On the Insert tab, click the Shapes button, click the shape that you want, and then drag the shape so that it surrounds the group of objects. …
- In the Arrange group, point to Send Backward, and then click Send to Back.
Furthermore, How do I put text in front of a shape in Word? Click the WordArt, shape, or text box that you want to move up or down in the stack. On the Drawing Tools Format tab, click either Bring Forward or Send Backward. You’ll have the choice of moving the object up one layer (Bring Forward) or to the top of the stack (Bring to Front).
What is a text wrapping? Alternatively referred to as text flow, text wrap is a feature in text editors and word processors. It allows the user’s text to be continued to the next line when the side of the page is reached. Soft return, Word processor terms, Word wrap.
How do you put a box around text in Word?
Select the text you want to surround with a border and go to the Home tab. Click the drop-down arrow next to Borders and choose “Borders and Shading.” Use a Setting option on the left or the buttons below Preview on the right to add the border around the text.
How do you insert text in Microsoft Word?
Go to Insert > Text Box. Click in your file where you’d like to insert the text box, hold your mouse button down, then drag to draw the text box the size that you want. After you’ve drawn the text box click inside it to add text.
How do you create a text box in Word?
Draw Text Boxes
- From the Insert tab, expand the Text group, if necessary.
- Click the Text Box button.
- Select Draw Text Box.
- Click and drag in your document to create the text box.
Can you make layers in Word?
To layer items in any Word document, including label templates, you need to use the “Arrange” tools. The key tools that you need are “Bring Forward”, “Send Backward”, and (if you are using pictures or shapes) “Wrap Text”. To find the Arrange tools, left click on an image to select it.
How do you keep a shape from moving in Word?
Stop Graphics and Text from Jumping Around
- Display the File tab of the ribbon, then click Options. …
- Click Display at the left side of the dialog box. …
- Select the Object Anchors check box.
- Click on OK.
- In Print Layout view, select the shape (the block arrow).
How do you repeat headers in Word?
Repeat table header on subsequent pages
- In the table, right-click in the row that you want to repeat, and then click Table Properties.
- In the Table Properties dialog box, on the Row tab, select the Repeat as header row at the top of each page check box.
- Select OK.
How do I insert text into text in Word?
Type over text in Word for Windows
- In Word, choose File > Options.
- In the Word Options dialog box, choose Advanced.
- Under Editing options, do one of the following: To use Insert key to control Overtype mode, select the Use Insert key to control overtype check box.
How do you create a text box in Word?
Add a text box
- Go to Insert > Text Box, and then select Draw Text Box.
- Click or tap in the document, and drag to draw the text box the size that you want.
- To add text to a text box, select inside the text box, and then type or paste text. Notes:
How do I group a text box and shape in Word?
Group shapes, pictures, or objects
- Press and hold CTRL while you select the shapes, pictures, or objects that you want to group. The Wrap Text option for each object must be other than In line with Text. …
- Go to Drawing Tools or Picture Tools, on the Format tab, in the Arrange group, select Group. , and then select Group.
What does the text wrap option look like?
The text wrap you will probably use the most is the square text wrap, but there are other text wraps too. Tight/Through—Text wraps around image, regardless of what shape the image is.
…
Text Wrap Options.
| Square text wrap | Tight text wrap |
|---|---|
| Behind text | In front of text |
What are the different types of text wrapping?
What are the Text Wrapping Options?
- Square, Tight, and Through: These three options are all variations on the same thing. …
- Top and Bottom: This option keeps the text above and below the object, but not to its sides.
- Behind Text and In Front Of Text: These two options don’t affect the text at all.
In which tab Wrap text option is available?
In a worksheet, select the cells that you want to format. On the Home tab, in the Alignment group, click Wrap Text.
How do you put a border on Microsoft Word Mobile?
Choose a margin from the gallery in Word
- On your Android tablet, tap Layout. On your Android phone, tap the Edit icon. , tap Home, and then tap Layout.
- On the Layout tab, tap Margins.
- Select a margin from the drop-down gallery. Each selection shows the margin measurements.
How do you make a 0.2 hanging indent?
Create a hanging indent
- Select the text where you want to add a hanging indent.
- Go to Home > Paragraph dialog launcher. > Indents and Spacing.
- Under Special, select Hanging. You can adjust the depth of the indent using the By field.
- Select OK.
Why is there a blue box around my text in Word?
The blue boxes indicate “direct formatting” has been applied, as opposed for formatting that was determined by a Style.
- Reference 1
- Reference 2
- Reference 3
- Reference 4
- Reference 5
Вариант 1: Вокруг страницы с текстом
Если нужно обрамить всю страницу, на которой находится текст, то сделать это возможно с помощью встроенных инструментов MS Word на вкладке с дизайном. Чтобы сделать рамку вокруг всей страницы, действуйте следующим образом:
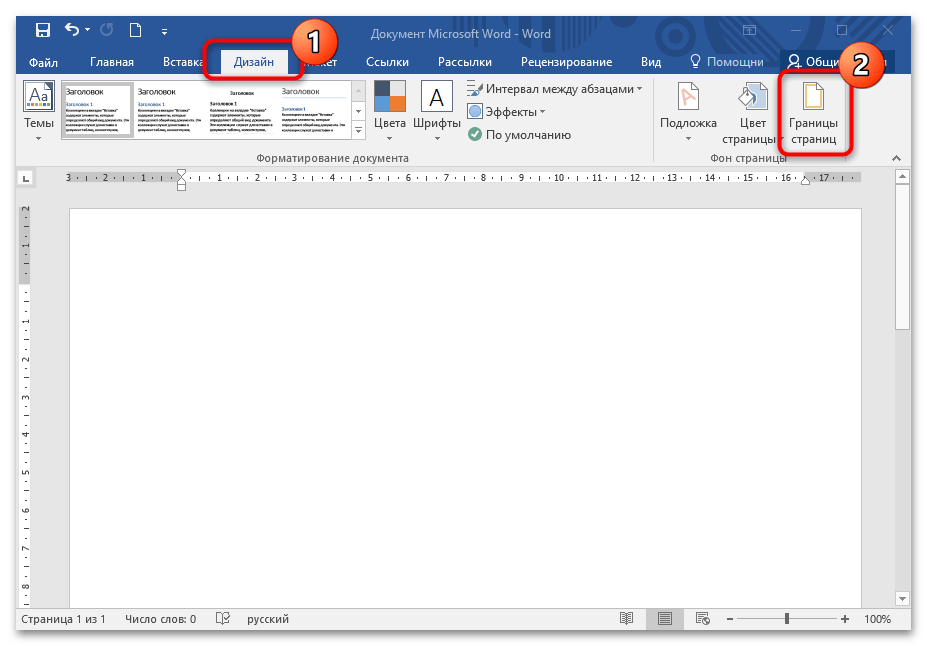
- В открытом документе откройте вкладку «Дизайн» на верхней панели. В блоке с фоном страницы нажмите на кнопку «Границы страниц».
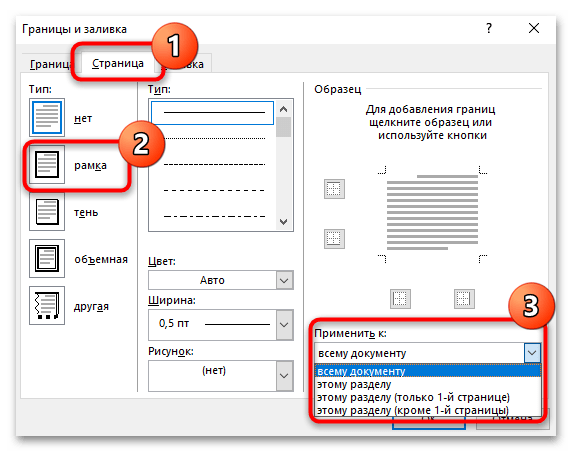
- В открывшемся окне на вкладке «Страница» в разделе «Тип» выберите шаблон с рамкой. Можно также определить, к какой части документа будут применены границы. Для этого раскройте меню «Применить к:».
- Для сохранения изменений щелкните по кнопке «ОК», расположенной внизу.

На этом добавление рамки вокруг всей страницы с текстом завершено. В окне с границами страниц можно поэкспериментировать и выбрать тип линий, их толщину, цвет и добавить рисунок, если нужно.
Вариант 2: Вокруг отдельного текста
Чтобы добавить границы не для всей страницы, а для отдельного абзаца, действовать придется иначе. Для добавления рамки вокруг определенного текста в документе нужно проделать следующее:
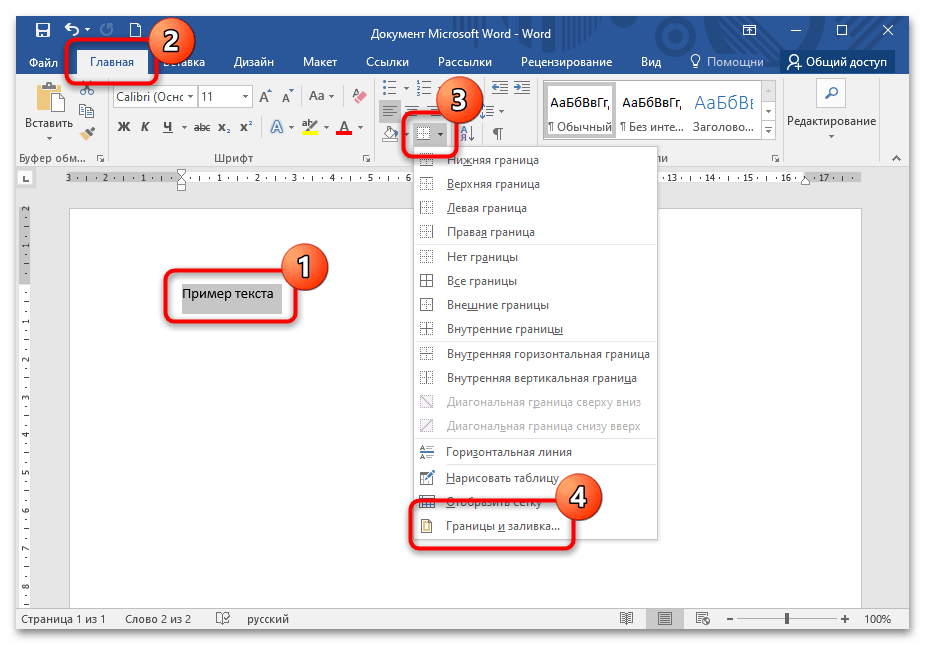
- Выделите нужный отрывок текста, затем, находясь на вкладке «Главная», нажмите на стрелку около иконки в виде квадрата в разделе «Абзац». Из появившегося списка выберите пункт «Внешние границы».
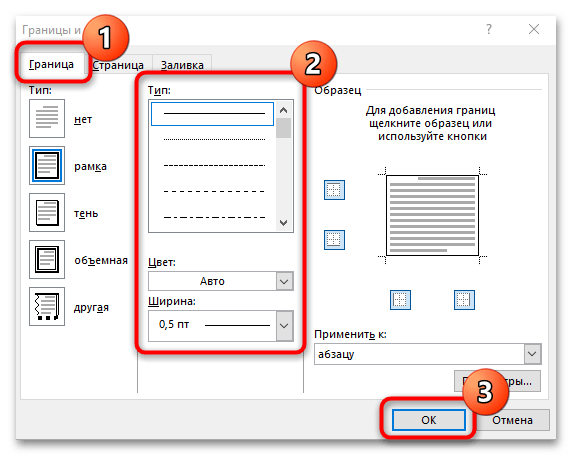
- Если нужно задать стиль или ширину линий, то перейдите в пункт «Границы и заливка…».
- На вкладке «Граница» выберите тип рамки, стиль, ширину и другие параметры. Для сохранения настроек кликните по кнопке «ОК».

В отличие от добавления границ для страницы, красивую рамку с рисунками для абзаца сделать нет возможности.
Читайте также: Как убрать рамки в Ворде
Еще статьи по данной теме:
Помогла ли Вам статья?
Microsoft 365, Microsoft Word, Office 2007, Office 2010, Office 2013, Office 2016, Office 2019, Office 2021 / Office LTSC, Office 365 /
5 August 2022
How to put text around an object; image, chart, shape or other Microsoft Word object.
Continuing from our look at putting Word text vertically, at an angle or curved
Text around a Box
Putting text around a box requires four separate text boxes, positioned and grouped around the object.
Here’s a chart with four text boxes around it.

Use the Insert | Text Box | Draw Text Box option to roughly place the four boxes around the object. Then drag each box to its exact position.

Smart users will make just two boxes (top and left), position and format them then copy those two for the matching bottom and right boxes.
Tip: group the four text boxes together in the selection pane to make management easier. If you’ll be editing the document regularly, rename the objects to clearer names then just ‘Text Box …’ etc.

Text around a Circle
For a circular object, make a curved text box with a ‘No Fill’ or transparent background.

‘No Fill’ transparency will let you place the text box over the object without hiding the object underneath.

As you can see, the text curve doesn’t exactly match the smiley face curve. You can try adjusting the curve but you might find that Word doesn’t have enough fine control to get the exact effect you’d like.

How to set text on its side, an angle or a curve in Word
Two ways to add Gradient or Rainbow text or background effects in Word
See more with Selection Pane in Excel, PowerPoint and Word
![]()
vbnitwit
asked on 6/7/2004
Okay heres the dealeo. I have a form that outputs to word and prints. How can I put boxes around sections of text. I have a two column text area that i need to have a box around it when it prints.
Part 2. How do i make a 2 column area besides using a table. I may just use the table idea though.
Visual Basic.NET

Last Comment
Bob Learned
8/22/2022 — Mon
I’m nowhere near an expert so not sure if there’s an easy way to do what you want, but this is just what I have done when outputting to word. Design a word template the way you want it to look, then have it pull in the information you need. Works well with automating the forms I’ve had to make by pulling all the information from the database instead of making the user type in all of the information over again. Did this with MS Access and VBA, and just started working on my first project with VB.net and SQL Server so not sure if it will be as easy.
Again not really that great with VB.net yet, so can’t help too much besides my suggestion.
Bryan
mainly i just want to know how to make a table that the outer part is bordered but the individual cells are not.
This might be something worth checking out. It explains how to create a table through code and draw the cell borders.
http://www.vbdotnetheaven.com/Code/Jun2003/2088.asp
I’d still suggest trying to do a word template if it’s a form you print out often. Simple to do and setting the table borders without individual cells outlined is a lot easier to do than through code.
okay well i still cant get this. Heres what I want to do. I want a 5 column table. Easy stuff. Heres the hard part. i want the table to have just a border around the outside and no borders of the individual cells.
THIS SOLUTION ONLY AVAILABLE TO MEMBERS.
View this solution by signing up for a free trial.
Members can start a
7-Day free trial
and enjoy unlimited access to the platform.
through code. i know how to do it with word. Thanks though.
anyone? im still looking for this.
THIS SOLUTION ONLY AVAILABLE TO MEMBERS.
View this solution by signing up for a free trial.
Members can start a
7-Day free trial
and enjoy unlimited access to the platform.