
This purchase order (PO) template for Excel is a simple and budget-friendly solution for your business. If you need to create purchase orders, you may not need special software. If you already use Excel or Google Sheets, just download our Purchase Order Template and customize it to create an order form with your contact and shipping information.
Advertisement
This PO template was created based on our original sales invoice template, so buyers and sellers can benefit from using similar tools. If you are a vendor and need a purchase order form template for your customers to use, you can simply point them to this page.
for Excel, OpenOffice, and Google Sheets

«No installation, no macros — just a simple spreadsheet» — by
To create a purchase order, follow these steps:
- Customize the purchase order spreadsheet by adding your company’s name, contact, and shipping information.
- Add the seller’s contact information in the Vendor section.
- Save a backup copy of your file (perhaps a separate copy for each major vendor).
- After you complete the order form, save a copy for archival purposes.
- Save the PO as a PDF file and email it to your supplier.
You can use the Purchase Order Tracker spreadsheet to keep track of the POs that you create. Doing this will also help you know what PO# to assign to the next order.
Purchase Order with Vendor List

Description
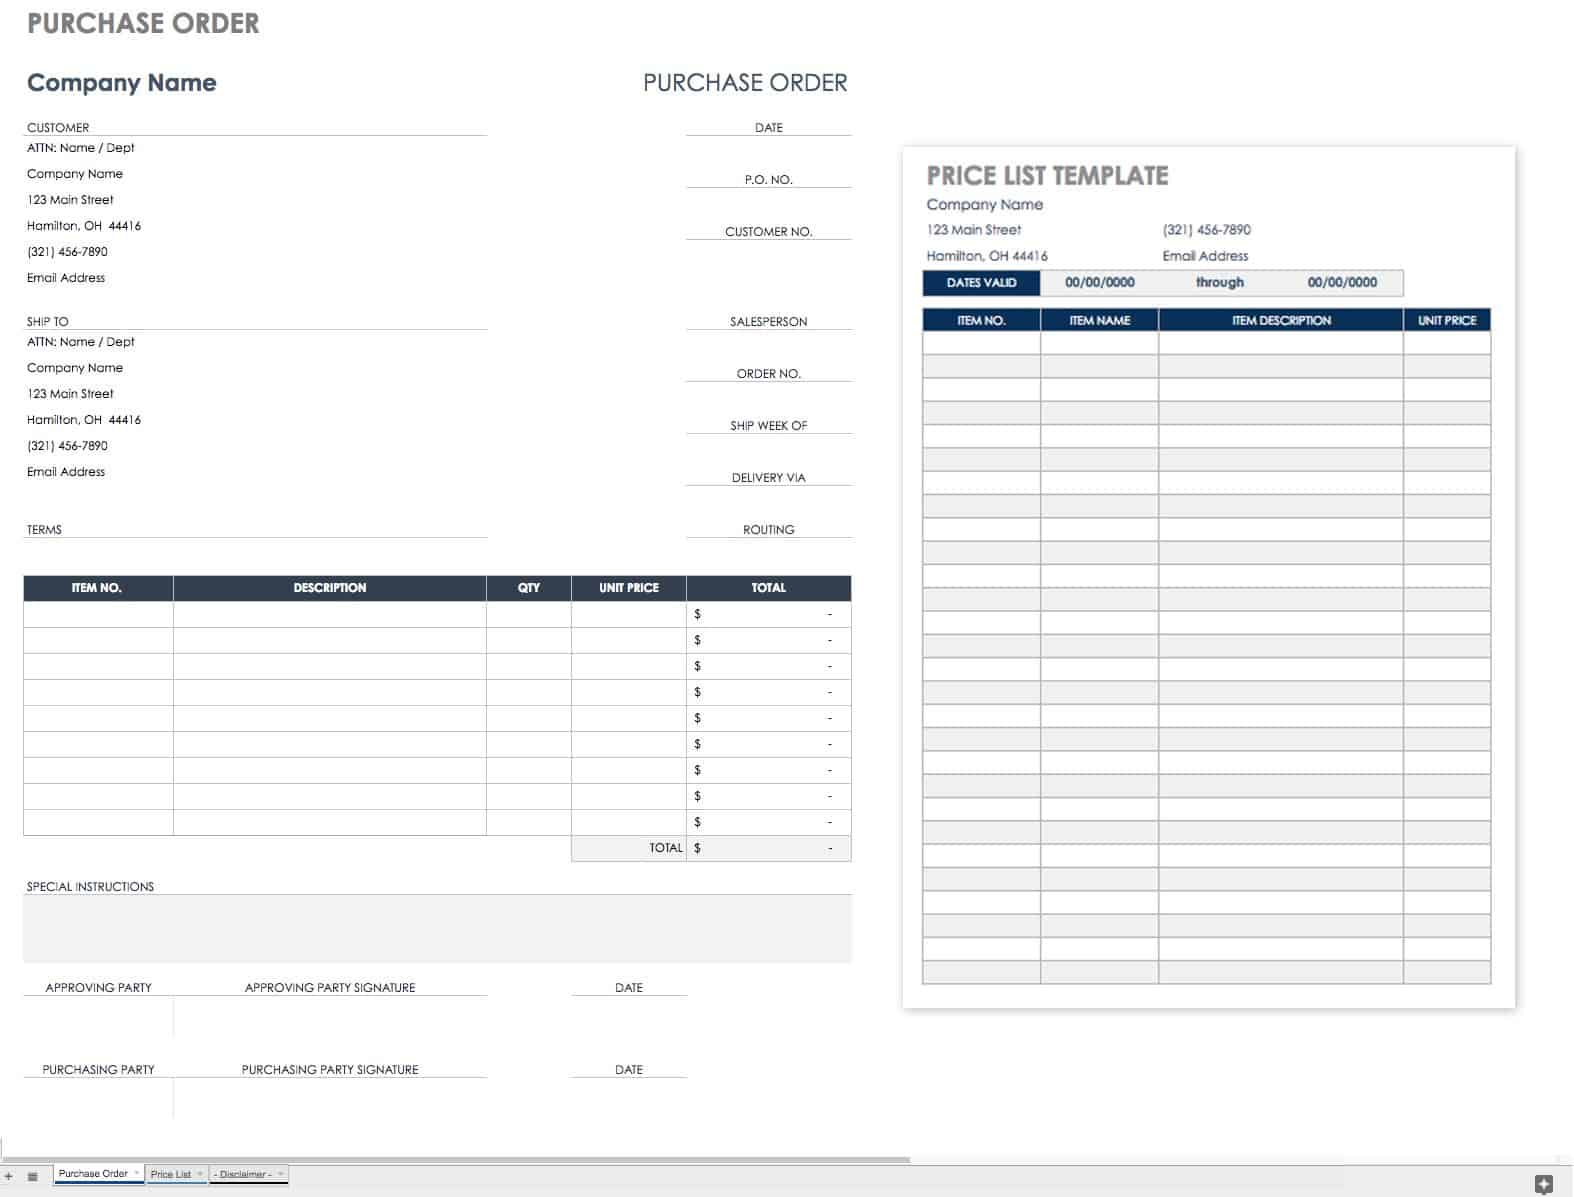
This version of the purchase order template includes drop-down lists for selecting the Vendor and the Ship To location, using the technique described on the Customer List page.
What is the difference between an invoice and a purchase order?
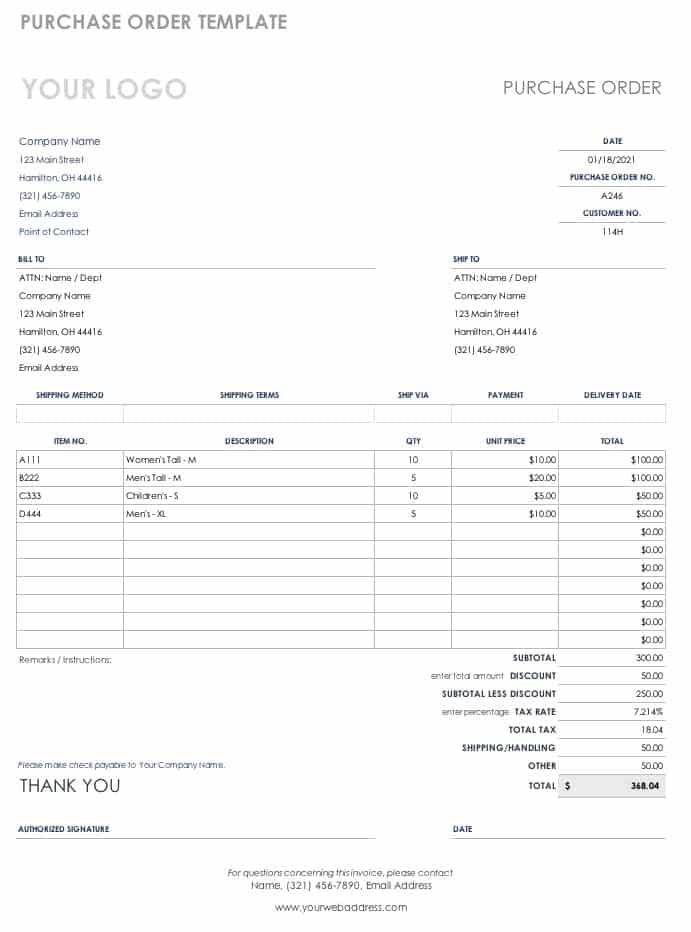
A Purchase Order (PO) is an official order form completed by the buyer to communicate the specific services and products the buyer agrees to purchase from the seller, including descriptions, quantities and prices. An invoice is created by a seller to bill a client for products and services. A purchase order is not a bill.
When the seller accepts the purchase order, it becomes a legally binding agreement between the seller and buyer. The seller will then prepare an invoice as either a receipt for payment already recieved, or to request payment. When a PO is used, the invoice should include the PO Number as a reference. When products are shipped, the seller includes a packing slip in the package which should reference the PO Number and/or Invoice Number.
The purpose of a purchase order is to communicate exactly what you want to buy from the seller, how you want the order and shipment handled, and to provide an official record (i.e. contract) that can help protect both the buyer and seller if there are problems with the the payment or delivery. A purchase order system is especially important in a business when multiple people are handling purchases, inventory, and accounting.
Related Order and Invoice Templates
How to Use and Fill Out the Purchase Order Template
Values within [brackets] are meant to be replaced with your company (the buyer) or vendor (the seller) information. Below are descriptions of fields used in the worksheet:
- [Company Name]: The main title and address listed at the top of the order form is for the buyer — the company requesting the order.
- P.O.#: The Purchase Order number is used by the buyer to track their POs.
- Vendor: The name and address of the vendor (the seller).
- Ship To: Your company’s name and address — where you want the products to be shipped to.
- Requisitioner: The name of the person ordering the products (the buyer). This person is usually the contact listed at the bottom of the order form.
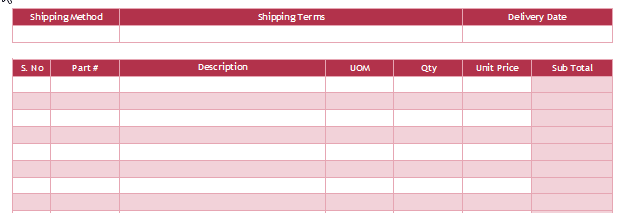
- Ship Via: The method of shipment such as «UPS Ground», «Federal Express», that the buyer is requesting.
- F.O.B.: This stands for «Free On Board» which is usually «Destination» or «Shipping Point». For more information, see F.O.B. at wikipedia.com
- Shipping Terms: This field is usually used for payment terms such as the method of payment or when the payment is due (usually set by the vendor or seller). Details that don’t fit within the Terms field can be described in more detail in the Special Instructions block.
For general information about purchase orders, see Wikipedia.com.
How to Send a Purchase Order to a Supplier
The recommended way to send the completed PO to a vendor is to email a PDF version of the document. Excel allows you to easily convert your worksheet to a PDF by using Save As and selecting PDF from the type list. If using Google Sheets, go to File > Download As > PDF Document (.pdf). You can also print out the PO and mail it to the supplier if emailing isn’t an option.
If you are a Vendor or Supplier and want to send a pre-completed purchase order template to a specific client (containing your address info for example), you may do so provided that the TermsOfUse and/or © worksheet is not hidden, removed, or modified, and as long as you don’t put the spreadsheet on the internet. You are welcome to create a printable PO as a PDF file and put that on your website for your clients to use, but we’d prefer that you simply refer them to this page to download their own spreadsheet.
In this article we will learn about how to prepare the Invoice template in Microsoft Excel.
Purchase order template is an extremely simple business and budget friendly solution. If you want to create a purchase order, and if you already use Excel or Open Office, simply download our free purchase order template, and you can whip put a purchase order in a matter of minute with this version. You only add a logo or color scheme command forms to customize the form.
The most widely use of purchase order and Invoices is where bulk order purchase happen.
The company sends purchase order to the supplier/vendor for purchase items then supplier/vendor send items with the invoice to the company. Purchase order template is an extremely simple business and budget-friendly solution. Creating a sales invoice is very easy, just follow the following steps.
Select File > New > Search invoice in the search box and select the type of template from many templates.
After selecting,Excel will create a readymade purchase order template which will look like this.

Enter the details as indicated in the above image.
The template will result the output as in the image below.

Your invoice is ready to send
You just have to add content and let Excel does your work. Hope you learned How to use templates making Purchase orders and Invoices in Excel. You can perform these functions in Excel 2013 and 2010. Find more articles about Excel here. Feel free to mention your any unresolved query. We will help you.
Popular Articles:
50 Excel Shortcut to Increase Your Productivity
How to use the VLOOKUP Function in Excel
How to use the COUNTIF function in Excel 2016
How to use the SUMIF Function in Excel
Содержание
- Purchase Order Template
- Purchase Order Template
- Download
- Other Versions
- To create a purchase order, follow these steps:
- Purchase Order with Vendor List
- Download
- Description
- What is the difference between an invoice and a purchase order?
- Related Order and Invoice Templates
- How to Use and Fill Out the Purchase Order Template
- How to Send a Purchase Order to a Supplier
- Excel Purchase Order Template
- How to use the Excel Purchase Order Template
- Tips for Using the Excel Purchase Order Template
- Excel Made Easy
- Excel Purchase Order Template
- Free Purchase Order Templates
- Purchase Order Form Templates
- Generic Purchase Order Template — Excel
- Purchase Order with Price List — Google Sheets
- Blanket Purchase Order Template
- Purchase Order Form with Images
- Blank Purchase Order Form
- Purchase Requisition Template
- Purchase Order Tracking Template
- Purchase Order Checklist
- Stock and Vendor Management Templates
- Inventory Control Template
- Vendor Contact List Template
- Vendor Price List Template
- Invoice and Receipt Templates
- Packing Slip Template
- Pro Forma Invoice Template
- Sales Invoice Template
- Service Invoice Template
- Sales Receipt Template
- Delivery Receipt Template
- What Makes a Great Purchase Order?
- Strengthen Purchase Order Tracking with Work Management in Smartsheet
Purchase Order Template
This purchase order (PO) template for Excel is a simple and budget-friendly solution for your business. If you need to create purchase orders, you may not need special software. If you already use Excel or Google Sheets, just download our Purchase Order Template and customize it to create an order form with your contact and shipping information.
This PO template was created based on our original sales invoice template, so buyers and sellers can benefit from using similar tools. If you are a vendor and need a purchase order form template for your customers to use, you can simply point them to this page.
Purchase Order Template
«No installation, no macros — just a simple spreadsheet» — by Jon Wittwer
Download
Other Versions
License: Private Use (not for distribution or resale)
To create a purchase order, follow these steps:
- Customize the purchase order spreadsheet by adding your company’s name, contact, and shipping information.
- Add the seller’s contact information in the Vendor section.
- Save a backup copy of your file (perhaps a separate copy for each major vendor).
- After you complete the order form, save a copy for archival purposes.
- Save the PO as a PDF file and email it to your supplier.
You can use the Purchase Order Tracker spreadsheet to keep track of the POs that you create. Doing this will also help you know what PO# to assign to the next order.
Purchase Order with Vendor List
Download
License: Private Use
(not for distribution or resale)
Description
This version of the purchase order template includes drop-down lists for selecting the Vendor and the Ship To location, using the technique described on the Customer List page.
What is the difference between an invoice and a purchase order?
A Purchase Order (PO) is an official order form completed by the buyer to communicate the specific services and products the buyer agrees to purchase from the seller, including descriptions, quantities and prices. An invoice is created by a seller to bill a client for products and services. A purchase order is not a bill.
When the seller accepts the purchase order, it becomes a legally binding agreement between the seller and buyer. The seller will then prepare an invoice as either a receipt for payment already recieved, or to request payment. When a PO is used, the invoice should include the PO Number as a reference. When products are shipped, the seller includes a packing slip in the package which should reference the PO Number and/or Invoice Number.
The purpose of a purchase order is to communicate exactly what you want to buy from the seller, how you want the order and shipment handled, and to provide an official record (i.e. contract) that can help protect both the buyer and seller if there are problems with the the payment or delivery. A purchase order system is especially important in a business when multiple people are handling purchases, inventory, and accounting.
How to Use and Fill Out the Purchase Order Template
Values within [brackets] are meant to be replaced with your company (the buyer) or vendor (the seller) information. Below are descriptions of fields used in the worksheet:
- [Company Name]: The main title and address listed at the top of the order form is for the buyer — the company requesting the order.
- P.O.#: The Purchase Order number is used by the buyer to track their POs.
- Vendor: The name and address of the vendor (the seller).
- Ship To: Your company’s name and address — where you want the products to be shipped to.
- Requisitioner: The name of the person ordering the products (the buyer). This person is usually the contact listed at the bottom of the order form.
- Ship Via: The method of shipment such as «UPS Ground», «Federal Express», that the buyer is requesting.
- F.O.B.: This stands for «Free On Board» which is usually «Destination» or «Shipping Point». For more information, see F.O.B. at wikipedia.com
- Shipping Terms: This field is usually used for payment terms such as the method of payment or when the payment is due (usually set by the vendor or seller). Details that don’t fit within the Terms field can be described in more detail in the Special Instructions block.
For general information about purchase orders, see Wikipedia.com.
How to Send a Purchase Order to a Supplier
The recommended way to send the completed PO to a vendor is to email a PDF version of the document. Excel allows you to easily convert your worksheet to a PDF by using Save As and selecting PDF from the type list. If using Google Sheets, go to File > Download As > PDF Document (.pdf). You can also print out the PO and mail it to the supplier if emailing isn’t an option.
If you are a Vendor or Supplier and want to send a pre-completed purchase order template to a specific client (containing your address info for example), you may do so provided that the TermsOfUse and/or © worksheet is not hidden, removed, or modified, and as long as you don’t put the spreadsheet on the internet. You are welcome to create a printable PO as a PDF file and put that on your website for your clients to use, but we’d prefer that you simply refer them to this page to download their own spreadsheet.
Источник
Excel Purchase Order Template
Many companies use purchase order forms to keep track of orders and know what was purchased, and on what date. These are important documents for matching to invoices, especially from repeat orders – and can help control inventory. The Excel purchase order template available on this page for immediate download is free, and it is an easy-to-use template that can allow anyone to edit the text fields to their needs to create their own professional looking forms. Use with Microsoft Excel 2003 or later.
How to use the Excel Purchase Order Template
- Download the Excel purchase order template to your computer, and save it in a folder of your choice or to the desktop for quicker access.
- Once downloaded – open it and you can start to edit the desired text fields.
- There are several areas that can be edited. You can insert a company logo and enter the address, phone and email details.
- Other spaces in brackets you see can also be edited. You can enter the vendors’ name and address. There is also another space you can edit – the ship to details – you can enter the information required here.
- In another field you can enter the purchase order number, the date, and the customer number.
- Check the columns on the template. You can edit the name fields if needed such as quantity, item description and more.
- Towards the bottom of the form you can edit the address in the line that reads, “Send all correspondence to” and enter the information you want.
Tips for Using the Excel Purchase Order Template
- The Excel purchase order template can be stored on your computer and copies can be printed as needed. This makes it easier for keeping paperwork to a minimum.
- Since it is easy to customize – any column that is not needed can be deleted or edited to match a description used most.
Purchase orders are an excellent way to keep records of all orders and matched against invoices received. It can also help improve inventory control knowing which products are ordered most often. To present a professional image, the Excel purchase order template on this page is a convenient way to create great looking forms with the information details that fit your needs.
Источник
Excel Made Easy
Excel Purchase Order Template
Download a free Purchase Order Template for Microsoft Excel and Google Sheets. If you intend to buy something specific from another company, you will need to use a purchase order template or PO Template. Purchase orders form are used to buy products and services. On a purchase order template for Excel, you will find exactly what you, as a buyer, want to purchase from the sellers’ company. By filling out purchase order template properly, you will then easily be able to trace back you purchase history so that yourself, or your tax accountant, will easily be able to fill out the tax return form saving you time and money.
If you need a professionally designed free purchase order template, you can use this PO template for Excel (all versions). It is at the same time a simple and very useful PO template. If you are a consultant, student, freelancer or a small company, this is the perfect purchase order form for you. DOWNLOAD link at the bottom of the page.
Under the following link you can also find special purchase order template for small businesses. This template of a PO is a very basic Excel purchase order template with less feature but enough for a small business.
You can find under these links a simple tax invoice template too and a professional invoice template version that you can customize.
Also a receipt template is available from this link.
Look at the screenshot of the purchase order template (you can change the colors and fonts as you wish).
It is important to describe in the purchase order template exactly the products or services you want, the quantity of each item and the price. These are the minimal items you have to describe in the PO template. By not writing them down properly, your purchase order form will not be complete and the seller will be uncertain of what you want to buy from him.
Using this Excel purchase order template, you can then modify it at will. It is totally free to download and to use.
For older Excel Versions take this PO template for this purchase order sample template.
We hope that this purchase order template will help you.
If you want to have some more classic Purchase order templates for Excel then you can go to our classic page here under. You will find this kind of purchase orders.
This Purchase Order template contains also a section called terms and condition. This is an important section of the purchase order template, as it describes conditions that are related the the act of buying that you are doing by sending the vendor this purchase order form. Simply said, if you want special delivery condition, like special packaging, or define a specific shipping company or a condition about the delivery time (in 2 weeks) or about warranty, etc. you can write them in this section ofthe purchase order template. These are the conditions under which you buy the items or services that are described in the section of the purchase order template. Nevertheless, the seller will have his own conditions and they might differ so if some of your conditions are very important to you, the best thing is to agree on them before sending the purchase order form.
Or you can have the multicolored templates Purchase Order for Excel. You can modifiy these purchase orders at will, add new field and colours. This free purchase order template for Excel can be exported to Word too and used as a word purchase order template.
You can find this Excel purchase order templates that looks more classic or colour full under these links: classic purchase order or a multicolour purchase order template for Excel.
Please look at our other templates in our 1000 examples page (that’s the target of course :-)). Most of the templates can be used with all office programs like Google Sheets, .
Источник
Free Purchase Order Templates
February 21, 2018
A purchase order (PO) is a type of order form for goods or services that is typically used in business-to-business transactions between a buyer and a supplier. A buyer submits a purchase order that specifies the type and quantity of goods needed along with shipping instructions. If the vendor is able to fulfil the request, they accept the PO, and the two parties enter into a mutual agreement. In this way, a purchase order can serve as a contract, including outlining terms and conditions to provide some legal protection to both buyer and seller.
Many small businesses rely on purchase order templates to manage their ordering process and avoid hassles and costs that can be associated with using PO software. Using customized templates can help standardize the ordering process, ensure accurate record-keeping, and save time. To get you started, below you’ll find a number of Microsoft Excel purchase order templates that are professionally designed, fully customizable, and free to download.
Purchase Order Form Templates
Generic Purchase Order Template — Excel
Download Generic Purchase Order Template
This template includes customer and purchase order numbers for tracking, vendor details, shipping information, and an itemized list of goods. Enter an identification number, quantity, and cost for each item being ordered, and the template will calculate subtotals and the grand total cost, including tax and shipping charges. There is also room to add comments or instructions, and you can attach lengthier terms and conditions as needed.
Purchase Order with Price List — Google Sheets
This purchase order template also doubles as a price list, so you can compile a list of commonly ordered items to expedite the purchasing process. Create separate price lists for multiple vendors, and update them regularly to ensure accuracy. You can save this Google Sheets template to your Google Drive account, and print it as a PDF file.
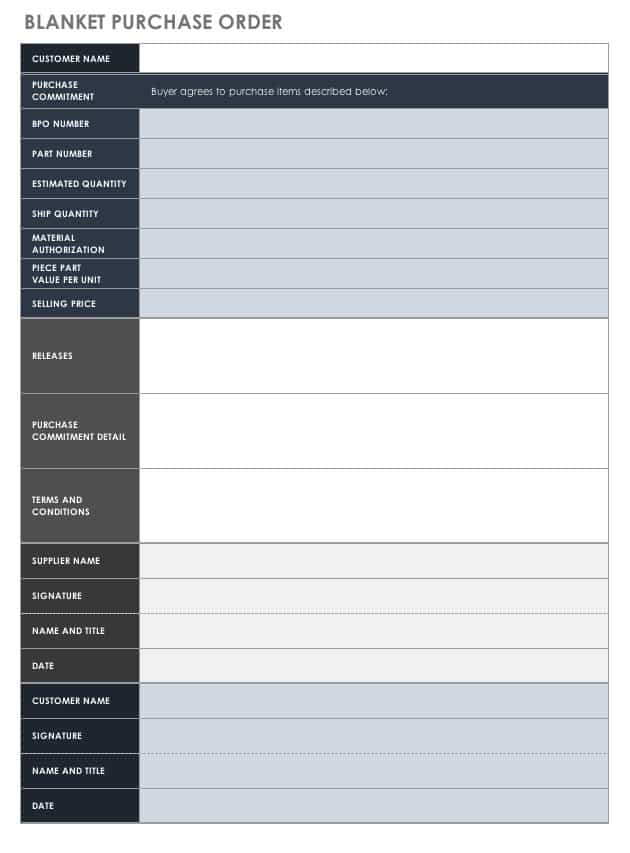
Blanket Purchase Order Template
![]()
Download Blanket Purchase Order Template
A blanket order may be used when an agreement is made between a buyer and vendor for multiple deliveries over a set time period. Special pricing may be negotiated as part of the deal, and details about the order along with terms and conditions are included in this blanket purchase agreement. You can also add your own terms to this template, which provides spaces for order information and authorization signatures.
Purchase Order Form with Images
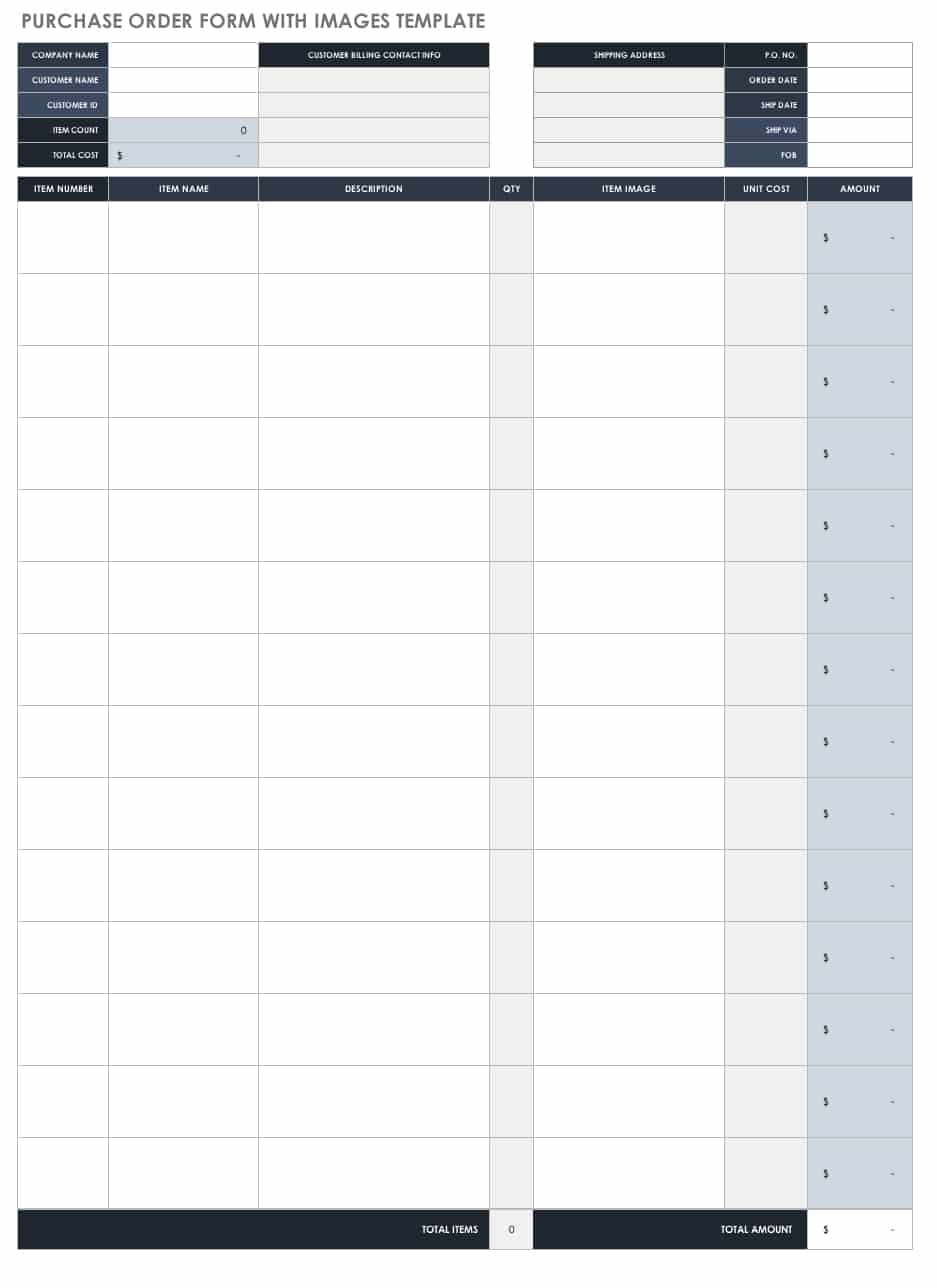
Download Purchase Order Form with Images
In addition to item numbers and descriptions, this template allows you to include images. This feature may be particularly helpful when ordering similar parts or items, thereby supporting accuracy when ordering as well as when filling the order. This template is available as an Excel, Word or PDF file.
Blank Purchase Order Form
![]()
Download Blank Purchase Order Form
Create a customized purchase order by editing and filling in the fields provided on this blank form. The template offers a simple layout with sections to add an order number, delivery instructions, unit prices, and quantities ordered. You can customize the template further by adding a company logo, terms and conditions, and any other details required by your business or the supplier.
Purchase Requisition Template

This purchase requisition template can be used to communicate with a purchasing department. Enter the items you need to order, vendor information, reason for the request, and billing info, and then submit the requisition to whoever is in charge of placing orders. They can then approve the request and create an official PO to order the items listed.
Purchase Order Tracking Template
![]()
Download Purchase Order Tracking Template
Track your outstanding orders with this simple spreadsheet template. You can keep track of purchase order numbers, vendor names, payment amounts, and delivery dates. Tracking purchase orders can help ensure that all orders have been paid in full and completed on time. Filter the spreadsheet to view individual suppliers, outstanding payments, or other info.
Purchase Order Checklist
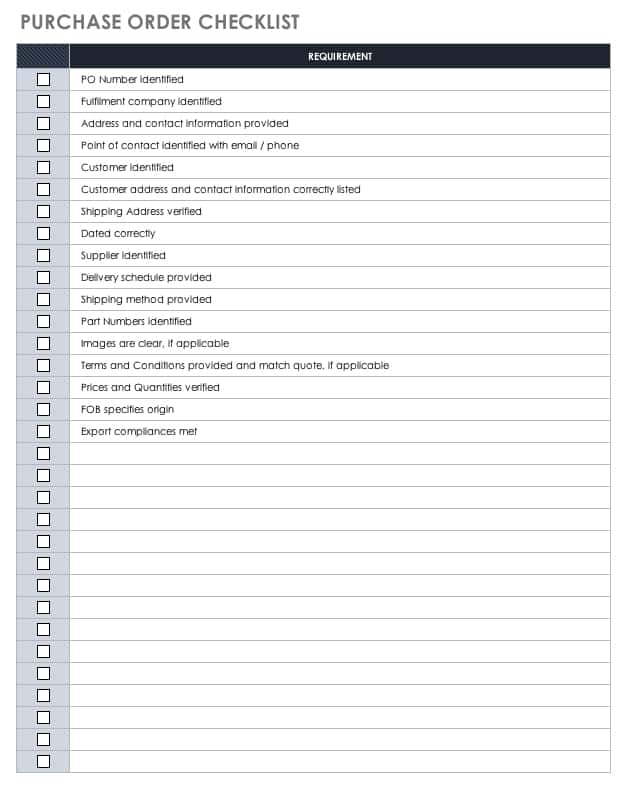
Download Purchase Order Checklist
Vendors can provide customers with this checklist template as a guide for creating and submitting purchase orders. List any elements that will provide customers with a clear understanding of the PO requirements. This can save time, simplify the process, and help you reach an agreement quickly.
Stock and Vendor Management Templates
Inventory Control Template
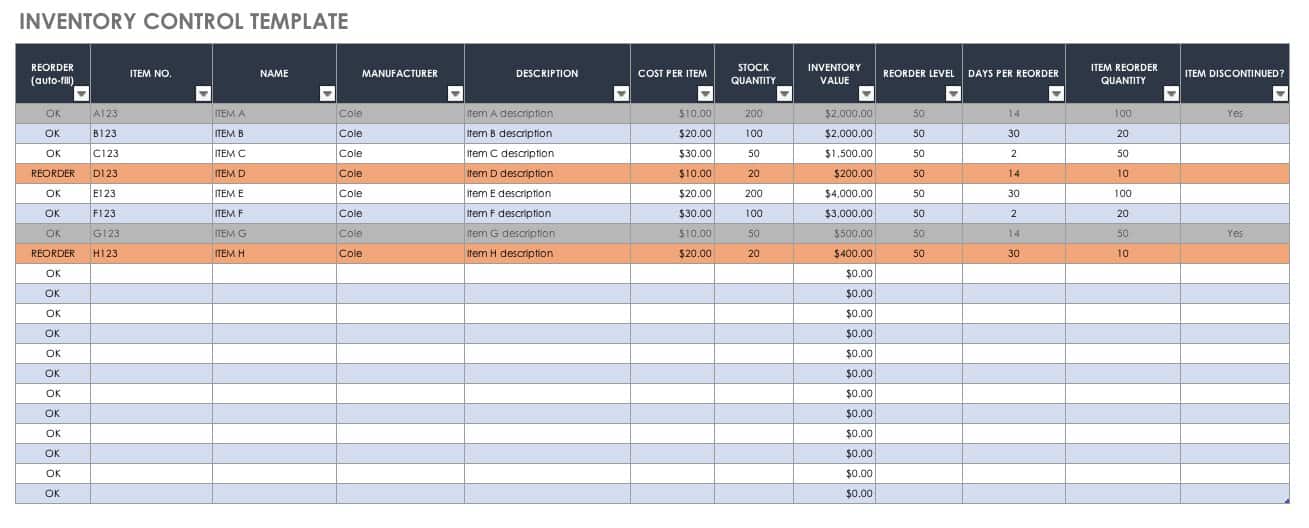
Download Inventory Control Template
Inventory management is a key part of knowing when to reorder stock and replace discontinued items. This Excel template provides columns for tracking detailed inventory information, quantities in stock, when to reorder items, and more. Use the template as-is, or edit the column headings to match the needs of your business.
Vendor Contact List Template
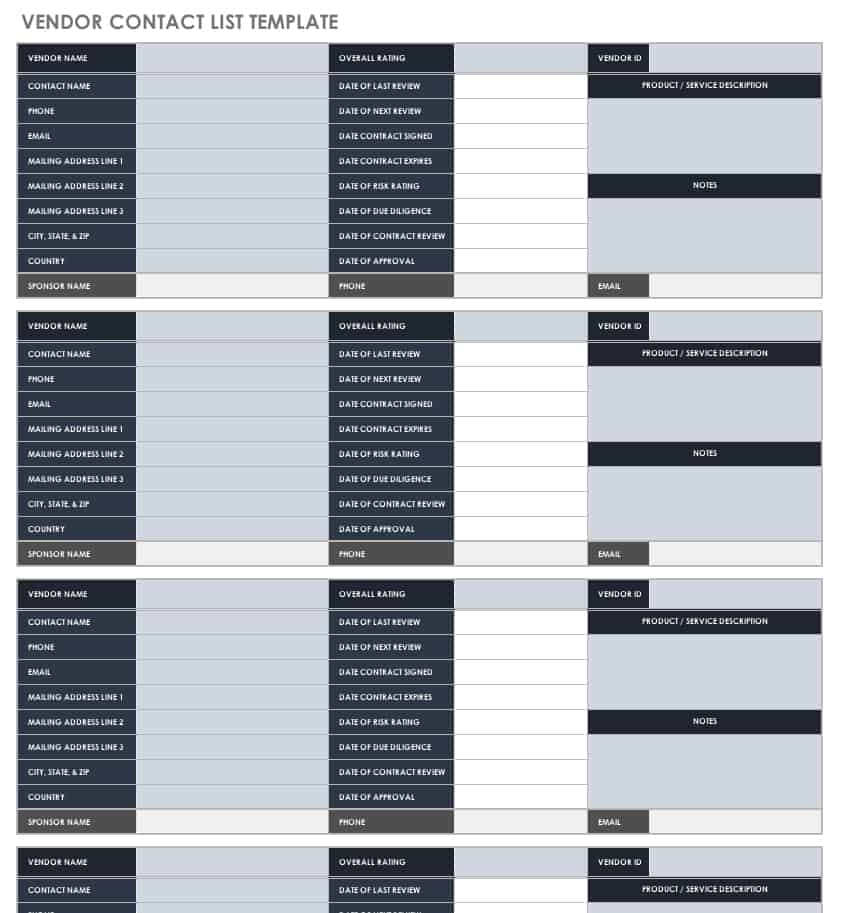
Download Vendor Contact List Template
Keep track of vendor contacts, including important details such as the status of contracts, review results, and approval ratings. Add a description of the product or service provided by the vendor for a thorough snapshot of the company. The template includes room for additional notes and you can easily update it as vendor relationships change.
Vendor Price List Template
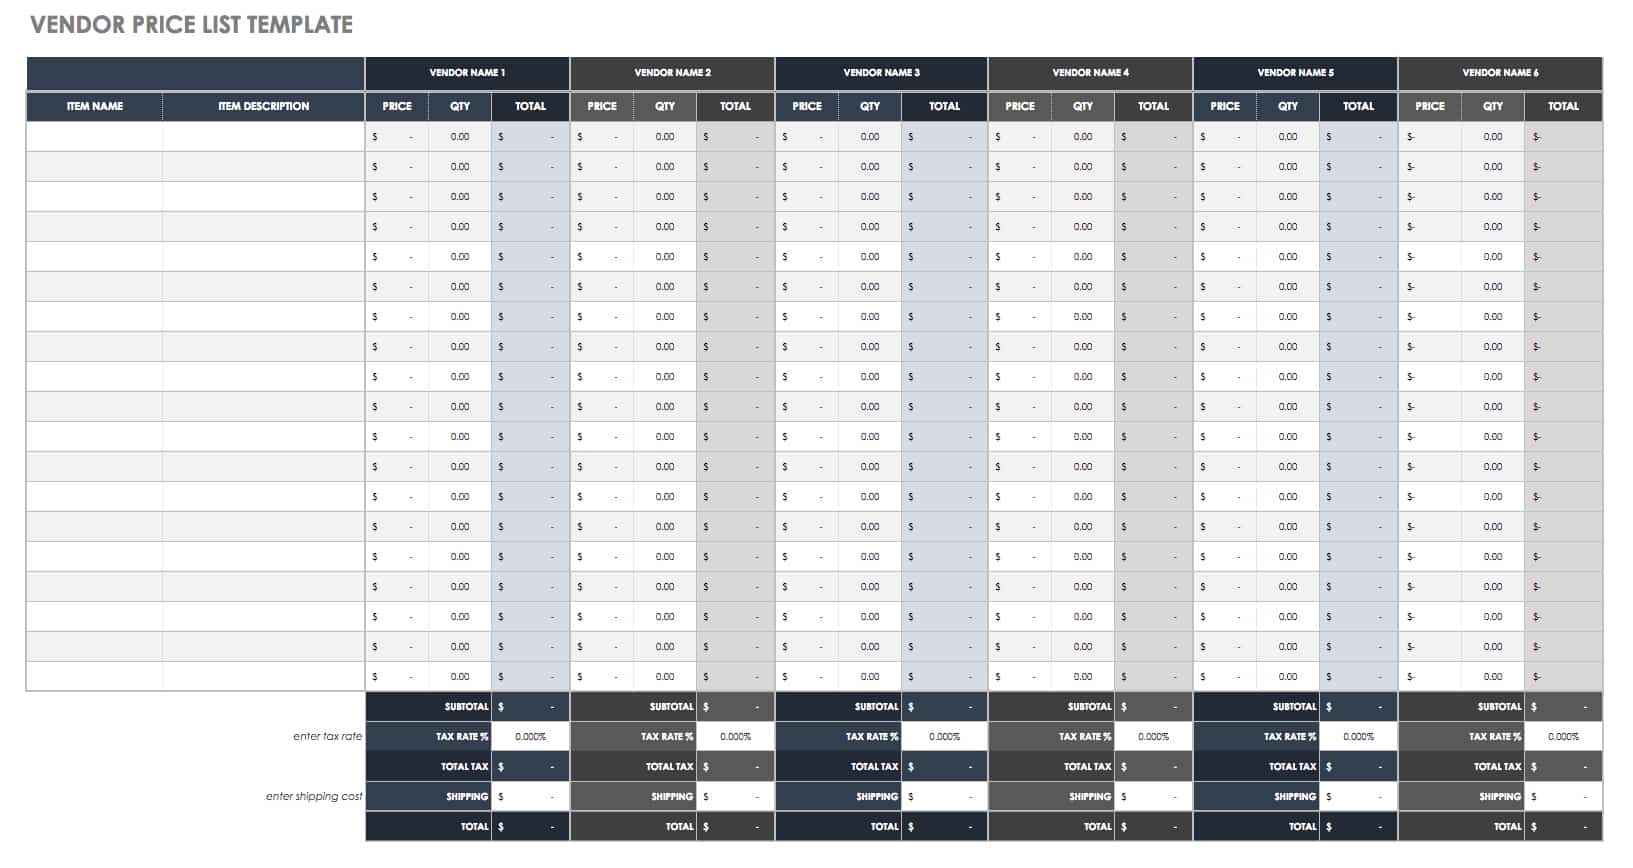
Download Vendor Price List Template
Use this template to track and compare product prices offered by various vendors. The template will calculate total costs based on the price and quantity entered for each item. Use this information to create an itemized list of goods to compare individual items as well as an overview of total costs for each vendor.
Invoice and Receipt Templates
Packing Slip Template

Download Packing Slip Template
A packing slip is often included with a sales invoice in a shipment, and shows ordered items along with items actually shipped. This allows a customer to quickly see any discrepancies in the order and verify what inventory items were received. This supports accurate inventory management and planning future orders.
Pro Forma Invoice Template
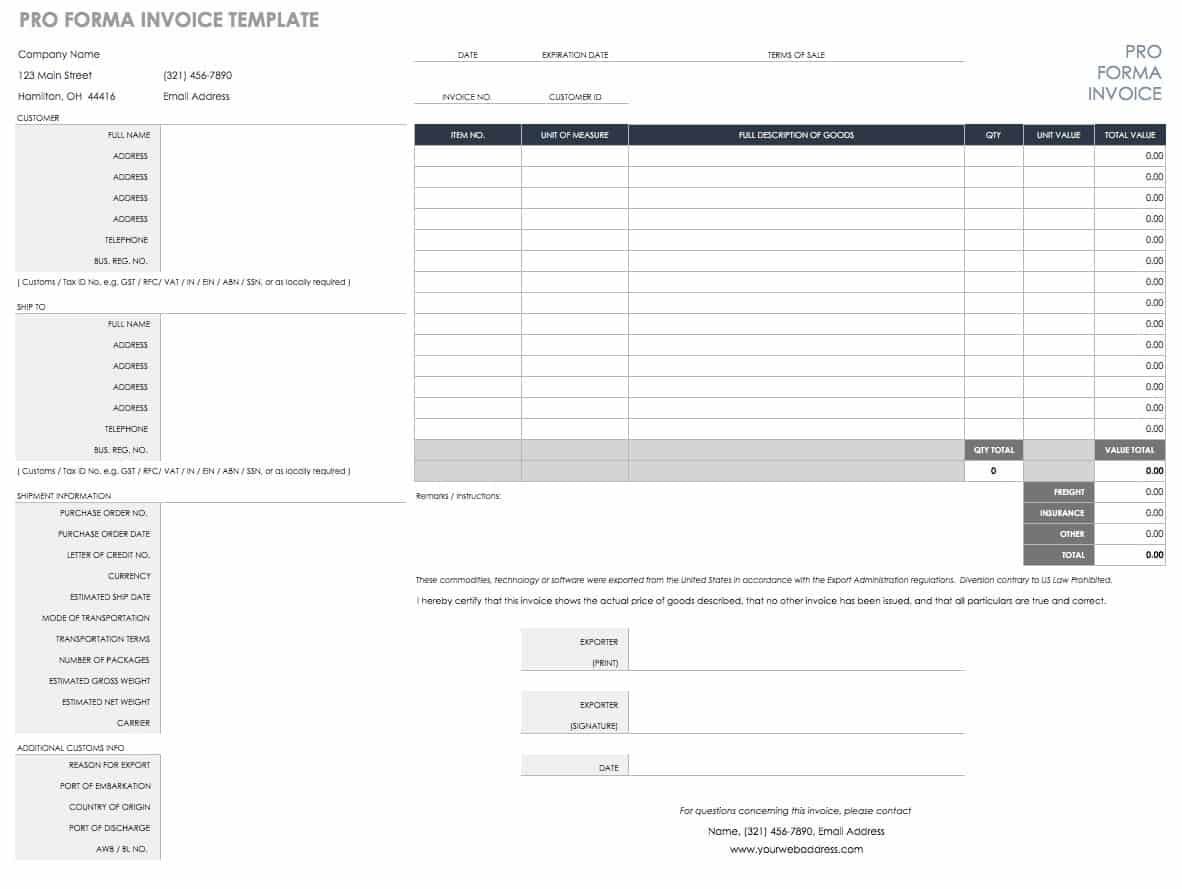
A pro forma invoice can be similar to a purchase order in that it provides a quote for goods before a sale occurs. Pro forma invoices are commonly used when exporting items, and may show the weight of a shipment, freight costs, and customs information. This template calculates the cost of goods sold, including insurance, tax, and shipping charges.
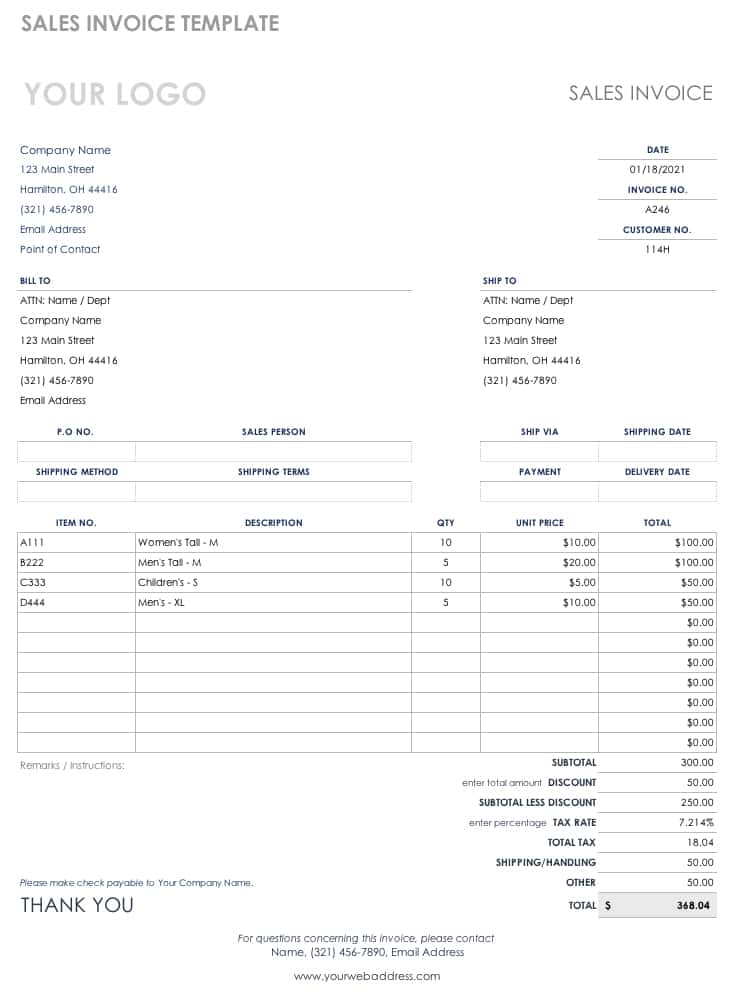
Sales Invoice Template
Suppliers can send this sales invoice to customers when an order has been fulfilled and payment is due. There are sections to enter the associated purchase order number, items sold, and the amount owed. Add your own payment terms or other instructions for collecting remittance.
Service Invoice Template
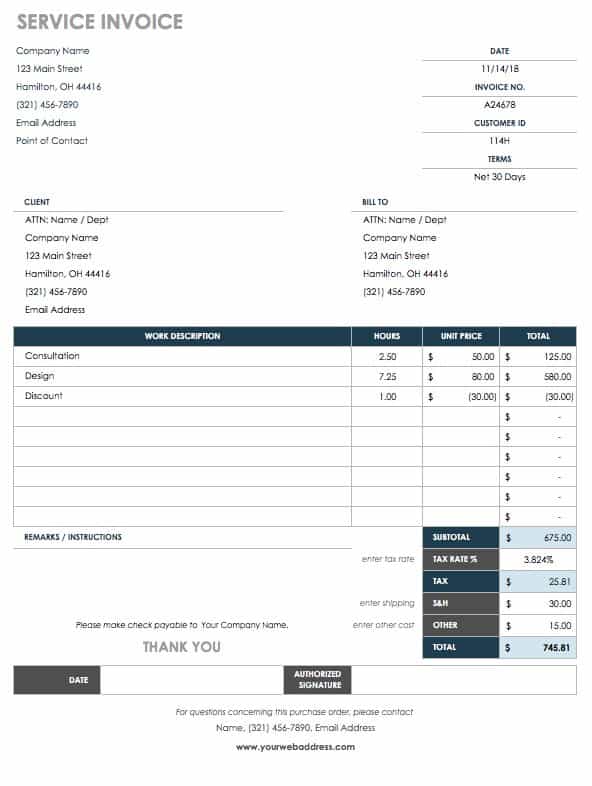
Download Service Invoice Template
This service invoice template includes columns for tracking hours spent on a project, hourly rates, and corresponding subtotals. Clients can see completed tasks, the amount owed for each item, and the total payment due. A second version of the invoice without hourly rates is included on a separate Excel sheet. This provides a simplified option for billing by project type rather than hourly rates.
Sales Receipt Template
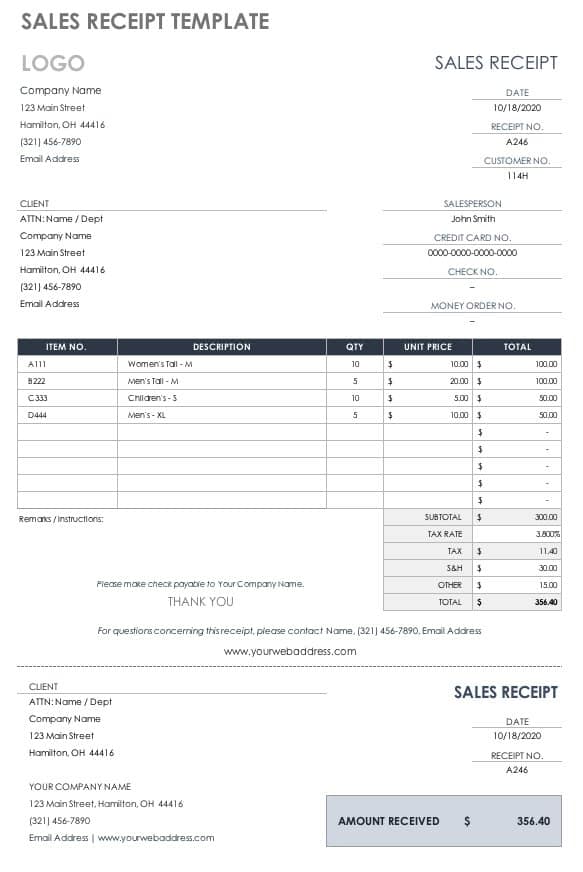
Use this sales receipt template to provide customers with documentation after your receive payment. This completes the sales process and shows the method of payment, itemized charges, amounts paid, and order details. The template includes a receipt number for reference.
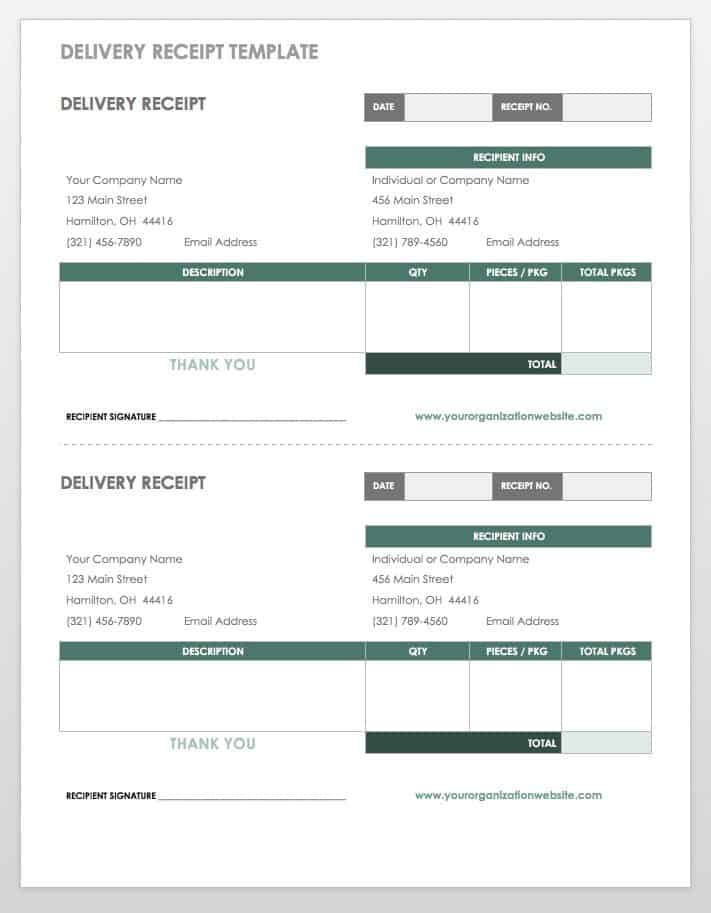
Delivery Receipt Template
A delivery receipt verifies that a shipment has been received. This simple template includes space for adding the items included in a shipment, customer and supplier contact information, and a recipient signature. Add a company logo or additional details for a customized receipt template.
What Makes a Great Purchase Order?
Since purchase orders list goods or services along with pricing and shipping information, they often resemble invoices. However, invoices are sent by sellers to indicate payments owed, whereas buyers send purchase orders to initiate a purchase. Buyers and sellers use a PO to create an agreement, which may be for a one-time order or an ongoing buying cycle. Businesses that have ongoing relationships with vendors often order items on credit and are then invoiced by the supplier at regular intervals. Purchase orders then become an important part of managing accounts payable. Listing any negotiation on pricing on the PO (such as discounts for large quantities) provides both parties with clear information about the order.
In some cases, a purchase order may take the form of a letter with order details, shipping instructions, and any terms and conditions written out. One advantage of listing order details in a table or spreadsheet format is that viewers can quickly see the type and number of items being requested. An Excel template or other spreadsheet option also provides the benefit of automatic calculations for adding item subtotals and the grand total cost. No matter what format you choose, a purchase order generally includes the following details:
- A purchase order number and issue date for tracking
- Company information, including contact information for both the requisitioner and vendor
- Order details, such as item numbers, descriptions, costs, and quantities needed
- Shipping instructions, which may include an Free on Board (FOB) shipping point, or the point at which the buyer assumes responsibility for shipping costs
- Authorization signatures to accept the agreed upon order, including any terms and conditions
Once you create a purchase order, you send it to a supplier via email. If you’re using any of the Excel templates listed below, save your completed order as a PDF file to provide vendors with a printable PO form. The main purpose of a purchase order is to provide clear communication and documentation between customers and vendors, so aim for clarity and simplicity as you create purchase orders. This can also help boost efficiency and streamline the purchasing process.
Strengthen Purchase Order Tracking with Work Management in Smartsheet
Empower your people to go above and beyond with a flexible platform designed to match the needs of your team — and adapt as those needs change.
The Smartsheet platform makes it easy to plan, capture, manage, and report on work from anywhere, helping your team be more effective and get more done. Report on key metrics and get real-time visibility into work as it happens with roll-up reports, dashboards, and automated workflows built to keep your team connected and informed.
When teams have clarity into the work getting done, there’s no telling how much more they can accomplish in the same amount of time. Try Smartsheet for free, today.
Источник
Blog
In a typical business transaction, especially one that involves buying and selling, a purchase order is an essential document that serves as the preliminary step in a sale. In other words, it is the proverbial handshake that kicks off a business transaction. It’s important to note that the fundamental difference between an invoice and a purchase order is that the former is issued by the seller. A purchase order is created by the buyer with the intent to engage the services of the the seller. But for the purpose of this tutorial, an invoice template can be used as a reference guide to customize your own purchase order. Using Microsoft Excel can help you draft a purchase order that’s quick and easy! The guide below is generally applicable to most recent Excel versions, for both Windows and Mac users.

Download this Free How to Create a Purchase Order in Excel Article in PDF
![]() Download
Download
SUMMARY:
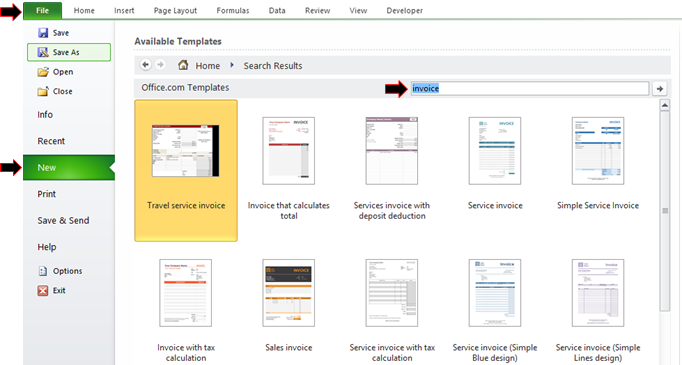
- For Windows: Click on New, then type in Invoice in the search bar. Choose an invoice template to customize into a purchase order. Click Create.
- For Mac: Go to New and type Invoice in the search bar. Pick a template to edit, then select Create.
How to Make a Purchase Order Using Templates in Microsoft Excel
Follow the step-by-step guide below on how to create a basic purchase order using ready-made Microsoft Excel templates.
1. Open Microsoft Excel and select New from the menu on the left. Type in ‘invoice’ using the search bar to browse the available templates.

2. There are no purchase order templates on Excel; but since its format is similar to that of a service invoice, you can use that as your template. Click Create once you’ve found a suitable template.

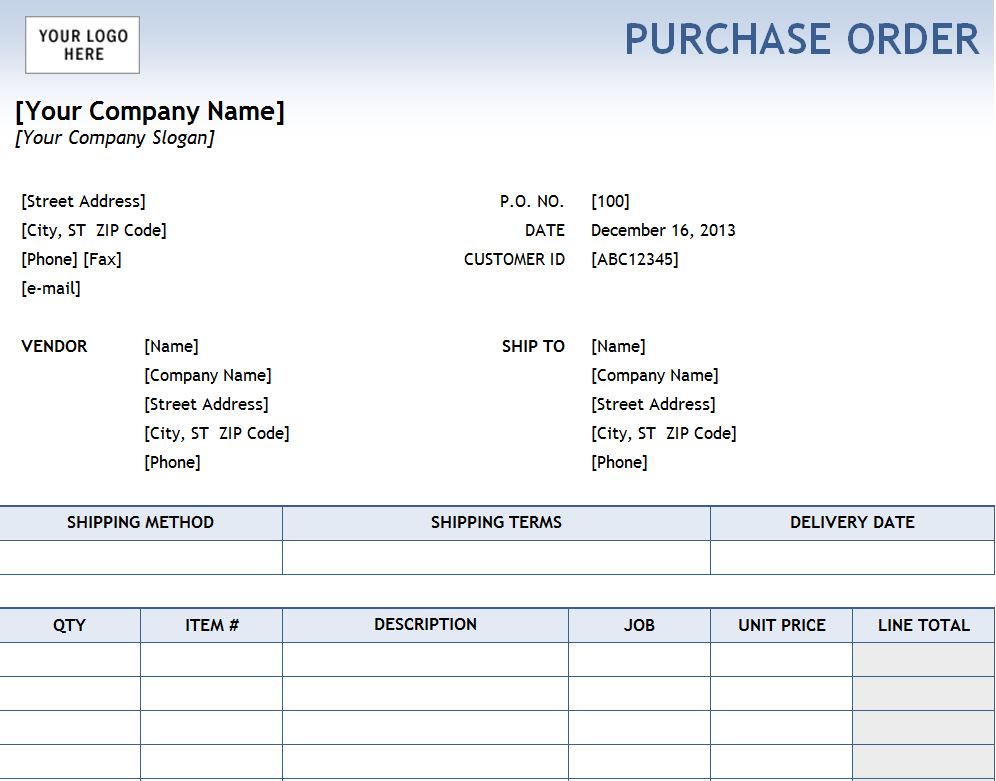
3. In the particular template below, you can customize the logo and replace it with your own company logo. Simply select the element and right click. Select Change Graphic to upload an image from your computer or other sources.

4. Change the word Invoice to Purchase Order as the title on the upper right corner. Insert your company name, date, order number, and customer ID. Below the date, change Invoice # to Order #. You also have the option to remove the customer ID if it’s unnecessary.

5. A purchase order is issued or billed to the seller, so make sure to indicate the contact information of the seller. State the point person’s name, company name, complete address, phone numbers, and email address.
6. Place all order details in an organized table. The basic elements included in the table are usually the quantity, item description, unit price, and total amount. Breakdown each item specifically. You may also insert a couple of terms and conditions at the bottom of the table. But keep it short and straight to the point.

7. Save the file when you’re done editing. You can print the purchase order or email it directly to the seller or vendor.
How to Create a Purchase Order for Mac Using Microsoft Excel
For Mac users, you can use the same templates to customize your own purchase order too. Just follow the basic instructions below to get started. This tutorial applies to most Excel versions- including MS Excel for Mac 2011 and MS Excel for Mac 2016.
1. Open Microsoft Excel and start by clicking the New document icon on the left. Type ‘invoice’ into the search bar. Choose a template and hit Create.

2. To create a purchase order, you can just apply minor changes to an existing invoice template. You can change the logo or image on the upper left part of the form. Select the element and right click, as seen below. Click Change Picture to replace the logo.

3. Click the cell to change the name from invoice to Purchase Order. Insert your company name and other key details. Be sure to change Invoice # to Order #.

4. Input the contact information of the vendor or seller- their complete name, company name, address, phone number, and email. As a buyer, you are sending a formal purchase order (PO) to establish your intent to buy from the seller.

5. Describe your order details using the table. Fill out each column accurately then indicate the overall total cost at the bottom.
6. Once you’ve filled in all the details, save your document. Print out the purchase order or send it directly to the vendor.
Blank Purchase Order Template

Download
Simple Purchase Order Template

Download
Basic Vehicle Purchase Order Template

Download
Purchase Order Confirmation Layout

Download
Basic Purchase Order Form Template

Download
Editable Purchase Order Template

Download
Sample Purchase Order Format Template

Download
Printable Construction Purchase Template

Download
Construction Purchase Order Template

Download
Modern Purchase Order – Log Template

Download
Software Purchase Order Form Template

Download
Simple Retail Purchase Order Template

Download
More in Blog
| Purchase Order Template – 15+ Free Excel, PDF, Documents Download | 54+ Purchase Order Examples — PDF, DOC |
| 17+ Purchase Order Templates | 16+ Purchase Order Templates — Docs, Word |
| 14+ Simple Purchase Order Templates -Docs, Word | 15+ Sample Purchase Order Forms |
| 10+ Simple Purchase Order Templates — Word, Docs | 15+ Purchase Order Templates |
| 12+ Purchase Order Samples | 12 Purchase Order Forms — Samples, Examples |
| 16+ Purchase Order Formats | Purchase Order Forms: Formatting and Writing Tips |

Many companies use purchase order forms to keep track of orders and know what was purchased, and on what date. These are important documents for matching to invoices, especially from repeat orders – and can help control inventory. The Excel purchase order template available on this page for immediate download is free, and it is an easy-to-use template that can allow anyone to edit the text fields to their needs to create their own professional looking forms. Use with Microsoft Excel 2003 or later.
How to use the Excel Purchase Order Template
- Download the Excel purchase order template to your computer, and save it in a folder of your choice or to the desktop for quicker access.
- Once downloaded – open it and you can start to edit the desired text fields.
- There are several areas that can be edited. You can insert a company logo and enter the address, phone and email details.
- Other spaces in brackets you see can also be edited. You can enter the vendors’ name and address. There is also another space you can edit – the ship to details – you can enter the information required here.
- In another field you can enter the purchase order number, the date, and the customer number.
- Check the columns on the template. You can edit the name fields if needed such as quantity, item description and more.
- Towards the bottom of the form you can edit the address in the line that reads, “Send all correspondence to” and enter the information you want.
Tips for Using the Excel Purchase Order Template
- The Excel purchase order template can be stored on your computer and copies can be printed as needed. This makes it easier for keeping paperwork to a minimum.
- Since it is easy to customize – any column that is not needed can be deleted or edited to match a description used most.
Purchase orders are an excellent way to keep records of all orders and matched against invoices received. It can also help improve inventory control knowing which products are ordered most often. To present a professional image, the Excel purchase order template on this page is a convenient way to create great looking forms with the information details that fit your needs.
Download: Excel Purchase Order Template
Related Templates:
Generic Purchase Order Template — Excel
Download Generic Purchase Order Template
Excel | Smartsheet
This template includes customer and purchase order numbers for tracking, vendor details, shipping information, and an itemized list of goods. Enter an identification number, quantity, and cost for each item being ordered, and the template will calculate subtotals and the grand total cost, including tax and shipping charges. There is also room to add comments or instructions, and you can attach lengthier terms and conditions as needed.
Purchase Order with Price List — Google Sheets
Download Purchase Order with Price List — Google Sheets
This purchase order template also doubles as a price list, so you can compile a list of commonly ordered items to expedite the purchasing process. Create separate price lists for multiple vendors, and update them regularly to ensure accuracy. You can save this Google Sheets template to your Google Drive account, and print it as a PDF file.
Blanket Purchase Order Template
Download Blanket Purchase Order Template
Excel | Word | PDF
A blanket order may be used when an agreement is made between a buyer and vendor for multiple deliveries over a set time period. Special pricing may be negotiated as part of the deal, and details about the order along with terms and conditions are included in this blanket purchase agreement. You can also add your own terms to this template, which provides spaces for order information and authorization signatures.
Purchase Order Form with Images
Download Purchase Order Form with Images
Excel | Word | PDF
In addition to item numbers and descriptions, this template allows you to include images. This feature may be particularly helpful when ordering similar parts or items, thereby supporting accuracy when ordering as well as when filling the order. This template is available as an Excel, Word or PDF file.
Blank Purchase Order Form

Download Blank Purchase Order Form
Excel | Word | PDF
Create a customized purchase order by editing and filling in the fields provided on this blank form. The template offers a simple layout with sections to add an order number, delivery instructions, unit prices, and quantities ordered. You can customize the template further by adding a company logo, terms and conditions, and any other details required by your business or the supplier.
Purchase Requisition Template
Download Purchase Requisition Template
This purchase requisition template can be used to communicate with a purchasing department. Enter the items you need to order, vendor information, reason for the request, and billing info, and then submit the requisition to whoever is in charge of placing orders. They can then approve the request and create an official PO to order the items listed.
Purchase Order Tracking Template
![]()
Download Purchase Order Tracking Template
Excel | Smartsheet
Track your outstanding orders with this simple spreadsheet template. You can keep track of purchase order numbers, vendor names, payment amounts, and delivery dates. Tracking purchase orders can help ensure that all orders have been paid in full and completed on time. Filter the spreadsheet to view individual suppliers, outstanding payments, or other info.
Purchase Order Checklist
Download Purchase Order Checklist
Excel | Word | PDF
Vendors can provide customers with this checklist template as a guide for creating and submitting purchase orders. List any elements that will provide customers with a clear understanding of the PO requirements. This can save time, simplify the process, and help you reach an agreement quickly.
This template enables users to create automated purchase orders, payment remittances & supplier account statements based on the business details, supplier information and purchase order & supplier invoice details recorded on the appropriate sheets. The template also facilitates creating automated reports including a 12 month purchase history review, age analysis for individual or all supplier accounts, supplier account balances and a supplier payment forecast. The template can be used for both stock based and service based suppliers.
The following sheets are included in this template:
Set-up — this sheet enables users to customize the template for their businesses by entering the appropriate business details and tax details. It also contains a list of user input error codes for information purposes.
Suppliers — create a unique supplier code for each supplier and enter a billing address and tax reference number for all suppliers on this sheet.
StockCode — create a unique stock code for each stock item or service on this sheet and enter an appropriate description and unit of measure. These details are then included automatically on the Details sheet and the purchase order.
Details — enter all purchase order & supplier invoice details on this sheet. Record payments to automatically calculate the supplier account balances on the other sheets.
PO — this sheet includes an automated purchase order which is populated based on the purchase order number entered in cell H11.
Remittance — this sheet includes an automated payment remittance which is populated based on the remittance number entered in cell J10.
Statement — this sheet includes a supplier account statement. All the appropriate information on the other sheets are automatically included on this sheet after simply selecting the appropriate supplier code from the list box in cell J11 and entering the appropriate statement date in cell J12. Note that the supplier account statement also includes an age analysis.
Monthly — this sheet includes a 12 month purchases analysis and monthly purchases, payments and creditor balance charts. The 12 month period is based on the start date specified in cell B4. Users can therefore compile a 12 month purchases analysis for any 12 month period by simply specifying the appropriate start date.
Ageing — this sheet includes an age analysis which is automatically compiled based on the statement date entered in cell B4 and the supplier account selected from the list box in cell B6. All the calculations on this sheet are automated and you can also compile an age analysis for all creditors by simply clearing the supplier account selection from the list box in cell B6.
Balances — this sheet includes an age analysis for all supplier accounts which is automatically compiled based on the statement date specified on the Ageing sheet. The age analysis only includes the first 20 supplier accounts by default but you can add additional accounts by simply copying the formulas from the last data row and pasting the formulas into the appropriate number of additional rows.
Forecast — this sheet includes a supplier payment forecast for a 35 day and 12 month period. The calculations are based on the supplier invoice due dates entered on the Details sheet and the reporting periods are determined based on the current date. The total overdue amount is also reflected. The sheet requires no user input — all the calculations are automated.
Set-up
The business details which are entered on this sheet are included at the top of the PO, Remittance and Statement sheets. The business name is also used as a heading on all the other sheets. The tax codes & percentages specified in cells A19 to B21 are used to calculate the sales tax amounts on the Details sheet and these amounts are included on the automated purchase order on the PO sheet.
We have included two sales tax types in the template to accommodate calculating sales tax on a national / federal basis and a state basis. Both sales tax types are based on the sales tax codes created in the sales tax section of the Setup sheet. If the sales tax percentages of the two sales tax types differ, you need to create separate codes for each sales tax type and use the appropriate codes in the list boxes in the tax code columns on the Details sheet.
Note: If the sales tax percentages change, you can simply create new sales tax codes with the appropriate new percentages in the sales tax section of the Setup sheet and use the new codes from the effective date of the sales tax rate change. The sales tax amounts will then be calculated based on the new sales tax percentages for all entries on the Details sheet where the new sales tax codes are selected.
Note: You can add additional tax codes & percentages by inserting a new row before the end of list item, entering the new code in column A and the appropriate percentage in column B. The new tax code will automatically be included in the list boxes in columns K and L on the Details sheet and automatically be taken into account in the tax calculations in column R and S on the Details sheet.
The error codes that are included at the bottom of the Set-up sheet are displayed for information purposes only. These error codes are reflected in column Z on the Details sheet if there is a problem with the input in some of the user input columns on the Details sheet. Refer to the Error Codes section of these instructions for more information on the user input errors.
Suppliers
A unique supplier code needs to be created for each supplier and the billing address and tax number of each supplier needs to be entered on the Suppliers sheet. Supplier codes are included in a list box on the Details sheet in order to simplify entering the appropriate purchase order / supplier invoice details. The supplier billing address is automatically included on the purchase order, payment remittance and supplier account statement based on the supplier code which is linked to each of these documents on the Details sheet. The appropriate sales tax number is also included on the documents.
Note: We recommend that you use an abbreviated version of the supplier name as the supplier code because it will make it easier to identify the correct supplier when selecting the appropriate supplier code from the list box in column E on the Details sheet. For example, a supplier code of ABC01 can be created for a supplier whose billing name is «ABC Trading».
The supplier code can also be selected on the Statement and Ageing sheets in order to automatically compile an account statement or age analysis for a particular supplier. Refer to the Account Statement and Age Analysis sections of these instructions for guidance on these features.
Note: All the columns on the Suppliers sheet have been included in an Excel table. This feature is extremely useful when entering data in a table format because the formulas which are included in calculated columns are automatically copied when new rows are inserted into the table or when data is entered into the first blank row below the table. You can therefore add suppliers to the table by simply entering a new supplier code in the first blank cell in column A — the table will then automatically extend to include the new supplier code.
In some instances, it may be preferable to allocate purchase orders or invoices to a generic supplier code instead of creating a unique supplier code for each supplier. For example, suppliers trading on a cash or COD basis may not require separate supplier accounts because there would be no amounts outstanding (for example: the code «XXX01» can be created for this purpose).
Stock Codes
The StockCode sheet has been included in the template in order to accommodate entering unique stock codes, descriptions and units of measure (UOM) on the Details sheet in order to include these details on purchase orders. A unique stock code can therefore be added to the StockCode sheet for all stock items and the stock description and UOM will be automatically populated into columns G and H on the Details sheet based on the stock code which is selected in column F on the Details sheet.
The description and UOM in columns G and H on the Details sheet is therefore automatically populated based on the description & UOM which is attached to the stock code that is selected. Some suppliers however do not supply stock but services instead. The formulas in columns G and H can therefore also be used to populate a description of the services provided by adding a service code to the StockCode sheet, adding a description of the service and using a generic unit of measure like hours or units.
Note: The code, description and UOM of all stock codes are automatically included on the purchase order on the PO sheet for stock items and services. This means that you need to select a stock code on the Details sheet for each entry in order to have these sections on the purchase order populated. If a single description does not apply to all services, you can add multiple codes, descriptions & units of measure to the StockCode sheet for the same supplier. If this is not practical, you can override the formulas in the description & UOM columns on the Details sheet with unique values which will then be included on the purchase order.
Note: If you prefer to enter descriptions for all purchase order entries, you do not need to use the StockCode sheet at all and you can override all the formulas in the description and UOM columns on the Details sheet (columns G and H). A standard code like «NON-STOCK» can then be used as the stock code but we recommend retaining the StockCode sheet otherwise some of the formulas which are linked to this sheet may not work properly.
Note: All the columns on the StockCode sheet have been included in an Excel table. This feature is extremely useful when entering data in a table format because the formulas included in calculated columns are automatically copied when new rows are inserted into the table or when data is entered into the first blank row below the table. You can therefore add new items to the table by simply entering a new stock code in the first blank cell in column A — the table will then automatically extend to include the new stock code.
Purchase Order / Supplier Invoice Details
All the transaction details which are included on the automated purchase order (PO sheet) are compiled from the data entered on the Details sheet. The transaction details consists of the purchase order number, purchase order date, stock code, description, unit of measure (UOM), quantity, price and amount. The supplier code selected on the Details sheet is used in order to identify the appropriate supplier and to include the supplier’s details on the purchase order. The tax codes for each entry on the Details sheet are used to calculate the sales tax applicable to the particular purchase order which is included at the bottom of the PO sheet.
All the column headings on the Details sheet contain a filter selection arrow — this feature indicates that the Filter feature has been applied to the sheet. This Excel feature is very useful when you need to filter data based on one of the filter criteria which are available after clicking the selection arrow. The Filter feature can also be used to sort data based on a single column and includes a «Custom» filter option which enables you to specify a custom filter which needs to be applied to the data on the sheet.
Example: If you only want to display the purchase orders for a particular month, you can filter the data based on the Order Date column by specifying filter criteria which includes all transaction dates greater than or equal to the 1st day of the month and less than or equal to the last day of the month. After reviewing the filtered data, simply select the «All» option in the filtered column in order to remove the filter and to display all the entries on the sheet.
The totals in the cells above all the amount columns (formatted in italic) contain a Subtotal function which results in all filtered records being included in the calculation. This means that after filtering data, only the entries displayed on the sheet are included in the calculation (column total). If you therefore print the sheet while a filter is in effect, the totals above the column headings will be calculated accurately and only include the filtered transactions which have been printed.
Note: All the columns on the Details sheet have been included in an Excel table. This feature is extremely useful when entering data in a table format because the formulas in the calculated columns (with light blue column headings) are automatically copied when new rows are inserted into the table or when data is entered into the first blank row below the table. You can therefore add new entries to the table by simply entering a new order number in the first blank cell in column A — the table will then automatically extend to include the new entry.
All the columns with yellow column headings require user input while the columns with light blue column headings contain formulas which are automatically copied for all new entries added to the Excel table. The following information should be included in the user input columns:
Purchase Order No — purchase order numbers can be in any format and are used as the primary reference for including the purchase order details on the PO sheet. If you are only going to use the template for supplier invoices, this column can be left blank or you can enter purchase orders in any generic numerical sequence. If you need to enter multiple rows for the same purchase order, the purchase order number needs to be repeated in each row.
Order Date — enter the purchase order date in this column. If you are not using purchase orders, you can enter the supplier invoice date in this column. If you need to enter multiple rows for the same purchase order, the purchase order date needs to be repeated in each row.
Supplier Invoice No — enter the supplier invoice number in this column. If you need to enter multiple rows for the same supplier invoice, the supplier invoice number needs to be repeated in each row.
Invoice Date — enter the supplier invoice date in this column. If you need to enter multiple rows for the same supplier invoice, the supplier invoice date needs to be repeated in each row.
Supplier Code — select the appropriate supplier code from the list boxes in column E. All the supplier codes which have been added to the Supplier sheet are included in the list boxes. You therefore need to create the appropriate supplier code on the Supplier sheet before it will be available for selection.
Stock Code — select the appropriate stock code from the list boxes in column F. All the stock codes which have been added to the StockCode sheet are included in the list boxes. You therefore need to create the appropriate stock code on the StockCode sheet before it will be available for selection.
Quantity — enter the purchase order quantity in this column. For stock items, this should be the quantity ordered but for services, you can use a quantity of 1 if you are going to be entering the full cost of the service in the Price column. If the service is based on a particular unit of measure (like hours), the correct ordered quantity needs to be entered in this column.
Price — enter the price of the ordered item in this column. The price should be inclusive of tax and consistent with the unit of measure that you used when entering the quantity in the previous column. If the ordered item is not a stock item, the total inclusive cost can be entered in this column and a quantity of 1 can be entered in the previous column. If an alternative unit of measure has been applied to the service, the price should be consistent with this unit of measure. For example, if hours have been entered in the Quantity column, the inclusive price per hour should be entered in this column.
Tax 1 Code — select a sales tax code from the list boxes in column K. All the tax codes which have been added to the Setup sheet will be included in the list boxes and the tax amounts will be calculated based on the percentages which have been specified on the Set-up sheet. Note that if you leave the tax code selection blank, the calculations will be based on the first tax code which has been created on the Set-up sheet. If your business is therefore not registered for tax purposes, you should ensure that the first percentage on the Set-up sheet in cell B19 has a nil value. The first sales tax code is for national or federal sales tax.
Tax 2 Code — select a tax code from the list box. All the sales tax codes which have been created on the Setup sheet will be available for selection and sales tax percentages are calculated based on the selected tax code. The second sales tax code is for state sales tax — if you do not need two sales tax codes, this column can be deleted.
Invoice Due Date — enter the date on which payment to the supplier is due. This date is will be used to calculate the supplier payment forecast on the Forecast sheet and should therefore be included for all the entries added to the Details sheet.
Payment Amount — enter the amount paid to the supplier. If the supplier invoice has not been paid, leave the payment amount and payment date columns blank. The payment amount should equal the tax inclusive amount if an invoice is paid in full. Refer to the Recording Partial Payments section of these instructions for guidance on how to record multiple partial payments.
Payment Date — enter the date on which payment is made in this column. If the supplier invoice has not been paid, leave the payment amount and payment date columns blank. Refer to the Recording Partial Payments section of these instructions for guidance on how to record multiple partial payments.
Remittance No — enter a payment remittance number in this column. The remittance number is used to populate the payment remittance on the Remittance sheet and can be in any format although we suggest using a combination of letters and numbers.
The following calculated columns (with light blue column headings) are included on the Details sheet:
Description — the stock description in column G is included based on the stock code which has been selected in column F and is entered on the StockCode sheet in column B. You can however override the formula in this column with user input if you are not using stock codes for all entries.
UOM — the unit of measure in column H is included based on the stock code which has been selected in column F and is entered on the StockCode sheet in column C. You can override the formula in this column with user input if you are not using stock codes for all entries.
Tax Inclusive Amount — this amount is calculated by multiplying the quantity in column I by the price in column J.
Sales Tax 1 Amount — the sales tax amounts in this column are calculated based on the tax 1 code selected in column K and the sales tax percentages specified on the Setup sheet. The tax 1 calculations are applicable for national or federal sales tax and should therefore apply to most countries. If no sales tax should be calculated, the E tax code can be selected in column K.
Sales Tax 2 Amount — the sales tax amounts in this column are calculated based on the tax 2 code selected in column L and the sales tax percentages specified on the Setup sheet. The tax 2 calculations are applicable for state sales tax and may therefore not apply in all countries. If you do not need state sales tax calculations, you can delete this column.
Exclusive Amount — these amounts are calculated by deducting the tax amounts from the tax inclusive amounts.
Invoice Balance — the current outstanding balance of each invoice is displayed in this column. If an invoice has been entered in multiple lines, only the first line relating to the particular invoice will contain a balance.
ID1, PO1, SC1, Invoice Ref, Remit Ref and RM1 — the calculations in these columns are used in compiling the automated reports that are included in this template.
Error Code — if any of the user input columns contain invalid data, an error code will be reflected in this column. It is therefore important to ensure that none of the cells in this column contain an error code. For more info on the error codes that may be encountered, refer to the Error Codes section of these instructions.
Note: When entering multiple lines for the same supplier invoice, it is important that the correct supplier code is specified in column E otherwise not all the lines will be included on the purchase order, remittance and supplier statement.
Recording Purchase Orders
When you record a purchase order on the Details sheet, the purchase order number, order date, supplier code, stock code, quantity, price and tax code should be entered on the Details sheet based on the above guidance. A supplier invoice number and invoice date should only be entered once an invoice has been received from the appropriate supplier after which the invoice due date, payment date and payment amount can be entered.
Note: Purchase orders are only included in the creditor balance calculations on the other sheets after an invoice number has been entered in column C. Purchase orders for which supplier invoices have not been received are therefore not treated as creditors. We have however included an outstanding purchase order total in column E on the Monthly sheet. If this column contains values, we suggest that you follow up on purchase orders for which no supplier invoices have been entered on the Details sheet because these entries may represent unrecorded liabilities.
Recording Partial Payments
All payments to suppliers are allocated against invoiced values based on the payment amount and payment date entered in columns N and O on the Details sheet. If a supplier invoice is paid in full, the user simply needs to enter the amount of the payment and the date of the payment into these columns and the invoice will not be included with other outstanding invoices.
If partial payments are made, the user basically needs to enter each payment amount and payment date as a separate entry in these two columns. If the purchase order consisted of multiple lines, the user has the option to enter each separate payment in each of these multiple lines. It will make no difference if the first payment amount is more than the tax inclusive amount that has been entered in the first line because all multiple lines for the same invoice are consolidated when matching payments.
If more partial payments have been made than there are lines for, the user needs to add a line in order to record the payment amount & payment date. The following process needs to be completed:
- Find the appropriate invoice on the Details sheet and insert a new row below the last entry for the particular invoice.
- Copy the entire last entry for the invoice into the new blank row so that the contents of the copied row and new row are exactly the same.
- In the new row, remove the stock code from column F and enter nil values in the quantity and price columns.
- Change the payment amount in column N and the payment date in column O to reflect the last payment made. Also enter a new remittance number in column P.
- This process can be repeated for an unlimited number of partial payments.
Removing Second Sales Tax Calculations
We have included two sales tax types in the template to accommodate calculating sales tax on a national / federal basis and a state basis. If you do not need both sales tax types, you can delete the second sales tax type. You should not however delete both as this may result in template calculation errors.
Note: If sales tax is not applicable to your business, we recommend using the «E» sales tax code when recording all entries. No sales tax will then be calculated as the sales tax percentage for this code is zero.
The second sales tax type can be removed by deleting the Tax 2 Code column (column L) and the Sales Tax 2 Amount (column S) on the Details sheet.
Note: No new columns should be added between the exclusive amount and sales tax amount columns on the Details sheet otherwise it may affect some of the sales tax calculations in this template. Also, if you delete the columns for the second sales tax type, the Sales Tax 1 Amount column may display validation warnings but these can safely be ignored as it has no effect on the template calculations. If you do not want to see these validation warnings, just keep both sales tax types and just don’t select any tax codes in the second sales tax code column.
Error Codes
The following error codes may result from inaccurate input on the Details sheet and will be displayed in the Error Code column. The heading of the affected input column will also be highlighted in orange:
- E1 — this error code means that the payment date which has been entered in column O on the Details sheet is before the invoice date in column D. These errors can be rectified by either amending the appropriate invoice date or amending the appropriate payment date.
- E2 — this error code means that the supplier code which has been selected in column E on the Details sheet is invalid. All the supplier codes that have been entered on the Suppliers sheet will be included in the list boxes in column E and the error can therefore be rectified by simply selecting a valid supplier code from the list box. New supplier codes must be created on the Suppliers sheet before being available for selection.
- E3 — this error code means that a payment date has been entered in column O but an invoice number has not been entered in column C. An invoice number should be specified before payment is made and it is therefore impossible for a supplier invoice to be paid before an invoice number has been specified. If this error therefore occurs, the appropriate invoice number should simply be entered in column C in order to rectify the error.
- E4 — this error code means that the stock code that has been selected in column F on the Details sheet is invalid. All the stock codes which have been entered on the StockCode sheet will be included in the list boxes in column F and the error can therefore be rectified by simply selecting a valid stock code from the list box. New stock codes must be created on the StockCode sheet before being available for selection.
Note: Input errors may result in inaccurate template calculations and it is therefore imperative that all errors are resolved before reviewing the creditor balance and ageing calculations on the other sheets in this template.
Purchase Orders
An automated purchase order has been included on the PO sheet. You can create, view, print or reprint any purchase order by simply copying or entering the appropriate purchase order number into cell H11 on the PO sheet. All the information that is included on the purchase order should be entered on the Set-up, Suppliers, StockCode and Details sheets and the purchase order is automatically updated based on the purchase order number specified in cell H11 on the PO sheet.
The business details (business name, business address, contact details, tax reference number and business registration number) are entered on the Set-up sheet. The Supplier information is looked up on the Suppliers sheet based on the supplier code that is specified in column E on the Details sheet for the particular purchase order.
The purchase order date is looked up on the Details sheet based on the purchase order number that is specified in cell H11. The purchase order date should be the same for all the lines that need to be included on the purchase order. If different dates are entered for the same purchase order in the Order Date column, only the first date will be displayed on the purchase order.
The stock code, stock description, unit of measure, quantity, price and amount are also looked up based on the information entered on the Details sheet for the purchase order number as entered in cell H11. Note that the PO sheet accommodates a maximum of 25 lines per purchase order and that the order in which items are included on the PO sheet are determined by the order in which the items are included on the Details sheet.
A subtotal, sales tax amounts and purchase order total are included below all the detail lines. The tax amounts are calculated based on the tax codes which are selected for each line on the Details sheet and the appropriate tax percentages specified on the Set-up sheet. The purchase order also contains authorisation fields at the bottom of the sheet which enables users to print & sign each purchase order.
If you want to customize the standard purchase order to your own requirements (example: changing fonts, colours, etc.), you will be able to do so but take care not to replace any of the formulas because it may result in the information that is included on the purchase order becoming inaccurate. Note you can also insert your own logo or artwork at the top of the PO sheet.
Note: If you do not see all the multiple lines that have been added for a particular purchase order on the PO sheet, you need to check that all the lines that relate to the purchase order have been assigned to the correct supplier code in column E on the Details sheet.
Remittance
An automated payment remittance has been included on the Remittance sheet. You can create, view, print or reprint any payment remittance by simply specifying the appropriate remittance number in cell J10. Remittance numbers can be entered in column P on the Details sheet. All the other information that is included on the Remittance sheet is automatically compiled based on the data entered on the Set-up, Suppliers and Details sheets.
The business details (business name, registration number, business address, contact details and tax reference number) are entered on the Set-up sheet. The Supplier information is looked up on the Suppliers sheet based on the supplier code entered for the appropriate remittance in column E on the Details sheet.
The payment date in cell J12 on the Remittance sheet is looked up based on the payment date entered in column O on the Details sheet for the appropriate remittance number. If more than one entry on the Details sheet have the same remittance number, the first payment date will be reflected.
The remittance also includes the total purchases, total payments and outstanding balance for the appropriate supplier. All entries that are dated on or before the payment date will be included in these calculations.
The total of all payments linked to the remittance number in cell J10 is displayed in cell J16. The invoices and amounts that make up this total are listed in the detailed section from row 24.
Note: The total remittance payment amount will not necessarily equal the outstanding balance for the supplier because it is dependent on the terms negotiated with the supplier. Some invoices may have been issued but will only become due after the remittance’s payment date which will result in an outstanding balance being reflected. The payment to which the remittance relates is included in the total payments and outstanding balance calculations because it falls on or before the payment date.
The remittance also includes an authorisation section where the name, signature and authorization date can be captured and which the person responsible for authorizing the payment can sign as proof of authorization.
All the supplier invoices which are included in the payment will automatically be listed in the Details section of the remittance. This section includes details of the invoice number, invoice date, purchase order number, document type and the payment amount. All the details are listed on a per invoice basis and based on the entries added to the Details sheet.
A payment status is also included in column K on the remittance. If an invoice is being paid in full, the text «FP» will be displayed in this column. If the payment is only a part payment of an invoice, «PP» will be displayed. If you do not want this text to be visible on your remittances, you can simply format the text in white or remove the formulas that have been added to this column.
Note: By default, the payment remittance includes a maximum of 30 outstanding invoices but you can add more invoices to this sheet by simply copying the formulas from row 53 and pasting them into the appropriate number of additional rows. We recommend that you select the entire row before copying & pasting the formulas.
Note: Invoices are listed on the remittance in the same order in which the invoices appear on the Details sheet. If you therefore want to change the order in which invoices are listed, you need to sort the data on the Details sheet accordingly.
Note: If you do not see all the invoices that have been added for a particular remittance on the Remittance sheet, you need to check that all the invoices that relate to the remittance have been assigned to the correct supplier code in column E on the Details sheet.
If you want to customize the payment remittance sheet to your own requirements (example: changing fonts, colours, etc.), you will be able to format the cells on the Remittance sheet accordingly. Also note that you can insert your own logo or artwork at the top of the Remittance sheet.
Supplier Account Statement
An automated supplier account statement has been included on the Statement sheet. You can create, view, print or reprint any account statement by simply specifying the appropriate supplier code and statement date in cells J11 and J12 respectively. All the other information which is included on the account statement is automatically compiled based on the data entered on the Set-up, Suppliers and Details sheets.
The business details (business name, registration number, business address, contact details and tax reference number) are entered on the Set-up sheet. The Supplier information is looked up on the Suppliers sheet based on the supplier code which is selected from the list box in cell J11.
The outstanding balance in cell J22, the ageing in the cell range from cell C16 to J17 and the list of outstanding invoices from row 22 downwards are all automatically calculated and displayed based on the supplier code selected from the list box in cell J11 and the statement date entered in cell J12.
If the statement date entered in cell J12 falls on a month end date, all the ageing calculations are based on calendar months but if the statement date falls on any other day of the month, the ageing calculations are based on the day component which forms part of the statement date.
For example: If the statement date is specified as the 27th of January, all invoices dated between the 28th of December and the 27th of January are included in the «Current» ageing group, all invoices between the 28th of November and the 27th of December are included in the «30 Days» ageing group and so forth.
If the statement date is specified as the 29th of February (a month end date), the ageing is calculated based on calendar months. For example, all invoices dated between 1 February and 29 February are included in the «Current» ageing group, all invoices dated between 1 January and 31 January are included in the «30 Days» ageing group and so forth.
It is also important to note that only the invoices which are outstanding on the statement date are included on the supplier account statement. Outstanding invoices are invoices dated before the statement date with payment dates after the statement date or blank (indicating that the invoices have not yet been paid).
Account statements are therefore compiled on an open item basis — this means that only open or outstanding items (invoices) are included on account statements and not all the movements on the supplier account during a specific period (opening balances, invoices and payments displayed separately). We believe that this is the most efficient method of compiling account statements because it negates the need for complicated account reconciliations.
One potential complication with open item account statements is the matching of partial payments to invoices. This process could be complicated regardless of which accounting system is being used, but we suggest that you follow the procedure listed under the Recording Partial Payments section of these instructions in order to correctly match partial payments to the supplier invoices listed on the Details sheet.
As we’ve mentioned before, the outstanding invoices listed on the account statement include both invoices which have been paid after the statement date and invoices which have not yet been paid. If you therefore compile an account statement (especially for previous periods) and some of the invoices have been paid subsequent to the statement date, these invoices will still be included on the account statement. We recognise that the inclusion of these invoices could result in some confusion and we have therefore included functionality to display a «FP» next to the invoice amounts of all fully paid invoices and a «PP» next to the invoice amounts of all partially paid invoices in order to indicate that the affected invoices have already been paid.
Note: By default, the account statement includes a maximum of 30 outstanding invoices, but you can add more invoices to this sheet by simply copying the formulas from row 51 and pasting them into the appropriate number of additional rows. We recommend that you select the entire row before copying & pasting the formulas.
Note: Invoices are listed on the account statement in the same order in which the invoices appear on the Details sheet. If you therefore want to change the order in which invoices are listed, you need to sort the data on the Details sheet accordingly.
If you want to customize the supplier account statement to your own requirements (example: changing fonts, colours, etc.), you will be able to format the cells on the Statement sheet accordingly. Also note that you can insert your own logo or artwork at the top of the Statement sheet.
Monthly Sales Analysis
A monthly purchases analysis and monthly purchases, payments and creditor balance charts have been included on the Monthly sheet. All the calculations on this sheet include a 12 month period which is calculated based on a user defined start date. Users can therefore amend the 12 month period which is included in the purchases analysis by simply entering a new date in cell B4.
Note: The purchase order balances in column E reflect the total amount of all outstanding purchase orders as at the end of the appropriate monthly period. Outstanding purchase orders are defined as all purchase orders which have been issued to a supplier but for which supplier invoices have not been received and entered on the Details sheet. If this column contains a total other than nil, we suggest that users follow up all blank supplier invoices to ensure that there are no unrecorded liabilities.
Creditors Age Analysis
A creditors age analysis, ageing chart and purchases / creditors balance history chart have been included on the Ageing sheet. All the calculations on this sheet are automated and the only user input which is required is the statement date in cell B4 and the supplier code in cell B6.
Ageing calculations can be performed for a specific supplier by simply selecting the appropriate supplier code from the list box in cell B6 or an age analysis of all supplier accounts can be compiled by simply clearing the supplier code from cell B6 (select cell B6 and simply press the Delete key on the keyboard).
The Ageing sheet also include purchase history and supplier account balance history calculations for a 12 month period and two charts which are extremely useful for analysing supplier account movements.
Note: All ageing calculations are performed on the same basis as we discussed under the Supplier Account Statement section of these instructions. If you enter any month end date as the statement date, the age analysis is calculated based on calendar months and if you enter any other date, the age analysis is calculated based on the day component which is included in the specified statement date.
Note: If you accidentally clear the statement date from cell B4, you may notice that some of the calculations on this sheet result in errors. This is because a statement date should always be specified in order to perform these calculations. We have therefore implemented conditional formatting features to highlight the statement date in orange if this cell is accidentally cleared.
Supplier Account Balances
A supplier account balance report has been included on the Balances sheet and reflects all outstanding balances as at the statement date specified in cell B4 on the Ageing sheet. The report also includes an age analysis of all supplier account balances calculated based on the statement date. All the calculations on this sheet are automated and no user input is required.
Note: By default, only the first 20 supplier accounts are included on the Balances sheet. If you therefore create more than 20 supplier accounts on the Suppliers sheet, some of the accounts may not be included on the Balances sheet. This limitation can be extended by simply selecting the last row on the Balances sheet, copying the entire row and pasting the formulas into the required number of additional rows. All supplier accounts should then be included in the report.
Note: If the number of suppliers on the Suppliers sheet and the number of suppliers included on the Balances sheet are not the same, cell A5 (the Code heading cell) on the Balances sheet will be highlighted in orange in order to indicate that you need to add additional rows to the Balances sheet.
As we mentioned before, the supplier account balance report is based on the statement date specified on the Ageing sheet. This functionality enables users to view an age analysis for all supplier accounts by entering the appropriate statement date and clearing the supplier code input cell on the Ageing sheet and to then view a breakdown of the age analysis amounts by supplier account on the Balances sheet.
Supplier Payment Forecast
We’ve also included an automated supplier payment forecast on the Forecast sheet. This forecast automatically displays the supplier payment totals which are due within the next 35 days on a daily basis and the next 12 months on a monthly basis.
The sheet requires no user input and is based on the current system date. The allocation of supplier payments to the appropriate periods are based on the invoice due dates entered in column M on the Details sheet.
The total of all overdue supplier payments is also displayed in cell E3. If you want to see the detail of the individual invoices that make up this total, you can filter the Details sheet based on invoice balances (column U) greater than nil and where the invoice due date (column M) is on or before the current system date.