
Excel for Microsoft 365 Excel for Microsoft 365 for Mac Excel for the web Excel 2021 Excel 2021 for Mac Excel 2019 Excel 2019 for Mac Excel 2016 Excel 2016 for Mac Excel 2013 Excel 2010 Excel 2007 Excel for Mac 2011 More…Less
To prevent other users from viewing hidden worksheets, adding, moving, deleting, or hiding worksheets, and renaming worksheets, you can protect the structure of your Excel workbook with a password.
Note: The screen shots in this article were taken in Excel 2016. If you have a different version your view might be slightly different, but unless otherwise noted, the functionality is the same.

Notes: Protecting the workbook is not the same as protecting an Excel file or a worksheet with a password. See below for more information:
-
To lock your file so that other users can’t open it, see Protect an Excel file.
-
To protect certain areas of the data in your worksheet from other users, you have to protect your worksheet. For more information, see Protect a worksheet.
-
To know the difference between protecting your Excel file, workbook, or a worksheet, see Protection and security in Excel.
Protect the workbook structure
To protect the structure of your workbook, follow these steps:
-
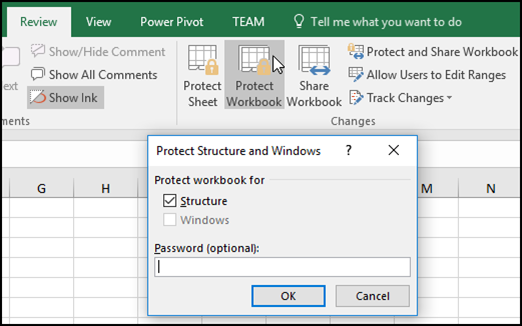
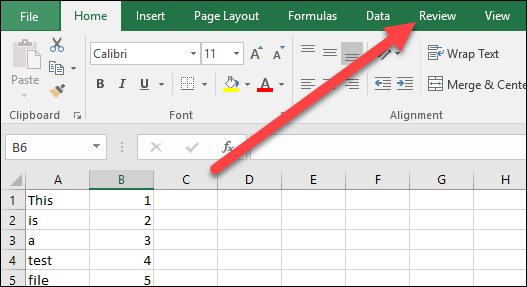
Click Review > Protect Workbook.

Note: The Windows option is available only in Excel 2007, Excel 2010, Excel for Mac 2011, and Excel 2016 for Mac. Select the Windows option if you want to prevent users from moving, resizing, or closing the workbook window, or hide/unhide windows.
-
Enter a password in the Password box.
Important: The password is optional. If you do not supply a password, any user can unprotect and change the workbook. If you do enter a password, make sure that you choose a password that is easy to remember. Write your passwords down and store them someplace safe. If you lose them, Excel cannot recover them for you.
-
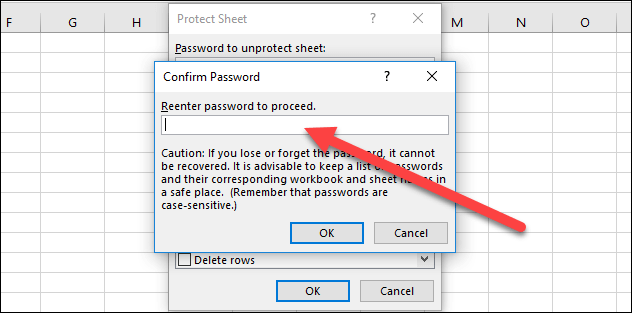
Select OK, re-enter the password to confirm it, and then select OK again.
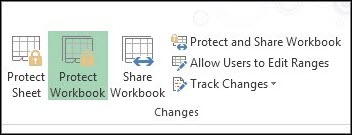
On the Review tab , see the Protect Workbook icon. If it’s highlighted, then the workbook is protected.
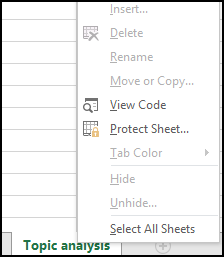
If you click on the bottom of a sheet inside your workbook, you will notice that the options to change the workbook structure, such as Insert, Delete, Rename, Move, Copy, Hide, and Unhide sheets are all unavailable.
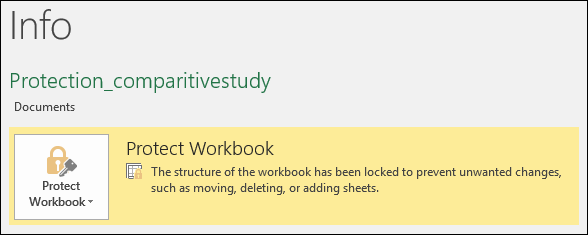
The Protect Workbook option in the Info menu also indicates that the workbook’s structure is protected. To view this option, click File > Info > Protect Workbook.
Click Review > Protect Workbook. Enter the password and then click OK.
To prevent other users from viewing hidden worksheets, adding, moving, deleting, or hiding worksheets, and renaming worksheets, you can protect the structure of your Excel workbook with a password.
Note: The screen shots in this article were taken in Excel 2016. If you have a different version your view might be slightly different, but unless otherwise noted, the functionality is the same.
Notes: Protecting the workbook is not the same as protecting an Excel file or a worksheet with a password. See below for more information:
-
To lock your file so that other users can’t open it, see Protect an Excel file.
-
To protect certain areas of the data in your worksheet from other users, you have to protect your worksheet. For more information, see Protect a worksheet.
-
To know the difference between protecting your Excel file, workbook, or a worksheet, see Protection and security in Excel.
Protect the workbook structure
To protect the structure of your workbook, follow these steps:
-
Click Review > Protect Workbook.
Note: The Windows option is available only in Excel 2007, Excel 2010, Excel for Mac 2011, and Excel 2016 for Mac. Select the Windows option if you want to prevent users from moving, resizing, or closing the workbook window, or hide/unhide windows.
-
Enter a password in the Password box.
Important:
-
The password is optional. If you do not supply a password, any user can unprotect and change the workbook. If you do enter a password, make sure that you choose a password that is easy to remember. Write your passwords down and store them someplace safe. If you lose them, Excel cannot recover them for you.
-
Passwords in Excel for Mac have a 15-character limit. You cannot open a workbook or document that has been password-protected in the Windows-based version of Excel or if the password is longer than fifteen characters. If you want to open the file in Excel for Mac, ask the Windows-based author to adjust the password length.
-
-
Retype the password and click OK.
On the Review tab , see the Protect Workbook icon. If it’s highlighted, then the workbook is protected.
If you click on the bottom of a sheet inside your workbook, you will notice that the options to change the workbook structure, such as Insert, Delete, Rename, Move, Copy, Hide, and Unhide sheets are all unavailable.
Click Review > Protect Workbook. Enter the password and then click OK.
To unprotect a sheet, follow these steps:
-
Go to the worksheet you want to unprotect.
-
Go to File > Info > Protect > Unprotect Sheet, or from the Review tab > Changes > Unprotect Sheet.
-
If the sheet is protected with a password, then enter the password in the Unprotect Sheet dialog box, and click OK.
Excel for the web can open workbooks protected by a password but these files cannot be edited in web. Passwords can’t be added, changed, removed, or recovered from Excel for the web.
If you want to add a password to a workbook you are working on in Excel for the web, and you have Excel desktop application, use the Open in Excel button to open the workbook and password protect the workbook. But going forward, you’ll only be able to view the file on web — to make changes to the workbook, open it in your desktop version of Excel.
-
Select Open in Excel and password protect the workbook.
Need more help?
You can always ask an expert in the Excel Tech Community or get support in the Answers community.
See Also
Protection and security in Excel
Protect an Excel file
Protect a worksheet
Collaborate on Excel workbooks at the same time with co-authoring
Video: Password protect workbooks and worksheets (Excel 2013)
Need more help?
Protect an Excel file
To prevent others from accessing data in your Excel files, protect your Excel file with a password.

Note: This topic covers file-level protection only, and not workbook or worksheet protection. To learn the difference between protecting your Excel file, workbook, or a worksheet, see Protection and security in Excel.
-
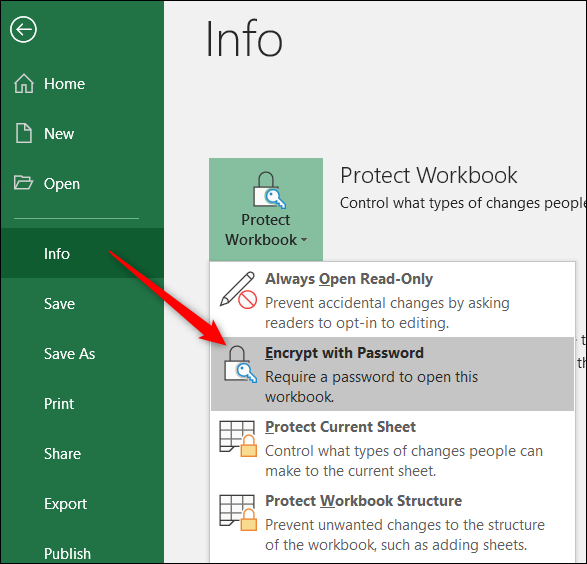
Select File > Info.
-
Select the Protect Workbook box and choose Encrypt with Password.
-
Enter a password in the Password box, and then select OK.
-
Confirm the password in the Reenter Password box, and then select OK.
Warning:
-
Microsoft cannot retrieve forgotten passwords, so be sure that your password is especially memorable.
-
There are no restrictions on the passwords you use with regards to length, characters or numbers, but passwords are case-sensitive.
-
It’s not always secure to distribute password-protected files that contain sensitive information such as credit card numbers.
-
Be cautious when sharing files or passwords with other users. You still run the risk of passwords them falling into the hands of unintended users. Remember that locking a file with a password does not necessarily protect your file from malicious intent.
Need more help?
You can always ask an expert in the Excel Tech Community or get support in the Answers community.
See Also
Protect a workbook
Protect a worksheet
Protection and security in Excel
Need more help?
How to Protect an Excel Workbook?
Protecting Excel workbooks is a method where we save the whole workbook rather than a single sheet. It means saving the entire structure of the workbook. If a workbook is protected with a password, no other user can insert a new sheet or delete any sheet. Neither can they view the hidden sheets or even change the name of the worksheets in the workbook.
Follow the below steps to learn how to protect a workbook.
- Go to the “File” tab and click on it.

- Once we click on the “File” tab, we can see various options. For example, we see a box protecting the workbook in the info section.

It says that the workbook’s structure is locked to prevent any changes.
- If the workbook is not protected, the message would be as follows:

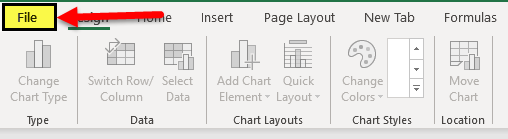
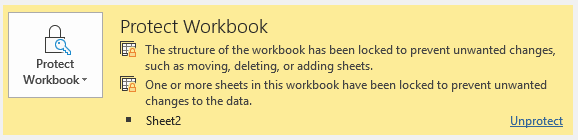
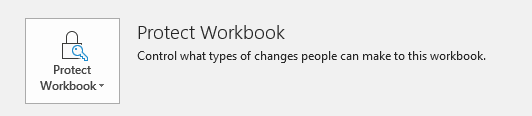
Table of contents
- How to Protect an Excel Workbook?
- Example of Protecting a Workbook in Excel
- Things to Remember
- Recommended Articles
Example of Protecting a Workbook in Excel
First, we will try to protect a workbook as a whole so that nobody can make any change in any of the worksheets or any cells without any password.
In this example, we are using Excel version 2013, so we will protect the workbook’s structure and then try to change the name of worksheet 3, which we have named “Anand.” Now, we want to change it to “Aran.”
It is very simple.
1) Click on “Protect Workbook” under the changes section in the “Review” tab.

2) A dialog box pops up.
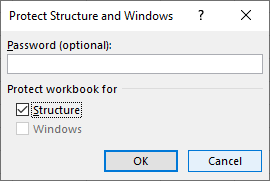
3) We will enter the same password, “EDUCBA,” to protect our Excel workbook and click on “OK.”
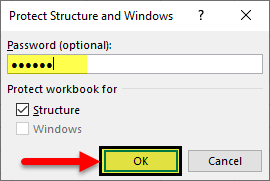
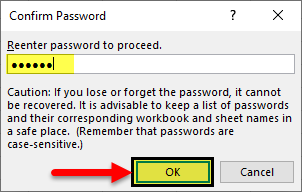
4) It asks us to re-enter the password. When we click on “OK,” the whole workbook is protected.
5) Now, let us see what the original name of “Sheet 3” was earlier.
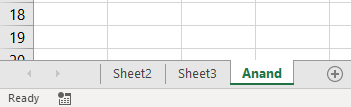
6) As the workbook is protected, double-click on the sheet name. As a result, we get the following display message.

7) We can also try to right-click on sheet 3 to see if we can change the sheet name by that method.
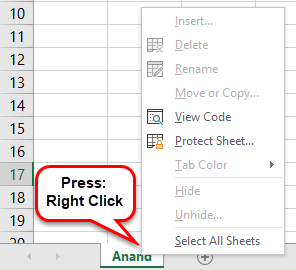
We can see that the “Rename,” “Insert,” “Delete,” or “Move,” and the “Copy” options have been disabled as we have protected the workbook.
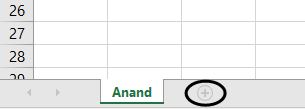
 We can also try to add a new worksheet from the “plus” sign beside the worksheet named “ANAND,” but we can see that we cannot as the “+” sign is disabled.
After protecting the workbook’s structure, any user cannot make changes to the protected workbook’s structure.
Things to Remember
- Protecting workbooks is different from protecting worksheets.
- In Excel version 2013 and above, we can only protect the workbook’s structure as the windows “Resize” option is disabled in the later versions.
- In Excel version 2010 and below, we can protect both structure and windows size options as resize available in the previous versions of Excel.
- It is advised to protect an Excel workbook with a password so that any other user cannot unprotect it easily and change the workbook’s structure.
- It is also recommended to remember the password, as once the password is lost, we cannot unprotect the Excel workbook again.
Recommended Articles
This article is a guide to Protect Workbook in Excel. We learn how to protect the workbook in Excel, practical examples, and downloadable Excel templates. You may learn more about Excel from the following articles: –
- Excel VBA UnProtect Sheet
- Excel Add Bullet Points
- Column Lock Excel
- Lock Cells Excel
- Insert (Embed) an Object in Excel
Reader Interactions
Wants to prevent your Excel data from being modified by any other user but don’t know how to protect Excel workbook from editing?
Well, we all have this fear of Excel data mess up before giving our Excel workbook to anyone. Right…?
Fortunately, Excel offers its user with some amazing built-in utilities to prevent Excel workbook editing.
Today, you will get to know about all such smart tricks to protect Excel workbook from editing through this post.
What’s The Need For Protecting Excel Workbook?
The very important reason for protecting Excel file from editing is to prevent users from deliberately or accidentally making changes in the worksheet.
Let’s understand this more clearly with an example:
Suppose you have maintained a report of team status in your worksheet. In which you want that your team member will add data only in specific cells and won’t modify any other data of your worksheet.
In such cases, Excel worksheet protection will only make certain parts of your sheets editable. Thus none of the users will be able to make changes in any other regions of the worksheet.
To repair corrupt Excel workbook, we recommend this tool:
This software will prevent Excel workbook data such as BI data, financial reports & other analytical information from corruption and data loss. With this software you can rebuild corrupt Excel files and restore every single visual representation & dataset to its original, intact state in 3 easy steps:
- Download Excel File Repair Tool rated Excellent by Softpedia, Softonic & CNET.
- Select the corrupt Excel file (XLS, XLSX) & click Repair to initiate the repair process.
- Preview the repaired files and click Save File to save the files at desired location.
There are various ways to protect Excel workbook from editing. But it’s up to you whether you want to apply security to your Excel workbook, file, Worksheet, or in specific cells.
- Protect Excel File From Editing
- Protect Excel Workbook From Editing
- Protect Excel Worksheet From Editing
- Protect Excel Workbook’s Structure From Editing
- Protect Excel Cells From Editing
Trick 1# Protect Excel File From Editing
“Mark As Final” Excel option is used for Protecting Excel File From Editing by another user. It’s like a reminder more than protecting Excel by turning OFF the typing-editing commands.
One can easily identify that the Excel file is protected from editing by seeing the marked as final icon which appears on the status bar.
Steps to apply Mark As Final for protecting Excel File from editing:
- Just open the Excel file in which you want to apply this mark as final option.
- Tap to the following: file > Info > Protect Workbook > Mark as Final options.

- Hit the ok button to save and apply the changes.
Trick 2# Protect Excel Workbook From Editing
If you want to protect the complete of your workbook from editing then you have two options to perform.
- Encrypting your Excel Workbook with the Password
- Making your workbook read-only
1. Encrypt Excel Workbook With A Password
To protect Excel Workbook from editing the very first option is to encrypt the workbook with some password.
So that whenever anyone else tries to open your Excel workbook, firstly they need to enter the password.
Note: try you need to set some tough Password that no one can guess.
Steps to encrypt Excel workbook with a password:
- Open your Excel file and click on the following options: File>info>Protect Workbook.
- From the Protect Workbook drop-down options choose the “Encrypt with Password”.
- In the opened window of Encrypt Document, just enter the password which you want to set. After that click to the ok.

Note: read the caution lines carefully and set the password that you don’t forget.
- For the password confirmation, you are asked to enter the password two times. After that click the OK button.

- To check whether your Excel workbook gets encrypted properly or not, You need to close your already opened workbook and re-open it again.

If later on, you want to remove password from Excel workbook then follow the steps given in this tutorial: Top 3 Methods To Unlock Password Protected Excel File
2. Make A Workbook Read-Only
Making Excel workbook read-only is very easy. This option doesn’t give any real protection so any user who is opening the file can easily enable the editing option. But it will give suggestions to the other user for being careful while making changes in the file.
- At first, Open your Excel workbook which you want to make read-only.
- Now Go to the file > info> Protect Workbook.
- Now from the drop-down options of Protect Workbook choose the “always open read only”.

- After applying this, whenever anyone tries to open the Excel file, they will get the warning that the file is opened in read-only mode.

- For removing up this read-only setting, just go to the File > Protect Workbook Now toggle the “Always Open Read-Only” setting off.
Helpful Article: 7 Quick Ways To Fix Excel File Read Only Error
Trick 3# Protect Excel Worksheet From Editing
Another option of preventing Excel workbook from editing is by protecting each individual worksheet.
Using this option you can easily lock all the cells from being edited by anyone. Protect Excel Worksheet means no can edit or delete its content.
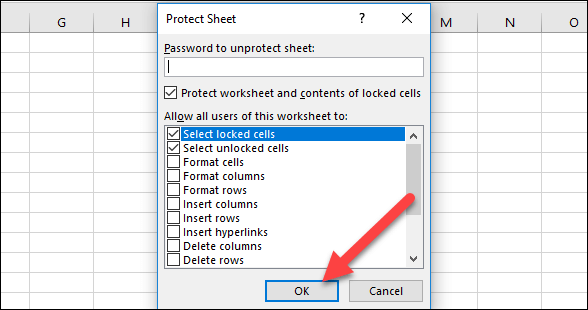
Follow the below steps to Protect Excel Worksheet From Editing:
- From the Excel ribbon tap to the “Review” tab.
- Now from the changes group make a tap on the “Protect Sheet.”

- Assign the password which you want to set for unlocking your Excel sheet in the future again.

- Enter the password one more time to make a confirmation and hit the ok.
- Choose the permissions from the listed option of “allow all users of this worksheet to” and then click the ok.
- For removing up the protection, go to the “Review” tab and hit the button “Unprotect Sheet”.
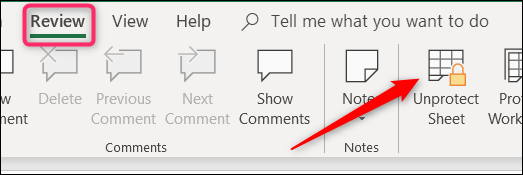
- Enter the password and click the “OK” button.

- Now your sheet is unprotected. So you have to apply for the protection again whenever you need it.
Trick 4# Protect Excel Workbook’s Structure From Editing
Another option to prevent workbook from editing is by protecting the Excel workbook’s structure.
Follow the steps to Protect Excel Workbook’s Structure From Editing:
- Go to the File menu in your opened Excel file. After that click on the following: Info> Protect Workbook> protect workbook structure.

- Assign the password and click the “OK”.

- Re-enter the password again for confirmation and click “OK.”

- After applying this option, anyone can open your Excel document but they can’t access its structural commands.
- If another user knows your password, they can easily access these commands. Only they need to make click over the “Review” tab and tap on the “Protect Workbook”.
- After that, they have to enter the password and now the structural commands get available.

This action will remove your Excel workbook structure protection from the document. For restating it, just go back to the File menu and protect your workbook once more.
Trick 5# Protect Excel Cells From Editing
If you want to protect only specific cells of your Excel sheet from editing then locking those cells is the best option.
Apply the following steps to protect specific cells from editing:
- Choose the cells which you want to lock from editing.

- Now, make a right-click over your selected cells. After that choose the command “Format Cells”.
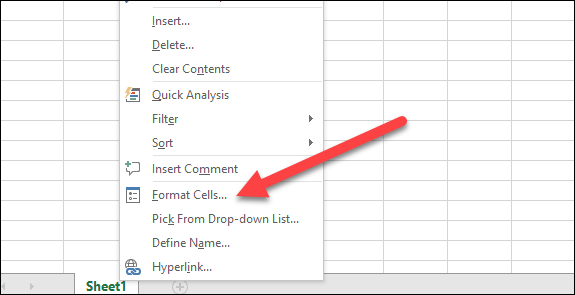
- In the Format Cells window, go to the “Protection”.

- Uncheck the checkbox present across the “Locked”.

- Hit the ok.

Helpful article: How To Lock And Unlock Cells, Formulas In Microsoft Excel 2016?
What Happens When You Protect A Workbook In Excel?
Protecting a workbook in Excel is basically used for controlling the access of another user within the workbook structure.
Excel workbook protection isn’t the security feature and you can’t use it as a means of protection for your intellectual property.
This option forbids other users from making any changes in the worksheets and also makes a strong defense against the hidden worksheets.
As there are so many Excel password remover tools available. So it’s that tough for any user to crack your password and edit your workbook.
It’s better to keep a backup of all your work before giving it to other users.
What Is The Difference Between Protect Sheet And Protect Workbook In Excel?
- Workbook-level:
With the application of this Workbook-level security you can lock the workbook structure by setting up the password. Locking up workbook structure prevent third party user from hiding, renaming, adding, moving the Excel worksheets.
- Worksheet-level:
Whereas with the application of worksheet level protection, you can easily keep control of other users working styles within your worksheets. As you have the option to specify what other users can do in the Excel worksheet.
Thus it assures you that none of your worksheet important data gets affected.
Suppose, if you want that the user will only add columns and rows or can only sort or use the auto filters. In that case, once you enable the sheet protection, you can easily protect other elements like ranges, formulas, cells, and ActiveX or Form controls.
How To Retrieve Lost Or Deleted Excel Workbook Data?
Following the above-given tricks, you can easily protect Excel workbooks from editing. But if due to misdeeds of any other user you get stuck into worksheet corruption, deletion, or missing like situations.
In that case, also you have the option left, so don’t get worried…!
It is recommended to try the Excel Repair Tool for easy repair and recovery of corrupted, damaged, and inaccessible data from the Excel workbook. This tool is well capable of fixing different errors and issues related to the Excel workbook and recover deleted Excel data.
* Free version of the product only previews recoverable data.
With this unique tool, you can restore entire data including the charts, worksheet properties cell comments, and other data without doing any modification. It is easy to use and support all Excel versions.
So, try the given solutions to recover corrupted Excel workbook data.
Wrap Up:
You have the option to use one or more protection levels in your Excel workbook s per your requirements.
Using all the options to protect Excel workbook from editing is completely depends on the security level which you want to apply for your Excel data.
You can opt for encrypting your shared Excel file along with enabling the worksheet or workbook protection. If you are applying the worksheet protection feature on your personal workbook to safeguard Excel formulas from deletion.
If, in case you have any additional questions concerning the ones presented, do tell us in the comments section below or you can also visit our Repair MS Excel social account Facebook and Twitter page.
Good Luck….


Priyanka is an entrepreneur & content marketing expert. She writes tech blogs and has expertise in MS Office, Excel, and other tech subjects. Her distinctive art of presenting tech information in the easy-to-understand language is very impressive. When not writing, she loves unplanned travels.
When it comes time to send your Excel spreadsheet, it’s important to protect the data that you’re sharing. You might want to share your data, but that doesn’t mean it should be changed by someone else.
Spreadsheets often contain essential data that shouldn’t be modified or removed by the recipient. Luckily, Excel has built-in features to protect your spreadsheets.
In this tutorial, I’ll help you make sure that your Excel workbooks maintain data integrity. Here are three key techniques you’ll learn in this tutorial:
- Password protect entire workbooks to prevent them from being opened by unauthorized users.
- Protect individual sheets and the workbook structure, to prevent the insertion or deletion of sheets in the workbook.
- Protect cells, to specifically allow or disallow changes to key cells or formulas in your Excel spreadsheets.
Even users with the best intentions may accidentally break an important or complex formula. The best thing to do is remove the option to change your spreadsheets altogether.
How to Protect Excel: Cells, Sheets, & Workbooks (Watch & Learn)
In the screencast below, you’ll see me work through several important types of protection in Excel. We’ll protect an entire workbook, a single spreadsheet, and more.
Want a step-by-step walkthrough? Check out my steps below to find out how to use these techniques. You’ll learn how to protect your workbook in Excel, as well as protecting individual worksheets, cells, and how to work with advanced settings.
We start with broader worksheet protections, then work down to narrower targeted protections you can apply in Excel. Let’s get started learning how to protect your spreadsheet data:
1. Password Protect an Excel Workbook File
Let’s start off by protecting an entire Excel file (or workbook) with a password to prevent others from opening it.
This is a breeze to do. While working in Excel, navigate to the File tab choose the Info tab. Click on the Protect Workbook dropdown option and choose Encrypt with Password.
As is the case with any password, choose a strong and secure combination of letters, numbers, and characters, bearing in mind that passwords are case-sensitive.


It’s important to note that Microsoft has really beefed up the seriousness of their password protection in Excel. In prior versions, there were easy workarounds to bypass password protection of Excel workbooks, but not in newer versions.


In Excel 2013 and beyond, the password implementation will prevent these traditional methods to bypass it. Make sure that you store your passwords carefully and safely or you risk permanently losing access to your crucial workbooks.
Excel Workbook — Mark as Final
If you want to be a bit less forceful with your spreadsheets, consider using the Mark as Final feature. When you mark an Excel file as the final version, it switches the file to read-only mode, and the user will have to re-enable editing.
To change a file to read-only mode, return to the File > Info button, and click on Protect Workbook again. Click on Mark as Final and confirm that you want to mark the document as a final version.


Marking a file as the final version will add a soft warning to the top of the file. Anyone who opens the file after it has been marked as final will see a notice, warning them that the file is finalized.


Marking a file as the final version is a less formal way of signaling that a file shouldn’t be changed further. The recipient still has the ability to click Edit Anyway and modify the spreadsheet. Marking a file as the final edition is more like a suggestion, but it’s a great approach if you trust the other file users.
2. Password Protect Your Excel Sheet Structure
Next up, let’s learn how to protect the structure of an Excel workbook. This option will ensure that no sheets are deleted, added, or re-arranged inside of the workbook.
If you want everyone to be able to access the workbook, but limit the changes they can make to a file, this is a great start. This protects the structure of the workbook, and limits how the user can change the sheets inside of it.
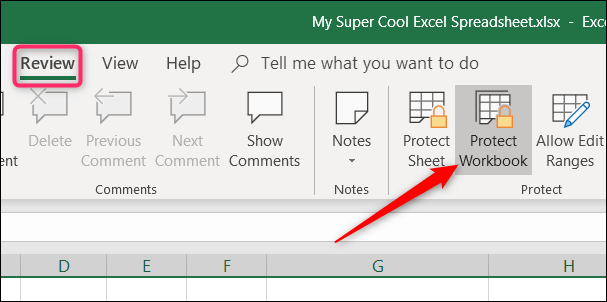
To turn on this protection, go to the Review tab on Excel’s ribbon and click on Protect Workbook.


Once this option is turned on, the following will go into effect:
- No new sheets can be added to the workbook.
- No sheets can be deleted from the workbook.
- Sheets can no longer be hidden or unhidden from the user’s view.
- The user can no longer drag and drop the sheet tabs to reorder them in the workbook.
Of course, trusted users can be given the password to unprotect the workbook and modify it. To unprotect a workbook, simply click on the Protect Workbook button again and input the password to unprotect the Excel workbook.


3. How to Protect Cells in Excel
Now, let’s get down to really detailed methods for protecting a spreadsheet. So far, we’ve been password protecting an entire workbook or the structure of an Excel file. In this section, we dig into how to protect your cells in Excel with specific settings you can apply. We cover how to allow or block certain types of changes to be made to parts of your spreadsheet.
To get started, find Excel’s Review tab, and click on Protect Sheet. On the pop-up window, you’ll see a huge set of options. This window allows you to fine-tune how you want to protect the cells in your Excel spreadsheet. For now, let’s leave the settings at their default.


This option allows for very specific protections of your spreadsheet. By default, the options will almost totally lock down the spreadsheet. Let’s add a password so that the sheet is protected. If you press OK at this point, let’s see what happens when you attempt to change a cell.


Excel throws off an error that the cell is protected, which is exactly what we wanted.
Basically, this option is crucial if you want to ensure that your spreadsheet isn’t changed by others who have access to the file. Using the protect sheet feature is a way that you can selectively protect the spreadsheet.
To unprotect the sheet, simply click on the Protect Sheet button and re-enter the password to remove the protections added to the sheet.
Specific Protections in Excel
Let’s take a second look at the options that show when you start to protect a sheet in Excel workbooks.

The Protect Sheet menu lets you refine the options for sheet protection. Each of the boxes on this menu lets the user change slightly more inside of a protected worksheet.
To remove a protection, check the respective box in the list. For example, you could allow the spreadsheet user to Format cells by checking the corresponding box.
Here are two ideas on how you could selectively allow the user to change the spreadsheet:
- Check the Format cells, columns, and rows boxes to let the user change the visual appearance of cells without modifying the original data.
- Insert columns and rows could be checked so that the user can add more data, while protecting the original cells.
The important box to leave checked is the Protect worksheet and contents of locked cells box. This protects the data inside of cells.
When you’re working with crucial financial data or formulas that will be used in making decisions, you have to maintain control of the data and ensure that it doesn’t change. Using these types of targeted protections is an important Excel skill to master.
Recap and Keep Learning More About Excel
Locking up a spreadsheet before you send it is crucial to protecting your valuable data and making sure that it’s not misused. The tips I shared in this tutorial help you maintain control of that data even after your Excel spreadsheet is forwarded and shared.
All of these tips are additional tools and steps to becoming an advanced Excel user. Protecting your workbooks is a specific skill, but there are lots of ways to improve your performance. As always, there’s room to grow your Excel skills further. Here are some helpful Excel tutorials with important skills to master next:
- PivotTables are a great tool for working with spreadsheet data. Here’s 5 Advanced Excel Pivot Table Techniques to learn now.
- ExcelZoo has a listing of additional tutorials for protecting your workbooks, sheets, and cells.
- Condition formatting changes how a cell looks based on what’s inside of it. Here’s a comprehensive Excel tutorial on How to Use Conditional Formatting.
How do you protect your important business data when sharing it? Let me know in the comments section if you use these protection tools or others I may not know about.
Did you find this post useful?

I believe that life is too short to do just one thing. In college, I studied Accounting and Finance but continue to scratch my creative itch with my work for Envato Tuts+ and other clients. By day, I enjoy my career in corporate finance, using data and analysis to make decisions.
I cover a variety of topics for Tuts+, including photo editing software like Adobe Lightroom, PowerPoint, Keynote, and more. What I enjoy most is teaching people to use software to solve everyday problems, excel in their career, and complete work efficiently. Feel free to reach out to me on my website.