

on
June 16, 2011, 11:40 PM PDT
How to protect cells in a Word table using a Text Form Field
Protecting data in a Word table isn’t as simple as turning a protection feature on, but it’s possible using Text Form Field controls.
Protecting specific cells in an Excel sheet is easy. Protecting cells in a Word table isn’t as easy, but it can be done: you insert a Text Form Field control into each cell where you want users to input or modify values. Then, you protect the document. Only those cells with the controls will allow changes. The solution’s a bit convoluted and works best with a simple document.
To protect and unprotect cells in a Word table, do the following:
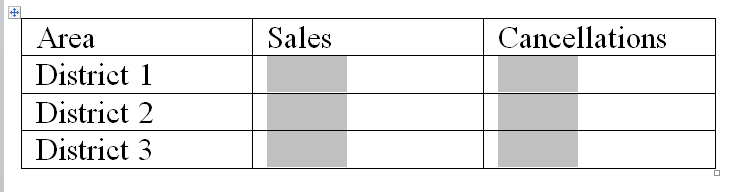
- Create the table and enter the labels or values you want to protect as you normally would.
- Select a cell where you want users to enter information.
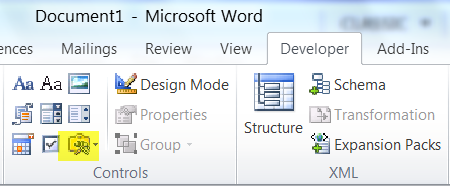
- Click the Developer tab.
- In the Controls group, click the Legacy Tools option and choose Text Form Field. In Word 2003, display the Forms toolbar and click Text Form Field.
- Continue to select input cells and insert controls until you’re done.
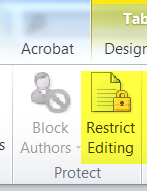
- Click Restrict Editing in the Protect group. In Word 2003, choose Protect Document from the Tools menu.
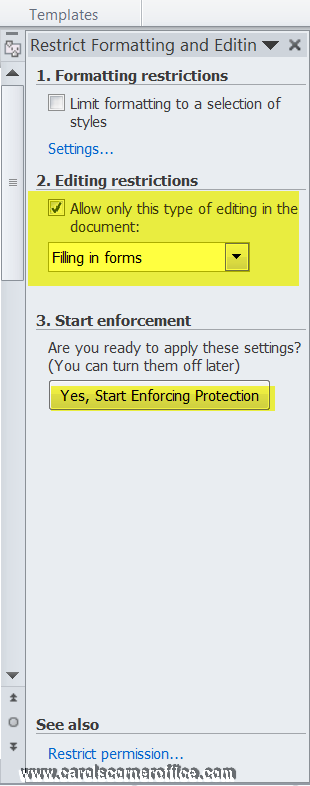
- In the resulting task pane, choose Filling In Forms from 2. Editing Restrictions, and then click Yes, Start Enforcing Protection. (In Word 2003, you can click Protect Form on the Forms toolbar instead.)
- Enter a password twice, and click OK.
After enabling protection, Word won’t let you select normal text. You can only select and input data in the cells containing a Text Form Field control. If the document contains elements and text other than the table, Word protects everything but the Text Form Field controls.
I recommend using an Excel sheet instead of protecting a Word table in this manner, because this Word protection technique isn’t very flexible. However, it’s a good one to know when your hands are tied.
-
Software
![]()
Written by Allen Wyatt (last updated December 12, 2017)
This tip applies to Word 97, 2000, 2002, and 2003
You may wonder if Word provides a way that you can protect the contents of a table. For instance, you may want to set up a table where the first column is used for text you don’t want changed, and the other columns are used for text that users of your document would answer. Unfortunately, there is no native way to protect a column in Word. There are a couple of workarounds, however.
The first potential solution (and perhaps the best) is to create the table using Excel. Within Excel you can protect the contents of cells. You can then insert the portion of the worksheet into Word. The protection remains, and people can still enter information in the cells that you have not protected.
If you don’t want to use Excel, you can instead modify your Word document so that it uses the form capabilities of the program. You would create form fields in the table columns where you want people to enter information, and then protect the rest of the document so it cannot be changed. The only drawback to this, of course, is that when you apply protection, the entire document is protected, not just the table column you didn’t want changed.
If you decide to use the form field workaround, follow these general steps:
- Create a new document.
- Insert a table with two columns and as many rows as desired.
- Type the text you don’t want changed into the left-hand column.
- Display the Forms toolbar (use the Toolbars option from the View menu).
- Place the insertion point in a table cell where you want the user to enter information.
- Click the Text Field button on the Forms toolbar. Word inserts a text form field in the cell.
- Repeat steps 5 and 6 for every other cell where you want the user to enter information.
- Click on the Protect button on the Forms toolbar. Nothing can be edited in the document now, except any text entered in the form fields.
This last step is the important part—it locks the document so that the user can only enter information in the form fields. Of course, the protection provided by locking the document as a form is very minimal, since anyone with any knowledge of Word can unlock the document by using the same steps you used to lock it. The way around this is to password-protect the document. (Full information on how to password protect a document is available in other issues of WordTips.)
WordTips is your source for cost-effective Microsoft Word training.
(Microsoft Word is the most popular word processing software in the world.)
This tip (3810) applies to Microsoft Word 97, 2000, 2002, and 2003.
Author Bio
With more than 50 non-fiction books and numerous magazine articles to his credit, Allen Wyatt is an internationally recognized author. He is president of Sharon Parq Associates, a computer and publishing services company. Learn more about Allen…
MORE FROM ALLEN
Opening a Workbook as Read-Only
When you need to work on a workbook, you may want to do so without modifying the original contents of the workbook. This …
Discover More
Adjusting Formulas when Pasting
The Paste Special feature in Excel can be used to uniformly adjust values and formulas. This tip shows how powerful this …
Discover More
Inserting Workbook Comments Into a Cell
One of the pieces of information that Excel can maintain relative to a workbook is a set of comments of your choice. …
Discover More
You can protect cells in your Excel worksheet pretty easily, but protecting cells in an Microsoft Word Table – not so much, although it can be done.
How? Well you insert a Text Form field control into each cell where you want your users to input or modify values.
Then, you protect your document. Only those cells with the controls will allow changes. The process is a bit convoluted and I would not recommend using it with a complex document, but it works fairly well with a simple one.
Follow the steps below to learn how to protect and unprotect cells in a Word table:
- Create your table and key in the labels or values you would like to protect as you normally would.
- Select a cell where you would like users to enter data.
- Click the Developer tab.
- In the Controls group, click the Legacy Tools option and select Text Form Field.
- Continue to select input cells and insert controls until you are finished.
- In the Protect group, click Restrict Editing.
- Click Allow only this type of edits in the document.
- In the resulting task pane, select Filling In Forms from 2. Editing Restrictions, and then click Yes, start Enforcing Protection.
- Enter a password and confirm it.
- Click OK.
After you have enabled protection, Word will not allow you to select normal text. You can only select and input data in the cells containing a Text Form Field control. If your document contains elements and text other than the table, Word will protect everything but the Text Form Field controls.
I would almost always use an Excel worksheet instead of protecting a Word table like this, but if you need it, this is a good trick to know!

Asked by: Doralina Seguin
asked in category: technology and computing Last Updated: 24th November, 2020
2 Answers. Open the Word document from which you want to remove protection. Go to the «Review» tab of the ribbon. Click the «Restrict Editing» button in the «Protect» group.
All this is further explained here. In respect to this, how do I edit a protected Word document?
Open the Restrict Formatting and Editing task pane
- On the Review tab, in the Protect group, click Protect Document, and then click Restrict Formatting and Editing.
- Click Find Next Region I Can Edit or Show All Regions I Can Edit.
Furthermore, how do I remove content control? Press Ctrl+A to select the entire document. Right-click a visible content control. In the context menu, click Remove Content Control.
Likewise, how do you unlock a table in Microsoft Word?
If you are using Word 2000 or later, the process is slightly different:
- Right-click the table and choose Table Properties from the Context menu.
- Make sure the Row tab is selected.
- Select the Specify Height check box, and then enter a height for the rows.
- Use the Row Height Is drop-down list to choose Exactly.
How do I turn on content control in Word?
View the Developer tab to add or change content controls To add a control, click in the document where you want to add it, and then click the control you want to add on the Design tab. To set properties on a control or change an existing control, on the Developer tab, in the Controls group, click Properties.
|
01-13-2015, 03:54 PM |
|||
|
|||
|
Password protect a table in Word Hi All, I was wondering if anyone had the expertise to somehow password protect a cell in a table in word so that when you try to input text into that cell you will be prompted with a password before you can input text. Any help would be greatly appreciated. Thank you
|


|
01-13-2015, 08:47 PM |
|
In Word 2007 & later, you can apply editing restrictions to the document and make the table an exception for only specified users. Anything fancier would require the use of formfields/content controls in the table and an on-entry macro that triggers the password check.
__________________
|
|
01-14-2015, 02:28 PM |
|||
|
|||
|
Thanks Paul
|