
Document properties, also known as metadata, are details about a file that describe or identify it. They include details such as title, author name, subject, and keywords that identify the document’s topic or contents.
If you include the document properties for your files, you can easily organize and identify them later. You can also search for documents based on their properties or insert them into your documents.
Learn more about document properties
There are four types of document properties:
-
Standard properties — By default, Microsoft 365 documents are associated with a set of standard properties, such as author, title, and subject. You can specify your own text values for these properties to make it easier to organize and identify your documents. For example, in Word, you can use the Keywords property (also called Tags) to add the keyword «customers» to your sales documents. You can then search for all sales documents with that keyword.
-
Automatically updated properties — These properties include both file system properties (for example, file size or the dates when a file was created or last changed) and statistics that are maintained for you by Microsoft 365 programs (for example, the number of words or characters in a document). You cannot specify or change the automatically updated properties.
You can use the automatically updated properties to identify or find files. For example, you can search for all files created after August 3, 2015, or for all files that were last changed yesterday.
-
Custom properties — You can define additional custom properties for your Microsoft 365 documents. You can assign a text, time, or numeric value to custom properties, and you can also assign them the values yes or no. You can choose from a list of suggested names or define your own.
For more information see View or create custom properties for a file
-
Document library properties — These are properties that are associated with documents in a document library on a website or in a public folder. When you create a new document library, you can define one or more document library properties and set rules on their values. When you add documents to the document library, you are prompted to include the values for any properties that are required, or to update any properties that are incorrect. For example, a document library that collects product ideas can prompt the person for properties such as Submitted By, Date, Category, and Description. When you open a document from a document library in Word, Excel, or PowerPoint, you can edit and update these document library properties by clicking File > Info. All required properties from the document library are outlined with red borders on the Info tab in Word, Excel, and PowerPoint,.
If you want to insert any of these properties into your Word document see Add the file name, date, author, or other document properties to a header or footer.
View and change the standard properties for the current file
-
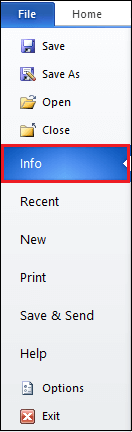
Click the File tab.
-
Click Info.
-
Click the View and edit database properties link at the top of the page.
-
In the Properties dialog box, click the tabs to select the properties that you want to view or update.
-
Click OK. Any changes you made are saved automatically.
-
Click the File tab again to return to your database.
-
Click the File tab.
-
Click Info to view the workbook properties.
-
To add or change properties, hover your pointer over the property you want to update and enter the information.
-
Click the File tab again to return to your workbook. Any changes you made are saved automatically.
Optional steps:
-
To see more properties, click the Show All Properties link at the bottom of the page.
-
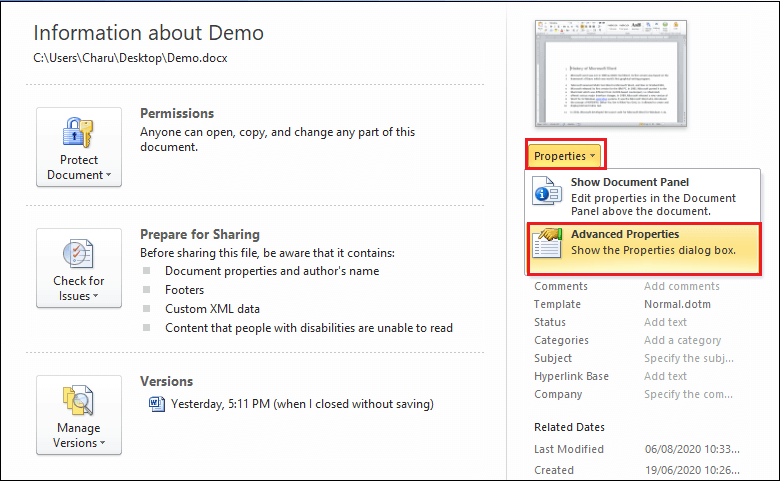
To open a properties dialog box where you can add or edit all the properties at once and view document information and statistics, click Properties at the top of the page, and then click Advanced Properties.

On the Summary tab, you can add or edit the Title, Subject, Author, Manager, Company, Category, Keywords (also called Tags), and Comments.
-
-
Click the File tab.
-
Click Info to view the presentation properties.
-
To add or change properties, hover your pointer over the property you want to update and enter the information.
-
Click the File tab again to return to your presentation. Any changes you made are saved automatically.
Optional steps:
-
To see more properties, click the Show All Properties link at the bottom of the page.
-
To open a properties dialog box where you can add or edit all the properties at once and view document information and statistics, click Properties at the top of the page, and then click Advanced Properties.
On the Summary tab, you can add or edit the Title, Subject, Author, Manager, Company, Category, Keywords (also called Tags), and Comments.
-
-
Click the File tab.
-
Click Info to view the project properties.
-
To add or change properties, hover your pointer over the property you want to update and enter the information.
-
Click the File tab again to return to your project. Any changes you made are saved automatically.
Optional steps:
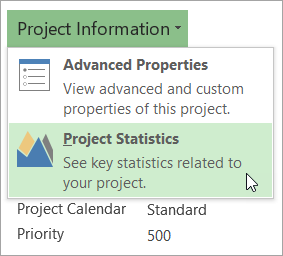
To see more properties or statistics, click Project Information at the top of the page, and then click Advanced Properties or Project Statistics.
On the Summary tab in the Properties dialog box, you can add or edit the Title, Subject, Author, Manager, Company, Category, Keywords (also called Tags), and Comments.
-
Click the File tab.
-
Click Info to view the properties.
-
Click the File tab again to return to your publication. Any changes you made are saved automatically.
Optional steps:
To open a properties dialog box where you can add or edit all the properties at once and view document information and statistics, click Publication Properties at the top of the page, and then click Advanced Properties.

On the Summary tab, you can add or edit the Title, Subject, Author, Manager, Company, Category, Keywords (also called Tags), and Comments.
-
Click the File tab.
-
Click Info to view the properties.
-
To add or change properties, hover your pointer over the property you want to update and enter the information.
-
Click the File tab again to return to your publication. Any changes you made are saved automatically.
Optional steps:
-
To open a properties dialog box where you can add or edit all the properties at once and view document information, click Properties at the top of the page, and then click Advanced Properties.
On the Summary tab, you can add or edit properties such as the Title, Subject, Author, Manager, Company, Category, Keywords (also called Tags), and Comments.
-
To add a link to related documents, click Related Documents at the bottom of the Info page, and select Add a Link to a Related Document.
-
-
Click the File tab.
-
Click Info to view the document properties.
-
To add or change properties, hover your pointer over the property you want to update and enter the information. Note that for some metadata, such as Author, you’ll have to right-click on the property and choose Remove or Edit.
-
Click the File tab again to return to your document. Any changes you made are saved automatically.
Optional steps:
-
To see more properties, click the Show All Properties link at the bottom of the page.
-
To open a properties dialog box where you can add or edit all the properties at once and view document information and statistics, click Properties at the top of the page, and then click Advanced Properties.
On the Summary tab, you can add or edit the Title, Subject, Author, Manager, Company, Category, Keywords (also called Tags), and Comments.
-
View or create custom properties for the current file
Custom properties are properties that you define for an Microsoft 365 document. You can assign a text, time, or numeric value to custom properties, and you can also assign them the values yes or no. You can choose from a list of suggested names or define your own.
-
Click the File tab.
-
Click Info.
-
Click Properties at the top of the page, and then select Advanced Properties.
Notes:
-
In Access you’d select View and edit database properties
-
In Project you’d select Project Information
-
In Publisher you’d select Publication Properties
-
Currently, you can’t view or create custom properties for Visio files
-
-
Click the Custom tab.
-
In the Name box, type a name for the custom property, or select a name from the list.
-
In the Type list, select the data type for the property that you want to add.
-
In the Value box, type a value for the property. The value that you type must match the selection in the Type list. For example, if you select Number in the Type list, you must type a number in the Value box. Values that don’t match the property type are stored as text.
-
-
Click OK.
Learn more about the document properties
There are five types of document properties:
-
Standard properties By default, Microsoft 365 documents are associated with a set of standard properties, such as author, title, and subject. You can specify your own text values for these properties to make it easier to organize and identify your documents. For example, in Word, you can use the Keywords property (also called Tags) to add the keyword «customers» to your sales files. You can then search for all sales files with that keyword.
-
Automatically updated properties These properties include both file system properties (for example, file size or the dates when a file was created or last changed) and statistics that are maintained for you by Microsoft 365 programs (for example, the number of words or characters in a document). You cannot specify or change the automatically updated properties.
You can use the automatically updated properties to identify or find documents. For example, you can search for all files created after August 3, 2005, or for all files that were last changed yesterday.
-
Custom properties You can define additional custom properties for your Microsoft 365 documents. You can assign a text, time, or numeric value to custom properties, and you can also assign them the values yes or no. You can choose from a list of suggested names or define your own.
-
Properties for your organization If your organization customized the Document Information Panel, the document properties that are associated with your document may be specific to your organization.
-
Document library properties These are properties that are associated with documents in a document library on a website or in a public folder. When you create a new document library, you can define one or more document library properties and set rules on their values. When you add documents to the document library, you are prompted to include the values for any properties that are required, or to update any properties that are incorrect. For example, a document library that collects product ideas can prompt the person for properties such as Submitted By, Date, Category, and Description. When you open a document from a document library in Word, Excel, or PowerPoint, you can edit and update these document library properties in the Document Information Panel.
View and change the properties for the current file
-
Click the File tab.
-
Click Info.
-
Click the View and edit database properties link at the top of the page.
-
In the Properties dialog box, click the tabs to select the properties that you want to view or update.
Note: If your organization customized the Document Information Panel, or if the document for which you want to view properties is saved to a document library or a document management server, additional document property views may be available.
-
Click OK. Any changes you made will be saved automatically.
-
Click the File tab again to return to your file.
-
Click the File tab.
-
Click Info to view the workbook properties.
-
To add or change properties, hover your pointer over the property you want to update and enter the information.
-
Click the File tab again to return to your workbook. Any changes you made will be saved automatically.
Optional steps:
-
To see more properties, click the Show All Properties link at the bottom of the page.
-
To open a properties dialog box where you can add or edit all the properties at once and view document information and statistics, click Properties at the top of the page, and then click Advanced Properties.
On the Summary tab, you can add or edit the Title, Subject, Author, Manager, Company, Category, Keywords (also called Tags), and Comments.
To view custom properties, click the Custom tab.
-
To see the properties in a panel within your workbook, click Properties at the top of the page and select Show Document Panel.
Note: If your organization customized the Document Information Panel, or if the document for which you want to view properties is saved to a document library or a document management server, additional document property views may be available.
-
-
Click the File tab.
-
Click Info to view the form statistics.
-
To change the Name, ID or Description of the form, click Form Template Properties, and make changes to those fields as needed.
-
To show this form in a custom category in InfoPath Filler, select the Enable custom category check box and enter a name for the custom category.
-
Click OK.
-
Click the File tab again to return to your workbook. Any changes you made will be saved automatically.
-
Click the File tab.
-
Click Info to view the presentation properties.
-
To add or change properties, hover your pointer over the property you want to update and enter the information.
-
Click the File tab again to return to your presentation. Any changes you made will be saved automatically.
Optional steps:
-
To see more properties, click the Show All Properties link at the bottom of the page.
-
To open a properties dialog box where you can add or edit all the properties at once and view document information and statistics, click Properties at the top of the page, and then click Advanced Properties.
On the Summary tab, you can add or edit the Title, Subject, Author, Manager, Company, Category, Keywords (also called Tags), and Comments.
To view custom properties, click the Custom tab.
-
To see the properties in a panel within your workbook, click Properties at the top of the page and select Show Document Panel.
Note: If your organization customized the Document Information Panel, or if the document for which you want to view properties is saved to a document library or a document management server, additional document property views may be available.
-
-
Click the File tab.
-
Click Info to view the project properties.
-
To add or change properties, hover your pointer over the property you want to update and enter the information.
-
Click the File tab again to return to your project. Any changes you made will be saved automatically.
Optional steps:
To see more properties or statistics, click Project Information at the top of the page, and then click Advanced Properties or Project Statistics.
On the Summary tab in the Properties dialog box, you can add or edit the Title, Subject, Author, Manager, Company, Category, Keywords (also called Tags), and Comments.
To view custom properties, click the Custom tab in the Properties dialog box.
Note: If your organization customized the Document Information Panel, or if the document for which you want to view properties is saved to a document library or a document management server, additional document property views may be available.
-
Click the File tab.
-
Click Info to view the properties.
-
Click the File tab again to return to your publication. Any changes you made will be saved automatically.
Optional steps:
To open a properties dialog box where you can add or edit all the properties at once and view document information and statistics, click Publication Properties at the top of the page, and then click Advanced Properties.
On the Summary tab, you can add or edit the Title, Subject, Author, Manager, Company, Category, Keywords (also called Tags), and Comments.
To view custom properties, click the Custom tab.
Note: If your organization customized the Document Information Panel, or if the document for which you want to view properties is saved to a document library or a document management server, additional document property views may be available.
-
Click the File tab.
-
Click Info to view the properties.
-
To add or change properties, hover your pointer over the property you want to update and enter the information.
-
Click the File tab again to return to your publication. Any changes you made will be saved automatically.
Optional steps:
To open a properties dialog box where you can add or edit all the properties at once and view document information, click Properties at the top of the page, and then click Advanced Properties.
On the Summary tab, you can add or edit properties such as the Title, Subject, Author, Manager, Company, Category, Keywords (also called Tags), and Comments.
Notes:
-
To add a link to related documents, click Related Documents at the bottom of the Info page, and select Add a Link to a Related Document.
-
If your organization customized the Document Information Panel, or if the document for which you want to view properties is saved to a document library or a document management server, additional document property views may be available.
-
-
Click the File tab.
-
Click Info to view the document properties.
-
To add or change properties, hover your pointer over the property you want to update and enter the information.
-
Click the File tab again to return to your document. Any changes you made will be saved automatically.
Optional steps:
-
To see more properties, click the Show All Properties link at the bottom of the page.
-
To open a properties dialog box where you can add or edit all the properties at once and view document information and statistics, click Properties at the top of the page, and then click Advanced Properties.
On the Summary tab, you can add or edit the Title, Subject, Author, Manager, Company, Category, Keywords (also called Tags), and Comments.
To view custom properties, click the Custom tab.
-
To see the properties in a panel within your workbook, click Properties at the top of the page and select Show Document Panel.
Note: If your organization customized the Document Information Panel, or if the document for which you want to view properties is saved to a document library or a document management server, additional document property views may be available.
-
View or create custom properties for a file
Custom properties are properties that you define for an Microsoft 365 document. You can assign a text, time, or numeric value to custom properties, and you can also assign them the values yes or no. You can choose from a list of suggested names or define your own.
-
Click the File tab.
-
Click Info.
-
Click the View and edit database properties link at the top of the page.
-
Click the Custom tab.
-
In the Name box, type a name for the custom property, or select a name from the list.
-
In the Type list, select the data type for the property that you want to add.
-
In the Value box, type a value for the property. The value that you type must match the selection in the Type list. For example, if you select Number in the Type list, you must type a number in the Value box. Values that don’t match the property type are stored as text.
-
-
Click Add, and then click OK.
-
Click the File tab again to return to your workbook.
-
Click the File tab.
-
Click Info.
-
Click Properties at the top of the page, and then select Advanced Properties.
-
Click the Custom tab.
-
In the Name box, type a name for the custom property, or select a name from the list.
-
In the Type list, select the data type for the property that you want to add.
-
In the Value box, type a value for the property. The value that you type must match the selection in the Type list. For example, if you select Number in the Type list, you must type a number in the Value box. Values that don’t match the property type are stored as text.
-
-
Click Add, and then click OK.
-
Click the File tab again to return to your presentation.
-
Click the File tab.
-
Click Info.
-
Click Project Information at the top of the page, and then select Advanced Properties.
-
Click the Custom tab.
-
In the Name box, type a name for the custom property, or select a name from the list.
-
In the Type list, select the data type for the property that you want to add.
-
In the Value box, type a value for the property. The value that you type must match the selection in the Type list. For example, if you select Number in the Type list, you must type a number in the Value box. Values that don’t match the property type are stored as text.
-
-
Click Add, then click OK.
-
Click the File tab again to return to your project.
-
Click the File tab.
-
Click Info.
-
Click Publication Properties at the top of the page, and then select Advanced Properties.
-
Click the Custom tab.
-
In the Name box, type a name for the custom property, or select a name from the list.
-
In the Type list, select the data type for the property that you want to add.
-
In the Value box, type a value for the property. The value that you type must match the selection in the Type list. For example, if you select Number in the Type list, you must type a number in the Value box. Values that don’t match the property type are stored as text.
-
-
Click the File tab again to return to your publication.
-
Click the File tab.
-
Click Info.
-
Click Properties at the top of the page, and then select Advanced Properties.
-
Click the Custom tab.
-
In the Name box, type a name for the custom property, or select a name from the list.
-
In the Type list, select the data type for the property that you want to add.
-
In the Value box, type a value for the property. The value that you type must match the selection in the Type list. For example, if you select Number in the Type list, you must type a number in the Value box. Values that don’t match the property type are stored as text.
-
-
Click the File tab again to return to your document.
Document Properties is one of those long-standing parts of Office that is worth another look. It can be quite useful and not always in the ways that Microsoft intends.
At first, document properties looks like a fixed and rigid feature with limited use. However it can be used in much wider and creative ways.
Any time you have a piece of text repeated within a document, is a potential use for document properties. It’s a way to quickly and easily automate your document and ensure it’s consistent and accurate. Document properties let you replace text in places Word itself won’t go.
For example, the document Title property can show up in the Header or even as text in the document. In fact some of the supplied Header formats in Word use document properties (like Title) already.

Both places where you see ‘Flanders and Swann’ it’s actually a document property. Click on either text and you’ll see that.

Change the document property and the document changes.

In each document
Each Office document (Word, Excel and PowerPoint) has a series of hidden document properties that can be shown within a document. In Word 2013 and Word 2010 you can see them on the right-side of the Info screen.

In Word 2007 go to Start | Prepare | Properties. Word 2003 and before to File | Properties.
Some properties are set by the application itself like file size, pages, word count, creation and last modified date.
Many others can be set by you and displayed in the document. If you change that property, the document is updated automatically.
Why bother?
The smarties among you might wonder at this point … why bother with document properties? There are at least two other ways to do the same thing; find & replace or bookmarks.
That’s true, however sometimes those options aren’t suitable. Replace can change text that you don’t want changed (for example when the text to find is there in other contexts) and doesn’t always work (e.g. in multiple text boxes). Bookmarks can be confusing to find and change.
Document Properties are flexible and controlled outside the main document content which can be an advantage.
You choose the solution that suits your needs and it’s good to know all the options available. We’ll explain how document properties can be used beyond the narrow purposes that are usually explained.
Setting a property
The common document properties are set on the File | Info pane as you can see above. There are more available if you click on the See more properties at bottom right of the Info pane.

Now there’s more editable properties available:
- Title
- Tags
- Comments
- Status
- Categories
- Subject
- Hyperlink Base
- Company
- Manager
And there’s even more than that, but we’ll get to those later.
Let’s look at the Title property.

Changing the property is simple. Just click in the area ‘Add a title’ and type in the text you want. The data entry area doesn’t look editable but it changes into a text entry field when you click on it.
![]()
When you go back to the document, any place with the Title document property inserted will show that text.
Some properties are also visible from the Document Panel that appears above the document, worksheet or presentation. Go to Info | Properties | Show Document Panel (Word 2013/2010), File | Prepare | Properties (Word 2007).


Choosing ‘Advanced Properties’ then the Summary tab will show a list of the main document properties. This dialog box hasn’t changed much for many versions of Word going past more than a decade.

Within the document
You don’t even have to go to the Info pane if the property is already inserted into the document.
Click on the document property text so the content control box appears. The text in that box is editable so type away.

When you click away from the control, other instances of that property should be automatically updated.

For advanced users there are other ways to change document properties:
- Via VBA code
 BuiltInDocumentProperties( <Property Name> ).Value or
 ActiveDocument.CustomDocumentProperties(<Property Name> ).Value
- Changing the XML within the document itself. It’s in docProps/core.xml in the <dc:title> tag.


Both of these options are great for programmers and network administrators. They are easier to implement than large scale replace commands within the main document.
Inserting a document property
In Word 2007, Word 2010 and Word 2013, the main document properties are at Insert | Text | Explore Quick Parts | Document Property.

As we’ve seen already, an inserted property appears as a content control when you click on it.
In Word 2003 and before go to Insert | Field | DocProperty and choose the property you want to insert a field code.
Hovering over a control changes the background to gray.

Advanced Properties
Beyond the main document properties are ‘Advanced Properties’ available from File | Info | Properties | Advanced Properties

Under the Custom tab there’s a long list of other document properties. These ‘advanced’ properties are just more inbuilt labels that aren’t on the main panes or dialog boxes.

However these ‘advanced properties’ can’t be easily added to documents nor changed within the document like the main properties can. See Custom Properties below.
Custom Properties
The same dialog lets you add your own document properties. Any pair of text label and a property (Text,Date,Number or Yes/No) is possible.

To add a custom property, type the name/label into the Name field, choose a Type, enter a value and click Add.
Inserting Custom Properties is a little more fussy than the inbuilt properties. The standard ‘Document Properties’ insertion menu doesn’t change to allow for advanced or custom properties.
Go to Insert | Text | Quick Parts | Field | Document Information | DocProperty. Choose from the list of Properties shown which includes any custom properties.

In the document the property appears in the text where you’ve inserted it.

Press Alt + F9 to reveal the field code DOCPROPERTY that displays the custom properties.

Unlike the main document properties, you can’t change Advanced or Custom properties within the document itself. That makes Advanced and Custom properties less useful for many purposes and leads us to the simple trick that you can use.
Ignore the property name
The main document properties have names (aka labels) linked to a place for your text. Those labels are obvious things like Title, Subject etc but there’s no rule that the Subject property has to contain subject text … it can contain any text you want.
As long as you know what the property is used for … you can ignore the label.
For example, you might have a standard document for new clients. One way to insert the clients name throughout that document is to use the document property called ‘Client’. But that’s an ‘advanced’ property that’s harder to change and use.
Instead use the ‘Company’ property (or Status, Title, Subject etc.) which is more easily changed. As long as everyone using the document knows what to do, it doesn’t matter what Microsoft called the property.

Beyond Word …
Document Properties work well in Word. You can set and use properties quite easily.
In Excel and PowerPoint it’s a very different story which makes a mockery of Microsoft’s talk about consistency across the Office applications.
Both Excel and PowerPoint have document properties that you can change and even customize. But inserting those properties into documents is NOT easy at all. There’s no simple way to drop a worksheet property into a cell – amazing but true.
Excel
You’ll search in vain for an function like DocProperty() that would let you insert a document property into a cell.
Such an obvious and useful thing is completely missing. You can set Document Properties and custom properties but using them in a worksheet requires a custom VBA function.
PowerPoint
It’s even worse in PowerPoint. There are document properties available to set but no direct way to put them into slides. Since Powerpoint lacks almost all of the document automation that Word has, the only way to get document properties into a slide is VBA to search a presentation and replace text with a document property.
Wish List
Document Properties have been around for many versions of Office and appear to have been forgotten by the Microsoft Office development teams.
The Word group needs to remove the arbitrary difference between main, advanced and custom properties. All properties should be inserted as content controls and editable from within the document, just as main properties are now.
The Excel and PowerPoint development gurus need to get their act together. It should be embarrassing to both groups that document properties can be set but not easily used within their programs. The lack of an Excel function to retrieve document properties is truly astonishing.
What are document properties and give examples?
Document properties are strings of meta-data containing information about a document. The Author, Title and Created Date are examples of document properties.
Where is the document Properties panel in Word?
Click the File tab to go to the Backstage area. In the left navigation panel, click the Info category. On the right side of the screen, click the Properties drop-down and choose Show Document Panel. There you have it, four simple clicks to open the Document Information Panel in Word (or Excel or PowerPoint).
Why are document properties useful?
Any time you have a piece of text repeated within a document, is a potential use for document properties. It’s a way to quickly and easily automate your document and ensure it’s consistent and accurate. Document properties let you replace text in places Word itself won’t go.
What is the document Properties panel?
The Document Information Panel, which is displayed in Microsoft Office Word 2007, Microsoft Office PowerPoint 2007, and Microsoft Office Excel 2007 documents, enables users to view and change the properties for an individual file or for a content type that is saved to a document management server, such as a Document …
How do I change file properties?
About This Article
- Open File Explorer.
- Right-click a file.
- Click Properties.
- Make changes.
- Click Apply.
- Click OK.
How do I find document properties in Word for Mac?
In Microsoft Word 2016 for Mac, the document properties settings are under the “File” menu. After clicking the :File” menu, select “Properties . . . “ (see figure 1).
How do you add keywords to document properties?
Here’s how:
- Open Windows Explorer and find the Word document.
- Right-click the file and choose Properties.
- Go to the Details tab.
- In the Tags text box, enter the keywords.
- Select OK to save the tags and close the dialog box.
Where is document properties in Excel?
View document properties
- Click on the File tab. You switch to the backstage view.
- Choose Info from the File menu. The Properties pane is shown on the right-hand side. …
- Click on Properties to open the drop-down menu.
- Choose ‘Show Document Panel’ from the menu.
How do I remove properties from a File?
Here’s how:
- Go to File Explorer.
- Select one or more files in Windows Explorer.
- Right-click > select Properties from the contextual menu.
- Go to the Details tab > click Remove Properties and Personal Information to open the Remove Properties dialog.
How do I change the status property of a Word document to draft?
What are document Properties in Excel?
Document properties are bits of information that describe and identify a workbook, such as a title, author name, subject, and keywords in the workbook.
How do I change document properties in PDF?
Choose File > Properties, and then select Custom. To add a property, type the name and value, and then click Add. To change the properties, do any of the following, and then click OK: To edit a property, select it, change the Value, and then click Change.
Why would you want to assign document properties to a workbook?
One reason is that users can save time locating a particular file because they can view a document’s properties without opening the workbook. A second reason why document properties are valuable is because by creating consistent properties for files having similar content, users can better organize their workbooks.
How do you show document properties in Powerpoint?
Click the File tab and open the backstage view; Click the Info button on left bar; At right side, you will view your presentation properties.
How do you add a title to a document properties in Word?
Go to Insert > Header or Footer. Select Edit Header or Edit Footer. Select Quick Parts, and select Field. In the Field names list, choose the field you want (such as FileName, Date, Author, or Title), choose the format you want in the Field properties section.
How do you edit document properties by entering workshop costs as the title document property?
Video: Change document properties
- Select File > Info.
- Select a property that starts with Add, like Add a title, Add a tag, or Add an author.
- Enter the information.
- To see more properties, select Show all properties.
- When you’re done, select the Back arrow and Save. your changes.
How do I view metadata in Word?
You can access a document’s metadata from within Word by clicking on File, followed by Info. Doing so takes you to a screen like the one shown in Figure 2. As you can see in the figure, this screen displays much of the same information that was shown back in Figure 1.
Is document title one of the document properties that Word automatically tracks?
Word keeps track of many pieces of information about your document. You can see the information maintained by Word in this manner: If you are using Word 2010 or Word 2013, display the File tab of the ribbon and then click Info | Properties | Advanced Properties. …
How do I turn off widow orphan control?
How to Turn the Widow Orphan Control Setting On or Off in Microsoft Word
- Open a document in Word.
- Select everything with Ctrl + A.
- Click the Home tab.
- Click the Paragraph button.
- Select the Line and Page Breaks tab.
- Click Widow/orphan control to remove the checkmark.
- Click OK.
What is justify in word processing?
When you justify text, space is added between words so that both edges of each line are aligned with both margins. The last line in the paragraph is aligned left. Click anywhere in the paragraph that you want to justify.
For any document, Word creates certain types of metadata about the document. It stores them as document properties.
These properties are standard with fixed names. You cannot change them—these are the Document’s Title, Author name, Keywords, and Comments. Other properties store statistical data about your document. These include file size, date, and time you last printed or saved the document.
Word updates these properties automatically, and you cannot edit them.
Apart from the standard document properties, Word also has custom properties.
As the name implies, you can add and modify custom document properties. By default, Word does not add any custom document property by itself.
However, you can add your own custom properties to your document. For this, you must assign a name, a data type, and a value to each custom property you are adding. Word offers a choice of four data types for each custom property—Text, Date, Number, and Yes or No.
Word also adds document library properties. These are related to documents stored on a website, a document library, or a public folder.
The necessity for Document Properties
As such, you will not be able to see any document property in the content of the document. But, you can insert their value into the document’s content. You can insert the value of any standard or custom property.
You may have a piece of text that repeats within the document. This presents a potential use for document properties. By inserting custom document properties, you can quickly automate your document. This ensures what you are entering in your document repeatedly is consistent and accurate.
For instance, you can add the document Title property in the Header on each page. You can also add it as text in the document. When you change a document property, the document’s content will change.
Document properties are flexible. Word allows you to control them outside the content of the main document. This is an advantage when your document is large.
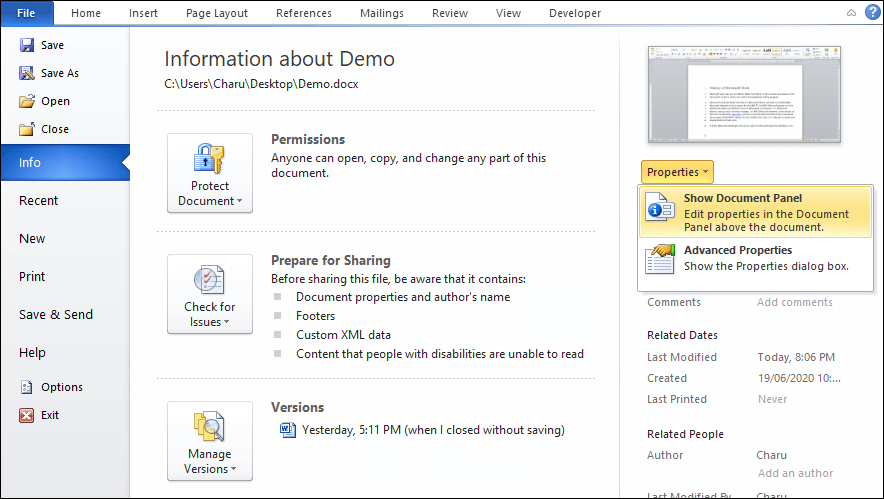
How to View Document Properties
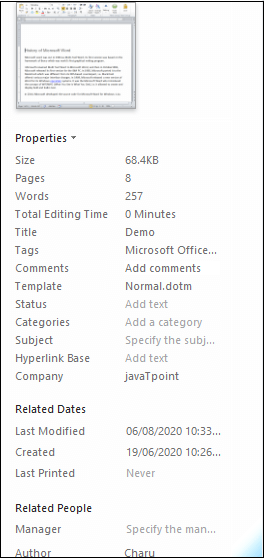
To see document properties, open your document. Click on the Files tab in the top menu bar. This will open the Files menu with two panes, left and right. In the left pane, click on the Info tab. In the right panel, Word displays the document properties.

To see more properties, click on Show All Properties at the bottom of the right pane.

Advanced Properties
In the right-hand pane, click on Properties. This will show another tab, Advanced Properties. Click on Advanced Properties to open the Properties dialog box.
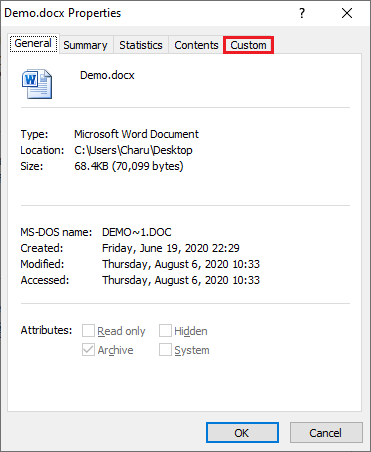
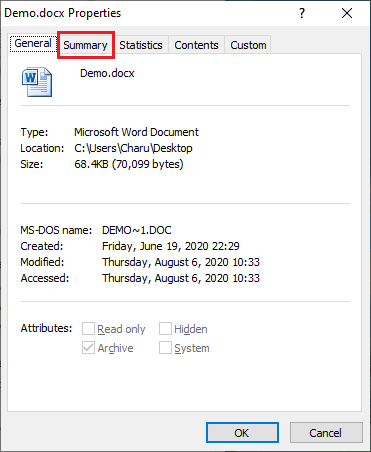
You will see five tabs:
General — Standard data about document’s origin, its creation, modification, and access.

Summary — Custom date about document, you can fill in the blanks.

Statistics — Statistical data about the document.

Contents — Data about the document’s contents.

Custom — Data you can add to the document properties.

Once you have added the above information, Word will show these document properties in the Info screen.
Conclusion
We have given a brief introduction about document properties in MS Word and how you can use them.
Document properties are also referred to as metadata. They include information related documents such as title, author name, subject, and keywords to identify the document’s topic.
In Microsoft Word, there are the following four types of document properties —
- Standard properties
- Automatically updated properties
- Custom properties
- Document library properties
Create a custom property for the current Word document
In Microsoft Word 2010, follow the below steps to create a custom property for current Word document —
Step 1: Open the new or an existing Word document.
Step 2: Click on the File tab at the top left corner of the document.
Step 3: A list of file options will appear on the screen with the selected Info tab.
Step 4: Click on the drop-down menu associated with the Properties. Select Advanced Properties from the Properties drop-down menu.
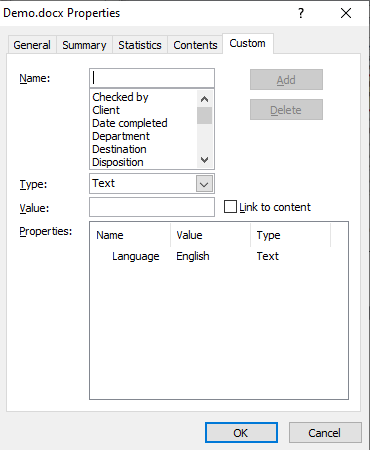
Step 5: A current document Properties dialog box will appear on the screen in which click on the Custom tab.
Step 6: A custom tab will open with the following text fields —
Name: Enter the Custom property name in the Name text field or you can also select name from the Name list.
Type: Select Type from the Type list
Value: Type Value for the custom property
Once you enter Name, Type, and Value in the custom tab, click on the OK button at the bottom of the screen.
Now, you can see that your desired custom properties are added to the Properties section.
Set Advanced document properties in Word document
Follow the below-mentioned steps to set advanced document properties in Word document —
Step 1: Open the new or an existing Word document where you want to set advanced document properties.
Step 2: Go to the File tab on the Ribbon. A list of File options will appear with the selected Info option.
Step 3: Click on the drop-down menu associated with the Properties and select Advanced Properties on the right side of the Info screen.
Step 4: An Advanced Properties dialog box will appear on the screen in which click on the Summary tab.
Step 4: A Summary dialog box will appear on the screen in which enter the information related to your current documents such as Title, Author, Subject, Company name, Keywords, and more.
Once you fill all necessary information in the Summary dialog box, click on the OK button, as shown in the screenshot below.

Now, when you open the Info Tab, the information you entered in the summary dialog box will appear on the screen.
Show advanced document properties to the current document
Microsoft Word allows you to show (display) and edit the advanced document properties at the top of the current document.
Follow the below instruction to see the advanced document properties —
1. Open the Word document where you set the advanced document properties.
2. Go the File tab on the Ribbon, a list of options will appear on the screen with the selected Info tab.
3. Click on the Properties drop-down menu and click on the Show Document Panel option on the Right corner of the Info screen.
4. The screenshot below shows that Document Properties option will automatically appear at the top of the current Word document.
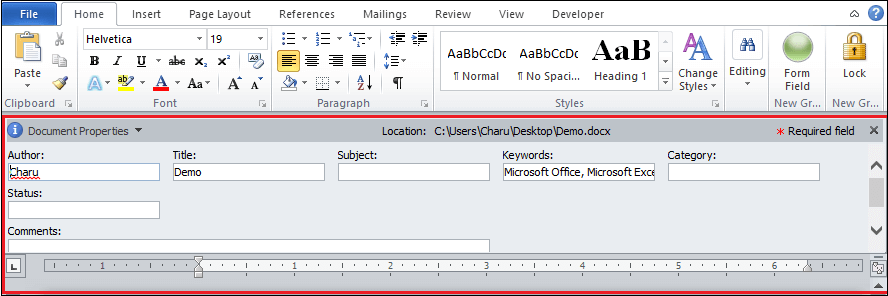
Note: Using the Document Properties panel, you can also edit the entered information.
To close the Document Properties panel, click on the cross (×) button in the upper right corner of the Document Properties panel.