
- Ошибка отсутствующих средств проверки в Microsoft Word возникает из-за повреждения файла или неправильной языковой конфигурации.
- В этой статье мы покажем вам, как навсегда исправить ошибку отсутствия средств проверки правописания в Microsoft Word.
- Хотите больше советов по Microsoft Word? Посетите нашу специальную веб-страницу Microsoft Word.
- Для получения дополнительных исправлений и руководств посетите нашу страницу устранения неполадок.
Чтобы исправить различные проблемы с ПК, мы рекомендуем Restoro PC Repair Tool: это программное обеспечение исправит распространенные компьютерные ошибки, защитит вас от потери файлов, вредоносных программ, сбоев оборудования и оптимизирует ваш компьютер для максимальной производительности. Решите проблемы с ПК и удалите вирусы прямо сейчас, выполнив 3 простых шага:
- Загрузите Restoro PC Repair Tool, который поставляется с запатентованными технологиями (патент доступен здесь ).
- Нажмите Начать сканирование, чтобы найти проблемы Windows, которые могут вызывать проблемы с ПК.
- Нажмите «Восстановить все», чтобы исправить проблемы, влияющие на безопасность и производительность вашего компьютера.
- В этом месяце Restoro скачали 657 095 читателей.
При редактировании документа в Microsoft Word вы можете столкнуться с ошибкой Отсутствуют средства проверки правописания. Полный текст ошибки гласит: “Отсутствуют средства проверки”. Этот документ содержит текст на русском языке, который не проходит проверку. Возможно, вы сможете получить средства проверки для этого языка.
Эта ошибка может возникать по разным причинам, включая поврежденную установку Word и неправильную настройку языка в Microsoft Word.
В этой статье мы рассмотрим несколько шагов по устранению неполадок, которые помогут вам устранить ошибку «Отсутствуют средства проверки правописания» в Microsoft Word.
Как исправить ошибку отсутствующих средств проверки Microsoft Word в Windows 10?
1 Восстановление документов Word с помощью Stellar Word Repair
![[Решено] Отсутствуют инструменты проверки правописания в Microsoft Word](https://howto.mediadoma.com/wp-content/uploads/2021/03/post-59703-604f8e041eb91.png)
Звездный инструмент восстановления Word – это одношаговое решение для исправления проблем с вашими файлами Word. Это простой в использовании инструмент, который может восстанавливать поврежденные файлы Microsoft Word .doc и .docx без изменения исходного текста, изображений, шрифтов, заголовков и гиперссылок.
Ошибка отсутствия средств проверки может возникнуть из-за повреждения файла. Stellar Word Recovery может помочь вам восстановить файлы, которые недоступны, автоматически начать репагинацию или отображать нечитаемые символы. Вы также можете искать текстовые документы, если не знаете, где их сохранить.
После сканирования файла Word предоставляется бесплатный предварительный просмотр восстанавливаемых данных. Он также поставляется с двумя дополнительными вариантами восстановления – Advanced и Raw, обеспечивающими расширенные функции восстановления.
Ключевые особенности Stellar Word Repair
- Может восстановить несколько поврежденных документов Word за один процесс.
- Восстановите текст, шрифт, гиперссылки, заголовок, комментарии и многое другое.
- Три варианта восстановления: простое, расширенное и исходное восстановление.
- Поддерживает MS Word 2019 и более ранние версии.
2 Измените язык проверки вручную
![[Решено] Отсутствуют инструменты проверки правописания в Microsoft Word](https://howto.mediadoma.com/wp-content/uploads/2021/03/post-59703-604f8e05f3ac8.png)
- Запустите Microsoft Word на вашем компьютере и откройте документ с ошибкой.
- Нажмите Ctrl + A, чтобы выделить весь текст в документе.
- Откройте вкладку Review на панели инструментов.
- Нажмите кнопку раскрывающегося списка ” Язык”.
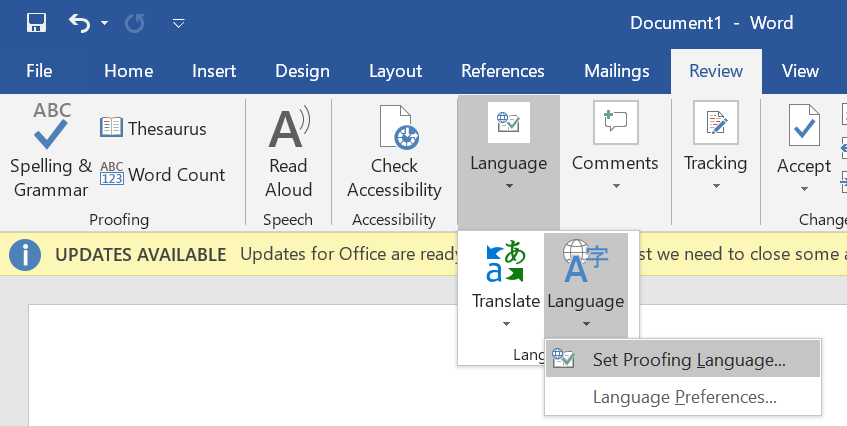
- Перейдите в раздел «Язык» и выберите «Установить язык проверки».
- Выберите желаемый язык в новом окне «Язык».
- Нажмите кнопку «Установить по умолчанию» , если вы хотите установить язык по умолчанию для всех документов.
- Щелкните ОК, чтобы применить изменения.
Ручное изменение документа и языка проверки, похоже, устранило ошибку для многих пользователей. Однако не забудьте выбрать правильный язык документа в языковых настройках, чтобы избежать ошибок в будущем.
3 Установите Proofing Tools 2016
![[Решено] Отсутствуют инструменты проверки правописания в Microsoft Word](https://howto.mediadoma.com/wp-content/uploads/2021/03/post-59703-604f8e0778568.jpg)
- Откройте средства проверки правописания Microsoft Office 2016.
- На странице центра загрузок выберите язык.
- Нажмите кнопку «Загрузить», чтобы продолжить.
- Выберите 32-разрядную / 64-разрядную версию средств проверки правописания в зависимости от версии вашей ОС.
- Щелкните Далее.
- Запустите установщик и следуйте инструкциям на экране, чтобы установить средства проверки для Office 2016.
Примечание. Важно установить 32-разрядную программу проверки правописания для 32-разрядной системы Windows и 64-разрядную версию для 64-разрядной системы. В противном случае инструмент может работать некорректно.
После установки перезапустите Microsoft Office и проверьте, устранена ли ошибка. Обратите внимание, что средство проверки работает в версии Microsoft Office 2016. Он включает в себя полный набор инструментов проверки, доступных для Officer на этом языке. Установите инструмент и перезапустите Office, чтобы проверить, работает ли ваша установка Office.
4 Исправить установку Word
![[Решено] Отсутствуют инструменты проверки правописания в Microsoft Word](https://howto.mediadoma.com/wp-content/uploads/2021/03/post-59703-604f8e089cc43.png)
- Нажмите клавиши Windows + R, чтобы открыть Выполнить.
- Введите control и нажмите OK.
- В Панели управления перейдите в «Программы» и нажмите «Программы и компоненты».
- Выберите Microsoft Word из списка установленных приложений.
- Нажмите «Изменить», а затем нажмите «Да» при появлении запроса от UAC.
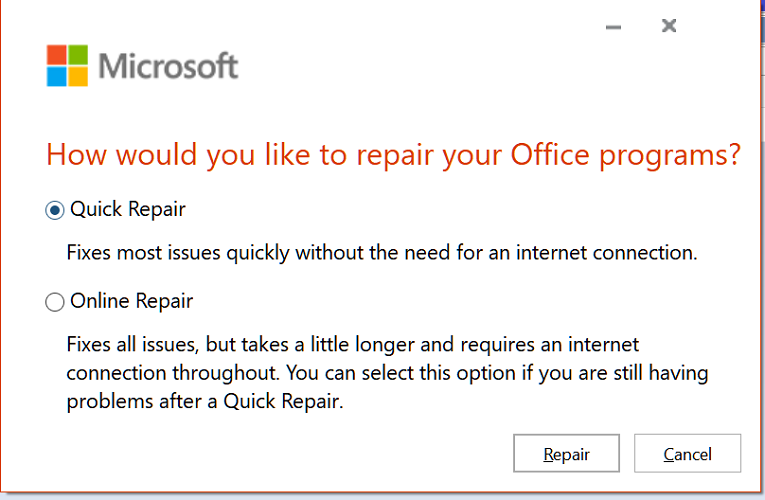
- Выберите «Быстрое восстановление» и нажмите кнопку «Восстановить». Дождитесь завершения восстановления и перезапустите Office. Если ошибка не исчезнет, выполните оперативное восстановление.
- Убедитесь, что ваш компьютер подключен к Интернету, и выберите Online Repair.
- Нажмите кнопку «Восстановить», чтобы продолжить. Процесс восстановления займет больше времени, но устранит все проблемы с установкой Microsoft Office.
После завершения процесса восстановления перезапустите Office и проверьте, устранена ли ошибка «Отсутствуют средства проверки правописания».
Ошибка отсутствующих средств проверки в Microsoft Word может возникать из-за повреждения документа Word или проблем с установкой Office. К счастью, вы можете исправить эту ошибку, исправив документ Word или изменив языковые настройки.
Источник записи: windowsreport.com

Proofing and editing with Microsoft Word is far more powerful than any other tool. Microsoft has a comment and «track changes» feature that lets you pass around content to different recipients for feedback. Each comment is marked by a different color and user initials, and you can accept or reject changes that other recipients make to your document. After you make these changes, you can then send the document to a printer to make a hard copy.
Word’s Internet Grammar and Spelling Checker
Before you start proofing your document, you can rely on Word’s internal grammar and spelling checker. This tool checks grammar and spelling as you type text in a document, but you can manually run a spell check over a document using proofing tools. You can also get a word count to identify the number of words and characters stored in a file.
Proofing tools are found in the «Review» ribbon tab. These buttons are found on the left side of the ribbon tab in the «Proofing» category.
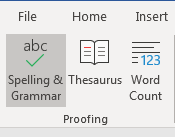
(Proofing tools in Word)
In the image above, the «Spelling and Grammar» button is selected. This button runs a quick check on the document, but Word provides this check as you type. Spelling errors in a word are indicated when a red line is underneath the word. Grammar errors are shown using a blue underline underneath the word. Sentences that Word determines could be better written have a green underline. Should you decide to run another check on the document, click the «Spelling and Grammar» button to execute the process.
The «Thesaurus» tool provides a lookup of alternative words for another typed in your document. When you click this button, a search text box displays where you can type a word and Word performs a look up for synonymous words or phrases.
Finally, you can get statistics on your document by clicking the «Word Count» button. When you click this button, a new window opens giving you several statistics on the current document.

(A word count in the current document)
These statistics are beneficial when you need to identify the number of pages, words, characters paragraphs and lines in a document. The numbers shown are used for academic papers or when you must reach a word count for specific content.
Adding Comments to a Page
When you review content from another writer, or you send content to another person to review, Word comments make it easy to communicate revision requests and changes. Comments allow someone with access to the document to create a small bubble window at the side of the document to create a message to another person who reads the document.
The «Review» ribbon tab has a category named «Comments» where all tools for viewing and creating new comments can be found.
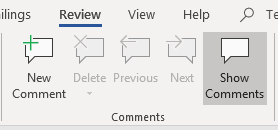
(Comment tools in Word)
When you create comments, you want the viewer to see what section of the document that you’re commenting on. You do this by linking a comment to a part of your document. Highlight the word or paragraph that you want to comment on, and then click the «New Comment» button. This action will link the comment to this part of the document, so the viewer knows where to edit text. You should keep comments linked to a small part of the document to ensure that it’s not confusing for the reader. For instance, if you want to revise a sentence in a paragraph, you would highlight just the sentence and not the entire paragraph.
Highlight a section of your document and click «New Comment.» The highlight color changes, and you’re prompted to enter a new comment on the right side of the document.

(Add new comment)
Notice that it has your initials and your name that you configured when you installed Microsoft Word. This is used, because several people could be using the comment feature. By separating comments using color codes, initials and names, the person making revisions can identify who is making the request.
Each highlighted section of your document with a comment can be replied to or marked as resolved. Click the «Reply» button to add a reply to the comment. This can then be seen when the reviewer responds to a revision request. The «Resolve» button will delete the comment and mark it as «Resolved» whether you make changes or not. The resolve feature indicates that changes were made, or the reader could reject changes and just mark it as resolved with no changes. To better work with changes that can be accepted or rejected, it’s better to work with the «Track Changes» feature.
Should you decide to delete a comment, click it on the right side of the document and then click the «Delete» button in the «Comments» category menu options. You can also cycle through each comment in a file by clicking the «Previous» and «Next» buttons. Cycling through comments makes it simple to see each one in documents that have several that you need to review for revision request.
Tracking Changes in Word
The track changes tool isn’t unique to Word, but Word is one of the few word document solutions that support it. This tool tracks any changes made to a document including deletions, additions and edits to content. When a recipient views a document with track changes turned on, the content that was deleted is shown along with the content that replaces it. These changes are also shown in a different color based on the user making the changes similar to comments added to a document.
The track changes features are found in the «Tracking» and «Changes» categories in the «Review» ribbon tab.
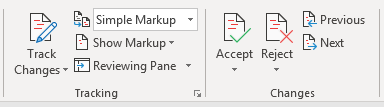
(Track changes button controls)
Before you can start tracking changes, you must first click the «Track Changes» button. Click the «Track Changes» option from the dropdown. You can also lock changes by clicking the «Lock Changes» option. After track changes are turned on, any changes made to the document will be highlighted by the color assigned to you in Word.
To test these settings, find a word in the document and make changes to it. Notice that the word as a line through it and the new word has the same color. This indicates that a change was made to the document, and anyone who views it will see these highlights.

(Tracked changes)
The line at the left of the sentence can be clicked to turn review of these changes on or off. If you want to see the document without the tracked changes, click the gray line and it will only show the end result. The line will turn red indicating that a change was made. The reader can then click the red line to see those changes. This feature lets the reader turn off the track changes view which can be confusing when there are several in the document.
Accept and Reject Changes
When a proofreader edits content in a document, the owner of the document can accept or reject changes. Word incorporates this functionality with the track changes tool. The accept and reject buttons are found in the «Changes» category of the «Review» ribbon tab shown in the image in the previous section.
When you review suggestions to a document, you have the option to revert to the original content or accept the changes from a third-party. Should you accept the changes, you click the change made in the content and then click «Accept.» If you prefer the original version, click «Reject» to delete these changes.
Printing Documents
Printing documents in Microsoft Word 2019 isn’t much different than printing in previous versions. Word displays several options when you click the «Print» link in the «File» ribbon tab. Clicking this tab opens a new view where you have several options in the left panel. One of these options is the «Print» link.
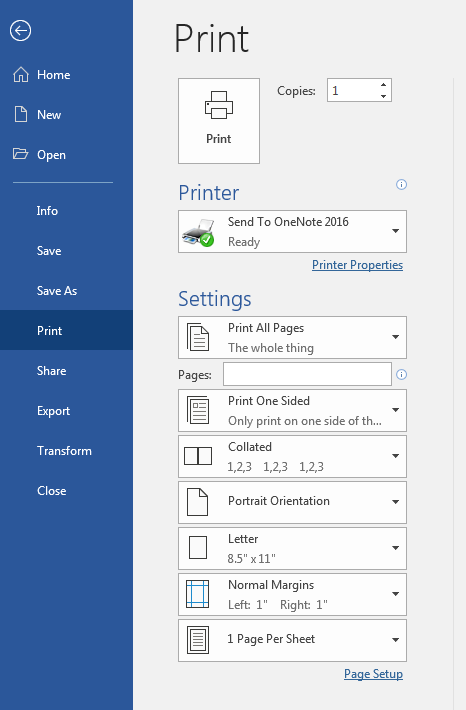
(Print options)
Notice that you can use the print settings to select the way that you want it to create a hard copy on your printer. You also need to choose a printer to send the print job. If you don’t have a physical printer, Microsoft chooses a virtual one for you. In the image above, the default print is set to OneNote due to a physical printer not connected to the computer.

What are proofing tools in Word?
Proofing Tools for MS Word
- Track Changes. Track Changes enables you to make edits and corrections in a document while tracking the changes.
- Spelling And Grammar Checker. The spelling and grammar checker tool will search the entire document for spelling and grammar errors.
- Dictionary And Thesaurus.
- Autocorrect.
What are the proofing tools buttons in MS Word?
Proofing tools are found in the “Review” ribbon tab. These buttons are found on the left side of the ribbon tab in the “Proofing” category. In the image above, the “Spelling and Grammar” button is selected. This button runs a quick check on the document, but Word provides this check as you type.
How do you use proofing tools in Word?
How to Access the Proofing Options in Microsoft Word
- Open a Microsoft Word document.
- Go to File > Options.
- Select Proofing from the list on the left of the dialog box.
What is proofing in word processing?
Proofing means reading each word (and punctuation mark) in a document slowly and carefully while looking for errors. It means focussing on the surface of your text, not on the content.
What is the use of proofing command?
Correct the spelling errors in the sentences. Correct the grammar mistake that appears in one of the sentences. Use the Spelling & Grammar command to check the remainder of the document.
Why do we need proofing a document?
Proofreading ensures that the document is completely free of errors and polished to a high standard. Proofreading is important as it can add power to our writing; without it, our work has a higher chance of containing errors.
What is meant by proofing document?
The process of producing an accurate sample of a document or printed piece for internal or client review is called proofing. In other words, how a document will look when it prints. Before sending a document to a printing press, proofread it for errors.
How long should it take to proofread 1000 words?
20 minutes
How do you prove your writing?
Tips For Effective Proofreading
- Proofread backwards.
- Place a ruler under each line as you read it.
- Know your own typical mistakes.
- Proofread for one type of error at a time.
- Try to make a break between writing and proofreading.
- Proofread at the time of day when you are most alert to spotting errors.
- Proofread once aloud.
What are the four proofreading tips?
Try these four tips to improve your proofreading:
- Use tools to your advantage. Pay attention to what your spell-checker is telling you. Don’t rely on spell-check to catch everything, but it is a handy tool to catch redundant words and obvious typos.
- Read backward. Most of us have become unabashed skimmers.
How do you prove your own work?
Here are some tips on how to proofread your own work effectively:
- Read your work aloud word by word.
- Print out a copy of what you’re proofreading and read it with a pencil or pen, focusing on each word.
- To catch typos, read your content backward so you’re reading each word independently.
What are some proofreading techniques?
Proofreading Techniques
- Read your paper aloud. Sometimes writing sounds different in your head than it sounds on paper.
- Make a list of errors that you commonly make and keep an eye out for them.
- Read the text backwards.
- Proofread for only one type of error at a time.
- Double check everything:
- Read slowly and carefully.
What are 7 types of errors you look for when you proofread a document?
The the 5 most common proofreading mistakes
- Number 1. Homophones. Homophones (from the Greek words homos, meaning same, and phone, meaning sound) are words that have the same sound but different meanings.
- Number 2. Inconsistency.
- Number 3. Apostrophe problems.
- Number 4. Poor syntax.
What are the common proofreading symbols?
Commonly Used Proofreading Symbols with Examples
- New paragraph here.
- Delete; take out something.
- Close up space.
- Transpose elements.
- Insert whatever is written above or below the proofreading symbol.
- Insert en dash.
- Insert em dash.
- Move left.
How do you proofread like a pro?
Six Tips for Proofreading Like a Pro
- Read it out loud.
- Switch it up.
- Review different elements one at a time.
- Identify key repeat phrases or words, and then search for them.
- Look with fresh eyes.
- Make a personal proofreading checklist.
Is it hard to proofread?
Proofreading is highly essential but the skill for proofreading is not something that takes overnight to develop. It is actually very difficult to proofread your own work. There is the tendency to see only what you want to see, which leads to missing errors because you do not see what you actually wrote.
What is a proofing Mark called?
Proofreading marks (also called proofreaders’ marks) are symbols and notations for correcting typeset pages. The proofreader places these marks in the margins and in corresponding lines of text. A slash separates marginal marks that appear on the same line.
What is a proofreading symbol?
Proofreading symbols are the marks that a proofreader makes on a paper when they edit it. They are a coded set of instructions that point out where mistakes have been made and how a piece of writing can be improved.
What is the symbol for inserting a space?
Symbols
| Symbol Name | Image | Meaning |
|---|---|---|
| # | Insert space | |
| Close up (Unicode U+2050) | ⁐ | Tie words together, eliminating a space |
| ] [ | Center text | |
| ] | Move text right |
What is the symbol of delete?
Technical information
| Name | Symbol for Delete |
|---|---|
| Unicode number | U+2421 |
| HTML-code | ␡ |
| CSS-code | 2421 |
| Block | Control Pictures |
What symbol means delete?
A mark is also placed in the text to indicate where the correction needs to be made. A caret (^) indicates an addition, and a line through the text indicates a deletion or a replacement.
How do you show lowercase in editing?
A vertical line delete mark is made through a single letter or mark of punctuation. The letter or punctuation to be deleted may also be circled with the delete mark. A stroke through a capital letter means set it in lowercase. Three lines under a lowercase letter mean to make it a capital.
What does Pilcrow mean?
The pilcrow, also called the paragraph mark, paragraph sign, paraph, alinea, or blind P, is a typographical character for individual paragraphs. The pilcrow is usually drawn similar to a lowercase q reaching from descender to ascender height; the loop can be filled or unfilled.
What is the backwards P on Microsoft Word?
It’s a paragraph mark. See http://www.word.mvps.org/FAQs/Formatting/NonPrintChars.htm. Usually it appears and disappears (along with the dots in the spaces between words, and arrows for tab characters) when you click the ¶ button on the Home tab.
What does a reverse Pilcrow mean?
In academic writing, it is sometimes used as an in-text referencing tool to make reference to a specific paragraph from a document that does not contain page numbers. In proofreading, it indicates that one paragraph should be split into two or more separate paragraphs.
What does the backwards P mean?
In Word, these markers indicate the ends of paragraphs, and are created when you press RETURN at the end of a line. If you do not want to see these markers, click on the Show/Hide icon in the Paragraph group on the Home tab. …
What is the P symbol on word?
The pilcrow, ¶, also called the paragraph mark, paragraph sign, paraph, or blind P, is a typographical character marking the start of a paragraph.
How do I get rid of the P?
Quickly turn off or on all formatting symbols by clicking the “P” icon in the “Paragraph” section of the “Home” tab. This may not turn off all formatting symbols, however, depending on the options you have chosen.
What are proofing tools in Word?
by
Alex Heath
·
2019-04-25
What are proofing tools in Word?
Proofing Tools for MS Word
- Track Changes. Track Changes enables you to make edits and corrections in a document while tracking the changes.
- Spelling And Grammar Checker. The spelling and grammar checker tool will search the entire document for spelling and grammar errors.
- Dictionary And Thesaurus.
- Autocorrect.
What are the proofing tools buttons in MS Word?
Proofing tools are found in the “Review” ribbon tab. These buttons are found on the left side of the ribbon tab in the “Proofing” category. In the image above, the “Spelling and Grammar” button is selected. This button runs a quick check on the document, but Word provides this check as you type.
How do you use proofing tools in Word?
How to Access the Proofing Options in Microsoft Word
- Open a Microsoft Word document.
- Go to File > Options.
- Select Proofing from the list on the left of the dialog box.
What is proofing in word processing?
Proofing means reading each word (and punctuation mark) in a document slowly and carefully while looking for errors. It means focussing on the surface of your text, not on the content.
What is the use of proofing command?
Correct the spelling errors in the sentences. Correct the grammar mistake that appears in one of the sentences. Use the Spelling & Grammar command to check the remainder of the document.
Why do we need proofing a document?
Proofreading ensures that the document is completely free of errors and polished to a high standard. Proofreading is important as it can add power to our writing; without it, our work has a higher chance of containing errors.
What is meant by proofing document?
The process of producing an accurate sample of a document or printed piece for internal or client review is called proofing. In other words, how a document will look when it prints. Before sending a document to a printing press, proofread it for errors.
How long should it take to proofread 1000 words?
20 minutes
How do you prove your writing?
Tips For Effective Proofreading
- Proofread backwards.
- Place a ruler under each line as you read it.
- Know your own typical mistakes.
- Proofread for one type of error at a time.
- Try to make a break between writing and proofreading.
- Proofread at the time of day when you are most alert to spotting errors.
- Proofread once aloud.
What are the four proofreading tips?
Try these four tips to improve your proofreading:
- Use tools to your advantage. Pay attention to what your spell-checker is telling you. Don’t rely on spell-check to catch everything, but it is a handy tool to catch redundant words and obvious typos.
- Read backward. Most of us have become unabashed skimmers.
How do you prove your own work?
Here are some tips on how to proofread your own work effectively:
- Read your work aloud word by word.
- Print out a copy of what you’re proofreading and read it with a pencil or pen, focusing on each word.
- To catch typos, read your content backward so you’re reading each word independently.
What are some proofreading techniques?
Proofreading Techniques
- Read your paper aloud. Sometimes writing sounds different in your head than it sounds on paper.
- Make a list of errors that you commonly make and keep an eye out for them.
- Read the text backwards.
- Proofread for only one type of error at a time.
- Double check everything:
- Read slowly and carefully.
What are 7 types of errors you look for when you proofread a document?
The the 5 most common proofreading mistakes
- Number 1. Homophones. Homophones (from the Greek words homos, meaning same, and phone, meaning sound) are words that have the same sound but different meanings.
- Number 2. Inconsistency.
- Number 3. Apostrophe problems.
- Number 4. Poor syntax.
What are the common proofreading symbols?
Commonly Used Proofreading Symbols with Examples
- New paragraph here.
- Delete; take out something.
- Close up space.
- Transpose elements.
- Insert whatever is written above or below the proofreading symbol.
- Insert en dash.
- Insert em dash.
- Move left.
How do you proofread like a pro?
Six Tips for Proofreading Like a Pro
- Read it out loud.
- Switch it up.
- Review different elements one at a time.
- Identify key repeat phrases or words, and then search for them.
- Look with fresh eyes.
- Make a personal proofreading checklist.
Is it hard to proofread?
Proofreading is highly essential but the skill for proofreading is not something that takes overnight to develop. It is actually very difficult to proofread your own work. There is the tendency to see only what you want to see, which leads to missing errors because you do not see what you actually wrote.
What is a proofreading symbol?
Proofreading symbols are the marks that a proofreader makes on a paper when they edit it. They are a coded set of instructions that point out where mistakes have been made and how a piece of writing can be improved.
What is the symbol of delete?
Technical information
| Name | Symbol for Delete |
|---|---|
| Unicode number | U+2421 |
| HTML-code | ␡ |
| CSS-code | 2421 |
| Block | Control Pictures |
What symbol means delete?
A mark is also placed in the text to indicate where the correction needs to be made. A caret (^) indicates an addition, and a line through the text indicates a deletion or a replacement.
How do you show lowercase in editing?
A vertical line delete mark is made through a single letter or mark of punctuation. The letter or punctuation to be deleted may also be circled with the delete mark. A stroke through a capital letter means set it in lowercase. Three lines under a lowercase letter mean to make it a capital.
What is the backwards P on Microsoft Word?
It’s a paragraph mark. See http://www.word.mvps.org/FAQs/Formatting/NonPrintChars.htm. Usually it appears and disappears (along with the dots in the spaces between words, and arrows for tab characters) when you click the ¶ button on the Home tab.
What does the backwards P mean?
In Word, these markers indicate the ends of paragraphs, and are created when you press RETURN at the end of a line. If you do not want to see these markers, click on the Show/Hide icon in the Paragraph group on the Home tab. …
What is the P symbol on word?
The pilcrow, ¶, also called the paragraph mark, paragraph sign, paraph, or blind P, is a typographical character marking the start of a paragraph.
How do I get rid of the P?
Quickly turn off or on all formatting symbols by clicking the “P” icon in the “Paragraph” section of the “Home” tab. This may not turn off all formatting symbols, however, depending on the options you have chosen.
Learn to get rid of this error message
by Tashreef Shareef
Tashreef Shareef is a software developer turned tech writer. He discovered his interest in technology after reading a tech magazine accidentally. Now he writes about everything tech from… read more
Updated on January 17, 2023
Reviewed by
Alex Serban

After moving away from the corporate work-style, Alex has found rewards in a lifestyle of constant analysis, team coordination and pestering his colleagues. Holding an MCSA Windows Server… read more
- The Missing proofing tools error in Microsoft Word is triggered due to file corruption or incorrect language configuration.
- In this article, we show you how to fix missing proofing tools error in Microsoft Word for good.
- A workaround for this is manually changing the proofing language.

XINSTALL BY CLICKING THE DOWNLOAD FILE
This software will repair common computer errors, protect you from file loss, malware, hardware failure and optimize your PC for maximum performance. Fix PC issues and remove viruses now in 3 easy steps:
- Download Restoro PC Repair Tool that comes with Patented Technologies (patent available here).
- Click Start Scan to find Windows issues that could be causing PC problems.
- Click Repair All to fix issues affecting your computer’s security and performance
- Restoro has been downloaded by 0 readers this month.
When editing a document in Microsoft Word, you may encounter the Missing proofing tools error. The full error reads – Missing proofing tools. This document contains text in Russian, which isn’t being proofed. You may be able to get proofing tools for this language.
This error can occur due to various reasons, including corrupted Word installation and incorrect language configuration in Microsoft Word.
In this article, we explore a few troubleshooting steps to help you resolve the Missing proofing tools error in Microsoft Word.
- How do I fix the missing proofing tools Microsoft Word error?
- 1. Change the proofing language manually
- 2. Install the Proofing Tools 2016
- 3. Repair Word docs with Stellar Word Repair
- 4. Repair Word installation
1. Change the proofing language manually
- Launch Microsoft Word on your computer and open the document with the error.
- Press Ctrl + A to select all the text in the document.
- Open the Review tab from the toolbar.
- Click the Language drop-down button.
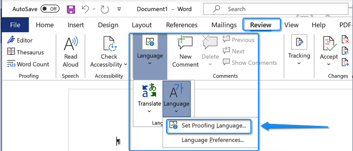
- Go to Language and choose Set Proofing Language.
- Select your preferred language from the new Language window.
- Click the Set as Default button if you want to set the language as default for all the documents.
- Click OK to apply the changes.
Manually changing the document and proofing language seem to have fixed the error for many users. However, make sure to select the correct document language from the language settings to prevent errors in the future.
2. Install the Proofing Tools 2016
- Open the Microsoft Office Proofing Tools 2016.
- On the download center page, select the language.
- Click the Download button to proceed.
- Select the 32-bit/64-bit version of proofing tools, depending on your OS edition.
- Click Next.
- Run the installer and follow on-screen instructions to install the proofing tools for Office 2016.
Note: It is important to install a 32-bit proofing tool for 32-bit Windows systems and 64-bit for 64-bit systems. The tool otherwise may not work correctly.
Once installed, relaunch Microsoft Office and check if the error is resolved. Note that the Proofing tool works on Microsoft Office 2016 edition. It includes the full set of proofing tools available for Officer in this language. Install the tool and restart Office to get proofing working on your Office installation.
3. Repair Word docs with Stellar Word Repair
The stellar Word Repair tool is a one-step repair solution to fix problems with your Word files. It is an easy-to-use tool that can repair corrupt Microsoft Word .doc and .docx files without modifying the original text, images, fonts, headers, and hyperlinks.
The proofing tools missing error can occur due to file corruption. Stellar Word Recovery can help you repair files that are inaccessible, start repagination automatically, or show unreadable characters. You can also search for word documents if you are unsure of their saved location.
Some PC issues are hard to tackle, especially when it comes to corrupted repositories or missing Windows files. If you are having troubles fixing an error, your system may be partially broken.
We recommend installing Restoro, a tool that will scan your machine and identify what the fault is.
Click here to download and start repairing.
After scanning the Word file, it provides a free preview of recoverable data. It also comes with two additional recovery options – Advanced and Raw recovery providing advanced recovery features.
Key features of Stellar Word Repair
- Can repair multiple corrupted Word documents in a single process.
- Repair text, font, hyperlinks, header, comments, and more.
- Three recovery options: Simple, Advanced, and Raw Recovery.
- Supports MS Word 2019 and earlier versions.
Additionally, you should know that it’s most likely to repair your Word documents errors using the Simple Word repair option for minor issues, or the Advanced repair option for more complicated cases.
With this being said, you have all the resources you need to repair missing proofing errors and recover your MS Word documents.
⇒ Get Stellar Word Repair
4. Repair Word installation
- Press the Windows key + R to open Run.
- Type control and click OK.
- In Control Panel, go to Programs and click on Programs and Features.
- Select Microsoft Word from the list of installed apps.
- Click on Change and then click Yes when prompted by UAC.
- Select Quick Repair and then click on the Repair button. Wait for the repair to complete and restart Office. If the error persists, perform Online Repair.
- Make sure your computer is connected to the Internet and choose Online Repair.
- Click the Repair button to proceed. The repair process will take longer but will fix all issues with your Microsoft Office installation.
After the repair process is complete, restart Office and check if the Missing proofing tools error is resolved.
- How to Integrate ChatGPT With Word [Quickest Ways]
- Word for Windows 11: How to Download It For Free
- User Does Not Have Access Privileges: How to Fix This Error
- Word Has Run Into an Error: 5 Ways to Easily Fix It
- How to Prevent Word From Reducing Image Quality in Documents
The Missing proofing tools in Microsoft Word error can occur due to Word document in corruption or issues with Office installation.
Fortunately, you can fix this error by repairing the Word document or changing language preferences.
![]()
Newsletter
If you need Help!
- About Proofing tools for Office 365, you can report an incident / submit a request.
- You can also reach the Service Desk by phone at 77777 or by e-mail at service-desk@cern.ch.
MS Language Pack
Due to the large size of the Language packs, CERN cannot grant every client access to every language.
- If you want to add additionnal language pack, please consult Language Accessory Pack for Office (external link)
MS Language Pack is a software package that allow Office applications (Word, Excel, Powerpoint…) to be used in different languages other than the English and French (by default in CERN CMF). Beyond simple user interface changes, this pack includes proofing tools to improve productivity.
A language pack offers:
| Features | Description |
|---|---|
| Editing Language | The language used for typing and editing in the software. To use a given language, the computer must support the corresponding keyboard |
| Display Language | The user-interface (UI) language, including the buttons, menus, controls and commands |
| Help Language | The language used for the Help function |
| Proofing tools | Spelling and Grammar tools |
Proofing tools for Office 365
Microsoft Proofing tools for Office 365 allows people to edit Office documents in different languages. These editing tools may include spelling and grammar checkers, thesauruses, and hyphenators. Proofing tools may also include language-specific editing features such as Language AutoDetect, AutoSummarize, and Intelligent AutoCorrect.
- The English and French packs (installed by default) include proofing tools for English, French, Spanish, Dutch and German. Dutch and German are available in CMF.
- In order to offer more proofing tools language to the users of the CERN member states, additional proofing tools for Microsoft Office are available in CMF. (see picture below)
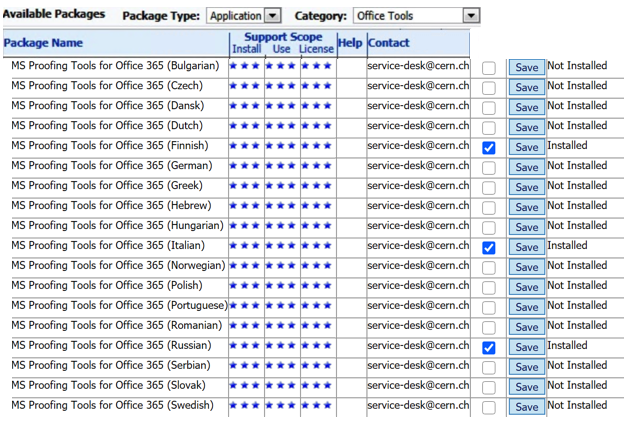
You can install more than one Proofing tools at the same time. CMF will install them one by one.
- Righ-click the CMF icon (traybar), then select Add/Remove CMF Packages.
- If required, please Authenticate with your CERN Login + password
- In Category dropdown list, select Office Tools and look for the additional MS Office Proofing Tools for Office 365 you want to install, tick the box Install and then push the Save button.
- Wait until CMF icon in the system tray starts blinking. Right-click on it and then select Pending Actions option. Close all Office applications if necessary and click the Start Now button. The installation is silent and a CMF notification in the tray bar will be displayed when it is completed.
How to set language in Office document ?
After you installed your additional proofing tools, you must check Office for your new language preferences in proofing Tools.
- In any MS Office application (ie: Word), select the Review tab, in the Language group, click Language, then Set Proofing Language. From the list, select the language used to check the spelling and grammar in your Office document.
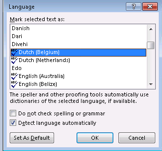
the sign ![]() means that a proofing tool for this language is available on the machine and you can use it.
means that a proofing tool for this language is available on the machine and you can use it.