
Hi, Office Insiders! My name is Shruthi Ramesh, and I’m a Program Manager on the Word team. I’m here to share some changes we’ve made to Editor based on feedback we received from many of you. You now have the ability to proof selected text in Word for Windows.
Proof selected text
When you work in a large document in Word, you may want to focus on revising or finalizing a specific section before getting input and feedback from others. In cases like this, you’ll often want to use Editor to check the grammar and spelling, and to make refinements to ensure clarity and conciseness for just that part of the document. Word now makes it easy for you to do so.
How it works
-
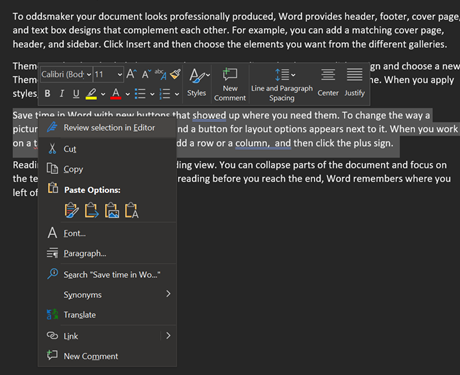
- Open the document and select the content you want to proof.
- Right-click the selected text, and then select Review selection in Editor.

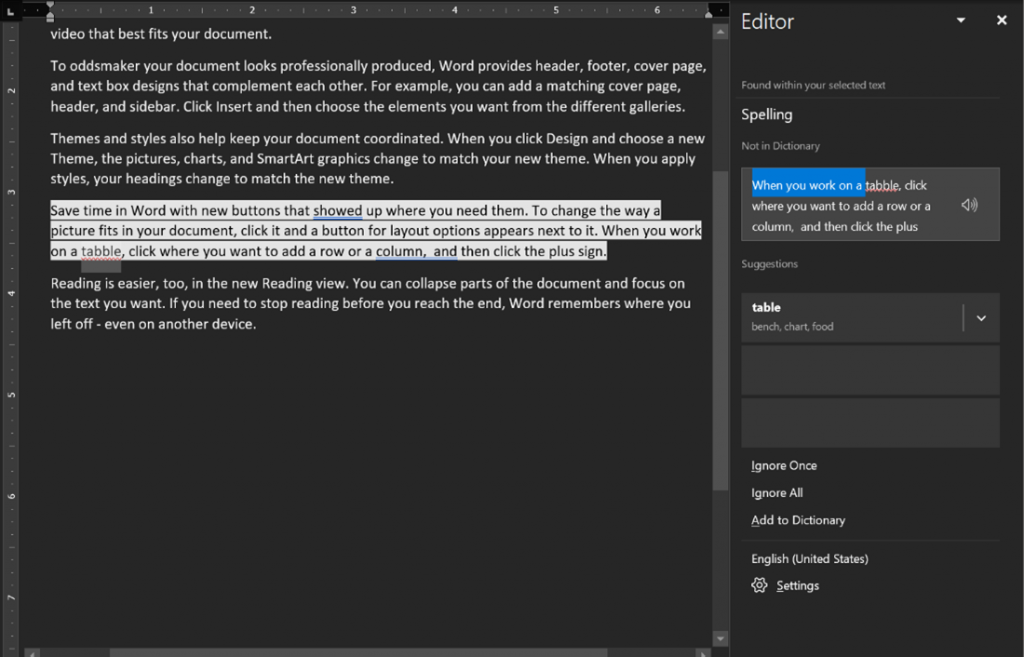
3. In the Editor pane, review and address the issues found in this section of the document by following the guidance provided.
Availability
This feature is available to Office 365 subscribers running Current Channel (Preview) Version 2103 (Build 13929.20216) or later.
Features are released over some time to ensure things are working smoothly. We highlight features that you may not have because they’re slowly releasing to larger numbers of Insiders. Sometimes we remove elements to further improve them based on your feedback. Though this is rare, we also reserve the option to pull a feature entirely out of the product, even if you, as an Insider, have had the opportunity to try it.
Feedback
We hope you find this new Word functionality helpful. Please let us know what you think! You can provide feedback directly in the Editor pane by clicking on the button at the bottom of the pane and filling out the form. Or you can use the feedback command in Word, which can be accessed at Help > Feedback.
Learn what other information you should include in your feedback to ensure it’s actionable and reaches the right people. We’re excited to hear from you!
Sign up for the Office Insider newsletter and get the latest information about Insider features in your inbox once a month!
The spellchecker in Microsoft Word cannot replace expert proofreading, but it can be a useful tool for proofreaders. We look at this in our Becoming A Proofreader course. However, to make the most of this tool, you need to understand the proofing options in Microsoft Word.
How to Access the Proofing Options in Microsoft Word
Even if you have used the spellchecker in Microsoft Word, you may not have realised how much you can customise what it looks for and how it highlights errors.
To access these proofing options, you need to:
- Open a Microsoft Word document.
- Go to File > Options.
- Select Proofing from the list on the left of the dialogue box.
In Word for Mac, meanwhile you can access similar options by:
- Going to Word > Preferences.
- Clicking Authoring and Proofing Tools and selecting Spelling and Grammar.
Here, you will see options for customising the spellchecker, including some that apply to all Microsoft Office programs and some for Word in particular. Let’s take a quick look at both.
Proofing Settings for Microsoft Office
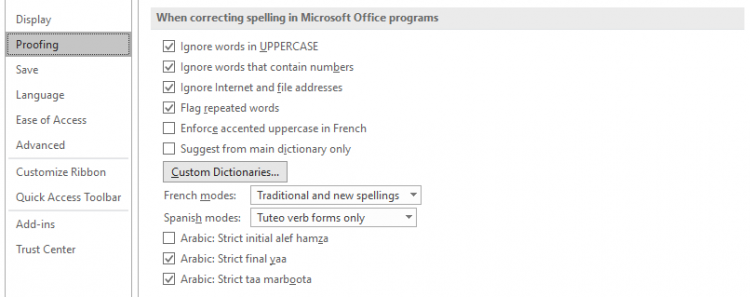
You can control the proofing options across all Microsoft Office programs in the section titled ‘When correcting spelling in Microsoft Office programs’. These include:
- The ability to ignore certain terms, including UPPERCASE TERMS and URLs.
- Flagging instances where the same word is used twice in a row.
- Options to select and customise the dictionary used for spellchecking.
Depending on the languages you have installed in your version of Microsoft Office, you may also see other language-specific options here. We’ll focus on English for now, though!
Proofing Settings for Word
The most important options for using the spellchecker effectively in Word are in the ‘When correcting spelling and grammar in Word’ section. These include:
- Check spelling as you type – Controls whether Word will highlight errors as you type (if you deselect this, you will need to run the spellchecker manually).
- Mark grammar errors as you type – As above, but for grammar errors.
- Frequently confused words – Highlights words that it thinks may have been confused for another term (e.g. mix ups of ‘effect’ and ‘affect’).
- Check grammar with spelling – When checked, Word will check both grammar and spelling when you run a spellcheck (when unchecked, it will only check spelling).
- Show readability statistics – Provides readability stats at the end of a spellcheck.
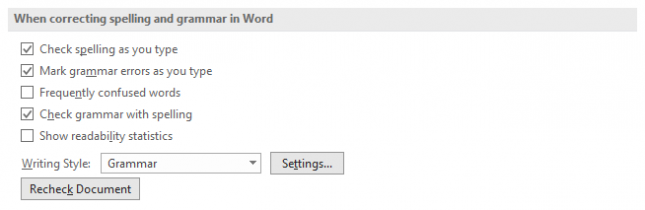
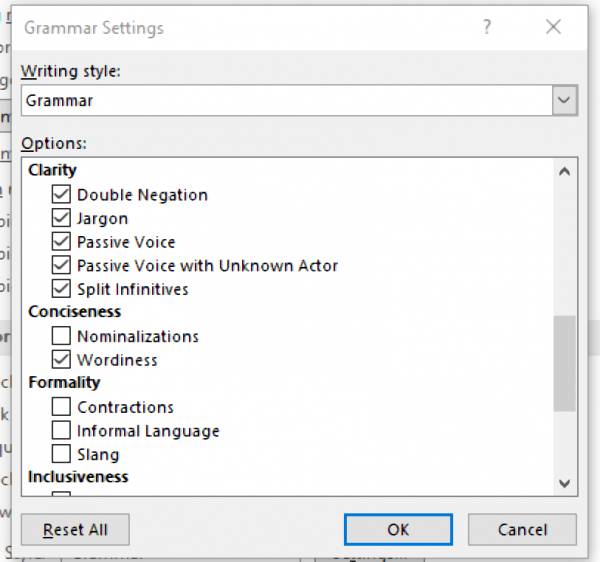
Beneath these options, you’ll also see a ‘Writing Style’ menu. The options here are:
- Grammar – Focuses on errors related to grammar and punctuation, such as comma splices, incorrect verb forms, or mixing up adverbs and adjectives.
- Grammar & Refinements – Also looks for potential stylistic issues, such as gendered language, excessive wordiness, or informal language.
Both options can be fully customised by clicking the ‘Settings’ button next to the menu. This will open a new dialogue box where you can select or deselect specific issues to check.
Becoming A Proofreader
Do you want to start a career as a freelance proofreader? Our Becoming A Proofreader course contains everything you need to know to proofread professionally! Sign up for a free trial today.

Proofing and editing with Microsoft Word is far more powerful than any other tool. Microsoft has a comment and «track changes» feature that lets you pass around content to different recipients for feedback. Each comment is marked by a different color and user initials, and you can accept or reject changes that other recipients make to your document. After you make these changes, you can then send the document to a printer to make a hard copy.
Word’s Internet Grammar and Spelling Checker
Before you start proofing your document, you can rely on Word’s internal grammar and spelling checker. This tool checks grammar and spelling as you type text in a document, but you can manually run a spell check over a document using proofing tools. You can also get a word count to identify the number of words and characters stored in a file.
Proofing tools are found in the «Review» ribbon tab. These buttons are found on the left side of the ribbon tab in the «Proofing» category.
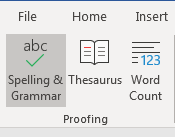
(Proofing tools in Word)
In the image above, the «Spelling and Grammar» button is selected. This button runs a quick check on the document, but Word provides this check as you type. Spelling errors in a word are indicated when a red line is underneath the word. Grammar errors are shown using a blue underline underneath the word. Sentences that Word determines could be better written have a green underline. Should you decide to run another check on the document, click the «Spelling and Grammar» button to execute the process.
The «Thesaurus» tool provides a lookup of alternative words for another typed in your document. When you click this button, a search text box displays where you can type a word and Word performs a look up for synonymous words or phrases.
Finally, you can get statistics on your document by clicking the «Word Count» button. When you click this button, a new window opens giving you several statistics on the current document.

(A word count in the current document)
These statistics are beneficial when you need to identify the number of pages, words, characters paragraphs and lines in a document. The numbers shown are used for academic papers or when you must reach a word count for specific content.
Adding Comments to a Page
When you review content from another writer, or you send content to another person to review, Word comments make it easy to communicate revision requests and changes. Comments allow someone with access to the document to create a small bubble window at the side of the document to create a message to another person who reads the document.
The «Review» ribbon tab has a category named «Comments» where all tools for viewing and creating new comments can be found.
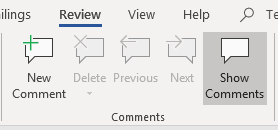
(Comment tools in Word)
When you create comments, you want the viewer to see what section of the document that you’re commenting on. You do this by linking a comment to a part of your document. Highlight the word or paragraph that you want to comment on, and then click the «New Comment» button. This action will link the comment to this part of the document, so the viewer knows where to edit text. You should keep comments linked to a small part of the document to ensure that it’s not confusing for the reader. For instance, if you want to revise a sentence in a paragraph, you would highlight just the sentence and not the entire paragraph.
Highlight a section of your document and click «New Comment.» The highlight color changes, and you’re prompted to enter a new comment on the right side of the document.

(Add new comment)
Notice that it has your initials and your name that you configured when you installed Microsoft Word. This is used, because several people could be using the comment feature. By separating comments using color codes, initials and names, the person making revisions can identify who is making the request.
Each highlighted section of your document with a comment can be replied to or marked as resolved. Click the «Reply» button to add a reply to the comment. This can then be seen when the reviewer responds to a revision request. The «Resolve» button will delete the comment and mark it as «Resolved» whether you make changes or not. The resolve feature indicates that changes were made, or the reader could reject changes and just mark it as resolved with no changes. To better work with changes that can be accepted or rejected, it’s better to work with the «Track Changes» feature.
Should you decide to delete a comment, click it on the right side of the document and then click the «Delete» button in the «Comments» category menu options. You can also cycle through each comment in a file by clicking the «Previous» and «Next» buttons. Cycling through comments makes it simple to see each one in documents that have several that you need to review for revision request.
Tracking Changes in Word
The track changes tool isn’t unique to Word, but Word is one of the few word document solutions that support it. This tool tracks any changes made to a document including deletions, additions and edits to content. When a recipient views a document with track changes turned on, the content that was deleted is shown along with the content that replaces it. These changes are also shown in a different color based on the user making the changes similar to comments added to a document.
The track changes features are found in the «Tracking» and «Changes» categories in the «Review» ribbon tab.
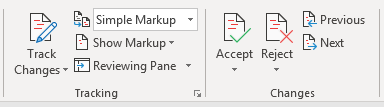
(Track changes button controls)
Before you can start tracking changes, you must first click the «Track Changes» button. Click the «Track Changes» option from the dropdown. You can also lock changes by clicking the «Lock Changes» option. After track changes are turned on, any changes made to the document will be highlighted by the color assigned to you in Word.
To test these settings, find a word in the document and make changes to it. Notice that the word as a line through it and the new word has the same color. This indicates that a change was made to the document, and anyone who views it will see these highlights.

(Tracked changes)
The line at the left of the sentence can be clicked to turn review of these changes on or off. If you want to see the document without the tracked changes, click the gray line and it will only show the end result. The line will turn red indicating that a change was made. The reader can then click the red line to see those changes. This feature lets the reader turn off the track changes view which can be confusing when there are several in the document.
Accept and Reject Changes
When a proofreader edits content in a document, the owner of the document can accept or reject changes. Word incorporates this functionality with the track changes tool. The accept and reject buttons are found in the «Changes» category of the «Review» ribbon tab shown in the image in the previous section.
When you review suggestions to a document, you have the option to revert to the original content or accept the changes from a third-party. Should you accept the changes, you click the change made in the content and then click «Accept.» If you prefer the original version, click «Reject» to delete these changes.
Printing Documents
Printing documents in Microsoft Word 2019 isn’t much different than printing in previous versions. Word displays several options when you click the «Print» link in the «File» ribbon tab. Clicking this tab opens a new view where you have several options in the left panel. One of these options is the «Print» link.
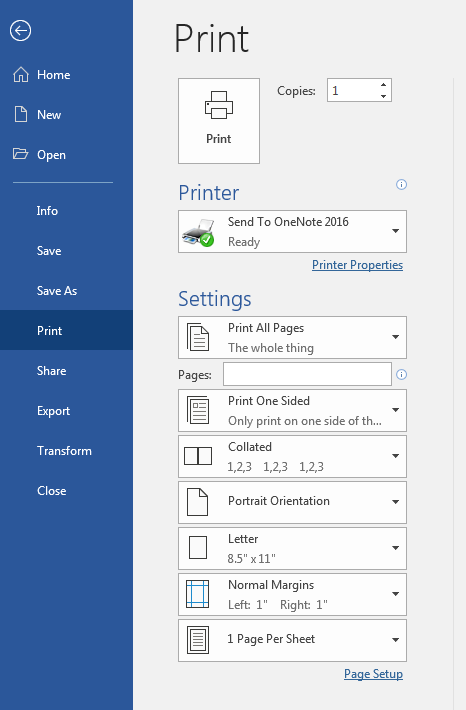
(Print options)
Notice that you can use the print settings to select the way that you want it to create a hard copy on your printer. You also need to choose a printer to send the print job. If you don’t have a physical printer, Microsoft chooses a virtual one for you. In the image above, the default print is set to OneNote due to a physical printer not connected to the computer.

- Ошибка отсутствующих средств проверки в Microsoft Word возникает из-за повреждения файла или неправильной языковой конфигурации.
- В этой статье мы покажем вам, как навсегда исправить ошибку отсутствия средств проверки правописания в Microsoft Word.
- Хотите больше советов по Microsoft Word? Посетите нашу специальную веб-страницу Microsoft Word.
- Для получения дополнительных исправлений и руководств посетите нашу страницу устранения неполадок.
Чтобы исправить различные проблемы с ПК, мы рекомендуем Restoro PC Repair Tool: это программное обеспечение исправит распространенные компьютерные ошибки, защитит вас от потери файлов, вредоносных программ, сбоев оборудования и оптимизирует ваш компьютер для максимальной производительности. Решите проблемы с ПК и удалите вирусы прямо сейчас, выполнив 3 простых шага:
- Загрузите Restoro PC Repair Tool, который поставляется с запатентованными технологиями (патент доступен здесь ).
- Нажмите Начать сканирование, чтобы найти проблемы Windows, которые могут вызывать проблемы с ПК.
- Нажмите «Восстановить все», чтобы исправить проблемы, влияющие на безопасность и производительность вашего компьютера.
- В этом месяце Restoro скачали 657 095 читателей.
При редактировании документа в Microsoft Word вы можете столкнуться с ошибкой Отсутствуют средства проверки правописания. Полный текст ошибки гласит: “Отсутствуют средства проверки”. Этот документ содержит текст на русском языке, который не проходит проверку. Возможно, вы сможете получить средства проверки для этого языка.
Эта ошибка может возникать по разным причинам, включая поврежденную установку Word и неправильную настройку языка в Microsoft Word.
В этой статье мы рассмотрим несколько шагов по устранению неполадок, которые помогут вам устранить ошибку «Отсутствуют средства проверки правописания» в Microsoft Word.
Как исправить ошибку отсутствующих средств проверки Microsoft Word в Windows 10?
1 Восстановление документов Word с помощью Stellar Word Repair
![[Решено] Отсутствуют инструменты проверки правописания в Microsoft Word](https://howto.mediadoma.com/wp-content/uploads/2021/03/post-59703-604f8e041eb91.png)
Звездный инструмент восстановления Word – это одношаговое решение для исправления проблем с вашими файлами Word. Это простой в использовании инструмент, который может восстанавливать поврежденные файлы Microsoft Word .doc и .docx без изменения исходного текста, изображений, шрифтов, заголовков и гиперссылок.
Ошибка отсутствия средств проверки может возникнуть из-за повреждения файла. Stellar Word Recovery может помочь вам восстановить файлы, которые недоступны, автоматически начать репагинацию или отображать нечитаемые символы. Вы также можете искать текстовые документы, если не знаете, где их сохранить.
После сканирования файла Word предоставляется бесплатный предварительный просмотр восстанавливаемых данных. Он также поставляется с двумя дополнительными вариантами восстановления – Advanced и Raw, обеспечивающими расширенные функции восстановления.
Ключевые особенности Stellar Word Repair
- Может восстановить несколько поврежденных документов Word за один процесс.
- Восстановите текст, шрифт, гиперссылки, заголовок, комментарии и многое другое.
- Три варианта восстановления: простое, расширенное и исходное восстановление.
- Поддерживает MS Word 2019 и более ранние версии.
2 Измените язык проверки вручную
![[Решено] Отсутствуют инструменты проверки правописания в Microsoft Word](https://howto.mediadoma.com/wp-content/uploads/2021/03/post-59703-604f8e05f3ac8.png)
- Запустите Microsoft Word на вашем компьютере и откройте документ с ошибкой.
- Нажмите Ctrl + A, чтобы выделить весь текст в документе.
- Откройте вкладку Review на панели инструментов.
- Нажмите кнопку раскрывающегося списка ” Язык”.
- Перейдите в раздел «Язык» и выберите «Установить язык проверки».
- Выберите желаемый язык в новом окне «Язык».
- Нажмите кнопку «Установить по умолчанию» , если вы хотите установить язык по умолчанию для всех документов.
- Щелкните ОК, чтобы применить изменения.
Ручное изменение документа и языка проверки, похоже, устранило ошибку для многих пользователей. Однако не забудьте выбрать правильный язык документа в языковых настройках, чтобы избежать ошибок в будущем.
3 Установите Proofing Tools 2016
![[Решено] Отсутствуют инструменты проверки правописания в Microsoft Word](https://howto.mediadoma.com/wp-content/uploads/2021/03/post-59703-604f8e0778568.jpg)
- Откройте средства проверки правописания Microsoft Office 2016.
- На странице центра загрузок выберите язык.
- Нажмите кнопку «Загрузить», чтобы продолжить.
- Выберите 32-разрядную / 64-разрядную версию средств проверки правописания в зависимости от версии вашей ОС.
- Щелкните Далее.
- Запустите установщик и следуйте инструкциям на экране, чтобы установить средства проверки для Office 2016.
Примечание. Важно установить 32-разрядную программу проверки правописания для 32-разрядной системы Windows и 64-разрядную версию для 64-разрядной системы. В противном случае инструмент может работать некорректно.
После установки перезапустите Microsoft Office и проверьте, устранена ли ошибка. Обратите внимание, что средство проверки работает в версии Microsoft Office 2016. Он включает в себя полный набор инструментов проверки, доступных для Officer на этом языке. Установите инструмент и перезапустите Office, чтобы проверить, работает ли ваша установка Office.
4 Исправить установку Word
![[Решено] Отсутствуют инструменты проверки правописания в Microsoft Word](https://howto.mediadoma.com/wp-content/uploads/2021/03/post-59703-604f8e089cc43.png)
- Нажмите клавиши Windows + R, чтобы открыть Выполнить.
- Введите control и нажмите OK.
- В Панели управления перейдите в «Программы» и нажмите «Программы и компоненты».
- Выберите Microsoft Word из списка установленных приложений.
- Нажмите «Изменить», а затем нажмите «Да» при появлении запроса от UAC.
- Выберите «Быстрое восстановление» и нажмите кнопку «Восстановить». Дождитесь завершения восстановления и перезапустите Office. Если ошибка не исчезнет, выполните оперативное восстановление.
- Убедитесь, что ваш компьютер подключен к Интернету, и выберите Online Repair.
- Нажмите кнопку «Восстановить», чтобы продолжить. Процесс восстановления займет больше времени, но устранит все проблемы с установкой Microsoft Office.
После завершения процесса восстановления перезапустите Office и проверьте, устранена ли ошибка «Отсутствуют средства проверки правописания».
Ошибка отсутствующих средств проверки в Microsoft Word может возникать из-за повреждения документа Word или проблем с установкой Office. К счастью, вы можете исправить эту ошибку, исправив документ Word или изменив языковые настройки.
Источник записи: windowsreport.com
Эксперты Cyble обнаружили в дикой природе новую Android-угрозу — банковского трояна, находящегося на ранней стадии разработки. Вредонос с кодовым именем Chameleon маскируется под разные легитимные приложения, а для кражи данных использует в основном оверлеи и кейлоггинг.
Проведенный в Cyble анализ не выявил признаков родства новобранца с каким-либо известным троянским семейством. Вредонос с января активно раздается с взломанных сайтов, хостинга Bitbucket и через вложения в чатах Discord.
Чтобы скрыть свои намерения, Chameleon использует иконки популярных программ: ChatGPT, Google Chrome, Bitcoin-кошелька, клиента Налоговой службы Австралии, банковского приложения IKO, широко используемого в Польше.

Эксперты проанализировали новейший образец зловреда, замаскированный под Android-клиент австралийской криптобиржи CoinSpot (уровень детектирования 30/65 на 14 апреля). Его C2-сервер находится в США, а набор функций обеспечивает следующие возможности:
- кейлоггинг;
- оверлейные атаки;
- сбор СМС;
- кража куки;
- кража ключа разблокировки экрана;
- отключение Google Play Protect;
- противодействие запуску в эмуляторе;
- предотвращение деинсталляции;
- самоудаление.
При запуске троян прежде всего проводит антиотладочные и антиэмуляционные проверки, а также ищет признаки рутинга. Обнаружив угрозу раскрытия, он завершает свой процесс.
Считав данные устройства, Chameleon, как и многие другие Android-банкеры, просит жертву активировать Accessibility Service. Получив доступ, он использует спецвозможности для автоматического получения разрешений, отключения защиты Google Play, блокировки деинсталляции и т. п.
Параллельно троян в фоновом режиме отправляет на C2 основную информацию о зараженном устройстве, такую как версия, модель, наличие статуса root, страна, местоположение. После этого зловред загружает в WebView легитимную страницу CoinSpot и скрытно ворует куки.
Мониторинг и захват клавиатурного ввода обеспечивают функции editLog() и writeLog(). Результаты сохраняются в базе данных, а затем отсылаются на командный сервер. Оверлеи для целевых банковских приложений загружаются с C2 и сохраняются локально. При совершении инъекции фишинговая страница открывается в WebView.
Доступ к Accessibility Service также позволяет Chameleon украсть ключ к устройству. Вначале зловред определяет тип замка — пароль, пин-код, свайп, а затем сохраняет введенные идентификаторы в своей базе данных.
Для кражи входящих СМС банкер регистрирует экземпляр класса BroadcastReceiver. Улов передается на C2, чтобы оператор смог получить одноразовые пароли для обхода двухфакторной аутентификации (2FA).
Для автоматической деинсталляции и предотвращения попыток удаления вредонос использует переменные предпочтения (общие для всех семплов), такие как is_chameleon, app_chameleon, app_chameleon_name. Это и подсказало аналитикам название для новой Android-угрозы.
Создатели Chameleon также предусмотрели возможность загрузки дополнительного пейлоада, с сохранением в виде jar-файла и последующим запуском на исполнение. Эта функциональность пока не используется.
![]() Подписывайтесь на канал «Anti-Malware» в Яндекс Дзен, чтобы первыми узнавать о новостях и наших эксклюзивных материалах по информационной безопасности.
Подписывайтесь на канал «Anti-Malware» в Яндекс Дзен, чтобы первыми узнавать о новостях и наших эксклюзивных материалах по информационной безопасности.