Главная »
26 Апрель 2011 149663 просмотров
MZTools — Очень полезная утилита для тех, кто программирует на VBA. Поистине экономит время при написании кодов. Немаловажен тот факт, что утилита абсолютно бесплатна. Вот некоторые из её возможностей:
- Автоматическая вставка обработчиков ошибок в модули
- Вставка комментариев в заголовок процедуры, с автоматической вставкой времени, имени модуля и процедуры, возможностью указать автора процедуры
- Автоматическая нумерация строк кода
- Снятие нумерации со строк кода
- Создание шаблонов часто используемых кодов
- Собственный буфер обмена на 9 операций с возможностью кодов и последующей вставки любого из 9 скопированных кодов
- и еще много полезного
Программа распространяется бесплатно.
Скачать

Официальный сайт: http://www.mztools.com/index.aspx
VBA Code Compare v.0.4 — позволяет сравнить и объединить любой внедрённый VBA код (макросы, код листов, исходный код модулей и пр.). Программа использует прямой доступ для работы с модулями VBA проекта. Таким образом, она избавляет от операций экспорта исходного кода в файл для последующего сравнения и обратного импорта после внесения изменений.
Программа распространяется бесплатно.
Скачать

Официальный сайт:http://www.formulasoft.ru/vba-code-compare.html
Smart Indenter v3.5 — очень хорошая надстроечка для VBA. Настоятельно рекомендую всем, кто программирует в данной среде. Ведь почти все ставят отступы с помощью Tab или пробела во всяких конструкциях типа IF…End If, Do…Loop и т.д. В общем-то именно это будет делать за Вас данная программулька — просто автоматически проставлять отступы в коде(в таких местах как конструкции IF…End If, Do…Loop и т.д.). Я когда у меня был 32-разрядный ПК с ней вообще обленился — забыл, когда вручную эти отступы проставлял.
К сожалению, работает только с 32-разрядными системами. Если у вас 64-бита — то программа не установится.
Программа распространяется бесплатно.
Скачать

Официальный сайт: http://www.oaltd.co.uk/Indenter/Default.htm
VBE Tools v2.0 — Главные особенности программы — можно переименовать элемент на форме и при этом все ссылки на этот элемент в коде будут заменены на новое имя элемента; возможность перемещать и изменять размеры форм и их элементов горячими клавишами.
Программа распространяется бесплатно.
Скачать

Официальный сайт:http://www.oaltd.co.uk/VBETools/Default.htm
VBA CodeCleaner — Программа вычищает из VBA-кода все «лишнее»: комментарии, пробелы, отступы и пр. Все это, конечно, можно настроить отдельно и программа будет очищать только то, что укажете. Перед внесением изменений в проект можно задать создание резервных копий модулей.
Программа распространяется бесплатно.
Скачать

Официальный сайт:http://www.appspro.com/Utilities/CodeCleaner.htm
MsgBox Generator — Совсем маленькая программка , которая делает лишь одну простую вещь — она показывает код на VB и VBA для вывода MsgBox-а с заданными параметрами. Вы выбираете параметры сообщения: задаете текст заголовка, тип сообщения(Предупреждение, Информация и т.д.), тип кнопока(Ок, Да и Нет и т.д.) и текст самого сообщения, а она выдает код.
Подробнее про MsgBox можно узнать в статье Работа с диалогами
Программа распространяется бесплатно.
Скачать

Официальный сайт: не обнаружен
VBE Tools — Многим из вас приходилось написать код для формы, а затем вспомнить, что какой-то элемент не назвали, как хотелось или просто захотелось переименовать в связи с изменением в коде? И, конечно же, сталкивались с той проблемой, что при переименовании элемента приходится идти в код и заменять там все ссылки на данный элемент на новое название. Так вот с помощью этой программы можно переименовать имя любого элемента формы(TextBox, Label и т.д.) и элементов ActiveX на листе Excel, а программа уже сама заменит в коде все ссылки со старого названия на новое. Очень удобно.
Программа распространяется бесплатно.
Скачать

Официальный сайт:http://www.oaltd.co.uk/VBETools/
много писать макросов для EXCEL на VBA. в стандартном редакторе это делать. Пробовал писать в NotePad++ там это делать удобней. Но потом с кучей файлов. есть средство для работы с макросами?
-
Вопрос задан23 мар.
-
330 просмотров
Писать и исполнять код VBA можно только в IDE Office.
Если у Вас большой проект, посмотрите в сторону реализации проекта на базе VSTO.
VBA и VB.NET очень похожи, адаптация пройдёт быстро (если есть время, лучше изучить c#).
Из плюсов — практически неограниченные возможности новой платформы (VBA очень ограничен).
В VSTO есть неочевидные особенности (обращение к книге, deploy и т.д.), но конечный результат вполне быстр и user frendly.
Пригласить эксперта
Microsoft Visual Studio, умеет работать как с
Visual Basic так и
с VB.net (VB.net похож на VB script и зачастую код можно даже тупо копировать)
Начни от сюда
-
Показать ещё
Загружается…
div.
•
Ставрополь
от 70 000 до 85 000 ₽
16 апр. 2023, в 22:36
300 руб./в час
16 апр. 2023, в 21:57
3000 руб./за проект
16 апр. 2023, в 21:48
500 руб./за проект
Минуточку внимания
Written by Puneet for Excel 2007, Excel 2010, Excel 2013, Excel 2016, Excel 2019, Excel for Mac

KEY POINTS
- Visual Basic Editor is a code editor for VBA.
- It’s a separate application but you can only use it with Excel.
- You need to have the developer tab on the ribbon to access it.
- You can also use the keyboard shortcut (Alt + F11).
- It also stores the macros that you recode with the macro recorder.
- It has multiple tools to help you to write and manage all the codes.
The world of VBA starts with the Visual Basic Editor (VBE).
It’s the place where you write and manage all the macro codes and if you ask me about VBE, I’d say if you are serious about learning VBA you need to understand all the components of VBE.
That’s why it’s part of our VBA tutorial and in this guide, we have covered every single aspect of Visual Basic Editor to make you understand its functionality.
So, let’s get started.
I will be using different words (VBA editor, VB editor, or VBE) in this guide for referring to the Visual Basic Editor, so don’t be confused with it.
What is the Visual Basic Editor?
Visual Basic Editor is an application (a separate one) in which you can write and save all the VBA codes. In simple words, it’s a code editor for Excel in which you can write all the macros and store them. Even though it is a separate application (VB Editor) you can only use it with Excel.
Yes, that’s right. You can’t run VBE separately; there must be an Excel workbook open for using VBE.
Visual Basic Editor is the only way to write a VBA code in Excel. In fact, all Microsoft applications that host VBA use the Visual Basic Editor for script writing (writing code).
Below is the VBE:
Microsoft Windows

Mac

VBA is one of the ADVANCED EXCEL SKILLS and to master the VBA; you need to learn all the aspects of Visual Basic Editor.
Open the Visual Basic Editor
From the developer tab
To open the visual basic editor, you need to have the developer tab on the ribbon and to activate the developer tab (steps to add).

Now on the developer tab, in the code group, there is a button called “Visual Basic” and when you click on this button it opens the VB editor.

Shortcut Key (Window)
You can also use the keyboard shortcut key Alt + F11 to open the VBE in windows and Opt + F11 or Fn + Opt + F11 for MAC.
Even if you don’t have the developer tab on the ribbon, this shortcut key will still work and open the editor.
Edit a Macro from the List
If you want to open the VBA editor to edit a specific macro, then you can open the macros list from the developer tab.

And click on the edit button to open the VB editor to edit that specific macro.

On Quick Access Toolbar
You can also add a button on the quick access toolbar to open the VBA editor. For this, you need to click on the drop-down on the quick access toolbar and open more commands.

And then select the developer tab from “Choose Commands From” and then add the visual basic editor to the quick access toolbar by clicking on the add button.

Now you can open the visual basic editor from the button that you have on the QAT.

From the Worksheet Tab
You can also open the VBA editor by right-clicking on the worksheet tab and clicking on the view code. It will instantly take you to the code window of that worksheet.

Components of Visual Basic Editor
When you open the VBA editor first time it looks like an old application and to understand how it works you need to go component by component.

The user interface is the same (almost) for all the Excel versions in the last more than 15 years, so no matter which Excel version you are using, you can learn about Visual Basic Editor from this guide. Yes, VBE has different components which can help you in different ways, so let’s explore them one by one.
- Menu Bar
- Tool Bar
- Project Window
- Properties Window
- Code Window
- Immediate Window
- Watch Window
- Object Browser
- Find and Replace
- Locals Window
Just like any other application VBA editor has a menu bar where you can find all the options that are available to the user.
Now in the menu bar, each tab is a category of options that are available to use. Let’s suppose, in the edit menu, you can see all the options from cut-copy-paste, find and replace, and adding indent and outdent.

Along with all the options (most of them), you can find the shortcut keys to use those options.
2. Tool Bar
Just below the menu bar, you have the toolbar which is a collection of some of the options that a normal user needs to use more frequently. When you open the visual basic editor first time you will only have the standard toolbar, just like the image below.

But there are total four toolbars that you can add and use.
- Debug
- Edit
- Standard
- User Form
If you go to the view tab in the menu bar you have the option to add or remove these toolbars.

And you can also add or remove buttons from the toolbar if you want.

You can also move a toolbar just by dragging and dropping from the small dots on the right side.

3. Project Window/ Project Explorer
The project window is the place where you can see all the ongoing projects. Whenever you open a file and then open the visual basic editor you can see the hierarchy of that file in the project window.

Every project further has a collection of objects:
- Worksheet: Each worksheet in a workbook lists as an object.
- The Workbook: It represents the workbook itself as an object.
- Module: It’s the place where you write code or recorded macros stores.
- Chart Sheet: Chart sheet in the workbook will also be listed there.

When you open the VB editor, you’ll find the project window there by default. But if it’s not there somehow you can add it from the View (Menu Bar) or you can use the shortcut key Control + R.
Each object that is listed on the project window has its own code window which you can open by double click on it or you can right-click and select the view code option.

The project window is the best way to navigate through all the ongoing projects and when you start working with the editor you will get to know more about it.
4. Properties Window
As the name suggests the properties window gives you access to the properties of the selected object. Each object, for example, a worksheet has its own properties that you can see and make changes in it.

For each property, there is a drop-down on the right side from where you can change or edit that property.

Quick Tip: You can change the name of a project from the properties window.

And, if the properties window is not there by default you can activate it from the view (menu bar), or you can also use the shortcut key F4.

5. Code Window
The code window is the place where you write codes and do most of your work (editing, writing, and testing). In simple words, the code window is the place where you do all the programming.

When you first see it, it looks like a simple text editor, but it has Intellisense that can help you while programming.
There is no way I have found to add line number in the code window as other code editors have but still, VB editor indicates you the line number of the code.
Note
There’s no way I have found to add line number in the code window as other code editors have but still, VB editor indicates you the line number of the code.
6. Immediate Window
Immediate Window is the place where you can debug your code. You can type a line of code and test how it works. Let’s say if you want to test the following code:
Range("A1").Value = 9999All you need to do is enter type a question mark and then paste the code there and HIT enter. It will immediately show the result of the code.

The other way is to add Debug.Print before the code and get its result value in the immediate window.
Sub Macro1()
Debug.Print Range("A1").Value = "Yes"
End Sub
By default, the immediate window won’t be there when you open the visual basic editor, so you need to activate it from the view tab in the menu bar. You can also use the shortcut key Control + G.
7. Watch Window
Just like Excel Watch Window, the visual basic editor also has a watch window where you can add expressions to track them. You simply need to select the expression and then right-click and go to add a watch.

In the below example, I have added the Selection.Value to the add watch.

Now, to activate the watch window, go to the view menu and click on the watch window option.

And here you have the watch window tracking the added expression.
8. Object Browser
VBA has its own object browser which can help you to work with all the objects by finding all the properties and which you can use.

Imagine if you want to use the range object, the object browser will tell you about all the properties and method that comes with it. Look at the below example.

To open the object browser, use the shortcut key F2 or you can also go to the view tab and click on the object browser to open it.
9. Find and Replace
Just like the find and replace in Excel, the VBA editor has its own find and replace option that you can use to find and replace values from procedures. To open the FIND option, you can use the shortcut key Control + F, and to open the replace you can use the shortcut key Control + H.

Otherwise, you can open both options from the edit menu.

The find and replace option in VBE gives you different search patterns, like, if you want to find and replace something from the current procedure, from the current module, or from the current project.
You can also use the CASE SENSITIVE search and decide the direction of the search as well.
10. Locals Window
You can use the Locals window in VBE to displays all declared variables in the current procedure and their present values.
Using VB Editor to Write a Code
At this point, you know all the major components of the VBA editor, so now let’s learn how to add code in it.
Module Code Window Vs Object Code Window
There are two different types of code windows and both look just the same but there is a difference that you need to know.
- Module Code Window: Code in the normal module can be executed manually or you can also call it from a separate procedure.
- Object Code Window: Code in the object code window can be executed by using an event. Let’s suppose you want to run code when you double click on a cell, in that case, you need to use the double click event and you need to add code to that worksheet.
2. Module Code Window
You will be writing most of the VBA code in a module. To add code in a module you need to use the SUB procedure or the FUNCTION procedure.
- Sub procedure
- Function procedure
The difference between a sub and a function procedure is sub procedure can’t return a value, on the other hand, a function procedure can return a value.
When you record a macro that code goes straight into a module that VBA inserts automatically when you use the macro recorder.
Insert a Module
When you need to write code, you have to insert a module and for this, you simply need to go to the project window and right-click on the project name, and from that menu go to insert and select module.

Remove a Module
You can also remove a module if it doesn’t require anymore so you just simply need to right-click on the module and select remove.

And when you click on remove, it asks you if you want to back up that module before removing it. There is also an option where you can export a module to save it as a file in your system.
3. Object Code Window
Open the code window for the object you simply need to double click on it and in its the code window, there is a dropdown from where you can select the event that you want to use to execute the code.

Imagine if you want to write the code and want to execute on the double click then you need to select “BeforeDoubleClick” from the dropdown.
Understanding Design Mode, Run Mode, and Debug Mode
You can use the visual basic editor in three different modes depending on the face of programming, writing the code, locating an error, and fixing an error.
- Design Mode: Normally, when you are working in VB editor on a code you are in the design mode. Even then you just writing the code instead of designing a user form or a form you are in the design mode, like typing a code. This is also called design time.
- Run Mode: When you run a code to test a code that is how it works you are in the run mode. The best example to define this mode is when you execute a code using the Run button from the toolbar. This is also called runtime.
- Break Mode: When a code is running and in between the execution is suspended, at that time you are in break mode. In this mode, you can run a code step by step. This is also called debugging.
Tips to work with VB editor like a PRO
Just like any other programming language in VBA you can also use comments to define how that code works. Using comments is a good habit and it can help you in so many ways.
- Track Changes
- Contact Details of the Programmer
- How to Troubleshoot the Code
- And much more
To add a comment, you need to type an apostrophe and then the line of code.
Related Tip: VBA Comment Block
Quick Info
Now, look at the below example where I am adding add a VBA function (VBA LEFT Function), and the moment I type the name of the function, it shows me a tooltip for all the arguments which I need to define.

You can also use the shortcut key Control + I or use the quick info option from the EDIT menu.

Auto List Members
Each object in VBA comes with some properties and methods and when you insert an object or a command in the code window and then you enter (.) it shows you the complete list of properties and methods which come with that object.

In the above example, when I added a (.) after the borders property of the range, it showed me all the available properties that are available to access.
List Constants
While defining expressions for a property or a method you can use the list of constants available. In the below example, while using the Border Around method it showed me all the constants which are available for the weight argument.

You can use the shortcut key Control + Shift + J to get the list of constants or you can also go to the edit menu and use the option from there.

Activate Option Explicit
While writing VBA codes you will need to use variables and one of the most important things while using variables is to declare their data type. And there’s a chance that you could forget to declare it.
But when you use the option explicit statement, then you have to declare the data type for every single variable which you are using, and if you fail to do so VBA will show an error message. It’s like forcing yourself to declare every single variable with its data type. For this, you can go to the tools menu and open the options.

And from the options, tick mark “Require Variable Declaration” and click OK.

Now every module will have an Option Explicit statement at the beginning, and you have to declare every single variable.

Change the Code Window View
When you can write multiple codes in a single code window and VBA separate them with a divider, but if you want to have a more focused view, you can change the view of the code window. Below I have the codes in a single module.

But I can change this view from the view buttons from the bottom left of the window.

Now I have only active code visible.
Run a Code Step by Step
When you write a VBA code there could be a chance that that code has a bug or an error that can come while executing it. In that case, the best way is to execute that code step by step and validate each line of code.

For this, you can use shortcut key F8 to execute a code line by line or use step into option from the debug menu.

And there is also a button on the debug toolbar that you can use.

Code Indenting
When you write lengthy and complex codes then it’s important to structure them in the right way so that you can understand them later. For this, there’s one thing which comes handy, INDENTING. Indenting is basically structuring the code using tabs, below is an example.

To add indenting in a line you can use the TAB key from the keyboard, or you can also use the indent/outdent buttons from the toolbar.

Get Code from a Text File
The visual basic editor allows you to import VBA codes from a text file without copy-pasting. Once you insert a module you can go to the insert menu and select the file option from there.

It opens the dialog box where you can locate the text file and import all the codes from it to the current module.
R1C1 Reference Style
If you ever worked with the R1C1 reference style, then I’m sure you can agree on this point that way easier to write codes with it.
R1C1 Reference Style
Line Break
Even though you can adjust the width of the code window and make it wide but there could be a situation when you will be dealing with long lines of code that makes it hard to read.
The best way to deal with this problem is to add a line break. Basically, a line break is something when you break a line into two lines using the line break character.
Use a SPACE & UNDERSCORE and hit enter to add a line break.

Formatting
When it comes to user interface visual basic editor is not that good looking. But there are few formatting options that you can use to customize it or change its look the way you want.
From the Tools Menu Options Editor Format, you can access the formatting option where you can change the font style size or background color as well

Check out this video on customizing the VBA editor for a dark theme.
Personal Macro Workbook
There could be some macros that you need to access within all the workbooks that you use.
In that case, you can use the Personal Macro Workbook that can help you to store all the important codes in one place and you can access them from all the workbooks.

Using Bookmarks
The visual basic editor allows you to add bookmarks to a line from Right Click ➤ Toggle ➤ Bookmark.

And then you can also navigate between bookmarks from the option from the edit menu.

Syntax Checking
When you write codes in the code window VBA check for the syntax error and notify you when you make a syntax error. This option is activated by default, but you can also turn it off if you don’t want VBA to notify you every time you make an error.
Tools Menu ➤ Options ➤ Editor Tab ➤ Auto Syntax Check.

But I would recommend you not to deactivate it because it can help you to identify all the syntax errors that you make while writing codes.
List of Macros
If you have a lot of macros in a module, there is an option that you can use to see all the macros (Tools ➤ Macro).

There’s one big benefit of using this list option is that you can run a macro, delete it, and edit it without navigating to that procedure.
Locking a Project with a Password
Visual Basic Editor also gives you an option to lock a module with a password. So, if you don’t want the users to know the code and don’t want them to make a change in the code, you can use this option.

Tools Menu ➤ VBAProject Properties ➤ Protection Tab

Important Shortcut Keys
- Shift + F7: Object browser.
- F5: Run macro.
- Tab: Add an indent.
- Alt + Q: Close.
- F8: Step into.
- Control + H: Find and replace.
- Control + G: Immediate Window.
- Control + R: Project Explorer.
- F4: Properties window.
Learn some AMAZING Keyboard Shortcuts: Excel Keyboard Shortcuts Cheat Sheet
Alternative to Visual Basic Editor
Well, I have tried quite a few other editors to write a macro but the problem which I have found is that without the Intellisense it’s really hard to use anything other than the visual basic editor itself.

VBA editor works along with Excel, you can test your codes instantly and you can save them into the workbook. But are a few names to try.
Visual Studio Code | Ultra Edit
Points to Remember
- You can maximize or minimize the code window.
- You can change a project’s name anytime.
- The project window is the best way to navigate through the editor.
- It will make a line red if there’s an error in it while writing the code.
- You can also add a bookmark to a line of code from the Right-Click Menu Toggle Bookmark.
- You cannot use the visual basic editor without opening an Excel workbook.
More on VBA
- VBA Functions
- VBA to Add a New Sheet
- VBA Code to Activate a Worksheet
- VBA IF Then Statement
- VBA User Defined Function
- VBA Message Box
- VBA to Extract Hyperlink
- Macro to Highlight Duplicate Values
- VBA to Create a Pivot Table
[icon name=”bell” class=”” unprefixed_class=””] VBA is one of the Advanced Excel Skills
Should I need to install the Visual Basic Editor?
No. You don’t need to install the visual basic editor. It comes pre-installed with the Microsoft Office applications.
What if I don’t have the Developer Tab on the Ribbon?
If you don’t have the developer tab on the Excel ribbon, you can activate it from the Excel ribbon.
Is there an alternative to the Visual Basic Editor?
Not really. The IntelliSense that you have in the VBE makes it perfect to use to write VBA codes.
Если вы произносите слово «макрОсы» с придыханием от ужаса и ударением на втором слоге, а фраза «Visual Basic for Applications» для вас звучит как заклинание, то эта статья — не для вас. Во всяком случае — пока 
Если же у вас за плечами есть хоть какой-то опыт программирования макросов на VBA в Excel, и вы не планируете останавливаться, то приведенная ниже подборка полезных надстроек и программ должна вам (хотя бы частично) пригодиться.
MZ-Tools — «швейцарский нож» для программиста
После установки в редакторе VBE в меню Tools появится подменю MZ-Tools и новая панель инструментов для быстрого вызова тех же функций:
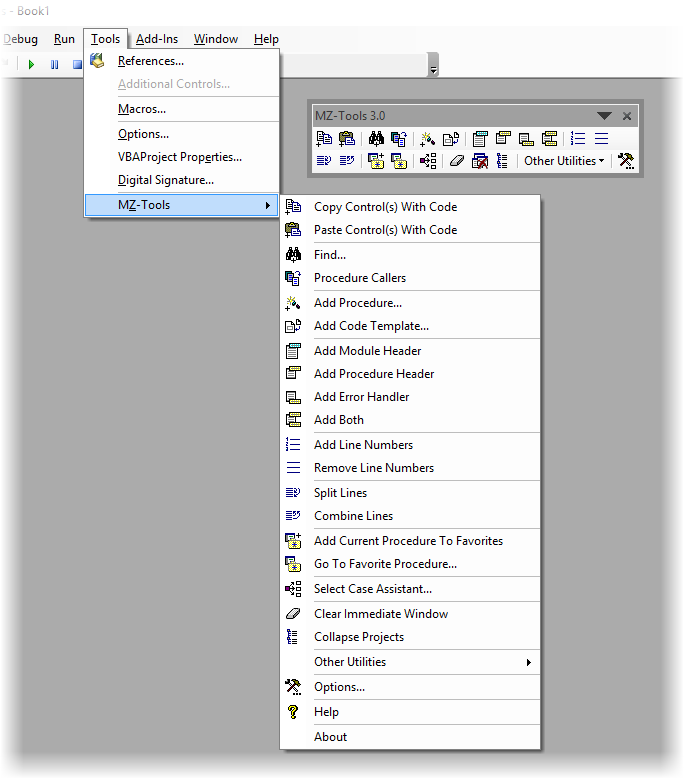
Умеет очень и очень много. Из самого ценного, на мой взгляд:
- Автоматически добавлять «рыбы-заготовки» для создания процедур, функций, обработчиков событий и ошибок с правильным наименованием переменных по венгерской системе.
- Копировать элементы управления на пользовательских формах вместе с их кодом.
- Делать закладки (Favorites) на процедуры и быстро к ним переходить в большом проекте.
- Разбивать длинные строки кода на несколько и собирать обратно (split и combine lines).
- Выдавать подробную статистику по проекту (кол-во строк кода, процедур, элементов на формах и т.д.)
- Проверять проект на наличие неиспользуемых переменных и процедур (Review Source)
- Создать свою базу заготовок кода (Code Templates) для типичных случаев и быстро вставлять их потом в новые макросы.
- Автоматически создавать длинную и страшную строку для подключения к внешним источникам данных по ADO.
- Вешать горячие клавиши на любую функцию из надстройки.
Однозначный мастхэв для программиста любого уровня. Если у вас последняя версия Office, то скачивайте обязательно свежую версию MZ-Tools 3.00.1218 от 1 марта, т.к. в ней исправлен баг, при работе с Excel 2013.
Ссылка на скачивание MZ-Tools
Smart Indenter — автоматическая расстановка отступов в коде
Хорошо делает одну простую, но очень нужную операцию — автоматически расставляет отступы табуляции в коде VBA, наглядно выделяя вложенные циклы, проверки условий и т.д.
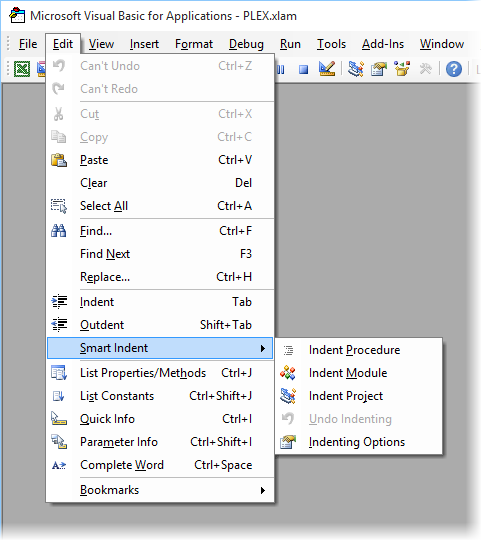
Очень удобно повесить это действие на любое удобное сочетание клавиш в разделе Indenting Options и делать в одно касание.
К сожалению, автор программы забросил ее в 2005 году (почему, Карл!?) и последняя версия на сайте предназначена для Excel 97-2003. Тем не менее, программа вполне успешно работает и с более новыми версиями. Единственный нюанс: если у вас Excel 2013, то перед установкой Smart Indenter нужно установить сначала MZ-Tools последней версии, т.к. она содержит нужную для работы Indenter’а динамическую библиотеку.
Ссылка на скачивание Smart Indenter
VBE Tools — микроподстройка элементов в формах
Выравнивание элементов управления (кнопок, полей ввода, текстовых надписей и т.д.) на сложной форме может быть весьма мучительным процессом. Стандартная привязка к сетке редактора через меню Tools — Options — General — Align Controls to Grid иногда не очень помогает и даже начинает мешать, особенно если нужно сдвинуть, например, кнопку совсем на чуть-чуть. В этом деле поможет надстройка VBE Tools, которая после установки отобразить простую панельку, где можно для выбранного элемента произвести микроподстройку размеров и положения на форме:
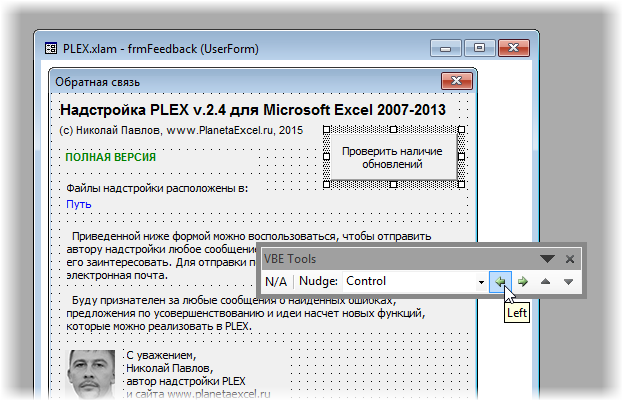
Сдвиг положения также можно будет делать с помощью сочетаний клавиш Alt+стрелки, а изменение размеров с помощью Shift+Alt+стрелки и Ctrl+Alt+стрелки.
Также по щелчку правой кнопки мыши по элементу можно его переименовать сразу вместе с кодом.
Ссылка на скачивание VBE Tools
VBA Diff — поиск отличий в коде
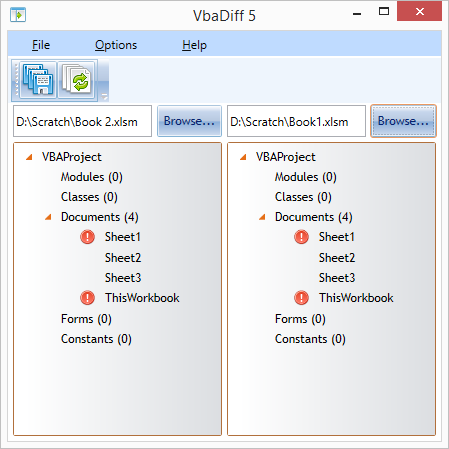
Этот инструмент пригодится, пожалуй, больше профессиональным программистам на VBA при создании больших и сложных проектов или совместной разработке. Его основная функция — сравнивать два проекта и наглядно отображать разницу в коде между ними:
Есть 30-дневный бесплатный период, а потом надстройка попросит заплатить за нее 39 фунтов (около 3.5 тыс.руб по текущему курсу).
Говоря откровенно, мне она пригодилась в этой жизни всего раза 3-4 на супербольших проектах, но сэкономила мне тогда несколько дней и много-много нервных клеток 
Ссылка на скачивание VBA Diff
Moqups и Wireframe Sketcher — прототипирование интерфейса
При создании сложных интерфейсов для взаимодействия с пользователем очень удобно бывает заранее спроектировать примерный внешний вид диалоговых окон, т.е. выполнить прототипирование. По факту, это оказывается гораздо проще, чем переделывать потом готовые формы и их код. Помню, как-то раз в одном из проектов заказчик просил сделать «меню», имея ввиду «вкладки». Полдня работы псу под хвост 
Существует огромное количество платных и бесплатных программ разного уровня сложности и мощи для этих задач. Я таких программ и сервисов перепробовал с десяток, и в последнее время чаще всего использую Moqups:
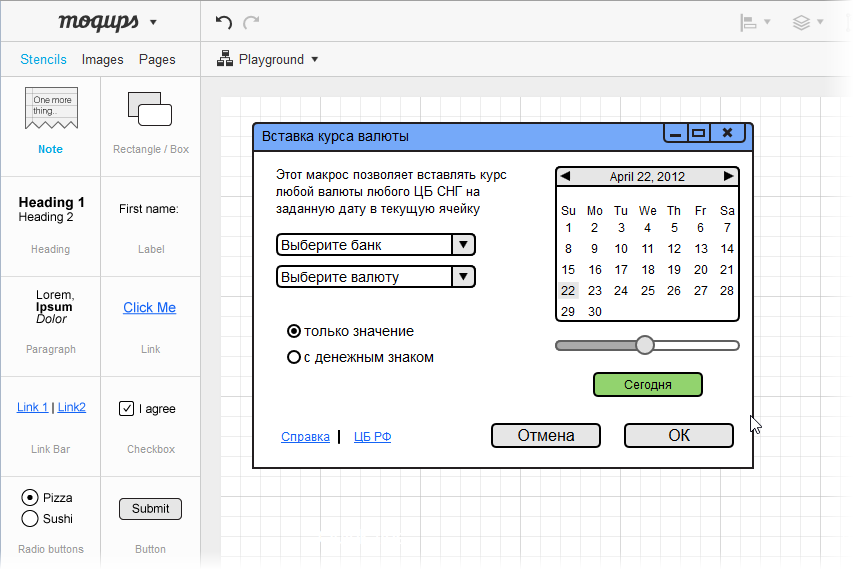
Это онлайновый редактор, который:
- Не требует установки отдельных программ. Всегда можно приехать к клиенту в офис и прямо на сайте открыть-показать-подправить созданный интерфейс.
- Содержит все основные элементы диалоговых окон (надписи, кнопки, вып.списки и т.д.) в вариантах для Windows и Mac.
- Позволяет экспортировать созданный интерфейс в PNG или PDF форматах или отправить клиенту ссылочку для просмотра онлайн.
- Фактически бесплатен. Есть ограничения на количество графических элементов, но мне еще ни разу не удалось за них выйти. Если не будет хватать места или захочется хранить сразу несколько больших проектов, то всегда можно перейти на премиум-версию за 99$ в год.
В общем и целом, для задач разработчика на VBA — более, чем достаточно, я считаю.
Если для кого принципиально нужен офлайновый вариант (для работы без доступа к интернету на берегу моря, например), то рекомендую Wireframe Sketcher:
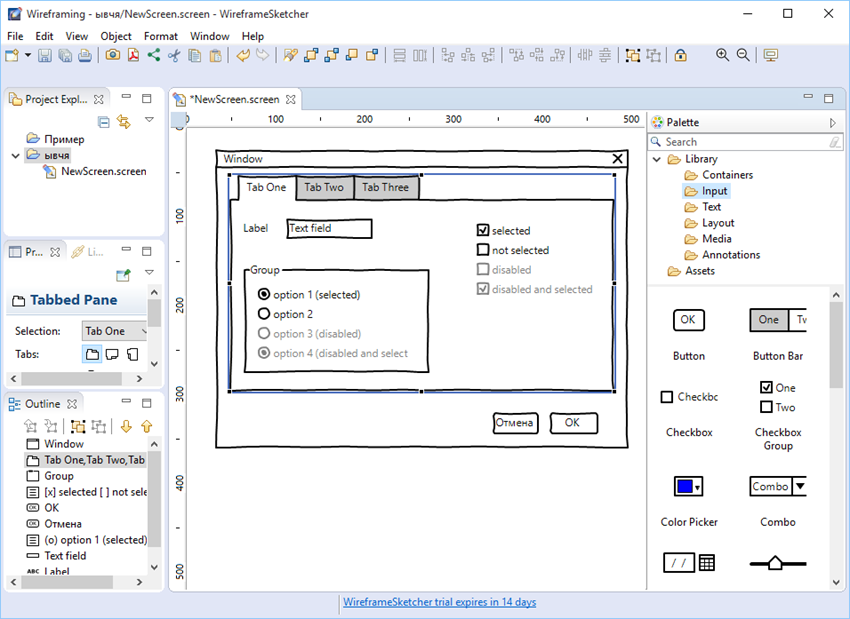
После бесплатного демо-периода на 2 недели попросит купить за те же 99$.
Ссылка на Moqups
Ссылка на скачивание Wireframe Sketcher
Invisible Basic — обфускатор кода
Надежно закрыть исходный код ваших макросов паролем в Microsoft Excel, к сожалению, невозможно. Однако, существует целый класс программ, называемых обфускаторами (от англ. obfuscate — сбивать с толку, запутывать), которые так меняют внешний вид VBA-кода, что прочитать и понять его будет крайне сложно, а именно:
- имена переменных, процедур и функций заменяются на длинные бессмысленные наборы символов или, наоборот, на короткие буквенные непонятные обозначения
- убираются наглядные отступы табуляции
- убираются или, наоборот, хаотично ставятся переносы строк и т.д.
Откровенно говоря, я не фанат использования подобных методов. В частности, с PLEX я решил, что лучше буду отдавать покупателям полной версии открытый, понятный и прокомментированный исходный код — это мне кажется более правильным. Тем не менее, у моих знакомых программистов неоднократно были случаи, когда подобная программка очень пригодилась бы (программист выполнил работу, а клиент не заплатил и т.д.) Так что если понадобится — знайте, где взять. «Мы мирные люди, но наш бронепоезд…» и все такое.
Скачать Invisible Basic
Code Cleaner — очистка кода
В процессе работы над проектом (особенно, если он большой и долгий) в модулях кода и формах начинает накапливаться «мусор» — обрывки служебной информации редактора VBE, которые могут привести к неожиданным и нежелательным глюкам. Утилита Code Cleaner чистит эту гадость простым, но надежным способом: экспортирует код из модулей в текстовые файлы, а потом импортирует его чистеньким обратно. Очень рекомендую при работе над большими проектами периодически проводить такую «уборку».
Ссылка на скачивание Code Cleaner
Ribbon XML Editor
Если для запуска ваших макросов хочется создать на ленте Excel собственную вкладку с красивыми кнопками, то вам не обойтись без редактора XML-файлов интерфейса. Однозначно, самым удобным и мощным на сегодняшний день является в этом плане отечественная программа Ribbon XML Editor, созданная Максимом Новиковым.
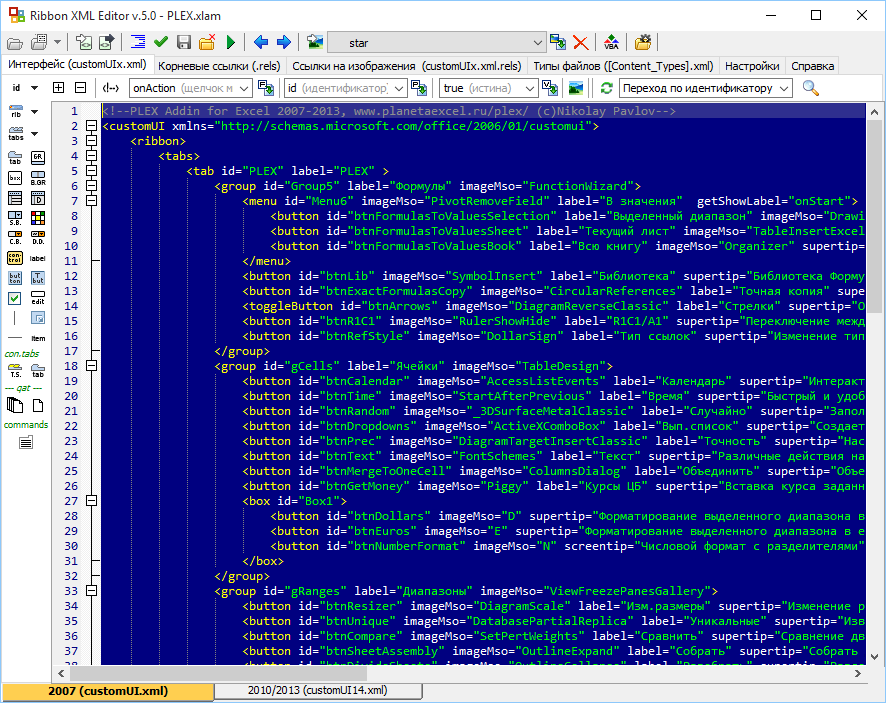
Совершенно замечательный софт, который:
- позволит легко добавлять на ленту собственные вкладки, кнопки, выпадающие списки и другие элементы нового интерфейса Office
- полностью поддерживает русский язык
- помогает при редактировании, отображая контекстные подсказки
- можно легко освоить по урокам
- полностью бесплатен
Ссылка на скачивание Ribbon XML Editor
P.S.
Долгие годы Microsoft упорно в лоб игнорирует разработчиков на VBA, считая его, судя по всему, неполноценным языком программирования. Периодически проскальзывают слухи, что в следующей версии Office Visual Basic уже не будет или его заменят на JavaScript. Регулярно выходят новые версии Visual Studio с новыми плюшками, а редактор VBE так и застрял в 1997 году, до сих пор не умея стандартными средствами расставить отступы в коде.
В реальности же, тысячи людей экономят часы и дни, благодаря программистам на VBA, создающим макросы для автоматизации повседневных рутинных задач офисной обработки данных. Кто видел, как макрос в 10 строк кода делает за полминуты рассылку файлов по 200 клиентам, заменяя три часа тупой работы — тот меня поймет 
И еще.
Все вышеперечисленные программы — это сугубо мой личный выбор и персональная рекомендация на основе личного опыта. Никто из авторов не просил меня о рекламе и не платил за нее (а я бы и не взял, из принципа). Если у вас есть что добавить к приведенному списку — добро пожаловать в комментарии, благодарное человечество в долгу не останется.
Первое знакомство с редактором VBA Excel, создание процедур (подпрограмм) и написание простейшего кода, работающего с переменными и ячейками рабочего листа.
Начинаем программировать с нуля
Часть 1. Первая программа
[Часть 1] [Часть 2] [Часть 3] [Часть 4]
Эта статья предназначена для тех, кто желает научиться программировать в VBA Excel с нуля. Вы увидите, как это работает, и убедитесь, что не все так сложно, как кажется с первого взгляда. Свою первую программу вы напишите за 7 простых шагов.
- Создайте новую книгу Excel и сохраните ее как книгу с поддержкой макросов с расширением .xlsm. В старых версиях Excel по 2003 год – как обычную книгу с расширением .xls.
- Нажмите сочетание клавиш «Левая_клавиша_Alt+F11», которое откроет редактор VBA. С правой клавишей Alt такой фокус не пройдет. Также, в редактор VBA можно перейти по ссылке «Visual Basic» из панели инструментов «Разработчик» на ленте быстрого доступа. Если вкладки «Разработчик» на ленте нет, ее следует добавить в настройках параметров Excel.
В левой части редактора VBA расположен проводник проекта, в котором отображены все открытые книги Excel. Верхней строки, как на изображении, у вас скорее всего не будет, так как это – личная книга макросов. Справа расположен модуль, в который записываются процедуры (подпрограммы) с кодом VBA. На изображении открыт модуль листа, мы же далее создадим стандартный программный модуль.
- Нажмите кнопку «Module» во вкладке «Insert» главного меню. То же подменю откроется при нажатии на вторую кнопку после значка Excel на панели инструментов.
После нажатия кнопки «Module» вы увидите ссылку на него, появившуюся в проводнике слева.
Первая программа на VBA Excel
Добавляем на стандартный модуль шаблон процедуры – строки ее начала и завершения, между которыми мы и будем писать свою первую программу (процедуру, подпрограмму).
- Откройте стандартный модуль двойным кликом по его ссылке в проводнике. Поместите в него курсор и нажмите кнопку «Procedure…» во вкладке «Insert» главного меню. Та же ссылка будет доступна при нажатии на вторую кнопку после значка Excel на панели инструментов.
В результате откроется окно добавления шаблона процедуры (Sub).
- Наберите в поле «Name» имя процедуры: «Primer1», или скопируйте его отсюда и вставьте в поле «Name». Нажмите кнопку «OK», чтобы добавить в модуль первую и последнюю строки процедуры.
Имя процедуры может быть написано как на латинице, так и на кириллице, может содержать цифры и знак подчеркивания. Оно обязательно должно начинаться с буквы и не содержать пробелы, вместо которых следует использовать знак подчеркивания.
- Вставьте внутрь шаблона процедуры следующую строку:
MsgBox "Привет".
Функция MsgBox выводит информационное сообщение с указанным текстом. В нашем примере – это «Привет».
- Проверьте, что курсор находится внутри процедуры, и запустите ее, нажав клавишу «F5». А также, запустить процедуру на выполнение можно, нажав на треугольник (на изображении под пунктом меню «Debug») или на кнопку «Run Sub/UserForm» во вкладке «Run» главного меню редактора VBA Excel.
Если вы увидели такое сообщение, как на изображении, то, поздравляю – вы написали свою первую программу!
Работа с переменными
Чтобы использовать в процедуре переменные, их необходимо объявить с помощью ключевого слова «Dim». Если при объявлении переменных не указать типы данных, они смогут принимать любые доступные в VBA Excel значения. Комментарии в тексте процедур начинаются со знака «’» (апостроф).
Пример 2
Присвоение переменным числовых значений:
|
Public Sub Primer2() ‘Объявляем переменные x, y, z Dim x, y, z ‘Присваиваем значение переменной x x = 25 ‘Присваиваем значение переменной y y = 35 ‘Присваиваем переменной z сумму ‘значений переменных x и y z = x + y ‘Выводим информационное сообщение ‘со значением переменной z MsgBox z End Sub |
Пример 3
Присвоение переменным строковых значений:
|
Public Sub Primer3() ‘Объявляем переменные x, y, z Dim x, y, z ‘Присваиваем строку переменной x x = «Добрый» ‘Присваиваем строку переменной y y = «день!» ‘Присваиваем переменной z строку, ‘состоящую из строк x и y ‘с пробелом между ними z = x & » « & y ‘Выводим информационное сообщение ‘со значением переменной z MsgBox z End Sub |
Скопируйте примеры процедур в стандартный модуль и запустите их на выполнение.
Изменение содержимого ячеек
Для обозначения диапазонов, в том числе и отдельных ячеек, в VBA Excel имеется ключевое слово «Range». Ячейке A1 на рабочем листе будет соответствовать выражение Range("A1") в коде VBA Excel.
Пример 4
|
Public Sub Primer4() ‘Объявляем переменную x Dim x ‘Присваиваем значение переменной x x = 125.61 ‘Присваиваем ячейке A1 ‘значение переменной x Range(«A1») = x ‘Присваиваем значение ячейке B1 Range(«B1») = 356.24 ‘Записываем в ячейку C1 ‘сумму ячеек A1 и B1 Range(«C1») = Range(«A1») + Range(«B1») End Sub |
Скопируйте процедуру этого примера в стандартный модуль и запустите на выполнение. Перейдите на активный рабочий лист Excel, чтобы увидеть результат.


