
Есть программный код на C++, который необходимо вставить в отчет по работе в Word 2013.
Но если напрямую вставлять его — то получается совершенно не читаемая белиберда.
Хочется оформить так, как код выглядит в компиляторе — с номерами строк, правильным форматированием и подсветкой синтаксиса.
Встроенных средств для этого я не нашел. Подскажите, как это можно сделать?
-
Вопрос заданболее трёх лет назад
-
106331 просмотр
Встроенных средств для этого я не нашел
Как так? Создаете свой стиль, там настраивайте шрифт, отступы, табуляцию и тд. Вставляете текст и применяете к нему ваш стиль. Подстветка останется, если в стиле не переопределять цвет шрифта.
С номерами строк придется труднее — надо будет настроить свой стиль нумерации, и в созданном выше стиле абзаца указать, чтобы использовать эту нумерацию.
Например, можно добиться вот таких результатов

Скачать док: https://www.dropbox.com/s/8fvq11sw5k0tvky/example….
Пригласить эксперта
tohtml.com/ — онлайн-редактор кода с подсветкой синтаксиса для кучи разных языков. Полученное скопипастить в Word.
Из Microsoft Visual Studi, Qt Creator, Eclipse (да вроде почти из всех IDE), код копируется отформатированный, с подсветкой и т.д.
С номерами строк вам наверное не помогу, но вот подсветка отлично копируется из Qt Creator.
Я для этих целей Notepad++ — у него есть ф-ция копированя RTF в буффер
единственное что не будет номеров строк кажется
Я всегда вставляю preformatted текст в таблицу.
Таблица состоит из одной большой ячейки, если вставляется самодостаточный кусок кода или фрагмент лога, и из нескольких — если нужны заголовки или комментарии.
А по поводу подсветки синтаксиса в копируемом коде коллеги выше уже всё сказали.
-
Показать ещё
Загружается…
СПСК
•
Санкт-Петербург
от 80 000 ₽
14 апр. 2023, в 15:00
800 руб./за проект
14 апр. 2023, в 14:45
20000 руб./за проект
14 апр. 2023, в 14:39
1500 руб./за проект
Минуточку внимания
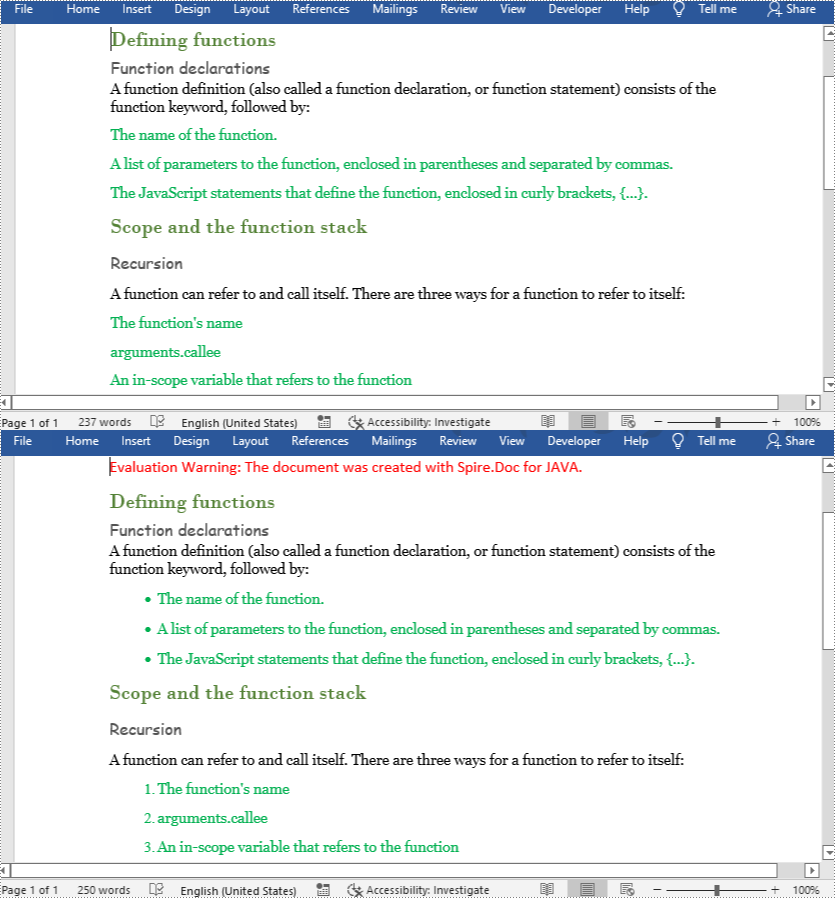
A bulleted list is a list with dots in the front and the same indentation for each item, while a numbered list with numbers in the front. Bulleted lists and numbered lists work much better than lengthy text content because, with a well-organized list, readers can easily get the structure and the point of each item. This article shows how to create lists from existing text in Word documents with Spire.Doc for Java.
Install Spire.Doc for Java
First of all, you’re required to add the Spire.Doc.jar file as a dependency in your Java program. The JAR file can be downloaded from this link. If you use Maven, you can easily import the JAR file in your application by adding the following code to your project’s pom.xml file.
<repositories>
    <repository>
        <id>com.e-iceblue</id>
        <name>e-iceblue</name>
        <url>https://repo.e-iceblue.com/nexus/content/groups/public/</url>
    </repository>
</repositories>
<dependencies>
    <dependency>
        <groupId>e-iceblue</groupId>
        <artifactId>spire.doc</artifactId>
        <version>11.3.11</version>
    </dependency>
</dependencies>
Create a Bulleted List and a Numbered List from Existing Text in a Word Document
Spire.Doc for Java provides two methods, ListFormat.applyBulletStyle() and ListFormat.applyNumberedStyle(), to create bulleted and numbered lists.
The detailed steps of creating bulleted and numbered lists are as follows.
- Create an object of Document class.
- Load a Word document from file using Document.loadFromFile() method.
- Get the first section using Document.getSections().get() method.
- Loop through the 4th to 6th paragraphs.
- Apply bulleted list style to these paragraphs using ListFormat.applyBulletStyle() method and set their position using ListFormat.getCurrentListLevel().setNumberPosition() method.
- Loop through the 10th to 12th paragraphs.
- Apply numbered list style to these paragraphs using ListFormat.applyNumberedStyle() method and set their position using ListFormat.getCurrentListLevel().setNumberPosition() method.
- Save the document using Document.saveToFile() method.
- Java
import com.spire.doc.Document;
import com.spire.doc.FileFormat;
import com.spire.doc.Section;
import com.spire.doc.documents.Paragraph;
import com.spire.doc.formatting.ListFormat;

public class CreateLists {
    public static void main(String[] args) {

        //Create an object of Document class
        Document document = new Document();

        //Load a Word document from file
        document.loadFromFile("C:/Samples/Sample2.docx");

        //Get the first section
        Section section = document.getSections().get(0);

        //Loop through the 4th to the 6th paragraphs
        for(int i = 3; i <= 5; i++){
            Paragraph para = section.getParagraphs().get(i);
            ListFormat listFormat = para.getListFormat();

            //Apply bulleted list style
            listFormat.applyBulletStyle();

            //Set list position
            listFormat.getCurrentListLevel().setNumberPosition(-10);
        }

        //Loop through the 10th to the 12th paragraphs
        for(int i = 9; i <= 11; i++){
            Paragraph para = section.getParagraphs().get(i);
            ListFormat listFormat = para.getListFormat();

            //Apply numbered list style
            listFormat.applyNumberedStyle();

            //Set list position
            listFormat.getCurrentListLevel().setNumberPosition(-10);

        }

        //Save the document
        document.saveToFile("CreateLists.docx", FileFormat.Docx_2013);
    }
}
Apply for a Temporary License
If you’d like to remove the evaluation message from the generated documents, or to get rid of the function limitations, please request a 30-day trial license for yourself.
But this is a program that over time has not stopped evolving and growing. Thus, it has been receiving new updates and functions in order to meet the expectations and needs of its millions of users. Therefore and due to all this, at the moment we can find a multitude of functions, more or less useful or extended, but which try to cover all environments. At the same time we must bear in mind that here we are not only going to work with texts , but also that the application supports all kinds of additional elements. Here we find graphics, tables, images , videos, etc; many of them from the Insert menu.

To all that we have mentioned so far, another very interesting element as well as useful that we can add, are those called lists. In fact, in these we are going to focus on these same lines , a type of object as used and versatile as lists.
Surely, over the years, many of you have used these elements to add a plus to your documents. Well, that is why here we are going to focus on showing you in detail what these objects can offer us. We will also see the types of lists that we can use in Word , as well as the utility that they will offer us separately.
What is a Word list and what is it for?
First of all and as its own name lets us glimpse, the Word lists function allows us to carry out an accumulation of similar elements, and ordered properly. Thus, what we achieve is to generate our own personal lists that in the end will come in handy to show a set of elements, but in a structured way.
Of course, we must bear in mind that the advanced program of the Redmond , presents us with several ways, both to create those lists, and formats for them. For example, initially we have the possibility of accessing this type of elements directly from the Start menu option of Word itself. Thus, at the top of the section called Paragraph, we see the formats of the same that we can access and use below.

As we mentioned, a program of the potential of this Microsoft , presents us with several alternatives to choose from when dealing with its additional elements. Here come into play, as it could not be otherwise, the lists that concern us in these lines. That is why below we are going to talk about each of the types of lists that we are going to find here and that we can use. Each will be best suited for a type of use, or work environment.
Numbered lists
It is evident that the numbered lists are perhaps one of the most common ones that are often used when the time comes to make use of these elements. They could be considered as the most basic of the exposed formats, but perhaps they are also the most useful. These are represented, in the section discussed above, by a button with a series of numbers vertically. Therefore, to see what this format offers us, we will only have to click on it.
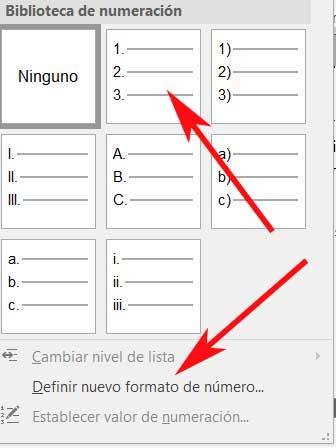
It is worth mentioning that despite being called Numbering Lists, here we can use other elements in the form of separators for the elements of the same. We will see these on the screen by clicking on the drop-down list to the right of the mentioned button. In this way, we can opt to use simple numbers , upper or lower case letters, numbers with a separator, etc. Say that when you click on the button directly, the list will begin to be classified by simple numbers.
But that’s not all, but at the same time we can specify our own custom classifier, all through the link Define new number format.
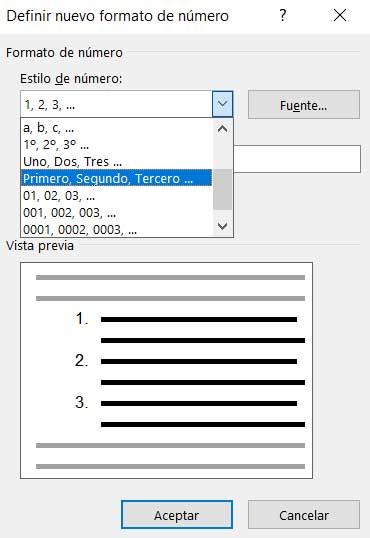
Here the program itself proposes a wide range of formats that will serve as classification elements for the list that we will create. Similarly, we will have the possibility to create a custom one by adding characters to the Number format field. Say that in this same window we have a preview to visualize how the numerical list that we are going to create will look like. As you can imagine, this function opens up a wide range of possibilities when creating basic and original lists in Word.
Before we finish this type, we will tell you that a shortcut to creating numerical lists here is, for example, writing a 1 followed by a -. Thus, when pressing the space bar, Word will directly create a list of this type for us to fill in and customize.
Bullet lists
On the other hand, a little more original than those previously reviewed, we find the Bullet lists. These we will find in the same section of the main interface of the program that we discussed earlier. But in this case, if we choose to use this specific format, say that it is represented by a button with a series of small squares. As in the previous case, when you click on the small arrow on the right of it, the corresponding drop-down list appears.
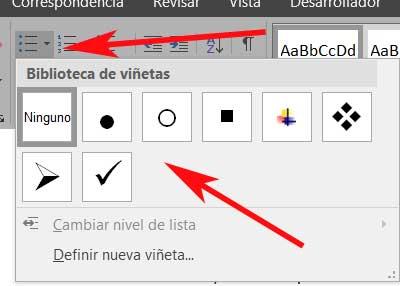
Here, as before, we are going to find a series of slightly more graphic elements or objects that will serve as cataloguers or separators for this new list. In this section, what we are going to find are a series of elements in the form of symbols that can act as separators for the elements of the new list. Thus, we find circles, squares, arrows, etc. But of course, as in the previous case, we can also define new ones. For this we click on Define new bullet from the mentioned drop-down list.
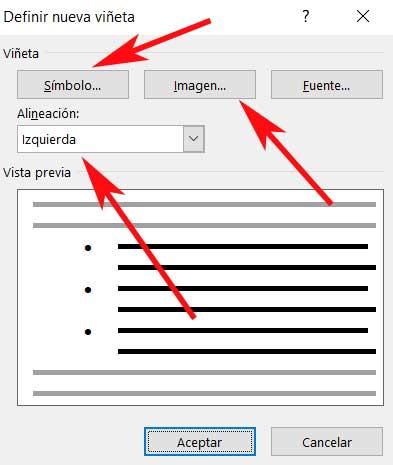
The most interesting thing about this is that here we can specify that we want to use some of the multiple symbols that we usually use throughout the operating system. But that is not all, we will also have the possibility to select an image that we have stored in the disk drives . Of course, we should be a little cautious, since this image will be repeated over and over again for each item on the list.
As in the previous case, we also have the possibility to shorten the process of creating a custom list. For this, it is enough that we write an asterisk on a new line, so that the bullet list starts automatically by pressing the space bar .
Multilevel lists
So far we have been able to see the main objective and how we can create both numerical and bulleted lists. Each format can serve us in an environment or type of independent use, we can also create both lists made up of generic classifiers, as well as more personalized and therefore original.
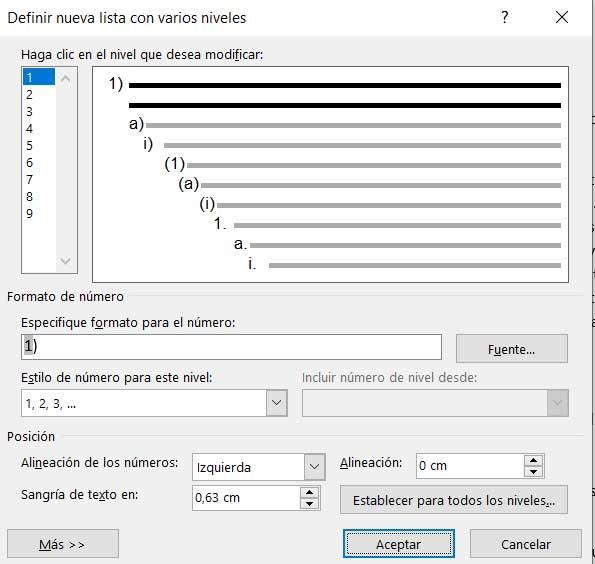
However, it is also worth taking a look at the so-called Multilevel lists. We will find these in the same section of the Word interface of the previous two. Of course, in this case they are represented by the levels of which they will be composed, in miniature. So, to start we will tell you these Multilevel are elements of this same type that we have seen, but they allow you to create a list within another. It is evident that for this the container must already exist, so within the primary list, we can create others. Say that these will keep the indentations that we added initially, as well as the numbering indicated in their design.

That is why it could be said that the use of these elements is like taking the use of the simple lists previously reviewed, one step further. In fact, if we deploy the corresponding drop-down menu on its button , we find designs similar to those we saw in the previous formats, but in this case, nested. In the same way we can create the design of our new multilevel list from the link Define new list style.
At the same time, we find another link in the same window that allows us to define a new, multilevel, personalized list. Here we will have the opportunity to specify various parameters of this nested list element. Among these we find the possibility of customizing the types of separators of the different lists, including the level number, the alignment of the elements, the distance of the indentation , etc.
How to sort a Word list
First, it must be clear that in order to sort the components of a Word list, we must first create an element of this type. For this we can use any of the types that we talked about previously, to later mark the list in its entirety.
Well, once we have marked it with the mouse, we return to look at the Paragraph section, but in this case we opted for the button called Order. This is represented by the letters A and Z with an arrow, where we can directly click. There are no drop-down lists here, as before. But of course, by clicking on the mentioned button that we discussed, we find a new window that will give us the opportunity to customize the order to use in the marked list, depending on the needs of each case.
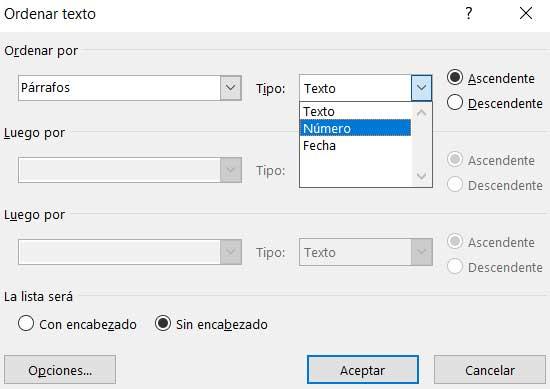
In this way, the program offers us the possibility of sorting the lists marked by paragraphs or titles on the one hand. When it comes to placing the elements that are part of it, Word offers us to order them by alphabetical, numerical order, or by date. Thus, if we are a little tricky and create the source lists in a structured way, this function will allow us to order their elements in a few seconds. And it is that the correct use of these elements will help to better understand our created documents.
Using the OpenXML SDK, 2.0 CTP, I am trying to programmatically create a Word document. In my document I have to insert a bulleted list, an some of the elements of the list must be underlined. How can I do this?
![]()
asked Dec 21, 2009 at 15:57
![]()
Lists in OpenXML are a little confusing.
There is a NumberingDefinitionsPart that describes all of the lists in the document. It contains information on how the lists should appear (bulleted, numbered, etc.) and also assigns and ID to each one.
Then in the MainDocumentPart, for every item in the list you want to create, you add a new paragraph and assign the ID of the list you want to that paragraph.
So to create a bullet list such as:
- Hello,
- world!
You would first have to create a NumberingDefinitionsPart:
    NumberingDefinitionsPart numberingPart =
      mainDocumentPart.AddNewPart<NumberingDefinitionsPart>("someUniqueIdHere");

    Numbering element =
      new Numbering(
        new AbstractNum(
          new Level(
            new NumberingFormat() { Val = NumberFormatValues.Bullet },
            new LevelText() { Val = "·" }
          ) { LevelIndex = 0 }
        ) { AbstractNumberId = 1 },
        new NumberingInstance(
          new AbstractNumId() { Val = 1 }
        ) { NumberID = 1 });

    element.Save(numberingPart);
Then you create the MainDocumentPart as you normally would, except in the paragraph properties, assign the numbering ID:
    MainDocumentPart mainDocumentPart =
      package.AddMainDocumentPart();

    Document element =
      new Document(
        new Body(
          new Paragraph(
            new ParagraphProperties(
              new NumberingProperties(
                new NumberingLevelReference() { Val = 0 },
                new NumberingId() { Val = 1 })),
            new Run(
              new RunProperties(),
              new Text("Hello, ") { Space = "preserve" })),
          new Paragraph(
            new ParagraphProperties(
              new NumberingProperties(
                new NumberingLevelReference() { Val = 0 },
                new NumberingId() { Val = 1 })),
            new Run(
              new RunProperties(),
              new Text("world!") { Space = "preserve" }))));

    element.Save(mainDocumentPart);
There is a better explanation of the options available in the OpenXML reference guide in Section 2.9.
![]()
MadBoy
10.8k23 gold badges95 silver badges155 bronze badges
answered Dec 23, 2009 at 15:05
![]()
Adam SheehanAdam Sheehan
2,12224 silver badges19 bronze badges
2
I wanted something that would allow me to add more than one bullet list to a document. After banging my head against my desk for a while, I managed to combine a bunch of different posts and examine my document with the Open XML SDK 2.0 Productity Tool and figured some stuff out. The document it produces now passes validation for by version 2.0 and 2.5 of the SDK Productivity tool.
Here is the code; hopefully it saves someone some time and aggravation.
Usage:
const string fileToCreate = "C:\temp\bulletTest.docx";

 if (File.Exists(fileToCreate))
    File.Delete(fileToCreate);

var writer = new SimpleDocumentWriter();
List<string> fruitList = new List<string>() { "Apple", "Banana", "Carrot"};
writer.AddBulletList(fruitList);
writer.AddParagraph("This is a spacing paragraph 1.");

List<string> animalList = new List<string>() { "Dog", "Cat", "Bear" };
writer.AddBulletList(animalList);
writer.AddParagraph("This is a spacing paragraph 2.");

List<string> stuffList = new List<string>() { "Ball", "Wallet", "Phone" };
writer.AddBulletList(stuffList);
writer.AddParagraph("Done.");

writer.SaveToFile(fileToCreate);
Using statements:
using System;
using System.Collections.Generic;
using System.IO;
using System.Linq;
using DocumentFormat.OpenXml;
using DocumentFormat.OpenXml.Packaging;
using DocumentFormat.OpenXml.Wordprocessing;
Code
public class SimpleDocumentWriter : IDisposable
{
    private MemoryStream _ms;
    private WordprocessingDocument _wordprocessingDocument;

    public SimpleDocumentWriter()
    {
        _ms = new MemoryStream();
        _wordprocessingDocument = WordprocessingDocument.Create(_ms, WordprocessingDocumentType.Document);
        var mainDocumentPart = _wordprocessingDocument.AddMainDocumentPart();
        Body body = new Body();
        mainDocumentPart.Document = new Document(body);
    }

    public void AddParagraph(string sentence)
    {
        List<Run> runList = ListOfStringToRunList(new List<string> { sentence});
        AddParagraph(runList);
    }
    public void AddParagraph(List<string> sentences)
    {
        List<Run> runList = ListOfStringToRunList(sentences);
        AddParagraph(runList);
    }

    public void AddParagraph(List<Run> runList)
    {
        var para = new Paragraph();
        foreach (Run runItem in runList)
        {
            para.AppendChild(runItem);
        }

        Body body = _wordprocessingDocument.MainDocumentPart.Document.Body;
        body.AppendChild(para);
    }

    public void AddBulletList(List<string> sentences)
    {
        var runList = ListOfStringToRunList(sentences);

        AddBulletList(runList);
    }


    public void AddBulletList(List<Run> runList)
    {
        // Introduce bulleted numbering in case it will be needed at some point
        NumberingDefinitionsPart numberingPart = _wordprocessingDocument.MainDocumentPart.NumberingDefinitionsPart;
        if (numberingPart == null)
        {
            numberingPart = _wordprocessingDocument.MainDocumentPart.AddNewPart<NumberingDefinitionsPart>("NumberingDefinitionsPart001");
            Numbering element = new Numbering();
            element.Save(numberingPart);
        }

        // Insert an AbstractNum into the numbering part numbering list.  The order seems to matter or it will not pass the
        // Open XML SDK Productity Tools validation test.  AbstractNum comes first and then NumberingInstance and we want to
        // insert this AFTER the last AbstractNum and BEFORE the first NumberingInstance or we will get a validation error.
        var abstractNumberId = numberingPart.Numbering.Elements<AbstractNum>().Count() + 1;
        var abstractLevel = new Level(new NumberingFormat() {Val = NumberFormatValues.Bullet}, new LevelText() {Val = "·"}) {LevelIndex = 0};
        var abstractNum1 = new AbstractNum(abstractLevel) {AbstractNumberId = abstractNumberId};

        if (abstractNumberId == 1)
        {
            numberingPart.Numbering.Append(abstractNum1);
        }
        else
        {
            AbstractNum lastAbstractNum = numberingPart.Numbering.Elements<AbstractNum>().Last();
            numberingPart.Numbering.InsertAfter(abstractNum1, lastAbstractNum);
        }

        // Insert an NumberingInstance into the numbering part numbering list.  The order seems to matter or it will not pass the
        // Open XML SDK Productity Tools validation test.  AbstractNum comes first and then NumberingInstance and we want to
        // insert this AFTER the last NumberingInstance and AFTER all the AbstractNum entries or we will get a validation error.
        var numberId = numberingPart.Numbering.Elements<NumberingInstance>().Count() + 1;
        NumberingInstance numberingInstance1 = new NumberingInstance() {NumberID = numberId};
        AbstractNumId abstractNumId1 = new AbstractNumId() {Val = abstractNumberId};
        numberingInstance1.Append(abstractNumId1);

        if (numberId == 1)
        {
            numberingPart.Numbering.Append(numberingInstance1);
        }
        else
        {
            var lastNumberingInstance = numberingPart.Numbering.Elements<NumberingInstance>().Last();
            numberingPart.Numbering.InsertAfter(numberingInstance1, lastNumberingInstance);
        }

        Body body = _wordprocessingDocument.MainDocumentPart.Document.Body;

        foreach (Run runItem in runList)
        {
            // Create items for paragraph properties
            var numberingProperties = new NumberingProperties(new NumberingLevelReference() {Val = 0}, new NumberingId() {Val = numberId});
            var spacingBetweenLines1 = new SpacingBetweenLines() { After = "0" };  // Get rid of space between bullets
            var indentation = new Indentation() { Left = "720", Hanging = "360" };  // correct indentation

            ParagraphMarkRunProperties paragraphMarkRunProperties1 = new ParagraphMarkRunProperties();
            RunFonts runFonts1 = new RunFonts() { Ascii = "Symbol", HighAnsi = "Symbol" };
            paragraphMarkRunProperties1.Append(runFonts1);

            // create paragraph properties
            var paragraphProperties = new ParagraphProperties(numberingProperties, spacingBetweenLines1, indentation, paragraphMarkRunProperties1);

            // Create paragraph
            var newPara = new Paragraph(paragraphProperties);

            // Add run to the paragraph
            newPara.AppendChild(runItem);

            // Add one bullet item to the body
            body.AppendChild(newPara);
        }
    }


    public void Dispose()
    {
        CloseAndDisposeOfDocument();
        if (_ms != null)
        {
            _ms.Dispose();
            _ms = null;
        }
    }

    public MemoryStream SaveToStream()
    {
        _ms.Position = 0;
        return _ms;
    }

    public void SaveToFile(string fileName)
    {
        if (_wordprocessingDocument != null)
        {
            CloseAndDisposeOfDocument();
        }

        if (_ms == null)
            throw new ArgumentException("This object has already been disposed of so you cannot save it!");

        using (var fs = File.Create(fileName))
        {
            _ms.WriteTo(fs);
        }
    }

    private void CloseAndDisposeOfDocument()
    {
        if (_wordprocessingDocument != null)
        {
            _wordprocessingDocument.Close();
            _wordprocessingDocument.Dispose();
            _wordprocessingDocument = null;
        }
    }

    private static List<Run> ListOfStringToRunList(List<string> sentences)
    {
        var runList = new List<Run>();
        foreach (string item in sentences)
        {
            var newRun = new Run();
            newRun.AppendChild(new Text(item));
            runList.Add(newRun);
        }

        return runList;
    }
}
![]()
answered Aug 10, 2016 at 19:08
![]()
David YatesDavid Yates
1,8552 gold badges23 silver badges38 bronze badges
7
Adam’s answer above is correct except it is new NumberingInstance( instead of new Num( as noted in a comment.
Additionally, if you have multiple lists, you should have multiple Numbering elements (each with it’s own id eg 1, 2, 3 etc — one for each list in the document. This doesn’t seem to be a problem with bullet lists, but numbered lists will continue using the same numbering sequence (as opposed to starting over again at 1) because it will think that it’s the same list. The NumberingId has to be referenced in your paragraph like this:
ParagraphProperties paragraphProperties1 = new ParagraphProperties();
ParagraphStyleId paragraphStyleId1 = new ParagraphStyleId() { Val = "ListParagraph" };
NumberingProperties numberingProperties1 = new NumberingProperties();
NumberingLevelReference numberingLevelReference1 = new NumberingLevelReference() { Val = 0 };

NumberingId numberingId1 = new NumberingId(){ Val = 1 }; //Val is 1, 2, 3 etc based on your numberingid in your numbering element
numberingProperties1.Append(numberingLevelReference1);
numberingProperties1.Append(numberingId1);
paragraphProperties1.Append(paragraphStyleId1);
paragraphProperties1.Append(numberingProperties1);
Children of the Level element will have an effect on the type of bullet, and the indentation.
My bullets were too small until I added this to the Level element:
new NumberingSymbolRunProperties(
    new RunFonts() { Hint = FontTypeHintValues.Default, Ascii = "Symbol", HighAnsi =   "Symbol" })
Indentation was a problem until I added this element to the Level element as well:
new PreviousParagraphProperties(
  new Indentation() { Left = "864", Hanging = "360" })
answered Oct 31, 2013 at 14:28
![]()
And if you are like me — creating a document from a template, then you may want to use this code, to handle both situations — when your template does or does not contain any numbering definitions:
// Introduce bulleted numbering in case it will be needed at some point
NumberingDefinitionsPart numberingPart = document.MainDocumentPart.NumberingDefinitionsPart;
if (numberingPart == null)
{
    numberingPart = document.MainDocumentPart.AddNewPart<NumberingDefinitionsPart>("NumberingDefinitionsPart001");
}
answered Feb 5, 2015 at 23:31
![]()
ajehajeh
2,6402 gold badges31 silver badges63 bronze badges
Not sure if this helps anyone, but here is my snippet for inserting a list of bullets.
Create the word processing document and word document body
WordprocessingDocument wordprocessingDocument = WordprocessingDocument.Open($"{tempFolder}{tempFileName}", true);

Body wordDocumentBody = wordprocessingDocument.MainDocumentPart.Document.Body;
Then get the insert index. This is placeholder text inside the word document, so you can insert into the correct place in the word document.
int insertIndex = wordDocumentBody.ToList().IndexOf(wordDocumentBody.Where(p => p.InnerText.Contains("PLACEHOLDER_TEXT")).First());
You can then call this method to insert into the word document in both bullet points for lettering.
    public static void InsertBullets(Body wordDocumentBody, int insertIndex, int bulletStyle, List<string> strToAdd)
    {
        //// Bullet Styles:
        // 1 - Standard bullet
        // 2 - Numbered


        foreach (string item in strToAdd)
        {
            Paragraph para = wordDocumentBody.InsertAt(new Paragraph(), insertIndex);
            ParagraphProperties paragraphProperties = new ParagraphProperties();
            paragraphProperties.Append(new ParagraphStyleId() { Val = "ListParagraph" });
            paragraphProperties.Append(new NumberingProperties(
                new NumberingLevelReference() { Val = 0 },
                new NumberingId() { Val = bulletStyle }));
            para.Append(paragraphProperties);
            para.Append(new Run(
                new RunProperties(
                    new RunStyle() { Val = "ListParagraph" },
                    new NoProof()),
                new Text($"{item}")));

            insertIndex++;
        }
    }
You can then remove the placeholder text after with this.
wordDocumentBody.Elements().ElementAt(wordDocumentBody.ToList().IndexOf(wordDocumentBody.Where(p => p.InnerText.Contains("PLACEHOLDER_TEXT")).First())).Remove();
answered Jan 10 at 10:36
![]()
I’m continuing the discussion on how to create a word document. Now it’s time to understand how to format text in Word;
This time I’ll show how to write Bullet Lists into a word document.
First, read up on how to create a word document here:
http://www-10.lotus.com/ldd/ddwiki.nsf/dx/HowTo_Create_a_Word_Document_from_LotusScript
So, let’s start with creating a blank Word document:
Dim objWord As Variant ' Holder for Word (application)
Dim objDoc As Variant ' Holder for the word document
Set objWord = CreateObject("Word.Application")
Set objDoc = objWord.Documents.Add() ' The Add() function takes one parameter. See my previous article about this.
Word stores the Bullet lists in what’s called as «Galleries» — a couple of predefined ways to display lists in different ways. Therefore we need to retreive the galleries object from wich we will get the desired bullet list:
Dim objListGalleries As Variant ' Holder for the galleries
Set objListGalleries = objWord.Application.ListGalleries
Now, we will need a bunch of CONSTANTS:
Const wdUndefined = &H98967F
Const wdTrailingTab = 0
Const wdListNumberStyleBullet = &H17
Const wdListLevelAlignLeft = 0
Const wdListApplyToWholeList = 0
Const wdWord9ListBehavior = 1
Const wdNumberParagraph = 1
Const wdBulletGallery = 1
Const wdNumberGallery = 2
Const wdColorAutomatic = &HFF000000
Const wdColorDarkRed = &H80
Const wdColorDarkBlue = &H800000
Const wdLine = 5
Later on, we will need to convert the «Position» to Points, rather than centimeters (if You are using the metric system). I have a function called «CentimetersToPoints()»:
Public Function CentimetersToPoints(Byval cm As Single) As Single
' 1 cm = 28.35 points
CentimetersToPoints = (cm * 28.35)
End Function
You could skip this function and set the positions with point-values directly, but working with centimeters or inches is far easier that points…
Now we can set the gallery with the look and feel of Your choise:
With objListGalleries(wdBulletGallery).ListTemplates(1).ListLevels(1)
.NumberFormat = Uchr$(61623)
.TrailingCharacter = wdTrailingTab
.NumberStyle = wdListNumberStyleBullet
.NumberPosition = CentimetersToPoints(0.63) ' See the function described earlier!
.Alignment = wdListLevelAlignLeft
.TextPosition = CentimetersToPoints(1.27)
.TabPosition = CentimetersToPoints(1.27)
.ResetOnHigher = 0
.StartAt = 1
With .Font
.Bold = wdUndefined
.Italic = wdUndefined
.StrikeThrough = wdUndefined
.Subscript = wdUndefined
.Superscript = wdUndefined
.Shadow = wdUndefined
.Outline = wdUndefined
.Emboss = wdUndefined
.Engrave = wdUndefined
.AllCaps = wdUndefined
.Hidden = wdUndefined
.Underline = wdUndefined
.Color = wdUndefined
.Size = wdUndefined
.Animation = wdUndefined
.DoubleStrikeThrough = wdUndefined
.Name = "Symbol"
End With
.LinkedStyle = ""
End With
Next step is now to give a name to the gallery, but since we are not saving the gallery and will only use it this one time, we will set the name to an empty string:
objListGalleries(wdBulletGallery).ListTemplates(1).Name = ""
Now, we will apply the gallery as soon as we want to start to use the bullet list:
objWord.Selection.Range.ListFormat.ApplyListTemplate objListGalleries(wdBulletGallery).ListTemplates(1), False, wdListApplyToWholeList, wdWord9ListBehavior
Then type the text… In the example here we will have two bullets with the first entry stating ASDF and the second will be GHIJKLM.
objWord.Selection.TypeText "ASDF"
objWord.Selection.TypeParagraph
objWord.Selection.TypeText "GHIJKLM"
objWord.Selection.TypeParagraph
When the bullet list is complete, then turn off the listformat/gallery to resume normal text:
objWord.Selection.Range.ListFormat.RemoveNumbers wdNumberParagraph
objWord.Selection.TypeText "Another line"
Now, all we have to do is to save the document:
objDoc.SaveAs("C:Temptestdocument.docx")
objDoc.Close
objWord.Quit
' Garbage collection of variables:
Set objListGalleries = Nothing
Set objDoc = Nothing
Set objWord = Nothing
That’s it! This is how to create a word document with bullet list — completely programmatically.