
Table is a means of visual communication mode and organizational organizational data, widely used in various occasions and documents. Common forms can contain elements such as text, pictures, and we can insert images, write text and formatted table style when we operate. Next, the form is created in the Word document and implemented in the Word document, including setting font, font size, font color, font thick, etc., set cell alignment, cell background color, cell merge, set table Border style Insert a picture, etc.
use tools:Free Spire.doc for Java 2.0.0 (free version)
JarFile import
method1:First passOfficial website acquisitionJar package. Download the control package and decompressed.
Import steps: Creating a new Directory directory in the program, naming (named LIB in this example); copy the spire.doc.jar file under the control package lib folder (as shown in Figure 1 below) to the newly created directory in the program. After copying the JAR file, right-click the JAR file and select Add as Library. Complete import (as shown in Figure 2 below).
Figure1:

Figure2:

method2:Imported via maven. referenceImport method。
JavaCode example (for reference)
Step 1: Create a document
Document doc = new Document();
Section sec = doc.addSection();
Step 2:Disclaimer array content
//Disclaimer array content
 String [] Header = {"class", "name", "gender", "student number", "professional results"};
String[][] data =
        {
                new  String [] {"One Class", "Wang Li", "Women", "Y1256486", "138"},
                new  String [] {"One Class", "Hong Feifei", "Female", "Y5425875", "134"},
                new  String [] {"Two Class", "Liu Yang", "Men", "B1546258", "141"},
                new  String [] {"Three Class", "Feng Gang", "Men", "B1542367", "136"},
                new  String [] {"Three Class", "Liu Siyuan", "Men", "Z1263547", "133"},
        };
Step 3:Add a form and write data
//Add a form
Table table = sec.addTable(true);
table.resetCells(data.length + 1, header.length);

//Set the first line of the table as the header, write to the table head array content, and format the header data
TableRow row = table.getRows().get(0);
row.isHeader(true);
row.setHeight(20);
row.setHeightType(TableRowHeightType.Exactly);
row.getRowFormat().setBackColor(Color.ORANGE);
for (int i = 0; i < header.length; i++) {
    row.getCells().get(i).getCellFormat().setVerticalAlignment(VerticalAlignment.Middle);
    Paragraph p = row.getCells().get(i).addParagraph();
    p.getFormat().setHorizontalAlignment(HorizontalAlignment.Center);
    TextRange range1 = p.appendText(header[i]);
    range1.getCharacterFormat().setFontName("Arial");
    range1.getCharacterFormat().setFontSize(12f);
    range1.getCharacterFormat().setBold(true);
    range1.getCharacterFormat().setTextColor(Color.white);
}
//Write the remaining group content to the form, and format the data
for (int r = 0; r < data.length; r++) {
    TableRow dataRow = table.getRows().get(r + 1);
    dataRow.setHeight(25);
    dataRow.setHeightType(TableRowHeightType.Exactly);
    dataRow.getRowFormat().setBackColor(Color.white);
    for (int c = 0; c < data[r].length; c++) {
        dataRow.getCells().get(c).getCellFormat().setVerticalAlignment(VerticalAlignment.Middle);
        TextRange range2 = dataRow.getCells().get(c).addParagraph().appendText(data[r][c]);
        range2.getOwnerParagraph().getFormat().setHorizontalAlignment(HorizontalAlignment.Center);
        range2.getCharacterFormat().setFontName("Arial");
        range2.getCharacterFormat().setFontSize(10f);
    }
}
Step 4:Merge Cells
table.applyVerticalMerge(0,1,2);
table.applyVerticalMerge(0,4,5);
Step 5:Insert a picture to a cell
DocPicture dp = table.getRows().get(1).getCells().get(0).addParagraph().appendPicture("1.png");
dp.getOwnerParagraph().getFormat().setHorizontalAlignment(HorizontalAlignment.Center);
Step 6:Set the cell background color
for (int j = 1; j < table.getRows().getCount(); j++) {
    if (j % 2 == 0) {
        TableRow row2 = table.getRows().get(j);
        for (int f = 1; f < row2.getCells().getCount(); f++) {
            row2.getCells().get(f).getCellFormat().setBackColor(new Color(144,238,144));
        }
    }
}
Step 7:Set table border style
table.getTableFormat().getBorders().setBorderType(BorderStyle.Thick_Thin_Large_Gap);
Step 8: Save document
doc.saveToFile("CreateTable.docx", FileFormat.Docx_2013);
Table creation effect:

All code:


import com.spire.doc.*;
import com.spire.doc.documents.*;
import com.spire.doc.fields.DocPicture;
import com.spire.doc.fields.TextRange;
import java.awt.*;

public class CreateTable {
    public static void main(String[] args){
        //Create a Document object
        Document doc = new Document();
        Section sec = doc.addSection();

        //Disclaimer array content
                 String [] Header = {"class", "name", "gender", "student number", "professional results"};
        String[][] data =
                {
                        new  String [] {"One Class", "Wang Li", "Women", "Y1256486", "138"},
                        new  String [] {"One Class", "Hong Feifei", "Female", "Y5425875", "134"},
                        new  String [] {"Two Class", "Liu Yang", "Men", "B1546258", "141"},
                        new  String [] {"Three Class", "Feng Gang", "Men", "B1542367", "136"},
                        new  String [] {"Three Class", "Liu Siyuan", "Men", "Z1263547", "133"},
                };

        //Add a form
        Table table = sec.addTable(true);
        table.resetCells(data.length + 1, header.length);

        //Set the first line of the table as the header, write to the table head array content, and format the header data
        TableRow row = table.getRows().get(0);
        row.isHeader(true);
        row.setHeight(20);
        row.setHeightType(TableRowHeightType.Exactly);
        row.getRowFormat().setBackColor(Color.ORANGE);
        for (int i = 0; i < header.length; i++) {
            row.getCells().get(i).getCellFormat().setVerticalAlignment(VerticalAlignment.Middle);
            Paragraph p = row.getCells().get(i).addParagraph();
            p.getFormat().setHorizontalAlignment(HorizontalAlignment.Center);
            TextRange range1 = p.appendText(header[i]);
            range1.getCharacterFormat().setFontName("Arial");
            range1.getCharacterFormat().setFontSize(12f);
            range1.getCharacterFormat().setBold(true);
            range1.getCharacterFormat().setTextColor(Color.white);
        }

        //Write the remaining group content to the form, and format the data
        for (int r = 0; r < data.length; r++) {
            TableRow dataRow = table.getRows().get(r + 1);
            dataRow.setHeight(25);
            dataRow.setHeightType(TableRowHeightType.Exactly);
            dataRow.getRowFormat().setBackColor(Color.white);
            for (int c = 0; c < data[r].length; c++) {
                dataRow.getCells().get(c).getCellFormat().setVerticalAlignment(VerticalAlignment.Middle);
                TextRange range2 = dataRow.getCells().get(c).addParagraph().appendText(data[r][c]);
                range2.getOwnerParagraph().getFormat().setHorizontalAlignment(HorizontalAlignment.Center);
                range2.getCharacterFormat().setFontName("Arial");
                range2.getCharacterFormat().setFontSize(10f);
            }
        }

        //Longitudinal merge specified cell
        table.applyVerticalMerge(0,1,2);
        table.applyVerticalMerge(0,4,5);

        //Insert pictures to specify cell
        DocPicture dp = table.getRows().get(1).getCells().get(0).addParagraph().appendPicture("1.png");
        dp.getOwnerParagraph().getFormat().setHorizontalAlignment(HorizontalAlignment.Center);

        //Set cell background color
        for (int j = 1; j < table.getRows().getCount(); j++) {
            if (j % 2 == 0) {
                TableRow row2 = table.getRows().get(j);
                for (int f = 1; f < row2.getCells().getCount(); f++) {
                    row2.getCells().get(f).getCellFormat().setBackColor(new Color(144,238,144));
                }
            }
        }

        //Set table border style
        table.getTableFormat().getBorders().setBorderType(BorderStyle.Thick_Thin_Large_Gap);

        //Save document
        doc.saveToFile("CreateTable.docx", FileFormat.Docx_2013);
    }

}
View Code
(This article is over)
Please indicate the source!
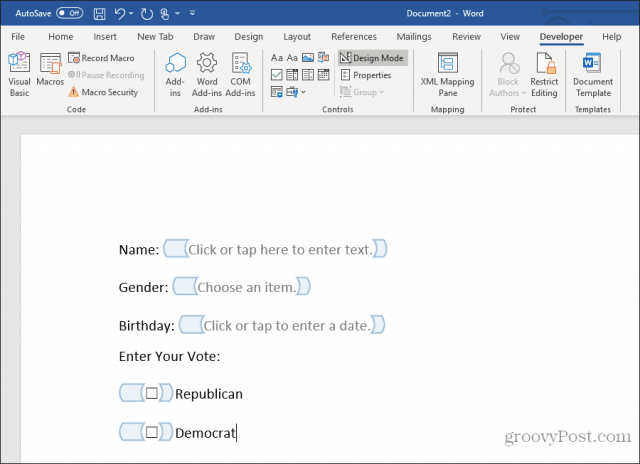
A form allows you to create placeholders for different types of information, such as text, dates, images and yes-no questions. This makes it easier for readers to know what type of information to include, and it also helps ensure all of the information is formatted the same way. In order to create a fillable form in Word, you will need to use the following tools.
- Content Controls: The areas where users input information in a form.
- Tables: Tables are used in forms to align text and form fields, and to create borders and boxes.
- Protection: Allows users to populate fields but not to make changes to the rest of the document.
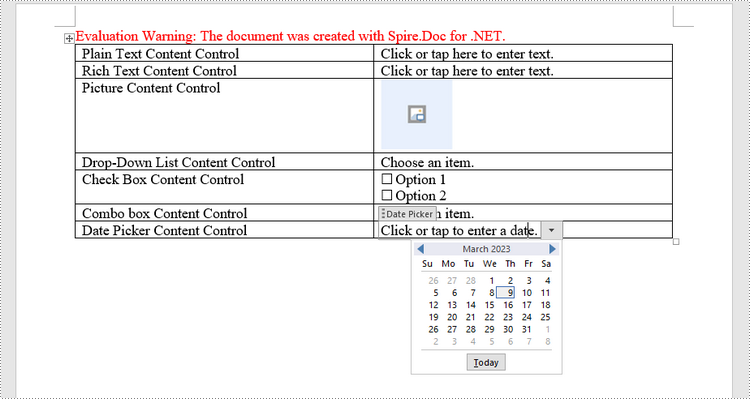
Content controls in Word are containers for content that let users build structured documents. A structured document controls where content appears within the document. There are basically ten types of content controls available in Word 2013. This article focuses on how to create a fillable form in Word consisting of the following seven common content controls using Spire.Doc for .NET.
| Content Control | Description |
| Plain Text | A text field limited to plain text, so no formatting can be included. |
| Rich Text | A text field that can contain formatted text or other items, such as tables, pictures, or other content controls. |
| Picture | Accepts a single picture. |
| Drop-Down List | A drop-down list displays a predefined list of items for the user to choose from. |
| Combo Box | A combo box enables users to select a predefined value in a list or type their own value in the text box of the control. |
| Check Box | A check box provides a graphical widget that allows the user to make a binary choice: yes (checked) or no (not checked). |
| Date Picker | Contains a calendar control from which the user can select a date. |
Install Spire.Doc for .NET
To begin with, you need to add the DLL files included in the Spire.Doc for .NET package as references in your .NET project. The DLL files can be either downloaded from this link or installed via NuGet.
PM> Install-Package Spire.Doc
Create a Fillable Form in Word in C# and VB.NET
The StructureDocumentTagInline class provided by Spire.Doc for .NET is used to create structured document tags for inline-level structures (DrawingML object, fields, etc.) in a paragraph. The SDTProperties property and the SDTContent property under this class shall be used to specify the properties and content of the current structured document tag. The following are the detailed steps to create a fillable form with content controls in Word.
- Create a Document object.
- Add a section using Document.AddSection() method.
- Add a table using Section.AddTable() method.
- Add a paragraph to a specific table cell using TableCell.AddParagraph() method.
- Create an instance of StructureDocumentTagInline class, and add it to the paragraph as a child object using Paragraph.ChildObjects.Add() method.
- Specify the properties and content of the structured document tag though the SDTProperties property and the SDTContent property of the StructureDocumentTagInline object. The type of the structured document tag is set through SDTProperties.SDTType property.
- Prevent users from editing content outside form fields using Document.Protect() method.
- Save the document using Document.SaveToFile() method.
- C#
- VB.NET
using Spire.Doc;
using Spire.Doc.Documents;
using Spire.Doc.Fields;
using System.Drawing;

namespace CreateFormInWord
{
    class Program
    {
        static void Main(string[] args)
        {
            //Create a Document object
            Document doc = new Document();

            //Add a section
            Section section = doc.AddSection();

            //add a table
            Table table = section.AddTable(true);
            table.ResetCells(7, 2);

            //Add text to the cells of the first column
            Paragraph paragraph = table.Rows[0].Cells[0].AddParagraph();
            paragraph.AppendText("Plain Text Content Control");
            paragraph = table.Rows[1].Cells[0].AddParagraph();
            paragraph.AppendText("Rich Text Content Control");
            paragraph = table.Rows[2].Cells[0].AddParagraph();
            paragraph.AppendText("Picture Content Control");
            paragraph = table.Rows[3].Cells[0].AddParagraph();
            paragraph.AppendText("Drop-Down List Content Control");
            paragraph = table.Rows[4].Cells[0].AddParagraph();
            paragraph.AppendText("Check Box Content Control");
            paragraph = table.Rows[5].Cells[0].AddParagraph();
            paragraph.AppendText("Combo box Content Control");
            paragraph = table.Rows[6].Cells[0].AddParagraph();
            paragraph.AppendText("Date Picker Content Control");

            //Add a plain text content control to the cell (0,1)
            paragraph = table.Rows[0].Cells[1].AddParagraph();
            StructureDocumentTagInline sdt = new StructureDocumentTagInline(doc);
            paragraph.ChildObjects.Add(sdt);
            sdt.SDTProperties.SDTType = SdtType.Text;
            sdt.SDTProperties.Alias = "Plain Text";
            sdt.SDTProperties.Tag = "Plain Text";
            sdt.SDTProperties.IsShowingPlaceHolder = true;
            SdtText text = new SdtText(true);
            text.IsMultiline = false;
            sdt.SDTProperties.ControlProperties = text;
            TextRange tr = new TextRange(doc);
            tr.Text = "Click or tap here to enter text.";
            sdt.SDTContent.ChildObjects.Add(tr);

            //Add a rich text content control to the cell (1,1)
            paragraph = table.Rows[1].Cells[1].AddParagraph();
            sdt = new StructureDocumentTagInline(doc);
            paragraph.ChildObjects.Add(sdt);
            sdt.SDTProperties.SDTType = SdtType.RichText;
            sdt.SDTProperties.Alias = "Rich Text";
            sdt.SDTProperties.Tag = "Rich Text";
            sdt.SDTProperties.IsShowingPlaceHolder = true;
            text = new SdtText(true);
            text.IsMultiline = false;
            sdt.SDTProperties.ControlProperties = text;
            tr = new TextRange(doc);
            tr.Text = "Click or tap here to enter text.";
            sdt.SDTContent.ChildObjects.Add(tr);

            //Add a picture content control to the cell (2,1)
            paragraph = table.Rows[2].Cells[1].AddParagraph();
            sdt = new StructureDocumentTagInline(doc);
            paragraph.ChildObjects.Add(sdt);
            sdt.SDTProperties.SDTType = SdtType.Picture;
            sdt.SDTProperties.Alias = "Picture";
            sdt.SDTProperties.Tag = "Picture";
            SdtPicture sdtPicture = new SdtPicture();
            sdt.SDTProperties.ControlProperties = sdtPicture;
            DocPicture pic = new DocPicture(doc);
            pic.LoadImage(Image.FromFile("C:\Users\Administrator\Desktop\ChooseImage.png"));
            sdt.SDTContent.ChildObjects.Add(pic);

            //Add a dropdown list content control to the cell(3,1)
            paragraph = table.Rows[3].Cells[1].AddParagraph();
            sdt = new StructureDocumentTagInline(doc);
            sdt.SDTProperties.SDTType = SdtType.DropDownList;
            sdt.SDTProperties.Alias = "Dropdown List";
            sdt.SDTProperties.Tag = "Dropdown List";
            paragraph.ChildObjects.Add(sdt);
            SdtDropDownList sddl = new SdtDropDownList();
            sddl.ListItems.Add(new SdtListItem("Choose an item.", "1"));
            sddl.ListItems.Add(new SdtListItem("Item 2", "2"));
            sddl.ListItems.Add(new SdtListItem("Item 3", "3"));
            sddl.ListItems.Add(new SdtListItem("Item 4", "4"));
            sdt.SDTProperties.ControlProperties = sddl;
            tr = new TextRange(doc);
            tr.Text = sddl.ListItems[0].DisplayText;
            sdt.SDTContent.ChildObjects.Add(tr);

            //Add two check box content controls to the cell (4,1)
            paragraph = table.Rows[4].Cells[1].AddParagraph();
            sdt = new StructureDocumentTagInline(doc);
            paragraph.ChildObjects.Add(sdt);
            sdt.SDTProperties.SDTType = SdtType.CheckBox;
            SdtCheckBox scb = new SdtCheckBox();
            sdt.SDTProperties.ControlProperties = scb;
            tr = new TextRange(doc);
            sdt.ChildObjects.Add(tr);
            scb.Checked = false;
            paragraph.AppendText(" Option 1");

            paragraph = table.Rows[4].Cells[1].AddParagraph();
            sdt = new StructureDocumentTagInline(doc);
            paragraph.ChildObjects.Add(sdt);
            sdt.SDTProperties.SDTType = SdtType.CheckBox;
            scb = new SdtCheckBox();
            sdt.SDTProperties.ControlProperties = scb;
            tr = new TextRange(doc);
            sdt.ChildObjects.Add(tr);
            scb.Checked = false;
            paragraph.AppendText(" Option 2");

            //Add a combo box content control to the cell (5,1)
            paragraph = table.Rows[5].Cells[1].AddParagraph();
            sdt = new StructureDocumentTagInline(doc);
            paragraph.ChildObjects.Add(sdt);
            sdt.SDTProperties.SDTType = SdtType.ComboBox;
            sdt.SDTProperties.Alias = "Combo Box";
            sdt.SDTProperties.Tag = "Combo Box";
            SdtComboBox cb = new SdtComboBox();
            cb.ListItems.Add(new SdtListItem("Choose an item."));
            cb.ListItems.Add(new SdtListItem("Item 2"));
            cb.ListItems.Add(new SdtListItem("Item 3"));
            sdt.SDTProperties.ControlProperties = cb;
            tr = new TextRange(doc);
            tr.Text = cb.ListItems[0].DisplayText;
            sdt.SDTContent.ChildObjects.Add(tr);

            //Add a date picker content control to the cell (6,1)
            paragraph = table.Rows[6].Cells[1].AddParagraph();
            sdt = new StructureDocumentTagInline(doc);
            paragraph.ChildObjects.Add(sdt);
            sdt.SDTProperties.SDTType = SdtType.DatePicker;
            sdt.SDTProperties.Alias = "Date Picker";
            sdt.SDTProperties.Tag = "Date Picker";
            SdtDate date = new SdtDate();
            date.CalendarType = CalendarType.Default;
            date.DateFormat = "yyyy.MM.dd";
            date.FullDate = DateTime.Now;
            sdt.SDTProperties.ControlProperties = date;
            tr = new TextRange(doc);
            tr.Text = "Click or tap to enter a date.";
            sdt.SDTContent.ChildObjects.Add(tr);

            //Allow users to edit the form fields only
            doc.Protect(ProtectionType.AllowOnlyFormFields, "permission-psd");

            //Save to file
            doc.SaveToFile("WordForm.docx", FileFormat.Docx2013);
        }
    }
}
Apply for a Temporary License
If you’d like to remove the evaluation message from the generated documents, or to get rid of the function limitations, please request a 30-day trial license for yourself.

There are two simple methods to create fillable fields in Word. One is to create custom fields. The other is to use developer tools and the various data-entry controls that are available there.
Whenever there’s a need for fillable forms, people often turn toward advanced PDF editors with interactive form tools. However, not many people realize that it’s simple to create fillable forms in Word.
There are two methods to do this in Word. One is to use text boxes throughout and then creating custom fields. The other is to use developer tools and the various data-entry controls that are available there.
Which Option Should You Choose?
The method you use depends on what kind of form you’re creating.
You should use the custom field method if the form:
- Has only text fields to fill out
- You don’t mind training your users how to fill out custom fields
- You need forms filled out quickly
You should use developer tools if the form:
- Requires drop-down lists or checkboxes
- You’re sending an individual file to each user
- You don’t want to have to train users on how to use the form
Once you’ve decided which approach you want to take, you can learn how to use each option below.
Create Fillable Forms In Word with Custom Fields
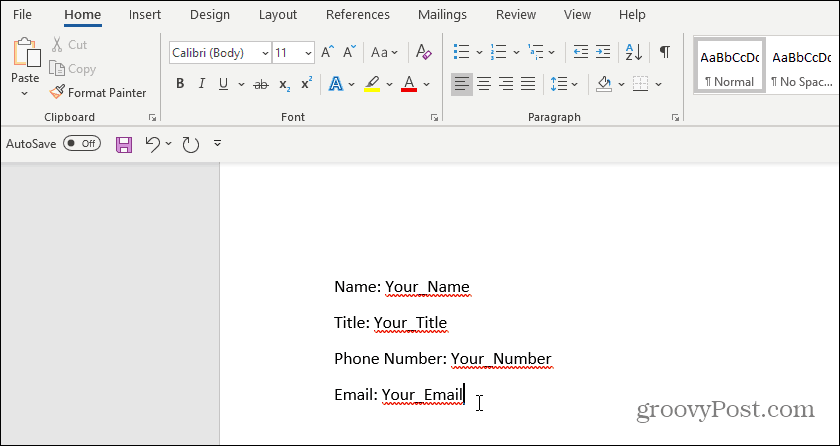
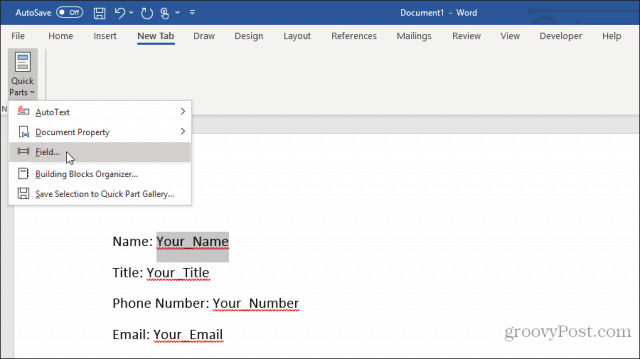
Creating a fillable form with fields is very simple. First, create your form by typing the name for each field and filler text for where the answers should go.
Next, you’ll need to create custom fields for data entry. To do this, select File, Options, and Properties. Then, under Properties, select Advanced Properties.
This will open a Document Properties dialog window. Select the Custom tab.
This window is where you’ll create each custom field that will go into your fillable form. Then, one at a time, name each field and give it an initial value.
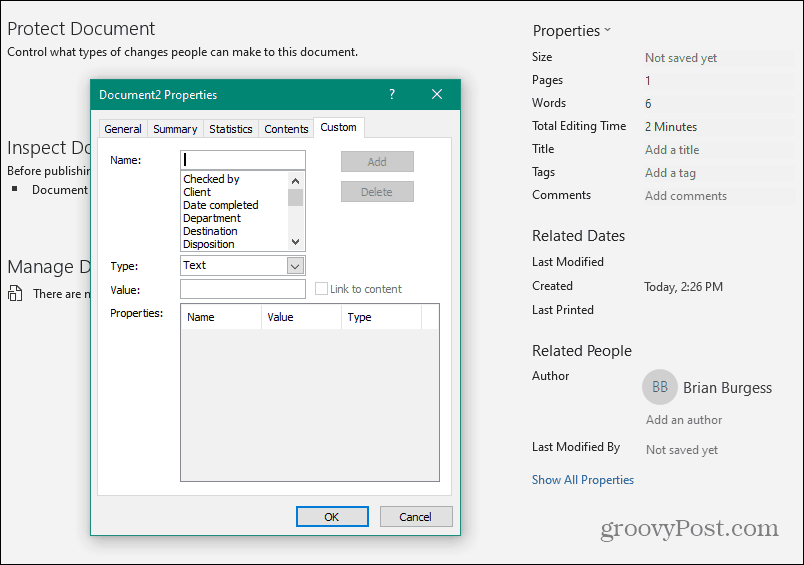
Select Add to add each field, and then continue by entering all of the fields in your form.
Select OK when you’re done.
In your document, highlight the first field in your form. Then, in the Word menu, click on the Insert menu, click the Quick Parts dropdown, and select Fields. If Quick Parts doesn’t appear under the Insert menu, you’ll need to add Quick Parts to the ribbon to access the Field item.
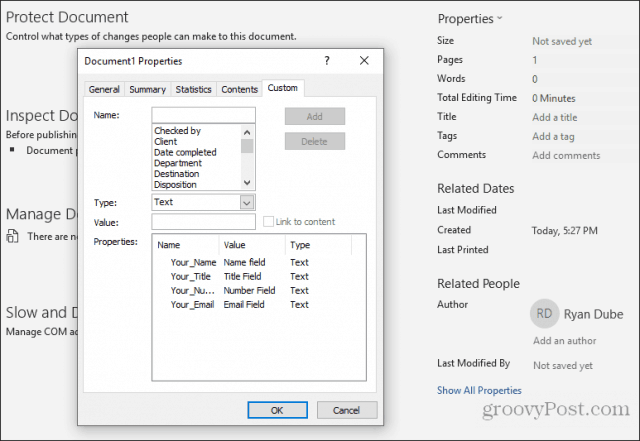
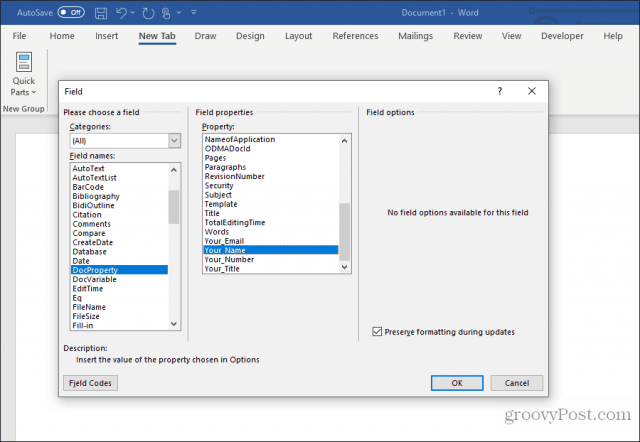
Click on DocProperty under Field names in the pop-up window, and click on Your_Name (or whatever you named the field) under Property.
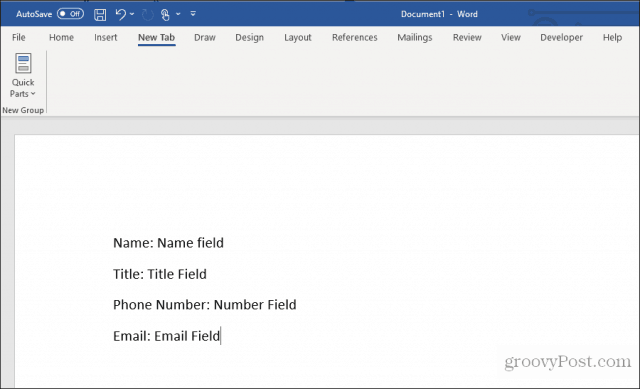
Continue this process for all remaining fields in your form until they’re all converted to fields.
You can learn more about using custom fields in a variety of ways to automate your documents.
Filling out a Form with Custom Fields
Now, all your users need to fill out the form is to go through all of the custom fields and enter the values.
To do this, they’ll need to select File, Options, and Properties. Under Properties, select Advanced Properties. This will open a Document Properties dialog window. Select the Custom tab.
In the Document Properties window, your users need to select each of the properties, enter the correct value for those fields, and select Modify.

After entering the custom fields’ values, clicking OK will add those values to the correct fields in the form.
You can update each form in the field by right-clicking on it and selecting Update Field. Or, you can select all of the fields and press F9.

Once they’re all updated, the customized Word form will contain all the answers entered into the custom fields.
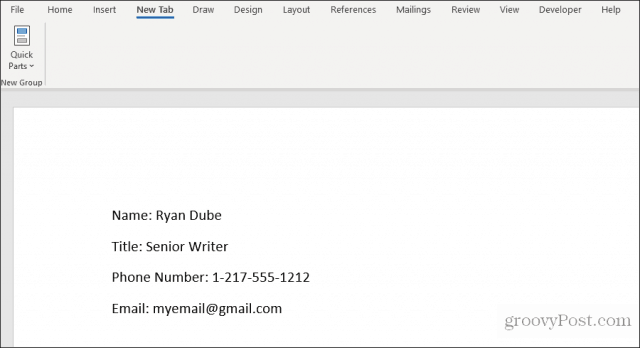
Your user can then save the form and send it to you with all the fields properly filled out.
As you can see, this approach saves a lot of time because all of the field values can be entered quickly in one place.
Create Fillable Forms In Word with Developer Tools
If you need a more versatile form, then you’re better off using developer tools in Word to create the required form entry fields. Before you can do this, you’ll need to enable the developer menu in Word.
Select the File menu, and select Options. In the Word Options dialog window, select Customize Ribbon from the left navigation pane. Under Choose commands from, select Main tabs. If Developer is already displayed in the right pane, select the checkbox to enable it. If it isn’t, select Developer in the left pane and select the Add>> button to add it to the right pane.
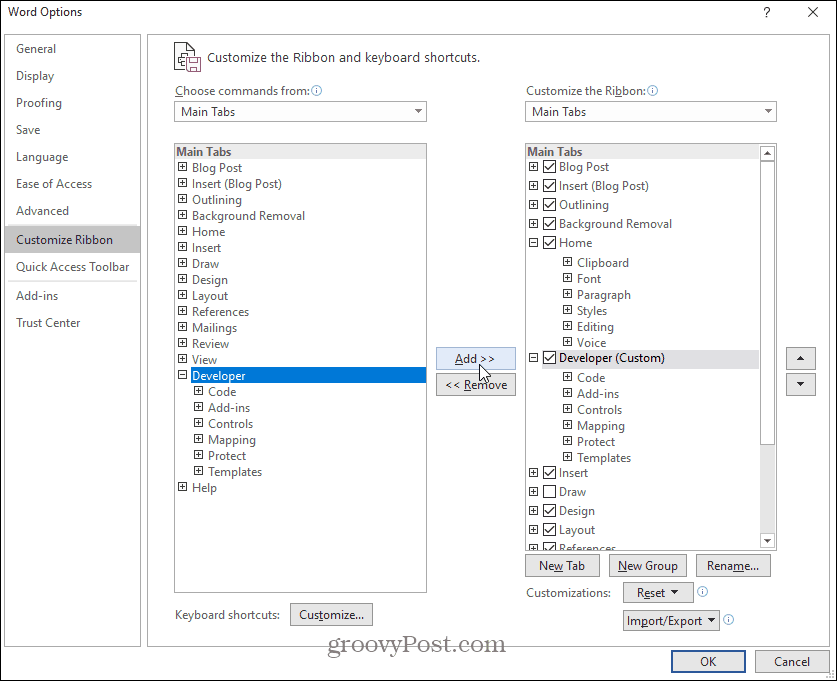
Select OK to finish. Now you should see Developer appear in the Windows menu.
Open a new Word document by selecting File from the menu, select New, and choose Blank document.
Select Developer in the menu, and select Design Mode.
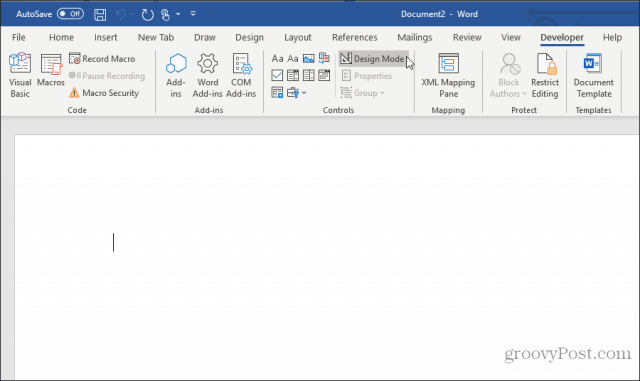
Insert a Text Field
For a text field entry, choose the Plain Text Content Control.

This will insert a text entry box into the fillable form.

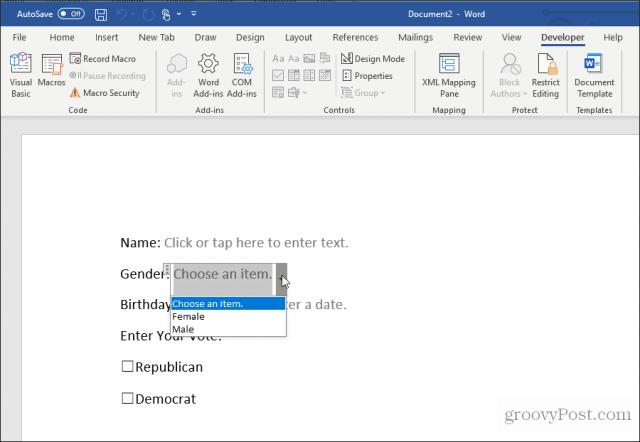
Insert a Drop-Down List
To add a dropdown box entry, select Drop-Down List Content Control.

This will insert a drop-down list into the fillable form. However, to fill out the list box, you need to set up the list. To do this, right-click the drop-down list control and select Properties. In the Content Control Properties box, select the Add button to add new items to the list.
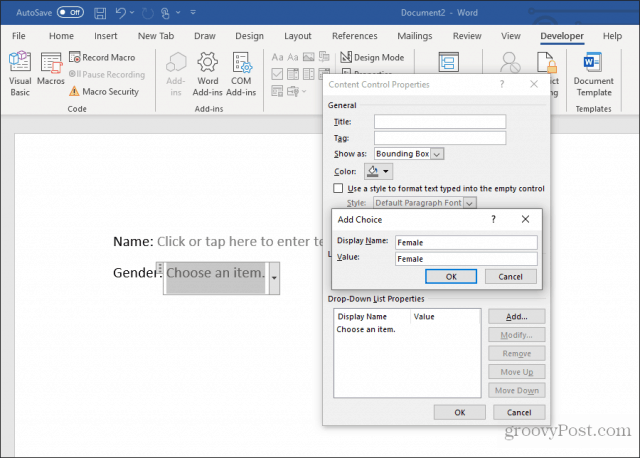
When you’re done, select OK. Now you’ll see the drop-down list appear in your fillable form.
You won’t see the dropdown list while you’re creating the form in Design Mode. But you can select Design Mode to turn it off and test what the drop-down list will look like.

Insert a Date Picker
Another useful tool to use for a fillable form in Word is the Date Picker Content Control. Select this to add a date picker option in your form.

You don’t have to do anything to customize this control. It’ll work as required to let the user choose a date for this field.
Insert Check Boxes
The next control that’s useful in a fillable form is the Check Box Content Control.

First, insert the number of checkboxes you need in your form after writing the question above it.
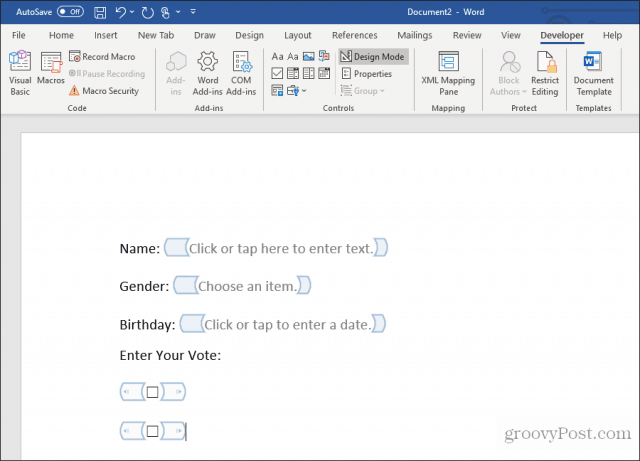
Next, type the text for each selection beside each checkbox.
Testing Your Fillable Form in Word
You can add any number of controls throughout your fillable form to suit your needs. When you’re finished, select Design mode from the Controls menu to turn off Design Mode and see your finished fillable form.
Test all of the controls in your form to ensure that they work as you expect.
As you can see, creating a fillable form in Word isn’t as difficult as it may seem. The approach you choose depends on the complexity of the form and the types of responses you’re looking for.
Give it a try and see what kind of form you can create in Word using either of the two methods above.
![]()
Продолжаем серию заметок по теме автоматизации документов.
Сегодня я расскажу, как добавить к вашим документам специальную форму, с помощью которой можно легко и просто вводить данные в документ. Введенные в форму данные адресата по нажатию кнопки на форме будут автоматически внесены в документ.
Предполагается, что у вас есть готовый шаблон документа, например, письма. В качестве образца можно использовать подготовленный мною шаблон официального письма вымышленной организации.
Использование шаблона необходимо, ведь на его основе вы в дальнейшем будете создавать свои документы.
Распакуйте файл из архива и поместите его в папку с шаблонами редактора Word. Как правило, эта папка находится по адресу: C:Documents and SettingsИМЯ_ПОЛЬЗОВАТЕЛЯApplication DataMicrosoftШаблоны.
Итак, шаблон документа у нас есть, открыт и готов к изменению. В первую очередь нам необходимо добавить закладки в те позиции в документе, куда вы собираетесь вставлять данные из формы. Как правило, письмо должно содержать фамилию, имя и отчество адресата, наименование организации адресата, полный почтовый адрес и приветствие.
Исходя из этого мы добавим в документ следующие закладки:
- name
- company
- address
- date
- salutation
Обратите внимание, реквизитов адресата, которые должно содержать письмо, на самом деле может быть много, а закладок мы определили всего пять. Это логично, так как в дальнейшем мы будем подставлять несколько реквизитов к одной закладке (например, адрес, который будет состоять из индекса, названия города, области, улицы).
После добавления закладок (и если у вас включен режим отображения меток закладок), наш документ будет выглядеть примерно как на рисунке ниже (щелкните по картинке для ее увеличения):

Эти метки закладок после нажатия кнопки «Внести данные» будут заменены на конкретные тексты.
Не забывайте сохранять сделанные вами изменения в шаблоне на всякий «пожарный» случай.
На втором шаге мы создадим специальную форму с текстовыми полями, которая будет открываться при создании каждого нового документа на основе вашего шаблона письма. Кратко расскажу, как добавить в шаблон форму.
- Откройте редактор Visual Basic с помощью сочетания клавиш «Alt»+«F11». Убедитесь, что в окне проектов выделен ваш шаблон:
- В меню Insert выберите команду UserForm. В окне проектов будет создан новый объект Forms с пустой формой или просто добавлен в проект модуль userForm.
- Разместите на форме необходимые элементы. Например, как на рисунке ниже:
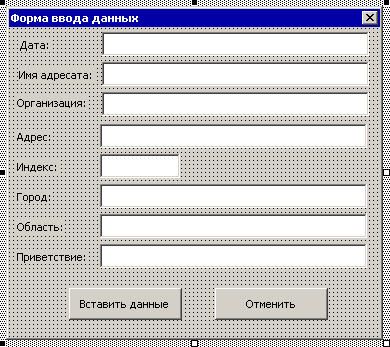
Текстовые поля (со стандартными именами TextBox1) были мною переименованы с учетом их назначения. Обратите внимание в нижеприведенном коде, как они теперь называются.
Третий шаг — написание кода для элементов нашей формы.
- В меню Insert выберите команду Module. В окне проектов будет создан новый модуль Module1. Дважды щелкните по модулю и перейдите в окно редактирования кода. Вставьте следующий код:
- Перейдите на модуль UserForm1. Переименуйте его в MyForm.
- Нажмите клавишу «F7» и в окне редактора кода вставьте следующий код (содержит процедуры для действий с элементами формы):
- Ниже этого кода вставьте следующий код:
- Сохраните проект и попробуйте создать на основе вашего шаблона новый документ. Введите необходимые данные в поля формы и нажмите кнопку «Внести данные».
Sub AutoNew()
Dim oF As MyForm
Set oF = New MyForm
oF.Show
Set oF = Nothing
End Sub
Этот код запускает форму каждый раз при создании нового документа на основе вашего шаблона.
Private Sub CommandButton1_Click()
'Действия формы по нажатию кнопки "Ввести данные"
Dim bm As Bookmarks
Dim rng As Word.Range
Dim addr As String
Dim sText As String
Dim sResult1 As String
Dim sResult2 As String
Dim arName() As String
Set bm = ActiveDocument.Bookmarks
sText = Me.tbName.Text  'присваиваем переменной текст из текстового поля "Имя адресата"
arName = Split(sText)   'создаем массив из отдельных слов, вместе составляющих ФИО адресата
'Действия с полем "Дата"
With Me.tbDate
   If Not IsDate(.Text) Then  'если данные введены не в формате даты, то
      MsgBox "В поле ""Дата"" неверно введены данные."   'выводим сообщение
      .Text = Format(Now, "dd MMMM yyyy") 'автоматически заполняем поле текущей датой
      .SetFocus   'фокус на поле "Дата"
      .SelStart = 0  '
      .SelLength = Len(.Text) 'выделяем весь текст в поле, начиная с левого края
      Exit Sub
   Else
      Set rng = bm("date").Range 'присваиваем переменной rng ссылку на закладку "date"
      rng.Text = .Text & " г."   'определяем новый текст закладки
      bm.Add "date", rng   'заменяем закладку
   End If
End With
Set rng = bm("name").Range 'присваиваем переменной rng ссылку на закладку "name"
sResult1 = arName(0) & " " 'присваиваем переменной значение первого слова из поля "Имя адресата" и добавляем пробел
sResult1 = sResult1 & Left(arName(1), 1) & ". " 'добавляем к первому слову первую букву Имени и точку
sResult1 = sResult1 & Left(arName(2), 1) & "."  'добавляем первую букву Отчества и точку
rng.Text = sResult1  'определяем новый текст закладки
bm.Add "name", rng   'заменяем закладку
Set rng = bm("company").Range 'присваиваем переменной rng ссылку на закладку "company"
rng.Text = Me.tbCompany  'определяем новый текст закладки
bm.Add "company", rng   'заменяем закладку
If Len(sText) > 0 Then  'если в поле "Имя адресата" есть какие-то символы, то
    sText = sResult1 & vbCr   'присваиваем переменной текст закладки "name" и переводим строку
End If
If Len(Me.tbCompany.Text) > 0 Then  'если в поле "Организация" есть какие-то символы, то
   Me.tbCompany.Text = Me.tbCompany.Text & vbCr   'присваиваем переменной текст из поля и переводим строку
End If
If Len(Me.tbAddress.Text) > 0 Then  'если в поле "Адрес" есть какие-то символы, то
   Me.tbAddress.Text = Me.tbAddress.Text   'присваиваем переменной текст из поля
End If
If Len(Me.tbIndex.Text) > 0 Then 'если в поле "Индекс" есть какие-то символы, то
   Me.tbIndex.Text = Me.tbIndex.Text & ","    'присваиваем переменной текст из поля и добавляем запятую
End If
If Len(Me.tbCity.Text) > 0 Then  'если в поле "Город" есть какие-то символы, то
   Me.tbCity.Text = Me.tbCity.Text & "," 'присваиваем переменной текст из поля и добавляем запятую
End If
If Len(Me.tbOblast.Text) > 0 Then   'если в поле "Область" есть какие-то символы, то
   Me.tbOblast.Text = Me.tbOblast.Text & "," 'присваиваем переменной текст из поля и добавляем запятую
End If
'присваиваем переменной фрагментов текста из полей "Индекс", "Город", "Область" и "Адрес"
addr = Me.tbIndex.Text & " " & Me.tbCity.Text & " " & Me.tbOblast.Text & " " & Me.tbAddress.Text
Set rng = bm("address").Range 'присваиваем переменной rng ссылку на закладку "address"
rng.Text = addr   'определяем новый текст закладки из переменной addr
bm.Add "address", rng   'заменяем закладку
Set rng = bm("salutation").Range 'присваиваем переменной rng ссылку на закладку "salutation"
rng.Text = Me.tbSalutation.Text  'определяем новый текст закладки
bm.Add "salutation", rng   'заменяем закладку
Unload Me   'Закрываем форму
ActiveDocument.Range.Fields.Update  'Обновляем все поля в документе
End Sub
Private Sub CommandButton2_Click()
'Выход из формы и закрытие окна документа при нажатии кнопки "Отменить"
On Error GoTo ErrLabel
Unload Me    'Закрываем форму
ActiveDocument.Close  'Закрываем текущий документ
ErrLabel:
End Sub
Private Sub tbIndex_Exit(ByVal Cancel As MSForms.ReturnBoolean)
'Устанавливаем правила заполнения поля "Индекс"
With Me.tbIndex
   If Not IsNumeric(.Text) Or Len(.Text) <> 6 Then 'если в поле "Индекс" данные не цифры и меньше 6, то
      MsgBox "Ошибка!" & " " & "Введите 6 цифр индекса города или района." 'выводим сообщение
      Cancel = True  'возвращаемся к полю
      .Text = ""  'очищаем поле
      .SetFocus
   End If
End With
End Sub
Private Sub tbName_Exit(ByVal Cancel As MSForms.ReturnBoolean)
'При выходе из поля "Имя адресата" его имя подставляется в поле "Приветствие"
sText = Me.tbName.Text
arName = Split(sText)
sResult2 = arName(1) & " "
sResult2 = sResult2 & arName(2)
Me.tbSalutation = "Уважаемый " & sResult2 & "!"
End Sub
Private Sub UserForm_Initialize()
Me.tbDate = Format(Now, "dd MMMM yyyy")
With Me.tbName
   .Text = "Фамилия Имя Отчество"
   .SetFocus
   .SelStart = 0
   .SelLength = Len(.Text)
End With
End Sub
Вы можете скачать уже готовый шаблон письма и подредактировать его под свои нужды.
В этом шаблоне есть небольшой недостаток: в текстовые поля нужно вводить информацию в правильном формате и регистре, иначе в итоговом письме придется вручную править недочеты.
Образцом для шапки шаблона послужила картинка из шаблона городского письма редактора Word 2007.
Образцом кода для данного макроса и формы послужила заметка Gregory Maxey Address a Letter Using as UserForm.
A few days back, I was working with one of my customers and his requirement was to make the responses in Microsoft Forms available in Word’s document format. The only reason why he wanted to make these responses available specifically in Word formatted documents, was that his team would later go through the individual responses and add comments to them.
We were brainstorming on how we could fulfill this requirement , when I thought of extracting the responses from the Microsoft Forms and then creating an HTML string composed of those responses. Once I had that HTML string, I could then use one of the third party converters available in the market and bring about it’s conversion to Word.
I was able to achieve this by creating a simple Power Automate solution and using Muhimbi PDF Converter services online , a very flexible product that supports cross conversion between different file formats.
I have distilled my solution into this blog post and following it will allow you to capture data from Microsoft forms and represent it in a Word document. An added feature is that you can also represent this data in Excel, since HTML allows you the ability to showcase data in the form of tables. Perfect- an elegant and flexible solution!
Prerequisites
Before we begin, please make sure the following prerequisites are in place:
- An Office 365 subscription with access to Power Automate (Flow).
- Muhimbi PDF Converter Services Online Full or trial subscription (Start trial).
- Appropriate privileges to create Flows.
- Working knowledge of Power Automate (Flow).
Now, on to the details of how to create a Power Automate (Flow) solution to capture responses from Microsoft forms and convert them into a Word document.
Step 1 – Trigger
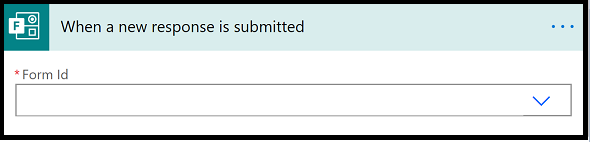
- We use the trigger ‘When a new response is submitted’.
- This means that, whenever a new response gets submitted on the configured Microsoft Form, the Power Automate will get triggered automatically.
- For the ‘Form Id’ in the image below, choose the correct Microsoft Form from the drop down menu.
Step 2 – Get response details
- Choose the same Microsoft form as the one in the ‘Trigger’ action above from the drop down menu.
- For the ‘Response Id‘ in the image below, navigate to ‘Add Dynamic content’ screen and choose ‘Response Id‘ from the ‘When a new response is submitted‘ action.

Step 3 – Compose HTML
- Next add a ‘Compose‘ action to your Power Automate (Flow) solution.
- For the ‘Inputs‘ as shown in the image below, we will now configure some HTML so as to represent the captured response in a neat manner in the converted Word document.
- Please copy the HTML configured below this image and paste it in the ‘Inputs‘ field. When doing this, please be sure not to include the quotes.

<!DOCTYPE html>
<html>
<head>
<style>
table {
font-family: arial, sans-serif;
border-collapse: collapse;
width: 100%;
}td, th {
border: 1px solid #dddddd;
text-align: left;
padding: 8px;
}
</style>
</head>
<body><h2>Response Details</h2>
<table>
<tr>
<th>Email of responder</th>
<th>Full name</th>
<th>DOB</th>
<th>Option no 1/2</th>
</tr><tr>
<td> </td>
<td> </td>
<td> </td>
<td> </td>
</tr>
</table></body>
</html>
Important note – You will notice the <td> tags in red in the HTML above. Well you need to navigate to the ‘Add Dynamic content‘ line and choose the responses from the ‘Get response details‘ action and insert it over there, as shown in the image below.

Step 4 – Convert Document
- Next, add a ‘Convert document‘ action and for the ‘Source File Name’,include a proper name with ‘.html‘ as an extension. Here we are using Test.html since we are working with a test Microsoft form.
- For the ‘Source File Content‘, navigate to ‘Add Dynamic Content‘ line, and choose ‘Outputs‘ inside the ‘Compose‘ action.
- Choose ‘Output format‘ as ‘DOCX‘ from the drop down menu.

Step 5 – Create File
- Add a ‘Create File‘ action and for the ‘Site Address‘ in it, choose the correct site address from the drop down menu.
- Select the correct ‘Folder Path‘ where the converted Word document file should be created.
- Give a meaningful ‘File Name‘ to the created Word document, but make sure you remember to add the extension ‘.docx‘ after the ‘File Name’ and to make the file name unique, or multiple runs of the flow will overwrite the same file. I recommend basing it on the source file name, but with some kind of suffix.
- Select the ‘Processed file content‘ option, shown in the image below, to populate the ‘File Content‘ field.

Now go ahead and fill up your Microsoft Form with some responses to set your Power Automate solution in action.
Let us see how it worked out for me.
Microsoft Form with responses –

Output – Word document with captured responses

Keep checking this blog for exciting new articles about Power Automate, SharePoint Online, Power Apps, as well as document conversion and manipulation using The Muhimbi PDF Converter.

Published by Yash kamdar
Yash Kamdar is a Cloud Engineer based out of India. He is an Author, Trainer, Speaker and also run his own Youtube channel- Power Podium.
View all posts by Yash kamdar
Published
April 27, 2020February 28, 2022