
Word for Microsoft 365 Word for the web Word 2021 Word 2019 Word 2016 Word 2013 Word 2010 Word 2007 More…Less
In Word, you can automate frequently used tasks by creating and running macros. A macro is a series of commands and instructions that you group together as a single command to accomplish a task automatically.
To save time on tasks you do often, bundle the steps into a macro. First, you record the macro. Then you can run the macro by clicking a button on the Quick Access Toolbar or pressing a combination of keys. It depends on how you set it up.
-
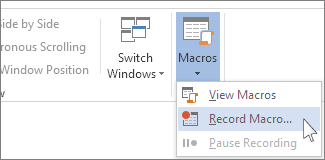
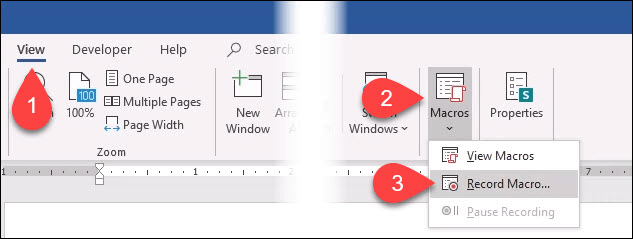
Click View > Macros > Record Macro.

-
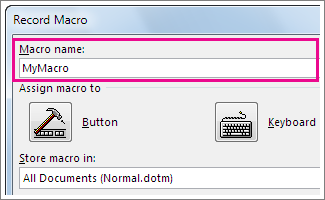
Type a name for the macro.
-
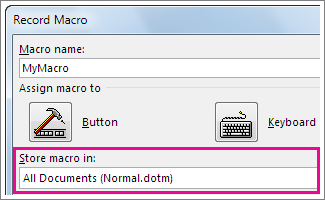
To use this macro in any new documents you make, be sure the Store macro in box says All Documents (Normal.dotm).
-
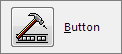
To run your macro when you click a button, click Button.
-
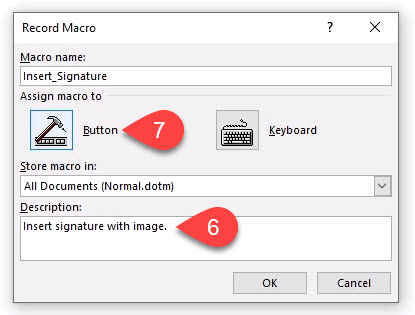
Click the new macro (it’s named something like Normal.NewMacros.<your macro name>), and click Add.
-
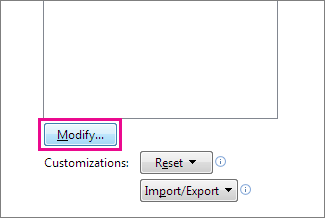
Click Modify.
-
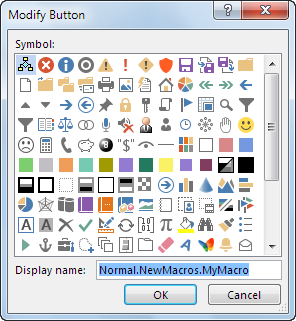
Choose a button image, type the name you want, and click OK twice.
-
Now it’s time to record the steps. Click the commands or press the keys for each step in the task. Word records your clicks and keystrokes.
Note: Use the keyboard to select text while you’re recording your macro. Macros don’t record selections made with a mouse.
-
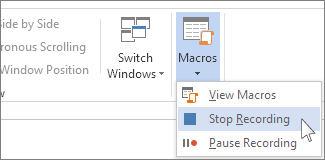
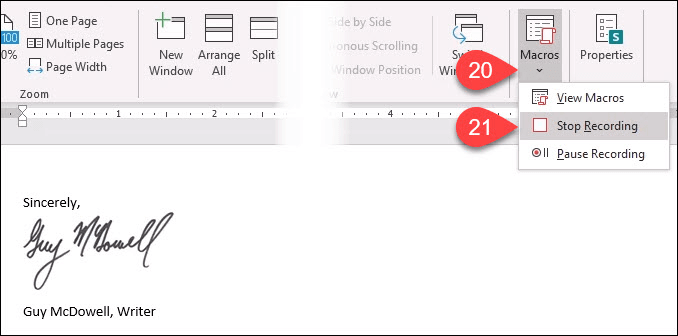
To stop recording, click View > Macros > Stop Recording.
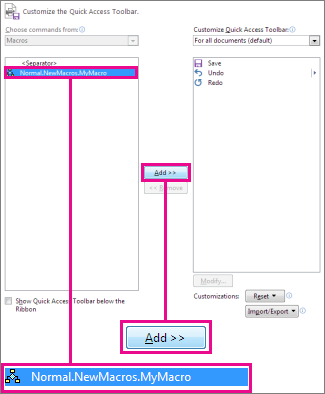
The button for your macro appears on the Quick Access Toolbar.

To run the macro, click the button.
-
Click View > Macros > Record Macro.
-
Type a name for the macro.
-
To use this macro in any new documents you make, be sure the Store macro in box says All Documents (Normal.dotm).
-
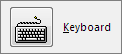
To run your macro when you press a keyboard shortcut, click Keyboard.
-
Type a combination of keys in the Press new shortcut key box.
-
Check to see whether that combination’s already assigned to something else. If it’s already assigned, try a different combination.
-
To use this keyboard shortcut in any new documents you make, be sure the Save changes in box says Normal.dotm.
-
Click Assign.
-
Now it’s time to record the steps. Click the commands or press the keys for each step in the task. Word records your clicks and keystrokes.
Note: Use the keyboard to select text while you’re recording your macro. Macros don’t record selections made with a mouse.
-
To stop recording, click View > Macros > Stop Recording.
To run the macro, press the keyboard shortcut keys.
To run a macro, click the button on the Quick Access Toolbar, press the keyboard shortcut, or you can run the macro from the Macros list.
-
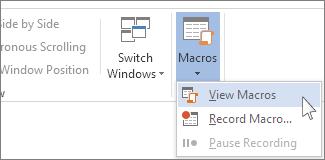
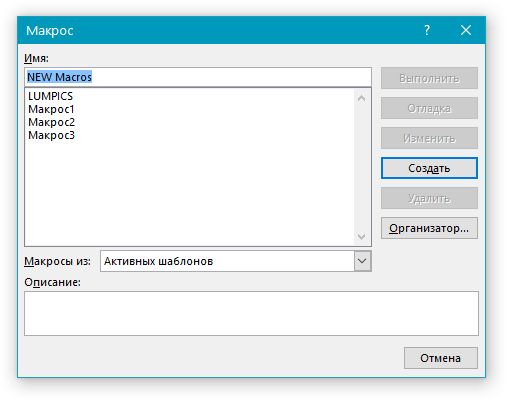
Click View > Macros > View Macros.
-
In the list under Macro name, click the macro you want to run.
-
Click Run.
To make a macro from one document available in all new documents, add it to the Normal.dotm template.
-
Open the document that contains the macro.
-
Click View > Macros > View Macros.
-
Click Organizer.
-
Click the macro you want to add to the Normal.dotm template, and click Copy.

-
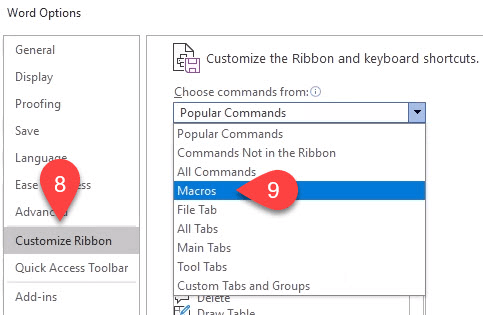
Click File > Options > Customize Ribbon.
-
Under Choose commands from, click Macros.
-
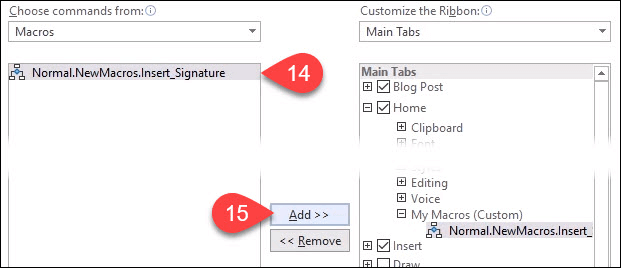
Click the macro you want.
-
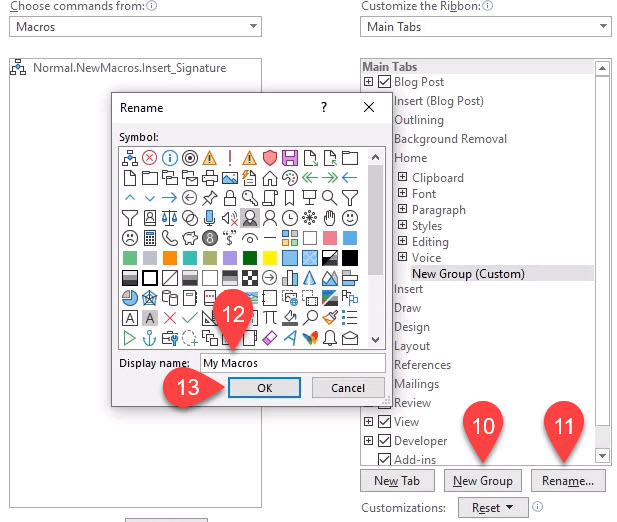
Under Customize the ribbon, click the tab and custom group where you want to add the macro.
If you don’t have a custom group, click New Group. Then click Rename and type a name for your custom group.
-
Click Add.
-
Click Rename to choose an image for the macro and type the name you want.
-
Click OK twice.
-
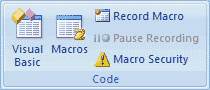
On the Developer tab, in the Code group, click Macros.
-
In the Macro name box, type a name for the macro.
Note: If you give a new macro the same name as a built-in macro in Word, the new macro actions will replace the built-in macro. To view a list of built-in macros, click Word Commands in the Macros in list.
-
In the Macros in list, click the template or document in which you want to store the macro.
To make your macro available in all documents, be sure to click Normal.dotm.
-
Click Create to open the Visual Basic Editor.
After you open the Visual Basic Editor, you may want more information about working with Visual Basic for Applications. For more information, click Microsoft Visual Basic Help on the Help menu or press F1.
You can record a sequence of actions, or you can write a macro from scratch by entering Visual Basic for Applications code in the Visual Basic Editor.
Note: To work with macros in Office Word 2007, you need to show the Developer tab.
-
Click the Microsoft Office Button
, and then click Word Options. -
Click Popular.
-
Under Top options for working with Word, select the Show Developer tab in the Ribbon check box.
Note: The Ribbon is a component of the Microsoft Office Fluent user interface.
 , and then click Word Options.
-
On the Developer tab, in the Code group, click Record Macro.
-
In the Macro name box, type a name for the macro.
Note: If you give a new macro the same name as a built-in macro in Office Word 2007, the new macro actions will replace the built-in macro. To view a list of built-in macros, on the Developer tab, in the Code group, click Macros. In the Macros in list, click Word Commands.
-
In the Store macro in box, click the template or document in which you want to store the macro.
Important: To make your macro available in all documents, be sure to click Normal.dotm.
-
In the Description box, type a description of the macro.
-
Do one of the following:
-
Begin recording To begin recording the macro without assigning it to a button on the Quick Access Toolbar or to a shortcut key, click OK.
-
Create a button To assign the macro to a button on the Quick Access Toolbar, do the following:
-
Click Button.
-
Under Customize Quick Access Toolbar, select the document (or all documents) for which you want to add the macro to the Quick Access Toolbar.
Important: To make your macro available in all documents, be sure to click Normal.dotm.
-
Under Choose commands from dialog box, click the macro that you are recording, and then click Add.
-
To customize the button, click Modify.
-
Under Symbol, click the symbol that you want to use for your button.
-
In the Display name box, type the macro name that you want to display.
-
Click OK twice to begin recording the macro.
The symbol that you choose is displayed in the Quick Access Toolbar. The name that you type is displayed when you point to the symbol.
-
-
Assign a keyboard shortcut To assign the macro to a keyboard shortcut, do the following:
-
Click Keyboard.
-
In the Commands box, click the macro that you are recording.
-
In the Press new shortcut key box, type the key sequence that you want, and then click Assign.
-
Click Close to begin recording the macro.
-
-
-
Perform the actions that you want to include in the macro.
Note: When you record a macro, you can use the mouse to click commands and options, but not to select text. You must use the keyboard to select text. For more information about selecting text by using the keyboard, see Select text.
-
To stop recording your actions, click Stop Recording in the Code group.
Change the keyboard shortcut for a macro
-
Click the Microsoft Office Button
, and then click Word Options. -
Click Customize.
-
Next to Keyboard shortcuts, click Customize.
-
In the Categories list, click Macros.
-
In the Macros list, click the macro that you want to change.
-
In the Press new shortcut key box, type the key combination that you want to choose.
-
Check the Current keys box to make sure that you aren’t assigning a key combination that you already use to perform a different task.
-
In the Save changes in list, click the option that matches where you want to run your macro.
Important: To make your macro available in all documents, be sure to click Normal.dotm.
-
Click Close.
-
On the Developer tab, in the Code group, click Macros.
-
In the list under Macro name, click the macro that you want to run.
-
Click Run.
-
On the Developer tab, in the Code group, click Macros.
-
In the Macro name box, type a name for the macro.
Note: If you give a new macro the same name as a built-in macro in Office Word 2007, the new macro actions will replace the built-in macro. To view a list of built-in macros, click Word Commands in the Macros in list.
-
In the Macros in list, click the template or document in which you want to store the macro.
To make your macro available in all documents, be sure to click Normal.dotm.
-
Click Create to open the Visual Basic Editor.
After you open the Visual Basic Editor, you may want more information about working with Visual Basic for Applications. For more information, click Microsoft Visual Basic Help on the Help menu or press F1.
To make quick work of tasks that you do often, in the desktop version of Word you can bundle the steps into macros that run with a single click. In Word for the web, you have to step through such tasks manually.
If you have Word, first click Open in Word to open your document in Word.

Then follow the instructions for the desktop version of Word.
When you run the macro in Word and save the document, you’ll see the results of the macro when you reopen your doc in Word for the web.
Need more help?
Содержание
- Области использования макросов:
- Включение макросов
- Запись макросов
- Изменение комбинаций клавиш для макроса
- Запуск макроса
- Создание нового макроса
- Вопросы и ответы
![]()
Макрос — это набор определенных действий, команд и/или инструкций, которые сгруппированы в одну целостную команду, обеспечивающую автоматическое выполнение той или иной задачи. Если вы активный пользователь MS Word, вы тоже можете автоматизировать часто выполняемые задачи, создав для них соответствующие макросы.
Именно о том, как включить макросы в Ворд, как их создавать и использовать для упрощения, ускорения рабочего процесса и пойдет речь в этой статье. И все же, для начала не лишним будет более подробно разобраться в том, зачем вообще они нужны.
Области использования макросов:
- 1. Ускорение часто выполняемых операций. В числе таковых форматирование и редактирование.
2. Объединение нескольких команд в целостное действие “от и до”. Например, с помощью макроса можно вставить таблицу заданного размера с необходимым количеством строк и столбцов.
3. Упрощение доступа к некоторым параметрам и инструментам, расположенным в различных диалоговых окнах программы.
4. Автоматизация сложных последовательностей действий.
Последовательность макросов может быть записана или создана с нуля путем введения кода в редактор Visual Basic на одноименном языке программирования.
Включение макросов
По умолчанию макросы доступны не во всех версиях MS Word, точнее, они просто не включены. Чтобы активировать их необходимо включить средства разработчика. После этого на панели управления программы появится вкладка “Разработчик”. О том, как это сделать, читайте ниже.
Примечание: В версиях программы, в которых макросы доступны изначально (например, Ворд 2016), средства для работы с ними находятся во вкладке “Вид” в группе “Макросы”.
1. Откройте меню “Файл” (кнопка “Microsoft Office” ранее).
2. Выберите пункт “Параметры” (ранее “Параметры Word”).
3. Откройте в окне “Параметры” категорию “Основные” и перейдите в группе “Основные параметры работы”.
4. Установите галочку напротив пункта “Показывать вкладку “Разработчик” на ленте”.
5. На панели управления появится вкладка “Разработчик”, в которой и будет находиться пункт “Макросы”.

Запись макросов
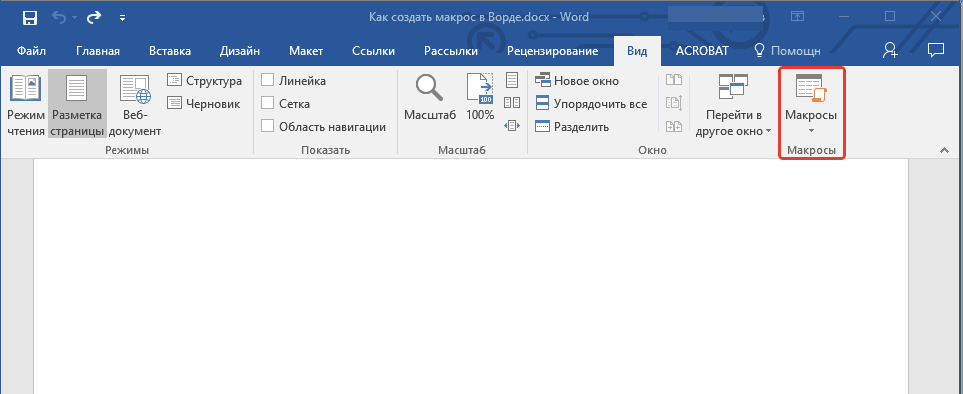
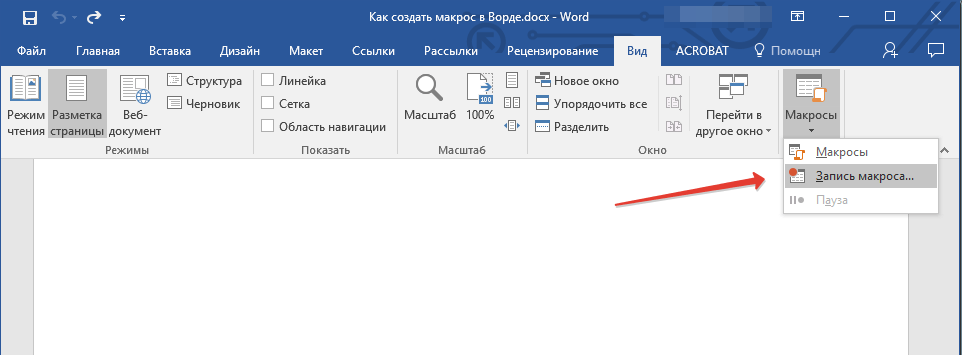
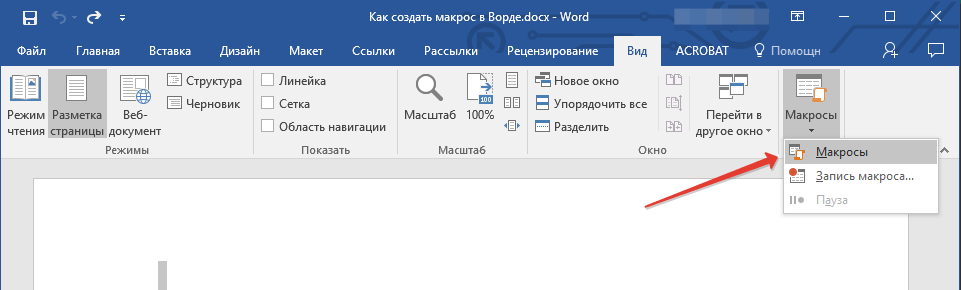
1. Во вкладке “Разработчик” или, в зависимости от используемой версии Ворда, во вкладке “Вид”, нажмите кнопку “Макросы” и выберите пункт “Запись макроса”.
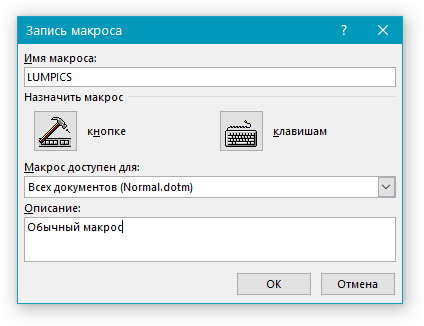
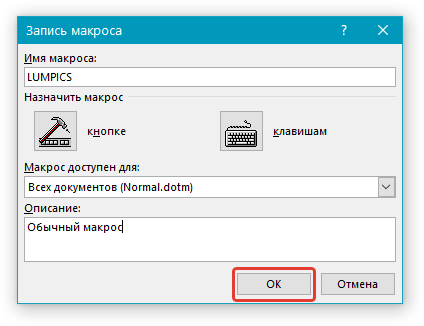
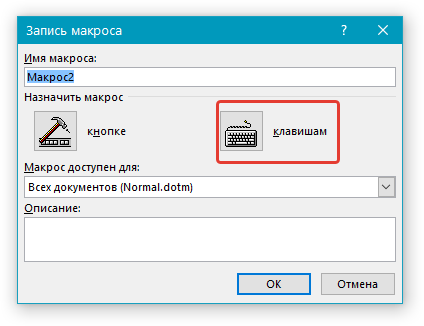
2. Задайте имя для создаваемого макроса.
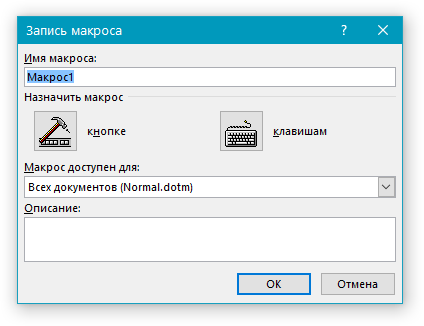
Примечание: Если вы, создавая новый макрос, даете ему точно такое же имя, как у встроенного в программу, действия, записанные вами в новый макрос, будут выполняться взамен стандартным. Для просмотра макросов, доступных в MS Word по умолчанию, в меню кнопки “Макросы” выберите “Команды Word”.
3. В пункте “Макрос доступен для” выберите то, для чего он будет доступен: шаблон или документ, в который его следует сохранить.
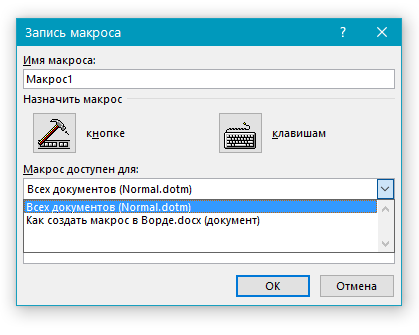
- Совет: Если вы хотите, чтобы создаваемый макрос был доступен во всех документах, с которыми вы работаете в дальнейшем, выберите параметр “Normal.dotm”.
4. В поле “Описание” введите описание для создаваемого макроса.
5. Выполните одно из действий, указанных ниже:
- Нажмите “кнопке”;
- Выберите документ или документы, в которых требуется добавить создаваемый макрос на панель быстрого доступа (раздел “Настройка панели быстрого доступа”);

- Совет: Чтобы создаваемый макрос был доступен для всех документов, выберите параметр “Normal.dotm”.
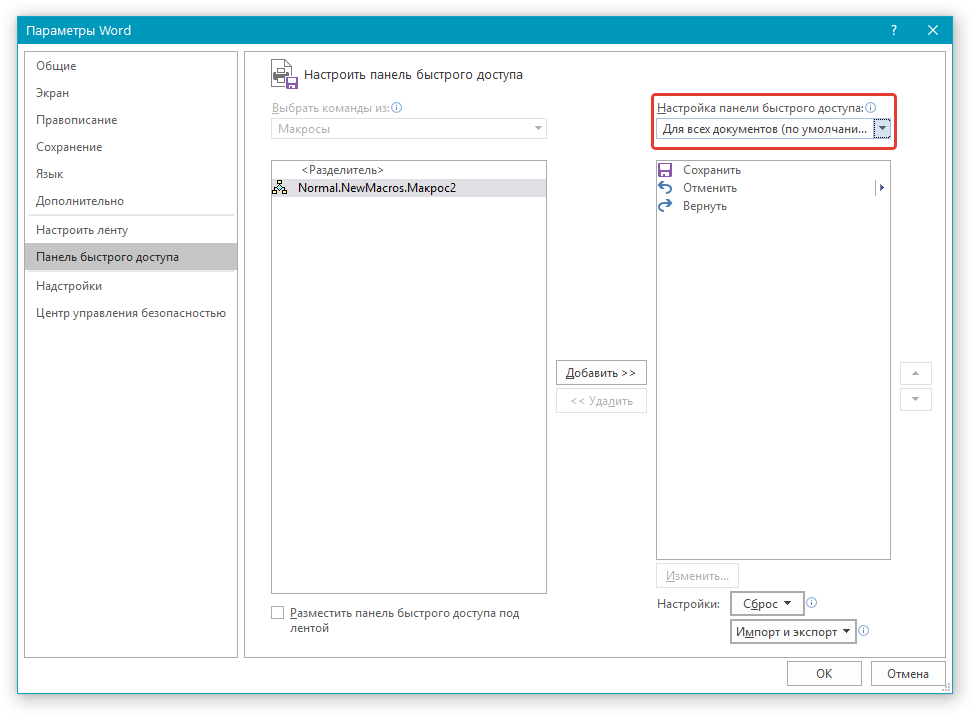
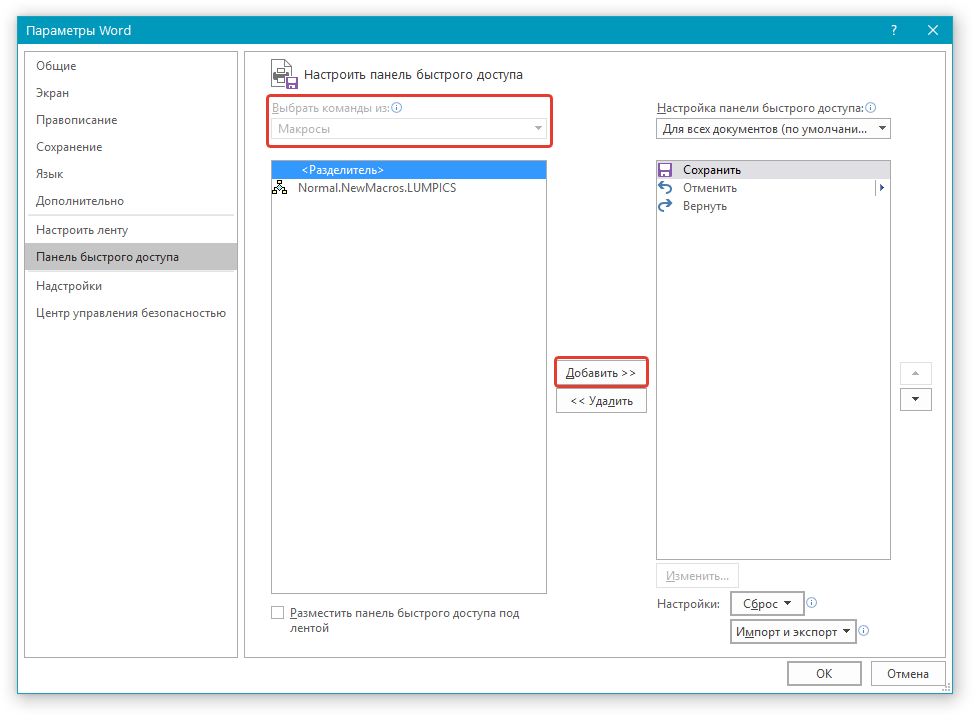
В окне “Макрос из” (ранее “Выбрать команды из”) выберите макрос, который следует записать, нажмите “Добавить”.
- Если вы хотите настроить эту кнопку, нажмите “Изменить”;
- Выберите подходящий символ для создаваемой кнопки в поле “Символ”;
- Введите имя макроса, которое будет отображаться в дальнейшем в поле “Отображаемое имя”;
- Для начала записи макроса дважды кликните по кнопке “ОК”.
Символ, который вы выбрали, будет отображаться на панели быстрого доступа. При наведении указателя курсора на этот символ, будет отображаться его имя.
- Кликните по кнопке “Клавишами” (ранее “Клавиатура”);
- В разделе “Команды” выберите макрос, который необходимо записать;
- В разделе “Новое сочетание клавиш” введите любую удобную для вас комбинацию, после чего нажмите кнопку “Назначить”;
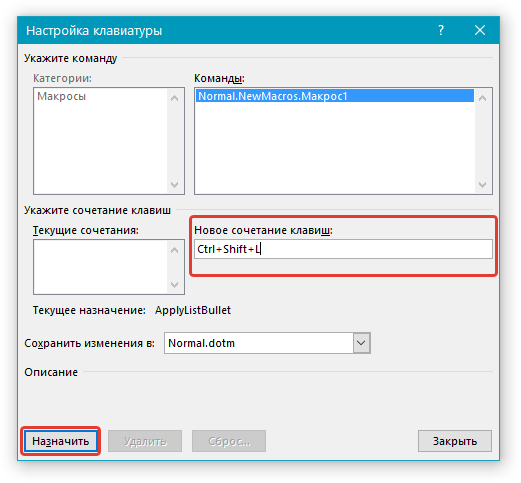
- Для начала записи макроса нажмите “Закрыть”.
6. Выполните поочередно все те действия, которые необходимо включить в макрос.
Примечание: Во время записи макроса нельзя использовать мышь для выделения текста, а вот для выбора команд и параметров нужно использовать именно ее. При необходимости, выделить текст можно с помощью клавиатуры.
Урок: Горячие клавиши в Ворде
7. Для остановки записи макроса нажмите “Остановить запись”, эта команда расположена в меню кнопки “Макросы” на панели управления.

Изменение комбинаций клавиш для макроса
1. Откройте окно “Параметры” (меню “Файл” или кнопка “MS Office”).
2. Выберите пункт “Настройка”.
3. Нажмите на кнопку “Настройка”, расположенную рядом с полем “Сочетание клавиш”.
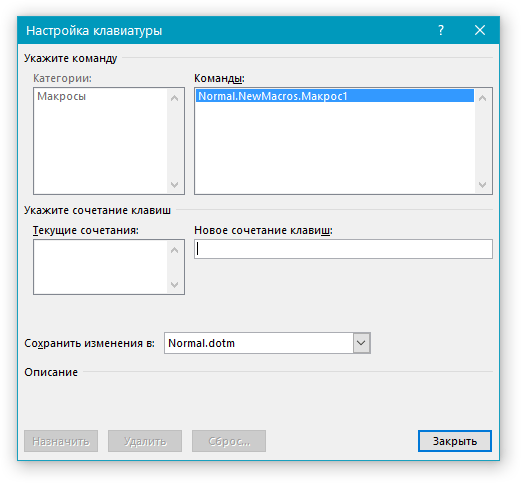
4. В разделе “Категории” выберите “Макросы”.
5. В открывшемся списке выберите макрос, который необходимо изменить.
6. Кликните по полю “Новое сочетание клавиш” и нажмите клавиши или комбинацию клавиш, которые вы хотите назначить для конкретного макроса.

7. Убедитесь, что назначенное вами сочетание клавиш не используется для выполнения другой задачи (поле “Текущее сочетание”).
8. В разделе “Сохранить изменения” выберите подходящий вариант (место) для сохранения места, где макрос будет запускаться.

- Совет: Если вы хотите, чтобы макрос был доступен к использованию во всех документах, выберите параметр “Normal.dotm”.
9. Нажмите “Закрыть”.
Запуск макроса
1. Нажмите на кнопку “Макросы” (вкладка “Вид” или “Разработчик”, в зависимости от используемой версии программы).

2. Выберите макрос, который хотите запустить (список “Имя макроса”).
3. Нажмите “Выполнить”.

Создание нового макроса
1. Нажмите кнопку “Макросы”.
2. Задайте имя для нового макроса в соответствующем поле.
3. В разделе “Макросы из” выберите шаблон или документ, для которого будет сохранен создаваемый макрос.

- Совет: Если вы хотите, чтобы макрос стал доступен во всех документах, выберите параметр “Normal.dotm”.
4. Нажмите “Создать”. Будет открыт редактор Visual Basic, в котором и можно будет создать новый макрос на языке Visual Basic.
На этом все, теперь вы знаете, что такое макросы в MS Word, зачем они нужны, как их создавать и как с ними работать. Надеемся, информация из этой статьи будет полезной для вас и действительно поможет упростить, ускорить работу со столь продвинутой офисной программой.
The Microsoft Office suite is one of the most popular office solutions. From Word and Excel to PowerPoint – the practical applications for writing, calculating, and presenting have been proving their worth for years. But many users are not even aware of the range of features that they provide. For instance, MS Office programs include a function that allows you to create, save, and execute macros in order to automate certain tasks and processes. Especially for regularly recurring workflows, this feature lets you save valuable time and effort.
But what role do macros play in Word and how do these command sequences work exactly? Also find out how to create macros in Word and integrate them into your documents.
Contents
- What is a Word macro?
- How Do Macros Work in Word?
- Creating Macros in Word: How it Works
- Recording Word Macros Executed by Button
- Creating Word Macros Executed via Key Combination
- Executing Word Macros
- Adding macro buttons to a Word tab ribbon
- Importing Existing Macros in Word
- Word Macros: Examples of Useful Command Sequences
- Word Macro for Automatically Determining the Average Sentence Length
- Word Macro Example: Correcting Transposed Letters
- Macro Code for Removing All Hyperlinks
What is a Word macro?
Macros are considered a standard feature in programming as well as the use of computer programs. They are basically subprograms that developers and users can create to save sequences of commands or operating instructions, which can then be started with a simple action. When faced with many regularly recurring tasks, Microsoft Word is typically an application that benefits from the option to automate work steps.
For this reason, the Editor (as well as Access, Excel or PowerPoint, for example) include an integrated tool for recording and executing custom Word macros. The script language Visual Basic for Applications (VBA), likewise developed by Microsoft, serves as the recording language here.
Note
The event-driven programming language VBA replaced the mutually incompatible macro languages of the various Microsoft Office programs in the mid-1990s. Thanks to this standardized solution, cross-program command chains can also be created and run to transfer data from a Word document into an Excel table with a single click, for example.
How Do Macros Work in Word?
Creating macros in Word may sound like a task for experienced programmers at first. After all, writing new program code in a special programming language is not often among the core skills of the average Word user. However, the fact that creating and using Word macros is possiblewithout any programming knowledge at all is thanks to the integrated macro tool. Known as a macro recorder, this tool makes writing code completely unnecessary. To create a new macro, all the user has to do is start recording, perform the desired operating steps and commands, and then stop the recording again when the sequence is finished. The VBA code for Word macros is generated automatically; no further action is required on the part of the user.
Note
With the Visual Basic Editor, the Microsoft Office tools have integrated their own VBA development environment that allows the code of recorded macros to be viewed and edited.
You can also assign each new macro in Word with a unique key combination or button that allows the corresponding command sequence to be run at any time. In the case of buttons, these can be added to the toolbar for quick access, enabling you to start a macro with a single click. If the Word macro created is to be available in all documents, save it in the template file Normal.dotm, which is used by Word as the general template for all new text projects.
Creating Macros in Word: How it Works
If you would like to configure your own automated sequences for your Word documents, but lack the technical knowledge in the programming language VBA, you should use the option to create macros in Word using the recorder. You can find the macro tools as standard under the “Macros” section in the “View” tab. In order to make it easier to create and manage Word macros, however, it is advisable to activate the developer tools which provide you access to the Visual Basic Editor, among other features. This optional toolbox can be unlocked as follows:
- Open the “File” tab.
- Click on “Options”.
- Switch to the “Customize the Ribbon” section and place a checkmark in the “Developer” box (under “Main Tabs”).

As soon as you have activated the “Developer” tools in the Word options, the tabunder the same name will automatically be added to the user interface. When you click on it, you will see the section for creating and managing macros in the far left of the toolbar. Find out in the following step-by-step guide how to create your own macros in Word using this quick-access menu and how you can run them at a later time.
Recording Word Macros Executed by Button
The typical solution for a new macro in Word is one that can be run by clicking a button. If you would like to create such a macro using the developer tools, first click on the “Developer” tab and then select the option “Record Macro”:

Now enter a name for the macro and select the document you wish to create the macro for under “Store macro in:”. If you would like to create a cross-program macro, simply select the option “All Documents (Normal.dotm)”. To enable the macro to be executed in Word using a button, finally click on “Button”:

Select the macro you wish to create in the left window and click on “Add”, making it also selectable in the right window. Click on it here again and then press the “Change” button. You can now assign your new Word macro any icon you wish:

Confirm your desired button by clicking on “OK” twice. Now perform the actions you want to save in the macro. Word will record your mouse clicks as well as key strokes. However, the recorder will not save any movements or highlighting with the mouse. So if you want to select some text, for example, you will need to use the keyboard (hold down the [Shift] key and use the arrow keys).
Once you have finished the sequence for the macro, you can stop the recording via “Stop Recording”:

The key for the new Word macro will automatically be added to the toolbar for quick access:

Creating Word Macros Executed via Key Combination
You can create a Word macro that can be started using a unique key combination in essentially the same way as for macro buttons: Start the process using the “Record Macro” button in the macro menu under “Developer”, enter a suitable name, and decide whether you want to make the macro available in all documents or only in a certain project. In the final step before beginning the recording, you should choose the “Keyboard” option in order to open the menu for new hotkeys:

In the “Customize Keyboard” menu that then appears, select the macro under “Commands”. Next, click on the “Press new shortcut key” field with the left mouse button and press your desired key combination. Here it is important to press these keys simultaneously. In the following Word macro example, we used the [Ctrl], [Shift], and [#] keys.

Under “Save changes in”, you can define whether the key combination should be valid universally (“Normal”) or only for a certain Word document; to confirm your choice, click on the “Assign” button. As soon as you close the menu, the macro recording will start.
Executing Word Macros
Once you have created a macro, you can start it at any time using the defined execution option. You only need to use the define key combination or click on the corresponding button in the quick-access menu (in the top left). You can also run your Word macros using the macro list by following the steps below:
- Click on the “Macros” button under the “Developer” tab or alternatively on “Macros” in the menu under the “View” tab, and then on “View Macros”.
- Select the desired macro from the list using a left mouse click.
- Now press “Run”.

Adding macro buttons to a Word tab ribbon
If the macro icon is too small for you in the quick-access toolbar or if you would like to add a button for a macro executable via key combination, you can also integrate a macro button into the ribbon of any tab. To do so, simply create a user-defined group for the tab and add the desired macro to it. You can do both in the “Customize Ribbon” menu in the Word options (accessibly via “File” -> “Options”).
Creating a user-defined group:
In the right window under “Customize Ribbon”, select the tab in which you wish to create the new group and then click on the “New Group” button. In addition to the standard groups here, the entry “New Group (User-Defined)” will now appear. Click on this and then press “Rename” to give the group a suitable name as well as an icon:

Integrating a Word macro into a user-defined group:
After creating a user-defined group for a tab’s ribbon, you can now add any number of Word macros to this group. First click on the “Macros” option in the left menu section under “Choose commands from:” and then on the Word macro you wish to integrate. In the right menu window, now click on the user-defined group before finally pressing the “Add” button:

Close the Word options and open the tab you added the macro button to. You should now see this in the group you created in the ribbon:

Importing Existing Macros in Word
You may also find yourself in the situation in which you already have VBA macros, but they are not available in your Word installation. This could be the case, for instance, if you created these macros on another device or received them from another person. Plus, there are various online sources where you can find a wide range of macros. Microsoft Word offers you the option to import ready-made command chains for use in your program. The tool for this is the Visual Basic Editor mentioned earlier. It can be opened via the key combination [Alt] + [F11] or alternatively using the “Developer” tab.
The next steps depend on whether you are importing a finished macro file or pure macro code.
Importing ready-made macro files (.frm, .bas, .cls):
If you have a complete macro as a file, you can import it into your Word installation in just a few steps. First, select the document you want to add the macro to in the Project Explorer. If you can’t find the explorer in the code editor, you can open it by selecting the “View” tab and pressing the “Project Explorer” menu item. In the file manager, now click on your current or another Word project if the macro should only be applied to one document. If you select the project “Normal”, the Word macro will be imported for all documents:

To import the macro, click on “File” and then “Import File”. Specify the storage location for the macro file and press “Open” to start the import process.

Importing macro code:
If you only have the code for a certain macro, other steps have to be taken for importing. Here too, you start by selecting the document you wish to add the automatic command sequence to. Open the explorer and double-click on the entry “ThisDocument” (in the subfolder “Microsoft Word Objects”) for the respective document or under “Normal” (to save the macro in the universal template):

In the code window that appears next, copy the macro code and then click on the “Save” button. If you selected a specific Word document in the previous step, you will be notified that you will have to save it as a “Word document with macros”. Then click on “No” and select the corresponding entry under the “File Type” list. Finally, click on “Save” to generate the new file format:

Word Macros: Examples of Useful Command Sequences
Now that you know what a Word macro is and how to use macros in Word (creating, running, and importing macros), we can explain the purpose of these command chains for automation in Microsoft’s text editor using a number of specific Word macro examples.
Word Macro for Automatically Determining the Average Sentence Length
There are various web tools you can use to analyze your texts – such as to ascertain the average length of your sentences. Using the right macro, you can also find this out directly in Word. The following code automatically looks at all the sentences in your document and divides the total word count by the number of sentences. The macro then displays the average length in a text popup (“Average Words Per Sentence:”):
Sub CountWords()
Dim s As Range
Dim numWords As Integer
Dim numSentences As Integer
numSentences = 0
numWords = 0
For Each s In ActiveDocument.Sentences
numSentences = numSentences + 1
numWords = numWords + s.Words.Count
Next
MsgBox "Average Words Per Sentence: " + Str(Int(numWords / numSentences))
End Sub
Word Macro Example: Correcting Transposed Letters
Anyone who regularly types texts on a computer will know just how quickly typos like transposed letters occur. But these errors can be quickly corrected. Using the following macro, you only need to place the marker in front of the erroneous pair of letters. Running the macro via key combination or button then allows the letters to be swapped around automatically:
Sub TransposeCharacters()
Selection.MoveRight Unit:=wdCharacter, Count:=1, Extend:=wdExtend
Selection.Cut
Selection.MoveRight Unit:=wdCharacter, Count:=1
Selection.Paste
End Sub
Macro Code for Removing All Hyperlinks
Whenever you include website addresses in your texts, Word will automatically change them into clickable hyperlinks to the corresponding sites. But if you don’t want your document to contain these hyperlinks, you usually have to delete the links individually. The following Word macro example saves you a whole lot of work by automatically removing the first hyperlink found in the document. You can therefore run the macro as often as necessary until all the hyperlinks are gone:
Sub RemoveHyperlinks()
'On Error Resume Next
Dim x As Variant
For Each x In ActiveDocument.Hyperlinks
Selection.WholeStory
Selection.Range.Hyperlinks(1).Delete
Next x
End Sub
Click here for important legal disclaimers.
If you work with Microsoft Word a lot and find yourself doing the same things repeatedly, create a macro. Macro is a shortening of the word macroinstruction, which means a series of instructions to accomplish a task.
The great thing about creating macros in Word is that you don’t need to know how to program. If you can press record and stop, you can do this.
Aren’t Macros Dangerous?
Have you heard about macros being bad because they can contain viruses? Although you do have to be careful about opening Office documents from unknown people because they might have malicious macros, that’s not an issue here. You make your own macro, so you know it’s not a virus.
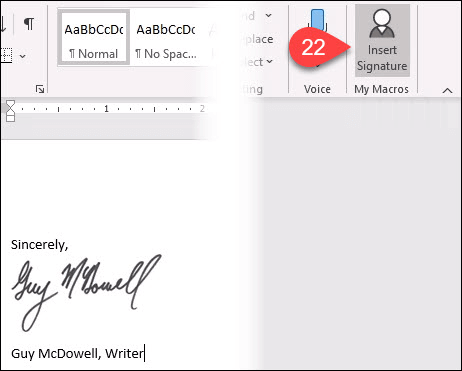
For this example, you’re going to create a macro in Word to insert your signature at the end of a document.
- With Word open, go to the View tab.
- Select the down arrow under the Macros button.
- Select Record Macro… a new window will open.
- In the Macro name: field, enter a meaningful name for the macro. Spaces are not allowed. Use an underscore or dash.
- In the Store macro in: dropdown, you can select what documents you want this macro to be used. If you choose All Documents (Normal.dotm), the macro will be available to you in every new Word document you make from now on. If you choose a single document, it will only apply to that single document. It’s usually best to choose All Documents.

- In the Description: field, write what the macro does. This is a simple macro with a descriptive name, but as you get confident with macros you’ll do more complex things, so a description is always a good idea.
- You can choose Assign macro to either a button you’ll create with the Button or hotkeys you can choose using the Keyboard button. There’s already a lot of shortcut keys for Word, so a button may be best. Select Button. A new window will open called Word Options.
- Here you’ll assign the macro a button on the Word Ribbon. Select Customize Ribbon.
- In the Choose commands from: dropdown, select Macros. This will show us our macros in the area beneath it.
- You need somewhere on the ribbon to put the macro. For this example, select Home in the Main Tabs area. Then select New Group.
- Select Rename so you can give it a meaningful name.
- In the Rename window, select one of the icons to represent the group then enter My Macros in the Display name field.
- Select OK to apply it. You’ll see the change in the Main Tabs area.
- With the new My Macros selected in the Main Tabs area, select the Normal.NewMacros.Insert_Signature macro.
- Select Add to insert it into the My Macros group.
- Of course, you’ll want to rename it. With the macro selected in the Main Tabs area, select Rename…
- In the Rename window, select an icon and enter a simple name in the Display name: field.
- Select OK to commit the change. You’ll see the change in the Main Tabs area.
- Select OK below the Main Tabs area to finish creating the button for the macro.

- Go ahead and create whatever signature block you’d like. Add in a scan of your signature or other images. Whatever you’d like. When done that, select the down arrow under the Macros button.
- Select Stop Recording. That’s it. Your Insert Signature macro is made.
- Test it out by finding the Insert Signature button you created in the Home tab and select it. Your signature block should magically appear exactly as you designed it.
How To Write a Macro
For most macros, the recording method is the most efficient way to create them. Eventually, you’ll want to do something more complex. This requires writing the macro in the Visual Basic for Applications (VBA) language. We’ve got the best VBA guide for beginners, so bookmark that. Let’s create a macro to give us the average words per sentence to help us tell when we’re being wordy.
- You need access to the Developer tab which is hidden by default in Word. In the top-left corner of Word, select File.
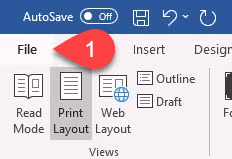
- Near the bottom-left, select Options.
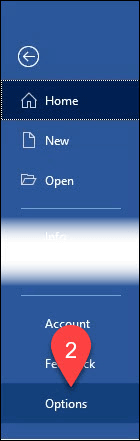
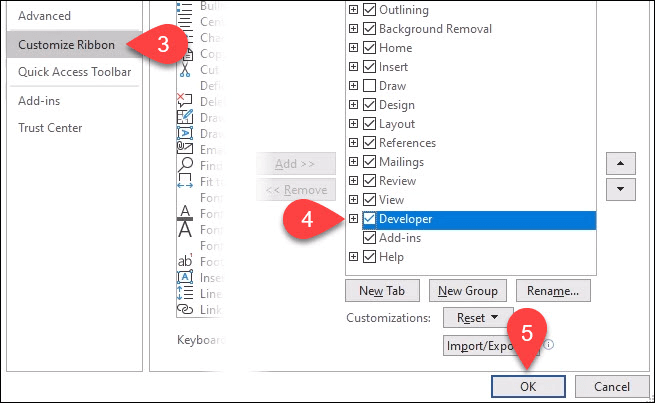
- In the window that opens, select Customize Ribbon.
- On the right side, look for Developer and put a checkmark next to it.
- Select OK to close the window. The Developer tab will now show.
- Select the Developer tab.
- Select the Macros button.
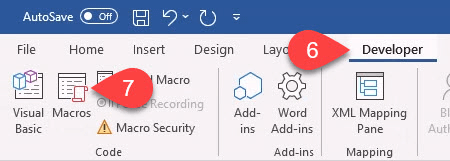
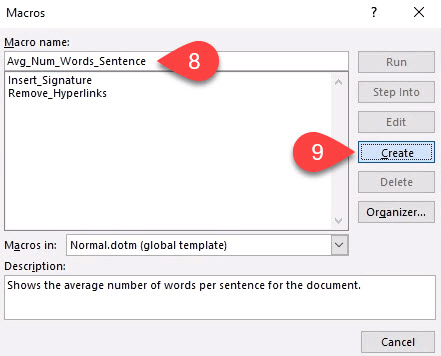
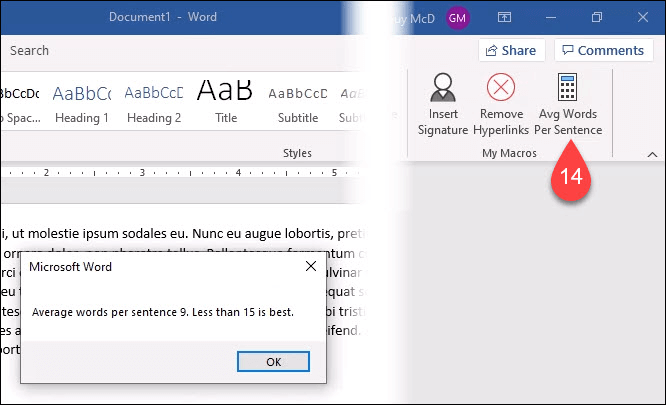
- Enter a meaningful name in Macro name: Leave the Macros in: as Normal.dotm so it will apply to all Word documents. Always enter a description in the Description: area.
- Select Create. The Microsoft Visual Basic for Applications development tool will open.
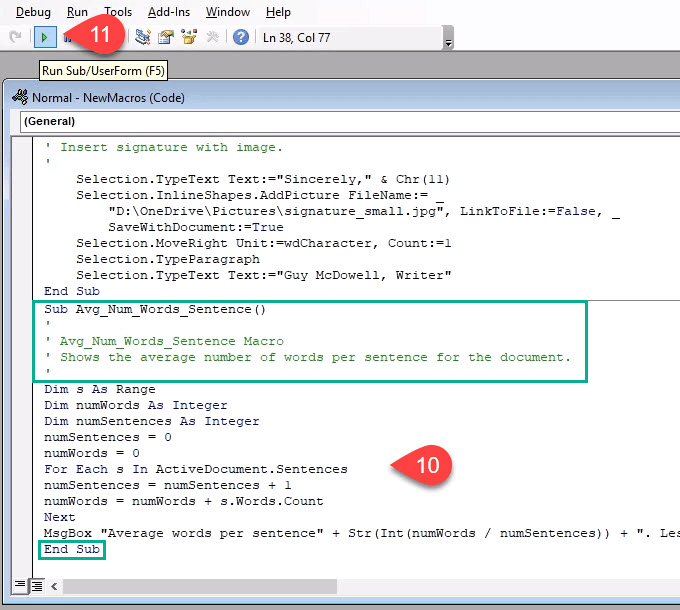
- The code that’s shown in the green rectangles below should already be there with some blank space between them. Copy and paste the following code into that space:
Dim s As Range
Dim numWords As Integer
Dim numSentences As Integer
numSentences = 0
numWords = 0
For Each s In ActiveDocument.Sentences
numSentences = numSentences + 1
numWords = numWords + s.Words.Count
Next
MsgBox “Average words per sentence” + Str(Int(numWords / numSentences)) + “. Less than 15 is best.”
- Select the Run button to test the code. If it doesn’t run as expected, edit the code until it runs the way you want.
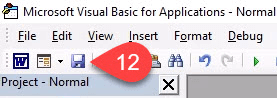
- Select the Save button and close the development window.
- Create a button in the Word ribbon using the same method as shown in the “How to Record a Macro” instructions above.
- Find the button you just created and test it.
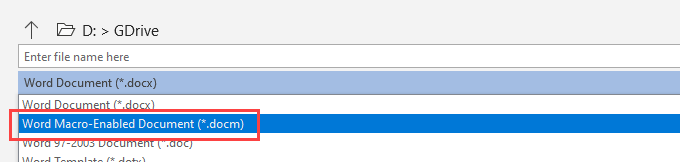
My Macro Doesn’t Work When I Save My Word Document
Word defaults to save with the file extension .docx, which doesn’t allow macros to automatically run. If you want the macro to run, you’ll need to change the file type to Word Macro-Enabled Document (*.docm).
This filetype exists partly to combat macro security issues. If you see this file extension on a document you weren’t expecting to receive, be suspicious.
What Else Can I Do With Macros?
You can create macros in Excel, Outlook, even PowerPoint. Anything that you’re currently doing manually, you should be able to record or write a macro to do it. Using macros in Word along with great Windows shortcut keys will amplify your productivity tenfold.
To run a macro, click the button on the Quick Access Toolbar, press the keyboard shortcut, or you can run the macro from the Macros list. Click View > Macros > View Macros. In the list under Macro name, click the macro you want to run. Click Run.
Contents
- 1 How do I run a VBA script in Word?
- 2 How do I make an automatic macro?
- 3 How do I create a VBA macro in Word?
- 4 Does Microsoft Word have VBA?
- 5 How do you run a macro?
- 6 How do I make a macro always run?
- 7 How do I make a macro run every 10 seconds?
- 8 Where is Macro Recorder in Word?
- 9 How do I import Macros into Word?
- 10 Where do I find Macros in Word?
- 11 How do you create a VBA in Word?
- 12 Can DOCX files contain macros?
- 13 How do I start VBA code?
- 14 How do I run a macro line by line?
- 15 How do I assign a macro to a button?
- 16 How do I create a macro?
- 17 Why is my macro not running automatically?
- 18 How do I run a macro automatically by time?
- 19 How do I run two macros after one?
- 20 How do I automatically run a macro when a cell changes?
How do I run a VBA script in Word?
Firstly, click “Visual Basic” in the “Code” group, on “Developer” tab or you can press “Alt” + “F11” in your keyboard to open the VBA editor. Then click “Insert”, in the drop-down menu, you can click “Module”. Next double click to open a new module.
How do I make an automatic macro?
Follow these steps to record a macro.
- On the Developer tab, in the Code group, click Record Macro.
- In the Macro name box, enter a name for the macro.
- To assign a keyboard shortcut to run the macro, in the Shortcut key box, type any letter (both uppercase or lowercase will work) that you want to use.
How do I create a VBA macro in Word?
Steps for Adding a Macro to Word
- Go to the View tab, and click on Macros in the Window area.
- Name your macro in the Macro name: box.
- Click Create.
- Close Word’s VBA editor by going to File, Close and Return to Microsoft Word.
Does Microsoft Word have VBA?
VBA is the programming language used to automate Microsoft Office programs including Word, Excel, Outlook, PowerPoint, and Access. Macros are blocks of VBA code that perform specific tasks. When you Record a Macro, Word will write VBA code into a Macro, allowing you to repeat your actions.
How do you run a macro?
Run a macro from the Developer tab
- Open the workbook that contains the macro.
- On the Developer tab, in the Code group, click Macros.
- In the Macro name box, click the macro that you want to run, and press the Run button.
- You also have other choices: Options – Add a shortcut key, or a macro description.
How do I make a macro always run?
Using Auto open method to run a macro automatically:
- Open an excel workbook.
- Press Alt+F11 to open VBA Editor.
- Insert a New Module from Insert Menu.
- Copy the above code and Paste in the code window.
- Save the file as macro enabled workbook.
- Open the workbook to test it, it will Run a Macro Automatically.
How do I make a macro run every 10 seconds?
Active Member
- Start Excel.
- Press ALT+F11 to start the Visual Basic editor.
- On the Insert menu, click Module.
- Type the following code into a new module sheet:
- Press ALT+F11 to return to Excel.
- On the Tools menu, point to Macro, and then click Macros.
- Click StartOnTime, and then click Run.
Where is Macro Recorder in Word?
To record a macro in Word, click the “View” tab in the Ribbon. Then click the drop-down part of the “Macros” button in the “Macros” button group. Then select the “Record Macro…” command from the drop-down menu that appears to open the “Record Macro” dialog box.
How do I import Macros into Word?
Export / Import Macros in Word 2016
- Open the word documents where you had your macros.
- ALT+F11 to open VBA Editor.
- On the modules which contain macros, right click > export file which will result in text files with extension *. bas.
- On target computer, they need to follow step 1 to 3 and in place of export, import.
Where do I find Macros in Word?
Here’s how you can find macros and VBA modules in your document:
- In Word or Excel, click View > Macro > View Macros. In PowerPoint, click View > Macro. In the Macro box, pick the macro you want to remove and click Delete.
- Press Alt+F11 to find macros in the VBA Editor.
How do you create a VBA in Word?
VBA-Excel: Create and Save the Word document
- Create the object of Microsoft Word.
- Create a document object and add documents to it.
- Make the MS Word visible.
- Create a Selection object with the help of WordObject.
- Use this Selection object to type the text into the WordDocument.
- Save the document.
Can DOCX files contain macros?
docx file has a macro loaded in it and is allowed to run macros: There is a new pop-up to the user, but it does not affect the payload. This is just due to the fact that . docx files are not intended to contain macros.
How do I start VBA code?
Press Alt + F11 to open Visual Basic Editor (VBE). Right-click on your workbook name in the “Project-VBAProject” pane (at the top left corner of the editor window) and select Insert -> Module from the context menu. Copy the VBA code (from a web-page etc.)
How do I run a macro line by line?
F8 is the key! In the visual basic editor, place your cursor inside of the macro and hit F8. This will run the first line of your code. Hit F8 to run each additional line, or F5 to resume without stopping.
How do I assign a macro to a button?
Add a button (Form control)
Click the worksheet location where you want the upper-left corner of the button to appear. The Assign Macro popup window appears. Note: If you have already inserted a button, you can right-click on it, and select Assign Macro. Assign a macro to the button and click OK.
How do I create a macro?
Record a macro with a button
- Click View > Macros > Record Macro.
- Type a name for the macro.
- To use this macro in any new documents you make, be sure the Store macro in box says All Documents (Normal.
- To run your macro when you click a button, click Button.
- Click the new macro (it’s named something like Normal.
Why is my macro not running automatically?
Macros require special permissions in order to run in Excel, since they are often the source of some dangerous computer virus attacks. Excel will not run macros by default, so you’ll have to explicitly change some settings in order for any macro to run automatically on start up.
How do I run a macro automatically by time?
OnTime method can make macros run automatically, once you’ve done some setup. Suppose you have a macro that you want to run each day at 15:00 (3:00 p.m.). First you need to determine how to kick off the OnTime method. You can do this using the Workbook_Open event in the private module of the Workbook object.
How do I run two macros after one?
Just type the word Call then space, then type the name of the macro to be called (run). The example below shows how to call Macro2 from Macro1. It’s important to note that the two macros DO NOT run at the same time. Once the Call line is hit, Macro2 will be run completely to the end.
How do I automatically run a macro when a cell changes?
Go to the VBA Editor (Alt + F11) and double-click the name of the spreadsheet that contains the cell that will change or just right-click the worksheet tab and click View Code. In the window that opens, select Worksheet from the left drop-down menu and Change from the right drop-down menu.