
Lesson 12: Page Layout
/en/word2016/hyperlinks/content/
Introduction
Word offers a variety of page layout and formatting options that affect how content appears on the page. You can customize the page orientation, paper size, and page margins depending on how you want your document to appear.
Optional: Download our practice document.
Watch the video below to learn more about page layout in Word.
Page orientation
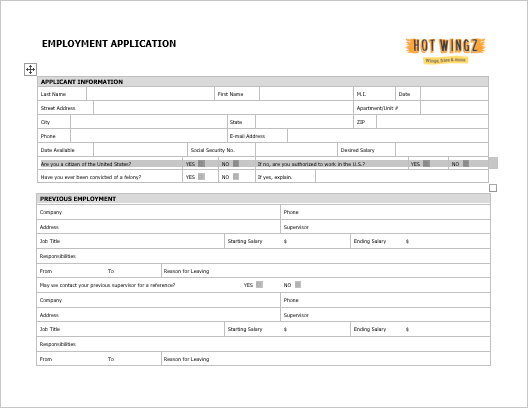
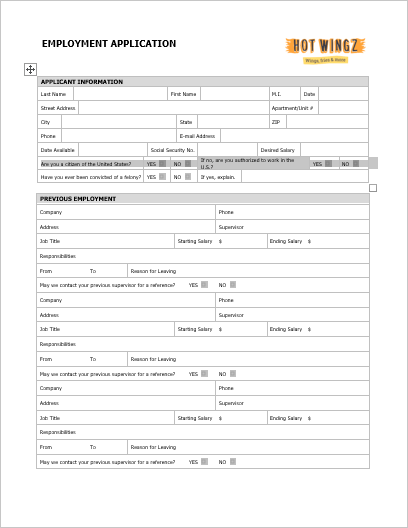
Word offers two page orientation options: landscape and portrait. Compare our example below to see how orientation can affect the appearance and spacing of text and images.
- Landscape means the page is oriented horizontally.

- Portrait means the page is oriented vertically.
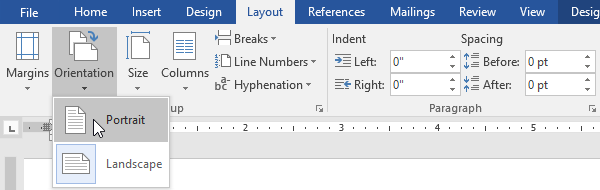
To change page orientation:
- Select the Layout tab.
- Click the Orientation command in the Page Setup group.
- A drop-down menu will appear. Click either Portrait or Landscape to change the page orientation.
- The page orientation of the document will be changed.

Page size
By default, the page size of a new document is 8.5 inches by 11 inches. Depending on your project, you may need to adjust your document’s page size. It’s important to note that before modifying the default page size, you should check to see which page sizes your printer can accommodate.
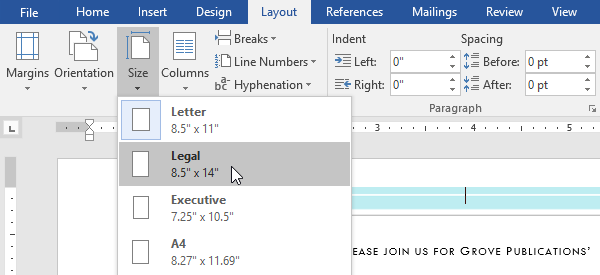
To change the page size:
Word has a variety of predefined page sizes to choose from.
- Select the Layout tab, then click the Size command.
- A drop-down menu will appear. The current page size is highlighted. Click the desired predefined page size.
- The page size of the document will be changed.

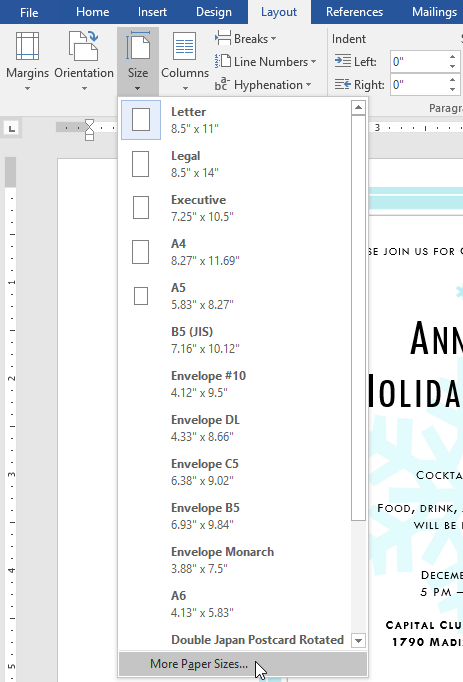
To use a custom page size:
Word also allows you to customize the page size in the Page Setup dialog box.
- From the Layout tab, click Size. Select More Paper Sizes from the drop-down menu.
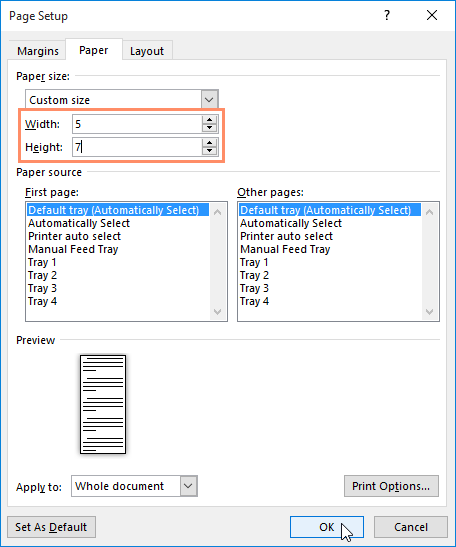
- The Page Setup dialog box will appear.
- Adjust the values for Width and Height, then click OK.
- The page size of the document will be changed.
Page margins
A margin is the space between the text and the edge of your document. By default, a new document’s margins are set to Normal, which means it has a one-inch space between the text and each edge. Depending on your needs, Word allows you to change your document’s margin size.
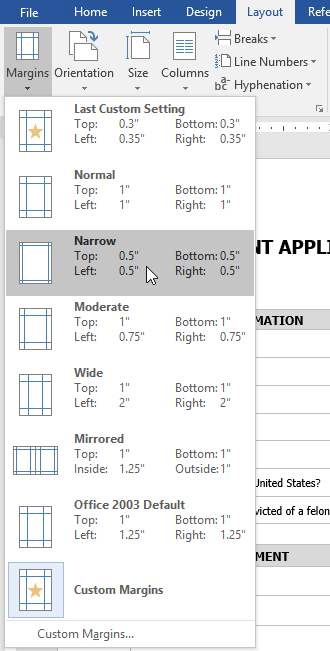
To format page margins:
Word has a variety of predefined margin sizes to choose from.
- Select the Layout tab, then click the Margins command.
- A drop-down menu will appear. Click the predefined margin size you want.
- The margins of the document will be changed.

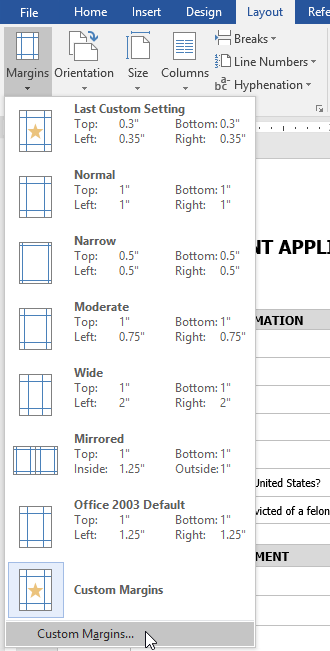
To use custom margins:
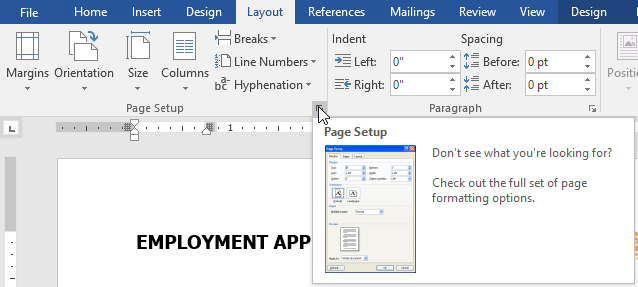
Word also allows you to customize the size of your margins in the Page Setup dialog box.
- From the Layout tab, click Margins. Select Custom Margins from the drop-down menu.
- The Page Setup dialog box will appear.
- Adjust the values for each margin, then click OK.
- The margins of the document will be changed.
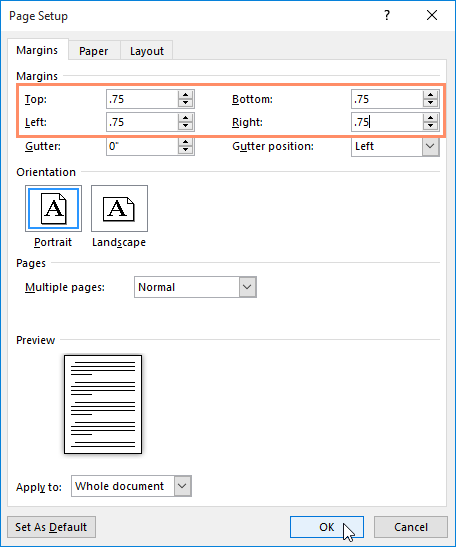
Alternatively, you can open the Page Setup dialog box by navigating to the Layout tab and clicking the small arrow in the bottom-right corner of the Page Setup group.
You can use Word’s convenient Set as Default feature to save all of the formatting changes you’ve made and automatically apply them to new documents. To learn how to do this, read our article on Changing Your Default Settings in Word.
Challenge!
- Open our practice document.
- Change the page orientation to Portrait.
- Change the page size to Legal. If Legal size is not available, you can choose another size such as A5.
- Change the margins to the Narrow setting.
- When you’re finished, your document should be one page if using Legal size. It should look something like this:
/en/word2016/printing-documents/content/

Try it!
Change your document’s layout to get it just the way you want.
Margins
-
Select Layout > Margins.
-
Choose the margins you want or select Custom Margins to define your own.
Page Orientation
-
To change orientation, select Layout > Orientation.
-
Select Portrait or Landscape.
Line Spacing
-
Select Home > More Paragraph Options > Line Spacing.
-
Choose the spacing you want.
Want more?
Word for the web Quick Start
Change margins
Change page orientation to landscape or portrait
Change the line spacing in Word
Need more help?
Want more options?
Explore subscription benefits, browse training courses, learn how to secure your device, and more.
Communities help you ask and answer questions, give feedback, and hear from experts with rich knowledge.
Page Layout in Microsoft Word refers to the arrangement or setting of certain pages or entire documents based on the requirements of the content being displayed.
Before beginning the process of taking printouts, it is very important to set the page’s margins, orientations, sizes of columns, and spacing.
Table of Contents
- Layout or Page Layout in Microsoft Word
- Page Setup:
- Paragraph:
- Arrange:

On the layout tab, we can see a number of different categories, such as Page Setup, Paragraph, and Arrange, and each of these groups contains a different set of commands to deal with.
Page Setup:

Margins: Margin is the space between the content beginning or ending in the document and the edges of the document pages. The default space between the content beginning or ending and the document edges of the margin is “Normal” which occupies the 1-inch space.
Orientations: Orientation is the page layout, in which the document is displayed or printed. The common types of orientations are Portrait and Landscape.
Size: Choose different page sizes in a word document based on your requirement. The default page size of a page is 8.5×11 inches, called Letter size.
Columns: Splitting (dividing) the text vertically in the pages called, columns. These include one column, two columns, three columns, left columns and right columns.
Breaks: Adding the new section breaks to the next pages or the current section on the same page to apply different Headers, Footers, Columns, Watermarks, or other works in the document pages wherever you want.
Line Numbers: Start each line in a document by using the Line Numbers in the Margin for your further reference even when the content starts with a Bulleted or Numbered List.
Hyphenation: The last word in a line moves down to the next line when it has not had enough space. When you select an Automatic or Manual Hyphenation, arrange some part of a word at the current line and move the remaining part of a word down. It is a great way for uniform spacing and saves spacing on your document page.
Paragraph:

On the layout tab, paragraph options include indent and spacing, these are explained below.
Indent: Indent is how far you want to move the paragraph away from the left margin or from the right margin. Generally, Professional material contains no indent, but some follow. According to Wikipedia “Professionally printed material typically does not indent the first paragraph, but indents those that follow.”
Spacing: Give more or less space above or below the selected paragraphs based on your requirement.
Arrange:

Position: Positioning is placing an object (picture, shape, etc.) on the page wherever you want. Whether it is on the top left, top centre, top right, middle left, middle centre, middle right, bottom left, bottom centre, or bottom right.
Wrap Text: Text wrapping means arranging the text around an object. By default, an object arranges in line with text when you insert an object (picture or drawing a shape) into a word document.
Bring Forward: Bring a selected object forward of all other objects.
Send Backward: Send a selected object backward from all other objects.
Selection Pane: Selection pane is one of the great ways to select, show, hide, and change the order of the objects in the word document.
Align: Placing objects (Pictures, Shapes, Icons, etc.) to margins, edges, or relative to one another in the word document.
Group: Grouping means making more objects together into one object to move, resize, and change their styles and effects as if they were a single object.
Rotate: Rotating an object is a circular movement in different degrees around a centre point of it. Rotate has various commands to rotate and flip the objects such as Rotate Right 900, Rotate Right 900, Flip vertical, and Flip Horizontal.
What is Layout or Page Layout in MS Word?
The Layout is the arrangement or the setting of some pages or whole documents based on the content requirement. Setting Margins, Orientations, Sizes Columns and Spacing of a page is a very important process before taking printouts.
There is no doubt that the Word program is not one of the best for layout. But it doesn’t mean that it can’t be done either, and with results very similar to those of layout programs. Therefore, if you want to know how to layout with Word, whether it is a magazine, a book or another type of publication, we are going to give you the classes.
Of course, we must start from the basis that Word is somewhat limited in terms of layout, which does not mean that it will not look good.
Table of Contents
- 1 Why layout in Word
- 2 How to layout in Word
- 2.1 The type of layout
- 2.2 The margins
- 2.3 Typography
- 2.4 Alignment
- 2.5 Line spacing
- 2.6 Be careful with the weight of the file
When it comes to working with layout, programs like Indesign sound much better than Word, which is still a simple text program, but without going any further.
However, surely you know that Word has multiple uses because, isn’t it useful for making a table? Or a business card? Or a poster? So why wouldn’t it be used for layout?
There are a few reasons to learn how to layout in Word. Some of them are:
- It is a program that you know well. If you are one of those who writes a lot in Word, then surely you have no problem knowing where everything is. This will make you not waste time discovering in which part of the program a function is located, something that can happen to you with the new ones.
- You don’t need another program because the layout must be presented in PDF, and that means that you can do it in Word without any problem and then convert it to PDF without moving a single millimeter in it.
- Because you are going to lay out among several. It is another problem, especially because if in the group that is going to be in charge of the layout there are people who do not know how professional layout programs work. Similar results can be achieved with the text editor and by being more “universal” you ensure that everyone will know how to work with it.
How to layout in Word
Now that you know the reasons that can lead you to layout in Word (there are many more), the next step is to know how you should do it.
In general, you should pay attention to certain details.
The type of layout
It is not the same that you want to lay out a book than what you want to be a business card, or a magazine. Each one will have a different layout and therefore details that you will have to modify according to the publication to be published.
For example, a book is usually 15 x 21 cm. But a business card could be 8 x 10 cm, or less. In addition, in one more key points such as typography, margins, borders, etc. come into play. while another is simpler.
We can modify this in the document format. That is, we can do it from scratch, with a blank document, or with an already created one you can change the format to adjust it to what you want.
The margins
Imagine that you are laying out a book and that you have finished and take it to print. When you open the first book, you realize that all the pages are cut off, and that the beginning cannot be read because it has been «pressed» in that area. What happened?
The simple answer would be: did you leave margins? Correct margins?
And it is that, if what you are going to layout is a book, a magazine or something similar that implies that it is going to be «sewn» or «stapled» on one side, you need the margins to be a little higher on one side to avoid that the letters are close together in it.
To give you an idea, the top and outside margin can be between 1,7 and 2cm but the inside and bottom would be better left a little larger.
Typography
When choosing the font, you can think about placing one for the headings and another for the text. It is not unreasonable, quite the opposite. But you do need both letters to be fully legible.
In addition, each font has a different scaling, which means that, at 12, it can look small and at 18 large. Or that at 12 it looks huge.
Our suggestion is that you try before laying out because, if you decide to change the font size when everything is laid out, you will have to check again because the number of pages will vary.
Alignment
Alignment refers to how you want the text to be presented. That is, if you want it to be centered, if you want it to the side (right or left) or if you want it justified.
In the case of books, magazines and the like, it is usually justified because it is more elegant. But keep in mind that Word increases the spaces between words because it does not divide them. Unless you expressly request it (this can be done in format/paragraph/text flow).
In other cases it will not be necessary and you can leave it aligned to the left (although if you want the words to be divided you can also).
Line spacing
Line spacing is the space between lines of text. This allows for better reading between sentences, which helps the reader. If they are too close together it can make them difficult to read and if they are too far apart they will not be as popular.
Typically, the value given is 1,5 space. But everything will depend on the type of font you want to put and the project you have in progress because it may require more space (or less). Of course, never less than 1.
Be careful with the weight of the file
When a document is laid out, it has a certain weight. The problem is that if you add images, graphics, tables, etc. to a Word. you make it become very heavy and that can affect the speed of your computer (it is not able to process it).
To avoid this, it is best to layout by dividing the document into several parts so that it is lighter and does not give us problems neither to send it nor to transport it (for example on a CD, a pen drive, etc.). Also, this way you make sure that the computer’s memory is enough to work with it and it doesn’t give you errors (losing the work you’ve done).
Modifying all this in Word you will have managed to have a template for the project you have in hand. And it is that layout in Word is not difficult. It is true that it is more limited than others, but if you do not need to make a very visual, interactive project, etc. It will serve you without any problem.
Did you layout with Word? How was your experience?
The content of the article adheres to our principles of editorial ethics. To report an error click here!.

If you’re creating a Word document with multiple page layouts, you may wish to make a single page landscape. Here’s how.
Photo Credit — iStockPhoto
When you’re creating Word documents, you have two-page layout options available—landscape or portrait. Portrait mode is the default option, but you can switch to landscape mode instead if you want your text sideways.
If you want to use both types of layouts in Word, you’ll need to use a few workarounds using section breaks and Word’s own page formatting options to do so. Here’s how.
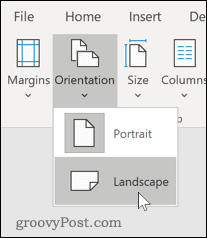
If you want to quickly make one page landscape in Word, here’s what you’ll need to do:
- Open your Word document and place the blinking cursor at the start of the page you wish to change to landscape mode.
- Click on the Layout menu in the ribbon bar.
- Select Breaks > Next Page in the Section Breaks section. This will insert a section break and push your text onto a new page.

- In the Layout menu, press Orientation > Landscape. This will switch the current page and all the following pages to landscape mode.

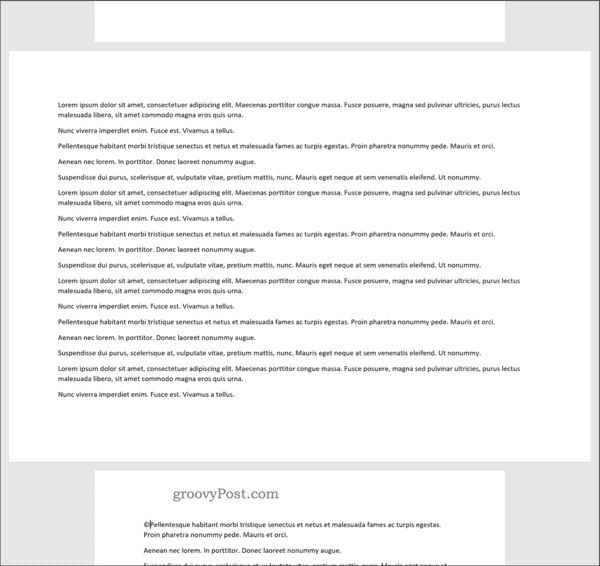
- You’ll now need to turn the remaining pages back to portrait mode. Scroll down to the next page, then place the blinking cursor at the start of the page.
- Press Layout > Breaks > Next Page to insert a new section break.
- Click on Orientation > Portrait to switch the pages to portrait mode.

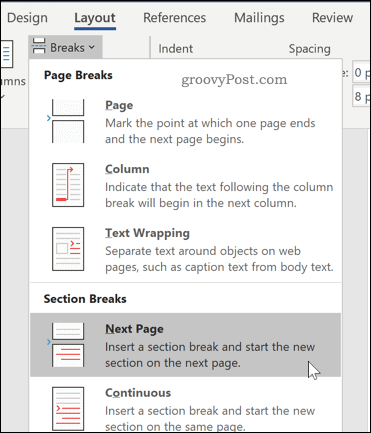

If you followed the steps correctly, you should now have one single landscape page, with all other pages remaining in portrait mode.
How to Make Specific Text Landscape in Word
If you don’t want all of the text on your page to appear on the landscape page, you can choose to make a landscape page that only contains specific text.
- To do this, start by highlighting the text that you want to appear on the landscape page.

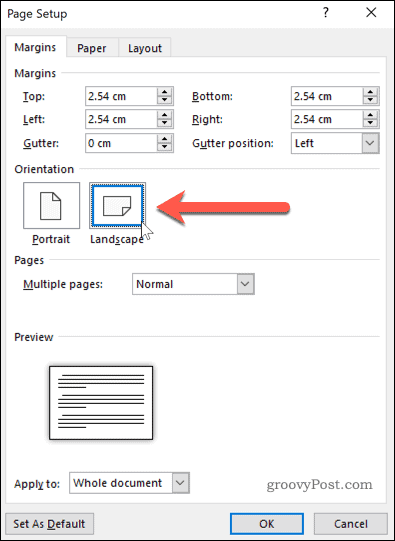
- In the Layout menu, click on Margins, then select the Custom Margins… option at the bottom of the drop-down menu.

- In the Page Setup window, click on the Landscape option in the Margins tab, under the Orientation section.

- In the Apply to box, choose Selected Text.

- Click OK to confirm the settings you’ve selected.


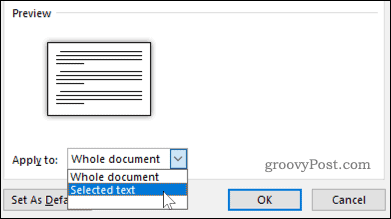
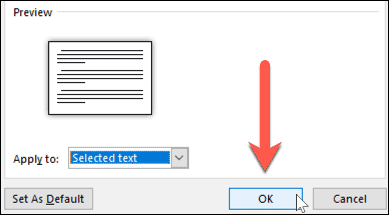
You should now have a landscape page that contains the text you previously highlighted, creating a section break that uses a different page layout to the rest of your Word document.
You can use this method to turn an entire page landscape—to do this, select all of the text on the page before you start and repeat the steps above to complete the change.
Formatting Microsoft Word Documents
Now that you know how to make a single page landscape in Word, you can start creating documents with as many combinations of landscape and portrait pages as you want. This is where learning how to rearrange pages in Word might just come in handy.
If you’re looking for other ways to take your Word documents further, why not learn how to insert an Excel table into Word. For academic documents, you may wish to create a table of contents in Word to keep your document organized.
![]()