
As a Data Analyst it is common to create a dataset in SAS and carry out further analysis in Microsoft Excel. But, how do you export data from SAS to Excel?
Exporting data from SAS to Microsoft Excel can be done with the EXPORT procedure and the LIBNAME statement. The EXPORT procedure provides flexibility when it comes to including column labels or header names. Whereas exporting data with a LIBNAME statement gives you more options for subsetting data and creating new columns.
In this article, we discuss both methods in more detail and answer common questions such as:
- How to define a sheet name?
- How to export column labels?
- How to create an Excel file without a header?
Do you know? How to Import an Excel File
Sample Data
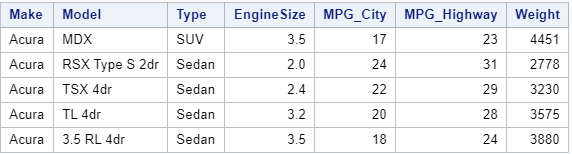
In this article, we use a sample dataset to export to Excel (work.my_data). This dataset is based on the CARS dataset from the SASHELP library, but with fewer columns.
The EXPORT Procedure
An easy way to export a table from SAS to Excel is with the EXPORT procedure (PROC EXPORT). This procedure is easy-to-understand and provides many options.
Syntax of PROC EXPORT
To export data from SAS to Excel with PROC EXPORT you need to define at least three parameters:
- DATA=-option to specify the SAS dataset you want to export. For example, DATA=work.my_data.
- OUTFILE=-option to define the output location and the file name. For instance, OUTFILE=”/folders/myfolders/export/cars.xlsx”
- DBMS=-option to specify the file extension such as DBMS=xlsx.
DATA=-option
The DATA=-option specifies the SAS dataset you want to export. You can either use a one- or two-level SAS name (i.e., with or without libref). When you export a dataset to Excel, you can use dataset options such as KEEP, RENAME, and WHERE in the DATA=-option.
OUTFILE=-option
The OUTFILE=-option specifies the location and file name of the exported dataset. The file name includes the extension. Keep in mind that the complete path (location and file name) can’t exceed 201 characters.
DBMS=-option
The DBMS=-option specifies the type of file the EXPORT procedure creates (e.g., .xlsx or .xls). It depends on the file type how much data SAS can export. For example, if you export data to Excel, the SAS dataset cannot exceed the maximum of 1,048,576 rows and 16,384 columns.
Examples
The SAS code below exports the work.my_data dataset to Excel and creates a file called cars.xlsx.
proc export data=work.my_data
    outfile="/folders/myfolders/export/cars.xlsx"
    dbms=xlsx;
run;
Note 1: If you want to create an XLS-file with PROC EXPORT, you need to change the file extension in the OUTFILE=-option and use DBMS=xls.
proc export data=work.my_data
    outfile="/folders/myfolders/export/cars.xls"
    dbms=xls;
run;
Note 2: You need the SAS/ACCESS Interface to PC Files license to export data from SAS to Excel. To check if this license is available on your SAS installation, you can use the PROC SETINIT statement.
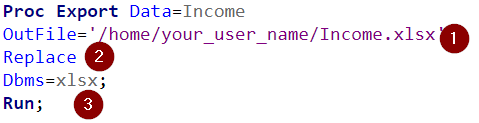
How to Overwrite Existing Files
By default, PROC EXPORT doesn’t overwrite existing files. If you try to do this, SAS will write an error to the log and will stop executing. To change this default behavior, you need the REPLACE option. If you use the REPLACE option, you can export and overwrite an existing file.
This is an example of how to use the REPLACE option.
proc export data=work.my_data
    outfile="/folders/myfolders/export/cars.xlsx"
    dbms=xlsx
    replace;
run;
Do you know? How to Archive Multiple Excel Files in one ZIP File from SAS
How to Define an Excel Sheet Name
By default, PROC EXPORT creates an Excel file where the sheet name is equal to the filename. However, you can overwrite this default behavior and define the sheet name with the SHEET=-option. You need to write the sheet name between quotation marks, and it cannot exceed 31 characters.
In the example below, we create the Excel file cars.xlsx and call the sheet All Cars.
proc export data=work.my_data
    outfile="/folders/myfolders/export/cars.xlsx"
    dbms=xlsx
    replace;
    sheet="All Cars";
run;
How to Export an Excel File with Multiple Sheets
Many Excel workbooks have multiple worksheets. Nevertheless, PROC EXPORT creates only one file with one sheet. So, how do you create an Excel file with multiple sheets using SAS?
You can create an Excel file with multiple sheets by submitting one PROC EXPORT statement for each sheet. In each PROC EXPORT statement, you change the DATA=-option and the SHEET=-option. But, the OUTFILE=-option and the DBMS=-option remain unchanged.
In the example below, we create an Excel file with two sheets, namely All Cars and Ford Cars. As you can see, we use dataset options, such as KEEP, RENAME, and WHERE in the DROP=-option.
/* One Excel File with Multiple Sheets */
/* Create a Sheet with All Cars */
proc export data=work.my_data
    outfile="/folders/myfolders/export/cars.xlsx"
    dbms=xlsx
    replace;
    sheet="All Cars";
run;

/* Create a Sheet with only Ford Cars */
proc export data=work.my_data
    (where=(Make="Ford")
    keep=Make Model
    rename=(Model = Ford_Model))
    outfile="/folders/myfolders/export/cars.xlsx"
    dbms=xlsx
    replace;
    sheet="Ford Cars";
run;
How to Export a Table to Excel with SAS Labels
SAS datasets have column names and, optionally, column labels. Column labels can contain special characters such as blanks and percentage signs. For this reason, column labels are more elegant and are frequently used in reports. However, by default, PROC EXPORT exports the column names instead of the column labels. So, how do you export the column labels with PROC EXPORT?
You use the LABEL option to export a sheet with the column labels instead of the column names. You place this option after the REPLACE option. If a column doesn’t have a label, then PROC EXPORT exports the column name.
With the SAS code below, we export the column labels instead of the column names.
/* Export the column labels */
proc export data=work.my_data
    outfile="/folders/myfolders/export/cars.xlsx"
    dbms=xlsx
    replace
    label;
    sheet="All Cars";
run;

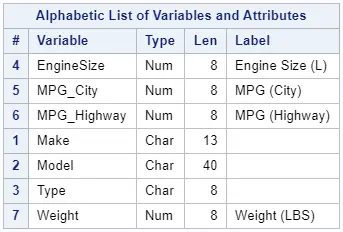
With a PROC CONTENTS statement, you can check whether a column has a label. For instance, some of the columns of our sample data work.my_data have labels.
proc contents data=work.my_data;
run;
Do you know? How to Change Variable Labels
How to Export a Table to Excel without Header (Column Names)
Typically, you want your Excel file to have a header (i.e., column names). However, sometimes you need to create a file without one. So, how do you export data from SAS to Excel with a header?
You can prevent SAS from exporting the header to Excel by setting the PUTNAMES=-option to No. By default, this option is set to Yes. In contrast to other options, you write the word NO without quotation marks.
In the example below, we use PUTNAMES=NO to prevent SAS from adding column names to the Excel file.
proc export data=work.my_data
    outfile="/folders/myfolders/export/cars.xlsx"
    dbms=xlsx
    replace;
    sheet="All Cars";
    putnames=NO;
run;

Do you know? How to Save SAS Output as a PDF file
Export data from SAS to Excel with the LIBNAME Statement
The LIBNAME Statement
A less known, but also very efficient way to export data from SAS to Excel is by creating a library with the LIBNAME statement.
Normally, you use the LIBNAME statement to create a library to store your SAS datasets. However, with the LIBNAME statement’s ENGINE option, you can also create libraries to import and export Excel files. Because of this option, it becomes very convenient to save the output of a DATA step or a SAS procedure directly as an Excel file.
Syntax
You create a library to export data to Excel with the LIBNAME statement. The statement starts with the LIBNAME keyword, followed by the libref and the engine type, and finally, the location and Excel file name.
LIBNAME libref XLSX "path";
- libref: The libref is the name of the library. A libref is at most 8 characters long, starts with a letter or an underscore, and can only include letters, numbers, or underscores.
- engine: The engine provides SAS with instructions on how to treat the data. The default engine is BASE for SAS tables. However, SAS treats the data in the library as an Excel file with the XLSX engine.
- path: The location and the file name (including the file extension).
A normal library (without specifying the engine) contains one or more SAS datasets. However, if you use the XLSX engine, then a library is one Excel file where the “datasets” are the worksheets of the file.
Do you know? 10 FAQs about SAS Libraries
Example
With the LIBNAME statement below, we create the library my_xlsx that refers to the Excel file cars.xlsx.
libname my_xlsx xlsx '/folders/myfolders/export/cars.xlsx';

Note: You can only use the LIBNAME statement to export (and import) Excel files if you use SAS version 9.04.01M2 or higher. With PROC SETINIT or the global macro variable &sysvlong you can check your SAS version.
How to Use a LIBNAME Statement to Export Data to Excel
After you have created a library that refers to an Excel file, you can use this library directly to export data as a worksheet. For example, with the code below, we export the work.my_data dataset and create the worksheet all_cars in the cars.xlsx file.
data my_xlsx.all_cars;
    set work.my_data;
run;
To create an Excel file with multiple sheets, you just need to submit another DATA step. (Don’t change the libref.)
For example:
data my_xlsx.only_ford_cars;
    set work.my_data (where=(Make = "Ford"));
run;
Caution: When you use this method to export data to Excel, SAS replaces without warning existing data. While with PROC EXPORT, you need to explicitly specify to overwrite existing data with the REPLACE option.
Advantages
An advantage of this method is that it also works for SAS procedures like PROC SQL or PROC SORT.
For example, with the code below, we directly export the result of the SORT procedure to an Excel sheet.
proc sort data=work.my_data out=my_xlsx.all_cars_sorted;
    by EngineSize;
run;
Disadvantages
A drawback of this method is that you can’t export column labels. It always exports the column headers. Nor can you create a worksheet without a header.
Did you know? How to use the LIBNAME statement to Import an Excel file
17 авг. 2022 г.
читать 2 мин
Вы можете использовать proc export для быстрого экспорта данных из SAS в файл Excel.
В этой процедуре используется следующий базовый синтаксис:
/*export data to file called my_data.xlsx*/
proc export data =my_data
 outfile ="/home/u13181/my_data.xlsx"
 dbms =xlsx
 replace ;
 sheet ="First Data";
run ;
Вот что делает каждая строка:
- data : имя набора данных для экспорта
- outfile : Место для экспорта файла Excel
- dmbs : формат файла для экспорта
- replace : заменить файл, если он уже существует
- лист : имя для отображения на листе в книге Excel
В следующих примерах показано, как использовать эту функцию на практике.
Пример 1: экспорт одного набора данных в один лист Excel
Предположим, у нас есть следующий набор данных в SAS:
/*create dataset*/
data my_data;
 input A B C;
 datalines ;
1 4 76
2 3 49
2 3 85
4 5 88
2 2 90
4 6 78
5 9 80
;
run ;

/*view dataset*/
proc print data =my_data;

Мы можем использовать следующий код для экспорта этого набора данных в файл Excel с именем my_data.xlsx :
/*export dataset*/
proc export data =my_data
 outfile ="/home/u13181/my_data.xlsx"
 dbms =xlsx
 replace ;
 sheet ="First Data";
run ;
Затем я могу перейти к месту на своем компьютере, куда я экспортировал файл, и просмотреть его в Excel:
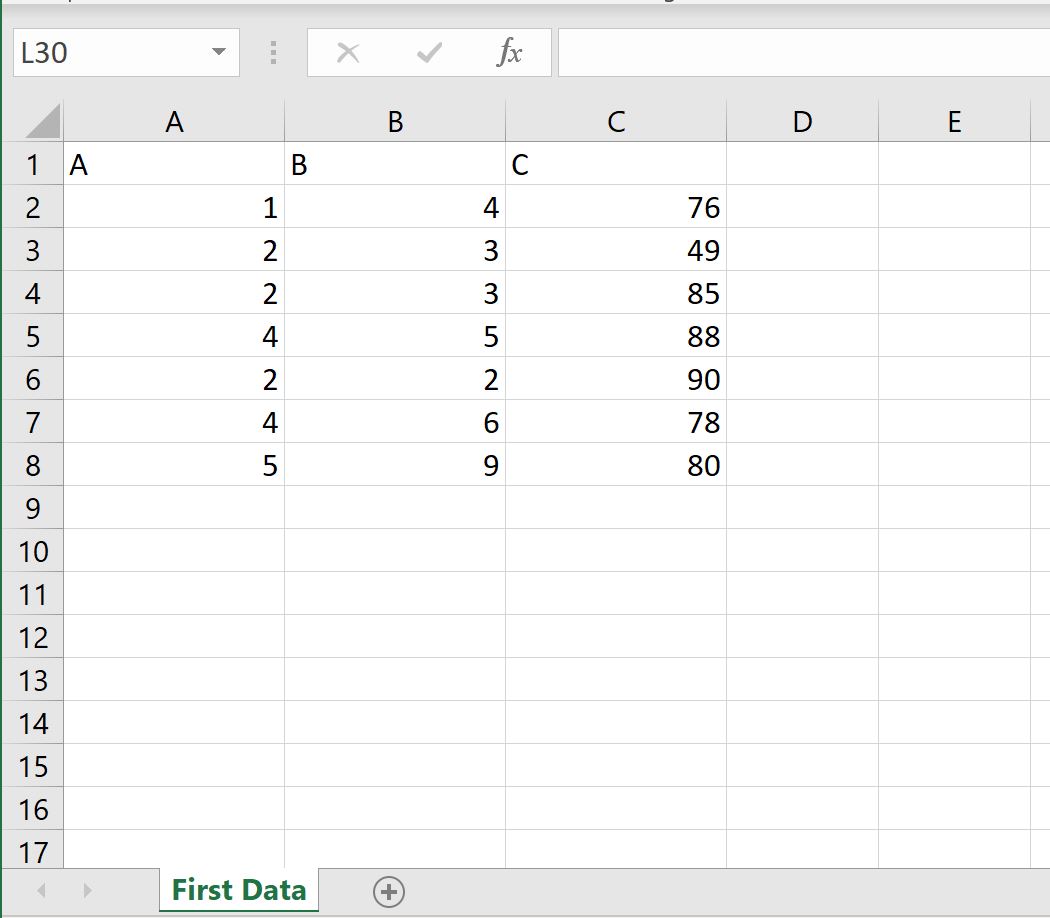
Данные в Excel соответствуют набору данных из SAS, а лист в книге Excel называется «Первые данные», как я указал в операторе экспорта proc .
Пример 2: экспорт нескольких наборов данных в несколько листов Excel
Предположим, у нас есть два набора данных в SAS:
/*create first dataset*/
data my_data;
 input A B C;
 datalines ;
1 4 76
2 3 49
2 3 85
4 5 88
2 2 90
4 6 78
5 9 80
;
run ;

/*create second dataset*/
data my_data2;
 input D E F;
 datalines ;
1 4 90
2 3 49
2 3 85
4 5 88
2 1 90
;
run ;
Мы можем использовать следующий код для экспорта обоих наборов данных в один и тот же файл Excel на разных листах:
/*export first dataset to first sheet in Excel*/
proc export data =my_data
 outfile ="/home/u13181/my_data.xlsx"
 dbms =xlsx
 replace ;
 sheet ="First Data";
run ;

/*export second dataset to second sheet in Excel*/
proc export data =my_data2
 outfile ="/home/u13181/my_data.xlsx"
 dbms =xlsx
 replace ;
 sheet ="Second Data";
run ;
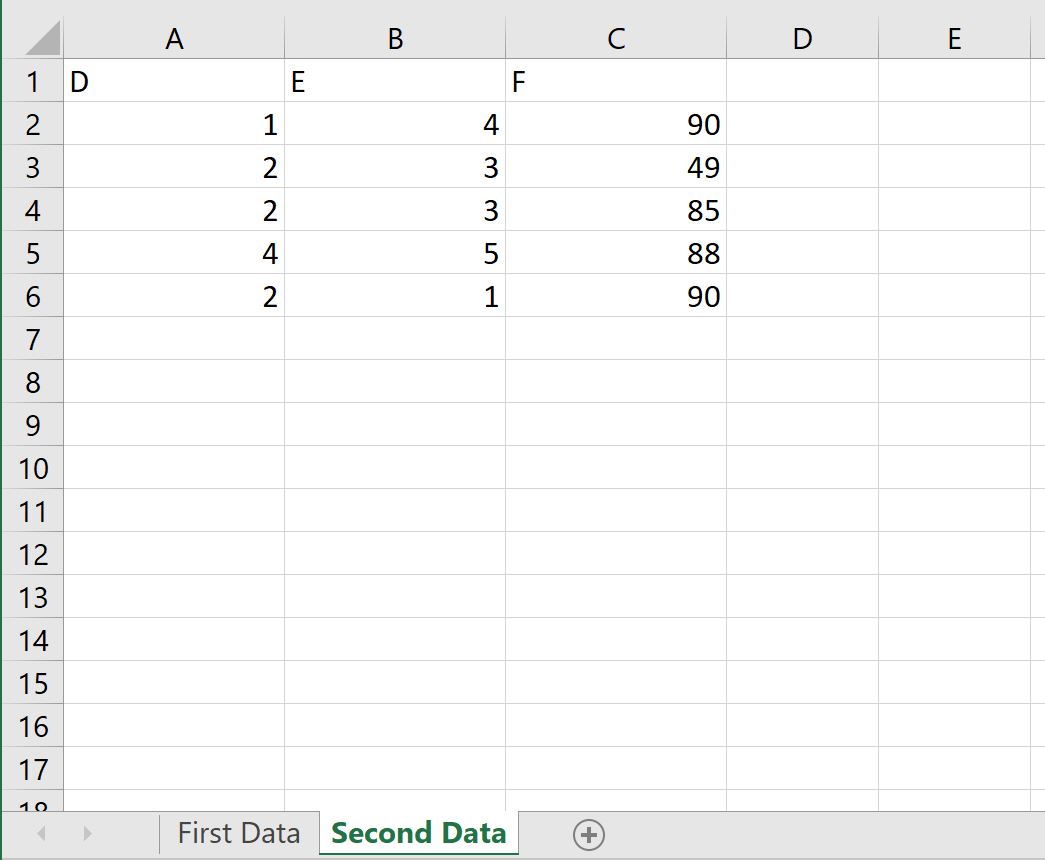
Затем я могу перейти к месту на своем компьютере, куда я экспортировал файл, и просмотреть его в Excel.
Первый лист под названием «Первые данные» содержит первый набор данных:

И второй лист под названием «Вторые данные» содержит второй набор данных:
Дополнительные ресурсы
В следующих руководствах объясняется, как выполнять другие распространенные задачи в SAS:
Как нормализовать данные в SAS
Как переименовать переменные в SAS
Как удалить дубликаты в SAS
Как заменить пропущенные значения нулем в SAS
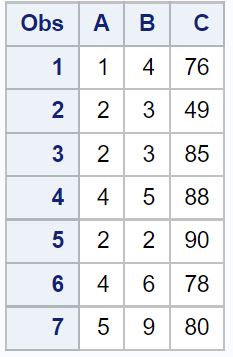
You can use proc export to quickly export data from SAS to an Excel file.
This procedure uses the following basic syntax:
/*export data to file called my_data.xlsx*/
proc export data=my_data
    outfile="/home/u13181/my_data.xlsx"
    dbms=xlsx
    replace;
    sheet="First Data";
run;
Here’s what each line does:
- data: Name of dataset to export
- outfile: Location to export Excel file
- dmbs: File format to use for export
- replace: Replace the file if it already exists
- sheet: Name to display on sheet in Excel workbook
The following examples show how to use this function in practice.
Example 1: Export One Dataset to One Excel Sheet
Suppose we have the following dataset in SAS:
/*create dataset*/
data my_data;
    input A B C;
    datalines;
1 4 76
2 3 49
2 3 85
4 5 88
2 2 90
4 6 78
5 9 80
;
run;

/*view dataset*/
proc print data=my_data;

We can use the following code to export this dataset to an Excel file called my_data.xlsx:
/*export dataset*/
proc export data=my_data
    outfile="/home/u13181/my_data.xlsx"
    dbms=xlsx
    replace;
    sheet="First Data";
run;
I can then navigate to the location on my computer where I exported the file and view it in Excel:

The data in Excel matches the dataset from SAS and the sheet in the Excel workbook is called “First Data” just like I specified in the proc export statement.
Example 2: Export Multiple Datasets to Multiple Excel Sheets
Suppose we have two datasets in SAS:
/*create first dataset*/
data my_data;
    input A B C;
    datalines;
1 4 76
2 3 49
2 3 85
4 5 88
2 2 90
4 6 78
5 9 80
;
run;

/*create second dataset*/
data my_data2;
    input D E F;
    datalines;
1 4 90
2 3 49
2 3 85
4 5 88
2 1 90
;
run;
We can use the following code to export both datasets to the same Excel file in different sheets:
/*export first dataset to first sheet in Excel*/
proc export data=my_data
    outfile="/home/u13181/my_data.xlsx"
    dbms=xlsx
    replace;
    sheet="First Data";
run;

/*export second dataset to second sheet in Excel*/
proc export data=my_data2
    outfile="/home/u13181/my_data.xlsx"
    dbms=xlsx
    replace;
    sheet="Second Data";
run;
I can then navigate to the location on my computer where I exported the file and view it in Excel.
The first sheet titled “First Data” contains the first dataset:

And the second sheet titled “Second Data” contains the second dataset:

Additional Resources
The following tutorials explain how to perform other common tasks in SAS:
How to Normalize Data in SAS
How to Rename Variables in SAS
How to Remove Duplicates in SAS
How to Replace Missing Values with Zero in SAS
Содержание
- Как экспортировать данные из SAS в Excel (с примерами)
- Пример 1: экспорт одного набора данных в один лист Excel
- Пример 2: экспорт нескольких наборов данных в несколько листов Excel
- Дополнительные ресурсы
- How to Export Data from SAS to Microsoft Excel
- Sample Data
- Export data from SAS to Excel with PROC EXPORT
- The EXPORT Procedure
- How to Overwrite Existing Files
- How to Define an Excel Sheet Name
- How to Export an Excel File with Multiple Sheets
- How to Export a Table to Excel with SAS Labels
- How to Export a Table to Excel without Header (Column Names)
- Export data from SAS to Excel with the LIBNAME Statement
- The LIBNAME Statement
- Blogs
- SAS export to Excel just got a little bit easier
- About Author
- 69 Comments
Как экспортировать данные из SAS в Excel (с примерами)
Вы можете использовать proc export для быстрого экспорта данных из SAS в файл Excel.
В этой процедуре используется следующий базовый синтаксис:
Вот что делает каждая строка:
- data : имя набора данных для экспорта
- outfile : Место для экспорта файла Excel
- dmbs : формат файла для экспорта
- replace : заменить файл, если он уже существует
- лист : имя для отображения на листе в книге Excel
В следующих примерах показано, как использовать эту функцию на практике.
Пример 1: экспорт одного набора данных в один лист Excel
Предположим, у нас есть следующий набор данных в SAS:
Мы можем использовать следующий код для экспорта этого набора данных в файл Excel с именем my_data.xlsx :
Затем я могу перейти к месту на своем компьютере, куда я экспортировал файл, и просмотреть его в Excel:
Данные в Excel соответствуют набору данных из SAS, а лист в книге Excel называется «Первые данные», как я указал в операторе экспорта proc .
Пример 2: экспорт нескольких наборов данных в несколько листов Excel
Предположим, у нас есть два набора данных в SAS:
Мы можем использовать следующий код для экспорта обоих наборов данных в один и тот же файл Excel на разных листах:
Затем я могу перейти к месту на своем компьютере, куда я экспортировал файл, и просмотреть его в Excel.
Первый лист под названием «Первые данные» содержит первый набор данных:
И второй лист под названием «Вторые данные» содержит второй набор данных:
Дополнительные ресурсы
В следующих руководствах объясняется, как выполнять другие распространенные задачи в SAS:
Источник
How to Export Data from SAS to Microsoft Excel
As a Data Analyst it is common to create a dataset in SAS and carry out further analysis in Microsoft Excel. But, how do you export data from SAS to Excel?
Exporting data from SAS to Microsoft Excel can be done with the EXPORT procedure and the LIBNAME statement. The EXPORT procedure provides flexibility when it comes to including column labels or header names. Whereas exporting data with a LIBNAME statement gives you more options for subsetting data and creating new columns.
In this article, we discuss both methods in more detail and answer common questions such as:
- How to define a sheet name?
- How to export column labels?
- How to create an Excel file without a header?
Sample Data
In this article, we use a sample dataset to export to Excel (work.my_data). This dataset is based on the CARS dataset from the SASHELP library, but with fewer columns.
Export data from SAS to Excel with PROC EXPORT
The EXPORT Procedure
An easy way to export a table from SAS to Excel is with the EXPORT procedure (PROC EXPORT). This procedure is easy-to-understand and provides many options.
Syntax of PROC EXPORT
To export data from SAS to Excel with PROC EXPORT you need to define at least three parameters:
- DATA=-option to specify the SAS dataset you want to export. For example, DATA=work.my_data.
- OUTFILE=-option to define the output location and the file name. For instance, OUTFILE=”/folders/myfolders/export/cars.xlsx”
- DBMS=-option to specify the file extension such as DBMS=xlsx.
DATA=-option
The DATA=-option specifies the SAS dataset you want to export. You can either use a one- or two-level SAS name (i.e., with or without libref). When you export a dataset to Excel, you can use dataset options such as KEEP, RENAME, and WHERE in the DATA=-option.
OUTFILE=-option
The OUTFILE=-option specifies the location and file name of the exported dataset. The file name includes the extension. Keep in mind that the complete path (location and file name) can’t exceed 201 characters.
DBMS=-option
The DBMS=-option specifies the type of file the EXPORT procedure creates (e.g., .xlsx or .xls). It depends on the file type how much data SAS can export. For example, if you export data to Excel, the SAS dataset cannot exceed the maximum of 1,048,576 rows and 16,384 columns.
Examples
The SAS code below exports the work.my_data dataset to Excel and creates a file called cars.xlsx.

Note 1: If you want to create an XLS-file with PROC EXPORT, you need to change the file extension in the OUTFILE=-option and use DBMS=xls.
Note 2: You need the SAS/ACCESS Interface to PC Files license to export data from SAS to Excel. To check if this license is available on your SAS installation, you can use the PROC SETINIT statement.
How to Overwrite Existing Files
By default, PROC EXPORT doesn’t overwrite existing files. If you try to do this, SAS will write an error to the log and will stop executing. To change this default behavior, you need the REPLACE option. If you use the REPLACE option, you can export and overwrite an existing file.
This is an example of how to use the REPLACE option.
How to Define an Excel Sheet Name
By default, PROC EXPORT creates an Excel file where the sheet name is equal to the filename. However, you can overwrite this default behavior and define the sheet name with the SHEET=-option. You need to write the sheet name between quotation marks, and it cannot exceed 31 characters.
In the example below, we create the Excel file cars.xlsx and call the sheet All Cars.
How to Export an Excel File with Multiple Sheets
Many Excel workbooks have multiple worksheets. Nevertheless, PROC EXPORT creates only one file with one sheet. So, how do you create an Excel file with multiple sheets using SAS?
You can create an Excel file with multiple sheets by submitting one PROC EXPORT statement for each sheet. In each PROC EXPORT statement, you change the DATA=-option and the SHEET=-option. But, the OUTFILE=-option and the DBMS=-option remain unchanged.
In the example below, we create an Excel file with two sheets, namely All Cars and Ford Cars. As you can see, we use dataset options, such as KEEP, RENAME, and WHERE in the DROP=-option.
How to Export a Table to Excel with SAS Labels
SAS datasets have column names and, optionally, column labels. Column labels can contain special characters such as blanks and percentage signs. For this reason, column labels are more elegant and are frequently used in reports. However, by default, PROC EXPORT exports the column names instead of the column labels. So, how do you export the column labels with PROC EXPORT?
You use the LABEL option to export a sheet with the column labels instead of the column names. You place this option after the REPLACE option. If a column doesn’t have a label, then PROC EXPORT exports the column name.
With the SAS code below, we export the column labels instead of the column names.
With a PROC CONTENTS statement, you can check whether a column has a label. For instance, some of the columns of our sample data work.my_data have labels.
Typically, you want your Excel file to have a header (i.e., column names). However, sometimes you need to create a file without one. So, how do you export data from SAS to Excel with a header?
You can prevent SAS from exporting the header to Excel by setting the PUTNAMES=-option to No. By default, this option is set to Yes. In contrast to other options, you write the word NO without quotation marks.
In the example below, we use PUTNAMES=NO to prevent SAS from adding column names to the Excel file.
Export data from SAS to Excel with the LIBNAME Statement
The LIBNAME Statement
A less known, but also very efficient way to export data from SAS to Excel is by creating a library with the LIBNAME statement.
Normally, you use the LIBNAME statement to create a library to store your SAS datasets. However, with the LIBNAME statement’s ENGINE option, you can also create libraries to import and export Excel files. Because of this option, it becomes very convenient to save the output of a DATA step or a SAS procedure directly as an Excel file.
Syntax
You create a library to export data to Excel with the LIBNAME statement. The statement starts with the LIBNAME keyword, followed by the libref and the engine type, and finally, the location and Excel file name.
- libref: The libref is the name of the library. A libref is at most 8 characters long, starts with a letter or an underscore, and can only include letters, numbers, or underscores.
- engine: The engine provides SAS with instructions on how to treat the data. The default engine is BASE for SAS tables. However, SAS treats the data in the library as an Excel file with the XLSX engine.
- path: The location and the file name (including the file extension).
A normal library (without specifying the engine) contains one or more SAS datasets. However, if you use the XLSX engine, then a library is one Excel file where the “datasets” are the worksheets of the file.
Источник
Blogs
SAS export to Excel just got a little bit easier
Note: as this is a popular topic, I’ve added a few notes with minor updates, including a link to a popular how-to tutorial video.
In case you missed it, the first maintenance release for SAS 9.3 was recently released. Because we’re all friends here, you may call it «SAS 9.3M1» for short.
Maintenance releases are usually about fixing problems that SAS has found or that customers have reported. However, sometimes a new capability might sneak out the door along with it. That’s what happened this time with improved XLSX support in PROC EXPORT.
Now for the first time, this round-trip import/export cycle works just as you would expect with no additional setup required:
Watch this tutorial (from SAS instructor Kathy Kiraly) to learn more about how to import and export XLSX files in SAS with just a few lines of code.
Kathy’s tutorial includes simple shortcuts, such as using the LIBNAME XLSX engine to read Excel files just like data sets.
Remember: using the IMPORT and EXPORT procedures to read and write Microsoft Excel files requires the SAS/ACCESS to PC Files module. With these latest changes, you can get the job done without setting up a PC Files Server, even on systems that don’t have a 32-bit Windows architecture.
Prior to this support, most customers who run SAS for 64-bit Windows or on a UNIX platform would need to use DBMS=EXCELCS for this operation. The EXCELCS method works by delegating the Excel read/write operation to another Windows node that has a PC Files Server instance. (On 64-bit Windows, you can make it work with very little configuration using the «autostart» capability.)
The PC Files Server is still very useful for other scenarios, such as supporting the PCFILES LIBNAME engine, which can read and write Microsoft Excel and Microsoft Access files, among others.
And if you’re looking for a point-and-click method for creating XLSX files in SAS Enterprise Guide, we cracked that nut a while ago. Just look for the Export as a Step task on your data view, or the «Share» tool in SAS Enterprise Guide 8.1.

+Chris Hemedinger is the Director of SAS User Engagement, which includes our SAS Communities and SAS User Groups. Since 1993, Chris has worked for SAS as an author, a software developer, an R&D manager and a consultant. Inexplicably, Chris is still coasting on the limited fame he earned as an author of SAS For Dummies.

Thanks! I have been struggling with this issue!
So, does this latest release fix the known issue with corruption of named ranges in xlsx/xlsm files under 9.2? From the track I had running a while ago, this was due to an issue with the MS Jet Engine which I am guessing has been fixed in 9.3M1.

I cannot say for certain whether this fixes the issue you saw. It’s true that this update allows you to create an XLSX file without invoking the Microsoft drivers (which seemed to be to blame for the issue you reported). But I’m not sure that you can use this method to accomplish your objective. especially if you are wanting to create a macro-enabled file (XLSM). That question might be work tracking again with SAS Technical Support.
Thank you Chris. I don’t have 9.3M1 yet — will need to wait until it is deployed at our site. In the meantime, I will stay with xls files for proc export, or a modified version of exportToXL (DDE maco suite) for xlsx or xlsm. Unfortunately exportToXL doesn’t work with hidden worksheets.
I’m facing some problem in creating EXCEL file under LINUX thru proc export.
Can you please suggest me the best way to create or export data to excel on LINUX platform itself?
If you have SAS 9.3 Maint 1, then you can use the XLSX method described in this post. For a more complete survey of all of the possibilities, check out «How do I export Excel files, let me count the ways».
Hi Chris,
I want to write xlsx file in unix server using unix sas code. My Unix Sas aricheture is ts1m1 64 bit and I am having 32 bit excel microsoft 2007. When I am using below code for exporting the xlsx file in unix server location.
Code used :
proc export data=
outfile=
dbms=xlsx
replace;
run;
xlsx file getting created in the unix location and after ftping to the local machine using ftp application. I am getting this error.
‘Excel found unreadable contents in ‘filename.xlsx’. Do you want to recover the contents of this workbook? If you trust the source of this workbook, click yes
Could you please help me on this
When you FTP the file, are you certain that you are using BINARY mode as the transport? If not, the file could become corrupted in the transfer.
XLSX files are ZIP-formatted archives, so you could try to open in a tool such as 7Zip or WinZip to make sure the file is at least a valid archive.
Chris. What would my proc export statement look like if I have SAS V9.1.3 and want to export to Excel 2010 because that’s what I have on my PC?
Marc,
In SAS 9.1.3 there is not native support for writing to XLSX files. You can still use DBMS=EXCEL of course, but you will still have the limitations of the XLS format: 65K rows, etc.
As an alternative, you can use DBMS=CSV, ODS TAGSETS.EXCELXP, or ODS CSV output. I have a more complete list of methods available here.
Works great; fixes a workflow bind.
But how does one specify a particular sheet (if it’s not the first worksheet in the workbook)
Subci, you currently can’t specify a particular sheet to export to or to import from by using SAS Interface to PC Files. You’d need to download and install SAS 9.3 PC Files Server.
All you need to know is explained here: http://support.sas.com/kb/43/802.html
I have found the following allows me to create worksheets within the same workbook (using the code example in the original post):
proc export
data=sashelp.prdsale
dbms=xlsx
outfile=»c:tempprdsale.xlsx» ;
sheet = sheet1 ;
run;
proc export
data=sashelp.prdsale
dbms=xlsx
outfile=»c:tempprdsale.xlsx» ;
sheet = sheet2 ;
run;
I hope this helps someone, as it was a lifesave for my team! Thanks!
Jessica, thanks for sharing. I believe that the ability to add sheets to an existing workbook is a new feature in SAS 9.4.
Is there a list of options for this output type? I can’t find any documentation on it. The defaults works great, but I’d love to write to a specific worksheet, add autofilters, freeze the first column and/or row, etc. Thanks!
I think what you want is the features of the TAGSETS.TABLEEDITOR, which I didn’t mention in this post. That has the ability to create more control over the output columns like you’re asking for.
Sorry, Doesn’t work.
38 %LET filrf = «/sas/sasdata/sashome/41000769/bilstod/2012/&prognos/Utbet_exc.xlsx»;
170
171 proc export data=bet5_3
172 outfile=&filrf
173 dbms=xlsx replace;
ERROR: DBMS type XLSX not valid for export.
— SAS-programvara —
SAS Enterprise Guide-version: 4.3.0.10196
SAS System-version: none
SAS System-kommando: none
Shared SAS-files: D:AppsSASSharedFiles
JMP-installation:
— Actual process —
Actual catalog: d:appssasenterpriseguide4.3
Commandorow: d:appssasenterpriseguide4.3SEGuide.exe
Space for tempfiles: C:TEMP7SEG55896
Memory used: 202 633 216 bytes
Type of clientsession: Terminal services client
Runs in WOW64 (32-bit subsystem): Nej
— Operativsystem —
Namn: Windows 2003
Version: 5.2.131072.3790
Servicepack: Service Pack 2
.NET Runtime Version: 2.0.50727.3634 (SP 2)
Internet Explorer-version: 6.0.3790.3959
Systemkatalog: C:WINNTsystem32
Standardwebreader: Citrix Metaframe Server FTA
MDAC-version: 2.82.3959.0
In order for this to work, you need SAS 9.3 maint 1 (at least) and SAS/ACCESS to PC Files on the SAS server. It’s not clear from your log whether you have that; I suggest redirecting follow up questions to SAS Technical Support.
Is there any way to pass SAS formats to Excel when using PROC EXPORT DBMS=XLSX? I’m exporting a dataset with some PERCENT-formatted columns, but they just show up as raw numbers in Excel.
If you want to stick with DBMS=XLSX, you might try creating a character-formatted column with put(col,percent5.) — for example — and see if that carries over.
Otherwise, you can use ODS tagsets.EXCELXP or LIBNAME EXCEL (or LIBNAME PCFILES) to put your data to a spreadsheet and perhaps retain the formatting you want. See this blog post for an inventory of various methods.
Thanks so much for this helpful tip! I notice that dbms=xlsx seems to apply some sort of compression to the xlsx file, since when I open it up and immediately resave with a different name, the new file is larger. Do you know anything about this?
Andrew, I don’t know what would make the file larger, exactly. but here’s what I do know. The XLSX file format is a ZIP archive, compressed already. SAS writes to this file directly, so it creates a no-frills version of your SAS content for use in Excel. When you open and resave the file in Excel, perhaps Excel «enriches» the file with additional information, such as formatting instructions, so the resulting file is a bit larger.
That’s my made-up answer. It might be at least partially correct.
Thanks. I guess my particular problem is that when I try to pass SAS-created xlsx files as attachments through outlook to colleagues, they get quarantined for «bad compression», but if I open them, resave, and then attach to an email, they go through fine. could be something specific to my work environment.
Andrew, it could be that the XLSX file doesn’t «smell» like a true XLSX file to your e-mail filters, since it wasn’t created with the Microsoft tools. It might be interesting to examine the file versions, before and after the re-save operation. You could work with SAS Tech Support on this and if a change needs to be made to DBMS=XLSX processing, they can help get that in the system.
Chris, thanks for your help. I was not able to comprehensively follow up on the issue, but I believe that it was a problem with my work environment unrelated to SAS.
Hi Chris,
The above syntax is not working for Mainframes SAS, is there any specific solution to export the data in excel 2007 file (.xlsx) in SAS mainframes.
Thanks and Regards
Babu — I see that z/OS is not listed in the support matrix for PROC EXPORT and XLSX. You can still use ODS TAGSETS.EXCELXP, or straight-line CSV. If you need another option, please contact SAS Technical Support for some ideas.
We just installed 64-bit SAS 9.4 (TS1M0) under Windows 7. Using PROC IMPORT with DBMS=XLSX works, except that the RANGE statement seems to be ignored and always the first worksheet in the Excel file being imported. This makes it pretty useless when I want to import multiple worksheets from a single Excel file. So, I am sticking with using DBMS=EXCELCS with the 32-bit PC Files Server installed, which seems to work fine with a RANGE statement. Any chance of a fix so that the RANGE statement will work anytime soon?
The XLSX method received some updates in SAS 9.4 TS1M1. I believe the RANGE= works better, plus there is support updating/adding a sheet to an existing workbook.
I suggest confirming this for your scenario with SAS Technical Support, and then pursue the M1 update if you can.
With SAS 9.2 this simply does the trick as well
Interesting find! I think in this case, it’s the XLSX extension that is triggering the file format. If you specify the same code (EXCEL2000) and an XLS file extension, you’ll see the file format is different.
Thank you so much Chris your tip works perfectly
I get the following error message when trying to import data from excel. I am using SAS 9.4 and my desktop is running on windows 7 with 64 bit OS.
Proc import out=MHET112_A1
192 datafile= «C:Users. DocumentsMHET112_A.xlxs»
193 dbms=xlxs
194 replace;
ERROR: DBMS type XLXS not valid for import.
NOTE: The SAS System stopped processing this step because of errors.
NOTE: PROCEDURE IMPORT used (Total process time):
real time 0.00 seconds
cpu time 0.00 seconds
195 getnames=yes;
196 run;
Are you sure that the file extension isn’t XLSX? The proper file extension for most Microsoft Excel files has the «S» before the final «X».
Hello, after the file import with XLSX I have very strange columns behaviour — length of the actual data is equal to the length of the column, for example I try to create new integer column from string and get the following note:
NOTE: Invalid numeric data, ‘22247. ‘ and new column is empty after that
I concatenated ‘. ‘ to all values and got the following result — ‘22247 . ‘ — can’t compress it either. Do you ever saw such a thing?
How are you importing this XLSX file? Using SAS Enterprise Guide and the Import Data task? Or are you using PROC IMPORT? If you can supply more details, I suggest that you post the question to communities.sas.com. The experts there can probably answer your question quickly.
It was PROC IMPORT. Will try to past it there, thanks
The code works good but. when I open the excel file a msg pops up that the file is corrupted and I couldn’t open it!!
If you want to follow up on this error, post in communities.sas.com with the details of the code you’re running, the version of SAS that you have installed, and the error message. Or, open a track with SAS Technical Support.
How do I change the column width? The width of each column looks either too narrow or too wide in Excel. How do I change it in the Proc Export statement? Thanks!
PROC EXPORT simply exports the data, and doesn’t tell Excel how to format the appearance at all.
There are two other mechanisms that provide a little bit more control. First, you could try ODS EXCEL, which has several appearance-related options. ODS EXCEL is new in SAS 9.4. Or, you could try the new LIBNAME XLSX engine — it doesn’t have formatting options but since it creates a native XLSX file, the output format might look a little bit better.
Thank you very much! Here is my code. The problem was the text in a couple of columns got truncated in the Excel 2010. But these columns look very nice in SAS 9.4 dataset. The columns weren’t truncated in SAS; but it’s trruncated after ods to excel. Please help!
ods excel file=»c:test.xlsx»
style=Pearl
options(sheet_interval=»proc» sheet_label=»none» sheet_name=»Test»);
proc print data=test noobs; run;
ods excel close;
You can use additional options to influence the column widths. For example:
ods excel file=»c:test.xlsx»
style=Pearl
options
(sheet_interval=»proc»
sheet_label=»none» sheet_name=»Test»
absolute_column_width=’20’);
I don’t think there is an «autofit» option.
I used your code and it works, but I have first few lines of comments in the excel before the data.
Is there a way to tell MIXED data in the file. That way it will only copy the data into dataset instead of comments as variable.
proc import
datafile=»c:tempprdsale.xlsx»
dbms=xlsx
out=work.prdsale
replace;
run;
Try the DATAROW= statement in PROC IMPORT, which tells the procedure where to begin reading.
Hi. I’m using this to export, and it works well except that if I export more than 1 spreadsheet to a workbook, the spreadsheets are all linked. If I don’t remember to unlink them, any changes in one affects all the others. Is there some way to stop this? (It happens both in a plain proc export and a ODS export to xlsx; it never happened when I was using xls.)
I wasn’t aware the sheets become linked. Can you share specifics about how you are creating these XLSX files? Perhaps post the details in SAS Support Communities — your fellow users will test and advise!
Kindly do me a favor.
How to IMPORT .xlsx file into SAS UNIX environment.
I tried
PROC IMPORT DATAFILE=»path/abc.xlsx» OUT=ABC DBMS=XLSX REPLACE;
RUN;
But I am getting ERROR: DBMS type XLSX not valid for import.
NOTE: In DBMS I also used DBMS=EXCEL or DBMS=EXCEL2000 but getting same error.
Kindly give your valuable inputs.
First, you need SAS/ACCESS to PC Files — can you verify you have that with proc product_status?
Next, DBMS=XLSX works with SAS 9.4 reliably, but not earlier. For that, you might need to use DBMS=XLS. But for XLSX files, you probably would need to set up a PC Files Server (again, this is only for releases earlier than SAS 9.4).
Enormous thanks, this code worked wonders for me. Thanks once again
But it doesn’t work for multiple sheet by macro. The new sheet will replace the old one. Is any solution for macro output to xlsx?
You don’t mention the SAS version you’re running. Replacing content at the sheet level is supported in SAS 9.4 — is that what you’re running?
Can someone help getting the following error wile exporting class dataset to local machine.
Insufficient authorization to access
/opt/sas/config/Lev1/SASApp_FIN_OPSPAY/\GBMLVFILFS04N02Home4$sahuaadProfileDesktopclass.xls.
Your SAS is running on UNIX (maybe Linux, and maybe SAS University Edition?). If running in SAS Enterprise Guide, you probably need to use this technique. If using SAS University Edition, you need to target the shared folder in your VM (path = ‘/folders/myfolders’). See this FAQ.
Can Someone Help Getting the following error while exporting report_daily dataset to local machine.
ERROR: Temporary file for XLSX file can not be created ->
/opt/sasinside/SASConfig/Lev1/SASApp/D:SASUniversityEditionmyfoldersDaily/MTD_AMDOCS.$$1. Make sure the path name is correct
and that you have write permission.
Using SAS University Edition, you must specify the proper path for your shared folder in the PROC EXPORT file out option, i.e., «/folders/myfolders/Daily/MTD_AMDOCS.xlsx».
I currently use SAS in a Linux environment. I have a 10k obs dataset that will be exported to an Excel spreadsheet (.xlsx file) using proc export.
Everytime I export, I need to manually format the output (column widths, column headers shading, etc.). Would there be a way to export to an excel file using a pre-existing excel template?
That would save me lots of time. Please, advise. Thanks!
You can automate those styles/widths by using ODS EXCEL and its many options. Here’s a good paper on the topic.
If you wanted to use a predefined template and you have SAS Add-In for Microsoft Office, you could design your workbook and then use SAS to pull the content into place.
proc sql;
create table WORK.Validations2 as
select distinct Lease_Type_Desc
from WORK.Validations1
group Lease_Type_Desc;
run;
proc export
data=VALIDATIONS2
dbms=EXCEL2000
outfile=»C:tempprdsale.xlsx»
replace;
run;
I got the output Data but file is not being created.
Why use EXCEL2000? Best advice is to use DBMS=XLSX these days for native Excel files.
Источник
I have a love-hate relationship with spreadsheet data. I am interested in finding data to analyze, and if it arrives in the form of a spreadsheet, I’ll take it. And I like to deliver results and reports, but often my constituents ask for it as a spreadsheet that they can then manipulate further. <Sigh.>
A spreadsheet is not a database, so it can be a challenge to whip spreadsheet data into analysis-ready shape. Likewise, saving results as a spreadsheet can lose something in the translation — usually value formatting, appearance attributes, or graphs.
SAS offers many ways to read from and write to Microsoft Excel spreadsheets. They each have pros and cons. This post is an inventory of the methods that I know about for creating Excel files from within SAS.
If you want to cut to the chase and learn by watching, check this tutorial by SAS instructor Kathy Kiraly.
Some «bits» about 32-bit and 64-bit architecture
Before I get to the Big List, let me set the stage by describing a few terms and concepts.
In order to create Excel files directly from SAS, you need SAS/ACCESS to PC Files. This product enables all sorts of file exchanges between SAS and other PC-based applications, including Microsoft Excel, Microsoft Access, SPSS, and more.
SAS/ACCESS to PC Files includes a component called the PC Files Server. The PC Files Server is a service-based application that runs apart from SAS on a Windows node. It accepts requests from SAS to convert data to and from Excel (and other file types). Traditionally, this innovation allows SAS running on UNIX (where there are no native facilities for Excel data) to exchange data with PC-based data programs.
Recent changes in desktop computing have complicated the picture. Newer desktop machines all have 64-bit architecture, and most organizations are now adopting 64-bit versions of Microsoft Windows. All of your 32-bit applications (designed for x86 architecture) still can still run, of course, but there are a few hard-and-fast rules. One of those rules is that a 64-bit application cannot dynamically load 32-bit modules in its process space. And guess what? There is a better-than-even chance that the built-in data providers that you have for Microsoft Excel — the bits that allow SAS to write to Excel on Windows — are 32-bit modules. This means that the PROC EXPORT DBMS=EXCEL program that worked in your 32-bit SAS session will not work in your 64-bit SAS session.
There are two remedies for this bitness mismatch. First, you could install the 64-bit data providers (which accompany the 64-bit version of Microsoft Office). But you cannot have both the 32-bit and 64-bit versions of these data providers on the same machine; if you have 32-bit Microsoft Office, then you’re stuck with the 32-bit providers for now.
The second remedy is to use the PC Files Server, right there on the same Windows machine where SAS is running. This allows a 64-bit SAS process to delegate the data exchange to a 32-bit PC Files Server process. Thanks to the out-of-process communication, this circumvents the bit architecture mismatch. To make this work you don’t have to set up any additional software, but your SAS programs must change to use DBMS=EXCELCS. The EXCELCS keyword tells SAS to use the PC Files Server instead of attempting to use in-process data providers.
Exporting to Excel: ways to get there from SAS
With the architecture lesson behind us, here’s my list for how to put SAS content into Microsoft Excel. I won’t dive into much detail about each method here; you can follow the links to find more documentation.
These methods use features of SAS/ACCESS to PC Files:
LIBNAME EXCEL – reads/writes Excel files at the sheet level when the bitness of SAS (32- or 64-bit) matches the bitness of Microsoft Office installed (or more specifically, the ACE drivers that accompany Office). An Excel file is viewed as a SAS library, while sheets/ranges are the member tables. Requires exclusive lock on an existing Excel file.
LIBNAME PCFILES – does the same as LIBNAME EXCEL, but uses PC Files Server. Good for UNIX and for Windows configurations where bitness of SAS and Microsoft Office don’t match.
LIBNAME XLSX — reads and writes native XLSX files without the need for Microsoft components or the PC Files Server. This works the same way on all platforms: Windows and UNIX based. LIBNAME XLSX is available in SAS 9.4 and later.
PROC EXPORT DBMS=EXCELCS – uses PC Files Server to write an Excel file. There are various options to control the output behavior. Good for UNIX and for Windows configurations where bitness of SAS and Microsoft Office don’t match.
PROC EXPORT DBMS=EXCEL — writes Excel files when the bitness of SAS (32- or 64-bit) matches the bitness of Microsoft Office installed (or more specifically, the ACE drivers that accompany Office).
PROC EXPORT DBMS=XLS – writes Excel (XLS) files directly, no driver or PC Files Server needed. Has limits on volume and format. Works on Windows and UNIX.
PROC EXPORT DBMS=XLSX – new in 9.3M1, writes Excel 2010 files (XLSX format) directly. No driver or PC Files Server needed. Works on Windows and UNIX.
The following methods do not require SAS/ACCESS to PC Files, so they are popular, even if some don’t produce «native» Excel files:
ODS EXCEL — produces a native XLSX file, and can include graphics, formatting, and formulas with the use of special directives. This method is available in SAS 9.4 Maintenance 3 and later. See this post for tips about achieving some fancy effects with ODS EXCEL. This method should replace your use of ODS TAGSETS.EXCELXP if you’re still using that.
PROC EXPORT DBMS=CSV – produces comma separated value files, most often used in Excel.
ODS TAGSETS.CSV (or just DATA step and FILE output) – produces comma separated value files, most often used in Excel.
DATA step, using FILE and PUT to create delimited files — a simple approach that provides a little bit more control than TAGSETS.CSV or PROC EXPORT DBMS=CSV.
ODS TAGSETS.EXCELXP – uses ODS to create an Office XML file. Provides a fair amount of control over the content appearance, but recent versions of Excel do not recognize as a «native» format, so user is presented with a message to that effect when opening in Excel.
FILENAME DDE – uses Windows messages to control what goes into an Excel file, down to the cell level. Works only when SAS for Windows and Excel are on the same machine. Doesn’t work in SAS workspace servers or stored process servers (often accessed with SAS Enterprise Guide). It’s an antiquated approach, but offers tremendous control that many long-time SAS users enjoy — when it works. See why your DDE programs don’t work anymore.
SAS client applications make it easier
While I’ve focused on the SAS programming methods for creating Excel files, applications like SAS Enterprise Guide and the SAS Add-In for Microsoft Office make the operation a breeze. SAS Enterprise Guide can import and export Excel files through point-and-click methods, and SAS/ACCESS to PC Files is not needed to make that work. (However, the work is not captured in a SAS program, so it cannot be run in SAS batch jobs or stored processes.)
SAS Add-In for Microsoft Office turns the problem on its head. By allowing you to access SAS data and analytics from within Microsoft Excel, you pull the results into your Excel session, rather than export them from your SAS session.
I have SAS guide output.
I want to PROC export him, the problem is that when i export him to excel
All the format changes.
When I use in the SAS guide the «export as step in the…» everything is ok.
But I need the PROC export
So , how can I export and save all of the format ?
Thanks
- sas
- sas-macro
asked Aug 29, 2017 at 9:54
![]()
itamaritamar
11 silver badge1 bronze badge
1
-
Please review the guidelines on how to ask a question. This question is unclear, and I have no idea what ‘him’ refers to. Data typically doesn’t have a gender. stackoverflow.com/help/how-to-ask
Aug 29, 2017 at 14:47
1 Answer
answered Sep 1, 2017 at 7:58
![]()
pinegulfpinegulf
1,28413 silver badges32 bronze badges
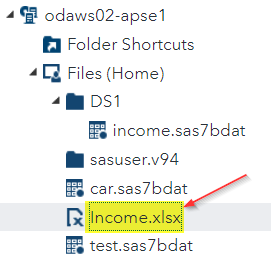
Export a SAS Data Set into an Excel spreadsheet
You will often need to export a data set into an Excel spreadsheet.
This can be easily done by using a procedure called PROC EXPORT.
Example
Proc Export Data=Income
OutFile='/home/your_user_name/Income.xlsx'
Replace
Dbms=xlsx;
Run;
[Note: you must change the directory path when running the code above.]
Proc Export is a procedure that allows you to export a SAS data set into an external file such as an Excel spreadsheet or a text file.
You should include these three options when using Proc Export:
1. OUTFILE option
The OUTFILE option lets you specify the file to be exported. In our example, the data is exported into Income.xlsx.
2. REPLACE option
The REPLACE option allows you to overwrite the file if it already exists in the stated directory path. It is recommended to always include this option when using PROC EXPORT.
3. DBMS option
The DBMS option specifies the file format (file type) to be exported. In our example, we use the DBMS option to tell SAS to export the data set into an Excel spreadsheet (.xlsx).
—-
Now, run the code in the example above with your own directory path.
The Income data set (created in one of our previous exercises) will then be exported into an Excel spreadsheet:
Want to track your progress?
Register for a Free SASCrunch account now!
Exercise
Locate the Electric data set in the SASHelp library.
Export Electric into an Excel spreadsheet.
Ensure the Excel spreadsheet contains the same rows and columns as the SAS data set.
Introduction
NPOI is a .NET project which can read and write read/write xls, doc, and ppt files without the need for a Microsoft Office installation or license. Formerly on CodePlex, the project is now located on Googlecode at http://code.google.com/p/npoi/.
In this CLR example, I’ll use NPOI to create a procedure that takes a stored procedure name and list of parameters and parameter values for that procedure, and outputs an Excel spreadsheet that contains the execution results of that proc to the passed .XLS file specification. The advantage to a CLR solution is that (in addition to lacking an MS Office install or license requirement) ActiveX and COM components are not required on your otherwise pristine SQL Server to accomplish this task.
This procedure supports output data types of CHAR, NCHAR, VARCHAR, NVARCHAR, all numerics, DATE, TIME, DATETIME, DATETIME2, BIT, and BOOLEAN. Other datatype outputs are not currently supported, but are easily added if needed.
The CLR Procedure
The declaration for my CLR procedure looks like this:
 [Microsoft.SqlServer.Server.SqlProcedure]
 public static void xsp_Export_Excel(
    [SqlFacet(MaxSize = 128)] SqlString ProcName,
    SqlXml XMLParams,
    SqlInt32 CommandTimeout,
    [SqlFacet(MaxSize = 1024)] SqlString FileSpec,
    SqlBoolean OverwriteIfExists,
    SqlBoolean HeaderRow,
    [SqlFacet(MaxSize = 32)] SqlString SheetName
 )
The parameters are:
ProcName
The name of the stored procedure whose results you want to write to the Excel spreadsheet.
XMLParams
An XML-formatted list of parameters that the procedure takes. For example, if my stored procedure takes three parameters — CustomerID (an int), UserName (varchar(80)), and CurrentDateTime (a datetime) — and I want to output data for Customer 12345, UserName «Blaque Jacque Shellaque», and a current datetime of 2011-06-10 08:00:00, I pass this XML as a string:
<params>
   <param name="CustomerID" value="12345" />
   <param name="UserName" value="Blaque Jacque Shellaque" />
   <param name="CurrentDateTime" value="2011-06-10 08:00:00" />
</params>
Note that the ordering does not matter; this will work too:
<params>
 <param name="CurrentDateTime" value="2011-06-10 08:00:00" />
 <param name="UserName" value="Blaque Jacque Shellaque" />
 <param name="CustomerID" value="12345" />
</params>
And if any parameters have default values, you can just omit them from the XML entirely to use the default:
<params>
  <param name="CustomerID" value="12345" />
  <param name="UserName" value="Blaque Jacque Shellaque" />
</params>
CommandTimeout
Specifies the CommandTimeout in seconds to use when executing the procedure. Zero means no timeout.
FileSpec
Specifies the full path, filename, and extension of the Excel file you want to write. This must be a location local to the SQL Server server itself or a network location accessible from it.
OverwriteIfExists
1=Overwrite the Excel file if it exists, 0= don’t overwrite it and throw an error if it is found.
HeaderRow
1=Write a header row to the Excel spreadsheet with the name of the result set columns as the headers, 0=no header row.
SheetName
Name to apply to the sheet created in the spreadsheet in which your results will appear.
The CLR Procedure
The procs starts by making a few sanity checks:
//check for empty parameters
if (ProcName.Value == string.Empty)
 throw new Exception("Procedure name value is missing.");// parse filespec
FileInfo fi = new FileInfo(FileSpec.Value);
string filePath = fi.DirectoryName;
string fileName = fi.Name;if (filePath == string.Empty)
 throw new Exception("Missing file path location.");if (fileName == string.Empty)
 throw new Exception("Missing name of file.");// does excel spreadsheet already exist?
if (fi.Exists == true && OverwriteIfExists.IsFalse)
 throw new Exception("File already exists, and OverwriteIfExists was specified as false.");
Next, I create a DataSet in which we will load the called procedure’s results, and open a context connection to prepare to execute the procedure:
DataSet exportData = new DataSet();using (SqlConnection conn = new SqlConnection("context connection=true"))
{SqlCommand getOutput = new SqlCommand();
getOutput.CommandText = ProcName.ToString();
getOutput.CommandType = CommandType.StoredProcedure;
getOutput.CommandTimeout = CommandTimeout.Value;
Parsing the XML parameters and adding them to the SQLCommand object is deceptively simple:
      string paramName;
      string paramValue;
      using (XmlReader parms = XMLParams.CreateReader())
      {
         while(parms.Read()
         {
            if (parms.Name == "param")
            {
               paramName = parms.GetAttribute("name");
               paramValue = parms.GetAttribute("value");
               getOutput.Parameters.AddWithValue(paramName, paramValue);
            }
         }
      }
Next, I open my connection, execute the procedure, and populate a DataTable with the results:
     getOutput.Connection = conn;
     conn.Open();
     SqlDataAdapter da = new SqlDataAdapter(getOutput);
     DataTable dt = new DataTable();
     int rc = da.Fill(dt);
Once I have results, and there was no error executing the proc, I check to see if the spreadsheet exists and OverwriteIfExists = 1. If both conditions are TRUE, I delete the existing spreadsheet. By putting this step here, I avoid overwriting the spreadsheet if the proc I want to execute fails for any reason — I only overwrite if the proc execution was successful.
     if (fi.Exists == true && OverwriteIfExists == true)
     {
       fi.Delete();
       if (fi.Exists == true)
          throw new Exception("Unable to overwrite the existing file!");
     }
Now the juicy part. I create a new spreadsheet object using NPOI, and a FileStream object to stream the data to the file:
 HSSFWorkbook hssfworkbook = new HSSFWorkbook();
 FileStream fs = new FileStream(FileSpec.ToString(), FileMode.CreateNew);
Next, I created a new sheet in the spreadsheet object just created, and add a header row if it was requested. NPOI exposes HSSFSheet, HSSFRow, and HSSFCell objects for this purpose. I set the header row cell type to a string, and the header row cell value to the name of the corresponding column from the DataTable:
 HSSFSheet sh = hssfworkbook.CreateSheet(SheetName.ToString());
 int RowOffset = 0;
 if (HeaderRow.Value == true)
 {
     RowOffset = 1;
     HSSFRow headerrow = sh.CreateRow(0);
     for (int h = 0; h < dt.Columns.Count; h++)
     {
        HSSFCell headercell = headerrow.CreateCell(h);
        headercell.SetCellType(HSSFCell.CELL_TYPE_STRING);
        headercell.SetCellValue(dt.Columns[h].ColumnName);
     }
}
Now I enumerate through the DataTable rows, create a matching row in HSSFSheet, and populate each cell in the row with the data. I use string formatted cells for datetimes; you might want to change this to actual Excel datetime formats for your purposes. Also, I replace string and boolean null values with the literal string «NULL», for clarity.
for (int r = 0; r < dt.Rows.Count; r++)
{
  HSSFRow row = sh.CreateRow(r + RowOffset);
  string val = "";
  for (int c = 0; c < dt.Columns.Count; c++)
  {
     HSSFCell cell = row.CreateCell(c);
     if (
         dt.Columns[c].DataType == System.Type.GetType("System.Int")
      || dt.Columns[c].DataType == System.Type.GetType("System.Int16")
      || dt.Columns[c].DataType == System.Type.GetType("System.Int32")
      || dt.Columns[c].DataType == System.Type.GetType("System.Int64")
      || dt.Columns[c].DataType == System.Type.GetType("System.Numeric")
      || dt.Columns[c].DataType == System.Type.GetType("System.Double")
      || dt.Columns[c].DataType == System.Type.GetType("System.Real")
    )
    {
       cell.SetCellType(HSSFCell.CELL_TYPE_NUMERIC);
       if (dt.Rows[r].ItemArray[c] != DBNull.Value)
       {
          cell.SetCellValue(Convert.ToInt32(dt.Rows[r].ItemArray[c]));
       }
    }
    else if (
        dt.Columns[c].DataType == System.Type.GetType("System.String")
     || dt.Columns[c].DataType == System.Type.GetType("System.DateTime")
    )
    {
       cell.SetCellType(HSSFCell.CELL_TYPE_STRING);
       if (dt.Rows[r].ItemArray[c] == DBNull.Value)
       {
          cell.SetCellValue("NULL");
       }
       else
       {
          cell.SetCellValue(dt.Rows[r].ItemArray[c].ToString());
       }
    }
    else if (
       dt.Columns[c].DataType == System.Type.GetType("System.Boolean"))
    {
       if (dt.Rows[r].ItemArray[c] == DBNull.Value)
       {
          cell.SetCellType(HSSFCell.CELL_TYPE_STRING);
          cell.SetCellValue("NULL");
       }
       else
       {
         cell.SetCellType(HSSFCell.CELL_TYPE_BOOLEAN);
         cell.SetCellValue(Convert.ToBoolean(dt.Rows[r].ItemArray[c]));
       }
    }
    else
    {
       string errMessage = "An invalid or unsupported datatype '" + dt.Columns[c].DataType.ToString() + "' was encountered in the result set of the procedure. Supported SQL types are: Bit, Boolean, DateTime, Date, Time, all numeric types, and String.";
       throw new Exception(errMessage);
    }
  }
}
And finally, we write the results to the target file, and close the FileStream, and that’s it!
hssfworkbook.Write(fs);
fs.Close();
Other Possibilities
These are just some of the many options available in NPOI. You can even control cell color, shading, borders, fonts, font sizes, formulas, etc. from within your CLR code or using parameters passed to the procedure (imagine green/yellow/red shading applied to the cell based on the data value in it). This is left as an exercise for the Gentle Reader.
Download
Please read the disclaimer below, and understand that I do not provide any support for this software, source or binaries, including but not limited to installation, configuration, maintenance, and tuning. If you’re good with that, then you can download the complete binaries and source code here.
Disclaimer
The program (source code AND binaries) is provided to you as is, without warranty. There is no warranty for the program, expressed or implied, including, but not limited to, the implied warranties of merchantability and fitness for a particular purpose and non infringement of third party rights. The entire risk as to the quality and performance of the program is with you. Should the program prove defective, you assume the cost of all necessary servicing, repair and correction.
[ПРИМЕЧАНИЕ. Я вставил строку ниже и добавил подробное описание того, что происходит для меня. Я оставил свое первоначальное описание, потому что Том ответил на это.]
Использование SAS 9.4 (32-разрядная версия) и Excel 2013 (32-разрядная версия) под Win10Pro.
В SAS я создал новую рабочую таблицу Excel в существующей книге, используя следующий код:
proc export data=sashelp.air file="C:Usersuser1Desktoptest1.xlsx"
dbms=XLSX replace;
sheet="AirlineData";
run;
Я закрыл SAS, открыл книгу в Excel и увидел мой первоначальный рабочий лист плюс новый лист AirlineData с ожидаемыми данными в нем (заголовок плюс 144 строки данных). Все идет нормально.
Я закрыл Excel, открыл SAS и выполнил следующие инструкции SAS:
options validmemname=extend;
libname desktop "C:Usersuser1Desktoptest1.xlsx";
Я открыл SAS Explorer и перешел в библиотеку “Рабочий стол” и увидел три рабочих листа:
- AirlineData
- AirlineData $
- Лист1 $
Когда я дважды щелкнул по Sheet1 $, я увидел исходные данные, но когда я дважды щелкнул по одному из других имен, все, что я видел, было пустым таблицей, примерно так:
    F1 F2
1
2
3
Ячейки были пусты, но было 144 наблюдения. Строка заголовка была проигнорирована.
Я выполнил PROC PRINT DATA=desktop.airlinedata и увидел то же самое в средстве просмотра результатов: переменные с именем F1 и F2 с 144 пустыми наблюдениями.
Однако, когда я очистил libref и выполнил следующее, я получил набор данных SAS с ожидаемыми данными (две переменные, 144 наблюдения):
proc import datafile="C:Usersuser1Desktoptest1.xlsx" dbms=xlsx OUT=testit
replace;
sheet="AirlineData";
run;
Таким образом, кажется, что когда я создаю рабочий лист с PROC EXPORT, я не могу использовать рабочий лист через libref.
Я делаю что-то неправильно?
[Новое описание]
Резюме. Проблема заключается в том, как работают двигатели EXCEL и XLSX при создании нового рабочего листа в существующей книге. Может быть спорным, должны ли эти два двигателя быть взаимозаменяемыми, но мне кажется, что если SAS правильно создает новый лист, он должен иметь возможность читать его с помощью любого из них.
Итак, что на самом деле происходит, если вы создаете новый лист с помощью PROC EXPORT с помощью движка XLSX, но используете LIBNAME <libref> [EXCEL] <pathfile.xlsx> чтобы прочитать его с помощью движка EXCEL, тогда такие методы, как “PROC PRINT” или шаг “ДАННЫЕ” не будет правильно читать. Однако, если вы создадите его с помощью PROC EXPORT с помощью EXCEL-движка, SAS может прочитать его с помощью оператора LIBNAME с помощью движка XLSX или EXCEL.
Шаг 1:
Workbook test.xlsx была создана в Excel 2013 с тремя рядами из четырех одноразрядных номеров.
proc export data=sashelp.air file="C:Usersuser1Desktoptest.xlsx"
dbms=XLSX replace;
sheet="AirlineData";
run;
Закрыть SAS. Excel отображает рабочий лист AirlineData обычным способом. Закрыть Excel.
Повторно открыть SAS, выполнить:
1    PROc import datafile="C:Usersuser1Desktoptest.xlsx" dbms=xlsx OUT=xx replace;
2        sheet="AirlineData";
3    run;
NOTE: WORK.XX data set was successfully created.
NOTE: The data set WORK.XX has 144 observations and 2 variables.
Набор данных XX представляется обычным набором данных SAS с правильными данными об авиакомпаниях.
Теперь выполните:
6    options validmemname=extend;
7    libname xldata XLSX "C:Usersuser1Desktoptest.xlsx";
NOTE: Libref XLDATA was successfully assigned as follows:
Engine:        XLSX
Physical Name: C:Usersuser1Desktoptest.xlsx
Проводник SAS в библиотеке xldata показывает “SHEET1” и “AIRLINEDATA”, но средство просмотра SAS не откроет ни один (проблема описана ранее и с момента подачи заявки на поддержку SAS).
Тем не менее, PROC PRINT и шаг DATA распечатывают и копируют данные с обоих листов, как и ожидалось.
Теперь выполните:
8    options validmemname=extend;
9    libname xldata "C:Usersuser1Desktoptest.xlsx";
NOTE: Libref XLDATA was successfully assigned as follows:
Engine:        EXCEL
Physical Name: C:Usersuser1Desktoptest.xlsx
Примечание. EXCEL – это двигатель.
В SAS Explorer в библиотеке xldata отображается “Sheet1 $”. “AirlineData” и “AirlineData $”.
- Средство просмотра SAS без проблем открывает Sheet1 $.
- Наблюдатель SAS говорит, что AirlineData $ имеет 0 наблюдений. Он отображает одну переменную (F1) без каких-либо наблюдений.
- Средство просмотра SAS отображает переменные F1 и F2 с 144, по-видимому, пустыми наблюдениями для AirlineData.
PROC PRINT также не находит никаких наблюдений в AirlineData $ и печатает 144 пустых наблюдения от AirlineData.
Шаг DATA также не обнаруживает никаких наблюдений в AirlineData $ и копирует 144 пустых наблюдения из AirlineData.
Шаг 2:
Книга Excel test2.xlsx является дубликатом исходного файла test.xlsx (созданного копированием в Windows).
28   LIBNAME xldata clear; * Just in case;
NOTE: Libref XLDATA has been deassigned.

29   proc export data=sashelp.air file="C:Usersuser1Desktoptest2.xlsx"
30        dbms=EXCEL replace;
31       sheet="AirlineData";
32   run;
NOTE: "AirlineData" range/sheet was successfully created.
Закрыть SAS. Excel отображает рабочий лист AirlineData обычным способом. Закрыть Excel.
Повторно открыть SAS, выполнить:
1    PROc import datafile="C:Usersuser1Desktoptest2.xlsx" dbms=EXCEL OUT=xx replace;
2        sheet="AirlineData";
3    run;
NOTE: WORK.XX data set was successfully created.
NOTE: The data set WORK.XX has 144 observations and 2 variables.
Набор данных XX представляется обычным набором данных SAS с правильными данными об авиакомпаниях.
Теперь выполните:
4    options validmemname=extend;
5    libname xldata xlsx "C:Usersuser1Desktoptest2.xlsx";
NOTE: Libref XLDATA was successfully assigned as follows:
Engine:        XLSX
Physical Name: C:Usersuser1Desktoptest2.xlsx
В SAS Explorer в библиотеке xldata отображаются “SHEET1” и “AIRLINEDATA”, но средство просмотра SAS не откроет ни одну (такую же проблему, как описано выше).
Как и выше, PROC PRINT и шаг DATA распечатывают и копируют данные с обоих листов, как и ожидалось.
Теперь выполните:
12   options validmemname=extend;
13   libname xldata "C:Usersuser1Desktoptest2.xlsx";
NOTE: Libref XLDATA was successfully assigned as follows:
Engine:        EXCEL
Physical Name: C:Usersuser1Desktoptest2.xlsx
Примечание. EXCEL – это двигатель.
В SAS Explorer в библиотеке xldata отображается “Sheet1 $”. “AirlineData” и “AirlineData $”. Средство просмотра SAS открывает все три листа без проблем.
Кроме того, PROC PRINT и шаг DATA распечатывают и копируют данные со всех трех листов, как ожидалось.
- Remove From My Forums
-
Question
-
Hi
I am Utarsh Gajjar.
I am working on SQL Server 2005.
I have following Stored Procedure.
—————————————————————————-
set ANSI_NULLS ON
set QUOTED_IDENTIFIER ON
GOALTER PROCEDURE [dbo].[ExportInExcel]
@QueryString VarChar(8000) =»
AS
BEGIN TRYINSERT INTO OPENROWSET(‘Microsoft.Jet.OLEDB.4.0’, ‘Excel 8.0;Database=C:Customers.xls;IMEX=1′,’SELECT * FROM [Sheet1$]’)
EXEC (@QueryString )END TRY
BEGIN CATCH
DECLARE @ErrorMessage VARCHAR(8000);
DECLARE @ErrorSeverity INT;
DECLARE @ErrorState INT;SELECT @ErrorMessage = ERROR_MESSAGE(),
@ErrorSeverity = ERROR_SEVERITY(),
@ErrorState = ERROR_STATE();RAISERROR (@ErrorMessage, — Message text.
@ErrorSeverity, — Severity.
@ErrorState — State.
);
END CATCH——————————————————————————-
Error is
——————————————————————————-
(0 row(s) affected)Msg 50000, Level 16, State 2, Procedure ExportInExcel, Line 31
The requested operation could not be performed because OLE DB provider «Microsoft.Jet.OLEDB.4.0» for linked server «(null)» does not support the required transaction interface.(1 row(s) affected)
how can i solve this problem?
Thanks in advance.