
Всем привет! Сегодня мы посмотрим, как можно сделать презентацию в Ворде, и вообще –возможно ли это. На самом деле сделать презентацию в Word можно, но есть небольшой нюанс. По умолчанию при установке даже минимального пакета Microsoft Office вы получаете три программы:
- Word – это текстовый редактор.
- Excel – работа с таблицами и расчетами.
- PowerPoint – программа для работы с презентациями.
Как в Word можно создать таблицу для работы в Excel, так можно создать и презентацию. Но в данном случае функционал будет сильно урезан. По сути мы создадим только сам каркас презентации, который в любом случае в будущем нужно будет править и открывать в PowerPoint. Например, вы руководитель отдела, и вам нужно быстро накидать план презентации, и отправить его работнику, чтобы он его украсил, добавил картинки и анимацию.
В этом случае основной костяк можно сделать в Ворде. Если же все равно вы будете делать основную презентацию, то советую сразу перейти к статье – как сделать презентацию с помощью PowerPoint. Урок достаточно интересный, поэтому советую с ним ознакомиться более детально.
Содержание
- Инструкция
- Задать вопрос автору статьи
Инструкция

Как же вообще делается проект презентации со слайдами и текстом в Ворде – разберемся вместе. Для начала давайте коротко пробежимся по тому, а что вообще должно содержаться в презентации. Так как мы будем делать только основу или каркас, то мы поговорим про сам текст. На каждом из слайдов обязательно должен быть заголовок. Далее идет основной текст, который может быть представлен просто блоком или списком. Картинки мы трогать не будем, их лучше вставлять непосредственно в PP.
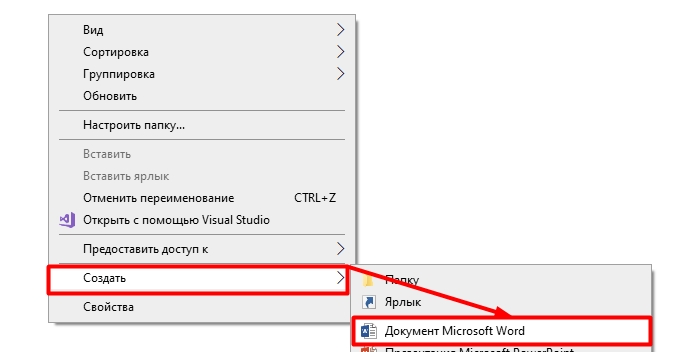
- Создайте документ, если вы этого еще не сделали. Жмем правой кнопкой мыши по пустой области и выбираем «Создать» – «Документ Microsoft Word». Но вы можете работать с уже готовым документом.
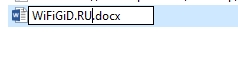
- Вводим название для нового файла и открываем его.
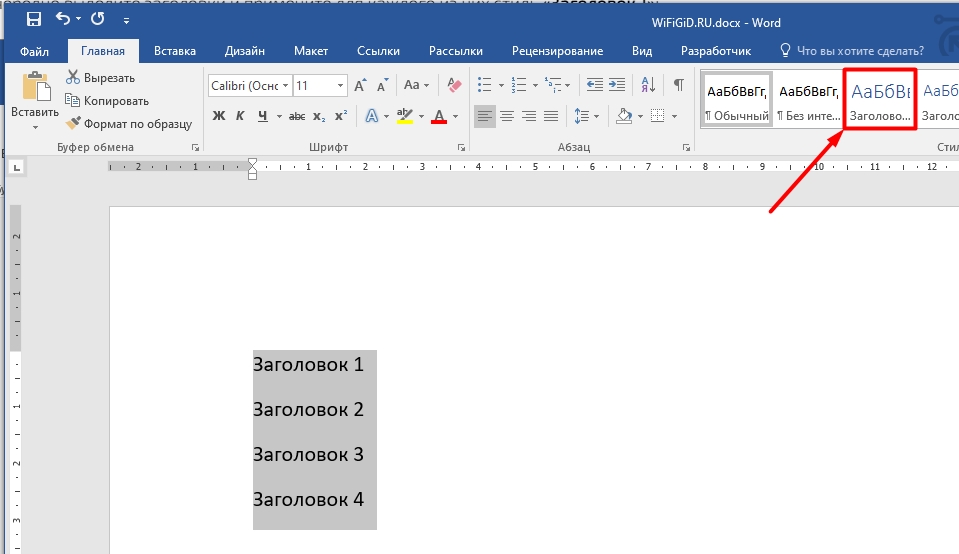
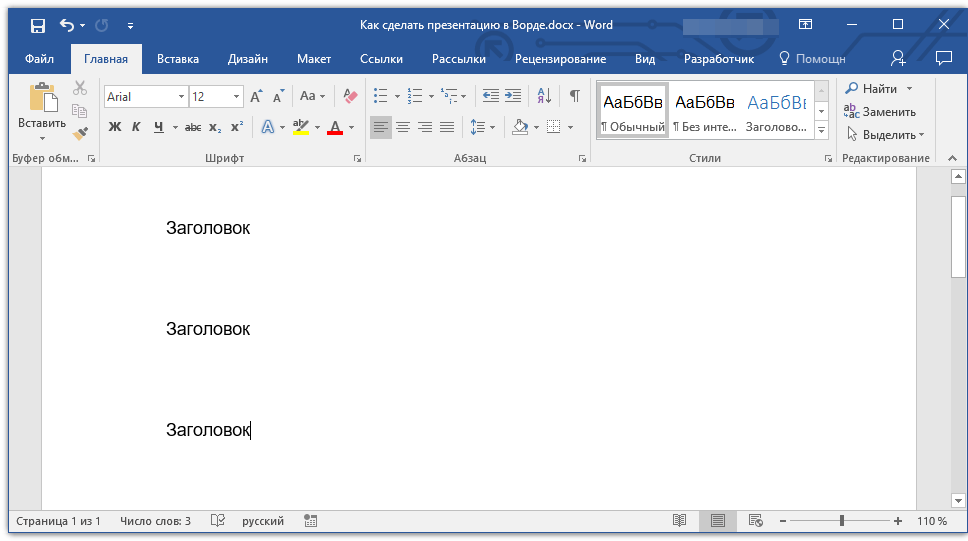
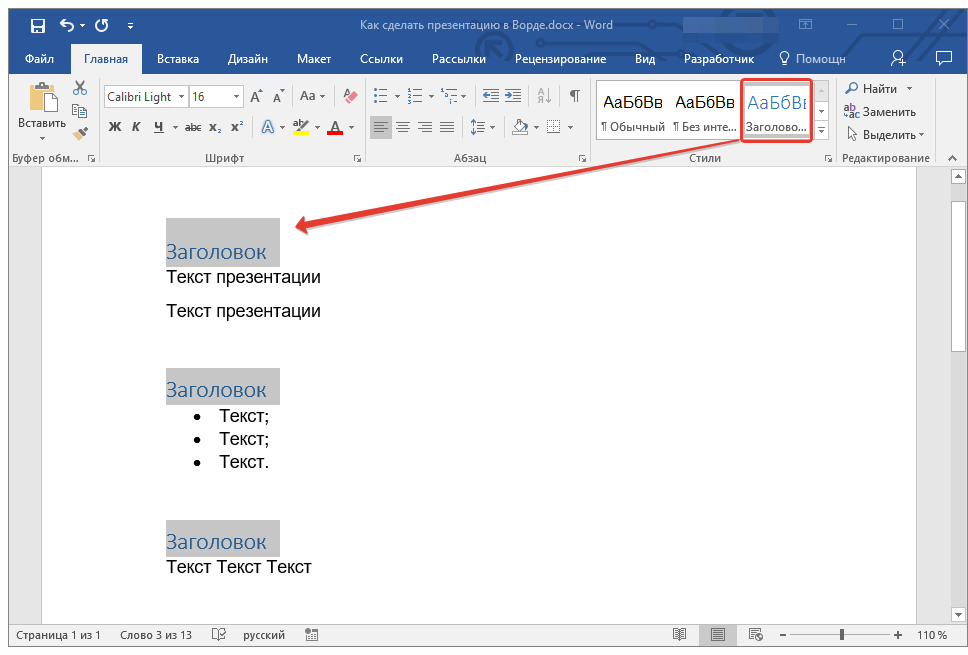
- Начнем, пожалуй, с заголовков. Сразу пишем ряд заголовков, которые будут рассказывать про разные области будущей презентации. Напомню, что каждый заголовок будет находиться на отдельном слайде. Теперь выделяем все заголовки и задаем им стиль «Заголовка 1» на вкладке «Главная». Это очень важно. Именно по этому стилю программа Power Point в будущем будет понимать, где находится отдельный слайд.
- Теперь введите текст, который будет содержаться в этом слайде. Можете добавлять различные списки.
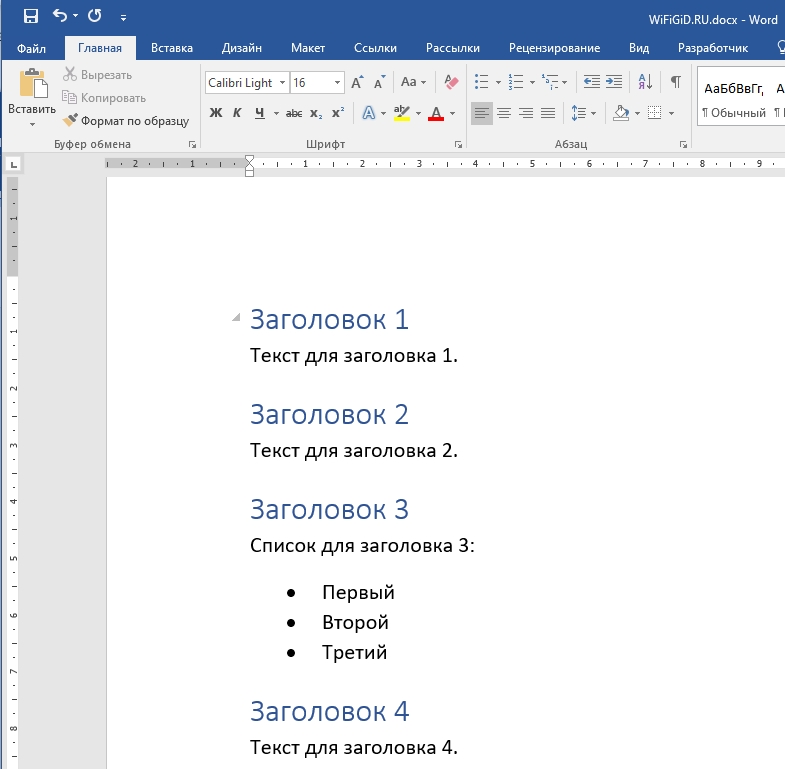
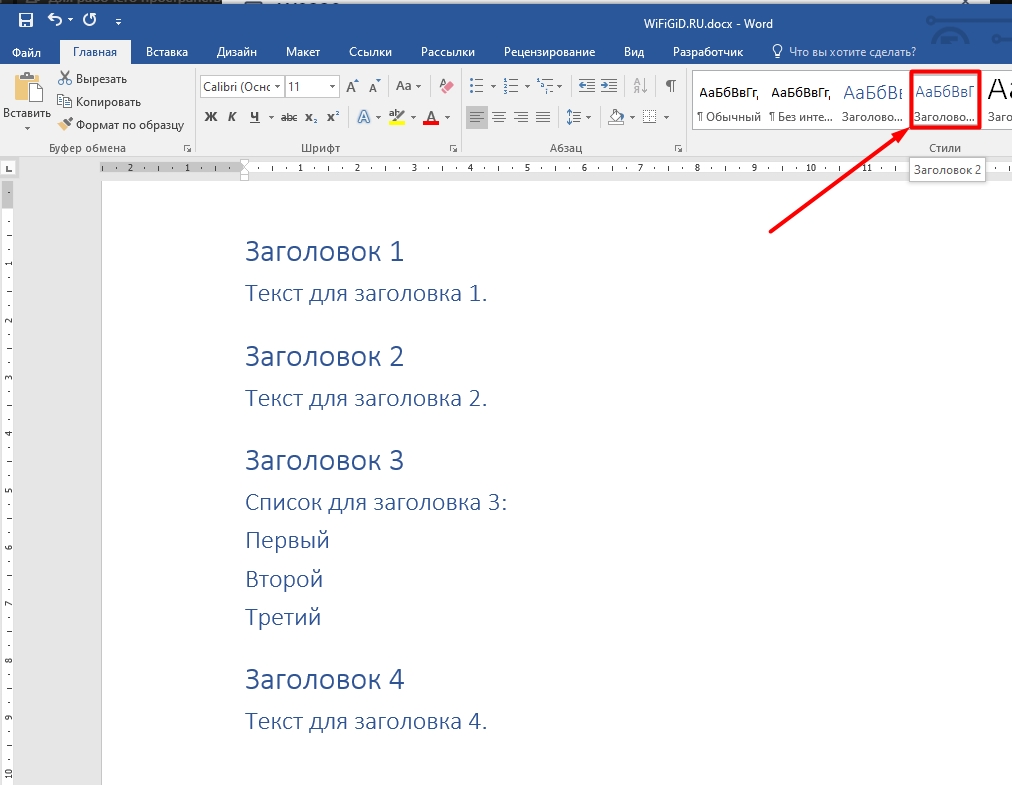
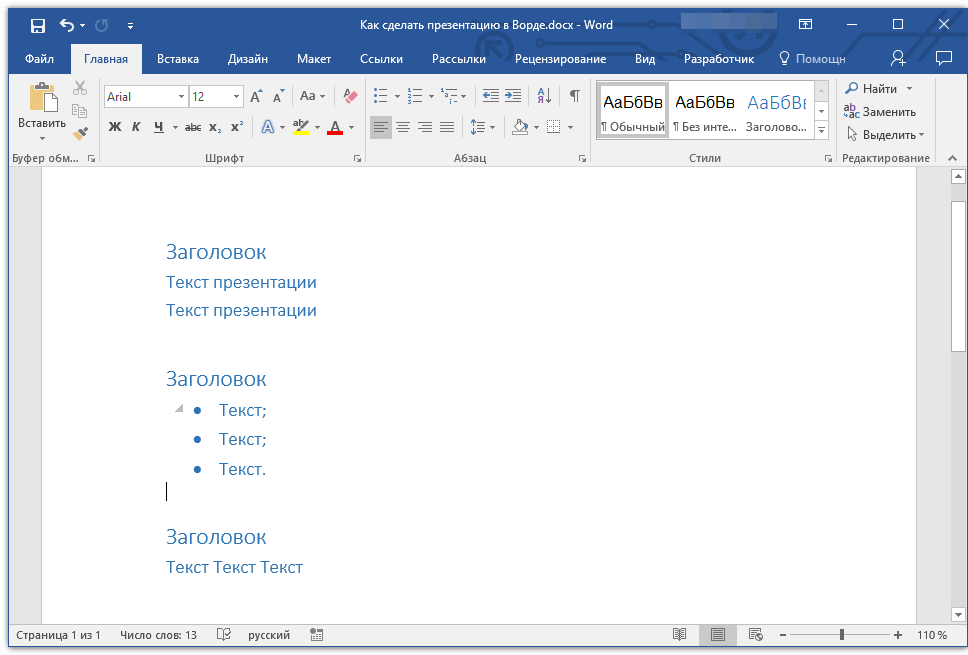
- Нам нужно задать для этого текста стиль «Заголовка 2» там же на «Главной». Выделяем весь текст (только текст без заголовков). Чтобы выделение не пропадало, после щелчка левой кнопкой мыши зажмите клавишу Ctrl и поочередно выделяйте все, что вы хотите.
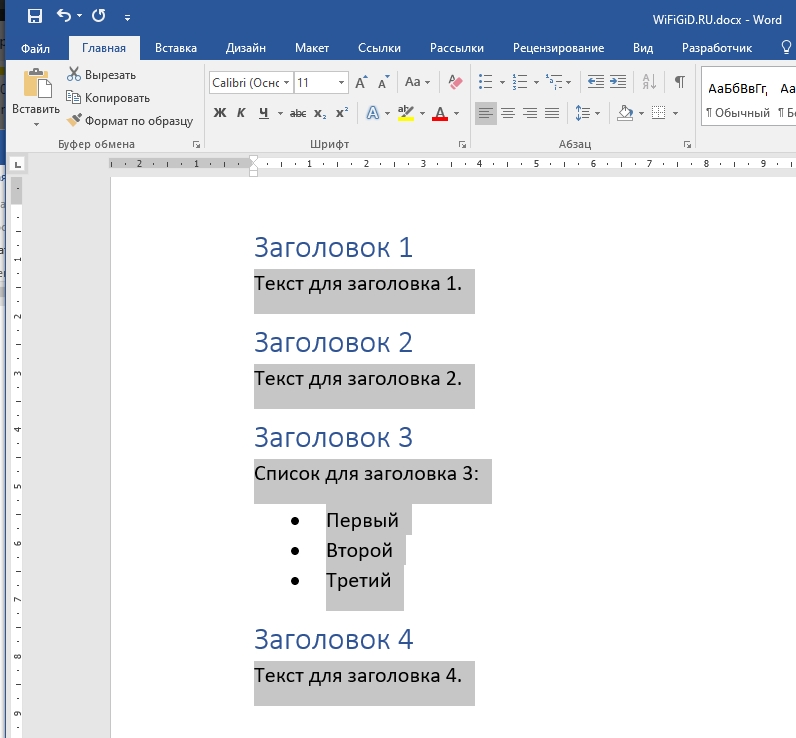
- Выбираем для них стиль «Заголовка 2».
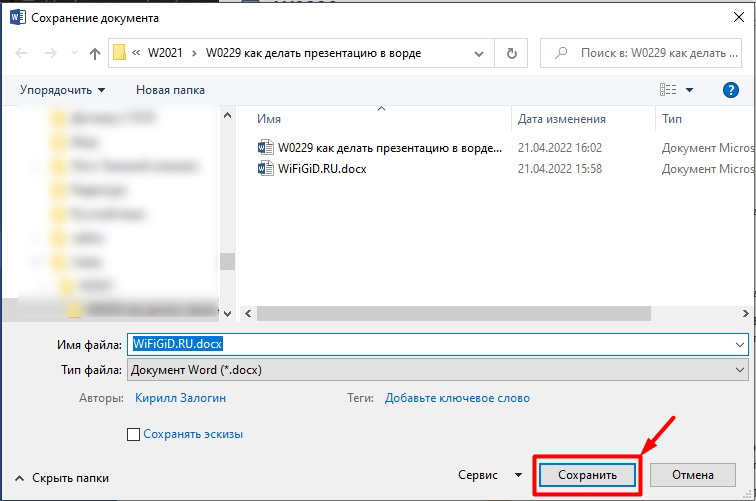
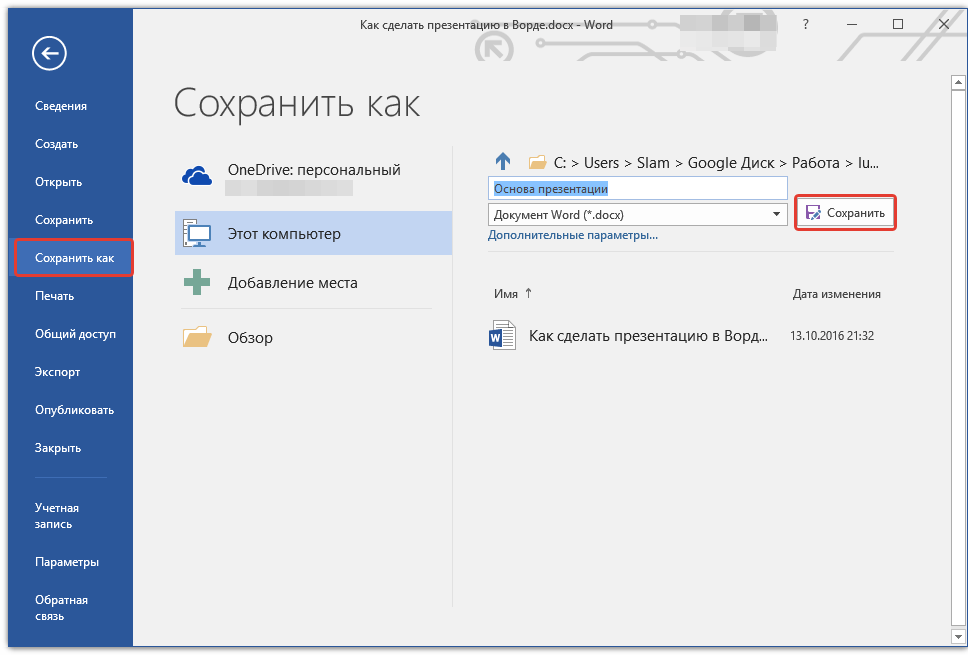
- Сохраните документ с помощью клавиш Ctrl + S, или перейдя в «Файл» – «Сохранить». Если вы его еще не сохраняли, то в разделе «Файл» выбираем «Сохранить как» – «Обзор» – выбираем место сохранения, вводим имя и жмем по кнопке.
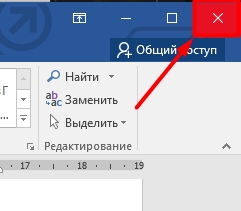
- Закройте документ, нажав по крестику в правом верхнем углу экрана.
- Теперь наша задача открыть его с помощью программы PowerPoint. Это можно сделать, нажав правой кнопкой и выбрав «Открыть с помощью…», но в списке не всегда присутствует нужная программа, поэтому сделаем проще. Откройте «Power Point» – проще всего это сделать через поиск, введя название программы.
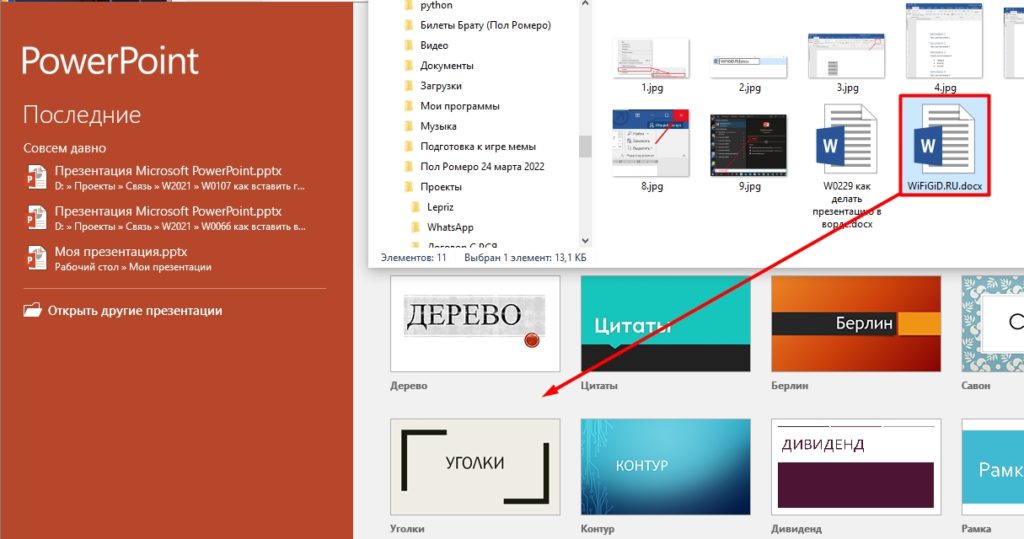
- Просто зажмите сверху файл и перетащите в область программы.
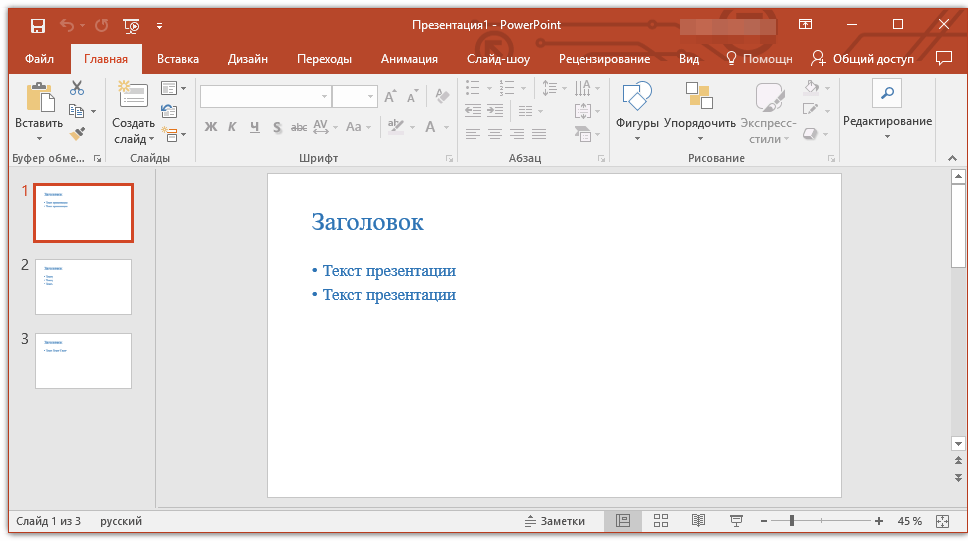
- Ура, мы создали небольшой костяк презентации.
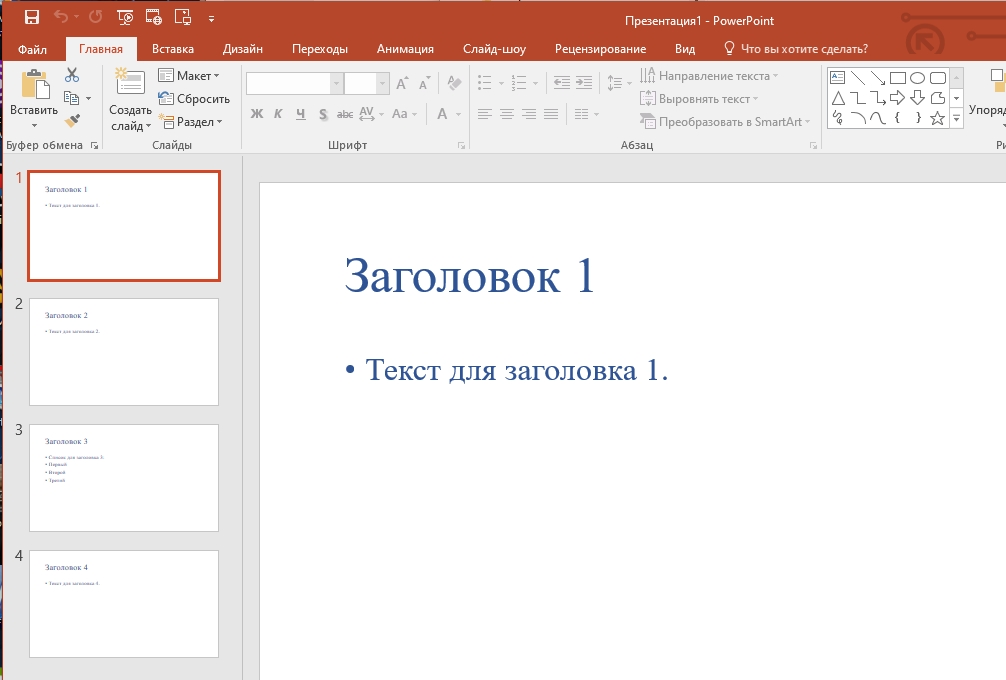
Как видите – это всего лишь голый текст, без стилей, картинок, видео и т.д. Я вам настоятельно рекомендую просмотреть урок, ссылку на который я оставил в самом начале. Там я подробно расскажу, как создавать новые слайды, как вставлять картинки, видео, как добавлять анимацию, списки и как правильно добавлять текстовую информацию.
На этом все, дорогие читатели WiFiGiD портала. Теперь вы понимаете, как можно сделать презентацию на компьютере в программе Microsoft Word. Если я что-то забыл указать, или вы нашли ошибку – пишите в комментариях. Берегите себя, и всем пока.
1
Plan: Introduction About Microsoft Word: History 10 reasons you should be using Microsoft Word Conclusion Used literatures
2
Introduction Microsoft Word is a word processor developed by Microsoft. It was first released on October 25, 1983 under the name Multi-Tool Word for Xenix systems.Subsequent versions were later written for several other platforms including IBM PCs running DOS (1983), Apple Macintosh running Classic Mac OS (1985), AT&T Unix PC (1985), Atari ST (1988), OS/2 (1989), Microsoft Windows (1989) and SCO Unix (1994). Commercial versions of Word are licensed as a standalone product or as a component of Microsoft Office, Windows RT or the discontinued Microsft suite. Microsoft Word Viewer and Office Online are freeware editions of Word with limited features.
3
History The first version of Microsoft Word was developed by Charles Simonyi and Richard Brodie, former Xerox programmers hired by Bill Gates and Paul Allen in Both programmers worked on Xerox Bravo, the first WYSIWYG (What You See Is What You Get) word processor. The first Word version, Word 1.0, was released in October 1983 for Xenix and MS-DOS; it was followed by four very similar versions that were not very successful. The first Windows version was released in 1989, with a slightly improved interface. When Windows 3.0 was released in 1990, Word became a huge commercial success. Word for Windows 1.0 was followed by Word 2.0 in 1991 and Word 6.0 in Then it was renamed to Word 95 and Word 97, Word 2000 and Word for Office XP (to follow Windows commercial names). With the release of Word 2003, the numbering was again year- based. Since then, Word 2007, Word 2010, Word 2013, and most recently, Word 2016 have been released for Windows.
4
History In 1986, an agreement between Atari and Microsoft brought Word to the Atari ST. The Atari ST version was a translation of Word 1.05 for the Apple Macintosh; however, it was released under the name Microsoft Write (the name of the word processor included with Windows during the 80s and early 90s).Unlike other versions of Word, the Atari version was a one time release with no future updates or revisions. The release of Microsoft Write was one of two major PC applications that were released for the Atari ST (the other application being WordPerfect). Microsoft Write was released for the Atari ST in In 2014 the source code for Word for Windows in the version 1.1a was made available to the Computer History Museum and the public for educational purposes.
5
History: Word 1990 to 1995 The first version of Word for Windows was released in 1990 at a price of US$498, but was not very popular as Windows users still comprised a minority of the market.The next year, Window 3.0 debuted, followed shortly afterwards by WinWord 1.1 which was updated for the new OS (WinWord 1.0 had been designed for Windows 2.x and could not operate in protecte mode on 286 and up PCs). The failure of WordPerfect to produce a Windows version proved a fatal mistake. The following year, WinWord 2.0 was released which had further improvements and finally solidified Word’s marketplace dominance. WinWord 3.0 came out in 1992 and was designed for the newly released Windows 3.1, also requiring a 386-based PC for the first time. Word 5.1 for the Macintosh, released in 1992, was a very popular word processor, owing to its elegance, relative ease of use and feature set. However, version 6.0 for the Macintosh, released in 1994, was widely derided, unlike the Windows version. It was the first version of Word based on a common code base between the Windows and Mac versions; many accused it of being slow, clumsy and memory intensive. Word 6.0 was the second attempt to develop a common code base version of Word.
6
History: Word 97 Word 97 had the same general operating performance as later versions such as Word This was the first copy of Word featuring the Office Assistant, «Clippit», which was an animated helper used in all Office programs. This was a takeover from the earlier launched concept in Microsoft Bob. Word 97 introduced the macro programming language Visual Basic for Applications (VBA) which remains in use in Word 2016.
7
History: Word 98 Word 98 for the Macintosh gained many features of Word 97, and was bundled with the Macintosh Office 98 package. Document compatibility reached parity with Office 97 and Word on the Mac became a viable business alternative to its Windows counterpart. Unfortunately, Word on the Mac in this and later releases also became vulnerable to future macro viruses that could compromise Word (and Excel) documents, leading to the only situation where viruses could be cross-platform. A Windows version of this was only bundled with the Japanese/Korean Microsoft Office 97 Powered By Word 98 and could not be purchased separately. It was then released in the same period as well.
8
History: Word 2001/ Word X Word 2001 was bundled with the Macintosh Office for that platform, acquiring most, if not all, of the feature set of Word Released in October 2000, Word 2001 was also sold as an individual product. The Macintosh version, Word X, released in 2001, was the first version to run natively on (and required) Mac OS X. Word 2002/ XP Word 2002 was bundled with Office XP and was released in It had many of the same features as Word 2000, but had a major new feature called the ‘Task Panes’, which gave quicker information and control to a lot of features that were before only available in modal dialog boxes. One of the key advertising strategies for the software was the removal of the Office Assistant in favor of a new help system, although it was simply disabled by default.
9
History: Word 2003 For the 2003 version, the Office programs, including Word, were rebranded to emphasize the unity of the Office suite, so that Microsoft Word officially became Microsoft Office Word Word 2004 A new Macintosh version of Office was released in May Substantial cleanup of the various applications (Word, Excel, PowerPoint) and feature parity with Office 2003 (for Microsoft Windows) created a very usable release. Microsoft released patches through the years to eliminate most known macro vulnerabilities from this version. While Apple released Pages and the open source community created NeoOffice, Word remains the most widely used word processor on the Macintosh.
10
History: Word 2007 The release includes numerous changes, including a new XML-based file format, a redesigned interface, an integrated equation editor and bibliographic management. Additionally, an XML data bag was introduced, accessible via the object model and file format, called Custom XML — this can be used in conjunction with a new feature called Content Controls to implement structured documents. It also has contextual tabs, which are functionality specific only to the object with focus, and many other features like Live Preview (which enables you to view the document without making any permanent changes), Mini Toolbar, Super-tooltips, Quick Access toolbar, SmartArt, etc. Word 2007 uses a new file format called docx. Word users on Windows systems can install a free add- on called the «Microsoft Office Compatibility Pack» to be able to open, edit, and save the new Word 2007 files.Alternatively, Word 2007 can save to the old doc format of Word
11
History: Word 2008 Word 2008 was released on January 15, It includes some new features from Word 2007, such as a ribbon-like feature that can be used to select page layouts and insert custom diagrams and images. Word 2008 also features native support for the new Office Open XML format, although the old doc format can be set as a default Word 2010 Microsoft Office 2010 (codenamed Office 14) is a version of the Microsoft Office productivity suite for Microsoft Windows. It is the successor to Microsoft Office 2007 and the predecessor to Microsoft Office Office 2010 includes extended file format support,user interface improvements, and a changed user experience.A 64-bit version of Office 2010 is available, but not for Windows XP or Windows Server 2003.It is the first version of the productivity suite to ship in both 32-bit and 64-bit versions.
12
History: Word 2011 Microsoft Office for Mac 2011 is a version of the Microsoft Office productivity suite for Mac OS X. It is the successor to Microsoft Office 2008 for Mac and is comparable to Microsoft Office 2010 for Windows. Office 2011 was followed by Microsoft Office 2016 for Mac released on September 22, 2015, requiring a Mac with a 64-bit Intel processor and OS X Yosemite or later. Word 2013 The release of Word 2013 has brought Word a cleaner look and this version focuses further on Cloud Computing with documents being saved automatically to OneDrive (previously Skydrive). If enabled, documents and settings roam with the user. Other notable features are a new read mode which allows for horizontal scrolling of pages in columns, a bookmark to find where the user left off reading their document and opening PDF documents in Word just like Word content. The version released for the Windows 8 operating system is modified for use with a touchscreen and on tablets. It is the first version of Word to not run on Windows XP or Windows Vista.
13
History: Word 2016 In 2016, Microsoft Word 16 was released. It is the modern newest version of the word processing application. New features include the tell me, share and faster shape formatting option too. Other useful features include the work together in real time which allows users to store documents on Share Point or OneDrive, improved version history and smart lookup tool as well. As normal, several editions of the program were released as well, including one for home. Business people can download the business edition.
14
10 reasons you should be using Microsoft Word 1. Smart Art The Office 2007 and Office 2010 applications share very similar features for working with a range of graphics including pictures, Clip Art, Shapes, diagrams and Charts. Its easy to confuse SmartArt with the similarly named WordArt. Where WordArt just allows you to display text using a wide variety of different formats and effects, SmartArt is a comprehensive and flexible business diagram tool that greatly improves upon the Diagram Gallery feature found in previous versions of Office.
15
10 reasons you should be using Microsoft Word 2. Turn Data into Visual Charts Charts are created using the same chart engine that Excel uses. Accordingly, as your chart is created, another window will appear containing the Excel- generated data that the chart is based on. Use the Insert Chart button in the Illustrations group to insert a chart and select from the variety of options. The charts are versatile, just like the user-friendly data represented separately in MS Excel to smooth out the whole data-input-to-graph process.
16
10 reasons you should be using Microsoft Word 3. Make Your Document Interactive Where possible, insert hyperlinks on images and text to make your document interactive (by right clicking on the text/image and clicking hyperlink, you can then select where you wish to direct the user to). Useful especially when sending the document online, hyperlinks allow recipients who have opened the file to click on images/text to directly access relevant webpages or other online sources of interest.
17
10 reasons you should be using Microsoft Word 4. Watermarks If youre sending an important document or draft sample, you want to be able to protect your content without having to edit much of it. Insert a watermark specific to your objectives via the page layout button. You can also customise your own watermark, and also insert your own picture. This feature is great for inserting your brand logo in reports or any other official document. Dont forget to Save As your file as a PDF document first to prevent anyone else from editing/removing the watermark you have inserted.
18
10 reasons you should be using Microsoft Word 5. Mail Merge This feature allows you to send out bulk s with unique, customizable elements. For example, you can produce a series of labels or envelopes for a large mailing list, an or letter that includes names and addresses and other details normally found in a directory. Users simply create one document that contains the information that will be the same in each version, and then add placeholders for the information that will be unique to each version. If you just want to send a single letter to one of your MS Outlook contacts, there may be no need to use mail merge at all. Word has an Address Book button that allows you to select and insert address details from Outlook. Just right-click in the Quick Access Toolbar and choose Customize Quick Access Toolbar. Select Commands Not in the Ribbon and Address Book.
19
10 reasons you should be using Microsoft Word 6. Headers & Footers Its important to use page numbers in many types of documents. While at it, you might want to consider adding other related features that will make your document look consistency and professionally done. What many people dont seem to take advantage of is the fact that they can insert images, such as a company logo or an image reflecting the documents overall theme in either the header or footer of the document.
20
10 reasons you should be using Microsoft Word 7. Cover Pages Use Microsoft Words available cover page templates to make your document stand out, especially when it is printed. Click on Insert, then Cover Pages and choose from a variety of default cover pages Microsoft Word provides. All the default cover pages allow you to insert the date, author and title, in an existing template that is already set up for you, simply insert the relevant text/date and edit your font accordingly.
21
10 reasons you should be using Microsoft Word 8. Search & Replace Have you ever spelled a word or name incorrectly throughout a whole word document? The Word Replace feature can search for all occurrences of a particular word, phrase or set of characters and replace them with the correct or an alternative version. You will be given the option to replace all occurrences or to move through them individually accepting or rejecting each change. Clicking the Replace All button will change all occurrences of the term in the entire document or the selected area and then report the number of changes made. Alternatively, Find Next will find the next occurrence of the term so you can use the Replace button to replace it or the Find Next button to leave it unaltered and select the next candidate for replacement.
22
10 reasons you should be using Microsoft Word 9. Spell Check If you dont want to bother correcting spelling errors as you go, or you want to make certain you havent missed any, you can run the full Word spell check from the Review tab, Proofing group, Spelling and Grammar button (or press the F7 keyboard shortcut). When using the main Spelling and Grammar dialog box, words in your document which are not found in Words dictionary will be listed in the Not in Dictionary box. Suggestions will be presented with the first suggestion pre-selected. The options you have are similar to the right-click options available for corrections as you type. There are two options available: the Change button to correct one occurrence and the Change All button to replace all occurrences of the word in the document with the same suggested replacement. Alternatively, you can double-click the appropriate suggestion to change this occurrence. The AutoCorrect button will add an item to the AutoCorrect list replacing the marked word with the currently selected suggestion. Note that you can still edit your document when the Spelling and Grammar dialog box is displayed, so if none of the suggestions are appropriate, you can make your own correction directly in the body of the document.
23
10 reasons you should be using Microsoft Word 10. View Options It may sound simple, but the option to change the document View is an underrated feature for many MS Word users. You can change the way you view your presentation using the buttons at the bottom of the application window. Here are brief descriptions of what each view does: s the document as it will look like when printed. devotes (nearly) the full screen to the contents of the document and rearranges the contents to improve readability. displays the document laid out as though it were in a web browser.displays a view that allows you to restrict what is displayed to certain outline levels. Large chunks of the document can be manipulated directly using this view.displays the document content with minimum formatting and without graphics. Regardless of which view type it is displayed in, note that the vertical scrollbar can be used to move across the document. Alternatively, you can also use the Page Up and Page Down keys or the arrow keys to move through the document.
24
Conclusion Microsoft Word is an essential tool for any individual in todays digital age. Whether you are a working professional, a diligent student or an active retiree, proficiency in Microsoft Word is a vital skill that is useful for both complex business requirements as well as basic day-to-day purposes. Not only is Microsoft Word a flexible tool that allows you to achieve many of your digital document needs, it is also one of the most user- friendly applications from the Microsoft Office suite.
25
Used literatures: «System requirements for Office 2013». TechNet. Microsoft. 4 December Office 2013 for Personal Computers—standard system requirements. Retrieved 19 December «Description of the security update for Office 2016 for Mac: July 12, 2016». «Version 1.0 of today’s most popular applications, a visual tour — Pingdom Royal». Pingdom Retrieved A. Allen, Roy (October 2001). «Chapter 12: Microsoft in the 1980’s» (PDF). A History of the Personal Computer: The People and the Technology (1st ed.). Allan Publishing. pp. Retrieved «Microsoft Office online, Getting to know you…again: The Ribbon». «The history of branding, Microsoft history». Wikipedia.com — Microsoft Word Google.com Skilledup.com
26
Thanks for attention!!!
Как сделать презентацию в Ворде
![]()
Автор:
Обновлено: 28.04.2018
Часто пользователи сталкиваются с необходимостью создания красивой презентации. Им на ум в первую очередь приходит PowerPoint. Разумеется, это удобный инструмент, который позволяет в короткое время осуществить задуманное. Однако не стоит забывать о том, что такую же по значимости презентацию можно создать и в текстовом редакторе Microsoft Word. Здесь работа получается максимально доступной и понятной для всех. Ворд, в отличие от Пауэр Поинт, отлично адаптирован к текстам в любых объемах. Любая презентация состоит из текста, потому его удобнее структурировать в документе, а уж после адаптировать под презентацию. Стоит лишь освоить несколько несложных этапов о том, как делать презентацию в Ворде.

Как сделать презентацию в Ворде
Содержание
- Основные аспекты
- Структура информации
- Информационные блоки
- Редактирование презентации в Microsoft Word
- Стиль заголовков
- Видео — Word для Начинающих
Основные аспекты
Любую тему, используемую в презентации, нужно преподнести ярко, интересно и понятно. Именно эти пункты и повлияют на итоговый успех выступления. В Ворде слайды получаются более информативными и доступными для визуального восприятия. Это и есть первостепенная задача – эффективность слайдов.
Пользователю нужно разделить текст, фигурирующий в документе, и сжать его до минимальных размеров с сохранением смысла. Не стоит забывать о том, что время – очень ценная вещь во время выступления. Аудитория не воспринимает ту информацию, о которой монотонно говорят больше 20-и минут. Лучше всего вписываться в эти параметры.

Структура презентации
Структура информации
Главное в Ворде — понять принцип построения презентации. Здесь каждый отдельный слайд является новой темой, привязанной к основной. Слайд частично раскрывает общую идею, дополняя картину. Поэтому в Microsoft Word начинают со структуры заголовков. Если подробнее, то начинаются слайды с «Главного заголовка». Затем идут несколько дополнительных, которые нумеруются 1 – 10.
Для начала открываем новый документ Microsoft Word на вашем компьютере. Вверху есть несколько вкладок, которые помогут в дальнейшей работе. Каждый отдельный лист будет одним кадром презентации. Наберите необходимый текст на первой странице. Затем, выделив его левой кнопкой мыши, можно отредактировать отображаемый текст – его гарнитуру, размер и стиль во вкладке «Шрифт». Латинская буква А с красной строчкой внизу поможет выбрать цвет шрифта. Чтобы добавить уже готовый стиль, также выделяется текст, и во вкладке «Стили» подбирается необходимый. Таким образом, создается текстовая составляющая презентации.
Следующая вкладка «Вставка» поможет добавить картинки и фотографии, а также видеоклипы, сохраненные на вашем компьютере. С помощью этой же вкладки создаются таблицы, диаграммы и рисунки.

Структура информации в презентации
Информационные блоки
Каждая презентация стартует с титульного листа. Основной заголовок в этом случае будет отражать тему, которая постепенно раскрывается. Последующая структура выступления строится согласно списку (например, если речь идет о презентации какой-либо компании):
- вступительная часть;
- знакомство;
- достижения, возможности;
- основное направление деятельности.

Информационные блоки на слайде
Для создания такого проекта надо на первом слайде размещать название компании, а на втором миссию фирмы и ее слоган. Текст не должен включать более 6-ти подзаголовков подряд.
Затем слайды отражают основные сведения о фирме, среди которых:
- опыт компании;
- принципы ее работы;
- данные о сертификатах;
- информация о наличии лицензий;
- преимущество перед конкурентами.
Актуальными будут листы с текущими акциями и специальными предложениями. На них акцентируется внимание больше всего, потому эти материалы должны выглядеть красочно и понятно. Последние изображения показывают контактную информацию и остаются видимыми до завершения выступления. Допустимо использование простых обобщений или общих выводов. Эти слайды не должны быть перегружены текстом и таблицами.
Важно! Контактная информация должна содержать актуальные на момент презентации данные.

Завершающий слайд
Редактирование презентации в Microsoft Word
Редактор помогает создать красочную презентацию, а также отредактировать ее в дальнейшем, если такая необходимость возникнет. Можно менять размер и цвет шрифтов, общий вид документа, а также стиль. Это делается посредством выделения заголовка и установления нужных параметров для него. Обратите внимание на то, что текст должен быть достаточно крупным для того, чтобы его видели все участники, находящиеся в зале. Наиболее выигрышная цветовая гамма — та, что является контрастной к основному фону. Самые популярные варианты: черно-белый и красный с синими оттенками.

Цветовое решение слайдов
Стиль заголовков
Для задания определенного стиля для заголовка, нужно воспользоваться командной лентой. Категория «Главная» поможет отредактировать любой текст презентации путем использования многочисленных функций. Стиль должен быть единым для каждого отдельного слайда. Разумеется, стилизация напрямую будет зависеть от того, какой продукт или компанию вы представляете.
Важно! Не актуальный для презентации шрифт может отвлечь от основной идеи и негативно повлиять на восприятие информации.

Задаем стиль заголовков
Видео — Word для Начинающих
Рекомендуем похожие статьи
Практически на каждом компьютере установлен пакет Microsoft Office, в состав которого входит ряд специализированных программ. Каждая из этих программ предназначена для различных целей, но многие функции у них схожи. Так, к примеру, создавать таблицы можно не только в Excel, но и в Word, а презентации не только в PowerPoint, но и в Ворде тоже. Точнее, в этой программе можно создать основу для презентации.
Урок: Как в Word сделать таблицу
Во время подготовки презентации предельно важно не погрязнуть во всей красоте и обилии инструментов PowerPoint, которые вполне могут запутать малоопытного пользователя ПК. Первым делом следует сосредоточиться на тексте, определив содержание будущей презентации, создав ее костяк. Как раз все это и можно сделать в Ворде, как раз об этом мы и расскажем ниже.
Типичная презентация — это набор слайдов, которые, помимо графических компонентов, имеют название (заголовок) и текст. Следовательно, создавая основу презентации в Word, следует упорядочить всю информацию в соответствии с логикой ее дальнейшего представления (показа).
Примечание: В Ворде можно создать заголовки и текст для слайдов презентации, изображение же лучше вставлять уже в PowerPoint. В противном случае графические файлы будут отображаться некорректно, а то и вовсе будут недоступны.
1. Определитесь с тем, сколько у вас будет слайдов в презентации и отдельной строкой пропишите в документе Word заголовок для каждого из них.
2. Под каждым заголовком впишите необходимый текст.
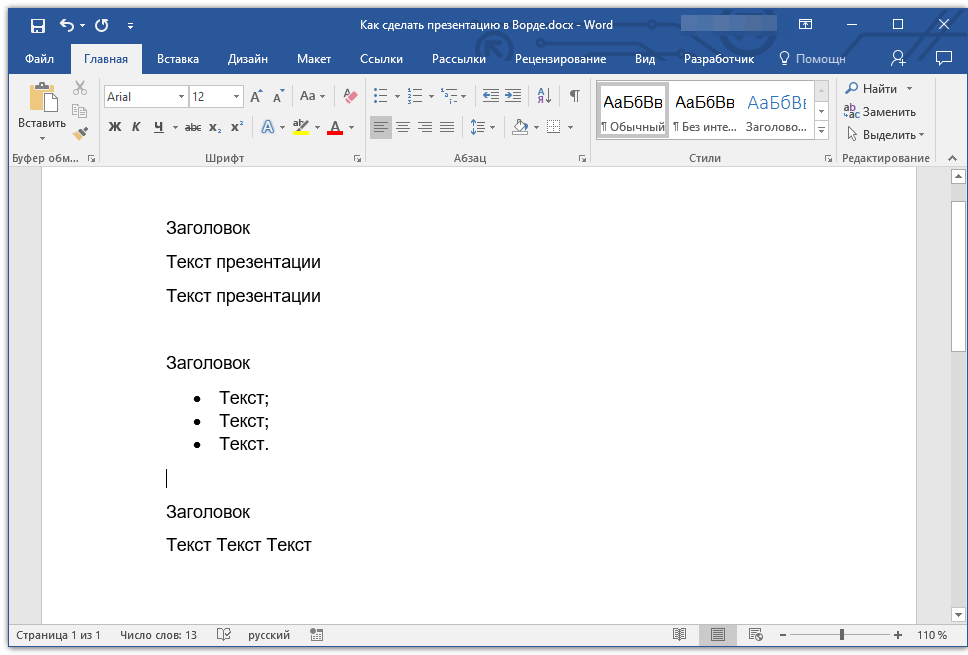
Примечание: Текст под заголовками может состоять из нескольких пунктов, в нем могут присутствовать маркированные списки.
Урок: Как в Ворде сделать маркированный список
- Совет: Не делайте слишком объемные записи, так как это усложнит восприятие презентации.
3. Измените стиль заголовков и текста под ними, чтобы PowerPoint смог автоматически расположить каждый фрагмент по отдельным слайдам.
- Поочередно выделите заголовки и примените для каждого из них стиль «Заголовок 1»;
- Поочередно выделите текст под заголовками, примените для него стиль «Заголовок 2».

Примечание: Окно выбора стилей для текста находится во вкладке «Главная» в группе «Стили».
Урок: Как в Word сделать заголовок
4. Сохраните в удобном месте документ в стандартном формате программы (DOCX или DOC).
Примечание: Если вы используете старую версию Майкрософт Ворд (до 2007 года), при выборе формата для сохранения файла (пункт «Сохранить как»), можно выбрать формат программы PowerPoint — PPTX или PPT.
5. Откройте папку с сохраненной основой презентации и кликните по нему правой кнопкой мышки.

6. В контекстном меню нажмите «Открыть с помощью» и выберите PowerPoint.

Примечание: Если программа не представлена в списке, найдите ее через пункт «Выбор программы». В окне выбора программы убедитесь в том, что напротив пункта «Использовать выбранную программу для всех файлов такого типа» не установлена галочка.
- Совет: Помимо открытия файла через контекстное меню, вы также можете сначала открыть PowerPoint, а затем уже открыть в нем документ с основой для презентации.
Основа презентации, созданная в Word, будет открыта в PowerPoint и разделена на слайды, количество которых будет идентично количеству заголовков.
На этом мы закончим, из этой небольшой статьи вы узнали, как сделать основу презентации в Ворде. Качественно преобразить ее и улучшить поможет специализированная программа — PowerPoint. В последнюю, к слову, можно еще и таблицы добавлять.
Урок: Как вставить таблицу Word в презентацию
Еще статьи по данной теме:
Помогла ли Вам статья?
Presentation on theme: «Introduction to MS WORD.»— Presentation transcript:
1
Introduction to MS WORD
2
What is MS Word? MS Word is a word processing program used to create, format, save and print letters, reports, newsletters, manuscripts, signs, certificates other documents.
3
Office Button Quick Access Toolbar Title Bar Ribbon Tabs Groups Commands Dialog Box Launcher Scroll Bar View Buttons Control Buttons Zoom Level or Zoom Slider
4
The Microsoft Office Button
It provides access to the only menu in Office When you click this button it shows the following menus, New, Open, Save, Save As, Print, Prepare, Send, Publish and Close.
5
Quick Access Toolbar It provides access to the most common Word commands including Save, Undo, Repeat and Copy. You can customize, add or delete buttons on this toolbar.
6
Title Bar It shows the open program and the name of the open file.
7
Ribbon It contains the commands organized in three components:
Tabs – represents the activities you perform and contain related groups. Groups – organize related commands. Group name appears below the group ribbon. Commands – appear within ach group
8
Dialog Box Launcher It opens a dialog box or task pane that provides more options.
9
Scroll Bar It moves the document vertically.
10
Document Area This is where you type your text. The insertion point represents the location where your text will appear.
11
Status Bar It displays the document information such as the number of the page on which the insertion point appears, the total number of pages, the proofing errors indicator and the view buttons.
12
View Buttons They display the buttons such as Print Layout, Full Screen, Reading, Web Layout, Outline, Draft.
13
Control Buttons They minimize, maximize, restore and close the window.
14
Starting the Word Processing Program
Click the START button. Point to All Programs. Point to Microsoft Office. Click on Microsoft Office 2007.
15
The Ribbon The Ribbon is the panel at the top portion of the document. It has seven tabs which are Home, Insert, Design, Animations, Slide Show, Review and View. These tabs contain commands and tools which are grouped according to their function. Additional tabs such as Format and Design will show when you are working on Pictures, ClipArt, WordArt, text boxes and shapes. When you move the mouse pointer over each command or tool, it will display the pop[-up name and function of the command.
16
Home Tab This Home tab displays the related commands which are grouped as Clipboard, Font, Paragraph, Styles, Editing.
17
Insert Tab This Insert tab displays the related commands which are grouped as Pages, Tables, Illustrations, Links, Header and Footer, Text, Symbols
18
Page Layout Tab This Page Layout tab displays the related command which are grouped as Themes, Page Setup, Page Background, Paragraph, Arrange.
19
Reference Tab This Reference tab displays the related commands which are grouped as Table of Contents, Footnotes, Citations & Bibliography, Caption, Index, Table of Authorities.
20
Mailings Tab This Mailings tab displays the related commands which are grouped as Create, Start Mail Merge, Write and Insert Fields, Preview Results, Finish.
21
Review Tab This Review tab displays the related commands which are grouped as Proofing, Comments, Tracking, Changes, Compare, Protect.
22
View Tab This View tab displays the related commands which are grouped as Document Views, Show/Hide, Zoom, Windows, Macros.
23
Customizing Quick Access Toolbar
Quick Access Toolbar contains frequently used commands. You can display or hide the icons. To customize this toolbar, click the Customize Quick Access Toolbar arrow, and a drop-down menu will appear. Check or uncheck the commands that you need or do not need. You can also move the Quick Access below or above the Ribbon.
24
Using Command Icons and Dialog Boxes
To apply a command, just click the icon. An arrow next to an icon means that there are other options available. Click the arrow to display the options . Dimmed menu items are not available for selection at this time. Selected command is the highlighted command. The arrow next to the Group name is the Dialog Box launcher. Click it to display the dialog box. A dialog box is an on-screen form that you fill up to tell MS Word how to complete a command.
25
Working with Mini Toolbar & Context Menus
When you move your mouse over the selected text a mini toolbar will appear. When you right click on the text, a context menu will appear. You can use the mini toolbar and context menu to format without going to the Home Tab.
26
Customizing the Ribbon
Right click on any part of the Ribbon. On the pop – up menu, click Customize the Ribbon. On the dialog box, click Customize Ribbon Tab. On the list of commands, select the one you would like to add. You can customize the Ribbon to add tabs, groups or commands that you will use often. To display the Customize Ribbon Tab following the following steps.
27
To add a New Group: To add a New Tab:
Click the tab you want to customize. Click the New Group button and Word adds the group. Click the Rename button. On the Rename dialog box, type the name of the group. Click OK and Word adds the new group to the tab. Click the New Tab button. Word now adds the tab and a new group with the tab. Click the new tab added. Click the Rename button. On the Rename dialog box, type the name of your new tab. Click Ok.
28
To add a New Command: Click the Choose Commands From arrow.
From the drop – down list, select the command category you want to use. Click the command you want to add. Click the Custom Group you want to use and click the Add button. Click Ok and Word adds the command. To remove a custom command, click it and then click the Remove button.
29
QUESTIONS?