
Каждая функция привнося выражение к определенному тип данных.
Синтаксис
CBool(
выражение
)
CByte(
выражение
)
CCur(
выражение
)
CDate(
выражение
)
CDbl(
выражение
)
CDec(
выражение
)
CInt(
выражение
)
CLng(
выражение
)
CSng(
выражение
)
CStr(
выражение
)
CVar(
выражение
)
Обязательный аргумент выражениеаргумент — это любое строковое выражение или числовое выражение.
Возвращаемые типы
Тип возвращаемого значения определяется по имени функции в соответствии со следующей таблицей:
|
Функция |
Тип возвращаемого значения |
Диапазон аргумента |
|
CBool |
Boolean |
Любое допустимое строковое или числовое выражение. |
|
CByte |
Byte |
От 0 до 255. |
|
CCur |
Currency |
От -922 337 203 685 477,5808 до 922 337 203 685 477,5807. |
|
CDate |
Date |
Любое допустимое выражение даты. |
|
CDbl |
Double |
От -1,79769313486231E308 до |
|
CDec |
Decimal |
+/-79 228 162 514 264 337 593 543 950 335 для чисел без дробной части. Для чисел с 28 десятичными знаками допустимый диапазон составляет |
|
CInt |
Integer |
От -32 768 до 32 767, дробная часть округляется. |
|
CLng |
Long |
От -2 147 483 648 до 2 147 483 647, дробная часть округляется. |
|
CSng |
Single |
От -3,402823E38 до -1,401298E-45 для отрицательных значений и от 1,401298E-45 до 3,402823E38 для положительных. |
|
CStr |
String |
Результат, возвращаемый функцией CStr, зависит от аргумента выражение. |
|
CVar |
Variant |
Тот же диапазон, что и для числов Double. Такой же диапазон, как и для строк для не числов. |
Замечания
Если передаваемое функции выражение находится за пределами диапазона типа данных, в который оно преобразуется, возникает ошибка.
Как правило, функции преобразования типов используются в тексте программ для того, чтобы указать, что результатом той или иной операции должны стать данные определенного типа, а не типа, заданного по умолчанию. Например, с помощью функции CCur можно принудительно перейти к вычислениям в денежном формате в тех случаях, в которых обычно используются действия с числами с обычной точностью, двойной точностью или с целыми числами.
Функции преобразования типа данных следует использовать вместо функции Val для преобразования типов данных в приложениях, поддерживающих различные региональные стандарты. Например, при использовании функции CCur десятичные разделители, разделители групп разрядов и параметры денежных единиц распознаются в соответствии с языковыми и региональными параметрами компьютера.
Если дробная часть целого числа строго равна 0,5, функции CInt и CLng всегда округляют результат до ближайшего четного числа. Например, 0,5 округляется до 0, а 1,5 — до 2. В отличие от функций CInt и CLng, в функциях Fix и Int дробная часть не округляется, а отбрасывается. Кроме того, функции Fix и Int всегда возвращают значение того же типа, что и переданное им выражение.
Для определения возможности преобразования даты в дату или время используется функция IsDate. Функция CDate распознает литералы даты и времени, а также некоторые числа, которые находятся в диапазоне допустимых дат. При преобразовании числа в дату преобразуется целая часть числа. Дробная часть преобразуется во время суток, начиная с полуночи.
CDate распознает форматы даты в соответствии с языковые стандарты системным параметром. Правильный порядок дат, месяца и года может быть определен не в том формате, который не является распознаемой датой. Кроме того, длинный формат даты не распознается, если он также содержит строку дней недели.
Функция CVDate предназначена для обеспечения совместимости с предыдущими версиями Visual Basic. Синтаксис функции CVDate идентичен синтаксису функции CDate, однако функция CVDate возвращает не результат типа Date, а результат типа Variant с подтипом Date. Поскольку теперь реализован встроенный тип Date, необходимость в функции CVDate отпадает. Того же результата можно добиться, преобразовав выражение в тип Date и присвоив это значение переменной типа Variant. Этот способ позволяет преобразовать все прочие встроенные типы в эквивалентные им подтипы Variant.
Примечание: Функция CDec не возвращает отдельный тип данных. Вместо этого она всегда возвращает результат типа Variant, значение которого преобразовано в подтип Decimal.
Примеры запросов
|
|
|
|
SELECT SalePrice,FinalPrice,CBool(SalePrice>FinalPrice) AS Expr1 FROM productSales; |
Возвращает значения «ЦенаПродажи», «ПоследняяЦена» и оценивает, превышает ли Цена конечная цена. Возвращает «-1», если истина, и «0», если ложь. |
|
SELECT ProductID, CByte(Quantity) AS Expr1 FROM productSales; |
Возвращает значение «ProductID», преобразует значения в поле «Количество» в формат «Количество» и отображает в столбце Expr1 значение «ProductID», преобразует значения в поле «Количество» в формат «Валюта» и отображает в столбце Expr1. |
|
SELECT ProductID, CDate(DateofSale) AS Expr1 FROM productSales; |
Возвращает значение «ProductID», преобразует значения поля DateofSale в формат Date и отображает значения в столбце Expr1. |
|
SELECT ProductID, CDbl(Discount) AS Expr1 FROM productSales; |
Возвращает значение «ProductID», преобразует значения в поле Discount в формат Double и отображает значения в столбце Expr1. |
|
SELECT ProductID, CInt(Discount) AS Expr1 FROM productSales; |
Возвращает значение «ProductID», преобразует значения в поле Discount в формат Integer и отображает значения в столбце Expr1. |
|
SELECT ProductID, CLng(Discount) AS Expr1 FROM productSales; |
Возвращает значение «ProductID», преобразует значения в поле Discount в формат Long и отображает в столбце Expr1. |
|
SELECT ProductID, CSng(Discount) AS Expr1 FROM productSales; |
Возвращает значение «ProductID», преобразует значения в поле «Скидка» в single format и отображает в столбце «Expr1». |
|
SELECT ProductID, CStr(Discount) AS Expr1 FROM productSales; |
Возвращает значение «ProductID», преобразует значения в поле Discount в строковом формате и отображает значения в столбце Expr1. |
|
SELECT ProductID, CVar(Discount) AS Expr1 FROM productSales; |
Возвращает значение «ProductID», преобразует значения в поле «Скидка» в значение Double для числных значений и String для не числных значений. |
Примеры VBA
Примечание: В примерах ниже показано, как использовать эту функцию в модуле Visual Basic для приложений (VBA). Чтобы получить дополнительные сведения о работе с VBA, выберите Справочник разработчика в раскрывающемся списке рядом с полем Поиск и введите одно или несколько слов в поле поиска.
Функция CBool
Совет: В Access 2010 и более поздних версиях есть построитель выражений с поддержкой IntelliSense, который помогает создавать выражения.
В этом примере функция CBool используется для преобразования выражения в тип Boolean. Если выражение разрешается в ненулевое значение, функция CBool возвращает значение True; в противном случае она возвращает значение False.
Dim A, B, Check
A = 5: B = 5    ' Initialize variables.
Check = CBool(A = B)    ' Check contains True.
A = 0    ' Define variable.
Check = CBool(A)    ' Check contains False.
Функция CByte
В этом примере функция CByte используется для преобразования выражения в тип Byte.
Dim MyDouble, MyByte
MyDouble = 125.5678    ' MyDouble is a Double.
MyByte = CByte(MyDouble)    ' MyByte contains 126.
Функция CCur
В этом примере функция CCur используется для преобразования выражения в тип Currency.
Dim MyDouble, MyCurr
MyDouble = 543.214588    ' MyDouble is a Double.
MyCurr = CCur(MyDouble * 2)
' Convert result of MyDouble * 2 (1086.429176) to a
' Currency (1086.4292).
Функция CDate
В этом примере функция CDate используется для преобразования выражения в тип Date. Как правило, не рекомендуется определять дату и время в виде строк (как показано в этом примере). Вместо этого пользуйтесь литералами даты и времени, например #2/12/1969# и #4:45:23 PM#.
Dim MyDate, MyShortDate, MyTime, MyShortTime
MyDate = "February 12, 1969"
' Convert to Date data type.
MyShortDate = CDate(MyDate)
MyTime = "4:35:47 PM"
' Convert to Date data type.
MyShortTime = CDate(MyTime)
Функция CDbl
В этом примере функция CDbl используется для преобразования выражения в тип Double.
Dim MyCurr, MyDouble
MyCurr = CCur(234.456784)
' Convert result to a Double.
MyDouble = CDbl(MyCurr * 8.2 * 0.01)
Функция CDec
В этом примере функция CDec используется для преобразования выражения в тип Decimal.
Dim MyDecimal, MyCurr
MyCurr = 10000000.0587    ' MyCurr is a Currency.
MyDecimal = CDec(MyCurr)     ' MyDecimal is a Decimal.
Функция CInt
В этом примере функция CInt используется для преобразования выражения в тип Integer.
Dim MyDouble, MyInt
MyDouble = 2345.5678    ' MyDouble is a Double.
MyInt = CInt(MyDouble)    ' MyInt contains 2346.
Функция CLng
В этом примере функция CLng используется для преобразования выражения в тип Long.
Dim MyVal1, MyVal2, MyLong1, MyLong2
MyVal1 = 25427.45
MyVal2 = 25427.55  ' MyVal1, MyVal2 are Doubles.
MyLong1 = CLng(MyVal1)
' MyLong1 contains 25427.
MyLong2 = CLng(MyVal2)
' MyLong2 contains 25428.
Функция CSng
В этом примере функция CSng используется для преобразования выражения в тип Single.
Dim MyDouble1, MyDouble2, MySingle1, MySingle2
' MyDouble1, MyDouble2 are Doubles.
MyDouble1 = 75.3421115: MyDouble2 = 75.3421555
MySingle1 = CSng(MyDouble1)
' MySingle1 contains 75.34211.
MySingle2 = CSng(MyDouble2)
' MySingle2 contains 75.34216.
Функция CStr
В этом примере функция CStr используется для преобразования выражения в тип String.
Dim MyDouble, MyString
MyDouble = 437.324    ' MyDouble is a Double.
MyString = CStr(MyDouble)
' MyString contains "437.324".
Функция CVar
В этом примере функция CVar используется для преобразования выражения в тип Variant.
Dim MyInt, MyVar
MyInt = 4534    ' MyInt is an Integer.
MyVar = CVar(MyInt & "000")
' MyVar contains the string 4534000.
Преобразование чисел, дат и строк в настраиваемый текстовый формат из кода VBA Excel с помощью функции Format. Синтаксис, параметры, символы, примеры.
Format – это функция, которая преобразует число, дату или строку в текст, отформатированный в соответствии с именованным выражением формата или инструкциями, составленными из специальных символов.
Синтаксис и параметры
Format(Expression, [FormatExpression], [FirstDayOfWeek], [FirstWeekOfYear])
- Expression – любое допустимое выражение (переменная), возвращающее числовое значение или строку (обязательный параметр).
- FormatExpression – выражение формата, именованное или содержащее инструкции из специальных символов (необязательный параметр).
- FirstDayOfWeek – константа, задающая первый день недели (необязательный параметр).
- FirstWeekOfYear – константа, задающая первую неделю года (необязательный параметр).
Именованные выражения форматов
Именные форматы даты и времени
| Имя формата | Описание |
|---|---|
| General Date | Стандартное отображение даты и времени в соответствии с параметрами системы. |
| Long Date | Длинный формат даты. |
| Medium Date | Средний формат даты. |
| Short Date | Краткий формат даты. |
| Long Time | Длинный формат времени. |
| Medium Time | Средний формат времени. |
| Short Time | Краткий формат времени. |
Проверьте отображение даты и времени с использованием именованных форматов на вашем компьютере при помощи следующего кода VBA Excel:
|
Sub FormatDateTime() MsgBox «General Date: « & Format(Now, «General Date») & vbNewLine _ & vbNewLine & «Long Date: « & Format(Now, «Long Date») & vbNewLine _ & vbNewLine & «Medium Date: « & Format(Now, «Medium Date») & vbNewLine _ & vbNewLine & «Short Date: « & Format(Now, «Short Date») & vbNewLine _ & vbNewLine & «Long Time: « & Format(Now, «Long Time») & vbNewLine _ & vbNewLine & «Medium Time: « & Format(Now, «Medium Time») & vbNewLine _ & vbNewLine & «Short Time: « & Format(Now, «Short Time») End Sub |
Скорее всего, результат будет таким:

Именованные форматы чисел
| Имя формата | Описание |
|---|---|
| General Number | Стандартное отображение числа без знака разделителя групп разрядов. |
| Currency | Денежный формат. |
| Fixed | Отображение числа без знака разделителя групп разрядов с двумя цифрами после разделителя целой и дробной части. |
| Standard | Отображение числа со знаком разделителя групп разрядов и с двумя цифрами после разделителя целой и дробной части. |
| Percent | Процентный формат: отображение числа, умноженного на 100, со знаком процента (%), добавленного справа. |
| Scientific | Отображение числа в экспоненциальном виде. |
| Yes/No | Возвращается «Нет», если число равно 0, иначе отображается «Да». |
| True/False | Возвращается «Ложь», если число равно 0, иначе отображается «Истина». |
| On/Off | Возвращается «Выкл», если число равно 0, иначе отображается «Вкл». |
Проверяем работу именованных форматов на числах 2641387.7381962 и 0 с помощью кода VBA Excel:
|
Sub FormatNumber() Dim n As Double n = 2641387.7381962 ‘n = 0 MsgBox «Форматируемое число = « & n & vbNewLine _ & vbNewLine & «General Number: « & Format(n, «General Number») & vbNewLine _ & vbNewLine & «Currency: « & Format(n, «Currency») & vbNewLine _ & vbNewLine & «Fixed: « & Format(n, «Fixed») & vbNewLine _ & vbNewLine & «Standard: « & Format(n, «Standard») & vbNewLine _ & vbNewLine & «Percent: « & Format(n, «Percent») & vbNewLine _ & vbNewLine & «Scientific: « & Format(n, «Scientific») & vbNewLine _ & vbNewLine & «Yes/No: « & Format(n, «Yes/No») & vbNewLine _ & vbNewLine & «True/False: « & Format(n, «True/False») & vbNewLine _ & vbNewLine & «On/Off: « & Format(n, «On/Off») End Sub |
Получаем следующий результат:


Вместо вопросительного знака в отображении числа в формате Currency, по идее, должен быть знак валюты (₽ или руб.).
Специальные символы для выражений форматов
Символы для форматов даты и времени
| Символ | Описание |
|---|---|
| Точка (.) | Разделитель компонентов даты (день, месяц, год). Используется при отображении месяца в виде числа. |
| Пробел | Разделитель компонентов даты (день, месяц, год). Используется при отображении месяца прописью. |
| Двоеточие (:) | Разделитель компонентов времени (часы, минуты, секунды). |
| d | День в виде числа без нуля в начале (1–31). |
| dd | День в виде числа с нулем в начале (01–31). |
| m | Месяц в виде числа без нуля в начале (1–12). Если (m) следует после (h) или (hh), отображаются минуты (0–59). |
| mm | Месяц в виде числа с нулем в начале (01–12). Если (mm) следует после (h) или (hh), отображаются минуты (00–59). |
| mmm | Месяц прописью в сокращенном виде (янв–дек). |
| mmmm | Полное название месяца (январь–декабрь). |
| y | День года в виде числа (1–366). |
| yy | Год в виде 2-значного числа (00–99). |
| yyyy | Год в виде 4-значного числа (1900–9999). |
| h | Часы в виде числа без нуля в начале (0–23). |
| hh | Часы в виде числа с нулем в начале (00–23). |
| n (m) | Минуты в виде числа без нуля в начале (0–59). |
| nn (mm) | Минуты в виде числа с нулем в начале (00–59). |
| s | Секунды в виде числа без нуля в начале (0–59). |
| ss | Секунды в виде числа с нулем в начале (00–59). |
В этой таблице перечислены далеко не все символы для выражений форматов даты и времени. Вы можете ознакомиться со всеми символами, в том числе и для форматирования чисел, на сайте разработчика.
Примеры отображения даты с помощью разных по количеству наборов символа d:
|
Sub DataIsD() MsgBox «d: « & Format(Now, «d») & vbNewLine _ & vbNewLine & «dd: « & Format(Now, «dd») & vbNewLine _ & vbNewLine & «ddd: « & Format(Now, «ddd») & vbNewLine _ & vbNewLine & «dddd: « & Format(Now, «dddd») & vbNewLine _ & vbNewLine & «ddddd: « & Format(Now, «ddddd») & vbNewLine _ & vbNewLine & «dddddd: « & Format(Now, «dddddd») End Sub |

Символы для числовых форматов
| Символ | Описание |
|---|---|
| Точка (.) | Десятичный разделитель. |
| Запятая (,) | Разделитель групп разрядов. В отображаемых числах заполняется пробелом. |
| (0) | Заполнитель, который отображает цифру или ноль. Используется, когда нужны ведущие нули или нули в конце числа. |
| (#) | Заполнитель, который отображает цифру или ничего не отображает. Используется, когда не нужны ведущие нули или нули в конце числа. |
| (%) | Заполнитель процента. Выражение умножается на 100, а знак процента (%) вставляется на той позиции, где он указан в строке формата. |
| (E- E+ e- e+) | Экспоненциальный формат. |
Примеры использования символов в выражениях числовых форматов VBA Excel:
|
Sub FormatNumber2() Dim n As Double n = 2641387.7381962 ‘n = 0.2397842 MsgBox «Форматируемое число = « & n & vbNewLine _ & vbNewLine & «0.##: « & Format(n, «0.##») & vbNewLine _ & vbNewLine & «000.###: « & Format(n, «000.###») & vbNewLine _ & vbNewLine & «#,###.###: « & Format(n, «#,###.###») & vbNewLine _ & vbNewLine & «0 %: « & Format(n, «0 %») & vbNewLine _ & vbNewLine & «0.### E-: « & Format(n, «0.### E-«) & vbNewLine _ & vbNewLine & «0.### E+: « & Format(n, «0.### E+») End Sub |


Символы для текстовых форматов
| Символ | Описание |
|---|---|
| At-символ (@) | Заполнитель для символов, отображающий знак или пробел. |
| Амперсанд (&) | Заполнитель для символов, отображающий знак или ничего (пустая строка). |
| Меньше (<) | Принудительный перевод всех буквенных символов в нижний регистр. |
| Больше (>) | Принудительный перевод всех буквенных символов в верхний регистр. |
Примеры использования символов в выражениях строковых форматов VBA Excel:
|
Sub FormatString() MsgBox «Номер телефона: « & Format(«1234567890», «+7 (@@@) @@@-@@-@@») & vbNewLine _ & vbNewLine & «Серия и номер паспорта: « & Format(«1234567890», «&& && &&&&») & vbNewLine _ & vbNewLine & «Нижний регистр: « & Format(«Нижний регистр», «<«) & vbNewLine _ & vbNewLine & «Верхний регистр: « & Format(«Верхний регистр», «>») End Sub |

Форматы для различных значений одного выражения
Различные форматы для разных числовых значений
В выражении формата для чисел предусмотрено от одного до четырех разделов, отделяемых друг от друга точкой с запятой. Отображаемая строка зависит от значения, возвращенного параметром Expression функции Format.
| Количество разделов | Результат форматирования |
|---|---|
| Один раздел | Выражение формата применяется ко всем значениям. |
| Два раздела | Первый раздел применяется к положительным значениям и нулям, второй – к отрицательным значениям. |
| Три раздела | Первый раздел применяется к положительным значениям, второй – к отрицательным значениям, третий – к нулям. |
| Четыре раздела | Первый раздел применяется к положительным значениям, второй – к отрицательным значениям, третий – к нулям, четвертый – к значениям Null. |
Пример использования четырех разделов в выражении формата числовых значений:
|
Sub FormatDifferentValues() MsgBox «Число 1234,5678: « & _ Format(1234.5678, «#,##0.00 руб.;Отрицательное число;Ноль рублей;Значение Null») _ & vbNewLine & vbNewLine & «Число -25: « & _ Format(—25, «#,##0.00 руб.;Отрицательное число;Ноль рублей;Значение Null») _ & vbNewLine & vbNewLine & «Число 0: « & _ Format(0, «#,##0.00 руб.;Отрицательное число;Ноль рублей;Значение Null») _ & vbNewLine & vbNewLine & «Null: « & _ Format(Null, «#,##0.00 руб.;Отрицательное число;Ноль рублей;Значение Null») End Sub |

Различные форматы для разных строковых значений
В выражении формата для строк предусмотрено до двух разделов, отделяемых друг от друга точкой с запятой. Отображаемая строка зависит от текста, возвращенного параметром Expression функции Format.
| Количество разделов | Результат форматирования |
|---|---|
| Один раздел | Выражение формата применяется ко всем строковым данным. |
| Два раздела | Первый раздел применяется к строковым данным, второй – к значениям Null и пустым строкам («»). |
Пример использования двух разделов в выражении формата строк:
|
Sub FormatString2() MsgBox «Строка «Белка»: « & _ Format(«Белка», «@;Пустая строка или Null») _ & vbNewLine & vbNewLine & «Пустая строка: « & _ Format(«», «@;Пустая строка или Null») _ & vbNewLine & vbNewLine & «Строка «Null»: « & _ Format(«Null», «@;Пустая строка или Null») _ & vbNewLine & vbNewLine & «Значение Null: « & _ Format(Null, «@;Пустая строка или Null») End Sub |

I have a column of dates (column A) stored as text in the format yyyy-mm-dd which I’m trying to convert to dates, ultimately so that I can do look ups against them.
I’ve read a few topics on here and tried some of the suggestions, but I can’t get anything to work. One was using:
Columns("A").Select
Selection.NumberFormat = "date"
This changed the format of the cells to date but didn’t actually change the format of the value which was still stored as text.
My understanding is that I need to use CDate() to change the format of the value from text to date. I’ve tried something like this:
Dim c As Range
For Each c In ActiveSheet.UsedRange.columns("A").Cells
    c.Value = CDate(c.Value)
Next c
Which gives me a type mismatch error. I wondered if this was because I was trying to save date values back into a non-date formatted cell so I tried combining it with the .NumberFormat = «date» above, which didn’t work either.
Any suggestions would be appreciated.
![]()
Teamothy
1,9903 gold badges15 silver badges24 bronze badges
asked Dec 4, 2013 at 12:20
![]()
2
You can use DateValue to convert your string to a date in this instance
Dim c As Range
For Each c In ActiveSheet.UsedRange.columns("A").Cells
    c.Value = DateValue(c.Value)
Next c
It can convert yyyy-mm-dd format string directly into a native Excel date value.
answered Dec 4, 2013 at 12:48
![]()
SamSam
7,2153 gold badges25 silver badges37 bronze badges
2
You can quickly convert a column of text that resembles dates into actual dates with the VBA equivalent of the worksheet’s Data ► Text-to-Columns command.
With ActiveSheet.UsedRange.Columns("A").Cells
    .TextToColumns Destination:=.Cells(1), DataType:=xlFixedWidth, FieldInfo:=Array(0, xlYMDFormat)
    .NumberFormat = "yyyy-mm-dd"   'change to any date-based number format you prefer the cells to display
End With
Bulk operations are generally much quicker than looping through cells and the VBA’s Range.TextToColumns method is very quick. It also allows you the freedom to set a MDY vs. DMY or YMD conversion mask that plagues many text imports where the date format does not match the system’s regional settings. See TextFileColumnDataTypes property for a complete list of the available date formats available.
Caveat: Be careful when importing text that some of the dates have not already been converted. A text-based date with ambiguous month and day integers may already been converted wrongly; e.g. 07/11/2015 may have been interpreted as 07-Nov-2015 or 11-Jul-2015 depending upon system regional settings. In cases like this, abandon the import and bring the text back in with Data ► Get External Data ► From Text and specify the correct date conversion mask in the Text Import wizard. In VBA, use the Workbooks.OpenText method and specify the xlColumnDataType.
answered Jun 3, 2015 at 2:11
1
Besides other options, I confirm that using
c.Value = CDate(c.Value)
works (just tested with the description of your case, with Excel 2010). As for the reasons for you getting a type mismatch error, you may check (e.g.) this.
It might be a locale issue.
![]()
answered Dec 4, 2013 at 14:05
![]()
0
Perhaps:
Sub dateCNV()
    Dim N As Long, r As Range, s As String
    N = Cells(Rows.Count, "A").End(xlUp).Row
    For i = 1 To N
        Set r = Cells(i, "A")
        s = r.Text
        r.Clear
        r.Value = DateSerial(Left(s, 4), Mid(s, 6, 2), Right(s, 2))
    Next i
End Sub
This assumes that column A contains text values like 2013-12-25 with no header cell.
answered Dec 4, 2013 at 12:31
![]()
Gary’s StudentGary’s Student
95.3k9 gold badges58 silver badges98 bronze badges
I had a very similar issue earlier. Unfortunately I looked at this thread and didn’t find an answer which I was happy with. Hopefully this will help others.
Using VBA.DateSerial(year,month,day) you can overcome Excel’s intrinsic bias to US date format. It also means you have full control over the data, which is something I personally prefer:
function convDate(str as string) as Date
  Dim day as integer, month as integer, year as integer
  year  = int(mid(str,1,4))
  month = int(mid(str,6,2))
  day   = int(mid(str,9,2))
  convDate = VBA.DateSerial(year,month,day)
end function
![]()
answered Jan 3, 2019 at 17:16
![]()
SancarnSancarn
2,54318 silver badges43 bronze badges
This code is working for me
Dim N As Long, r As Range
N = Cells(Rows.Count, "B").End(xlUp).Row
For i = 1 To N
    Set r = Cells(i, "B")
    r.Value = CDate(r.Value)
Next i
Try it changing the columns to suit your sheet
answered Oct 28, 2015 at 15:47
![]()
2
To the OP…
I also got a type mismatch error the first time I tried running your subroutine. In my case it was cause by non-date-like data in the first cell (i.e. a header).
When I changed the contents of the header cell to date-style txt for testing, it ran just fine…
Hope this helps as well.
answered Feb 20, 2015 at 18:10
![]()
Blast from the past but I think I found an easy answer to this. The following worked for me. I think it’s the equivalent of selecting the cell hitting F2 and then hitting enter, which makes Excel recognize the text as a date.
Columns("A").Select
Selection.Value = Selection.Value
answered Aug 16, 2018 at 13:02
![]()
1
I’ve got rid of type mismatch by following code:
Sub ConvertToDate()

Dim r As Range
Dim setdate As Range

'in my case I have a header and no blank cells in used range,
'starting from 2nd row, 1st column
Set setdate = Range(Cells(2, 1), Cells(2, 1).End(xlDown))

    With setdate
        .NumberFormat = "dd.mm.yyyy" 'I have the data in format "dd.mm.yy"
        .Value = .Value
    End With

    For Each r In setdate
        r.Value = CDate(r.Value)
    Next r

End Sub
But in my particular case, I have the data in format «dd.mm.yy»
answered Jun 1, 2017 at 8:36
![]()
For DD-MM-YYYY here is a simple workaround to manage string and dates:
insert the date into the string via DD-MMM-YYYY
for example 01-11-2017 -> 01-Nov-2017
U can use the FORMAT(date, «dd-mmm-yyyy») to input dates into a string from the spread sheet.
Later, when you output it from a string, it will not confuse the days and months.
answered Sep 5, 2017 at 0:37
![]()
GilcoGilco
1,31612 silver badges13 bronze badges
2
Solved the issue for me :
    Range(Cells(1, 1), Cells(100, 1)).Select

    For Each xCell In Selection

    xCell.Value = CDate(xCell.Value)

    Next xCell
answered Jul 4, 2019 at 13:24
![]()
![]() Visual Basic for Applications or VBA is a scripting language that enables automation of tasks in the Microsoft Office suite of products. It’s also an event driven programming language which contains a lot of useful functions. It is leveraged by programmers to create effective and efficient macros. Read more about what VBA can help you do, in this tutorial. Today, we are going to take it a step ahead in this intermediate tutorial and take a look at a vital date function namely CDate(). This function is used to convert the strings or numbers into date format.
Visual Basic for Applications or VBA is a scripting language that enables automation of tasks in the Microsoft Office suite of products. It’s also an event driven programming language which contains a lot of useful functions. It is leveraged by programmers to create effective and efficient macros. Read more about what VBA can help you do, in this tutorial. Today, we are going to take it a step ahead in this intermediate tutorial and take a look at a vital date function namely CDate(). This function is used to convert the strings or numbers into date format.
We assume that you have working knowledge of MS Excel and VBA. If you are new to this concept, we suggest you to go through our introductory course to Excel VBA.
Date Systems in Microsoft Excel
Date and time functions are frequently used in MS Excel and VBA. Therefore, it’s important that you know the basic concepts of date and time functions if you want to manipulate and use them in your programs. Please note that MS Excel stores date as sequential numbers known as serial values. MS Excel considers time to be a part of a day and it is stored as decimal fractions. Dates and times can be added and subtracted. Therefore they can be included in many calculations and VBA programs. That is you can compare two dates or subtract one date from another. You can learn more about this in our Excel course.
There are two date systems in MS Excel- the 1900 and 1904. By default Microsoft Excel for Windows is 1900 and for Macintosh is 1904. You can change the date system if you want by clicking on Tools menu. Then click “Options” and choose “Calculation tab.” In Calculation tab, select or clear the 1904 date system checkbox.
You should also be aware that, the date system will be changed automatically when you open an Excel worksheet from another platform. That is when you open a worksheet created in Excel for Macintosh, while working in Excel for Windows, the system will automatically select the 1904 date system.
The following table shows the first and last date for each date system.
|
Date system |
First date |
Last date |
| 1900 | January 1, 1900
(serial value 1) |
December 31, 9999
(serial value 2958465) |
| 1904 | January 2, 1904
(serial value 1) |
December 31, 9999
(serial value 2957003) |
How Microsoft Excel Interprets Two-Digit Years
If you are using Microsoft Windows 2000 or later versions, the regional options in Control Panel controls how Excel interprets two-digit years. If you want MS Excel to assume the year values as you intended it to be, enter the year as a four digit value. The reason is, Excel will not interpret century.
For example instead of entering “00” for the year 2000, you should enter the all the four digits “2000”.
How MS Excel Interprets Year Portion of the Date Entered as a String or Text
- 00 through 29– When you enter the date as 3/24/14, Excel assumes the date is March 24, 2014.
- 30 through 99– Here MS Excel interpret the two-digit year values 30 through 99 as the years 1930 through 1999. That is if you enter the date in the cell as 3/24/94, Excel will interpret the date as March 24, 1994.
Microsoft Excel VBA has many date and time functions.A few of the important ones being Date(), Day(), Now(), DateAdd(), TimeSerial() and DateSerial(). It also has equal number of data type conversion functions. An important data type conversion function that is frequently used in VBA programming is CDate(). To learn more about Excel VBA, you can check out this course.
What is CDate() Function
CDate identifies date and time literals (along with some numbers that fall inside the range of acceptable dates) and converts them to the date date type. If there a fractional part of the number it is converted to a time of day starting from midnight.
The CDate() function identifies date formats depending on the locale setting of your system. The correct order of day, month and year will not be realized by this function if it is entered in a format other than one of the recognized date settings. If the year is not specified in the date, then the current year is used. Also note that a long date format is not recognized if it also contains the day-of-the-week string.
VBA CDate()converts a value of any data type, string or integer, into a date type. The syntax of this date function looks like this
CDate(expression)
Here the argument expression is mandatory. When you enter a valid date and time expression this function converts it into type Date. Let’s make this concept clear using a simple example.
Example 1:
Function FnCDate ()
 Dim strDate_1
 Dim intDate_1
 Dim strTime_1
  strDate_1 = "January 24, 2014"
  intDate_1 = #12/03/2014#
  strTime_1 = "15:30:15 PM"
MsgBoxCDate(strDate_1)
MsgBoxCDate(intDate_1)
MsgBoxCDate(strTime_1)
End Function
In the program, three variables strDate_1, IntDate_1 and strTime_1 are declared. These variables are assigned values “January 24, 2014”, #12/03/2014# and “15:30:15 PM” respectively. The variables are passed through the CDate() function. The output is as follows.
For the MsgBoxCDate(strDate_1) the output displayed is “24-01-2014.”
For the MsgBoxCDate(intDate_1) the output displayed is “03-12-2014.”
For the MsgBoxCDate(strTime_1) the output displayed is “15:30:15.”
How to Convert Text String to Date in MS Excel VBA Using CDate() Function
When you are working with data that contains dates, you need to have a clear idea about how to use the date data type. From MS Excel versions 2000 onwards, you have VBA to automate tasks that you would otherwise perform manually. This is normally done with the help of macros (you can learn more about VBA macros in this course). VBA CDate()function is one of the most commonly used date functions to convert a date stored in a “String” variable into a date data type. The example given below will help make the concept clear.
Open your MS Excel and enter the date in cell A1 in the following format:
March 24, 2014
To open the “Visual Basic Editor”, click the “Developer” tab and then “Visual Basic”. In the editor click “Insert” menu and click “Module.” This will insert a new code module. Here is where you write the code.
Example 2:
Sub converTextToDate()
Dim Current_DateAs Date
Dim Date_StringAs String
Range("A1").Select
Date_String = Range("A1").Value
Current_Date = CDate(date_String)
Range("C1").Select
Range("C1").Value = Current_Date
End Sub
Let’s take a closer look at the program.
In this program, two variables, “Current_Date” and “Date_String” have been declared as type Date and String respectively. Range(“A1”).Select will get the date entered in the cell A1.Date_String = Range(“A1”).Valuestores in the “string” variable Date_String.Current_Date=CDate(date_string) converts the string into Date data type and stores it in the variable “Current_Date”.The last two steps will move the cursor to cell C1 and display the date in column C1 when the procedure is executed.
In the next program, we take a look at how to compare two dates in VBA using CDate() function.
Note that to compare dates in VBA, you need to have dates stored in variables of type “Date”. However, if the dates that you are comparing are entered as numbers or string, you need to convert them using CDate() function. “If statement” is used to compare the dates. The following example helps make the concept clear.
Example 3:
Public Sub CompareDates()
Dim d1, d2 As Date
d1 = CDate("24/1/2013")
d2 = CDate("24/1/2014")
If (d1 < d2) Then Debug.Print "Date 1 occurs earlier than date 2."
If (d1 > d2) Then Debug.Print "Date 1 occurs later than date 2."
If (d1 = d2) Then Debug.Print "Date 1 is the same as date 2."
End Sub
If you happen to work regularly on data which contains date columns, it is always wise to create a macro. Call that Macro whenever you want to delete rows in your table. Here is an example which deletes the dates prior to “12/30/2011.”
Example 4:
Sub DeleteRowbyDate()
Dim x As Long
For x = 1 To Cells.SpecialCells(xlCellTypeLastCell).Row
Debug.Print Cells(x, "B").Value
If CDate(Cells(x, "B")) <CDate("12/29/2011") Then
Cells(i, "B").EntireRow.delete
End If
Next i
End Sub
In this example all rows with dates less than “12/29/2011” will be deleted.For example, If you want to delete all the rows prior to December 29 2012 from your table, then you will have to change the line to:
If CDate(Cells(x, "B")) <CDate("12/29/12")
We hope this gives you a good understanding of the wide range of options available to you while working with dates in Excel and with VBA. As usual, the best way to get familiar with these formula, is to try them out for yourself. If you’d like, Mr Excel has a good course with plenty of examples to help you on your way!
Return to VBA Code Examples
This short tutorial will demonstrate how to convert a String to a Date in VBA.
Dates in Excel are stored as numbers, and then formatted to show as a date. Day 1 in the world of Excel was the 1st January 1900 (Windows default) or 1st January 1904 (Macintosh default) – which means that the 5th August 2021 is day 44413 since the 1st January 1900. To convert a string to a date in Excel, we first need to convert the string to a number, and then convert that number to the date.
CDate Function
We can use a function called CDate in VBA to convert a string to a date.
Sub ConvertDate()
  Dim dte As Single
  Dim strD As String
  strD = "05/10/2020"
  dte = CDate(strD)
  MsgBox dte
End Sub
As we have declared a numeric variable (dte as Single), the msgbox will return the number that refers to the date entered.
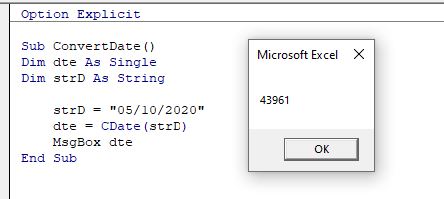
It is important that we enter the year using all 4 of the year digits (ie 2020 and not just 20), otherwise the number returned might not be as expected. Excel does not interpret the year part of the date – this is controlled by the Control Panel of our PC.
However, if we declare the variables as a date variable, the message box will return the number converted to a date.
Sub ConvertDate()
  Dim dte As Date
  Dim strD As String
  strD = "05/10/2020"
  dte = CDate(strD)
  MsgBox dte
End Sub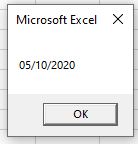
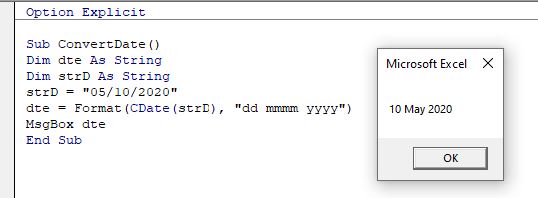
We can take this one step further and format the date to the type of date format that we would like to see.
Sub ConvertDate()
  Dim dte As String
  Dim strD As String
  strD = "05/10/2020"
  dte = Format(CDate(strD), "dd mmmm yyyy")
  MsgBox dte
End Sub
In this example, we are converting the string to a date, and then back to a string again!
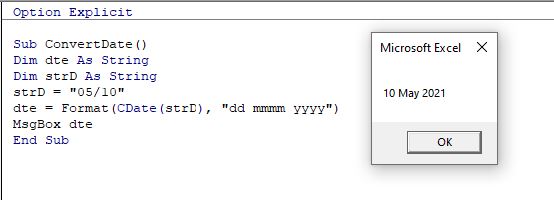
If we were to omit the year entirely, Excel assumes the current year.
VBA Coding Made Easy
Stop searching for VBA code online. Learn more about AutoMacro — A VBA Code Builder that allows beginners to code procedures from scratch with minimal coding knowledge and with many time-saving features for all users!

Learn More!
In VBA, there is a method through which we can convert a given string to a date. The method is known as the CDATE function in VBA. It is an inbuilt function in VBA, and the parts required for this function are first to convert the string to a number, then convert the given number to date. The result format depends on the system date format only.
One of the common problems we all face with Excel is “Date & Time,” which are often stored as text values and go unnoticed initially. But, when they require the use of that time, we know that those values are stored as text and don’t know how to deal with them. That is because “Date & Time” are two combined things in one element. But, once those values as text values are stored, it is a pain to work with.
Table of contents
- Excel VBA String to Date
- How to Convert String Values to Date?
- Example #1
- Example #2
- Example #3
- Things to Remember
- Recommended Articles
- How to Convert String Values to Date?
You are free to use this image on your website, templates, etc, Please provide us with an attribution linkArticle Link to be Hyperlinked
For eg:
Source: VBA String to Date (wallstreetmojo.com)
How to Convert String Values to Date?
You can download this VBA String to Date Excel Template here – VBA String to Date Excel Template
Example #1
Once the VBA variable is declaredVariable declaration is necessary in VBA to define a variable for a specific data type so that it can hold values; any variable that is not defined in VBA cannot hold values.read more and assigned as String, anything assigned to that variable will be treated as a string only. For example, look at the below code.
Code:
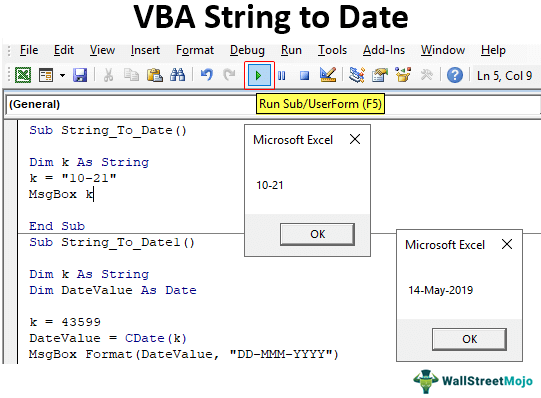
Sub String_To_Date()

  Dim k As String
  k = "10-21"
  MsgBox k

End Sub
The above code defines the variable “k” as the “String” data type. We have assigned this variable the value of “10-21.”
Run the code and see what we get in the message box in VBAVBA MsgBox function is an output function which displays the generalized message provided by the developer. This statement has no arguments and the personalized messages in this function are written under the double quotes while for the values the variable reference is provided.read more.
We only got the value as 10-21. But usually, these values are dates, not string values. So, even though the data type assigned is “String,” we can still convert to date using the data type conversion function CDATE VBAThe VBA CDATE Function converts a variable (text or string) to the date data type. VBA displays the run-time 13 error if it is unable to convert a value to Date & Time.read more.
Code:
Sub String_To_Date()

  Dim k As String
  k = "10-21"
  MsgBox CDate(k)

End Sub
In the above, before we show the variable “k” result in the message box. Then, we assigned the CDATE function. Then, we made a small adjustment. Finally, let us see how big an impact it makes.
Now, we would see the result as “Date” no longer as a “String” value.
Example #2
Look at the below code.
Code:
Sub String_To_Date()

  Dim k As String
  k = 43599
  MsgBox k

End Sub
The above code would show the result as “43599,” as we assigned above.
But once we use the CDATE function, it will convert to the date value.
Code:
Sub String_To_Date()

  Dim k As String
  k = 43599
  MsgBox CDate(k)

End Sub
The result after applying the CDATE function is as follows.
Since Excel stored the date as serial numbers, our assigned serial number 43599 equals the date 05/14/2019 when the date format is applied.
To read the date accurately, we can apply the format to the date as “DD-MMM-YYYY.”
Code:
Sub String_To_Date1()

  Dim k As String
  Dim DateValue As Date

  k = 43599
  DateValue = CDate(k)
  MsgBox Format(DateValue, "DD-MMM-YYYY")

End Sub
We have declared one extra variable to store the result in the above. For this variable, we have applied the CDATE conversion function.
Next, we used the FORMAT function to apply the “DD-MMM-YYYY” format. The result will be as shown below.

With this, we can read the daypart and month part. Of course, it also depends on your system date format in excelThe date format in Excel can be changed either from the “number format” of the Home tab or the “format cells” option of the context menu.read more. Since my system date format was “MM-DD-YYYY,” it was showing like that, but that should not hinder the format.
Example #3
Now, we will see how dates format as text values in worksheet cells. Below is the image of the dates stored as text in a worksheet.
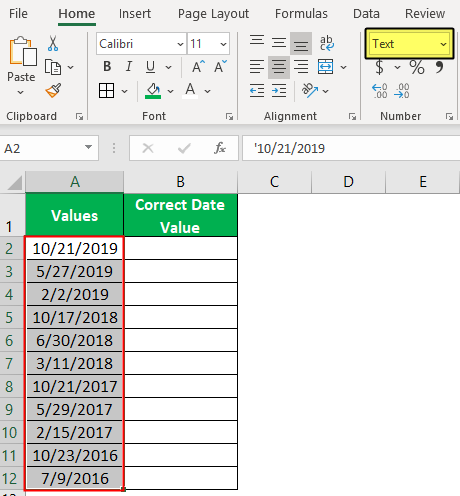
In column A from A2 to A12, we have date-looking values, but when we look at the format tab, it shows “Text” format. So, now we need to convert these values from text to date.
Below is the code we have written to convert the text-formatted date values to actual dates.
Code:
Sub String_To_Date2()

Dim k As Long

 'Data is in more than one cell, so need to loop through each cell
 'Open For Loop

For k = 2 To 12
 'Data starts from 2nd row and ends at 12th row, so 2 to 12
   Cells(k, 2).Value = CDate(Cells(k, 1).Value)
Next k

End Sub
If you run the code, it will give us the below result.
Things to Remember
- The CDATE is a data type conversion function that can convert VBA stringString functions in VBA do not replace the string; instead, this function creates a new string. There are numerous string functions in VBA, all of which are classified as string or text functions.read more stored date to actual date values.
- The result of the CDATE function format depends on the system date format only.
- Dates are stored as serial numbers in Excel, so formatting is required to show them as dates.
Recommended Articles
This article has been a guide to VBA String to Date. Here, we discuss converting date stores in string values to date format in Excel VBA using the CDATE function and examples. You can learn more about VBA functions from the following articles: –
- VBA Format Date
- Split String into Array in VBA
- Set Range in VBA
- Get Value from Cell in VBA
 Excel provides you several options for formatting dates. In addition to the several built-in date formats that exist, you can create custom date formats.
Even though the process of manually applying a date format isn’t very complicated, there are some circumstances in which you may want to create macros that format dates. This may the case if, for example:
- You use a particular date format constantly and want to be able to apply such a format without having to do everything manually; or
- You frequently format cells or cell ranges in a particular way, and the formatting rules you apply include date formats.
Regardless of your situation, if you’re interested in understanding how you can use Visual Basic for Applications for purposes of formatting dates, you’ve found the right place.
When working in Visual Basic for Applications, there are a few different properties and functions you can use for purposes of formatting a date. The following 3 are commonly used:
- The Format VBA function.
- The Range.NumberFormatLocal property.
- The Range.NumberFormat property.
This particular Excel tutorial focuses on the last item of the list above (the Range.NumberFormat property). I may cover the Format function and Range.NumberFormatLocal property in future blog posts. If you want to be informed whenever I publish new content in Power Spreadsheets, please make sure to register for our Newsletter by entering your email address below.
In addition to explaining the Range.NumberFormat property, I explain the different date format codes you can use and present 25 date formatting examples using VBA.
You can use the following detailed table of contents to navigate to the section of this tutorial that interests you the most.
Before I introduce the NumberFormat property in more detail, let’s start by taking a look at the sample file that accompanies this Excel tutorial:
Format Dates Using Excel VBA: Example
For purpose of this Excel tutorial, I use an Excel workbook that contains the full match schedule of the 2014 Brazil World Cup.

This Excel VBA Date Format Tutorial is accompanied by an Excel workbook containing the data and some versions of the macros I explain below. You can get immediate free access to this example workbook by subscribing to the Power Spreadsheets Newsletter.
Notice how the first column of the table contains dates:

These are the dates that I format throughout this tutorial.
However, since the focus of this macro is in formatting dates using VBA, we need a Sub procedure. The following image shows the basic structure of the macro (called “Format_Dates”) that I use to format these dates.

The macro has a single statement:
Selection.NumberFormat = “m/d/yy;@”
Therefore, before I start showing examples of how you can format dates using VBA, let’s analyze this statement. For these purposes, you simply need to understand…
The Range.NumberFormat Property And How To Format An Excel Date Using VBA
As mentioned at the beginning of this Excel tutorial, you can generally use the Range.NumberFormat property to format dates.
The Range.NumberFormat property sets a Variant value. This value represents the number format code of the relevant Range object. For these purposes, the Range object is generally a single cell or a range of cells.
Strictly speaking, in addition to setting the NumberFormat property value, you can also return the property’s current setting. As explained by Excel authority John Walkenbach in Excel VBA Programming for Dummies, the NumberFormat property is a read-write property.
However, if you’re reading this Excel tutorial, you likely want to modify the property, not read it. Therefore, this guide focuses on how to change the NumberFormat property, not how to read it.
You can, however, easily examine the number format of a cell or range of cells. I explain how you can read a property value in this tutorial. In such cases, if (i) you select a range of cells and (ii) all the cells don’t share the same format, the Range.NumberFormat property returns Null.
NumberFormat is just one of the many (almost 100 by my count) properties of the Range object. As explained in Excel Macros for Dummies, once you’ve selected a range of cells (as the sample Format_Dates macro does), “you can use any of the Range properties to manipulate the cells”.
This Excel tutorial is quite specific. The only property of the Range object that I cover in this blog post is NumberFormat. In fact, I only explain (in high detail) one of the applications of the NumberFormat property: to format dates with VBA.
I may cover other properties of the Range object, or other applications of the NumberFormat property, in future tutorials. If you want to receive an email whenever I publish new material in Power Spreadsheets, please make sure to subscribe to our Newsletter by entering your email address below:
Syntax Of The Range.NumberFormat Property
The syntax of the Range.NumberFormat property is relatively simple:
expression.NumberFormat
In this case, “expression” stands for the Range object, or a variable that represents this object.
The sample Format_Dates macro shown above uses the Application.Selection property, which returns whichever object is selected. Generally, you can use the sample Format_Dates macro framework whenever the selection is a range of cells. Therefore, the sample macro uses the following version of the syntax above:
Selection.NumberFormat
You can use another expression instead of Selection. What matters, as I mention above, is that the expression stands for a Range object.
Whenever you want to modify the value of a property, you must do the following:
- #1: Determine whether the property you’re working with uses arguments and, if that’s the case, determine what is the argument you want to use. These arguments are the ones that specify the value that the property takes.
- #2: Use an equal sign to separate the property name from the property value.
As shown in the examples throughout this tutorial, if you’re implementing the NumberFormat property using the framework structure of the sample Format_Dates macro, argument values are generally surrounded by double quotes (” “).
Therefore, if you’re setting the NumberFormat property value, you can use the following syntax:
expression.NumberFormat = “argument_value”
In other words, in order to change the current setting of the NumberFormat property, you use a statement including the following 3 items:
- Item #1: A reference to the NumberFormat property.
- Item #2: The equal sign (=).
- Item #3: The new value of the NumberFormat property, surrounded by double quotes (” “).
As I explain above, the Range.NumberFormat property determines the number format code of a Range object. Therefore, in order to be able to format a date using VBA, you must understand…
Date Format Codes: The Arguments Of The Range.NumberFormat Property
As explained at the Microsoft Dev Center:
The format code is the same string as the Format Codes option in the Format Cells dialog box.
This is quite a mouthful, so let’s break down the statement and process into different parts to understand how you can know which format code you want to apply. More precisely, you can find the string that represents a particular format code in the Format Cells dialog box in the following 5 easy steps.
This process is, mostly, useful if you don’t know the format code you want to apply. Generally, as you become more familiar with number format codes, you’ll be able to create macros that format dates without having to go through this every time. For these purposes, refer to the introduction to date format codes below.
Step #1: Go To The Number Tab Of The Format Cells Dialog Box
You can get to the Format Cells dialog box using any of the following methods:
- Method #1: Click on the dialog box launcher at the bottom-right corner of the Number command group of the Home Ribbon tab.

- Method #2: Go to the Home tab of the Ribbon, expand the Number Format drop-down list and select More Number Formats.

- Method #3: Use the “Ctrl + 1” keyboard shortcut.


Regardless of which of the methods above you use, Excel displays the Format Cells dialog box.

If you use method #1 or #2 above, Excel displays the Number tab, as in the image above. This is the one you need in order to find the date format codes.
However, if you use method #3 (keyboard shortcut), Excel may show you a tab other than the Number tab (as shown above). In such a case, simply go to the Number tab.

Step #2: Select The Date Category
Since you’re interested in date format codes, choose “Date” in the Category list box on the left side of the Format Cells dialog box.

Step #3: Choose The Date Format Type Whose Format Code You Want
Once you’ve selected the Date category, Excel displays the built-in date format types inside the Type box on the right side of the Format Cells dialog box. This allows you to select from several different date format types.
For example, in the image above, I select the option “14-Mar-12”:

Step #4: Select The Custom Category
Once you’ve selected the date format type you’re interested in, click on “Custom” within the Category list box on the right side of the Format Cells dialog.

Step #5: Get The Date Format Code
Once you’ve completed the 4 steps above, Excel displays the date format code that corresponds to the date format type you selected in step #3 above. This format code is shown in the Type box that appears on the upper-right section of the Format Cells dialog box.

The date format code shown in the example above, is “[$-en-US]d-mmm-yy;@”. This format code corresponds to the option “14-Mar-12” with the English (United States) locale that I selected in step #3.
Once you have this date format code, you can go back to you VBA code and use this as the argument for the Range.NumberFormat property.
To see how this works in practice, let’s go back to the World Cup calendar that I introduce above. If you want to apply the format shown above, the VBA code looks as follows:

As I show below, you can achieve the same date formatting effect without the first part of the date format code which makes reference to the locale settings. That means you can delete “[$-en-US]”. However, for the moment, I leave it in.
For purposes of this example, I modify the format of the dates that appear in the sample table. Let’s assume that, before applying this new version of the Format_Dates macro, all of the dates have the long date format, as shown in the following screenshot:

Before executing the Format_Dates macro, I select the cell that I want to format. In this case, I choose the date in the first row of the table. This corresponds to June 12 of 2014, which is the date of the match between Brazil and Croatia.

Once I execute the version above of the Format_Dates macro, the date format changes to the following:

The 5-step method to find date format codes described above can be useful in some situations.
However, Excel date format codes follow some general rules. If you know them, you don’t have to go through the whole process described above every single time you want to create a macro that formats dates.
Let’s take a look at these general rules and some additional examples:
Date Format Codes In Excel And VBA: General Guidelines
The date format codes that you can use to format a date using VBA appear in the table below. As shown in the following sections, you can use these codes to create different types of date formats to use in your VBA code.
| Format Code Applies To | Format Code | Description | How It Looks In Practice |
|---|---|---|---|
| Month | m | Month is displayed as number.
It doesn’t include a leading 0. |
1, 2, 3, 4, 5, 6, 7, 8, 9, 10, 11, 12 |
| Month | mm | Displays month as a number.
If the month is between January (month 1) and September (month 9), it includes a leading 0. |
01, 02, 03, 04, 05, 06, 07, 08, 09, 10, 11, 12 |
| Month | mmm | Month name is abbreviated. | Jan, Feb, Mar, Apr, May, Jun, Jul, Aug, Sep, Oct, Nov, Dec |
| Month | mmmm | Full name of month is displayed | January, February, March, April, May, June, July, August, September, October, November, December |
| Month | mmmmm | Only the first letter of the month name is displayed | J, F, M, A, M, J, J, A, S, O, N, D |
| Day (Number) | d | The day number is displayed without a leading 0. | 1, 2, 3, 4, 5, 6, 7, 8, 9, 10, 11, 12, 13, 14, 15, 16, 17, 18, 19, 20, 21, 22, 23, 24, 25, 26, 27, 28, 29, 30, 31 |
| Day (Number) | dd | The day number is displayed.
For days between 1 and 9, a leading 0 is displayed. |
01, 02, 03, 04, 05, 06, 07, 08, 09, 10, 11, 12, 13, 14, 15, 16, 17, 18, 19, 20, 21, 22, 23, 24, 25, 26, 27, 28, 29, 30, 31 |
| Day (Weekday) | ddd | The weekday is abbreviated | Mon, Tue, Wed, Thu, Fri, Sat, Sun |
| Day (Weekday) | dddd | The full weekday name is displayed | Monday, Tuesday, Wednesday, Thursday, Friday, Saturday, Sunday |
| Year | yy | The last 2 digits of the year are displayed | 00 to 99 |
| Year | yyyy | All of the four digits of the year are displayed | 1900 to 9999 |
Note, however, that the Format function (which I mention at the beginning of this Excel tutorial) supports slightly different date format codes from those appear in this table.
The following sections show examples of how all of these different options can be applied to format dates using VBA. For each situation, I show both of the following:
- The VBA code of the sample Format_Dates macro.
- The resulting format in one of the dates within the sample table that contains the 2014 Brazil World Cup schedule.
Let’s start taking a look at each of these:
Format Date Using VBA: Display A Single Item Of The Date
You can have Excel display just one of the items of a date, regardless of whether it’s the month, the day or the year. To do this, the argument of the Range.NumberFormat property must only include the format code of the relevant item.
Let’s take a look at the different date formats you can obtain by including a single item, and how does the corresponding VBA code looks like:
Format A Date To Display Only The Month Using VBA
You can display a month using any of the following 5 options:
Option #1: Display The Month As A Number (Without Leading 0)
You can format a date in a way that:
- Only the month is displayed; and
- The month is displayed as a number without a leading 0.
In this case, the format code that you use as argument for the NumberFormat property is “m”. The image shows the version of the sample Format_Dates macro that does this:

Let’s go back to the sample table with the schedule of the 2014 World Cup. I select the second date, which is June 13 of 2014 and corresponds to the match between Mexico and Cameroon.

The following image shows the results after the date is formatted by the Format_Dates macro. Notice how only the month number (6, corresponding to June) appears. Notice, also, that the value in the Formula Bar continues to be the same. The only thing that changes is the format of the date displayed in the cell itself.

Option #2: Display The Month As A Number (With Leading 0)
This option is similar to the one above. More particularly:
- Only the month is displayed; and
- The month is displayed as a number.
However, in this particular case, the month is displayed with a leading 0. In other words, if the relevant month is between January (month 01) and September (month 09), a leading 0 is added.
For these purposes, the VBA code behind the Format_Dates macro looks as follows:

This particular macro is applied to the third date in the 2014 World Cup schedule. The date is June 13 of 2014. The teams playing are Spain and Netherlands.

Once the Format_Dates macro is applied, the date looks as follows in the cell (where the format changes) and the Formula Bar (where the value remains the same):

Option #3: Display The Month As A 3-Letter Abbreviation
If you choose to implement this option, the month name is displayed as a 3-letter abbreviation. In order to achieve this, the VBA code of the Format_Dates macro is as follows:

Let’s continue with the same process of applying the new date formats to the match dates of the 2014 Brazil World Cup. In this case, the relevant date is June 13 of 2014. The match played is between Chile and Australia.

The following image shows how the cell looks like after the new format is applied. As in the previous cases, the value of the date itself (as shown in the Formula Bar), doesn’t change.

Option #4: Display The Full Name Of The Month
If you want to display the full name of the month that corresponds to a date (not just its abbreviation), the following version of the Format_Dates macro is of help:

In order to apply this format to a date in the sample 2014 Brazil World Cup schedule, I select the corresponding cell. In this case, the date is June 14 of 2014 and corresponds to the match between Colombia and Greece.

The results of applying the new version of the Format_Dates macro are shown in the following screenshot:

Option #5: Display The First Letter Of The Month
The fifth way in which you can display just the month when formatting a date using VBA is to display (only) the first letter of the relevant month. In this case, the Format_Dates macro looks as follows:

This macro is applied to the date June 14 of 2014. This date corresponds to the match between Uruguay and Costa Rica.

The results of executing the new macro are shown in the following image:

Format A Date To Display Only The Day Number Using VBA
Just as you can use VBA to format a date in a way that only the month is displayed, you can do the same for the day. In other words, you can use Visual Basic for Applications to format a date and have Excel display only the day.
The following 2 sections show how you can modify the sample Format_Dates macro so that only the day (number) is displayed when the date is formatted.
Option #1: Display The Day Number Without Leading 0
If you want Excel to display the day number without a leading 0 while using VBA, you can use the following version of the sample Format_Dates macro:

The date to which this macro is applied in the sample workbook is June 14 of 2014. In this case, the relevant match is that between England and Italy.

The results of applying the Format_Dates macro are shown in the following image:

Option #2: Display The Day Number With Leading 0
You can format dates in such a way that Excel adds a leading 0 whenever the day is only 1 digit long (1 to 9). The following version of the Format_Dates macro achieves this:

If I continue going down the 2014 Brazil World Cup match schedule (as until now), this version of the Format_Dates macro would be applied to the date June 14 of 2014. This date corresponds to the match between Ivory Coast and Japan.

However, since this the day (14) doesn’t require a leading 0, the result of applying the new version of the Format_Dates macro would be the same as that obtained above for the date of the match between England and Italy.

To see how this date format works like whenever the corresponding day is only one digit long, I go further down the sample table to one of the matches played at the beginning of July of 2014. More precisely, I apply the current version of the Format_Dates macro to the date July 1 of 2014. The match to which this date corresponds to is that played between Argentina and Switzerland.

The following image shows the results of applying the Format_Dates macro to this date. Notice how, now, Excel adds a leading 0 to the day number in the cell.

Format A Date To Display Only The Weekday Using VBA
The previous section shows how you can use VBA to format a date in such a way that only the day number is displayed. You can also format a date in such a way that only the weekday is displayed.
The following 2 sections show 2 ways in which you can implement this date format by using VBA.
Option #1: Display The Weekday As A 3-Letter Abbreviation
The first way in which you can format a date to display the weekday allows you to have that weekday shown as a 3-letter abbreviation. The following version of the Format_Dates macro achieves this:

Let’s go back to the match between Ivory Coast and Japan to which I make reference above and apply this new date format. The date of this match is June 14 of 2014.

After executing the Format_Dates macro, the date looks as follows:

Option #2: Display The Full Weekday
The second way in which you can format a date to display the weekday using VBA makes Excel show the full name of the weekday. The following version of the sample Format_Dates macro formats a date in such a way:

Let’s execute this macro for purposes of formatting the date of the match between Switzerland and Ecuador in the 2014 Brazil World Cup match schedule. This date, as shown in the image below, is June 15 of 2014.

Running the Format_Dates macro while this particular cell is active causes the following change in the date format:

Format A Date To Display Only The Year Using VBA
So far, you have seen how you can format a date using VBA for purposes of displaying only the (i) month, (ii) day number or (iii) weekday. In this section, I show you how to format a date using VBA to display only the year.
Let’s take a look at the 2 options you have for these purposes:
Option #1: Display The Last 2 Digits Of The Year
The first way in which you can format a date to display only the year results in Excel displaying only the last 2 digits of the relevant year. To achieve this date format, you can use the following version of the Format_Dates macro:

This date format is to applied to the date June 15 of 2014. This corresponds to the World Cup match between France and Honduras.

The following image shows the results of executing the sample Format_Dates macro while this cell is active:

Option #2: Display The Full Year
The second way in which you can format a date to display only the year results in Excel showing the full year. If you want to format a date in such a way using VBA, the following version of the Format_Dates macro achieves this result:

I apply this date format to the date of the match between Argentina and Bosnia and Herzegovina. This is June 15 of 2014.

Once the Format_Dates macro is executed, the results are as shown in the following screenshot:

Format Date Using VBA: Display Several Items Of The Date
The examples in the section above explain different ways in which you can format a date using VBA to display a single item (month, day or year) of that particular date.
Having the ability to format a date in such a way that only a single item is displayed is helpful in certain scenarios. Additionally, once you know the format codes that apply to each of the individual items of a date, you can easily start combining them for purposes of creating more complex and advanced date formats.
In any case, in a lot of cases, you’ll need to format dates in such a way that more than 1 element is displayed. In the following sections, I go through some date formats that result in Excel displaying more than 1 item of the relevant date.
Even though I don’t cover every single date format that you can possibly implement, these examples give you an idea of the possibilities you have at your disposal and how you can implement them in your VBA code.
All of the sections below follow the same form and show 2 things:
- The version of the Format_Dates macro that is applied.
- The result of executing that macro for purposes of formatting 1 of the dates of a match in the sample workbook that accompanies this blog post.
Format Date Using VBA: Display m/d/yyyy
The following version of the Format_Dates macro formats a date in the form m/d/yyyy.

The following image shows the result of applying this format to the date June 16 of 2014. This date corresponds to the match between Germany and Portugal.

Format Date Using VBA: Display m/d
To display a date in the form m/d, you can use the following macro:

When this macro is executed and the cell with the date of the match between Iran and Nigeria (June 16 of 2014) is selected, the formatted date looks as follows:

Format Date Using VBA: Display m/d/yy
The following macro formats a date so that it’s displayed in the form m/d/yy:

The result of applying this format, using the version of the Format_Dates macro above, to the date of June 16 of 2014 (for the match between Ghana and the USA) is shown below:

Format Date Using VBA: Display mm/dd/yy
You can format a date so that it’s displayed in the form mm/dd/yy by using the following version of the Format_Dates macro:

When this date format applied to the date of the World Cup match between Belgium and Algeria (June 17 of 2014), the result is as shown in the following image:

Format Date Using VBA: Display d-mmm
The following version of the Format_Dates macro makes Excel display the date in the form d-mmm:

The results of executing this macro while the date of the World Cup match between Brazil and Mexico is selected (June 17 of 2014) are shown in the next image:

Format Date Using VBA: Display d-mmm-yy
The next version of the Format_Dates macro makes Excel display dates using the form d-mmm-yy:

If I choose the cell that shows the date of the match between Russia and Korea (June 17 of 2014) prior to executing this version of the Format_Dates macro, the resulting date format is as follows:

Format Date Using VBA: Display dd-mmm-yy
To apply the format dd-mmm-yy to a particular date, you can use the following version of the sample Format_Dates macro:

The following screenshot shows the results of applying this version of the Format_Dates macro to the date in which Australia played against the Netherlands in the 2014 Brazil World Cup (June 18 of 2014):

Notice that, in this particular case, the resulting date format is exactly the same as that of the date of the match between Russia and Korea which is immediately above (and is used as an example in the previous section). To understand why this is the case, let’s take a look at the date format codes used in each case:
- Russia vs. Korea (June 17 of 2014) uses the date format code d-mmm-yy.
- Australia vs. Netherlands (June 18 of 2014) has the date format code dd-mmm-yy.
Notice that the only difference between both format codes is in the way the day is represented. In the first case, the format code uses “d”, which displays the day number without a leading 0. In the second case, the format code is “dd”, which adds a leading 0 whenever the day number has a single digit (between 1 and 9).
In this particular situation, the day numbers of both dates (17 and 18) have 2 digits. Therefore, the format code “dd” doesn’t add a leading 0 to the day number. The result is that shown above:
Both format codes (d-mmm-yy and dd-mmm-yy) result in the same date format when the number of digits of the day is 2 (between 10 and 31).
Let’s go further down the match schedule of the 2014 Brazil World Cup to see how the format code “dd-mmm-yy” adds a leading 0 when applied to a date in which the day number has a single digit:
The image below shows this. In this particular case, the Format_Dates macro is applied to the date July 1 of 2014, when Belgium played against the USA. Notice, especially, the leading 0 in the day number (01 instead of 1).

Format Date Using VBA: mmm-yy
The following version of the Format_Dates macro allows you to format a date using the form mmm-yy:

The resulting date format when this version of the Format_Date macro is executed is as shown in the image below. The formatted date is June 18 of 2014, corresponding to the match between Spain and Chile.

Format Date Using VBA: mmmm-yy
Continuing with date formats that only display the month and year, the following version of the Format_Dates macro applies the format code mmmm-yy:

The results of executing the macro on the date June 18 of 2014 are shown in the image below. In this case, the date corresponds to the World Cup match between Cameroon and Croatia.

Format Date Using VBA: mmmm d, yyyy
The following version of the sample Format_Dates macro formats dates so that they’re displayed using the form mmmm d, yyyy.

The next image shows the results of executing this macro while a cell with the date June 19 of 2014 is active. This date corresponds to the world cup match between Colombia and Ivory Coast.

Format Date Using VBA: mmmmm-yy
The following version of the sample Format_Dates macro makes Excel display dates using the format mmmmm-yy.

To see how a date looks like when formatted by this version of the Format_Dates macro, let’s go back to the 2014 Brazil World Cup match schedule. The following screenshot shows how the date June 19 of 2014 (for the match between Uruguay and England) looks like after this macro is executed:

Format Date Using VBA: d-mmm-yyyy
Further above, I show versions of the Format_Dates macro that use the format codes d-mmm-yy and dd-mmm-yy. The version of this macro displayed in the image below results in a similar date format. The main difference between this version and those displayed above is that the version below displays the 4 digits of the year.

I execute this macro while the cell with the date of the World Cup match between Japan and Greece (June 19 of 2014) is selected. The resulting date format is displayed in the image below:

Format Date Using VBA: dddd, mmmm dd, yyyy
The following version of the sample Format_Dates macro makes Excel display dates using the default long date format under the English (United States) locale settings.

To see how this looks in practice, check out the following image. This screenshot shows the date of the match between Italy and Costa Rica (June 20 of 2014) after the Format_Dates macro has been executed:

So far, this Excel tutorial includes 24 different examples of how you can use Visual Basic for Applications to format dates. The date formats introduced in the previous sections are relatively straightforward.
These basic date formats include several of the most commonly used date formats in American English. You can also use them as a basis to create other date formatting macros for less common date formats.
These basic date formats are, however, not the only ones you can apply. More precisely, once you have a good knowledge of how to apply date formats using VBA, you can start creating more complex constructions.
To finish this blog post, I introduce one such date formatting macro:
Format Date Using VBA: Add A Carriage Return To Dates
You can add a carriage return in custom date formats. This allows you to display different items of a date in different lines within a single cell.
Let’s see how this looks in practice:
The following screenshot shows an example of a date format with carriage returns. The formatted date is June 20 of 2014, corresponding to the World Cup match between Switzerland and France.

This example works with a date format that only includes month (using the format code mmmm) and year (using the format code yyyy). You can tweak the macro that I introduce below in order to adjust it to your needs and use any other date items or formats.
You can use Visual Basic for Applications for these purposes. The following macro (called “Format_Dates_Carriage_Return”) is the one that I’ve used to achieve the date format shown in the image above.

Some of the elements in this piece of VBA code probably look familiar. The following screenshot shows the elements that I introduce in the previous sections of this Excel tutorial:

There are, however, a few other elements that I don’t introduce in the previous sections of this blog post. These are the following 5:
Element #1: With Statement
You can generally identify a With statement because of its basic syntax. This syntax is roughly as follows:
- Begins with a statement of the form “With object”.
In the case of the Format_Dates_Carriage_Return macro, this opening statement is “With Selection”. As explained above, the Application.Selection property returns the object that is currently selected. When formatting dates using the sample macro above (Format_Dates_Carriage_Return), the selected object is a range of cells.

- Has 1 or more statements in its body.
You can easily identify these 2 statements within the Format_Dates_Carriage_Return macro due to the fact that they’re indented.
- Closes with an End With statement.


The effect of using a With statement is that all of the statements within it refer to the same object or structure. In this case:
- The object to which all of the statements refer to is that returned by the Selection property.
- The statements that refer to the object returned by Selection are:
Statement #1: .NumberFormat = “mmmm” & Chr(10) & “yyyy”.
Statement #2: .RowHeight = .RowHeight * 2.
Statement #3: .WrapText = True.
I explain each of these statements below.
Using the With statement allows you to, among other, simplify the syntax of the macro. I use this statement in other sample macros throughout Power Spreadsheets, including macros that delete blank rows.
Element #2: The Ampersand (&) Operator
The first statement within the With…End With block is:
.NumberFormat = “mmmm” & Chr(10) & “yyyy”
Since, as explained above, this statement works with the object returned by the Application.Selection property, it’s the equivalent of:
Selection.NumberFormat = “mmmm” & Chr(10) & “yyyy”
Most of this statement follows exactly the same structure of (pretty much) all of the other macro examples I include in the previous sections. There are, however, a couple of new elements.
One of those new elements is the ampersand (&) operator. Notice how there are 2 ampersands (&) within this statement:

Within the Visual Basic for Applications environment, the ampersand (&) operator works in a very similar way to how it works in Excel itself.
This means that, within VBA, ampersand (&) is a concatenation operator. In other words, within the Format_Dates_Carriage_Return macro, ampersand (&) concatenates the 3 following expressions:
- Expression #1: “mmmm”.
- Expression #2: Chr(10).
- Expression #3: “yyyy”.
Expression #2 above leads me to the next and last element you need to be aware of in order to understand the first statement within the With…End With block of the sample macro:
Element #3: The Chr Function
The Chr Function returns a string. The string that is returned is determined by the particular character code that you feed as an argument.
In the sample Format_Dates_Carriage_Return macro, the character code is the number 10. This corresponds to a linefeed character. In other words:
“Chr(10)” is what actually adds the carriage return between the date’s month and year.
The second statement within the With…End With block is also new. Let’s take a look at the new element it introduces:
Element #4: Range.RowHeight Property
The Range.RowHeight property allows you to set the height for a row.
In the Format_Dates_Carriage_Return sample macro, this property is used for purposes of doubling the height of the row for which you’re changing the date format. This is done by the statement:
.RowHeight = .RowHeight * 2
The expression to the right side of the equal sign (=) takes the current row height and, using the asterisk (*) operator, multiplies it by 2. The result of applying this property change to the sample chart with the 2014 Brazil World Cup Match Schedule is that a row can now fit the 2 date elements that are separated by the carriage return.
Compare the following 2 screenshots to see the difference this statement makes in the date format. The first image shows what happens when the Format_Dates_Carriage_Return macro is executed without having the statement under analysis. The formatted date, which corresponds to the match between Honduras and Ecuador, is June 20 of 2014.

The image below shows the result of including the Range.RowHeight property for purposes of doubling the row height. The formatted date corresponds to that of the match between Argentina and Iran (June 21 of 2014).

Notice that this format isn’t yet what we want. More precisely, the month and year that correspond to the formatted date are displayed on the same line. Element #5, which I explain below, fixes this.
If the height of the cells whose date format you’re modifying is enough to fit all of the elements/lines, you may not need to include this particular statement in your date-formatting macro. In other cases, you may need to change the factor by which you multiply the current row height. In other words, instead of using the number 2 at the end of the statement (as I do in the sample macro), you may need to use a different number.
The use of the Range.RowHeight property is optional and doesn’t affect the date format of the selected cells. You may choose to omit it from your macros, or work with a different property.
The reason why I use RowHeight in the sample Format_Dates_Carriage_Return is for illustration purposes only. In particular, it ensures that the cell that I format using this macro shows the complete date.
Let’s take a look at the fifth and last of the new elements introduced in the sample Format_Dates_Carriage_Return macro:
Element #5: Range.WrapText Property
The Range.WrapText Property allows you to determine whether Excel wraps the text within the relevant range object. In the sample Format_Dates_Carriage_Return macro, that relevant range object is the range of cells returned by the Application.Selection property.
Within the Format_Dates_Carriage_Return macro, the WrapText property is used for purposes of wrapping the text within its own cell. More precisely, the following statement sets the property to True for all the cells within the range returned by the Selection property:
.WrapText = True
The last image I show when explaining the Range.RowHeight property above displays both the month and the year on the same line. The following image allows you to compare the results obtained when I execute: (i) the macro version that doesn’t include the WrapText property (for the date of the match between Argentina and Iran) and (ii) the macro version that uses the WrapText property (for the match between Germany and Ghana):

Conclusion
This Excel tutorial explains the Range.NumberFormat property in great detail and shows how you can use it for purposes of formatting dates using VBA.
As you’ve probably realized, successfully applying date formats using VBA generally boils down to knowing and understanding the following 2 topics:
- Item #1: The Range.NumberFormat property.
- Item #2: Date format codes.
In addition to reading about these 2 items, you’ve seen 25 different date formatting examples using VBA. Such a long list of examples may seem a little excessive, and there are several similarities between some of the date formats I applied.
However, these 25 examples are evidence of the flexibility you have when formatting dates using VBA. At the same time, they provide a base for you to create your own macros to apply different date formats.
This Excel VBA Date Format Tutorial is accompanied by an Excel workbook containing the data and some versions of the macros I explain above. You can get immediate free access to this example workbook by subscribing to the Power Spreadsheets Newsletter.
Books Referenced In This Excel Tutorial
- Alexander, Michael (2015). Excel Macros for Dummies. Hoboken, NJ: John Wiley & Sons Inc.
- Walkenbach, John (2013). Excel VBA Programming for Dummies. Hoboken, NJ: John Wiley & Sons Inc.
|
stevie44 Пользователь Сообщений: 257 |
Здравствуйте! |
|
Grr Пользователь Сообщений: 595 |
А изменить формат ячеек почему нельзя? |
|
stevie44 Пользователь Сообщений: 257 |
Grr, формат меняю, но при этом дата остается текстовой, пока в каждую ячейку не зайду и не нажму Enter. |
|
Z  Пользователь Сообщений: 6111 Win 10, MSO 2013 SP1 |
#4 16.11.2016 09:48:41
До того, как — скопировать 1, выделить диапазон, спец вставка — умножить, выбрать краткий формат даты. Как вариант… «Ctrl+S» — достойное завершение ваших гениальных мыслей!.. |
||

|
Hugo Пользователь Сообщений: 23257 |
Я с датами замечал косяк, все сразу одним действием в макросе преобразовать не получалось, пришлось макросом проходить по всем ячейкам, или по всем элементам массива, затем выгружать (не помню точно как делал). Изменено: Hugo — 16.11.2016 11:54:17 |
|
stevie44 Пользователь Сообщений: 257 |
Z, Не совсем понял последовательность действий… Получается дата умножается на дату… Изменено: stevie44 — 16.11.2016 10:40:48 |
|
stevie44 Пользователь Сообщений: 257 |
Пардон, туплю) 1 умножить на даты))) |
|
Larth  Пользователь Сообщений: 1 |
Я так и не понял последовательность. можете детально описать? |
|
vikttur Пользователь Сообщений: 47199 |
Копировать пустую ячейку (в буфер обмена копируется ноль) |
|
stevie44 Пользователь Сообщений: 257 |
#10 16.11.2016 12:20:50 vikttur, есть еще проще способ, выделить столбцы, и сделать автозаменой точку на точку.
Изменено: stevie44 — 16.11.2016 12:21:12 |
||||
|
kuklp Пользователь Сообщений: 14868 E-mail и реквизиты в профиле. |
#11 16.11.2016 13:24:31
Я сам — дурнее всякого примера! … |
||
|
Exelior Пользователь Сообщений: 46 |
#12 16.11.2016 22:36:44 Как вариант, макрос задающий формат «дата» для выделенных ячеек, для удобства можно вынести макрос на панель быстрого доступа:
Изменено: Exelior — 16.11.2016 22:36:58 |
||
|
Antonina Пользователь Сообщений: 1 |
Мне удалось решить эту проблему в VBA через новую переменную с типом данных «Дата» Dim cell As Range For Each cell In Range(«…») |
|
Алексей Швидко  Пользователь Сообщений: 13 |
#14 23.12.2022 13:34:22 Может кому полезно будет Excel 2010 pro. Сработало по следующему коду без всяких циклов на весь выделенный диапазон в данном случае к колонке из умной таблицы
З.Ы. Решение пол дня в инете искал. Нашел на вашем форуме. Ура |
||
|
Jack Famous  Пользователь Сообщений: 10852 OS: Win 8.1 Корп. x64 | Excel 2016 x64: | Browser: Chrome |
#15 23.12.2022 13:37:15
тестировали на диапазонах с более, чем одной областью? Во всех делах очень полезно периодически ставить знак вопроса к тому, что вы с давних пор считали не требующим доказательств (Бертран Рассел) ►Благодарности сюда◄ |
||
|
Алексей Швидко Пользователь Сообщений: 13 |
#16 23.12.2022 14:39:49
Пока нет! если интересно могу попробовать)))) |
||
|
Алексей Швидко Пользователь Сообщений: 13 |
#17 23.12.2022 14:56:03
Да все прекрасно работает две колонки «период» и» дата» не связанные то есть1 и 4 по счету!
|
||||
|
SlA_pls  Пользователь Сообщений: 8 |
#18 27.01.2023 05:36:47 Можно просто выделить столбец и нажать «Данные» -> «Текст по столбцам» и готово =) Горячими клавишами очень удобно |