
Improve Article
Save Article
Like Article
Improve Article
Save Article
Like Article
Python proves to be a powerful language when the requirement is to convert a file from one format to the other. It supports tools that can be employed to easily achieve the functionality. In this article, we’ll find out how we will convert from an Excel file to Extensible terminology (XML) files with Python.
Modules needed
- OpenPyXL helps in interacting with Excel files. It can read and write to .xlsx and .xlsm files and can be installed as:
pip install openpyxl
- Yattag is a Python library for generating HTML or XML documents with Python in a very readable way. This Yattag Library is pretty simple and easy to use library. If you are searching for any library in order to more easily generate HTML or XML documents.
pip install yattag
Function needed
- To load the contents of the Excel file load_workbook() method of OpenPyXl is used.
- To iterate through loaded file and read data Iter_rows() with appropriate attributes is used
Syntax: Iter_rows(min_col, min_row, max_col, max_row, values_only)
Parameters:
- min_col (int) – smallest column value (1-based index)
- min_row (int) – smallest row value (1-based index)
- max_col (int) – largest column value (1-based index)
- Max_row (int) – largest row value (1-based index)
- values_only (bool) – whether only cell values should be returned
- The tagtext() method is a helper method that returns a triplet composed of:
- The Doc instance itself
- The tag method of the Doc instance
- The text method of the Doc instance
- The asis method appends a string to the document without any form of escaping.
- The tag method will accept any string as a tag name.
- The indent function takes a string representing an XML or HTML document and returns a well-indented version of this document.
Database in use: Click here
To convert Excel data to XML first, it needs to be read, the given program explains the mechanism for reading data.
Approach
- Import module
- Load Excel file
- Create sheet object
- Iterate through rows
Example
Python3
from openpyxl import load_workbook
wb = load_workbook("demo_database.xlsx")
ws = wb.worksheets[0]
for row in ws.iter_rows(min_row=1, max_row=2, min_col=1, max_col=6):
print([cell.value for cell in row])
Now, Once we are done with Reading data. Let’s Code how to convert Excel to XML format,
Approach:
- Import module
- Read data
- Create XML format page
- Append to file
- Save file
Example:
Python3
from openpyxl import load_workbook
from yattag import Doc, indent
wb = load_workbook("demo_database.xlsx")
ws = wb.worksheets[0]
doc, tag, text = Doc().tagtext()
xml_header = '<?xml version="1.0" encoding="UTF-8"?>'
doc.asis(xml_header)
doc.asis(xml_schema)
with tag('People'):
for row in ws.iter_rows(min_row=2, max_row=10, min_col=1, max_col=6):
row = [cell.value for cell in row]
with tag("Person"):
with tag("First_Name"):
text(row[0])
with tag("Last_Name"):
text(row[1])
with tag("Gender"):
text(row[2])
with tag("Country"):
text(row[3])
with tag("Age"):
text(row[4])
with tag("Date"):
text(row[5])
result = indent(
doc.getvalue(),
indentation=' ',
indent_text=True
)
with open("output.xml", "w") as f:
f.write(result)
Output: output.xml
Like Article
Save Article
Python xls2xml converter
![]()
This project contains a Python code for converting all Excell files (xlsx, xlsm, xltx, xltm) to pretified XML format.
Dependencies:
This script uses openpyxl library for maniuplating files. For simplicity I included instalation files for Python 2.5 which you can download and simply run setup.py to install it. This has been tested on MacOS Sierra and High Sierra.
There’s a high chance it will not work on Windows since I didn’t have time to test it. In that case, visit the openpyxl repo and follow install instructions for Windows or Linux machines before you continue.
Usage:
The script is amazingly simple to use simply run the index.py file.
How it works?
The script will scan for all the supported files within its root folder and convert them all. XML files will be saved into a folder named XML which the script also creates. Every row within excell will be saved as a separete XML (one row for header and one for content). XML will be saved as a pritified output (you can modify the script if you need compressed). Script works for any number of sheets, number of columns and rows. The format of the XML will have look like the following:
<?xml version='1.0' encoding='utf-8'?>
<Workbook>
  <Worksheet name="Sheet name">
    <Row>
      <Cell>
        <Data type="String">Column one</Data>
      </Cell>
      <Cell>
        <Data type="String">Column two</Data>
      </Cell>
    </Row>
    <Row>
      <Cell>
        <Data type="unicode"> Content as a string </Data>
      </Cell>
      <Cell>
        <Data type="long"> 12345 </Data>
      </Cell>
    </Row>
  </Worksheet>
</Workbook>
The name of each XML file will have the following format: 2017-12-12_17.40.23.545001
and is guaranted to be unique for every export.
Feature list breakdown:
- Scans for all supported files
- Converts regardles of the number of sheets, rows or columns
- Exports uniqe XML file for every row
- Provides data type for every cell
Planed future features and improvements:
- Create a config file for allowing users to customize script behaviour
- Support CSV files
- Make compresed version to be used as a standalone cross platform app
Contributions:
Any improvements to the script, bug fixes or feature additions are more than welcome. Fork the code, and submit a pull request, I will do my best to review it in shortest possible time. You can also open an issue if you have any questions or problems.
Estimated reading time: 3 minutes
Are you working on a data analytics project where you need to feed your data to a location that is able to process an XML file?
The ability to get your data into a structured format like XML has many benefits:
(A) You can transfer the data to a web service for processing.
(B) Multiple different formats of your raw data can be standardised, enabling quick conversion and processing.
(C) XML files can be read by multiple different programs, as long as you deliver them in the correct format.
(D) The receiver of data can easily read the XML file and store it on their database.
The ability to use this method to read and transfer data is a very powerful way to help a data analyst process large data sets.
In fact, if you are using cloud-based applications to analyse the information you are storing, this will quickly enable you to deliver the data.
What packages do I need in Python?
The first step is to import the following:
import pandas as pd
from lxml import etree as et
Next we want to read in the source data
In this instance, we are reading an excel file
raw_data = pd.read_excel(r'Link to where your data is stored including the full file name')Now we want to start building the XML structure
The FIRST STEP is to define the root
root = et.Element('root')The root is the parent of all the data items (tags) contained in the XML file and is needed as part of the structure
The SECOND STEP is to define the tag names that will store each row of the source data
for row in raw_data.iterrows(): ==> This is a loop that takes runs through each record and populates for each tag.
    root_tags = et.SubElement(root, 'ExportData') #=== > Root name
# These are the tag names for each row (SECTION 1)
    Column_heading_1 = et.SubElement(root_tags, 'Name')
    Column_heading_2 = et.SubElement(root_tags, 'Area')
    Column_heading_3 = et.SubElement(root_tags, 'NoPurchases')
    Column_heading_4 = et.SubElement(root_tags, 'Active')

###These are the values that will be populated for each row above
# The values inside the [] are the raw file column headings.(SECTION 2)
    Column_heading_1.text = str(row[1]['Name'])
    Column_heading_2.text = str(row[1]['Area'])
    Column_heading_3.text = str(row[1]['No Purchases'])
    Column_heading_4.text = str(row[1]['Active'])
The raw file looks like this:
| Name | Area | No Purchases | Active |
| John | Dublin | 2 | Y |
| Mary | Galway | 3 | N |
| Joe | Limerick | 4 | N |
| Jimmy | Kilkenny | 55 | Y |
| Jennifer | Belfast | 6 | N |
| Susan | Waterford | 3 | Y |
| Jake | Cork | 1 | Y |
| Bobby | Dundalk | 11 | N |
| Sarah | Sligo | 9 | N |
| Cian | Ennis | 8 | Y |
The THIRD STEP is to create the XML file and populate it with the data from the source file
# This Section outputs the data to an xml file
# Unless you tell it otherwise it saves it to the same folder as the script.
tree = et.ElementTree(root) ==> The variable tree is to hold all the values of "root"
et.indent(tree, space="t", level=0) ===> This just formats in a way that the XML is readable
tree.write('output.xml', encoding="utf-8") ==> The data is saved to an XML file
The XML output should look like the below
<root>
	<ExportData>
		<Name>John</Name>
		<Area>Dublin</Area>
		<NoPurchases>2</NoPurchases>
		<Active>Y</Active>
	</ExportData>
	<ExportData>
		<Name>Mary</Name>
		<Area>Galway</Area>
		<NoPurchases>3</NoPurchases>
		<Active>N</Active>
	</ExportData>
	<ExportData>
		<Name>Joe</Name>
		<Area>Limerick</Area>
		<NoPurchases>4</NoPurchases>
		<Active>N</Active>
	</ExportData>
	<ExportData>
		<Name>Jimmy</Name>
		<Area>Kilkenny</Area>
		<NoPurchases>55</NoPurchases>
		<Active>Y</Active>
	</ExportData>
	<ExportData>
		<Name>Jennifer</Name>
		<Area>Belfast</Area>
		<NoPurchases>6</NoPurchases>
		<Active>N</Active>
	</ExportData>
	<ExportData>
		<Name>Susan</Name>
		<Area>Waterford</Area>
		<NoPurchases>3</NoPurchases>
		<Active>Y</Active>
	</ExportData>
	<ExportData>
		<Name>Jake</Name>
		<Area>Cork</Area>
		<NoPurchases>1</NoPurchases>
		<Active>Y</Active>
	</ExportData>
	<ExportData>
		<Name>Bobby</Name>
		<Area>Dundalk</Area>
		<NoPurchases>11</NoPurchases>
		<Active>N</Active>
	</ExportData>
	<ExportData>
		<Name>Sarah</Name>
		<Area>Sligo</Area>
		<NoPurchases>9</NoPurchases>
		<Active>N</Active>
	</ExportData>
	<ExportData>
		<Name>Cian</Name>
		<Area>Ennis</Area>
		<NoPurchases>8</NoPurchases>
		<Active>Y</Active>
	</ExportData>
</root>
Additional XML data can be added
- Add more rows – All you need to do is add onto the source file and save. When you rerun the logic it will read in the extra information.
- Add more columns – All you need to do is go to the second step above add in a tag name to SECTION 1. Seperately you will need to add an additional column with data to the source file, and then add that column name to SECTION 2 as well
Recipe Objective
In big data scenarios, converting data from Excel format to XML format using Python can be used to to exchange data between different applications. We process complex XML files into a relational format or a Big Data format such as Parquet/ORC . XML is user-readable and more commonly used in network communication, especially with the rise of REST-based web services. The tools needed to manage big data analytics, often in the form of NoSQL databases, only map over to XML in a partial sense. XML is considered to be at odds with relational schemas, which puts it in a camp with most of NoSQL technology
System requirements :
- Install Yattag python module as follows:
pip install yattag - Install OpenPyXL python module as follows:
pip install openpyxl - The below codes can be run in Jupyter notebook , or any python console
- In this example we are going to use the excel employee dataset
Table of Contents
- Recipe Objective
- System requirements :
- Step 1: Import the modules
- Step 2: Load the Workbook
- Step 3: Fill the headers with Yattags
- Step 4: Then create main Tag
- Step 5: Now start loop through the sheet
- Step 6: Adding the Yattag indent
Step 1: Import the modules
import openpyxl

import yattag

import load_workbook

import Doc, indent
Step 2: Load the Workbook
create a Yattag document using yattag module and load the workbook and the worksheet.
#load the excel file along with path where exists

wb = load_workbook("empdata.xlsx")

ws = wb.worksheets[0]
# Create Yattag doc, tag and text objects
doc, tag, text = Doc().tagtext()
Step 3: Fill the headers with Yattags
Fill the headers with Yattags asis() method which enables us to input any string as the next line
xml_header = ''
xml_schema = ''
doc.asis(xml_header)
doc.asis(xml_schema)
Step 4: Then create main Tag
create main tag Employees as below:
with tag('Employees'):
Step 5: Now start loop through the sheet
Now start loopthrough the sheet with the iter_rows method. The iter_rows method returns a generator with all the cells. We use a list comprehension to get all the values from the cells.
for row in ws.iter_rows(min_row=2, max_row=100, min_col=1, max_col=12):

        row = [cell.value for cell in row]

        with tag("Employee"):

            with tag("FirstName"):

                text(row[0])

            with tag("LastName"):

                text(row[1])

            with tag("Email"):

                text(row[10])

            with tag("Phone"):

                text(row[8])

            with tag("Company"):

                text(row[2])
Step 6: Adding the Yattag indent
Next, we are adding the Employees. When finished we indent our result with Yattags indent method.
 result = indent(

    doc.getvalue(),

    indentation = '    ',

    indent_text = True

)

print(result)

with open("employee1.xml", "w") as f:

    f.write(result)
The complete code looks as follows :
import openpyxl, yattag

from openpyxl import load_workbook

from yattag import Doc, indent
wb = load_workbook("empdata.xlsx")
ws = wb.worksheets[0]
# Create Yattag doc, tag and text objects
doc, tag, text = Doc().tagtext()
xml_header = ''
xml_schema = ''
doc.asis(xml_header)
doc.asis(xml_schema)
with tag('Employees'):
# Use ws.max_row for all rows
for row in ws.iter_rows(min_row=2, max_row=100, min_col=1, max_col=12):
row = [cell.value for cell in row]
with tag("Employee"):
with tag("FirstName"):
text(row[0])
with tag("LastName"):
text(row[1])
with tag("Email"):
text(row[10])
with tag("Phone"):
text(row[8])
with tag("Company"):
text(row[2])
result = indent(
doc.getvalue(),
indentation = ' ',
indent_text = True
)
print(result)
with open("employee.xml", "w") as f: #give path where you want to create
f.write(result)
Output of the above Code as follows :
If you are a person who is working on a data analytics project, then you might need to feed your data to a specific location. This can be done using the XML file. The main advantages of having your data in XML format are that it can be read by multiple different programs if it is delivered in the correct format, and also that the data receiver can easily read the files and store them in their database. Apart from these, one of the most popular reasons for using the XML file is that it helps to read and transfer the data quickly and helps the data analyst process large datasets. As a result, it becomes necessary to convert the Excel files to XML format. And to convert the Excel file to an XML file, we can simply use the powerful programming language Python.
Thus, here is a detailed tutorial that explains “How do you convert XLS to XML using Python?” with examples. Scroll down to find out more.
How to Create an XML file from Excel using Python?
Converting data from Excel format to XML format using Python can be used in huge data applications to exchange data between different applications. We convert complex XML files to relational or Big Data formats like Parquet/ORC. XML is more widely used in network communication, particularly with the rise of REST-based web services. The tools required to manage big data analytics, which is frequently in the form of NoSQL databases, only partially map to XML. XML is thought to be incompatible with relational schemas, putting it in the same camp as most NoSQL technology.
Why Python?
When converting a file from one format to another, Python proves to be a powerful language. It includes tools that can be used to quickly obtain the functionality. In this post, let us see how to use Python to convert an Excel file to Extensible terminology (XML) files.
Modules Used
OpenPyXL:
OpenPyXL is used to interact with Excel files. It can read and write to.xlsx and.xlsm files. Use the below command for Installation:
Yattag:
Yattag is a Python library for generating readable HTML or XML documents with Python. This Yattag Library is straightforward and simple to use. If you are looking for a library to help you create HTML or XML documents more effortlessly then this library is helpful.
Functions Used:
1)load_workbook(): The load_workbook() method of OpenPyXl is used to load the contents of an Excel file.
2)Iter_rows(): Iter_rows() with proper attributes is used to iterate through the loaded file and read data.
- Syntax of Iter_rows():
Iter_rows(min_col, min_row, max_col, max_row, values_only)
Parameters
- min_col: It is the minimum/smallest column value(1-based index)
- min_row: It is the minimum/smallest row value(1-based index)
- max_col: It is the maximum/largest column value(1-based index)
- max_row: It is the maximum/largest row value(1-based index)
- values_only: This returns a boolean value. It indicates whether only cell values must be returned or not.
3)tagtext() Function:
This tagtext() function is a helper method that returns a triplet made up of:
Doc instance itself, tag method of the Doc instance, text method of the Doc instance.
4) asis() Function:
The asis method adds/appends a string to the document without escaping it.
5)tag() Function:
The tag function is used to accept any string as a tag name.
6)indent() Function:
The indent function accepts a string that represents an XML or HTML document and gives a properly indented version of that document.
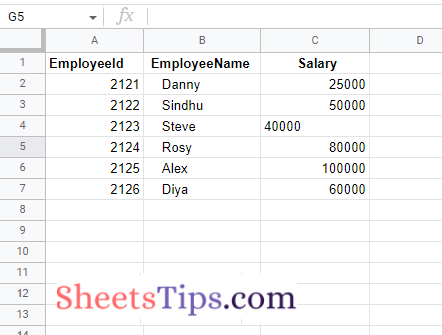
Here we now work on the Excel spreadsheet shown in the image below:
SampleExcelFile:
Method #1: Reading an Excel File and printing all the Rows
Approach:
- Import load_workbook function from openpyxl module using the import keyword
- Pass the excel file path to the load_workbook() function of openpyxl module to load the excel file and store it in a variable
- Access Sheet1 of the given Excel File and store it in another variable
- Loop till all the cells of the worksheet by passing the arguments min,max rows and columns.
- Print all the cell values row-by-row.
- The Exit of the Program.
Below is the implementation:
# Import load_workbook function from openpyxl module using the import keyword
from openpyxl import load_workbook

# Pass the excel file path to the load_workbook() function of openpyxl
# module to load the excel file and store it in a variable
workbookObj  = load_workbook("SampleExcelFile.xlsx")

# Access Sheet1 of the given Excel File and  store it in another variable
newWorksheet = workbookObj.worksheets[0]

# Loop till all the cells of the worksheet by passing the arguments min,max rows and columns
for eachrow in newWorksheet.iter_rows(min_row=1, max_row=7, min_col=1, max_col=3):
    print([cell.value for cell in eachrow])
Output:
['EmployeeId', ' EmployeeName', ' Salary']
[2121.0, 'Danny', 25000.0]
[2122.0, 'Sindhu', 50000.0]
[2123.0, 'Steve', 40000.0]
[2124.0, 'Rosy', 80000.0]
[2125.0, 'Alex', 100000.0]
[2126.0, 'Diya', 60000.0]
Method #2: Converting Excel File to XML Format
Approach:
- Import load_workbook from openpyxl module using the import keyword
- Import Doc, indent functions from yattag module using the import keyword
- Pass the excel file path to the load_workbook() function of openpyxl module which is the file we want to work with and store it in a variable
- Get/access the Sheet1 of the above workbookObj and store it in another variable
- Get the Returning returns a triplet
- Give the XML file header and store it in a variable
- Give the XML file schema and store it in a variable
- Append the above XML file header(String) to the document using the asis() function
- Append the above XML file schema(String) to document using the asis() function
- Give some random tag name using the above tag of document.
- Open some random file name in write mode.
- Write the above-obtained result into this corresponding file using the write() function.
- The Exit of the Program.
Below is the implementation:
# Import load_workbook from openpyxl module using the import keyword
from openpyxl import load_workbook
# Import Doc, indent functions from yattag module using the import keyword
from yattag import Doc, indent

# Pass the excel file path to the load_workbook() function of openpyxl module
# which is the file we want to work with and store it in a variable
workbookObj  = openpyxl.load_workbook('SampleExcelFile.xlsx')
# Get/access the Sheet1 of the above workbookObj and store it in another variable
newWorksheet  = workbookObj.worksheets[0]

# Get the Returning returns a triplet
document, tag_of_doc, text_of_doc = Doc().tagtext()

# Give the xml file header and store it in a variable
xmlFileHeader = '<?xml version="1.0" encoding="UTF-8"?>'
# Give the xml file schema and store it in a variable
xmlFileSchema = '<xs:schema xmlns:xs="http://www.w3.org/2001/XMLSchema"></xs:schema>'

# Append the above xml file header(String) to document using the asis() function
document.asis(xmlFileHeader)
# Append the above xml file schema(String) to document using the asis() function
document.asis(xmlFileSchema)

# Give some random tag name using the above tag of document
with tag_of_doc('EmployDetails'):
    for row in newWorksheet.iter_rows(min_row=1, max_row=7, min_col=1, max_col=3):
        row = [cell.value for cell in row]
        with tag_of_doc("EmployDetails"):
            with tag_of_doc("EmployeeId"):
                text_of_doc(row[0])
            with tag_of_doc(" EmployeeName"):
                text_of_doc(row[1])
            with tag_of_doc("Salary"):
                text_of_doc(row[2])

# Open some random file name in write mode.
with open("ConvertedtXMLFile.xml", "w") as file:
  # Write the above obtained result into this corresponding file
  # using the write() function
    file.write(document.getvalue())
Output:
<?xml version=”1.0″ encoding=”UTF-8″?> <xs:schema xmlns:xs=”http://www.w3.org/2001/XMLSchema”> </xs:schema> <EmployDetails> <EmployDetails> <EmployeeId>EmployeeId</EmployeeId>< EmployeeName> EmployeeName </ EmployeeName> <Salary> Salary</Salary> </EmployDetails> <EmployDetails> <EmployeeId>2121.0</EmployeeId>< EmployeeName>Danny </ EmployeeName> <Salary>25000.0</Salary>undefined</EmployDetails>undefined<EmployDetails> <EmployeeId>2122.0</EmployeeId>< EmployeeName>Sindhuundefined</ EmployeeName>undefined<Salary>50000.0</Salary>undefined</EmployDetails>undefined<EmployDetails>undefined<EmployeeId>2123.0</EmployeeId>< EmployeeName>Steveundefined</ EmployeeName>undefined<Salary>40000.0</Salary>undefined</EmployDetails>undefined<EmployDetails>undefined<EmployeeId>2124.0</EmployeeId>< EmployeeName>Rosyundefined</ EmployeeName>undefined<Salary>80000.0</Salary>undefined</EmployDetails>undefined<EmployDetails>undefined<EmployeeId>2125.0</EmployeeId>< EmployeeName>Alexundefined</ EmployeeName>undefined<Salary>100000.0</Salary>undefined</EmployDetails>undefined<EmployDetails>undefined<EmployeeId>2126.0</EmployeeId>< EmployeeName>Diyaundefined</ EmployeeName>undefined<Salary>60000.0</Salary>undefined</EmployDetails>undefined</EmployDetails>
Now we have provided the best way to convert the Excel file to an XML file using Python. If you have better methods than the methods provided here, do let us know in the comment box below.
22.12.2019
Introduction
In this post, we will take a look into how we can generate Extensible Markup Language (XML) files from an Excel file with Python. We will be using the Yattag package to generate our XML file and the OpenPyXL package for reading our Excel data.
Packages
Yattag
Yattag is described in its documentation as following:
Yattag is a Python library for generating HTML or XML in a pythonic way.
That pretty much sums Yatttag up, I find it as a simple, easy to use library that just works. I had been searching for this kind of library in order to more easily generate different XML files.
To install Yattag with pip: pip install yattag
Using Yattag
Adding a tag with Yattag is as easy as using the With keyword:
with tag('h1'):
    text('Hello world!')
Tags are automatically closed. To start using Yattag we need to import Doc from Yattag and create our Doc, tag and text with Doc().tagtext().
from yattag import Doc
doc, tag, text = Doc().tagtext()
with tag('h1'):
    text('Hello world!')
doc.getvalue()

Output:
'<h1>Hello world!</h1>'
OpenPyXL
OpenPyXL is a library for interacting with Excel 2010 files. OpenPyXL can read and write to .xlsx and .xlsm files.
To install OpenPyXL with pip: pip install openpyxl
Using OpenPyXL
To load an existing workbook in OpenPyXl we need to use the load_workbook method. We also need to select the sheet we are reading the data from. In our example, we are using popular baby names in New York City. You can access the dataset from the link at the bottom of this post.
I have created a workbook named NY_baby_names.xlsx with one sheet of data, Sheet1. The worksheet has the following headers: Year of Birth, Gender, Child’s First Name, Count, Rank. You can download the Excel file from my website here.
To access the data with OpenPyXL, do the following:
from openpyxl import load_workbook
wb = load_workbook("NY_baby_names.xlsx")
ws = wb.worksheets[0]
for row in ws.iter_rows(min_row=1, max_row=2, min_col=1, max_col=4):
    print([cell.value for cell in row])

Output:
['Year of Birth', 'Gender', "Child's First Name", 'Count']
[2011, 'FEMALE', 'GERALDINE', 13]
First, we load the workbook with load_workbook, and then select the first worksheet. We then iterate through the first two rows with the iter_rows method.
Generating the XML from Excel
After the imports, we load the workbook and the worksheet. We then create our Yattag document. We fill the headers with Yattags asis() method. The asis method enables us to input any string as the next line.
We then create our main tag, Babies. We start looping through our sheet with the iter_rows method. The iter_rows method returns a generator with all the cells. We use a list comprehension to get all the values from the cells.
Next, we are adding the babies. Notice the use of the With tag and text. When we are finished we indent our result with Yattags indent method.
Finally, we save our file. The output should look like below. Notice that I only included two babies in the output.
<?xml version="1.0" encoding="UTF-8"?>
<xs:schema xmlns:xs="http://www.w3.org/2001/XMLSchema"></xs:schema>
<Babies>
    <Baby>
        <Name>
            GERALDINE
        </Name>
        <Gender>
            FEMALE
        </Gender>
        <year>
            2011
        </year>
        <count>
            13
        </count>
        <rank>
            75
        </rank>
    </Baby>
    <Baby>
        <Name>
            GIA
        </Name>
        <Gender>
            FEMALE
        </Gender>
        <year>
            2011
        </year>
        <count>
            21
        </count>
        <rank>
            67
        </rank>
    </Baby>
</Babies>
Complete code
from openpyxl import load_workbook
from yattag import Doc, indent

wb = load_workbook("NY_baby_names.xlsx")
ws = wb.worksheets[0]

# Create Yattag doc, tag and text objects
doc, tag, text = Doc().tagtext()

xml_header = '<?xml version="1.0" encoding="UTF-8"?>'
xml_schema = '<xs:schema xmlns:xs="http://www.w3.org/2001/XMLSchema"></xs:schema>'

doc.asis(xml_header)
doc.asis(xml_schema)

with tag('Babies'):
    # Use ws.max_row for all rows
    for row in ws.iter_rows(min_row=2, max_row=100, min_col=1, max_col=5):
        row = [cell.value for cell in row]
        with tag("Baby"):
            with tag("Name"):
                text(row[2])
            with tag("Gender"):
                text(row[1])
            with tag("year"):
                text(row[0])
            with tag("count"):
                text(row[3])
            with tag("rank"):
                text(row[4])

result = indent(
    doc.getvalue(),
    indentation = '    ',
    indent_text = True
)

with open("baby_names.xml", "w") as f:
    f.write(result)
Data sets
Popular Baby Names dataset: https://catalog.data.gov/dataset/most-popular-baby-names-by-sex-and-mothers-ethnic-group-new-york-city-8c742
Since you need a single <Portfolio> and <PortfolioPositions> as parent grouping, consider a nested loop by iterating through a list of data frames. Then, within each data frame loop through its rows:
import xml.etree.ElementTree as ET
import pandas as pd
import xml.dom.minidom as md

df = pd.read_excel("Input.xlsx", sheet_name="Sheet1", dtype=object)

# LIST OF DATA FRAME SPLITS
df_list = [g for i,g in df.groupby(
    ["Name", "BaseCurrency2", "TradingPower", "ValidationProfile", "CommissionProfile"]
)]

# ROOT LEVEL
root = ET.Element('trading-data')
root.set('xmlns:xsi', 'http://www.w3.org/2001/XMLSchema-instance')

# ROOT CHILD LEVEL
Portfolios = ET.SubElement(root, "Portfolios")
Defaults = ET.SubElement(Portfolios, "Defaults", BaseCurrency="USD")

# GROUP LEVEL ITERATION
for df in df_list:
    Portfolio = ET.SubElement(
        Portfolios,
        "Portfolio",
        Name = df["Name"][0],
        BaseCurrency = df["BaseCurrency2"][0],
        TradingPower = str(df["TradingPower"][0]),
        ValidationProfile = df["ValidationProfile"][0],
        CommissionProfile = df["CommissionProfile"][0]
    )

    PortfolioPositions = ET.SubElement(Portfolio, "PortfolioPositions")

    # ROW LEVEL ITERATION
    for row in df.itertuples():
        if row.Type == "Cash":
            PortfolioPosition = ET.SubElement(
                PortfolioPositions,
                "PortfolioPosition",
                Type = row.Type,
                Volume = str(row.Volume)
            )
            Cash = ET.SubElement(
                PortfolioPosition,
                "Cash",
                Currency = str(row.Currency)
            )
        else:
            PortfolioPosition = ET.SubElement(
                 PortfolioPositions,
                 "PortfolioPosition",
                 Type = row.Type,
                 Volume = str(row.Volume),
                 Invested = str(row.Invested),
                 BaseInvested = str(row.BaseInvested)
            )
            Instrument = ET.SubElement(
                 PortfolioPosition,
                 "Instrument",
                 Ticker = str(row.Ticker),
                 ISIN = str(row.ISIN),
                 Market = str(row.Market),
                 Currency = str(row.Currency2),
                 CFI = str(row.CFI)
            )

# SAVE PRETTY PRINT OUTPUT
with open("Output.xml", "wb") as f:
    dom = md.parseString(ET.tostring(root))
    f.write(dom.toprettyxml().encode("utf-8"))
My question is that I have assigned one task in that I have to read excel document and store that data into XML file. So I have done one code in python for that. But it giving me error when I am writing an XML file.
#!/usr/bin/python

import xlrd
import xml.etree.ElementTree as ET

workbook = xlrd.open_workbook('anuja.xls')
workbook = xlrd.open_workbook('anuja.xlsx', on_demand = True)
worksheet = workbook.sheet_by_index(0)
first_row = [] # Header
for col in range(worksheet.ncols):
    first_row.append( worksheet.cell_value(0,col) )
# tronsform the workbook to a list of dictionnaries
data =[]
for row in range(1, worksheet.nrows):
    elm = {}
    for col in range(worksheet.ncols):
        elm[first_row[col]]=worksheet.cell_value(row,col)
    data.append(elm)

for set1 in data :
    f = open('data.xml', 'w')
    f.write("<Progress>%s</Progress>" % (set1[0]))
    f.write("<P>%s</P>" % (set1[1]))
    f.write("<Major>%s</Major>" % (set1[2]))
    f.write("<pop>%s</pop>" % (set1[3]))
    f.write("<Key>%s</Key>" % (set1[4]))
    f.write("<Summary>%s</Summary>" % (set1[5]))
Error is
Traceback (most recent call last):
  File "./read.py", line 23, in <module>
    f.write("<Progress>%s</Progress>" % (set1[0]))
KeyError: 0