
В это статье мы покажем, как получить доступ к данным в файлах Excel напрямую из PowerShell. Возможности прямого обращения к данным Excel из PowerShell открывает широкие возможности по инвентаризации и построению различных отчетов по компьютерам, серверам, инфраструктуре, Active Directory и т.д.
Содержание:
- Доступ к данным в Excel из консоли PowerShell
- Как получить данные из Active Directory и сохранить их в книге Excel?
Обращение к Excel из PowerShell выполняется через отдельный Component Object Model (COM) объект. Это требует наличие установленного Excel на компьютере.
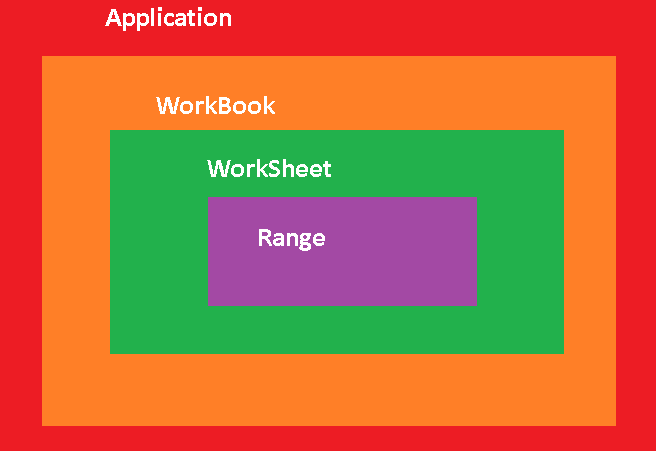
Прежде, чем показать, как обратиться к данным в ячейке файла Excel, необходимо рассмотреть архитектуру уровней представления в документе Excel. На следующем рисунке показаны 4 вложенных уровня в объектной модели Excel:
- Уровень приложения (Application Layer) – запущенное приложение Excel;
- Уровень книги (WorkBook Layer) – одновременно могут быть открыты несколько книг (документов Excel);
- Уровень листа (WorkSheet Layer) – в каждом xlsx файле может быть несколько листов;
- Ячейки (Range Layer) – здесь можно получить доступ к данным в конкретной ячейке или диапазонe ячеек.
Доступ к данным в Excel из консоли PowerShell
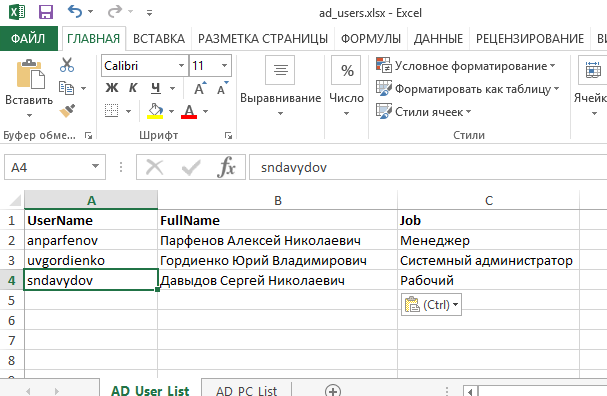
Рассмотрим на простом примере как получить доступ из PowerShell к данным в Excel файле со списком сотрудников.
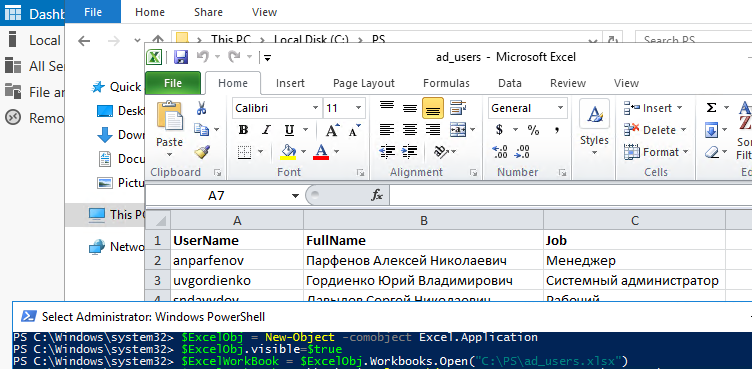
Сначала нужно запустить на компьютере приложение Excel (application layer) через COM объект:
$ExcelObj = New-Object -comobject Excel.Application
После выполнения этой команды на компьютере запускается в фоновом режиме приложение Excel. Чтобы сделать окно Excel видимым, нужно изменить свойство Visible COM объекта:
$ExcelObj.visible=$true
Все свойства объекта Excel можно вывести так:
$ExcelObj| fl
Теперь можно открыть файл (книгу, workbook) Excel:
$ExcelWorkBook = $ExcelObj.Workbooks.Open("C:PSad_users.xlsx")
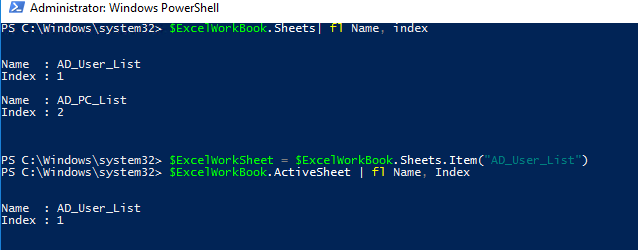
В каждом файле Excel может быть несколько листов (worksheets). Выведем список листов в текущей книге Excel:
$ExcelWorkBook.Sheets| fl Name, index
Теперь можно открыть конкретный лист (по имени или по индексу):
$ExcelWorkSheet = $ExcelWorkBook.Sheets.Item("AD_User_List")
Текущий (активный) лист Excel можно узнать командой:
$ExcelWorkBook.ActiveSheet | fl Name, Index
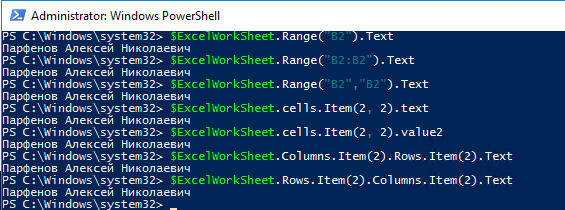
Теперь вы можете получить значения из ячеек документа Excel. Можно использовать различные способы адресации ячеек в книге Excel: через диапазон (Range), ячейку (Cell), столбец (Columns) или строку(Rows). Ниже я привел разные примеры получения данных из одной и той же ячейки:
$ExcelWorkSheet.Range("B2").Text
$ExcelWorkSheet.Range("B2:B2").Text
$ExcelWorkSheet.Range("B2","B2").Text
$ExcelWorkSheet.cells.Item(2, 2).text
 $ExcelWorkSheet.cells.Item(2, 2).value2
$ExcelWorkSheet.Columns.Item(2).Rows.Item(2).Text
$ExcelWorkSheet.Rows.Item(2).Columns.Item(2).Text
Как получить данные из Active Directory и сохранить их в книге Excel?
Рассмотрим практический пример использования доступа к данным Excel из PowerShell. Например, нам нужно для каждого пользователя в Excel файле получить информацию из Active Directory. Например, его телефон (атрибут telephoneNumber), отдел (department) и email адрес (mail).
# Импорт модуля Active Directory в сессию PowerShell
import-module activedirectory
# Сначала откройте книгу Excel:
$ExcelObj = New-Object -comobject Excel.Application
$ExcelWorkBook = $ExcelObj.Workbooks.Open("C:PSad_users.xlsx")
$ExcelWorkSheet = $ExcelWorkBook.Sheets.Item("AD_User_List")
# Получаем количество заполненных строк в xlsx файле
$rowcount=$ExcelWorkSheet.UsedRange.Rows.Count
# Перебираем все строки в столбце 1, начиная со второй строки (в этих ячейках указано доменное имя пользователя)
for($i=2;$i -le $rowcount;$i++){
$ADusername=$ExcelWorkSheet.Columns.Item(1).Rows.Item($i).Text
# Получаем значение атрибутов пользователя в AD
$ADuserProp = Get-ADUser $ADusername -properties telephoneNumber,department,mail|select-object name,telephoneNumber,department,mail
#Заполняем ячейки данными из AD
$ExcelWorkSheet.Columns.Item(4).Rows.Item($i) = $ADuserProp.telephoneNumber
 $ExcelWorkSheet.Columns.Item(5).Rows.Item($i) = $ADuserProp.department
$ExcelWorkSheet.Columns.Item(6).Rows.Item($i) = $ADuserProp.mail
}
#Сохраните xls файл и закройте Excel
$ExcelWorkBook.Save()
$ExcelWorkBook.close($true)
В результате в Excel файле для каждого пользователя были добавлены столбцы с информацией из AD.

Рассмотрим еще один пример построения отчета с помощью PowerShell и Excel. Допустим, вам нужно построить Excel отчет о состоянии службы Print Spooler на всех серверах домена.
# Создать объект Excel
$ExcelObj = New-Object -comobject Excel.Application
$ExcelObj.Visible = $true
# Добавить рабочую книгу
$ExcelWorkBook = $ExcelObj.Workbooks.Add()
$ExcelWorkSheet = $ExcelWorkBook.Worksheets.Item(1)
# Переименовывать лист
$ExcelWorkSheet.Name = 'Статус сервиса spooler'
# Заполняем шапку таблицы
$ExcelWorkSheet.Cells.Item(1,1) = 'Имя сервера'
$ExcelWorkSheet.Cells.Item(1,2) = 'Имя службы'
$ExcelWorkSheet.Cells.Item(1,3) = 'Статус службы'
# Выделить шапку таблицы жирным. задать размер шрифта и ширину столбцов
$ExcelWorkSheet.Rows.Item(1).Font.Bold = $true
$ExcelWorkSheet.Rows.Item(1).Font.size=14
$ExcelWorkSheet.Columns.Item(1).ColumnWidth=25
$ExcelWorkSheet.Columns.Item(2).ColumnWidth=25
$ExcelWorkSheet.Columns.Item(3).ColumnWidth=25
# получим список всех Windows Server в домене
$computers = (Get-ADComputer -Filter 'operatingsystem -like "*Windows server*" -and enabled -eq "true"').Name
$counter=2
# подключается к каждому компьютеру и получаем статус службы
foreach ($computer in $computers) {
$result = Invoke-Command -Computername $computer –ScriptBlock { Get-Service spooler | select Name, status }
#Заполняем ячейки Excel данными с сервера
$ExcelWorkSheet.Columns.Item(1).Rows.Item($counter) = $result.PSComputerName
$ExcelWorkSheet.Columns.Item(2).Rows.Item($counter) = $result.Name
$ExcelWorkSheet.Columns.Item(3).Rows.Item($counter) = $result.Status
$counter++
}
# сохраните полученный отчет и закройте Excel:
$ExcelWorkBook.SaveAs('C:psservice-report.xlsx')
$ExcelWorkBook.close($true)
Область применения возможностей доступа из PowerShell в Excel очень широка. Начиная от простого построения отчетов, например, из Active Directory, и заканчивая возможностью создания PowerShell скриптов для актуализации данных в AD из Excel.
Например, вы можете поручить сотруднику отдела кадров вести реестр пользователей в Excel. Затем с помощью PowerShell скрипта через Set-ADUser сотрудник может автоматически обновлять данные пользователей в AD (достаточно делегировать пользователю права на изменение этих атрибутов пользователей AD и показать как запускать PS скрипт). Таким образом можно вести актуальную адресную книгу с актуальными номерами телефонами и должностями.
I’m trying to export a complete CSV to Excel by using Powershell. I stuck at a point where static column names are used. But this doesn’t work if my CSV has generic unknown header names.
Steps to reproduce
Open your PowerShell ISE and copy & paste the following standalone code. Run it with F5
«C:Windowssystem32WindowsPowerShellv1.0powershell_ise.exe»
Get-Process | Export-Csv -Path $env:tempprocess.csv -NoTypeInformation

$processes = Import-Csv -Path $env:tempprocess.csv
$Excel = New-Object -ComObject excel.application
$workbook = $Excel.workbooks.add()

$i = 1
foreach($process in $processes)
{
 $excel.cells.item($i,1) = $process.name
 $excel.cells.item($i,2) = $process.vm
 $i++
}
Remove-Item $env:tempprocess.csv
$Excel.visible = $true
What it does
- The script will export a list of all active processes as a CSV to your temp folder. This file is only for our example. It could be any CSV with any data
- It reads in the newly created CSV and saves it under the
$processesvariable - It creates a new and empty Excel workbook where we can write data
- It iterates through all rows (?) and writes all values from the
nameandvmcolumn to Excel
My questions
- What if I don’t know the column headers? (In our example
nameandvm). How do I address values where I don’t know their header names? - How do I count how many columns a CSV has? (after reading it with
Import-Csv)
I just want to write an entire CSV to Excel with Powershell
asked Jul 16, 2013 at 23:09
![]()
nixdanixda
2,59711 gold badges48 silver badges82 bronze badges
Ups, I entirely forgot this question. In the meantime I got a solution.
This Powershell script converts a CSV to XLSX in the background
Gimmicks are
- Preserves all CSV values as plain text like
=B1+B2or0000001.
You don’t see#Nameor anything like that. No autoformating is done. - Automatically chooses the right delimiter (comma or semicolon) according to your regional setting
- Autofit columns
PowerShell Code
### Set input and output path
$inputCSV = "C:somefolderinput.csv"
$outputXLSX = "C:somefolderoutput.xlsx"

### Create a new Excel Workbook with one empty sheet
$excel = New-Object -ComObject excel.application
$workbook = $excel.Workbooks.Add(1)
$worksheet = $workbook.worksheets.Item(1)

### Build the QueryTables.Add command
### QueryTables does the same as when clicking "Data » From Text" in Excel
$TxtConnector = ("TEXT;" + $inputCSV)
$Connector = $worksheet.QueryTables.add($TxtConnector,$worksheet.Range("A1"))
$query = $worksheet.QueryTables.item($Connector.name)

### Set the delimiter (, or ;) according to your regional settings
$query.TextFileOtherDelimiter = $Excel.Application.International(5)

### Set the format to delimited and text for every column
### A trick to create an array of 2s is used with the preceding comma
$query.TextFileParseType  = 1
$query.TextFileColumnDataTypes = ,2 * $worksheet.Cells.Columns.Count
$query.AdjustColumnWidth = 1

### Execute & delete the import query
$query.Refresh()
$query.Delete()

### Save & close the Workbook as XLSX. Change the output extension for Excel 2003
$Workbook.SaveAs($outputXLSX,51)
$excel.Quit()
![]()
answered Jan 16, 2014 at 18:01
![]()
nixdanixda
2,59711 gold badges48 silver badges82 bronze badges
7
I am using excelcnv.exe to convert csv into xlsx and that seemed to work properly.
You will have to change the directory to where your excelcnv is. If 32 bit, it goes to Program Files (x86)
Start-Process -FilePath 'C:Program FilesMicrosoft OfficerootOffice16excelcnv.exe' -ArgumentList "-nme -oice ""$xlsFilePath"" ""$xlsToxlsxPath"""
answered May 16, 2019 at 0:06
![]()
WinstonKyuWinstonKyu
2012 silver badges9 bronze badges
4
Why would you bother? Load your CSV into Excel like this:
$csv = Join-Path $env:TEMP "process.csv"
$xls = Join-Path $env:TEMP "process.xlsx"

$xl = New-Object -COM "Excel.Application"
$xl.Visible = $true

$wb = $xl.Workbooks.OpenText($csv)

$wb.SaveAs($xls, 51)
You just need to make sure that the CSV export uses the delimiter defined in your regional settings. Override with -Delimiter if need be.
Edit: A more general solution that should preserve the values from the CSV as plain text. Code for iterating over the CSV columns taken from here.
$csv = Join-Path $env:TEMP "input.csv"
$xls = Join-Path $env:TEMP "output.xlsx"

$xl = New-Object -COM "Excel.Application"
$xl.Visible = $true

$wb = $xl.Workbooks.Add()
$ws = $wb.Sheets.Item(1)

$ws.Cells.NumberFormat = "@"

$i = 1
Import-Csv $csv | ForEach-Object {
  $j = 1
  foreach ($prop in $_.PSObject.Properties) {
    if ($i -eq 1) {
      $ws.Cells.Item($i, $j++).Value = $prop.Name
    } else {
      $ws.Cells.Item($i, $j++).Value = $prop.Value
    }
  }
  $i++
}

$wb.SaveAs($xls, 51)
$wb.Close()

$xl.Quit()
[System.Runtime.Interopservices.Marshal]::ReleaseComObject($xl)
Obviously this second approach won’t perform too well, because it’s processing each cell individually.
answered Jul 16, 2013 at 23:49
![]()
Ansgar WiechersAnsgar Wiechers
190k23 gold badges244 silver badges319 bronze badges
8
This topic really helped me, so I’d like to share my improvements.
All credits go to the nixda, this is based on his answer.
For those who need to convert multiple csv’s in a folder, just modify the directory. Outputfilenames will be identical to input, just with another extension.
Take care of the cleanup in the end, if you like to keep the original csv’s you might not want to remove these.
Can be easily modifed to save the xlsx in another directory.
$workingdir = "C:data*.csv"
$csv = dir -path $workingdir
foreach($inputCSV in $csv){
$outputXLSX = $inputCSV.DirectoryName + "" + $inputCSV.Basename + ".xlsx"
### Create a new Excel Workbook with one empty sheet
$excel = New-Object -ComObject excel.application
$excel.DisplayAlerts = $False
$workbook = $excel.Workbooks.Add(1)
$worksheet = $workbook.worksheets.Item(1)

### Build the QueryTables.Add command
### QueryTables does the same as when clicking "Data » From Text" in Excel
$TxtConnector = ("TEXT;" + $inputCSV)
$Connector = $worksheet.QueryTables.add($TxtConnector,$worksheet.Range("A1"))
$query = $worksheet.QueryTables.item($Connector.name)

### Set the delimiter (, or ;) according to your regional settings
### $Excel.Application.International(3) = ,
### $Excel.Application.International(5) = ;
$query.TextFileOtherDelimiter = $Excel.Application.International(5)

### Set the format to delimited and text for every column
### A trick to create an array of 2s is used with the preceding comma
$query.TextFileParseType  = 1
$query.TextFileColumnDataTypes = ,2 * $worksheet.Cells.Columns.Count
$query.AdjustColumnWidth = 1

### Execute & delete the import query
$query.Refresh()
$query.Delete()

### Save & close the Workbook as XLSX. Change the output extension for Excel 2003
$Workbook.SaveAs($outputXLSX,51)
$excel.Quit()
}
## To exclude an item, use the '-exclude' parameter (wildcards if needed)
remove-item -path $workingdir -exclude *Crab4dq.csv
answered Aug 30, 2016 at 12:24
![]()
obiwankobanobiwankoban
1432 silver badges6 bronze badges
3
If you want to convert CSV to Excel without Excel being installed, you can use the great .NET library EPPlus (under LGPL license) to create and modify Excel Sheets and also convert CSV to Excel really fast!
Preparation
- Download the latest stable EPPlus version
- Extract EPPlus to your preferred location (e.g. to
$HOMEDocumentsWindowsPowerShellModulesEPPlus) - Right Click EPPlus.dll, select Properties and at the bottom of the General Tab click «Unblock» to allow loading of this dll. If you don’t have the rights to do this, try
[Reflection.Assembly]::UnsafeLoadFrom($DLLPath) | Out-Null
Detailed Powershell Commands to import CSV to Excel
# Create temporary CSV and Excel file names
$FileNameCSV = "$HOMEDownloadstest.csv"
$FileNameExcel = "$HOMEDownloadstest.xlsx"

# Create CSV File (with first line containing type information and empty last line)
Get-Process | Export-Csv -Delimiter ';' -Encoding UTF8 -Path $FileNameCSV

# Load EPPlus
$DLLPath = "$HOMEDocumentsWindowsPowerShellModulesEPPlusEPPlus.dll"
[Reflection.Assembly]::LoadFile($DLLPath) | Out-Null

# Set CSV Format
$Format = New-object -TypeName OfficeOpenXml.ExcelTextFormat
$Format.Delimiter = ";"
# use Text Qualifier if your CSV entries are quoted, e.g. "Cell1","Cell2"
$Format.TextQualifier = '"'
$Format.Encoding = [System.Text.Encoding]::UTF8
$Format.SkipLinesBeginning = '1'
$Format.SkipLinesEnd = '1'

# Set Preferred Table Style
$TableStyle = [OfficeOpenXml.Table.TableStyles]::Medium1

# Create Excel File
$ExcelPackage = New-Object OfficeOpenXml.ExcelPackage
$Worksheet = $ExcelPackage.Workbook.Worksheets.Add("FromCSV")

# Load CSV File with first row as heads using a table style
$null=$Worksheet.Cells.LoadFromText((Get-Item $FileNameCSV),$Format,$TableStyle,$true)

# Load CSV File without table style
#$null=$Worksheet.Cells.LoadFromText($file,$format)

# Fit Column Size to Size of Content
$Worksheet.Cells[$Worksheet.Dimension.Address].AutoFitColumns()

# Save Excel File
$ExcelPackage.SaveAs($FileNameExcel)

Write-Host "CSV File $FileNameCSV converted to Excel file $FileNameExcel"
answered Dec 29, 2014 at 15:37
![]()
Florian FeldhausFlorian Feldhaus
5,4322 gold badges39 silver badges45 bronze badges
1
This is a slight variation that worked better for me.
$csv = Join-Path $env:TEMP "input.csv"
$xls = Join-Path $env:TEMP "output.xlsx"

$xl = new-object -comobject excel.application
$xl.visible = $false
$Workbook = $xl.workbooks.open($CSV)
$Worksheets = $Workbooks.worksheets

$Workbook.SaveAs($XLS,1)
$Workbook.Saved = $True

$xl.Quit()
answered Jan 16, 2014 at 16:04
![]()
mackmack
2,6238 gold badges39 silver badges66 bronze badges
2
I had some problem getting the other examples to work.
EPPlus and other libraries produces OpenDocument Xml format, which is not the same as you get when you save from Excel as xlsx.
macks example with open CSV and just re-saving didn’t work, I never managed to get the ‘,’ delimiter to be used correctly.
Ansgar Wiechers example has some slight error which I found the answer for in the commencts.
Anyway, this is a complete working example. Save this in a File CsvToExcel.ps1
param (
[Parameter(Mandatory=$true)][string]$inputfile,
[Parameter(Mandatory=$true)][string]$outputfile
)

$excel = New-Object -ComObject Excel.Application
$excel.Visible = $false

$wb = $excel.Workbooks.Add()
$ws = $wb.Sheets.Item(1)

$ws.Cells.NumberFormat = "@"

write-output "Opening $inputfile"

$i = 1
Import-Csv $inputfile | Foreach-Object {
    $j = 1
    foreach ($prop in $_.PSObject.Properties)
    {
        if ($i -eq 1) {
            $ws.Cells.Item($i, $j) = $prop.Name
        } else {
            $ws.Cells.Item($i, $j) = $prop.Value
        }
        $j++
    }
    $i++
}

$wb.SaveAs($outputfile,51)
$wb.Close()
$excel.Quit()
write-output "Success"
Execute with:
.CsvToExcel.ps1 -inputfile "C:TempXdata.csv" -outputfile "C:TempXdata.xlsx"
answered May 22, 2016 at 14:04
![]()
Gil RoittoGil Roitto
3252 silver badges8 bronze badges
I found this while passing and looking for answers on how to compile a set of csvs into a single excel doc with the worksheets (tabs) named after the csv files. It is a nice function. Sadly, I cannot run them on my network  so i do not know how well it works.
Function Release-Ref ($ref)
{
    ([System.Runtime.InteropServices.Marshal]::ReleaseComObject(
    [System.__ComObject]$ref) -gt 0)
    [System.GC]::Collect()
    [System.GC]::WaitForPendingFinalizers()
    }
    Function ConvertCSV-ToExcel
    {
    <#
    .SYNOPSIS
    Converts     one or more CSV files into an excel file.

    .DESCRIPTION
    Converts one or more CSV files into an excel file. Each CSV file is imported into its own worksheet with the name of the
    file being the name of the worksheet.

    .PARAMETER inputfile
    Name of the CSV file being converted

    .PARAMETER output
    Name of the converted excel file

    .EXAMPLE
    Get-ChildItem *.csv | ConvertCSV-ToExcel -output ‘report.xlsx’

    .EXAMPLE
    ConvertCSV-ToExcel -inputfile ‘file.csv’ -output ‘report.xlsx’

    .EXAMPLE
    ConvertCSV-ToExcel -inputfile @(“test1.csv”,”test2.csv”) -output ‘report.xlsx’

    .NOTES
    Author:     Boe Prox
    Date Created: 01SEPT210
    Last Modified:

    #>

    #Requires -version 2.0
    [CmdletBinding(
    SupportsShouldProcess = $True,
    ConfirmImpact = ‘low’,
    DefaultParameterSetName = ‘file’
    )]
    Param (
    [Parameter(
    ValueFromPipeline=$True,
    Position=0,
    Mandatory=$True,
    HelpMessage=”Name of CSV/s to import”)]
    [ValidateNotNullOrEmpty()]
    [array]$inputfile,
    [Parameter(
    ValueFromPipeline=$False,
    Position=1,
    Mandatory=$True,
    HelpMessage=”Name of excel file output”)]
    [ValidateNotNullOrEmpty()]
    [string]$output
    )

    Begin {
    #Configure regular expression to match full path of each file
    [regex]$regex = “^w:\”

    #Find the number of CSVs being imported
    $count = ($inputfile.count -1)

    #Create Excel Com Object
    $excel = new-object -com excel.application

    #Disable alerts
    $excel.DisplayAlerts = $False

    #Show Excel application
    $excel.V    isible = $False

    #Add workbook
    $workbook = $excel.workbooks.Add()

    #Remove other worksheets
    $workbook.worksheets.Item(2).delete()
    #After the first worksheet is removed,the next one takes its place
    $workbook.worksheets.Item(2).delete()

    #Define initial worksheet number
    $i = 1
    }

    Process {
    ForEach ($input in $inputfile) {
    #If more than one file, create another worksheet for each file
    If ($i -gt 1) {
    $workbook.worksheets.Add() | Out-Null
    }
    #Use the first worksheet in the workbook (also the newest created worksheet is always 1)
    $worksheet = $workbook.worksheets.Item(1)
    #Add name of CSV as worksheet name
    $worksheet.name = “$((GCI $input).basename)”

    #Open the CSV file in Excel, must be converted into complete path if no already done
    If ($regex.ismatch($input)) {
    $tempcsv = $excel.Workbooks.Open($input)
    }
    ElseIf ($regex.ismatch(“$($input.fullname)”)) {
    $tempcsv = $excel.Workbooks.Open(“$($input.fullname)”)
    }
    Else {
    $tempcsv = $excel.Workbooks.Open(“$($pwd)$input”)
    }
    $tempsheet = $tempcsv.Worksheets.Item(1)
    #Copy contents of the CSV file
    $tempSheet.UsedRange.Copy() | Out-Null
    #Paste contents of CSV into existing workbook
    $worksheet.Paste()

    #Close temp workbook
    $tempcsv.close()

    #Select all used cells
    $range = $worksheet.UsedRange

    #Autofit the columns
    $range.EntireColumn.Autofit() | out-null
    $i++
    }
    }

    End {
    #Save spreadsheet
    $workbook.saveas(“$pwd$output”)

    Write-Host -Fore Green “File saved to $pwd$output”

    #Close Excel
    $excel.quit()

    #Release processes for Excel
    $a = Release-Ref($range)
    }
}
![]()
answered Oct 14, 2020 at 13:44
![]()
1
As of now, there is no built-in command like CSV (Export-CSV) to export output to the excel file but we can use the Out-File command to export data to excel or any other file format.
Let’s use Out-File to export the output of the Get-Processes command to an excel file.
Get-Process | Out-File C:Tempprocesses.xls
The above command will get all the running processes on the local system to the excel file. Let’s check the output of the excel file. You can see that the output is not in the proper excel format.

One other way is to install the ImportExcel module for excel. It is a very popular module to work with excel files.
To install the ImportExcel module, you need to run the below command to get it installed from the PowerShell gallery.
Install-Module ImportExcel -AllowClobber -Force
Once you install it, you need to import the module in the current PowerShell session if not imported.
Get-Module ImportExcel -ListAvailable | Import-Module -Force -Verbose
Once you have this module loaded in PowerShell, you can run the below command to export output into the excel format.
Get-Process | Export-Excel -Path C:TempProcesses.xlsx
Output
January 10th, 2014
Summary: Microsoft PowerShell MVP, Tobias Weltner, talks about Windows PowerShell and Excel interaction.
Microsoft Scripting Guy, Ed Wilson, is here. Let’s welcome back guest blogger, Tobias Weltner…
Microsoft Excel is a great tool to share Windows PowerShell data. However, the scripting tactics have changed from the good old VBScript times. Let’s take a look at how Windows PowerShell can output data to Excel fast, safe, and reliably.
Out-GridView: Built-in “mini-Excel”
Before I touch Excel, let’s first look at its little cousin, which ships with Windows PowerShell: Out-GridView.
It’s trivial to use: simply pipe anything to Out-GridView, and it will happily display the content in a mini-spreadsheet:
Get-Process | Where-Object { $_.MainWindowTitle } | Out-GridView
You can even use Out-GridView as a generic selection dialog box. Add the parameter –passThru (added in PowerShell 3.0). This parameter adds two new buttons to the lower right area of the grid view, and when you select something, it will be returned to you.
Curious? This piece of script pipes all top-level applications to the grid view, and when you select one and click OK, it will be immediately deleted:
Get-Process |
Where-Object MainWindowTitle |
Out-GridView -Title ‘Select Program To Kill’ -PassThru |
Stop-Process
That’s admittedly a bit rude (and dangerous, too, because you will lose all unsaved data). So here is a gentleman’s version that will actually ask if there is unsaved data. It also allows the program to clean up its resources before it closes.
Get-Process |
Where-Object MainWindowTitle |
Out-GridView -Title ‘Select Program To Kill’ -PassThru |
ForEach-Object { $_.CloseMainWindow() }
Excel: Out-GridView on steroids
So what about Excel? Why use it at all? Well, there are things that Out-GridView cannot do. You cannot save the data, and you cannot hand it over to someone else. And of course, you cannot use the many sophisticated formatting options that are found in Microsoft Excel spreadsheets.
Out-GridView can show a maximum of 30 columns. So if an object has more than 30 properties, Out-GridView silently suppresses the rest. I’d call this a bug, but maybe it’s a feature, too. Anyhow, here is a script to prove the point:
1..100 |
ForEach-Object { $hash = [Ordered]@{} }{$hash.”Column$_” = $_}{ New-Object PSObject -Property $hash} | Out-GridView
This creates an object with 100 properties. Out-GridView only displays the first 30. Time for Excel…the real thing.
Wouldn’t it be nice to be able to do this:
Get-Process | Where-Object { $_.MainWindowTitle } | Out-Excel
Or, for that matter, this (and finally get all object properties and not just the first 30):
1..100 |
ForEach-Object { $hash = [Ordered]@{} }{$hash.”Column$_” = $_}{ New-Object PSObject -Property $hash} |
Out-Excel
Well, you can.
Out-Excel actually is a ridiculously simple Windows PowerShell function:
function Out-Excel
{
param($Path = “$env:temp$(Get-Date -Format yyyyMMddHHmmss).csv”)
$input | Export-CSV -Path $Path -UseCulture -Encoding UTF8 -NoTypeInformation
Invoke-Item -Path $Path
}
Get-Process | Where-Object { $_.MainWindowTitle } | Out-Excel
You get a report that includes all the technical data from all of your running main applications. With all of the object properties—nothing is left out.
Basically, you can pipe anything into Out-Excel. It works pretty much like Out-GridView (except that you cannot turn Excel into a selection dialog, of course).
$input is an automatic Windows PowerShell variable. It delivers all data that is piped from the upstream cmdlet, and this data is then written to a CSV file and opened with Excel.
Because Excel always shows all properties, you may want to use Select-Object and select only the properties you really care about:
Get-Process |
Where-Object { $_.MainWindowTitle } |
Select-Object -Property Name, Company, Description, CPU |
Out-Excel
Writing directly to Excel
Going the CSV route is fast and robust, but cannot use color in cells or apply any other formatting.
That’s why some years ago in VBScript, people started to use a COM object to access the Excel object model. Although this works in Windows PowerShell, too, it is not very reliable anymore. Excel lives in the old COM world, and Windows PowerShell lives in the modern .NET world.
The underlying .NET Framework needs extensive marshalling to access the COM objects (which makes it very slow). In some scenarios, it fails altogether, for example, when type libraries do not fit together because operating system and office binaries use different locales. Even if everything works, and you waited for the code to finish, Excel will continue to linger in memory because of leaking handles. It’s just too complicated.
Here is sample code that does access Excel’s object model directly. You have been warned. Don’t be mad at me if the code fails or is really, really slow:
$excel = New-Object -ComObject Excel.Application
$excel.Visible = $true
$workbook = $excel.Workbooks.Add()
$sheet = $workbook.ActiveSheet
$counter = 0
Get-Service |
ForEach-Object {
$counter++
$sheet.cells.Item($counter,1) = $_.Name
$sheet.cells.Item($counter,2) = $_.DisplayName
$sheet.cells.Item($counter,3) = $_.Status
}
Here is the fast and clean way that is used by Windows PowerShell to create the same report:
Get-Service |
Select-Object -Property Name, DisplayName, Status |
Export-Csv -Path $env:tempreport.csv -Encoding UTF8 -UseCulture -NoTypeInformation
Invoke-Item -Path $env:tempreport.csv
Actually, Windows PowerShell is not even touching the internals of Excel; but instead, it is producing CSV files that can then be opened by Excel.
Formatting data with colors
Unfortunately, importing CSV data is a black and white world. You cannot use color in cells or format the spreadsheet otherwise.
Well actually, you can. This will create the very same report of services. This time, running services will show in green and stopped services in red.
# write HTML intro code:
$begin =
{
‘<table>’
‘<tr>’
‘<th>DisplayName</th><th>Status</th><th>Required</th><th>Dependent</th>’
‘</tr>’
}
# this is executed for each data object:
$process =
{
if ($_.Status -eq ‘Running’)
{
$style = ‘<td style=”color:green; ; font-family:Segoe UI; font-size:14pt”>’
}
else
{
$style = ‘<td style=”color:red; font-family:Segoe UI; font-size:14pt”>’
}
‘<tr>’
‘{0}{1}</td><td>{2}</td><td>{3}</td><td>{4}</td>’ -f $style, $_.DisplayName, $_.Status, ($_.RequiredServices -join ‘,’), ($_.DependentServices -join ‘,’)
‘</tr>’
}
# finish HTML fragment:
$end =
{
‘</table>’
}
$Path = “$env:temptempfile.html”
# get all services and create custom HTML report:
Get-Service |
ForEach-Object -Begin $begin -Process $process -End $end |
Set-Content -Path $Path -Encoding UTF8
# feed HTML report into Excel:
Start-Process -FilePath ‘C:Program Files*Microsoft OfficeOffice*EXCEL.EXE’ -ArgumentList $Path
The trick is to create an HTML report that gives you all the formatting opportunities you need. To create a Excel spreadsheet with color, the HTML file needs to be fed directly into excel.exe.
Note how Windows PowerShell automatically identifies the Excel version you use. Start-Process accepts a file path that can contain wildcard characters. By replacing version numbers in the path, Windows PowerShell can launch any Excel version that happens to be installed.
If you wanted to know that path, too, then simply ask Resolve-Path:
Resolve-Path -Path ‘C:Program Files*Microsoft OfficeOffice*EXCEL.EXE’ |
Select-Object -ExpandProperty Path -First 1
Turning arrays into string
Take a look at the Excel spreadsheet that uses color again. Look at the columns RequiredServices and DependentServices. They are just fine—which might surprise you. Because typically, when Windows PowerShell exports arrays of information, they do not display well in Excel.
Check this out, for example…
The next piece of script outputs the 10 newest error events from your System event log to Excel. When you look at the data, the columns Data and ReplacementStrings contain unreadable stuff.
To make array content display correctly in Excel, arrays need to be converted to strings. Here’s sample script that illustrates how easily that can be done:
$Path = “$env:temp$(Get-Date -Format yyyyMMddHHmmss)report.csv”
Get-EventLog -LogName System -EntryType Error -Newest 10 |
Select-Object -Property * |
ForEach-Object {
$_.ReplacementStrings = $_.ReplacementStrings -join ‘,’
$_.Data = $_.Data -join ‘,’
$_
} |
Export-CSV -Path $Path -UseCulture -Encoding UTF8 -NoTypeInformation
Invoke-Item -Path $Path
When you run the script, the columns now reveal their content. And here is why…
The script first piped the data to Select-Object –Property *. Typically, you would use Select-Object to select the columns you want to have in your report. Select-Object will also do another thing: It copies the data into a new object, and this new object is yours. You can do whatever you want with it.
That’s the prerequisite for the subsequent Foreach-Object loop. Inside of it, you can fine tune, change, or revise the data in any way you wish. So the script takes the properties that contain arrays, ReplacementStrings, and Data, and converts these arrays to strings by using the –join operator. That’s it. Just don’t forget to put back the $_ variable inside Foreach-Object so that the downstream cmdlets can receive it.
Thank you, Tobias. Awesome script as usual.
I invite you to follow me on Twitter and Facebook. If you have any questions, send email to me at scripter@microsoft.com, or post your questions on the Official Scripting Guys Forum. See you tomorrow. Until then, peace.
Ed Wilson, Microsoft Scripting Guy
I have found the custom lists in a particular site and I want to print the names to Excel. How do I do it?
![]()
asked Jun 16, 2014 at 11:27
![]()
2
Use the following Command:
$spWeb = Get-SPWeb SiteUrl
$spWeb.Lists | select Title | Export-CSV c:Lists.csv
answered Jun 16, 2014 at 11:39
![]()
AanchalAanchal
7,8651 gold badge14 silver badges20 bronze badges
You can pipe the output from your command to an .csv file:
FileToExecute.ps1 | Out-File C:output.csv
Make sure you in your script file uses Write-Outputand not Write-Host when printing your output.
answered Jun 16, 2014 at 11:31
![]()
Robert LindgrenRobert Lindgren
24.5k12 gold badges52 silver badges79 bronze badges
0
You can export any output of the powershell to a CSV. This is a built in function.
Export-CSV
answered Jun 16, 2014 at 11:31
![]()
Stefan BauerStefan Bauer
2,74615 silver badges19 bronze badges
Try if this works:
Install-Module importexcel
If it works, then after that you can use export-excel command.
![]()
Ganesh Sanap
37.1k19 gold badges30 silver badges54 bronze badges
answered Jan 22, 2021 at 9:56
![]()
You wanna use the Export-Csv parameter. I also found this easy example.
SharePoint list to .csv file
Export-Csv
$MyWeb = WebUrl
$MyList = MyWeb.Lists["ListName"]
$MyItems = $MyList.Items
$MyItems | Select Fields.. | Export-Csv -path C:exampleexcel.csv
$MyWeb.Dispose()
answered Jun 16, 2014 at 11:34
![]()
ChristofferChristoffer
9,5712 gold badges35 silver badges53 bronze badges
Using the Export-CSV as usual way we can export the SharePoint list items to a csv file, and using the below code we can convert the particular csv file to excel file:
### Set input and output path
$inputCSV = "C:somefolderinput.csv"
$outputXLSX = "C:somefolderoutput.xlsx"

### Create a new Excel Workbook with one empty sheet
$excel = New-Object -ComObject excel.application
$workbook = $excel.Workbooks.Add(1)
$worksheet = $workbook.worksheets.Item(1)

### Build the QueryTables.Add command
### QueryTables does the same as when clicking "Data » From Text" in Excel
$TxtConnector = ("TEXT;" + $inputCSV)
$Connector = $worksheet.QueryTables.add($TxtConnector,$worksheet.Range("A1"))
$query = $worksheet.QueryTables.item($Connector.name)

### Set the delimiter (, or ;) according to your regional settings
$query.TextFileOtherDelimiter = $Excel.Application.International(5)

### Set the format to delimited and text for every column
### A trick to create an array of 2s is used with the preceding comma
$query.TextFileParseType  = 1
$query.TextFileColumnDataTypes = ,2 * $worksheet.Cells.Columns.Count
$query.AdjustColumnWidth = 1

### Execute & delete the import query
$query.Refresh()
$query.Delete()

### Save & close the Workbook as XLSX. Change the output extension for Excel 2003
$Workbook.SaveAs($outputXLSX,51)
$excel.Quit()
Reference URL:
How to export a CSV to Excel using Powershell
Note:
- There is no direct inbuilt function to export in excel using PowerShell as like Export-CSV, so first we need to export to csv file, then we have to convert that file to excel.
answered Jan 14, 2020 at 18:19
![]()
SP 2022SP 2022
3,9432 gold badges10 silver badges25 bronze badges