
PowerShell and Excel

Has the ImportExcel module helped you?
- Made you look good to the boss?
- Saved you time?
- Made you more productive?
Consider donating. Thank you!
![]()

Overview
Automate Excel with PowerShell without having Excel installed. Works on Windows, Linux and Mac. Creating Tables, Pivot Tables, Charts and much more just got a lot easier.
Examples ✨
Check out the more than 100 examples on ways to create amazing reports as well as make you more productive with PowerShell and Excel.
Basic Usage
Installation
Install-Module -Name ImportExcel
Create a spreadsheet
Here is a quick example that will create spreadsheet file from CSV data. Works with JSON, Databases, and more.
$data = ConvertFrom-Csv @"
Region,State,Units,Price
West,Texas,927,923.71
North,Tennessee,466,770.67
East,Florida,520,458.68
East,Maine,828,661.24
West,Virginia,465,053.58
North,Missouri,436,235.67
South,Kansas,214,992.47
North,North Dakota,789,640.72
South,Delaware,712,508.55
"@

$data | Export-Excel .salesData.xlsx

Read a spreadsheet
Quickly read a spreadsheet document into a PowerShell array.
$data = Import-Excel .salesData.xlsx

$data
Region State        Units Price
------ -----        ----- -----
West   Texas        927   923.71
North  Tennessee    466   770.67
East   Florida      520   458.68
East   Maine        828   661.24
West   Virginia     465   053.58
North  Missouri     436   235.67
South  Kansas       214   992.47
North  North Dakota 789   640.72
South  Delaware     712   508.55
Add a chart to spreadsheet
Chart generation is as easy as 123. Building charts based on data in your worksheet doesn’t get any easier.
Plus, it is automated and repeatable.
$data = ConvertFrom-Csv @"
Region,State,Units,Price
West,Texas,927,923.71
North,Tennessee,466,770.67
East,Florida,520,458.68
East,Maine,828,661.24
West,Virginia,465,053.58
North,Missouri,436,235.67
South,Kansas,214,992.47
North,North Dakota,789,640.72
South,Delaware,712,508.55
"@

$chart = New-ExcelChartDefinition -XRange State -YRange Units -Title "Units by State" -NoLegend

$data | Export-Excel .salesData.xlsx -AutoNameRange -ExcelChartDefinition $chart -Show

Add a pivot table to spreadsheet
Categorize, sort, filter, and summarize any amount data with pivot tables. Then add charts.
$data = ConvertFrom-Csv @"
Region,State,Units,Price
West,Texas,927,923.71
North,Tennessee,466,770.67
East,Florida,520,458.68
East,Maine,828,661.24
West,Virginia,465,053.58
North,Missouri,436,235.67
South,Kansas,214,992.47
North,North Dakota,789,640.72
South,Delaware,712,508.55
"@

$data | Export-Excel .salesData.xlsx -AutoNameRange -Show -PivotRows Region -PivotData @{'Units'='sum'} -PivotChartType PieExploded3D

Convert Excel data to other formats
Create a separate CSV file for each Excel sheet
Do you have an Excel file with multiple sheets and you need to convert each sheet to CSV file?
Problem Solved
The yearlyRetailSales.xlsx has 12 sheets of retail data for the year.
This single line of PowerShell converts any number of sheets in an Excel workbook to separate CSV files.
(Import-Excel .yearlyRetailSales.xlsx *).GetEnumerator() |
ForEach-Object { $_.Value | Export-Csv ($_.key + '.csv') }
Additional Resources
Videos
- Export-Excel Hello World
- Make Excel Data Pop
- Slice And Dice Data
- Lightning talk — PowerShell Excel Module
More Videos
- Look smarter: deliver your work in Excel — James O’Neill @jamesoneill
- Module Monday: ImportExcel — Adam Driscoll @adamdriscoll
- Tutorials Excel Module Part 1
- Tutorials Excel Module Part 2
- Tutorials Excel Module Part 3
- PowerShell Excel — Invoke-ExcelQuery
- Powershell Excel — Data Validation
- Creating Dashboards xPlatform
Articles
| Title | Author | |
|---|---|---|
| More tricks with PowerShell and Excel | James O’Neill | @jamesoneill |
| Using the Import-Excel module: Part 1 Importing | James O’Neill | @jamesoneill |
| Using the Import Excel module part 2: putting data into .XLSx files | James O’Neill | @jamesoneill |
| Using the import Excel Module: Part 3, Pivots and charts, data and calculations | James O’Neill | @jamesoneill |
| Export AdventureWorksDW2017 to Excel for a Power BI Demo with Export-Excel | Aaron Nelson | @sqlvariant |
| Creating beautiful Powershell Reports in Excel | Doug Finke | @dfinke |
| PowerShell Excel and Conditional Formatting | Doug Finke | @dfinke |
| Learn to Automate Excel like a Pro with PowerShell | Doug Finke | @dfinke |
Contributing
Contributions are welcome! Open a pull request to fix a bug, or open an issue to discuss a new feature or change.
Original README.md
November 25th, 2015
Summary: Guest blogger, Doug Finke talks about his PowerShell Excel module.
The PowerShell Excel Module is a brand new, exciting, and better way to interact with Microsoft Excel from Windows PowerShell. Plus for bonus points, you don’t need Excel installed on the target machine to create the spreadsheet. Many users of this module generate Excel spreadsheets on servers, and then others in the company pick up the reports from a central server. Or for the last step in their script, they can mail the .xlsx file.
The challenge
Until now, there have been a few ways to get data into Excel. One way is to create a comma-separated value file (.csv) by using Export-Csv, and then open it in Excel, for example:
Get-Process | Export-Csv –NoType c:Tempps.csv
Invoke-Item c:Tempps.csv
Another way to get data into Excel is to remotely control Excel. Use the Excel COM interface to spin it up, create a workbook or a worksheet, and then loop through your data to push it into the appropriate cells. You need to create headers and add the data to the correct row and column.
Here’s a snippet that creates Excel, makes it visible, and then adds a workbook:
$xl = New-Object -ComObject Excel.Application
$xl.Visible = $true
$xl.Workbooks.Add()
An alternative is to use .NET and Open Database Connectivity (ODBC). It takes some set up, and you need to write the looping and poking in the same way as the COM interface example. This approach is like working with SQL Server data.
Enter Office, open XML
What if you could just do this?
Get-Process | Export-Excel c:tempps.xlsx –Show
This example creates a ps.xlsx file, a workbook, a worksheet, a header row, and organizes all the data in rows and columns. The –Show parameter launches Excel and opens the ps.xlsx file.
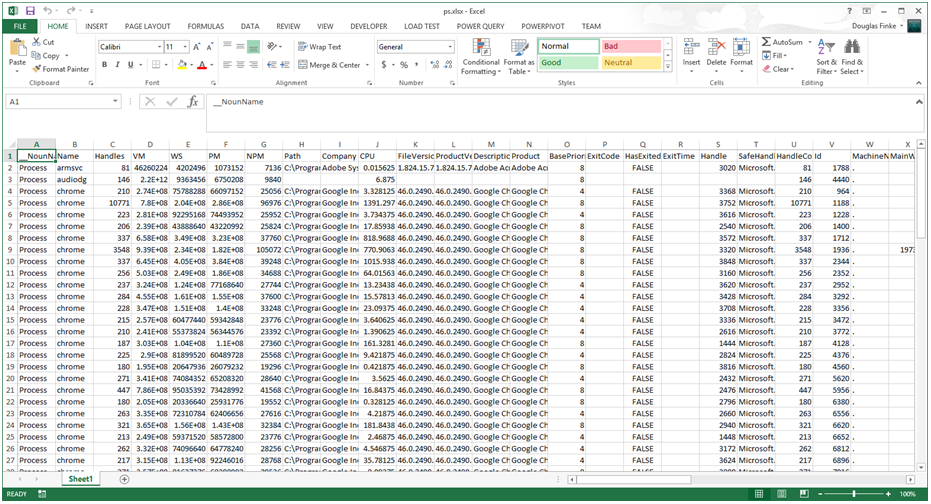
This is great (and it works with any data in PowerShell). The flat data is important, and so are the visuals.
Kick it up a notch
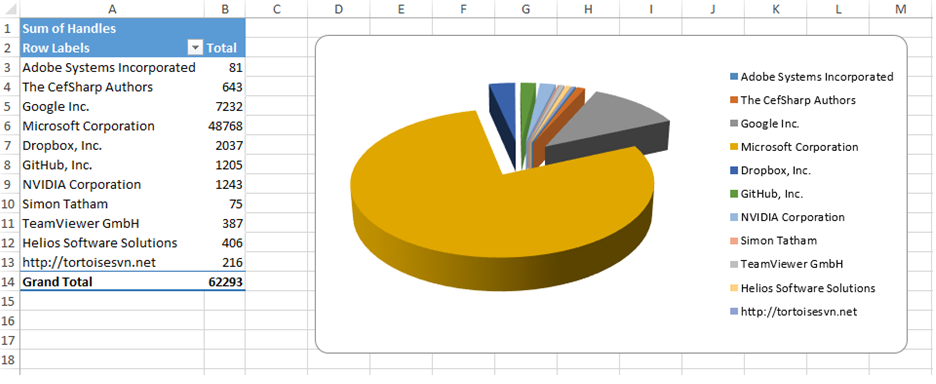
What if you could produce the following visual image? The PowerShell Excel module lets you create Excel pivot tables and charts from the transformed data. From the data generated above (and stored in a separate spreadsheet in the same workbook), you can easily create a pivot table and a chart.
Here’s the script:
Get-Process | Where Company |
Export-Excel C:Tempps.xlsx -Show `
-IncludePivotTable -PivotRows Company -PivotData @Handles=”sum”}`
-IncludePivotChart -ChartType PieExploded3D
The IncludePivotTable and IncludePivotChart cmdlets generate the pivot table and chart. ChartType lets you pick what type of chart you want (there are many to choose from). The PivotRows and PivotData parameters describe how to tabulate the data.
If you run Get-Process, you’ll see each process running on your system. The pivot table in Excel groups the information by using PivotRows and calculates measurements with PivotData. Here you tell it to sum the number of handles. In the previous image, the number of handles are totaled from Get-Process and grouped by company. Now you can see that the processes running from Microsoft Corporation have almost 50 K handles.
That’s the quick tour
I wrote the Excel module to plug in to the PowerShell ecosystem so you can easily export any data to Excel just as you would a .csv file. You can pipe the results of an SQL Server query or a REST API—the list goes on and on.
There is a lot more to this module to check out. Try the Import-Excel function, which lets you read an Excel spreadsheet and convert it to PowerShell objects. It lends itself to taking existing spreadsheets, applying a calculation (or adding more data from a look up), and quickly creating a new spreadsheet. Here is an example:
Import-Excel sales.xlsx |
ForEach { “calc projections” } |
Export-Excel futureSales.xlsx
Where to get it?
There are a couple of ways that you can download and install this module.
PowerShell Gallery If you are running Windows PowerShell 5.0, you can use the new Install-Module ImportExcel command. It’ll pull down the module from the gallery.
GitHub You can also get it from GitHub: dfinke/ImportExcel.
A few words about GitHub…
You can Star the project if you like it. You can also open issues if you have questions or find issues. Plus, you can install the module from GitHub. You can also clone or fork the project. This lets you make modifications that you want. If you want to share them, you can create a Pull Request to add it to the core project.
This PowerShell module makes you more productive. Plus it highlights how to interact with .NET DLLs and build complex functions. The project has grown in several ways, based on the community contributing updates to the scripts and making great suggestions and feature requests.
Join in! Hop over to GitHub and post what you’d like to see and how you’re working with it.
~Doug
Thanks, Doug. This is such a useful module.
I invite you to follow me on Twitter and Facebook. If you have any questions, send email to me at scripter@microsoft.com, or post your questions on the Official Scripting Guys Forum. See you tomorrow. Until then, peace.
Ed Wilson, Microsoft Scripting Guy
![]() Данный материал является переводом оригинальной статьи «ATA Learning : Adam Bertram : PowerShell and Excel: Seize the Power!».
Данный материал является переводом оригинальной статьи «ATA Learning : Adam Bertram : PowerShell and Excel: Seize the Power!».
Microsoft Excel — один из тех вездесущих инструментов, от которых большинство из нас не может уйти, даже если хочет. Многие ИТ-специалисты используют Excel, как небольшую базу данных, в которой хранятся тонны данных в различных процедурах автоматизации. Каков наилучший сценарий автоматизации и Excel? Это, например, PowerShell!
Работу с таблицами Excel непросто автоматизировать. В отличие от менее функционального (и более простого) аналога файла CSV, книги Excel — это не просто текстовые файлы. Для работы со сложными книгами Excel потребует от PowerShell манипуляции с Component Object Model (COM), для чего раньше нужно было установить Excel. Однако, на самом деле, это вовсе не обязательно. Например, проницательный участник сообщества PowerShell, Doug Finke, создал модуль PowerShell, названный ImportExcel. Модуль устраняет сложность работы с Excel и позволяет легко работать с книгами Excel через PowerShell сценарии!
В этой статье рассмотрим пример того, что можно сделать в PowerShell и Excel с помощью модуля ImportExcel, а также рассмотрим несколько популярных вариантов использования.
Предварительные требования
При запуске модуля ImportExcel в системе Windows отдельные зависимости не требуются. Однако, если вы работаете с MacOS, вам необходимо установить пакет mono-libgdiplus, используя команду вида:
brew install mono-libgdiplus
Примечание: Все примеры в этой статье будут построены с использованием macOS, но все они должны работать и на других платформах. При использовании macOS, не забудьте перезапустить сеанс PowerShell, прежде чем продолжить.
Установка модуля ImportExcel
Начните с загрузки и установки модуля через PowerShell Gallery, запустив:
Install-Module ImportExcel -Scope CurrentUser
Через несколько секунд все будет в порядке.
Использование PowerShell для экспорта в рабочий лист Excel
Возможно, вы знакомы со стандартными командлетами PowerShell Export-Csv и Import-Csv. Эти командлеты позволяют читать и экспортировать объекты PowerShell в файлы CSV. К сожалению, в PowerShell нет таких же встроенных командлетов для Excel. Но, используя модуль ImportExcel, вы можете создать такой функционал!
Один из наиболее частых запросов системного администратора — это экспорт объектов PowerShell в рабочий лист Excel. С помощью командлета Export-Excel из модуля ImportExcel, вы можете легко сделать это. Командлет Export-Excel принимает любой объект точно так же, как делает Export-Csv. Этому командлету можно передать любой объект.
Например, возможно, вам нужно найти какие-то процессы, запущенные на вашем локальном компьютере, и поместить их в книгу Excel.
Чтобы найти процессы, запущенные в системе с помощью PowerShell, используйте командлет Get-Process, который возвращает каждый запущенный процесс и различную информацию о каждом процессе. Чтобы экспортировать эту информацию в Excel, используйте командлет Export-Excel, указывающий путь к создаваемой книге Excel. Вы можете увидеть пример команды и снимок экрана сгенерированного файла Excel ниже.
Get-Process | Export-Excel -Path './processes.xlsx
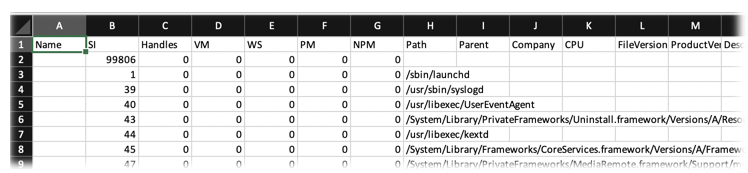
Поздравляем! Вы экспортировали всю информацию точно так же, как Export-Csv, но, в отличие от Export-Csv, мы можем сделать эти данные намного интереснее. Убедитесь, что имя рабочего листа называется «Proccesses», данные находятся в таблице, а размер строк устанавливается автоматически.
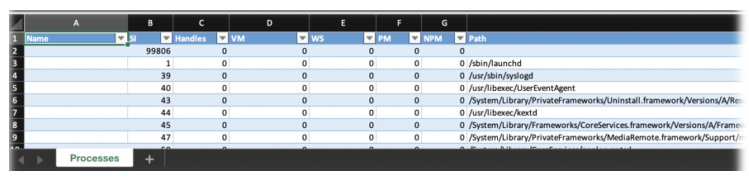
Добавим к командлету параметр -AutoSize для автоматического изменения размера всех строк, -TableName, чтобы указать имя таблицы, которая будет включать все данные, и имя параметра -WorksheetName для процессов, и сможем увидеть на снимке экрана ниже, что в итоге получится.
Get-Process | Export-Excel -Path './processes.xlsx' -AutoSize -TableName 'Processes' -WorksheetName 'Proccesses'
Командлет Export-Excel имеет множество параметров, которые можно использовать для создания книг Excel всех видов. Для получения полной информации о возможностях Export-Excel, запустите:
Get-Help Export-Excel
Использование PowerShell для импорта в Excel
Итак, ранее вы экспортировали некоторую информацию в файл с именем process.xlsx. Возможно, теперь вам нужно переместить этот файл на другой компьютер и импортировать / прочитать эту информацию. Командлет Import-Excel к вашим услугам.
При простейшем использовании вам нужно только указать путь к документу / книге Excel с помощью параметра -Path, как показано ниже. Вы увидите, что он читает первый рабочий лист, в данном случае рабочий лист «Processes», и возвращает объекты PowerShell.
Import-Excel -Path './processes.xlsx'
Может быть, у вас есть несколько листов в книге Excel? Вы можете прочитать конкретный рабочий лист с помощью параметра -WorkSheetname.
Import-Excel -Path './processes.xlsx' -WorkSheetname 'SecondWorksheet'
Вам нужно читать только определенные столбцы из рабочего листа Excel? Используйте параметр -HeaderName, чтобы указать только те параметры, которые вы хотите прочитать.
Import-Excel -Path './processes.xlsx' –WorkSheetname 'Processes' -HeaderName 'CPU','Handle'
Командлет Import-Excel имеет другие параметры, которые можно использовать для чтения книг Excel всех типов. Чтобы получить полное изложение всего, что может делать Import-Excel, запустите:
Get-Help Import-Excel
Использование PowerShell для получения (и установки) значений ячеек Excel
Теперь вы знаете, как читать весь лист Excel с помощью PowerShell. Но что, если вам нужно только одно значение ячейки? Технически вы можете использовать Import-Excel и отфильтровать нужное значение с помощью Where-Object, но это будет не слишком эффективно.
Вместо этого, используя командлет Open-ExcelPackage, вы можете «преобразовать» книгу Excel в объект PowerShell, который затем можно будет читать и изменять. Этот командлет аналогичен использованию New-Object -ComObject ‘Excel.Application’, если работать напрямую с COM-объектами.
Чтобы найти значение ячейки, сначала откройте книгу Excel, чтобы занести его в память. Затем выберите лист внутри книги.
$excel = Open-ExcelPackage -Path './processes.xlsx'
$worksheet = $excel.Workbook.Worksheets['Processes']
Этот процесс похож на способ открытия книг с помощью COM-объекта ‘Excel.Workbooks.Open’.
После того, как рабочий лист назначен переменной, вы можете перейти к отдельным строкам, столбцам и ячейкам. Возможно, вам нужно найти все значения ячеек в строке A1. Вам просто нужно сослаться на свойство ‘Cells’, указав индекс A1, как показано ниже.
$worksheet.Cells['A1'].Value
Вы также можете изменить значение ячеек на листе, присвоив другое значение, например:
$worksheet.Cells['A1'] = 'differentvalue'
Будучи хранимым в оперативной памяти, важно высвобождать пакет Excel с помощью командлета Close-ExcelPackage.
Close-ExcelPackage $excel
Конверсия Excel в файлы CSV с помощью PowerShell
Если у вас есть содержимое листа Excel, представленное с помощью объектов PowerShell, преобразование листов Excel в CSV просто требует отправки этих объектов в командлет Export-Csv.
Используя созданную ранее книгу processes.xlsx, прочтите первый рабочий лист, который получает все данные в объекты PowerShell, а затем экспортируйте эти объекты в CSV с помощью приведенной ниже команды.
Import-Excel './processes.xlsx' | Export-Csv -Path './processes.csv' -NoTypeInformation
Конверсия множества рабочих листов
Если у вас есть книга Excel с несколькими листами, вы также можете создать файл CSV для каждого листа. Для этого вы можете найти все листы в книге с помощью командлета Get-ExcelSheetInfo. Когда у вас есть имена рабочих листов, вы можете передать их в параметр -WorksheetName, а также использовать имя листа в качестве имени файла CSV.
Ниже вы можете найти необходимый пример кода.
$sheets = (Get-ExcelSheetInfo -Path './processes.xlsx').Name
foreach ($sheet in $sheets) {
 Import-Excel -WorksheetName $sheet -Path './processes.xlsx' | Export-Csv "./$sheet.csv" -NoTypeInformation
 }
Заключение
Используя модуль ImportExcel из библиотеки модулей PowerShell, вы можете импортировать, экспортировать и управлять данными в книгах Excel точно так же, как и в CSV, без установки Excel!
The ImportExcel is a PowerShell module that allows you import to or export data directly from Excel spreadsheets without having Microsoft Excel installed on your computer. In this tutorial, you’ll learn to work with Import-Excel and Export-Excel. The ImportExcel module runs on Windows, Linux, or Mac and now can be used in Azure functions and GitHub Actions. Simply put, if you need to generate reports for work, you must learn this module.
Contents
- Importing data from Excel
- Export data to Excel
- Adding data to an existing spreadsheet
- Exporting data with formatting
- Creating charts
- Editing existing data in an Excel spreadsheet
- Conclusion and links
- Author
- Recent Posts

Mike Kanakos is a Cloud and Datacenter Microsoft MVP, tech blogger and PowerShell community leader. He writes about infrastructure management and cloud automation. You can follow Mike on his blog https://www.commandline.ninja or on Twitter at @MikeKanakos.
Doug Finke, a Microsoft MVP since 2009, builds and maintains the module. Doug is constantly improving the module and releases new module updates frequently. As of this writing, the module is at v7.1.3 and is continually being developed. His module is nearing 1 million downloads since its first release! Installing the module is a simple task with PowerShell code.
Install-Module -Name ImportExcel
Excel is not required to be installed for this module to work. The module installs a .net DLL named epplus.dll that allows the module to import Excel data or export to Excel format. This allows you to install the module on a server without having to install Office on the server.
Importing data from Excel
Getting started with the module is very easy. Let’s start by importing some data from Excel. In this first demo, I’ll be importing some simple data I have from a table in Excel.

Sample Excel table data for import
To import data, I use the Import-Excel cmdlet and specify the path. In this example, I will also save the data to a variable called «Fruit» for later use.
Import-Excel "c:tempExcelDemo.xlsx" -OutVariable Fruit

Excel data import in PowerShell
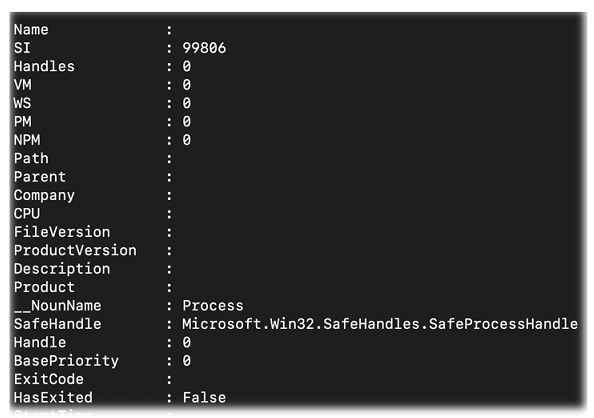
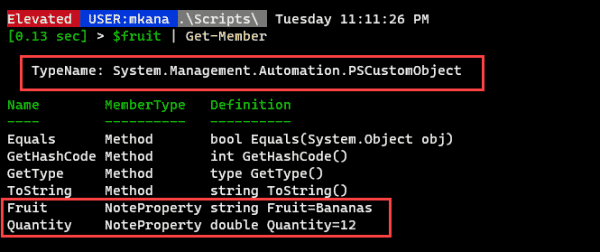
Now, we have a simple table with data organized in columns and rows. The table properties reveal that PowerShell has created a PSCustomObject with two note properties for the two columns.
Excel table properties
But what if I have a large table of data? I can specify which data gets imported without having to pull in the entire table. Let’s look at how that works.
I have created a new tab in my spreadsheet that contains all the process info from my machine. I have named the tab «Processes.» The spreadsheet has 69 columns of data. I could import all these columns and filter the data, but for this demonstration I just want the Name, ProcessName, CPU, and Memory columns.

Process info data in Excel
Using the Import-Excel cmdlet, I can pull in just the data I am interested in. Let’s pull in the columns I mentioned earlier (Name, ProcessName, CPU, and Memory). For this demo, I only want 6 rows of data. To accomplish this, I use the -ImportColumns, -StartRow and -EndRow parameters.
To pick the columns, I simply count columns from left to right in my spreadsheet starting at 1. I know you can’t see the full spreadsheet, but I have already counted out the columns that I need. To select the columns I want, I will need columns 1, 6, 12, and 46. But if I want to keep them in the order I mentioned above, then the order would have to be 1, 46, 12, and 6.
import-excel C:tempExcelDemo.xlsx -WorksheetName Processes -ImportColumns @(1, 46, 12, 6) -startrow 1 -endrow 7
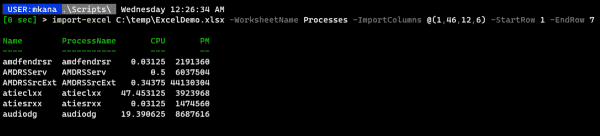
Process info imported into PowerShell
Export data to Excel
As with the process of importing data, I can also export data to Excel easily with just one line of code. Let’s go back to my previous example: getting the process data. If I want to export all the process info on my machine, all I need to do is type one line:
Get-process | Export-Excel
This results in the Export-Excel cmdlet creating a spreadsheet. If I have Excel installed, it launches Excel and presents the file output to me.

Exporting data to Excel using default values
Notice that I didn’t specify a filename or any other formatting information. However, the Export-Excel cmdlet created the spreadsheet and applied some default formatting (see callout 2) and created a temporary file for me (callout 1).
Of course, I can choose a filename and path on export, if I so desire, by using the -path parameter and inputting a value like so:
Get-process | Export-Excel C:tempProcessList.xlsx
Adding data to an existing spreadsheet
At some point, you will need to add data to an existing spreadsheet. The -Append parameter adds data to an existing spreadsheet. I can specify a worksheet to add to with the -worksheet parameter or I can start a new worksheet with the same parameter but picking a new tab name.
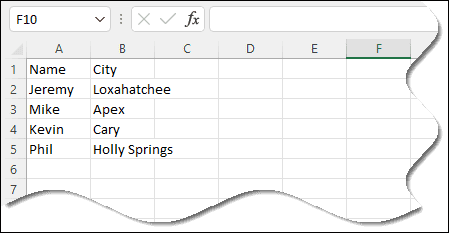
So far, I have been working on a spreadsheet named «ExcelDemo.xlsx,» which contains the Fruit and Processes worksheets. I want to add a new tab named «People» and copy in data from a small table I created.

Table of person and city info saved to the People variable
Exporting this data to my existing Excel spreadsheet and creating a new worksheet would look like this:
$People | Export-Excel c:tempExcelDemo.xlsx -Append -WorksheetName "People"
People table export
This is easy and doesn’t require much code. Below, we can see the worksheet tabs that have been created from Export-Excel.
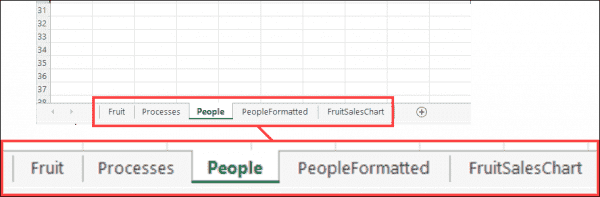
Excel worksheet tabs created by Export Excel
When you look at the table, you’ll see that it has none of the familiar Excel spreadsheet formatting. I would like to add some formatting to my data. Let me show you how this can be done.
Exporting data with formatting
The Export-Excel cmdlet offers many options for formatting my data on export. I’ll highlight a few options, but make sure you review the parameters available for the Export-Excel cmdlet for a full list of formatting options.
I would like to export the data again. This time, however, I will add a table style and a title for my table, and I would like the table title to be bold. This is possible with Export-Excel. The code used to do this is slightly different from the previous example:
$People | Export-Excel c:tempExcelDemo.xlsx -Append -WorksheetName "PeopleFormatted" -TableStyle Medium16 -title "Demo of Table Formatting" -TitleBold

Formatted version of the People table in Excel
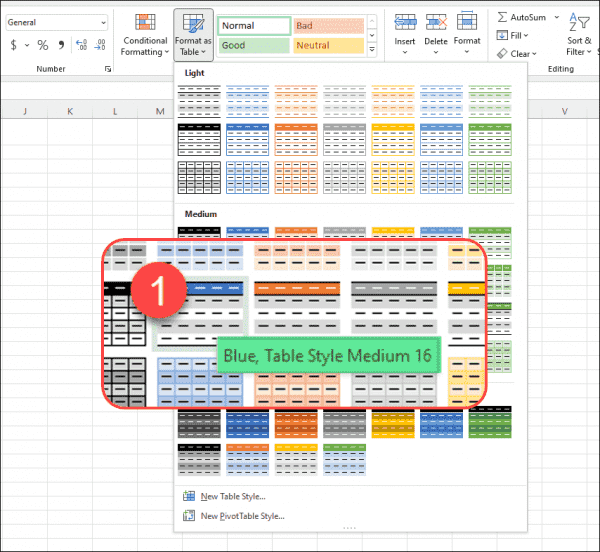
You might wonder what the table style I selected (Medium16) in the last example is. The Export-Excel cmdlet has table styles built in that correspond to the table styles you see in Excel.

Export Excel table styles available
The table styles in Excel are the same. In the screen cap below, I clicked on the «Format As Table» at the top of the spreadsheet, which then displays the table styles. If you hover your mouse over a style, you’ll see some text that provides you the style details. The #1 callout is the style I hovered over. Notice that it says Medium16. This is how I got the name that I used in my previous code example for the table style parameter.
Corresponding Excel table styles
Creating charts
Export-Excel does more than just make spreadsheets. The cmdlet can export table data and turn that data into a chart inside an Excel spreadsheet. For my next example, I have created a table of some simple inventory items and sales data.

Sales data
I would like to chart these sales in a simple bar graph that depicts units sold. To do this, I need to define the properties I want for my table. To do this, I use the New-ExcelChartDefinition cmdlet.
$ChartData = New-ExcelChartDefinition -XRange Item -YRange TotalSold -ChartType ColumnClustered -Title "Total Fruit Sales"
This line of code defines my table properties, and it tells Excel what to use for the xValue in the chart. I first use the Item column, then, I define the yValue (I am using the TotalSold column). Then, I specify a chart type. There are 69 chart types available in the cmdlet, all of which correspond to the chart types in Excel. I chose the «ColumnClustered» type for my example.
I then add a chart title, although this is not required. These values are saved to a variable named $ChartData. The next piece to add to the export cmdlet is this chart definition:
$data | Export-Excel C:tempExcelDemo.xlsx -Append -WorksheetName FruitSalesChart -ExcelChartDefinition $ChartData -AutoNameRange -show -Title "Fruit Sales"
Let’s walk through this example. First, I send the $data variable to the Export-Excel cmdlet. The $data variable is our sales data. The syntax for Export-Excel is a continuation from my previous example. I export and append this to a spreadsheet named «ExcelDemo.xlsx.» I create new worksheet tab named FruitSalesChart. This is all code we saw in the previous examples.
Then, I am add in the chart definition I created earlier by calling the $ChartData variable. Finally, I tell Excel that I want an auto name range. The -show parameter auto opens the spreadsheet after I create it.

Fruit Sales exported to Excel as a table and chart
Editing existing data in an Excel spreadsheet
I find it so easy to export data from PowerShell to Excel that I default to the Export-Excel cmdlet for much of my work. However, you can also update individual data values in an existing spreadsheet. I will connect to the spreadsheet that I used in the previous examples. To connect, use the Open-ExcelPackage cmdlet.
$ExcelPkg = Open-ExcelPackage -Path "C:tempExcelDemo.xlsx"
I can start to work with the data after opening the file.

Spreadsheet info in PowerShell
The first five rows constitute the worksheet tabs I created earlier in the spreadsheet. I can view the data in any of the tabs with some simple code.
#Let's access the data in the "PeopleFormatted" worksheet
$WorkSheet = $ExcelPkg.Workbook.Worksheets["PeopleFormatted"].Cells
$WorkSheet[3,1] | select value

Value
-----
Jeremy

$WorkSheet[3,2] | select value

Value
-----
Loxahatchee
The code above probably doesn’t make much sense without a visual reference. Have a look at this screen cap below, which should help explain the code.
In the first code example, I called $WorkSheet[3,1] . If you look at the Excel spreadsheet, «3» represents the 3rd row. «1» represents the first column (starting from left of column A).
In the second code example, I called $WorkSheet[3,2] which is Row 3, Column2 (column B in spreadsheet).
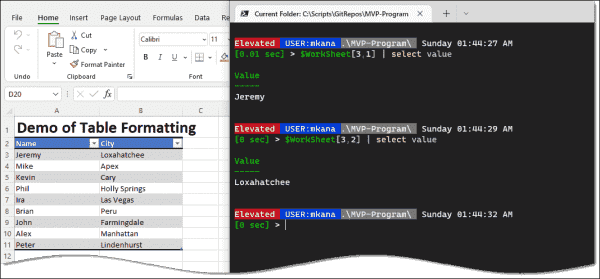
Example of accessing Excel data values
Inserting a new value into the Excel data cell is done with a similar set of code. I will replace the name «Jeremy» with the name «Robert».
$WorkSheet[3,1].Value = "Robert"

$WorkSheet[3,1] | select value

Value
-----
Robert
It’s that easy to update a field in Excel! However, there’s one catch. This change I just made is still in memory inside PowerShell. The file needs to «closed» for the data to be written back into the file.
Close-ExcelPackage $ExcelPkg
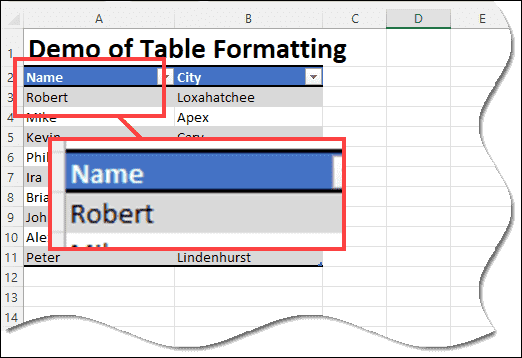
Updated spreadsheet value
Conclusion and links
Today, I showed you how to import data from an Excel spreadsheet, create a spreadsheet, create a simple chart, and manipulate the imported data in an existing Excel spreadsheet. The ImportExcel module makes these tasks and others operations simple to complete.
I have touched upon a just few of the many complex tasks you can perform with this module. If you would like to learn more, please visit Doug Finke’s GitHub page for many more examples of demo code you can try for yourself. He has a page dedicated to FAQs and a thorough analysis on examples that you should definitely check out.
Subscribe to 4sysops newsletter!
Many of the code examples in Doug’s module come from community members looking to use Excel in unique ways. If you have ideas for new ways to use his module, please submit a pull request to his repo so that others can learn from your use case.
![]()
В это статье мы покажем, как получить доступ к данным в файлах Excel напрямую из PowerShell. Возможности прямого обращения к данным Excel из PowerShell открывает широкие возможности по инвентаризации и построению различных отчетов по компьютерам, серверам, инфраструктуре, Active Directory и т.д.
Содержание:
- Доступ к данным в Excel из консоли PowerShell
- Как получить данные из Active Directory и сохранить их в книге Excel?
Обращение к Excel из PowerShell выполняется через отдельный Component Object Model (COM) объект. Это требует наличие установленного Excel на компьютере.
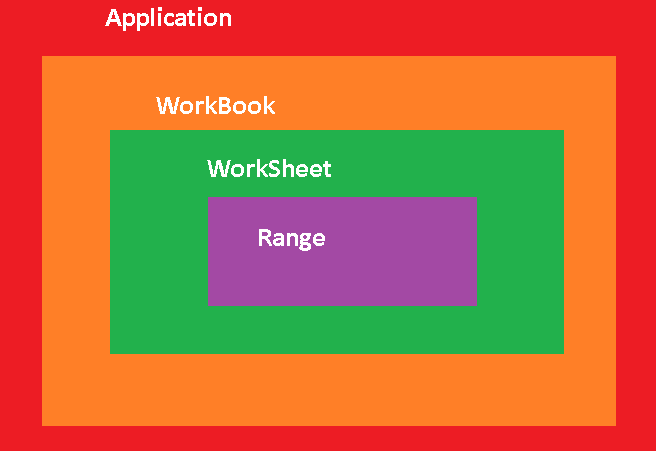
Прежде, чем показать, как обратиться к данным в ячейке файла Excel, необходимо рассмотреть архитектуру уровней представления в документе Excel. На следующем рисунке показаны 4 вложенных уровня в объектной модели Excel:
- Уровень приложения (Application Layer) – запущенное приложение Excel;
- Уровень книги (WorkBook Layer) – одновременно могут быть открыты несколько книг (документов Excel);
- Уровень листа (WorkSheet Layer) – в каждом xlsx файле может быть несколько листов;
- Ячейки (Range Layer) – здесь можно получить доступ к данным в конкретной ячейке или диапазонe ячеек.
Доступ к данным в Excel из консоли PowerShell
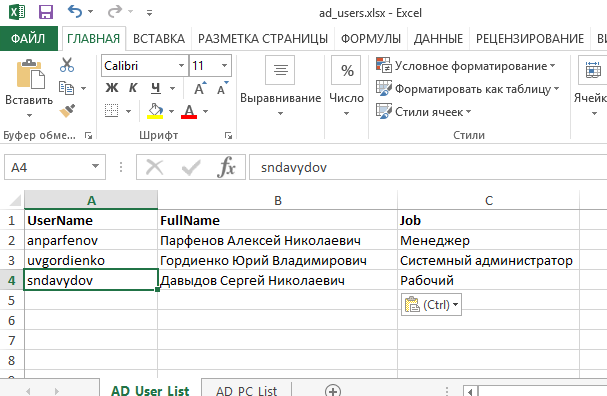
Рассмотрим на простом примере как получить доступ из PowerShell к данным в Excel файле со списком сотрудников.
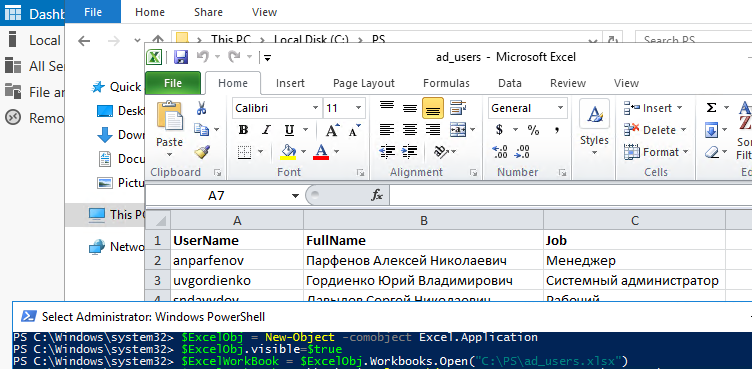
Сначала нужно запустить на компьютере приложение Excel (application layer) через COM объект:
$ExcelObj = New-Object -comobject Excel.Application
После выполнения этой команды на компьютере запускается в фоновом режиме приложение Excel. Чтобы сделать окно Excel видимым, нужно изменить свойство Visible COM объекта:
$ExcelObj.visible=$true
Все свойства объекта Excel можно вывести так:
$ExcelObj| fl
Теперь можно открыть файл (книгу, workbook) Excel:
$ExcelWorkBook = $ExcelObj.Workbooks.Open("C:PSad_users.xlsx")
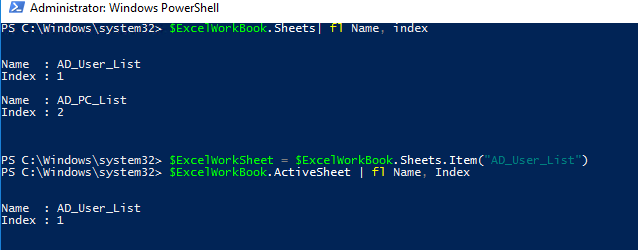
В каждом файле Excel может быть несколько листов (worksheets). Выведем список листов в текущей книге Excel:
$ExcelWorkBook.Sheets| fl Name, index
Теперь можно открыть конкретный лист (по имени или по индексу):
$ExcelWorkSheet = $ExcelWorkBook.Sheets.Item("AD_User_List")
Текущий (активный) лист Excel можно узнать командой:
$ExcelWorkBook.ActiveSheet | fl Name, Index
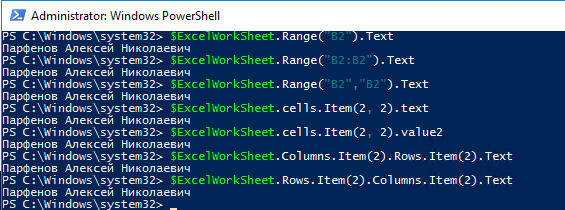
Теперь вы можете получить значения из ячеек документа Excel. Можно использовать различные способы адресации ячеек в книге Excel: через диапазон (Range), ячейку (Cell), столбец (Columns) или строку(Rows). Ниже я привел разные примеры получения данных из одной и той же ячейки:
$ExcelWorkSheet.Range("B2").Text
$ExcelWorkSheet.Range("B2:B2").Text
$ExcelWorkSheet.Range("B2","B2").Text
$ExcelWorkSheet.cells.Item(2, 2).text
 $ExcelWorkSheet.cells.Item(2, 2).value2
$ExcelWorkSheet.Columns.Item(2).Rows.Item(2).Text
$ExcelWorkSheet.Rows.Item(2).Columns.Item(2).Text
Как получить данные из Active Directory и сохранить их в книге Excel?
Рассмотрим практический пример использования доступа к данным Excel из PowerShell. Например, нам нужно для каждого пользователя в Excel файле получить информацию из Active Directory. Например, его телефон (атрибут telephoneNumber), отдел (department) и email адрес (mail).
# Импорт модуля Active Directory в сессию PowerShell
import-module activedirectory
# Сначала откройте книгу Excel:
$ExcelObj = New-Object -comobject Excel.Application
$ExcelWorkBook = $ExcelObj.Workbooks.Open("C:PSad_users.xlsx")
$ExcelWorkSheet = $ExcelWorkBook.Sheets.Item("AD_User_List")
# Получаем количество заполненных строк в xlsx файле
$rowcount=$ExcelWorkSheet.UsedRange.Rows.Count
# Перебираем все строки в столбце 1, начиная со второй строки (в этих ячейках указано доменное имя пользователя)
for($i=2;$i -le $rowcount;$i++){
$ADusername=$ExcelWorkSheet.Columns.Item(1).Rows.Item($i).Text
# Получаем значение атрибутов пользователя в AD
$ADuserProp = Get-ADUser $ADusername -properties telephoneNumber,department,mail|select-object name,telephoneNumber,department,mail
#Заполняем ячейки данными из AD
$ExcelWorkSheet.Columns.Item(4).Rows.Item($i) = $ADuserProp.telephoneNumber
 $ExcelWorkSheet.Columns.Item(5).Rows.Item($i) = $ADuserProp.department
$ExcelWorkSheet.Columns.Item(6).Rows.Item($i) = $ADuserProp.mail
}
#Сохраните xls файл и закройте Excel
$ExcelWorkBook.Save()
$ExcelWorkBook.close($true)
В результате в Excel файле для каждого пользователя были добавлены столбцы с информацией из AD.

Рассмотрим еще один пример построения отчета с помощью PowerShell и Excel. Допустим, вам нужно построить Excel отчет о состоянии службы Print Spooler на всех серверах домена.
# Создать объект Excel
$ExcelObj = New-Object -comobject Excel.Application
$ExcelObj.Visible = $true
# Добавить рабочую книгу
$ExcelWorkBook = $ExcelObj.Workbooks.Add()
$ExcelWorkSheet = $ExcelWorkBook.Worksheets.Item(1)
# Переименовывать лист
$ExcelWorkSheet.Name = 'Статус сервиса spooler'
# Заполняем шапку таблицы
$ExcelWorkSheet.Cells.Item(1,1) = 'Имя сервера'
$ExcelWorkSheet.Cells.Item(1,2) = 'Имя службы'
$ExcelWorkSheet.Cells.Item(1,3) = 'Статус службы'
# Выделить шапку таблицы жирным. задать размер шрифта и ширину столбцов
$ExcelWorkSheet.Rows.Item(1).Font.Bold = $true
$ExcelWorkSheet.Rows.Item(1).Font.size=14
$ExcelWorkSheet.Columns.Item(1).ColumnWidth=25
$ExcelWorkSheet.Columns.Item(2).ColumnWidth=25
$ExcelWorkSheet.Columns.Item(3).ColumnWidth=25
# получим список всех Windows Server в домене
$computers = (Get-ADComputer -Filter 'operatingsystem -like "*Windows server*" -and enabled -eq "true"').Name
$counter=2
# подключается к каждому компьютеру и получаем статус службы
foreach ($computer in $computers) {
$result = Invoke-Command -Computername $computer –ScriptBlock { Get-Service spooler | select Name, status }
#Заполняем ячейки Excel данными с сервера
$ExcelWorkSheet.Columns.Item(1).Rows.Item($counter) = $result.PSComputerName
$ExcelWorkSheet.Columns.Item(2).Rows.Item($counter) = $result.Name
$ExcelWorkSheet.Columns.Item(3).Rows.Item($counter) = $result.Status
$counter++
}
# сохраните полученный отчет и закройте Excel:
$ExcelWorkBook.SaveAs('C:psservice-report.xlsx')
$ExcelWorkBook.close($true)
Область применения возможностей доступа из PowerShell в Excel очень широка. Начиная от простого построения отчетов, например, из Active Directory, и заканчивая возможностью создания PowerShell скриптов для актуализации данных в AD из Excel.
Например, вы можете поручить сотруднику отдела кадров вести реестр пользователей в Excel. Затем с помощью PowerShell скрипта через Set-ADUser сотрудник может автоматически обновлять данные пользователей в AD (достаточно делегировать пользователю права на изменение этих атрибутов пользователей AD и показать как запускать PS скрипт). Таким образом можно вести актуальную адресную книгу с актуальными номерами телефонами и должностями.