
Excel files (.xlsx) are a very important data exchange format for a number of reasons:
- Human Readable: Excel files can easily be opened and read by non-IT staff. It is trivial to browse the data or make changes.
- Type Support: Excel files support basic data types like string, dates, and numeric values
- Not Platform-Specific: You can exchange excel data across platforms and locales. Unlike with text-based formats, encoding and special character support are no issue
PowerShell does not come with native support for .xlsx files though. That’s why previously users resorted to exporting excel data to csv, then use Import-Csvto read the exported data into PowerShell.
This workaround produces extra work and has a number of other disadvantages. Thanks to the free module ImportExcel, going the extra route via csv is not required anymore. You now can directly read and write .xlsx data. Microsoft Office is not required.
In this article, you’ll learn how to read and write .xlsx and .xlsm files in just a line of code. Plus I provide you with Convert-XlsToXlsx, a clever function that auto-converts .xls files to .xlsx and .xlsm file types. That’s important because ImportExcel can only deal with the modern .xlsx and .xlsm file types. The older .xls excel files use a proprietary binary format that only excel knows how to read.
Convert-XlsToXlsxmay be highly useful in its own right when you need to bulk-convert older excel files to modern formats.It also illustrates how to access the excel object model, and more importantly, how to release COM objects so you don’t end up with memory leaks and ghost processes.
Adding Excel Support to PowerShell
Thanks to Doug Finke and his awesome free module ImportExcel, reading and writing .xlsx files is a snap now — no Office installation required. Simply download and install this free module from the PowerShell Gallery:
Install-Module -Name ImportExcel -Scope CurrentUser -Force
If you have Administrator privileges at hand, you might want to install the module for All Users instead. This makes sure the module is available for all users but more importantly, it makes the module available for both in Windows PowerShell and PowerShell 7.
Install-Module -Name ImportExcel -ForceWhen you install modules in the scope CurrentUser, modules are available only for the PowerShell edition you used to do the install, so you would have to potentially install the module twice in different locations.
Reading And Writing Excel Files
The two most important cmdlets from this module are:
-
Import-Excel: takes a path to a .xlsx file and returns all data from the default worksheet. Use the parameter -WorksheetName to specify a given worksheet. Example:# import excel file and show in gridview (make sure file exists!) $Path = "c:pathtosomeexcel.xlsx" Import-Excel -Path $Path | Out-GridView -
Export-Excel: saves all piped data to a *.xlsx file. Use the parameter -WorksheetName to specify a given worksheet. By default, existing data on the worksheet will be overwritten. Example:# create am excel sheet with all local user accounts Get-LocalUser | Export-Excel
Playing With Sample Data
Let’s play with the new excel commands! Writing excel files is simple: pipe data to Export-Excel to create new excel files:
$Path = "$env:templistOfServices.xlsx"
Get-Service | Export-Excel -Path $Path -AutoSize -AutoFilter -FreezeTopRow -BoldTopRow -ClearSheet -WorksheetName 'List of Services' -Show
To play with Import-Excel, let’s retrieve some real-world sample data files first.
Downloading Sample Data
Finding excel sample data is easy: just google for Download Excel Sample Data to come up with urls. They come as individual files and ZIP archives. To make downloading a pleasant experience, I created a bunch of helper functions.
To download files, simply use Download-File and Download-Zip:
# use TLS1.2 with HTTPS:
[Net.ServicePointManager]::SecurityProtocol = [Net.SecurityProtocolType]::Tls12

# creates folder if it does not yet exist:
filter Assert-FolderExists
{
  $exists = Test-Path -Path $_ -PathType Container
  if (!$exists) {
    Write-Warning "$_ did not exist. Folder created."
    $null = New-Item -Path $_ -ItemType Directory
  }
}

# download, unblock and extract zip files
filter Download-Zip($Path)
{
  # download to temp file:
  $temp = "$env:temptemp.zip"
  Invoke-WebRequest -Uri $_ -OutFile $temp
  # unblock:
  Unblock-File -Path $temp
  # extract archive content:
  Expand-Archive -Path $temp -DestinationPath $Path -Force

  # report
  $zip = [System.IO.Compression.ZipFile]::OpenRead($temp)
  $zip.Entries | ForEach-Object { Write-Warning "Download: $_" }
  $zip.Dispose()

  # remove temp file:
  Remove-Item -Path $temp
}

# test whether filename is valid:
function Test-ValidFileName($FileName)
{
  $FileName.IndexOfAny([System.IO.Path]::GetInvalidFileNameChars()) -eq -1
}

# download and unblock file:
filter Download-File($Path, $FileName)
{
  # does the url specify a filename?
  if ([string]::IsNullOrWhiteSpace($FileName))
  {
    # take filename from url:
    $FileName = $_.Split('/')[-1]
    # remove url parameters:
    $FileName = $FileName.Split('?')[0]
    # test for valid file name:
    $isValid = Test-ValidFileName -FileName $FileName
    if (!$isValid)
    {
      throw "Url contains no valid file name. $FileName is not valid. Use parameter -FileName to specify a valid filename."
    }
  }

  $filePath = Join-Path -Path $Path -ChildPath $FileName
  Invoke-WebRequest -Uri $_ -OutFile $filePath
  # unblock:
  Unblock-File -Path $Path

  Write-Warning "Download: $FileName"
}

# create local folder for downloaded files:
($OutPath = "$env:tempexcelsampledata") | Assert-FolderExists

# download various excel sample files:
'https://www.contextures.com/SampleData.zip' | Download-Zip -Path $OutPath
'https://go.microsoft.com/fwlink/?LinkID=521962' | Download-File -Path $OutPath -FileName financial.xlsx
'http://www.principlesofeconometrics.com/excel/theories.xls' | Download-File -Path $OutPath
'http://www.principlesofeconometrics.com/excel/food.xls' | Download-File -Path $OutPath
'https://www.who.int/healthinfo/statistics/whostat2005_mortality.xls?ua=1' | Download-File -Path $OutPath
'https://www.who.int/healthinfo/statistics/whostat2005_demographics.xls?ua=1' | Download-File -Path $OutPath
When you run this code, it downloads a bunch of excel sample files:
WARNING: Download: SampleData.xlsx
WARNING: Download: financial.xlsx
WARNING: Download: theories.xls
WARNING: Download: food.xls
WARNING: Download: whostat2005_mortality.xls
WARNING: Download: whostat2005_demographics.xls
Reading Excel Files
To read data directly from excel files, use Import-Excel. For example, to get the financial data for December only, try this:
# path with excel files
# (assuming you downloaded the sample data as instructed before)
Set-Location -Path "$env:tempexcelsampledata"

Import-Excel -Path .financial.xlsx | Where-Object 'Month Number' -eq 12 | Out-GridView
By default,
Import-Excelreads data from the first worksheet. If your file contains more than one worksheet, use the parameter -WorksheetName to specify its name.
To group the countries for December, simply use the common PowerShell pipeline cmdlets:
Obviously, you can do this with excel directly as well. This is about automation (in case you need to do these kinds of analysis regularly), and it is for PowerShell home boys who may not know how to pivot in excel but do know their tools in PowerShell.
And it is about learning: there is no better way to learn the PowerShell pipeline cmdlets!
# path with excel files
# (assuming you downloaded the sample data as instructed before)
Set-Location -Path "$env:tempexcelsampledata"

Import-Excel -Path .financial.xlsx | Where-Object 'Month Number' -eq 12 | Group-Object -Property Country -NoElement | Sort-Object -Property Count -Descending
Here is the result:
Count Name
----- ----
   21 Germany
   21 United States of America
   21 Canada
   21 France
   21 Mexico
Accessing XLS Files
The bad news is: .xls files cannot be accessed. They use a proprietary binary format that can only be read by excel.
The good news is: provided you have excel installed, it is trivial to convert .xls files to .xlsx files. If you are really still using .xls files, you should consider this transform for good. .xls is really outdated and should no longer be used.
Converting XLS To XLSX
Above I downloaded a bunch of .xls files that can’t be processed by Import-Excel. Bummer.
Below is a function Convert-XlsToXlsx that auto-converts .xls files to .xlsx and .xlsm files, though. The script requires Microsoft Office to be installed on your box because only excel knows how to open the binary format used in .xls files:
function Convert-XlsToXlsx
{
  param
  (
    # Path to the xls file to convert:
    [Parameter(Mandatory,ValueFromPipeline,ValueFromPipelineByPropertyName)]
    [string[]]
    [Alias('FullName')]
    $Path,

    # overwrite file if it exists:
    [switch]
    $Force,

    # show excel window during conversion. This can be useful for diagnosis and debugging.
    [switch]
    $Visible
  )

  # do this before any file can be processed:
  begin
  {
    # load excel assembly (requires excel to be installed)
    Add-Type -AssemblyName Microsoft.Office.Interop.Excel

    # open excel in a hidden window
    $excel = New-Object -ComObject Excel.Application
    $workbooks = $excel.Workbooks
    if ($Visible) { $excel.Visible = $true }

    # disable interactive dialogs
    $excel.DisplayAlerts = $False
    $excel.WarnOnFunctionNameConflict = $False
    $excel.AskToUpdateLinks = $False

    # target file formats
    $xlsx = [Microsoft.Office.Interop.Excel.XlFileFormat]::xlOpenXMLWorkbook
    $xlsm = [Microsoft.Office.Interop.Excel.XlFileFormat]::xlOpenXMLWorkbookMacroEnabled
  }

  # do this for each file:
  process
  {
    foreach($_ in $Path)
    {
      # check for valid file extension:
      $extension = [System.Io.Path]::GetExtension($_)
      if ($extension -ne '.xls')
      {
        Write-Verbose "No xls file, skipping: $_"
        continue
      }

      # open file in excel:
      $workbook = $workbooks.Open($_)

      # test for macros:
      if ($workbook.HasVBProject)
      {
        $extension = 'xlsm'
        $type = $xlsm
      }
      else
      {
        $extension = 'xlsx'
        $type = $xlsx
      }

       # get destination path
      $outPath = [System.Io.Path]::ChangeExtension($_, $extension)

      # does it exist?
      $exists = (Test-Path -Path $outPath) -and !$Force
      if ($exists)
      {
        Write-Verbose "File exists and -Force was not specified, skipping: $_"
        Write-Warning "File exists. Use -Force to overwrite. $_"
        continue
      }

      # save in new format:
      $workbook.SaveAs($outPath, $type)
      # close document
      $workbook.Close()
      # release COM objects to prevent memory leaks:
      $null = [System.Runtime.InteropServices.Marshal]::ReleaseComObject($workbook)

      Write-Verbose "File successfully converted: '$_' -> '$outPath'"
    }
  }

  # do this once all files have been processed
  end
  {
    # quit excel and clean up:
    $excel.Quit()

    # release COM objects to prevent memory leaks:
    $null = [System.Runtime.InteropServices.Marshal]::ReleaseComObject($workbooks)
    $null = [System.Runtime.InteropServices.Marshal]::ReleaseComObject($excel)
    $excel = $workbooks = $null
    # clean up:
    [GC]::Collect()
    [GC]::WaitForPendingFinalizers()
    Write-Verbose "Done."
  }
}
It is beyond the scope of this article to discuss the function in detail. I’d like to point out though that the code illustrates important aspects when using COM objects in PowerShell:
When using COM objects like Excel.Application, it can be challenging to free all object references at the end. When you do this wrong, references will stay alive, and so does the excel process in memory. Of course you can always kill the process after use but this might damage excel, and next time you launch it, it starts in recovery mode.
A better approach is to make sure you are storing each object reference in a dedicated variable. Next, make sure you actively release each reference after use by calling ReleaseComObject().
When you did that right, no open reference should survive, and when you call Quit(), excel should be removed from your process list.
Now it’s trivial to convert all downloaded .xls files to the appropriate new formats:
# path with excel files.
# assuming you created this folder and downloaded files to it:
$Path = "$env:tmpExcelsampledata"

# get all xls files and convert them:
Get-ChildItem -Path $Path -Filter *.xls -File | Convert-XlsToXlsx -Verbose
Содержание
- Reading and Writing Excel Files
- Adding Excel Support to PowerShell
- Reading And Writing Excel Files
- Playing With Sample Data
- Downloading Sample Data
- Reading Excel Files
- Accessing XLS Files
- Converting XLS To XLSX
- PowerShell 6 doesn’t find Excel Interop. PowerShell 5.1 does
- 3 Answers 3
- Use PowerShell to Remove Personal Information from Excel
Reading and Writing Excel Files
Excel files are a popular data source. With the help of the free module ImportExcel, PowerShell supports reading and writing .xlsx files.
Excel files (.xlsx) are a very important data exchange format for a number of reasons:
- Human Readable: Excel files can easily be opened and read by non-IT staff. It is trivial to browse the data or make changes.
- Type Support: Excel files support basic data types like string, dates, and numeric values
- Not Platform-Specific: You can exchange excel data across platforms and locales. Unlike with text-based formats, encoding and special character support are no issue
PowerShell does not come with native support for .xlsx files though. That’s why previously users resorted to exporting excel data to csv, then use Import-Csv to read the exported data into PowerShell.
This workaround produces extra work and has a number of other disadvantages. Thanks to the free module ImportExcel, going the extra route via csv is not required anymore. You now can directly read and write .xlsx data. Microsoft Office is not required.
In this article, you’ll learn how to read and write .xlsx and .xlsm files in just a line of code. Plus I provide you with Convert-XlsToXlsx , a clever function that auto-converts .xls files to .xlsx and .xlsm file types. That’s important because ImportExcel can only deal with the modern .xlsx and .xlsm file types. The older .xls excel files use a proprietary binary format that only excel knows how to read.
Convert-XlsToXlsx may be highly useful in its own right when you need to bulk-convert older excel files to modern formats.
It also illustrates how to access the excel object model, and more importantly, how to release COM objects so you don’t end up with memory leaks and ghost processes.
Adding Excel Support to PowerShell
Thanks to Doug Finke and his awesome free module ImportExcel, reading and writing .xlsx files is a snap now — no Office installation required. Simply download and install this free module from the PowerShell Gallery:
If you have Administrator privileges at hand, you might want to install the module for All Users instead. This makes sure the module is available for all users but more importantly, it makes the module available for both in Windows PowerShell and PowerShell 7.
When you install modules in the scope CurrentUser, modules are available only for the PowerShell edition you used to do the install, so you would have to potentially install the module twice in different locations.
Reading And Writing Excel Files
The two most important cmdlets from this module are:
Import-Excel : takes a path to a .xlsx file and returns all data from the default worksheet. Use the parameter -WorksheetName to specify a given worksheet. Example:
Export-Excel : saves all piped data to a *.xlsx file. Use the parameter -WorksheetName to specify a given worksheet. By default, existing data on the worksheet will be overwritten. Example:
Playing With Sample Data
Let’s play with the new excel commands! Writing excel files is simple: pipe data to Export-Excel to create new excel files:
To play with Import-Excel , let’s retrieve some real-world sample data files first.
Downloading Sample Data
Finding excel sample data is easy: just google for Download Excel Sample Data to come up with urls. They come as individual files and ZIP archives. To make downloading a pleasant experience, I created a bunch of helper functions.
To download files, simply use Download-File and Download-Zip :
When you run this code, it downloads a bunch of excel sample files:
Reading Excel Files
To read data directly from excel files, use Import-Excel . For example, to get the financial data for December only, try this:
By default, Import-Excel reads data from the first worksheet. If your file contains more than one worksheet, use the parameter -WorksheetName to specify its name.
To group the countries for December, simply use the common PowerShell pipeline cmdlets:
Obviously, you can do this with excel directly as well. This is about automation (in case you need to do these kinds of analysis regularly), and it is for PowerShell home boys who may not know how to pivot in excel but do know their tools in PowerShell.
And it is about learning: there is no better way to learn the PowerShell pipeline cmdlets!
Here is the result:
Accessing XLS Files
The bad news is: .xls files cannot be accessed. They use a proprietary binary format that can only be read by excel.
The good news is: provided you have excel installed, it is trivial to convert .xls files to .xlsx files. If you are really still using .xls files, you should consider this transform for good. .xls is really outdated and should no longer be used.
Converting XLS To XLSX
Above I downloaded a bunch of .xls files that can’t be processed by Import-Excel . Bummer.
Below is a function Convert-XlsToXlsx that auto-converts .xls files to .xlsx and .xlsm files, though. The script requires Microsoft Office to be installed on your box because only excel knows how to open the binary format used in .xls files:
It is beyond the scope of this article to discuss the function in detail. I’d like to point out though that the code illustrates important aspects when using COM objects in PowerShell:
When using COM objects like Excel.Application, it can be challenging to free all object references at the end. When you do this wrong, references will stay alive, and so does the excel process in memory. Of course you can always kill the process after use but this might damage excel, and next time you launch it, it starts in recovery mode.
A better approach is to make sure you are storing each object reference in a dedicated variable. Next, make sure you actively release each reference after use by calling ReleaseComObject().
When you did that right, no open reference should survive, and when you call Quit(), excel should be removed from your process list.
Now it’s trivial to convert all downloaded .xls files to the appropriate new formats:
 /
/ 
This Article is licensed under a Attribution-NoDerivatives 4.0 International license.
All Code samples are licensed under a Attribution 4.0 International license. Use, share, and experiment freely.
Источник
PowerShell 6 doesn’t find Excel Interop. PowerShell 5.1 does
In order to use constants from the xlFileFormat enum, I used
In the PowerShell 5.1 it works. Now I do transition to PowerShell 6. The same line issues the error message:
Exception calling «LoadWithPartialName» with «1» argument(s): «Could not load file or assembly ‘Microsoft.Office.InterOp.Excel, Culture=neutral, PublicKeyToken=null’. Operation is not supported.»
Calling Add-Type instead, I get an error too:
Add-Type : Cannot find path ‘C:transformsoftwareMicrosoft.Office.Interop.Excel.dll’ because it does not exist.
How can I load the Interop DLL installed with the Office?
3 Answers 3
This is a little more flexible way to access it from PowerShell 7:

In Windows PowerShell, which is built on (the full) .NET Framework, loading assemblies with [System.Reflection.Assembly]::LoadWithPartialName() or — preferably — Add-Type -AssemblyName looks for assemblies in the GAC (Global Assembly Cache), and seemingly in both:
the .NET Framework 4+ GAC, $env:WINDIRMicrosoft.Netassembly
and also the older .NET Framework 3.x- GAC, $env:WINDIRassembly
Microsoft.Office.InterOp.Excel.dll is located in the .NET Framework 3.x- GAC (only), so Windows PowerShell is able to find it by the assembly’s simple name (partial name), Microsoft.Office.InterOp.Excel .
PowerShell [Core] is built on .NET Core, which itself has no GAC.
In PowerShell [Core], Add-Type -AssemblyName :
- first looks in the current directory,
- then among the assemblies in $PSHOME , PowerShell Core’s installation folder.
- and, finally, in the .NET Framework 4+ GAC, but seemingly not the .NET Framework 3.x- GAC (as tested in .NET Core 3.1 / PowerShell [Core] 7.0, with the exception noted below) — presumably, because the assemblies there are assumed to be incompatible with .NET Core — even though not all of them technically are.
doesn’t find the assembly.
Curiously, Add-Type -AssemblyName Microsoft.Office.InterOp.Excel finds it [1] , but fails to load the actual types, which you can see by adding -PassThru .
You can load assemblies by (full) file path with Add-Type -LiteralPath .
- Note that Add-Type not reporting an error is itself not enough to conclude that its types are usable:
adding -PassThru is a quick way to verify that: normally, information about the types should be listed; otherwise, you’ll see errors.
Note that assemblies may be stub assemblies that themselves contain no types and instead forward types from different assemblies; as of PowerShell 7.0, -PassThru then produces no output rather than listing the forwarded types — see this GitHub issue.
Источник
Use PowerShell to Remove Personal Information from Excel

Summary: Learn how to use Windows PowerShell to remove personal and other information from Microsoft Excel workbooks in this Scripting Guys article.
 Hey, Scripting Guy! At times, I really hate where I work. It seems everyone is always scared. They are scared to say what they really think in meetings, they are scared to make decisions, and they are scared to talk to one another. The term walking on eggshells comes to mind; it might be a neat trick, but after a while, it begins to make your arches ache. Management has absolutely no vision, no strategy, and no leadership. It might be a result of having had three layoffs in the last six months, but I believe the general malaise had crept into our culture long before that—the layoffs are, in that regard, merely symptomatic. When you combine scared with no strategy, you get reactivity. We are constantly being pulled in one direction, and then we are told to drop everything and reverse directions. It is as predictable as the tides, and as changeable as the Bay of Fundy. This would be bad enough in a normal company, but in our organization, it is nearly intolerable.
The latest scourge is over “hidden” information in Microsoft Excel workbooks. It seems that someone forwarded an Excel workbook to a customer, and it had “all kinds” of confidential information in the form of comments on various cells. To make matters worse, the person who forwarded the file to the customer claimed she created the Excel workbook, but the owner of the document was someone else. Now we have to review every single Microsoft Excel workbook on our shared files folder and delete everything “that is not part of the spreadsheet.” I am not a Microsoft Excel expert, and I cannot seem to get a complete list of all the files metadata, nor do I have time to personally review thousands of files.
To make matters worse, I feel certain that if I miss something, I will be fired. Is this something that can be scripted?

Microsoft Scripting Guy Ed Wilson here. Dude (or dudette), I feel depressed for you. I am glad I do not have to work in such an environment (I absolutely love working for Microsoft because we are the complete opposite of everything you described). I can understand what it would be like because I have been there. Unfortunately, I cannot solve all your problems, but I can at least help you with this latest flail.
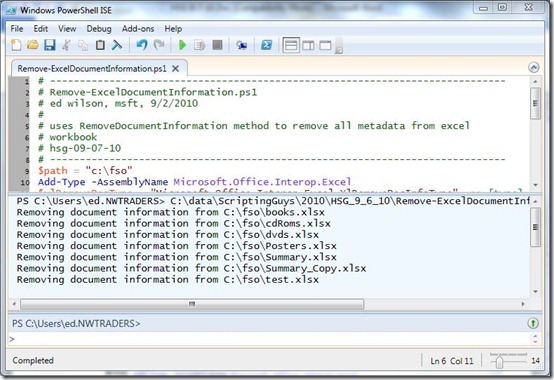
I wrote the Remove-ExcelDocumentInformation.ps1 for you. It does exactly what you require. It removes all of the “extra” information (or metadata) from all the Microsoft Excel workbooks in a specific folder. All you will need to do is modify the value of the $path variable. It requires Windows PowerShell 2.0. The RemoveDocumentInformation method is available for Microsoft Word, Microsoft Excel, Microsoft PowerPoint, and possibly other applications in Microsoft Office. The method was first available with 2007 Microsoft Office System. The complete Remove-ExcelDocumentInformation.ps1 script is shown here.
Remove-ExcelDocumentInformation.ps1
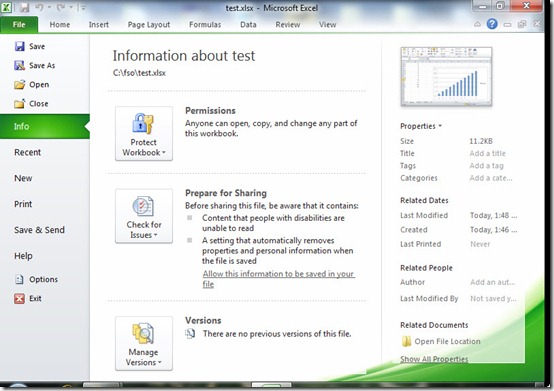
EC, in Microsoft Excel 2010, the Info tab in the File menu shows the metadata associated with a Microsoft Excel file. On the far right side of the following image, you can see the properties such as title, tags, and comments. If you were to scroll down, you could see additional values. Most of these properties can be directly edited from this location.

The Remove-ExcelDocumentInformation.ps1 script begins by adding the Microsoft.Office.Interop.Excel assembly. The Add-Type cmdlet is used to do this. If this assembly is not loaded, the access to the XLRemoveDocInfoType will not work the first time the script runs in the Windows PowerShell ISE. However, the second time the script runs, it will work. This is because the Windows PowerShell ISE will dynamically load the Microsoft.Office.Interop.Excel assembly! Please keep this in mind because it can make troubleshooting a script horrible. Interestingly enough, yesterday’s script did not require loading the Microsoft.Office.Interop.Excel assembly—strange.
The error that is generated the first time the script runs without loading the Excel interop assembly is shown here:
As you can see, nothing about a missing assembly is indicated. The only clue is the part about an incorrect parameter. It does not understand our $xlRemoveDocType::xlRDIAll command. Once again, the strange thing is that the syntax we used to create the type is exactly the same as the syntax that was used yesterday.
When troubleshooting a script such as this, it is important to keep in mind the feature of dynamically loading assemblies, and—as you narrow down the problems that need to be fixed—to close and to re-open the Windows PowerShell ISE. I do not know of a way to unload an assembly after it has been loaded, assuming that I had figured that out in the first place. When you make some inconsequential change to a script, run it, and it works, you tend to think, “It is fixed.” Save it, close it out, or share it with someone else, and—it does not work for them.
The command to load the Microsoft.Office.Interop.Excel assembly is shown here:
The RemoveDocumentInformation method accepts an enumeration value to tell it which document information to remove. The XlRemoveDocInfoType enumeration specifies 17 different things that can be removed. The enumeration names and values can be obtained by using a script such as the Get-xlConstantAndValue.ps1 script.
Get-xlContstantAndValue.ps1
Add-Type -AssemblyName Microsoft.Office.Interop.Excel
$xl = “Microsoft.Office.Interop.Excel.XlRemoveDocInfoType” -as [ type ]
[enum]::getNames( $xl ) | %
The output from the Get-xlConstantAndValue.ps1 script is shown here:
I have written a number of articles about working with enumeration values. For more information about enumeration values including creating your own enums, refer to those articles.
The Get-ChildItem cmdlet is used to retrieve all the Microsoft Excel workbooks in the folder. Next, the excel.application object is created, and the visible property is set to false. This is shown here:
$excelFiles = Get-ChildItem -Path $path -include *.xls, *.xlsx -recurse
$objExcel = New-Object -ComObject excel.application
$objExcel .visible = $false
All of the files are collected in the $excelFiles variable, and each workbook is opened. A string is displayed that indicates the fullname of each file that is being processed. This is shown here:
$workbook = $objExcel .workbooks.open( $wb .fullname)
“Removing document information from $wb”
The part of the script, that is unique to this particular operation is the RemoveDocumentInformation method call. This method is present on a workbook object and it accepts an instance of the previously mentioned xlRemoveDocInfoType enumeration. After this method is called, the workbook needs to be saved and closed. This is shown here:
The script will then loop back around to the next Microsoft Excel workbook in the collection. After all the files have been processed, the quit method from the excel.application object is called:
When the Remove-ExcelDocumentInformation.ps1 script runs, the following output is displayed.
You may want to audit a few of the Microsoft Excel workbooks that are in the path that was supplied to the script. A cleaned Microsoft Excel workbook is shown in the following image.
EC, that is all there is to using Windows PowerShell to remove metadata from Microsoft Excel workbooks. Microsoft Excel Week will continue tomorrow when we will talk about copying data from one Microsoft Excel spreadsheet into another spreadsheet and saving the new spreadsheet as a CSV file. It’s a way cool script, and like today’s script, it solves a very real business problem.
We invite you to follow us on Twitter and Facebook. If you have any questions, send email to us at scripter@microsoft.com, or post your questions on the Official Scripting Guys Forum. See you tomorrow. Until then, take it easy.
Ed Wilson and Craig Liebendorfer, Scripting Guys
Источник
September 7th, 2010
Summary: Learn how to use Windows PowerShell to remove personal and other information from Microsoft Excel workbooks in this Scripting Guys article.
![]() Hey, Scripting Guy! At times, I really hate where I work. It seems everyone is always scared. They are scared to say what they really think in meetings, they are scared to make decisions, and they are scared to talk to one another. The term walking on eggshells comes to mind; it might be a neat trick, but after a while, it begins to make your arches ache. Management has absolutely no vision, no strategy, and no leadership. It might be a result of having had three layoffs in the last six months, but I believe the general malaise had crept into our culture long before that—the layoffs are, in that regard, merely symptomatic. When you combine scared with no strategy, you get reactivity. We are constantly being pulled in one direction, and then we are told to drop everything and reverse directions. It is as predictable as the tides, and as changeable as the Bay of Fundy. This would be bad enough in a normal company, but in our organization, it is nearly intolerable.
Hey, Scripting Guy! At times, I really hate where I work. It seems everyone is always scared. They are scared to say what they really think in meetings, they are scared to make decisions, and they are scared to talk to one another. The term walking on eggshells comes to mind; it might be a neat trick, but after a while, it begins to make your arches ache. Management has absolutely no vision, no strategy, and no leadership. It might be a result of having had three layoffs in the last six months, but I believe the general malaise had crept into our culture long before that—the layoffs are, in that regard, merely symptomatic. When you combine scared with no strategy, you get reactivity. We are constantly being pulled in one direction, and then we are told to drop everything and reverse directions. It is as predictable as the tides, and as changeable as the Bay of Fundy. This would be bad enough in a normal company, but in our organization, it is nearly intolerable.
The latest scourge is over “hidden” information in Microsoft Excel workbooks. It seems that someone forwarded an Excel workbook to a customer, and it had “all kinds” of confidential information in the form of comments on various cells. To make matters worse, the person who forwarded the file to the customer claimed she created the Excel workbook, but the owner of the document was someone else. Now we have to review every single Microsoft Excel workbook on our shared files folder and delete everything “that is not part of the spreadsheet.” I am not a Microsoft Excel expert, and I cannot seem to get a complete list of all the files metadata, nor do I have time to personally review thousands of files.
To make matters worse, I feel certain that if I miss something, I will be fired. Is this something that can be scripted?
— EC
![]()
Hello EC,
Microsoft Scripting Guy Ed Wilson here. Dude (or dudette), I feel depressed for you. I am glad I do not have to work in such an environment (I absolutely love working for Microsoft because we are the complete opposite of everything you described). I can understand what it would be like because I have been there. Unfortunately, I cannot solve all your problems, but I can at least help you with this latest flail.
I wrote the Remove-ExcelDocumentInformation.ps1 for you. It does exactly what you require. It removes all of the “extra” information (or metadata) from all the Microsoft Excel workbooks in a specific folder. All you will need to do is modify the value of the $path variable. It requires Windows PowerShell 2.0. The RemoveDocumentInformation method is available for Microsoft Word, Microsoft Excel, Microsoft PowerPoint, and possibly other applications in Microsoft Office. The method was first available with 2007 Microsoft Office System. The complete Remove-ExcelDocumentInformation.ps1 script is shown here.
Remove-ExcelDocumentInformation.ps1
$path = “c:fso”
Add-Type -AssemblyName Microsoft.Office.Interop.Excel
$xlRemoveDocType = “Microsoft.Office.Interop.Excel.XlRemoveDocInfoType” -as [type]
$excelFiles = Get-ChildItem -Path $path -include *.xls, *.xlsx -recurse
$objExcel = New-Object -ComObject excel.application
$objExcel.visible = $false
foreach($wb in $excelFiles)
{
$workbook = $objExcel.workbooks.open($wb.fullname)
“Removing document information from $wb”
$workbook.RemoveDocumentInformation($xlRemoveDocType::xlRDIAll)
$workbook.Save()
$objExcel.Workbooks.close()
}
$objExcel.Quit()
EC, in Microsoft Excel 2010, the Info tab in the File menu shows the metadata associated with a Microsoft Excel file. On the far right side of the following image, you can see the properties such as title, tags, and comments. If you were to scroll down, you could see additional values. Most of these properties can be directly edited from this location.
The Remove-ExcelDocumentInformation.ps1 script begins by adding the Microsoft.Office.Interop.Excel assembly. The Add-Type cmdlet is used to do this. If this assembly is not loaded, the access to the XLRemoveDocInfoType will not work the first time the script runs in the Windows PowerShell ISE. However, the second time the script runs, it will work. This is because the Windows PowerShell ISE will dynamically load the Microsoft.Office.Interop.Excel assembly! Please keep this in mind because it can make troubleshooting a script horrible. Interestingly enough, yesterday’s script did not require loading the Microsoft.Office.Interop.Excel assembly—strange.
The error that is generated the first time the script runs without loading the Excel interop assembly is shown here:
PS C:Usersed.NWTRADERS> C:dataScriptingGuys2010HSG_9_6_10Remove-ExcelDocumentInformation.ps1
Removing document information from c:fsobooks.pdf
Exception calling “RemoveDocumentInformation” with “1” argument(s): “The parameter is
incorrect. (Exception from HRESULT: 0x80070057 (E_INVALIDARG))”
At C:dataScriptingGuys2010HSG_9_6_10Remove-ExcelDocumentInformation.ps1:19 char:37
+ $workbook.RemoveDocumentInformation <<<< ($xlRemoveDocType::xlRDIAll)
+ CategoryInfo : NotSpecified: (:) [], MethodInvocationException
+ FullyQualifiedErrorId : ComMethodTargetInvocation
As you can see, nothing about a missing assembly is indicated. The only clue is the part about an incorrect parameter. It does not understand our $xlRemoveDocType::xlRDIAll command. Once again, the strange thing is that the syntax we used to create the type is exactly the same as the syntax that was used yesterday.
When troubleshooting a script such as this, it is important to keep in mind the feature of dynamically loading assemblies, and—as you narrow down the problems that need to be fixed—to close and to re-open the Windows PowerShell ISE. I do not know of a way to unload an assembly after it has been loaded, assuming that I had figured that out in the first place. When you make some inconsequential change to a script, run it, and it works, you tend to think, “It is fixed.” Save it, close it out, or share it with someone else, and—it does not work for them.
The command to load the Microsoft.Office.Interop.Excel assembly is shown here:
Add-Type -AssemblyName Microsoft.Office.Interop.Excel
The RemoveDocumentInformation method accepts an enumeration value to tell it which document information to remove. The XlRemoveDocInfoType enumeration specifies 17 different things that can be removed. The enumeration names and values can be obtained by using a script such as the Get-xlConstantAndValue.ps1 script.
Get-xlContstantAndValue.ps1
Add-Type -AssemblyName Microsoft.Office.Interop.Excel
$xl = “Microsoft.Office.Interop.Excel.XlRemoveDocInfoType” -as [type]
[enum]::getNames($xl) | % { “$_” + “`t” + $xl::$_.value__ }
The output from the Get-xlConstantAndValue.ps1 script is shown here:
PS C:Usersed.NWTRADERS> C:dataScriptingGuys2010HSG_9_6_10Get-xlContstantAndValue.ps1
xlRDIComments 1
xlRDIRemovePersonalInformation 4
xlRDIEmailHeader 5
xlRDIRoutingSlip 6
xlRDISendForReview 7
xlRDIDocumentProperties 8
xlRDIDocumentWorkspace 10
xlRDIInkAnnotations 11
xlRDIScenarioComments 12
xlRDIPublishInfo 13
xlRDIDocumentServerProperties 14
xlRDIDocumentManagementPolicy 15
xlRDIContentType 16
xlRDIDefinedNameComments 18
xlRDIInactiveDataConnections 19
xlRDIPrinterPath 20
xlRDIAll 99
I have written a number of articles about working with enumeration values. For more information about enumeration values including creating your own enums, refer to those articles.
The Get-ChildItem cmdlet is used to retrieve all the Microsoft Excel workbooks in the folder. Next, the excel.application object is created, and the visible property is set to false. This is shown here:
$excelFiles = Get-ChildItem -Path $path -include *.xls, *.xlsx -recurse
$objExcel = New-Object -ComObject excel.application
$objExcel.visible = $false
All of the files are collected in the $excelFiles variable, and each workbook is opened. A string is displayed that indicates the fullname of each file that is being processed. This is shown here:
foreach($wb in $excelFiles)
{
$workbook = $objExcel.workbooks.open($wb.fullname)
“Removing document information from $wb”
The part of the script, that is unique to this particular operation is the RemoveDocumentInformation method call. This method is present on a workbook object and it accepts an instance of the previously mentioned xlRemoveDocInfoType enumeration. After this method is called, the workbook needs to be saved and closed. This is shown here:
$workbook.RemoveDocumentInformation($xlRemoveDocType::xlRDIAll)
$workbook.Save()
$objExcel.Workbooks.close()
The script will then loop back around to the next Microsoft Excel workbook in the collection. After all the files have been processed, the quit method from the excel.application object is called:
$objExcel.Quit()
When the Remove-ExcelDocumentInformation.ps1 script runs, the following output is displayed.
You may want to audit a few of the Microsoft Excel workbooks that are in the path that was supplied to the script. A cleaned Microsoft Excel workbook is shown in the following image.
EC, that is all there is to using Windows PowerShell to remove metadata from Microsoft Excel workbooks. Microsoft Excel Week will continue tomorrow when we will talk about copying data from one Microsoft Excel spreadsheet into another spreadsheet and saving the new spreadsheet as a CSV file. It’s a way cool script, and like today’s script, it solves a very real business problem.
We invite you to follow us on Twitter and Facebook. If you have any questions, send email to us at scripter@microsoft.com, or post your questions on the Official Scripting Guys Forum. See you tomorrow. Until then, take it easy.
Ed Wilson and Craig Liebendorfer, Scripting Guys
The core MS Office apps have their application and inner objects exposed via COM. These COM interfaces have distributable .NET Interop assemblies available to download.
There are two basic ways to interact with Excel via the COM objects and via the interop assembly. Functionally I think the COM will allow you to accomplish the same tasks, but it will not be as easy. To load the interop you will need:
|
001 |
#Load the Excel Assembly, Locally or from GAC |
I tend to distribute the inerop DLL in my network share so I don’t have to make sure that all servers and workstations have it installed. The above should take care of either loading a local assembly or looking in the GAC.
To access Excel data, you have to be aware of the hierarchy of things. At the top is the application class that contains one or more workbooks that contain one or more worksheets. Within the worksheet are ranges. Each layer can access down to some of the other layers.
|
001 |
Function Open-ExcelApplication { |
Yields:
Name MemberType Definition
—- ———- ———-
ActiveCell Property Microsoft.Office.Interop.Excel.Range ActiveCell {get;}
ActiveChart Property Microsoft.Office.Interop.Excel.Chart ActiveChart {get;}
ActiveDialog Property Microsoft.Office.Interop.Excel.DialogSheet ActiveDialog …
ActiveEncryptionSession Property int ActiveEncryptionSession {get;}
ActiveMenuBar Property Microsoft.Office.Interop.Excel.MenuBar ActiveMenuBar {get;}
ActivePrinter Property string ActivePrinter {get;set;}
ActiveProtectedViewWindow Property Microsoft.Office.Interop.Excel.ProtectedViewWindow Activ…
ActiveSheet Property System.Object ActiveSheet {get;}
ActiveWindow Property Microsoft.Office.Interop.Excel.Window ActiveWindow {get;}
ActiveWorkbook Property Microsoft.Office.Interop.Excel.Workbook ActiveWorkbook {…
All of the classes also have a .Application property that points back to the top.
|
001 |
function New-ExcelWorkBook { |
Yields:
TypeName: System.__ComObject#{000208da-0000-0000-c000-000000000046}
Name MemberType Definition
—- ———- ———-
ActiveChart Property Chart ActiveChart () {get}
ActiveSheet Property IDispatch ActiveSheet () {get}
ActiveSlicer Property Slicer ActiveSlicer () {get}
Alternately, you can open an existing workbook:
|
001 |
function Get-ExcelWorkBook { |
The Interop allows you easy access to the classes and enumerations. The largest caveat is what you may expect vs what you get when you look at the COM collections. These collections are built implementing default properties that do not come across in powershell. A recorded macro may reference WorkSheets(«Sheet1») but in PS you will need to say $WorkSheets.item(«Sheet1»). So, what looks like it may be an array may need a call to the item property to do what you expect.
When you look at Excel you see cells, when you automate it you have ranges.
|
001 |
$Sheet = $Book.Worksheets.item(«Sheet1») |
Yields:
TypeName: System.__ComObject#{000208d8-0000-0000-c000-000000000046}
Name MemberType Definition
—- ———- ———-
Range ParameterizedProperty Range Range (Variant, Variant) {get}
Cells Property Range Cells () {get}
CircularReference Property Range CircularReference () {get}
Columns Property Range Columns () {get}
Rows Property Range Rows () {get}
UsedRange Property Range UsedRange () {get}
All of the following are the same:
|
001 |
$sheet.Range(«A1»).Text |
If you were going to use a formula in a cell, this same convention is used for the .Range ParameterizedProperty. Cells you have to use the .Item property but you can more easily use in loops as the cell is a coordinate. UsedRange is limited to the cells that have or have had data in them as a block. So furthest X and furthest Y make up the range. If you want to know what these bounds are:
|
001 |
$sheet.UsedRange.Columns.Count |
To close it all down you can do something like:
|
001 |
Function Close-ExcelApplication { |
This will work fine if you only have one workbook open with changes. If you have more than one open you will need to make sure that you close or save each sheet. If you try to close and have more than the active workbook not saved, excel will prompt you to save. This is not something that you want if you expect your script to run unattended.
Another big point to consider is the garbage collection. I know it was a big concern with Office 2003 and may be unneeded in 2007 or 2010, but an extra step to clean up your variables should be used.
|
001 |
function Release-Ref ($ref) { |
If you don’t do this, Excel may (may) fail to close.
More later…
Hi PowerShell Scripters !
In the function below the following Line
$CsvFileFormat = [Microsoft.Office.Interop.Excel.XlFileFormat]::xlCSVWindows
Causes the following error:
[ERROR] Unable to find type [Microsoft.Office.Interop.Excel.XlFileFormat].
[ERROR] At D:ClancyA_TeraTasticDevIngramMicro01IngramMicro1TTIM_Functions_Excel.p
[ERROR] s1:245 char:21
[ERROR] + … CsvFileFormat = [Microsoft.Office.Interop.Excel.XlFileFormat]::xlCSVW …
[ERROR] + ~~~~~~~~~~~~~~~~~~~~~~~~~~~~~~~~~~~~~~~~~~~~~
[ERROR] + CategoryInfo : InvalidOperation: (Microsoft.Offic…el.XlFileFo
[ERROR] rmat:TypeName) [], RuntimeException
[ERROR] + FullyQualifiedErrorId : TypeNotFound
[ERROR]
Any assistance in understanding this error or how to resolve it would be appreciated !
(I am running PowerShell in (VS Enterprise 2015 with Update 3) on Windows 10 with (Office 365 Pro Plus 16.0.6965.2115) installed)
Thanks
Terry Clancy
ClanceZ
And here is the code for the complete function:
function SaveAsCsv
 {
   param (
     [string]$FileName,
	 [string]$CsvFileName,
     [string]$WorksheetName,
     [bool]$DisplayProgress = $true
   )

  if ($FileName -eq "") {
     throw "Please provide path to the Excel file"
     Exit
   }

  if (-not (Test-Path $FileName)) {
     throw "Path '$FileName' does not exist."
     exit
   }

  if (Test-Path $CsvFileName) {
     Remove-Item $CsvFileName
   }

  $FileName = Resolve-Path $FileName
   $SaveAsCsvExcel = New-Object -com "Excel.Application"
   $SaveAsCsvExcel.Visible = $false   # $true
   $SaveAsCsvExcel.DisplayAlerts  = $false
   $workbook = $SaveAsCsvExcel.workbooks.open($FileName)

  if (-not $WorksheetName) {
     Write-Warning "Defaulting to the first worksheet in workbook."
     $sheet = $workbook.ActiveSheet
   } else {
     $sheet = $workbook.Sheets.Item($WorksheetName)
   }

   if (-not $sheet)
   {
     throw "Unable to open worksheet $WorksheetName"
     exit
   }

   $sheetName = $sheet.Name

   $CsvFileFormat = [Microsoft.Office.Interop.Excel.XlFileFormat]::xlCSVWindows   # <<<<< Causes Problem
   $Password  = ""
   $WriteResPassword  = ""
   $ReadOnlyRecommended  = $false
   $CreateBackup = $false
   $AccessMode = [Microsoft.Office.Interop.Excel.XlSaveAsAccessMode]::xlNoChange
   $ConflictResolution = [Microsoft.Office.Interop.Excel.XlSaveConflictResolution]::xlLocalSessionChanges
   $AddToMru = $true

   $workbook.SaveAs($CsvFileName, $CsvFileFormat)  # , $Password, $WriteResPassword, $ReadOnlyRecommended, $CreateBackup, $AccessMode, $ConflictResolution, $AddToMru)

   #$workbook.SaveAs($FileName,$CsvFileFormat)
   # ActiveWorkbook.SaveAs Filename:="D:Temp1MOLP-1116_VBA.csv", FileFormat:= xlCSV, CreateBackup:=False

   Write-Warning "Saved to $FileName"

      $workbook.Close()
	  $SaveAsCsvExcel.Quit()

   }
Terry Clancy