
В это статье мы покажем, как получить доступ к данным в файлах Excel напрямую из PowerShell. Возможности прямого обращения к данным Excel из PowerShell открывает широкие возможности по инвентаризации и построению различных отчетов по компьютерам, серверам, инфраструктуре, Active Directory и т.д.
Содержание:
- Доступ к данным в Excel из консоли PowerShell
- Как получить данные из Active Directory и сохранить их в книге Excel?
Обращение к Excel из PowerShell выполняется через отдельный Component Object Model (COM) объект. Это требует наличие установленного Excel на компьютере.
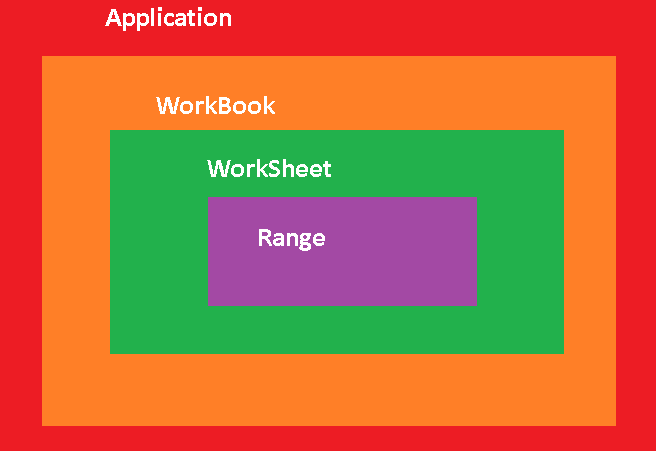
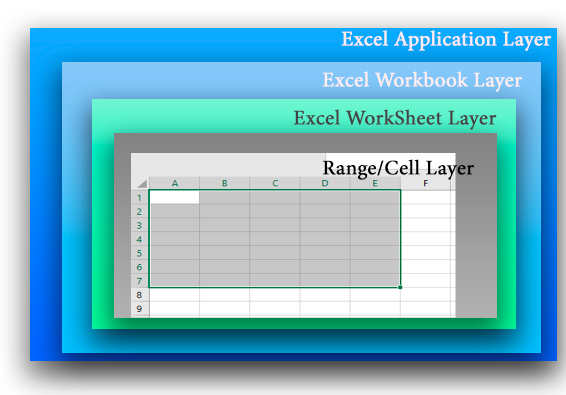
Прежде, чем показать, как обратиться к данным в ячейке файла Excel, необходимо рассмотреть архитектуру уровней представления в документе Excel. На следующем рисунке показаны 4 вложенных уровня в объектной модели Excel:
- Уровень приложения (Application Layer) – запущенное приложение Excel;
- Уровень книги (WorkBook Layer) – одновременно могут быть открыты несколько книг (документов Excel);
- Уровень листа (WorkSheet Layer) – в каждом xlsx файле может быть несколько листов;
- Ячейки (Range Layer) – здесь можно получить доступ к данным в конкретной ячейке или диапазонe ячеек.
Доступ к данным в Excel из консоли PowerShell
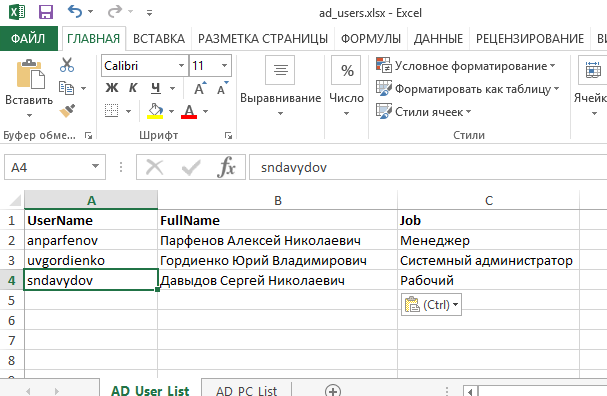
Рассмотрим на простом примере как получить доступ из PowerShell к данным в Excel файле со списком сотрудников.
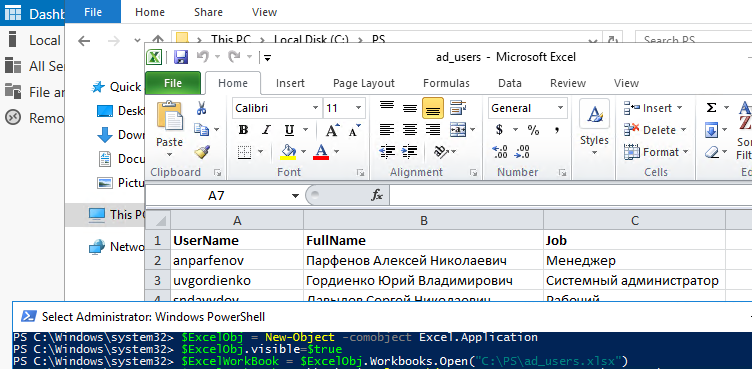
Сначала нужно запустить на компьютере приложение Excel (application layer) через COM объект:
$ExcelObj = New-Object -comobject Excel.Application
После выполнения этой команды на компьютере запускается в фоновом режиме приложение Excel. Чтобы сделать окно Excel видимым, нужно изменить свойство Visible COM объекта:
$ExcelObj.visible=$true
Все свойства объекта Excel можно вывести так:
$ExcelObj| fl
Теперь можно открыть файл (книгу, workbook) Excel:
$ExcelWorkBook = $ExcelObj.Workbooks.Open("C:PSad_users.xlsx")
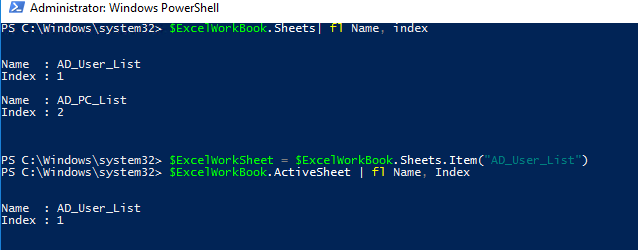
В каждом файле Excel может быть несколько листов (worksheets). Выведем список листов в текущей книге Excel:
$ExcelWorkBook.Sheets| fl Name, index
Теперь можно открыть конкретный лист (по имени или по индексу):
$ExcelWorkSheet = $ExcelWorkBook.Sheets.Item("AD_User_List")
Текущий (активный) лист Excel можно узнать командой:
$ExcelWorkBook.ActiveSheet | fl Name, Index
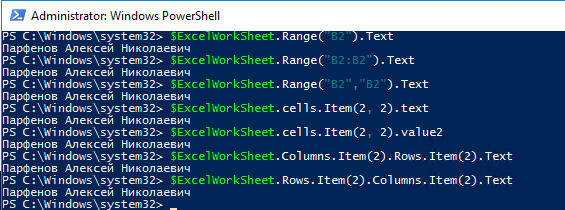
Теперь вы можете получить значения из ячеек документа Excel. Можно использовать различные способы адресации ячеек в книге Excel: через диапазон (Range), ячейку (Cell), столбец (Columns) или строку(Rows). Ниже я привел разные примеры получения данных из одной и той же ячейки:
$ExcelWorkSheet.Range("B2").Text
$ExcelWorkSheet.Range("B2:B2").Text
$ExcelWorkSheet.Range("B2","B2").Text
$ExcelWorkSheet.cells.Item(2, 2).text
 $ExcelWorkSheet.cells.Item(2, 2).value2
$ExcelWorkSheet.Columns.Item(2).Rows.Item(2).Text
$ExcelWorkSheet.Rows.Item(2).Columns.Item(2).Text
Как получить данные из Active Directory и сохранить их в книге Excel?
Рассмотрим практический пример использования доступа к данным Excel из PowerShell. Например, нам нужно для каждого пользователя в Excel файле получить информацию из Active Directory. Например, его телефон (атрибут telephoneNumber), отдел (department) и email адрес (mail).
# Импорт модуля Active Directory в сессию PowerShell
import-module activedirectory
# Сначала откройте книгу Excel:
$ExcelObj = New-Object -comobject Excel.Application
$ExcelWorkBook = $ExcelObj.Workbooks.Open("C:PSad_users.xlsx")
$ExcelWorkSheet = $ExcelWorkBook.Sheets.Item("AD_User_List")
# Получаем количество заполненных строк в xlsx файле
$rowcount=$ExcelWorkSheet.UsedRange.Rows.Count
# Перебираем все строки в столбце 1, начиная со второй строки (в этих ячейках указано доменное имя пользователя)
for($i=2;$i -le $rowcount;$i++){
$ADusername=$ExcelWorkSheet.Columns.Item(1).Rows.Item($i).Text
# Получаем значение атрибутов пользователя в AD
$ADuserProp = Get-ADUser $ADusername -properties telephoneNumber,department,mail|select-object name,telephoneNumber,department,mail
#Заполняем ячейки данными из AD
$ExcelWorkSheet.Columns.Item(4).Rows.Item($i) = $ADuserProp.telephoneNumber
 $ExcelWorkSheet.Columns.Item(5).Rows.Item($i) = $ADuserProp.department
$ExcelWorkSheet.Columns.Item(6).Rows.Item($i) = $ADuserProp.mail
}
#Сохраните xls файл и закройте Excel
$ExcelWorkBook.Save()
$ExcelWorkBook.close($true)
В результате в Excel файле для каждого пользователя были добавлены столбцы с информацией из AD.

Рассмотрим еще один пример построения отчета с помощью PowerShell и Excel. Допустим, вам нужно построить Excel отчет о состоянии службы Print Spooler на всех серверах домена.
# Создать объект Excel
$ExcelObj = New-Object -comobject Excel.Application
$ExcelObj.Visible = $true
# Добавить рабочую книгу
$ExcelWorkBook = $ExcelObj.Workbooks.Add()
$ExcelWorkSheet = $ExcelWorkBook.Worksheets.Item(1)
# Переименовывать лист
$ExcelWorkSheet.Name = 'Статус сервиса spooler'
# Заполняем шапку таблицы
$ExcelWorkSheet.Cells.Item(1,1) = 'Имя сервера'
$ExcelWorkSheet.Cells.Item(1,2) = 'Имя службы'
$ExcelWorkSheet.Cells.Item(1,3) = 'Статус службы'
# Выделить шапку таблицы жирным. задать размер шрифта и ширину столбцов
$ExcelWorkSheet.Rows.Item(1).Font.Bold = $true
$ExcelWorkSheet.Rows.Item(1).Font.size=14
$ExcelWorkSheet.Columns.Item(1).ColumnWidth=25
$ExcelWorkSheet.Columns.Item(2).ColumnWidth=25
$ExcelWorkSheet.Columns.Item(3).ColumnWidth=25
# получим список всех Windows Server в домене
$computers = (Get-ADComputer -Filter 'operatingsystem -like "*Windows server*" -and enabled -eq "true"').Name
$counter=2
# подключается к каждому компьютеру и получаем статус службы
foreach ($computer in $computers) {
$result = Invoke-Command -Computername $computer –ScriptBlock { Get-Service spooler | select Name, status }
#Заполняем ячейки Excel данными с сервера
$ExcelWorkSheet.Columns.Item(1).Rows.Item($counter) = $result.PSComputerName
$ExcelWorkSheet.Columns.Item(2).Rows.Item($counter) = $result.Name
$ExcelWorkSheet.Columns.Item(3).Rows.Item($counter) = $result.Status
$counter++
}
# сохраните полученный отчет и закройте Excel:
$ExcelWorkBook.SaveAs('C:psservice-report.xlsx')
$ExcelWorkBook.close($true)
Область применения возможностей доступа из PowerShell в Excel очень широка. Начиная от простого построения отчетов, например, из Active Directory, и заканчивая возможностью создания PowerShell скриптов для актуализации данных в AD из Excel.
Например, вы можете поручить сотруднику отдела кадров вести реестр пользователей в Excel. Затем с помощью PowerShell скрипта через Set-ADUser сотрудник может автоматически обновлять данные пользователей в AD (достаточно делегировать пользователю права на изменение этих атрибутов пользователей AD и показать как запускать PS скрипт). Таким образом можно вести актуальную адресную книгу с актуальными номерами телефонами и должностями.
I want to open an excel workbook and read out data, do other kinds of operations, etc. I know that I have to add an assembly reference:
[Reflection.Assembly]::LoadFile("C:Program FilesMicrosoft OfficeOffice16ADDINSMicrosoft Power Query for Excel IntegratedbinMicrosoft.Office.Interop.Excel.dll")
And then I need to instantiate an Application object.
$workbook = New-Object -TypeName Microsoft.Office.Interop.Excel.Application
This however returns an error «A constructor was not found»
Isn’t by the way Microsoft.Office.Interop.Excel.Application an interface actually? I am wondering how it can be instantiated in this scenario.
![]()
asked Jun 6, 2016 at 19:09
![]()
1
You need to open it as a ComObject.
$Excel = New-Object -ComObject Excel.Application
$Workbook = $Excel.Workbooks.Open($FilePath)
In that example you would have needed to define $FilePath as the full path to the Excel file that you are trying to open.
answered Jun 6, 2016 at 19:54
![]()
TheMadTechnicianTheMadTechnician
34.4k3 gold badges42 silver badges54 bronze badges
I’ve found a nice snippet which also runs a macro here
# start Excel
$excel = New-Object -comobject Excel.Application

#open file
$FilePath = 'C:tempBook1.xlsm'
$workbook = $excel.Workbooks.Open($FilePath)

#make it visible (just to check what is happening)
$excel.Visible = $true

#access the Application object and run a macro
$app = $excel.Application
$app.Run("Macro1")
answered Jun 11, 2016 at 22:58
![]()
ThomasMXThomasMX
1,6152 gold badges18 silver badges35 bronze badges
4
If you just add the path to the variable $FilePath without quotes, it will open automatically:
$FilePath = C:temptempfile.csv
The only problem is that if you did not properly closed the file on Excel, the next time you run it, it will open as READ ONLY and you have to kill the process on TASK manager.
Depending of the needs and coding, sometimes simple works the best.
![]()
stateMachine
4,9884 gold badges13 silver badges28 bronze badges
answered Jul 1, 2020 at 22:41
![]()
1
Just let Windows take care of the hard part for you:
explorer.exe $filename
Simples 
answered Aug 6, 2019 at 12:56
![]()
2
При работе с файлами Excel очень удобно использовать PowerShell. С помощью PowerShell можно сократить время обработки и значительно облегчить себе жизнь. Сегодня мы рассмотрим способы чтения данных из файла.
Для начала немного теории.
Excel представляет из себя иерархическую структуру, состоящую из нескольких уровней (layers). Первым, верхним уровнем является приложение (Application). В приложении содержится одна или несколько книг (WorkBooks). Каждая книга состоит из одного или нескольких листов (Worksheets), а внутри каждого листа находится диапазон ячеек (Range), в которых расположены данные.

Соответственно для доступа к данным необходимо точно знать расположение каждого уровняэлемента и его место в общей иерархии. На первый взгляд это выглядит сложно и запутанно, но на самом деле все довольно просто.
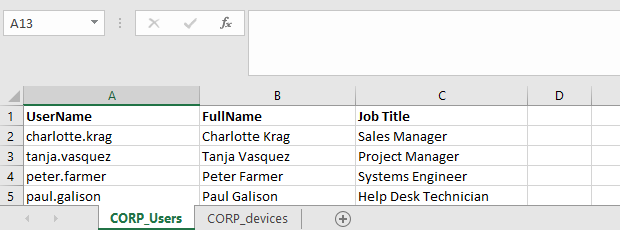
Перейдем к практике. Для примера возьмем типичный файл со списком сотрудников и с помощью PowerShell разберем его на уровни.

Application
PowerShell не умеет напрямую работать с файлом, поэтому первое, что нам надо сделать — это запустить само приложение Excel. Для запуска приложения создаем COM-объект и помещаем его в переменную:
$Excel = New-Object -ComObject Excel.Application

Примечание. Описание класса Microsoft.Office.Interop.Excel.ApplicationClass на MSDN.
Если посмотреть свойства полученного объекта, то можно найти много интересного. К примеру так мы можем узнать подробные данные о версии приложения:
$Excel | fl value, version, build, path

а так посмотреть свойства окна:
$Excel | fl visible, windowstate

Кстати, свойство Visible отвечает за видимость приложения. По умолчанию Excel открывается в фоне, но можно сделать его видимым с помощью команды:
$Excel.visible = $true
Вот собственно как выглядит уровень приложения. Чистый, ничем не замутненный Excel 🙂

WorkBook
Следующим шагом будет открытие книги (workbook), т.е. файла, с которой мы будем работать. Для этого выполним команду:
$WorkBook = $Excel.Workbooks.Open("D:Excelusers.xlsx")

Убедимся, что открыли нужный файл, проверим имя, путь и автора:
$WorkBook | fl Name, Path, Author

WorkSheet
Каждая книга состоит из одного или нескольких листов (worksheets). Вывести список имеющихся листов можно командой:
$WorkBook | fl Name, Index

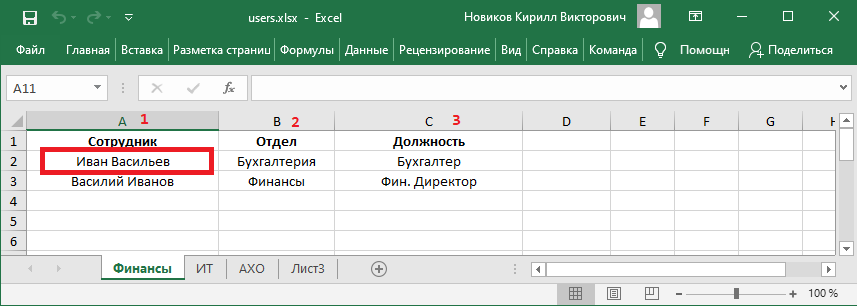
Обращаться к листу можно как по имени, так и по индексу. Выберем лист с именем «Финансы»:
$WorkSheet = $WorkBook.Sheets.Item("Финансы")

Посмотреть, какой лист выбран, можно командой:
$WorkBook.ActiveSheet | fl Name, Index

Ну а в приложении это выглядит так.

Range
Вот мы и добрались до нижнего уровня, на котором находятся данные. Данные хранятся в ячейках, и для доступа к ним нам надо выбрать нужную ячейку и извлечь ее содержимое. Для примера возьмем ячейку с именем сотрудника.
Каждая ячейка имеет свои координаты, по которым ее можно найти. При этом для доступа есть несколько различных способов. Например если использовать диапазон (Range), то в качестве координат указываем имя столбца и номер строки:
$Worksheet.Range("A2").Text
Чтобы не попасть на пустую ячейку, можно ограничить диапазон только занятыми ячейками (UsedRange):
$Worksheet.UsedRange.Range("A2").text
Можно обращаться к самой ячейке (cell) по номеру строки и столбца, например так:
$Worksheet.Cells.Item(2,1).text
или так:
$Worksheet.Cells.Item(2,1).Value2
Можно отдельно указать столбец (column) и строку (row):
$Worksheet.Columns.Item(1).Rows.Item(2).Text
или наоборот:
$Worksheet.Rows.Item(2).Columns.Item(1).Text

Ну и немного о том, как обрабатывать полученные данные. Один из способов — это создать объект типа PSObject:
$user = New-Object -TypeName PSObject
и извлеченные из ячеек данные добавлять как свойства объекта:
$user | Add-Member -Name $WorkSheet.UsedRange.Cells(1,1).Text -Value $WorkSheet.UsedRange.Cells(2,1).Text -MemberType NoteProperty

$user | Add-Member -Name $WorkSheet.UsedRange.Cells(1,2).Text -Value $WorkSheet.UsedRange.Cells(2,2).Text -MemberType NoteProperty

$user | Add-Member -Name $WorkSheet.UsedRange.Cells(1,3).Text -Value $WorkSheet.UsedRange.Cells(2,3).Text -MemberType NoteProperty
Это очень удобно, поскольку позволяет при необходимости извлекать нужные свойства объекта, например имя:
$user.Сотрудник
или должность:
$user.Должность

Ну а если необходимо извлечь все данные из книги, то можно создать массив, состоящий из объектов. К примеру, считать данные из нашего файла можно с помощью такого скрипта:
$file = "D:Excelusers.xlsx";

$SheetName = "Финансы";
$Excel = New-Object -ComObject Excel.Application;

$Workbook = $Excel.workbooks.open($file);

$Worksheets = $Workbooks.worksheets;

$WorkSheet = $WorkBook.sheets.item($SheetName);
$MaxRows = ($WorkSheet.UsedRange.Rows).count;

$MaxColumns = ($WorkSheet.UsedRange.Columns).count;

$users=@();
for ($row = 2; $row -le $MaxRows; $row++) {
$user = New-Object -TypeName PSObject;
for ($col = 1; $col -lt $MaxColumns; $col++) {
$user | Add-Member -Name $WorkSheet.UsedRange.Cells(1,$col).Text -Value $WorkSheet.UsedRange.Cells($row,$col).Text -MemberType NoteProperty;
}
$users+=$user
}
$users

$Excel.Quit();
Запускаем скрипт и получаем вот такую картину.

На этом все. В следующий раз рассмотрим способы создания и редактирования Excel файлов.
In this article we’ll show how to read and write data from Excel worksheets directly from PowerShell scripts. You can use Excel along with PowerShell to inventory and generate various reports on computers, servers, infrastructure, Active Directory, etc.
Contents:
- How to Read Data from an Excel Spreadsheet using PowerShell?
- Exporting Active Directory User Info to Excel Spreadsheet using PowerShell
You can access Excel sheets from PowerShell via a separate COM object (Component Object Model). This requires Excel to be installed on the computer.
Before showing how to access data in an Excel cell, it is worth to understand the architecture of presentation layers in the Excel file. The figure below shows 4 nested presentation layers in the Excel object model:
- Application Layer – deals with the running Excel app;
- WorkBook Layer – multiple workbooks (Excel files) may be open at the same time;
- WorkSheet Layer – each XLSX file can contain several sheets;
- Range Layer – here you can access data in the specific cell or cell range.
How to Read Data from an Excel Spreadsheet using PowerShell?
Let’s take a look at a simple example of how to use PowerShell to access data in an Excel file containing a list of employees.
First, run the Excel app (application layer) on your computer using the COM object:
$ExcelObj = New-Object -comobject Excel.Application
After running the command, Excel will be launched on your computer in the background. To show the Excel window, change the Visible property of the COM object:
$ExcelObj.visible=$true
You can display all Excel object properties as follows:
$ExcelObj| fl
Then you can open an Excel file (a workbook):
$ExcelWorkBook = $ExcelObj.Workbooks.Open("C:PScorp_ad_users.xlsx")
Each Excel file can contain several worksheets. Let’s display the list of worksheets in the current Excel workbook:
$ExcelWorkBook.Sheets| fl Name, index

Then you can open a sheet you want (by its name or index):
$ExcelWorkSheet = $ExcelWorkBook.Sheets.Item("CORP_users")
You can get the name of the current (active) Excel worksheet using this command:
$ExcelWorkBook.ActiveSheet | fl Name, Index

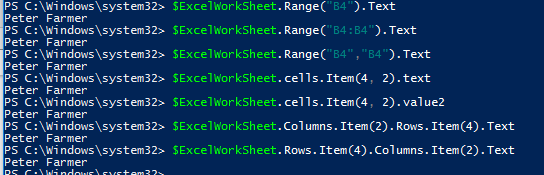
Then you can get values from cells in Excel worksheet. You can use different methods to get the cell values on the current Excel worksheet: using a range, a cell, a column or a row. See the examples of how to get data from the same cell below:
$ExcelWorkSheet.Range("B4").Text

$ExcelWorkSheet.Range("B4:B4").Text

$ExcelWorkSheet.Range("B4","B4").Text

$ExcelWorkSheet.cells.Item(4, 2).text

$ExcelWorkSheet.cells.Item(4, 2).value2

$ExcelWorkSheet.Columns.Item(2).Rows.Item(4).Text

$ExcelWorkSheet.Rows.Item(4).Columns.Item(2).Text
Exporting Active Directory User Info to Excel Spreadsheet using PowerShell
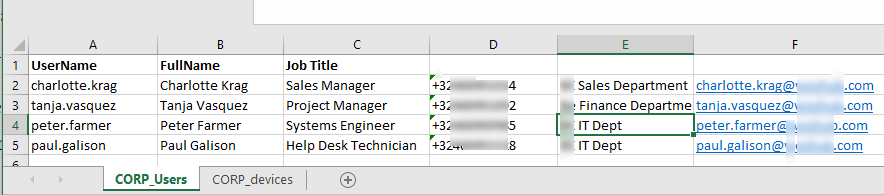
Let’s see a practical example of how to access Excel data from PowerShell. Suppose, we want to get some information from Active Directory for each user in an Excel file. For instance, their phone number (the telephoneNumber attribute), department and e-mail address .
# Importing Active Directory module into PowerShell session

import-module activedirectory

# Open an Excel workbook first:

$ExcelObj = New-Object -comobject Excel.Application

$ExcelWorkBook = $ExcelObj.Workbooks.Open("C:PScorp_ad_users.xlsx")

$ExcelWorkSheet = $ExcelWorkBook.Sheets.Item("CORP_Users")

# Get the number of filled in rows in the XLSX worksheet

$rowcount=$ExcelWorkSheet.UsedRange.Rows.Count

# Loop through all rows in Column 1 starting from Row 2 (these cells contain the domain usernames)

for($i=2;$i -le $rowcount;$i++){

$ADusername=$ExcelWorkSheet.Columns.Item(1).Rows.Item($i).Text

# Get the values of user attributes in AD

$ADuserProp = Get-ADUser $ADusername -properties telephoneNumber,department,mail|select-object name,telephoneNumber,department,mail

# Fill in the cells with the data received from AD

$ExcelWorkSheet.Columns.Item(4).Rows.Item($i) = $ADuserProp.telephoneNumber

$ExcelWorkSheet.Columns.Item(5).Rows.Item($i) = $ADuserProp.department

$ExcelWorkSheet.Columns.Item(6).Rows.Item($i) = $ADuserProp.mail

}

# Save the XLS file and close Excel

$ExcelWorkBook.Save()

$ExcelWorkBook.close($true)
As a result, the columns containing AD information have been added for each user in the Excel file.
Let’s consider another example of making a report using PowerShell and Excel. Suppose, you want to make an Excel report about Print Spooler service state on all domain servers.
# Create an Excel object

$ExcelObj = New-Object -comobject Excel.Application

$ExcelObj.Visible = $true

# Add a workbook

$ExcelWorkBook = $ExcelObj.Workbooks.Add()

$ExcelWorkSheet = $ExcelWorkBook.Worksheets.Item(1)

# Rename a worksheet

$ExcelWorkSheet.Name = 'Spooler Service Status'

# Fill in the head of the table

$ExcelWorkSheet.Cells.Item(1,1) = 'Server Name'

$ExcelWorkSheet.Cells.Item(1,2) = 'Service Name'

$ExcelWorkSheet.Cells.Item(1,3) = 'Service Status'

# Make the table head bold, set the font size and the column width

$ExcelWorkSheet.Rows.Item(1).Font.Bold = $true

$ExcelWorkSheet.Rows.Item(1).Font.size=15

$ExcelWorkSheet.Columns.Item(1).ColumnWidth=28

$ExcelWorkSheet.Columns.Item(2).ColumnWidth=28

$ExcelWorkSheet.Columns.Item(3).ColumnWidth=28

# Get the list of all Windows Servers in the domain

$computers = (Get-ADComputer -Filter 'operatingsystem -like "*Windows server*" -and enabled -eq "true"').Name

$counter=2

# Connect to each computer and get the service status

foreach ($computer in $computers) {

$result = Invoke-Command -Computername $computer –ScriptBlock { Get-Service spooler | select Name, status }

# Fill in Excel cells with the data obtained from the server

$ExcelWorkSheet.Columns.Item(1).Rows.Item($counter) = $result.PSComputerName

$ExcelWorkSheet.Columns.Item(2).Rows.Item($counter) = $result.Name

$ExcelWorkSheet.Columns.Item(3).Rows.Item($counter) = $result.Status

$counter++

}

# Save the report and close Excel:

$ExcelWorkBook.SaveAs('C:psServer_report.xlsx')

$ExcelWorkBook.close($true)
You can use PowerShell to access Excel in a variety of scenarios. For example, you can create handy Active Directory reports or create PowerShell scripts to update AD data from Excel.
For example, you can ask an employee of your HR department to keep the user register in Excel. Then using a PowerShell script and the Set-ADUser cmdlet, the employee can automatically update user info in AD (just delegate the employee the permissions to change AD user attributes and show how to run the PowerShell script). Thus you can keep an up-to-date address book with the relevant phone numbers, job titles and departments.
Содержание
- Чтение и запись данных в Excel файл из PowerShell
- Доступ к данным в Excel из консоли PowerShell
- Как получить данные из Active Directory и сохранить их в книге Excel?
- Read and Write Data to Excel File with PowerShell
- How to Read Data from an Excel Spreadsheet using PowerShell?
- Exporting Active Directory User Info to Excel Spreadsheet using PowerShell
- PowerShell into Excel — ImportExcel Module Part 1
- What is ImportExcel?
- ImportExcel – quick start
- ImportExcel – how to?
- ImportExcel – how to work with worksheets?
- ImportExcel – how to make pivot tables?
- ImportExcel – how to make pivot table charts?
- Summary
- You May Also Enjoy
- T-SQL Tuesday 159 — New Year’s Resolutions — Magda
- T-SQL Tuesday 159 — What’s Your Favorite New Feature? — Magda
- T-SQL Tuesday 150 — My first technical job
Чтение и запись данных в Excel файл из PowerShell
В это статье мы покажем, как получить доступ к данным в файлах Excel напрямую из PowerShell. Возможности прямого обращения к данным Excel из PowerShell открывает широкие возможности по инвентаризации и построению различных отчетов по компьютерам, серверам, инфраструктуре, Active Directory и т.д.
Прежде, чем показать, как обратиться к данным в ячейке файла Excel, необходимо рассмотреть архитектуру уровней представления в документе Excel. На следующем рисунке показаны 4 вложенных уровня в объектной модели Excel:
- Уровень приложения (Application Layer) – запущенное приложение Excel;
- Уровень книги (WorkBook Layer) – одновременно могут быть открыты несколько книг (документов Excel);
- Уровень листа (WorkSheet Layer) – в каждом xlsx файле может быть несколько листов;
- Ячейки (Range Layer) – здесь можно получить доступ к данным в конкретной ячейке или диапазонe ячеек.
Доступ к данным в Excel из консоли PowerShell
Рассмотрим на простом примере как получить доступ из PowerShell к данным в Excel файле со списком сотрудников.
Сначала нужно запустить на компьютере приложение Excel (application layer) через COM объект:
$ExcelObj = New-Object -comobject Excel.Application
После выполнения этой команды на компьютере запускается в фоновом режиме приложение Excel. Чтобы сделать окно Excel видимым, нужно изменить свойство Visible COM объекта:
Теперь можно открыть файл (книгу, workbook) Excel:
В каждом файле Excel может быть несколько листов (worksheets). Выведем список листов в текущей книге Excel:
$ExcelWorkBook.Sheets| fl Name, index
Теперь можно открыть конкретный лист (по имени или по индексу):
Текущий (активный) лист Excel можно узнать командой:
$ExcelWorkBook.ActiveSheet | fl Name, Index
Теперь вы можете получить значения из ячеек документа Excel. Можно использовать различные способы адресации ячеек в книге Excel: через диапазон (Range), ячейку (Cell), столбец (Columns) или строку(Rows). Ниже я привел разные примеры получения данных из одной и той же ячейки:
$ExcelWorkSheet.Range(«B2»).Text
$ExcelWorkSheet.Range(«B2:B2»).Text
$ExcelWorkSheet.Range(«B2″,»B2»).Text
$ExcelWorkSheet.cells.Item(2, 2).text
$ExcelWorkSheet.cells.Item(2, 2).value2
$ExcelWorkSheet.Columns.Item(2).Rows.Item(2).Text
$ExcelWorkSheet.Rows.Item(2).Columns.Item(2).Text
Как получить данные из Active Directory и сохранить их в книге Excel?
Рассмотрим практический пример использования доступа к данным Excel из PowerShell. Например, нам нужно для каждого пользователя в Excel файле получить информацию из Active Directory. Например, его телефон (атрибут telephoneNumber), отдел (department) и email адрес (mail).
# Импорт модуля Active Directory в сессию PowerShell
import-module activedirectory
# Сначала откройте книгу Excel:
$ExcelObj = New-Object -comobject Excel.Application
$ExcelWorkBook = $ExcelObj.Workbooks.Open(«C:PSad_users.xlsx»)
$ExcelWorkSheet = $ExcelWorkBook.Sheets.Item(«AD_User_List»)
# Получаем количество заполненных строк в xlsx файле
$rowcount=$ExcelWorkSheet.UsedRange.Rows.Count
# Перебираем все строки в столбце 1, начиная со второй строки (в этих ячейках указано доменное имя пользователя)
for($i=2;$i -le $rowcount;$i++)<
$ADusername=$ExcelWorkSheet.Columns.Item(1).Rows.Item($i).Text
# Получаем значение атрибутов пользователя в AD
$ADuserProp = Get-ADUser $ADusername -properties telephoneNumber,department,mail|select-object name,telephoneNumber,department,mail
#Заполняем ячейки данными из AD
$ExcelWorkSheet.Columns.Item(4).Rows.Item($i) = $ADuserProp.telephoneNumber
В результате в Excel файле для каждого пользователя были добавлены столбцы с информацией из AD.
Рассмотрим еще один пример построения отчета с помощью PowerShell и Excel. Допустим, вам нужно построить Excel отчет о состоянии службы Print Spooler на всех серверах домена.
# Создать объект Excel
$ExcelObj = New-Object -comobject Excel.Application
$ExcelObj.Visible = $true
# Добавить рабочую книгу
$ExcelWorkBook = $ExcelObj.Workbooks.Add()
$ExcelWorkSheet = $ExcelWorkBook.Worksheets.Item(1)
# Переименовывать лист
$ExcelWorkSheet.Name = ‘Статус сервиса spooler’
# Заполняем шапку таблицы
$ExcelWorkSheet.Cells.Item(1,1) = ‘Имя сервера’
$ExcelWorkSheet.Cells.Item(1,2) = ‘Имя службы’
$ExcelWorkSheet.Cells.Item(1,3) = ‘Статус службы’
# Выделить шапку таблицы жирным. задать размер шрифта и ширину столбцов
$ExcelWorkSheet.Rows.Item(1).Font.Bold = $true
$ExcelWorkSheet.Rows.Item(1).Font.size=14
$ExcelWorkSheet.Columns.Item(1).ColumnWidth=25
$ExcelWorkSheet.Columns.Item(2).ColumnWidth=25
$ExcelWorkSheet.Columns.Item(3).ColumnWidth=25
# получим список всех Windows Server в домене
$computers = (Get-ADComputer -Filter ‘operatingsystem -like «*Windows server*» -and enabled -eq «true»‘).Name
$counter=2
# подключается к каждому компьютеру и получаем статус службы
foreach ($computer in $computers) <
$result = Invoke-Command -Computername $computer –ScriptBlock < Get-Service spooler | select Name, status >
#Заполняем ячейки Excel данными с сервера
$ExcelWorkSheet.Columns.Item(1).Rows.Item($counter) = $result.PSComputerName
$ExcelWorkSheet.Columns.Item(2).Rows.Item($counter) = $result.Name
$ExcelWorkSheet.Columns.Item(3).Rows.Item($counter) = $result.Status
$counter++
>
# сохраните полученный отчет и закройте Excel:
$ExcelWorkBook.SaveAs(‘C:psservice-report.xlsx’)
$ExcelWorkBook.close($true)
Область применения возможностей доступа из PowerShell в Excel очень широка. Начиная от простого построения отчетов, например, из Active Directory, и заканчивая возможностью создания PowerShell скриптов для актуализации данных в AD из Excel.
Источник
Read and Write Data to Excel File with PowerShell
In this article we’ll show how to read and write data from Excel worksheets directly from PowerShell scripts. You can use Excel along with PowerShell to inventory and generate various reports on computers, servers, infrastructure, Active Directory, etc.
Before showing how to access data in an Excel cell, it is worth to understand the architecture of presentation layers in the Excel file. The figure below shows 4 nested presentation layers in the Excel object model:
- Application Layer – deals with the running Excel app;
- WorkBook Layer – multiple workbooks (Excel files) may be open at the same time;
- WorkSheet Layer – each XLSX file can contain several sheets;
- Range Layer – here you can access data in the specific cell or cell range.
How to Read Data from an Excel Spreadsheet using PowerShell?
Let’s take a look at a simple example of how to use PowerShell to access data in an Excel file containing a list of employees.
First, run the Excel app (application layer) on your computer using the COM object:
$ExcelObj = New-Object -comobject Excel.Application
After running the command, Excel will be launched on your computer in the background. To show the Excel window, change the Visible property of the COM object:
Then you can open an Excel file (a workbook):
Each Excel file can contain several worksheets. Let’s display the list of worksheets in the current Excel workbook:
$ExcelWorkBook.Sheets| fl Name, index
Then you can open a sheet you want (by its name or index):
You can get the name of the current (active) Excel worksheet using this command:
$ExcelWorkBook.ActiveSheet | fl Name, Index
Then you can get values from cells in Excel worksheet. You can use different methods to get the cell values on the current Excel worksheet: using a range, a cell, a column or a row. See the examples of how to get data from the same cell below:
$ExcelWorkSheet.Range(«B4»).Text
$ExcelWorkSheet.Range(«B4:B4»).Text
$ExcelWorkSheet.Range(«B4″,»B4»).Text
$ExcelWorkSheet.cells.Item(4, 2).text
$ExcelWorkSheet.cells.Item(4, 2).value2
$ExcelWorkSheet.Columns.Item(2).Rows.Item(4).Text
$ExcelWorkSheet.Rows.Item(4).Columns.Item(2).Text
Exporting Active Directory User Info to Excel Spreadsheet using PowerShell
Let’s see a practical example of how to access Excel data from PowerShell. Suppose, we want to get some information from Active Directory for each user in an Excel file. For instance, their phone number (the telephoneNumber attribute), department and e-mail address .
# Importing Active Directory module into PowerShell session
import-module activedirectory
# Open an Excel workbook first:
$ExcelObj = New-Object -comobject Excel.Application
$ExcelWorkBook = $ExcelObj.Workbooks.Open(«C:PScorp_ad_users.xlsx»)
$ExcelWorkSheet = $ExcelWorkBook.Sheets.Item(«CORP_Users»)
# Get the number of filled in rows in the XLSX worksheet
$rowcount=$ExcelWorkSheet.UsedRange.Rows.Count
# Loop through all rows in Column 1 starting from Row 2 (these cells contain the domain usernames)
for($i=2;$i -le $rowcount;$i++) <
$ADusername=$ExcelWorkSheet.Columns.Item(1).Rows.Item($i).Text
# Get the values of user attributes in AD
$ADuserProp = Get-ADUser $ADusername -properties telephoneNumber,department,mail|select-object name,telephoneNumber,department,mail
# Fill in the cells with the data received from AD
$ExcelWorkSheet.Columns.Item(4).Rows.Item($i) = $ADuserProp.telephoneNumber
$ExcelWorkSheet.Columns.Item(5).Rows.Item($i) = $ADuserProp.department
$ExcelWorkSheet.Columns.Item(6).Rows.Item($i) = $ADuserProp.mail
>
# Save the XLS file and close Excel
$ExcelWorkBook.Save()
$ExcelWorkBook.close($true)
As a result, the columns containing AD information have been added for each user in the Excel file.
Let’s consider another example of making a report using PowerShell and Excel. Suppose, you want to make an Excel report about Print Spooler service state on all domain servers.
# Create an Excel object
$ExcelObj = New-Object -comobject Excel.Application
$ExcelObj.Visible = $true
# Add a workbook
$ExcelWorkBook = $ExcelObj.Workbooks.Add()
$ExcelWorkSheet = $ExcelWorkBook.Worksheets.Item(1)
# Rename a worksheet
$ExcelWorkSheet.Name = ‘Spooler Service Status’
# Fill in the head of the table
$ExcelWorkSheet.Cells.Item(1,1) = ‘Server Name’
$ExcelWorkSheet.Cells.Item(1,2) = ‘Service Name’
$ExcelWorkSheet.Cells.Item(1,3) = ‘Service Status’
# Make the table head bold, set the font size and the column width
$ExcelWorkSheet.Rows.Item(1).Font.Bold = $true
$ExcelWorkSheet.Rows.Item(1).Font.size=15
$ExcelWorkSheet.Columns.Item(1).ColumnWidth=28
$ExcelWorkSheet.Columns.Item(2).ColumnWidth=28
$ExcelWorkSheet.Columns.Item(3).ColumnWidth=28
# Get the list of all Windows Servers in the domain
$computers = (Get-ADComputer -Filter ‘operatingsystem -like «*Windows server*» -and enabled -eq «true»‘).Name
$counter=2
# Connect to each computer and get the service status
foreach ($computer in $computers) <
$result = Invoke-Command -Computername $computer –ScriptBlock < Get-Service spooler | select Name, status >
# Fill in Excel cells with the data obtained from the server
$ExcelWorkSheet.Columns.Item(1).Rows.Item($counter) = $result.PSComputerName
$ExcelWorkSheet.Columns.Item(2).Rows.Item($counter) = $result.Name
$ExcelWorkSheet.Columns.Item(3).Rows.Item($counter) = $result.Status
$counter++
>
# Save the report and close Excel:
$ExcelWorkBook.SaveAs(‘C:psServer_report.xlsx’)
$ExcelWorkBook.close($true)
You can use PowerShell to access Excel in a variety of scenarios. For example, you can create handy Active Directory reports or create PowerShell scripts to update AD data from Excel.
Источник
PowerShell into Excel — ImportExcel Module Part 1
While ago I needed to do some manipulation on Excel spreadsheets but had no Office installed on the server. For the specific case, I looked for a way to complete my task with PowerShell. A quick look into Google search results and…
Even though the name is not specified, both articles talk about the ImportExcel module (if you scroll down the results a bit you will see this link).
If you like the topic please have a look at the series of different usage scenarios.
Winter series of PowerShell and Excel
What is ImportExcel?
I will use Doug’s description from the GitHub repository:
This PowerShell Module allows you to read and write Excel files without installing Microsoft Excel on your system. No need to bother with the cumbersome Excel COM-object. Creating Tables, Pivot Tables, Charts and much more has just become a lot easier.
That’s right! No need to install Microsoft Excel.
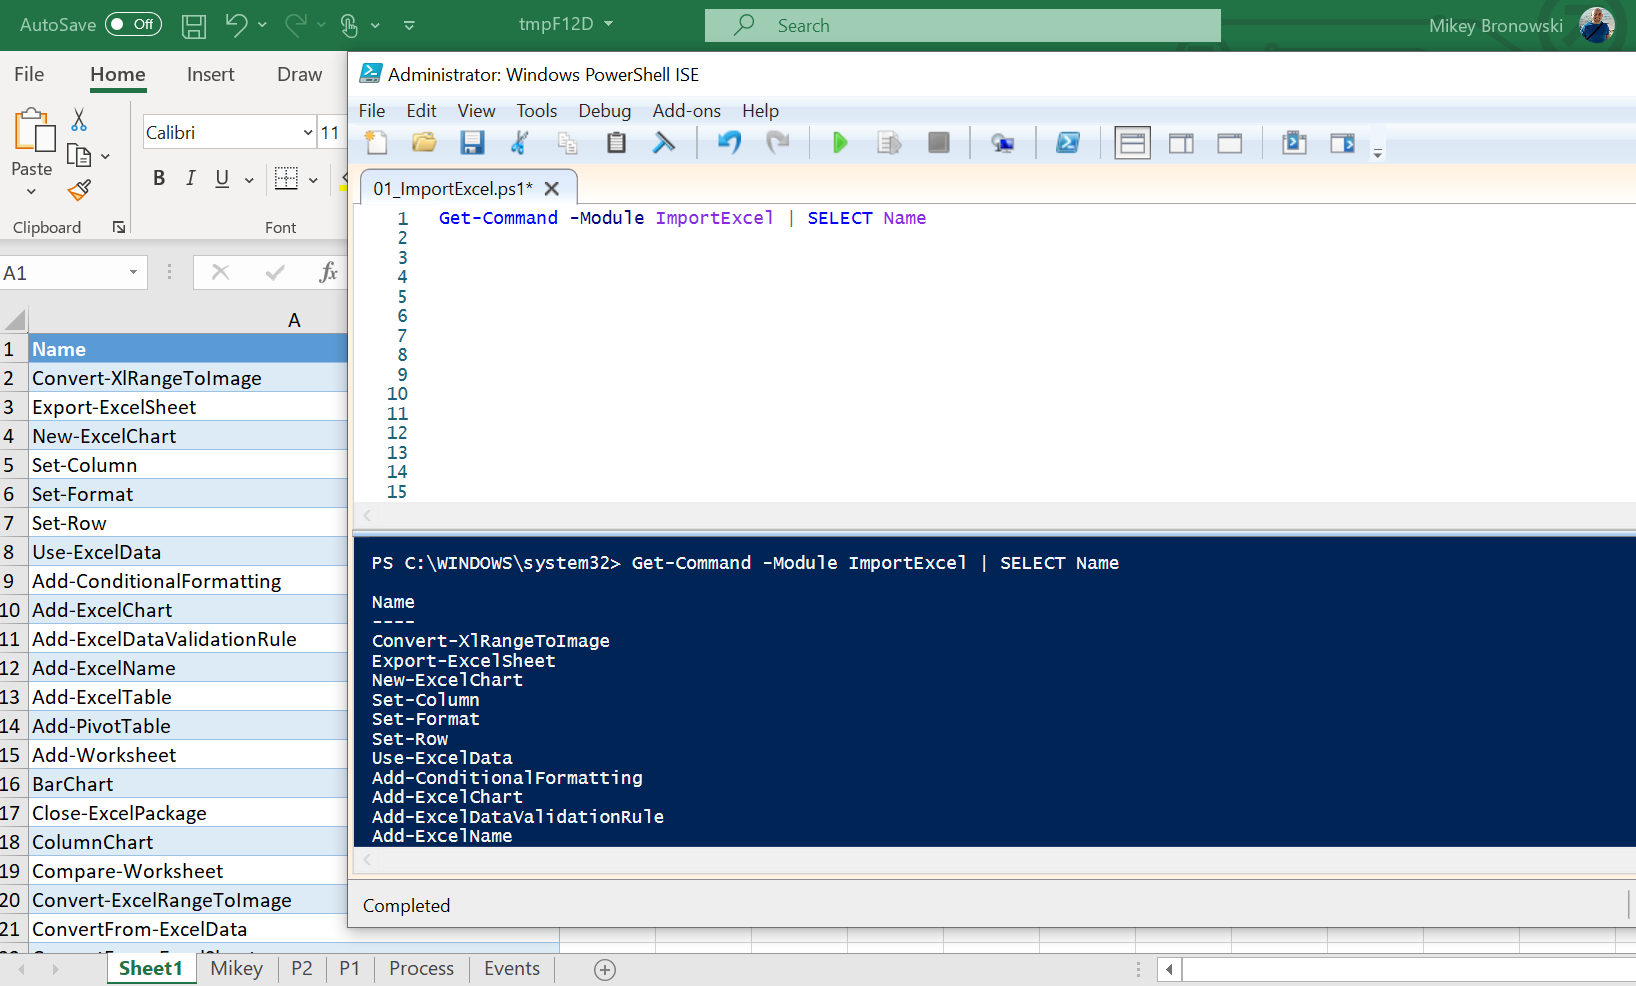
I have recently tested the 7.1.0 version and it contains about 60 functions. Some of the functions are:
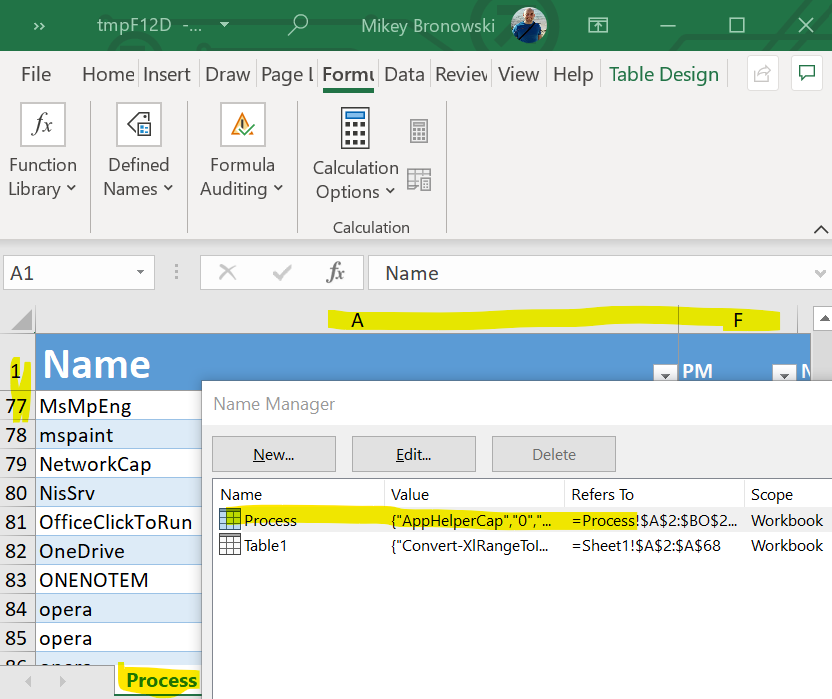
Add-ConditionalFormatting Add-ExcelTable Compare-Worksheet ConvertFrom-ExcelToSQLInsert Export-Excel Import-Excel Join-Worksheet PieChart Pivot
ImportExcel – quick start
Firstly, to get the module installed on my machine I have ran this short script:
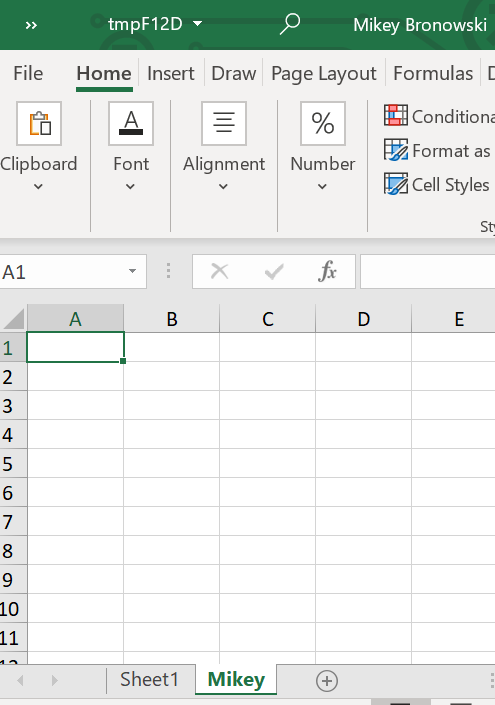
Secondly, let’s see what this tool can do! I would like to see all the commands from the module and export their names to the Excel spreadsheet:
As a result, I am getting new Excel windows open with temporary name tmpF12D located in $env:TEMP with output formatted as a spreadsheet table Table1.

That was easy, but I want to see more.
ImportExcel – how to?
I have created an Excel spreadsheet from PowerShell, but what else I could do?
ImportExcel – how to work with worksheets?
As a matter of fact the ImportExcel module allows to manipulate worksheets.
And the reason for that is simple – I had the file open. Therefore I am going to close it and repeat the above script:
As shown above, adding an empty sheet was amazingly easy (and I have learned a new thing about closing files). How about populating it with the data?
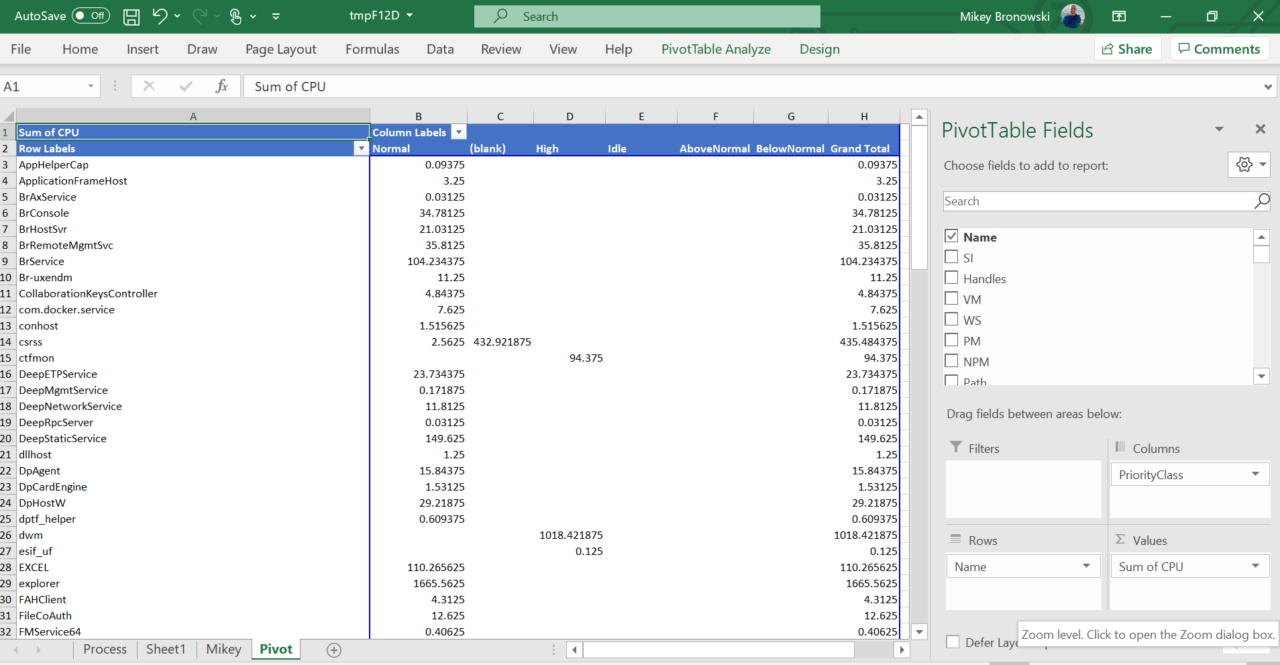
Perfect, we have some data. Pivot? Why not.
ImportExcel – how to make pivot tables?
For example, using Add-PivotTable is straightforward (and from now on I am closing the whole Excel). Also, note the Activate switch at the end. When you open the Excel file the worksheet that was used in the command will show up first.
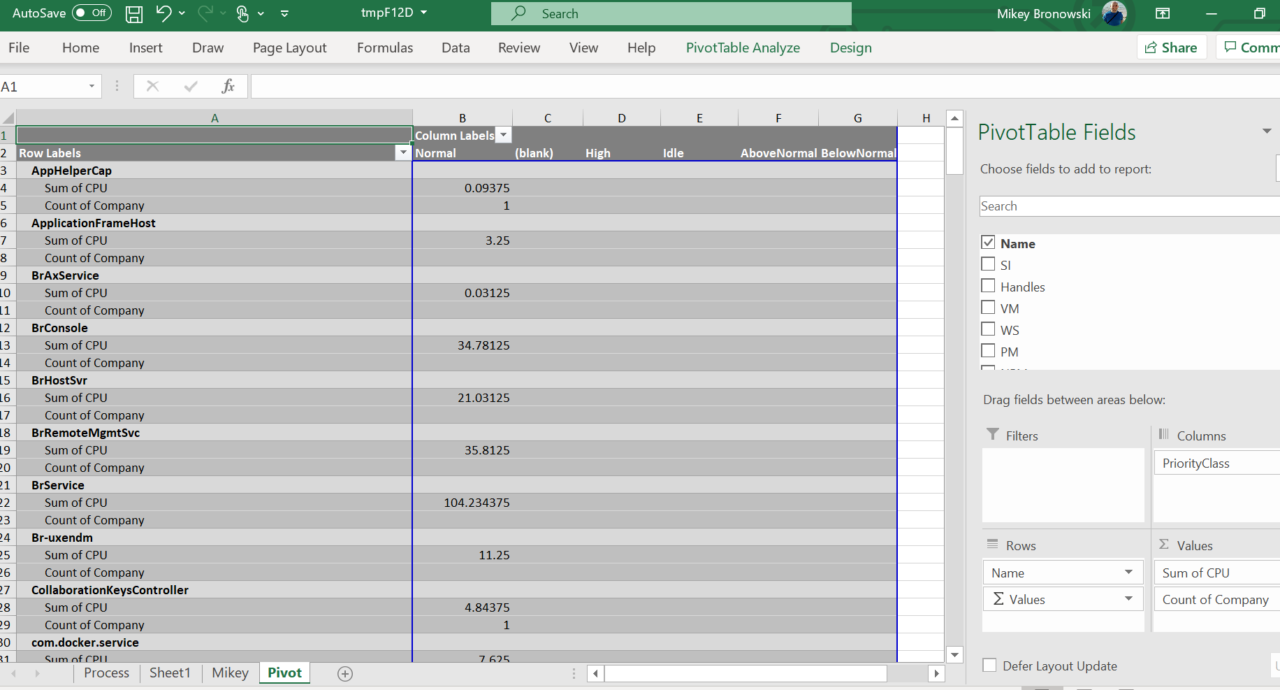
Additionally, if something went wrong with our data and we need to recreate the pivot table. No problem. Drop the worksheet and create a new pivot table.
As a result of both operations we get two tables;
ImportExcel – how to make pivot table charts?
It is common to have a pivot table chart alongside the data. In fact, ImportExcel module supports that too.
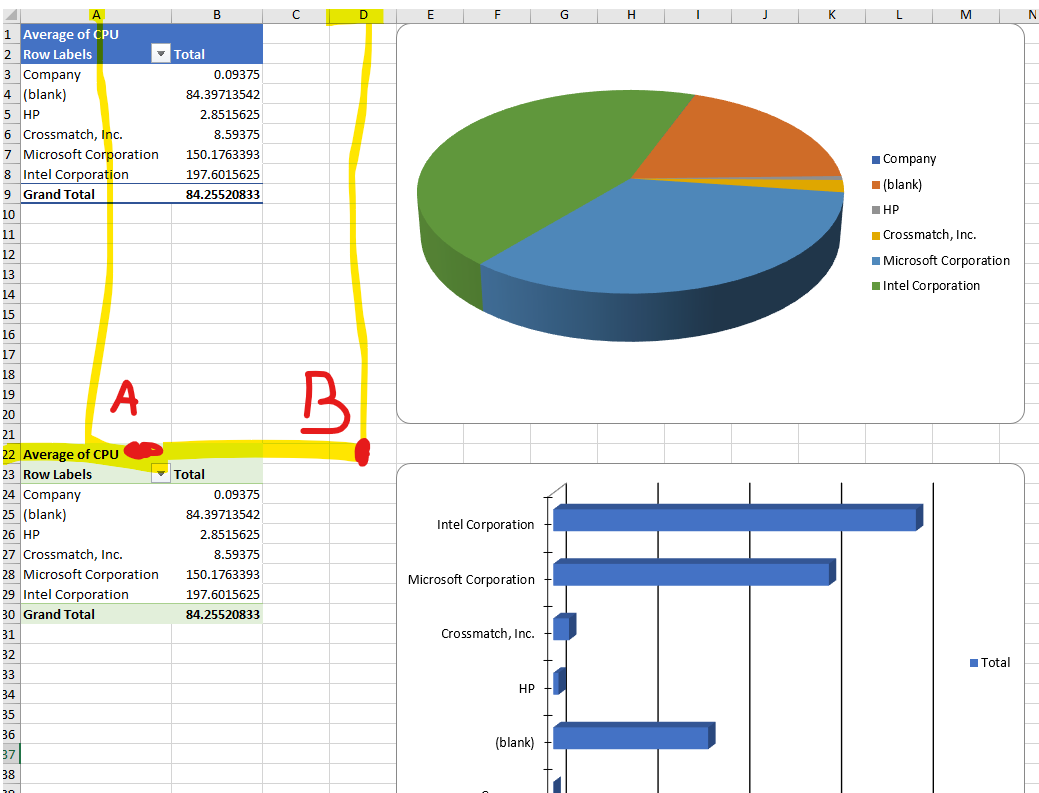
That does not limit the user to create pivot table charts on a new worksheet. It is quite simple to add more charts on the worksheet. Just to avoid overlapping of the charts and tables set the Address (for placing table [A]) and ChartRow / ChartColumn (to set location for a chart [B]).
Amazing! In fact, it would be a day-long session to show all the scenarios just for pivot tables and charts.
Summary
To sum up, ImportExcel PowerShell module has many features and it is a powerful task. I showed you today how to do basic operations on worksheets and pivot tables/charts. Next week will describe more about regular charts and conditional formatting.
Updated: June 22, 2020
You May Also Enjoy
T-SQL Tuesday 159 — New Year’s Resolutions — Magda
This month the #TSQL2SDAY invitation comes from Deepthi Goguri who asks us to write about our favorite new feature in SQL Server 2022 or in Azure and New Yea.
T-SQL Tuesday 159 — What’s Your Favorite New Feature? — Magda
This month the #TSQL2SDAY invitation comes from Deepthi Goguri who asks us to write about our favorite new feature in SQL Server 2022 or in Azure and New Yea.
T-SQL Tuesday 150 — My first technical job
This month the #TSQL2SDAY invitation comes from Kenneth Fisher who asks us to write about our first technical job.
Источник