
I’m trying to export a complete CSV to Excel by using Powershell. I stuck at a point where static column names are used. But this doesn’t work if my CSV has generic unknown header names.
Steps to reproduce
Open your PowerShell ISE and copy & paste the following standalone code. Run it with F5
«C:Windowssystem32WindowsPowerShellv1.0powershell_ise.exe»
Get-Process | Export-Csv -Path $env:tempprocess.csv -NoTypeInformation

$processes = Import-Csv -Path $env:tempprocess.csv
$Excel = New-Object -ComObject excel.application
$workbook = $Excel.workbooks.add()

$i = 1
foreach($process in $processes)
{
 $excel.cells.item($i,1) = $process.name
 $excel.cells.item($i,2) = $process.vm
 $i++
}
Remove-Item $env:tempprocess.csv
$Excel.visible = $true
What it does
- The script will export a list of all active processes as a CSV to your temp folder. This file is only for our example. It could be any CSV with any data
- It reads in the newly created CSV and saves it under the
$processesvariable - It creates a new and empty Excel workbook where we can write data
- It iterates through all rows (?) and writes all values from the
nameandvmcolumn to Excel
My questions
- What if I don’t know the column headers? (In our example
nameandvm). How do I address values where I don’t know their header names? - How do I count how many columns a CSV has? (after reading it with
Import-Csv)
I just want to write an entire CSV to Excel with Powershell
asked Jul 16, 2013 at 23:09
![]()
nixdanixda
2,59711 gold badges48 silver badges82 bronze badges
Ups, I entirely forgot this question. In the meantime I got a solution.
This Powershell script converts a CSV to XLSX in the background
Gimmicks are
- Preserves all CSV values as plain text like
=B1+B2or0000001.
You don’t see#Nameor anything like that. No autoformating is done. - Automatically chooses the right delimiter (comma or semicolon) according to your regional setting
- Autofit columns
PowerShell Code
### Set input and output path
$inputCSV = "C:somefolderinput.csv"
$outputXLSX = "C:somefolderoutput.xlsx"

### Create a new Excel Workbook with one empty sheet
$excel = New-Object -ComObject excel.application
$workbook = $excel.Workbooks.Add(1)
$worksheet = $workbook.worksheets.Item(1)

### Build the QueryTables.Add command
### QueryTables does the same as when clicking "Data » From Text" in Excel
$TxtConnector = ("TEXT;" + $inputCSV)
$Connector = $worksheet.QueryTables.add($TxtConnector,$worksheet.Range("A1"))
$query = $worksheet.QueryTables.item($Connector.name)

### Set the delimiter (, or ;) according to your regional settings
$query.TextFileOtherDelimiter = $Excel.Application.International(5)

### Set the format to delimited and text for every column
### A trick to create an array of 2s is used with the preceding comma
$query.TextFileParseType  = 1
$query.TextFileColumnDataTypes = ,2 * $worksheet.Cells.Columns.Count
$query.AdjustColumnWidth = 1

### Execute & delete the import query
$query.Refresh()
$query.Delete()

### Save & close the Workbook as XLSX. Change the output extension for Excel 2003
$Workbook.SaveAs($outputXLSX,51)
$excel.Quit()
![]()
answered Jan 16, 2014 at 18:01
![]()
nixdanixda
2,59711 gold badges48 silver badges82 bronze badges
7
I am using excelcnv.exe to convert csv into xlsx and that seemed to work properly.
You will have to change the directory to where your excelcnv is. If 32 bit, it goes to Program Files (x86)
Start-Process -FilePath 'C:Program FilesMicrosoft OfficerootOffice16excelcnv.exe' -ArgumentList "-nme -oice ""$xlsFilePath"" ""$xlsToxlsxPath"""
answered May 16, 2019 at 0:06
![]()
WinstonKyuWinstonKyu
2012 silver badges9 bronze badges
4
Why would you bother? Load your CSV into Excel like this:
$csv = Join-Path $env:TEMP "process.csv"
$xls = Join-Path $env:TEMP "process.xlsx"

$xl = New-Object -COM "Excel.Application"
$xl.Visible = $true

$wb = $xl.Workbooks.OpenText($csv)

$wb.SaveAs($xls, 51)
You just need to make sure that the CSV export uses the delimiter defined in your regional settings. Override with -Delimiter if need be.
Edit: A more general solution that should preserve the values from the CSV as plain text. Code for iterating over the CSV columns taken from here.
$csv = Join-Path $env:TEMP "input.csv"
$xls = Join-Path $env:TEMP "output.xlsx"

$xl = New-Object -COM "Excel.Application"
$xl.Visible = $true

$wb = $xl.Workbooks.Add()
$ws = $wb.Sheets.Item(1)

$ws.Cells.NumberFormat = "@"

$i = 1
Import-Csv $csv | ForEach-Object {
  $j = 1
  foreach ($prop in $_.PSObject.Properties) {
    if ($i -eq 1) {
      $ws.Cells.Item($i, $j++).Value = $prop.Name
    } else {
      $ws.Cells.Item($i, $j++).Value = $prop.Value
    }
  }
  $i++
}

$wb.SaveAs($xls, 51)
$wb.Close()

$xl.Quit()
[System.Runtime.Interopservices.Marshal]::ReleaseComObject($xl)
Obviously this second approach won’t perform too well, because it’s processing each cell individually.
answered Jul 16, 2013 at 23:49
![]()
Ansgar WiechersAnsgar Wiechers
190k23 gold badges244 silver badges319 bronze badges
8
This topic really helped me, so I’d like to share my improvements.
All credits go to the nixda, this is based on his answer.
For those who need to convert multiple csv’s in a folder, just modify the directory. Outputfilenames will be identical to input, just with another extension.
Take care of the cleanup in the end, if you like to keep the original csv’s you might not want to remove these.
Can be easily modifed to save the xlsx in another directory.
$workingdir = "C:data*.csv"
$csv = dir -path $workingdir
foreach($inputCSV in $csv){
$outputXLSX = $inputCSV.DirectoryName + "" + $inputCSV.Basename + ".xlsx"
### Create a new Excel Workbook with one empty sheet
$excel = New-Object -ComObject excel.application
$excel.DisplayAlerts = $False
$workbook = $excel.Workbooks.Add(1)
$worksheet = $workbook.worksheets.Item(1)

### Build the QueryTables.Add command
### QueryTables does the same as when clicking "Data » From Text" in Excel
$TxtConnector = ("TEXT;" + $inputCSV)
$Connector = $worksheet.QueryTables.add($TxtConnector,$worksheet.Range("A1"))
$query = $worksheet.QueryTables.item($Connector.name)

### Set the delimiter (, or ;) according to your regional settings
### $Excel.Application.International(3) = ,
### $Excel.Application.International(5) = ;
$query.TextFileOtherDelimiter = $Excel.Application.International(5)

### Set the format to delimited and text for every column
### A trick to create an array of 2s is used with the preceding comma
$query.TextFileParseType  = 1
$query.TextFileColumnDataTypes = ,2 * $worksheet.Cells.Columns.Count
$query.AdjustColumnWidth = 1

### Execute & delete the import query
$query.Refresh()
$query.Delete()

### Save & close the Workbook as XLSX. Change the output extension for Excel 2003
$Workbook.SaveAs($outputXLSX,51)
$excel.Quit()
}
## To exclude an item, use the '-exclude' parameter (wildcards if needed)
remove-item -path $workingdir -exclude *Crab4dq.csv
answered Aug 30, 2016 at 12:24
![]()
obiwankobanobiwankoban
1432 silver badges6 bronze badges
3
If you want to convert CSV to Excel without Excel being installed, you can use the great .NET library EPPlus (under LGPL license) to create and modify Excel Sheets and also convert CSV to Excel really fast!
Preparation
- Download the latest stable EPPlus version
- Extract EPPlus to your preferred location (e.g. to
$HOMEDocumentsWindowsPowerShellModulesEPPlus) - Right Click EPPlus.dll, select Properties and at the bottom of the General Tab click «Unblock» to allow loading of this dll. If you don’t have the rights to do this, try
[Reflection.Assembly]::UnsafeLoadFrom($DLLPath) | Out-Null
Detailed Powershell Commands to import CSV to Excel
# Create temporary CSV and Excel file names
$FileNameCSV = "$HOMEDownloadstest.csv"
$FileNameExcel = "$HOMEDownloadstest.xlsx"

# Create CSV File (with first line containing type information and empty last line)
Get-Process | Export-Csv -Delimiter ';' -Encoding UTF8 -Path $FileNameCSV

# Load EPPlus
$DLLPath = "$HOMEDocumentsWindowsPowerShellModulesEPPlusEPPlus.dll"
[Reflection.Assembly]::LoadFile($DLLPath) | Out-Null

# Set CSV Format
$Format = New-object -TypeName OfficeOpenXml.ExcelTextFormat
$Format.Delimiter = ";"
# use Text Qualifier if your CSV entries are quoted, e.g. "Cell1","Cell2"
$Format.TextQualifier = '"'
$Format.Encoding = [System.Text.Encoding]::UTF8
$Format.SkipLinesBeginning = '1'
$Format.SkipLinesEnd = '1'

# Set Preferred Table Style
$TableStyle = [OfficeOpenXml.Table.TableStyles]::Medium1

# Create Excel File
$ExcelPackage = New-Object OfficeOpenXml.ExcelPackage
$Worksheet = $ExcelPackage.Workbook.Worksheets.Add("FromCSV")

# Load CSV File with first row as heads using a table style
$null=$Worksheet.Cells.LoadFromText((Get-Item $FileNameCSV),$Format,$TableStyle,$true)

# Load CSV File without table style
#$null=$Worksheet.Cells.LoadFromText($file,$format)

# Fit Column Size to Size of Content
$Worksheet.Cells[$Worksheet.Dimension.Address].AutoFitColumns()

# Save Excel File
$ExcelPackage.SaveAs($FileNameExcel)

Write-Host "CSV File $FileNameCSV converted to Excel file $FileNameExcel"
answered Dec 29, 2014 at 15:37
![]()
Florian FeldhausFlorian Feldhaus
5,4322 gold badges39 silver badges45 bronze badges
1
This is a slight variation that worked better for me.
$csv = Join-Path $env:TEMP "input.csv"
$xls = Join-Path $env:TEMP "output.xlsx"

$xl = new-object -comobject excel.application
$xl.visible = $false
$Workbook = $xl.workbooks.open($CSV)
$Worksheets = $Workbooks.worksheets

$Workbook.SaveAs($XLS,1)
$Workbook.Saved = $True

$xl.Quit()
answered Jan 16, 2014 at 16:04
![]()
mackmack
2,6238 gold badges39 silver badges66 bronze badges
2
I had some problem getting the other examples to work.
EPPlus and other libraries produces OpenDocument Xml format, which is not the same as you get when you save from Excel as xlsx.
macks example with open CSV and just re-saving didn’t work, I never managed to get the ‘,’ delimiter to be used correctly.
Ansgar Wiechers example has some slight error which I found the answer for in the commencts.
Anyway, this is a complete working example. Save this in a File CsvToExcel.ps1
param (
[Parameter(Mandatory=$true)][string]$inputfile,
[Parameter(Mandatory=$true)][string]$outputfile
)

$excel = New-Object -ComObject Excel.Application
$excel.Visible = $false

$wb = $excel.Workbooks.Add()
$ws = $wb.Sheets.Item(1)

$ws.Cells.NumberFormat = "@"

write-output "Opening $inputfile"

$i = 1
Import-Csv $inputfile | Foreach-Object {
    $j = 1
    foreach ($prop in $_.PSObject.Properties)
    {
        if ($i -eq 1) {
            $ws.Cells.Item($i, $j) = $prop.Name
        } else {
            $ws.Cells.Item($i, $j) = $prop.Value
        }
        $j++
    }
    $i++
}

$wb.SaveAs($outputfile,51)
$wb.Close()
$excel.Quit()
write-output "Success"
Execute with:
.CsvToExcel.ps1 -inputfile "C:TempXdata.csv" -outputfile "C:TempXdata.xlsx"
answered May 22, 2016 at 14:04
![]()
Gil RoittoGil Roitto
3252 silver badges8 bronze badges
I found this while passing and looking for answers on how to compile a set of csvs into a single excel doc with the worksheets (tabs) named after the csv files. It is a nice function. Sadly, I cannot run them on my network  so i do not know how well it works.
Function Release-Ref ($ref)
{
    ([System.Runtime.InteropServices.Marshal]::ReleaseComObject(
    [System.__ComObject]$ref) -gt 0)
    [System.GC]::Collect()
    [System.GC]::WaitForPendingFinalizers()
    }
    Function ConvertCSV-ToExcel
    {
    <#
    .SYNOPSIS
    Converts     one or more CSV files into an excel file.

    .DESCRIPTION
    Converts one or more CSV files into an excel file. Each CSV file is imported into its own worksheet with the name of the
    file being the name of the worksheet.

    .PARAMETER inputfile
    Name of the CSV file being converted

    .PARAMETER output
    Name of the converted excel file

    .EXAMPLE
    Get-ChildItem *.csv | ConvertCSV-ToExcel -output ‘report.xlsx’

    .EXAMPLE
    ConvertCSV-ToExcel -inputfile ‘file.csv’ -output ‘report.xlsx’

    .EXAMPLE
    ConvertCSV-ToExcel -inputfile @(“test1.csv”,”test2.csv”) -output ‘report.xlsx’

    .NOTES
    Author:     Boe Prox
    Date Created: 01SEPT210
    Last Modified:

    #>

    #Requires -version 2.0
    [CmdletBinding(
    SupportsShouldProcess = $True,
    ConfirmImpact = ‘low’,
    DefaultParameterSetName = ‘file’
    )]
    Param (
    [Parameter(
    ValueFromPipeline=$True,
    Position=0,
    Mandatory=$True,
    HelpMessage=”Name of CSV/s to import”)]
    [ValidateNotNullOrEmpty()]
    [array]$inputfile,
    [Parameter(
    ValueFromPipeline=$False,
    Position=1,
    Mandatory=$True,
    HelpMessage=”Name of excel file output”)]
    [ValidateNotNullOrEmpty()]
    [string]$output
    )

    Begin {
    #Configure regular expression to match full path of each file
    [regex]$regex = “^w:\”

    #Find the number of CSVs being imported
    $count = ($inputfile.count -1)

    #Create Excel Com Object
    $excel = new-object -com excel.application

    #Disable alerts
    $excel.DisplayAlerts = $False

    #Show Excel application
    $excel.V    isible = $False

    #Add workbook
    $workbook = $excel.workbooks.Add()

    #Remove other worksheets
    $workbook.worksheets.Item(2).delete()
    #After the first worksheet is removed,the next one takes its place
    $workbook.worksheets.Item(2).delete()

    #Define initial worksheet number
    $i = 1
    }

    Process {
    ForEach ($input in $inputfile) {
    #If more than one file, create another worksheet for each file
    If ($i -gt 1) {
    $workbook.worksheets.Add() | Out-Null
    }
    #Use the first worksheet in the workbook (also the newest created worksheet is always 1)
    $worksheet = $workbook.worksheets.Item(1)
    #Add name of CSV as worksheet name
    $worksheet.name = “$((GCI $input).basename)”

    #Open the CSV file in Excel, must be converted into complete path if no already done
    If ($regex.ismatch($input)) {
    $tempcsv = $excel.Workbooks.Open($input)
    }
    ElseIf ($regex.ismatch(“$($input.fullname)”)) {
    $tempcsv = $excel.Workbooks.Open(“$($input.fullname)”)
    }
    Else {
    $tempcsv = $excel.Workbooks.Open(“$($pwd)$input”)
    }
    $tempsheet = $tempcsv.Worksheets.Item(1)
    #Copy contents of the CSV file
    $tempSheet.UsedRange.Copy() | Out-Null
    #Paste contents of CSV into existing workbook
    $worksheet.Paste()

    #Close temp workbook
    $tempcsv.close()

    #Select all used cells
    $range = $worksheet.UsedRange

    #Autofit the columns
    $range.EntireColumn.Autofit() | out-null
    $i++
    }
    }

    End {
    #Save spreadsheet
    $workbook.saveas(“$pwd$output”)

    Write-Host -Fore Green “File saved to $pwd$output”

    #Close Excel
    $excel.quit()

    #Release processes for Excel
    $a = Release-Ref($range)
    }
}
![]()
answered Oct 14, 2020 at 13:44
![]()
1
- Remove From My Forums
-
Question
-
Hi there,
I’ve seen on alot of websites the ability to convert from xls to csv using Powershell but how would you go about converting from a csv to a xlsx file?
Hope someone can help.
Dave
Answers
-
Hi Mervyn,
I ended up using the code below:
$xl = new-object -comobject excel.application
$xl.visible = $true
$Workbook = $xl.workbooks.open(«$loglocationerrors_$server.csv»)
$Worksheets = $Workbooks.worksheets$Workbook.SaveAs(«$loglocationerrors_$server.xls»,1)
$Workbook.Saved = $True$xl.Quit()
Thanks for asking.
Dave
-
Marked as answer by
Monday, September 6, 2010 1:40 AM
-
Marked as answer by
-
Threw this together and tested good on a few CSV’s I had.
Function Release-Ref ($ref)
  {
    ([System.Runtime.InteropServices.Marshal]::ReleaseComObject(
    [System.__ComObject]$ref) -gt 0)
    [System.GC]::Collect()
    [System.GC]::WaitForPendingFinalizers()
  }


Function ConvertCSV-ToExcel
{
<#
 .SYNOPSIS
  Converts a CSV file to an Excel file

 .DESCRIPTION
  Converts a CSV file to an Excel file

 .PARAMETER inputfile
  Name of the CSV file being converted

 .PARAMETER output
  Name of the converted excel file

 .EXAMPLE

 .NOTES
 Author: Boe Prox
 Date Created:
 Last Modified:

#>

#Requires -version 2.0
[CmdletBinding()]
Param
  (
    [parameter(Mandatory=$False,Position=1)][string]$inputfile,
    [parameter(Mandatory=$False,Position=1)][string]$output

  )

#Create Excel Com Object
$excel = new-object -com excel.application

#Show Excel application
$excel.Visible = $True

#Add workbook
$workbook = $excel.workbooks.Add()

#Use the first worksheet in the workbook
$worksheet1 = $workbook.worksheets.Item(1)

#Remove other worksheets that are not needed
$workbook.worksheets.Item(2).delete()
$workbook.worksheets.Item(2).delete()

#Start row and column
$r = 1
$c = 1

#Begin working through the CSV
$file = (GC $inputfile)
ForEach ($f in $file) {
  $arr = ($f).split(',')
  ForEach ($a in $arr) {
    $worksheet1.Cells.Item($r,$c) = "$(($a).replace('"',''))"
    $c++
    }
  $c = 1
  $r++
  }

#Select all used cells
$range = $worksheet1.UsedRange

#Autofit the columns
$range.EntireColumn.Autofit() | out-null

#Save spreadsheet
$workbook.saveas("$pwd$output")

Write-Host -Fore Green "File saved to $pwd$output"

#Close Excel
$excel.quit()

#Release processes for Excel
$a = Release-Ref($range)
$a = Release-Ref($worksheet1)
$a = Release-Ref($workbook)
$a = Release-Ref($range)
}
Dot source the script and use like this:
ConvertCSV-ToExcel -inputfile «test.csv» -output «report.xlsx»
-
Marked as answer by
Mervyn Zhang
Tuesday, August 31, 2010 5:57 AM
-
Marked as answer by
![]() Данный материал является переводом оригинальной статьи «ATA Learning : Adam Bertram : PowerShell and Excel: Seize the Power!».
Данный материал является переводом оригинальной статьи «ATA Learning : Adam Bertram : PowerShell and Excel: Seize the Power!».
Microsoft Excel — один из тех вездесущих инструментов, от которых большинство из нас не может уйти, даже если хочет. Многие ИТ-специалисты используют Excel, как небольшую базу данных, в которой хранятся тонны данных в различных процедурах автоматизации. Каков наилучший сценарий автоматизации и Excel? Это, например, PowerShell!
Работу с таблицами Excel непросто автоматизировать. В отличие от менее функционального (и более простого) аналога файла CSV, книги Excel — это не просто текстовые файлы. Для работы со сложными книгами Excel потребует от PowerShell манипуляции с Component Object Model (COM), для чего раньше нужно было установить Excel. Однако, на самом деле, это вовсе не обязательно. Например, проницательный участник сообщества PowerShell, Doug Finke, создал модуль PowerShell, названный ImportExcel. Модуль устраняет сложность работы с Excel и позволяет легко работать с книгами Excel через PowerShell сценарии!
В этой статье рассмотрим пример того, что можно сделать в PowerShell и Excel с помощью модуля ImportExcel, а также рассмотрим несколько популярных вариантов использования.
Предварительные требования
При запуске модуля ImportExcel в системе Windows отдельные зависимости не требуются. Однако, если вы работаете с MacOS, вам необходимо установить пакет mono-libgdiplus, используя команду вида:
brew install mono-libgdiplus
Примечание: Все примеры в этой статье будут построены с использованием macOS, но все они должны работать и на других платформах. При использовании macOS, не забудьте перезапустить сеанс PowerShell, прежде чем продолжить.
Установка модуля ImportExcel
Начните с загрузки и установки модуля через PowerShell Gallery, запустив:
Install-Module ImportExcel -Scope CurrentUser
Через несколько секунд все будет в порядке.
Использование PowerShell для экспорта в рабочий лист Excel
Возможно, вы знакомы со стандартными командлетами PowerShell Export-Csv и Import-Csv. Эти командлеты позволяют читать и экспортировать объекты PowerShell в файлы CSV. К сожалению, в PowerShell нет таких же встроенных командлетов для Excel. Но, используя модуль ImportExcel, вы можете создать такой функционал!
Один из наиболее частых запросов системного администратора — это экспорт объектов PowerShell в рабочий лист Excel. С помощью командлета Export-Excel из модуля ImportExcel, вы можете легко сделать это. Командлет Export-Excel принимает любой объект точно так же, как делает Export-Csv. Этому командлету можно передать любой объект.
Например, возможно, вам нужно найти какие-то процессы, запущенные на вашем локальном компьютере, и поместить их в книгу Excel.
Чтобы найти процессы, запущенные в системе с помощью PowerShell, используйте командлет Get-Process, который возвращает каждый запущенный процесс и различную информацию о каждом процессе. Чтобы экспортировать эту информацию в Excel, используйте командлет Export-Excel, указывающий путь к создаваемой книге Excel. Вы можете увидеть пример команды и снимок экрана сгенерированного файла Excel ниже.
Get-Process | Export-Excel -Path './processes.xlsx
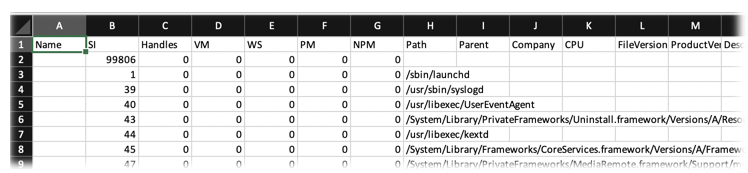
Поздравляем! Вы экспортировали всю информацию точно так же, как Export-Csv, но, в отличие от Export-Csv, мы можем сделать эти данные намного интереснее. Убедитесь, что имя рабочего листа называется «Proccesses», данные находятся в таблице, а размер строк устанавливается автоматически.
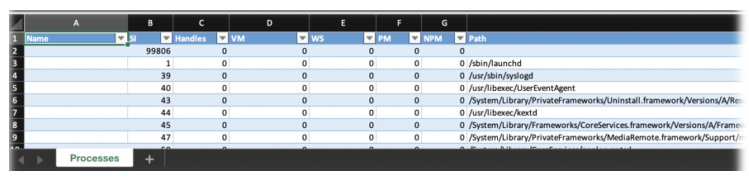
Добавим к командлету параметр -AutoSize для автоматического изменения размера всех строк, -TableName, чтобы указать имя таблицы, которая будет включать все данные, и имя параметра -WorksheetName для процессов, и сможем увидеть на снимке экрана ниже, что в итоге получится.
Get-Process | Export-Excel -Path './processes.xlsx' -AutoSize -TableName 'Processes' -WorksheetName 'Proccesses'
Командлет Export-Excel имеет множество параметров, которые можно использовать для создания книг Excel всех видов. Для получения полной информации о возможностях Export-Excel, запустите:
Get-Help Export-Excel
Использование PowerShell для импорта в Excel
Итак, ранее вы экспортировали некоторую информацию в файл с именем process.xlsx. Возможно, теперь вам нужно переместить этот файл на другой компьютер и импортировать / прочитать эту информацию. Командлет Import-Excel к вашим услугам.
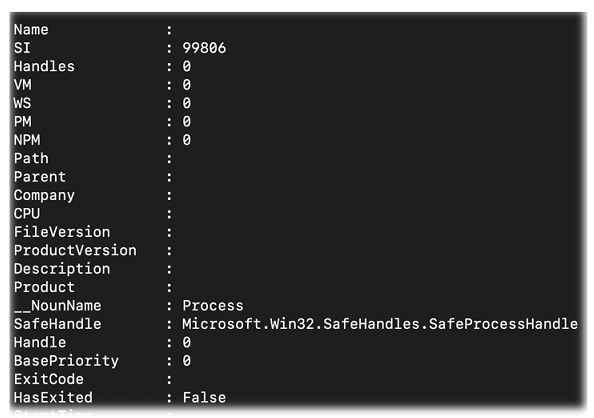
При простейшем использовании вам нужно только указать путь к документу / книге Excel с помощью параметра -Path, как показано ниже. Вы увидите, что он читает первый рабочий лист, в данном случае рабочий лист «Processes», и возвращает объекты PowerShell.
Import-Excel -Path './processes.xlsx'
Может быть, у вас есть несколько листов в книге Excel? Вы можете прочитать конкретный рабочий лист с помощью параметра -WorkSheetname.
Import-Excel -Path './processes.xlsx' -WorkSheetname 'SecondWorksheet'
Вам нужно читать только определенные столбцы из рабочего листа Excel? Используйте параметр -HeaderName, чтобы указать только те параметры, которые вы хотите прочитать.
Import-Excel -Path './processes.xlsx' –WorkSheetname 'Processes' -HeaderName 'CPU','Handle'
Командлет Import-Excel имеет другие параметры, которые можно использовать для чтения книг Excel всех типов. Чтобы получить полное изложение всего, что может делать Import-Excel, запустите:
Get-Help Import-Excel
Использование PowerShell для получения (и установки) значений ячеек Excel
Теперь вы знаете, как читать весь лист Excel с помощью PowerShell. Но что, если вам нужно только одно значение ячейки? Технически вы можете использовать Import-Excel и отфильтровать нужное значение с помощью Where-Object, но это будет не слишком эффективно.
Вместо этого, используя командлет Open-ExcelPackage, вы можете «преобразовать» книгу Excel в объект PowerShell, который затем можно будет читать и изменять. Этот командлет аналогичен использованию New-Object -ComObject ‘Excel.Application’, если работать напрямую с COM-объектами.
Чтобы найти значение ячейки, сначала откройте книгу Excel, чтобы занести его в память. Затем выберите лист внутри книги.
$excel = Open-ExcelPackage -Path './processes.xlsx'
$worksheet = $excel.Workbook.Worksheets['Processes']
Этот процесс похож на способ открытия книг с помощью COM-объекта ‘Excel.Workbooks.Open’.
После того, как рабочий лист назначен переменной, вы можете перейти к отдельным строкам, столбцам и ячейкам. Возможно, вам нужно найти все значения ячеек в строке A1. Вам просто нужно сослаться на свойство ‘Cells’, указав индекс A1, как показано ниже.
$worksheet.Cells['A1'].Value
Вы также можете изменить значение ячеек на листе, присвоив другое значение, например:
$worksheet.Cells['A1'] = 'differentvalue'
Будучи хранимым в оперативной памяти, важно высвобождать пакет Excel с помощью командлета Close-ExcelPackage.
Close-ExcelPackage $excel
Конверсия Excel в файлы CSV с помощью PowerShell
Если у вас есть содержимое листа Excel, представленное с помощью объектов PowerShell, преобразование листов Excel в CSV просто требует отправки этих объектов в командлет Export-Csv.
Используя созданную ранее книгу processes.xlsx, прочтите первый рабочий лист, который получает все данные в объекты PowerShell, а затем экспортируйте эти объекты в CSV с помощью приведенной ниже команды.
Import-Excel './processes.xlsx' | Export-Csv -Path './processes.csv' -NoTypeInformation
Конверсия множества рабочих листов
Если у вас есть книга Excel с несколькими листами, вы также можете создать файл CSV для каждого листа. Для этого вы можете найти все листы в книге с помощью командлета Get-ExcelSheetInfo. Когда у вас есть имена рабочих листов, вы можете передать их в параметр -WorksheetName, а также использовать имя листа в качестве имени файла CSV.
Ниже вы можете найти необходимый пример кода.
$sheets = (Get-ExcelSheetInfo -Path './processes.xlsx').Name
foreach ($sheet in $sheets) {
 Import-Excel -WorksheetName $sheet -Path './processes.xlsx' | Export-Csv "./$sheet.csv" -NoTypeInformation
 }
Заключение
Используя модуль ImportExcel из библиотеки модулей PowerShell, вы можете импортировать, экспортировать и управлять данными в книгах Excel точно так же, как и в CSV, без установки Excel!
Update 07SEPT2010: Updated script based on an excellent comment to use the Paste() method for converting CSV files into an excel workbook. Thanks Luc!
While going through the Technet Powershell Forums and Scripting Guys Forums, I came across a question by an individual who was looking for the best way to convert a .csv file into an excel file. As it stood, the individual only need to convert one csv file and that made for a fairly easy solution.
$xl = new-object -comobject excel.application$xl.visible = $true
$Workbook = $xl.workbooks.open(“$loglocationerrors_$server.csv”)
$Worksheets = $Workbooks.worksheets $Workbook.SaveAs(“$loglocationerrors_$server.xls”,1)
$Workbook.Saved = $True $xl.Quit()
Simple enough. Just open up the CSV file using a created excel com object in Powershell and then save that file as an excel spreadsheet.
This got me to thinking about what if I wanted to save multiple csv files into an excel workbook? How would that be done? And of course, can this all be automated to auto-fit the columns and provide a name to each worksheet that was relevant to each csv file that was being converted?
The short answer, is…Yes! This can be done with Powershell and accomplish all of the requirements.
Below is the script that I wrote that takes multiple csv files and adds them all into excel. It also auto-fits each column in excel so when you open it up, you already have access to all of the information without having to manually re-size each column. Plus, for each csv that you submit, a separate worksheet is created with the name of the csv file submitted, minus the extension. Depending on the size of the csv, the time it takes for the conversion will vary.
As shown in the picture below, I have two csv files that are being converted into one excel workbook and saved to whatever filename I want using the .xlsx format.

When I open up the excel file, I now see both of my CSV’s there to view.

Simple enough!
You can find this script below or at this link on the Technet Gallery:
ConvertCSV-ToExcel.ps1
Script Below
Function Release-Ref ($ref){
([System.Runtime.InteropServices.Marshal]::ReleaseComObject(
[System.__ComObject]$ref) -gt 0)
[System.GC]::Collect()
[System.GC]::WaitForPendingFinalizers()
}
Function ConvertCSV-ToExcel
{
<#
.SYNOPSIS
Converts one or more CSV files into an excel file.
.DESCRIPTION
Converts one or more CSV files into an excel file. Each CSV file is imported into its own worksheet with the name of the
file being the name of the worksheet.
.PARAMETER inputfile
Name of the CSV file being converted
.PARAMETER output
Name of the converted excel file
.EXAMPLE
Get-ChildItem *.csv | ConvertCSV-ToExcel -output ‘report.xlsx’
.EXAMPLE
ConvertCSV-ToExcel -inputfile ‘file.csv’ -output ‘report.xlsx’
.EXAMPLE
ConvertCSV-ToExcel -inputfile @(“test1.csv”,”test2.csv”) -output ‘report.xlsx’
.NOTES
Author: Boe Prox
Date Created: 01SEPT210
Last Modified:
#>
#Requires -version 2.0
[CmdletBinding(
SupportsShouldProcess = $True,
ConfirmImpact = ‘low’,
DefaultParameterSetName = ‘file’
)]
Param (
[Parameter(
ValueFromPipeline=$True,
Position=0,
Mandatory=$True,
HelpMessage=”Name of CSV/s to import”)]
[ValidateNotNullOrEmpty()]
[array]$inputfile,
[Parameter(
ValueFromPipeline=$False,
Position=1,
Mandatory=$True,
HelpMessage=”Name of excel file output”)]
[ValidateNotNullOrEmpty()]
[string]$output
)
Begin {
#Configure regular expression to match full path of each file
[regex]$regex = “^w:\”
#Find the number of CSVs being imported
$count = ($inputfile.count -1)
#Create Excel Com Object
$excel = new-object -com excel.application
#Disable alerts
$excel.DisplayAlerts = $False
#Show Excel application
$excel.Visible = $False
#Add workbook
$workbook = $excel.workbooks.Add()
#Remove other worksheets
$workbook.worksheets.Item(2).delete()
#After the first worksheet is removed,the next one takes its place
$workbook.worksheets.Item(2).delete()
#Define initial worksheet number
$i = 1
}
Process {
ForEach ($input in $inputfile) {
#If more than one file, create another worksheet for each file
If ($i -gt 1) {
$workbook.worksheets.Add() | Out-Null
}
#Use the first worksheet in the workbook (also the newest created worksheet is always 1)
$worksheet = $workbook.worksheets.Item(1)
#Add name of CSV as worksheet name
$worksheet.name = “$((GCI $input).basename)”
#Open the CSV file in Excel, must be converted into complete path if no already done
If ($regex.ismatch($input)) {
$tempcsv = $excel.Workbooks.Open($input)
}
ElseIf ($regex.ismatch(“$($input.fullname)”)) {
$tempcsv = $excel.Workbooks.Open(“$($input.fullname)”)
}
Else {
$tempcsv = $excel.Workbooks.Open(“$($pwd)$input”)
}
$tempsheet = $tempcsv.Worksheets.Item(1)
#Copy contents of the CSV file
$tempSheet.UsedRange.Copy() | Out-Null
#Paste contents of CSV into existing workbook
$worksheet.Paste()
#Close temp workbook
$tempcsv.close()
#Select all used cells
$range = $worksheet.UsedRange
#Autofit the columns
$range.EntireColumn.Autofit() | out-null
$i++
}
}
End {
#Save spreadsheet
$workbook.saveas(“$pwd$output”)
Write-Host -Fore Green “File saved to $pwd$output”
#Close Excel
$excel.quit()
#Release processes for Excel
$a = Release-Ref($range)
}
}
This entry was posted in powershell, scripts and tagged csv, excel, Powershell. Bookmark the permalink.
Make Your CSV Output Look Nicer
The ImportExcel module is available in the PowerShell gallery. Maintained by MVP Doug Finke, the module allows developers to import and export data to Excel without needing to install the application on a workstation.
Although Microsoft 365 comes with some basic reports, many organizations use PowerShell scripts to generate reports covering anything from user activity to lists of mailboxes. Often, scripts use the Export-CSV cmdlet to export reports to CSV files. Later, people might use the CSV file to create a nicer report with Excel or import the data into Power BI. I cannot count the number of times I have been through this routine. On the input side, the Import-CSV cmdlet brings data into PowerShell for processing, such as a list of mailboxes to check.
Exporting to Excel
To check out the ImportExcel module, I used some of the reporting scripts I have discussed here over the years. After consulting the FAQ, I started by using the script to report the storage used by OneDrive for Business sites to generate a report, which is in a PowerShell list called $Report. To export to Excel (and have Excel start with the data loaded if the application is available), all I need to do is:
$Report | Export-Excel
Excel loads the data after applying the default table style (Figure 1).

To export to a named spreadsheet, add its name to the command:
$Report | Export-Excel -Path c:TempOneDrive.xlsx
This kind of export doesn’t apply any formatting, so you end up with something like Figure 2.

Because Excel supports multiple worksheets in a workbook, you can add new worksheets to an existing workbook. For example:
$Report | Export-Excel -Path c:TempOneDrive.xlsx -Append -WorksheetName "New data"
A more sophisticated version of the command creates a workbook with a named sheet, named table, title, and a different style. The names of the available table styles are visible if you hover over the styles displayed in the Excel Format as Table option. Figure 3 shows the output of this command:
$Report | Export-Excel -Path c:TempOneDrive.xlsx -WorksheetName "May 2022" -Title "OneDrive for Business Storage Consumption" -TitleBold -TableName "OneDriveStorage" -TableStyle Dark1

Charts
One of Excel’s most popular features is its ability to generate a variety of charts from spreadsheet data. To create a chart in a worksheet, we first define the kind of chart to generate in a variable and then export the data using the chart definition. Here’s how I created a pie chart (Figure 4) of the OneDrive storage data.
$ExcelChart = New-ExcelChartDefinition -XRange Owner -YRange UsedGB -ChartType Pie -Title "OneDrive for Business Storage"
$Report | Export-Excel -Path c:tempOneDrive.xlsx -Append -WorksheetName "Pie Chart" -ExcelChartDefinition $ExcelChart -AutoNameRange -Show -Title "OneDrive for Business Storage"

Some trial and error are necessary to select the chart type from the set supported by Excel, but it’s easy enough to figure out.
Teams Membership
The ImportExcel module handled any of the reports I used as input. For instance, the output from the Microsoft 365 and Teams Membership Report script can grow to be pretty large, but ImportExcel had no problems. I generated the report shown in Figure 5 with this command:
$SummaryData | Export-Excel -Path c:TempTeamMembership.xlsx -WorksheetName "Groups May 2022" -Title "Microsoft 365 Groups and Teams Membership" -TitleBold -TableName "GroupsMembership" -TableStyle Medium28

Importing from Excel
Importing from Excel is like using the Import-CSV cmdlet, but with some extra controls. In this example, I identify what columns to import and a starting row.
[array]$Data = Import-Excel -Path c:tempTeamMembership.xlsx -ImportColumns @(1,2,3,4,5) -StartRow 2
Once loaded into the array, you can interact with the data using standard PowerShell commands. For instance, this code loops through the data to highlight users with “red” in their name:
ForEach ($D in $Data) {
   If ($D.User -like "*Red*") {
      Write-Host ("{0} is a member of {1} groups..." -f $D.User, $D."Groups count" ) }
}
Updating Excel
Having some extra control over how you load data into PowerShell is interesting. Being able to interact with Excel data through Excel is more interesting. To do this, we use ImportExcel to load information for a worksheet in the target spreadsheet into a variable, and then use it to populate an array with information from the cells in the worksheet:
$ExcelData = Open-ExcelPackage -path c:tempTeamMembership.xlsx
$Data = $ExcelData.Workbook.WorkSheets["Groups May 2022"].Cells
We can now navigate through cells using a row/column notation. For example, cell 3,1 (third row, first column) contains this information:
$Data[3,1]

Style                 : OfficeOpenXml.Style.ExcelStyle
StyleName             : Normal
StyleID               : 0
Value                 : Tony Redmond
Text                  : Tony Redmond
Formula               :
FormulaR1C1           :
Hyperlink             :
Merge                 : False
AutoFilter            : False
IsRichText            : False
IsArrayFormula        : False
RichText              : {}
Comment               :
Worksheet             : Groups May 2022
FullAddress           : 'Groups May 2022'!A3
FullAddressAbsolute   : 'Groups May 2022'!$A$3
ConditionalFormatting : OfficeOpenXml.ConditionalFormatting.RangeConditionalFormatting
DataValidation        : OfficeOpenXml.DataValidation.RangeDataValidation
Current               :
Address               : A3
Start                 : OfficeOpenXml.ExcelCellAddress
End                   : OfficeOpenXml.ExcelCellAddress
Table                 :
IsName                : False
Rows                  : 1
Columns               : 1
To update the cell, we write a new value into it, and when happy that the value is correct, close the Excel spreadsheet to save the data.
$Data[3,1].Value = “The Fool on the Hill”
$Data[3,1] | Select -ExpandProperty Value
The Fool on the Hill
Close-ExcelPackage $ExcelData
Excel’s normal AutoSave functionality does not work, even when the spreadsheet location is on OneDrive for Business or a SharePoint Online site, so it’s important to remember to make changes and then save to commit, just like when working with files stored on local drives.
Worthwhile Toolkit Component
I like the ImportExcel module and think it brings a lot of useful functionality to the table. It’s an easy upgrade to apply formatting to CSV reports generated by scripts and certainly something worth considering, especially if the intended consumers of a report like charts.
Learn how to exploit the data available to Microsoft 365 tenant administrators through the Office 365 for IT Pros eBook. We love figuring out how things work.