
You want to write numbers with powers (example: 10 to the power of 6 = 106 ) on your keyboard, in Word or in another word processing software ? To do so, it will depend on the power used:
1. To make the symbol «squared» (ex: 10 squared: 10²)
To write «squared», you can press the key located just below the Esc key (the key at the top left of your keyboard), otherwise you can also press the Altkey (to the left of your Space bar) + «253«, then release the Alt key.
-
Alt + 2 5 3 (Alt + 253) -> 10 to the power of 2 = 10²
2. To make the symbol «cubed» (example: 2 cubic meters: 2m³)
To write «cube», you can press the » Alt » key (to the left of your Space bar) + » 252 «, then release the «Alt» key.
-
Alt + 2 5 2 (Alt + «252) -> 10 to the power of 3 = 10³
3. To make the powers or exponents greater than 3 (example: 10 to the power of 4 or 10 to the power of 5 : 10 4 or 10 5 )
Above the power «3», there is no keyboard shortcut available, it will depend on where you want to write your power or your exponent:
- In Microsoft tools (Word, Powerpoint, Outlook, etc.): The easiest way is to select the figure to be superseded then to use the following keyboard shortcut : Ctrl + Shift ⇧ + = (ie the key «+ =» to the left of the Return key) .
- Example: 10 to the power of 8:
- We write 108 , we select 8 and we do the combination Ctrl + Shift ⇧ + = → 10 8
- Example: 10 to the power of 8:
- In OpenOffice : Same method but with a different combination: Select the number to put in superscript or in power then perform the key combination : Ctrl + Shift ⇧ + P
IMPORTANT : Note that you can also use this method to write letters by superscribing as for the abbreviations of first : 1st or second : 2nd . This technique works will all letters or symbols.
Conversely, if you want to put the number or letters at the bottom, as for typical chemical formulas: H2O, you just have to type:
- Ctrl + = in Microsoft tools (Word, Excel, Powerpoint, etc…)
- Ctrl + Shift ⇧ + B in Open Office.
![]()
Download Article
![]()
Download Article
Exponents are superscripted numbers or variables (single letters) showing what power a number has been raised to; that is, how many times it is used as a factor in multiplying it by itself. (Raising 5 to the third power means using it as a factor 3 times in multiplying it by itself, or 5 x 5 x 5 = 125.) You can add exponents to Microsoft Word in 1 of several ways: as symbols, as text formatted with the Font dialog, or with the Equation Editor. Following are instructions for adding exponents using each method.
-

1
Open the Symbol dialog. Word lets you insert special symbols into your text through the Symbol dialog. How you open the dialog depends on your version of Word.
- For Word 2007 and later, which use the ribbon interface, click the Symbol button (which displays the Greek letter omega) in the Symbols section of the Insert ribbon tab. Select «More Symbols» at the bottom of the popup menu of commonly used symbols to display the Symbol dialog.
- For Word 2003 and earlier, select «Symbol» from the «Insert» menu.
-
2
Choose the font you want to display the exponent in. In most cases, you’ll want to display the exponent in the same font as the rest of the text, so you can leave the setting «(normal text)» in the Font dropdown alone. If you want to display the exponent in a different font, click the down arrow button at the right of the dropdown and select the font you desire from the list.
- Be aware that not all fonts include superscripted numbers or letters. If the font you’re using for your primary text doesn’t support the exponent you want to add, you’ll have to choose a font that supports the exponent.
Advertisement
-
3
Choose the exponent you want to display. You can scroll to the exponent using the scroll bar on the right of the character display, or you can select one of these options from the Subset dropdown menu: «Latin-1 Supplement» (or simply «Latin-1») or «Superscripts and Subscripts.» The available numeric exponents are «1,» «2,» and «3,» and a superscripted «n» is available to represent an exponent variable. Click on the superscript character to select it.
-
4
Insert the exponent in your text. Click the Insert button at the bottom of the Symbol dialog. This will close the dialog and insert your exponent in the text at the point of your cursor.
- In Word 2007 and later, after you select an exponent, it will appear in the Recently Used Symbols display at the bottom of the Symbols dialog page. If you want to use the exponent again, you can select it from this location.
- You can also insert the exponent by using the shortcut key for that exponent. When you select an exponent, the Symbol dialog displays a shortcut key of «Alt» followed by a letter or 4-digit combination. By pressing the «Alt» key and entering this combination, you can display the exponent without displaying the Symbol dialog. (Older versions of Word may not display a shortcut key for some exponents.) You can also create or modify a shortcut key by using the Shortcut Key button.


Advertisement
-
1
Select the text you want to format as an exponent. Place your cursor in front of the number or letter you want to format as superscript (an exponent), then hold down your left mouse button and drag the cursor over the text to highlight it.
-
2
Access the Font dialog. The Font dialog not only lets you change the font and point size of your text, but it also lets you format the text in a number of ways, including making it into an exponent. How you access the Font dialog depends on your version of Word.
- For Word 2007 and later, click the diagonal down arrow button at the right of the Font section in the Home ribbon tab.
- For Word 2003 and earlier, select «Font» from the «Format» menu.
- Your highlighted text will be displayed in the Preview window.
-
3
Check the «Superscript» box in the Effects section. The text in the Preview window will appear small and raised.
-
4
Click «OK.» This closes the Font dialog and displays your selected text as superscript.
- In addition to representing mathematical exponents, you can use this method to represent ionic charge, which is written as raised plus or minus signs (with either a number denoting how many electrons were gained or lost or with a sign for each extra or missing electron) after the chemical symbol. Do not use superscript numbers to represent multiple atoms of an element in a molecule; for that, use subscript numbers.
- Instead of typing the text you want to superscript first, you can bring up the Font dialog, check «Superscript,» click «OK,» and then type your text. If you do this, you must bring up the Font dialog box after typing your superscripted text and uncheck «Superscript» to turn this feature off.


Advertisement
-
1
Open the Equation Editor. Click the Equation button (which displays the Greek letter pi) in the Symbols section of the Insert ribbon tab. Select the «Insert New Equation» option at the bottom of the dropdown menu.
- You can open the editor from a new or existing document, but the Equation Editor is available only in Word’s XML-based .docx or .dotx formats.
-
2
Select the Script option from the Structures section of the Design tab. This option button displays an «e» raised to the power of «x.» Clicking the option button displays a dropdown menu with headings labeled «Subscripts and Superscripts» and «Common Subscripts and Superscripts.»
-
3
Select the first option under «Subscripts and Superscripts.» This option displays a larger dashed-line rectangular box with a smaller, raised rectangular box to its right. Selecting this option displays a similar pair of boxes in the Equation field on the document page.
-
4
Enter the number or variable (base) to be raised to a power. Enter the value of the base in the larger box to the left using your keyboard. If you enter a letter for a variable, it will automatically be displayed in italics.
-
5
Enter the number or variable for the exponent. Enter this value in the smaller box to the right using your keyboard. If you enter a letter for a variable, it will automatically be displayed in italics.
- You can also enter the base and exponent in the Equation field entirely from the keyboard by typing first the base, then the caret (^) symbol, then the exponent. When you hit Enter, closing the Equation field, the caret will disappear and the exponent will appear as a superscript.
- The Equation Editor in Word 2007 and later treats equations as Word text, with the Equation Editor using a special math font.


Advertisement
-
1
Open the Equation Editor. Click «Object» on the «Insert» menu. Select the «Create New» option from the Insert Object dialog box, then select «Microsoft Equation 3.0.»
-
2
Click the Exponent button on the bottom row of the Equation toolbar. This will display a template with a space for the base and a space for the exponent.
-
3
Enter the value of the base. Enter this value in the larger box to the left using your keyboard.
-
4
Enter the value of the exponent. Enter this value in the smaller box to the right.
- The Equation Editor in Word 2003 and earlier treats equations as objects, rather than text, but you can change the font and its size, format, and position as you would regular text.


Advertisement
Ask a Question
200 characters left
Include your email address to get a message when this question is answered.
Submit
Advertisement
Video
Thanks for submitting a tip for review!
-
Although Word offers several ways to create exponents and superscripts, they are considered special characters. Not all fonts will support exponents, and Word text with exponents copied into other applications may not display the exponent correctly. If there’s any doubt as to whether the exponent will display, you can write the exponent as a regular number, preceded by a caret. (The Equation Editor in Word 2007 or later will convert exponents created with it to this format. Click on the equation with the exponent to be converted to display the Equation field, then click the down arrow button at the lower right. Select Linear from the Equation Options dropdown menu.)
Advertisement
About This Article
Thanks to all authors for creating a page that has been read 671,415 times.
Is this article up to date?
Доброго времени суток друзья. Я уже рассказывал, как можно работать с Microsoft Excel средствами PowerShell. В данной статье мы рассмотрим работу
PowerShell
с
Microsoft Word
. Как и для Excel, чтобы получить доступ к MS Word нужно использовать COM объект. Для этого используем командлет
New-Object
с параметром
–ComObject
далее сам объект к которому хотим получить доступ, в нашем случае это
Word.Application
.
    #Создаем новый объект WORD
    $word = New-Object -ComObject Word.Application
После создания объекта обращаемся к свойству
Visible
и переключаем его в
TRUE
чтобы видеть работу скрипта непосредственно в самом
MS Word
а не в фоновом режиме.
    #Видимый режим вставки, по умолчанию FALSE
    $word.Visible = $True
Далее необходимо создать сам документ для этого обращаемся к свойству
Documents
и его методу
Add()
.
    #Создаем новый документ
    $doc = $word.Documents.Add()
Обратимся к свойству
Selection
для работы с текущим документом, далее мы будем использовать его для форматирования нашего документа.
    #Выбираем открывшийся документ для работы
    $Selection = $word.Selection
Задаем начальные настройки для документа допустим отступы со всех сторон.
    #Устанавливаем отступы для документа
    $Selection.Pagesetup.TopMargin = 50
    $Selection.Pagesetup.LeftMargin = 50
    $Selection.Pagesetup.RightMargin = 50
    $Selection.Pagesetup.BottomMargin = 50
Установим строчный интервал сверху и снизу.
    #Интервал отступов сверху и снизу
    $Selection.ParagraphFormat.SpaceBefore = 0
    $Selection.ParagraphFormat.SpaceAfter = 0
Подготовительные работы закончены, теперь можем заполнять наш документ. Укажем что наш первый абзац будет по центру для этого воспользуемся свойством ParagraphFormat и его свойством
Aligment
.
    #Выравнивание по центру
    $Selection.ParagraphFormat.Alignment = 1
Далее создаем таблицу с одной строкой и одной ячейкой которую зальем черным цветом и разместим пользовательскую картинку.
    #Добавляем таблицу
    $Table = $Word.ActiveDocument.Tables.Add($Word.Selection.Range, 1, 1)

    #Устанавливаем черный цвет заливки ячейки
    $Table.Cell(1,1).Shading.BackgroundPatternColor = 0

    #Вставляем картинку в ячейку таблицы
    $Table.Cell(1,1).Range.InlineShapes.AddPicture("D:Tempbezramok-tlt.png")

    #Конец таблицы, начать новую строку
    $Selection.EndKey(6, 0)
Далее переходим на новую строчку документа воспользовавшись методом
TypeParagraph()
.
    #Новый параграф
    $Selection.TypeParagraph()
Далее установим нужные настройки для нашего заголовка.
    #Шрифт написания
    $Selection.Font.Name = "Times New Roman"

    #Размер шрифта
    $Selection.Font.Size = 18
Как видно из примера мы установили шрифт
Time New Roman
и размер шрифта
18
, далее вставляем текст.
    #Текст заголовка
    $Selection.TypeText("Работаем с Microsoft Word при помощи PowerShell")
Для следующего текста поменяем настройки шрифта и размер и вид, а также выровняем текст по ширине документа.
    #Выравнивание по ширине листа
    $Selection.ParagraphFormat.Alignment = 3

    #Устанавливаем новые значения размера шрифта
    $Selection.Font.Name = "Arial"
    $Selection.Font.Size = 12

    #Пишем курсивом
    $Selection.Font.Italic = $true
Далее добавляем новый текст в наш документ.
    #Добавляем следующий текст
    $Selection.TypeText("Windows PowerShell — расширяемое средство автоматизации от Microsoft с открытым исходным кодом")
Так как для следующего текста нам не нужен курсив, то отключаем его.
    #отключаем курсив
    $Selection.Font.Italic = $false
Далее создаем настройки для следующего текста, выправным его по центру и изменим цвет на темно-зеленый, а также выделим жирным.
    #Вставляем заголовок по центру
    $Selection.ParagraphFormat.Alignment = 1

    #Устанавливаем новые значения размера шрифта
    $Selection.Font.Name = "Arial"
    $Selection.Font.Size = 18

    #Делаем цвет текста темно-зеленым
    $Selection.Font.Color = "wdColorDarkGreen"

    #Выделяем жирным
    $Selection.Font.Bold = $True

    #Следующий текст в нашем документе
    $Selection.TypeText("Добавляем картинку из файла ")
Далее вставляем картинку в документ по центру, для этого используем свойство
InlineShapes
и его метод
AddPicture()
передав путь до картинки.
    #Вставляем картинку из файла
    $Selection.InlineShapes.AddPicture("D:Tempword.jpg")
Далее отменяем центрирование и меняем цвет текста на черный.
    #Делаем цвет текста черным
    $Selection.Font.Color = 0

    #Отменяем жирный
    $Selection.Font.Bold = $False
Устанавливаем новые настройки для следующего текста.
    #Настройки размера шрифта для нового текста
    $Selection.Font.Name="Times New Roman"
    $Selection.Font.Size=12
Далее создадим таблицу с тремя столбцами в которую заполним с помощью
PowerShell
.
    #Добавляем таблицу
    $Table = $Word.ActiveDocument.Tables.Add($Word.Selection.Range, 1, 3)

    #Ручной вариант форматирования таблицы
    # $Table.Range.Style = "Table Grid"
    # $Table.Borders.InsideLineStyle = 1
    # $Table.Borders.OutsideLineStyle = 1

    #Заполняем шапку таблицы
    $Table.Cell(1,1).Range.Text = "№"
    $Table.Cell(1,2).Range.Text = "Name"
    $Table.Cell(1,3).Range.Text = "DysplayName"

    #Счетчики для генерации таблицы
    $i = 2
    $counter = 1

    #Получаем список всех процессов на компьютере
    $srv = Get-Service a*

    #Записываем полученые данные в ячейки таблицы
    foreach ($arr in $srv)
    {
    $Table.Rows.Add()
    $Table.Cell($i,1).Range.Text = $counter
    $Table.Cell($i,2).Range.Text = $arr.Name
    $Table.Cell($i,3).Range.Text = $arr.DisplayName


    #инкрементируем счетчики
    $i = $i + 1
    $counter = $counter + 1
    }

    #Автоформатирование таблицы
    $Table.AutoFormat(20)

    #Конец таблицы, начать новую строку
    $Selection.EndKey(6, 0)
Здесь нужно отметить, что ячейки таблицы начинаются с
1
. Для генерации новой строки нужно использовать свойство Rows и его метод
Add()
. Для удобства форматирования таблицы используем метод
AutoFormat()
передав число (это идентификатор шаблона форматирования таблицы). Для перехода от таблицы к обычному документу используем метод
EndKey(6, 0)
.
Далее создаем настройки для нового текста, выровняем все по левому краю и добавим гиперссылок в наш документ.
    #Вставляем заголовок по центру
    $Selection.paragraphFormat.Alignment = 0

    #Размер шрифта
    $Selection.Font.Size=14

    #Текст
    $Selection.TypeText("Урок создал")

    #Новый параграф
    $Selection.TypeParagraph()

    #Размер шрифта
    $Selection.Font.Size=12

    #Гиперссылка сайта
    $Selection.Hyperlinks.Add($Selection.Range,"http:#bezramok-tlt.ru")

    #Новый параграф
    $Selection.TypeParagraph()

    #Гиперссылка почты
    $Selection.Hyperlinks.Add($Selection.Range,"mailto:bezramok-tlt@mail.ru")

    #Новый параграф
    $Selection.TypeParagraph()

    #Текст
    $Selection.TypeText("Админ")

    #Новый параграф
    $Selection.TypeParagraph()

    #Размер шрифта
    $Selection.Font.Size=10

    #Текст
    $Selection.TypeText("Дата: " + $date)
Как вы заметили мы использовали свойство
Hyperlinks
и его метод
Add()
в который передали
URL
для гиперссылки.
Далее сохраняем документ (СохранитьКак) указываем путь куда будем сохранять наш файл, закрываем сам документ, закрываем само приложение MS Word.
    #СохранитьКак указываем путь куда и имя файла
    $doc.SaveAs([ref]"D:tempPsWord.docx")

    #Закрываем документ
    $doc.Close()

    #Закрываем приложение
    $word.Quit()
Я постарался собрать на мой взгляд основные действия для заполнения документа – это форматирование текста, изменение размера текста, шрифта, цвета. Создание таблиц, заполнение таблицы графически и текстовым материалом, а также заливка ячейки цветом.
Вот таким способом можно создавать документы
MS Word
с помощью
PowerShell
.
Скрипт PowerShell работа с MS Word целиком
    #Получаем текущую дату
    $date = Get-Date

    #Создаем новый объект WORD
    $word = New-Object -ComObject Word.Application

    #Видимый режим вставки, по умолчанию FALSE
    $word.Visible = $True

    #Создаем новый документ
    $doc = $word.Documents.Add()

    #Выбираем открывшийся документ для работы
    $Selection = $word.Selection

    #Устанавливаем отступы для документа
    $Selection.Pagesetup.TopMargin = 50
    $Selection.Pagesetup.LeftMargin = 50
    $Selection.Pagesetup.RightMargin = 50
    $Selection.Pagesetup.BottomMargin = 50


    #Интервал отступов сверху и снизу
    $Selection.ParagraphFormat.SpaceBefore = 0
    $Selection.ParagraphFormat.SpaceAfter = 0


    #Выравнивание по центру
    $Selection.ParagraphFormat.Alignment = 1

    #Добавляем таблицу
    $Table = $Word.ActiveDocument.Tables.Add($Word.Selection.Range, 1, 1)

    #Устанавливаем черный цвет заливки ячейки
    $Table.Cell(1,1).Shading.BackgroundPatternColor = 0

    #Вставляем картинку в ячейку таблицы
    $Table.Cell(1,1).Range.InlineShapes.AddPicture("D:Tempbezramok-tlt.png")


    #Конец таблицы, начать новую строку
    $Selection.EndKey(6, 0)

    #Новый параграф
    $Selection.TypeParagraph()

    #Шрифт написания
    $Selection.Font.Name = "Times New Roman"

    #Размер шрифта
    $Selection.Font.Size = 18

    #Текст заголовка
    $Selection.TypeText("Работаем с Microsoft Word при помощи PowerShell")

    #Переходим на новую строку
    $Selection.TypeParagraph()

    #Выравнивание по ширине листа
    $Selection.ParagraphFormat.Alignment = 3

    #Устанавливаем новые значения размера шрифта
    $Selection.Font.Name = "Arial"
    $Selection.Font.Size = 12

    #Пишем курсивом
    $Selection.Font.Italic = $true

    #Добавляем следующий текст
    $Selection.TypeText("Windows PowerShell — расширяемое средство автоматизации от Microsoft с открытым исходным кодом")

    #отключаем курсив
    $Selection.Font.Italic = $false

    #Новый параграф
    $Selection.TypeParagraph()

    #Новый параграф
    $Selection.TypeParagraph()

    #Вставляем заголовок по центру
    $Selection.ParagraphFormat.Alignment = 1

    #Устанавливаем новые значения размера шрифта
    $Selection.Font.Name = "Arial"
    $Selection.Font.Size = 18

    #Делаем цвет текста темно-зеленым
    $Selection.Font.Color = "wdColorDarkGreen"

    #Выделяем жирным
    $Selection.Font.Bold = $True

    #Следующий текст в нашем документе
    $Selection.TypeText("Добавляем картинку из файла ")

    #Вставляем картинку из файла
    $Selection.InlineShapes.AddPicture("D:Tempword.jpg")

    #Делаем цвет текста черным
    $Selection.Font.Color = 0

    #Отменяем жирный
    $Selection.Font.Bold = $False

    #Новый параграф двойной отступ
    $Selection.TypeParagraph()
    $Selection.TypeParagraph()

    #Настройки размера шрифта для нового текста
    $Selection.Font.Name = "Times New Roman"
    $Selection.Font.Size = 14

    $Selection.TypeText("Создание таблицы в Microsoft Word средствами PowerShell")

    #Новый параграф
    $Selection.TypeParagraph()

    #Новый параграф
    $Selection.TypeParagraph()

    #Настройки размера шрифта для нового текста
    $Selection.Font.Name="Times New Roman"
    $Selection.Font.Size=12

    #Добавляем таблицу
    $Table = $Word.ActiveDocument.Tables.Add($Word.Selection.Range, 1, 3)

    #Ручной вариант форматирования таблицы
    # $Table.Range.Style = "Table Grid"
    # $Table.Borders.InsideLineStyle = 1
    # $Table.Borders.OutsideLineStyle = 1

    #Заполняем шапку таблицы
    $Table.Cell(1,1).Range.Text = "№"
    $Table.Cell(1,2).Range.Text = "Name"
    $Table.Cell(1,3).Range.Text = "DysplayName"

    #Счетчики для генерации таблицы
    $i = 2
    $counter = 1

    #Получаем список всех процессов на компьютере
    $srv = Get-Service a*

    #Записываем полученые данные в ячейки таблицы
    foreach ($arr in $srv)
    {
    $Table.Rows.Add()
    $Table.Cell($i,1).Range.Text = $counter
    $Table.Cell($i,2).Range.Text = $arr.Name
    $Table.Cell($i,3).Range.Text = $arr.DisplayName


    #инкрементируем счетчики
    $i = $i + 1
    $counter = $counter + 1
    }

    #Автоформатирование таблицы
    $Table.AutoFormat(20)

    #Конец таблицы, начать новую строку
    $Selection.EndKey(6, 0)

    #Новый параграф
    $Selection.TypeParagraph()

    #Вставляем заголовок по центру
    $Selection.paragraphFormat.Alignment = 0

    #Размер шрифта
    $Selection.Font.Size=14

    #Текст
    $Selection.TypeText("Урок создал")

    #Новый параграф
    $Selection.TypeParagraph()

    #Размер шрифта
    $Selection.Font.Size=12

    #Гиперссылка сайта
    $Selection.Hyperlinks.Add($Selection.Range,"http:#bezramok-tlt.ru")

    #Новый параграф
    $Selection.TypeParagraph()

    #Гиперссылка почты
    $Selection.Hyperlinks.Add($Selection.Range,"mailto:bezramok-tlt@mail.ru")

    #Новый параграф
    $Selection.TypeParagraph()

    #Текст
    $Selection.TypeText("Админ")

    #Новый параграф
    $Selection.TypeParagraph()

    #Размер шрифта
    $Selection.Font.Size=10

    #Текст
    $Selection.TypeText("Дата: " + $date)

    #Новый параграф
    $Selection.TypeParagraph()

    #СохранитьКак указываем путь куда и имя файла
    $doc.SaveAs([ref]"D:tempPsWord.docx")

    #Закрываем документ
    $doc.Close()

    #Закрываем приложение
    $word.Quit()
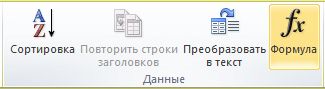
Вычисления и логические сравнения можно выполнять с помощью формул. Команда Формула находится в разделе Работа с таблицами на вкладке Макет в группе Данные.
В приложении Word формулы обновляются автоматически при открытии документа, который их содержит. Результаты формул также можно обновлять вручную. Дополнительные сведения см. в разделе Обновление результатов формул.
Примечание: Формулы в таблицах Word и Outlook — это тип кода поля. Дополнительные сведения о кодах полей см. в разделе См. также.
В этой статье
-
Вставка формулы в ячейку таблицы
-
Обновление результатов формул
-
Обновление результатов отдельных формул
-
Обновление результатов всех формул в таблице
-
Обновление всех формул в документе
-
-
Примеры: сложение чисел в таблице с помощью позиционных аргументов
-
Доступные функции
-
Использование закладок и ссылок на ячейки в формуле
-
Ссылки формата RnCn
-
Ссылки формата A1
-
Вставка формулы в ячейку таблицы
-
Выделите ячейку таблицы, в которой должен находиться результат. Если ячейка не пустая, удалите ее содержимое.
-
В разделе Работа с таблицами на вкладке Макет в группе Данные нажмите кнопку Формула.
-
С помощью диалогового окна Формула создайте формулу. Можно ввести формулу в поле Формула, выбрать формат числа в поле Формат числа, а также вставить функции и закладки, используя списки Вставить функцию и Вставить закладку.
Обновление результатов вычислений
В Word результат формулы рассчитывается при ее вставке, а также при открытии содержащего ее документа. В Outlook результат формулы рассчитывается только при ее вставке, и получатель сообщения не сможет его изменить.
Кроме того, поддерживается ручное обновление следующих элементов:
-
результатов отдельных формул;
-
результатов всех формул в отдельной таблице;
-
всех кодов полей в документе, включая формулы.
Обновление результатов отдельных формул
-
Выделите формулы, которые необходимо обновить. Чтобы выделить несколько формул, удерживайте нажатой клавишу CTRL.
-
Выполните одно из указанных ниже действий.
-
Щелкните формулу правой кнопкой мыши и выберите команду Обновить поле.
-
Нажмите клавишу F9.
-
Обновление результатов всех формул в таблице
-
Выделите таблицу, содержащую результаты формул, которые необходимо обновить, и нажмите клавишу F9.
Обновление всех формул в документе
Важно: В результате выполнения этой процедуры будут обновлены не только формулы, а все коды полей в документе.
-
Нажмите клавиши CTRL+A.
-
Нажмите клавишу F9.
Примеры: сложение чисел в таблице с помощью позиционных аргументов
Позиционные аргументы (LEFT, RIGHT, ABOVE, BELOW) можно использовать для следующих функций:
-
AVERAGE
-
COUNT
-
MAX
-
MIN
-
PRODUCT
-
SUM
В качестве примера рассмотрим процедуру сложения чисел с помощью функции SUM и позиционных аргументов.
Важно: Чтобы при нахождении суммы в таблице с помощью позиционных аргументов не возникло ошибки, введите в пустые ячейки, учитываемые при вычислении, нуль (0).
-
Выделите ячейку таблицы, в которой должен находиться результат. Если ячейка не пустая, удалите ее содержимое.
-
В разделе Работа с таблицами на вкладке Макет в группе Данные нажмите кнопку Формула.
-
В диалоговом окне Формула выполните одно из указанных ниже действий.
|
Местонахождение складываемых чисел |
Значение поля Формула |
|---|---|
|
Над ячейкой |
=SUM(ABOVE) |
|
Под ячейкой |
=SUM(BELOW) |
|
Над ячейкой и под ней |
=SUM(ABOVE;BELOW) |
|
Слева от ячейки |
=SUM(LEFT) |
|
Справа от ячейки |
=SUM(RIGHT) |
|
Слева и справа от ячейки |
=SUM(LEFT;RIGHT) |
|
Слева от ячейки и над ней |
=SUM(LEFT;ABOVE) |
|
Справа от ячейки и над ней |
=SUM(RIGHT;ABOVE) |
|
Слева от ячейки и под ней |
=SUM(LEFT;BELOW) |
|
Справа от ячейки и под ней |
=SUM(RIGHT,BELOW) |
-
Нажмите кнопку «ОК».
Доступные функции
Примечание: Формулы, в которых используются позиционные аргументы (например, LEFT), не учитывают значения в строке заголовков.
В формулах, располагаемых внутри таблиц Word и Outlook, можно использовать перечисленные ниже функции.
|
Функция |
Действие |
Пример |
Возвращаемое значение |
|---|---|---|---|
|
ABS() |
Определяет абсолютную величину числа в скобках |
=ABS(-22) |
22 |
|
AND() |
Определяет, все ли аргументы внутри скобок являются истинными. |
=AND(SUM(LEFT)<10;SUM(ABOVE)>=5) |
1, если сумма значений, находящихся слева от формулы (в той же строке), меньше 10 исумма значений, находящихся над формулой (в том же столбце, исключая ячейки заголовка) больше или равна 5; в противном случае — 0. |
|
AVERAGE() |
Находит среднее арифметическое значение элементов, указанных в скобках. |
=AVERAGE(RIGHT) |
Среднее арифметическое всех значений, находящихся справа от ячейки с формулой (в той же строке). |
|
COUNT() |
Определяет количество элементов, указанных в скобках. |
=COUNT(LEFT) |
Количество значений, находящихся слева от ячейки с формулой (в той же строке). |
|
DEFINED() |
Устанавливает, определен ли аргумент внутри скобок. Возвращает значение 1, если аргумент определен и вычисляется без ошибок, или 0, если аргумент не определен или возвращает ошибку. |
=DEFINED(валовый_доход) |
1, если элемент «валовой_доход» определен и вычисляется без ошибок; в противном случае — 0. |
|
FALSE |
Не имеет аргументов. Всегда возвращает значение 0. |
=FALSE |
0 |
|
IF() |
Вычисляет первый аргумент. Если первый аргумент является истинным, возвращает второй аргумент; если ложным — третий. Примечание: Необходимо задать все три аргумента. |
=IF(SUM(LEFT)>=10;10;0) |
10, если сумма значений, находящихся слева от формулы, больше или равна 10; в противном случае — 0. |
|
INT() |
Округляет значение в скобках до ближайшего целого числа (меньшего). |
=INT(5,67) |
5 |
|
MAX() |
Возвращает наибольшее значение среди элементов, указанных в скобках. |
=MAX(ABOVE) |
Наибольшее из значений, находящихся в ячейках над формулой (за исключением ячеек строк заголовков). |
|
MIN() |
Возвращает наименьшее значение среди элементов, указанных в скобках. |
=MIN(ABOVE) |
Наименьшее из значений, находящихся в ячейках над формулой (за исключением ячеек строк заголовков). |
|
MOD() |
Имеет два аргумента (числа или выражения, результатами которых являются числа). Возвращает остаток от деления первого аргумента на второй. Если остаток равен нулю (0), возвращает значение 0,0. |
=MOD(4;2) |
0,0 |
|
NOT() |
Имеет один аргумент. Определяет истинность аргумента. Если аргумент является истинным, возвращает значение 0; если ложным — 1. В основном используется в функции IF. |
=NOT(1=1) |
0 |
|
OR() |
Имеет два аргумента. Если хотя бы один из них является истинным, возвращает значение 1. Если оба аргумента являются ложными, возвращает значение 0. В основном используется в функции IF. |
=OR(1=1;1=5) |
1 |
|
PRODUCT() |
Вычисляет произведение элементов, указанных в скобках. |
=PRODUCT(LEFT) |
Произведение всех значений, находящихся в ячейках слева от формулы. |
|
ROUND() |
Имеет два аргумента (первый аргумент должен быть числом или выражением, результатом которого является число, второй — целым числом или выражением, результатом которого является целое число). Округляет первый аргумент до заданного вторым аргументом количества десятичных разрядов. Если второй аргумент больше нуля (0), первый аргумент округляется до указанного количества десятичных разрядов (в меньшую сторону). Если второй аргумент равен нулю (0), первый аргумент округляется до ближайшего целого числа (в меньшую сторону). Если второй аргумент меньше нуля, первый аргумент округляется слева от десятичной запятой (в меньшую сторону). |
=ROUND(123,456; 2) =ROUND(123,456; 0) =ROUND(123,456; -2) |
123,46 123 100 |
|
SIGN() |
Имеет один аргумент, который должен быть числом или выражением, результатом которого является число. Сравнивает указанный в скобках элемент с нулем (0). Если этот элемент больше нуля, возвращает значение 1; если равен нулю — 0; если меньше нуля — -1. |
=SIGN(-11) |
-1 |
|
SUM() |
Вычисляет сумму элементов, указанных в скобках. |
=SUM(RIGHT) |
Сумма значений, находящихся в ячейках справа от формулы. |
|
TRUE() |
Имеет один аргумент. Определяет истинность аргумента. Если аргумент является истинным, возвращает значение 1, если ложным — 0. В основном используется в функции IF. |
=TRUE(1=0) |
0 |
Использование в формуле закладок и ссылок на ячейки
В формулу можно вставить ссылку на ячейку, для которой создана закладка, используя имя этой закладки. Например, если для ячейки, содержащей число или выражение, результатом которого является число, создана закладка с именем валовой_доход, формула =ROUND(валовой_доход,0) округлит значение этой ячейки до ближайшего целого числа в меньшую сторону.
В формуле также можно использовать ссылки на столбцы и строки. Существует два формата записи ссылок: RnCn и A1.
Примечание: Ячейки с формулами не учитываются в вычислениях, в которых используются ссылки. Если ячейка является частью ссылки, она игнорируется.
Ссылки формата RnCn
Для записи ссылки на строку, столбец или ячейку таблицы в формуле можно использовать формат RnCn. Здесь Rn соответствует n-ой строке, а Cn — n-му столбцу. Например, ссылка R1C2 указывает на ячейку в первой строке и втором столбце. Приведенная ниже таблица содержит примеры записи ссылок в таком формате.
|
Ячейка или диапазон |
Формат записи ссылки |
|---|---|
|
Весь столбец |
Cn |
|
Всю строку |
Rn |
|
Отдельная ячейка |
RnCn |
|
Строка, содержащая формулу |
R |
|
Столбец с формулой |
C |
|
Все ячейки между двумя заданными ячейками |
RnCn:RnCn |
|
Ячейка в таблице с закладкой |
ИмяЗакладки RnCn |
|
Диапазон ячеек в таблице с закладкой |
ИмяЗакладки RnCn:RnCn |
Ссылки формата A1
Для записи ссылки на ячейку, набор или диапазон ячеек можно использовать формат A1. Здесь буква соответствует столбцу, а цифра — строке ячейки. Первый столбец таблицы обозначен буквой «A», а первая строка — цифрой «1». Приведенная ниже таблица содержит примеры записи ссылок в таком формате.
|
Ячейка или диапазон |
Формат записи ссылки |
|---|---|
|
Ячейка в первом столбце и второй строке |
A2 |
|
Первые две ячейки в первой строке |
A1;B1 |
|
Все ячейки в первом столбце и первые две ячейки во втором столбце |
A1:B2 |
Последнее обновление: 29.08.2015
См. также
Коды полей в Word и Outlook
Word provides some simple formulas and functions without need to embed Excel tables. It is easy
to insert and use formulas:
- In a Word table:

- In a document body:

You can use simple formulas in Microsoft Word, such as addition (+), subtraction (-),
multiplication (*), or division (/). Also, you can calculate a power of (^):

See
How to reference a cell of a Word
table
for more details.
All functions you can see in the Paste function drop-down list of the
Formula dialog box:

| Function | Description |
|---|---|
| ABS () | Calculates the absolute value of the value inside the parentheses. |
| AND () | Evaluates whether the arguments inside the parentheses are all TRUE. |
| AVERAGE () | Calculates the average of the elements identified inside the parentheses. |
| COUNT () | Calculates the number of elements identified inside the parentheses. |
| DEFINED () | Evaluates whether the argument inside parentheses is defined. Returns 1 if the argument has been defined and evaluates without error, 0 if the argument has not been defined or returns an error. |
| FALSE | Always returns 0 |
| IF () | Evaluates the first argument. Returns the second argument if the first argument is true; returns the third argument if the first argument is false. Note: Requires exactly three arguments. |
| INT () | Rounds the value inside the parentheses down to the nearest integer. |
| MAX () | Returns the maximum value of the items identified inside the parentheses. |
| MIN () | Returns the minimum value of the items identified inside the parentheses. |
| MOD () | Takes two arguments (must be numbers or evaluate to numbers). Returns the remainder after the second argument is divided by the first. If the remainder is 0 (zero), returns 0.0. |
| NOT | Evaluates whether the argument is true. Returns 0 if the argument is true, 1 if the argument is false. Mostly used inside an IF formula. |
| OR () | Takes two arguments. If both are false, returns 0, else returns 1. Mostly used inside an IF formula. |
| PRODUCT () | Calculates the product of items identified inside the parentheses. |
| ROUND () | Rounds the first argument to the number of digits specified by the second argument. If the second argument is greater than zero (0), first argument is rounded down to the specified number of digits. If second argument is zero (0), first argument is rounded down to the nearest integer. If second argument is negative, first argument is rounded down to the left of the decimal. |
| SIGN () | Takes one argument that must either be a number or evaluate to a number. Evaluates whether the item identified inside the parentheses if greater than, equal to, or less than zero (0). Returns 1 if greater than zero, 0 if zero, -1 if less than zero. |
| SUM () | Calculates the sum of items identified inside the parentheses. |
| TRUE | Always returns 1. |
The arguments can be:
| Argument | Description |
|---|---|
| ABOVE | Cells above the current. For example, =SUM(ABOVE) |
| BELOW | Cells below the current. For example, =SUM(BELOW) |
| LEFT | Cells on left of the current. For example, =SUM(LEFT) |
| RIGHT | Cells on right of the current. For example, =SUM(RIGHT) |
See also this tip in French:
Fonctions et formules dans Word.
Please, disable AdBlock and reload the page to continue
Today, 30% of our visitors use Ad-Block to block ads.We understand your pain with ads, but without ads, we won’t be able to provide you with free content soon. If you need our content for work or study, please support our efforts and disable AdBlock for our site. As you will see, we have a lot of helpful information to share.