
Если вы или ваша компания храните данные в облаке OneDrive или на корпоративном портале SharePoint, то напрямую подключиться к ним с помощью Power Query в Excel или из Power BI может оказаться непростой, как это ни странно, задачей.
Когда я в своё время столкнулся с подобным вопросом, то с удивлением обнаружил, что не существует «законных» способов для её решения. В списке доступных источников данных в Excel и даже в Power BI (где набор коннекторов традиционно шире) почему-то отсутствует возможность подключения к файлам и папкам OneDrive.
Так что все предлагаемые ниже варианты — в той или иной степени «костыли», требующие небольшой, но ручной «доводки напильником». Но у этих костылей есть большой плюс — они работают 
А в чём проблема?
Короткая вводная для тех, кто последние 20 лет провел в коме не в теме.
OneDrive — это облачное хранилище данных от Microsoft, доступное в нескольких вариантах:
- OneDrive Personal — для простых (некорпоративных) пользователей. Дают 5Гб бесплатно + дополнительное место за небольшую месячную плату.
- OneDrive for Business — вариант для корпоративных пользователей и подписчиков Office 365 с гораздо большим доступным объемом (от 1Тб и больше) и дополнительными фишками вроде хранения версий и т.п.
Частным случаем OneDrive for Business является хранение данных на корпоративном портале SharePoint — в таком сценарии OneDrive выступает, по сути, одной из библиотек SharePoint’а.
Доступ к файлам возможен либо через веб-интерфейс (сайт https://onedrive.live.com либо корпоративный сайт SharePoint) либо путем синхронизации выбранных папок с вашим ПК:

Обычно эти папки хранятся в профиле пользователя на диске С — путь к ним выглядит примерно как C:UsersИмяПользователяOneDrive). За актуальностью файлов и синхронизацией всех изменений следит специальная программа — Агент OneDrive (синее или серое облачко в правом нижнем углу экрана):

А теперь главное.
Если нам нужно загрузить данные из OneDrive в Excel (через Power Query) или в Power BI, то мы, конечно, можем указать в качестве источника локальные синхронизируемые файлы и папки обычным образом через Получить данные — Из файла — Из книги / Из папки (Get Data — From file — From workbook / Folder), но это не будет прямой ссылкой на облако OneDrive.
То есть в будущем, при изменении, например, файлов в облаке другими пользователями, нам потребуется сначала выполнить синхронизацию (это бывает долго и не всегда удобно) и только потом обновлять наш запрос Power Query или модель в Power BI.
Естественно, возникает вопрос: как импортировать данные из OneDrive / SharePoint напрямую, чтобы загрузка данных происходила непосредственно из облака?
Вариант 1. Подключение к книге из OneDrive for Business или SharePoint
- Открываем книгу в нашем Excel — локальную копию из синхронизированной папки OneDrive как обычный файл. Или открываем на сайт сначала в Excel Online, а потом жмем на кнопку Открыть в Excel (Open in Excel).
- Идем в Файл — Сведения (File — Info)
- Копируем облачный путь к книге кнопкой Копировать путь (Copy Path) в заголовке:

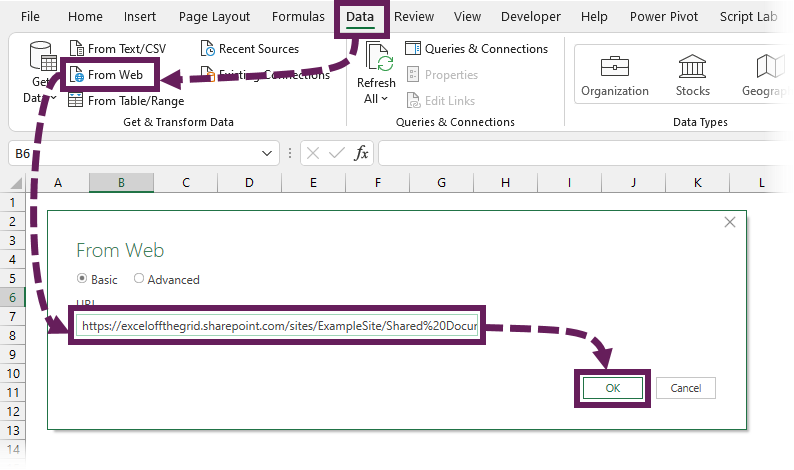
- В другом файле Excel или в Power BI, куда нужно залить данные, выбираем команды Получить данные — Из интернета (Get Data — From web) и вставляем в поле адреса скопированный путь.
- Удаляем в конце пути ?web=1 и жмем на ОК:

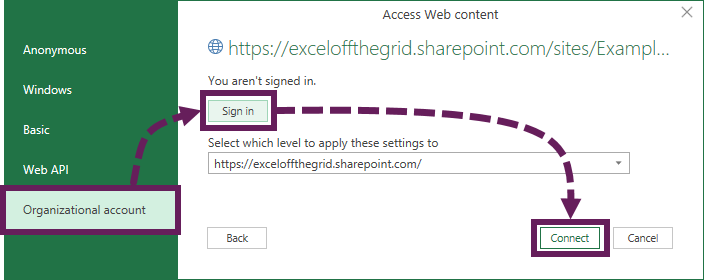
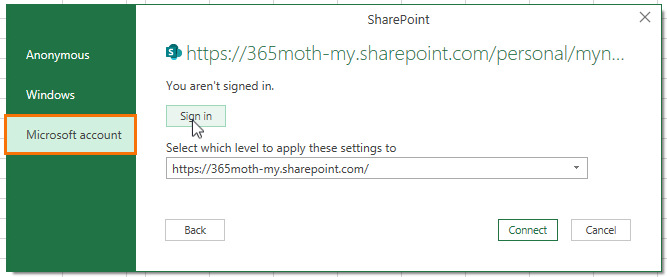
- В появившемся окне выбираем способ авторизации Учетная запись в организации (Organization Account) и жмём на кнопку Вход (Log in):

Вводим наш рабочий логин-пароль или выбираем корпоративную учетную запись из появившегося списка. Если все сделаете правильно, то надпись Вход должна поменяться на Войти от имени другого пользователя (Log in with other user account).
- Жмем на кнопку Подключение (Connect).


Дальше всё как при обычном импорте книги — выбираем нужные листы, умные таблицы для импорта и т.д.
Вариант 2. Подключение к файлу из OneDrive Personal
Для подключения к книге в личном (некорпоративном) облаке OneDrive подход будет уже другим:
- Открываем на сайте OneDrive содержимое нужной папки и находим импортируемый файл.
- Щёлкаем по нему правой кнопкой мыши и выбираем команду Внедрение (Embed) или выделяем файл и выбираем аналогичную команду в верхнем меню:

- В появившейся справа панели жмем кнопку Создать и копируем сформированный код:

- Вставляем скопированный код в Блокнот и «дорабатываем напильником»:
- Убираем всё, кроме ссылки в кавычках
- Удаляем блок cid=XXXXXXXXXXXX&
- Заменяем слово embed на download
В итоге из исходного кода должно получиться такое:

- Дальше всё, как и в предыдущем способе. В другом файле Excel или в Power BI, куда нужно залить данные, выбираем команды Получить данные — Из интернета (Get Data — From web), вставляем в поле адреса отредактированный путь и жмём ОК.
- При появлении окна авторизации выбираем вариант Windows и, при необходимости, вводим логин-пароль от OneDrive.


Вариант 3. Импорт содержимого целой папки из OneDrive for Business
Если нужно залить в Power Query или Power BI содержимое не одного файла, а сразу целой папки (например, с отчетами), то подход будет чуть попроще:
- В Проводнике щёлкаем правой кнопкой мыши по интересущей нас локальной синхронизированной папке в OneDrive и выбираем Просмотреть на сайте (View online).
- В адресной строке браузера копируем начальную часть адреса — до слова /_layouts:

- В книге Excel, куда нужно загрузить данные или в отчёте Power BI Desktop выбираем команды Получить данные — Из файла — Из папки SharePoint (Get Data — From file — From SharePoint folder):

Затем вставляем скопированный фрагмент пути в поле адреса и жмем ОК:

Если появляется окно авторизации, то выбираем тип Учетная запись Microsoft (Microsoft Account), жмём на кнопку Вход (Log in), а потом, после успешного входа, на кнопку Подключение (Connect):

- После этого происходит запрос и загрузка всех файлов из SharePoint и появляется окно предварительного просмотра, где можно смело жать на Преобразовать данные (Transform Data).
- Дальнейшее редактирование списка всех файлов и их объединение происходит уже в Power Query или в Power BI стандартным образом. Чтобы сузить круг поиска только до нужной нам папки, можно воспользоваться фильтрацией по столбцу Folder Path (1) и затем развернуть всё содержимое обнаруженных файлов с помощью кнопки в столбце Content (2):


Примечание: при наличии большого количества файлов на портале SharePoint этот способ будет существенно медленее двух предыдущих.
Ссылки по теме
- Сборка таблиц из разных файлов с помощью Power Query
- Что такое Power Query, Power Pivot, Power BI и чем они могут вам помочь
- Сборка данных со всех листов книги в одну таблицу
Update September 2020: This post gets so many hits every day I decided to make a video. You should watch it. It is short.
Original post:
I try to avoid using Excel as a data source when I can. Although Excel has many benefits[1], its limitations[2] make it less than ideal for enterprise BI solutions. Despite this, it feels like I end up needing to analyze data in Excel at least once a month. And every time I’m connecting from Power Query to an Excel workbook located in SharePoint Online or OneDrive for Business, I find myself exclaiming “it shouldn’t be this hard!”[3]
What’s the problem? It’s not working with the data – Power Query makes this as painless as you’d expect. The problem is referencing the XSLX file. What path do I use?
In Excel and in SharePoint, there is a “copy link” option, which will copy a link to the workbook so you can share it with others.

It always feels like this should work, that I should be able to paste this URL into the Get Data experience in Power Query, and if it’s been more than a few months since the last time I tried, I expect it to work. But it never does.
This works:

In the Excel ribbon, click on the File tab, and on the Info screen that appears click on the label under the file name. There’s no visual indicator that this label is a menu button until you hover over it, but when you click on it, a menu appears with a “Copy path to clipboard” option.
Update May 2020: Since this post was originally published, the Excel team has made this option a little easier to find. Your Excel options may look something like this:

Clicking “Copy path” will give you a path in this format:
https://organization.sharepoint.com/path/path/path/NicelyEscapedFileName.xlsx?web=1
With this starting point, all you need to do is remove the ?web=1 query string parameter at the end of the URL, and you have the path to the workbook that Power Query needs.
Choose “Web” as the data source in the Get Data menu, and paste this URL into the Dialog:

Power Query is smart enough to understand that this URL is pointing to an Excel workbook, so from this point on, you’ll get an experience where you can select tables and worksheets, and can start manipulating and analyzing your Excel data.

Life is good.
Full disclosure: Were it not for Power Query program manager Miguel Llopis, I never would have found this. During one of our dataflows sessions at Microsoft Ignite, Miguel spent a few minutes walking through the these steps at the beginning of a demo. My initial reaction was along the lines of “Why are you showing this? This isn’t a dataflows topic!” but when I realized what he was showing it quickly changed to “Holy crap – I didn’t know you could do that!”
In any event, I’m working with data in Excel again today, and spent a few minutes trying to find this technique documented anywhere. When I couldn’t find any, this post was born… but all credit should go to Miguel.
[1] None of which will I list here. It’s not that kind of blog.
[2] Neither will the limitations be enumerated. Feel free to take my word for it, or go build a data warehouse or two that extract data from Excel, and then come back and let me know what you think.
[3] To be fair, this may be another of those “get off my lawn” moments. It’s hard to tell sometimes.
In Power Query, when we connect to a local file, it’s reasonably obvious how we do that; it’s built directly into the UI. We just need to navigate to the location… Bam. Done! However, what if we want Power Query to get data from OneDrive or SharePoint? How do we do that? It’s not obvious. Actually, sometimes what seems like the answer can lead us down the wrong “file” path (oh, sorry, that was a terrible Dad joke).
As more companies use online storage locations such as OneDrive and SharePoint, the more relevant the data connectors to these sources become.
If you are looking to get data from OneDrive personal, check out this post: Get data from OneDrive Personal files with Power Query
So, in this post, I want to show you how to connect to OneDrive or SharePoint with Power Query.
Watch the video
Watch the video on YouTube.
Find the URL
OneDrive and SharePoint both use web connections, so the first thing we need to do is find the URL of the file. The problem is that it’s harder to find the URL than you might think.
If you open the file online and look at the URL in the address bar, that’s got to be it, right… wrong! This won’t work.
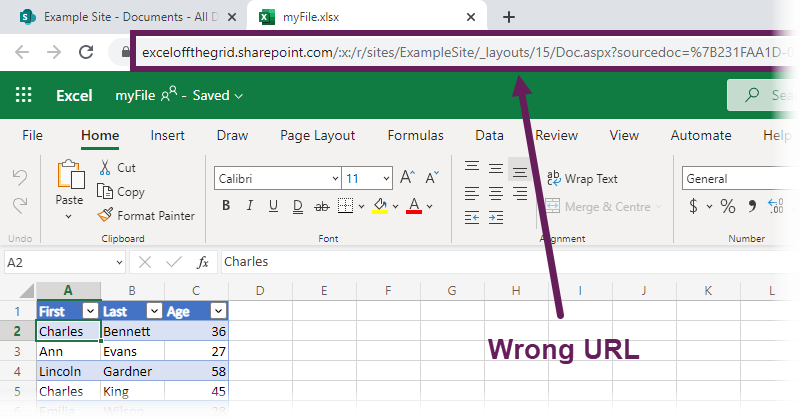
Initially, it will ask you to sign in to your Microsoft account. It will appear to be connecting, and then… ha, ha, fooled you! You’ll get the error message below.

OK, let’s try another method. If you copy the share link for the file, that’s got to work, right? Nope!
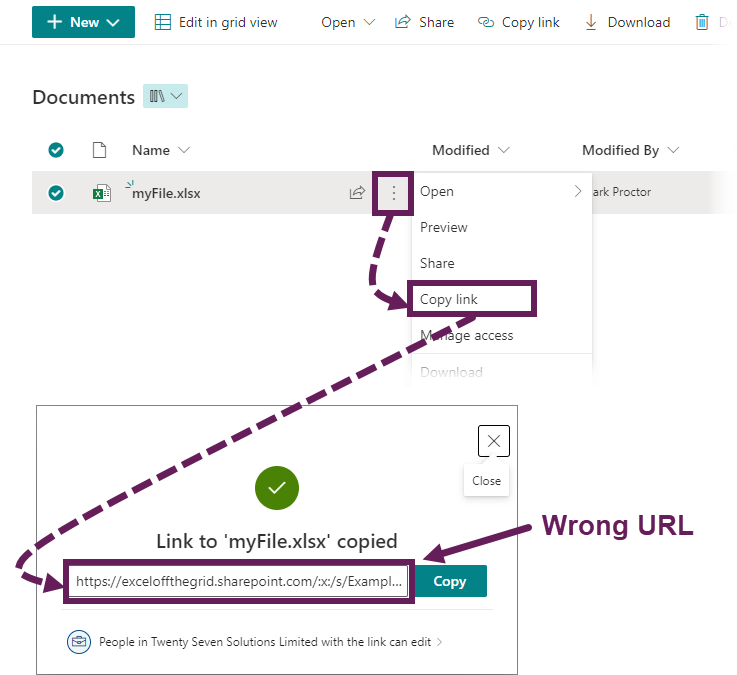
The share copy URL will also return the “Unable to connect” error.
So, where are the URLs you need? Microsoft has hidden them away; they are like little Easter Eggs for us to find.
Option #1
Now let’s look at the first valid option:
- Navigate to the file in OneDrive or SharePoint.
- Click on the (i) information button in the top right.
- With the information pane open, scroll down until you find the Path (it is there, though it might not be visible on the screen initially, keep scrolling).
- Click the Copy button next to the word “Path”.
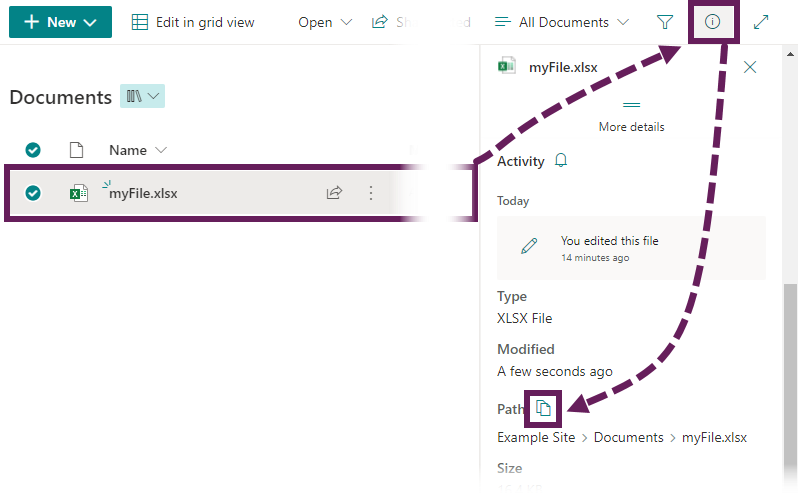
You have now copied the URL to the clipboard.
Option #2
If the file is already open in Excel, we can get the path directly inside Excel.
- Click File > Info
- Click the Copy Path button at the top
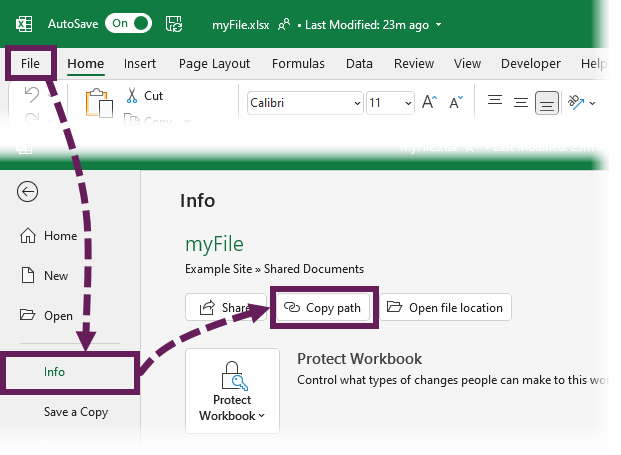
You have now copied the URL to the clipboard.
Connect to the file in Power Query
Now we have the URL, we can use a web connector in Power Query. Click Data > From Web (or the alternative is Data > Get Data > From Other Sources > From Web).
Paste the URL into the URL box.
If you used Option #2, the URL will have ?web=1 at the end. You don’t need this, so just delete those characters from the end of the URL. Option #1 doesn’t have this additional piece of text, so we won’t need to make this change.
Click OK.
You may need to sign in using your organizational account. You should only need to do this once.
Ta-dah! You are now connected to the file on OneDrive or SharePoint. Before you ask, yes, you can create a cell parameter for this. Check out this post to find out how: https://exceloffthegrid.com/power-query-source-cell-value/
Connect to a folder instead of a file?
If you want to connect to a folder rather than an individual file, we already have the information we need.
By looking at the URL for a file, we can identify the folder path.
https://exceloffthegrid.sharepoint.com/sites/ExampleSite/Shared%20Documents/myFile.xlsx
The bold section is the part we need; the end section can be removed.
To connect to a SharePoint folder in Power Query, go to Data > Get Data > From File > From SharePoint Folder.
Enter the folder path from above and click OK.

Ta-dah!! You can now connect to an entire folder in SharePoint or OneDrive.
Conclusion
Connecting to files and folders stored on OneDrive or SharePoint is possible. It may appear that Microsoft have hidden away this information. But now you know where to look; it should all be straightforward.
Related Posts:
- Power Query – Connect to OneDrive Personal files
- Common Power Query errors & how to fix them
- Common Power Query transformations (50+ powerful transformations explained)

About the author
Hey, I’m Mark, and I run Excel Off The Grid.
My parents tell me that at the age of 7 I declared I was going to become a qualified accountant. I was either psychic or had no imagination, as that is exactly what happened. However, it wasn’t until I was 35 that my journey really began.
In 2015, I started a new job, for which I was regularly working after 10pm. As a result, I rarely saw my children during the week. So, I started searching for the secrets to automating Excel. I discovered that by building a small number of simple tools, I could combine them together in different ways to automate nearly all my regular tasks. This meant I could work less hours (and I got pay raises!). Today, I teach these techniques to other professionals in our training program so they too can spend less time at work (and more time with their children and doing the things they love).
Do you need help adapting this post to your needs?
I’m guessing the examples in this post don’t exactly match your situation. We all use Excel differently, so it’s impossible to write a post that will meet everybody’s needs. By taking the time to understand the techniques and principles in this post (and elsewhere on this site), you should be able to adapt it to your needs.
But, if you’re still struggling you should:
- Read other blogs, or watch YouTube videos on the same topic. You will benefit much more by discovering your own solutions.
- Ask the ‘Excel Ninja’ in your office. It’s amazing what things other people know.
- Ask a question in a forum like Mr Excel, or the Microsoft Answers Community. Remember, the people on these forums are generally giving their time for free. So take care to craft your question, make sure it’s clear and concise. List all the things you’ve tried, and provide screenshots, code segments and example workbooks.
- Use Excel Rescue, who are my consultancy partner. They help by providing solutions to smaller Excel problems.
What next?
Don’t go yet, there is plenty more to learn on Excel Off The Grid. Check out the latest posts:
Microsoft Power Query is a free add-in for Excel – Part of PowerBI that provides self-service Business Intelligence features. Let’s see how to extract SharePoint list data using Power Query for Excel.
Step 1: Download & Install Power Query Add-in
To start with, Download the Power Query Add-in for Excel from: https://www.microsoft.com/en-us/download/details.aspx?id=39379
Once installed, You’ll find a new tab “Power Query” tab added to Microsoft Excel.

Step 2: Connect to SharePoint List
To extract SharePoint list data, click on the “From Other Sources” button from the ribbon and choose “From SharePoint List”

Provide the URL of your SharePoint site and choose the Authentication method accordingly – I Selected Windows. For Office 365, choose organizational credentials.

Once you are successfully logged in, You’ll get the Navigator page to choose your source list and click on “Load”. By default, Only Lists appear in the Navigator. Pick any list and use “Advanced Editor”, change List name & “SharePoint.Tables” to “SharePoint.Contents” to get data from any library!

Step 3: Remove Unnecessary columns, Perform ETL
This loads all columns from the SharePoint list. However, we may not be interested in fetching all columns, and also removing columns that are not required speeds up our data retrieval. So, Right-click on the Query from the Right side pane, Choose Edit.

You’ll get a Power Query Editor window where you can:
- Add remove columns to your query – in order to focus only on what we need
- Merge-Append (Join-Union) from other lists
- Perform ETL operations such as replace values, Split Columns, Group by etc.
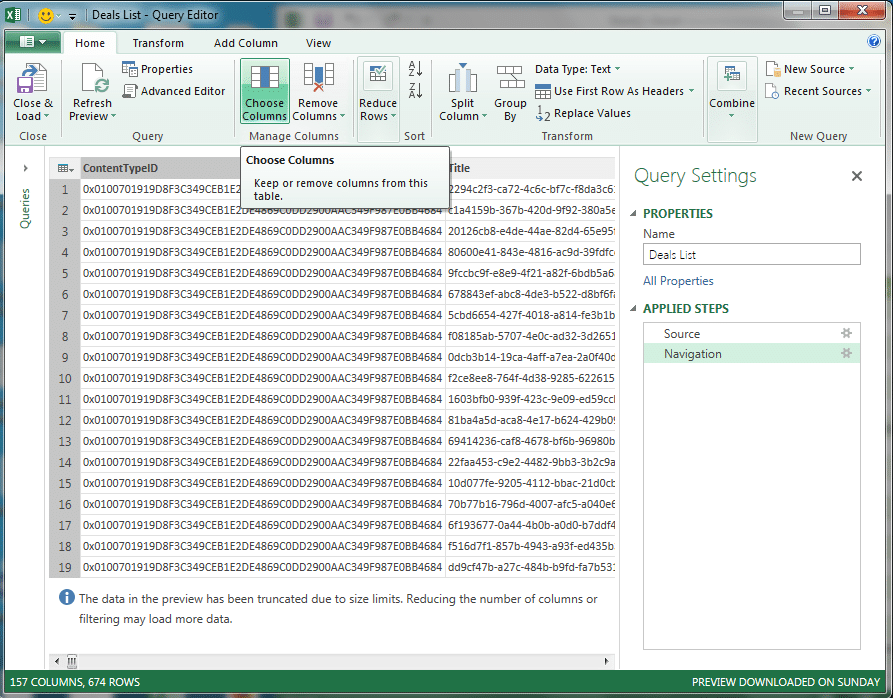
To remove unnecessary columns, click on the “Choose Columns” button and select only the columns you need. Once done, click on the “Load & Close” button from the ribbon. All activities inside the query editor are recorded as steps, and we can remove/Re-order them as required.

To get actual values of Lookup columns, You’ll have to “Expand” them. Once ready, click “Close and Load” from the Query Editor ribbon, and the list data will load to your workbook,

Although “Export to Excel” can retrieve data from the SharePoint list, Power Query has much more capabilities.
So next time, without the need to open the SharePoint site in the browser, You can just open the Excel file and hit refresh! Once the data is loaded, We can utilize advanced features such as Pivot Table, Pivot Chart, etc., to output a variety of visual data in an Excel worksheet.
I used this Power Query tool with SharePoint 2010 and SharePoint 2013.
I recently started a consulting job for a construction company to fix their Excel quotation template. But even the best Excel based template in the world wasn’t going to solve all their problems.
After a bit of investigation, I came to the conclusion that what they really needed was a custom quote app which could be built fairly easily with Microsoft PowerApps.
PowerApps can easily connect to and save data to many different data sources, so after a bit more investigating, I decided I would use SharePoint lists to store all the quote data from the app.
I had heard about SharePoint before, but I never really knew what it was.
I had also come across it in Excel since Excel Tables have the ability to export to SharePoint.
In this post, I’m going to share with you what I found out about SharePoint and Excel.
What is SharePoint?
As the name might suggest, it’s a place to share stuff.
It’s a browser based platform from Microsoft that can house all the content (data, files, folders, photos, documents etc.) related to your work to make it easier to share and collaborate with others on the same work.
You can think of it as an internal company website (intranet) that can help improve your organization’s data management. A sort of Wikipedia style server or information portal. It’s also a bit like OneDrive in that it can store and manage your files in the cloud, but with some more advanced collaboration features.
I set up my SharePoint site quickly and didn’t bother to edit or customize anything. This is what you get straight out of the box.
There’s a lot of customization possible, but I’m just using it to store a couple data lists so didn’t think it was worth spending any time on.
How Do I Get SharePoint?
SharePoint doesn’t come with any of the Office 365 Home products. It’s really only intended for business use so it’s only available with an Office 365 Business account subscription.
In fact, you’ll have to shell out for the Office 365 Business Premium account if you want to use SharePoint. It’s not available with the regular business account.
What is a SharePoint List?
A SharePoint list is similar to an Excel Table, it’s a container for data.
SharePoint lists allow you to store data in list format with rows and columns.
You can use a list to house all your customer contact details, employee details, product pricing etc. If you can organize the data into a table structure, then it can be stored in a SharePoint list.
Unlike Excel tables, the columns in a SharePoint list allow you to set a column as a certain type of data like text, number, date, hyperlink etc… A SharePoint list can even contain attachments so you could attach a photo to each employee in your employee details list.
Creating a New List in SharePoint
Creating a new list in SharePoint is easy.
From the homepage of your SharePoint site, press the New button then choose List from the options. Give the list a name and description and press the Create button.
You will now have a blank SharePoint list!
All SharePoint lists contain a Title column, and this should usually be reserved for a field that contains unique values.
You can customize your new list by adding columns, assigning data types to each column and then adding data to the list.
The new list might appear in your site navigation menu, but if not you can use the Site Contents menu item to navigate back to the list from any place on your SharePoint site.
Exporting an Excel Table to a SharePoint List
If your data already exists in Excel, then there is an easier way to create a new SharePoint list.
You can export data from Excel to SharePoint. This way, you can avoid the tedious task of creating and assigning data types to columns.
If your data already has column names in Excel, then these are also exported to your new SharePoint list. The Export wizard will also guess what SharePoint data types to use for the columns based on the data.
Create an Excel Table for the Data
First, the data is going to need to be in a table format.
Select the data then go to the Insert tab and choose Table. Another way to turn your data into a table is to use the Ctrl + T keyboard shortcut.
Make sure you name the table after by going to the Table Tools Design tab and giving it a new name in the Properties section.
Export the Excel Table to a SharePoint List
Select the table and go to the Table Tools Design tab and select the Export command then choose Export Table to SharePoint List.
The first step in the Export to SharePoint List wizard.
- Enter the URL for your SharePoint site.
- Check the box if you want to create a read-only connection to the SharePoint list. This means when you add data to the list on your SharePoint site, the new data will show up in your Excel table when you right click and refresh the table.
- Enter a Name for the new list.
- Enter a Description for the new list. This is an optional entry.
- Press the Next button to review the data types selected before exporting.
Your SharePoint URL should be something like https://yourcompany.sharepoint.com/sites/yoursitename.
In step 2 of the export wizard, review the data types for each of the columns in the data. If a selected data type is incorrect, you’ll need to cancel the export and either fix the key cell in the table or change the entire column of data in the table.
When you’re happy with the data types in the export wizard, press the Finish button to complete the export.
How big the list is will affect how long the export takes. A handful of rows will be near instant but a couple thousand rows can take several minutes to export.
When the export process completes successfully, you’ll get a pop up notification with a link to the location of the new list.
You can click on this link and the SharePoint list will open in your default browser. Alternatively, you can find the list from the Site Contents navigation menu.
Refreshing an Excel Table with a Read-Only Connection to a SharePoint List
In the export table wizard there was an option to create a read-only connection to the new SharePoint list.
If you select this option then you’ll be able to refresh your Excel table with any new or changed data from the SharePoint list.
Select the table and go to the Table Tools Design tab and press the Refresh button or right click on the table and select Refresh from the menu.
The data in the Excel table will be updated with the latest data from the SharePoint list.
Exporting a SharePoint List to an Excel Table
You can also move data the other way by exporting from SharePoint to Excel.
There’s a big Export to Excel button in each list.
Press this button and the browser will download a query.iqy file.
Open this file and Excel will launch and prompt you to choose where to load the data (Table, Pivot Table or Pivot Chart) and choose the location to load it (an existing worksheet, new worksheet or new workbook).
This is actually the exact same read-only setup that was an option when exporting from Excel. If you missed enabling that option, no worries because you can achieve the same thing by exporting from your SharePoint list.
Importing a SharePoint List to Excel with Power Query
Power query can be used to connect to all sorts of data sources and SharePoint lists are one of them.
This will give you more control over which data in the list you import as compared to creating a read-only connection to the SharePoint list.
Create a SharePoint Power Query
To create a new SharePoint list query, go to the Data tab ➜ select Get Data ➜ choose From Online Services ➜ choose From SharePoint Online List.
This option is also available under the From Other Sources menu as From SharePoint List.
You will be prompted to enter the URL to the SharePoint site. This should be of the format https://yourcompany.sharepoint.com/sites/yoursitename. Then you can press the OK button.
This will open the power query navigator preview where you can select the list you want to import. Once selected, a preview of the list will show on the right.
A large number of columns in the data preview will look unfamiliar. This is because SharePoint lists contain a lot of extra columns even if they aren’t being used.
For example, every SharePoint list will have an ID column which is a unique identifier automatically created for each row in the list.
You will need to edit the query slightly to avoid importing all these unfamiliar columns. Press the Transform Data button to open the power query editor.
There are a lot of extra columns, so it will usually be easier to select the columns you want to keep (hold the Ctrl key to select multiple columns). Then right click on any of the selected column headings and choose Remove Other Columns from the menu.
You can also do any other type of data transformation available with power query if you would like.
Once you’re finished with the query, you can save it and load the data into Excel. Go to the Home tab in the power query editor and press the Close & Load command to save the query and load the data into an Excel table in your workbook.
Importing Files from a SharePoint Document Library or Folder with Power Query
SharePoint can store more than just lists, it can also store all types of files in a document library.
You can use use power query to import and combine data from multiple data files like Excel workbooks or CSV’s.
What is a SharePoint Document Library or Folder?
A SharePoint document library is very similar to a folder on your computers hard drive. It’s a place to store all your related files.
You might set up a document library for all your monthly sales files.
Here I have a document library called Sales and in a folder called 2018Q1 in which I have 3 Excel workbooks.
Each file has sales data by day for the particular month.
Export a Folder to Excel
If you click on the Export to Excel button found in the SharePoint folder this will download a query.iqy file.
When you open this file it launches Excel and creates a read-only connection to the list of files in the folder. You can refresh this just like when exporting a SharePoint List to an Excel Table.
This table only contains the names of files and not the actual contents of the files. There is a handy clickable hyperlink for each of the file or folder names. This will open up the SharePoint file or folder.
Create a From SharePoint Folder Query
You’ll need power query if you want to import and combine the data inside all the files.
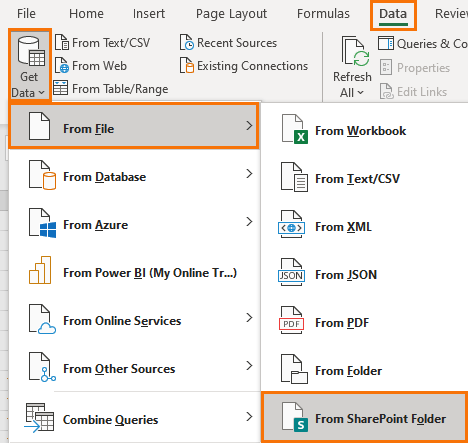
To create a SharePoint Folder query go to the Data tab ➜ select Get Data ➜ choose From File ➜ choose From SharePoint Folder.
Now you’ll need to input the site URL (not the folder URL).
The Navigation preview will show a list of all files in the site and you’ll need to use power query to filter down to the files you want. Press the Transform Data button.
Filter on the Folder Path column to the desired folder. Then further filter on any file Name or Extension to get exactly the files you want.
When only the files you want to import and combine are left, click on the Combine Files toggle in the Content column heading.
Power query will import and combine the files based on a sample file. You can then select which sheets to import and view a preview of the data on the right side. Press the OK button to combine the files.
You can then Close & Load the query to import all the data. Now if you add a new monthly sales files to the folder and refresh the query, the new file’s data will be included in the query’s output.
Conclusions
SharePoint is a great place for storing files for collaboration and data that’s shared throughout the company.
But it might not be the best place for further using or analyzing the files or data.
That’s ok though, SharePoint and Excel are very well integrated. It’s easy to push and pull data from SharePoint to Excel.
You can quickly get data using the export options in either Excel or SharePoint. If you’re comfortable with power query, you can even use that.
About the Author
John is a Microsoft MVP and qualified actuary with over 15 years of experience. He has worked in a variety of industries, including insurance, ad tech, and most recently Power Platform consulting. He is a keen problem solver and has a passion for using technology to make businesses more efficient.
Nowadays many of us are saving our files to the cloud using OneDrive for Business or SharePoint Online. Unfortunately, it’s not straight forward to get data form OneDrive or SharePoint with Power Query, so in this tutorial I’m going to step you through the three scenarios: getting data from an individual file on OneDrive or SharePoint, getting data from a SharePoint folder, and getting data from a SharePoint shared library.
Note: The SharePoint Folder connector is only available in Excel 2019 Professional Plus and with a Microsoft 365 Apps for Enterprise license.
Watch the Video

I’ll start with getting data from an individual file on OneDrive or SharePoint. Either way the process is the same and it requires getting the file path, but not the file path as you know it.
If you’re like me, you’ll have your OneDrive files synced to your hard drive. You can see mine here in the file explorer:
If you try to copy a file’s path from here it will reference the copy of the file on your hard drive, not the OneDrive/SharePoint file path.
The trick is to go to OneDrive or SharePoint online and open the file from there in the Desktop App:
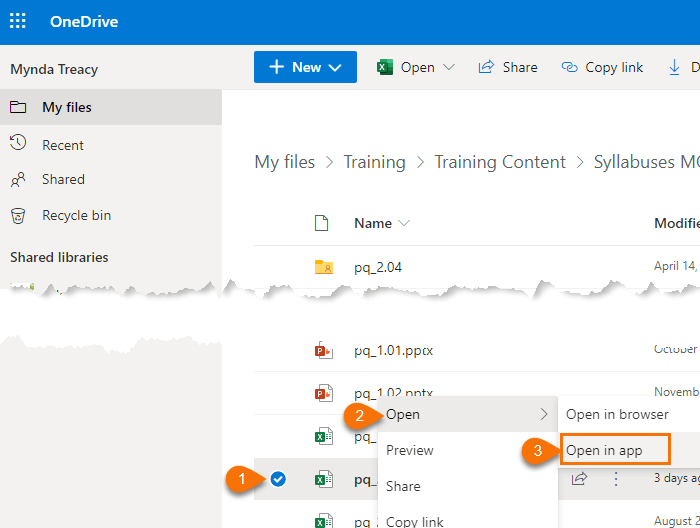
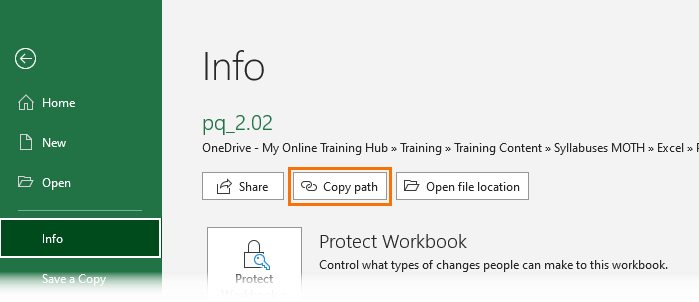
Then in Excel go to the File tab > Info and click the ‘Copy Path’ button:
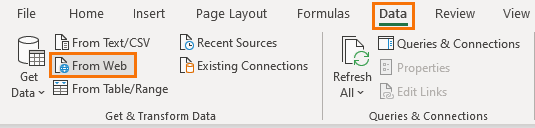
Now that you have the file path you can close the file and create a query in a new Excel workbook using the From Web connector in Power BI or Excel (shown below):
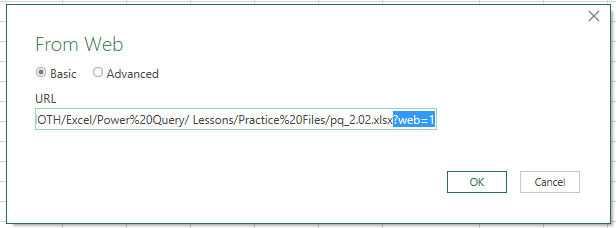
Paste the URL for the file into the dialog box, deleting the ?web=1 from the end before pressing OK:
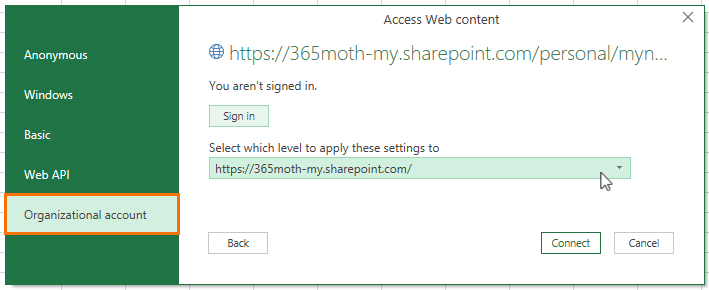
At the authentication dialog box choose Organizational Account and enter your OneDrive or SharePoint logon credentials:
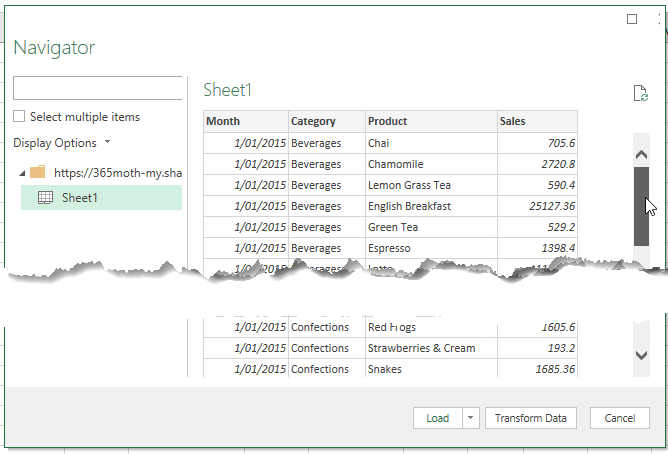
At the navigator dialog box, you can choose the sheet(s) or table(s) from the list and then click Transform Data to load the data to the Query Editor where you can perform further transformations before loading to Excel or the Data Model:
Get Data from a Folder on OneDrive or SharePoint with Power Query
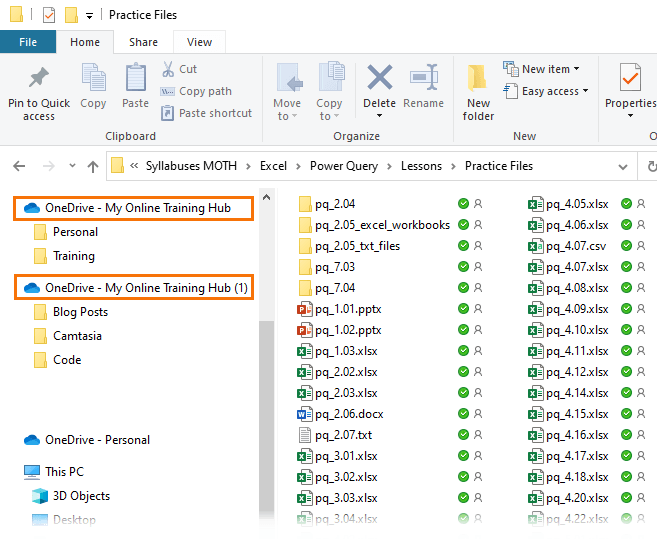
Getting data from a folder on OneDrive or SharePoint requires a different approach. First, we need the folder path, which you get from your browser. In the image below I want to get data from the folder called pq_2.05_excel_workbooks:
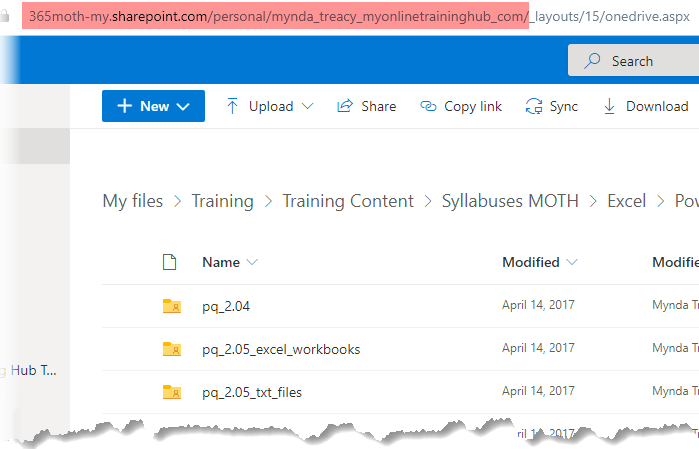
I simply copy the portion of the URL up to _layouts/15…, which you can see highlighted in pink.
Then in Power BI or Excel (shown below) you want the From SharePoint Folder connector:
Paste in the URL and at the authentication dialog box choose Microsoft Account and sign in with your SharePoint logon credentials:
Next, you’ll see a list of the files on your SharePoint site. Click Transform data to filter the list to the folder you want:

Filter the Folder Path column to only show files that are contained in the folder you want. You can use Filter > Text Contains > to enter part of your folder path string. e.g. my files are in a folder with this path:
Training/Training Content/ Syllabuses MOTH/Excel/Power Query/Lessons/Practice Files/pq_2.05_excel_workbooks:
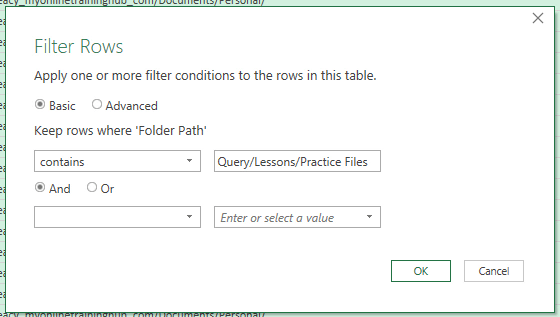
IMPORTANT: remember Power Query is case sensitive, so you must enter the folder path exactly as it appears in SharePoint.
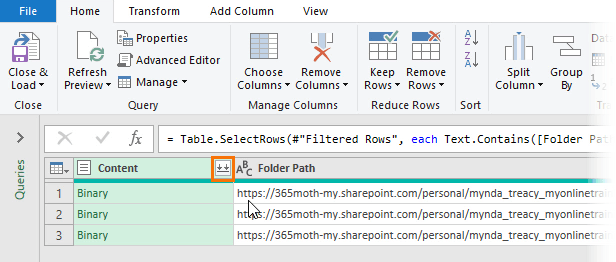
In the Power Query Editor, click the double down arrow on the Content column to get the data from the files in the folder:
Choose the Table/Sheet that you want from each file, then click OK:
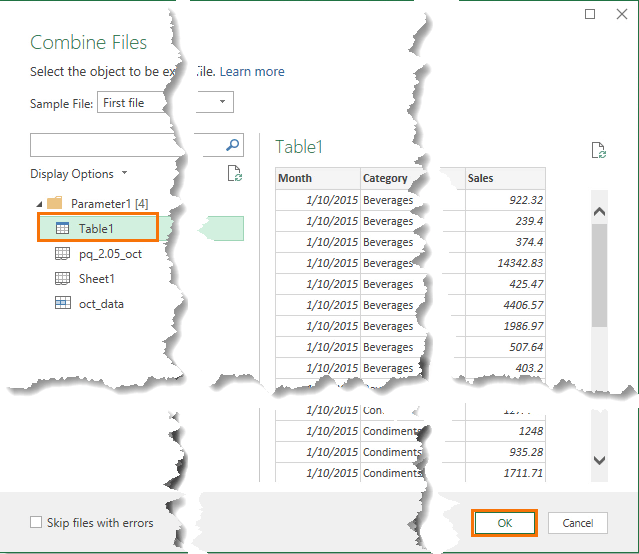
IMPORTANT: the sheet or table that you choose must have the same name in each file you want to consolidate.
This will consolidate the data in each file into one table and from there you can perform further transformations.
Get Data from a Shared Library on SharePoint with Power Query
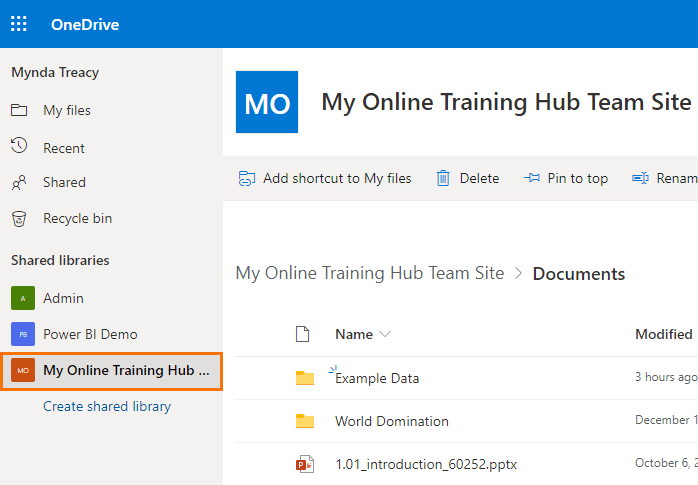
Lastly, if you work with Shared Libraries in SharePoint Online then the process is a hybrid of the first and second examples. You can see in the screenshot below that I’m in our My Online Training Hub Team Site and I want to get the data from the Example Data folder. You can see it’s a Shared Library from the list on the left.
There are two ways you can get the URL for the shared library, one is to copy the domain from the URL, but you need to remove the -my from the URL before pasting it into Power Query.
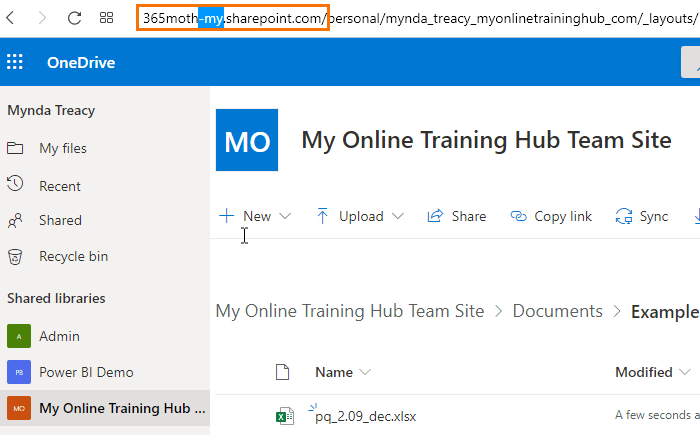
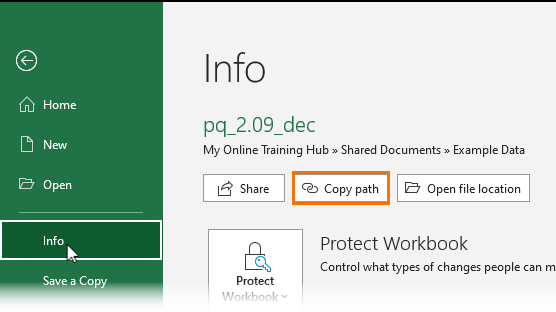
Alternatively, if you open one of the files in the folder in the desktop app…
And copy the path from the File tab > Info
You’ll notice the URL you get through this path does not include ‘-my’ so it’s ready to use by selecting the path up to and including .sharepoint.com/ e.g.:
https://your_tenant.sharepoint.com/
Then in Power BI or Excel (shown below) you want the From SharePoint Folder connector:
And the process from here is the same as the previous example.
Sharing Files with Power Query Connections to OneDrive or SharePoint
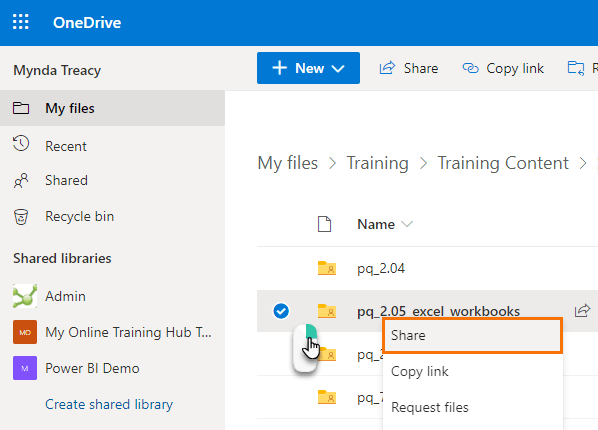
If you want to share files with other users you need to make sure they have permission to access the file, folder or shared library.
You can do this by right-clicking the file, folder or library in OneDrive or SharePoint > Share:
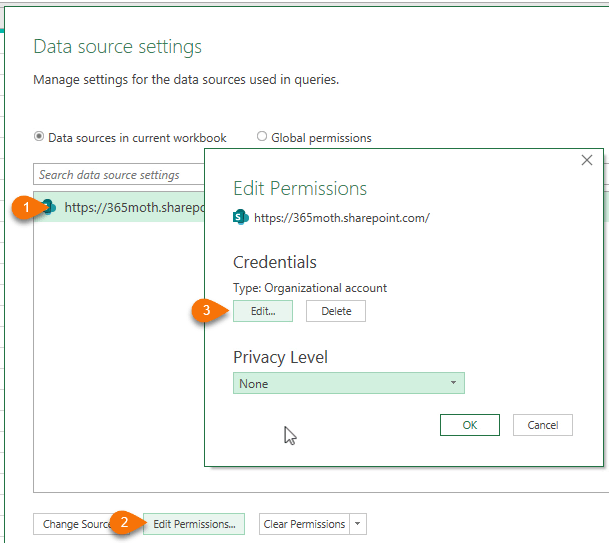
Then in Power Query they’ll also need to enter their credentials. Power Query will prompt them to edit their credentials when they open the query editor. As shown below where you can see a yellow warning bar below the ribbon. Alternatively they can edit them via the Data Source Settings on the Home tab.
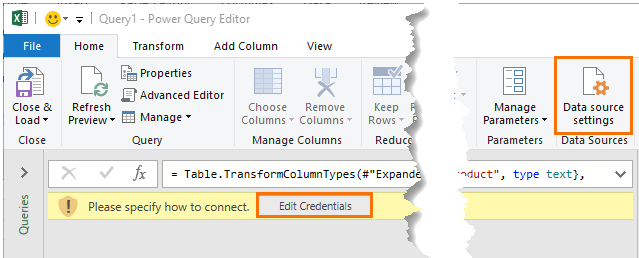
- Select the source from the list
- Edit Permissions
- Edit to switch to a different account
Thanks
Big thanks to fellow Microsoft MVP, Wyn Hopkins for demystifying connecting to OneDrive or SharePoint in his video here.
Learn Power Query
Power Query not only transforms data, it can transform your work load with significant efficiency gains. Check out this introduction to Power Query video. And if you’re ready for more, sign up for my Power Query course.
- Remove From My Forums
-
Question
-
Hello,
I want to Power Query an excel file located on a Sharepoint site.
What I try to do unsuccessfully is to take the URL of the Excel file from the browser when I open that excel file and I try to power query from Web and from Sharepoint List using that URL and it both return errors. When I try to authenticate it returns a
blank excel sheet called Documents that is is no way related to the file I am trying to query.Any clues how to achieve this?
Thanks
Wassim
Answers
-
The URL in the browser is the wrong URL — it’s the URL of the web-based display, not the URL of the file. What I usually do is to view the file in the browser, then pick “Edit in Excel”. Inside Excel, click on “File” to bring up the file information. Then,
click on the file’s location near the top and choose “Copy link to clipboard”. Paste the link somewhere; it should look like this:https://microsoft-my.sharepoint.com/personal/curth_microsoft_com/Documents/SqlDataTypes.xlsx?web=1
Now, edit the link by removing the ?web=1 from the end. This is the URL for the file.
-
Proposed as answer by
Friday, December 12, 2014 3:08 PM
-
Marked as answer by
Ed Price — MSFTMicrosoft employee
Wednesday, December 31, 2014 2:31 AM
-
Proposed as answer by