
Excel для Mac включает в себя технологию Power Query (также называемую «Получить и преобразовать»), обеспечивающую более широкие возможности при импорте, обновлении и проверке подлинности источников данных, управлении источниками данных Power Query, очистке учетных данных, изменении расположения файловых источников данных и преобразование данных в таблицу, соответствующую вашим требованиям. Вы также можете создать запрос Power Query с помощью VBA.
Примечание: Источник данных базы данных SQL Server можно импортировать только в бета-версии программы предварительной оценки.
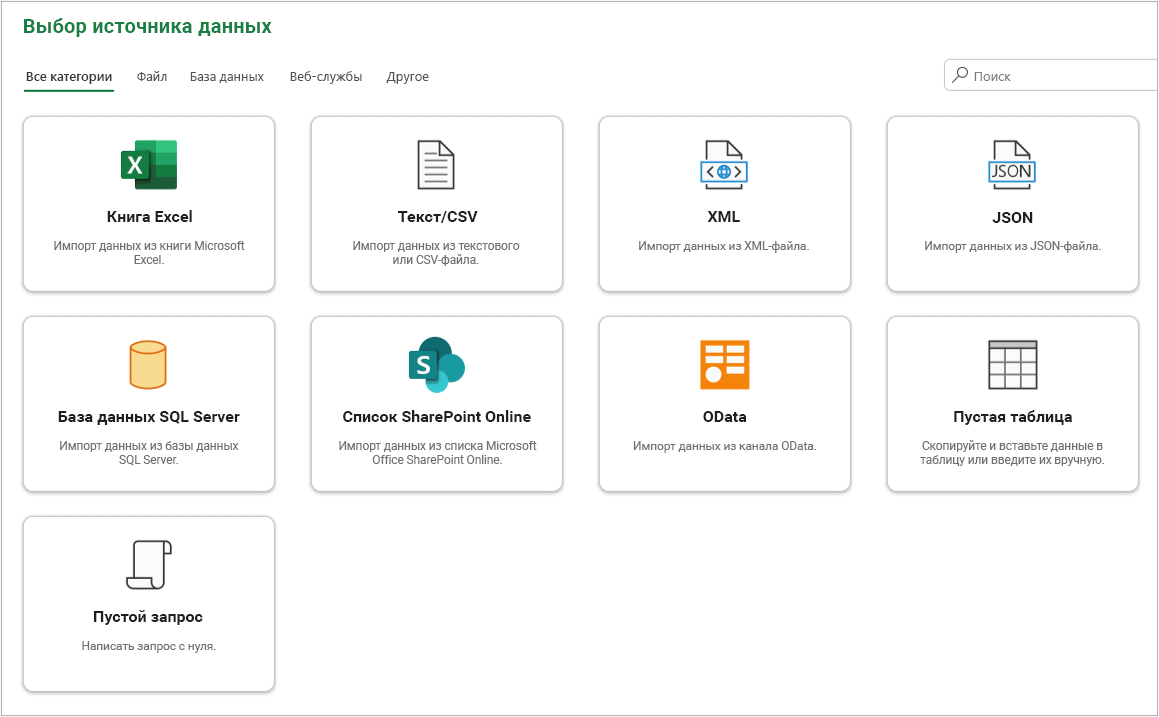
Вы можете импортировать данные в Excel с помощью Power Query из различных источников данных: книга Excel, текст/CSV, XML, JSON, база данных SQL Server, список SharePoint Online, OData, пустая таблица и пустой запрос.
-
Выберите Данные > Получить данные.

-
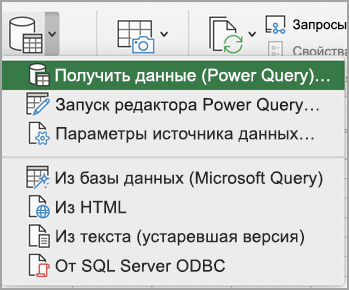
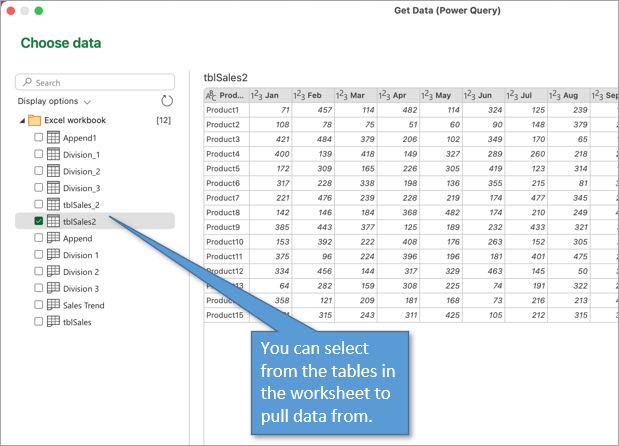
Чтобы выбрать нужный источник данных, выберите Получить данные (Power Query).
-
В диалоговом окне Выбор источника данных выберите один из доступных источников данных.
-
Подключение к источнику данных. Дополнительные сведения о способах подключения к каждому источнику данных, см. в разделе Импорт данных из источников данных.
-
Выбор данных для импорта.
-
Загрузите данные, щелкнув кнопку Загрузить.
Result (Результат)
Импортированные данные появятся на новом листе.
Дальнейшие действия
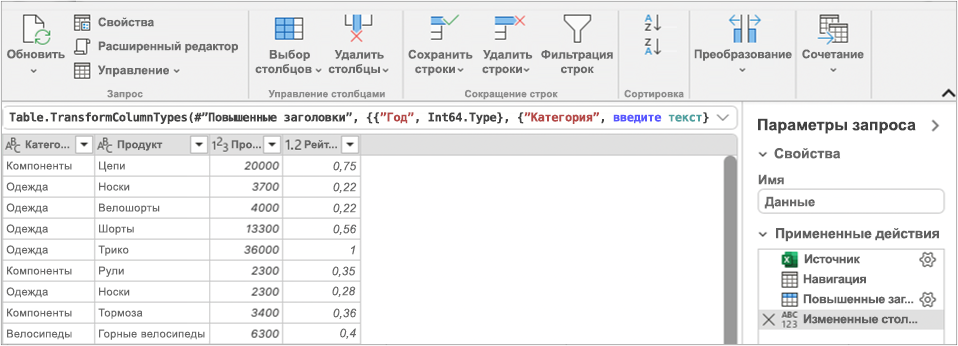
Для формирования и преобразования данных с помощью редактора Power Query, выберите Преобразовать данные. Дополнительные сведения см. в статье Формирование данных с помощью редактора Power Query.
Примечание: Эта функция обычно доступна подписчикам Microsoft 365, использующим версию 16.69 (23010700) или более позднюю версию Excel для Mac. Если вы являетесь подписчиком Microsoft 365, проверьте, установлена ли у вас последняя версия Office.
Последовательность действий
-
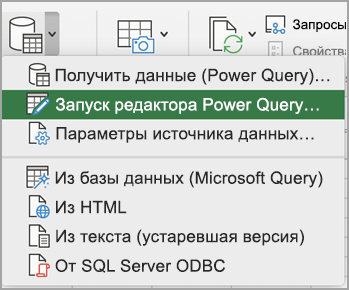
ВыберитеДанные > Получить данные (Power Query).
-
Чтобы открыть редактор запросов, выберите Запустить редактор Power Query.
Совет: Вы также можете получить доступ к редактору запросов, выбрав Получить данные (Power Query), выбрав источник данных и щелкнув Далее.
-
Вы можете формировать и преобразовывать данные с помощью редактора запросов, как в Excel для Windows.
Дополнительные сведения см. в разделе справка по Power Query для Excel.
-
Когда все будет готово, выберите пункт Домашняя страница > Закрыть и загрузить.
Result (Результат)
Недавно импортированные данные появятся на новом листе.
Вы можете обновить следующие источники данных: файлы SharePoint, списки SharePoint, папки SharePoint, OData, текстовые/CSV-файлы, книги Excel (.xlsx), файлы XML и JSON, локальные таблицы и диапазоны, а также базу данных Microsoft SQL Server.
Первое обновление
При первой попытке обновить файловые источники данных в запросах книги может потребоваться обновить путь к файлу.
-
Выберите Данные, стрелку рядом с Получить данные, а затем Параметры источника данных. Появится диалоговое окно Параметры источника данных.
-
Выберите подключение, а затем выберите Изменить путь к файлу.
-
В диалоговом окне Путь к файлу выберите новое расположение, а затем выберите Получить данные.
-
Выберите Закрыть.
Последующие обновления
Чтобы обновить:
-
Все источники данных в книге — выберите Данные> Обновить все.
-
Определенный источник данных — щелкните правой кнопкой мыши таблицу запросов на листе и выберите Обновить.
-
Сводная таблица — выберите ячейку в сводной таблице, а затем выберите Анализ сводной таблицы > Обновить данные.
При первом доступе к Microsoft Office SharePoint Online, SQL Server, OData или другим источникам данных, требующим разрешения, необходимо предоставить соответствующие учетные данные. Также можно очистить учетные данные и ввести новые.
Ввод учетных данных
При первом обновлении запроса вам может потребоваться войти в систему. Выберите метод проверки подлинности и укажите учетные данные для входа в систему, чтобы подключиться к источнику данных и продолжить обновление.
Если требуется вход в систему, появится диалоговое окно Введите учетные данные.
Например:
-
Учетные данные Microsoft Office SharePoint Online:
-
Учетные данные SQL Server:

Очистка учетных данных
-
Выберите Данные > Получить данные > Параметры источника данных.
-
В диалоговом окне Параметры источника данных выберите нужное подключение.
-
В нижней части выберите Очистить разрешения.
-
Подтвердите выбор действия, а затем выберите Удалить.
Хотя разработка в редакторе Power Query недоступна в Excel для Mac, VBA поддерживает разработку Power Query. Перенос модуля кода VBA в файле из Excel для Windows в Excel для Mac — это двухэтапный процесс. Выборка программы приведена в конце этого раздела.
Шаг 1. Excel для Windows
-
В Excel для Windows разрабатывайте запросы с помощью VBA. Код VBA, использующий следующие сущности в объектной модели Excel, также работает в Excel для Mac: объект запросов, объект WorkbookQuery, свойство Workbook.Queries.Дополнительные сведения см. в справочнике по Excel VBA.
-
В Excel проверьте, открыт ли редактор Visual Basic, нажав клавиши ALT+F11.
-
Щелкните модуль правой кнопкой мыши и выберите Экспорт файла. Откроется диалоговое окно Экспорт.
-
Введите имя файла, убедитесь, что файл имеет расширение .bas, а затем выберите Сохранить.
Шаг 2. Excel для Mac
-
Загрузите файл VBA, сохраненный на этапе «Шаг 1. Excel для Windows» и загруженный в веб-службу, в локальный файл
-
В Excel для Mac выберите Инструменты > Макрос > Редактор Visual Basic. Появится окноредактора Visual Basic.
-
Щелкните правой кнопкой мыши объект в окне проекта и выберите Импорт файла. Появится диалоговое окно Импорт файла.
-
Найдите файл VBA и выберите Открыть.
Выборка кода
Вот базовый код, который вы можете адаптировать и использовать. Это выборка запроса, создающего список со значениями от 1 до 100.
Sub CreateSampleList()
    ActiveWorkbook.Queries.Add Name:="SampleList", Formula:= _
        "let" & vbCr & vbLf & _
            "Source = {1..100}," & vbCr & vbLf & _
            "ConvertedToTable = Table.FromList(Source, Splitter.SplitByNothing(), null, null, ExtraValues.Error)," & vbCr & vbLf & _
            "RenamedColumns = Table.RenameColumns(ConvertedToTable,{{""Column1"", ""ListValues""}})" & vbCr & vbLf & _
        "in" & vbCr & vbLf & _
            "RenamedColumns"
    ActiveWorkbook.Worksheets.Add
    With ActiveSheet.ListObjects.Add(SourceType:=0, Source:= _
        "OLEDB;Provider=Microsoft.Mashup.OleDb.1;Data Source=$Workbook$;Location=SampleList;Extended Properties=""""" _
        , Destination:=Range("$A$1")).QueryTable
        .CommandType = xlCmdSql
        .CommandText = Array("SELECT * FROM [SampleList]")
        .RowNumbers = False
        .FillAdjacentFormulas = False
        .PreserveFormatting = True
        .RefreshOnFileOpen = False
        .BackgroundQuery = True
        .RefreshStyle = xlInsertDeleteCells
        .SavePassword = False
        .SaveData = True
        .AdjustColumnWidth = True
        .RefreshPeriod = 0
        .PreserveColumnInfo = True
        .ListObject.DisplayName = "SampleList"
        .Refresh BackgroundQuery:=False
    End With
End Sub
-
Откройте книгу Excel.
-
При получении предупреждения системы безопасности об отключении внешних подключений к данным, выберите Включить содержимое.
-
Если появится диалоговое окно Предоставить доступ к файлам, выберите Выбрать, а затем выберите Предоставить доступ к папке верхнего уровня, содержащей файлы источников данных.
-
Выберите Данные > Из текста (прежние версии). Появится диалоговое окно Finder .
-
Найдите файл .txt или .csv и выберите Открыть. Появится мастер импорта текста.
Совет Несколько раз проверьте панельпредварительного просмотра выбранных данных, чтобы подтвердить свой выбор.
-
На первой странице сделайте следующее:
Тип файла Чтобы выбрать тип текстового файла, выберите С разделителями или Фиксированная ширина.
Номер строки В поле Начать импорт со строки выберите номер строки, чтобы указать первую строку данных для импорта.
Набор символов В поле Источник файла выберите набор символов, используемый в текстовом файле. В большинстве случаев этот параметр можно оставить по умолчанию.
-
На второй странице сделайте следующее:
С разделителями
Если вы выбрали С разделителями на первой странице, в разделе Разделители выберите символ-разделитель или установите флажок «Другой», чтобы ввести символ, которого нет в списке.
Выберите Рассматривать последовательные разделители как один, если данные содержат разделитель из более чем одного символа между полями данных или если данные содержат несколько настраиваемых разделителей.
В Text qualifier выберите символ, который заключающий значения в текстовом файле, чаще всего это символ кавычек («).
Фиксированная ширина
Если вы выбрали Фиксированная ширина на первой странице, следуйте инструкциям по созданию, удалению или перемещению линии разрыва в поле Предварительный просмотр выбранных данных .
-
На третьей странице сделайте следующее:
Для каждого столбца в разделе Предварительный просмотр выбранных данных выберите его, а затем измените формат столбца, если хотите. Вы можете дополнительно установить формат даты и выбрать Дополнительно, чтобы изменить параметры числовых данных. Вы также можете преобразовать данные после их импорта.
ВыберитеГотово. Откроется диалоговое окно Импорт данных.
-
Выберите, куда вы хотите добавить данные: на существующий лист, на новый лист или в сводную таблицу.
-
Нажмите кнопку ОК.
Чтобы проверить, работает ли соединение, введите некоторые данные, а затем выберите Подключения > Обновить.
-
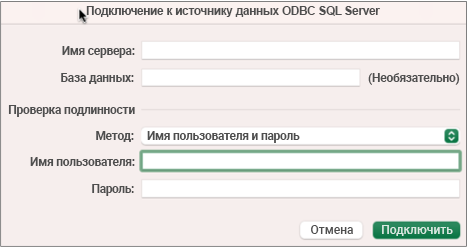
Выберите Данные > Из ODBC SQL Server. Откроется диалоговое окно подключения к источнику данных SQL Server ODBC.
-
Введите сервер в поле Имя сервера и, при необходимости, введите базу данных в поле Имя базы данных.
Получите эти сведения от администратора базы данных.
-
В разделе Проверка подлинности выберите метод из списка: Имя пользователя и пароль, Kerberos, или NTLM.
-
Введите учетные данные в поля Имя пользователя и Пароль .
-
Выберите Подключение. Появится диалоговое окно Навигатор.
-
На панели слева перейдите к нужной таблице и выберите ее.
-
Подтвердите оператор SQL на панели справа. Вы можете изменить оператор SQL по своему усмотрению.
-
Для предварительного просмотра данных выберите Выполнить.
-
Когда все будет готово, выберите Вернуть данные. Откроется диалоговое окно Импорт данных.
-
Выберите, куда вы хотите добавить данные: на существующий лист, на новый лист или в сводную таблицу.
-
Чтобы задать свойства соединения на вкладках Использование и Определение диалогового окна Свойства, выберите Свойства. После импорта данных можно также выбрать Данные > Подключения, а затем в диалоговом окне Свойства подключения выбрать Свойства.
-
Нажмите кнопку ОК.
-
Чтобы проверить, работает ли подключение, введите некоторые данные, а затем выберите Данные > Обновить все.

Если вы хотите использовать внешний источник, который не является базой данных SQL (например, FileMaker Pro), вы можете использовать драйвер Open Database Connectivity (ODBC), установленный на своем Mac. Информация о драйверах есть на этой веб-странице. После установки драйвера для своего источника данных выполните следующие действия:
-
Выберите Данные > Из базы данных (Microsoft Query).
-
Добавьте источник данных для своей базы данных и выберите ОК.
-
При запросе учетных данных SQL Server введите метод проверки подлинности, имя пользователя и пароль.
-
Выберите стрелку рядом с сервером слева, чтобы увидеть базы данных.
-
Выберите стрелку рядом с нужной базой данных.
-
Выберите нужную таблицу.
-
Для предварительного просмотра данных выберите Выполнить.
-
Когда все будет готово, выберите Вернуть данные.
-
В диалоговом окне Импорт данных выберите, где вы хотите разместить данные: на существующем листе, на новом листе или в сводной таблице.
-
Нажмите кнопку ОК.
-
Чтобы проверить, работает ли подключение, введите некоторые данные, а затем выберите Данные > Обновить все.

Если ваши разрешения не работают, вы не можете сначала очистить их, а затем войти в систему.
-
Выберите Данные > Подключения. Появится диалоговое окно Подключения к книге.
-
Выберите нужное подключение в списке, а затем нажмите Очистить разрешения.

См. также
Справка по Power Query для Excel
Драйверы ODBC, совместимые с Excel для Mac
Создание сводной таблицы для анализа данных на листе
Bottom Line: Learn about the new Power Query Editor that Microsoft just released for the Mac version of Excel.
Skill Level: Beginner
Watch the Tutorial
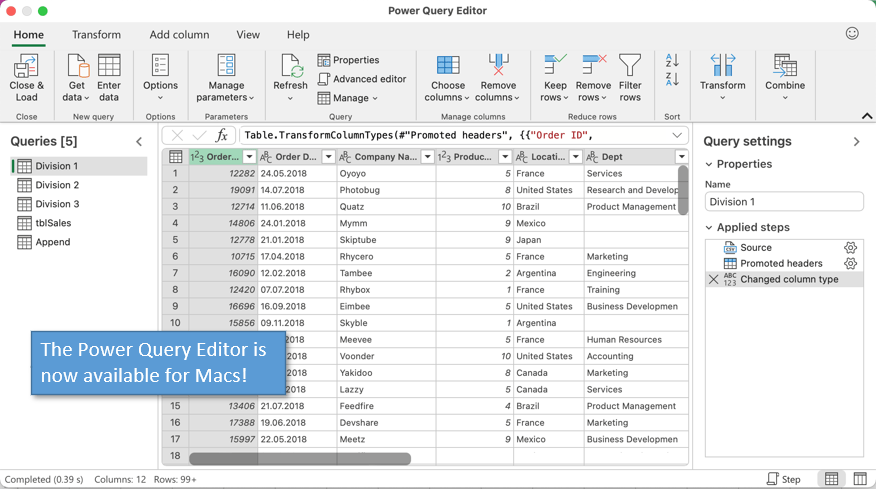
The Power Query editor for Mac is finally here!
Let’s take a look at how Power Query for Mac works, what some of the current limitations are, and if this means you should go by a Mac computer.
The Editor for the Mac version of Excel looks quite similar to the Windows version.
If you’re not familiar with Power Query, it’s a tool that allows you to bring in data from all different types of sources and then clean up that data. It’s a fantastic resource for automating data preparation, and it can save you lots of time. You can watch my overview of Power Query and get a better understanding of how it works here:
Power Query Overview: An Introduction to Excel’s Most Powerful Data Tool – Excel Campus
At the moment, the Power Query Editor for Mac is only available to the Insider’s Beta Channel for Microsoft 365. Learn more about how to join for free here: https://insider.office.com/en-us/join/Mac.
It should be rolling out to other channels in the coming months.
Using the Power Query Editor in Mac
Let’s start by creating a query. On the Data tab of the Ribbon, you’ll notice a new button called Get Data (Power Query). It’s a split button that allows you to see these different options. Click on the option that says Get Data (Power Query).
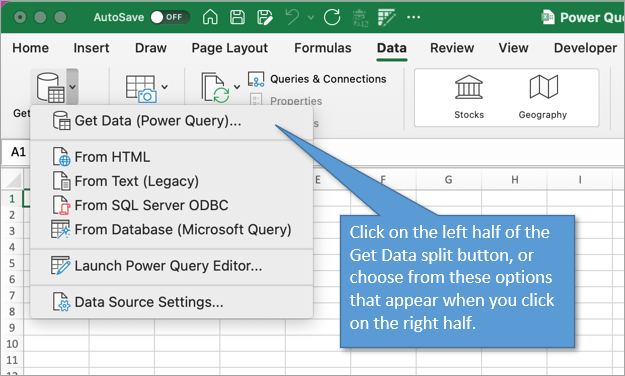
That’s going to open up a window where you can choose your data source. Currently, there are only two options.
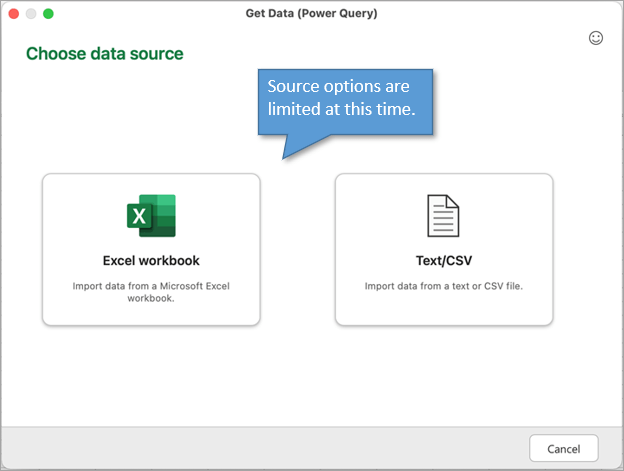
As the Editor for Mac continues to develop, they will be adding more data sources.
Get Data From Text/CSV Files
We’ll first look at getting data from a CSV file.
First, choose Text or CSV file. That’s going to prompt us to browse for a file to pull into the Editor.
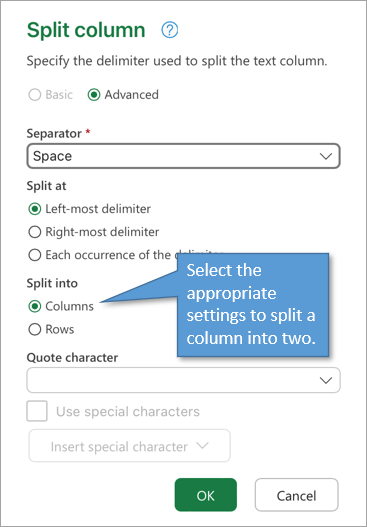
Once our data is visible in the Editor, we can do all types of transformations. For example, if we want to split a combined name column into first and last names, we can. Just right-click on the column, and then choose Split Column.
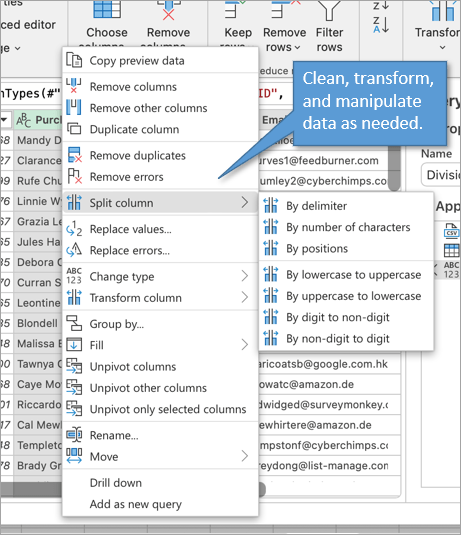
We want to split by the left-most delimiter, with the Space character as our delimiter. When we hit OK, that will run our transformation.
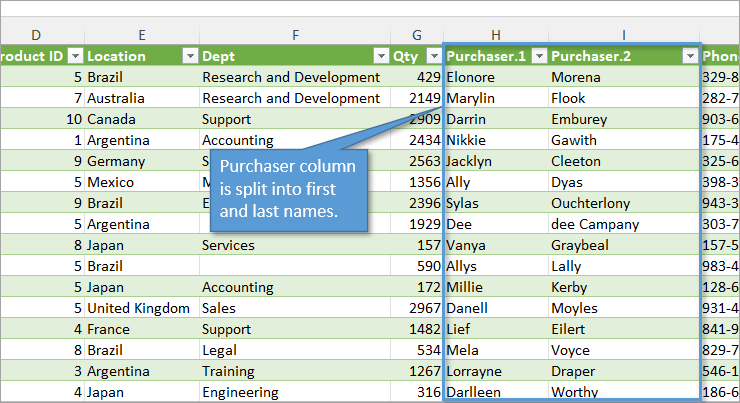
That will give us two columns now for our purchasers’ first names and last names. Of course, we can rename those columns. We can also delete columns or otherwise clean up our data as we like. Once those transformations are done, we just click the Close and Load button. This creates a new sheet in our workbook with our cleaned-up data.
Get Data from Excel Table
We can also pull Excel Tables into the Power Query Editor. Instead of selecting a text or CSV file, we would select the Excel Worksheet where the table resides and then we would see a list of the tables available to choose from.
At this point, we’re not actually able to pull in a table from the same workbook that we’re working on, at least not with the one-step process we’re used to seeing in the Windows Editor. Instead, we have to browse for the file and table that we want.
After selecting the sheet or table, the Power Query Editor opens where we can make transformations and load the results to the current workbook.
See the video above for an example.
Current Limitations
Microsoft is working on enhancing the Power Query Editor for the Mac version of Excel, so I expect that these limitations I mention will eventually get ironed out, hopefully in the near future.
No Connection Only Queries
The first limitation is the Close and Load button. As of now, it’s not a split button and we don’t have the option to create a connection only, as we do on Windows.
Let’s say I wanted to combine three CSV files for Divisions 1, 2, and 3. If I had these queries on the Windows version, I could create a connection-only query, which means they wouldn’t create an output table in Excel when I close and load.
With the Power Query editor for Mac, however, we will have to create and output those tables and then combine them. Fortunately, you still can do an append query to combine all of them.

The data will be stacked on top of each other for all three data sources.
No From Folder Option
Another limitation is there’s no option to get data from a folder. With windows, we can add more CSV files into a specified folder and automatically combine those using Power Query. With Mac, we don’t yet have that capability.
Limited Data Sources
The other big limitation right now is just the limited number of data sources. In Microsoft’s announcement post they also mention SharePoint as a data source. I’m not seeing that option yet, but hopefully, it will come soon.
Again, all of these limitations should hopefully be temporary as the PQ Editor for Mac continues to be enhanced.
Should I buy a Mac now?
Eric Bremiller on LinkedIn asked if this new update puts the Windows and Mac versions of Excel on equal footing.

The answer is:
It depends…
Even with the addition of Power Query, there are still other limitations for the Mac.
- Power Pivot is not currently available on the Mac version of Excel.
- Power BI Desktop is also not available for the Mac OS.
- The VB Editor is much more robust in the Windows version. The Mac version does not support the editing of userforms and has some other limitations.
So to answer Eric’s question directly, no, they are not yet on equal footing. It will really depend on if you need or use the features listed above.
One workaround for those who need to use a Mac is to implement virtualization software like Parallels or VMware Fusion for the Mac. With these, you can actually run Windows on a Mac computer, and therefore use the Windows version of Excel even though you are on a Mac.
There can be limitations with the virtualization options depending on the Mac you are using, so it’s best to do your research on those workaround solutions as well.
Conclusion
I hope this quick overview of Power Query for Mac is helpful for you. I’d love to know what you think about the new feature, so leave a comment below with your first impressions.
OK – you might not have a Mac and you might not be convinced on Excel for Mac just yet, but here’s something that will light up your eyes if you’re a Power Query user:
Power Query can run up to 600% faster on Excel for Mac
YES! – I’m not kidding!! I’m almost as shocked as you are.

This blog post won’t be about which OS is better than the other. Whether you pick the red or blue pill, you’ll still get Power Query inside of Excel.
I know quite a few folks that are using their Mackbook Pros to run Windows using Parallels or Boot camp, but never use Excel for Mac and this might be a good reason to start using it.
What is Power Query in Excel for Mac?
I’d like to tackle this question in two parts. In the first one, let’s define some initial concepts:
- What is Power Query? Power Query is the Microsoft Data Connectivity and Data Preparation technology that enables business users to seamlessly access data stored in hundreds of data sources and reshape it to fit their needs, with an easy to use, engaging and no-code user experience.
- What is Excel on Mac? It’s the MacOS specific version of Excel. It is not the same as the one that you get on your iOS like your iPhone or tablet, but rather a full desktop experience, but not exactly the same that you might be accustomed to on Windows.
OK – with that out of the way, let’s go with part 2: what is Power Query in Excel for Mac?
Well, in essence is the integration of the new standard Microsoft business-user oriented Data Preparation tool inside of Excel on Mac.
The integration is still in its early stages, but it was released on a public preview through the Office Insider program for Mac. You can read the full press release by Guy Hunkin (Microsoft’s Excel PM) from here.
What can I do with Power Query for Excel on Mac?

The most important part about Power Query, besides its user interface, is the actual engine that runs all of the transformations. Guess what! That engine is now able to run inside of Mac.
I didn’t think that I’d be alive to see Power Query run on a MacOS, especially since PowerPivot has been around for almost 10 years now and it seems like it’ll never see the light on MacOS.
so, why Power Query and not PowerPivot? that’s a good question and something that I’d let the MSFT team answer, but I do firmly believe that Power Query is a tool that has a way bigger audience/reach. While PowerPivot is more intended to be used by the Power Users, Power Query can be used by almost 70% of the Excel userbase.
The current integration is very limited on what you can do, but so much of the ground work is already in place. Again, the engine is already in place, so that’s BIG.
What exactly can we do right now with this integration? We can do 2 things:
- Refresh an existing query inside of a Workbook
- Change the File Paths of our queries
The only supported connectors right now are for local files:
- Text / CSV
- Excel files (not from Table / Range yet)
- XML
- JSON
You’re probably wondering, what happens if you try using a connector not previously listed? Well, you end up in an infinite loop of prompts telling you that something went wrong, so I highly recommend that you don’t try other connectors just yet.

This makes me believe that only a “Implicit” authentication is available at this point and you can’t use other types of authentications just yet.
The current integration basically limits you to consumption only. You can get queries from other folks (who create them in Windows Excel) and you can refresh them inside of MacOS.
Testing Power Query in Excel for Mac
My first intention was to figure out what M functions are already available inside of this integration. You can see the full list of available functions on Power Query in Excel for Mac from here.
Most of the functions are already in there. Most of the ones that are missing are the ones related to Connectors, but there’s more than 680 functions already in MacOS just dormant in there – waiting for someone to use them.
I then did a simple test refreshing a query that connected to a file on a local file inside my windows PC and it gave me an error, so I went into the connections window, change the file path to my local MacOS path and it worked.
That was pretty straightforward, but what about the performance?
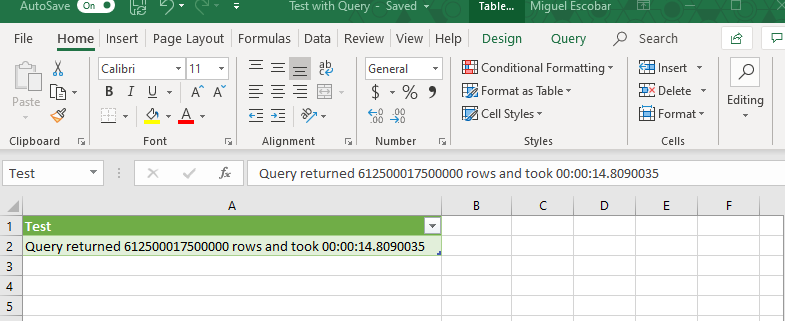
That’s when it hit me. The engine is already there. We need too perform an engine test.
Sadly, we can’t access the trace log (I have no idea if it’s even available in MacOS), so we have to go back to our roots and do something similar to what Chris Webb did back in the old days (as showcased here).
That’s how I modified Chris’ original code and ended up with this code:
I created a query from that code and saved the file in my SharePoint so I could easily access the file from both my Mac mini and my Windows PC.
The good thing about this query is that it’s not using any connectors. It’s basically M code in its purest form, so you don’t have to worry about any prompts or issues. It’ll simply run.
About my Hardware used in the tests
I do have an acceptable hardware in my own opinion. Is not an apples to apples comparison (pun intended), but it’s what I have, so it’ll do:
My Windows Desktop PC
- CPU: Intel i7-7700K CPU @4.20GHz, 4 cores, 8 logical processors, 8MB L3
- RAM: 32GB DDR4 @ 2133 MHz
- Power Query version: 2.70.5494.701 64-bit
- OS: Windows 10 Pro 64-bit
My Mac Mini (v2018)
- CPU: Intel i5-8500B @ 3.00GHz, 6 cores, 6 logical processors, 9MB L3
- RAM: 8GB DDR4 @ 2666 MHz
- Power Query version: Office Insider Fast Channel (201907)
- OS: macOS Mojave
Running the tests
When I test this on my Windows 10 PC, I do see that my CPU is running at 100% during the whole processing of the query and the final results say this:

and when I test this same query on my Mac mini, the average result that I get is this:

and yes – my CPU does the same turbo boost for its processing time, but in this case it’s much faster and finishes evaluating the query in just 3 to 4 seconds.
One of the key pieces of my test code is that I use a Buffer function, and when I remove that piece of my code, the comparison is much closer, but the Mac Mini still wins by up to 25% faster.
Comparing Apples to Apples
What if I run this same test on the same hardware? I was advised to use Boot Camp to install Windows 10 and partition my hard drive so I could test the same query under the same hardware.
That’s exactly what I did. I installed Windows 10 through Boot Camp, installed Office and then ran the query inside of my Windows inside my Mac mini and the average of that test was 17 seconds. The fastest time was around 12-14 seconds:
This is still a big difference! Power Query in Excel for Mac is still at least 3x faster than on Windows. Why? I have no clue. I wish I had the answer, but I’ve contacted the MSFT folks letting them know about my findings.
The reality is that I’m thrilled about this because it means that Power Query can get better. Power Query can run faster without just throwing more resources at it, which translates into more consumer-grade computers being able to take full advantage of Power Query without being limited to processing power.
We are far from seeing the best performance that Power Query can deliver. Now Power BI dataflows or Power Query Online has its own set of configurations that enable you more resources and capacity, so if I try doing this same test with dataflows, I can’t even begin to imagine how crazy fast it would be. I need to give it a try.
Try this on your own!
I highly encourage you to do this test on your own Mac computer and let me know your results in the comments section. You can download my workbook from the button below and all you have to do is simply click refresh.
Perform your own tests and let me know your experience!
What can you expect in the future for Power Query inside Excel for Mac?
Note: This is pure speculation and me guessing what things might happen, so take things with a grain of salt. I’ll be updating this post as soon as new features get added to the tool.
Support for new connectors is a given. We can expect new connectors for things like SQL Database, ODBC, Web.Contents, probably SharePoint and others like the From Folder connector. This has happened before in other Power Query integrations, and I doubt that this will be the exception.
Apart from that, I really hope that they end up integrating the full query authoring experience with the full Power Query interface inside of Excel for Mac. Right now there’s a huge dependency on having someone that has Power Query on a Windows PC so that they can create the query and the file for you, but maybe there are already some situations like that in the real world?
If you’ve tried Power Query in Excel for Mac, leave you feedback in the comments below.
UPDATE 2-October-2019: Power Query in Excel for Mac has hit GA. Read more here (url).
Update 9-December-2019: I recently did a webinar to cover more on this topic. You can watch the full recording from the video below:
Hello, I’m Guy, a Program Manager working on the Excel team. I’m here today with another story about the power of feedback from the Office Insiders community!
When we first integrated the Power Query technology in Excel for Windows, we got a lot of feedback that people love it! It is a truly powerful and time-saving set of tools to gather and shape data fast and easily in Excel. But we also heard from our Mac Office Insiders community that you want Power Query to be supported in Excel for Mac, as well. “Excel for Mac is a toy without Power Query!”, some of you said.
And we heard you! We got our best engineers working on this project, and today we are glad to announce the first step in a journey to support Power Query in Excel for Mac. In this release, you can refresh your Power Query queries on Mac from Text, CSV, XLSX, XML and JSON files.
Update! You can now import data from local using Power Query. Check out this blog to learn more.
Getting started
The new functionality is live for all Office Insiders Fast customers in Excel for Mac version 16.26 (19052200) and later.
UPDATE! This feature is now also available to Insider Slow customers running 16.27 (19070800) and later.
Scenarios to try
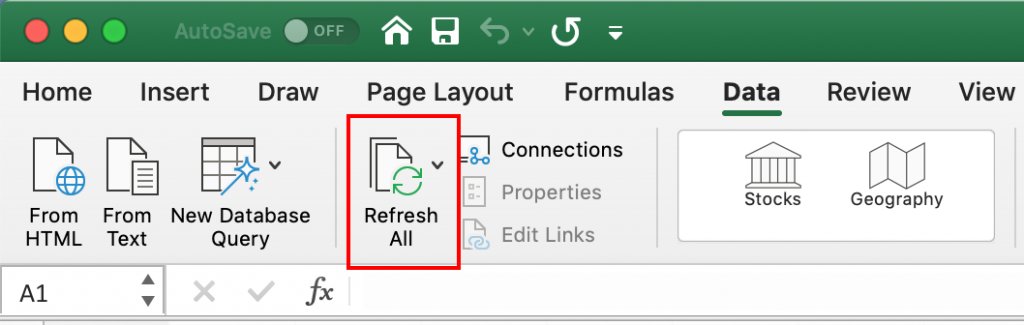
Refresh your workbook queries as you would usually do (for example, via Data > Refresh All or VBA). Note that the refresh will work only for those queries that pull data from text, CSV, XLSX, XML or JSON files.
You may need to update the file path so that it works on your Mac. Click Data > Connections > select the connection that failed to refresh > and click Change File Path to update it.
Feedback
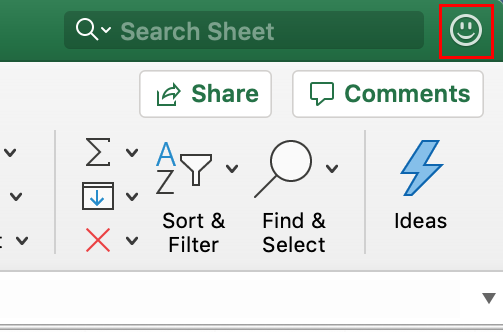
We’d love to hear from you! Let us know what you think and submit your feedback using Send a Smile/Frown (Send us a Smile 😊 or Frown ☹ button at the top right)! Learn what other information you should include in your feedback to ensure it’s actionable and reaches the right people. We’re excited to hear from you!
Sign up for the Office Insider newsletter and get the latest information about Insider features in your inbox once a month!
Aug 05 2019
09:59 AM
Hello,
Recently switched to Macbook, I notice that the Excel environment is slightly modified compared to the Windows interface.
I have a problem with this upheaval. Indeed, I was using requests from web sources. But on the mac I can’t find any tab to check the sources already present in the document, or even to modify them….
I looked in the preferences, but I didn’t find anything.
Do you have any idea how to reach it?
Thank you in advance!
Nb : I have the latest Excel’s version
-
All Discussions -
Previous Discussion -
Next Discussion
7 Replies
best response confirmed by
Quentin85 (Occasional Visitor)
Aug 05 2019
11:00 AM
Solution
@Quentin85
Hi,
Power Query is still not supported on Mac, but the good news is that the Excel team is planned to support it soon according to this idea.
Regards
May 18 2021
06:11 PM
@Haytham Amairah
Do you know when exactly Power Query will be available for Mac? It looks like it is in the works according to your post, but eager to know some times! Must learn this tool.
May 24 2021
08:17 AM
Thanks Sergei. Another related question. How can I import data from financial statements from the web (e.g. Yahoo Finance) for analysis in Excel. This link here suggests go to Data tab > From Web > Copy and paste link of financial statement, etc. I have MS Office 2019 and don’t seem to have this ‘From Web’ option, but I do have ‘Get external data’ (including from HTML, text, and new database query): https://www.youtube.com/watch?v=u-uICE9akmA&ab_channel=MyE-Lesson. What should I do?
Jun 03 2021
06:43 AM
How come this is not available on MS Office 2019 for Mac? «Queries and Connections»? If I were to download excel on a windows PC would I get access to Power Query? This is terribly frustrating that such an essential add-in is not available for mac.
Jun 03 2021
08:39 AM
@CEdward0764
In general, Office 2019 is not feature updated version, that’s only Office 365 has feature updates on regular basis. Next feature update for Office 2019 will be with Office 2021.
As for the platform, only Office on Windows has full functionality. Power Query on Mac has very very limited functionality, but it’s slowly improved.
This post has been republished via RSS; it originally appeared at: Excel Blog articles.
Excel 2016 for Windows introduced a powerful set of Get & Transform Data tools. These tools, based on Power Query technology, enable you to easily connect, combine, and shape data coming from a variety of sources.
Today, we are excited to announce the first step in a journey to support Power Query in Excel for Mac. This is by far the most popular idea on Excel UserVoice under Excel for Mac category. In this release, you can refresh your Power Query queries on Mac from Text, CSV, XLSX, XML and JSON files, and you can author queries with VBA.
Getting Started
The new functionality is live for all Office 365 subscribers in Excel for Mac running version 16.29 (19090802) and later. If you are running an earlier version, find out how to update your Office for Mac.
Refreshing Power Query Queries
You can now refresh the Power Query queries in your workbook that pull data from Text, CSV, XLSX, XML or JSON files. Triggering the refresh command is done the same way that you’ve been doing it so far. For example:
- Click on the Data tab of the ribbon > then choose Refresh All
- Right-click on your query table > then click Refresh
- Right click on your PivotTable > then click Refresh Data
- Use a VBA script
- And more…

Please note that upon the first time you try to refresh your workbook queries, you may need to update the location of the data source so that it works on your Mac. Click the Data tab on the ribbon > Connections > select the desired connection > and click Change File Path button to update it.

Authoring Power Query Queries
With this update, you can also create and manage Power Query queries in your workbook using VBA. Any existing macros and VBA scripts that reference Workbook.Queries and WorkbookQuery entities in the Excel’s object model will work in Excel for Mac as expected.
Note: You may still need to adjust your scripts to reflect the notion of a file path on Mac (e.g., /Users/USERNAME/Desktop/data.csv) that is different than a file path on Windows (e.g., C:UsersUSERNAMEDesktopdata.csv).
Sharing your feedback
Let us know what you think and submit your feedback using Send a Smile/Frown (Send us a Smile  or Frown
  button at the top right)!

Stay tuned for more updates!
Guy Hunkin
Program Manager, Excel
- Remove From My Forums
-
Question
-
I had posted a question about how to transform data in my Excel sheet and had a great solution using Get and Transform data on Excel 2016 for Windows:
https://social.technet.microsoft.com/Forums/office/en-US/b1fe131a-ac7d-4681-80e1-074408986947/pivot-table-with-actual-values-instead-of-aggregates?forum=excel
I need this to work on Excel 2016 for Mac and just learned that power query is not supported on Macs.
Excel for Macs does recognize the tables, but cannot refresh them with source data.
How do i get around this to work on Excel 2016 for Macs?
Thank you
Answers
-
Hi,
In my opinion, use code to generate the determine table will be the best way for you use in both Office for Windows and MAC.
Please ask your requirement to Excel for Developer forum:
https://social.msdn.microsoft.com/Forums/en-US/home?forum=exceldev
The reason why we recommend posting appropriately is you will get the most qualified pool of respondents, and other partners who read the forums regularly can either share their knowledge or learn from your interaction with us. Thank you
for your understanding.Regards,
Emi
Please remember to mark the replies as answers if they helped. If you have feedback for TechNet Subscriber Support, contact
tnsf@microsoft.com.
Click
here to learn more. Visit the dedicated
forum to share, explore and talk to experts about Microsoft Teams.-
Proposed as answer by
Tuesday, June 5, 2018 6:33 AM
-
Marked as answer by
JHarding08
Tuesday, June 26, 2018 6:33 PM
-
Proposed as answer by
Power BI и полноценный Excel на Mac.
Правила выживания
Версии Power BI под Mac не существует. Excel под Mac урезан (относительно windows версии), менее стабилен, под него нет надстроек Power Query и PowerPivot, возможности сводных таблиц ограничены. В статье мы разбираем 4 основных способа работы с Excel for Windows на Mac, разберем их минусы и плюсы.
Parallels desktop — это виртуальная машина, для обладателей Mac. Виртуальная машина это программа эмулирующая виртуальный компьютер и позволяющая установить в него другую операционную систему. С помощью Parallels при запущенном Mac можно в отдельном окне можно запустить Windows и любые программы под Windows. При этом возможно полноэкранное использование.
Плюсы:
— Интеграция с вашими папками и файлами на Mac
— Для работы не нужно подключение к интернет
Минусы:
— Нужен мощный компьютер. На Macbook air запустить Windows в Parallels удастся, но будет тормозить
— Использует дополнительные ресурсы системы — место на жестком диске, оперативную память
— Дополнительно нагружает батарейку
— Parallels desktop — платный софт
Статья по оптимизации работы «Parallels Desktop 10 — семь советов для эффективной работы»
В видео ниже Максим Уваров делится своим опытом использования Windows приложений под MacOs.
BI-TV #16: Power BI и полноценный Excel на MacOS X
2. Дополнительная машина на Windows
Второй по популярности способ запуска Excel – запуск Excel через дополнительную машину (сервер). То есть вы ставите на стационарный компьютер (или только системный блок) Windows, устанавливаете Microsoft Office и подключаетесь с помощью удаленного рабочего стола, например через Windows RDP-клиент или CoRD. Этот метод удобен для тех, кто большую часть времени проводит в Windows и не хочет дополнительно нагружать свой Mac.
Плюсы:
— Не нагружает систему, все вычисления происходят на стороннем компьютере
— Не сажает дополнительно батарею
Минусы:
— Для работы нужен интернет
— Для работы нужен отдельный, постоянно работающий компьютер (сервер), подключенный к интернету
3. Запуск через BootCamp
BootCamp есть в каждом Mac по умолчанию. Он позволяет отделить от вашего диска часть памяти, создать новый раздел и загрузить в него Windows. Разница с Parallels в том, что через BootCamp вы работаете с операционными системами по очереди. Чтобы переключиться, нужно перезагрузить систему.
Плюсы:
— Не нагружает систему
— BootCamp идет с любой Mac OS
Минусы:
— Нужно перезагружаться, чтобы сменить операционную систему
Статья про установку Windows на Macbook «Почему не ставится Windows на MacBook Air 2013 через BootCamp?»
Microsoft Azure предлагает виртуальные машины, которые можно запустить буквально за несколько минут. При этом вы можете развернуть свою копию Microsoft Office без дополнительных расходов из вашего аккаунта Microsoft.
По сути этот метод объединяет преимущества методов 1 и 2, за одним исключением — виртуальная машина оплачивается по часам, либо помесячно и тарифы (так как они в долларах), не самые бюджетные – от 15$ за самую простую машину.
Плюсы:
— Не нагружает дополнительно систему
— Не нагружает батарею
Минусы:
— Сервер оплачивается помесячно или по часам
— Нужно подключение к интернет
Дополнительная настройка
— Вы можете установить на Windows облако (Google Drive, Dropbox) и работать с файлами он-лайн
— Вам нужно будет отключить некоторые горячие клавиши вашего Mac, чтобы они не работали «поверх» Windows
Отключаем горячие клавиши:
— Все клавиши с Control (⌃) (⌃+вверх, вниз, влево, вправо)

— Включаем работу с клавишами F через Fn

Мы разобрали основные способы запуска полноценного MS Excel на Mac. Если вы знаете еще какие либо способы — пишите на info@needfordata.ru и мы их опубликуем.