How to find the last column in a row that has data. This includes selecting that column or a cell in it, returning the column number, and getting data from that column.
Sections:
Find the Last Column with Data
Select the Last Cell
Select the Entire Column
Get the Number of the Last Column
Get the Data from the Last Column
Notes
Find the Last Column with Data
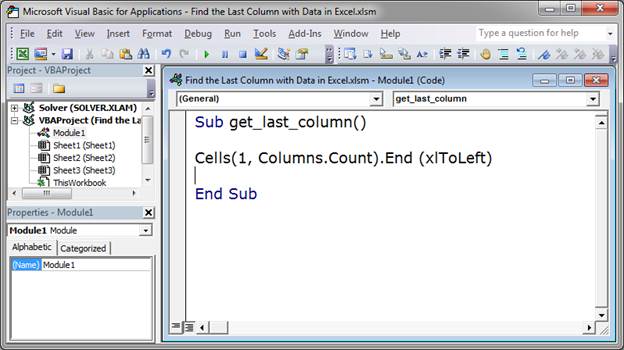
Cells(1, Columns.Count).End(xlToLeft)
All you have to change to make this work for you is the 1.
This is the basic method that you use to return the last cell in a row that has data. That means that the cell will be in the last column that has data.
The 1 in the above code is the number of the row that you want to use when searching for the last column that has data. Currently, this code looks in row 1 and finds the last column in row 1 that has data. Change this to any number you want.
This doesn’t seem very useful right now, but, in practice, it is often used within a loop that goes through a list of rows and you can then set this code to find the last column of data for each row without having to manually change this number.
Columns.Count puts the total number of columns in for that argument of the Cells() function. This tells Excel to go to the very last cell in the row, all the way to the right.
Then, End(xlToLeft) tells Excel to go to the left from that last cell until it hits a cell with data in it.
This basic format is also used to find the last row in a column.
Now, let’s look at how to get useful information from this code.
Select the Last Cell
The first thing that you might want to do is to select the cell that has data in the last column of a row.
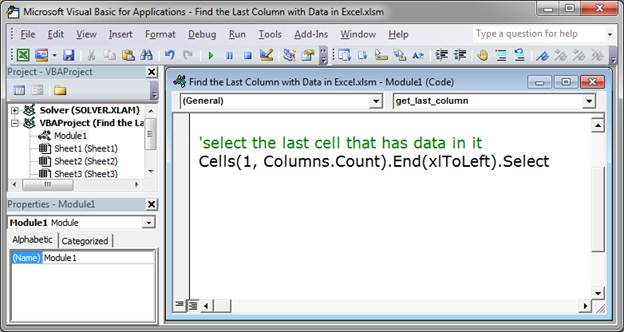
Cells(1, Columns.Count).End(xlToLeft).Select
Select is what selects that last cell in the row that has data.
This is exactly the same as the first piece of code except we added Select to the end of it.
1 is the row that is being checked.
Select the Entire Column
This selects the entire column where the last cell with data is found within a particular row.
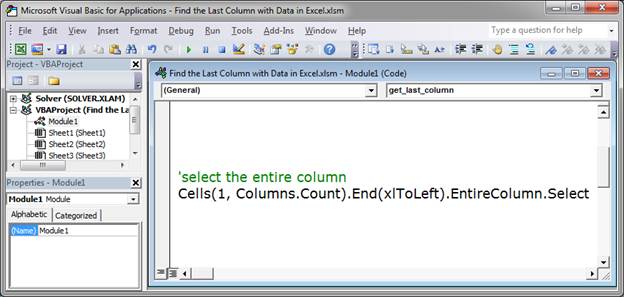
Cells(1, Columns.Count).End(xlToLeft).EntireColumn.Select
EntireColumn is added to the base code and that is what references, well, the entire column.
Select is added to the end of EntireColumn and that is what does the actual «selecting» of the column.
1 is the row that is being checked.
Get the Number of the Last Column
Let’s get the number of the last column with data. This makes it easier to do things with that column, such as move one to the right of it to find the next empty cell in a row.
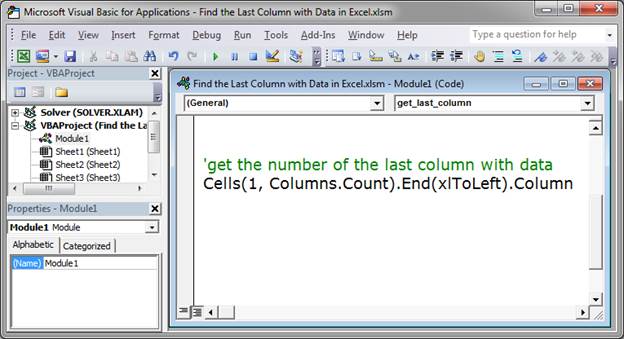
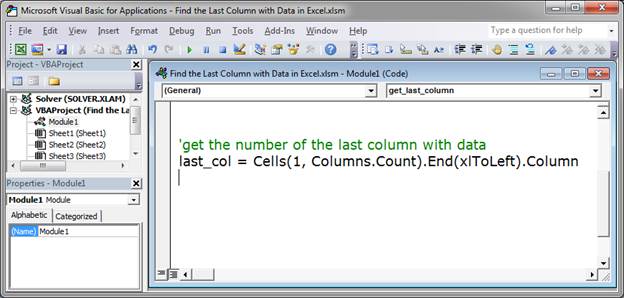
Cells(1, Columns.Count).End(xlToLeft).Column
Column is appended to the original code in order to give us the number of the column that contains the last piece of data in a row.
This is rather useless on its own though, so let’s put it into a variable so it can be used throughout the macro.
last_col = Cells(1, Columns.Count).End(xlToLeft).Column
The number of the last column is now stored in the variable last_col and you can now use that variable to reference this number.
1 is the row that is being checked.
Get the Data from the Last Column
Return any data contained in the cell in the last column.
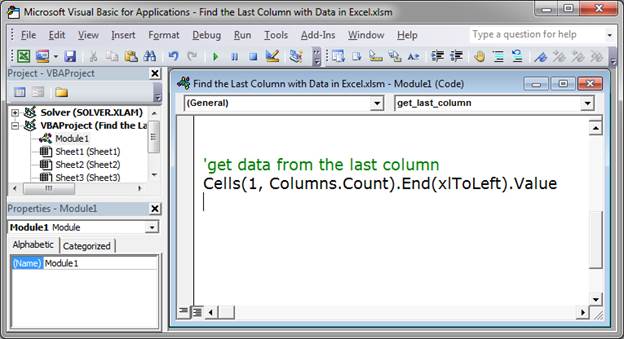
Cells(1, Columns.Count).End(xlToLeft).Value
Value is added to the end of the base code in order to get the contents of the cell.
This is rather useless in its current form so let’s put it into a variable.
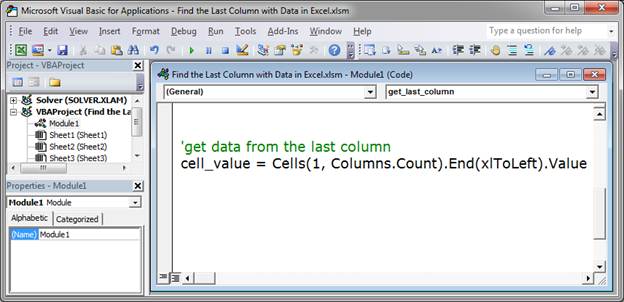
cell_value = Cells(1, Columns.Count).End(xlToLeft).Value
Now, the variable cell_value will contain anything that is in the last cell in the row.
1 is the row that is being checked.
Notes
The basic format for finding the last cell that has data in a row is the same and is the most important part to remember. Each piece of information that we want to get from that last cell simply requires one or two things to be added to the end of that base code.
Download the attached file to work with these examples in Excel.
Similar Content on TeachExcel
Get the Last Row using VBA in Excel
Tutorial:
(file used in the video above)
How to find the last row of data using a Macro/VBA in Exce…
Next Empty Row Trick in Excel VBA & Macros
Tutorial:
A simple way to find the next completely empty row in Excel using VBA/Macros, even if som…
How to Add a New Line to a Message Box (MsgBox) in Excel VBA Macros
Tutorial: I’ll show you how to create a message box popup window in Excel that contains text on mult…
Loop Through an Array in Excel VBA Macros
Tutorial:
I’ll show you how to loop through an array in VBA and macros in Excel. This is a fairly…
Filter Data in Excel to Show Only the Top X Percent of that Data Set — AutoFilter
Macro: This Excel macro filters a set of data in Excel and displays only the top X percent of tha…
Sort Data Left to Right in Excel
Tutorial: How to sort columns of data in Excel. This is the same as sorting left to right.
This wi…
Subscribe for Weekly Tutorials
BONUS: subscribe now to download our Top Tutorials Ebook!
Return the number of columns in a given array or reference
How to Get Excel Last Value in Column
The COLUMNS Function[1] in Excel is an Excel Lookup/Reference function. It is useful for looking up and providing the number of columns in a given reference or array. The COLUMNS function, after specifying an Excel range, will return the number of columns that are contained within that range.
Formula
=COLUMNS(array)
The COLUMNS function in Excel includes only one argument – array. The array argument is a required argument. It is the reference to a range of cells or an array or array formula for which we want the number of columns. The function returns a numerical value.
How to use the COLUMNS Function in Excel?
It is a built-in function that can be used as a worksheet function in Excel. To understand the uses of this function, let’s consider a few examples:
Example 1
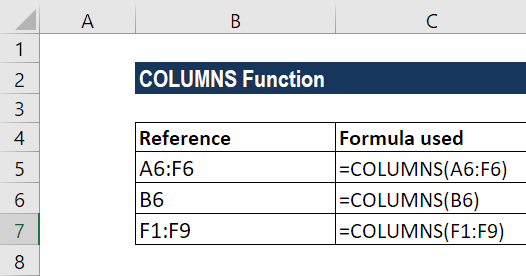
Let’s see how this function works when we provide the following references:
Suppose we wish to find out the number of columns in a range. The most basic formula used is = COLUMNS(rng).
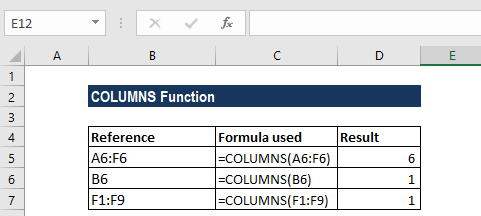
In the first reference above, we used the COLUMNS function to get the number of columns from range A6:F6. We got the result as 6 as shown in the screenshot below:
So, this function counted the number of columns and returned a numerical value as the result.
When we gave the cell reference B6, it returned the result of 1, as only one reference was given.
Lastly, when we provided the formula F1:F9, it counted the number of columns as 1 and the function returned the result accordingly.
Thus, in this function, “array” can be an array, an array formula, or a reference to a single contiguous group of cells.
COLUMNS Function – Example 2
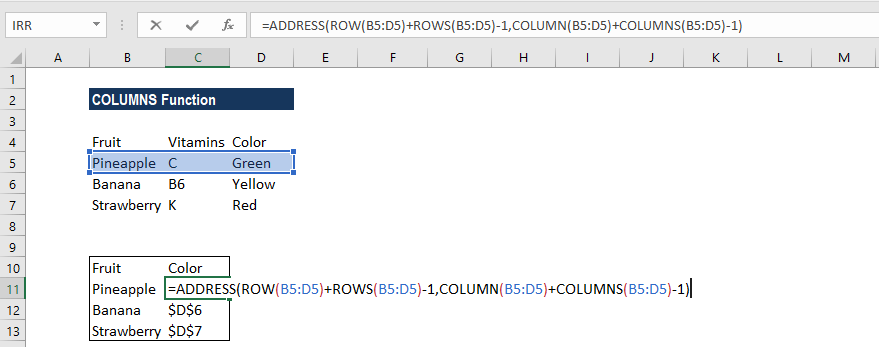
Using Columns with other formulas: If we wish to get the address of the first cell in a named range, we can use the ADDRESS function together with the ROW and COLUMN functions. The formula to be used is below:
What happens in this formula is that the ADDRESS function builds an address based on a row and column number. Then, we use the ROW function to generate a list of row numbers, which are then shifted by adding ROWS(B5:D5)-1, so that the first item in the array is the last row number:
ROW(B5:D5)+ROWS(B5:D5)-1
We do the same for COLUMN and COLUMNS: COLUMN(B5:D5)+COLUMNS(B5:D5)-1
What happens is that the ADDRESS function now collects and returns an array of addresses. If we enter the formula in a single cell, we just get the item from the array, which is the address corresponding to the last cell in a range.
COLUMNS Function – Example 3
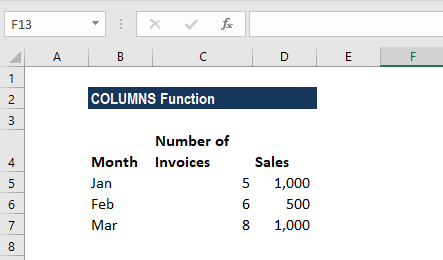
Now let’s see how to find out the last column in a range. The data given is as follows:
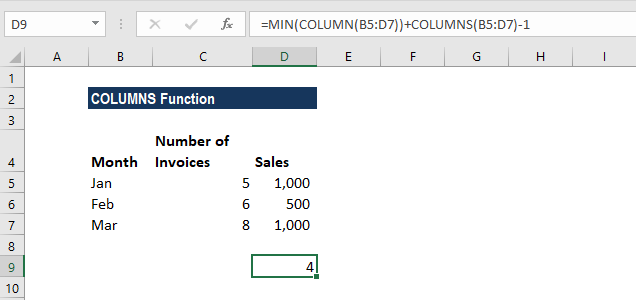
The formula used is =MIN(COLUMN(A3:C5))+COLUMNS(A3:C5)-1
Using the formula above, we can get the last column that is in a range with a formula based on the COLUMN function.
When we give a single cell as a reference, the COLUMN function will return the column number for that particular reference. However, when we give a range that contains multiple columns, the COLUMN function will return an array that contains all column numbers for the given range.
If we wish to get only the first column number, we can use the MIN function to extract just the first column number, which will be the lowest number in the array.
Once we get the first column, we can just add the total columns in the range and subtract 1, to get the last column number.
The result is shown below:
For a very large number of ranges, we can use the INDEX function instead of the MIN function. The formula would be:
=COLUMN(INDEX(range,1,1))+COLUMNS(range)-1
Click here to download the sample Excel file
Additional Resources
Thanks for reading CFI’s guide to important Excel functions! By taking the time to learn and master these functions, you’ll significantly speed up your financial analysis. To learn more, check out these additional CFI resources:
- Excel Functions for Finance
- Advanced Excel Formulas Course
- Advanced Excel Formulas You Must Know
- Excel Shortcuts for PC and Mac
- See all Excel resources
Article Sources
- COLUMNS Function
Номер последнего столбца в Экселе |
Я |
05.07.18 — 18:10
77, читаем эксель
определяем границы читаемых данных
Строк = Excel.Cells.SpecialCells(11).Row; // строка последней ячейки
Столбцов= Excel.Cells.SpecialCells(11).Column; // столбец последней ячейки
.
получается криво. В частности, количество столбцов определяется неверно, так как присутсвует столбец. который по всей «высоте» не заполнен данными, и после этого пустого столбца тоже есть столбцы с данными.
Вышеприведенное определение последнего столбца дает номер последнего заполненного столбца ПЕРЕД пустым столбцом, а это явно не все данные —
вопрос: как правильно определить самый поледний правый столбец с данными?
1 — 05.07.18 — 18:34
То есть у тебя в первых строках 3 столбца заполнено, а ниже
— сотня?
2 варианта попробуй:
1. Пересохранить файл, вдруг МС пересчитывает SpecialCells.
2. Функцию на VBA, цикл по строкам, цикл по столбцам.
Критерием конца цикла по строкам я брал пустые подряд 20 строк. Но этот код был на 1Сике.
2 — 05.07.18 — 18:54
(1) ТТН в виде эксельного файла. куча столбцов/ячеек. читаю — как выше — до 85 столбца и все. хотя есть справа еще столбцы и нужная ячейка в 91 столбце. оказалось 86 столбец по всей высоте — пустой. СпешалЦелс выдавал 85 столбцов.
3 — 05.07.18 — 18:55
1. не пойдет, сильно много файлов и вообще противоречит моему чувству прекрасного.
2. бяка.
4 — 05.07.18 — 19:15
как-то вот так типа наверное
Excel_Лист = Excel.Worksheets(i);//просмотрим ячейки одного листа
первИспСтрока = Excel_Лист.UsedRange.Row;
ВсегоСтрок = первИспСтрока + Excel_Лист.UsedRange.Rows.Count -1;
первИспСтолбец = Excel_Лист.UsedRange.Column;
ВсегоСтолбцов = первИспСтолбец + Excel_Лист.UsedRange.Columns.Count -1;
Excel: метод SpecialCells неверно определяет последний столбец. Помогите!!!
5 — 05.07.18 — 19:15
(2) Если у тебя постоянный формат, то храни ширину как параметр прямо в коде или рядом. Используй функцию «АНеТТНЛиВыМнеПодсунули»
6 — 05.07.18 — 19:19
(5) это понятно, но некузяво (примерно так и сделал в параметрах функции).
7 — 05.07.18 — 19:20
.. и как максимально быстро считать Эксель в ТЗ..? поячеечное чтение из экселя — очень долго…
8 — 05.07.18 — 20:06
(6) Шум на входе приводит к шуму на выходе.
Более того, пользователь (нет, тот кто несёт вред вместо пользы — это вредзователь) сможет создать достаточно кривой бланк xls, который читать можно будет только полным перебором ячеек.
(7) Забыл. Именно с семёркой я работал с неприлично большими файлами. Что-то брал у УжасБухгалтера и быстренько допиливал.
9 — 05.07.18 — 20:16
UsedRange()?
А вообще бывает так, что область данных в файле принудительно задают вместо автомата, но не помню, где это менять.
10 — 05.07.18 — 23:55
(7) Через ADO, если структура регулярная и плоская.
11 — 06.07.18 — 00:06
(0) Самый лучший вариант знаешь какой?
Выкинуть эксель нафик и файлы его формата тоже.
Нынче 21 век и пора уже использовать json или хотя бы xml и специальные системы для создания/редактирования/просмотра структурированных упорядоченных данных.
12 — 06.07.18 — 00:10
(11) Скажи это бюджету и всяким тендерам. Работаем с тем, что получаем, а получаем сотни ТОРГ12 и/или ТТН в виде экселевских файлов это и есть максимальный вариант автоматизации для участника цепочки передачи тмц.
13 — 06.07.18 — 00:12
(12) VBA скриптом внутри Экселя разобрать всю сотню и слить в один текстовый. Потом с спокойно, с комфортом загрузить.
14 — 06.07.18 — 00:29
SpecialCells(11).Address даёт букву на самом деле последнего столбца.
15 — 06.07.18 — 00:44
(13) Я тут в одной ветке (ибо сам не спец) попросил файл порезать на части (кстати, не забыть оплатить надо) — ну да, режет скрипт на части. только GUI серверный лег (Разрезать большой Excel-файл с кучей типовых ТОРГ12 по одной). Спеца для написания на ВБА дольше будет найти чем тупо по 1С-ному сделать все..
16 — 06.07.18 — 00:45
LastCellAddress = Cells.SpecialCells(11).Address
LastColumnName = Mid(LastCellAddress, 2, InStr(1, LastCellAddress, «$»))
LastColumnNumber = Columns(LastColumnName).Column
17 — 06.07.18 — 00:45
(14) то есть SpecialCells(11) вернет 85 столбец, а SpecialCells(11).Address — даст букву 115 столбца?
18 — 06.07.18 — 00:45
да, сам проверил и удивился
19 — 06.07.18 — 06:37
(18) однако… надо будет проверить…
и потом буквы столбца преобразовывать в число столбца.
а если включить в экселе настройку вывода адреса столбцов в виде чисел, а не букв, интересно что будет…
20 — 06.07.18 — 09:49
(15) Такая делилка делается за полчаса на Lazarus. Рекомендую. Там есть хорошая либа для excel. Неделю уже страдаешь из за такой ерунды.
21 — 06.07.18 — 10:07
(0) попробовал записать макрос нажатия Ctrl+End
дало: ActiveCell.SpecialCells(xlLastCell).Select
возможно, xlLastCell тебя спасет?
22 — 06.07.18 — 10:13
xlLastCell = 11
23 — 06.07.18 — 10:15
24 — 06.07.18 — 10:22
(20) да сделано уже давно. но перфекционизм не дает спать спокойно.. встаю ночью.. брожу.. руки текладу просят… 
blutang
25 — 06.07.18 — 11:02
(19) в (16) уже всё преобразовано 
Узнать последнюю строку можно следующими примерами:
1.
Код 1C v 8.х
Сообщить(appExcel.WorkSheets(1).UsedRange.Row);
2. метод определяет, когда закончились данные на листе:
SpecialCells(11) — «последняя» ячейка
Например, если нужен номер строки последней ячейки,
Код 1C v 8.х
LastRow=ExcelApp.Cells(1,1).SpecialCells(11).Row; Для проверки нажмите в проверяемом файле ctrl+end. Посмотрите на какой строке остановится курсор.
Узнать последнюю колонку можно следующими примерами:
1.
Код 1C v 8.х
Сообщить(appExcel.WorkSheets(1).UsedRange.Columns); 2.
Код 1C v 8.х
LastCol=ExcelApp.Cells(1,1).SpecialCells(11).Columns; Информация взята с сайта http://helpf.pro
Хотите узнать больше по этому вопросу?
Подпишитесь на нашу рассылку новостей
Подписаться
Чтобы задать вопрос или предложить тему статьи, нажмите на кнопку ниже:
Предложить статью
На чтение 3 мин. Просмотров 13 Опубликовано 20.05.2021
На большом листе, если вы хотите быстро и легко определить последнюю строку или столбец, содержащие значения, вы можете просто перетащить полосу прокрутки, чтобы найти ее. Но будет больно, если на вашем листе будут тысячи строк данных. В этой статье я расскажу о некотором полезном коде VBA для решения этой задачи.
Найдите последнюю строку или столбец с данными с помощью кода VBA
Найдите и выберите последнюю строку или столбец с данными с помощью Kutools for Excel
Содержание
- Найти последнюю строку или столбец с данными с помощью кода VBA
- Найти и выберите последнюю строку или столбец с данными с помощью Kutools for Excel
- Найдите и выберите последнюю строку или столбец с данными с помощью Kutools for Excel
Найти последнюю строку или столбец с данными с помощью кода VBA
Большинство из нас может подумать о том, чтобы найти последнюю ячейку, нажав Ctrl + End клавиши, чтобы найти последнюю строку и столбец, но сочетание клавиш не найдет ячейку с точным значением, если некоторые ячейки имеют форматирование ниже диапазона данных. Итак, используйте следующий код VBA:
1 . Активируйте свой рабочий лист, на котором вы хотите определить последнюю строку или столбец с данными.
2 . Удерживая нажатыми клавиши ALT + F11 , откройте окно Microsoft Visual Basic для приложений .
3 . Затем нажмите Insert > Module и вставьте следующий код в окно модуля .
Код VBA: найти последнюю строку с данными
4 . Затем нажмите клавишу F5 , чтобы запустить этот код, и появится окно подсказки, в котором будет указан номер строки используемого диапазона. См. Снимок экрана:

5 . Продолжайте нажимать кнопку OK , на этот раз номер последней строки со значениями был показан, как показано на следующем снимке экрана:

Примечание. Чтобы найти последний столбец с данными, примените этот код:
Код VBA: найти последний столбец с данными
Найти и выберите последнюю строку или столбец с данными с помощью Kutools for Excel
Если вы хотите напрямую найти и выбрать последнюю строку или столбец с данными в Excel, Выбрать последний Строка и утилиты Выбрать последний столбец из Kutools of Excel могут вам помочь. Пожалуйста, сделайте следующее.
Перед применением Kutools for Excel , пожалуйста, сначала загрузите и установите его .
1. Если вы хотите найти и выбрать последнюю строку с данными, нажмите Kutools > Выбрать > Выбрать последнюю ячейку > Последняя строка . См. Снимок экрана:

Примечание : для поиска и выбора последнего столбца с данными нажмите Kutools > Выберите > Выбрать последнюю ячейку > Последний столбец .
Затем последняя строка или столбец с данными на текущем листе найдена и немедленно выбрана.

Если вы хотите получить 30-дневную бесплатную пробную версию этой утилиты, пожалуйста щелкните, чтобы загрузить его , а затем перейдите к применению операции в соответствии с указанными выше шагами.
Найдите и выберите последнюю строку или столбец с данными с помощью Kutools for Excel

