
Пример создания пользовательской формы в редакторе VBA Excel для начинающих программировать с нуля. Добавление на форму текстового поля и кнопки.
Начинаем программировать с нуля
Часть 4. Первая форма
[Часть 1] [Часть 2] [Часть 3] [Часть 4]
Создание пользовательской формы
Создайте или откройте файл Excel с расширением .xlsm (Книга Excel с поддержкой макросов) или с расширением .xls в старых версиях приложения.
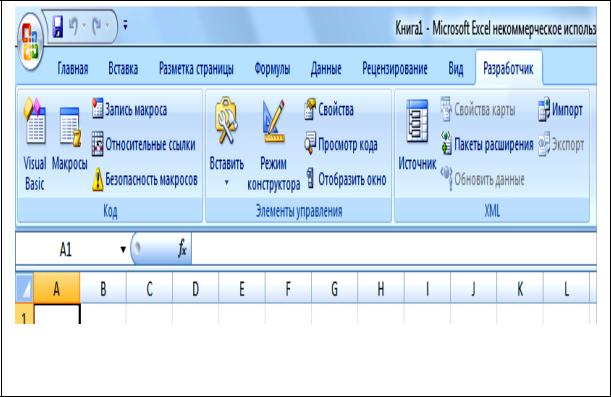
Перейдите в редактор VBA, нажав сочетание клавиш «Левая_клавиша_Alt+F11».
В открывшемся окне редактора VBA выберите вкладку «Insert» главного меню и нажмите кнопку «UserForm». То же подменю откроется при нажатии на вторую кнопку (после значка Excel) на панели инструментов.

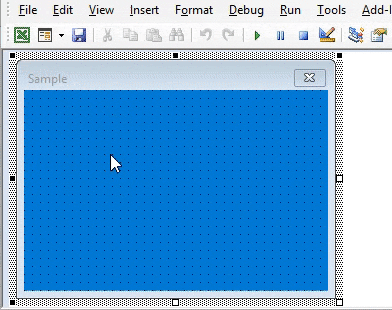
На экране редактора VBA появится новая пользовательская форма с именем «UserForm1»:

Добавление элементов управления
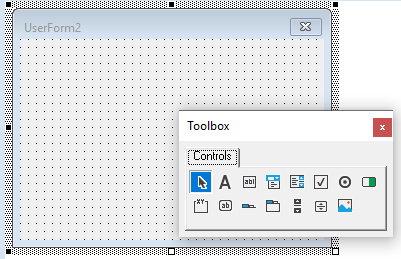
Обычно вместе с пользовательской формой открывается панель инструментов «Toolbox», как на изображении выше, с набором элементов управления формы. Если панель инструментов «Toolbox» не отобразилась, ее можно вызвать, нажав кнопку «Toolbox» во вкладке «View»:

При наведении курсора на элементы управления появляются подсказки.
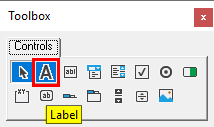
Найдите на панели инструментов «Toolbox» элемент управления с подсказкой «TextBox», кликните по нему и, затем, кликните в любом месте рабочего поля формы. Элемент управления «TextBox» (текстовое поле) будет добавлен на форму.
Найдите на панели инструментов «Toolbox» элемент управления с подсказкой «CommandButton», кликните по нему и, затем, кликните в любом месте рабочего поля формы. Элемент управления «CommandButton» (кнопка) будет добавлен на форму.
Кликнув по элементу управления на форме, вы можете изменять его размер, перетягивая границы за белые квадратики, и перетаскивать по форме, ухватив за одну из границ. Кликнув по заголовку формы или по ее рабочему полю, вы можете также изменять ее размер, перетягивая границы за белые квадратики.

Нажатием клавиши «F4» вызывается окно свойств, с помощью которого можно вручную задавать значения свойств пользовательской формы и элементов управления. В окне свойств отображаются свойства выбранного элемента управления или формы, если выбрана она. Также окно свойств можно вызвать, нажав кнопку «Properties Window» во вкладке «View».
Отображение формы на экране
Чтобы запустить пользовательскую форму для просмотра из редактора VBA, необходимо выбрать ее, кликнув по заголовку или свободному от элементов управления полю, и совершить одно из трех действий:
- нажать клавишу «F5»;
- нажать на треугольник на панели инструментов (на изображении выше треугольник находится под вкладкой «Debug»);
- нажать кнопку «Run Sub/UserForm» во вкладке «Run».
Для запуска пользовательской формы с рабочего листа Excel, можно использовать кнопки, описанные в этой статье. Например, чтобы отобразить форму с помощью «кнопки – элемента ActiveX», используйте в модуле рабочего листа следующий код:
|
Private Sub CommandButton1_Click() UserForm1.Show End Sub |

Для «кнопки – элемента управления формы» можно использовать следующий код, размещенный в стандартном программном модуле:
|
Sub ShowUserForm() UserForm1.Show End Sub |

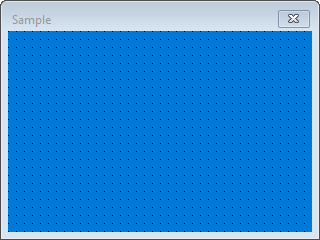
В результате вышеперечисленных действий мы получаем на рабочем листе Excel пользовательскую форму с мигающим курсором в текстовом поле:

Добавление программного кода
Программный код для пользовательской формы и элементов управления формы записывается в модуль формы. Перейти в модуль формы можно через контекстное меню, кликнув правой кнопкой мыши на поле формы или на ссылке «UserForm1» в проводнике слева и нажав кнопку «View Code».
Переходить между открытыми окнами в редакторе VBA можно через вкладку «Window» главного меню.
Изменить название пользовательской формы и элементов управления, их размеры и другие свойства можно через окно свойств (Properties Window), которое можно отобразить клавишей «F4». Мы же это сделаем с помощью кода VBA Excel, записанного в модуль формы.
Откройте модуль формы, кликнув правой кнопкой мыши по форме и нажав кнопку «View Code» контекстного меню. Скопируйте следующий код VBA, который будет задавать значения свойств формы и элементов управления перед ее отображением на экране:
|
1 2 3 4 5 6 7 8 9 10 11 12 13 14 15 16 17 18 19 20 21 22 23 24 25 26 27 28 29 30 31 32 33 34 35 36 37 38 39 40 41 42 43 44 45 |
Private Sub UserForm_Initialize() ‘Me — это обращение к форме в ее модуле With Me ‘Присваиваем форме заголовок .Caption = «Новая форма» ‘Задаем ширину формы .Width = 300 ‘Задаем высоту формы .Height = 150 End With With TextBox1 ‘Задаем ширину текстового поля .Width = 200 ‘Задаем высоту текстового поля .Height = 20 ‘Задаем расстояние от внутреннего края ‘формы сверху до текстового поля .Top = 30 ‘Задаем расстояние от внутреннего края ‘формы слева до текстового поля, чтобы ‘текстовое поле оказалось по центру .Left = Me.Width / 2 — .Width / 2 — 6 ‘Задаем размер шрифта .Font.Size = 12 ‘Присваиваем текст по умолчанию .Text = «Напишите что-нибудь своё!» End With With CommandButton1 ‘Задаем ширину кнопки .Width = 70 ‘Задаем высоту кнопки .Height = 25 ‘Задаем расстояние от внутреннего края ‘формы сверху до кнопки .Top = 70 ‘Задаем расстояние от внутреннего края ‘формы слева до кнопки, чтобы ‘кнопка оказалось по центру .Left = Me.Width / 2 — .Width / 2 — 6 ‘Задаем размер шрифта .Font.Size = 12 ‘Присваиваем кнопке название .Caption = «OK» End With End Sub |
Вставьте скопированный код в модуль формы:

Познакомьтесь еще с одним способом отображения на экране пользовательской формы в процессе тестирования: установите курсор внутри процедуры UserForm_Initialize() и нажмите клавишу «F5» или треугольник на панели инструментов. Все предыдущие способы (с выбором формы в редакторе и кнопками на рабочем листе) тоже работают.
В результате мы получаем следующую форму:

Теперь перейдите в редактор VBA, откройте проект формы «UserForm1» и дважды кликните по кнопке «CommandButton1». В результате откроется модуль формы и будет создан шаблон процедуры CommandButton1_Click(), которая будет запускаться при нажатии кнопки:
|
Private Sub CommandButton1_Click() End Sub |
Вставьте внутрь шаблона процедуры CommandButton1_Click() следующую строку кода, которая будет копировать текст из текстового поля в ячейку «A1» активного рабочего листа:
|
Range(«A1») = TextBox1.Text |

Отобразите пользовательскую форму на экране и проверьте работоспособность кнопки «OK».
Пользовательская форма (UserForm) для ввода данных по Регистрации туристов. VBA Excel
Пакет Microsoft Office (и Google-таблицы) дает возможность автоматизации взаимодействия оператора с ЭВМ.
- Разработать приложение, позволяющее заполнять таблицу Регистрации туристов
- Всплывающие подсказки на органах управления формы vba
- Создание заголовков полей базы данных на Листе Excel
- Заполнение раскрывающихся списков ComboBox
- Исходный код UserForm VBA Excel
Прикладное программирование должно повысить легкость и удобство взаимодействия пользователя со средой предметной области.
Разработать приложение, позволяющее заполнять таблицу Регистрации туристов
Задание: Рзработать приложение, позволяющее при помощи UserForm, заполнять таблицу Регистрация туристов. Обязательные поля таблицы:
- Фамилия
- Имя
- пол
- Выбранный тур
- оплачено
- фото
- паспорт
- срок

Рис.1 Разработать приложение, позволяющее заполнять таблицу Регистрации туристов
Если Вы предложите что-то свое (доработки, усовершенствования) и меня это заинтересует (как вариант), то скоро увидите его на этом месте…
Всплывающие подсказки на органах управления формы vba
Практически все органы управления имеют свойство ControlTipText, которому можно присвоить текстовое значение.
Это помогает пользователю ориентироваться на форме…

Рис.2 Всплывающие подсказки на органах управления формы vba
У командных кнопок это свойство установлено. Приглядитесь…
Создание заголовков полей базы данных на Листе Excel
Так было рекомендовано в методическом пособии, но я этот шаг пропустил…
//------------------------------

Sub ЗаголовокРабочегоЛиста()

'Процедура создания заголовков полей базы данных

If Range(«A1»).Value = «Фамилия» Then Range(«A2»).Select Exit Sub 'Если заголовки существуют, то досрочный выход из процедуры

End If 'Если заголовки не существуют, то создаются заголовки полей

ActiveSheet.Сеlls.Clear

Range(«A1:H1»).Value = Array(«Фамилия», «Имя», «Пол», «Выбранный Тур», «Оплачено», «Фото», «Паспорт», «Срок»)

Range(«А: А»).ColumnWidth = 12

Range(«D: D»).ColumnWidth = 14.4

Range(«2:2»).Select

'Закрепляется первая строка с тем, чтобы она всегда отображалась на экране

ActiveWindow.FreezePanes = True

Range(«A2»).Select

'К каждому заголовку поля базы данных присоединяется примечание

Range(«Al»).AddComment

Range(«A1»).Comment.Visible = False

Range(«A1»).Comment.Text Text:="Фамилия клиента"

Range(«B1»).AddComment

Range(«B1»).Comment.Visible = False

Range(«B1»).Comment.Text Техt:="Имя клиента"

Range(«C1»).AddComment

Range(«C1»).Comment.Visible = False

Range(«C1»).Comment.Text Text:="Пол клиента"

Range(«D1»).AddComment

Range(«D1»).Comment.Visible = False

Range(«D1»).Comment.Text Text:="Направление" & Chr(lO) & «выбранного тура»

Range(«E1»).AddComment

Range(«E1»).Comment.Visible = False

Range(«E1»).Comment.Text Text:="Путевка оплачена?" & Chr(lO) & «(Да/Нет)»

Range(«F1»).AddComment

Range(«F1»).Comment.Visible = False

Range(«F1»).Comment.Text Text:="Фото сданы" & Chr(lO) & «(Да/Нет)»

Range(«G1»).AddComment

Range(«G1»).Comment.Visible = False

Range(«G1»).Comment.Text Text:="Наличие паспорта" & Chr(lO) & "(Да/Нет)»

Range(«H1»).AddComment

Range(«H1»).Comment.Visible = False

Range(«H1»).Comment.Text Text:="Продолжительность" & Chr(lO) & «поездки»

End Sub
//------------------------------
Заполнение раскрывающихся списков ComboBox
Обратите внимание на колонку «AE» строки 1-7…
по коду:
//------------------------------
ComboBox1.RowSource = "=AE2:AE7" 'Заполняет раскрывающийся список из диапазона

//------------------------------
Исходный код UserForm VBA Excel
Почти весь исходный код расположен в модуле формы UserForm1.
А в модуле Лист1 расположены только короткие процедуры «Вызова формы», «Очистки таблицы» и «Запрета выделения ячеек в таблице».
Другие примеры на языке «Visual Basic for application — VBA»
Если у Вас остались вопросы, то задать их Вы можете, нажав на эту кнопочку …
Если на этой странице не нашлось того, что Вы так искали…
Не расстраивайтесь, не все потеряно… Смело щелкайте…
телефон:
+7(919) 572-59-92
+7(987) 848-79-61
This post provides an in-depth guide to the VBA Userform starting from scratch.
The table of contents below shows the areas of the VBA UserForm that are covered and the section after this provides a quick guide so you can refer back to the UserForm code easily.
“The system should treat all user input as sacred.” – Jef Raskin
A Quick Guide to the VBA UserForm
The following table provides a quick guide to the most common features of the UserForm
| Function | Examples |
|---|---|
| Declare and create | Dim form As New userformCars |
| Declare and create | Dim form As userformCars Set form = New userformCars |
| Show as modal | form.Show OR form.Show vbModal |
| Show as non modal | form.Show vbModeless |
| Unload | Private Sub buttonCancel_Click() Unload Me End Sub |
| Hide | Private Sub buttonCancel_Click() Hide End Sub |
| Getset the title | form.Caption = «Car Details» |
The Webinar
If you are a member of the website, click on the image below to view the webinar for this post.
(Note: Website members have access to the full webinar archive.)

Introduction
The VBA UserForm is a very useful tool. It provides a practical way for your application to get information from the user.
If you are new to UserForms you may be overwhelmed by the amount of information about them. As with most topics in VBA, 90% of the time you will only need 10% of the functionality.
In these two blog posts(part 2 is here) I will show you how to quickly and easily add a UserForm to your application.
This first post covers creating the VBA Userform and using it as modal or modeless. I will also show you how to easily pass the users selection back to the calling procedure.
In the second part of this post I will cover the main controls such as the ListBox, the ComboBox(also called the Dropdown menu), the TextBox and the CheckBox. This post will contain a ton of examples showing how to use each of these controls.
Related Articles
VBA Message Box
VBA UserForm Controls
Download the Code
What is the VBA Userform?
The VBA UserForm is a dialog which allows your application to get input from the user. UserForms are used throughout all Windows applications. Excel itself has a large number of UserForms such as the Format Cells UserForm shown in the screenshot below.

Excel’s “Format cells” UserForm
UserForms contain different types of controls such as Buttons, ListBoxes, ComboBoxes(Dropdown lists), CheckBoxes and TextBoxes.
In the Format Cells screenshot above you can see examples of these controls:
- Font, Font style and Size contain a textbox with a ListBox below it
- Underline and Color use a Combobox
- Effects uses three CheckBoxes
- Ok and Cancel are command Buttons
There are other controls but these are the ones you will use most of the time.
The Built-in VBA Userforms
It is important to note that VBA has some useful built-in UserForms. These can be very useful and may save you having to create a custom one. Let’s start by having a look at the MsgBox.
VBA MsgBox
The VBA message box allows you to display a dialog to the user. You can choose from a collection of buttons such as Yes, No, Ok and Cancel.

You can easily find out which of these buttons the user clicked on and use the results in your code.
The following code shows two simple examples of using a message box
' https://excelmacromastery.com/
Sub BasicMessage()

    ' Basic message
    MsgBox "There is no data on this worksheet "
    ' Basic message with "Error" as title
    MsgBox "There is no data on this worksheet ", , "Error"

End Sub
In the next example, we ask the user to click Yes or No and print a message displaying which button was clicked
' https://excelmacromastery.com/
Sub MessagesYesNoWithResponse()

    ' Display Yes/No buttons and get response
    If MsgBox("Do you wish to continue? ", vbYesNo) = vbYes Then
        Debug.Print "The user clicked Yes"
    Else
        Debug.Print "The user clicked No"
    End If

End Sub
In the final example we ask the user to click Yes, No or Cancel
' https://excelmacromastery.com/
Sub MessagesYesNoCancel()

    ' Display Yes/No buttons and get response
    Dim vbResult As VbMsgBoxResult

    vbResult = MsgBox("Do you wish to continue? ", vbYesNoCancel)

    If vbResult = vbYes Then
        Debug.Print "The user clicked Yes"
    ElseIf vbResult = vbNo Then
        Debug.Print "The user clicked No"
    Else
        Debug.Print "The user clicked Cancel"
    End If

End Sub
You can see all the MsgBox options here.
InputBox
If you want to get a single piece of text or value from the user you can use the InputBox. The following code asks the user for a name and writes it to the Immediate Window(Ctrl + G):
' Description: Gets a value from the InputBox
' The result is written to the Immediate Window(Ctrl + G)
' https://excelmacromastery.com/vba-userform/
Sub GetValue()

    Dim sValue As String
    sValue = Application.InputBox("Please enter your name", "Name Entry")

    ' Print to the Immediate Window
    Debug.Print sValue

End Sub
You can add validation to the InputBox function using the Type parameter:
' https://excelmacromastery.com/
Public Sub InputBoxTypes()

    With Application
        Debug.Print .InputBox("Formula", Type:=0)
        Debug.Print .InputBox("Number", Type:=1)
        Debug.Print .InputBox("Text", Type:=2)
        Debug.Print .InputBox("Boolean", Type:=4)
        Debug.Print .InputBox("Range", Type:=8)
        Debug.Print .InputBox("Error Value", Type:=16)
        Debug.Print .InputBox("Array", Type:=64)
    End With

End Sub
You can download the workbook with all the code examples from the top of this post.
GetOpenFilename
We can use the Windows file dialog to allow the user to select a file or multiple files.
The first example allows the user to select a file
' Print the name of the selected file
sfile = Application.GetOpenFilename("Excel Files (*.xlsx),*.xlsx")
Debug.Print sfile
The following example allows the user to select multiple files
' https://excelmacromastery.com/
Sub GetMultipleFiles()

    Dim arr As Variant
    arr = Application.GetOpenFilename("Text Files(*.txt),*.txt" _
        , MultiSelect:=True)

    ' Print all the selected filenames to the Immediate window
    Dim filename As Variant
    For Each filename In arr
        Debug.Print filename
    Next

End Sub
Note: If you need more flexibility then you can use the File Dialog. This allows you to use the “Save as” file dialog, select folders and so on.
How to Create a VBA UserForm
If the built-in UserForms do not cover your needs then you will need to create your own custom Userform. To use a UserForm in our code we must first create one. We then add the necessary controls to this Userform.
We create a UserForm with the following steps
- Open the Visual Basic Editor(Alt + F11 from Excel)
- Go to the Project Window which is normally on the left(select View->Project Explorer if it’s not visible)
- Right-click on the workbook you wish to use
- Select Insert and then UserForm(see screenshot below)

Creating a Userform
A newly created UserForm will appear. Anytime you want to access this Userform you can double click on the UserForm name in the Project window.
The Toolbox dialog should also be visible. If it’s not visible select View->Toolbox from the menu. We use the toolbox too add controls to our UserForm.

The UserForm Toolbox
Designing the VBA UserForm
To view the design of the UserForm, double click on it in the Project window. There are three important windows we use when creating our UserForms.
- The UserForm
- The properties window – this is where we can change the setting of the Userform and its controls
- The toolbox – we use this to add new controls to our UserForm

UserForm Windows
A Very Simple VBA UserForm Example
Let’s have a look at a very simple UserForm example.
You can download this and all the code examples from the top of this post.
- Create a new UserForm
- Rename it to userformTest in the (Name) property in the properties window
- Create a new module(Right-click on properties window and select Insert->Module)
- Copy the DislayUserForm sub below to the module
- Run the sub using Run->Run UserForm Sub from the menu
- The UserForm will be displayed – you have created your first UserForm application!
- Click on the X in the top right of the UserForm to close
' https://excelmacromastery.com/
Sub DisplayUserForm()

    Dim form As New UserFormTest
    form.Show

End Sub
Setting the Properties of the UserForm
We can change the attributes of the UserForm using the properties window. Select View->Properties Window if the window is not visible.
When we click on the UserForm or a control on a UserForm then the Properties window displays the attributes of that item.

VBA Properties Window
Generally speaking, you only use a few of these properties. The important ones for the UserForm are Name and Caption.
To change the name of the UserForm do the following
- Click on the UserForm in the Project window or click on the UserForm itself
- Click in the name field of the properties window
- Type in the new name
The Controls of the VBA UserForm
We add controls to the UserForms to allow the user to make selections, enter text or click a button. To add a control use the steps below
- Go to the toolbox dialog – if not visible select View->Toolbox
- Click on the control you want to add – the button for this control will appear flat
- Put the cursor over the UserForm
- Hold down the left mouse button and drag until the size you want
The following table shows a list of the common controls
| Control | Description |
|---|---|
| CheckBox | Turn item on/off |
| ComboBox | Allows selection from a list of items |
| CommandButton | Click to perform action |
| Label | Displays text |
| ListBox | Allows selection from a list of items |
| Textbox | Allows text entry |
Adding Code to the VBA UserForm
To view the code of the UserForm
- Right-click on the UserForm in the properties windows(or the UserForm itself) and select “View Code”
- You will see a sub called UserForm_Click. You can delete this when you create your first sub
Note: If you double click on a control it will bring you to the click event of that control. This can be a quicker way to get to the UserForm code.
Adding Events to the VBA UserForm
When we use a UserForm we are dealing with events. What this means is that we want to perform actions when events occur. An event occurs when the users clicks a button, changes text, selects an item in a ComboBox, etc. We add a Sub for a particular event and place our code in it. When the event occurs our code will run.
One common event is the Initialize event which occurs when the UserForm is created at run time. We normally use this event to fill our controls with any necessary data. We will look at this event in the section below.

To add an event we use the ComboBoxes over the code window(see screenshot above). The left one is used to select the control and the right one is used to select the event. When we select the event it will automatically add this sub to our UserForm module.
Note: Clicking on any control on the UserForm will create the click event for that control.
The Initialize Event of the VBA UserForm
The first thing we want to do with a UserForm is to fill the controls with values. For example, if we have a list of countries for the user to select from we could use this.
To do this we use the Initialize event. This is a sub that runs when the UserForm is created(see next section for more info).
To create the Initialize event we do the following
- Right-click on the UserForm and select View Code from the menu.
- In the Dropdown list on the left above the main Window, select UserForm.
- This will create the UserForm_Click event. You can ignore this.
- In the Dropdown list on the right above the main Window, select Initialize.
- Optional: Delete the UserForm_Click sub created in step 2.

Adding the Initialize Event
We can also create the Initialize event by copying or typing the following code
Private Sub UserForm_Initialize()

End Sub
Once we have the Initialize event created we can use it to add the starting values to our controls. We will see more about this in the second part of this post.
Initialize versus Activate
The UserForm also has an Activate event. It is important to understand the difference between this and the Initialize event.
The Initialize event occurs when the actual object is created. This means as soon as you use on of the properties or functions of the UserForm. The code example below demonstrates this
Dim frm As New UserForm1

' Initialize will run as UserForm is created
' the first time we use it
frm.BackColor = rgbBlue

frm.Show
We normally reference the UserForm first by calling Show which makes it seem that displaying the UserForm is triggering the Initialize event. This is why there is often confusion over this event.
In the example below calling Show is the first time we use the UserForm. Therefore it is created at this time and the Initialize event is triggered.
Dim frm As New UserForm1

' Initialize will run here as the Show is the
' first time we use the UserForm
frm.Show
The Activate event occurs when the UserForm is displayed. This can happen using Show. It also occurs any time the UserForm is displayed. For example, if we switch to a different window and then switch back to the UserForm then the Activate event will be triggered.
We create the Activate event the same way we create the Initialize event or we can just copy or type the following code
Private Sub UserForm_Activate()

End Sub
- Initialize occurs when the Userform is created. Activate occurs when the UserForm is displayed.
- For each UserForm you use – Initialize occurs only once, Activate occurs one or more times.
Calling the VBA UserForm
We can use the VBA UserForm in two ways
- Modal
- Modeless
Let’s look at each of these in turn.
Modal Userform
Modal means the user cannot interact with the parent application while this is visible. The excel Format cells dialog we looked at earlier is a modal UserForm. So are the Excel Colors and Name Manager dialogs.
We use modal when we don’t want the user to interact with any other part of the application until they are finished with the UserForm.
Modeless Userform
Modeless means the user can interact with other parts of the application while they are visible. An example of modeless forms in Excel is the Find dialog(Ctrl + F).
You may notice that any Excel dialog that allows the user to select a range has a limited type of Modeless – the user can select a range of cells but cannot do much else.
Modal versus Modeless
The actual code to make a UserForm modal or modeless is very simple. We determine which type we are using when we show the UserForm as the code below demonstrates
Dim frm As New UserFormFruit

' Show as modal - code waits here until UserForm is closed
frm.Show vbModal

' Show as modeless - code does not wait
frm.Show vbModeless

' default is modal
frm.Show
As the comments above indicate, the code behaves differently for Modal and Modeless. For the former, it waits for the UserForm to close and for the latter, it continues on.
Even though we can display any UserForm as modal or modeless we normally use it in one way only. This is because how we use them is different
Typical use of a Modal form
With a Modal UserForm we normally have an Ok and a Cancel button.

The Ok button normally closes the UserForm and performs the main action. This could be saving the user inputs or passing them back to the procedure.
The Cancel button normally closes the UserForm and cancels any action that may have taken place. Any changes the user made on the UserForm are ignored.
Typical use of a Modeless form
With a Modeless UserForm we normally have a close button and an action button e.g. the Find button on the Excel Find Dialog.
When the action button is clicked an action takes place but the dialog remains open.
The Close button is used to close the dialog. It normally doesn’t do anything else.
A VBA UserForm Modal Example
We are going to create a Modal UserForm example. It is very simple so you can see clearly how to use a UserForm.
You can download this and all the code examples from the top of this post.
The following UserForm allows the user to enter the name of a fruit:

We use the following code to show this UserForm and to retrieve the contents of the fruit textbox:
' PROCEDURE CODE
' https://excelmacromastery.com/
Sub UseModal()

    ' Create and show form
    Dim frm As New UserFormFruit

    ' Display Userform - The code in this procedure
    ' will wait here until the form is closed
    frm.Show

    ' Display the returned value
    MsgBox "The user has selected " & frm.Fruit

    ' Close the form
    Unload frm
    Set frm = Nothing

End Sub

' USERFORM CODE
' Returns the textbox value to the calling procedure
Public Property Get Fruit() As String
    Fruit = textboxFruit.Value
End Property

' Hide the UserForm when the user click Ok
Private Sub buttonOk_Click()
    Hide
End Sub
What you will notice is that we hide the UserForm when the user clicks Ok. We don’t set it to Nothing or unload it until after we are finished retrieving the user input. If we Unload the UserForm when the user clicks Ok then it no longers exists so we cannot access the values we want.
Using UserForm_QueryClose to Cancel the UserForm
We always want to give the user the option to cancel the UserForm. Once it is canceled we want to ignore any selections the user made.
Each form comes with an X in the top right-hand corner which allows the user to cancel it:

The X button on the UserForm
This button cancels the UserForm automatically – no code is necessary. When the user clicks X the UserForm is unloaded from memory. That is, it no longer exists so we will get an error if we try to access it. The code below will give an error if the user clicks on the X
' https://excelmacromastery.com/
Sub DisplayFruit()

    Dim frm As New UserFormFruit
    frm.Show

    ' ERROR HERE - If user clicks the X button
    Debug.Print frm.Fruit

End Sub

To avoid this error we want to prevent the UserForm from being Unloaded when the X button is clicked. To do this we use the QueryClose event.
We create a variable first at the top of the UserForm code module. We also add a property so that we can read the variable when we need to retrieve the value:
Private m_Cancelled As Boolean

Public Property Get Cancelled() As Variant
    Cancelled = m_Cancelled
End Property
Then we add the UserForm_QueryClose event to the UserForm module:
' https://excelmacromastery.com/
Private Sub UserForm_QueryClose(Cancel As Integer _
                                       , CloseMode As Integer)

    ' Prevent the form being unloaded
    If CloseMode = vbFormControlMenu Then Cancel = True

    ' Hide the Userform and set cancelled to true
    Hide
    m_Cancelled = True

End Sub
In the first line, we prevent the UserForm from being unloaded. With the next lines, we hide the UserForm and set the m_Cancelled variable to true. We will use this variable later to check if the UserForm was canceled:
We can then update our calling procedure to check if the UserForm was canceled
' PROCEDURE CODE
' https://excelmacromastery.com/
Sub DisplayFruit()

    Dim frm As New UserFormFruit
    frm.Show

    If frm.Cancelled = False Then
        MsgBox "You entered: " & frm.Fruit
    Else
        MsgBox "The UserForm was cancelled."
    End If

End Sub
If we want to add a Cancel button it is simple to do. All we need to do is Hide the form and set the variable m_Cancelled to true. This is the same as we did in the QueryClose Event above:
' https://excelmacromastery.com/vba-userform/
Private Sub buttonCancel_Click()
    ' Hide the Userform and set cancelled to true
    Hide
    m_Cancelled = True
End Sub

Using the Escape key to cancel
If you want to allow the user to cancel using the Esc it is simple(but not obvious) to do. You set the Cancel property of your ‘Cancel’ button to True. When Esc is pressed the click event of your Cancel button will be used.

Putting All the Modal Code Together
The final code for a Modal form looks like this:
' USERFORM CODE
' https://excelmacromastery.com/
Private m_Cancelled As Boolean

' Returns the cancelled value to the calling procedure
Public Property Get Cancelled() As Boolean
    Cancelled = m_Cancelled
End Property

' Returns the textbox value to the calling procedure
Public Property Get Fruit() As String
    Fruit = textboxFruit.Value
End Property

Private Sub buttonCancel_Click()
    ' Hide the Userform and set cancelled to true
    Hide
    m_Cancelled = True
End Sub

' Hide the UserForm when the user click Ok
Private Sub buttonOk_Click()
    Hide
End Sub

' Handle user clicking on the X button
Private Sub UserForm_QueryClose(Cancel As Integer _
                                  , CloseMode As Integer)

    ' Prevent the form being unloaded
    If CloseMode = vbFormControlMenu Then Cancel = True

    ' Hide the Userform and set cancelled to true
    Hide
    m_Cancelled = True

End Sub

' PROCEDURE CODE
' https://excelmacromastery.com/
Sub DisplayFruit()

    ' Create the UserForm
    Dim frm As New UserFormFruit

    ' Display the UserForm
    frm.Show

    ' Check if the user cancelled the UserForm
    If frm.Cancelled = True Then
        MsgBox "The UserForm was cancelled."
    Else
        MsgBox "You entered: " & frm.Fruit
    End If

    ' Clean up
    Unload frm
    Set frm = Nothing

End Sub
&nbps;
You can use this code as a framework for any Modal UserForm that you create.
VBA Minimize UserForm Error
We are now going to use a simple example to show how to use a Modeless VBA UserForm. In this example, we will add a customer name to a worksheet each time the user clicks on the Add Customer button.
You can download this and all the code examples from the top of this post.

The code below displays the UserForm in Modeless mode. The problem with this code is that if you minimize Excel the UserForm may not be visible when you restore it:
' PROCEDURE CODE
' https://excelmacromastery.com/
Sub UseModeless()

    Dim frm As New UserFormCustomer
    ' Unlike the modal state the code will NOT
    ' wait here until the form is closed
    frm.Show vbModeless

End Sub
The code below solves the problem above. When you display a Userform using this code it will remain visible when you minimize and restore Excel:
' https://excelmacromastery.com/
Sub UseModelessCorrect()

    Dim frm As Object
    Set frm = VBA.UserForms.Add("UserFormCustomer")

    frm.Show vbModeless

End Sub
An important thing to keep in mind here is that after the frm.Show line, the code will continue on. This is different to Modal where the code waits at this line for the UserForm to be closed or hidden.
When the Add button is clicked the action occurs immediately. We add the customer name to a new row in our worksheet. We can add as many names as we like. The UserForm will remain visible until we click on the Close button.
The following is the UserForm code for the customer example:
' USERFORM CODE
' https://excelmacromastery.com/
Private Sub buttonAdd_Click()
    InsertRow
End Sub

Private Sub buttonClose_Click()
    Unload Me
End Sub

Private Sub InsertRow()

    With Sheet1

        ' Get the current row
        Dim curRow As Long
        If .Range("A1") = "" Then
            curRow = 1
        Else
            curRow = .Range("A" & .Rows.Count).End(xlUp).Row + 1
        End If

        ' Add item
        .Cells(curRow, 1) = textboxFirstname.Value
        .Cells(curRow, 2) = textboxSurname.Value

    End With

End Sub
Part 2 of this post
You can find the second part of this post here.
What’s Next?
Free VBA Tutorial If you are new to VBA or you want to sharpen your existing VBA skills then why not try out the The Ultimate VBA Tutorial.
Related Training: Get full access to the Excel VBA training webinars and all the tutorials.
(NOTE: Planning to build or manage a VBA Application? Learn how to build 10 Excel VBA applications from scratch.)
МИНИСТЕРСТВО ОБРАЗОВАНИЯ И НАУКИ РОССИЙСКОЙ ФЕДЕРАЦИИ
Федеральное государственное бюджетное образовательное учреждение высшего профессионального образования
МОСКОВСКИЙ ГОСУДАРСТВЕННЫЙ ТЕХНИЧЕСКИЙ УНИВЕРСИТЕТ «МАМИ»
А.Н. Любин
СОЗДАНИЕ ПОЛЬЗОВАТЕЛЬСКИХ ФОРМ
В VISUAL BASIC FOR APPLICATIONS
Учебное пособие
по дисциплинам «Информатика» и «Информационные технологии»
для студентов всех направлений и специальностей
Москва
2012
УДК 681.3.06
Разработано в соответствии с Государственным образовательным стандартом 2008 г. Для всех направлений и специальностей на основе примерных программ по дисциплинам «Информатика» и «Информационные технологии».
Рецензенты: генеральный директор «Института информационных технологий», д.т.н., профессор В. Г. Зубков; профессор кафедры «Информационные системы и дистанци-
онные технологии» МГТУ «МАМИ» к.т.н. А. И. Макаров.
«СОЗДАНИЕ ПОЛЬЗОВАТЕЛЬСКИХ ФОРМ В VISUAL BASIC FOR APPLICATIONS»
учебное пособие по дисциплинам «Информатика» и «Информационные технологии» для студентов всех направлений
и специальностей: М.,МГТУ « МАМИ», 2012
Кафедра «Информационные системы и дистанционные технологии»
Пособие ориентировано на изучение темы « Пользовательские формы VBA в Microsoft Office», а именно в Excel и получение навыков в создании пользовательских форм при решении задач на ПК.
© А.Н. Любин © МГМУ «МАМИ», 2012
2
Введение
Язык программирования VBA (Visual Basic for Applications)
объектно-ориентированный язык программирования, базируется на синтаксисе и операторах языка Visual Basic. VBA встроен в среду всех основных, популярных офисных приложений, и позволяет манипулировать их объектами, используя их методы и свойства.
Чаще всего основным офисным приложением, в котором пользователь создаѐт свои приложения, является MS Excel. Поэтому в настоящем учебном пособии рассматривается программирование на VBA именно в Excel.
В VBA, как и в большинстве языков, любые приложения, обладающие пользовательским интерфейсом, создаются (программируются) на основе специальных средств – пользовательские формы или экранные формы. Именно этот раздел VBA, как наиболее интересный и трудно усваиваемый, рассматривается в данном учебном пособии. Предполагается, что читатель знаком с элементами структурного программирования на VBA. Пользовательские формы дают возможность пользователю создавать разнообразные диалоговые окна в разрабатываемых приложениях и размещать в окнах элементы управления.
В учебном пособии подробно рассмотрены примеры создания пользовательских форм и процедур к ним, предложены задания для самостоятельного выполнения. Пособие может использоваться, как в учебном процессе при изучении VBA, так и при самостоятельном обучении.
Примеры создания пользовательских форм, их процедур и изображения диалоговых окон, приведѐнные в пособии, выполнены в среде MS Office 2007.
3
1. Объекты, методы, свойства и события в VBA
VBA относится к языкам объектно-ориентированного программирования, поэтому знакомство с ним следует начать с понятия объекта.
Объект — основной элемент VBA Excel. В VBA объектами являются рабочая книга, рабочий лист и его составляющие, например:
Sheet — лист Excel; Cell — ячейка;
Range — диапазон ячеек; Application — приложение;
UserForm — пользовательская форма.
CommandButton –кнопка, и другие.
Работа с объектами возможна через его методы и свойства. Над объектами можно совершать различные действия.
Методы это действия, совершаемые над объектами. Например, ячейку или диапазон ячеек можно очистить (Clear), можно выбрать (Select), приложение закрыть (Quit), пользовательскую форму показать (Show) или скрыть (Hide). Название метода отделяется от названия объекта точкой:
название объект . название метода
Ниже приведены примеры использования методов применительно к объектам:
Range(«B2:E2»).Select — выбрать диапазон ячеек B2:E2; Range(«C1:C5»).Clear — очистить диапазон ячеек C1:C5;
UserForm2.Hide — скрыть форму под номером 2; UserForm5.Show — показать форму под номером 5; Application.Quit — выйти из приложения.
Свойства служат для описания, задания характеристик объектов. Например, размера и цвета шрифта, положения формы на эк-
4
ране или состояние объекта (доступность, видимость), задания значений. Чтобы задать или изменить характеристику объекта, надо изменить значение его свойства, т.е. присвоить ему определенные значения.
Синтаксис задания значения свойства следующий:
Объект.Свойство = Значение Свойства
где:
Объект — обозначает имя объекта; Свойство — имя свойства, которому присваивается значение,
имя объекта отделяется от имени свойства точкой. Ниже приведены примеры задания свойств объектам:
Range(«В1»).Value = 2011 — поместить в ячейку В1 значение
2011.
Range(«А1:А12»).Text = «Программа» — поместить в диапазон ячеек А1:А12 текст Программа.
Range(«С2»).Font.Size = 18 — в ячейке С2 установить размер шрифта 18.
Свойства: Value ( позволяет задать значение), Text (ввод текста), Font.Size (задание размера шрифта).
Событие представляет собой действие, например, щелчок мышью или нажатие клавиши, перемещение мыши или выход из программы, для которого можно запрограммировать отклик, т.е. реакцию объекта на произошедшее событие.
В языке программирования VBA для каждого объекта определен набор стандартных событий. Например, стандартное событие для объекта CommandButton (кнопка) — Click (щелчок мышью).
Если пользователь нажимает на кнопку, то это событие. На это событие должен быть отклик, т.е. выполнение какой-либо процедуры (программы). Такая процедура называется процедурой обработки события и имеет стандартное имя. Если такой отклик не создан,
5
т.е. не написана соответствующая процедура, то система не будет реагировать на это событие. Для каждого события можно написать процедуру, которая будет срабатывать именно тогда, когда это событие произойдет. На каждое событие пишется своя процедура, которая это событие обрабатывает, т. е. выполняет определенные действия, которые должны быть выполнены, когда это событие происходит. Особое значение понятие события имеет при написании процедур реакций пользовательской формы на изменения ее элементов.
2. Пользовательские формы
При работе в Excel, как и в большинстве, других приложениях, приходиться сталкиваться с такими элементами интерфейса, как диалоговые окна. Диалоговые окна используются повсеместно для получения информации для ввода и вывода сообщений и данных.
Одним из объектов VBA, объектом визуализации являются UserForm — пользовательские формы.
Пользовательские формы UserForm — это диалоговые окна интерфейса процедур VBA. С их помощью пользователь может эффективно передавать данные в процедуры и получать результаты их работы.
Пользовательские формы дают возможность пользователю создавать диалоговые окна в разрабатываемых приложениях и размещать в окнах элементы управления.
В VBA есть две функции – MsgBox и InputBox, которые позволяют отображать простые диалоговые окна, не создавая пользовательскую форму. Эти окна можно видоизменять, использовать управляющие ими параметры, но они не имеют тех широких и эффективных возможностей, опций которые предоставляют пользовательские формы.
6
VBA предлагает обширные возможности, которые можно использовать при создании пользовательских диалоговых окон, для программирования элементов управления, размещаемых непосредственно на листах Excel, или для работы с диалоговыми окнами, встроенными в Excel. Дополнительные сведения об этих возможностях см. в разделе «Элементы управления, диалоговые окна и формы» в справочном руководстве разработчика для Excel 2007.
В последующих разделах мы подробно рассмотрим процесс создания пользовательских форм.
Создание пользовательской формы
Чтобы создать форму, откройте редактор Visual Basic для этого нажмите (Alt + F11) или выберете на ленте вкладку « Разработчик», а на ней Visual Basic см. рис.1
Рис.1
|
В открывшемся окне |
Microsoft Visual Basic см. рис. 2 выбрать |
|
на ленте вкладку Insert. |
В открывшемся меню выбрать UserForm. |
|
7 |
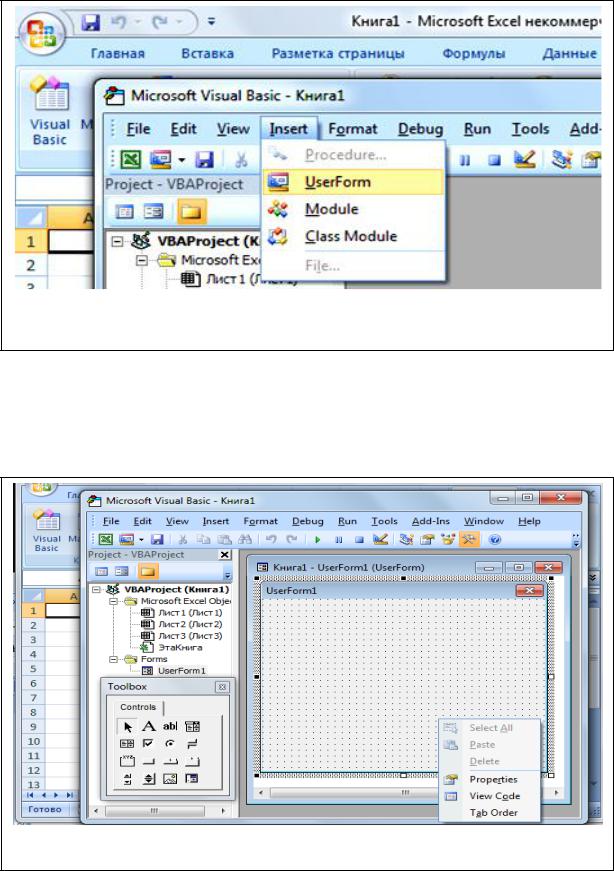
Рис. 2
На экране появилась пустая форма UserForm1 см. рис.3, инструментальная панель Toolbox и при нажатии правой кнопки мыши контекстное меню с предложением Properties – свойства формы.
Рис.3
8

2.1. Элементы управления
На инструментальной панели Toolbox см. рис.3 расположены следующие элементы управления, которые являются объектами
VBA : TextBox — поле, Label — надпись, CommandButton — кнопка,
ListBox — список, ComboBox — поле со списком, ScrollBar — полоса прокрутки, SpinButton — счетчик, OptionButton — переключатель, CheckBox — флажок , ToggleButton — выключатель, Frame —
рамка, Image — рисунок, RefEdit — RefEdit, MultiPage — набор страниц.
Любой из этих элементов управления, объектов можно разместить на форме. Например, можно поместить кнопку. Для этого мышью перетаскиваем на форму объект или элемент управления  под названием CommandBatton, расположенный вторым слева в третьем ряду панели Toolbox. На форме появиться кнопка
CommandBatton1 см. рис. 4.
Рис. 4
9

2.2.Свойства элементов управления
Выбрав в контекстном меню см. Рис. 3 Propertiesсвойства формы, в открывшемся окне см. рис. 5, можно изменить заголовок элементов формы, в частности кнопки, еѐ шрифт, цвет фона, добавить картинки, добавить и изменить многие другие свойства.
Наиболее часто используемые свойства объекта UserForm: Name — возвращает имя пользовательской формы, Caption — возвращает текст, отображаемый в строке заголовка формы, BackColor — возвращает цвет фона формы, BorderStyle — устанавливает тип границы, Picture — указывает рисунок, отображаемый как фон формы.
Рис.5
10
Соседние файлы в предмете [НЕСОРТИРОВАННОЕ]
- #
- #
- #
- #
- #
- #
- #
- #
- #
- #
- #
Excel VBA UserForm
In Excel VBA, we have a very useful tool which is known as UserForm. It is a practical way of getting information from a user. What is a UserForm in VBA? UserForm is like a wizard box or a dialog box in which we ask users to input data, and it has some instructions on it.
VBA UserForm is also inbuilt in excel and can be created by the developers. To use the VBA userform first, we need to activate the developer tab from the Options tab. Once the developer tab is activated, we can go ahead in Excel VBA and create UserForms. Userforms are used to store data in excel. It can be compared to google forms, where we have a specific set of instructions and ask the user to input data as per the instructions.
UserForm is widely used everywhere. In UserForm, the data entered by the user gets stored in the corresponding column. It is the most practical way in excel to take input from the user and store the data in excel relatively in the correct location.
How to Create UserForm in Excel VBA?
Below are the different examples to create UserForm in Excel using VBA code.
You can download this VBA UserForm Excel Template here – VBA UserForm Excel Template
Excel VBA UserForm – Example #1
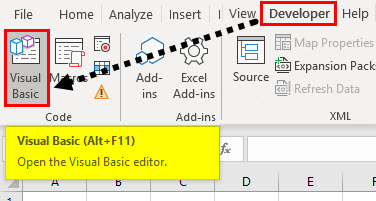
First, let us get to the basic of the UserForm. How to view a UserForm and what a UserForm is.
- In the Excel worksheet, go to the Developer’s tab and click on the Visual Basic editor.
- Now how do we add a userform to this blank screen? In the insert tool, click on UserForms.
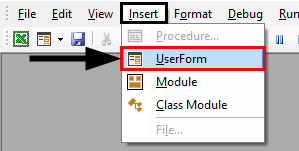
- A new wizard box opens up, and it is blank, which is our blank userform.

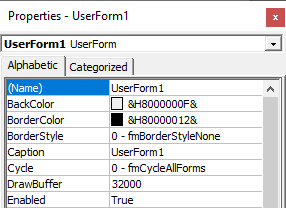
- It is currently named as userform1 as we have not given it any name. We can do that by changing its name from the properties option on the left-hand side of the screen.
- Let us change the name to the sample form and see the result.
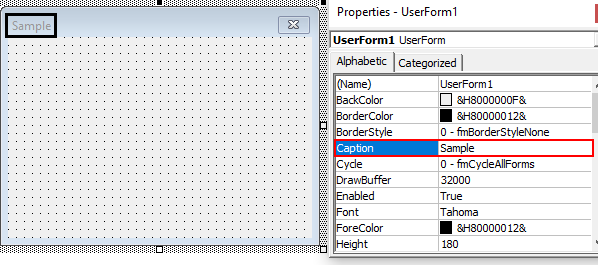
Our userform is named as a sample now.
- Now let us try to change the color of the userform. In the properties toolbox, we have a dropdown provided to us named as back color; we can select any set of colors we want.
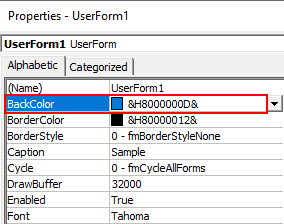
- After I have selected the option for black color, my sample UserForm’s color has been changed as follows,
- How do we run this userform? Make sure that we have clicked on the userform itself and click on the run button shown in the screenshot below. When we click on the run button, we can see that a blank form appears on the excel screen.
It has no other options than to close it because we have not added any other buttons to it.
Excel VBA UserForm – Example #2
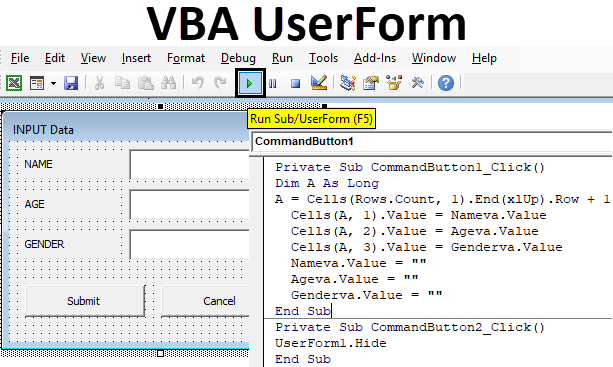
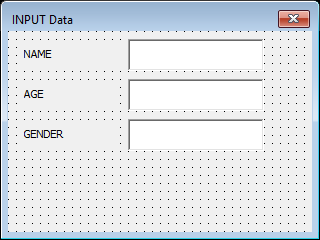
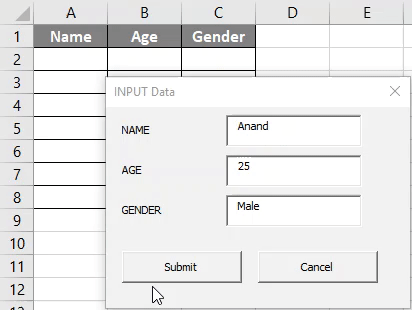
Let’s see how to add buttons to a userform to input the data in Excel VBA. We will make a simple VBA userform in which we will ask the user to enter his name, age, and sex. The steps involved in making such userform is as follows.
- In the Excel worksheet, go to the developer’s tab and click on the visual basic editor.

- Now in the insert tab, click on userform to open a userform window.
- We need to add buttons to this userform in order to get input from the user. We can see that a toolbox is also opened beside our userform, which has the control buttons.
This toolbox has various controls in it, which is used in UserForms.
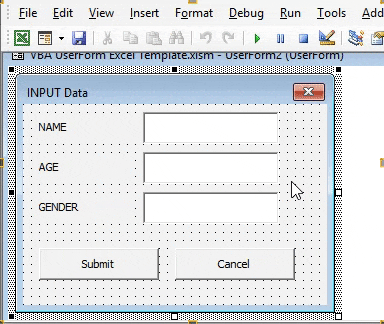
- So for our example, we need a name, age, and gender to be input by the user. We Basically need three labels which will represent our instructions. Click on Labels.
- Hover the mouse on userform and click and drag to insert a label in the userform.
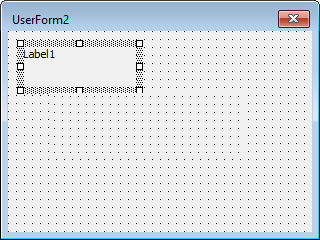
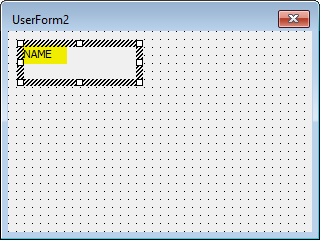
- Currently, it is named as label 1; we need to change the label name to “Name” for the instruction to the user. Click on the label and delete the default name provided and insert the new name.
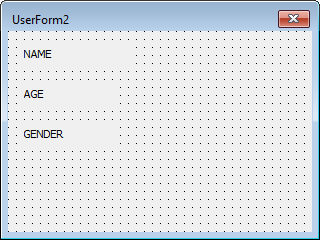
- Now insert the label for Age and Gender in a similar way and rename them.
- Now adjacent to the labels, we need to insert a text box so that the user can input values. From the toolbox controls, click on TextBox.
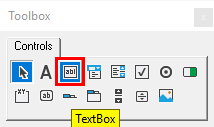
- Hover the mouse adjacent to the labels and click on the form.
- Now let us insert the command button in the userform, which will store the data for us. From the toolbox controls, click on CommandButton.
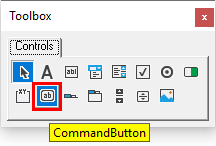
- Hover the mouse on the form.
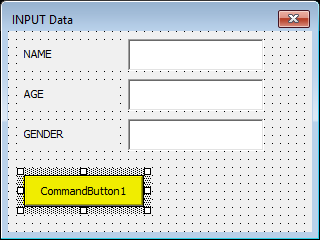
- Change the caption of CommandButton1 to “Submit”.
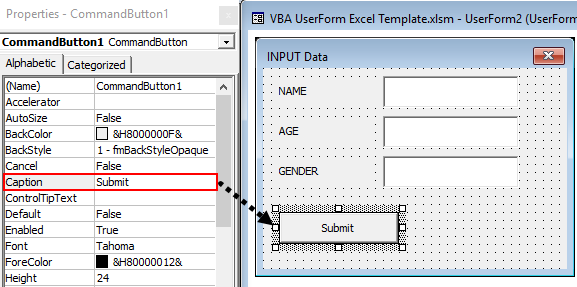
- Insert one CommandButton and call it as “Cancel”.
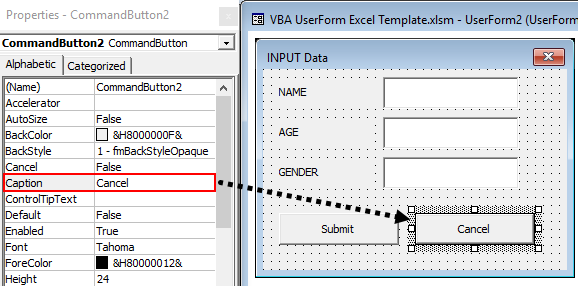
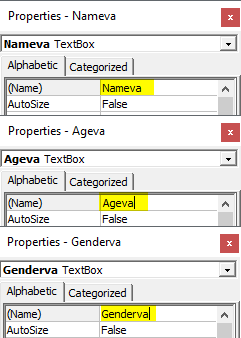
- The next step is to rename each of the Textboxes so that we can easily use them in our codes; for name rename the textbox against it as Nameva for name value and for age as Ageva similarly for gender as Genderva for gender value,
- Run the UserForm by clicking on the play button or by pressing the F5 key.
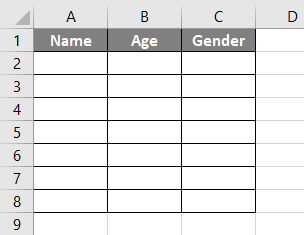
- In the Excel Sheet, write the header for the data has to be entered as follows.
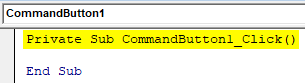
- Double click on the submit button, which will open the code window for us for the submit button as follows.
Code:
Private Sub CommandButton1_Click()

End Sub
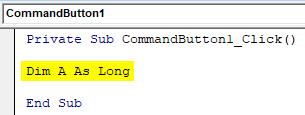
- In the code window, Declare a variable as long as shown below.
Code:
Private Sub CommandButton1_Click()

Dim A As Long

End Sub
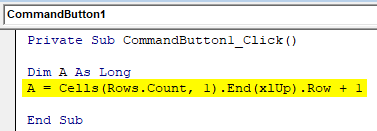
- Now let us move the first vacant cell in the first column with the following code.
Code:
Private Sub CommandButton1_Click()

Dim A As Long
A = Cells(Rows.Count, 1).End(xlUp).Row + 1

End Sub
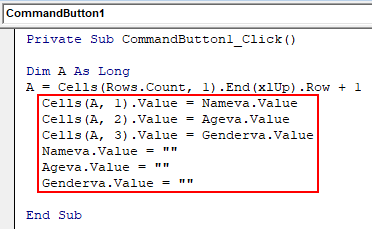
- Let us store the value provided by the user in the worksheet by the following code.
Code:
Private Sub CommandButton1_Click()

Dim A As Long
A = Cells(Rows.Count, 1).End(xlUp).Row + 1
  Cells(A, 1).Value = Nameva.Value
  Cells(A, 2).Value = Ageva.Value
  Cells(A, 3).Value = Genderva.Value
  Nameva.Value = ""
  Ageva.Value = ""
  Genderva.Value = ""

End Sub
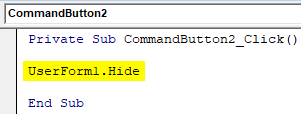
- Now double click on the Cancel button; this will also show you the auto macro name like this.
Code:
Private Sub CommandButton2_Click()

End Sub
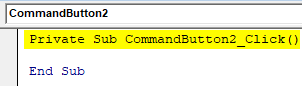
- Use the below code.
Code:
Private Sub CommandButton2_Click()

UserForm1.Hide

End Sub
- Run the userform from the run button provided or by pressing the F5 key, and we get the following result.
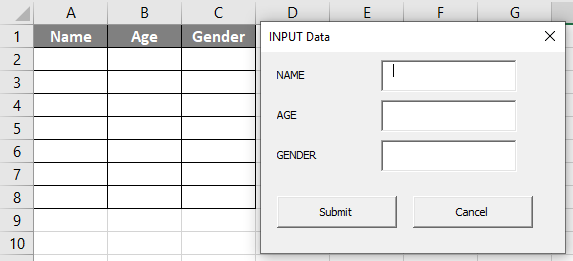
- Enter the values in the text boxes as follows.
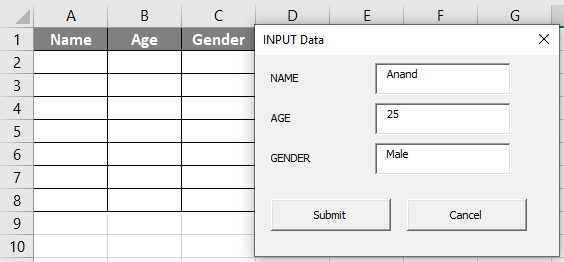
- Press the Submit button to see the result in the excel sheet as follows.
This is how we create a userform to get the data from the user.
Things to Remember
- Userforms are inbuilt or can be created by the developer in VBA.
- The properties of userform can be changed from the properties wizard box in VBA.
- Userforms need to have buttons in order to fetch data from the user.
- To run a userform, make sure that the userform is selected.
Recommended Articles
This is a guide to VBA UserForm. Here we discuss how to Create UserForm in Excel using VBA code along with some practical examples and a downloadable excel template. You can also go through our other suggested articles –
- VBA TextBox
- VBA List Box
- VBA Code
- VBA XLUP