
На работе встретился с такой задачей «Надо сделать отчет, который брал бы данные из MySQL и закидывал его в таблицу Excel».
Ну вот я сейчас и опишу процесс конекта.
Есть:
1. Сервер MySQL
2. База данных на MySQL
3. Microsoft Excel 2010
Начнем:
1. Самое первое что нужно сделать, это установить MySQL Connector, актуальную версию можно скачать здесь
2. Нужно создать источник данных, идем вот сюда Панель управления — Администрирование — Источники данных (ODBC)
2.1. Вкладка Пользовательский DSN — Добавить — MySQL ODBC 5.1 Driver (должен появиться после манипуляций с п.1)
2.2. Откроется окно настройки источника, там в поле Data Source Name нужно написать имя сервера MySQL, порт оставляем стандартным (если вы при установке сервера не указали иной), User — имя пользователя, скорее всего root, Password — пароль, Database — тут можно указать базу, к которой подключаться, если все правильно на начальных этапах, то в выпадающем списке уже появятся существующие БД на сервере.
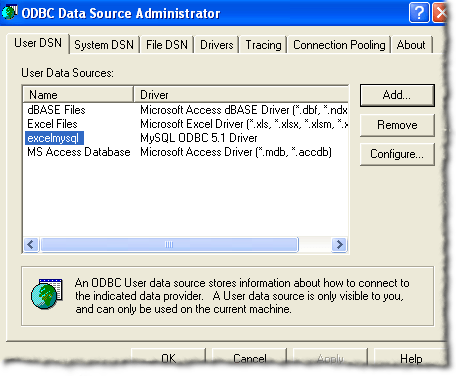
2.3. Ок. Источник данных создан.
3. Теперь необходимо создать строку подключения.
3.1. В любом месте компьютера создайте текстовый файл и переименуйте его в тип файла .udl
3.2. В открывшемся окне Использовать источник данных — выбрать ранее созданный источник данных (п. 2), ввести Пользователь и Пароль, жмем Ок.
3.3. Теперь созданный файл надо открыть с помощью Блокнот’а и там будет что-то подобное:
[oledb]

; Everything after this line is an OLE DB initstring

Provider=MSDASQL.1;Persist Security Info=False;User ID=root;Data Source=MySQL
то, что начинается с Provider и до MySQL и есть строка подключения, т.е. Provider=MSDASQL.1;Persist Security Info=False;User ID=root;Data Source=MySQL она нам понадобиться при настройке Excel.
4. Теперь скачиваем специально подготовленный мной документ Excel
5. Открываем, возможно будет ругаться из-за того, что у вас сервер отличный от моего.
6. Идем на вкладку Данные — Параметры — Источник данных — Свойства подключения — Вкладка Определения.
6.1. Вводим Строка подключения, которая у нас появилась ранее (п. 3.3.), вводим текст SQL команды и жмем Ок.
Все, если все правильно было сделано, то в правой части должны появиться поля, которые вы хотели выбрать. Советую на сервере протестировать синтаксис и правильность своего SQL запроса, чтобы не появлялись дополнительные вопросы. Лично я работаю с MySQL через HeidiSQL, там сделал запрос, а потом просто скопировал его в Excel.
Конечно, Excel используется для электронных таблиц, но знаете ли вы, что вы можете подключить Excel к внешним источникам данных? В этой статье мы собираемся обсудить, как подключить электронную таблицу Excel к таблице базы данных MySQL и использовать данные в таблице базы данных для заполнения нашей электронной таблицы. Есть несколько вещей, которые вам нужно сделать, чтобы подготовиться к этой связи.
подготовка
Во-первых, вы должны загрузить самую последнюю версию драйвера Open Database Connectivity (ODBC) для MySQL. Текущий драйвер ODBC для MySQL может быть расположен в
https://dev.mysql.com/downloads/connector/odbc/
После загрузки файла убедитесь, что вы проверили его хэш-код md5, указанный на странице загрузки.
Далее вам нужно будет установить только что загруженный драйвер. Дважды щелкните файл, чтобы начать процесс установки. После завершения процесса установки вам потребуется создать имя источника базы данных (DSN) для использования с Excel.
Создание DSN
DSN будет содержать всю информацию о соединении, необходимую для использования таблицы базы данных MySQL. В системе Windows вам нужно будет нажать Пуск, затем Панель управления, затем Администрирование, затем Источники данных (ODBC). Вы должны увидеть следующую информацию:
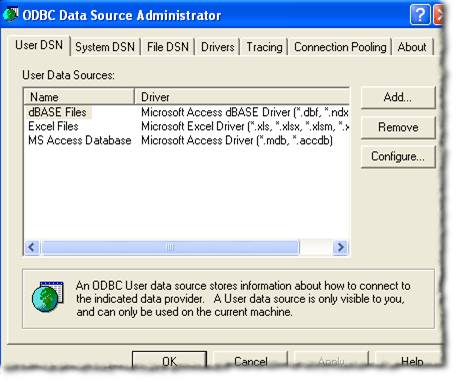
Обратите внимание на вкладки на изображении выше. Пользовательский DSN доступен только пользователю, который его создал. Системный DSN доступен любому, кто может войти в систему. Файл DSN — это файл .DSN, который можно транспортировать и использовать в других системах, в которых установлены те же ОС и драйверы.
Чтобы продолжить создание DSN, нажмите кнопку «Добавить» в правом верхнем углу.
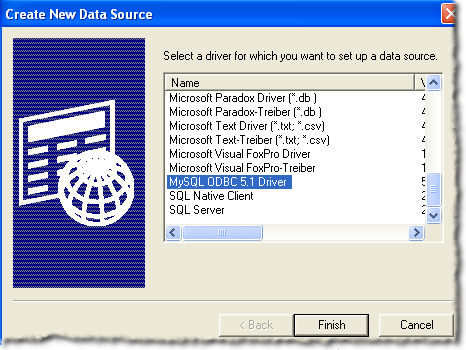
Возможно, вам придется прокрутить вниз, чтобы увидеть драйвер MySQL ODBC 5.x. Если его нет, значит, что-то пошло не так с установкой драйвера в разделе Подготовка этого поста. Чтобы продолжить создание DSN, убедитесь, что драйвер MySQL ODBC 5.x выделен, и нажмите кнопку Готово. Теперь вы должны увидеть окно, подобное приведенному ниже:
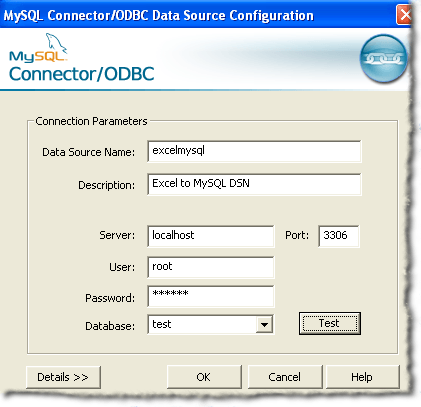
Далее вам нужно будет предоставить информацию, необходимую для заполнения формы, показанной выше. База данных и таблица MySQL, которые мы используем для этого поста, находятся на компьютере разработчика и используются только одним человеком. Для «производственных» сред предлагается создать нового пользователя и предоставить новому пользователю только привилегии SELECT. В будущем вы можете предоставить дополнительные привилегии, если это необходимо.
После того, как вы предоставили данные для конфигурации вашего источника данных, вы должны нажать на кнопку «Тест», чтобы убедиться, что все в порядке. Далее нажмите на кнопку ОК. Теперь вы должны увидеть имя источника данных, которое вы указали в форме из предыдущего набора, указанного в окне администратора источника данных ODBC:
Создание подключения к электронной таблице
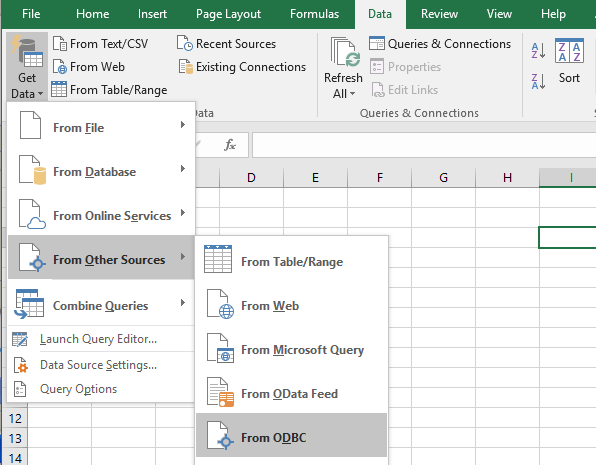
Теперь, когда вы успешно создали новый DSN, вы можете закрыть окно ODBC Data Source Administrator и открыть Excel. Открыв Excel, нажмите на ленту данных. Для более новых версий Excel нажмите «Получить данные», затем «Из других источников», затем «Из ODBC».
В более старых версиях Excel это немного более сложный процесс. Во-первых, вы должны увидеть что-то вроде этого:
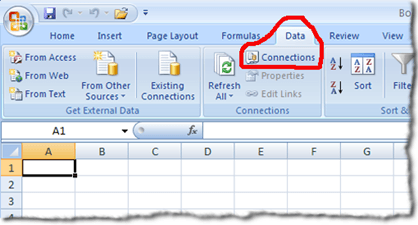
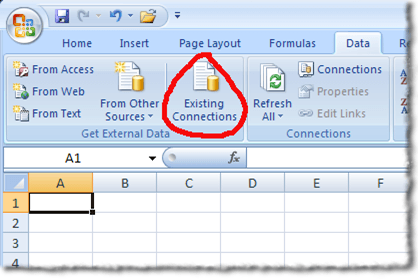
Следующий шаг — щелкнуть ссылку «Соединения», расположенную прямо под словом «Данные» в списке вкладок. Расположение ссылки Connections обведено красным на изображении выше. Вам должно быть представлено окно Соединения с рабочей книгой:
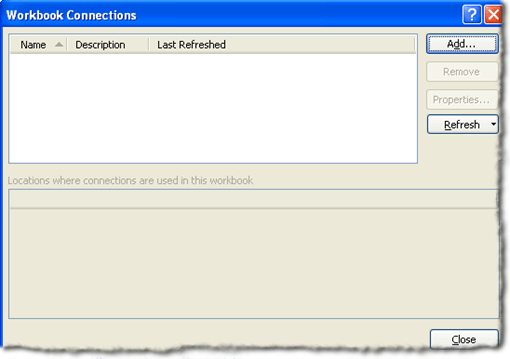
Следующим шагом является нажатие на кнопку Добавить. Это откроет вам окно существующих соединений:
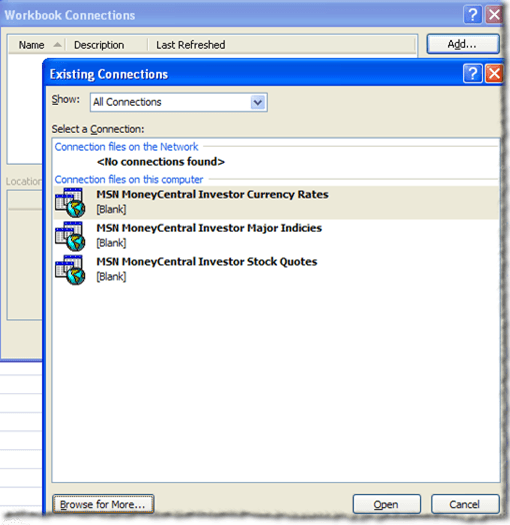
Очевидно, вы не хотите работать ни с одним из перечисленных соединений. Поэтому нажмите кнопку «Обзор для более». Это откроет вам окно выбора источника данных:
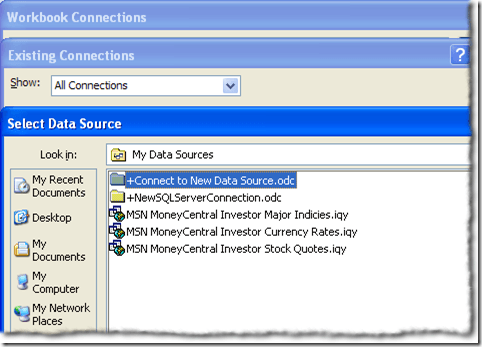
Как и в предыдущем окне «Существующие подключения», вы не хотите использовать подключения, перечисленные в окне «Выбор источника данных». Поэтому вы хотите дважды щелкнуть по папке + Connect to New Data Source.odc. При этом вы должны увидеть окно мастера подключения данных:
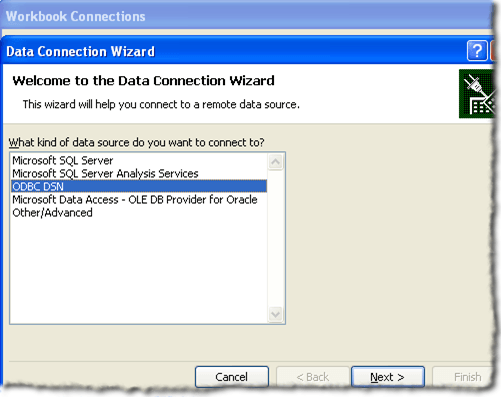
Учитывая перечисленные варианты выбора источника данных, вы хотите выделить ODBC DSN и нажать Далее. На следующем шаге мастера подключения к данным отобразятся все источники данных ODBC, доступные в используемой вами системе.
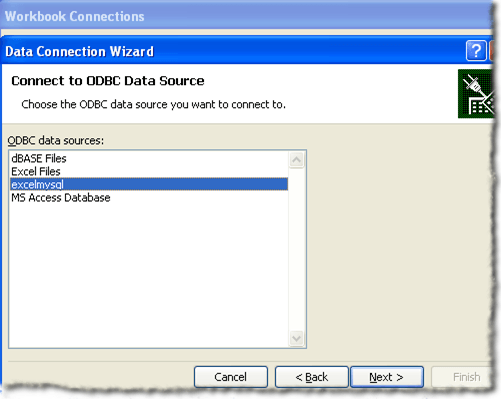
Надеемся, что если все идет по плану, вы должны увидеть DSN, созданный на предыдущих шагах, в списке источников данных ODBC. Выделите его и нажмите «Далее».
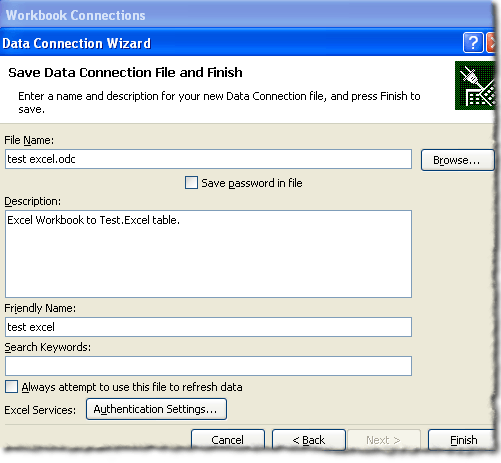
Следующим шагом мастера подключения к данным является сохранение и завершение. Поле имени файла должно быть заполнено автоматически. Вы можете предоставить описание. Описание, использованное в этом примере, самоочевидно для любого, кто может его использовать. Затем нажмите кнопку Готово в правом нижнем углу окна.
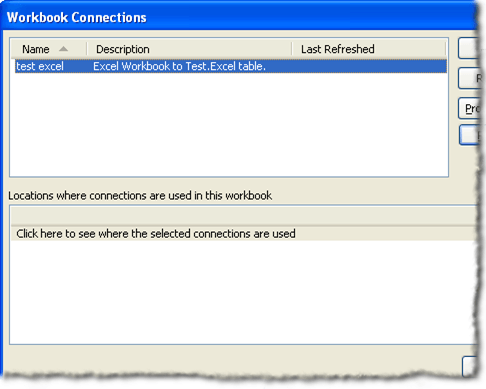
Теперь вы должны вернуться к окну Workbook Connection. Соединение для передачи данных, которое вы только что создали, должно быть перечислено:
Импорт данных таблицы
Вы можете закрыть окно подключения к книге. Нам нужно нажать на кнопку «Существующие подключения» на ленте данных Excel. Кнопка «Существующие подключения» должна быть расположена слева на ленте данных.
При нажатии на кнопку «Существующие подключения» откроется окно «Существующие подключения». Вы видели это окно на предыдущих шагах, теперь разница в том, что ваше подключение для передачи данных должно быть указано вверху:

Убедитесь, что подключение для передачи данных, созданное на предыдущих этапах, выделено, а затем нажмите кнопку «Открыть». Теперь вы должны увидеть окно Import Data:
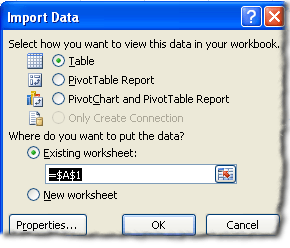
В этом сообщении мы будем использовать настройки по умолчанию в окне «Импорт данных». Далее нажмите на кнопку ОК. Если у вас все получилось, вы должны теперь представить данные таблицы базы данных MySQL на вашем рабочем листе.
Для этого поста таблица, с которой мы работали, имела два поля. Первое поле представляет собой поле INT с автоматическим приращением под названием ID. Второе поле — VARCHAR (50) и называется fname. Наша последняя таблица выглядит примерно так:
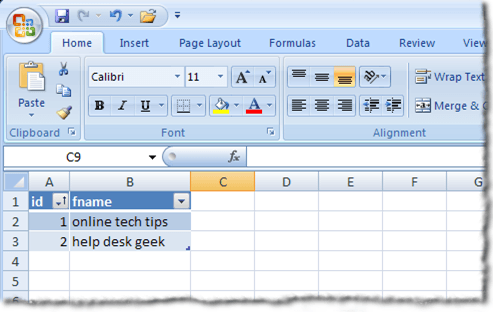
Как вы, наверное, заметили, первая строка содержит имена столбцов таблицы. Вы также можете использовать стрелки раскрывающегося списка рядом с именами столбцов для сортировки столбцов.
Заворачивать
В этом посте мы рассмотрели, где найти последние драйверы ODBC для MySQL, как создать DSN, как создать соединение данных электронной таблицы с помощью DSN и как использовать соединение данных электронной таблицы для импорта данных в электронную таблицу Excel. Наслаждайтесь!
Microsoft Excel has been a traditional choice as a spreadsheet application for organizations across the world. The ease of access, power formulas, and the ability to make visually stunning reports has made Microsoft Excel is widely used tool. However, managing thousands of sheets can be a time-consuming and resource-intensive task that may also lead to some errors. A good solution is to import your Excel files to a scalable, reliable, and fast relational database management system like MySQL.
You can Import Excel into MySQL either by using simple SQL commands like LOAD DATA or opt for third-party tools. By importing your Excel files to MySQL, you can leverage the powerful MySQL engine to quickly query data and perform complex data manipulations.
In this article, you will learn how to effectively Import Excel into MySQL using 4 different methods.
What is Microsoft Excel?
Microsoft Excel is a spreadsheet application developed by Microsoft to organize and record data in a tabular format. Launched in 1985, Microsoft Excel is a widely used Spreadsheet software in businesses worldwide allowing you to organize and manipulate data through formulas in columns and rows. MS Excel is loaded with functionalities to perform several operations such as calculations, pivot tables, graph tools, etc.
Compatible with Microsoft Windows, macOS, Android, and iOS, MS Excel is included with the MS Office Suite. It is typically used by firms to record, organize and analyze financial data. MS Excel also offers VBA programming that can assist you in automating repetitive tasks.
Key Features of Microsoft Excel
- Conditional Formatting: MS Excel allows you to apply formats to a cell or range of cells, and have that formatting change depending on the value of the cell or the value of a formula.
- Built-in Formulae: MS Excel provides you with basic and advanced built-in formulae for sum, average, minimum, etc. You can use formula auditing to graph or trace the relationship between cells and formulas with blue arrows. You can track precedents (cells that provide data for a particular cell) or the cells that depend on the value of a particular cell.
- Data Protection: Excel spreadsheets can be password protected on your laptop or PC. MS Excel also provides a robust system to recover data.
- Data Sorting & Filtering: You can easily perform the basic data sorting and filtering operation on your data in excel. MS Excel also provides Advanced filtering options for complex criteria.


What is MySQL?
MySQL is a popular Open-Source Relational Database Management System. MySQL data is stored in tables consisting of rows and columns. Introduced in 1995, MySQL is completely developed, distributed, and maintained by Oracle Corporation. Looking over the technical side, MySQL is written in the C and C ++ languages.
MySQL is compatible with multiple platforms such as Microsoft Windows, Oracle Solaris, AIX, Symbian, Linux, and macOS. You can use SQL commands to retrieve, change or add data from your MySQL tables. MySQL is also a vital component of the Modern LAMP stack, which consists of a Linux-based Operating System, Apache Web Server, MySQL Database, and PHP for processing.
SQL can also be used to define the table schema or even configure the relationship between the tables in the database. Client-Side Graphical User Interfaces such as MySQL WorkBench, SequelPro, or DBVisualizer can be used to type the SQL commands and the server will respond with the requested information. MySQL also offers a paid Enterprise version which includes premium support services and several extensions that can be installed as Server Plugins.
Key Features of MySQL
MySQL is widely used by organizations like Facebook, Flickr, Twitter, Wikipedia, and YouTube. This is due to the following set of MySQL’s eye-catching features:
- Ease of Operation: With MySQL, you can work with a diverse set of programming languages such as PHP, PERL, C, C ++, and JAVA. It also provides a set of intuitive tools to simplify time-consuming tasks such as Server Management, Reporting, and Data Analysis.
- Support for Several Data Structures: Allowing you to work with a broader range of datasets, MySQL offers full support for several Data structures like JSON and Geospatial data, as well as Logical, Numeric, Alphanumeric, Date, and Time data types.
- First-rate Performance: MySQL delivers best-in-class query performance across a variety of clustered servers. It provides a fast-loading utility with a separate memory cache and table index partitioning. MySQL can also efficiently handle fluctuating workloads and process large volumes of data at optimal speeds. This allows you to store more than 50 million rows of data in a table with a table’s default file size limit of 4 GB which can be increased to a theoretical limit of 8 million terabytes (TB).
- Open-Source: MySQL is under the GNU General Public License (GPL), which means it will always be freely available. It provides you the freedom to customize it on Oracle’s Open-Source MySQL codebase based on your needs.
- Localization: To make it user-friendly, MySQL supports multiple character sets, including latin1 (cp1252), german, big5, ujis, and more. You can also set the error message language that the server provides to the client.
- Data Security: MySQL provides full control over the Data Access Control settings. Robust mechanisms such as Access Privilege Systems and User Account Management allow you to regulate who can view or use your MySQL data. MySQL sets the highest standard with Host-based Verification and Password Encryption.
Why should you import Excel into MySQL?
Microsoft Excel is an easy-to-use spreadsheet application that allows you to directly access data and perform a combination of operations on this data. As you collect data and store it in your separate excel files, it becomes a huge task to track each sheet with millions of records in it. To simplify this, you can import Excel into MySQL. MySQL is a scalable, fast, and reliable database management system that allows you to store and query millions of rows of data using simple SQL commands.
Using MYSQL, you can also connect your Excel tables with one another tables using primary and foreign keys. MySQL can easily handle large datasets and allows you to manipulate data, filter data, update data and combine it. You can import Excel into MySQL and enjoy better speed, accuracy, & consistency for your ever-growing data needs.
MySQL is a popular Open-Source Relational Database Management system that allows you to effectively store your Excel file data and manage it using simple SQL commands or via its simple user interface MySQL Workbench. To import Excel into MySQL, check out the following four methods:
Method 1: Using Hevo Data to Import Excel into MySQL
Hevo Data, an Automated Data Pipeline, provides you a hassle-free solution to easily load data from 150+ data sources (including 40+ free sources like Google Sheets) to your desired destination such as MySQL, Data Warehouses, or BI tools in a completely hassle-free & automated manner. Using Hevo you can easily upload your Excel files present on your Google Drive to your MySQL Database in just a few clicks.
Get Started with Hevo for Free
Hevo is fully managed and completely automates the process of not only loading data from 150+ data sources but also enriching the data and transforming it into an analysis-ready form without having to write a single line of code.
Method 2: Using Sqlizer.io to Import Excel into MySQL
This method requires you to upload your Excel files that will be converted into SQL commands. You need to copy the SQL statements and execute them on MySQL Workbench. This method is only effective if you’re dealing with small Excel files with a few records that requires zero data transformation.
Method 3: Using the Load Data Statement to Import Excel into MySQL
This method would be time-consuming and somewhat tedious to implement. Users will have to write custom SQL statements & use the MySQL Workbench to import excel into MySQL. This method is suitable for users with a technical background.
Method 4: Import Excel into MySQL using phpMyAdmin
This method would require you to install the phpMyAdmin database administration tool to import Excel into MySQL. This tool is a good option if you require to perform data transfer once in a while with little to no data transformation.
- Method 1: Using Hevo Data to import Excel into MySQL
- Method 2: Using Sqlizer.io to Import Excel into MySQL
- Method 3: Using the Load Data Statement to Import Excel into MySQL
- Method 4: Import Excel into MySQL using phpMyAdmin
Method 1: Using Hevo Data to import Excel into MySQL
Hevo Data is a No-code Data Pipeline solution that can help you move data from 150+ data sources (including 40+ free sources like Google Drive & Google Sheets) to your desired destination such as MySQL, Data Warehouses, or BI tools in a completely hassle-free & automated manner. Using Hevo you can easily upload your Excel files present on your Google Drive to your MySQL Database.
Hevo also supports MySQL as a Source for loading data to a destination of your choice. Hevo is fully managed and completely automates the process of not only loading data from 150+ data sources but also enriching the data and transforming it into an analysis-ready form without having to write a single line of code. Its fault-tolerant architecture ensures that the data is handled in a secure, consistent manner with zero data loss.
Hevo Data takes care of all your data preprocessing needs and lets you focus on key business activities and draw a more powerful insight on how to generate more leads, retain customers, and take your business to new heights of profitability. It provides a consistent & reliable solution to manage data in real-time and always have analysis-ready data in your desired destination.
Take a look at some of the salient features of Hevo:
- Blazing-fast Setup: Straightforward interface for new customers to work on, with minimal setup time.
- Reliability at Scale – With Hevo, you get a world-class fault-tolerant architecture that scales with zero data loss and low latency.
- Monitoring and Observability – Monitor pipeline health with intuitive dashboards that reveal every stat of pipeline and data flow. Bring real-time visibility into your ELT with Alerts and Activity Logs
- Stay in Total Control – When automation isn’t enough, Hevo offers flexibility – data ingestion modes, ingestion, and load frequency, JSON parsing, destination workbench, custom schema management, and much more – for you to have total control.
- Transparent Pricing – Say goodbye to complex and hidden pricing models. Hevo’s Transparent Pricing brings complete visibility to your ELT spend. Choose a plan based on your business needs. Stay in control with spend alerts and configurable credit limits for unforeseen spikes in data flow.
- Auto-Schema Management – Correcting improper schema after the data is loaded into your warehouse is challenging. Hevo automatically maps source schema with destination warehouse so that you don’t face the pain of schema errors.
- 24×7 Customer Support – With Hevo you get more than just a platform, you get a partner for your pipelines. Discover peace with round the clock “Live Chat” within the platform. What’s more, you get 24×7 support even during the 14-day full-feature free trial.
Sign up here for a 14-Day Free Trial!
Without the need for converting your .xlsx file to .csv, you effortlessly import Excel into MySQL using Hevo by following the simple steps given below:
- Step 1: Upload your Excel files into your Google Drive.
- Step 2: Login to Hevo and naviagte to Pipleines > + Create. Select Google Drive as your Source and configure your Drive account by selecting the authentication method for connecting to Google Drive.
- Step 3: Finally, provide a name for your Pipeline and select all the folders whose Excel files you want to import to MySQL. Then, click on the Continue button.
- Step 4: For completing the process to import Excel into MySQL, you can start by providing your MySQL database credentials such as your authorized Username and Password, along with information about your Host IP Address and Port Number value. You will also need to provide a name for your database and a unique name for this destination.
Method 2: Using Sqlizer.io to Import Excel into MySQL
To import Excel into MySQL, you can use Sqlizer.io to convert your Excel files into SQL commands. You can achieve this by following the simple instructions given below:
- Step 1: Click on the Browse button and select the Excel file you want to import to MySQL.
- Step 2: Select MySQL as your desired database. According to your excel file, check or uncheck My File has a Header Row.
- Step 3: Based on your Excel file, check Use CHECK IF TABLE EXISTS. For using the active worksheet, check the Use the active worksheet box.
- Step 4: You can also choose to enter the Worksheet name. For this example, the worksheet name Students is mentioned.
- Step 5: To import Excel into MySQL, you can either provide the data cell range or check the Convert the whole worksheet box to import the whole data.
- Step 6: Finally, name the table in which to import excel into MySQL. Then, click on the Convert My File button.
- Step 7: After your file is converted, you will get the following message. Now, download the queries or you can even copy the queries to execute them on MySQL.
After the queries have been executed, you can view your data in MySQL using the SELECT command.
Method 3: Using the Load Data Statement to Import Excel into MySQL
Using the LOAD DATA Statement, you can import Excel data into MySQL. To do that, follow the simple steps given below:
- Step 1: You have to first convert your .xlsx file to .csv file. For that, open up the excel file that you need to import.
- Step 2: Navigate to File > Save As. Select CSV (Comma delimited)(*.csv) as your file type and click on the Save button.
- Step 3: Now, enter the LOAD DATA command shown below in your MySQL Workbench import Excel into MySQL.
# MySQL Version 8.0.27
LOAD DATA INFILE
'C:/ProgramFiles/MySQLExcel/import excel into mysql.csv'
INTO TABLE new_file
FIELDS TERMINATED BY ','
ENCLOSED BY '"'
LINES TERMINATED BY 'n'
IGNORE 1 ROWS;
In the above process to import an excel file in MySQL workbench, the .csv file data will be added to the new_file table in your MySQL database without the first row as it contains the row headers. For this example, the .csv file uses a comma as the delimiter to separate 2 fields. You can also use FIELDS TERMINATED BY ‘t’ or FIELDS TERMINATED BY ‘ ‘ if your file’s fields are separated using a tab or a single space respectively.
Alternatively, you can use the LOAD DATA command directly from the Command Line (CMD).
Method 4: Import Excel into MySQL using phpMyAdmin
You can also import excel into MySQL using phpMyAdmin by first converting your .xlsx files to .csv files. For that, you have to first download and phpMyAdmin tool on your system. For this example, a new table named tb_students_phpmyadmin has been created in the MySQL Database. To import excel into MySQL, you can follow the simple steps given below:
- Step 1: In phpMyAdmin, click on the Import tab and choose your desired .csv file.
- Step 2: Now, enter the format-specific options and once you are done, click on the Go button present in the bottom right corner of your screen.
After clicking on the Go button, you will observe the data import confirmation messages for all your rows.
- Step 3: Using the SELECT statement, you can check if the process to import excel into MySQL was successful or not.
Conclusion
In this article, you have learned how to effectively import Excel into MySQL using 4 different methods. Using Method 2, you convert your Excel file rows into SQL queries via sqlizer.io which you, later on, execute on your MySQL Workbench or Command-Line. Though this can be a time-consuming process if you are dealing with excel files containing thousands of rows. You can also use the LOAD DATA statement or a database administration tool like phpMyAdmin, though these require you to first convert the Excel files into CSV files.
These 3 methods are a good option if you only need to rarely import Excel into MySQL with no requirement for processes like Data Cleaning & Data Standardisation. However, when you need to frequently import excel files with millions of rows of data in real-time that require complex data transformation, then you can opt for a No-Code Automated Data Integration platform like Hevo Data!
Visit our Website to Explore Hevo
Hevo Data is a No-code Data Pipeline solution that can help you import data from a vast sea of sources like Google Drive to your desired destination such as MySQL, Data Warehouses, or BI tools. Using Hevo you can easily upload your Excel files present on your Google Drive to your MySQL Database. Hevo also supports MySQL as a Source for loading data to a destination of your choice. It is a reliable, completely automated, and secure service that doesn’t require you to write any code!
If you are using MySQL as your Database Management System and searching for a no-fuss alternative to manual data integration, then Hevo can effortlessly automate this for you. Hevo, with its strong integration with 150+ sources (Including 40+ Free Sources like Google Drive & Google Sheets), allows you to not only export & load data but also transform & enrich your data & make it analysis-ready in a jiffy.
Want to take Hevo for a ride? Sign Up for a 14-day free trial and simplify your Data Integration process. Do check out the pricing details to understand which plan fulfills all your business needs.
Tell us about your experience of completing the process to Import Excel into MySQL! Share your thoughts with us in the comments section below.
Конечно, Excel используется для электронных таблиц, но знаете ли вы, что вы можете подключить Excel к внешним источникам данных? В этой статье мы собираемся обсудить, как подключить электронную таблицу Excel к таблице базы данных MySQL и использовать данные из таблицы базы данных для заполнения нашей электронной таблицы. Есть несколько вещей, которые вы должны сделать, чтобы подготовиться к этой связи.
подготовка
Во-первых, вам необходимо загрузить последнюю версию драйвера Open Database Connectivity (ODBC) для MySQL. Текущий драйвер ODBC для MySQL можно найти по адресу
//dev.mysql.com/downloads/connector/odbc/
Убедитесь, что после загрузки файла, проверьте хэш md5 файла по списку на странице загрузки.
Затем вам нужно установить только что загруженный драйвер. Дважды щелкните файл, чтобы начать процесс установки. После завершения процесса установки вам потребуется создать имя источника базы данных (DSN) для использования с Excel.
Создание DSN
DSN будет содержать всю информацию о соединении, необходимую для использования таблицы базы данных MySQL. В системе Windows вы должны нажать инициированиезатем в Панель управлениязатем в Административные инструментызатем в Источники данных (ODBC) , Вы должны увидеть следующую информацию:

Обратите внимание на вкладки на изображении выше. Пользователь DSN Он доступен только пользователю, который его создал. Системный DSN Это доступно любому, кто может войти в систему. Файл DSN Это файл .DSN, который можно транспортировать и использовать в других системах, в которых установлена та же операционная система и установлены драйверы.
Чтобы продолжить создание DSN, нажмите кнопку добавлять возле правого верхнего угла.

Возможно, вам придется прокрутить вниз, чтобы увидеть MySQL ODBC 5.x драйвер. Если это не так, при установке драйвера в разделе «Подготовка» данной публикации произошла ошибка. Чтобы продолжить создание DSN, убедитесь, что драйвер MySQL ODBC 5.x выделен, и нажмите кнопку финализации , Теперь вы должны увидеть окно, подобное приведенному ниже:

Далее вы должны предоставить информацию, необходимую для заполнения формы, показанной выше. База данных MySQL и таблица, которую мы используем для этой публикации, находятся на компьютере разработчика и используются только одним человеком. Для «производственных» сред предлагается создать нового пользователя и предоставить привилегии SELECT только новому пользователю. В будущем вы можете предоставить дополнительные привилегии, если это необходимо.
После того, как вы предоставили детали для настройки источника данных, вы должны нажать на кнопку Пытаться чтобы убедиться, что все работает правильно. Затем нажмите кнопку принимать , Теперь вы должны увидеть имя источника данных, который вы указали в форме из предыдущего набора, указанного в окне ODBC Data Source Manager:

Создание соединения с электронной таблицей
Теперь, когда вы успешно создали новый DSN, вы можете закрыть окно ODBC Data Source Manager и открыть Excel. Когда Excel откроется, нажмите на ленту данные , Для получения последних версий Excel нажмите Получить данныезатем в Другие источникизатем в ODBC ,

В более ранних версиях Excel это был немного более сложный процесс. Прежде всего, вы должны увидеть что-то вроде этого:

Следующий шаг – нажать на ссылку. связи находится чуть ниже слова данных в списке вкладок. Расположение ссылки Connections отмечено красным кружком на изображении выше. Оно должно появиться в окне «Подключения» книги:

Следующим шагом является нажатие на кнопку добавлять , Это подарит вам окно существующие соединения :

Очевидно, вы не хотите работать ни с одним из перечисленных соединений. Поэтому нажмите на кнопку Найти больше … Это представит вам окно Выберите источник данных :

Как и в окне «Существующие подключения» выше, вы не хотите использовать подключения, перечисленные в окне «Выбор источника данных». Итак, вы хотите дважды щелкнуть по папке + Подключиться к новому источнику данных .odc , При этом вы должны увидеть Мастер подключения к данным :

Учитывая перечисленные параметры источника данных, вы хотите выделить ODBC DSN и нажмите на после , На следующем шаге мастера подключения к данным отобразятся все доступные источники данных ODBC в используемой вами системе.
Надеемся, что если все прошло по плану, вы должны увидеть DSN, созданный на предыдущих шагах, который указан среди источников данных ODBC. Выделите и нажмите после ,

Следующим шагом мастера подключения к данным является сохранение и завершение. Поле имени файла должно быть заполнено автоматически. Вы можете предоставить описание. Описание, использованное в примере, самоочевидно для всех, кто может его использовать. Затем нажмите кнопку финализации в угол нижний правый угол окна.

Теперь вы должны вернуться в окно подключения книги. Соединение для передачи данных, которое вы только что создали, должно появиться в списке:

Импорт данных из таблицы
Вы можете закрыть окно входа в рабочую книгу. Нам нужно нажать на кнопку Существующие соединения на ленте данных Excel. Кнопка «Существующие подключения» должна быть расположена слева на ленте данных.

При нажатии на кнопку «Существующие подключения» откроется окно «Существующие подключения». Вы видели это окно на предыдущих шагах, теперь разница в том, что ваше подключение для передачи данных должно отображаться вверху:

Убедитесь, что подключение для передачи данных, созданное на предыдущих этапах, выделено, а затем нажмите кнопку. Открыть , Теперь вы должны увидеть окно Импорт данных :

Для целей данной публикации мы будем использовать настройки по умолчанию в окне «Импорт данных». Затем нажмите кнопку принимать , Если у вас все сработало, теперь вам будут представлены данные из таблицы базы данных MySQL на вашем рабочем листе.
Для этого поста таблица, с которой мы работали, имела два поля. Первое поле представляет собой поле INT с автоматическим приращением под названием ID. Второе поле – VARCHAR (50), и оно называется fname. Наша последняя таблица выглядит следующим образом:

Как вы, наверное, заметили, первая строка содержит имена столбцов в таблице. Вы также можете использовать стрелки раскрывающегося списка рядом с именами столбцов для сортировки столбцов.
обертывание
В этой публикации мы рассмотрели, где найти последние драйверы ODBC для MySQL, как создать DSN, как создать подключение к данным электронной таблицы, используя DSN, и как использовать подключение к данным электронной таблицы для импорта данных в электронную таблицу. Расчет в Excel. Наслаждайтесь!
Post Views: 53
Sure Excel is used for spreadsheets, but did you know you can connect Excel to external data sources? In this article we’re going to discuss how to connect an Excel spreadsheet to a MySQL database table and use the data in the database table to populate our spreadsheet. There are a few things you need to do in order to prepare for this connection.
Preparation
First, you must download the most recent Open Database Connectivity (ODBC) driver for MySQL. The current ODBC driver for MySQL can be located at
https://dev.mysql.com/downloads/connector/odbc/
Make sure after you download the file that you check the file’s md5 hash against that listed on the download page.
Next, you will need to install the driver you just downloaded. Double click the file to start the install process. Once the install process is complete you will need to create a Database Source Name (DSN) to use with Excel.
Creating the DSN
The DSN will contain all of the connection information necessary to use the MySQL database table. On a Windows system, you will need to click on Start, then Control Panel, then Administrative Tools, then Data Sources (ODBC). You should see the following information:
Notice the tabs in the image above. A User DSN is only available to the user that created it. A System DSN is available to anyone that can log into the machine. A File DSN is a .DSN file that can be transported to and used on other systems that have the same OS and drivers installed.
To continue creating the DSN, click on the Add button near the top right corner.
You will probably have to scroll down to see the MySQL ODBC 5.x Driver. If it’s not present, something went wrong with installing the driver in the Preparation section of this post. To continue creating the DSN, make sure MySQL ODBC 5.x Driver is highlighted and click on the Finish button. You should now see a window similar to the one listed below:
Next you will need to supply the information necessary to complete the form shown above. The MySQL database and table we’re using for this post is on a development machine and is only used by one person. For “production” environments, it is suggested you create a new user and grant the new user SELECT privileges only. In the future, you can grant additional privileges if necessary.
After you have supplied the details for your data source configuration, you should click on the Test button to make sure everything is in working order. Next, click on the OK button. You should now see the data source name you supplied on the form in the previous set listed on the ODBC Data Source Administrator window:
Creating the Spreadsheet Connection
Now that you have successfully created a new DSN, you can close the ODBC Data Source Administrator window and open Excel. Once you have opened Excel, click on the Data ribbon. For newer versions of Excel, click on Get Data, then From Other Sources, then From ODBC.
In older versions of Excel, it’s a bit more of a process. Firstly, you should see something like this:
The next step is to click on the Connections link located right under the word Data in the tab list. The location of the Connections link is circled in red in the above image. You should be presented with the Workbook Connections window:
The next step is to click on the Add button. This will present you with the Existing Connections window:
Obviously you don’t want to work on any of the connections listed. Therefore, click on the Browse for More… button. This will present you with the Select Data Source window:
Just like the previous Existing Connections window, you do not want to use the connections listed in the Select Data Source window. Therefore, you want to double click on the +Connect to New Data Source.odc folder. In doing so, you should be now see the Data Connection Wizard window:
Given the data source choices listed, you want to highlight ODBC DSN and click Next. The next step of the Data Connection Wizard will display all of the ODBC data sources available on the system you are using.
Hopefully, if all as gone according to plan, you should see the DSN that you created in previous steps listed among the ODBC data sources. Highlight it and click on Next.
The next step in the Data Connection Wizard is to save and finish. The file name field should be auto filled for you. You can supply a description. The description used in the example is pretty self explanatory for anyone that might use it. Next, click on the Finish button in the lower right of the window.
You should now be back at the Workbook Connection window. The data connection you just created should be listed:
Importing the Table Data
You can close the Workbook Connection window. We need to click on the Existing Connections button in the Data ribbon of Excel. The Existing Connections button should be located to the left on the Data ribbon.
Clicking on the Existing Connections button should present you with the Existing Connections window. You’ve seen this window in previous steps, the difference now is that your data connection should be listed near the top:
Make sure the data connection you created in the previous steps is highlighted and then click on the Open button. You should now see the Import Data window:
For the purposes of this post, we are going to use the default settings on the Import Data window. Next, click on the OK button. If everything worked out for you, you should now be presented with the MySQL database table data in your worksheet.
For this post, the table we were working with had two fields. The first field is an auto-increment INT field titled ID. The second field is VARCHAR(50) and is titled fname. Our final spreadsheet looks likes like this:
As you’ve probably noticed, the first row contains the table column names. You can also use the drop down arrows next to the column names to sort the columns.
Wrap-Up
In this post we covered where to find the latest ODBC drivers for MySQL, how to create a DSN, how to create a spreadsheet data connection using the DSN and how to use the spreadsheet data connection to import data into an Excel spreadsheet. Enjoy!