There is nothing more frustrating than finding out a previous employee has used passwords to protect an Excel file, and it turns out nobody else knows the password. Or maybe it’s worse when it’s your file, your password and you’ve forgotten it. Either way… you’re stuffed! However, before you give in, let me share some ideas on how to remove Excel passwords with VBA.
By the way, if you’re not familiar with VBA or find these methods too difficult, you can try a simpler solution. Password-Find is paid Excel password remover.
Download the example file
I recommend you download the example file for this post. Then you’ll be able to work along with examples and see the solution in action, plus the file will be useful for future reference.
![]()
Download the file: 0012 Remove passwords.zip
The download includes a free Excel password remover. Please see the sections below for full details on how to use the tool.
WARNING! – When messing around with password removal, it is easy to make files unreadable, so make sure you back up before doing anything. After all, there is no point in cracking a password, if the file can’t be viewed afterward.
Before we even start discussing how to remove passwords, we need to understand the different types of passwords within an Excel file. The removal approach will vary for each.
Setting different types of passwords
There are five different passwords within Excel:
- File open
- File modify
- Workbook protection
- Worksheet protection
- VBA project
Each of them is applied differently and serves a different purpose. Let’s look at each in turn.
File open passwords
The file open password prevents an Excel workbook from opening until the password is entered.
To set a file open password in Excel:
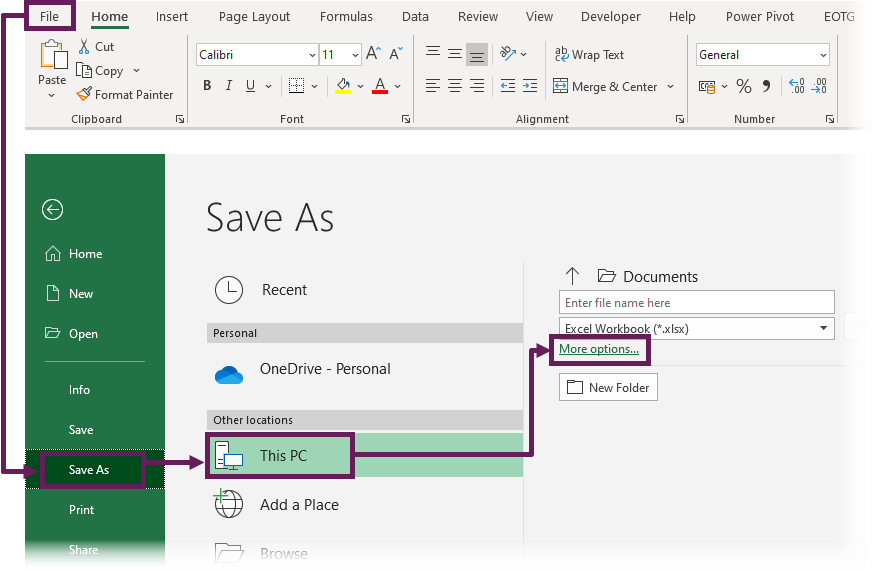
- Click File > Save As > More Options…

- Next, in the Save As dialog box, click Tools > General Options…
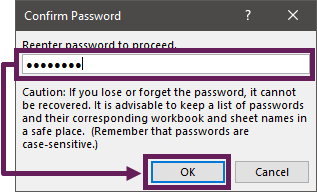
- The General Options dialog box appears. Enter a password in the password to open box, then click OK.
.
- In the Confirm Password window, re-enter the password and click OK.

- Finally, enter a file name and click Save in the Save As window.


The file open password has now been set. A user cannot open the workbook until the password has been entered.
Warning Message
Did you notice the warning message which appeared when setting the password?
Caution: If you lose or forget the password, it cannot be recovered. It is advisable to keep a list of passwords and their corresponding workbook and sheet names in a safe place. (Remember that passwords are case-sensitive.)
This is good advice. As these passwords cannot be easily recovered.
File modify passwords
The file modify password prevents the workbook from being changed until a password has been entered. Some of the steps are the same as the file open password, but they are repeated here for completeness.
- Click File > Save As > More Options…
- The Save As window appears, click Tools > General Options…
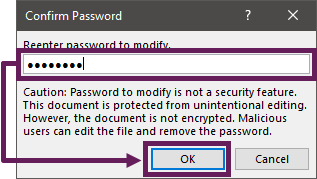
- The General Options box appears. Enter a password in the password to modify box, then click OK.
- In the Confirm Password window, re-enter the password and click OK.

- Finally, click Save on the Save As window.
The File Modify password has now been set. A user can open the workbook, but it is set as read-only unless they enter the password.
Warning Message
Did you notice the warning message this time?
Caution: Password to modify is not a secure feature. This document is protected from unintentional editing. However, the document is not encrypted. Malicious users can edit the file and remove the password.
Did you see the difference in tone of the warning message? Even Microsoft recognizes that this password is not secure. We will cover how to remove this password later in the post.
Worksheet protection passwords
Worksheet protection passwords prevent specific cells from being changed. A user can open and interact with the worksheet but is restricted in the activities they can do.
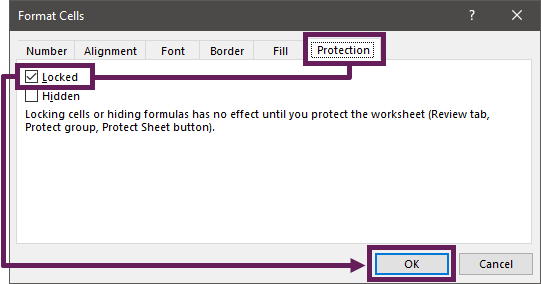
- Start by setting the lock property of a cell or range of cells. Select some cells then click Home > Format > Format Cells from the ribbon (or the shortcut is Ctrl + 1)
- The Format Cells window opens. Select the Protection tab, tick or untick the Locked option as required, then click OK.

- To apply the protection, click Review > Protect Sheet.
- The Protect Sheet window opens. Enter a password, and use the tick boxes to set the protection to be applied, then click OK.
- In the Confirm Password window, re-enter the password and click OK again.

Done. The worksheet is now protected. If a user tries to make changes to a locked cell, an error message appears:

Warning Message
When setting the password, the warning message is the same as the file open password.
Caution: If you lose or forget the password, it cannot be recovered. It is advisable to keep a list of passwords and their corresponding workbook and sheet names in a safe place. (Remember that passwords are case-sensitive.)
This would imply it is the same level of security as the file open password, which isn’t true. As you’ll see later in this post, we can remove this password (it’s not as secure as they make it seem).
Workbook protection passwords
Workbook protection is applied in a similar way to worksheet protection, but with fewer options. It prevents users from changing the structure of a workbook, such as creating or renaming worksheets.
- Click Review > Protect Workbook from the ribbon.

- The Protect Structure window opens. Enter a password, then click OK.

Note: Prior to Excel 2013, both the Structure and Window options were available. Due to the Single Document Interface introduced in Excel 2013, the Windows option is no longer relevant and greyed out. - In the Confirm Password window, re-enter the password and click OK.

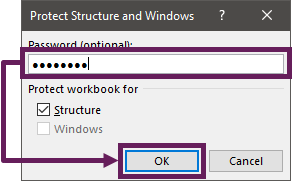
The workbook structure is now protected.
Warning Message
Did you notice the warning message again?
Caution: If you lose or forget the password, it cannot be recovered. It is advisable to keep a list of passwords and their corresponding workbook and sheet names in a safe place. (Remember that passwords are case-sensitive.)
Again, this message would imply it has high security. However, this just isn’t true. As we will see later in this post, we can remove this password (it’s not as secure as Microsoft make it seem).
VBA project passwords
VBA project passwords prevent users from viewing or changing the code of a VBA Project.
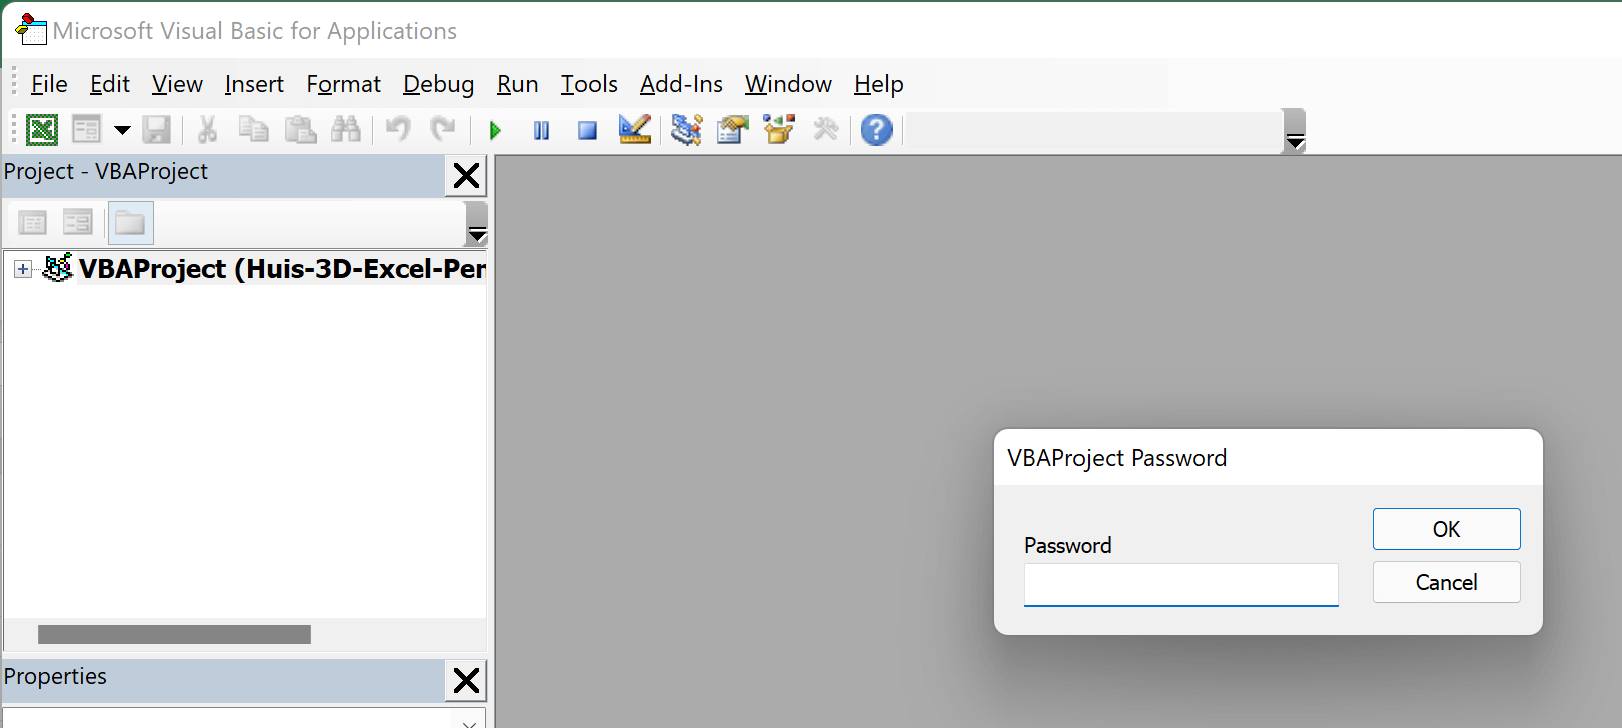
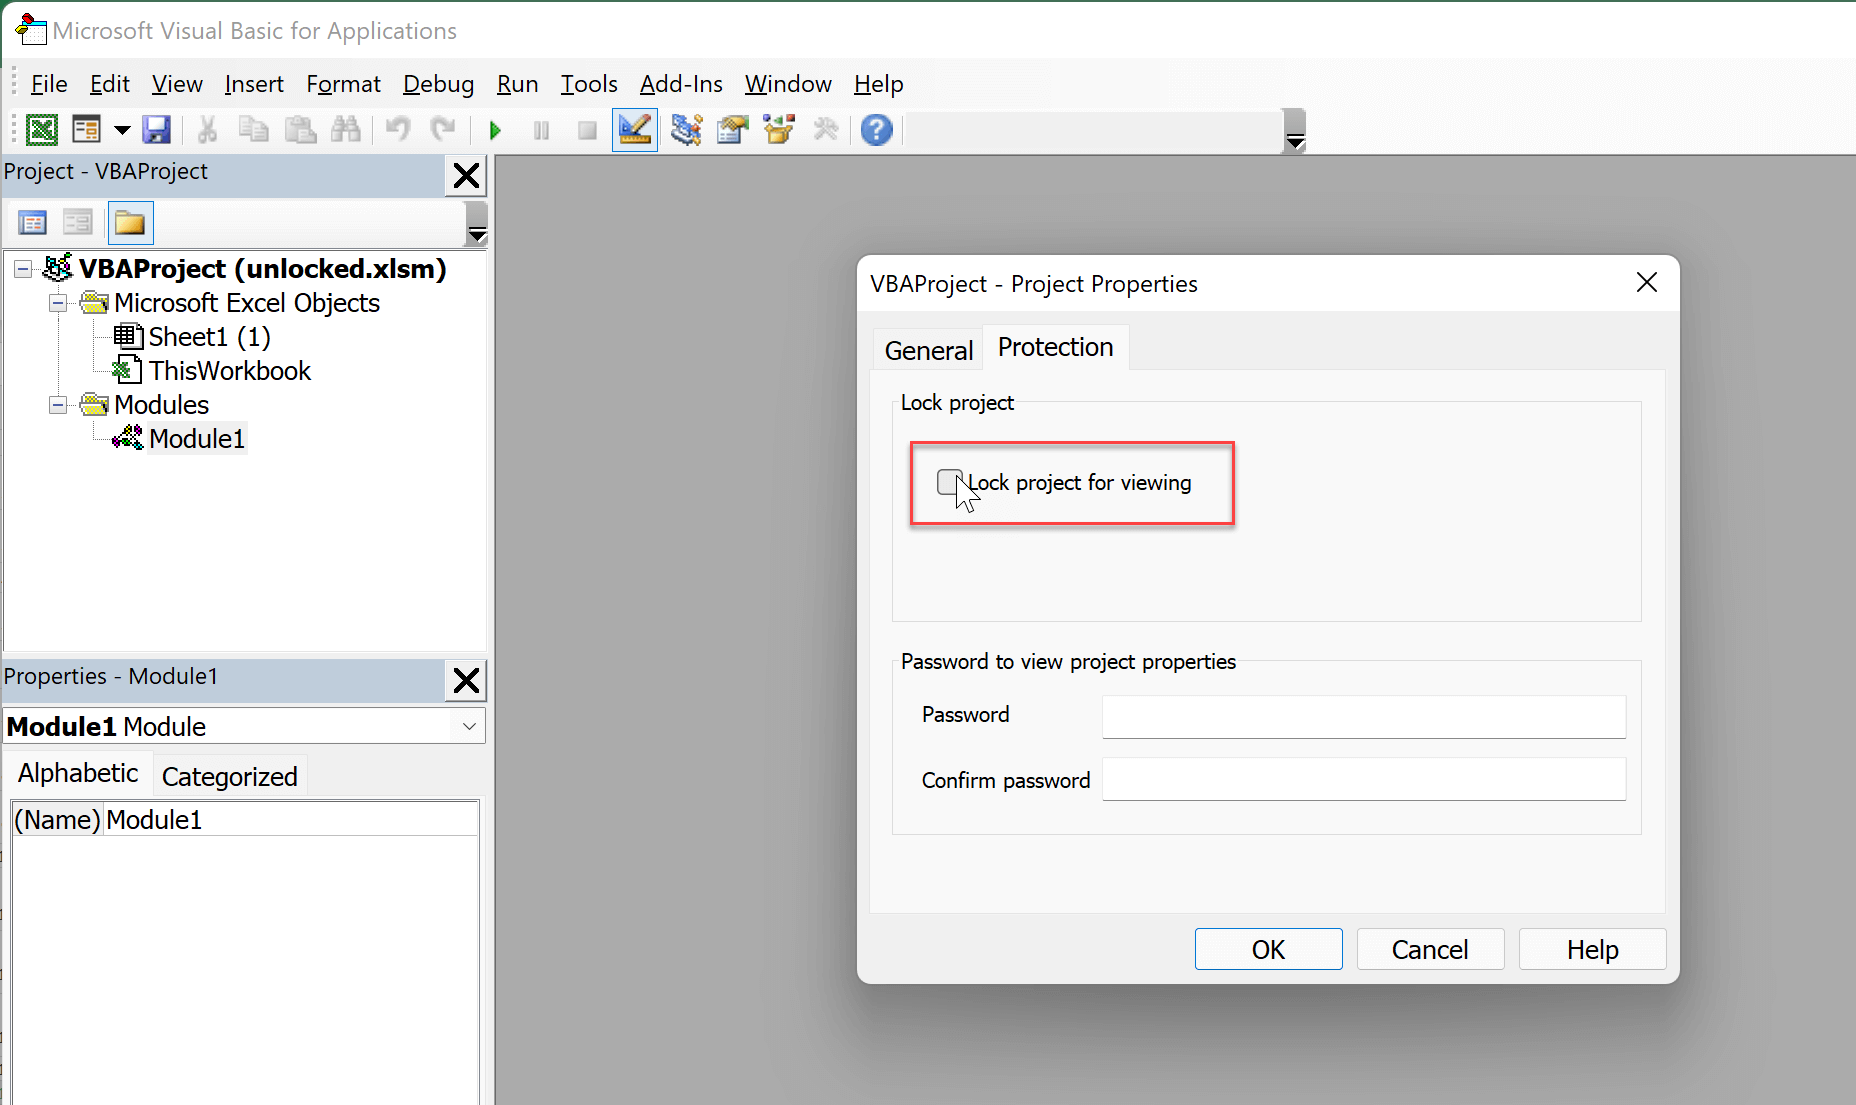
- In the Visual Basic Editor window, click Tools > VBA Project Properties…
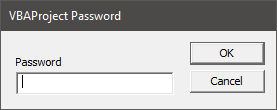
- The VBA Project – Project Properties window opens. Select the Protection tab, tick the Lock project for viewing, enter and confirm a password, then click OK.
The VBA project is now protected. Close and re-open the workbook. When expanding the VBA project, the user is presented with a box to enter the password.
How Excel handles passwords
Whilst we have considered five different types of passwords, a standard xlsx file handles these in only three ways:
- XML file code
- Encryption
- VBA Project binary
Notes: Excel files can be saved in many different spreadsheet file formats. The most common of which are:
- .xlsx – The standard file format which primarily compressed XML files
- .xls – The legacy file format which was replaced in Excel 2007
- .xlsb – Stores the Excel file as compressed binary files. It is a proprietary file format, which is generally not supported outside of Excel.
- .xlsm – A .xlsx file which contains a macro
- .xlam – A .xlsm file saved with a setting identifying it as an add-in
The remainder of this post only covers the xlsx, xlsm and xlam file formats.
XML file code (worksheet, workbook and modify passwords)
From Excel 2007, the standard file format changed to an xlsx format. This means the file is built using mostly code written in an XML structure. That might sound confusing, but don’t worry. All you need to know is that with a bit of knowledge we can edit XML code ourselves
Encryption (file open password)
From Excel 2007, Microsoft’s level of protection increased significantly. When saving a file with the file open password, Excel applies encryption to the XML code.
VBA Project binary (VBA passwords)
VBA Projects are stored as binary files within the Excel file format structure. The passwords, or the encrypted versions of those passwords are stored within the VBA binary file itself.
Removing each type of password
Since the passwords are stored in different ways, the method of removing them is also different.
Crack the file open password (encrypted)
For this first password method, it’s bad news. The only way I know to open one of these files is through a brute-force attack. This means trying every combination of every letter until the password is identified.
Just using numbers, uppercase and lowercase letters, an 8-digit password has 218,340,105,584,896 possible character combinations. Therefore, to speed things up, any software which uses this approach tends to focus on known patterns and word combinations. The more complex the password, the longer it will take to crack.
If you’re looking for an Excel password cracker to detail with these types of passwords, then I recommend third-party software tools and services which can perform this attack at high speed.
I have tried one of these services, and have good results, try them out: https://www.password-find.com. They claim to be able to find 80% of passwords, which is pretty good going.
Crack the modify file password
The truth is, we don’t even need an Excel password remover for the file modify password. The password can be removed by re-saving the file with a new name.
That’s it. It pretty much serves no security purpose. Nice and simple.
Cracking worksheet and workbook passwords
As noted above, Excel files are just text files that are written in a specific format, which Excel can interpret. So, if we can edit the code, we can remove the password.
Excel does not store the password itself within the file. Instead, it uses an algorithm to create an adjusted code; then it stores the adjusted code within the file.
Any password we enter is processed through the same algorithm. If that algorithm creates the same result, then it follows that it must be the same password, and Excel allows us to edit the worksheet or workbook.
Thankfully, we do not have to try a brute-force attack. As noted above, we can simply edit the code.
Crack the workbook and worksheet passwords manually
If you think that you need software to remove Excel passwords, you will be surprised by this method. All it needs is a text editor, like Notepad.
I keep talking about the XML file and the file structure; let’s have a look at it. You’ll see it’s not too scary.
This method can corrupt a file. So, before trying this, make sure you back up the file.
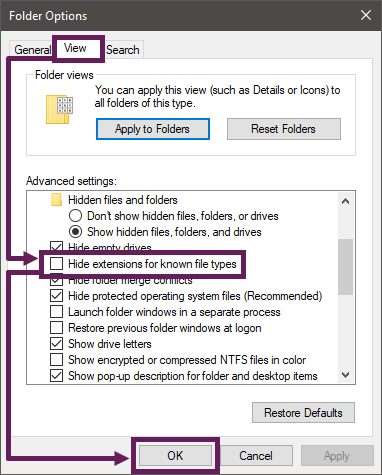
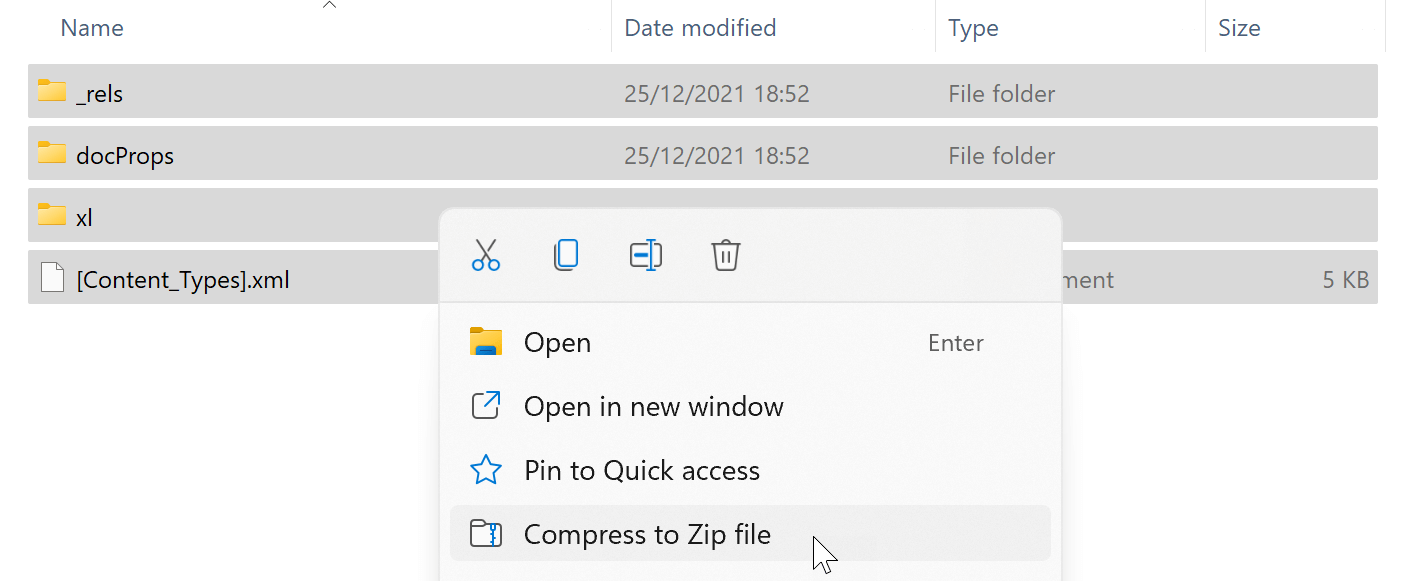
- Make sure the file extensions are visible on your computer. On any Windows folder, click View > Options.
- In the Folder Options dialog box, click the View tab, remove the tick from hide extensions for known file types, then click OK.

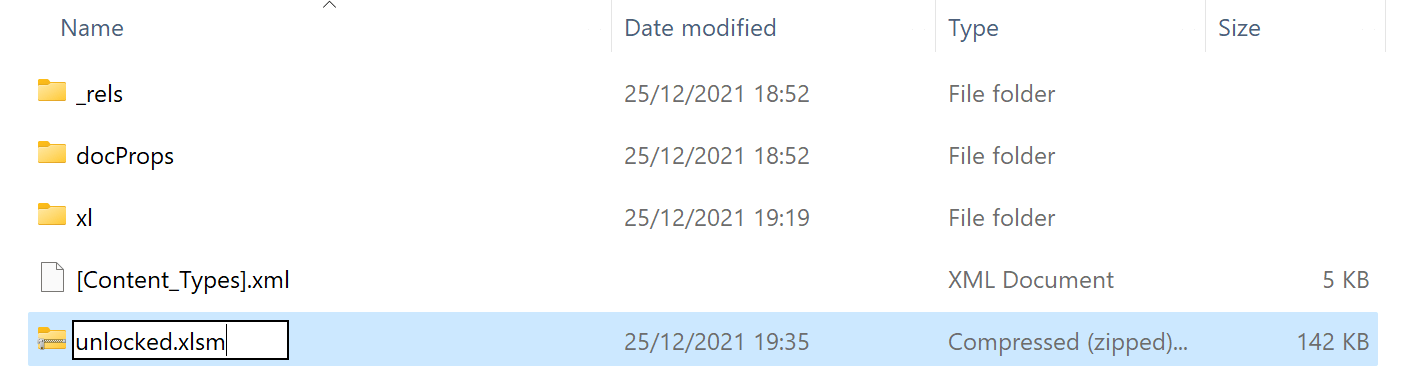
- It is now possible to see the .xlsx file extension. Rename the file to include the .zip extension.

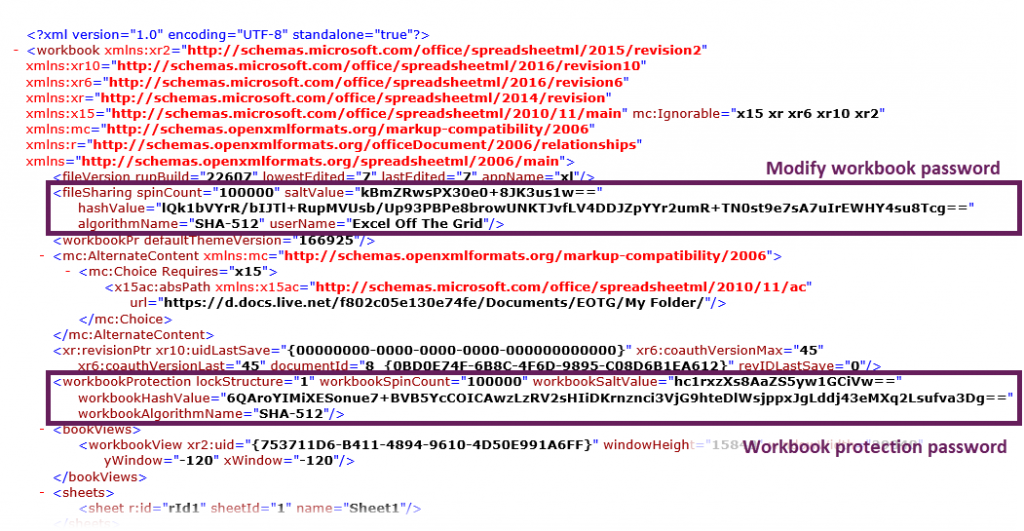
- Open the zip file, then navigate to the xlworkbooks.xml file. The highlighted section below shows where the modify and workbook passwords are coded:

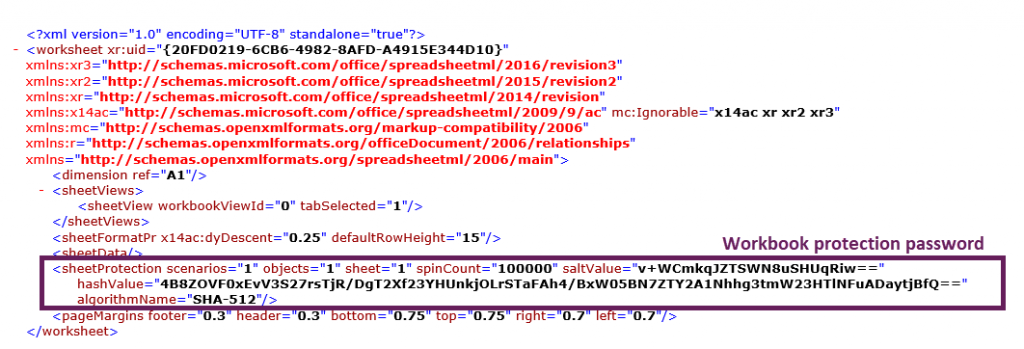
- Next, navigate to xlworksheetssheet1.xml. The highlighted section below shows where the worksheet protection password code is:

- Save the worksheet and workbook XML files outside of the zip folder.
- Open the files with a text editor and remove the highlighted sections of code.
- Save the XML files, then copy them back into the zip folders.
- Rename the file to include the .xlsx, .xlsm or .xlam file extension.
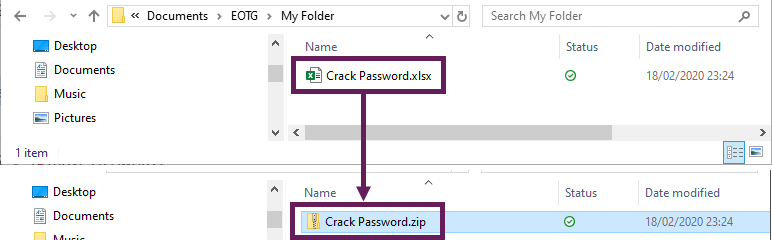
Note: For this to work. We need to adjust the XML files, then insert them, back into the zip folder in the same location. Don’t unzip the folder completely, as the zipping and unzipping process can make the Excel file unusable.
Alternatively, we could use a macro to remove the code automatically.
Crack the workbook, worksheet and modify passwords with a macro
The following is my VBA code for cracking Excel passwords. It may not be the best tool available, but based on feedback I’ve received, it has successfully helped thousands of use.
The download file already includes this macro and can be used to remove Excel passwords for workbook, worksheet and modify scenarios.
Close the file with the password to be removed.
Open a new Excel workbook and copy the following code into a standard module within the Visual Basic Editor.
Sub RemoveProtection()

Dim dialogBox As FileDialog
Dim sourceFullName As String
Dim sourceFilePath As String
Dim sourceFileName As String
Dim sourceFileType As String
Dim newFileName As Variant
Dim tempFileName As String
Dim zipFilePath As Variant
Dim oApp As Object
Dim FSO As Object
Dim xmlSheetFile As String
Dim xmlFile As Integer
Dim xmlFileContent As String
Dim xmlStartProtectionCode As Double
Dim xmlEndProtectionCode As Double
Dim xmlProtectionString As String

'Open dialog box to select a file
Set dialogBox = Application.FileDialog(msoFileDialogFilePicker)
dialogBox.AllowMultiSelect = False
dialogBox.Title = "Select file to remove protection from"

If dialogBox.Show = -1 Then
    sourceFullName = dialogBox.SelectedItems(1)
Else
    Exit Sub
End If

'Get folder path, file type and file name from the sourceFullName
sourceFilePath = Left(sourceFullName, InStrRev(sourceFullName, ""))
sourceFileType = Mid(sourceFullName, InStrRev(sourceFullName, ".") + 1)
sourceFileName = Mid(sourceFullName, Len(sourceFilePath) + 1)
sourceFileName = Left(sourceFileName, InStrRev(sourceFileName, ".") - 1)

'Use the date and time to create a unique file name
tempFileName = "Temp" & Format(Now, " dd-mmm-yy h-mm-ss")

'Copy and rename original file to a zip file with a unique name
newFileName = sourceFilePath & tempFileName & ".zip"
On Error Resume Next
FileCopy sourceFullName, newFileName

If Err.Number <> 0 Then
    MsgBox "Unable to copy " & sourceFullName & vbNewLine _
        & "Check the file is closed and try again"
    Exit Sub
End If
On Error GoTo 0

'Create folder to unzip to
zipFilePath = sourceFilePath & tempFileName & ""
MkDir zipFilePath

'Extract the files into the newly created folder
Set oApp = CreateObject("Shell.Application")
oApp.Namespace(zipFilePath).CopyHere oApp.Namespace(newFileName).items

'loop through each file in the xlworksheets folder of the unzipped file
xmlSheetFile = Dir(zipFilePath & "xlworksheets*.xml*")
Do While xmlSheetFile <> ""

    'Read text of the file to a variable
    xmlFile = FreeFile
    Open zipFilePath & "xlworksheets" & xmlSheetFile For Input As xmlFile
    xmlFileContent = Input(LOF(xmlFile), xmlFile)
    Close xmlFile

    'Manipulate the text in the file
    xmlStartProtectionCode = 0
    xmlStartProtectionCode = InStr(1, xmlFileContent, "<sheetProtection")

    If xmlStartProtectionCode > 0 Then

        xmlEndProtectionCode = InStr(xmlStartProtectionCode, _
            xmlFileContent, "/>") + 2 '"/>" is 2 characters long
        xmlProtectionString = Mid(xmlFileContent, xmlStartProtectionCode, _
            xmlEndProtectionCode - xmlStartProtectionCode)
        xmlFileContent = Replace(xmlFileContent, xmlProtectionString, "")

    End If

    'Output the text of the variable to the file
    xmlFile = FreeFile
    Open zipFilePath & "xlworksheets" & xmlSheetFile For Output As xmlFile
    Print #xmlFile, xmlFileContent
    Close xmlFile

    'Loop to next xmlFile in directory
    xmlSheetFile = Dir

Loop

'Read text of the xlworkbook.xml file to a variable
xmlFile = FreeFile
Open zipFilePath & "xlworkbook.xml" For Input As xmlFile
xmlFileContent = Input(LOF(xmlFile), xmlFile)
Close xmlFile

'Manipulate the text in the file to remove the workbook protection
xmlStartProtectionCode = 0
xmlStartProtectionCode = InStr(1, xmlFileContent, "<workbookProtection")
If xmlStartProtectionCode > 0 Then

    xmlEndProtectionCode = InStr(xmlStartProtectionCode, _
        xmlFileContent, "/>") + 2 ''"/>" is 2 characters long
    xmlProtectionString = Mid(xmlFileContent, xmlStartProtectionCode, _
        xmlEndProtectionCode - xmlStartProtectionCode)
    xmlFileContent = Replace(xmlFileContent, xmlProtectionString, "")

End If

'Manipulate the text in the file to remove the modify password
xmlStartProtectionCode = 0
xmlStartProtectionCode = InStr(1, xmlFileContent, "<fileSharing")
If xmlStartProtectionCode > 0 Then

    xmlEndProtectionCode = InStr(xmlStartProtectionCode, xmlFileContent, _
        "/>") + 2 ''"/>" is 2 characters long
    xmlProtectionString = Mid(xmlFileContent, xmlStartProtectionCode, _
        xmlEndProtectionCode - xmlStartProtectionCode)
    xmlFileContent = Replace(xmlFileContent, xmlProtectionString, "")

End If

'Output the text of the variable to the file
xmlFile = FreeFile
Open zipFilePath & "xlworkbook.xml" & xmlSheetFile For Output As xmlFile
Print #xmlFile, xmlFileContent
Close xmlFile

'Create empty Zip File
Open sourceFilePath & tempFileName & ".zip" For Output As #1
Print #1, Chr$(80) & Chr$(75) & Chr$(5) & Chr$(6) & String(18, 0)
Close #1

'Move files into the zip file
oApp.Namespace(sourceFilePath & tempFileName & ".zip").CopyHere _
oApp.Namespace(zipFilePath).items
'Keep script waiting until Compressing is done
On Error Resume Next
Do Until oApp.Namespace(sourceFilePath & tempFileName & ".zip").items.Count = _
    oApp.Namespace(zipFilePath).items.Count
    Application.Wait (Now + TimeValue("0:00:01"))
Loop
On Error GoTo 0

'Delete the files & folders created during the sub
Set FSO = CreateObject("scripting.filesystemobject")
FSO.deletefolder sourceFilePath & tempFileName

'Rename the final file back to an xlsx file
Name sourceFilePath & tempFileName & ".zip" As sourceFilePath & sourceFileName _
& "_" & Format(Now, "dd-mmm-yy h-mm-ss") & "." & sourceFileType

'Show message box
MsgBox "The workbook and worksheet protection passwords have been removed.", _
vbInformation + vbOKOnly, Title:="Password protection"

End Sub
Run the macro above. Select the file containing the password to be removed, then click OK. The macro will create a new file with the modify, workbook and worksheet passwords removed.
NOTE – The macro will not work on a Mac, only on a Windows PC.
Common error messages and solutions
If you get the following error messages, the reason could be one of the following:
Run-time error ’53’: file not found:
- The workbook is an xlsb file type; the macro only works on the xlsx file type.
Run-time error ’76’: file not found:
- The workbook is an xls file type; the macro only works on the xlsx, xlsm or xlam file types.
- The workbook has a file open password applied.
Run-time error ’91’: Object variable or With block variable not set:
- You are running the macro on a Mac, instead of a PC.
Run-time error ‘5’: Invalid function call on the xml read into the string
- Does not work with very large worksheets – The macro converts the XML file to a string. Therefore if the string is more than 2 billion characters, it will cause a VBA error.
Other tips to use this macro successfully:
- Ensure the workbook is saved on your local PC
Crack the VBA project binary password with a macro
Finally, we get to the VBA project binary passwords. Many tutorials suggest using a HEX editor to remove the password. But there is a better and simpler way.
There is an amazing macro that confuses the Visual Basic Editor into believing a valid password has been entered.
I could not have coded this macro in a million years. I don’t claim to be the author of this code, I have copied it from here: https://stackoverflow.com/questions/1026483/is-there-a-way-to-crack-the-password-on-an-excel-vba-project
If you are the copyright owner of the original code and wish me to remove the code below, please let me know.
Ensure the workbook containing locked VBA project is open.
Create a new workbook and copy all the code below into a standard VBA module, then run the VBAUnprotected macro (the one at the bottom).
The download file already includes this macro and can be used to remove the VBA password.
Private Const PAGE_EXECUTE_READWRITE = &H40

Private Declare PtrSafe Sub MoveMemory Lib "kernel32" Alias "RtlMoveMemory" _
    (Destination As LongPtr, Source As LongPtr, ByVal Length As LongPtr)

Private Declare PtrSafe Function VirtualProtect Lib "kernel32" (lpAddress As LongPtr, _
    ByVal dwSize As LongPtr, ByVal flNewProtect As LongPtr, lpflOldProtect As LongPtr) As LongPtr

Private Declare PtrSafe Function GetModuleHandleA Lib "kernel32" (ByVal lpModuleName As String) As LongPtr

Private Declare PtrSafe Function GetProcAddress Lib "kernel32" (ByVal hModule As LongPtr, _
    ByVal lpProcName As String) As LongPtr

Private Declare PtrSafe Function DialogBoxParam Lib "user32" Alias "DialogBoxParamA" (ByVal hInstance As LongPtr, _
    ByVal pTemplateName As LongPtr, ByVal hWndParent As LongPtr, _
    ByVal lpDialogFunc As LongPtr, ByVal dwInitParam As LongPtr) As Integer

Dim HookBytes(0 To 11) As Byte
Dim OriginBytes(0 To 11) As Byte
Dim pFunc As LongPtr
Dim Flag As Boolean

Private Function GetPtr(ByVal Value As LongPtr) As LongPtr
GetPtr = Value
End Function

Public Sub RecoverBytes()
If Flag Then MoveMemory ByVal pFunc, ByVal VarPtr(OriginBytes(0)), 12
End Sub

Public Function Hook() As Boolean

Dim TmpBytes(0 To 11) As Byte
Dim p As LongPtr, osi As Byte
Dim OriginProtect As LongPtr

Hook = False

#If Win64 Then
    osi = 1
#Else
    osi = 0
#End If

pFunc = GetProcAddress(GetModuleHandleA("user32.dll"), "DialogBoxParamA")

If VirtualProtect(ByVal pFunc, 12, PAGE_EXECUTE_READWRITE, OriginProtect) <> 0 Then

    MoveMemory ByVal VarPtr(TmpBytes(0)), ByVal pFunc, osi+1
    If TmpBytes(osi) <> &HB8 Then

        MoveMemory ByVal VarPtr(OriginBytes(0)), ByVal pFunc, 12

        p = GetPtr(AddressOf MyDialogBoxParam)

        If osi Then HookBytes(0) = &H48
        HookBytes(osi) = &HB8
        osi = osi + 1
        MoveMemory ByVal VarPtr(HookBytes(osi)), ByVal VarPtr(p), 4 * osi
        HookBytes(osi + 4 * osi) = &HFF
        HookBytes(osi + 4 * osi + 1) = &HE0

        MoveMemory ByVal pFunc, ByVal VarPtr(HookBytes(0)), 12
        Flag = True
        Hook = True
    End If
End If

End Function

Private Function MyDialogBoxParam(ByVal hInstance As LongPtr, _
    ByVal pTemplateName As LongPtr, ByVal hWndParent As LongPtr, _
    ByVal lpDialogFunc As LongPtr, ByVal dwInitParam As LongPtr) As Integer

If pTemplateName = 4070 Then
    MyDialogBoxParam = 1
Else
    RecoverBytes
    MyDialogBoxParam = DialogBoxParam(hInstance, pTemplateName, _
        hWndParent, lpDialogFunc, dwInitParam)
    Hook
End If

End Function


''''RUN THE CODE BELOW''''
Sub VBAUnprotected()

If Hook Then
    MsgBox "VBA Project is unprotected!", vbInformation, "*****"
End If

End Sub
This code does not remove the password but tricks the Visual Basic Editor into thinking the correct password has been entered. To remove or change the password go into the VBA Project Properties settings to change the existing settings.
Please note, the macro only works with passwords created using Excel’s standard VBA password feature. VBA projects protected with Unviewable+ (or similar software) cannot be cracked.
Conclusion
There you have it, that’s how to crack Excel passwords with VBA.
For worksheet, workbook, modify and VBA projects, there is a solution.
If you were hoping to get instructions to crack the file open password, then I’m sorry, I don’t have an easy solution. Try investigating a brute force attack method from https://www.password-find.com

About the author
Hey, I’m Mark, and I run Excel Off The Grid.
My parents tell me that at the age of 7 I declared I was going to become a qualified accountant. I was either psychic or had no imagination, as that is exactly what happened. However, it wasn’t until I was 35 that my journey really began.
In 2015, I started a new job, for which I was regularly working after 10pm. As a result, I rarely saw my children during the week. So, I started searching for the secrets to automating Excel. I discovered that by building a small number of simple tools, I could combine them together in different ways to automate nearly all my regular tasks. This meant I could work less hours (and I got pay raises!). Today, I teach these techniques to other professionals in our training program so they too can spend less time at work (and more time with their children and doing the things they love).
Do you need help adapting this post to your needs?
I’m guessing the examples in this post don’t exactly match your situation. We all use Excel differently, so it’s impossible to write a post that will meet everybody’s needs. By taking the time to understand the techniques and principles in this post (and elsewhere on this site), you should be able to adapt it to your needs.
But, if you’re still struggling you should:
- Read other blogs, or watch YouTube videos on the same topic. You will benefit much more by discovering your own solutions.
- Ask the ‘Excel Ninja’ in your office. It’s amazing what things other people know.
- Ask a question in a forum like Mr Excel, or the Microsoft Answers Community. Remember, the people on these forums are generally giving their time for free. So take care to craft your question, make sure it’s clear and concise. List all the things you’ve tried, and provide screenshots, code segments and example workbooks.
- Use Excel Rescue, who are my consultancy partner. They help by providing solutions to smaller Excel problems.
What next?
Don’t go yet, there is plenty more to learn on Excel Off The Grid. Check out the latest posts:
Макрос предназначен для программного подбора и снятия защиты с листа Excel.
Подобранный пароль не совпадает с установленным — но, тем не менее, защита снимается.
Sub Unlock_Excel_Worksheet()
    t = Timer
    If UnlockSheet(ActiveSheet) Then
        MsgBox "Защита снята. Потребовалось времени: " & Format(Timer - t, "0.0 сек.")
    Else
        MsgBox "Не удалось снять защиту листа", vbCritical
    End If
End Sub
Function UnlockSheet(ByRef sh As Worksheet) As Boolean
    Dim i%, j%, k%, l%, m%, n As Long, i1%, i2%, i3%, i4%, i5%, i6%, txt$
    On Error Resume Next
    For i = 65 To 66: For j = 65 To 66: For k = 65 To 66
    For l = 65 To 66: For m = 65 To 66: For i1 = 65 To 66
    For i2 = 65 To 66: For i3 = 65 To 66: For i4 = 65 To 66
    For i5 = 65 To 66: For i6 = 65 To 66
        txt$ = Chr(i) & Chr(j) & Chr(k) & Chr(l) & Chr(m) & Chr(i1) & Chr(i2) & Chr(i3) & Chr(i4) & Chr(i5) & Chr(i6)
        For n = 32 To 126
            sh.Unprotect txt$ & Chr(n)
            If Err Then
                Err.Clear
            Else
                Debug.Print "Пароль: " & txt$ & Chr(n)
                UnlockSheet = True
                Exit Function
            End If
        Next
    Next: Next: Next: Next: Next: Next
    Next: Next: Next: Next: Next
End Function
Аналогичный макрос снимает защиту книги Excel:
Sub Unlock_Excel_Workbook() ' снятие защиты книги Excel
    t = Timer
    If UnlockWorkbook(ActiveWorkbook) Then
        MsgBox "Защита снята. Потребовалось времени: " & Format(Timer - t, "0.0 сек.")
    Else
        MsgBox "Не удалось снять защиту книги", vbCritical
    End If
End Sub
Function UnlockWorkbook(ByRef wb As Workbook) As Boolean
    Dim i%, j%, k%, l%, m%, n As Long, i1%, i2%, i3%, i4%, i5%, i6%, txt$
    On Error Resume Next
    For i = 65 To 66: For j = 65 To 66: For k = 65 To 66
    For l = 65 To 66: For m = 65 To 66: For i1 = 65 To 66
    For i2 = 65 To 66: For i3 = 65 To 66: For i4 = 65 To 66
    For i5 = 65 To 66: For i6 = 65 To 66
        txt$ = Chr(i) & Chr(j) & Chr(k) & Chr(l) & Chr(m) & Chr(i1) & Chr(i2) & Chr(i3) & Chr(i4) & Chr(i5) & Chr(i6)
        For n = 32 To 126
            wb.Unprotect txt$ & Chr(n)
            If Err Then
                Err.Clear
            Else
                Debug.Print "Пароль: " & txt$ & Chr(n)
                UnlockWorkbook = True
                Exit Function
            End If
        Next
    Next: Next: Next: Next: Next: Next
    Next: Next: Next: Next: Next
End Function
The truth is that the code files for most macro-enabled Office documents are not encrypted and the password only prevents opening the project with Office programs.
This means that, as other answers suggested, you can usually use an Office alternative to access and edit the file.
However, if you just need access to the code, you can use a tool like oledump.py to extract the Macro code. This is useful for malware analysis, as well as getting most of the code from the file so that you don’t have to start from scratch if you forget the password.
In addition, many excel files dynamically set the password when the file is opened. This means that if you can read the code, you can usually find the password in plaintext or de-obfuscate it.
oledump.py Examples:
List all «streams» (embedded binary or code files) within an office document:
python oledump.py -v yourExcelFile.xlsm
Output:
A: xl/vbaProject.bin
 A1:      2000 'PROJECT'
 A2:      1500 'PROJECTwm'
 A3: M    1224 'VBA/Module1'
 A4: M   18694 'VBA/Module2'
 A5: M   11877 'VBA/Module3'
...
Streams with an M next to them are macros, which is unencrypted VBA code
Extract a stream
python oledump.py -s A3 -v yourExcelFile.xlsm > Module1.vba
This will output the code contained in the A3 stream to Module1.vba.
I usually combine this with a loop to extract all files to a folder. This quick PowerShell script will extract all streams in most files:
New-Item -ItemType Directory "Output"

# just hardcode the highest stream outputted by oledump.py -v
$max = 5
for ($i = 1; $i -le $max; $i++) {
    python oledump.py -s "A$i" -v yourExcelFile.xlsm > ".OutputA$i"
}
Note that this will only extract human-readable files.
Можно ли взломать мой проект Excel VBA, если код защищен утерянным или забытым паролем? И если да, то как это можно сделать? Ответ положительный. Взлом пароля Excel VBA — не сложная задача, если у вас есть подходящие инструменты. Фактически, если у вас есть правильный инструмент и методология, взломать даже сложные пароли будет довольно легко.
В этой статье мы покажем вам, как взломать пароли VBA, используя несколько простых методов. Но сначала давайте посмотрим, что такое пароль VBA в Excel.
Пароль VBA — как это работает?
VBA (Visual Basic для приложений) — это язык программирования, используемый для создания приложений Microsoft Office, таких как Excel и О компании более мощный и простой в использовании. VBA также используется для создания пользовательских приложений.
A Проект VBA можно защитить паролем для предотвращения несанкционированного доступа. Когда вы открываете проект VBA в электронной таблице Excel, вам может быть предложено ввести пароль (как показано на рисунке ниже). Если вы не введете правильный пароль, вы не сможете просматривать или редактировать код VBA.
Как взломать пароль Excel VBA
Есть несколько различных методов, которые можно использовать для взлома пароля Excel VBA. Мы подробно рассмотрим каждый из этих методов ниже.
Метод 1: использование Сброс пароля VBA
«VBA Password Reset a» — это мощный плагин для восстановления пароля Excel, который может быстро сбросить пароль на «a» из большинства проектов VBA. Этот инструмент совместим с Excel 2007 и более поздними версиями на компьютере с Windows, а также с Excel 2016 и более поздними версиями на Mac.
Excel Сброс пароля VBA После установки и включения надстройка будет доступна с ленты Excel. Чтобы удалить пароль макроса в Excel, нужно всего два действия.
Шаг 1. Откройте файл книги с запросом пароля — нажмите «Сбросить пароль VBA — a».
Шаг 2. Выберите вариант сброса пароля — здесь мы можем выбрать в меню «Снять защиту со всех листов в активной книге».

Вам будет предоставлена копия файла Excel в том же месте, где он был изначально создан, и с паролем VBA «a».
Метод 2: использование Средство удаления паролей SysTools VBA
SysTools представила приложение Windows под названием «SysTools VBA Password Remover» для Excel 97 и более поздних версий. Эта программа легко взломает пароли VBA в книгах Excel без каких-либо технических знаний.
Шаг 1. Нажмите кнопку ниже и загрузите эту программу.
Бесплатная загрузка
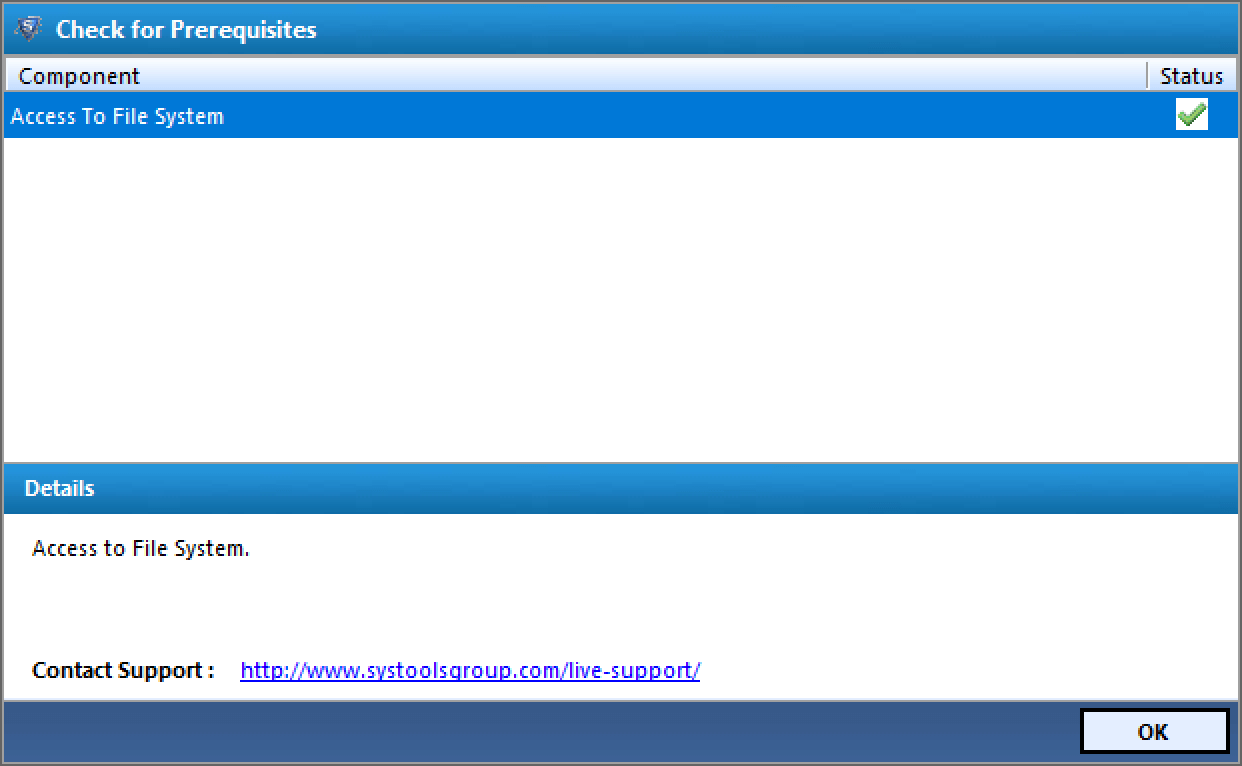
Шаг 2. После того, как вы запустили программу, вы увидите страницу с заголовком «Проверить наличие предварительных условий», на которой нам нужно нажать «ОК», чтобы продолжить.
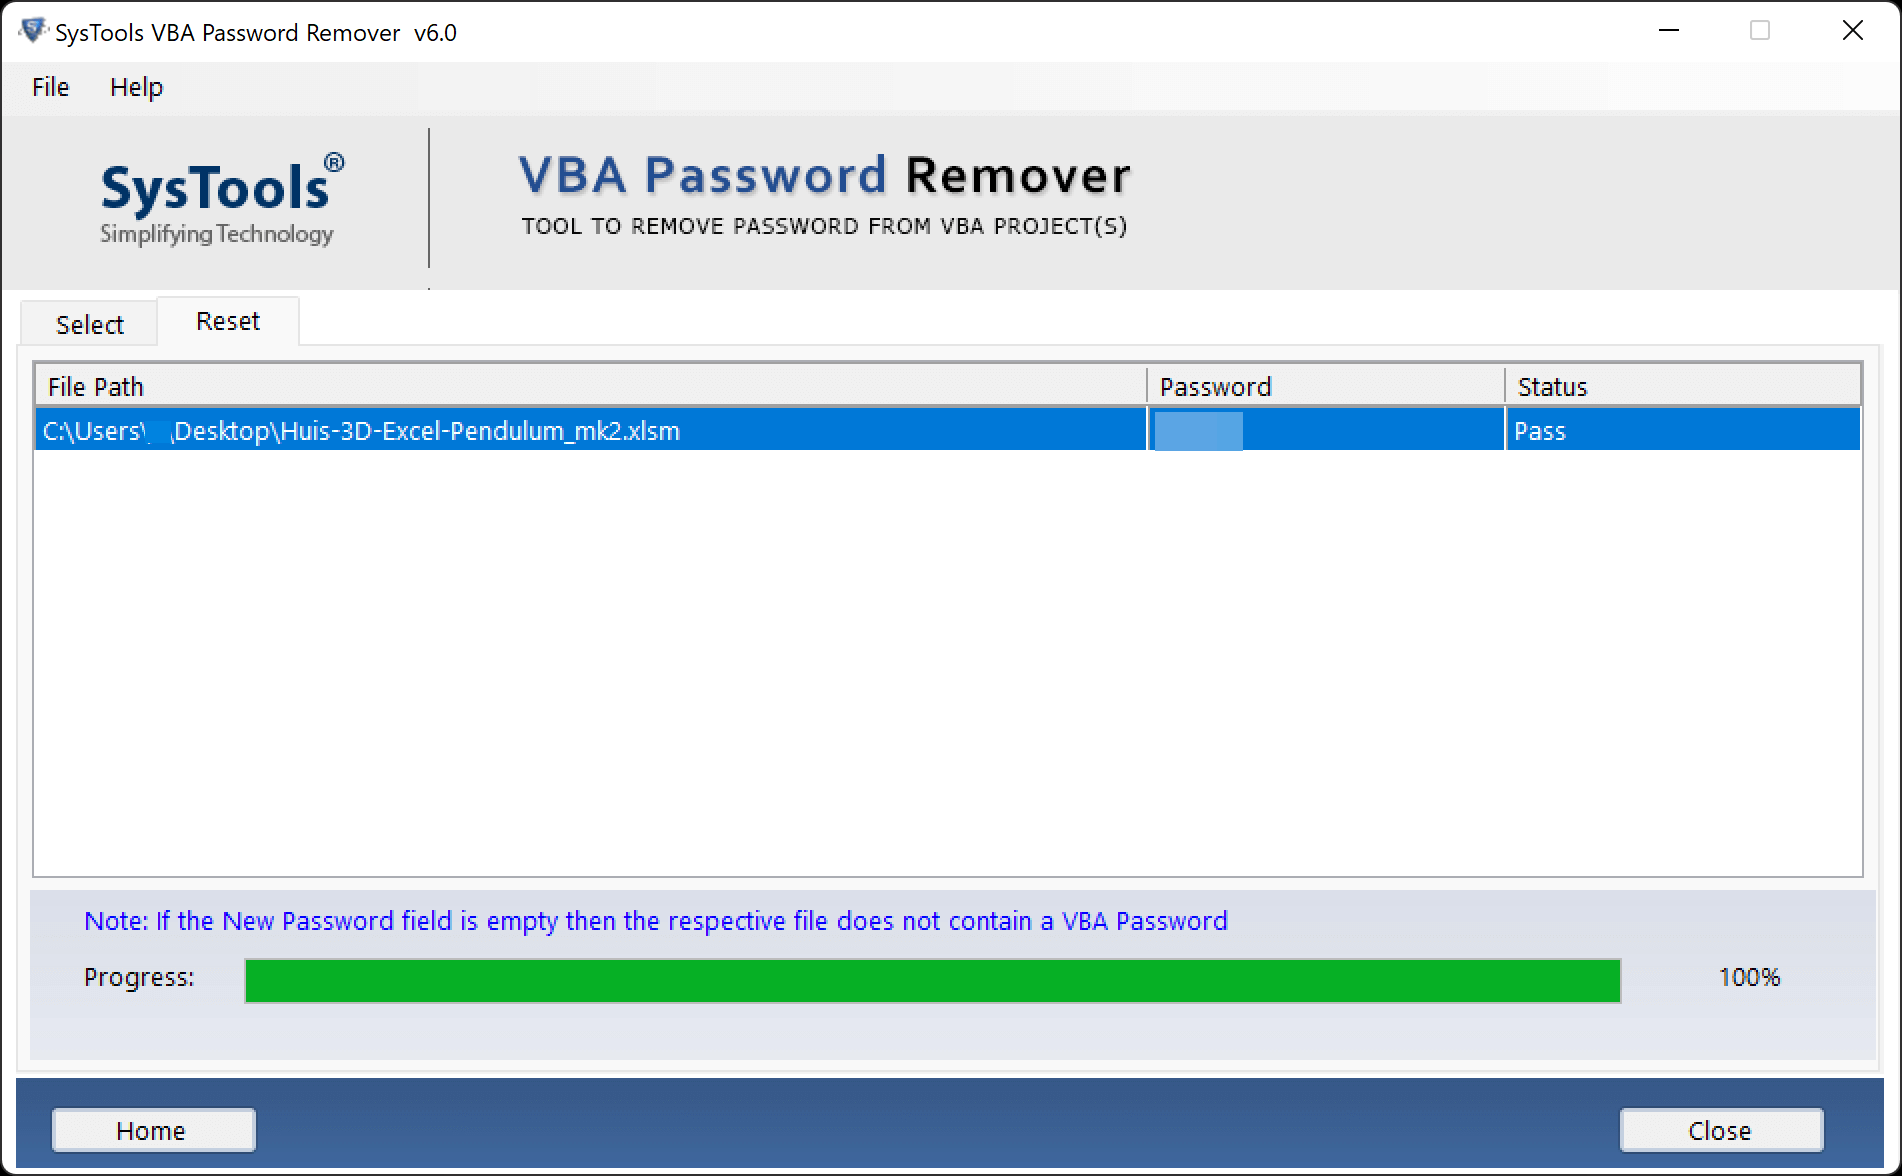
Шаг 3. Выберите книгу Excel с зашифрованным содержимым с помощью кнопки «Добавить файл (ы)». Затем нажмите «Сброс», чтобы разблокировать все коды VBA.

Шаг 4. Теперь вы можете видеть, что для этого файла был установлен новый пароль, а статус показывает «Пройдено», что означает, что это будет пароль для доступа к вашему проекту VBA.
Метод 3: изменить расширение + шестнадцатеричный редактор
Чтобы сбросить или удалить пароль из книги Excel с помощью Hex Editor, нам сначала нужно создать резервную копию файла, который был защищен паролем VBA. После того, как вы создали резервную копию файла, выполните следующие действия:
Шаг 1. Измените расширение файла Excel с «xlsm» на «zip». Это сделает файл похожим на ZIP-архив.

Для многих людей флажок «Скрыть расширения для известных типов файлов» в параметрах папки установлен по умолчанию. Если снять этот флажок, расширения будут отображаться в проводнике.

Шаг 2. Извлеките ZIP-файл с помощью такого инструмента, как WinZip или 7-Zip.
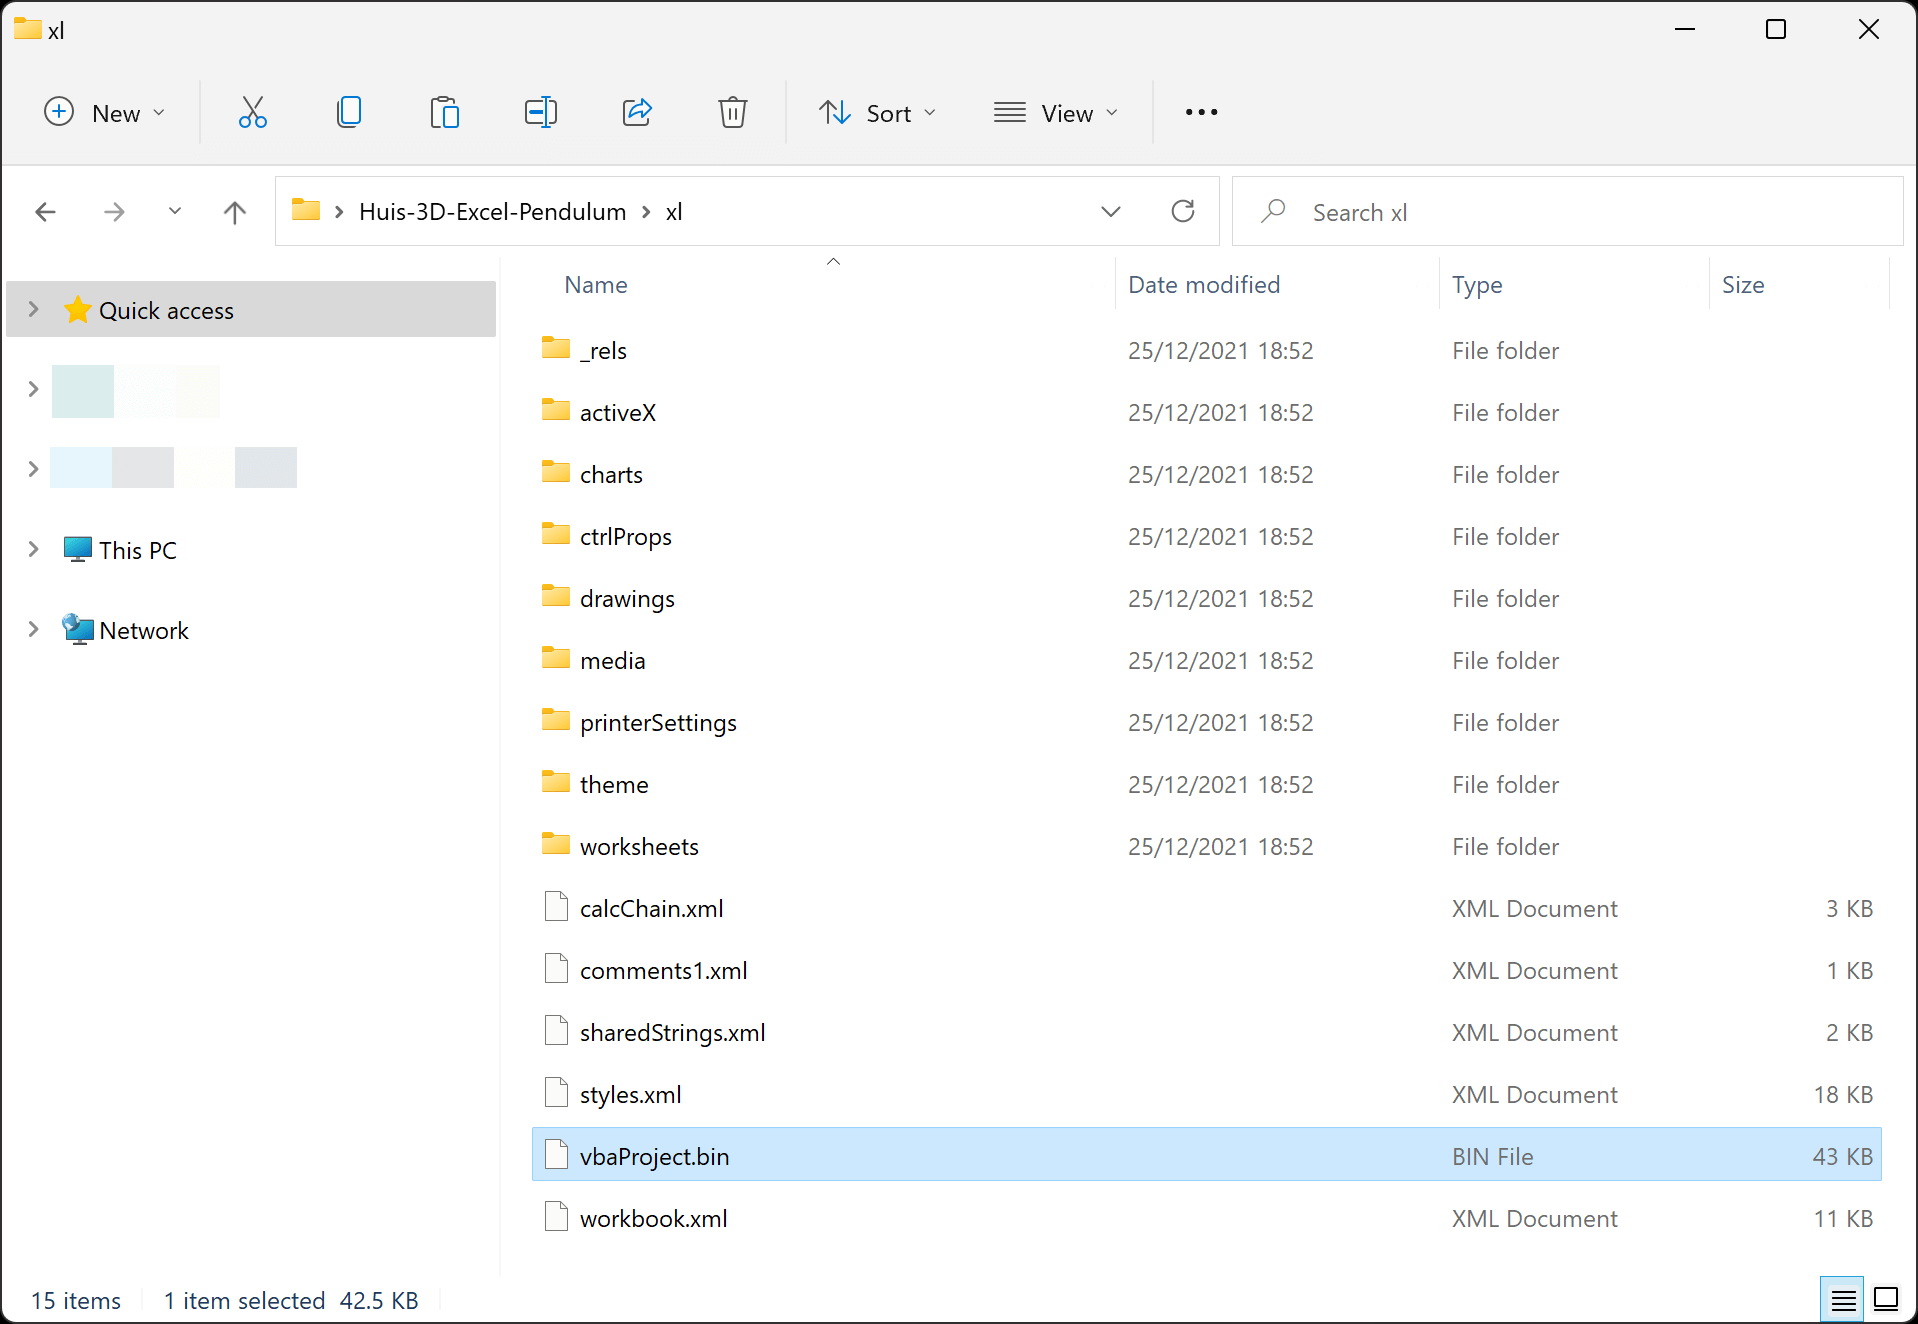
Шаг 3. Откройте распакованную папку. Внутри этого есть подпапка «xl», в которой вы можете найти файл «vbaProject.bin».
Шаг 4. Откройте файл «vbaProject.bin» с помощью шестнадцатеричного редактора, например HxD.
Шаг 5. Найдите в файле «DPB».

Шаг 6. Теперь измените «DPB» на «DPx». Сохраните изменения и выйдите.
Только «B» следует заменить на «x», и не удаляйте знак равенства по ошибке.

Шаг 7. Сожмите все папки и файлы в ZIP-архив.
Шаг 8. Измените расширение с «zip» на «xlsm», а затем откройте его.
Шаг 9. Итак, вы находитесь в файле xlsm. Первое, что может произойти, — это выскакивать много ошибок, но не волнуйтесь: просто нажмите «Да», чтобы закрыть их.
Откройте редактор VB, щелкнув «Разработчик», затем «Visual Basic». Затем в разделе «Инструменты»> «Свойства VBAProject» снимите флажок «Заблокировать проект для просмотра».
Шаг 10. Закройте редактор и сохраните файл Excel. Возможно, вам будет предложено сохранить в другом месте как новый файл.
Шаг 11. Откройте новый файл. Теперь ваш код VBA будет виден без ввода пароля!
* Мы протестировали этот метод на файле Excel 2007.
Заключение
Пароль VBA использовался многими разработчиками, чтобы защитить свой код от просмотра или редактирования другими людьми, которые воспользуются им не по назначению. В большинстве случаев это хороший метод, но если вы забыли свой пароль Excel VBA и вам нужно увидеть код своего проекта, указанные выше методы помогут вам.
В этой статье мы рассмотрели три способа получить доступ к своему проекту VBA без пароля. Если вы хотите использовать надстройка или скачать программа для удаления паролей от SysTools, это не займет много времени, прежде чем ваш файл снова откроется и станет доступен для редактирования.
Перейти к содержимому
В данной статье описаны несколько способов разблокировки (снятия защиты, пароля) в запароленном файле «Эксель» и приведен макрос подбора пароля к файлу.
Категорически рекомендую использовать данные способы для разблокировки и снятия защиты только со своих собственных файлов, когда забыли (запамятовали) пароль и ни в коем случае не применять данные способы для взлома паролей защиты на чужих файлах не принадлежащих Вам.
Способ номер 1. Использование бесплатной офисной программы Open Office Calc
Это один из самых простых способов снятия забытого пароля с файла.
Что нужно делать:
- Скачать и установить бесплатную программу Open Office.
- Открыть запароленный файл в программе Open Office Calc.
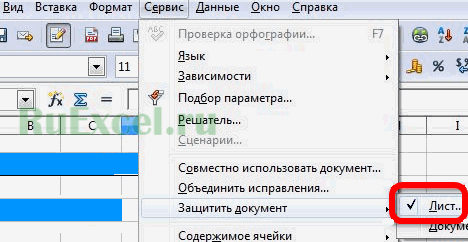
- Перейти во вкладку «Сервис»
- Далее выбрать пункт «Защитить документ»
- Снять флажок (галочку) с пункта с названием защищенного листа.

Снять пароль в Open Office - Пароль с файла будет снят.
- Теперь остается только сохранить незапароленный файл и открыть его в «Excel», при необходимости.
Способ номер 2. Использование программы-архиватора для снятия пароля с листа «Excel»
Что нужно делать:
- Установить программу для открытия архивов и архивирования документов, если таковая не установлена на Вашем ПК. Например WinRar или 7Zip ;

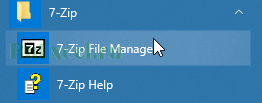
7Zip man - Запустить программу архиватор ;
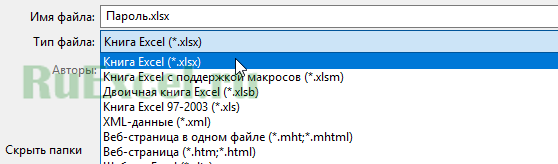
- Сохранить защищенный файл в формате .xlsx ;

Сохранить как xlsx - Открыть защищенный документ в этой программе, как архив ;
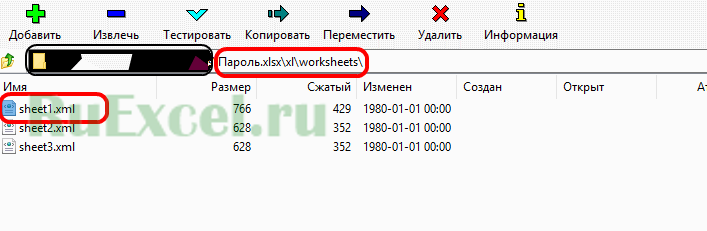
- Далее перейти в папку архива Название файла.xlsxxlworksheets ;

Снятие пароля через архив - Открыть интересующий вас лист для редактирования ;
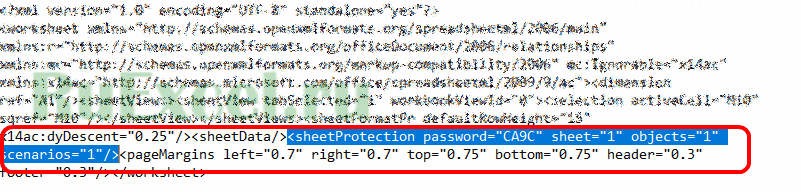
- Найдите фрагмент кода начинающийся с «<sheetProtection password=» и заканчивающийся «/>». Удалите его ;

Удаление строки с паролем - Сохраните архив с измененным файлом ;
- Закройте программу-архиватор и откройте файл в «Excel» ;
- Защита листа снята.
Способ номер 3. Макрос VBA «Excel» для подбора пароля и снятия защиты листа.
Этот способ немного сложнее, так как от Вас потребуются хотя бы начальные знания в написании макросов «Excel».
Как пишется простейший макрос в «Excel» Вы можете посмотреть на странице сайта по ссылке:
Как написать простой макрос в программе Excel
Если вы знакомы с написанием макросов VBA , то для разблокировки файла защищенного паролем Вам следует выполнить следующие действия:
- Открыть редактор макросов во вкладке разработчик.
- Записать следующий код макроса:
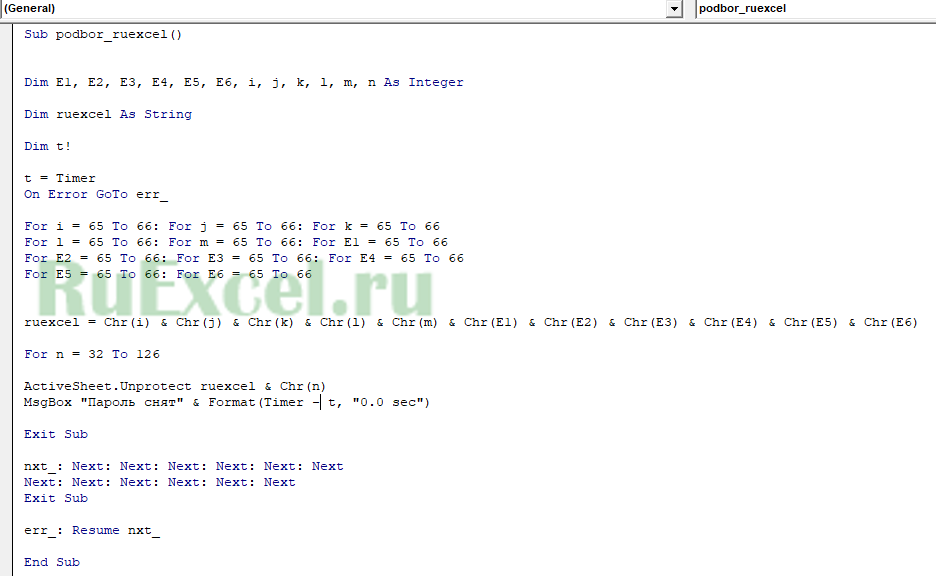
- Sub podbor_ruexcel()
- Dim E1, E2, E3, E4, E5, E6, i, j, k, l, m, n As Integer
- Dim ruexcel As String
- Dim t!
- t = Timer
- On Error GoTo err_
- For i = 65 To 66: For j = 65 To 66: For k = 65 To 66
- For l = 65 To 66: For m = 65 To 66: For E1 = 65 To 66
- For E2 = 65 To 66: For E3 = 65 To 66: For E4 = 65 To 66
- For E5 = 65 To 66: For E6 = 65 To 66
- ruexcel = Chr(i) & Chr(j) & Chr(k) & Chr(l) & Chr(m) & Chr(E1) & Chr(E2) & Chr(E3) & Chr(E4) & Chr(E5) & Chr(E6)
- For n = 32 To 126
- Unprotect ruexcel & Chr(n)
- MsgBox «Пароль снят » & Format(Timer — t, «0.0 sec»)
- Exit Sub
- nxt_: Next: Next: Next: Next: Next: Next
- Next: Next: Next: Next: Next: Next
- Exit Sub
- err_: Resume nxt_
- End Sub
- Запустить полученный макрос.
- После выполнения макроса пароль с листа «Excel» будет снят.
Результат редактирования макроса: