
I took your file, and made a macro for you:
Sub LongWidth()
'
' LongWidth Macro
'
'
    With Selection.PageSetup
        .Orientation = wdOrientLandscape
        .TopMargin = InchesToPoints(0.5)
        .BottomMargin = InchesToPoints(0.5)
        .LeftMargin = InchesToPoints(0.5)
        .RightMargin = InchesToPoints(0.5)
        .Gutter = InchesToPoints(0)
        .HeaderDistance = InchesToPoints(0.5)
        .FooterDistance = InchesToPoints(0.5)
        .PageWidth = InchesToPoints(8.5)
        .PageHeight = InchesToPoints(11)
        .GutterPos = wdGutterPosLeft
    End With
    Selection.WholeStory
    Selection.Font.Size = 7
    ActiveDocument.ExportAsFixedFormat OutputFileName:= _
        "C:PathToFolderfoo.pdf", ExportFormat:=wdExportFormatPDF, _
        OpenAfterExport:=True, OptimizeFor:=wdExportOptimizeForPrint, Range:= _
        wdExportAllDocument, From:=1, To:=1, Item:=wdExportDocumentContent, _
        IncludeDocProps:=True, KeepIRM:=True, CreateBookmarks:= _
        wdExportCreateNoBookmarks, DocStructureTags:=True, BitmapMissingFonts:= _
        True, UseISO19005_1:=False
End Sub
So what this does is first sets the page to landscape mode with narrow margins. Then I selected all the text and set the font to 7. Then I exported the document as a PDF.
If you have users looking to view this on an iPhone or something, I would look into automating Word to convert all these files into a PDF in an automated process. Joel Spolsky wrote an article long ago on this process. A lot has changed, but these concepts are still valid.
Whether you’re a one-person business operating out of your kitchen, or a billion-dollar company on Wall Street, the expectation is the same. Your business documents must be the paragon of professionalism and competence.


This expectation shouldn’t be a cause for worry. With applications like Microsoft Word you can create professional-looking documents with your own computer. Through the years, Word has become more powerful, yet more intuitive. Anyone with basic computer skills can use Word to create well-designed documents.
In this article, you’ll learn how to format text in Word to make your business documents easier to read and understand. You’ll also pick up tips on how to make sure your formatting doesn’t look amateurish—even if you’re getting started with Word.
Formatting Text in Word
Formatting text in Microsoft Word refers to controlling how text appears in your document. This includes the size, color, and font of the text. It also covers text alignment, spacing, and letter case.
Microsoft Word styles make it easy to change and apply styles throughout a document. A “style” is a set of formatting settings applied to a specific kind of text.
For example, you can set up a style for headings that’s bold, 14 points, aligned left, and uses the Tahoma font. This means all text in your document with the heading style will be formatted the same way. You don’t have to manually format each heading in your document.
In this post, you’ll see how to use MS Word styles.
How to Format Text in Word
To show you how to format text in Word, we’ll walk through formatting a completely unformatted business document file.
This is what my marketing report looks like without any formatting in Word:


As you can see, it’s plain and boring. Nobody would be inspired to read it, let alone act on the findings of the report!
Some basic Word text formatting can fix that.
1. How to Apply Typographic Emphasis
1. For starters, let’s use typographic emphasis (bold, italic, underline) to make the report title stand out.
To do this, select the text you want to emphasize. Click on the bold button on the Microsoft Word ribbon.


Note that the ribbon also has the buttons to apply italic, underline, strikethrough, and other formatting effects for text. Follow the same steps to apply those effects.
2. Now, let’s change the font, font size, and color of the title.
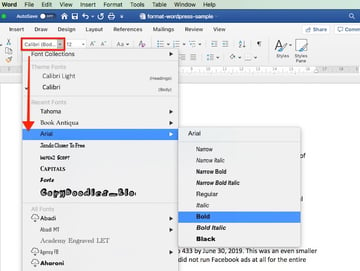
Again, select the text. Click the drop-down arrow on the font section of the ribbon, then select the font you want to apply. In this case, I’m using Arial bold.


3. To change the font size, highlight the text. Click the drop-down arrow on the font size indicator on the ribbon. Click on the font size of your choice.


Or, after highlighting the text, you can type the font size into the font size indicator on the ribbon. This is especially useful when the font size you want isn’t available in the font size selector.


4. You can also use the Increase Font Size or Decrease Font Size buttons on the ribbon to quickly change the font size.


5. We can easily change the font color as well.
Highlight the text, then click the down arrow beside the Font Color selector. Click on the color of your choice.


Choose More Colors… if you wish to apply a custom color.
2. How to Change Capitalization in Word
Microsoft Word also allows you to easily and quickly change the capitalization of your text. For example, if we want to make the title all uppercase, we don’t have to retype it.
Highlight the title, then click the Change Case button on the ribbon.


Or, highlight the text, go to Format > Change Case…


… then click on the radio button for the case you want to apply. Click OK.


Now the title is looking much better. It’s the most prominent part of the document and commands the reader’s attention. However, we can still improve its readability.
3. How to Format Paragraphs
One way to make your document easier to read is by increasing white space around lines and paragraphs.
1. To adjust the line spacing, select the text. Click on the arrow on the Line and Paragraph Spacing button. Select the line spacing you wish to apply.


2. To change the spacing around a paragraph, select the paragraph. Click on the arrow on the Line and Paragraph Spacing button > Line Spacing Options…. Then, type the amount of spacing before and after the paragraph. (Tip: You can adjust other settings from this dialog box as well.)
For the title, I’ll add a generous amount of space after the paragraph, to set it apart from the rest of the document.


3. Finally, let’s change the alignment of the title. Select the text, click on either the Align Left, Center Text, Align Right, or Justify button on the ribbon. Since this is a title, let’s use Center Text.


These simple formatting effects make the title stand out from the rest of the document.
4. How to Work With MS Word Styles
As much as Word makes it easy to format text, if you need to apply formatting effects on the entire document, the process becomes tedious.
Word solves that through styles. MS Word Styles allow you to define a set of formatting commands and apply them automatically to every item in the document with that style.
Let’s look at a specific example:
1. How to Modify a Paragraph Style
Let’s follow the steps above to define a style for the main headings of the report with the following characteristics:
- Font: Arial
- Size: 14 points
- Color: Blue-grey
- Typographic Emphasis: Bold
- Case: Capitalize each word
- Alignment: Left
- Line spacing: Single
- Paragraph spacing: 6 pts before paragraph, 0 pts after paragraph
It would look like this:


One way to apply this exact formatting on every main heading is to modify the existing Heading 1 style in our document. Place your cursor anywhere in the main heading. Go to Styles, right-click on Heading 1, then choose Update Heading 1 to Match Selection.


You can also modify any style by going to Format > Style…. The Style dialog box opens.


Select the style you want to modify from the Style list. This gives you a preview of the paragraph and character, as well as a description of the current style settings of the selected style.
Click Modify…. The Modify Style dialog box pops up.


Change the text and paragraph format settings. You can control the font, font size, font color, typographic emphasis, alignment, and spacing. When you’re done, click OK.
2. How to Apply a Paragraph Style
Now, go to each main heading in the document and apply the Heading 1 style to it. Place the cursor on a heading, go to Styles > Heading 1.


The selected text instantly takes on the formatting of Heading 1.


3. How to Create a List Paragraph Style
You can also create a new paragraph style from scratch, instead of modifying an existing one. To demonstrate, let’s create a list-type paragraph style.
1. Go to Format > Style…. Fill in the Properties section of the dialog box that opens. For Style based on, you may wish to use one of the pre-existing list styles as a starting point.


2. Next, change the formatting options. The box below gives you a preview of what the list paragraph would look like with those settings. There’s also a summary of the formatting properties you’ve specified.


You also have the option to do the following for this style:
- Add to template. Adds the style you’re creating to the document template.
- Add to Quick Style list. Shows the new style to the Quick Style list, making it quickly accessible from the ribbon.
- Automatically update. Automatically updates the style when you manually format a paragraph with that style.
When you’re happy with the settings you’ve made, click OK. Notice how the new Bullet style you created is now included in the Quick Style popup.


Once the bullet style is applied, our list now looks like this:


4. How to Use Character Styles in Microsoft Word
You can also define a style to an individual word or a block of text, rather than a paragraph. In the next example, I’d like to apply a character style for every URL in the document.
1. Select the text. Then, go to Format > Styles…. From the Style dialog, click New…. The Create New Style from Formatting dialog opens.


2. Give the new character style a name. For Style type, choose Character. Then, make the formatting settings you want to apply to this character. Note that you can’t change alignment and spacing for a character style. The preview box shows you a sneak peek of the text based on the settings you specified.


3. When you’re done, click OK.


To apply the character style, place your cursor in a word or select a set of words. Go to Format > Style…. Find the character style you wish to apply. Click Apply.


Tip: To quickly find the MS Word styles you’ve created, for List, choose User-defined styles.
5. How to Use Table Styles in Word
We can also define a table style to provide a consistent look to the tables in our document.
1. Create the table. Go to Insert > Table…, then indicate the number of columns and rows you need in your table (you can always add or remove these later). Click OK.


2. Add your text to the table. If necessary, click and drag any of the borderlines to adjust the width or a column, or the height of a row.
3. To apply a table style, click anywhere on the table, then go to Table Design. The Table Design ribbon appears.


4. Click on the down-arrow for table styles to display the table styles gallery.


5. Click on any style to apply it to your table.


Expand the table styles gallery again to change the existing style, clear the style you applied, or create your own table style.
Discover Great Microsoft Word Templates for 2020
Some experts say it’s a good idea to set up your formatting styles in Word first before typing or copying the text into the document. One quick way to do this is by starting with a Microsoft Word template. Templates come pre-formatted by professional designers to look current and impressive.
You can find thousands of Word templates for all kinds of business documents in Envato Elements.


For a small monthly subscription fee, you get unlimited downloads of all the templates at Elements. You also have unlimited access to everything else in the Elements catalog:
- presentation templates
- web templates
- fonts
- photos
- graphics
- other digital assets
Use as many of these assets as you want, as often as you want, without paying more. This makes Elements a terrific source for all the creative assets you need to create remarkable marketing and communication materials.
You can also pay as you go at GraphicRiver. This marketplace also offers a huge library of templates for Microsoft Word and other digital assets for all your marketing and communication needs. The difference is, you only pay each time you use an item. This can be a very economical option.
Below are some of the best print templates for Word available on Envato Elements and GraphicRiver:
After downloading any of these Microsoft Word templates, you can apply what you’ve learned about formatting text in Word. This way, you can personalize the template so that it aligns with your visual branding and preferences. You now know how to take any Word template and make it your own!
5 Top FAQs on Formatting Text in Microsoft Word
Below are some of the questions that come up as people format text in Word.
1. How Do You Make a Word Document Easier for the Reader to Scan?
Your primary goal when formatting text in Word is to make it easy for people to scan, read, and understand the content of the document. The different formatting options in Word help you achieve this:
- Use typographic emphasis like bold, italics, and underline to emphasize specific text and add variety to your document.
- Break up the document into sections with headings and sub-headings to help the reader scan and navigate their way through it.
- Use either bulleted or numbered lists where appropriate to shorten paragraphs and make lists easier to comprehend.
- Set up line and paragraph spacing so that there’s plenty of white spaces throughout the document.
2. How Many Fonts Should I Use in a Word Document?
It’s easy—and fun—to apply different fonts in Word. Too easy, in fact, that you could end up overwhelming your reader and making your document look like someone played with the formatting.
Avoid this by sticking to a maximum of two different fonts in a single document. For instance, you could choose a sans serif font for your title and headings, and a serif font for all other text. You could even use one font for the entire document, relying on typographical emphasis and color to distinguish different types of text from each other.
3. Why Should I Use Microsoft Word Text Styles?
Use Microsoft Word text styles because they let you apply formatting settings globally throughout your document. This is important in long documents, where formatting each line or paragraph is too onerous. With text styles, you only need to determine what style you want for each piece of text. Word will do the rest.
4. How Can I Make My Document Formatting Consistent?
Using MS Word styles, as you’ve learned in this article, is an easy way to make your document formatting consistent. You decide and set how you want each type of text to be formatted. Then you can apply those styles consistently through your entire document.
Beyond Microsoft Word styles, also make sure that the recurring parts of your document are consistent as well. These include your headers and footers, for example. You must also be consistent with the placement of images: Do they have borders? Are they always within the document’s margins or do they bleed to the edge of the page?
When you use a Word template, these design decisions are already made for you. So, if you want a consistent design without all the hard work, then starting with a template for Word is the way to go.
5. How do You Copy text into Word without also copying junk code?
When you copy text from one application and paste it into Word, you run the risk of also copying the underlying formatting code for it. This code or set of formatting commands is invisible so you won’t know you’re copying it inadvertently. This can mess up your formatting in Word. Soon, you’ll be pulling your hair wondering why Word won’t “follow” your commands.
To avoid this grief, make sure you strip all formatting when you copy and paste the text into Word. Here’s how: Copy the text. In Word, click Edit > Paste and Match Style.


That’s all there is to it!
Using Microsoft Word, Style Your Business Document for Maximum Impact
You’ve learned how to format a document in Word to make it easier to scan and read. Good formatting is also essential to make sure the final document represents you and your business in a favorable light.
You’ve seen how doable formatting is, even if you’re starting from scratch with completely unformatted text. You’ve also discovered that you can rely on professional designers to make the formatting decisions for you by starting with a template for Word.
For unlimited downloads of print templates for Word at a fixed subscription fee, look to Envato Elements. Here, you can also have your fill of fonts, icons, photos, and other design assets you’ll need without having to pay more. Or, get your premium Word templates from GraphicRiver on a pay-per-use basis. You also get a wide range of choices without having to commit to a subscription.
With Microsoft Word styles and formatting tools, there’s no more excuse to have poorly designed business documents. Make your next business document one you’ll be proud of.
Содержание
- Выбор шрифта и типа написания текста
- Выделение заголовка
- Выравнивание текста
- Изменение интервалов
- Добавление маркированных и нумерованных списков
- Дополнительные операции
- Вопросы и ответы
![]()
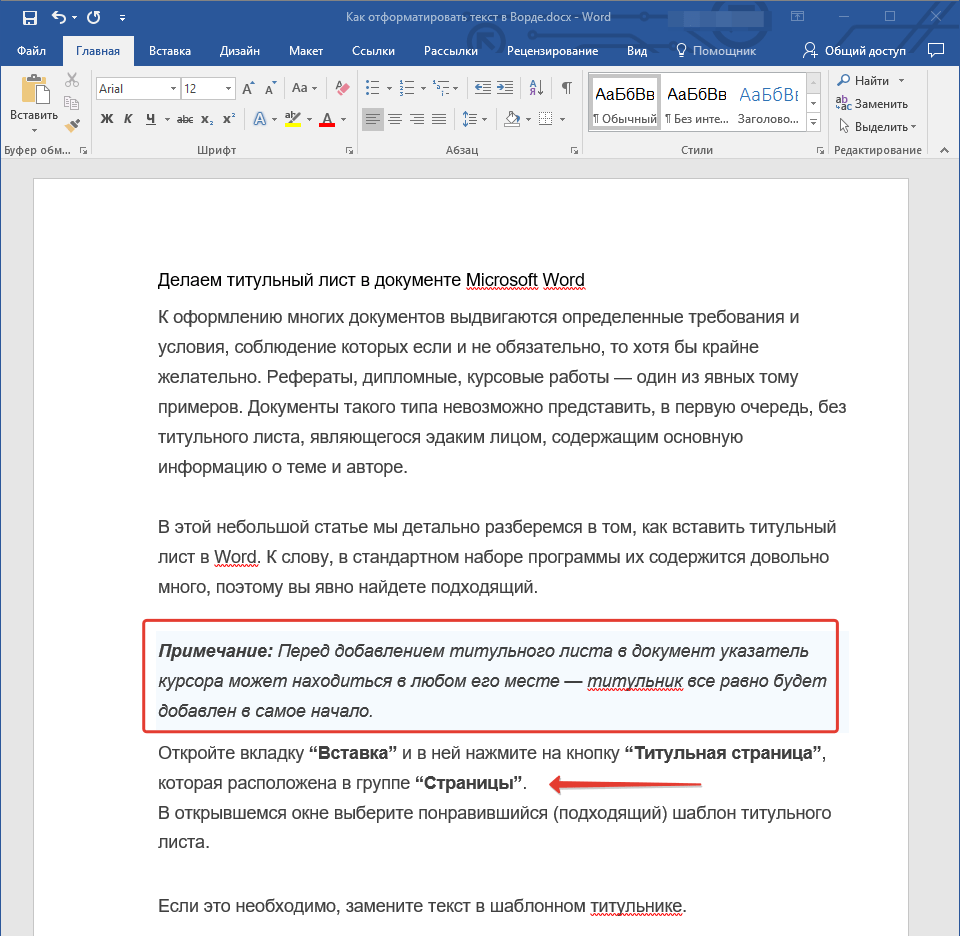
Мы уже неоднократно писали об инструментах для работы с текстом в MS Word, о тонкостях его оформления, изменения и редактирования. О каждой из этих функций мы рассказывали в отдельных статьях, вот только для того, чтобы сделать текст более привлекательным, удобным для чтения, понадобится большинство из них, причем, выполненных в правильном порядке.
Урок: Как добавить новый шрифт в Ворд
Именно о том, как правильно выполнить форматирование текста в документе Microsoft Word и пойдет речь в данной статье.
Выбор шрифта и типа написания текста
О том, как изменять шрифты в Ворде мы уже писали. Вероятнее всего, вы изначально набирали текст в понравившемся шрифте, выбрав подходящий размер. Более подробно о том, как работать со шрифтами, вы можете узнать в нашей статье.
Урок: Как изменить шрифт в Word

Выбрав подходящий шрифт для основного текста (заголовки и подзаголовки пока что не торопитесь изменять), пройдитесь по всему тексту. Возможно, некоторые есть фрагменты нужно выделить курсивом или полужирным шрифтом, что-то нужно подчеркнуть. Вот пример того, как может выглядеть статья на нашем сайте.
Урок: Как подчеркнуть текст в Ворде
Выделение заголовка
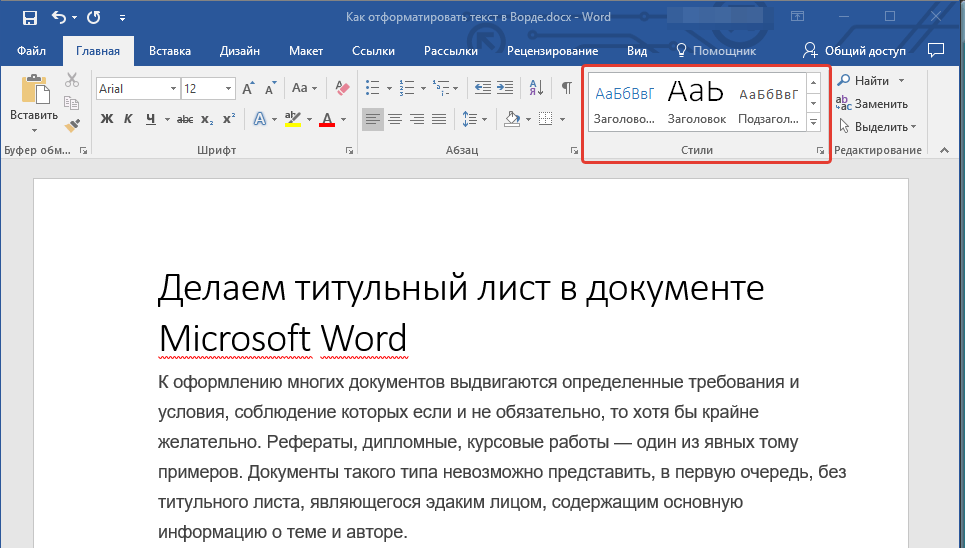
С вероятностью в 99,9% у статьи, которую вы хотите отформатировать, есть заголовок, и, скорее всего, подзаголовки в ней тоже имеются. Конечно же, их нужно отделить от основного текста. Сделать это можно с помощью встроенных стилей Word, а более подробно с тем, как работать с этими инструментами, вы можете ознакомиться в нашей статье.
Урок: Как сделать заголовок в Ворде
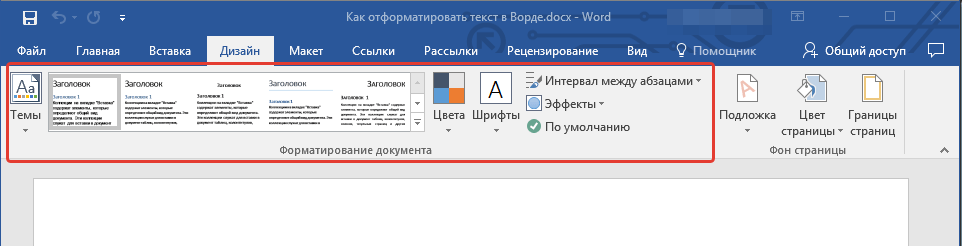
Если вы используете последнюю версию MS Word, дополнительные стили для оформления документа вы можете найти во вкладке “Дизайн” в группе с говорящим названием “Форматирование текста”.

Выравнивание текста
По умолчанию текст в документе выравнивается по левому краю. Однако, если это необходимо, вы можете изменить выравнивание всего текста или отдельно выделенного фрагмента так, как вам это необходимо, выбрав один из подходящих вариантов:
Урок: Как выровнять текст в Ворде
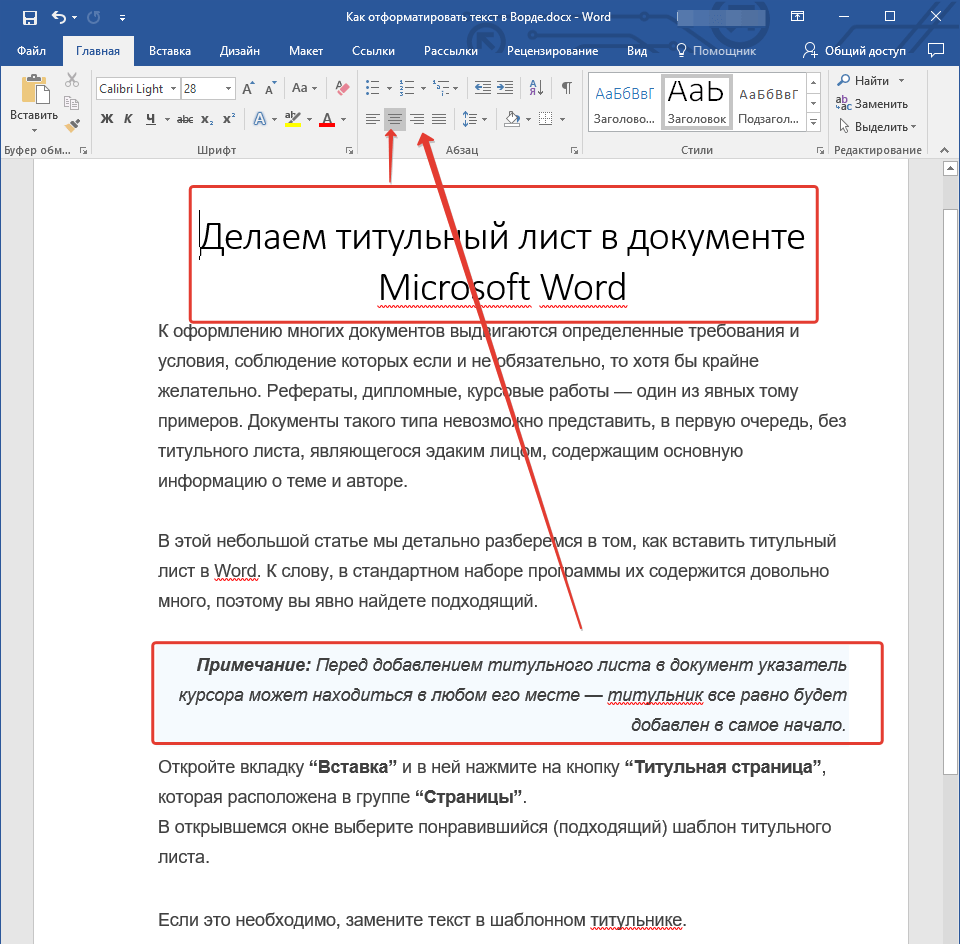
Инструкция, представленная на нашем сайте, поможет вам правильно расположить текст на страницах документа. Выделенные красным прямоугольником фрагменты текста на скриншоте и связанные с ними стрелки показывают, какой стиль выравнивания выбран для данных частей документа. Остальное содержимое файла выровнено по стандарту, то есть, по левому краю.
Изменение интервалов
Расстояние между строчками в MS Word по умолчанию составляет 1,15, однако, его всегда можно изменить на большее или меньшее (шаблонное), а также вручную задать любое подходящее значение. Более подробную инструкцию касательно того, как работать с интервалами, изменять и настраивать их вы найдете в нашей статье.
Урок: Как изменить межстрочный интервал в Ворде

Помимо интервала между строками, в Word также можно изменить и расстояние между абзацами, причем, как до них, так и после. Опять-таки, вы можете выбрать шаблонное значение, которое вас устраивает, или задать собственное вручную.
Урок: Как изменить интервал между абзацами в Ворде
Примечание: Если заголовок и подзаголовки, которые имеются в вашем текстовом документе, оформлены с помощью одного из встроенных стилей, интервал определенного размера между ними и следующими абзацами задается автоматически, а зависит он от выбранного стиля оформления.
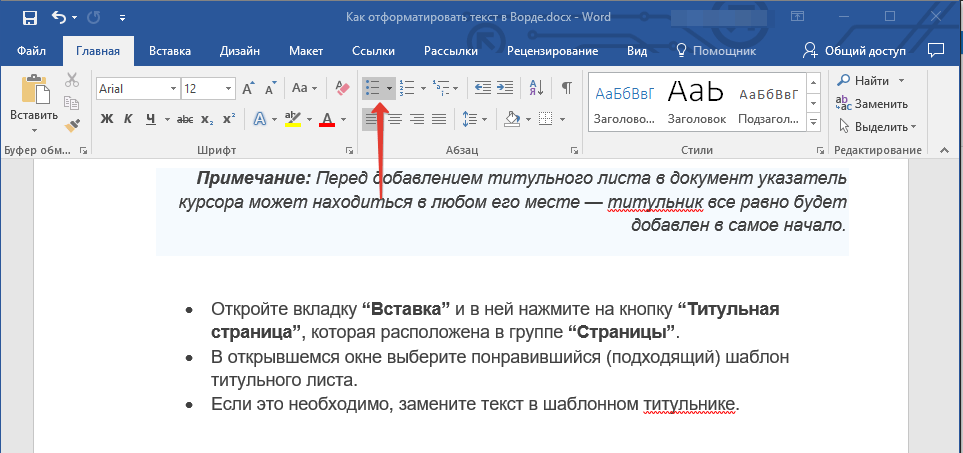
Добавление маркированных и нумерованных списков
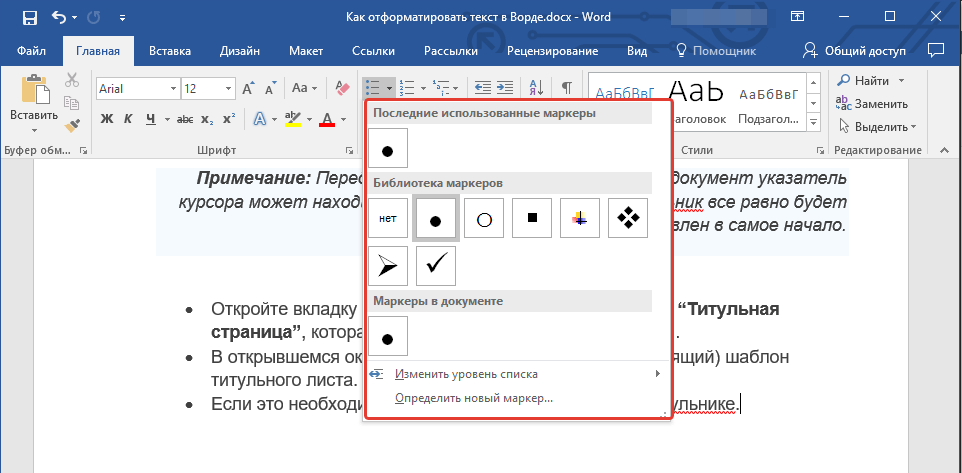
Если в вашем документе содержатся списки, незачем нумеровать или уж тем более маркировать их вручную. В Microsoft Word для этих целей предусмотрены специальных инструменты. Они, как и средства для работы с интервалами, расположены в группе “Абзац”, вкладка “Главная”.

1. Выделите фрагмент текста, который необходимо преобразовать в маркированный или нумерованный список.

2. Нажмите одну из кнопок (“Маркеры” или “Нумерация”) на панели управления в группе “Абзац”.
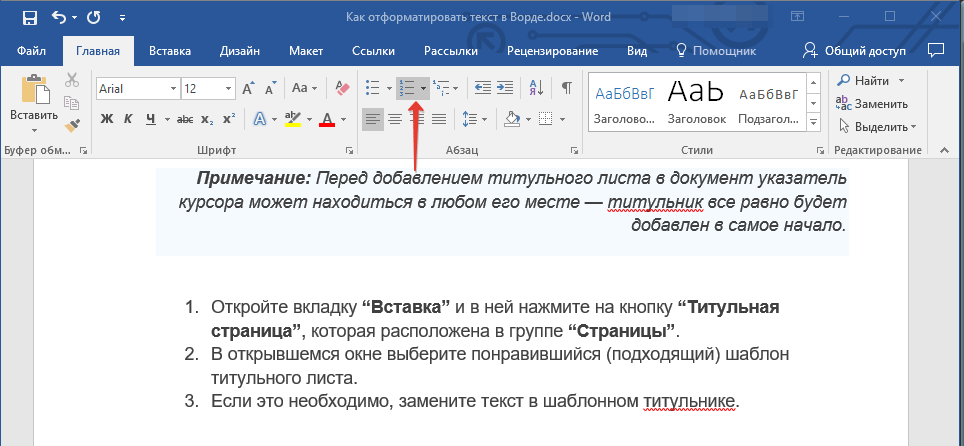
3. Выделенный фрагмент текста преобразуется в красивый маркированный или нумерованный список, в зависимости от того, какой из инструментов вы выбрали.
- Совет: Если развернуть меню кнопок, отвечающих за списки (для этого нужно нажать на небольшую стрелочку справа от значка), вы можете увидеть дополнительные стили оформления списков.
Урок: Как в Ворде сделать список в алфавитном порядке
Дополнительные операции
В большинстве случаев того, что мы уже описали в данной статье и остальном материале по теме форматирования текста более, чем достаточно для оформления документов на должном уровне. Если же вам этого будет мало, либо же вы просто пожелаете внести какие-то дополнительные изменения, коррективы и т. д. в документ, с большой вероятность, вам будут очень полезны следующие статьи:
Уроки по работе с Microsoft Word:
Как сделать отступы
Как сделать титульный лист
Как пронумеровать страницы
Как сделать красную строку
Как сделать автоматическое содержание
Табуляция
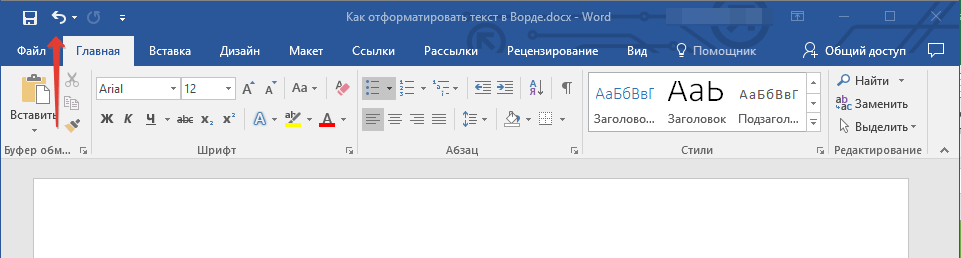
- Совет: Если во время оформления документа, при выполнении той или иной операции по его форматированию, вы допустили ошибку, ее всегда можно исправить, то есть, отменить. Для этого просто нажмите на закругленную стрелку (направленную влево), расположенную возле кнопки “Сохранить”. Также, для отмены любого действия в Ворде, будь то форматирование текста или любая другая операция, можно использовать комбинацию клавиш “CTRL+Z”.
Урок: Горячие клавиши в Word
На этом мы смело можем закончить. Теперь вы точно знаете, как отформатировать текст в Ворде, сделав его не просто привлекательным, а хорошо читабельным, оформленным в соответствии с выдвигаемыми требованиями.
Содержание
- — Как включить форматирование в ворде?
- — Как сохранить форматирование в ворде?
- — Как скопировать страницу в ворде с сохранением форматирования?
- — Как скопировать текст без изменений?
- — Как сделать стиль в ворде по умолчанию?
- — Как сделать табуляцию в ворде?
- — Как в ворде оставить только текст?
- — Как применить форматирование одного документа к другому?
- — Как скопировать условное форматирование Гугл таблицы?
- — Как в Ворде вставить лист из другого документа?
- — Как скопировать и вставить страницу в ворде?
- — Как сохранить только одну страницу в ворде?
- — Как вставить текст без форматирования горячие клавиши?
- — Как скопировать только текст?
- — Как скопировать текст и вставить его?
Найдите в списке стиль, который необходимо изменить, и наведите на него указатель мыши. Нажмите стрелку вниз и в выпадающем списке выберите Изменить (Modify). В диалоговом окне Изменение стиля (Modify Style) настройте нужные параметры форматирования.
Как включить форматирование в ворде?
Вы можете использовать параметры форматирования на вкладке Главная.
- Изменение шрифта: выделите фрагмент текста, а затем нажмите поле «Название шрифта». …
- Изменение размера шрифта: выделите фрагмент текста, нажмите поле «Размер шрифта» и выберите нужный вариант из раскрывающегося списка.
Как сохранить форматирование в ворде?
По умолчанию Word сохраняет исходное форматирование при вклеии содержимого в документ с помощью клавиш CTRL+V, кнопки «Вировать» или щелчка правой кнопкой мыши + Вп.
Как скопировать страницу в ворде с сохранением форматирования?
Поместите курсор в то место новой страницы, в котором должен быть текст. Нажмите клавиши CTRL+V, чтобы вставить скопированный текст. Примечание: При этом вы можете сохранить форматирование или вставить только текст. Для выбора параметров используйте меню Параметры вставки, которое выводится под скопированным текстом.
Как скопировать текст без изменений?
Чтобы вставить без форматирования, нажмите Ctrl+Shift+V вместо Ctrl+V. Это работает в самых разных приложениях, включая веб-браузеры, такие как Google Chrome. Это сочетание клавиш должно работать на Windows, Chrome OS и Linux.
Как сделать стиль в ворде по умолчанию?
Изменение макета по умолчанию
- Откройте шаблон или документ, созданный на основе шаблона, для которого нужно изменить параметры по умолчанию.
- В меню Формат щелкните Документ и откройте вкладку Макет.
- Внесите нужные изменения и нажмите кнопку По умолчанию.
Как сделать табуляцию в ворде?
Чтобы создать табуляцию в таблице Word используйте сочетание клавиш Ctrl+Tab. Управлять табуляцией в ворде нам поможет горизонтальная линейка. Если линейка не отображается, то перейдите во вкладку «ВИД» и установите флаг для пункта «Линейка».
Как в ворде оставить только текст?
В Microsoft Word есть одна спасительная возможность: Вы можете щелкнуть маленькое всплывающее окно под вставленным текстом и выбрать Plain Text (Только текст), чтобы оставить только текст и никаких других деталей форматирования.
Как применить форматирование одного документа к другому?
Использование средства «Формат по образцу»
- Выделите текст или графический объект, форматирование которого вы хотите скопировать. …
- На вкладке Главная нажмите кнопку Формат по образцу. …
- Проведите кистью по выделенному тексту или изображению, чтобы применить форматирование.
Как скопировать условное форматирование Гугл таблицы?
Как скопировать правило условного форматирования? И вставьте, кликнув на выбранных ячейках правой кнопкой, используя “специальная вставка”-> “вставить только условное форматирование” (либо вставьте через панель меню, эти же пункты). Значения не поменяются, на выделенные ячейки перенесется только правило.
Как в Ворде вставить лист из другого документа?
Вставка документа
- Щелкните или нажмите место, куда нужно вставить содержимое существующего документа.
- На вкладке «Вставка» выберите стрелку рядом с объектом .
- Выберите текст из файла.
- Найдите нужный файл и дважды щелкните его.
- Чтобы добавить содержимое других документов Word, повторите эти действия.
Как скопировать и вставить страницу в ворде?
Копирование интернет-страницы в Ворд
- Кликните по свободной области сайта (где отсутствуют картинки, ссылки и анимация) правой кнопкой мыши.
- «Выделить всё».
- Нажмите Ctrl+C или «Копировать» в контекстном меню.
- Откройте конечный документ.
- Ctrl+V или «Вставить»
Как сохранить только одну страницу в ворде?
Открыть «Файл»; Выбрать «Сохранить как»; Ввести имя файла, нажать «Сохранить»; В выпадающем списке указать расширение «Документ Word 97-2003» и изменить на «.
Как вставить текст без форматирования горячие клавиши?
Вот и все! Теперь при нажатии CTRL+V в MS Word будет вставляться текст из буфера обмена без форматирования. Для вставки текста с форматированием у меня работает сочетание клавиш Shift+Ins.
Как скопировать только текст?
Сочетание клавиш Можно также нажать клавиши CTRL+X. Сочетание клавиш Можно также нажать сочетание клавиш CTRL+C.
Как скопировать текст и вставить его?
Используйте быстрые клавиши: Windows. Ctrl + C (копировать), Ctrl + X (вырезать) и Ctrl + V (вставить).
Интересные материалы:
Как убрать значок из области уведомлений Windows 10?
Как убрать значок микрофона Windows 10?
Как убрать значок Центра уведомлений Windows 10?
Как убрать значок уведомлений Windows 10?
Как удаленно подключиться к компьютеру Windows 10?
Как удалять драйвера на Windows 10?
Как удалять программы в Windows 7?
Как удалить antimalware service executable Windows 10?
Как удалить Antimalware Windows 10?
Как удалить аудиодрайвера на Windows 10?
Вы устали от того, что после вставки скопированного текста в Word, вместе с ним копируются цвета, форматирование, ссылки и всё остальное? Вот как Вы можете защититься от засорения Вашего документа неформатированным текстом.
По умолчанию, Word сохраняет форматирование текста и других объектов, которые Вы вставляете в документ, включая ссылки, цвета, шрифт и прочее. В лучшем случае это может немного раздражать, в худшем – испортить всё остальное форматирование Вашего документа.
Если Вы копируете большой объём текста или картинок с сайта, и вдруг интернет-соединение стало медленным, Word может даже на некоторое время зависнуть, пока получает и обрабатывает данные. Это совсем не весело!
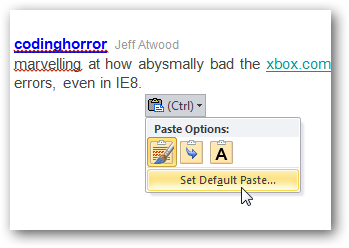
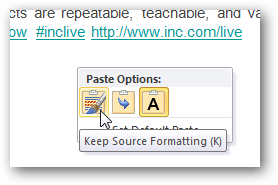
В Microsoft Word есть одна спасительная возможность: Вы можете щелкнуть маленькое всплывающее окно под вставленным текстом и выбрать Plain Text (Только текст), чтобы оставить только текст и никаких других деталей форматирования. Тем не менее, это потребует ещё 2 дополнительных щелчка мышью. Если же Вы постоянно хотите вставлять только текст и больше ничего, то гораздо выгоднее будет установить это в настройках по умолчанию. К счастью, сделать это можно очень просто. Если Вы только что вставили текст, нажмите на всплывающее окно и выберите пункт Set Default Paste (Вставка по умолчанию).
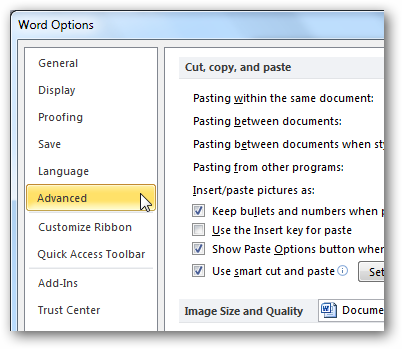
Есть другой путь – открыть диалоговое окно Word Options (Параметры Word). Для этого перейдите на вкладку File (Файл) > Options (Параметры), если у Вас Word 2007, нажмите кнопку Office > Word Options (Параметры Word).

Выберите категорию Advanced (Дополнительно), промотайте вниз до раздела Cut, copy, and paste (Вырезание, копирование и вставка).
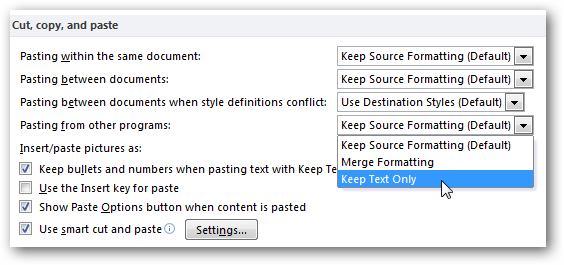
Здесь Вы можете изменить большое количество настроек вставки. Чтобы по умолчанию включить вставку только текста, выберите Keep Text Only (Сохранить только текст) в выпадающих меню. Вы можете изменить установки для всех опций или только для избранных. Часто мы хотим сохранить форматирование, когда копируем в пределах одного документа, поэтому первую опцию оставим без изменений, а для всех остальных установим Keep Text Only (Сохранить только текст).
После того как изменения настроек сделаны, попробуйте вставить тот же текст, чтобы убедиться, что всё работает правильно. Теперь вставится только текст, даже если были скопированы картинки, ссылки и различное форматирование. Такие установки по умолчанию довольно удобны, так как значительно ускоряют работу.
Если же Вы решите вставить текст вместе с форматированием, ссылками и прочим содержимым, просто щелкните по всплывающему меню и выберите Keep Source Formatting (Сохранить исходное форматирование). В этом случае Вам придётся делать лишние действия мышью, только если необходимо вставить дополнительное содержимое.
Таким образом, Вы можете сэкономить своё время и извлекать только нужный текст с веб-сайтов, других программ и прочих источников без задержек из-за копирования большого объёма и, не тратя драгоценное время на обработку вставленного содержимого.
Оцените качество статьи. Нам важно ваше мнение: