
The word processor plugins are bundled with Zotero and should be installed automatically for each supported word processor on your computer when you first start Zotero.
You can reinstall the plugins later from the Cite → Word Processor Plugins pane of the Zotero preferences. If you’re having trouble, see Manually Installing the Zotero Word Processor Plugin or Word Processor Plugin Troubleshooting.
If you previously installed the Firefox versions of the word processor plugins into Zotero 5.0 or Zotero Standalone 4.0, you should uninstall them from Tools → Add-ons.
Manually Installing the Zotero Word Processor Plugin
The Zotero Word plugins will be installed automatically into Word for most users. If you don’t see a Zotero toolbar in Word, you should attempt to reinstall the plugin from the Cite → Word Processors pane of the Zotero preferences. If you receive an error or still don’t see the plugin after trying to reinstall from the preferences, you can try the manual installation instructions below.
Note that, if you rely on manual installation, you may run into problems later due to the plugin in Word becoming outdated, so it’s better to figure out why automatic installation isn’t working (e.g., security software blocking the installation or an incorrect Word Startup folder location) and fix the underlying problem.
Word for Windows
-
Open the Zotero installation folder (usually C:Program Files (x86)Zotero).
-
In the installation folder, open extensionszoteroWinWordIntegration@zotero.orginstall, where you can find a copy of the Zotero.dotm file.
-
If the folder is empty, the file was somehow deleted — possibly by security software — and you should reinstall Zotero.
-
If the folder is empty immediately after reinstalling Zotero, you can download Zotero.dotm, but your security software may delete the downloaded file as well, and you’ll need to configure it not to do so.
-
If you see two “Zotero” files without file extensions, your computer is set not to display file extensions, and you can determine which one is Zotero.dotm by right-clicking on each file and selecting Properties. One will say “Microsoft Word 97-2003 Template (.dot)” and one will say “Microsoft Word Template (.dotm)”.
-
-
Find your Word startup folder and copy the path to the clipboard:
-
In the Word ribbon, click the File tab, click Options, and then click Advanced.
-
Under General, click File Locations. The current Startup folder should be listed.
-
In most cases, the Startup folder path should be the default location of
C:Users::username::AppDataRoamingMicrosoftWordSTARTUP(orStartup), where::username::is your computer username. The path should not include “Zotero” in any way, and if it does you previously configured it incorrectly. If that’s the case, you should reset the path to the default location.
-
-
Select the Startup folder path and click Modify, click in the whitespace to the right of the path in the location bar at the top of the window, copy the complete path to the clipboard with Ctrl-C, and then click Cancel to close the dialog without making changes.
-
-
Open a new File Explorer window and paste the Startup folder path into the address bar. You should now have two folders open: the “install” folder containing Zotero.dotm and the Word startup folder.
-
Copy the Zotero.dotm file from “install” to your Word Startup folder. (Be sure to copy the file rather than moving it. If dragging, hold down Ctrl.)
-
Restart Word to begin using the plugin.
Word for Mac 2016 and 2019
-
In Finder, press Cmd-Shift-G and navigate to
/Applications/Zotero.app/Contents/Resources/extensions/zoteroMacWordIntegration@zotero.org/install
where you can find a copy of the Zotero.dotm file. If the folder is empty, the file was somehow deleted — possibly by security software — and you should reinstall Zotero.
-
Find your Word startup folder by following the instructions below. You should now have two folders open: the Word startup folder and the “install” folder containing Zotero.dotm.
-
Copy the Zotero.dotm file to your Word Startup folder. (Be sure to copy the file rather than moving it.)
-
Start (or restart) Microsoft Word to begin using the plugin.
Word for Mac 2011
-
Download Zotero.dot.zip and double-click it to extract the Zotero.dot file. (Note: The file must be extracted in Finder, not via the command line.)
-
Find your Word startup folder by following the instructions below.
-
Move the Zotero.dot file to your Word Startup folder.
-
If you have a non-English version of Office, you may need to move the Zotero.dot file into the “Word” directory within the equivalent of “Startup” in your language. The correct path should be listed in Tools → Templates and Add-ins in Word.
-
If you’re using a non-admin macOS user account, you will need to install the Word plugin from an administrative account or grant write access for the startup directory to the non-admin account to allow it to install Zotero.dot.
-
-
Start (or restart) Microsoft Word to begin using the plugin.
-
Delete the downloaded ZIP file.
LibreOffice
-
Navigate to the Zotero application files:
-
Mac: In Finder, press Cmd-Shift-G and paste in
/Applications/Zotero.app/Contents/Resources/extensions/zoteroOpenOfficeIntegration@zotero.org/install
-
Windows: Open the folder
C:Program Files (x86)ZoteroextensionszoteroOpenOfficeIntegration@zotero.org/install
-
Linux: Go to the directory where Zotero is installed and open
extensions/zoteroOpenOfficeIntegration@zotero.org/install
-
-
Double-click the Zotero_OpenOffice_Integration.oxt file to install it.
If you get an error, there’s a problem with your LibreOffice installation, and you should follow the troubleshooting steps.
Locating your Word Startup folder
Note: On non-English systems or in certain custom setups, these locations may be different.
Word 2007 or later for Windows
The default location of the Startup folder is C:Users::username::AppDataRoamingMicrosoftWordStartup, where ::username:: is your computer username. The AppData folder may be hidden on your system, but you can get there by opening the Windows File Explorer, typing %AppData% in the address bar, and pressing Enter, which will take you into the Roaming directory. From there you can navigate to MicrosoftWordStartup.
If changes you make to the Startup folder aren’t taking effect, you can confirm that Word isn’t set to a different location. In the Word ribbon, click the File tab, click Options, and click Advanced. Under General, click File Locations. The Startup folder should be listed there. Select it and click Modify. In the window that opens, click the whitespace to the right of the path in the location bar at the top and copy the complete path to the clipboard by pressing Ctrl-C. Click Cancel to close the dialog without making changes. You can then open a new File Explorer dialog and paste the path into the address bar to open the Startup folder.
Note that the path should not include “Zotero” in any way, and if it does you previously configured it incorrectly. If that’s the case, you should reset the path to the default location.
Word 2016 and 2019 for Mac
The default location of the Startup folder is ~/Library/Group Containers/UBF8T346G9.Office/User Content/Startup/Word. (~/Library refers to the Library folder within your home directory.) You can open it from the Finder by pressing Cmd-Shift-G and copying in the path. Alternatively, to navigate to it in Finder, hold down Option, click the Go menu, and select Library (which is hidden by default), and then follow the rest of the path.
If changes you make to the Startup folder aren’t taking effect, you can confirm that Word isn’t set to a different location. In Word, open the “Word” menu in the top-left of the screen and select “Preferences”. Click on “File Locations” under “Personal Settings” and click on “Startup” at the bottom of the list.
Generally, no location should be listed, causing Word to use the default location. If another location is listed (e.g., /Applications/Microsoft Office 2011/Office/Startup/Word, from an earlier version of Word), clearing the setting and letting Word use the default location may fix installation problems and allow Zotero to install the plugin automatically going forward.
Note that the path should not include “Zotero” in any way, and if it does you previously configured it incorrectly. If that’s the case, you should reset the path so that it is blank and the default location is used.
Word 2011 for Mac
The default location of the startup folder is /Applications/Microsoft Office 2011/Office/Startup/Word. You can open it from the Finder by pressing Cmd-Shift-G and copying in the path or by navigating to it.
If changes you make to the startup folder aren’t taking effect, you can confirm that Word isn’t set to a different location. In Word, open the “Word” menu in the top-left of the screen and select “Preferences”. Click on “File Locations” under “Personal Settings” and click on “Startup” at the bottom of the list.
Для чего нужен Zotero?
Zotero — это бесплатная программа с открытым исходным кодом, которая помогает систематизированно хранить библиографические описания текстов и, при желании, их полные версии. Помимо этого, с помощью Zotero вы сможете тратить меньше времени на оформление ссылок и списка литературы по нужным стандартам.
Zotero — не единственная программа, решающая эти задачи; существует ещё, как минимум, два значимых аналога: Mendeley и Citavi. У каждой из них есть свои уникальные функциональные особенности, но среди примечательных функций Zotero — интеграция с веб-браузером и Google Docs.
Как пользоваться этой инструкцией
Для удобства навигации элементы содержания инструкции интерактивны. Все описываемые компоненты программы, которые вынесены на картинки, выделены бордовыми прямоугольниками. В инструкции описаны только самые необходимые функции, поэтому если вы освоили базовый уровень и хотите больше узнать о возможностях Zotero, напишите нам на Адрес электронной почты защищен от спам-ботов. Для просмотра адреса в вашем браузере должен быть включен Javascript..
Содержание
Установка и регистрация
Установка программы
Установка плагина
Регистрация
Синхронизация
Загрузка данных в Zotero
Загрузка файлов с помощью плагина Zotero
Загрузка файлов с компьютера
Плагин для MS Word
Как можно систематизировать данные в Zotero?
Создание папок
Присвоение собственных ключевых слов (тегов)
Возможности поиска в Zotero
Установка и регистрация
Установка программы
Для установки программы необходимо зайти на официальный сайт Zotero — www.zotero.org — и нажать на красную кнопку «Download». 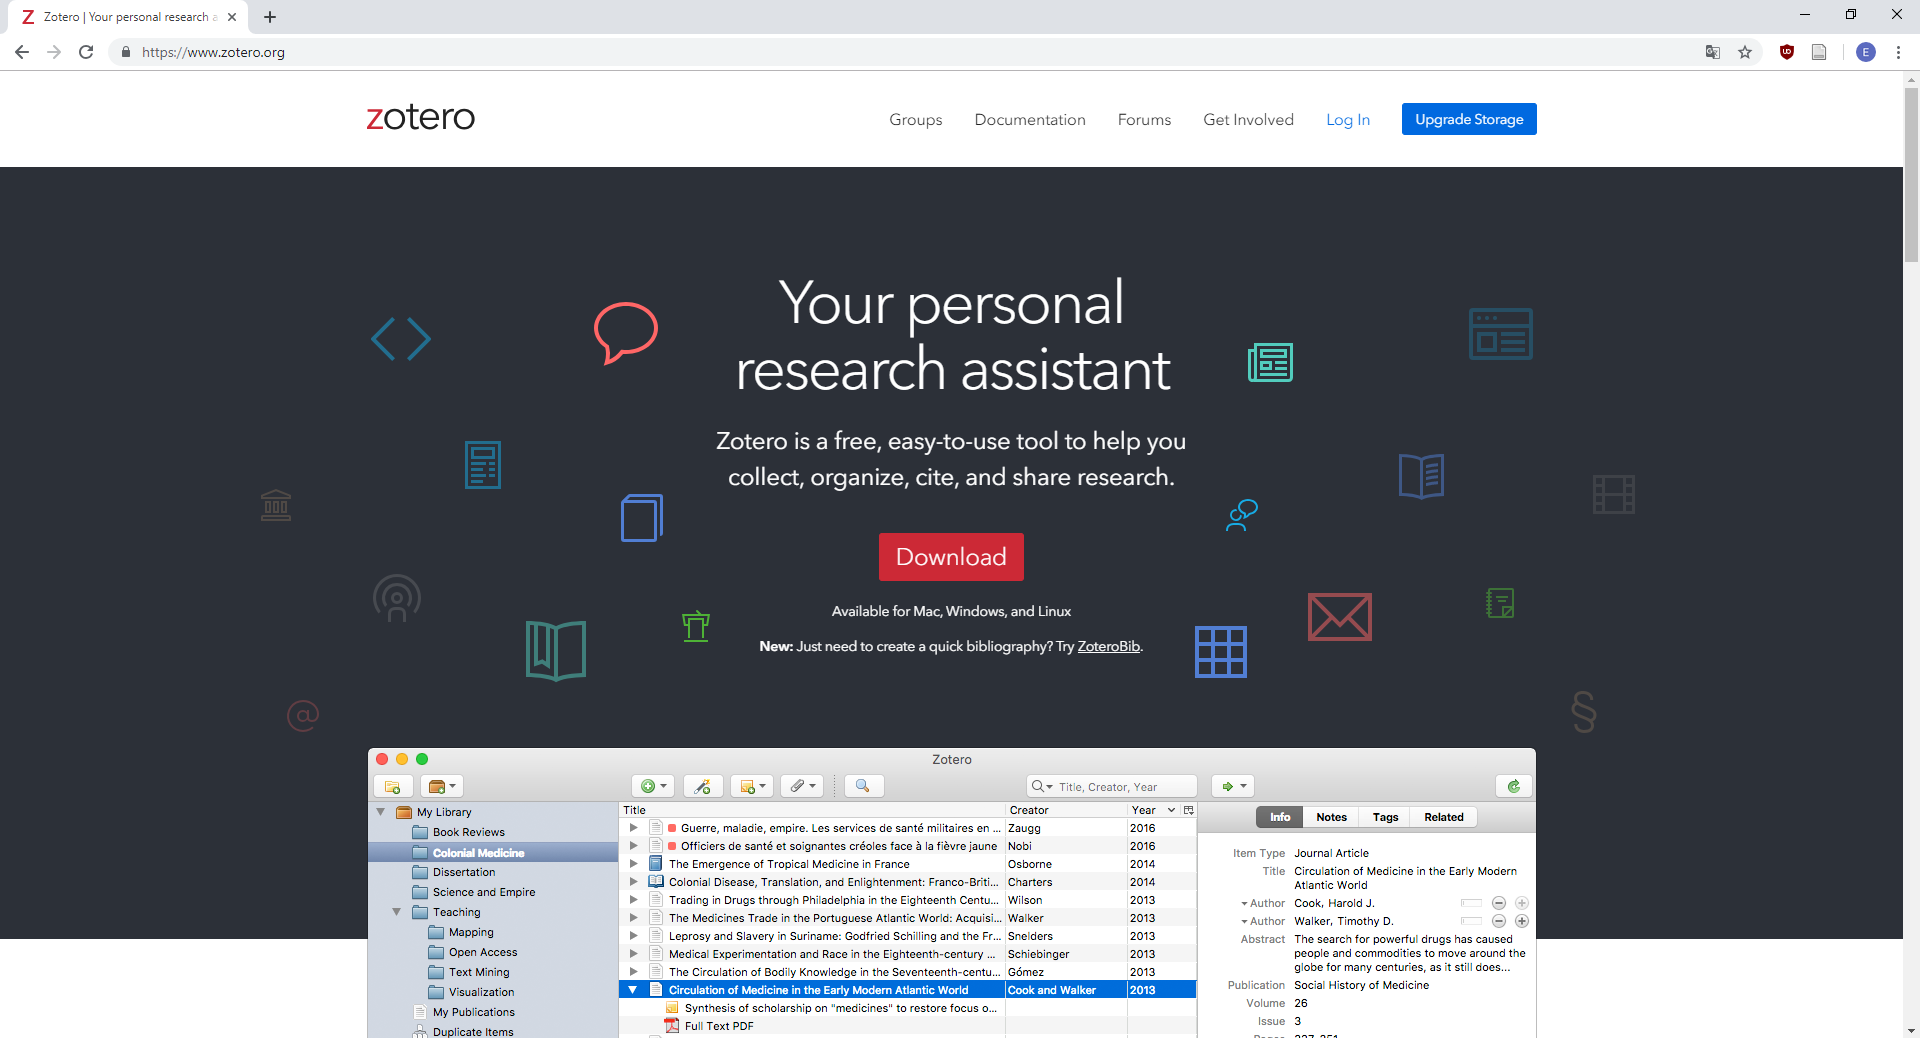
Рис. 1. Главная страница с красной кнопкой «Download»
После этого вы окажетесь на странице, где будут два раздела для скачивания. Скачивайте версию программы, которая подходит для вашей операционной системы. Zotero адаптирован для Windows 7 и выше, MacOS и Linux. 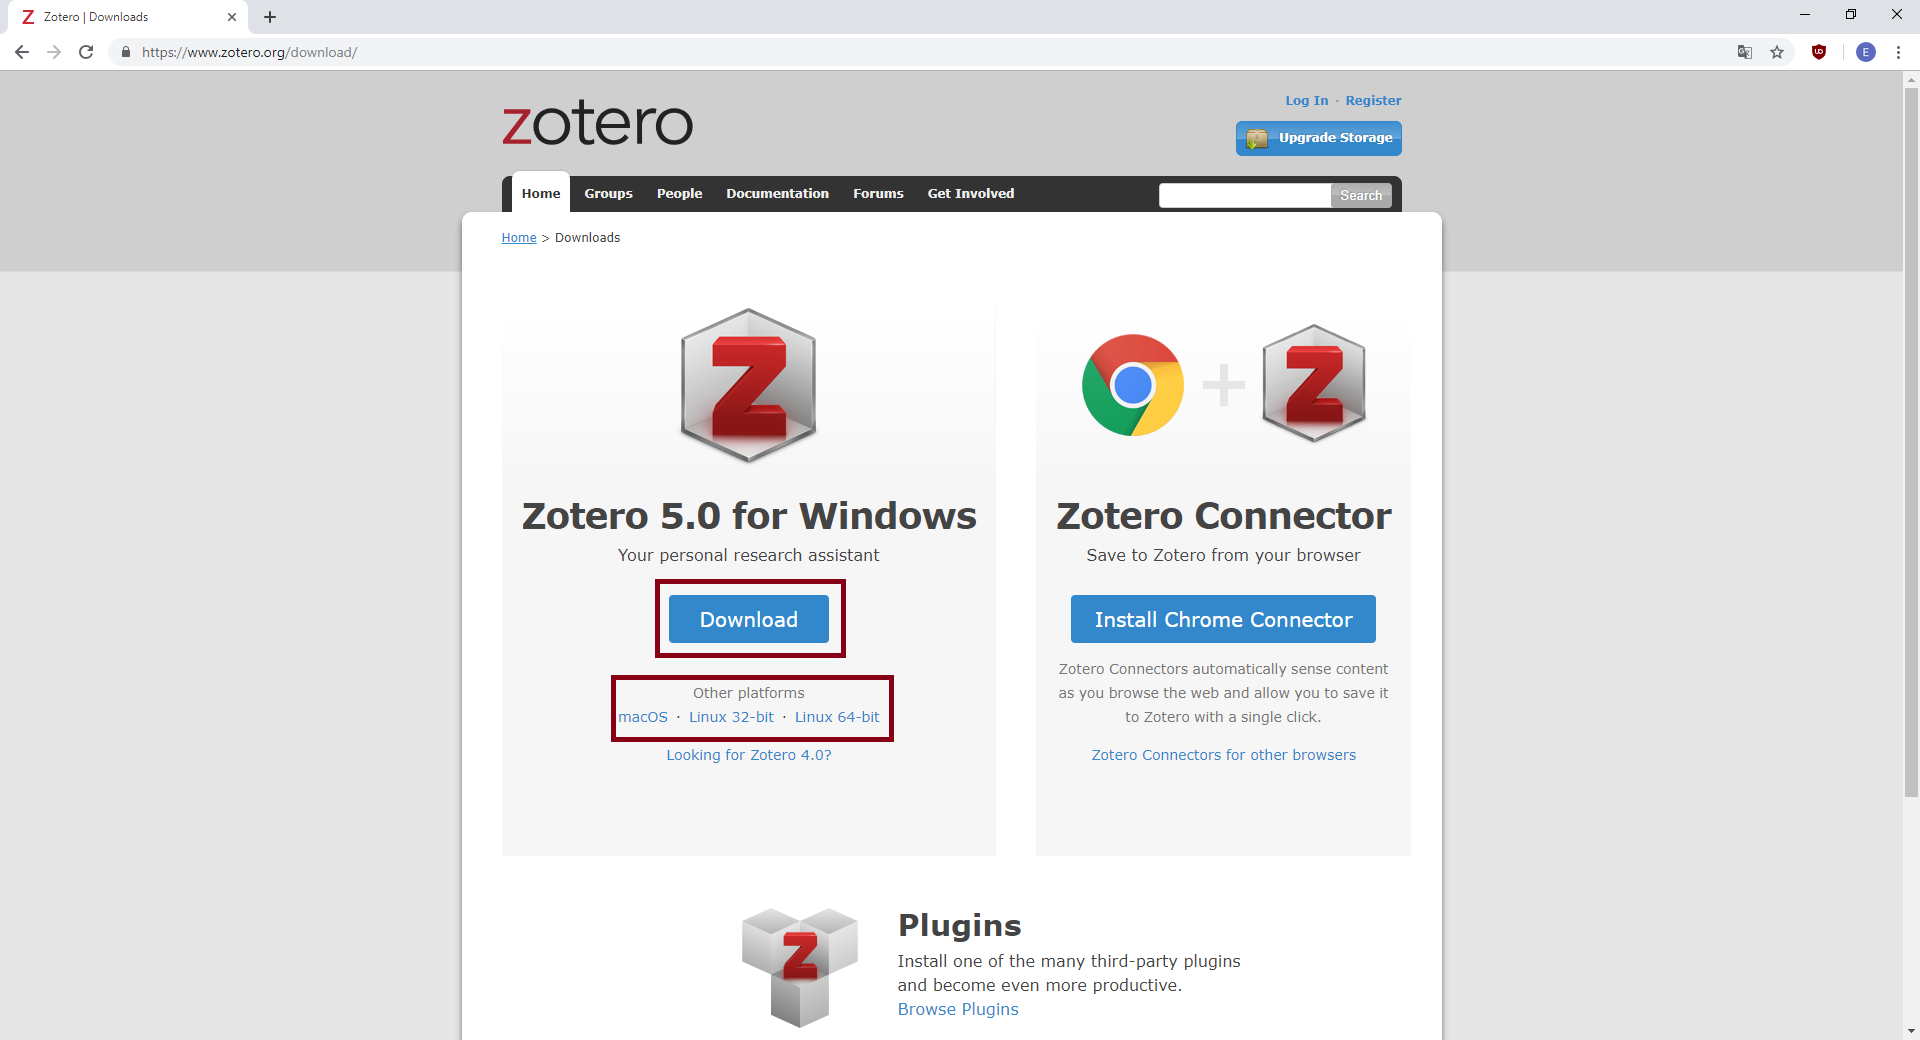
Рис. 2. Страница загрузки Zotero (в верхней бордовой рамке синяя кнопка для скачивания версии для Windows, в нижней бордовой рамке — ссылки на скачивание программы для MacOS и Linux)
После загрузки нажмите на иконку с этим файлом на панели загрузок в вашем браузере или найдите установочный файл в папке с загрузками на вашем компьютере и запустите его. Вам нужна установка по умолчанию, поэтому выберите пункт «Standard» и нажмите кнопку «Next».
Установка плагина
На той же странице вам нужно скачать плагин Zotero Connector. Плагин для браузера — одно из главных преимуществ Zotero, потому что он упрощает сохранение библиографических данных и полных текстов. С помощью плагина доступные данные загружаются в Zotero прямо из браузера, и их не нужно скачивать на компьютер. Вы можете установить плагин в Firefox, Google Chrome и Safari. Для Internet Explorer и Microsoft Edge плагина не предусмотрено.
На сайте предлагается плагин для того браузера, в котором вы открываете страницу. Если вам нужно установить плагин в другой браузер, то вы можете открыть страницу загрузок в нем или нажать на название нужного браузера под синей кнопкой «Install…». После установки в правом углу браузера появится значок Zotero, который меняет вид в зависимости от того, какой контент видит Zotero: веб-страницу, статью, набор статей, книгу (или её фрагмент), диссертацию, статью в газете или энциклопедии. 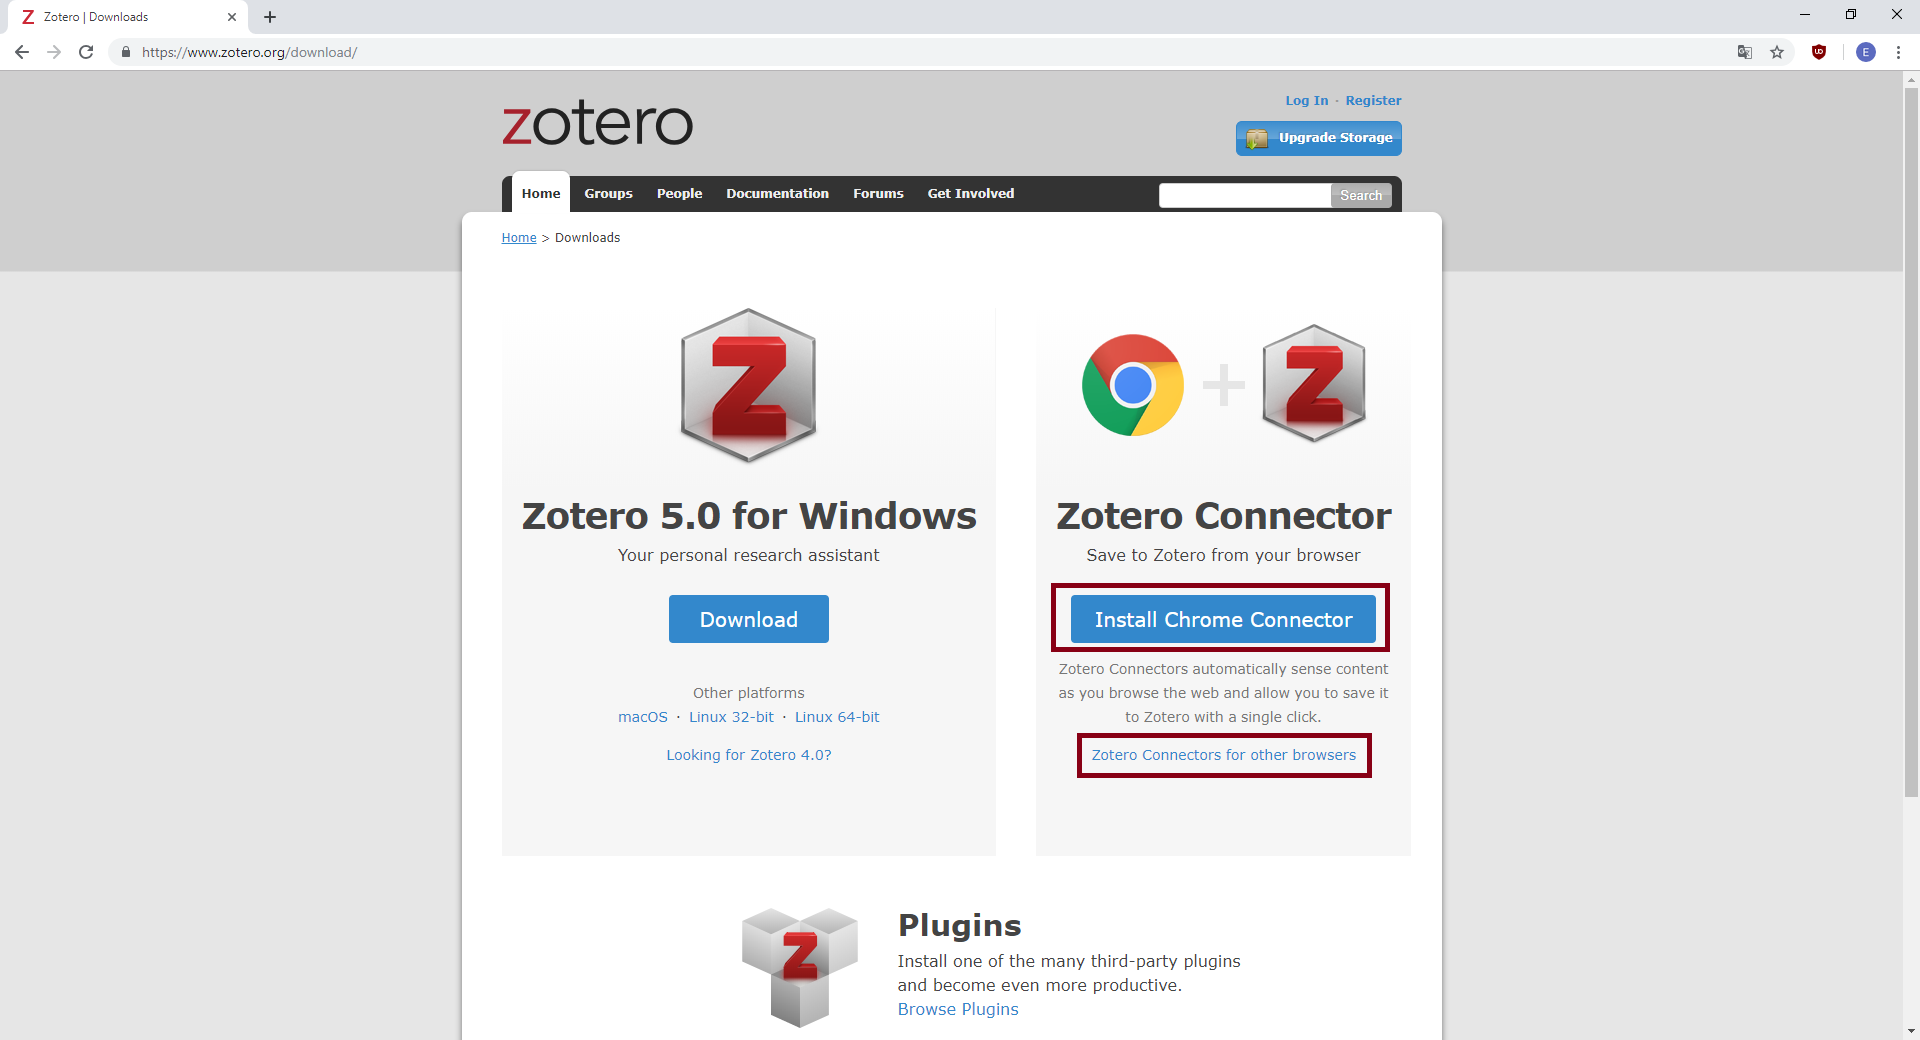
Рис. 3. Страница загрузки плагина для браузера в Google Chrome (синяя кнопка в верхней бордовой рамке); чтобы загрузить плагин для других браузеров, нажмите ссылку из нижней бордовой рамки)
Регистрация
На сайте есть возможность зарегистрироваться, но в целом для работы с программой делать это необязательно. Регистрация может понадобиться вам для того, чтобы синхронизировать данные с другими устройствами. Zotero хранит все данные на компьютере, где установлена программа, поэтому если с компьютером что-то случится, а синхронизация у вас отключена, ваши данные могут не сохраниться. Zotero предлагает бесплатно онлайн-хранилище на 300 Мб. Лучше всего хранить библиографические описания в облаке Zotero, но полные тексты с ним не синхронизировать, иначе доступный объём при активном использовании быстро исчерпается и придётся платить за хранилище или перестать пользоваться синхронизацией.
Для того чтобы зарегистрироваться, вам нужно перейти по ссылке «Register» в правом верхнем углу страницы. На странице регистрации заполните все необходимые поля. После этого вам на почту придёт письмо с ссылкой для подтверждения учётной записи. Нажмите на ссылку в письме — после этого вы сможете пользоваться своим аккаунтом Zotero и синхронизировать свои данные. 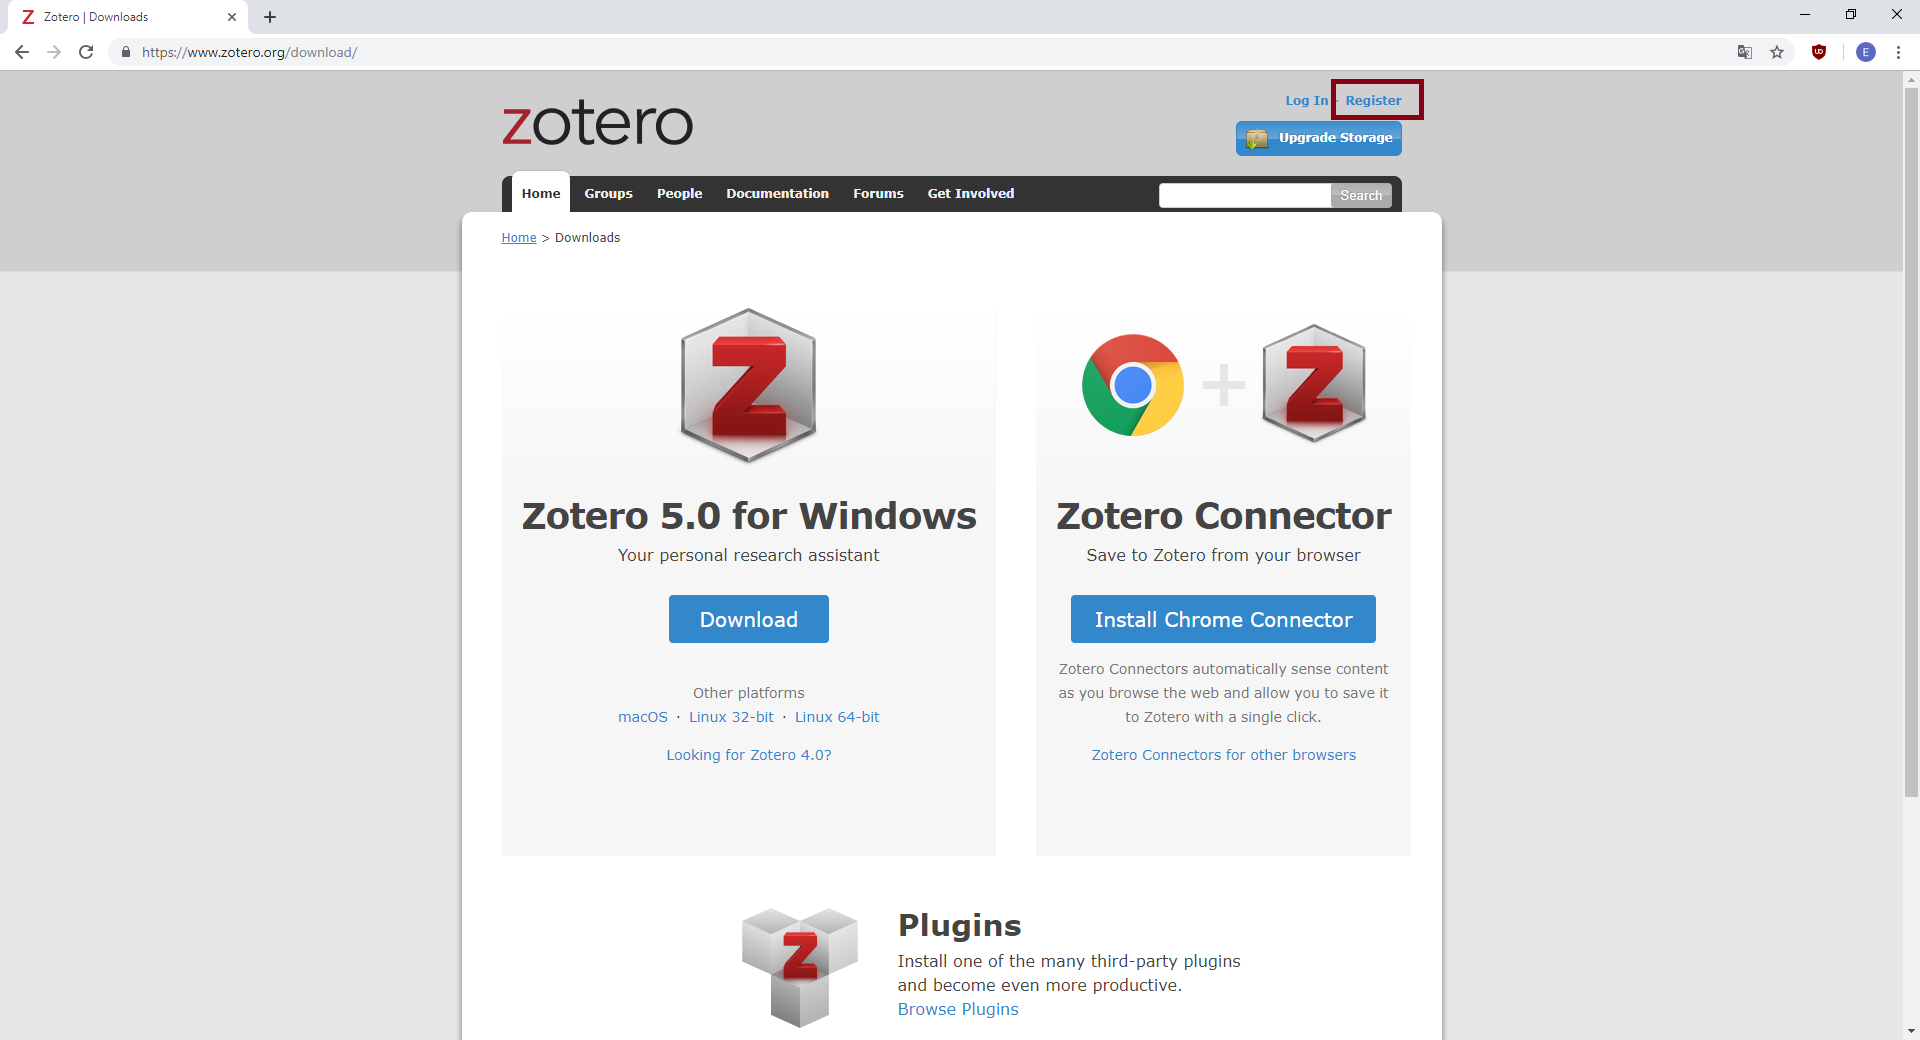
Рис. 4. Кнопка «Register» для регистрации (в правом верхнем углу)
Синхронизация
Для того, чтобы войти в свой аккаунт, вам нужно открыть программу на компьютере, на верхней панели меню выбрать пункт Правка → Настройки → Синхронизация. Там будет поле для ввода логина-пароля, куда вы можете ввести ваши данные. 
Рис. 5. Поле для ввода логина-пароля во вкладке Правка → Настройки → Синхронизация (в верхнем меню)
После ввода логина-пароля появятся настройки синхронизации, где можно уточнить, что нужно переносить в облачное хранилище Zotero, а что синхронизировать с другим хранилищем. Для того, чтобы настроить синхронизацию с другим облачным хранилищем, в строке «Синхронизировать файлы приложений в Моей Библиотеке, используя» нужно выбрать WebDAV. Появятся поля для заполнения, введите в них информацию о вашем хранилище, после этого нажмите «проверить сервер» — если все введено корректно, то синхронизация будет настроена. Один из самых удобных серверов для хранения — Яндекс.Диск. Впишите в строку URL — адрес — https://webdav.yandex.ru/ и свои логин и пароль от почты на Яндексе. По ссылке https://webdav.yandex.ru/ вы можете прочитать инструкцию по настройке синхронизации с Яндекс. Диском. 
Рис. 6. Кнопка для включения протокола WebDAV для синхронизации с внешним хранилищем (верхний бордовый прямоугольник) и поле для ввода адреса внешнего хранилища (нижний бордовый прямоугольник)
Загрузка данных в Zotero
В Zotero можно загружать несколько категорий данных: библиографические описания, полные тексты, веб-страницы и другие типы файлов.
Загрузка файлов с помощью плагина Zotero
Главный плюс Zotero в том, что плагин в браузере автоматически считывает и сохраняет данные с веб-страницы. Для того, чтобы загрузить нужный материал в Zotero зайдите на сайт любой базы публикаций, например JSTOR, и введите интересующий вас запрос. Когда загрузится поисковая выдача по вашему запросу, значок плагина Zotero на странице с результатами поиска будет выглядеть как папка. Если вы нажмете на неё, то на экране появится окно, где будет список найденных статей — выбирайте нужные вам, и в Zotero сохранятся их библиографические описания или полные тексты, если они доступны.
Обратите внимание, что Zotero формирует список только для одной страницы выдачи, при переходе на следующую страницу с результатами поиска он соответственно меняется. Запись появится в основной папке «Моя Библиотека» или в папке, которую вы создали. 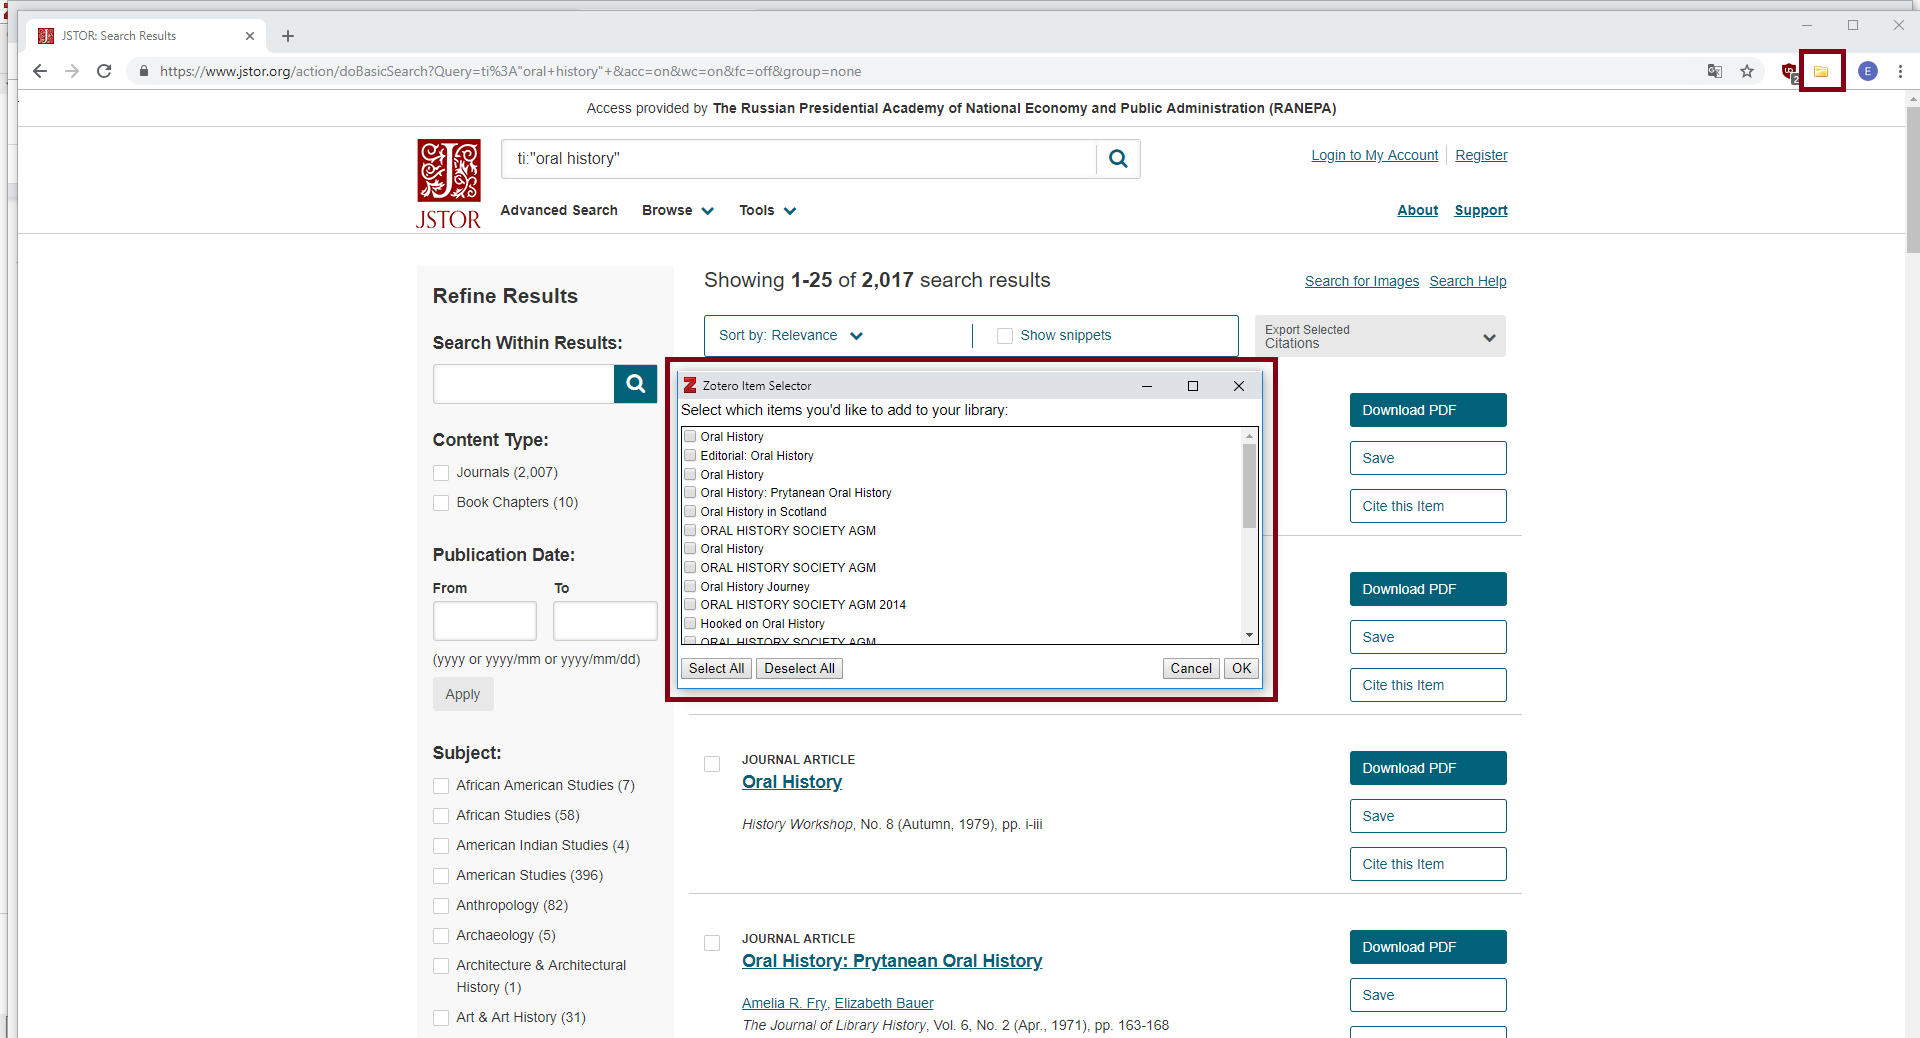
Рис. 7. Кнопка в виде папки для сохранения нескольких документов в Zotero (в правом верхнем углу) и поле для выбора текстов, которые нужно сохранить 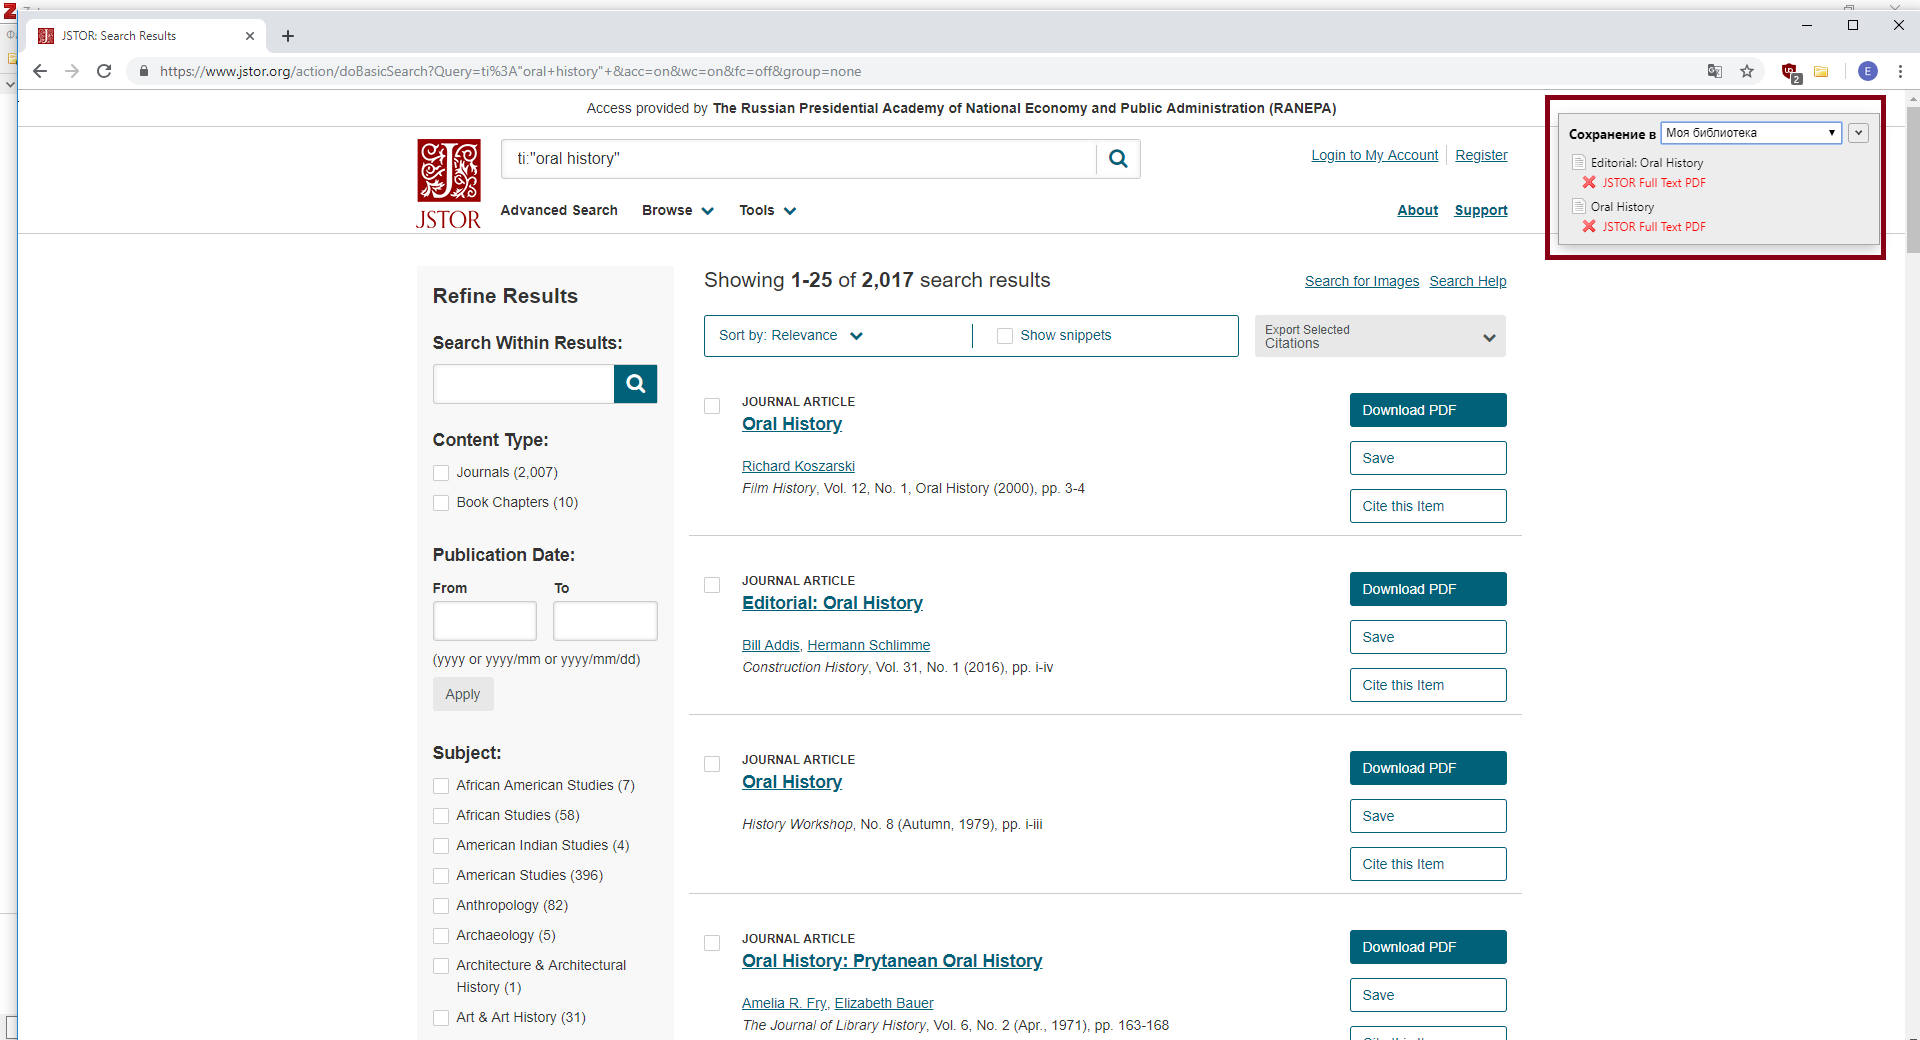
Рис. 8. Окно состояния загрузки файлов в Zotero (красный крест означает, что не доступны полные тексты и загрузятся только их библиографические описания)
Если вас интересует информация о конкретном тексте, то, перейдите на его страницу и нажмите на иконку Zotero в виде страницы текста — документ с библиографическим описанием появится в программе Zotero. Как и в случае с добавлением нескольких файлов, появление красного креста в окне загрузки означает, что недоступен полный текст и загрузится только библиографическое описание. 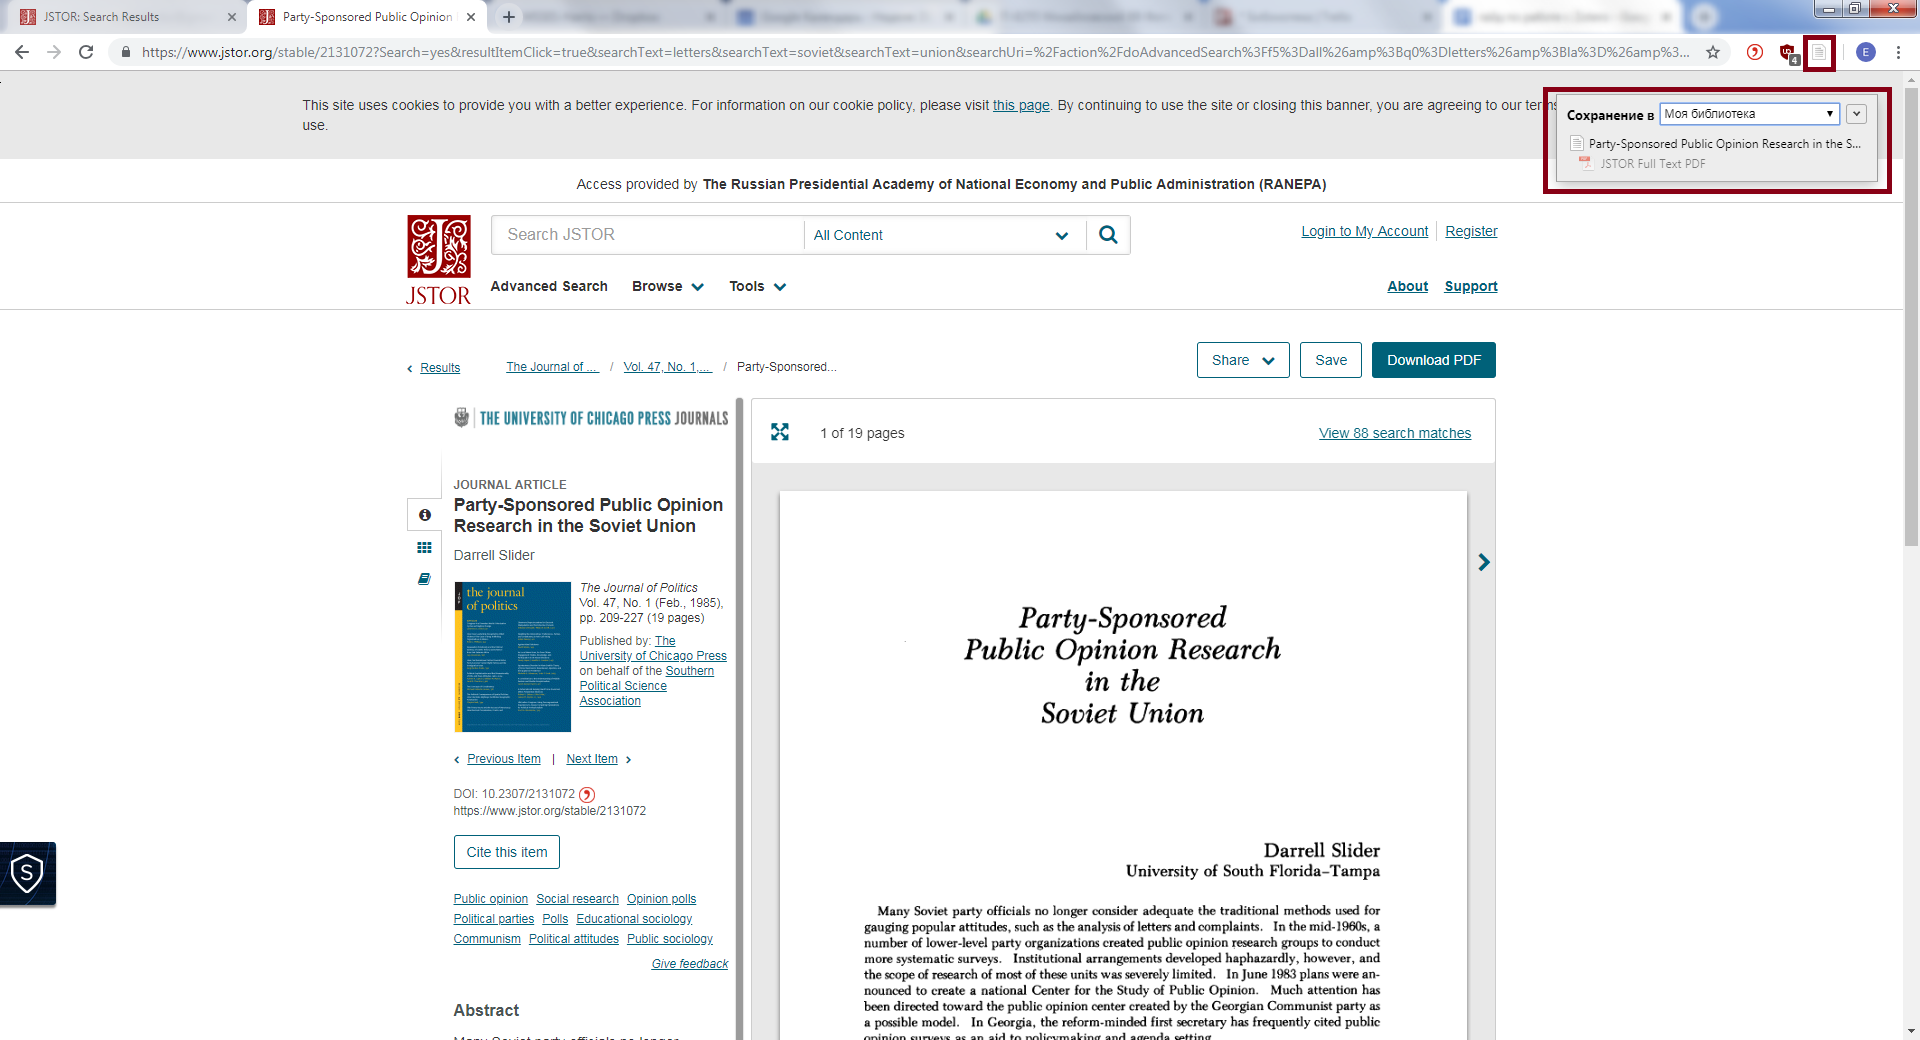
Рис. 9. Кнопка в виде документа (в правом верхнем углу) и окно загрузки данных одной статьи в Zotero
Zotero может сохранять материалы с веб-страниц, в том числе видео- и аудиоматериалы. Это может быть полезно тем, кто много работает с интернет-источниками и нуждается в их удобном хранении. Для того, чтобы сохранить информацию с сайта, нажмите на значок Zotero в виде веб-страницы. Программа сохранит страницу, так что вы сможете просматривать её, даже если она исчезнет с сайта. 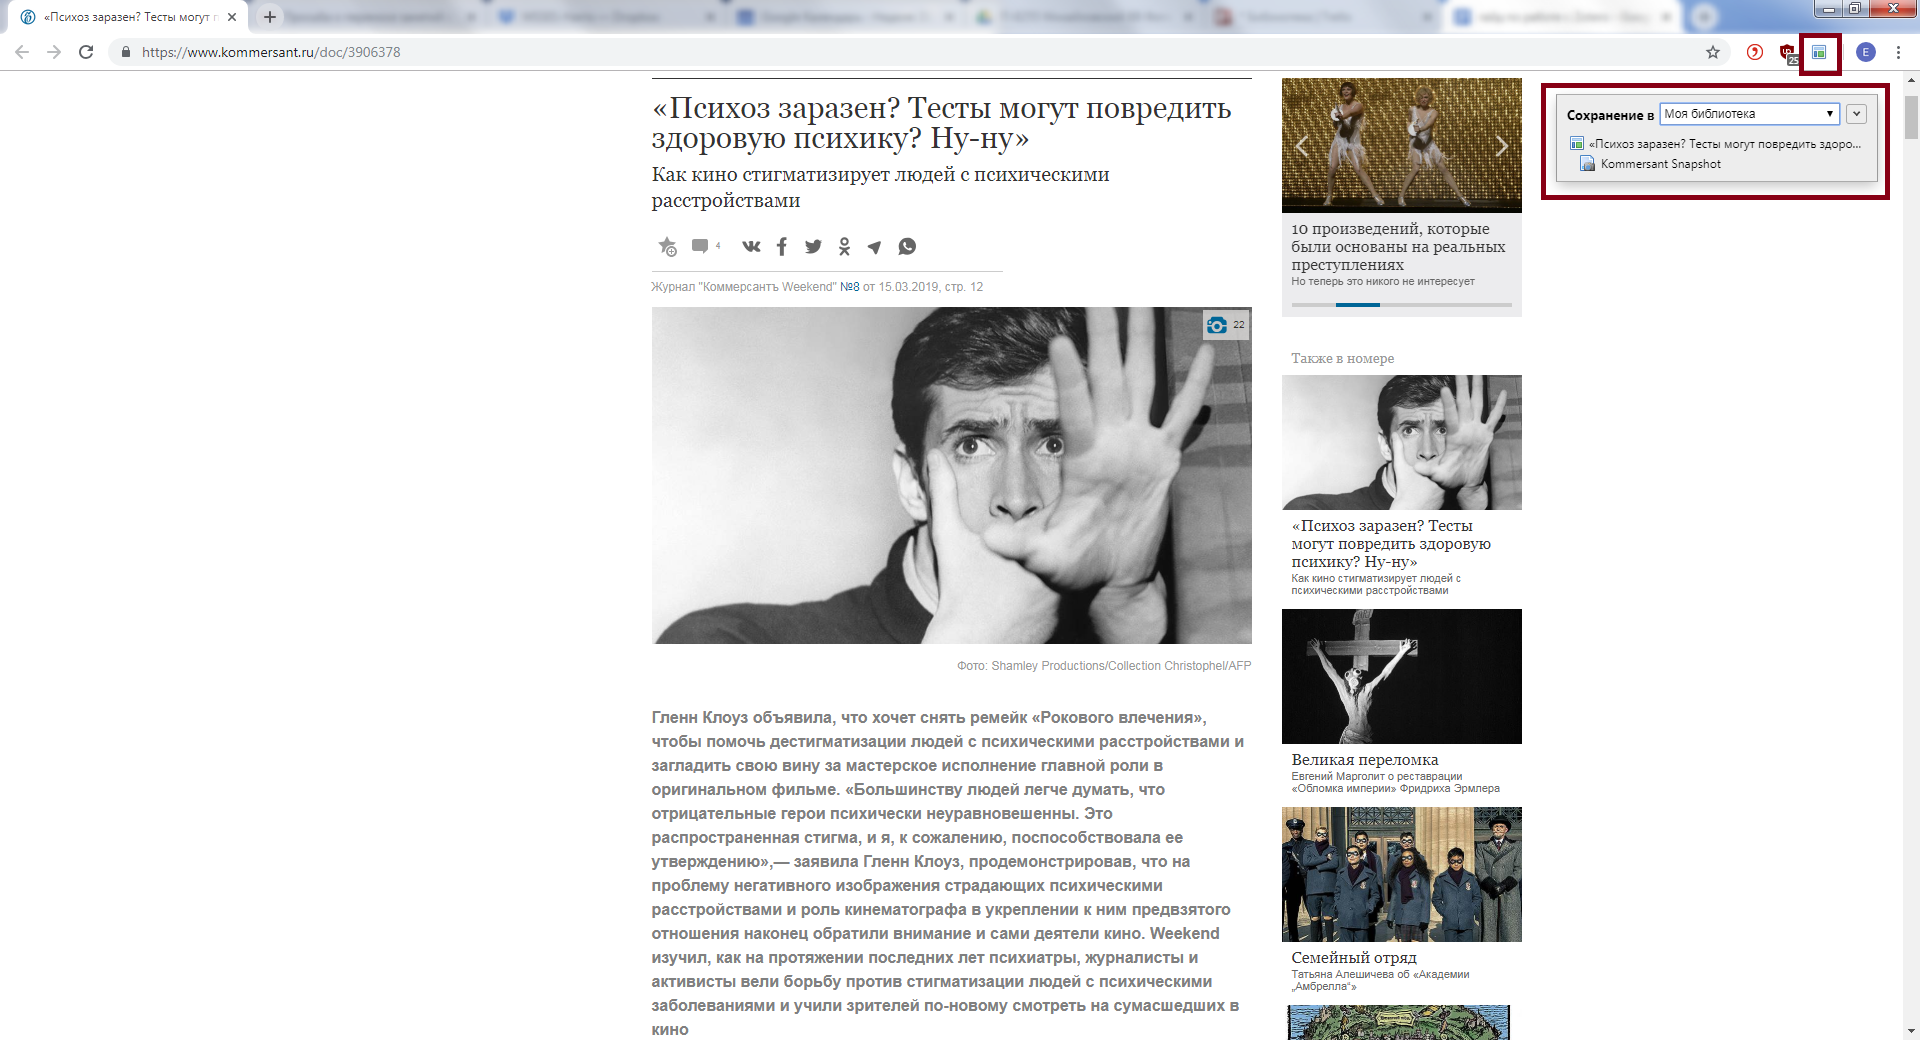
Рис. 10. Кнопка в виде веб-страницы (в правом верхнем углу) и окно сохранения страницы
Zotero обычно сохраняет следующие категории данных о веб-страницах: тип документа, название страницы, URL-адрес, дату доступа, дату добавления и изменения в Zotero. Это сохраняет достаточно много времени, поскольку вы не тратите усилия для того, чтобы вспомнить детали своего поиска. Плюс вы можете хранить всю разнородную информацию с помощью одной программы. 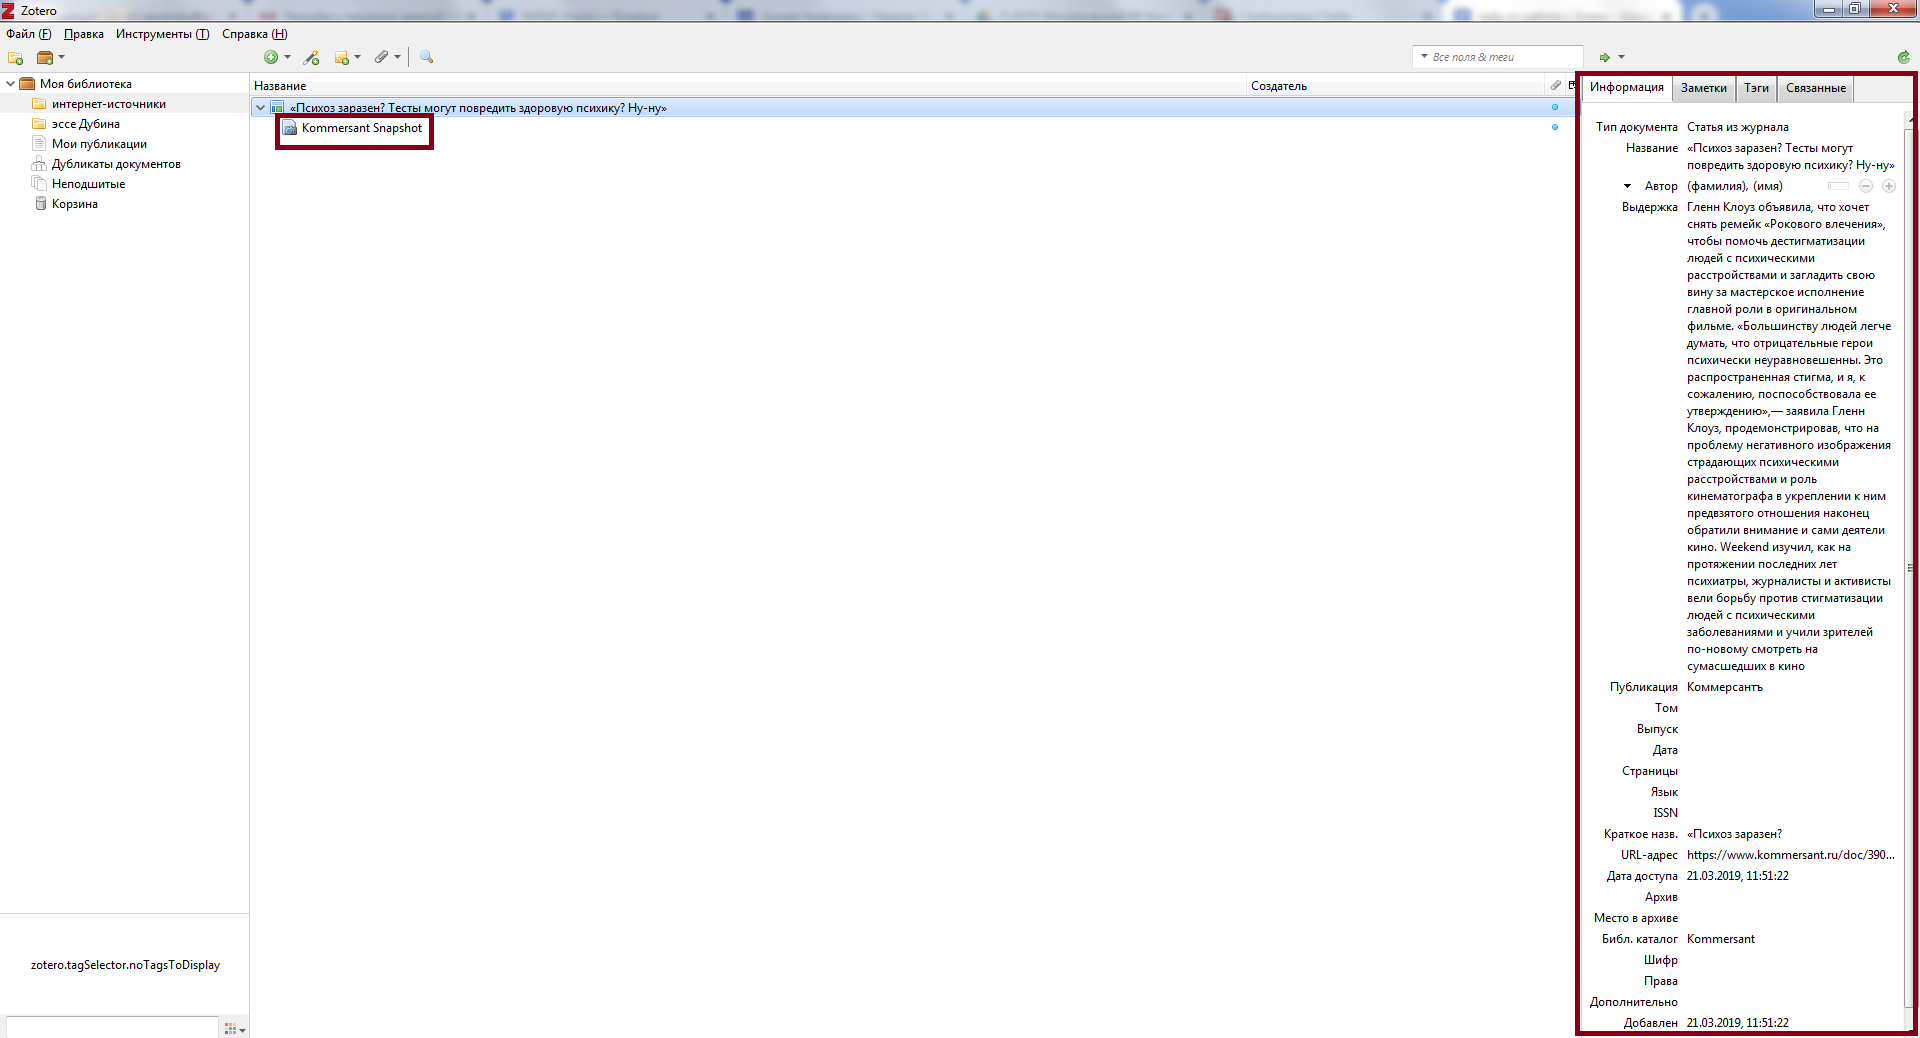
Рис. 11. Окно с описанием веб-страницы (справа) и кнопка для открытия сохраненной страницы (в основном окне)
Загрузка файлов с компьютера
Помимо этого, вы можете загружать данные в Zotero с компьютера. Существуют стандартизированные форматы хранения библиографической информации, которые позволяют программам вроде Zotero считывать эти данные и автоматически распределять по нужным полям (автор, название, год публикации и т.д.). Оптимальный вариант — скачивать эти данные в формате RIS (файлы с расширением .ris), потому что обычно там хранятся наиболее полные библиографические описания текстов. В большинстве баз публикаций (например, JSTOR или SpringerLink) существует возможность сохранять библиографические описания в таком формате, обычно на странице статьи есть кнопка со словом «cite», то есть «процитировать».
Чтобы добавить в Zotero описание, сохранённое в файле формата RIS, нажмите вкладку Файл→ Импорт → Файл (BibTex, RIS, Zotero PDF, etc.), затем выберите нужный файл и нажмите «Next». Файл с подробным библиографическим описанием будет сохранен в Zotero. На всякий случай проверьте корректность данных, иногда файлы с описаниями заполнены с ошибками или пропусками, но их всегда можно исправить вручную.
Чтобы исправить данные, нажмите на строку с нужным текстом — после этого справа появится панель со всей доступной информацией о документе. Наведите курсор в область рядом с названием нужного поля — там появится синий прямоугольник, нажмите на него, чтобы открылся режим редактирования, внесите правки, после чего нажмите на любую область вне этого поля, чтобы выйти из режима редактирования. 
Рис. 12. Поле с описанием документа (справа)
В Zotero можно загружать и хранить полные тексты документов, для этого нужно просто перетащить файл из папки, в которой он хранится на компьютере, в основное окно программы или сохранить его с веб-страницы, как было указано в предыдущем подразделе инструкции. В некоторых случаях Zotero автоматически распознает, какой текст вы загрузили, тогда его библиографическое описание появится в основном окне в строке с этим документом. Если этого не произошло, вы можете отредактировать данные самостоятельно.
Плагин для MS Word
Плагин Zotero для MS Word (или LibreOffice) позволяет быстро ссылаться на тексты, описания которых вы загрузили в Zotero, и создавать списки библиографии внутри MS Word. Важно! Для того, чтобы Zotero работал в MS Word или LibreOffice, программа Zotero должна быть открыта. После установки Zotero на верхней панели инструментов MS Word должна появиться отдельная вкладка Zotero. В ней находятся кнопки для автоматического цитирования текстов и составления списков библиографии на основе вашей библиотеки в Zotero. 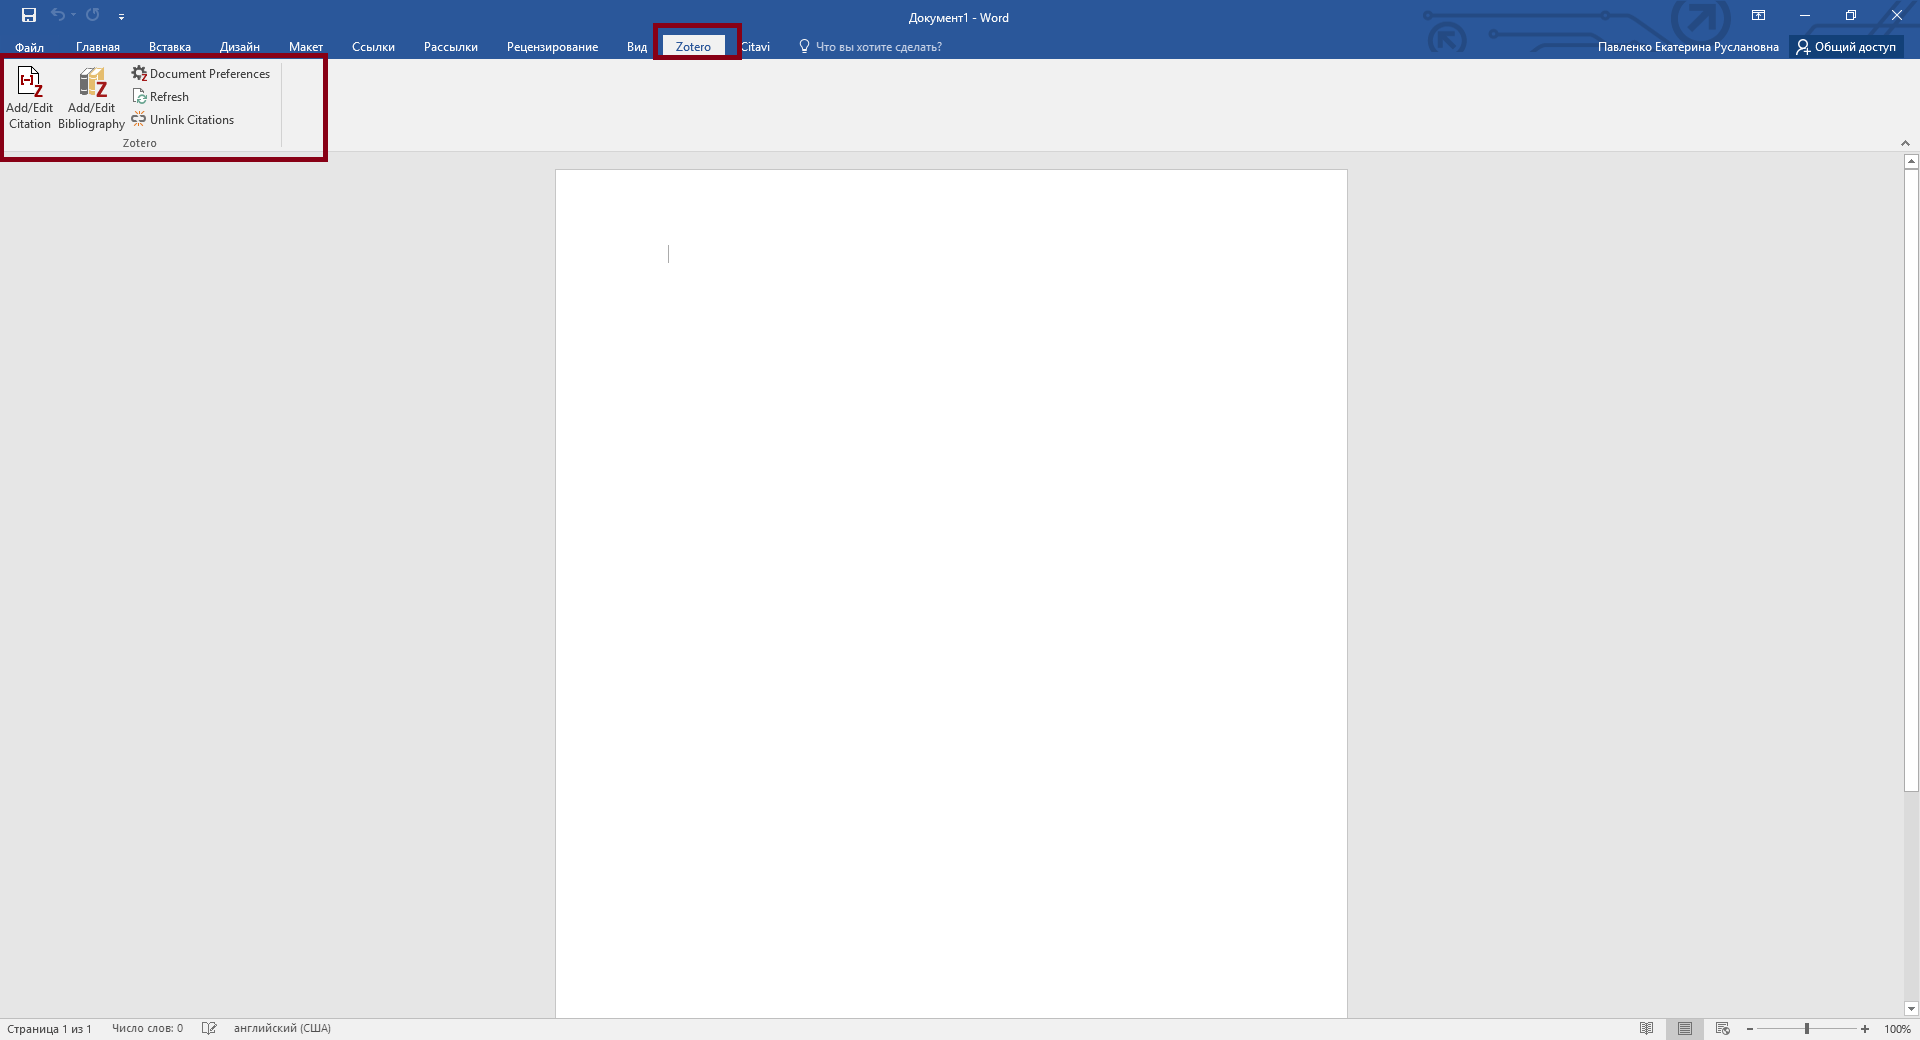
Рис. 13. РПлагин Zotero в MS Word на панели инструментов
Иногда вкладка Zotero не появляется в текстовом редакторе автоматически после установки самой программы Zotero, тогда нужно вернуться в Zotero, через верхнюю панель меню зайти в раздел Правка → Настройки → Цитирование и нажать «Переустановка дополнения Microsoft Word» или «Переустановка дополнения LibreOffice» в зависимости от того, каким текстовым редактором вы пользуетесь. 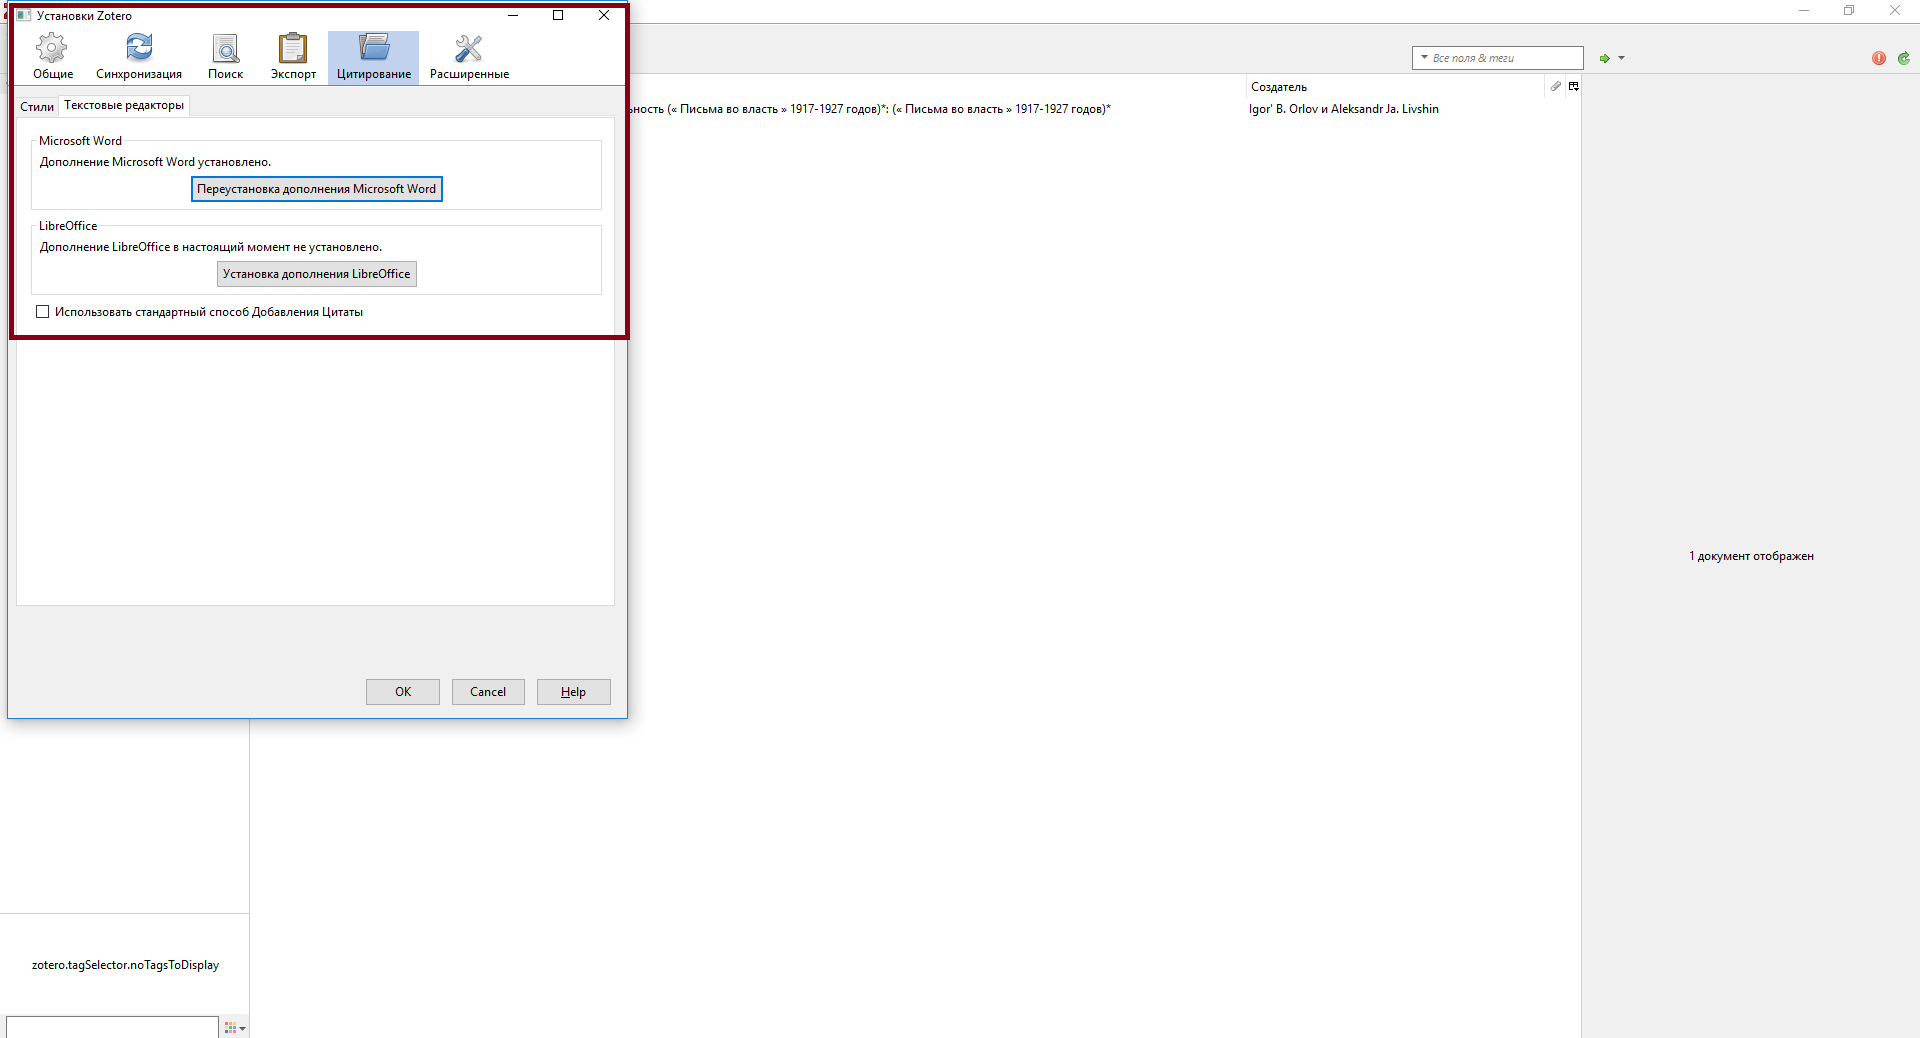
Рис. 14. Вкладка Правка → Настройки → Цитирование с кнопками для установки плагина в текстовые редакторы
После того, как плагин был установлен и вкладка Zotero появилась в текстовом редакторе, нужно нажать на неё. Для начала выберите, по какому стандарту будет настроено цитирование. Zotero позволяет настраивать цитирование в соответствии со многими существующими требованиями. В поле «Document Preferences» выберите нужный вам стандарт цитирования, например, установленный журналом, для которого вы готовите текст. Если в предложенном базовом списке не оказалось того стандарта, который вам нужен, нажмите на «Управление стилями». После этого автоматически откроется Zotero с окном поиска стандартов. Затем нужно нажать «Загрузить дополнительные стили» — откроется окно с поиском, где вы можете найти то, что вам нужно и добавить выбранное. Если вы хотите установить ГОСТ, наберите GOST латинскими буквами. 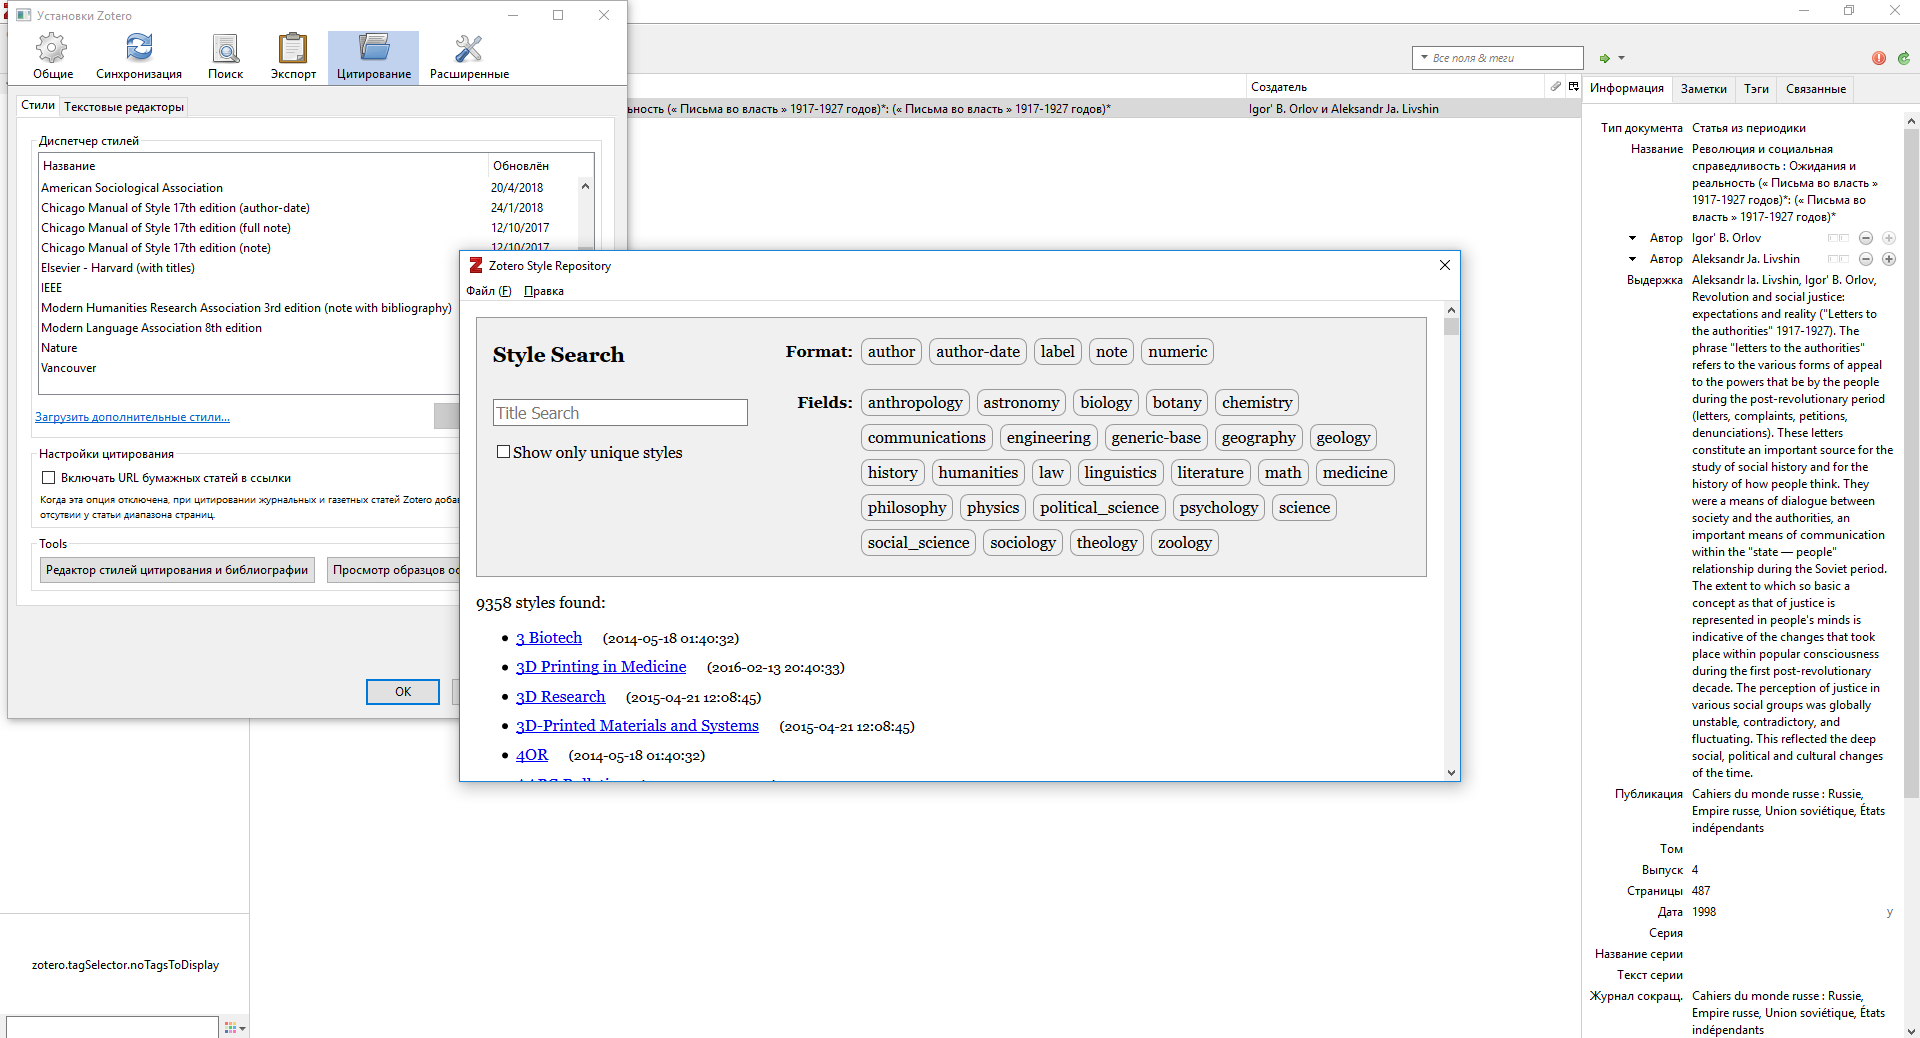
Рис. 15. Поле для поиска новых стилей в Zotero
Zotero стандартно предлагает только один вариант ГОСТа (GOST Russian), когда при цитировании в скобках указывается автор и год публикации. Есть еще, как минимум, два стандарта GOST, поэтому будьте внимательны при скачивании.
GOST (numeric) — при цитировании в скобках указывается номер цитируемого текста в библиографическом списке, в котором тексты указаны в порядке появления в вашей работе;
GOST(sorted alphabetically, Russian) — при цитировании в скобках указывается номер цитируемого текста в библиографическом списке, в котором тексты указаны в алфавитном порядке.
Несмотря на то, что база данных Zotero со стандартами цитирования обновляется регулярно, лучше перепроверять оформление, предложенное Zotero, — для этого внимательно прочтите последние требования на сайте журнала или в методических рекомендациях диссертационного совета и сравните форматирование своего документа с ними.
После того, как нужный стандарт установлен, вы можете добавлять правильно оформленные ссылки на документы, которые вы загрузили в Zotero, с помощью одной кнопки в MS Word — «Add Citation».
Как можно систематизировать данные в Zotero?
Плагин для MS Word
Если вы собираете тексты для нескольких разных задач или по нескольким разным обособленным темам, вы можете рассортировать их по папкам. Чтобы создать папку, правой кнопкой мыши нажмите на строку «Моя библиотека» на левой панели меню, а затем — «Новая подборка». При нажатии на кнопку появится строка, в которую нужно ввести название папки, после чего нажать Enter.
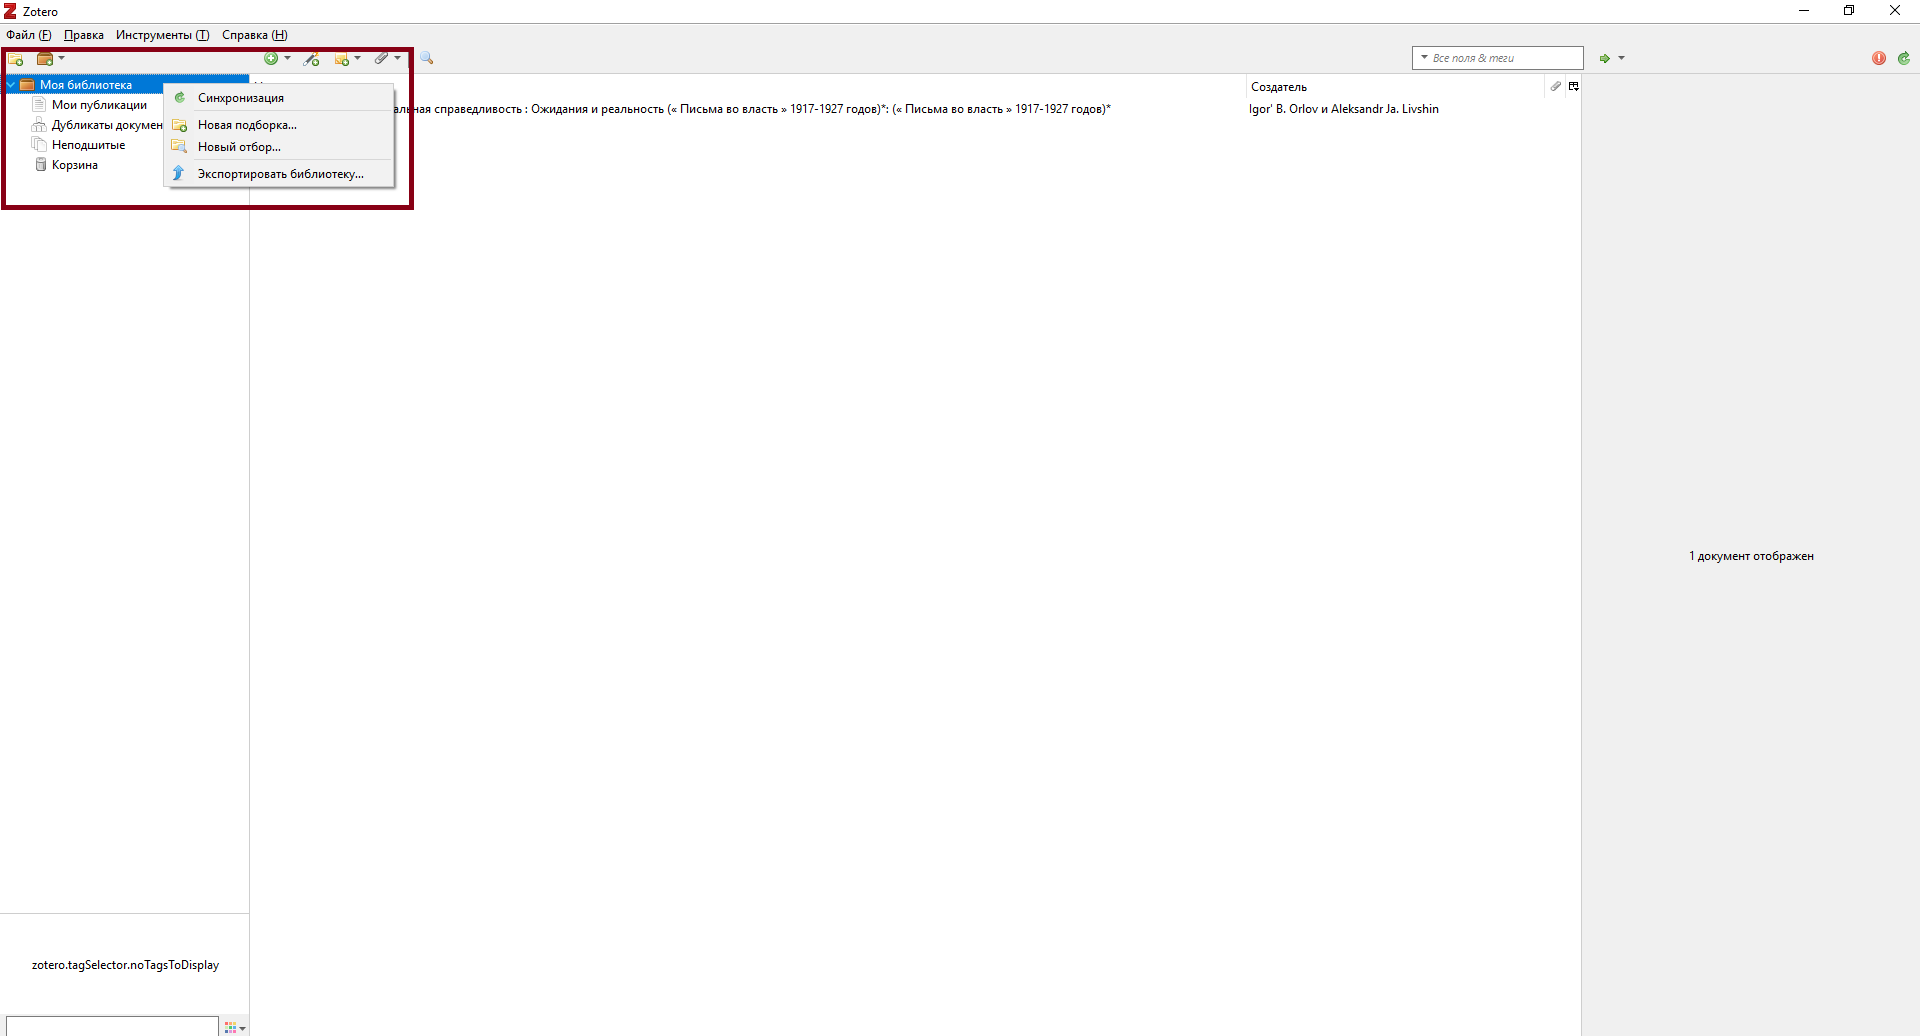
Рис. 16. Расположение кнопок «Моя библиотека» и «Новая подборка» на левой панели меню
Если вы хотите создать еще одну самостоятельную папку, повторите те же действия. Если вы хотите создать подпапку, переместите одну из папок в другую с помощью курсора. Чтобы добавить документ в папку, найдите строку с документом, который вы хотите добавить в папку, и перетащите эту строку в нужную папку на левой панели.
Присвоение собственных ключевых слов (тегов)
В Zotero сохранение ключевых слов работает недостаточно хорошо. Обычно авторские ключевые слова он считывает автоматически при добавлении документа в формате RIS или при скачивании с SpringerLink и Web of Science. Несмотря на то, что авторы сами присваивают статьям ключевые слова, они не всегда очевидно отражают содержание статьи или не включают категории, которые кажутся важными именно вам, поэтому вы можете размечать свою коллекцию самостоятельно, чтобы потом легко находить то, что вам нужно.
Ключевые слова, которые присвоил автор, отображаются во вкладке «Тэги» на панели справа. Они подгружаются не всегда, в случае, если вы знаете, какие ключевые слова указывал автор, и вам важно их сохранить, впишите их самостоятельно или вы можете присвоить собственные ключевые слова. Авторские ключевые слова выделяются желтым ярлыком, те, которые вписали вы — голубым. 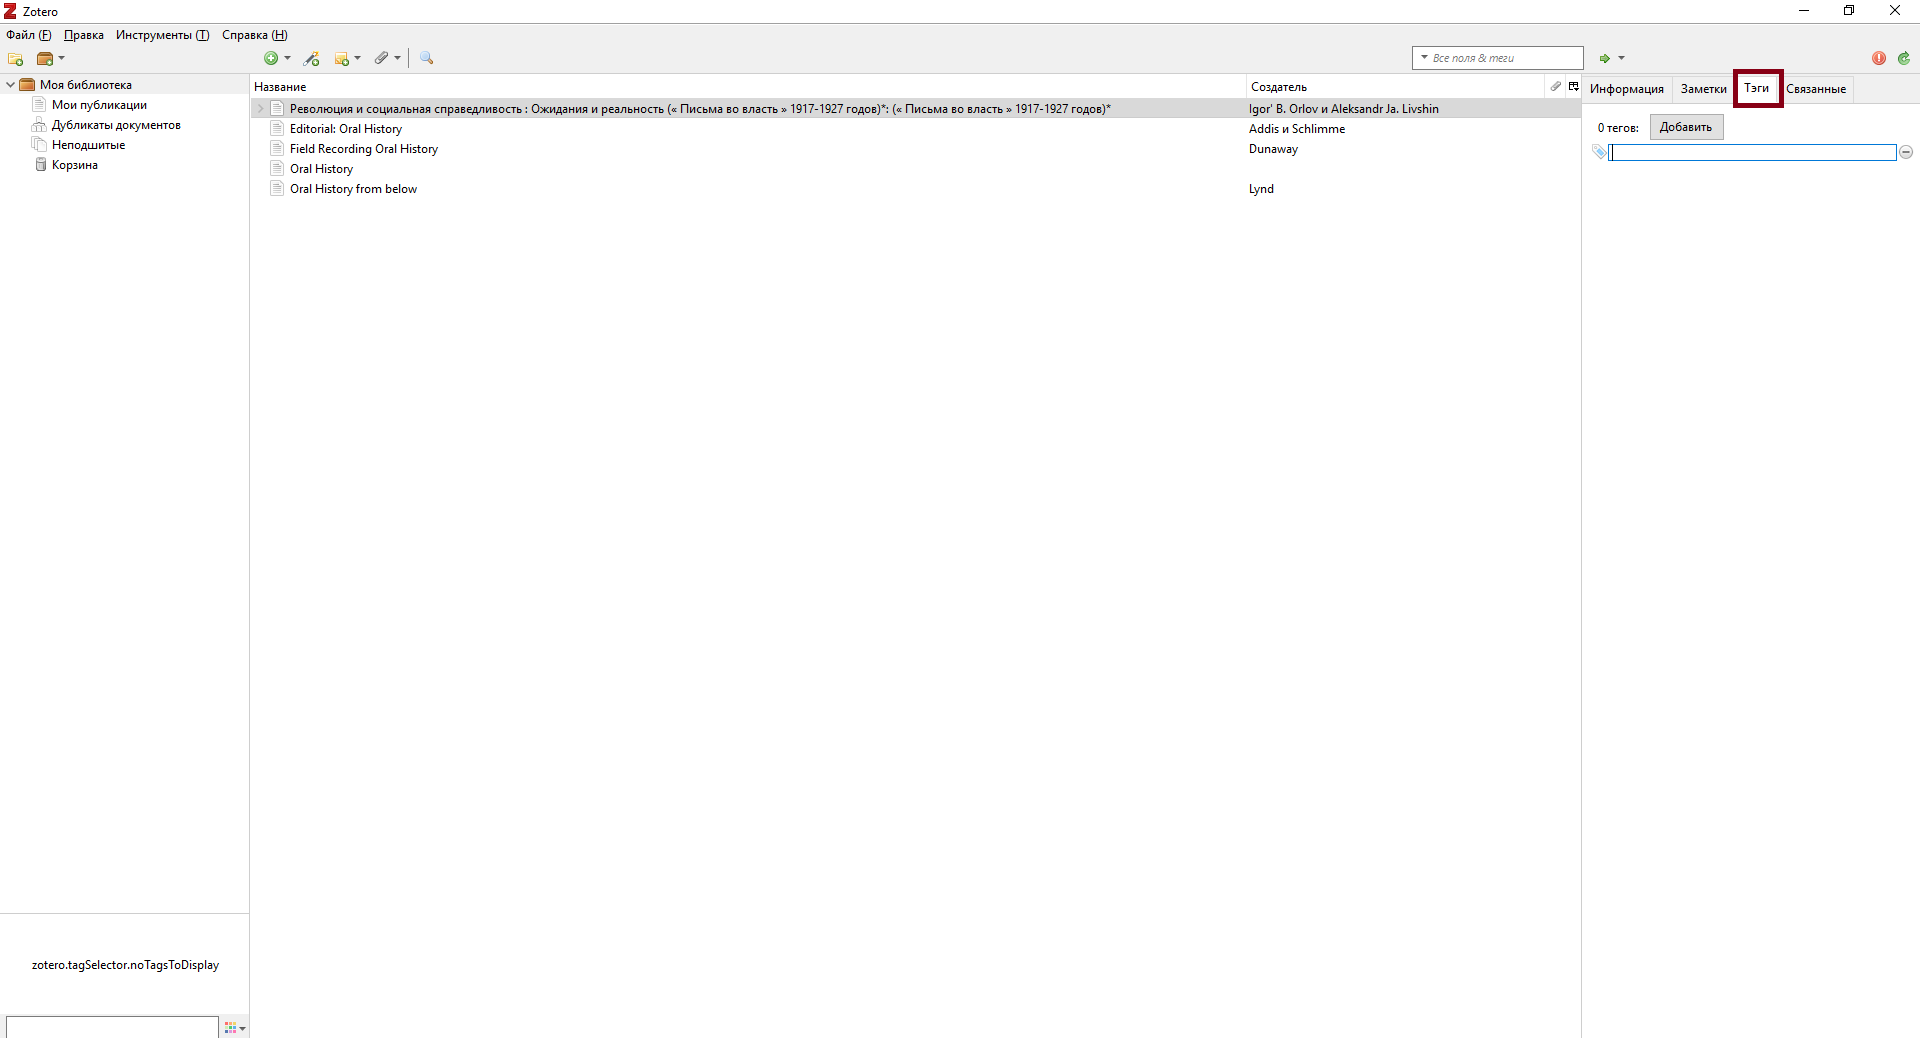
Рис. 17. Расположение вкладки «Тэги» на панели с описанием документа (справа)
Возможности поиска в Zotero
Когда исследователь пользуется Zotero длительное время и загружает туда информацию о большом количестве текстов, ему нужна навигация по документам. Для этого предусмотрен поиск по нескольким параметрам: автор, заглавие, год публикации, тэги. Если не выбирать параметр поиска, Zotero будет искать по всем полям описания документа. 
Рис. 18. Расположение поисковой строки для простого поиска (в правом верхнем углу)
Вы можете пользоваться функциями расширенного поиска для этого нажмите на значок лупы в верхней части панели меню, которая находится над списком текстов. Когда у вас будет достаточное количество материалов, вам будет удобнее пользоваться расширенным поиском. 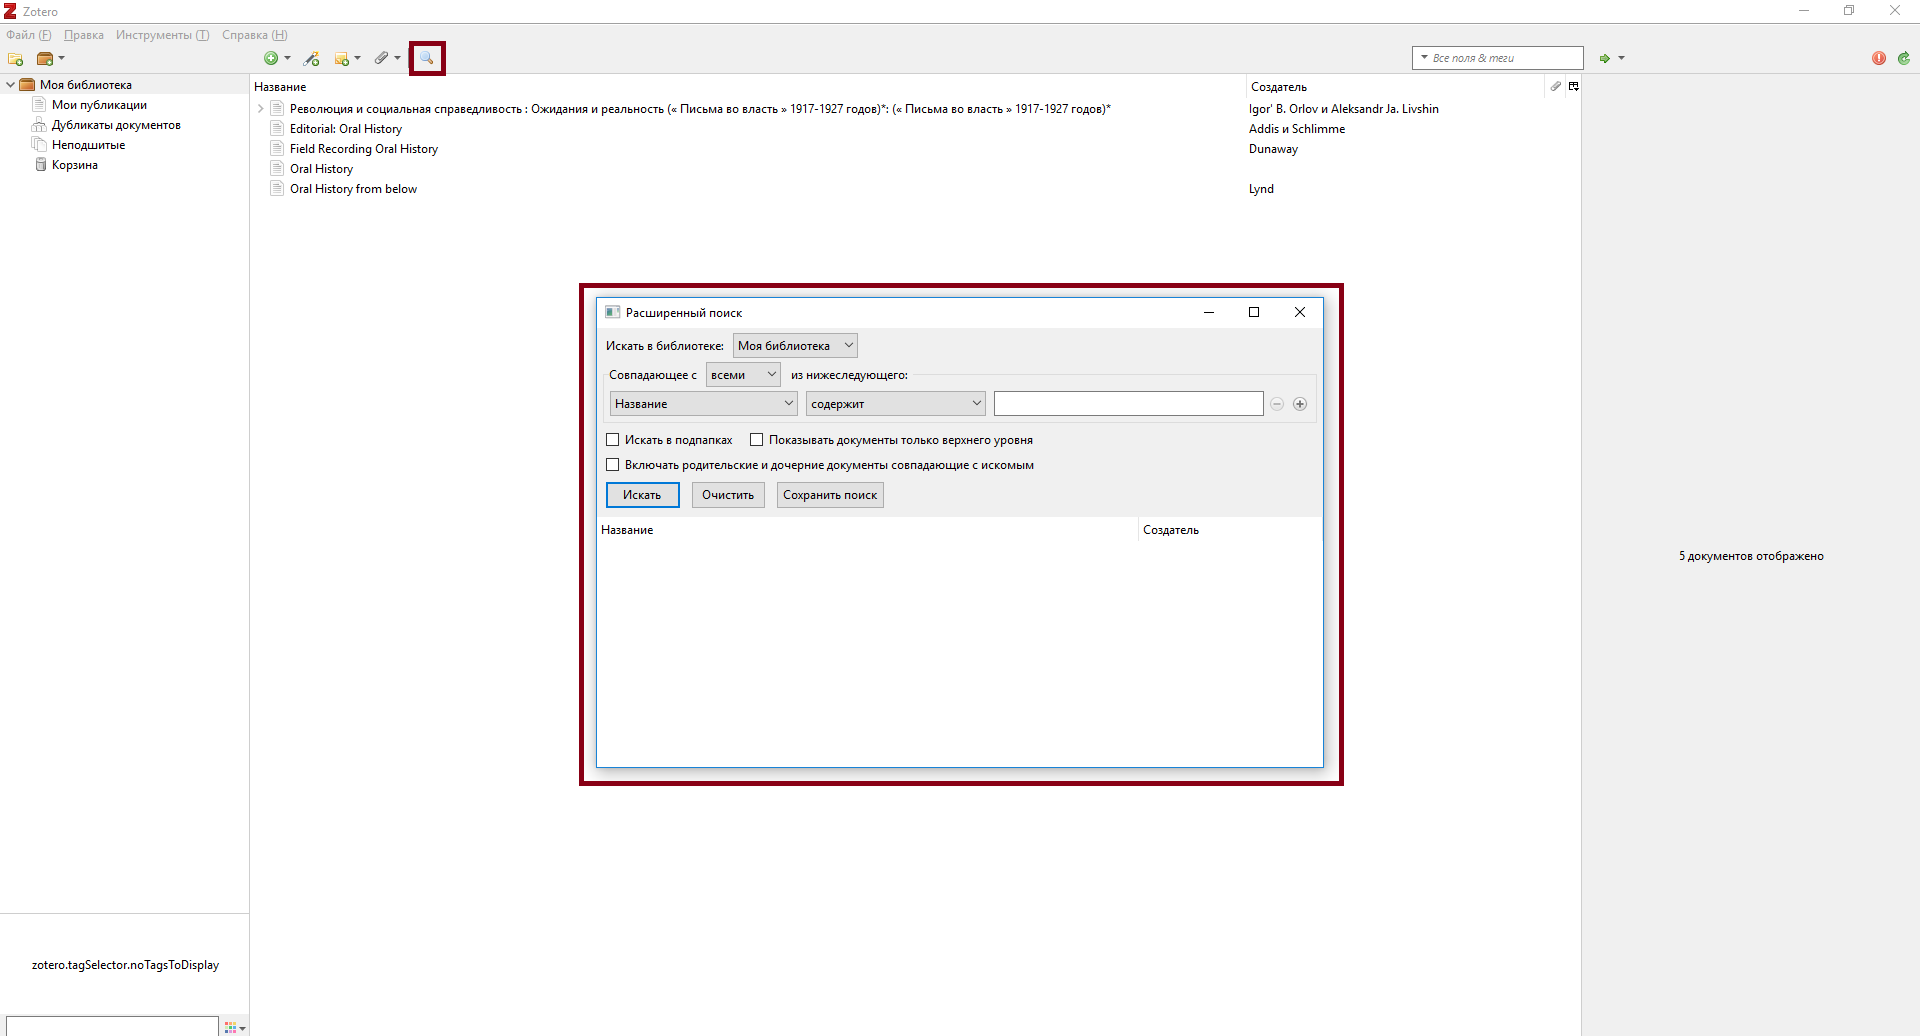
Рис. 19. Расположение кнопки для открытия расширенного поиска (на верхней панели меню) и непосредственно поле расширенного поиска
Все ключевые слова в вашей библиотеке или подборке отображаются в левом нижнем углу, здесь вы также можете искать материалы по ключевым словам. Будьте внимательны при поиске, поскольку в этой рамке авторские ключевые слова и те, которые вы вписали самостоятельно, не различаются. 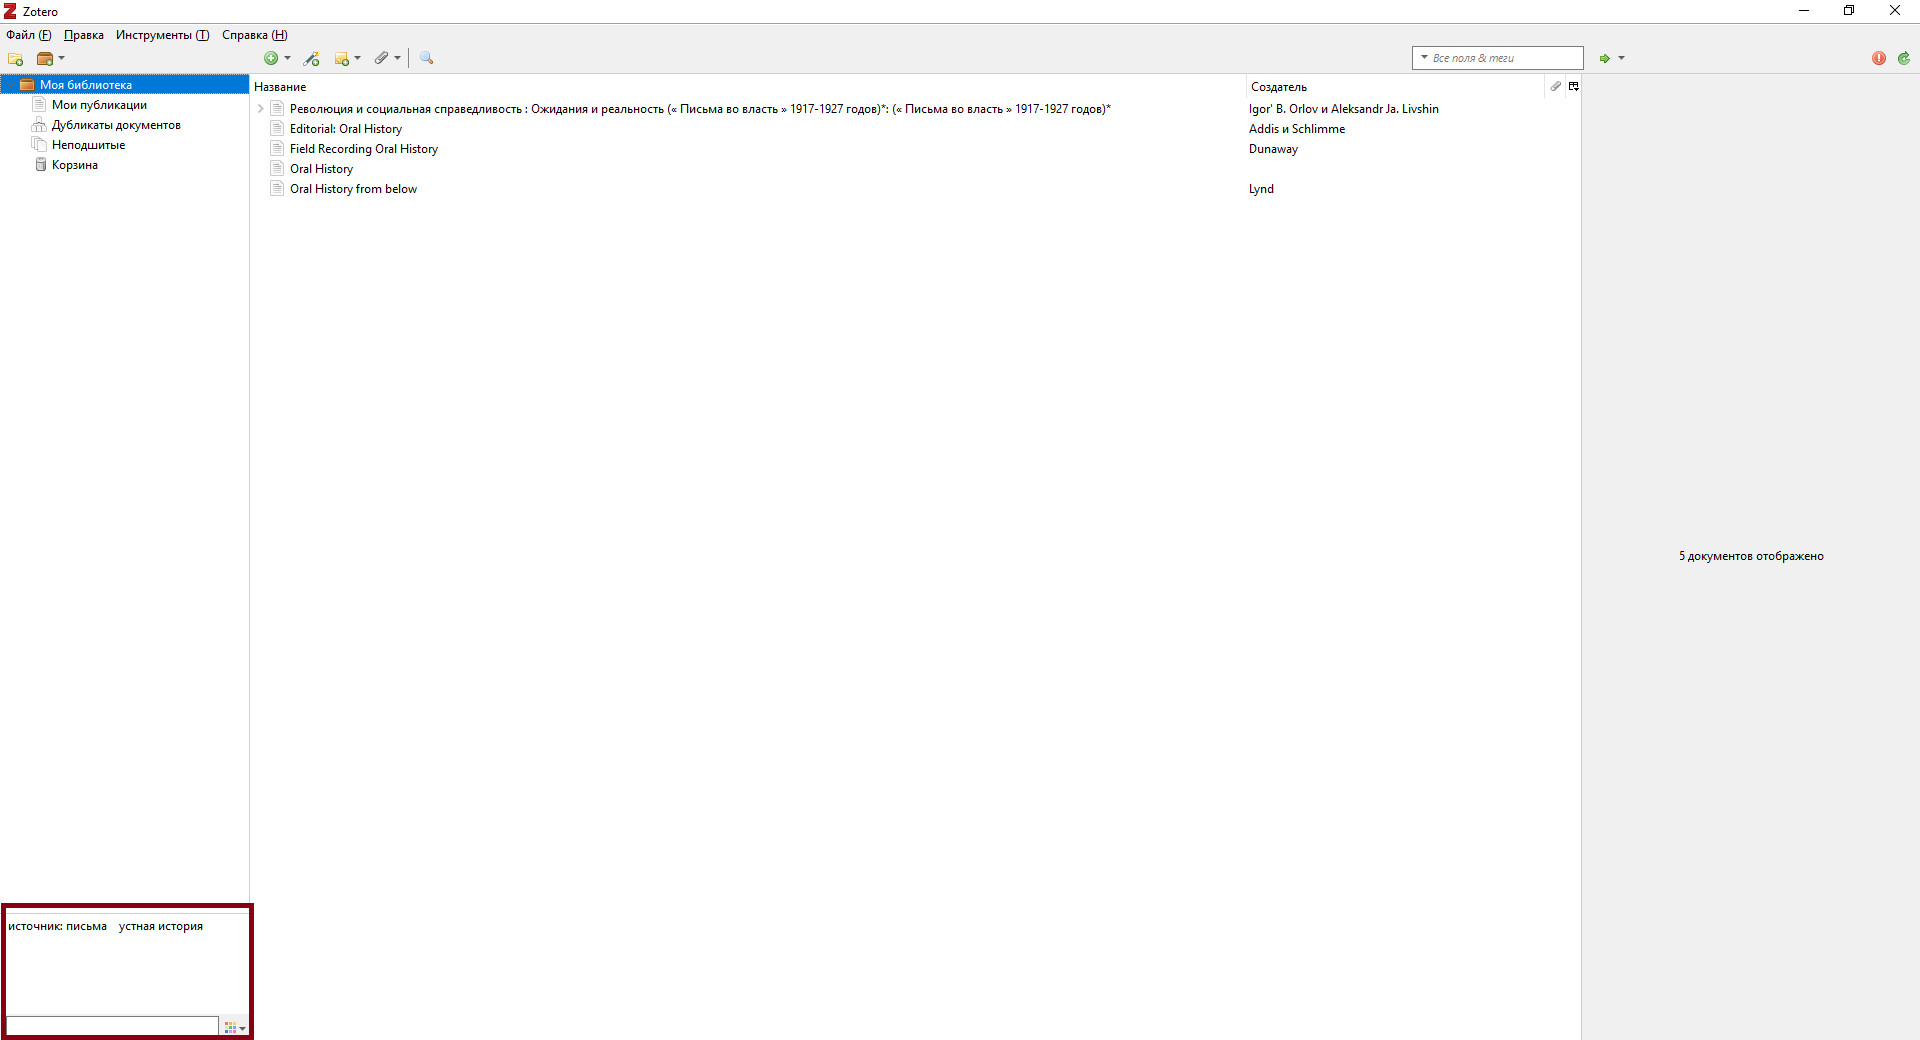
Рис. 20. Расположение всех ключевых слов в библиотеке или отдельной подборке и поле поиска по ним (в левом нижнем углу)
Если у вас остались вопросы, пишите нам на
Адрес электронной почты защищен от спам-ботов. Для просмотра адреса в вашем браузере должен быть включен Javascript.
.
Анастасия Маслова,
сотрудник отдела поддержки исследований
Научная библиотека РАНХиГС
Zotero Word for Windows Integration
This is a Firefox add-on that consists of a library written in C++ that communicates with Microsoft Word out of process using OLE Automation, a js-ctypes wrapper for said library, and a template that is installed into Microsoft Word to communicate with Zotero.
C++ Library Build Requirements
- Visual Studio (currently 2017)
- Windows XP C++ libraries (install in VS by right-clicking the project and selecting «Install Missing Features»)
- Microsoft Office (previously build with 2010, but newer versions should work)
To Build the C++ Library
- Open
build/zoteroWinWordIntegration/zoteroWinWordIntegration.sln - Change
imports.hto point to the appropriate files (may be in different places with newer Office) - Set to Release configuration in the dropdown in the toolbar
- Set to Win32 target in dropdown to the right of Release dropdown
- Build->Build Solution
- Set to x64 target in dropdown
- Build->Build Solution
Template Build Requirements
- Templates should be built with the oldest version of Word to be supported. Otherwise older versions of Word may fail to function properly. This is currently:
- Word 2007 (for the ribbonized dotm template)
- Word 2003 (for the old dot template)
To Modify/Build the Templates
- Open the template from inside Microsoft Word
- Go to View->Macros->View Macros (Ribbonized Word) or Tools->Macros->View Macros (Word 2003) and click «Edit» for one of the Zotero macros
- Edit/replace code as desired
- Go to Debug->Compile Project to ensure there are no code errors
- Run
build/template/unpack_templates.sh
Development Starter’s Guide
Start by opening the dotm/dot template in Word. Word templates have support for custom macros
and adding UI elements to call the macros, which is how the extension is implemented on Word.
RibbonUI can be edited by extracting the dotm file or using the Custom UI editor.
To edit the .dot template UI Word for Windows 2003 is needed.
In VBA macro code you will find that SendMessage
protocol is used to issue commands to Zotero process from Word. These commands are received in zotero-service.js
where they are passed to integration.js.
Zotero talks to Word via js-ctype bindings
to a C++ OLE Automation based library.
To generate new interfaces for Word interop communications you should use the Add New Class wizard in
Visual Studio and select ‘MFC Class from Typelib’. The interop API docs can be found in the MSDN.
The plugin should technically work with Word versions starting with 2003, but we have stopped supporting everything below Word 2010
due to impossible to fix bugs cropping up as time goes on and Microsoft drops compatibility themselves.
Some API calls are on a deprecation path, so we may be inevitably be forced to move
away or split the library into multiple DLLs.
Chapter Contents
- Installing Zotero
- Installing Zotero for Firefox
- Firefox version compatibility
- Word processor plugins
- Installing Zotero Standalone
- Connectors
- Bookmarklet
- Word processor plugins
- Installing Both Clients
- Updating Clients
- Troubleshooting
- Installing Zotero for Firefox
Installing Zotero
Zotero is available in several flavors. There are two versions of the desktop client: Zotero for Firefox, an add-on for the Firefox browser, and Zotero Standalone, a regular application that doesn’t require Firefox to run. You can also access and edit your Zotero libraries on the zotero.org website. There are currently no official mobile Zotero apps, although there are several third-party apps.
The desktop clients and the website have somewhat different roles. The clients have by far the most features, but require installation on a Mac, Windows, or Linux computer. The website has a more limited feature set, but allows you to access your Zotero library from any modern browser. With Zotero syncing, your local client and online libraries can be kept in sync, allowing you to use both.
You might be wondering which desktop client to use. Zotero was originally developed as a Firefox add-on. Because of this pedigree, and because Firefox is still the most extensible browser on the market, Zotero for Firefox has several features that are absent from Zotero Standalone. On the other hand, Zotero Standalone is typically somewhat faster, and connects easily to Firefox, Google Chrome, and Safari. For a full comparison, see the table below:
| Zotero for Firefox | Zotero Standalone |
|---|---|
| Integrates into Firefox, with the Zotero pane appearing minimized, in split-view, or in a dedicated tab | Runs as a dedicated program, and doesn’t require Firefox to be installed |
| Doesn’t connect to other browsers | Can connect to Firefox, Google Chrome, and Safari |
| Has better proxy support for gated resources | Starts up faster |
| Has better web translators | Runs faster |
| Can automatically import online RIS/Refer files (so you don’t have to download these to the desktop first) | Doesn’t slow down the browser |
| Allows you to print and customize Zotero reports |
If you have a hard time choosing between the two clients, or simply want to have the best of both worlds, you can install Zotero for Firefox and Zotero Standalone side-by-side. Upon installation of the second client, you will be asked whether you wish to share a single Zotero database between the two clients, or have each client have its own.
Installing Zotero for Firefox
The first step in installing Zotero for Firefox is installing Firefox, available at mozilla.org/firefox.
Then, visit zotero.org/download with Firefox and click the download button for Zotero for Firefox. If you see a pop-up saying “Firefox prevented this site (www.zotero.org) from asking you to install software on your computer.”, click the “Allow” button. Wait for the add-on to download, and click the “Install Now” button in the installation pop-up window. Complete the installation by restarting Firefox.
Firefox version compatibility
Firefox is frequently updated to add new features, squash bugs, and implement security fixes. Browsing the internet with an outdated browser is a safety risk, and we strongly recommend that you keep your browser up-to-date. The latest version of Zotero is always compatible with the latest version of Firefox.
You may encounter compatibility problems if you try to use Zotero with the development releases of Firefox (the Aurora and Beta channels). The Firefox Extended Support Release is typically supported by the latest Zotero release.
Word processor plugins
Zotero’s word processor plugins make it easy to cite Zotero items in Microsoft Word and LibreOffice. To install one of these plugins for Zotero for Firefox, visit zotero.org/download with Firefox after Zotero for Firefox is installed, and click the link to the plugins webpage. Look for the right version for your word processor and operating system, and click that version’s installation link.
Installing Zotero Standalone
To install Zotero Standalone, visit zotero.org/download and click the download link for Zotero Standalone. The webpage automatically preselects the version suited for your operating system. Then:
- Windows — open the downloaded .exe installer and follow the instructions
- Mac — drag the downloaded .dmg file into your Applications folder
- Linux — uncompress the downloaded .tar.bz2 tarball file and run “zotero”
Connectors
After installing Zotero Standalone, you can install one or more Zotero connectors. Connectors are browser add-ons that allow you to save items directly from your web browser to Zotero Standalone. There are connectors for Google Chrome, Safari, and Firefox. The Firefox connector is special: it is actually a full version of Zotero for Firefox (see Installing Both Clients below).
To install a connector, visit zotero.org/download and click the installation link for your browser(s) of choice.
When Zotero Standalone is closed (or not installed), the Google Chrome and Safari connectors will save items directly to your online Zotero library.
Bookmarklet
The Zotero bookmarklet allows you to save items from any browser directly to your online Zotero library. The features of the bookmarklet are more limited than those of the clients and connectors, but don’t require any installation of software.
To set up the bookmarklet, follow the official bookmarklet instructions.
Word processor plugins
Word processor plugins for Microsoft Word and LibreOffice are included with Zotero Standalone.
Installing Both Clients
The first time you install a Zotero client a new data directory will be created on your computer, in which the client stores its data. When you install a second client (Zotero for Firefox if Zotero Standalone is already installed, or Zotero Standalone if Zotero for Firefox is already installed), the second client will ask you whether you want it to share the data directory of the first client.
If the clients don’t share the same data directory, they will have separate libraries, although you can still keep the two clients synchronized via the internet using Zotero Sync.
If the clients do share the same data directory, Zotero for Firefox will behave as a connector whenever Zotero Standalone is open. You won’t be able to open the Zotero pane in Firefox, and clicking the Zotero logo in the Firefox Add-on Bar will open Zotero Standalone. Features specific to Zotero for Firefox are disabled. When you save items in Firefox, they end up directly in Zotero Standalone. In contrast, when Zotero Standalone is closed, Zotero for Firefox behaves as a regular full-featured client.
Updating Clients
By default, Zotero for Firefox and Zotero Standalone update automatically. To manually check for updates for Zotero for Firefox, open the Add-ons Manager of Firefox (Tools menu > “Add-ons”) and select “Check for Updates” in the gear menu. In Zotero Standalone, select “Check for Updates…” in the Zotero menu.
Also by default, the data directories of Zotero for Firefox and Zotero Standalone are stored in different locations than the clients themselves. It is therefore generally safe to uninstall and reinstall the Zotero clients (when uninstalling a client, you may be asked if your Zotero data should be deleted as well; don’t agree to this if you wish to keep your data). While relatively low-risk, we still strongly recommend that you make a backup before reinstalling clients.
Troubleshooting
If you experience problems installing the Zotero clients, see the official Zotero instructions on troubleshooting installation issues.