
Неужели невозможно найти идеальный плагин для электронной таблицы Excel?
В этой статье мы рассмотрим лучшие плагины WordPress для электронных таблиц Excel, чтобы ваш сайт оставался актуальным. Вы обнаружите, что некоторые из этих плагинов WordPress просты для начинающих. Тем не менее, большинство из них имеют расширенные функции, которые могут использовать даже опытные пользователи. Наконец, все современные темы WordPress совместимы с этими плагинами.
Предположим, вы не ищете точный плагин для электронных таблиц Excel. В этом случае эти плагины также работают для WordPress Excel Viewer, WordPress Excel Calculator, WordPress Google Spreadsheet Plugin и WordPress Table Plugins. Выберите плагин WordPress, который, по вашему мнению, подходит вам и улучшает ваш сайт.
Ниже приведены обзоры и рейтинги лучших плагинов WordPress для электронных таблиц Excel в 2022 году:
Импорт электронных таблиц из плагина Microsoft Excel
Позволяет импортировать расчетные электронные таблицы в режиме реального времени из Microsoft Excel
- Скачать облегченную версию
- Скачать Про версию
Импорт электронных таблиц из подключаемого модуля Microsoft Excel позволяет без проблем импортировать и загружать электронные таблицы с расчетами в реальном времени непосредственно из Microsoft Excel.
В отличие от компилятора Excel, этот плагин создает живую электронную таблицу в Интернете с использованием HTML и JavaScript. Этот плагин для WordPress также позволяет создавать красивые веб-приложения, такие как расчет цен, расчет финансов, расчет инвестиций, расчет состояния здоровья, отображение графиков и т. д.
Этот подключаемый модуль позволяет автоматически проверять данные через веб-форму, предоставляя вам доступ к функциям Excel, включая формулы и функции.
Использование надстройки Spreadsheet-converter для Microsoft Excel необходимо для преобразования вашей работы в веб-формат. Надстройка совместима с Microsoft Excel 2007 и более поздними версиями.
💵 Чтобы загрузить версию Lite, это бесплатно. Чтобы купить Премиум, это 35 долларов.
Ключевая особенность:
- Вы можете создавать общие формы
- Вы можете импортировать расчетные таблицы
- Вы можете создавать веб-приложения
- Электронные таблицы доступны в Excel и других форматах.
- Существует несколько способов автоматизации процесса проверки данных.
Плагин для создания таблиц WP
Плагин для таблиц WordPress

- Скачать облегченную версию
- Скачать Про версию
Используя плагин WP Table Builder, вы сможете создавать адаптивные таблицы на своем веб-сайте WordPress благодаря функциям, которые он предлагает. Плагин делает создание таблиц более доступным и интуитивно понятным, чем когда-либо прежде.
Этот плагин был выбран потому, что он позволяет импортировать файлы CSV и XML на ваш веб-сайт WordPress и отображать их в виде таблиц. Плагин может импортировать как отдельные файлы, так и несколько файлов одновременно; поэтому ваши файлы должны быть предварительно сжаты.
Также можно импортировать таблицы из плагинов TablePress — еще одна отличная функция, предлагаемая плагином. Помимо таблиц, файлы CSV/XML также можно экспортировать, если вы хотите использовать их на другом веб-сайте.
Этот плагин для работы с электронными таблицами доступен в репозитории WordPress для загрузки и использования любым пользователем. Существует также платная версия с более полезными функциями. К сожалению, панель настроек имеет вкладки в маленьком месте; поэтому прокрутка не была добавлена в CSS.
💵 Бесплатно скачать версию Lite и версию Premium.
Ключевая особенность:
- Количество таблиц, которые можно добавить на страницу с помощью коротких кодов, не ограничено.
- Для использования доступен редактор перетаскивания
- Редактор Гутенберга полностью согласен
- Его можно настроить в изощренной манере
- Импорт и экспорт стали проще
Плагин таблиц ниндзя
Лучший плагин WP DataTables для WordPress

- Скачать облегченную версию
- Скачать Про версию
Как и другие плагины для таблиц WordPress, такие как WP Table Builder, в Ninja Tables вы можете создавать расширенные таблицы данных, содержащие данные любого типа. Этот виджет позволяет вам создавать таблицы, используя ваши собственные пользовательские переменные.
В дополнение к файлам CSV вы также можете импортировать данные из файлов JSON с помощью этого плагина электронных таблиц WordPress для Google. И самое приятное то, что вы можете подключить свою учетную запись к своему блогу. Любые изменения, которые вы вносите в электронную таблицу, будут отражены в таблице сразу после сохранения.
Функция условного форматирования столбцов позволяет создавать настраиваемые таблицы на основе условий, применяемых к каждому столбцу. Вы также можете выделять строки, столбцы и ячейки в зависимости от ранее выбранных правил.
На этот плагин не повлияет таблица из тысяч строк. Это не замедлит работу сайта с тысячами точек данных.
Это единственный плагин, который может создавать внешние стили таблиц с помощью самых передовых инструментов, включая Footables, Bootstrap 3, Bootstrap 4, Symmetric UI и другие.
💵 В версии Lite цена бесплатна. В версии Premium цена составляет 49 долларов.
Ключевая особенность:
- Возможна интеграция с WooCommerce.
- Можно интегрировать Google Таблицы с Google Диском
- Возможно форматирование столбцов определенным образом
- На боковой панели доступна опция для просмотра сообщений WordPress.
- Функция перетаскивания доступна для столбцов и строк.
Плагин TablePress
Позволяет легко создавать красивые таблицы и управлять ими

- Скачать TablePress
TablePress, самый популярный плагин таблиц для WordPress, позволяет импортировать и экспортировать таблицы из файлов Excel, CSV, HTML и JSON.
Интерфейс, напоминающий электронную таблицу, упрощает процесс редактирования таблиц, так как вам не нужно писать код. Этот плагин позволяет создавать красивые таблицы с такими функциями, как фильтры, нумерация страниц и сортировка, и загружать их на свой веб-сайт или в блог.
Кроме того, он поставляется с расширениями, которые расширяют его функциональные возможности. Самое приятное, что все расширения бесплатны. Можно изменить стиль таблицы и сделать ее более современной, поместив команды CSS в поле «Пользовательский CSS» на экране «Параметры плагина».
Кроме того, можно добавить определенные функции вашей таблицы, такие как сортировка, нумерация страниц, фильтрация, чередование цветов строк, выделение строк и печать имен или описаний, просто установив соответствующие поля на экране «Редактировать».
К сожалению, хотя внешний код JS поддерживает «положительный» поиск в его текущей форме, он не может поддерживать обратный поиск.
💵 Это бесплатно. Плата за плагин не взимается.
Ключевая особенность:
- Плата за использование этой услуги не взимается
- Это довольно легко использовать
- Возможно использование шорткодов
- Обеспечивает поддержку широкого спектра форматов файлов
- В вашем распоряжении мощный редактор
Обновления в реальном времени из плагина Excel
Плагин Ipushpull для WordPress

- Скачать облегченную версию
- Скачать Про версию
Как и TablePress, с помощью плагина Live Updates From Excel вы можете легко отображать данные Excel на своем веб-сайте, используя всего несколько строк кода, и показывать обновления данных в реальном времени из электронной таблицы.
Этот плагин калькулятора WordPress Excel позволяет вам отображать, например, подробные результаты в реальном времени для каждого вида спорта для вашей команды. Данные автоматически обновляются независимо от того, изменяется ли информация вами или третьей стороной.
Чтобы загрузить данные на сервер этого плагина, вы должны сначала загрузить его, а затем выбрать данные, которые вы хотите загрузить.
Чтобы отобразить данные на вашем сайте, вам просто нужно установить плагин, а затем позволить ему извлекать данные из вашей электронной таблицы и вставлять их в ваши сообщения и страницы с помощью шорткодов. Это так просто.
Поскольку данные обновляются автоматически, не требуя от пользователя обновления страницы, ваш сайт отображает живой контент без обновления страницы пользователем.
💵 Премиум-версия плагина Live Updates From Excel стоит 50 долларов в месяц, а версия Lite бесплатна.
Ключевая особенность:
- Вы можете использовать функцию защиты паролем
- Вы можете использовать WP Shortcode Generator для создания коротких кодов.
- Данные могут быть встроены в Excel с помощью перетаскивания
- Есть диаграммы Excel для использования
- Вы можете получать обновления ваших данных в режиме реального времени
Плагин турнирной таблицы
Плагин таблицы, который вы можете использовать для создания сортируемых и адаптивных таблиц

- Скачать облегченную версию
- Скачать Про версию
Хотя плагин League Table был специально разработан для спортивных веб-сайтов, его высокий уровень настройки делает его подходящим практически для любого веб-сайта, как следует из его названия. Пользователи могут легко создавать таблицы с помощью этого плагина, нажав кнопку, поскольку редактор прост.
Простым копированием и вставкой информации из редактора электронных таблиц, такого как Microsoft Excel, OpenOffice, Google Sheets и т. д., в редактор плагина таблица может быть создана и опубликована менее чем за 30 секунд.
Используя этот плагин для просмотра Excel для WordPress, вы можете настроить свою электронную таблицу с более чем 135 параметрами, включая пользовательские цвета, шрифты, границы, адаптивные макеты и т. д. Если хотите, вы можете настроить размер ячеек и добавить к нему шорткод, как только вы создали нужную таблицу.
Кроме того, плагин создает таблицы с автоматическим или фиксированным макетом. При желании вы можете установить ширину таблицы и расстояние между отдельными столбцами.
💵 В настоящее время доступны профессиональная версия за 51 доллар и бесплатная облегченная версия.
Ключевая особенность:
- Обеспечивает возможность поддержки нескольких сайтов
- Для столбцов доступны различные методы сортировки.
- Поддерживает многоязычный функционал
- Возможно использование шорткода
- Вы можете создавать электронные таблицы интуитивно понятным способом
В целом можно сказать
Мы собрали коллекцию передовых и практичных лучших плагинов для электронных таблиц Excel. Создайте уникальный веб-сайт с помощью этих плагинов.
Я благодарен за понимание, предоставленное этим ресурсом. Каждый месяц публикуется новая статья о лучших темах WordPress для блоггеров и лучших плагинах WordPress для блоггеров. Вы можете голосовать за эти статьи, ссылаться на них и делиться ими с другими.
Источник записи: betterstudio.com
Import Spreadsheets from Microsoft Excel is a WordPress plugin that allows you to import live, calculating spreadsheets from Microsoft Excel to your blog or website in WordPress. The plugin is free but the calculating web page must have been generated with a paid license for SpreadsheetConverter, an add-in for Excel that converts the Excel spreadsheet to HTML and the formulas in Excel to JavaScript. The uploaded online spreadsheet is live and looks and feels exactly like in Excel. Now you can use Excel everywhere!
SpreadsheetConverter works like an Excel compiler creating live online spreadsheets in HTML and JavaScript. It is not a simple Excel viewer; the web spreadsheet plugin runs all your formulas in real-time – all the cells and charts are live!
You usually need to have your own WordPress server to install plugins. It may not be possible to install plugins on WordPress.com or other shared WordPress servers. If you are unable to use this plugin, you can use our Publish to Cloud service instead. It is built into SpreadsheetConverter and uploads the calculator to a cloud server. In most cases, this works just as well.
Note: before you upload a spreadsheet, you must use the SpreadsheetConverter add-in for Microsoft Excel to convert your spreadsheet to web format. To use this add-in, you must have Microsoft Excel 2007 or later for Windows – and the basic skills to create spreadsheets with it. Prices for unlimited, lifetime licenses for the current version start at $254. There are no extra fees per server, month, page or visitor.
We’d love to help you try SpreadsheetConverter on one of your own spreadsheets. You don’t have to install the software to test it. Just send one of your own spreadsheets, and we’ll send it back as a live, intelligent web form or calculator. Use the online form and remember to attach the spreadsheet!
This service is free, because it’s so simple to convert your spreadsheet to web format with SpreadsheetConverter that we can do it in almost no time at all. If you want to keep your web calculator or form up-to-date without ever installing or learning the converter, you can have us do all the conversion work for you, forever, using the paid conversion service.
SpreadsheetConverter is an advanced product that may require some time to learn. If you don’t want to invest in this new skill set right now, you can test the plugin right now with example files in the plugin’s ZIP file – read more below.
Please don’t post negative reviews until you have at least read the FAQ. Even better: contact support for any difficulties you have; we will help you get started for free!
Insert a live spreadsheet in your blog with just a few clicks
Any Excel spreadsheet can be published on the web:
- Open the spreadsheet in Excel and click Convert on the SpreadsheetConverter toolbar to have the Excel converter create a web spreadsheet.
- Click WordPress Plugin on the SpreadsheetConverter toolbar to create an SSC Calculator file with everything you will need in WordPress.
- Use this plugin to upload the SSC Calculator file to WordPress.
- Embed the calculator or form into one or more of your posts or pages in WordPress.
- Click Publish in WordPress and your calculator goes live, online on the web!
Please visit the Embed a spreadsheet in WordPress, FAQ and Screenshots sections for more detailed instructions.
A full online help for the plugin is available on the SpreadsheetConverter website.
Create beautiful web apps
At last you can create online calculators for your website without the help of a programmer. All you need is Microsoft Excel. Help your visitors do a better job, and they will return to your website for more.
- Price calculation: Online pricing calculators help your customers get the total price including options, maintenance etc.
- Financial calculation: provide online mortgage calculators, interest calculation, loan calculators or online lease calculation.
- Calculators for government and counties: online income tax calculation, online social benefits, online payroll calculators.
- ROI: Use online return on investment calculation to better show the benefits of your product, or calculate internal rate of return (IRR).
- Technical and engineering calculators: online dimensioning tools, online HVAC calculations, load calculators, concrete calculation, torque calculation, area calculators, volume calculation, electrical calculation, power calculation.
- Health calculators: online body mass index calculator, online calorie calculation, online body fat calculator.
You can use any feature of Excel on the web, including formulas and functions, to validate data entry, select intelligent default values or show customized images or maps.
- Create mobile-friendly, responsive calculators that automatically adapt to different screen widths, portrait/landscape orientation etc.
- Embed xls files with smart table lookup in an unlimited number of background data tables.
- Use graphical widgets like buttons and sliders to make the calculator easier to use.
- Use advanced data validation including Excel’s Data Validation presets.
- Show live graphs that automatically update when values are changed.
- Upload spreadsheets to any standard web server.
- With Real-time Sync, two or more persons can collaborate on an advanced calculation in real-time.
- Fetch live data from corporate databases when run on Node.js servers.
- Build calculating web apps that can be started directly from the iPhone or Android Home screen – even when the phone is offline.
Our calculators are completely self-contained and do not require any additional plugins. There is nothing to install in your server or website except this plugin, and it is only used when you edit. You don’t need any programming skills and there is no change to configuration or settings.
Build smart web forms with automatic data validation
Publish your electronic forms on the web and have completed web forms sent directly to your inbox. If you get a lot of electronic forms for post-processing, have forms saved in a cloud database as they arrive.
- Website contact forms with quality assurance for all contact data including e-mail addresses, phone numbers and addresses.
- HTML order forms with automatic calculation of totals and weights.
- Web booking forms with built-in input data validation.
- Online purchase order forms with automatic assignment of cost center and accounts.
- Web surveys converted from xlsx files.
The tabular Excel worksheet makes it very easy to design easy-to-use forms. The web page inherits the formatting in Excel and supports the use of graphical themes.
You can use any feature of Excel, including formulas and functions, to validate data entry, select intelligent default values or show customized images or Google maps.
- Create mobile-friendly, responsive forms that automatically adapt to different screen widths, portrait/landscape orientation etc.
- To make it easier to understand a large form, split into two or more sections and let users navigate between the sections using tabs, next/previous buttons or sliding panels.
- Use graphical widgets like menus and calendars to make the form easier to use.
- Hide rows or complete sections of a form until you know they are applicable.
- Allow file attachments with submitted web forms.
- Form fields can be made mandatory. Use hidden fields to discretely include supplemental information in the form.
- With Real-time Sync, two or more persons can collaborate on a form in real-time.
- Fetch live data from corporate databases when run on Node.js servers.
- Build apps for mobile data entry that can submit smart forms directly from iPhone or Android devices – even when the phone is offline.
- Use live, interactive charts that invite users to point-and-click, and the charts automatically update when values are changed.
Our forms processing services are completely self-contained, and the only thing you need to provide is an e-mail address. There is nothing to install in your server or website except this plugin, and it is only used when you edit. You don’t need any programming skills and there is no change to configuration or settings.
Create simple sign-up lists and other shared forms
Want to bring people together for a football game, a beach party or a barbecue? The Real-Time Sync feature allows all the users of a web spreadsheet to share the same content. Just create a spreadsheet with column headings for the information you want from each participant, e.g. Name and Age. Publish the empty list on your blog with the Real-Time Sync feature enabled, and all the readers of your blog will see who has registered for the event.
More information
Learn more about the plugin in the full Online Help for the plugin.
Learn more about the SpreadsheetConverter add-in for Microsoft Excel on the SpreadsheetConverter web site.
Installation instructions
Requirements
To use the plugin, you need the following:
- A web page created with a paid or free-trial license for SpreadsheetConverter. The plugin does not import unconverted spreadsheets. An example file is delivered with the plugin.
- Your paid SpreadsheetConverter license must be for the Professional Edition.
- You must use the same major version of the plugin as your SpreadsheetConverter license is for.
- A WordPress server that allows you to install plugins and use iframes. If you use WordPress.com or other hosted environments that limit this, it’s usually just as easy to use Publish to Cloud instead.
- Your WordPress server must be running version 4.5 or later of WordPress. For security reasons, WordPress should always be updated to the latest stable version.
- The plugin supports PHP 5, PHP 7, and PHP 8.
- The plugin requires that the ZipArchive extension for PHP is installed and enabled.
- You will need the help of a WordPress Administrator or be one yourself to install and maintain the plugin. Unfortunately we are unable to support you with basic WordPress issues.
Test it with the example file!
To upload a spreadsheet to WordPress, you first convert it to web format with an add-in for Excel called SpreadsheetConverter. Excel and the add-in will be your primary tools when publishing spreadsheets on your website.
You should first test the plugin with the example files that come with it. If you like it, you can then install SpreadsheetConverter in Excel and learn how to convert your own spreadsheets for the web.
Install the plugin file directly from the WordPress plugin directory
- Login to the WordPress administration page for your server.
- Click on Plugins in the left-hand menu. If you cannot find this in the menu, contact your WordPress administrator.
- Click on Add New.
- Type import spreadsheets in the search box on the right-hand side, and navigate to the plugin Import Spreadsheets from Microsoft Excel.
- Click on Install Now for this plugin.
- Locate the new plugin in the list of installed plugins and click on Activate Plugin.
- The plugin is now installed and active. You should now see a new menu option Upload SSC Calculator in the left-hand menu.
Manually upload the plugin file to your WordPress server
- Login to the WordPress administration page for your server.
- Click on Plugins in the left-hand menu. If you cannot find this in the menu, contact your WordPress administrator.
- Click on Add New.
- Click on Upload Plugin on the Add Plugin page.
- Click on Choose File on the Add Plugin page.
- In the File Explorer window, select the plugin zip file and click Open.
- Click on Install Now on the Add Plugin page.
- Locate the new plugin in the list of installed plugins and click on Activate Plugin.
- The plugin is now installed and active. You should now see a new menu option Upload SSC Calculator in the left-hand menu. This is where you start when you want to upload a converted calculator to WordPress.
A full online help for the plugin is available on the SpreadsheetConverter website.
Unfortunately, we are unable to support you in normal day-to-day WordPress activities. If you have problems installing the plugin, begin by contacting your local WordPress Administrator or webmaster. If they find any errors in our plugin, they are welcome to report the error in the support forum for the plugin.
Uploading instruction
You upload the result of the conversion in SpreadsheetConverter to WordPress in the form of an SSC Calculator file. The SSC Calculator file contains everything that WordPress needs to run the calculator.
Uploading a new calculator
Follow these instructions only when you upload a new calculator for the first time. If you later want to update an existing calculator that you have already uploaded at least once to WordPress, there are separate instructions below.
Creating the SSC Calculator file
With the plugin, you get two example files, one that you will use for this initial upload and one for the update described below.
Uploading the SSC Calculator file
- In WordPress, locate the Upload SSC Calculator link in your WordPress menu. If you don’t see this link, please verify that you have installed the plugin correctly according to the instructions above.
- Click on Upload SSC Calculator, then Add New if you are about to upload a new calculator that you haven’t uploaded before.
- Enter a unique, descriptive name for this particular calculator in the Enter calculator name field. For the example file, you can use Weekly Time Card.
- Click on Choose Package and select the SSC Calculator file. The example file provided with the plugin is in the examples > 1-upload folder of the plugin ZIP. Locate the weekly-time-card.zip file, select it and press Open.
- Press the Publish button and the SSC Calculator file will be uploaded to WordPress. It will not be visible in any post or page until you embed it (read more below).
Embedding instructions
Before you embed a spreadsheet, you must follow the steps above to upload the SSC Calculator file to WordPress. Now, it’s time to embed the calculator in one or more web pages.
Using the Block editor
To insert a converted spreadsheet in WordPress using the Block editor:
- In WordPress, click on the Upload SSC Calculator link in the menu.
- In the list of calculators, locate the calculator you want to embed.
- In the column Calculator iframe, click on the Click to Copy button for the calculator you want to embed. This copies the complete embed code to the clipboard.
- Open the Block editor for the page or post where you want the uploaded calculator to appear.
- Click on the plus sign to insert a new block. Type “html” in the search box and select to insert a Custom HTML block.
- Move the Custom HTML block to the correct position on the page, either by dragging it or using the up/down arrows.
- Select the HTML view for the Custom HTML block.
- Paste the embed code HTML into the Custom HTML block with Ctrl+V or right mouseclick+Paste.
- Select the Preview view for the block.
- If you cannot see the entire calculator, or if scrollbars appear, or if there’s too much whitespace around the calculator, you may need to adjust the size of the iframe. Select the HTML view for the Custom HTML block, adjust the height and width parameters in the table id=”hasIframe” tag that represents the calculator, switching back and forth to the Preview tab until the calculator looks good. Don’t be afraid of leaving a considerable margin around the calculator.
- Save your changes by clicking Publish.
- If you want to use an uploaded calculator on more than one page, just repeat the above once for every page where you want it to appear.
Using the Classic editor
To insert a converted spreadsheet in WordPress using the Classic editor:
- Open the Classic editor for the page or post where you want the uploaded calculator to appear.
- Place the cursor at the right spot and click Embed SSC Calculator.
- In the list called Calculator Link, scroll to and select the calculator you want to embed.
- If necessary, modify the size of the calculator frame in the web page using the fields Iframe Width and Iframe Height. Click Insert Calculator.
- If you don’t see the calculator, only a set of HTML tags, click on the Visual tab for a preview of the page.
- If you cannot see the entire calculator, or if scrollbars appear, or if there’s too much whitespace around the calculator, you may need to adjust the size of the iframe. On the Visual tab, drag the handle to resize the calculator frame. For better control, switch to the Text tab, adjust the height and width parameters in the table id=”hasIframe” tag that represents the calculator, switching back and forth to the Visual tab until the calculator looks good. Don’t be afraid of leaving a considerable margin around the calculator.
- Save your changes by clicking Publish.
- If you want to use an uploaded calculator on more than one page, just repeat the above once for every page where you want it to appear.
A full online help for the plugin is available on the SpreadsheetConverter website.
Updating an existing calculator
If you want to update an existing calculator that you have already uploaded at least once to WordPress, follow these instructions.
Creating the SSC Calculator file
With the plugin, you get two example files, one that you used above for the initial upload and one that you can use now for the update.
Uploading the SSC Calculator file
- In WordPress, locate the Upload SSC Calculator link in your WordPress menu. If you don’t see this link, please verify that you have installed the plugin correctly.
- Click on Upload SSC Calculator in the WordPress menu, then All Calculators.
- Move the mouse cursor over the title of the calculator you want to update, so that its menu links appear. Click on the Edit link.
- Click Choose Package and select the updated SSC Calculator ZIP file in the examples > 2-update folder of the plugin ZIP.
- Press Update. The new version is uploaded and automatically used instead of the old one, in all pages and posts that you have already embedded it.
Caching may delay updates to your web pages
If an update to a calculator does not immediately appear on the web or in the preview in the plugin, it may be a result of caching, which is beyond our control. Caching typically introduces a delay of 1-48 hours in the publishing of new or updated web content. When you test static web content like uploaded calculators, you can try adding a fake “version” parameter to the link to the calculator:
https://example.com/calculator.html?version=1
When you update the calculator, just remember to change also the version number in the links to it, which should force the cache to fetch the updated content. Note: you only need the version parameter during testing, to verify that the update went through correctly. In your production environment, the updated version will be loaded slightly later as the cached copies of the previous version expire.
A full online help for the plugin is available on the SpreadsheetConverter website.
Deletion instructions
Using the Block editor
To remove a calculator that you previously embedded in page or post:
- Select the Custom HTML block that contains the embed code for the calculator.
- Open the block menu for the block and select Remove Block.
- Save your changes by clicking Publish.
Using the Classic editor
To remove a calculator that you previously embedded in page or post:
- Switch to the Text mode.
- Remove the entire “hasIframe” table, from the table id=”hasIframe” statement to the /table statement.
- Switch to the Visual mode to verify the result.
- Save your changes by clicking Publish.
A full online help for the plugin is available on the SpreadsheetConverter website.
I want to test this with my own spreadsheets!
To test the plugin with your own spreadsheets, you need to download the SpreadsheetConverter add-in for Excel and install it in your system. After the free trial, you will be required to purchase SpreadsheetConverter at prices starting from $254, including the WordPress plugin.
- Verify that you are using a PC with a supported version of Windows and Excel, as listed in the requirements on the download page. Our examples convert without issues also in Windows on ARM devices.
- Download the Excel add-in.
- Install the Excel add-in by running the installation file in a Windows PC.
- In Excel, open the “Weekly Time Card” example spreadsheet. If you open Excel from the installation wizard, this file opens automatically. Otherwise, use the Try Examples section of the SpreadsheetConverter ribbon in Excel to open the “Weekly Time Card” example.
- Click on the Start tab in the example spreadsheet. This starts a small wizard that will show you how to edit a spreadsheet and convert it to a web page. Follow the simple, step-by-step instructions in the example spreadsheet until you have successfully created a web version of it. If you run into any problems in this process, please contact our helpdesk.
- Congratulations! You have now created a live web calculator! Play with it a while in the browser window to get a feel for how it works and what it does.
- In Excel, select the SpreadsheetConverter ribbon and click on the link in the ribbon to request a 30-day free trial license key.
- When you get the license key from us, select the SpreadsheetConverter ribbon in Excel and activate the license key.
- In Excel, select the SpreadsheetConverter ribbon and verify that there is a WordPress plugin button in the Publish section. If not, please contact our helpdesk.
Now, you’re ready to upload the converted web page to WordPress according to the instructions above.
При создании сайта очень часто происходит ситуация, когда необходимо вставить на страницу таблицу excel. Здесь важна не столько таблица, как дать возможность посетителям самим производить расчеты на сайта. Такая функция будет удобна для многих коммерческих сайтов, когда необходимо разместить калькулятор для клиентов. Именно поэтому, сегодня я расскажу, как вставить на сайт таблицу excel с возможностью редактирования.
Какие таблицы можно вставлять на сайт
Для примера я буду рассматривать сайт на WordPress, однако мой способ подойдет практически для любой CMS (таких как 1С-битрикс, ModX, Joomla, OpenCart). Чтобы вставить на сайт простой калькулятор, можно установить плагин калькулятора (Calculated Fields Form и т.д.) либо воспользоваться сторонними сервисами для их создания. Создав калькулятор в таком сервисе, можно просто вставить его код на соответствующую страницу.
Главным недостатком установки калькулятора на сайт является его ограниченный функционал. Как правило, можно вставить 2-3 переменных, которые вводятся пользователем, ответ подсчитывается по заранее установленной формуле. Например, я могу подсчитать количество обоев, требуемых в комнате, но не могу узнать количество разных обоев на всю квартиру.
Для того, чтобы решить эту задачу, необходимо ввести множество переменных, для которых необходимо разрабатывать собственный скрипт. Отличным решением такой проблемы станет создание файлы excel, в котором можно рассчитать множество параметров, и с помощью формул подсчитать итоговое значение. Но при кажущейся легкости вопроса, можно столкнуться с целым рядом проблем.
Как вставить таблицу для расчетов на сайт
Если Вам необходимо вставить на сайт таблицу с возможностью правки со стороны пользователя, одним из самых оптимальных вариантов будет вставка таблицы excel. Данный вариант отлично подойдет как для крупных сайтов (расчёт сложных показателей), так и для небольших сайтов визиток.
Вы можете вставить на сайт виджет таблицы Google Sheets, однако в настоящий момент ее нельзя править. С помощью специальных плагинов можно вывести вывод на сайт таблиц excel, однако обычный посетитель не сможет вносить в неё изменения.

Одним из лучших вариантов решения данного вопроса является вставка виджета таблицы excel из облака OneDrive. Благодаря этому способу пользователь сможет вносить правки в опубликованный файл, не изменяя исходный документ.
Размещение на сайте документа Excel с возможностью изменения со стороны пользователя
Чтобы разместить документ Excel в облаке OneDrive необходимо пройти регистрацию на сайте https://www.office.com/?ms.officeurl=webapps Регистрация предельно проста, необходимо указать свой e-mail и пароль, после этого сразу можно начинать пользоваться сервисом.

Далее заходим в облачный сервис OneDrive и авторизовываемся в нем с помощью полученного ранее логина и пароля. Вы попадете на страницу с названием “мои файлы”. Теперь можем приступать к созданию таблицы:
- Нажимаем на кнопку “+ создать” и выбираем файл excel.
- Если документ уже готов, то нажимаем на кнопку “добавить”.
- В созданном или загруженном файле excel необходимо выбрать пункт “файл” и нажать на функцию “поделиться”.
- В открывшемся окне выбираем функцию “внедрение”
- Чтобы запустить работу с файлом, необходимо нажать на кнопку “создать”.
- Вам откроется функционал по установке виджета Excel на сайт.

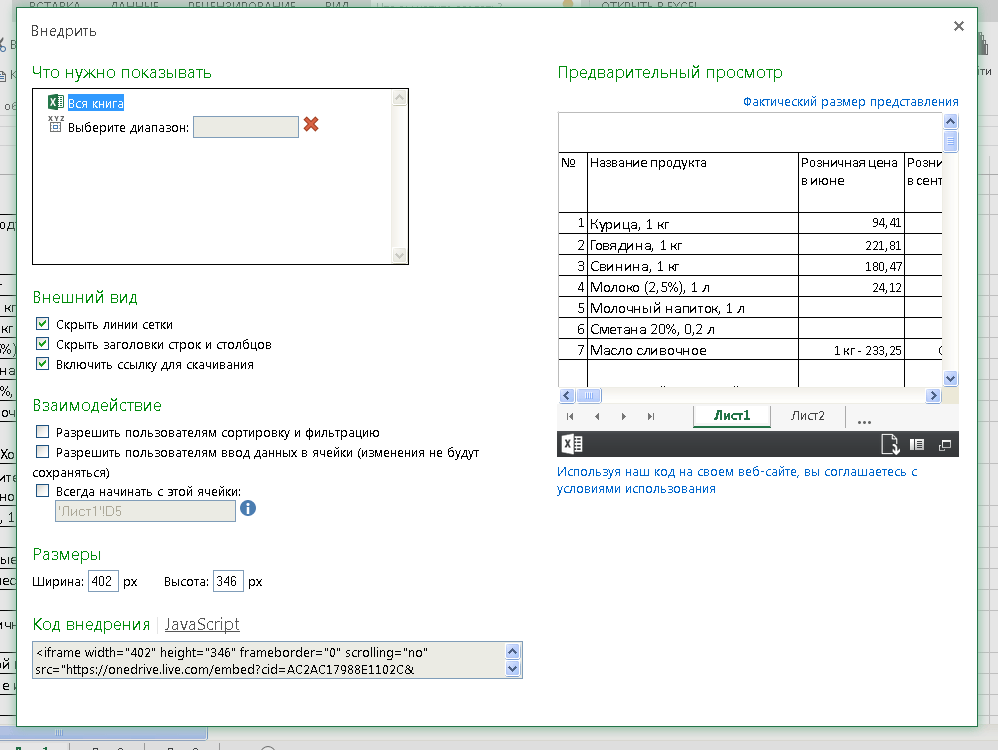
В открывшейся вкладке нам необходимо внести небольшие изменения, чтобы документ был доступен для редактирования посетителями сайта. В разделе взаимодействие ставим отметку напротив пункта “разрешить пользователям ввод данных в ячейку”. Теперь мы можем установить код HTML в нужное нам место (код находится в нижнем левом углу). Кроме того, здесь можно настроить еще несколько полезных функций:
- разрешить пользователю сортировать ячейки
- ограничить рабочую область (отлично подойдет для создания таблицы расчетов)
- выбрать оптимальные размеры виджета (помогает создавать красивые виджеты)

После завершения всех настроек необходимо проверить корректную работу таблицы на сайте. Теперь Вы знаете, как вставить на сайт таблицу excel с возможностью редактирования посетителями сайта.
Пример редактируемой таблицы excel на сайте
Ячейки с данными можно редактировать.
Снова используем OneDrive и Google Диск. Таблица внедряется на сайт через элемент <iframe>. Корректное отображение контейнера в <iframe> зависит от версии языка разметки вашей страницы — <!DOCTYPE>.
OneDrive — Microsoft
Заходим в OneDrive (требуется авторизация или регистрация). Добавляем файл электронной таблицы. Открываем.
Далее, Файл → Общий доступ → Внедрить.
Настройки и размер по вкусу. Копируем на выбор код внедрения или код JavaScript — вставляем в нужное место страницы.

Пример.
Google Диск — Документы
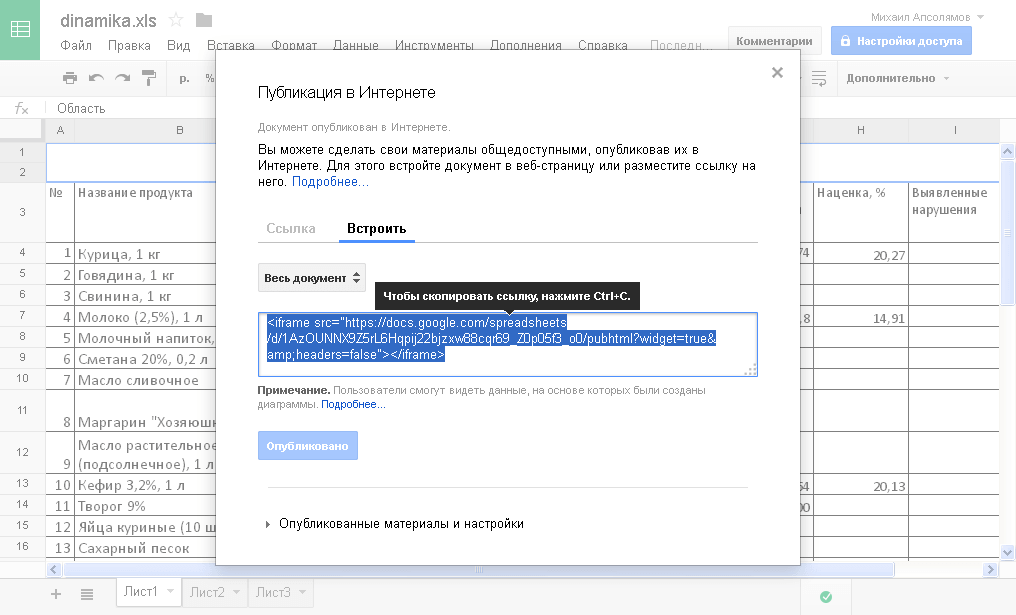
Заходим в Google Диск (требуется авторизация или регистрация). Добавляем файл электронной таблицы. Открываем через Google Таблицы.
Далее, Файл → Опубликовать в Интернете → Встроить.
Копируем и вставляем код в нужное место страницы.
Пример.
Когда дело доходит до экономии времени, у каждого свой способ выполнения задач. Возьмем, к примеру, нашу социальную жизнь: мы делимся вещами на каждой платформе — с помощью ссылок или встраивания сообщений. Встраивание сообщений не только экономит наше время, но и улучшает внешний вид наших блогов. Но когда дело доходит до обмена файлами, мы всегда стараемся делиться ссылками. Почему? Если мы тоже можем вставлять файлы, тогда зачем делиться ссылками? Мы уже видели, как встроить документ Word на веб-сайт. В этой статье мы узнаем, как встроить таблицы Excel на свой веб-сайт.
Чтобы встроить электронную таблицу, потребуется активная учетная запись в OneDrive и документ, который необходимо встроить. Когда вы открываете любой документ, который присутствует в OneDrive, он использует веб-версии приложения, которое вы используете в системе, чтобы открыть его.
Прежде чем начать, просто убедитесь, что вы не добавили в файл никакой важной и личной информации, прежде чем вставлять его.
Войдите в свою учетную запись OneDrive и загрузите в нее лист. Желательно сохранить файл в формате .xlsx.
После загрузки щелкните файл правой кнопкой мыши и выберите параметр «Встроить».
В правой части окна откроется новая панель. На панели нажмите «Создать». Он сгенерирует код для встраивания файла.
Теперь вставьте код в любом месте своего блога или веб-сайта.
Когда вы копируете код встраивания, под ним вы также найдете вариант «Настройте внешний вид этой встроенной книги«. Щелкните по нему, и вы откроете для себя некоторые новые настройки того, как должен выглядеть виджет вашего листа. Варианты будут включать:
- Что показать
- Внешность
- Взаимодействие
- Размеры
- Код для вставки | JavaScript
1]Что показать
В этом варианте вы можете либо выбрать всю книгу для отображения, либо выбрать диапазон строк и столбцов в виджете.
2]Внешний вид
Вы можете изменить внешний вид встроенного листа с помощью таких параметров, как «Скрыть линии сетки«,«Скрыть заголовки строк и столбцов» и «Включите ссылку для скачивания«.
3]Взаимодействие
Здесь вы можете выбрать, хотите ли вы, чтобы люди могли обрабатывать и фильтровать данные. Пусть люди вводят данные в ячейки, но данные не сохраняются. Всегда начинайте с выбранной ячейки.
4]Размеры
Вы можете выбрать ширину и высоту окна виджета в пикселях.
5]Код для вставки | JavaScript
Здесь вы получите два типа кодов, вы можете выбрать либо код встраивания, либо JavaScript. Если вы запускаете веб-сайт самостоятельно и знаете, как работает JavaScript, вы можете выбрать любой из них.
Встроенный файл появится на веб-странице в виде небольшого виджета. Зритель может скачать его, отредактировать и настроить по своему усмотрению. Изменения, внесенные любым средством просмотра, будут временными и не сохранятся. Вот пример того, как будет выглядеть встроенный лист:
После того, как электронная таблица будет встроена и веб-сайт будет запущен, документ появится на веб-странице в виде виджета.
Читайте дальше: Как встроить презентацию PowerPoint на веб-сайт.